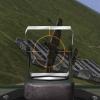
Trigger Posted August 31, 2017 Posted August 31, 2017 Hello there, There has been a lot to do lately about the P-47 " Dottie Mae" , this aircraft crashed in an Austrian lake in the last day of WWII, the pilot could barely get out alive while his plane sank to the bottom of the lake. The aircraft was salvaged from this lake a couple of years ago, and has been restored to flying condition. There are numerous films on you tube about this salvage operation, and about her restoration. The boys at Eduards must have been interested, so they made a limited production run of this aircraft in 1/32 scale with some beautiful artwork and some extra's in the kit. The subject raised my interest to, so i searched the internet for this kit, and found one for a reasonable €80 euro's, shipping costs included. (price at Eduards today €124,- without shipping). I won't do a review of the parts and the kit itself, since there are a number of reviews on the various web sites of this kit, So, on with the build, I started the build with the cockpit, added a lot of pe parts that come with the kit, The instrument panel, Cockpit complete, (still need to dirty up the cockpit a bit with various washes), Started on the wheelbay's, sprayed them in zinc chromate tamiya xf4, Done some work on the flaps, added some pe parts that come with the kit, Looking at the wings, i got the (stupid ) idea to add more detail as in rivet lines that are missing. The kit is basically a Hasegawa kit, and is missing these kind of details, and since the aircraft has a bare metal look i thought i was a good idea to add them to the kit. But what a tedious job!, almost regretted that i ever started it, anyway, here are some pics, before and after riveting, I am now working on the fuselage to add riveting lines, so more picture to follow, Greetz, Frank 1
Administrators JeroenPeters Posted August 31, 2017 Administrators Posted August 31, 2017 Very cool start!
Wumm Posted August 31, 2017 Posted August 31, 2017 Great start Frank, And props to you for working a kit that others might consider a Collector's piece, and tuck straight away into the Attic. S
Wingco57 Posted September 1, 2017 Posted September 1, 2017 Good that you persevered with the riveting, it will look much better in nmf. Do you do these free hand or use a ruler? I never seem to get the hang of this work. Any tips? Cheers Cees
Trigger Posted September 1, 2017 Author Posted September 1, 2017 9 hours ago, Wumm said: Great start Frank, And props to you for working a kit that others might consider a Collector's piece, and tuck straight away into the Attic. S thanks, i don't see this kit as a collectors item, for me it's just a nice plane to build Frank
Trigger Posted September 1, 2017 Author Posted September 1, 2017 57 minutes ago, Wingco57 said: Good that you persevered with the riveting, it will look much better in nmf. Do you do these free hand or use a ruler? I never seem to get the hang of this work. Any tips? Cheers Cees Hello Cees, I am not able to do this freehand, because i would be all over the place with my riveter, i use a combination of the good old "dymo tape" and a foto etch ruler that is so thin that you can bend it in all sorts angles, and i use rb riveter tools, here are some pics and a few pics of the progress on the fuselage, Greetz , Frank
Trigger Posted September 1, 2017 Author Posted September 1, 2017 11 hours ago, JeroenPeters said: Very cool start! Thanx Jeroen
coolboxx Posted September 1, 2017 Posted September 1, 2017 That riveting takes it to another level Great work
Trigger Posted September 6, 2017 Author Posted September 6, 2017 Hello There, Here is an update on the P-47, i have been busy with the fuselage and the engine and cowling, added some spark wires to the engine, and some pe parts tot the engine cowling, here are some pics, added riveting to the cowling parts added lead spark wires, and a wash to dirty things up a bit and get more detail Test fit inside the cowling Bought an extra pe update set for the P-47 from eduard containing parts so i could position the cooling flaps in an opened position, and you can see the result when fitted on the fuselage, just enough visible to make it interesting. Decided to use a mix of eduard pe and of the kit itself for the trim tab actuators, drilled a hole in the the covering where the rod comes out, used brass rod and a pe part on the tab itself to finish the job. Replaced a lot of plastic for pe parts as you can see Shot of the cockpit when the fuselage was all buttoned up. Test fitted the wings on the fuselage, looking good, i haven given the wings a coat of black primer so i could see how the riveting looked like, not 100% straight, but it will have to do, So thats's it for today, until the next update, Frank 1
Mark 'ozzy' Ostler Posted September 7, 2017 Posted September 7, 2017 On 1 September 2017 at 5:08 AM, Trigger said: Hello there, There has been a lot to do lately about the P-47 " Dottie Mae" , this aircraft crashed in an Austrian lake in the last day of WWII, the pilot could barely get out alive while his plane sank to the bottom of the lake. The aircraft was salvaged from this lake a couple of years ago, and has been restored to flying condition. There are numerous films on you tube about this salvage operation, and about her restoration. The boys at Eduards must have been interested, so they made a limited production run of this aircraft in 1/32 scale with some beautiful artwork and some extra's in the kit. The subject raised my interest to, so i searched the internet for this kit, and found one for a reasonable €80 euro's, shipping costs included. (price at Eduards today €124,- without shipping). I won't do a review of the parts and the kit itself, since there are a number of reviews on the various web sites of this kit, So, on with the build, I started the build with the cockpit, added a lot of pe parts that come with the kit, The instrument panel, Cockpit complete, (still need to dirty up the cockpit a bit with various washes), Started on the wheelbay's, sprayed them in zinc chromate tamiya xf4, Done some work on the flaps, added some pe parts that come with the kit, Looking at the wings, i got the (stupid ) idea to add more detail as in rivet lines that are missing. The kit is basically a Hasegawa kit, and is missing these kind of details, and since the aircraft has a bare metal look i thought i was a good idea to add them to the kit. But what a tedious job!, almost regretted that i ever started it, anyway, here are some pics, before and after riveting, I am now working on the fuselage to add riveting lines, so more picture to follow, Greetz, Frank Hi frank, nice subject choice. I'm glad to see that your tackling the pop rivet issue, I've got a 'Dottie' as well, and I was wondering about how to rivet the beast. I've got a trumpeter P47 that won't make it to the hall of fame, but left in the box as a kit o shame, but at least it's a visual reference to rivet. What is the reference that your looking at? I can't ever find these things on the web, can you enlighten me please? Keep up the good work! Cheers. Oz
Trigger Posted September 7, 2017 Author Posted September 7, 2017 2 hours ago, Mark 'ozzy' Ostler said: Hi frank, nice subject choice. I'm glad to see that your tackling the pop rivet issue, I've got a 'Dottie' as well, and I was wondering about how to rivet the beast. I've got a trumpeter P47 that won't make it to the hall of fame, but left in the box as a kit o shame, but at least it's a visual reference to rivet. What is the reference that your looking at? I can't ever find these things on the web, can you enlighten me please? Keep up the good work! Cheers. Oz Hello Oz, Thanks for the response, i just searched the internet and found a couple of useful line plans that i have used on my P-47, see pictures below, (they are from a razorback p-47, but a lot of lines are the same), further i looked at a lot of pictures of various aircraft in walkarounds, and there you can find a lot of details, I hope this will be useful for you, Cheers, Frank
Reuben L Hernandez Posted March 4, 2023 Posted March 4, 2023 Looking at building my next P-47 build. However, I can’t find any online source for the revit patterns. Where did you find yours? Your build looks great. Thank you, Reuben

Recommended Posts
Create an account or sign in to comment
You need to be a member in order to leave a comment
Create an account
Sign up for a new account in our community. It's easy!
Register a new accountSign in
Already have an account? Sign in here.
Sign In Now