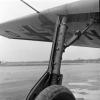
BevanBrooks Posted August 20, 2016 Share Posted August 20, 2016 Hey fellow modellers, haven't posted anything in a loooong time but have been lurking nearly everyday. So after reading Jeroen's topic on lurkers I thought I'd get off my lazy backside and take some pics of my most recent work, Trumpeter's 1/32nd Mig 29k. This is the first jet of any kind I've built so after being nagged at the recent Model Expo here in Melbourne to "just build a jet" I went home and did just that! Actually I picked this kit up at the swap n sell at said Expo for $50 after thinking that if I don't like it or it doesn't build well I haven't wasted a whole lot of hard earned. The kit builds beautifully with no real vices that some basic skills wouldn't be able to fix easily, general fit of the kit is excellent. Although the wing fold area is a real bear of a join to contend with! Photos... All paints used are Tamiya cross refed with Gunze which are called out in the instructions. And where she's at the minute.... I did have the bluing on the exhaust done with a drop of x8 blue in some acrylic clear which worked well but bought Tamiya's weathering set which has "burnt blue" in it and added to it......maybe a little over done? The painting of the top surfaces, as well as the bottom, I've tried to keep random. I tend to use the airbrush very much like a colouring pencil, very close to the surface and in short sharp strokes as well as cross hatching. What you end up with is a really patchy random layer of paint which in essence has already 2/3rds weathered the paint. Add to that some different shades and repair patches and it starts to become interesting and a whole heap of fun especially when its heading in the direction you want it to go! Not quite there yet with some small bits and bobs to do to the airframe. Working on the weapons at the moment so will update with that stuff soon. Sorry for the pic heavy post but I wanted to share my work with you all. Hopefully posting this will gee me up in the future to be more involved with the forum. Thanks for looking in...... Cheers Bevan 4 Link to comment Share on other sites More sharing options...
Members Mikester Posted August 22, 2016 Members Share Posted August 22, 2016 Well I hate to see anything distract you from Luftwaffe stuff, but that is excellent work! 1 Link to comment Share on other sites More sharing options...
BevanBrooks Posted August 22, 2016 Author Share Posted August 22, 2016 Well I hate to see anything distract you from Luftwaffe stuff, but that is excellent work! Doing the same stuff gets a bit boring sometimes Mike, needed a break from it and what better way than with a fast jet. Glad you like the change of pace. Cheers Bevan Link to comment Share on other sites More sharing options...
GusMac Posted August 22, 2016 Share Posted August 22, 2016 Looks great Bevan. The results your painting technique gives are very convincing, especially the weathering around the exhausts. Gus Link to comment Share on other sites More sharing options...
BevanBrooks Posted August 23, 2016 Author Share Posted August 23, 2016 Looks great Bevan. The results your painting technique gives are very convincing, especially the weathering around the exhausts. Gus Cheers Gus, pretty happy with the result. Link to comment Share on other sites More sharing options...
BevanBrooks Posted August 23, 2016 Author Share Posted August 23, 2016 Ok now for the weapons..... As you can see the tanks have had an oil wash of sorts (still drying)they will be cleaned up in due course. Missiles have been clear coated awaiting oils and what not. I found after painting the airframe and getting the gear on that she was a tail sitter, no call out in the instructions to add nose weight so I was pretty peeved. Oh well what to do now I said to myself! Ended up adding weight to the front of each fuel tank using fishing sinkers. I did tape the tanks to their pylons then taped to the airframe..... seemed to work. Now I'm a little worried about the wing to pylon join considering the extra weight. Fingers crossed. Cheers Bevan Link to comment Share on other sites More sharing options...
Dennis.E Posted August 23, 2016 Share Posted August 23, 2016 Gidday Bevan,...bloody fantastic job mate!!!!I must say though I liked your exhaust cans prior to applying the Tamiya product - I thought when I saw those 'you have got those bloody perfect'. I thought the Tamiya product was a wee bit much, but that's just my two cents worth Bevan...please don't take that as a slight on what is an awesome build! Cheers, Dennis 1 Link to comment Share on other sites More sharing options...
Dennis.E Posted August 23, 2016 Share Posted August 23, 2016 Actually Bevan, could you tell me how you painted and finished your cans up to the point of applying the Tamiya product? That looks so damned cool I am sorely tempted to click on the buy now I currently have on one of these on E-Bay right now... 1 Link to comment Share on other sites More sharing options...
BevanBrooks Posted August 25, 2016 Author Share Posted August 25, 2016 Actually Bevan, could you tell me how you painted and finished your cans up to the point of applying the Tamiya product? That looks so damned cool I am sorely tempted to click on the buy now I currently have on one of these on E-Bay right now... G'day to you too Dennis.... Exhaust cans hmmmmmm lets see if I can remember. The very first thing was to find reference for them. I've never built a jet before so this was new territory for me and ref was a must. First layer was Gunze burnt iron sealed with clear. Next I gave them a titanium white oil wash but kept a bit thicker than normal but not over the whole can, trying to keep it random. Stippling with a piece of old rag is a good way to get it uneven and more organic looking but it takes more than one go at it lol. Once I was happy with the look it was cleared to seal it in. Tamiya enamels next, brown , a darkish grey was made up again random and using the stippling method, sealed. For the bluing I dropped Tamiya blue x8? into some acrylic clear and was happy with the results. I do feel they are a little overcooked with the weathering powder added but you learn from your mistakes I guess. All of this was again sealed with clear ready for a pin wash of black and burnt umber oil paint. Final layer was Testors Dullcoat. Phew I think that's it, pretty sure I've forgotten something but you get the gist of it. Hope this helps. Cheers Bevan Link to comment Share on other sites More sharing options...
Dennis.E Posted August 28, 2016 Share Posted August 28, 2016 Cheers Bev! - Instead of the Mig though I have gone for the 32 scale Trumpy English Electric Lightning - a fantastic big brutish bulldog wrapped in aircraft grade aluminium and some huge jet engines up the backside!! 1 Link to comment Share on other sites More sharing options...
polsen Posted August 28, 2016 Share Posted August 28, 2016 Very nice Bevan ! I've always wanted to add the 1:48 GWH Mig-29 to my collection. But hey, 50 AUD for a Trumpeter Mig-29, that's a nice deal! I'll let you know when I make some progress on my 190. life 'outside the modelling bench' is a bit full on at the moment to say the least. Cheers, Pete 1 Link to comment Share on other sites More sharing options...
BevanBrooks Posted September 2, 2016 Author Share Posted September 2, 2016 Cheers Bev! - Instead of the Mig though I have gone for the 32 scale Trumpy English Electric Lightning - a fantastic big brutish bulldog wrapped in aircraft grade aluminium and some huge jet engines up the backside!! That sounds awesome, go for it! Very nice Bevan ! I've always wanted to add the 1:48 GWH Mig-29 to my collection. But hey, 50 AUD for a Trumpeter Mig-29, that's a nice deal! I'll let you know when I make some progress on my 190. life 'outside the modelling bench' is a bit full on at the moment to say the least. Cheers, Pete Thanks Pete, Yeah $50 was a steal! Will look forward to the next instalment on the D9 Link to comment Share on other sites More sharing options...
BevanBrooks Posted September 2, 2016 Author Share Posted September 2, 2016 Some weathering to the ordnance..... The fuel tanks received a stippling oil wash of black and burnt umber which is really hard to see. I then sealed with acrylic clear and started on the leaks out of the filling points. A thicker mix of the oil wash was used for this. Flat coat is Humbrol enamel flat coat. Sharp Derwent colour pencils were used for light scratches and Testors Aircraft Grey was used with a sponge for further detail. Prisma colour water colour pencils were used for the streaking of the fuel stains. I used Tamiya's "dark brown" enamel panel line colour for the missiles then flat coated with Humbrol flat coat. Not sure what to do with the exhaust area... bank it off .....paint black? Cheers Bevan 2 Link to comment Share on other sites More sharing options...
Members Mikester Posted September 3, 2016 Members Share Posted September 3, 2016 Dude! Freakin' amazing work! 1 Link to comment Share on other sites More sharing options...
timvkampen Posted September 4, 2016 Share Posted September 4, 2016 that is badas* work! Nice! 1 Link to comment Share on other sites More sharing options...
BevanBrooks Posted September 12, 2016 Author Share Posted September 12, 2016 Dude! Freakin' amazing work! that is badas* work! Nice! Thanks! Your too Kind. Link to comment Share on other sites More sharing options...
BevanBrooks Posted September 12, 2016 Author Share Posted September 12, 2016 When installing the wing pylons I discovered that some of the holes needed to be filled and a couple drilled to accept the weapon load I chose. I fixed the holes with some plastic rod using super glue and snipped them off flush with my sprue cutters I sanded smooth with a piece of sprue with some 600 wet and dry super glued to the end and cut down to a smaller size to keep the repair as small as possible. And blew it back in. And with the pylons in place. Cheers and thanks for looking in Bevan 3 Link to comment Share on other sites More sharing options...
GusMac Posted September 12, 2016 Share Posted September 12, 2016 Nice fix Bevan, you'd never know that the holes had been there. 1 Link to comment Share on other sites More sharing options...
Wingco57 Posted September 13, 2016 Share Posted September 13, 2016 Good to see your backside relieved to show us some amazing workmanship. 1 Link to comment Share on other sites More sharing options...
Guest DannyVM Posted September 28, 2016 Share Posted September 28, 2016 Bevan, you're painting and wheatering skills on this bird are just spot on, great work. Greetz Danny Link to comment Share on other sites More sharing options...
BevanBrooks Posted October 24, 2016 Author Share Posted October 24, 2016 Weapons are in place......... She's pretty much done now just got to take some shots of her. Thanks for looking in cheers Bevan 3 Link to comment Share on other sites More sharing options...
Dennis.E Posted November 25, 2016 Share Posted November 25, 2016 Good Morning Bevan, What a fantastic project! It really does look fantastic - congrats! 1 Link to comment Share on other sites More sharing options...
rverissimo Posted December 7, 2016 Share Posted December 7, 2016 Hello Bevan, excelent model and step by step! I really liked the wheathering process ! 1 Link to comment Share on other sites More sharing options...

Recommended Posts
Create an account or sign in to comment
You need to be a member in order to leave a comment
Create an account
Sign up for a new account in our community. It's easy!
Register a new accountSign in
Already have an account? Sign in here.
Sign In Now