JayDee
-
Posts
3,272 -
Joined
-
Last visited
Content Type
Profiles
Forums
Events
Gallery
Everything posted by JayDee
-

1/32 Rocket Science: Me 163 (Meng)
JayDee replied to JeroenPeters's topic in LSM 1/35 and Larger Work In Progress
Martin's photos have been immensely useful for my build too. And as for that ugly seam.....you're right, it doesn't exist. Thank God for Meng! -
1/32nd scale Halifax: *project complete*
JayDee replied to ThomasProbert's topic in LSM 1/35 and Larger Work In Progress
Loving this! This is pure, liquid inspiration. -
Kagero B-25J Mitchell in Combat over Europe (MTO) with decals
JayDee replied to One-Oh-Four's topic in Tools, Books & Misc.
Thanks for this one Erik. I was wondering what you thought of this title. -
Windsock 'World War Centenary' Vol.29, No.5 Albatros Productions Available from Albatros Productions for £7.60 I have to admit that seeing the latest Windsock magazine with the 'World War Centenary' wording next to the title, does make me feel a little more melancholy. It can't be nostalgia, as of course, I wasn't around during that conflict, but for many years I have had an interest in this period, and indeed met people with a direct link to the Great War. Now, we have no veterans left. The 'war to end all wars' has silently slipped into the history books as another episode for which we have to relate to books and old cine-footage to be able to comprehend. Featured on the cover of this issue is David Coulthard's post war conversion of the Wingnut Wings DH.9a 'Ninak', resplendent in a gorgeous silver-doped finish. Inside the front cover we have the Reader's Gallery and Frontline News. The Gallery in this issue is a single page instead of the doubles I've seen more recently, but features some fabulous modelling in the form of the Wingnut Wings Junkers J.1 and Pfalz D.IIIa. It's the end of an era (although we may see more in future) for the Lance Krieg 'Modelling Master Class' series. I've really enjoyed this aspect of Windsock, since we received the first review copies, and I've already built up a library of excellent modelling tips which will be invaluable for my full transition into WW1. I've always known there has been a scratch-builder within me, kicking and screaming to get out. This month's master class focuses on finishes and markings and their application. Lozenge application options are discussed, as is decal application and bare metal finishes. Weathering is also touched upon too, with many aspects of this 'science' being taken in hand and explained. The whole section is lavishly illustrated with superb, colour images, annotated for clarity. The real good news is that there is an intention to create a modelling-special from Lance's fine work. When that time comes, we hope to be able to bring you a thorough review. This month's featured aircraft is the Aviatic 30.24 experimental Austro-Hungarian triplane fighter. I admit to not knowing of this type, but would be naïve to think that the only triplane protagonists were Fokker and Sopwith. This particular machine certainly isn't as pretty as the usual suspects, but certainly creates an interesting article, complete with numerous period images and some 1:72 profile line drawings. Great War Paint again features the SE.5a, in the second part of this particular feature. If you thought there were some outrageous schemes with the last issue, then these put them to shade, with some of the most attractive British colours I've seen on an aircraft of this period. How about a red machine, with a Nazi swastika on the tail? I'm serious! The subject of colour is always a contentious one for any WW1 modeller. Anyone who knows anything about the subject will tell you that trying to decipher the colour spectrum from old period photos isn't an exact science. Some colour frequencies are so close as to be indeterminable, and some historians still argue over this subject. If this wasn't enough, 'Coloured Thinking', focusing on the minutiae of aircraft appearance from castor staining and repairs, to the divots, dents and scratches which can be seen in period images, and how the applied colours have suffered whilst in service. For the purist, this subject is a seriously contentious subject, and it's interesting to read an insight into this world. Enter at your peril, but don't ever stop trying to achieve your own version of perfection. A show report for the IPMS convention in Colorado is given, with some model images, and Kitbag Classics looks at a classic Fokker D.VII kit from Renwal, first tooled in 1966. Of course, it would be positively rude not to look at the cover aircraft in more detail, and this is exactly what we have here with some close-ups and in-construction images. A link is also given to the WW1 Aircraft Modelling forum, so you can see the build log for yourself. Since this model was started, and indeed finished, WNW have already now shown that they will eventually release a post-war Ninak. Don't you just hate it when you convert a model, and that happens! On the Transfer List looks at the latest decal releases for our hobby, and Kitbag takes a look at the latest kit releases, unsurprisingly. Accessories aren't forgotten too, with new releases from Taurus and Modelkasten looked at. The Figuratively Speaking section takes a quick peek into the world of figure accessories for your dioramas and vignettes. Again, Modelkasten is the company releasing items this month. Whilst we don't have a letters section this month, you can console yourself with the rather amazing images on the rear cover. These depict a reproduction Rumpler C.IV under construction. I hope that Windsock bring us more images of this as it progresses. The work looks gorgeous. Conclusion There is never a disappointment when the latest Windsock magazine arrives. Without exception, they are, for me, the single most interesting publication for our hobby. Ray Rimell is one of our most knowledgeable figures in the WW1 aviation genre, and a great modeller too. His professionalism and enthusiasm is written through each journal as clearly as any project within. Again, another issue you simply have to go and buy. Even better, treat yourself to a subscription. NB. From 2014, Windsock is becoming a quarterly publication again, with of course, a reduced annual subscription charge. Go treat yourself... Very highly recommended James H Our sincere thanks to Ray Rimell at Albatros Productions for this review sample. To purchase directly, click THIS link.
-
Fokker E.IV, 163/16, AOK 3 Fokkerstaffel, Kurt Student, August 1916
JayDee replied to JayDee's topic in Eindecker GB
Hi! Despite the world conspiring against me this last couple of weeks, I finally managed to lay paint for the cockpit parts, and get to the point where I'm almost ready to seal this baby up. THAT is my favourite part. The cockpit floor is done with Uschi wood grain decal, with the trap doors layered twice to give a richer appearance. Everything has been washed, matted and dry-brushed etc. For the first time, I got the hairspray technique to work too, and did the fuel tank with this. You won't see any of this when sealed up, but at least I did it! The interior walls were given a mottle effect with Tamiya pastels, and castor staining with Mig Oil & Grease wash. To apply to the proper area, I marked the location of the the frame vertical posts, and added the oil up against this, as you see in photos. I toned the oil/grease down with more pastel. I've already rigged the interior, but those shots, along with installed seatbelts, will be next. -
I've seen some pretty horrific WW1 era diorama images, with skeletons in mud etc. What offends one may not necessarily offend another. Offense is of course subjective, but this one, to me at least, looks quite tasteful and just depicts the horror of what confronted these soldiers, having seen a new weapon of war.
-
Francisco, those are just beautiful, and your review is extremely good. Thanks for taking time out to do this, and sharing your thoughts. I wish I could figure paint...
-
...a group build of '1'.
-
I think January 1st 2014. I need to finish up a couple of things before then.
-
Fokker E.IV, 163/16, AOK 3 Fokkerstaffel, Kurt Student, August 1916
JayDee replied to JayDee's topic in Eindecker GB
I promise more images tomorrow. See...now I have to. -
1/32 Rocket Science: Me 163 (Meng)
JayDee replied to JeroenPeters's topic in LSM 1/35 and Larger Work In Progress
I likes...I do. I have that chipping solution, but fund out the hard way that you need to spray onto a matt surface, so I resorted to actual hairspray for the E.IV fuel tank. -
I wish this could be downloaded properly. It's a great resource.
-
I knew that pit was small, but for it to do that, it must be great on long missions.
-
HpH de Havilland Hornet – Sea Hornet F Mk22 TT202
JayDee replied to airscale's topic in LSM 1/35 and Larger Work In Progress
I'm in absolute awe of this work. That Merlin is just superb. I'd never contemplated the Hornet before.....but now... -
Hansa Brandenburg W.29
JayDee replied to Umlaufmotor's topic in LSM 1/35 and Larger Work In Progress
Jeez, this is inspirational. SO many techniques. This is one of my favourite builds at the moment. -
A gorgeous bird. More walkaround excellence from the 'skull'
- 7 replies
-
- 1
-

-
- FE2b
- Night Bomber
- (and 4 more)
-
I love the idea. We'll need to collate the kits which are being proposed, then do a poll.
-
1/32 Rocket Science: Me 163 (Meng)
JayDee replied to JeroenPeters's topic in LSM 1/35 and Larger Work In Progress
So slick, again. Makes a change from all the usual silver and brass anomalies you see. -
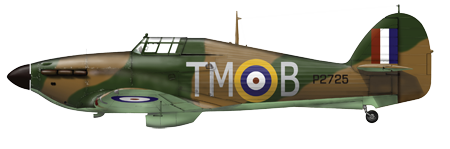
It is decided. I'll build the metal wing PCM Hurricane, and complete in the colours of Ray Holmes' machine. This is the one which rammed the Do 17, slicing off it's tail when he ran out of ammunition.

-
That's the modelling definition of 'hardcore'. Very nice though....
-
That's a real interesting conversion. I might be tempted by this one. Thanks for a great review too!
-
HpH de Havilland Hornet – Sea Hornet F Mk22 TT202
JayDee replied to airscale's topic in LSM 1/35 and Larger Work In Progress
Peter, you are like a machine. I admit, I'm loving the HPH stuff at the moment. -
1:32 Heinkel He 111P 'Cutaway Kit' Additional Interior Construction kit for Revell model kit HPH Catalogue # 32021 Available from HPH for €118,00 We had a lot of interest in the cutaway concept model with our recent 1:32 Desktop Mustang review, so we thought we'd continue this here today with our review of the HPH 'Cutaway Kit' detail set for the large 1:32 Revell He 111P kit. If the internal, structural aspects of aircraft appeal to you, and you are savvy with resin and photo etch, then this detail set could possibly provide you with the ultimate in internal-appeal when it comes to using a plastic, base kit. I had a sneaking suspicion that this detail set would come in a relatively large box, and when our hard-working postman visited last week, it pretty much confirmed it. HPH like to ensure that their kits reach you in one piece, and as usual, this was wrapped in layers of corrugated cardboard, and numerous layers of black plastic sheeting. The actual box itself is very sturdy too, with a top lifting lid, adorned with a side profile drawing of a cutaway He 111 fuselage. The depiction also indicates that this model can be built in TWO styles. The intended and preferred method is a half model (port side), with a half port wing. You can, if you wish build it in a complete format, as parts are included to detail the interior starboard side too. If you wish to build a full aircraft, then you could produce a cutaway model or a diorama model with combat damage etc. The possibilities are huge, and of course, you are building this for you, so you have to answer to no one if you choose to close it up after construction. Inside the box, the various bags of resin parts are protected by a copious amount of bubble-wrap sheet, and the box has been compartmented so that nothing rattles about. An Eduard-made set of etch, specifically for this release, has been included too, and the instructions are included again, on a CD in digital format. You do have to know at this stage, that you will need to purchase a few other items in order to maximise this release. Even though this set has a fully detailed fuselage bomb bay area, the actual bomb racks suggested for use are Eduard's, so consider purchasing a set to complement the amazing internal structural detail. You will also need some seatbelts. HPH have suggested either the HGW or Eduard releases. Lastly, consider the He 111 exterior set from Eduard too. If you get hungry at the outset of this project, the customary Belgian chocolate inside the box, should help a little. The first thing you will need to do is to absorb the instructions a little. This set certainly isn't designed for a newcomer to resin or super-detailing. You will need to be rather handy with saws, putty and something to remove internally moulded plastic detail before you can start to think about adding anything from this HPH set. This would usually be quite a challenging set to tackle in terms of how to write a review, as this is no ordinary upgrade path, but let's see what we can do in order to assess what's in the box, how it fits, and what quality everything is. Having already reviewed the Catalina, I'm certainly in for high expectations. HPH have thankfully split the large number of resin components in this set into various ziplock wallets. The larger parts tend to be clustered together in order to prevent them knocking chunks out of the smaller, and occasionally, more fragile components. One of the two larger wallets contains major size resin parts. These include the cockpit floor, fuselage bulkheads, flying surface structural components, wheel bay ceilings, as well as a number of the smaller, but more robust parts such as the inner bomb bay wall linings, bomb bay walking gantry, and inner cupola liner. An option exists for the 'mattress', on which the bomb aimer lies. A full length version is included, and also a split part one. The split one doesn't look too much like the full length, so perhaps these were simply different versions instead of rolled out/rolled back parts. Some casting blocks will need to be removed, as will a little resin flash and overcast, and also resin webs which cover over doorways etc. The detail on these large parts befits the importance of them as very major, visual elements of the build. Excellent constructional detail can be seen on the bulkheads, whilst the cockpit floor is very refined, again just needing minimal clean-up. No major defects are present. The occasional excess bit of resin or pin-hole will need to be corrected, but when you consider the number of components and the complexity of this set, then that isn't too bad. This large bag does have a smaller one within, and this contains all the tailplane structural ribs. Heinkel didn't produce these as solid ribs, but as a built-up framework instead, in order to achieve a light structure. These various sections are cast flat onto a backing block. You are going to have to take extreme care in removing these backing blocks, as they are about the same thickness as the part itself, and you'll have a lot of grinding to do. I wish HPH had cast these a little more thinly, but I'm presuming this is done to protect the delicate structures. A slightly smaller ziplock wallet contains a number of smaller parts which are concerned with the cockpit and bomb bay. The pilot seat is a separate part to the side mounting frames and a rather realistic-looking cushion. The control column assembly and transmission assembly are also cast separately, and all parts seem easy to remove from their respective blocks. Four blocks contain what appear to be incendiary bombs, but on my sample, some of these have become detached from the casting blocks, although all are intact and have no damage. One of the other numerous parts in this packet contains a replacement resin gondola. This part is beautifully cast, but does contain a few air bubbles, but thankfully, they remain just under the surface, with no breakthrough. You will need to remove the resin webs from the windows, and even out the upper mating surface. The cushions for this area are cast as separate parts. A small packet within this bag contains the bomb-sight and fire extinguisher for the cockpit. If you've ever seen a HPH kit, you'll know that many parts are actually cast flat, on thin resin sheets. The same applies here, and you'll see this en-masse in the large, last ziplock wallet. There are a number of smaller wallets within this pack, but I'll come to those soon. The He 111P set adds detail from the very front of the cockpit, all the way through the fuselage to the very tail extremities. Because of this, there is a lot of internal constructional detail which needs to be added before you can fit out the interior with the various interior area details. As the instructions show, the very first thing that you need to do is to remove the plastic moulded detail, joint the half-wing centre section (first carefully sawing it in half), and then blank the gaping hole in the wing root with an insert which isn't supplied in this set, and will need to be made by you, using measurements on the plans. Using careful measurement, given in the manual, you need to map out the interior with a soft pencil, so you know where to install the various bulkheads, longerons/stringers, and formers. The longerons and formers are cast onto flat resin sheets, as mentioned. Be careful when installing these, as these come in different sizes which are clearly shown on the instructions. These parts also come in set lengths, so ensure you maximise the usage of these when cutting to length. If you opt to build this model as a half-model study, then you have a little more flexibility, as you have enough resin for both interior sides....and that of course includes the formers. Other flat cast parts include the remaining undercarriage walls (again, enough for port and starboard), fuselage ribs, cockpit walls, rear-facing tail gun and brackets, cockpit parts, radio room and walkway boards. The boards themselves aren't quite flat, so a quick dip in hot water should fix that. Those smaller packets contain a combination of the more fragile flat cast parts, and a small number of individual parts for the bomb bay, radio operator/gunner stations, rudder etc. Again, all parts are superbly cast, and no real flaws are apparent. A little flash exists in some places, but at no detriment to the quality of the parts, all of which are superbly mastered, and sharply cast. With regards to the visible detail on instrumentation within the kit, the various radio sets, instrument panels and consoles etc are cast with blank faces in order that you may add the colour photo etch components, ably made by Eduard. The rear of the main instrument panel is cast with the various protrusions which are the back of each instrument. HPH doesn't show any associated wiring for this area, but you know that it would be correct to add at least a little something to this, as would be the case with the radio sets and other internal wiring looms. Take a look at the Aero Detail book which gives some great info on the interior; compartment by compartment. Of course, the various rear flying surfaces aren't operated by telepathy, and HPH do show where to fit the various wire linkages through the fuselage length. Wire isn't supplied, and I suggest you use thin styrene rod lengths to simulate this. The path of the various control rods is clearly mapped out for you. I have already mentioned that HPH suggests that you can purchase Eduard detail sets to help supplement their own work. With the bomb bay, you can of course use the Revell kit parts, but why would you use something poor in detail when it would let down the rest of the interior? I say you should definitely use the Eduard set, which we reviewed HERE. You'll need to choose a seatbelt option too. However, this set does come with its own specific PE set, again, produced by Eduard, and packed into one of Eduard's own wallets. This set consists of TWO PE frets. The large one is nickel-plated, and the smaller one also colour-printed. What does the included set add to the model? Well, the smaller colour fret is actually a standard Eduard part, and includes all the radio, instrument and console detail you will need, as well as switch banks, and levers. This fret is also self-adhesive. Having used Eduard's S.A. parts before, I know their glue to be pretty strong, so take care when aligning any layered parts. The second fret is rather general, and includes parts for the wheel bays, and all crew compartments within the fuselage. This is a large fret with probably a couple of hundred parts on there, detailing everything from ammunition drums, hydraulics lines, to the smallest cockpit detail. Etch quality really is amazing. How well-appointed are the various crew stations within the He 111? A picture can speak a thousand words, so let HPH's photos of the prototype model show you: Cockpit Bomb Bay Radio Room Rear Fuselage Tail Gun/Tail Undercarriage The only anomaly that I can see at present, but might be corrected as I build, is the dinghy stowage area in the upper fuselage spine. Some of the images of the finished model do actually show this in situ, but the instructions seem to omit its construction and fitting. Indeed, I can actually see the parts for this as I progress through them. It's no biggie, as making this small box-compartment, and stuffing it with thick, folded tin foil to simulate the folded life-preserver, should be very easy. Instructions HPH have included a PDF of their manual on the CD, as well as individual JPG images, should you wish to print out the occasional sheet. I'm a big fan of how these instructions are compiled. Starting with a proper parts plan, you can check off the kit as soon as you get it, and ensure you have no missing parts, and that everything looks as it should. The constructional sequences are in photo-format, and very clear to understand, as are the various sequences where you need to hack and slash the original kit, to prepare it for detailing. The layout of the various formers and stringers is shown throughout the manual, section per section, but I would be inclined to mark all of this out, from the start, when an empty fuselage shell is far easier to get to grips with. Avail yourself of some Swann Morton 15a blades to remove the pre-moulded Revell detail. Throughout the plans, reference is made to where the Eduard-made photo etch needs to be used, and the resin parts placement is very clear if you cross-reference the parts plan given at the beginning of the manual. It may well be advisable to print these sheets and have them with you at the bench. There is no colour referencing throughout construction, but that's no problem. If you are hard-core enough to build this, then it can rightfully be presumed that you at least have your own reference material, or have access to some. Conclusion This is no project for the faint-hearted. You'll need a £40 Revell kit (the cheap bit). You'll need some Eduard stuff to ease the way for best effect, and that won't be cheap. HPH's seatbelts are also a worthy investment. You'll also need to be proficient with a razor saw and resin parts, and finally, you'll need to be able to think about 10 stages ahead in order to ensure that everything works in harmony. If that is no issue to you, then I really do recommend that you take a look at this set. I wish HPH had ventured into the interior of the wing construction, and of course, if you can manage to fit an engine into the mix, then that really would be the ultimate in engineering projects. Some resin parts will need a little intermediate cleaning up, but again, if you undertake such a project, this really will be no problem for you. I've read a few comments from modellers who don't understand this technical approach to this set, but the internet is strewn with folks who feel they need to post about something that doesn't really appeal to them. It's the modern way, apparently. If the engineering aspect of aircraft appeals, or you are a natural voyeur, then this should be right up your straße! It won't be a fight that's easily won, but one that will be very rewarding when complete. Very highly recommended James H Our sincere thanks to HPH for the review sample seen here. To purchase directly, click THIS link.
-
HpH He 111 interior & Me 410A at SMW 2013
JayDee replied to One-Oh-Four's topic in Modelling Discussion
....guess what review we publish in less than an hour -
Aviattic news for the end of 2013
JayDee replied to Fran's topic in WW1 related items and accessories
We will be posting our new Aviattic article early next week, and there's something there for the 1:72 modeller.