


Wouter
-
Posts
183 -
Joined
-
Last visited
Content Type
Profiles
Forums
Events
Gallery
Everything posted by Wouter
-
Multimedia MPM Production 1/32 Heikel He162
Wouter replied to Padubon's topic in Modelling Discussion
Nice find! Absolute bargain for $62. Are you going to make a WIP thread for it? -
On to the radiator flaps on the backside. First a picture of the real thing. Look at the inwards curve (arrow) Here's the kit engine. Take note that the inward curvature is not steep enough. If you glue the radiator flaps they will lie flat on the engine (as I found out the hard way. In the end I cut the entire lower back part of the engine and did some plastic surgery . here's the result with the radiator flaps installed, much better if I may say so. Last but not least some other bits and pieces and the wingtip (to thick, needs lot's of sanding to blend in) That's it for now. On to the right wing en engine. I recon this will be a little faster now I have worked how to install and fix/adjust certain parts. Cheers
-
So, did I make any progress? Yes I did. But I'm not sure what easier to build, a full scale resin kit or this conversion.... Anyway, on to the pictures. At first I started with a few bits and pieces for the cockpit. A lot of PE, and with some patience this is perfectly doable Then my attention went on to the engines. A bit of a warning here as I mentioned earlier, this part of the conversion is not the best in my opinion. The engine facings are really bad copy's from a Hasegawa fw190. There's almost no detail and some parts are obscured by others. The good thing is, you won't see much of it anyway. I brought them to life with a bit of painting and some copper wire. Next part is the fan in front of the engine. This is a very fidely part to build since you have to align 12 PE blades. The good thing is that the resin part has some pre drilled holes so you don't have to worry about the right distance between the blades. The bad thing is that the blades, once glued are a bit too long and the fan doesn't fit in the cowling. Careful trimming with about 0,5mm per blade will fix this. Here's the engine within the cowling and with the fan in front. As I said, you won't see much of it luckily On to the engine cover then. As you can see from behind the resin is really thick (the grey resin is cast by MDC by the way). As the engine is a little bigger on the topside the the junkers engines provided in the Revell kit you get a step of about 1 mm. Instead of applying putty and try to let it blend in i removed the excess resin from the inside of the engine cover. Here's the result and from the top and from behind and a picture from the real thing (take note that the exhaust is shaped a little different as this was an early itteration for the exhaust)
-
Right, back from vacation and I have a few days left before I need to start working again. That should give me some decent time to get back up to speed with this build. Cheers!
-
That's big! Are you sure you've got room for it?
-
Those exhausts look the business, nice!
-
Absolutely Jeroen, I just have to adjust my expectations on this one. Build one of the wings last night. The wingtip extension was way to fat and needed to be sanded down. The same for the aileron extension but the other way around. Not thick enough and about 1mm to wide.
-
I was thinking about buying two Revell Fw190 F8's, but it's not going to be worth it. You won't see much of the engines anyway, so I will work with the ones provided by AIMS. As I said, it's not a real problem, but for the price I paid for it, I expected it to be a little better here and there.
-
It does fit now, but still needs serious work to blend in properly.
-
Started preparing the conversion and some preliminary construction on this bad boy. While not as big as a B17 it still is a pretty large kit with a 70 cm (27,5 inch) wingspan. I have just enough room to handle it on my workbench. I did get the replacement canopy's from John (AIMS) and it took all four of them to get one decent fit. This has also something to do with my inexperience with vacuum formed canopy's but nonetheless it still pretty hard to get it right. My first findings are that the big parts of the conversion will go on pretty well, nothing an average modeler can't handle. The cockpit won't be so easy, there's a lot of scratchbuilding to do. This is kind of a disappointment, you pay big money for this conversion. I know it's a one man job and one has to applaud John for bringing this conversion on the market. Having done all his research I still have the feeling he could have taken it a step further. Besides that, the castings are not as sharp as I would like them to be, thus another point of major attention to get it right. This is certainly the case for the engines, which are just bad copy's in my opinion and the shape of the propeller spinners is just not right. You can say, hey, you won't see the engines anyway, but as I said, If I'm paying 200 euro I expected a little more. Nothing that can't be fixed, so we'll see how things turn out. Night all, till next time.
-
I'm not much of help to you Cees with this specific ac, but that sure is some serious scratch-conversion!
-
Me410 B2/U2/R2 Finished
Wouter replied to Wouter's topic in LSM 1/32 and Larger Aircraft Ready for Inspection
haha, thanks Mike. I would by a Revell Me410 without hesitation! -
Me410 B2/U2/R2 Finished
Wouter replied to Wouter's topic in LSM 1/32 and Larger Aircraft Ready for Inspection
I will Jeroen, i just have to beat my wife with the agenda -
It's a bit of a double post, but since this build is finished I thougt it should be posted here. For more information go to the WIP section here: http://forum.largescalemodeller.com/topic/3704-hph-me410/ Enjoy! Cheers, Wouter
- 14 replies
-
- 11
-

-
Cool, I was thinking; why do I know this build... Turns out I have that particular issue of 'Models'. Very cool subject and build, nice magazine too by the way!
-
Thanks everyone! Though it was originally a wip on the LSP forums I'm still glad I got the support from here. I have to admit the one thing I'm not really happy with is the clearness of the canopy. I've tried several methods: Future, Parketlak, and Gunze clear topcoat, but I found none satisfactory. I know it's just me and not the products, so I still suck at this part. I should really meet with some of our Dutch members and ask/see how they do it Oh, and if one of the moderators could shift the pictures and following posts to the 'finished work' section... I published to fast, happy with the completion. But finished work should be in the finished section right? Cheers, Wouter
-
Today is the day. I'm officially going to call this build done! For the past one and a half year this build was in my mind. Lot's of fun, a lot of learning and a few mistakes made this a very rewarding experience. I couldn't wait to share some pictures with you guys so that's what I'm going to do. Maybe I'll write a little longer piece in the near future, but for now I'll let the pictures do the talking. Enjoy! Cheers, Wouter
-
Dammit Jeroen, do you ever take a break? You're building at breakneck speed here... Btw: nice subject, but you could have done a H22 variant with the V1. Just read PM is coming with this conversion.
-
Obligatory link for others who wish to endeavour in PE making: http://www.britmodeller.com/forums/index.php?/topic/234944044-how-to-make-photo-etched-parts-at-home/
-
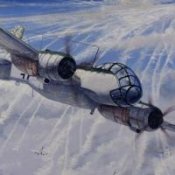
Ju-88C-2 "4D+FH" in pieces
Wouter replied to JeroenPeters's topic in LSM 1/35 and Larger Work In Progress
Whahaha, I van relate to that. The best moment of every building process. -
Revell bf 109g 6 Elias Kuhlein white 7
Wouter replied to coolboxx's topic in LSM 1/35 and Larger Work In Progress
Looks good but could you add some punctuation to your sentences because I have a hard time reading them... Like this: Looks good, but could you add some punctuation to your sentences? I have a hard time reading them... -
Hi all, On Lsp someone pointed out that the wheelhubs should be gloss black and that the rudder was also fabric covered instead of aluminium. Turns out he's right so I mad those changes. The rudder was partially covered in fabric and this part is now painted in red oxide. It certainly gives you something to look at and balances nicely with all the details in the cockpit. Before that, I did several things last weeks. After finishing with the decals I sprayed a gloss coat. I let this cure for several days and then started with the pinwash. This wash was made of Vallejo paint and thinner. I used a dark grey (mixed) for the upper side and a light grey for the underside. Is also attached the formation lights at the wingtips. I really should have done this earlier because it took a lot of time to get them in shape with the wings and redo the painting there. This was followed by a flat coat (50% Mr. Hobby flat and 50% Mr. Color Leveling thinner). Thanks Jeroen for the tip, I finally have a flat coat that works. Mr. Color leveling thinner delivers. After that I sprayed the exhaust stains. This was done with heavily thinned Mr.paint eh... paint (also Mr. Color leveling thinner). I started with brown, followed by black and also a little Tamiya XF19 smoke. With all the pictures I have collected there are not many that show the exhaust stains. In the end I found a few pictures of a captured Me410 flown by the British. This showed some heavy staining on the underside. I also found anther one which showed some staining on the upperside. Take note that the staining is only visible on the right hand engine side where there is no air intake. I have tried to replicate the exhaust staining from these two pictures on the model. Furthermore I redid the spinners and propeller blades. Checking the picture of the real thing I'm trying to replicate showed that the spiral on the spinner doesn't extend over ther entire spinner but stops halfway. The part closer to the engine has the same color as the blades, RLM 70. Besides that, the paintjob on the blades got a bit damaged during the build, so I had to redo them anyway. Last but not least I redid the wheelhubs and the rudder. Now I can concentrate on adding the last bits and pieces and then this build will be finished at last! Cheers, Wouter
-
Ju-88C-2 "4D+FH" in pieces
Wouter replied to JeroenPeters's topic in LSM 1/35 and Larger Work In Progress
Nice paint eh -
a D out of a G.... HK's B-17 conversion
Wouter replied to brahman104's topic in LSM 1/35 and Larger Work In Progress
You should marry Cees, you both use hack and saw and in the end there is a unique model Fantastic modelling.. eh scratchwork!- 167 replies
-
- 2
-
-
- B-17
- scratch built
- (and 1 more)