

Bill_S
-
Posts
990 -
Joined
-
Last visited
Content Type
Profiles
Forums
Events
Gallery
Everything posted by Bill_S
-

Tamiya F-14 VF-2 Bounty Hunters
Bill_S replied to Bill_S's topic in LSM 1/35 and Larger Work In Progress
In between filling and sanding, some minor progress. Intake interiors are done; They're satin white AKA Tamiya rattle can primer. Ordnance ready for paint. And some fiddly bits... -
Tamiya F-14 VF-2 Bounty Hunters
Bill_S replied to Bill_S's topic in LSM 1/35 and Larger Work In Progress
A quick update. Future works well for the task! I've got my fingers crossed that it's a bad batch, and that I don't have to use Future on every data stencil! -
Looking forward to this build. The Stuka is one of those planes that screams "Buy canopy masks!"
-
Tamiya F-14 VF-2 Bounty Hunters
Bill_S replied to Bill_S's topic in LSM 1/35 and Larger Work In Progress
I got the aftermarket decals from Milspec (formerly CAM Decals). They're nicely printed, with vibrant colors - but there are issues. 1. The tail emblem seems to me to be either too large, or the illustration is off. The same for the "USS Enterprise". 2. As supplied, I've been unable to get them to stick. Out comes the future. -
Smitty, I never applied for the Academy. I was NROTC.
-
Do you mean white plastic, Harv? If so, the answer is yes!
-
Another backstory... It was January 1976 and a group of fellow midshipmen and I hopped on a 4 engine prop driven military transport for a ride from Albany NY to the Naval Air Station in Beeville, Texas. It was a long, uncomfortable ride. When spent 3 or 4 days there; the highlight of the trip was when I got a ride in the back seat of a TA-4J. The pilot did his best to get each of us to puke (I didn't). The box is a little bruised, but everything inside is mint. Now if I can just locate an Avionix cockpit set for it...
-
Tamiya F-14 VF-2 Bounty Hunters
Bill_S replied to Bill_S's topic in LSM 1/35 and Larger Work In Progress
Thanks for the kind comments. I'm not really moving very fast on this one, though. I've posted a few pictures in the "What's on your bench" thread over the past few months. Peter suggested I start a build thread. I work on this one when I get burnt out on the XB-70. Carl, those intakes are the primary reason why I didn't opt for the Trumpeter kit! -
Tamiya F-14 VF-2 Bounty Hunters
Bill_S replied to Bill_S's topic in LSM 1/35 and Larger Work In Progress
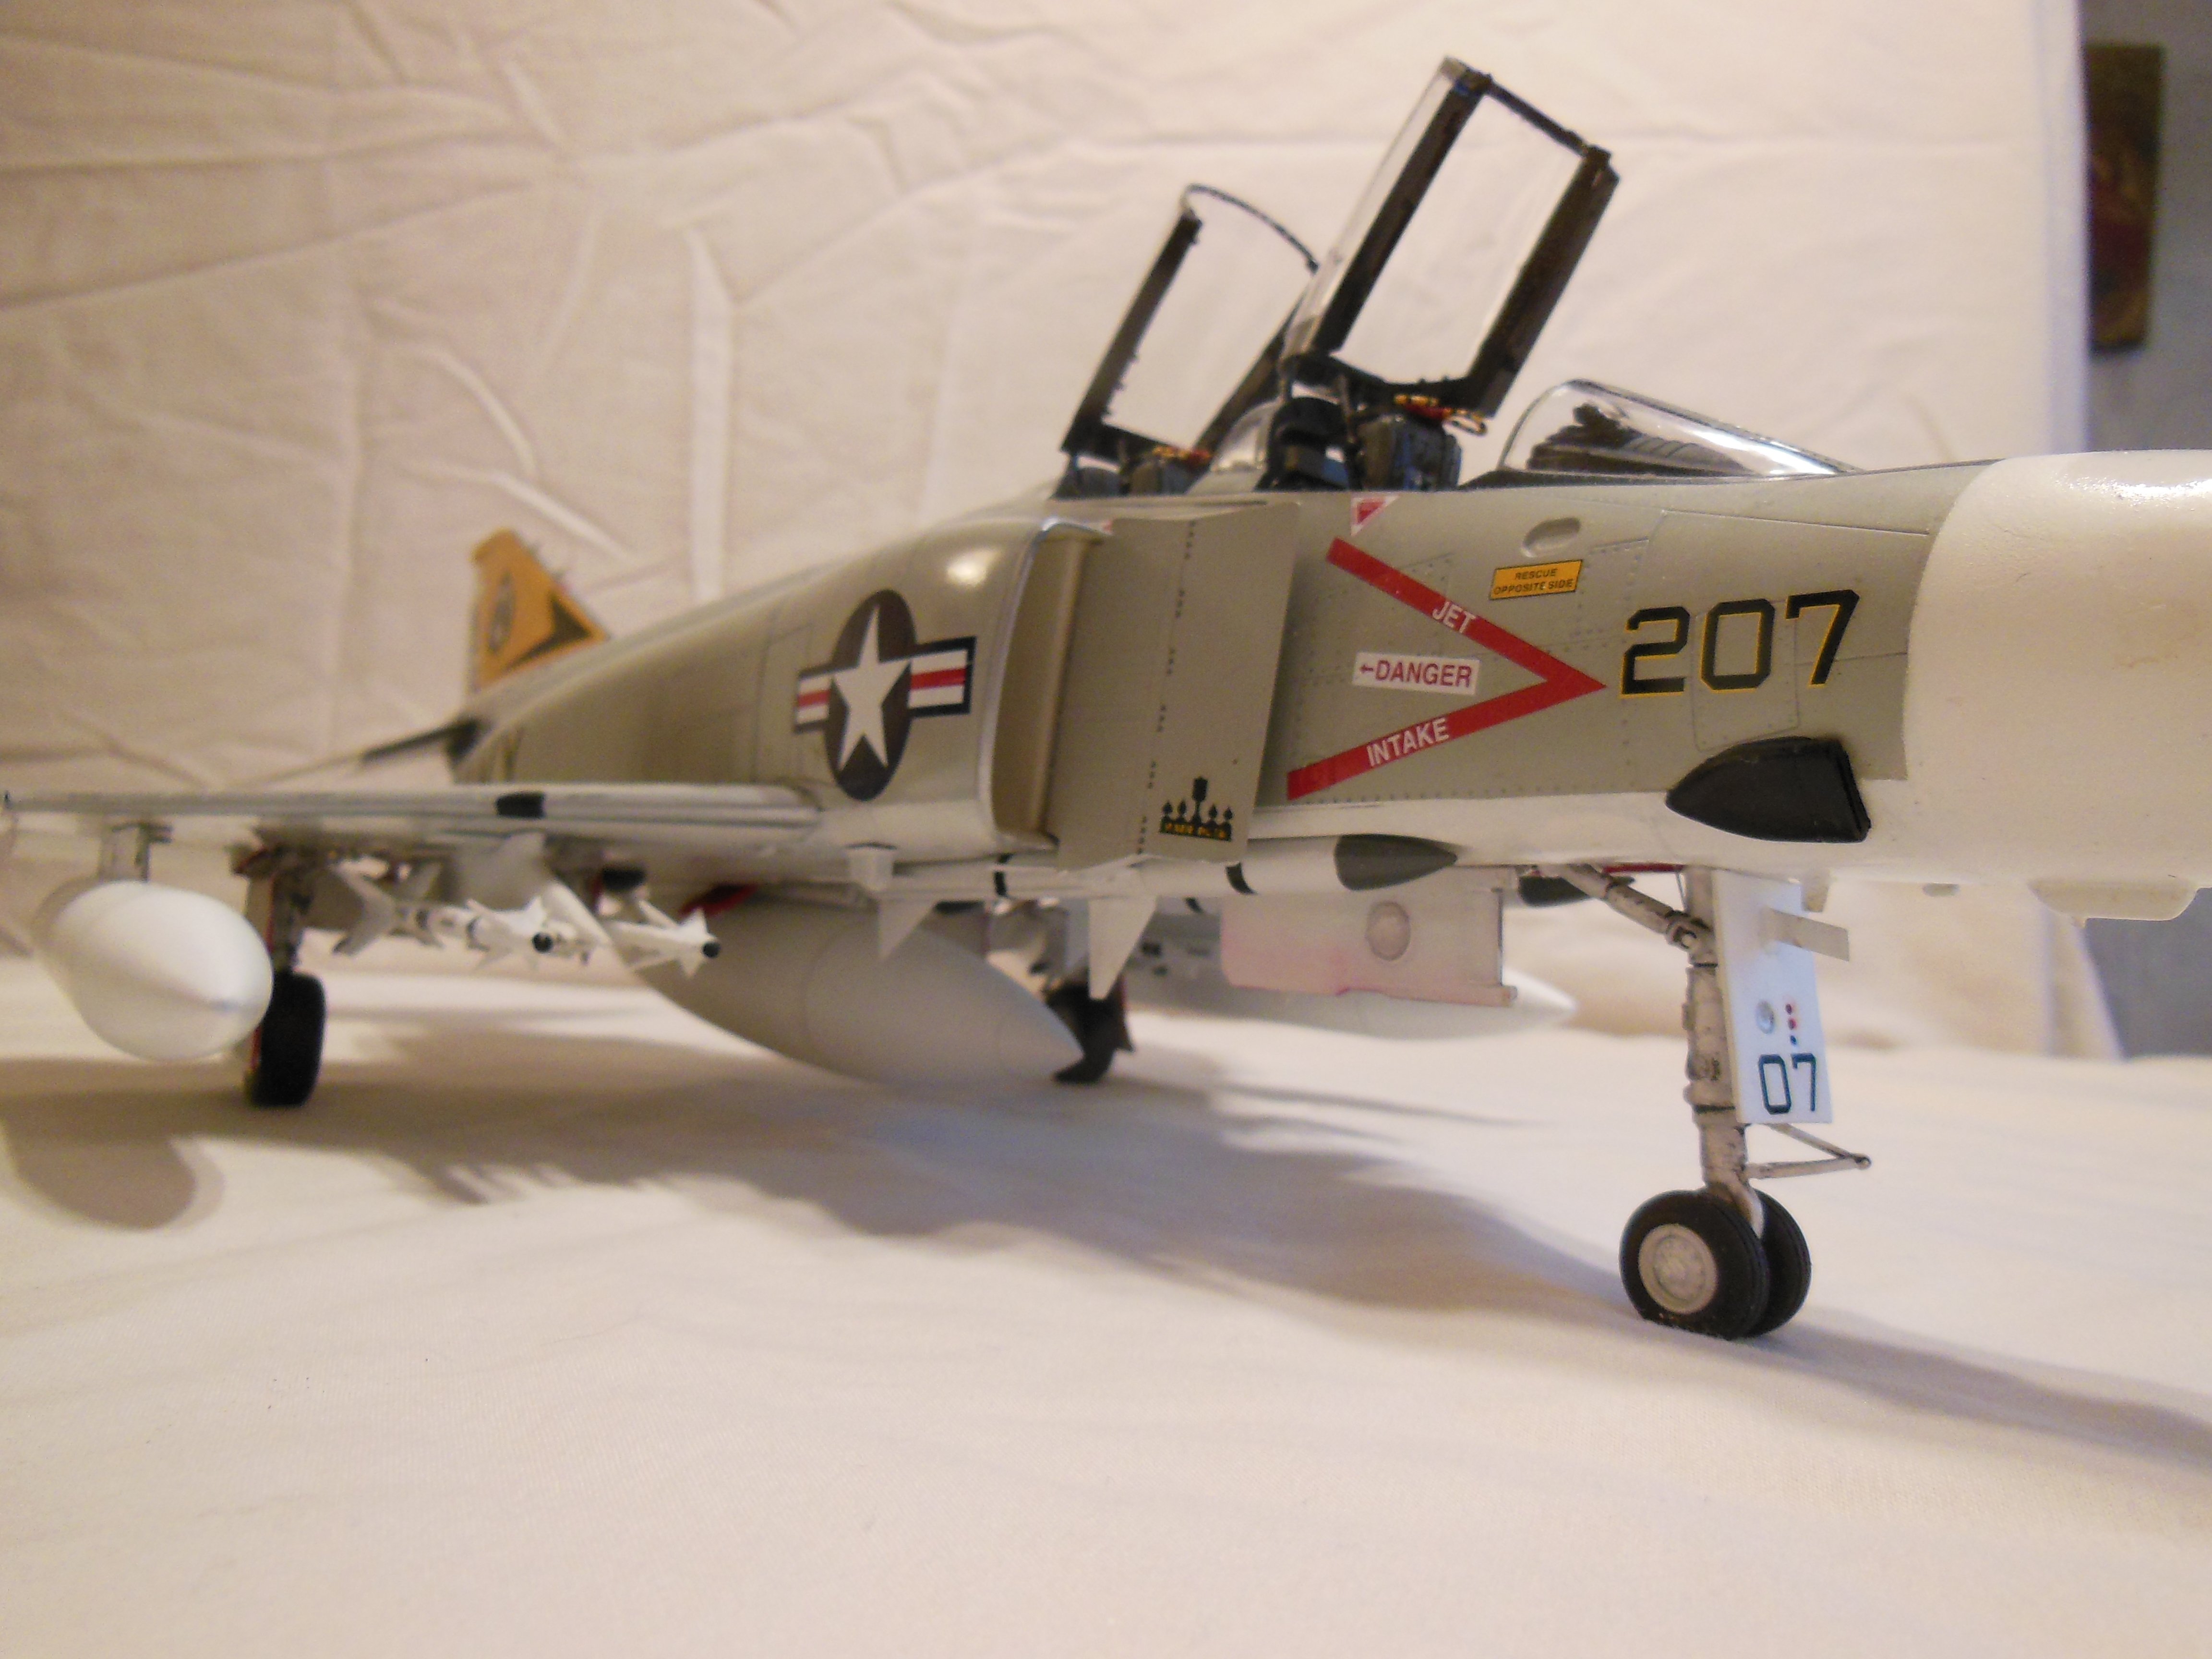
I've decided on armaments. Four Phoenix missiles slung under the fuselage, with Sparrows and Sidewinders on the wing mounted pylons. I'm leaving the external fuel tanks off; I think the lines look much cleaner that way - though I may change my mind later. They're easy to add. Tamiya provides slots in the belly for Sparrows to be put there. In the photo you can see where I've filled them in with styrene. One of the complaints about this kit is that it has a mix of raised and recessed panel lines. The forward fuselage (around the cockpit) has nice recessed detail; the main body behind it is all raised panel lines. It took a while, but the rescribing is complete. There are three screws to affix the upper and lower main fuselages. You can see one of the holes in the picture above. Of course, the holes aren't a standard size. Once things are together, I'll fashion some styrene plugs to cover them. The variable sweep wings mean (to me) that the wings should be painted prior to assembly. The top is light gull gray, the bottom gloss white. I'm using Mr. Color lacquers and some of my trusty Model Master metallizers. The fit between the forward fuselage and the main body has some minor gaps. In test fitting, there is a sizeable gap on the top surface. I've done a little experimentation, and a little "flex" should go a long way toward minimizing that gap. Tamiya would have you use cellophane tape here! Another seam that needs to be addressed. Yellow is on the tops of the rudders and the ventral fins. I couldn't resist applying some of the decals.- 60 replies
-
- 10
-

-

-
In January 1975, I was a Midshipman assigned to the USS John f. Kennedy for a six week refresher training cruise in the Caribbean. During that time, all the "middies" on board were called up to the tower to watch the fleet's newest fighter land. Once on deck, the lone Tomcat on board was immediately transferred to the hangar bay. As my duty station for the cruise just happened to be right next to the plane, I got a good chance to view the beast up close. The thing was mammoth, and screamed "Badass". It's been one of my favorite planes ever since. I got this kit as a gift for Christmas. Upon opening the box, I was dismayed at the lack of detail in the cockpit. Side consoles and instrument panels were flat, with decals supplied to go over them. I ordered the Quinta Studios 3D printed interior set (highly recommended). In my opinion, the Tomcat simply has to be displayed in a high visibility scheme. I searched high and low for hi-viz decals for the Kennedy's VF-32 birds to no avail. I settled on a hi-viz Tomcat from VF-2 aboard the USS Enterprise in 1977. I got them, along with a hi-viz data sheet from milspec decals. Other additions were Master Model pitot and AOA probe, and a set of seats from Quickboost. The cockpit enhancements were easy to apply and incredibly detailed. The only drawback was the gray, which to my eye didn't quite match the dark gull gray called out as the proper interior color for the F-14.
- 60 replies
-
- 10
-
-
What is on your bench right now ? Share a picture :)
Bill_S replied to Martinnfb's topic in Modelling Discussion
I hadn't really thought of a WIP, Peter - but you've made me change my mind... -
Awesome birthday gift, Rob! I hope you enjoyed your day.
-
What is on your bench right now ? Share a picture :)
Bill_S replied to Martinnfb's topic in Modelling Discussion
Tamiya Tomcat. It doesn't say so in the instructions, but I think the main wings need paint prior to assembly. I'll wrap them in plastic wrap until paint on the rest on the plane is complete. -
I finally got that pesky spinal seam smoothed to my satisfaction! I ended up using Tamiya primer - it gave much better coverage than the Mr. Surfacer. I need to do a little touchup at the nose, then on to the landing gear and the engine bay.
-
Just got these in the mail. If I'm going to build a Tomcat, it has to be a high visibility scheme. What a colorful bird!
-
Nothing like a coat of paint to show imperfections! Spraying white paint over white plastic is proving to be a challenge for these old eyes. I'm pretty pleased with the Mr. Surfacer white; the results are very much like Tamiya white primer from the rattle can. More filler, more sanding... Estimated delivery on the PE nozzles is slated for late July.
-
Did it come in over the lake, Carl? If so, it's the same one we got last night...
-
Some really long panel lines on this bird! It took a while, but they're all finished. Got the PE fiddly bits applied to the upper wing and fuselage. I love Mr. Surfacer. To date, I have only used black. I picked up this bottle somewhere.
-
Kitty Hawk T-28B completed
Bill_S replied to JohnB's topic in LSM 1/32 and Larger Aircraft Ready for Inspection
She's a beauty, John! I look at your output and feel ashamed... -
What is on your bench right now ? Share a picture :)
Bill_S replied to Martinnfb's topic in Modelling Discussion
Supposed to arrive mid-June, Peter. Fingers crossed. -
What is on your bench right now ? Share a picture :)
Bill_S replied to Martinnfb's topic in Modelling Discussion
I'm not happy unless I have multiple projects going. In addition to the XB-70 (waiting on PE exhaust nozzles from Ukraine), I'm working on a WNW DH.2 and a Tamiya F-14 -
Rob, it was essentially freehand; I let the round needle sit in the existing groove. The part itself served as a guide.
-
Some noticeable misalignment between the upper and lower wing sections. I masked, filled and sanded to eliminate some of the grooves. In a moment of inspiration, I found a new 18 ga. hypodermic needle in the tool box. Sharp, beveled and the correct diameter... I laid the needle flat on the wing, applied pressure to keep it in the groove, and gave it a push. I've highlighted the end result with a wash. A little cleanup, and she's good to go. On to the next task.
-
Several applications of putty and lots of sanding... I still have lots of scribing to do, but it's all on flat surfaces, and should be relatively straightforward. Another obstacle to tackle... when I test fir the tabs on the tails into their slots, they don't fit. Looking down into one of the slots in the wing, I noticed this: Not a really big deal, but it's aggravating. I'll have to carve the tab on one of the tails to put a step into it.
