


GazzaS
-
Posts
6,396 -
Joined
-
Last visited
Content Type
Profiles
Forums
Events
Gallery
Posts posted by GazzaS
-
-
9 hours ago, Peterpools said:
Gaz
I guess, the bigger the better and a little easier to paint but I have to give credit where credit is earned - facial color blending and the look are so very realistic. So very well done.
Keep 'em comin
Peter
Thank you, Peter!
-
 2
2
-
-
I loved models before I knew what love was. I have approximately 60 kits. My wife thinks I don't need more. But I try to build around a dozen a year so I can keep buying without really accumulating more kits.
I never stop to think about my wife before I buy another kit.
-
5
-
-
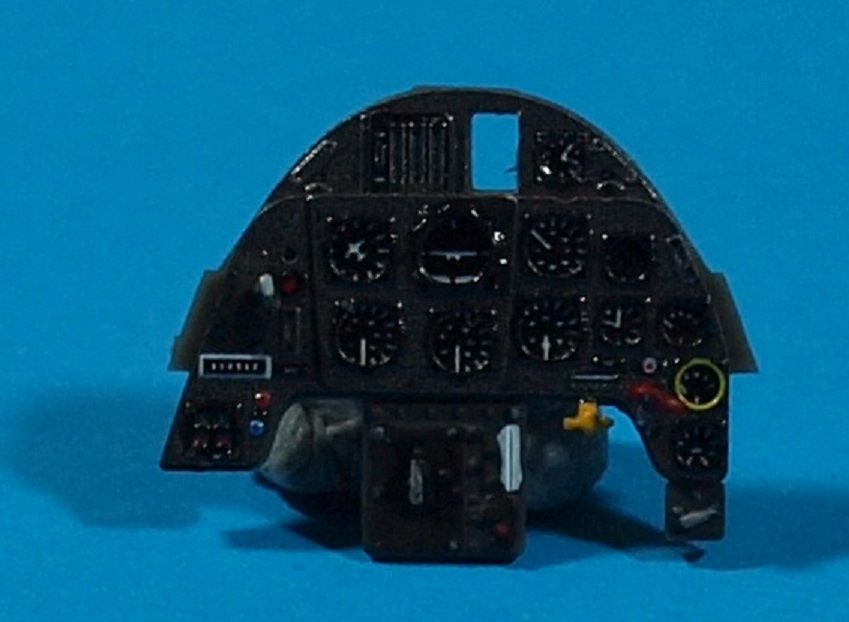
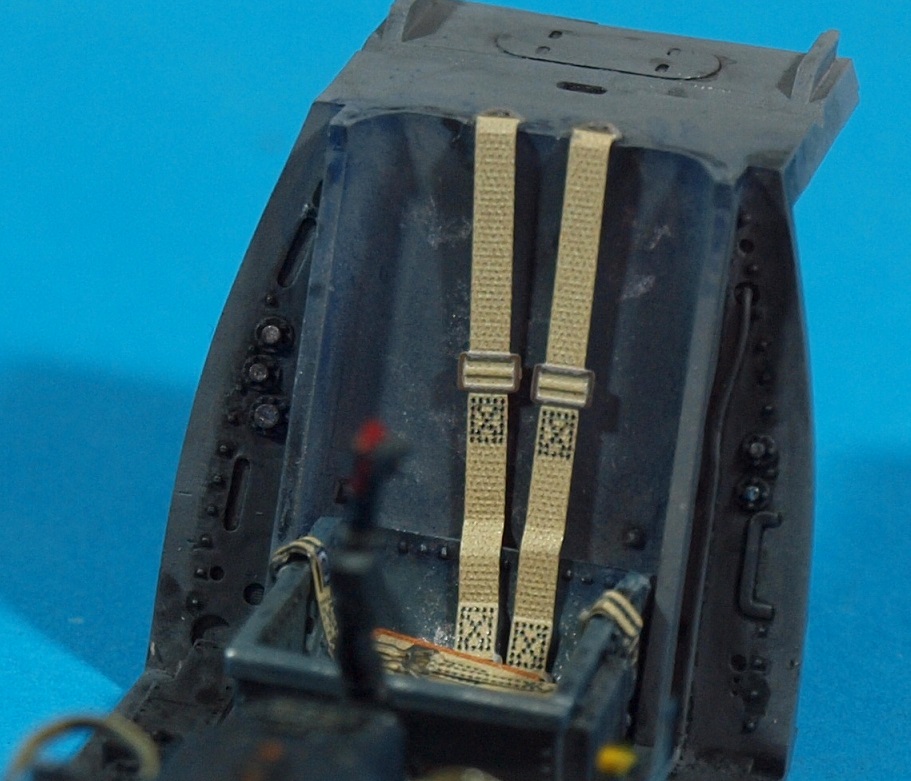
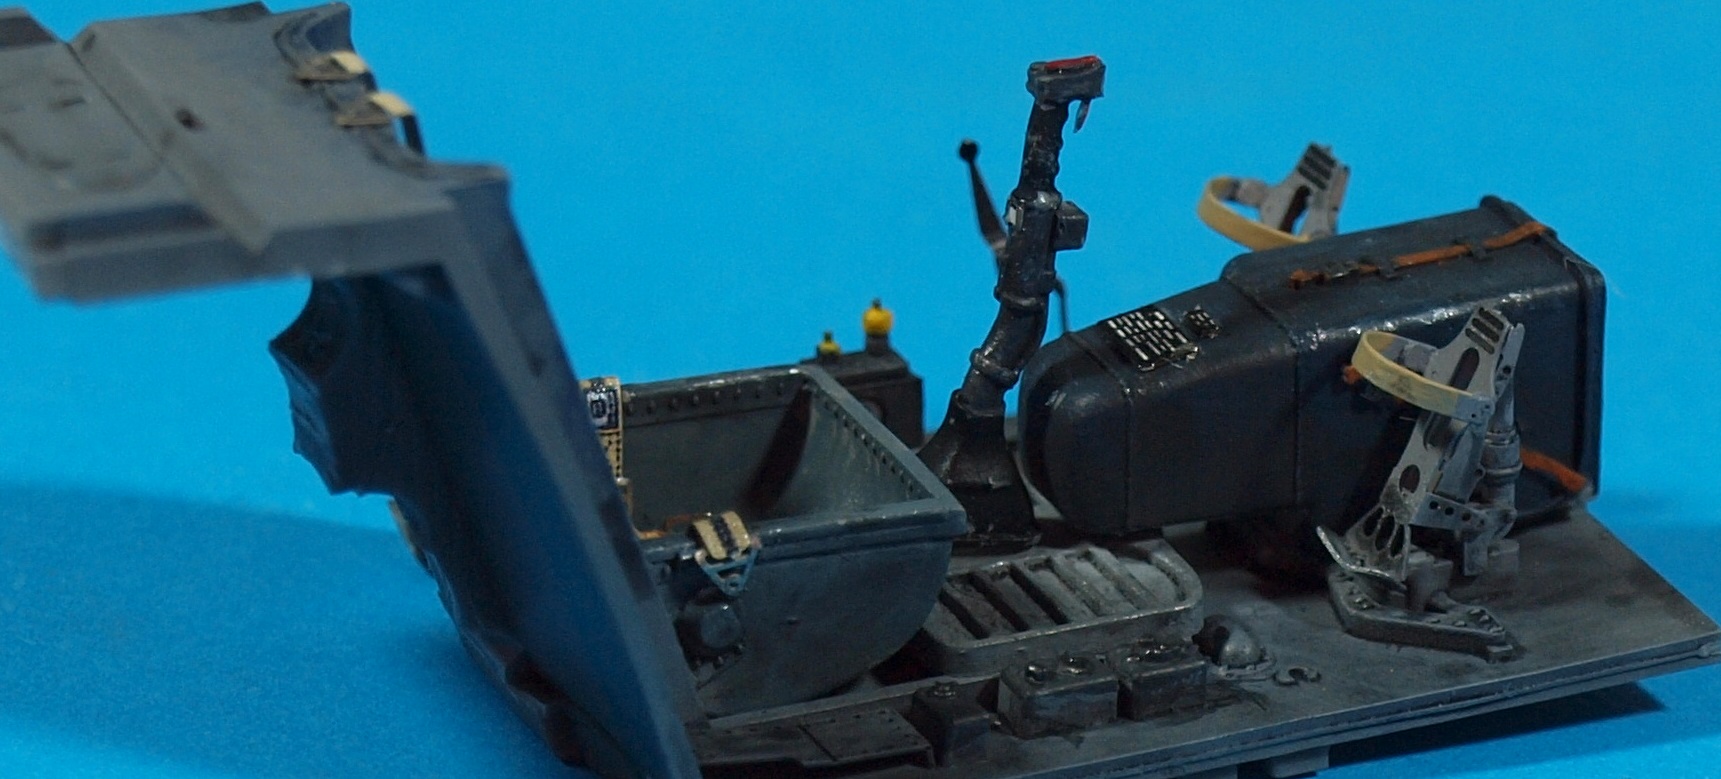
A day of tiny details and infinitesimal amounts of paint... Look at this Revi gunsight... so hard for my fumble fingers
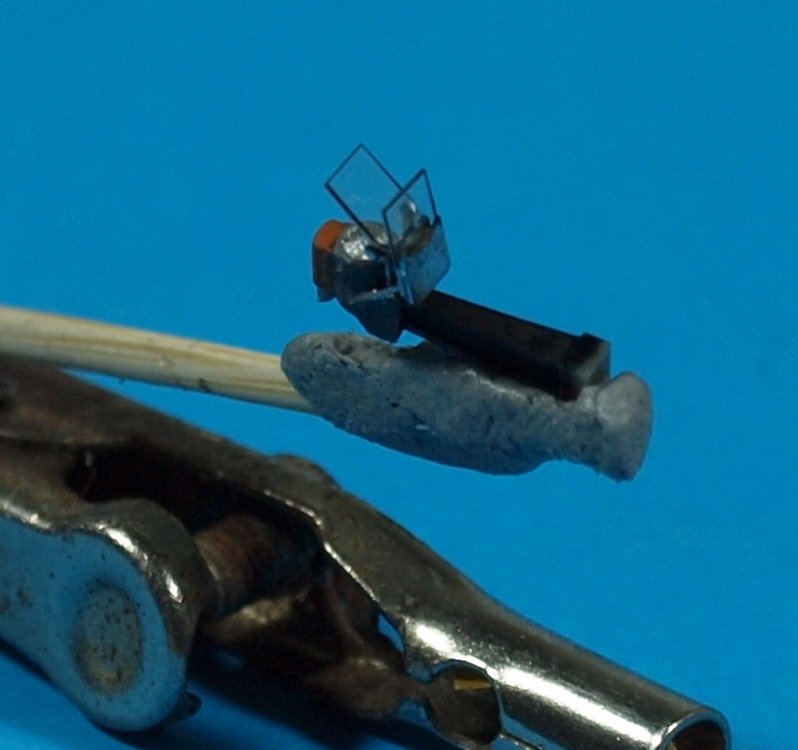

The seatbelts were fiddly... but since I paid for them already, I didn't order cloth belts.

Love those little painted PE panels... they just make everything look better.
The side panels were easiest of all...
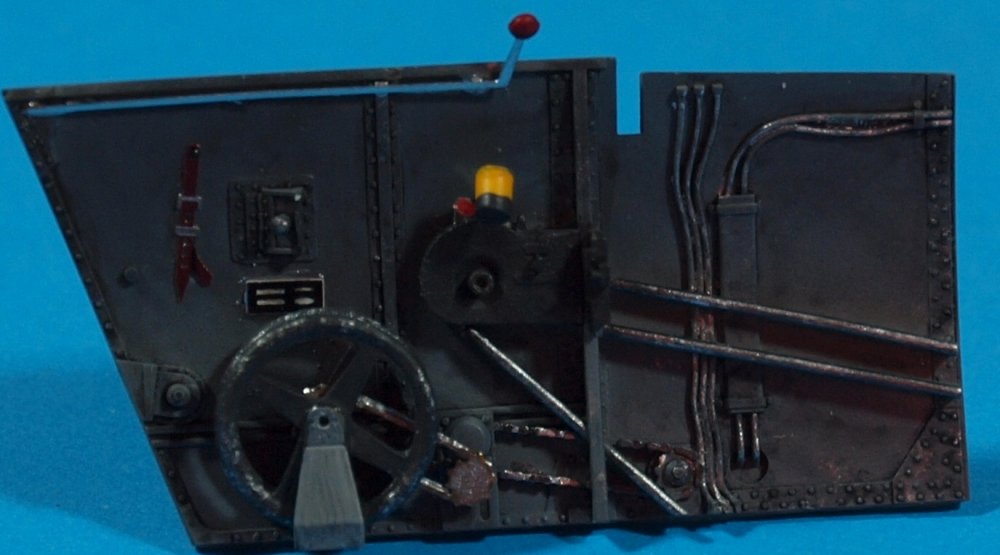
The elevator trim wheels are the only Revell parts in this pit. I decided that trying to impart a natural curve into the PE wheels would be too mcuh effort and give too little reward... so I used the plastic.
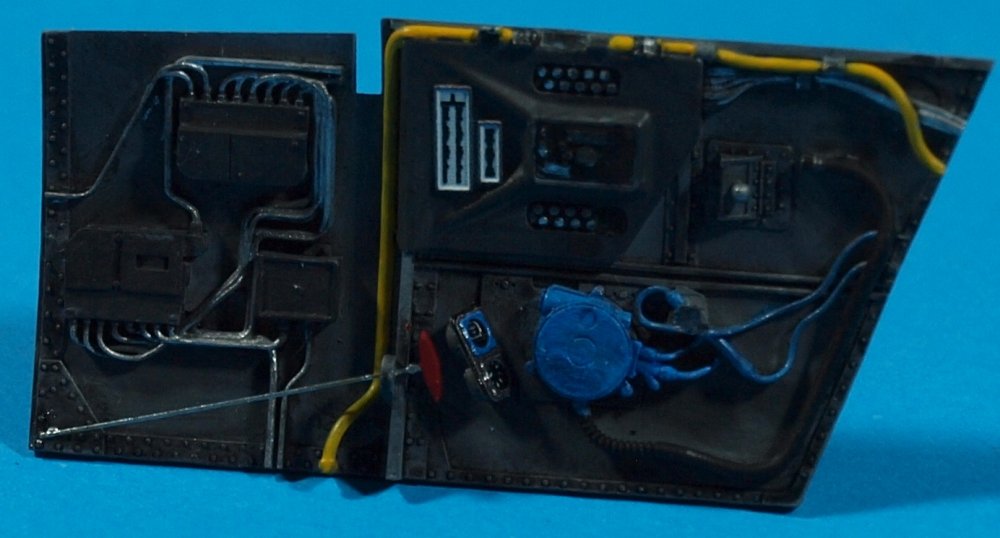
I took some liberties with metallic paints.
Finally a little more paint for the IP
Happy modelling!
There are two tiny little resin pieces to go. I believe they are the cockpit lighting and look like easy pieces to lose... so I;ll save them for later.
Happy modelling!
-
8
-
-
58 minutes ago, Peterpools said:
Gaz
Your eye for detail is amazing
Keep ‘em comin
Peter
57 minutes ago, belugawhaleman said:Thanks, I've come across Takom decals before and had some problems. I was wondering what the strongest solvent around was.
By the way; I just had another look at your Commander figure. Looks amazing! I wish I could paint like that!
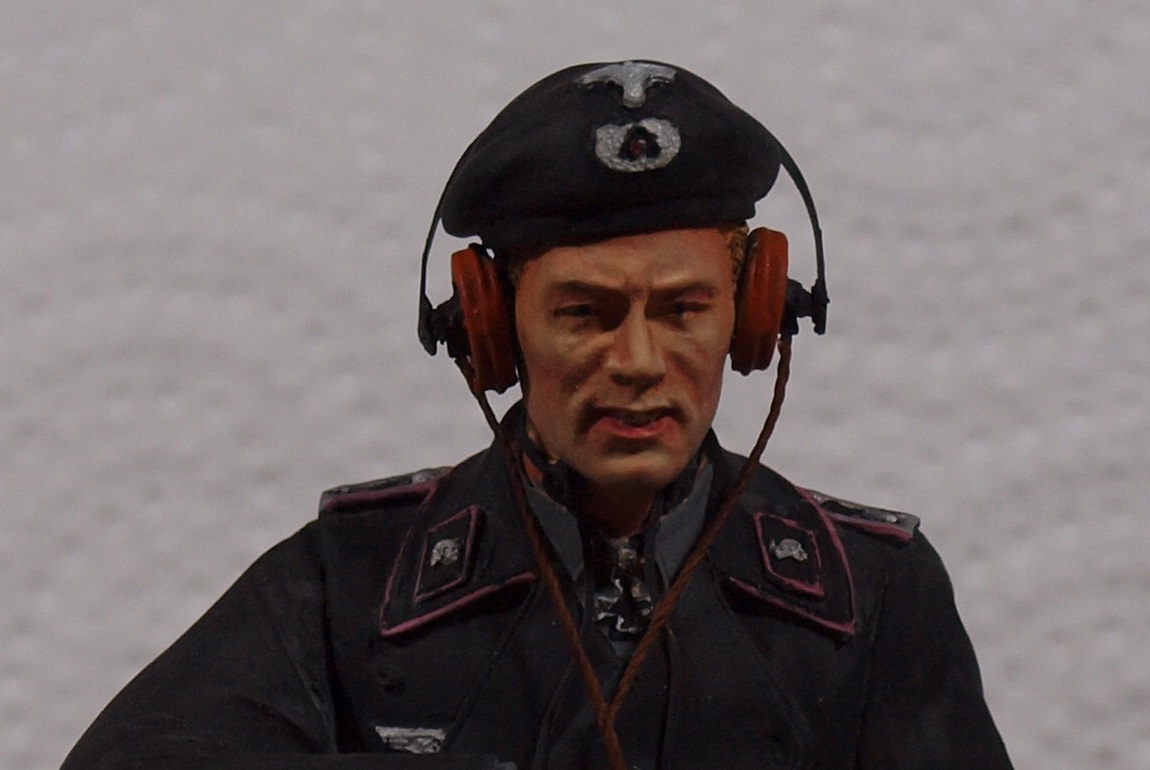
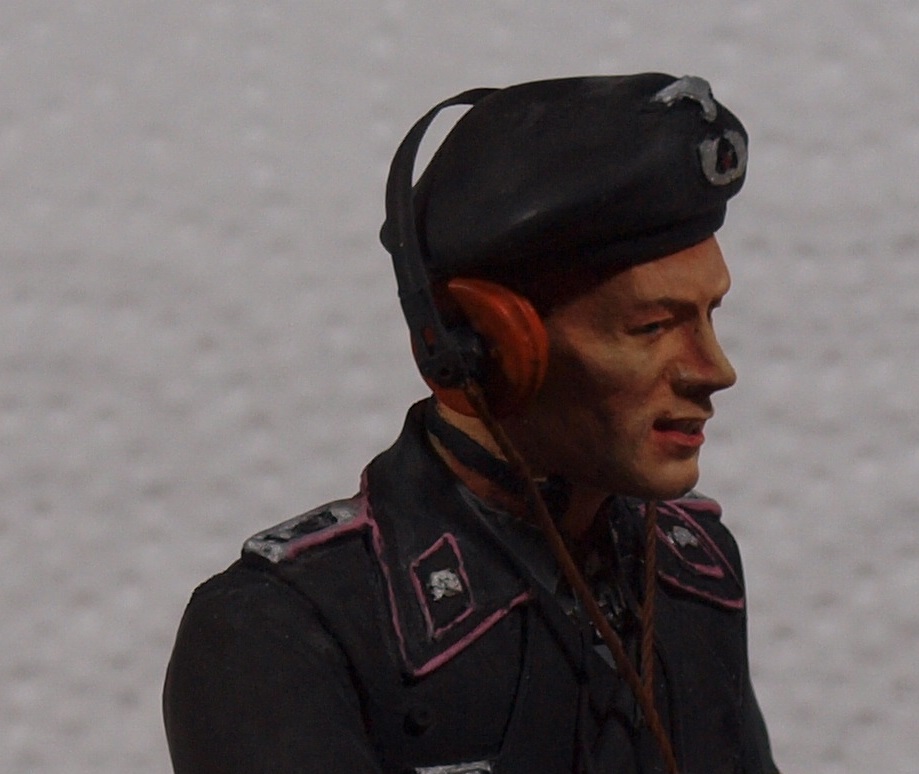
Thank you, Gents... this is my first decent face. It came out well for two reasons... one was the sculpture of the face. The details were clearly delineated so you could easily decide where to put your paint. Two... The size of the face was big enough that my motor skills weren't taxed trying to make super-minute movements. My 1/35 dudes aren't even close.
-
1
-
-
2 hours ago, belugawhaleman said:
Looks great! Regarding the Takom decals; which solvent did you try?
Thank you! I use Mr. Mark Softer.
-
1
-
-
What is it about white backgrounds that suck the light out of a picture??
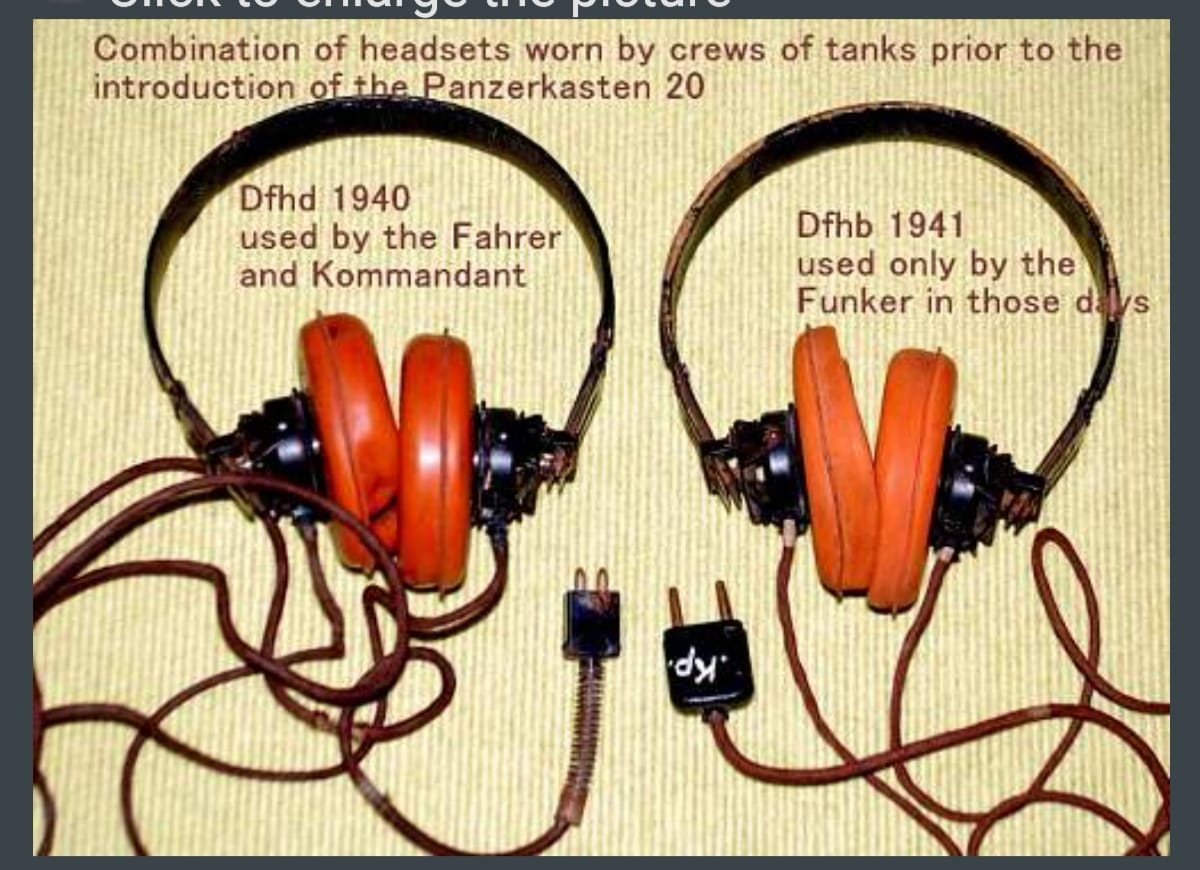
Anyway... Equipment updated to reflect newly gained info.


Just waiting on the glue holding the base to dry... strums fingers.... It's damp and gray today... so I won't be removing the clamps before Monday, at least.
Happy modelling!
-
4
-
 1
1
-
-
Am I the only modeller in the world that doesn’t use a cutting mat? My bench top is plywood and covered with paint marks, glue blobs.
Is there any benefit other than keeping your bench cut mark free?
-
5
-
 1
1
-
-
Looks sweet, Rob! I like the look of that panel, too.
-
3
-
1
-
-
12 hours ago, Kaireckstadt said:
Great build Gary!
With the right background and the finished base it would look like the real thing.
5 hours ago, Peterpools said:Gaz
Awesome work .. your Panzerkampfwagen was an amazing build and all the mini tutorials we learned from along the way are greatly appreciated.
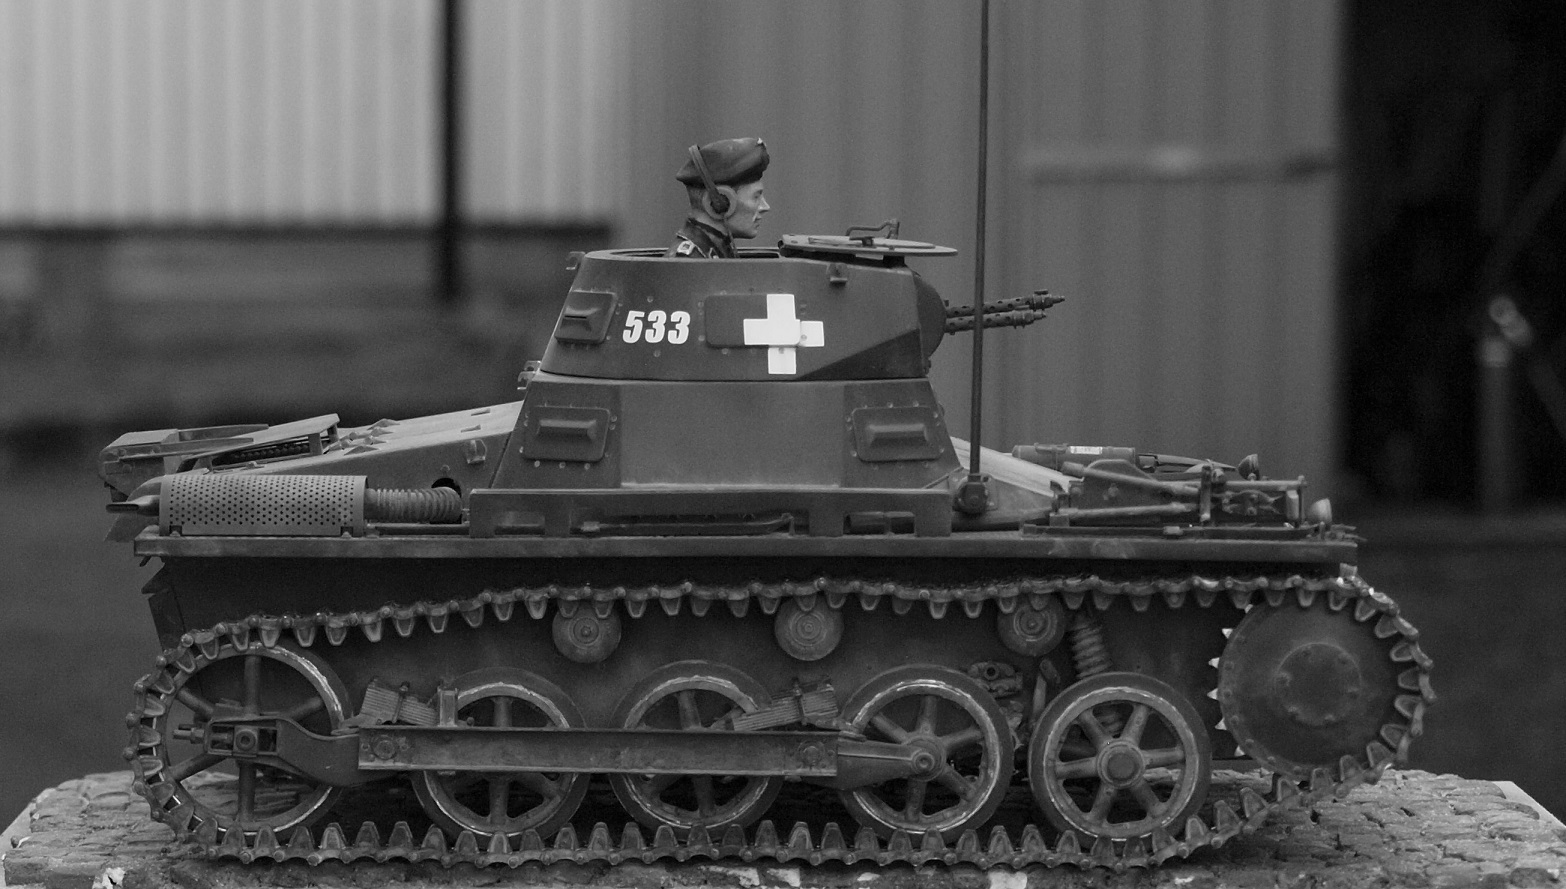
Love the B&W photographs.
Keep 'em comin
Peter
4 hours ago, DocRob said:Nothing to say against some nice B&W pics. They show the subtle layers of dust on the surfaces perfectly. A great build all around, congratulations Gaz.
Cheers Rob
Thank you for the kind word, fellas.
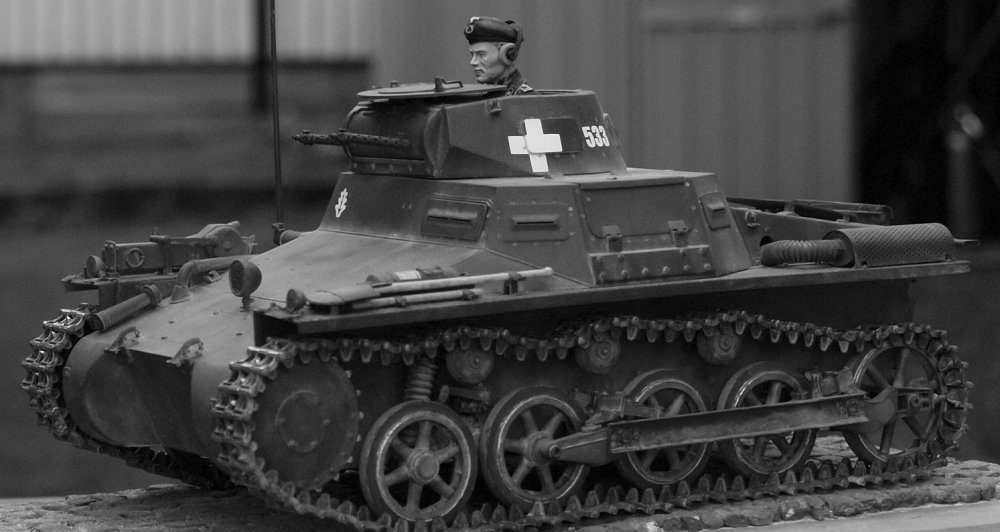
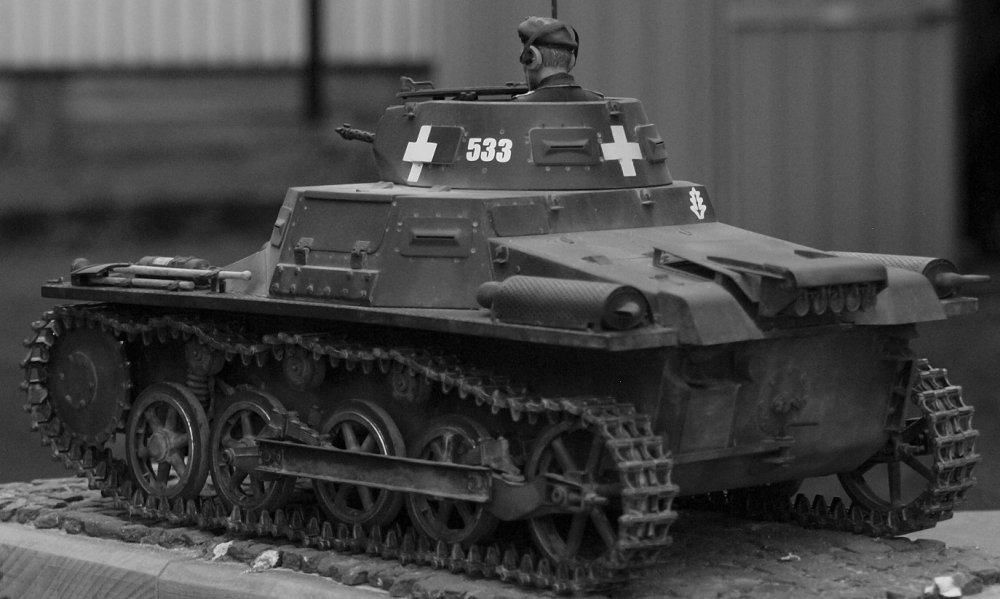
Unfortunately... last night I learned I was not finished. This photo popped up on facebook because of a comment from Mr. Dave Byrden regarding my B&W photos. He was congratulating me because I had chosen the proper color... Well... I chose feldgrau. But the real color will blow your minds:
-
2
-
1
-
-
Hi everyone!
On the last day of a build, I celebrate by throwing away the box and anything I don;t want to keep for spares. The decals were horrible... so I even pitched them.
Without further ado... the B&W preview. I'll do a color RFI once the proper base is completed.

-
4
-
1
-
-
1 hour ago, Wolf Buddee said:
Easy Peasy Gary,
Say you’re attaching a length of monofilament thread or fishing line to an elevator control horn. I use a sharp #11 blade to put a small indentation on the side of the control horn near the top. That gives me a pilot hole to keep my drill bit from wandering. I use a 0.0075 drill bit to drill the hole which is a good size for 2lb fishing line to go through. I often follow the 0.0075 bit with a 0.0095 bit to enlarge the hole to make threading the line through a bit easier. Slip one of Bob’s Buckles tubing on to a length of your line and then feed the line through the hole in the control horn. Then pass the end of the monofilament line around so that you can feed the line back in to the tube essentially forming a loop. Make sure the line goes all the way through the tube so you can grab both lengths. Then slide the tubing up to tighten the loop up to the control horn but not too tight. You want the line to be able to move at the control horn so the angle of the line is natural when securing the other end wherever it’s supposed to go. Add a small drop of extra thin CA to the horn side of the tube and capillary action will flow the CA through the tube and secure the line firmly within the tube. Cut off the excess monofilament line and Bob’s yer Uncle. Sorry, bad pun! I add the CA to the horn side of the tube as it makes trimming the unwanted end of the line as close to the tubing as possible much easier with my Tamiya decal scissors.
I hope that all makes sense.
Cheers,
Wolf
That make's perfect sense, Wolf! Thank you! I'll have to find some even finer bits than I have. The smallest I have is .0137inch or .35mm.
-
2
-
-
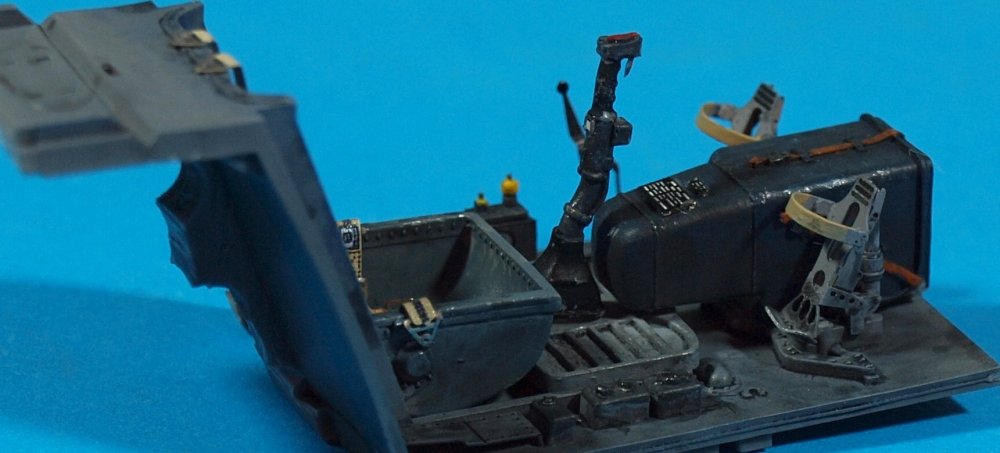
15 hours ago, Kaireckstadt said:
I remember you saying that you don’t like to do cockpits.
The pictures show the opposite.
They show what is possible without brass AM IPs. Just painting like in the times when no brass or 3D was available.Beautiful work Gary. Looking very busy and well worn - even without the missing detail bits -.
8 hours ago, harv said:Very good indeed....harv
 7 hours ago, Peterpools said:
Gaz
Right with Kai and Harv ... one good looking front office with wonderful operational weathering.
Keep 'em comin
Peter
Thank you, Gents!
-
2
-
-
8 hours ago, harv said:
Looks fantastic my friend ! Weathering is top shelf.....harv
7 hours ago, Peterpools said:Gaz
Your dio base is looking so good and the way you are going about it, it's nearly bomb proof.
Nothing seems to daunt you from the task at hand
Keep 'em comin
Peter
Thank you, Fellas. Not sure about bomb proof, Peter. I have my doubts whenever it comes to gluing stuff with PVA. Whilst the cobbles adhered very well to the beech, I'm hoping that they'll al least not come off while I'm leveling a bit with sand paper and a block. PVA is still Elmer's in my head.
-
1
-
-
Thanks for the recommendation. I really need an airbrush just for priming.
-
2
-
-
Fantastic!
-
1
-
-
Beautiful work, Mark!
-
3
-
-
-
2 minutes ago, Peterpools said:
Thanks Gaz
Have a few electronic toothbrushes with replaceable heads - going to give it a try.
Keep 'em comin
Peter
Good... you're already half way there! Enjoy!
-
1
-
-
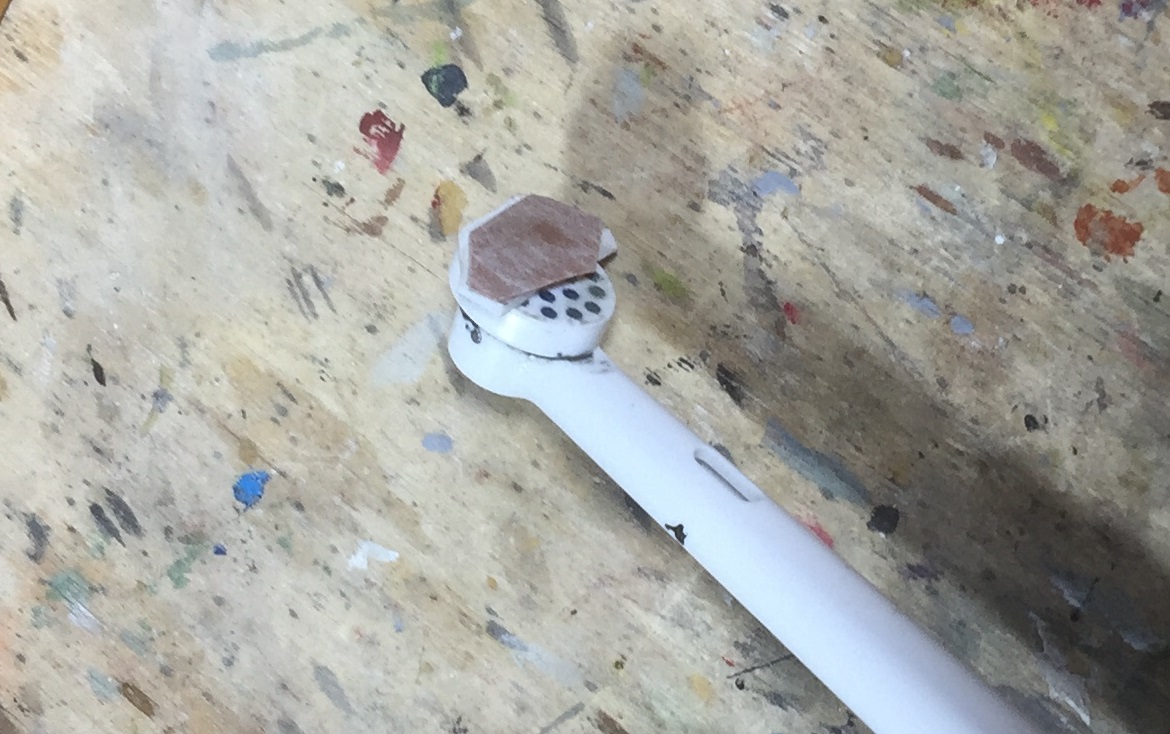
It's very simple, Peter. All you need is a cheap electric toothbrush. Double sided tape. And sandpaper. No fill is better, but the other stuff works too...you just have to replace it more often and deal with gum-up depending on what you're sanding.
Cut off all of the bristles of the toothbrush. Attach two-sided tape to the flat face where the bristles used to be. Attach your sandpaper. That's the simplest bit.
The toothbrush only turns in a 20-ish degree arc. So, you can shape your tape and sandpaper to get into nooks and crannies. I use three grits of paper... all no-fil, for most tasks: 340, 600, and 1200. I have also used 2000 and 3000 for finer finishes. Heck, I've even wet sanded, though the tape don't last very long.
It saves so much time... you just won't believe it.


-
2
-
1
-
-
Epic masking!
-
2
-
-
It's slow going Peter, but there are some time savers in the form of an electric toothbrush and CA. I've tried to make my scribing better and have seen some dividends...though I am still far from perfect. Waiting only 15-20 minutes to be able to fix a fault... or refix it... is much better than waiting overnight.
-
1
-
-
47 minutes ago, DocRob said:
Great tutorial, like Kai said. The cobbles look, well, -cobbly-, meaning perfectly uneven, like these ancient Berlin roads, I used to hate, when I was a bicycle messenger as a student. The woodwork on the frame looks the part too.
Cheers Rob
Thank you, Rob. They will need some sanding... some of them are far higher than the others.
-
3
-
-
1 hour ago, Kaireckstadt said:
Great looking model base Gary and thanks for the tutorial how to build it!
This will be a perfect presentation when finished.
Thank you Kai!
-
2
-
-
On 6/22/2021 at 10:43 PM, DocRob said:
Amazing, how the oils tie everything together. your progress is looking great Gaz. I discovered oil colors for varying effects over the last year and can't tell you, how I lived without them before. I plan to paint my PZL P.11 only by brush, using oil colors as an experiment.
Cheers Rob
On 6/23/2021 at 2:56 PM, Peterpools said:Gaz
Got ya. It’s hard to know when but she is looking so good
Keep ‘em comin
Peter
Thank you, fellas!
The model is still gassing out. That's when I know it's not ready for it's final matte coat. If it stinks. Hopefully tomorrow.
So, I went all in on the base. I bought a slab of 50mm (almost 2 inches) thick foam board. A bag of plaster of Paris and a 250ml bottle of PVA glue as well as an aerosol wood sealer for the edging. The edging I burned down from some pine I had on hand with a home-made bench saw. I then neatened it up with my AEG Plunge router. I have drop saw for cutting precise 45 degree corners. Then I put a different bit into the router and added a bevelled edge.
Then I mixed the plaster with water and spread it out over some baking paper. After half an hour I scored it one way with a knife. Then, half our later I chopped the drying plaster with an Ulu, using the curved blade to avoid having to lift as I separated the cobbles.
So, here were are with everything drying. Except for the cobbles, everything is dry fitted. And everything needs to dry overnight.

Happy modelling!
-
4
-


Gottfreid Weiroster Bf 109G6 R6 Revell 1/32
in LSM 1/35 and Larger Work In Progress
Posted
Thank you, my friends!