


Landlubber Mike
-
Posts
1,277 -
Joined
-
Last visited
Content Type
Profiles
Forums
Events
Gallery
Everything posted by Landlubber Mike
-
Looking great Chris - I wouldn't have thought to do a brown like that, but it came out nicely. Enough to highlight the panel lines and at the same time, showing a sandy bottom that will spare you from having to weather it too much more. One thing I've also struggled with is whether to use the same pre-shading color all over the model despite the various colors, or specially tailor the pre-shading to the eventual color. I haven't quite figured out what the proper technique is in such situations.
-
Hi Peter, hope you're feeling better. A couple of weeks after having ACL surgery in my early 20s, I had intense pain in my leg when I stood up that they thought was either cellulitis or possibly phlebitis. That was some of the most intense pain I've ever had in my life, but thankfully it went away after a week or so (no meds or antibiotics for me though). Hope your prognosis is better!
-
Hasegawa 1/32 Bf-109 F-4-Finished
Landlubber Mike replied to KevinM's topic in The Sandbox Group Build.
Looking great Kevin! Moving along quickly! -
Looking great Chris! Annoying about the rear canopy piece, but sounds like you have a good solution in mind.
-
I'm running out of superlatives so x6!
-
1/48 Eduard F2B in the Middle East
Landlubber Mike replied to PanzerWomble's topic in The Sandbox Group Build.
Love that color scheme PW - looking forward to seeing you work your magic! -
Thanks guys - it's a go for me. Should be fun!
-
Sikorsky JRS-1 1/72 - Bu. No. 1063
Landlubber Mike replied to Landlubber Mike's topic in The Great Twins Broup Bluild
Thanks guys, really appreciate it! -
Fantastic PE work!
-
Hasegawa 1/32 Bf-109 F-4-Finished
Landlubber Mike replied to KevinM's topic in The Sandbox Group Build.
That's a sharp looking scheme Kevin - looking forward to following along! -
Looking fantastic! That cockpit is really sweet.
-
Moving quickly PW - looks great!
-
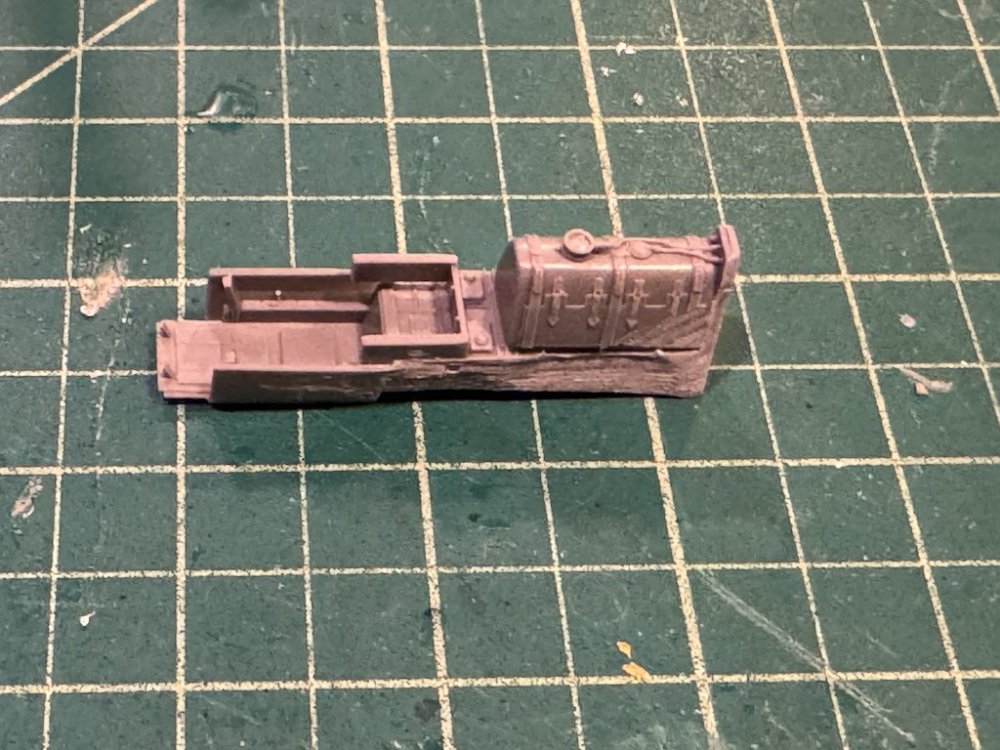
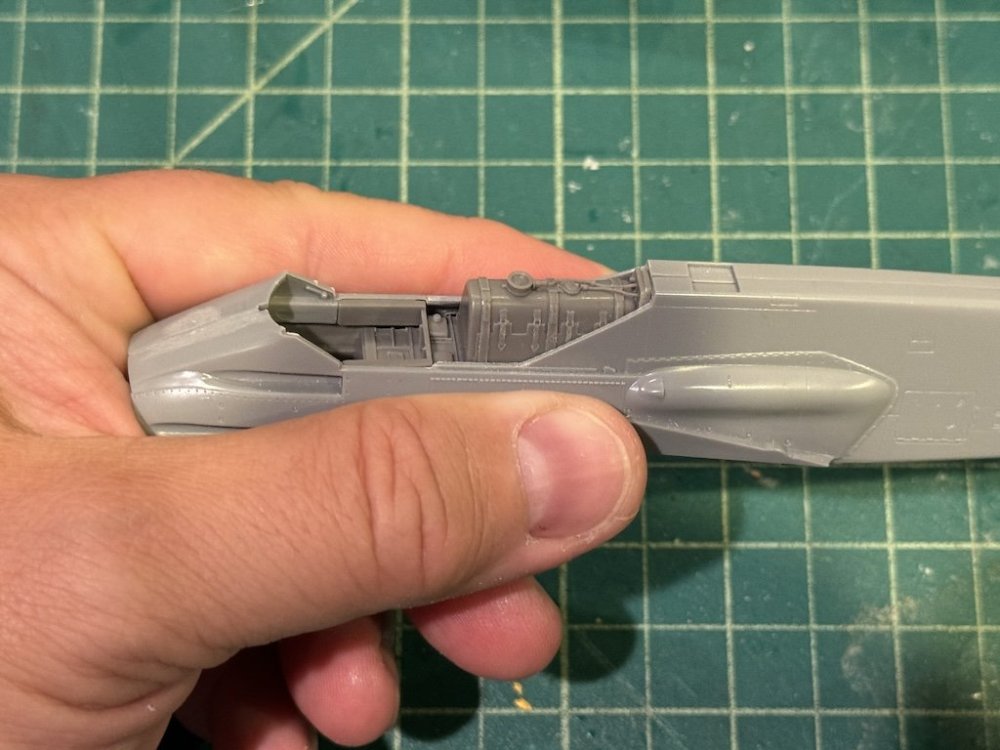
Last night, I started work on the cockpit. The CMK set has a nice replacement tub that includes the fuel tank behind the pilot's seat. To display that fuel tank, you need to cut off the part of the fuselage that covered it, which you can see in the top fuselage half below: Next up was trying to fit the CMK tub. It was a bit too big for the fuselage halves to close properly, but after sanding back some of the interior of the fuselage and portions of the tub that will not be visible, it fit nicely: Thanks for looking in!
-
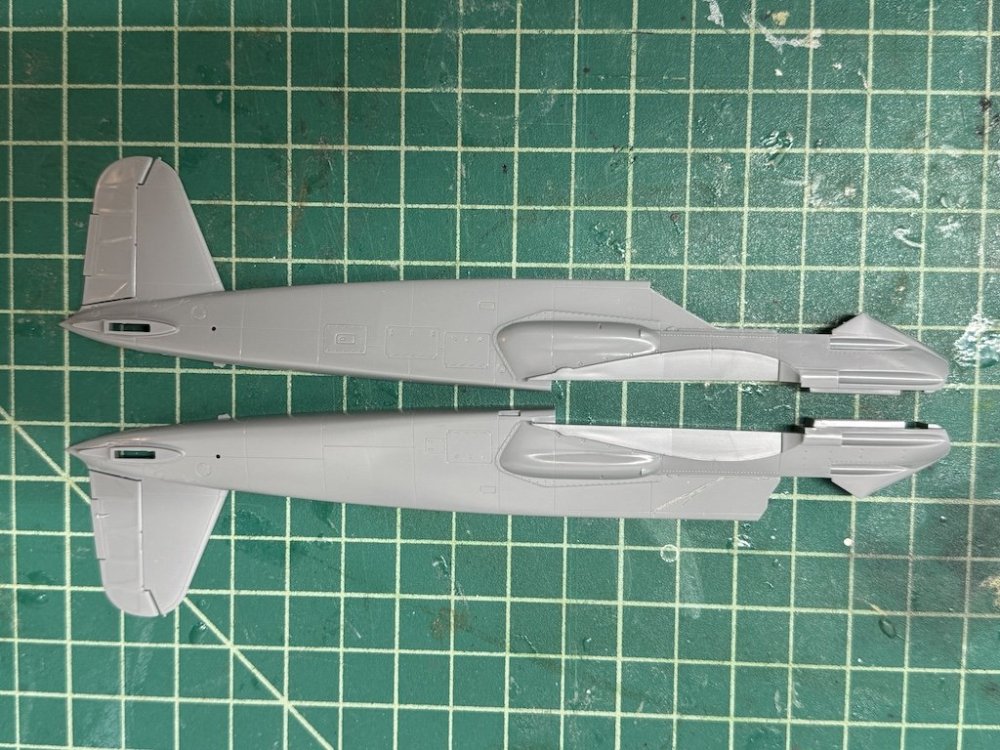
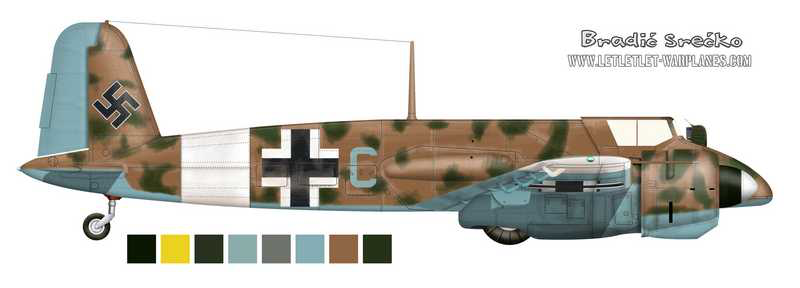
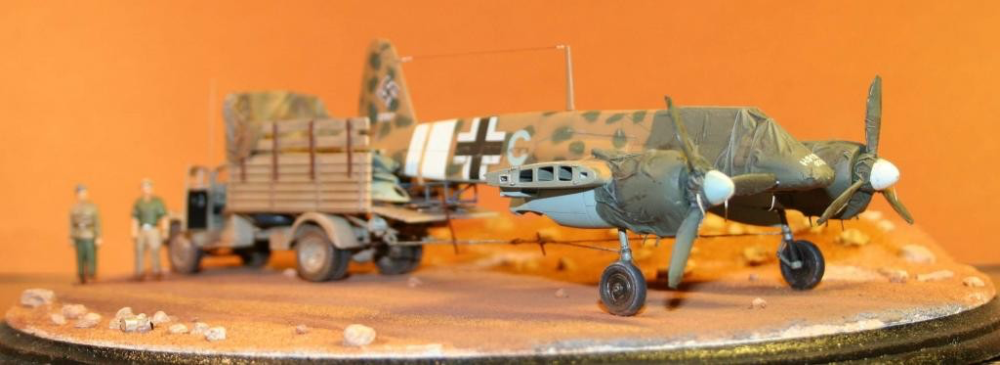
Well, I found my SOL Models Opel Blitz kit - actually found out that I had two of them, ugh - so with that, I ended up picking up an older Hasegawa Hs 129B-1 kit off eBay for a good deal. The B-1 and the B-2 were very similar, with the only difference being that the B-1 had what looks like intakes under the engine nacelles. Otherwise, the two kits use the same parts. I figured that I should be able to easily convert the B-1 nacelles to that of the B-2 (since the "Blue C" in the picture was a B-2) as it looks like I just need to cut off the exhausts and I can hide any issues as they were covered by tarps anyway. Along with getting the B-1 for a great price, the other good thing is that it has decals for an "O" scheme that I can use as a template to create a mask for the "C" that I need. So, off I go with two builds. Thanks again Martin
-
1/35 M923 Gun Truck, Italeri
Landlubber Mike replied to Martinnfb's topic in The Sandbox Group Build.
Great subject Martin! -
Yeah, I guess I will be doing two builds...
-
Wow Peter, that came out fantastic!
-
Thanks Peter! I definitely will build one all opened up as intended. I already am done that road as I started cutting parts out of the fuselage. I think I can squeeze in a second diorama build as this kit is fairly simple (only 9 build steps). Plus, without the wings and with the tarps, the second should be a fairly quick build. And, it will allow me to make perfect use of the Opel Blitz kit to reduce the slash. I don’t want to overestimate my ability to get both done by the end of the year though! At least the paints, etc. Will all be the same so there will be efficiencies. I agree though, maybe a little more clutter and it will look the part. @PanzerWomble - I’ll probably be bugging you for advice on how to do the sand, etc. since you’re an expert! Hmm, sounds like I’ve convinced myself to start a second diorama. Thanks @Martinnfb! First you send me a detailed rivet plan, now you have me doing a second diorama! 😆
-
Some interesting tidbits about this particular plane/scene in the pictures from the imodeler link above: Well, quite likely 🙂 thepic is from the Luftwaffe In Focus 2003/2 - more on this plane: This is no 0297 werknummer Hs129B2 assigned to No. 4 (PZ) / SG2. The unit was officially founded in June 1942 in Deblin-Irena and flew missions from EL Adem and this particular plane served by 11 July 1942 onwards. Shortly after arriving in El Adem this machine withdrawn from service because they were not part of the dust filter replacement on hand, the filters are so beat down of the engine power to the load machines was dangerous to fly. The fly records also show why it is not resolved the moving to new air bases by overflows: Due to the powder the Gnome engines oil consumption at the time of a 200km flight was 24 liter (normal value such term would been 4-5 liters !) that was the 70% of the total oil tank capacity - ie a longer flight time risked ruining the engine. The picture taken during the retreat of the unit from Barani, backed by Stehereasat and Misurata toward the busiest airports in Tunisia. In the course 0297 in Melhala was shattered after a sandstorm and left "destroyed" status reported. On 01.23.1943, the British marched into Melhala and found the machine that was returned to England and repaired under NF756 number. After repairing flight tests undergone (1426 Record-Keeping 6/23/1943). The machine was stored until 1947 in Brize Norton as "foreign equipment" then unfortunately scrapped. The unit - 4 (PZ) / SG 2 - after the retreat settled in Berlin Staaken for filling and relaxation. The last three working machines saved and brought back from Africa was handed over to the 8 (PZ) / SG-2's (eastern front). Several pictures were taken of this "C" during the retreat (which is why this diorama titled "Zu FUS - Somewhere In North Africa). On the canvas below the canopy clearly visible the Werknummer painted on. Also seen on the truck the BK101 gun's cover while the expensive new weapon probably shipped separately in a weapon crate. The wings also shipped separately as the Opel blitz 4x2 has limited cargo capability.
-
I've been seriously thinking hard about it. Would be a quick build as I wouldn't have any need for AM and can leave off the wings, and it's a fairly simple kit. I can build it at the same time, and use it for practice on my current kit which I've already started cutting up for the CMK aftermarket. I did find the color profile for this plane which is 0297 "Blue C": I don't have the Tamiya 4x2, but do have this SOL MM067 Opel Blitz truck which I think is the same truck: Then again, I just found out that someone built this same diorama almost a decade ago, though in 1/72 scale Maybe I'll have to try it in 1/48: https://imodeler.com/2015/04/zu-fus-a-hs129-retreating-in-the-desert-in-1942-on-foot/

-
Looking good Chris! Those radiators look sweet! Interesting about how they aren't perfect rectangles.
-
Another of my favorite series!
-
Looking good! Sopranos is one of my top three favorite TV series. What season are you on?
-
Sounds like good ol' SH to me! You have to wonder if the designers actually build the models sometimes. But, after a little love, the kits go together fine. Good luck!
-
Wow Chris, moving right along! Love the cockpit and IP. The exhausts came out really nicely too - I might have to look into the Model Master paint. I'm trying not to delve into too many paint lines, as it gets hard to keep them all straight with air pressures, thinners, clean ups, etc.


