Landlubber Mike
-
Posts
1,277 -
Joined
-
Last visited
Content Type
Profiles
Forums
Events
Gallery
Everything posted by Landlubber Mike
-
1/48 Monogram B-58 Hustler - SEA
Landlubber Mike replied to CANicoll's topic in LSM 1/48 Work in Progress
Looking really great Chris! That camo came out really nicely. Can't forget about the pin-up - nice looking for sure -
Sikorsky JRS-1 with AM (Eduard) 1/72
Landlubber Mike replied to Landlubber Mike's topic in The Great Twins Broup Bluild
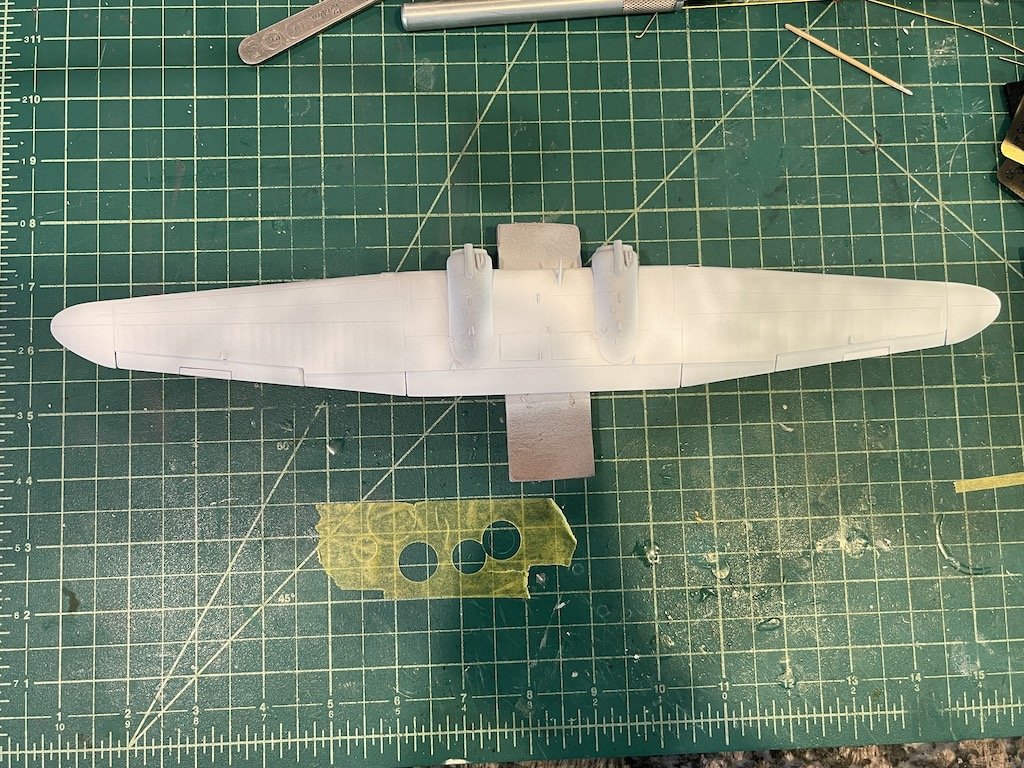
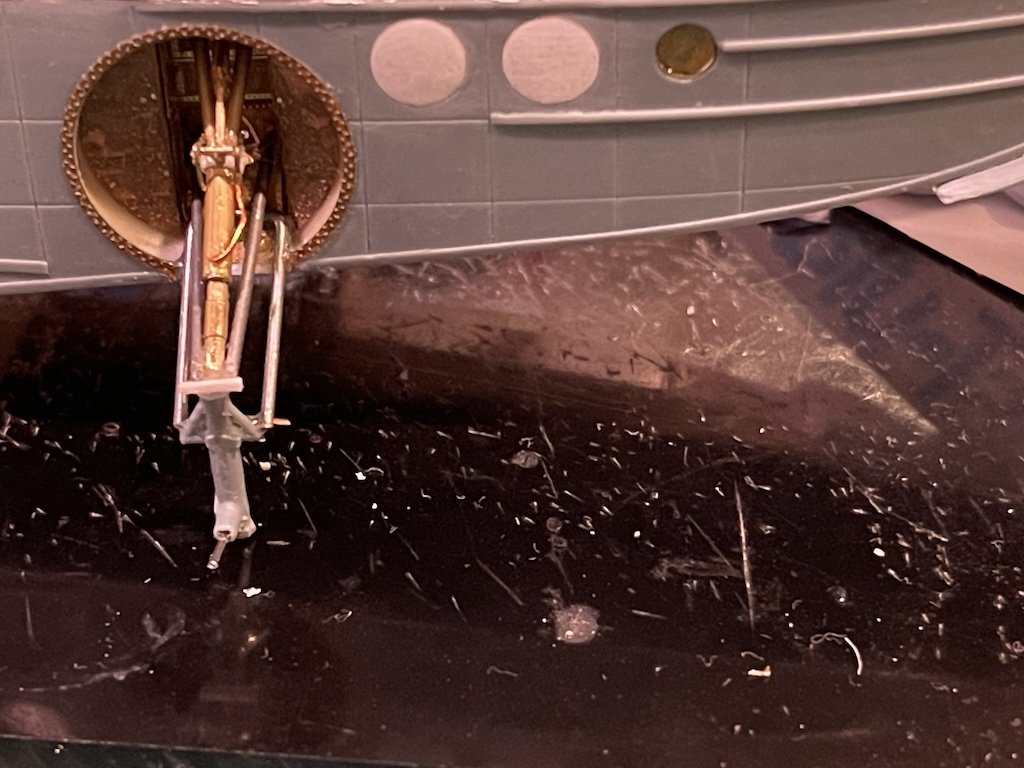
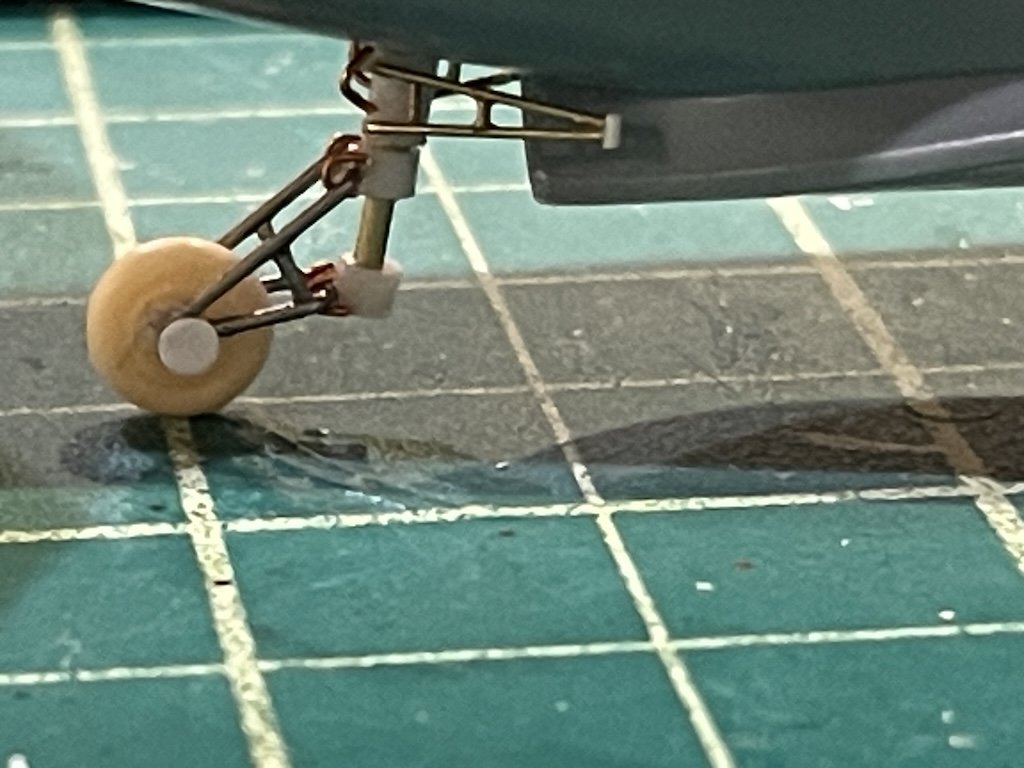
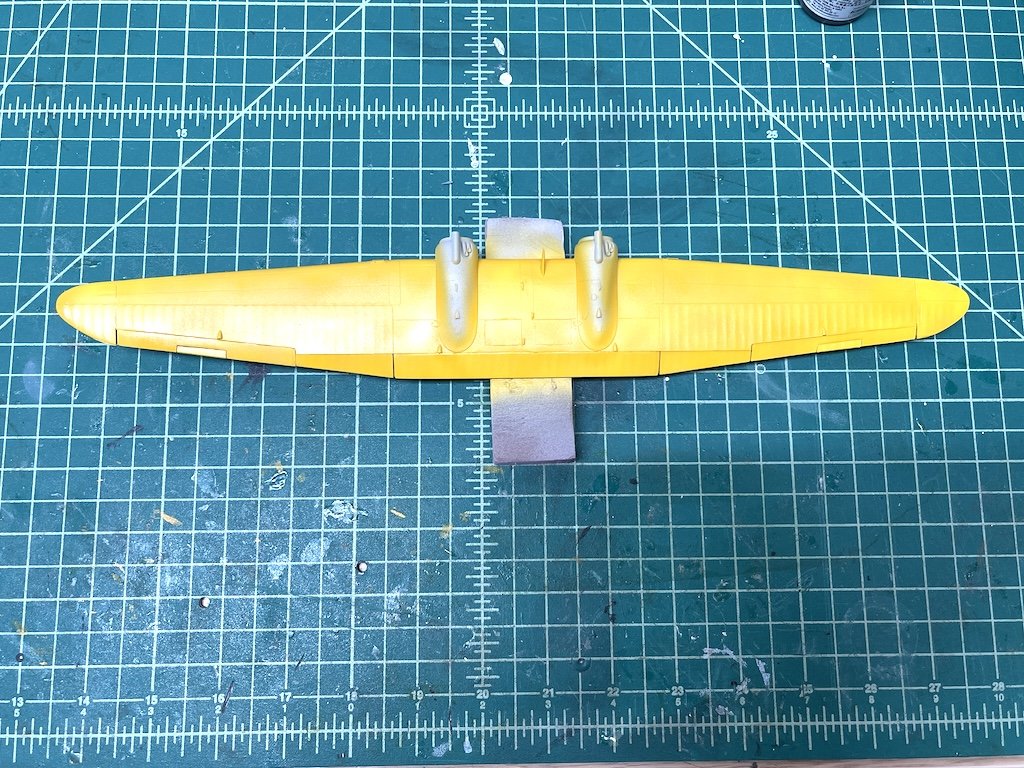
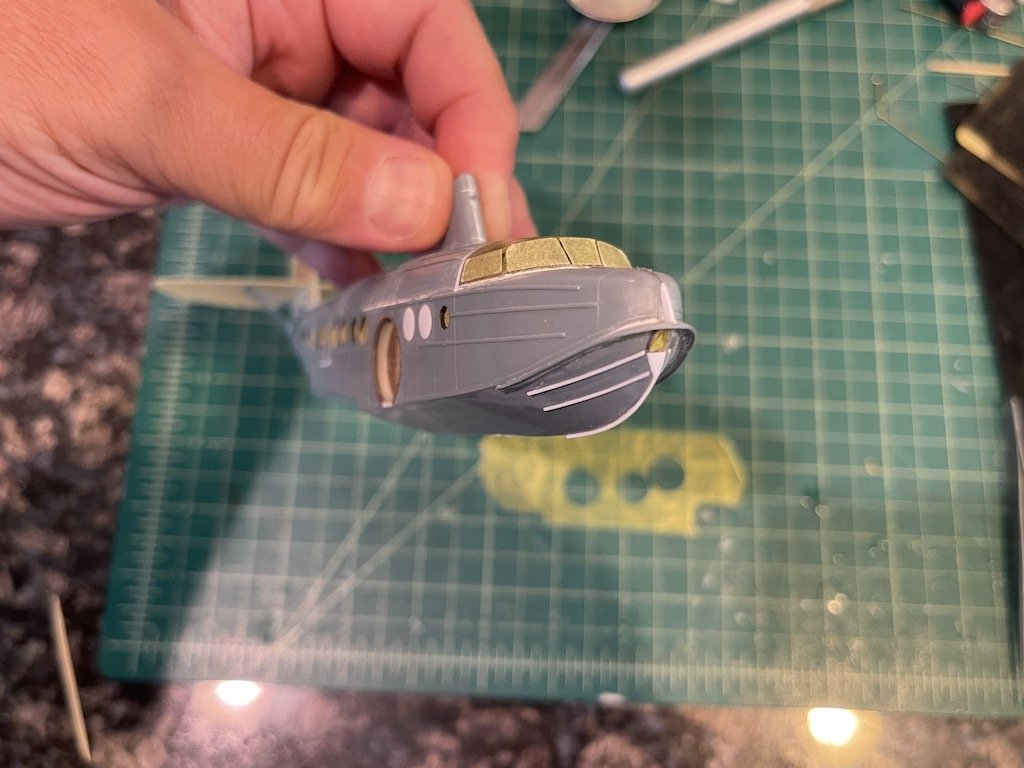
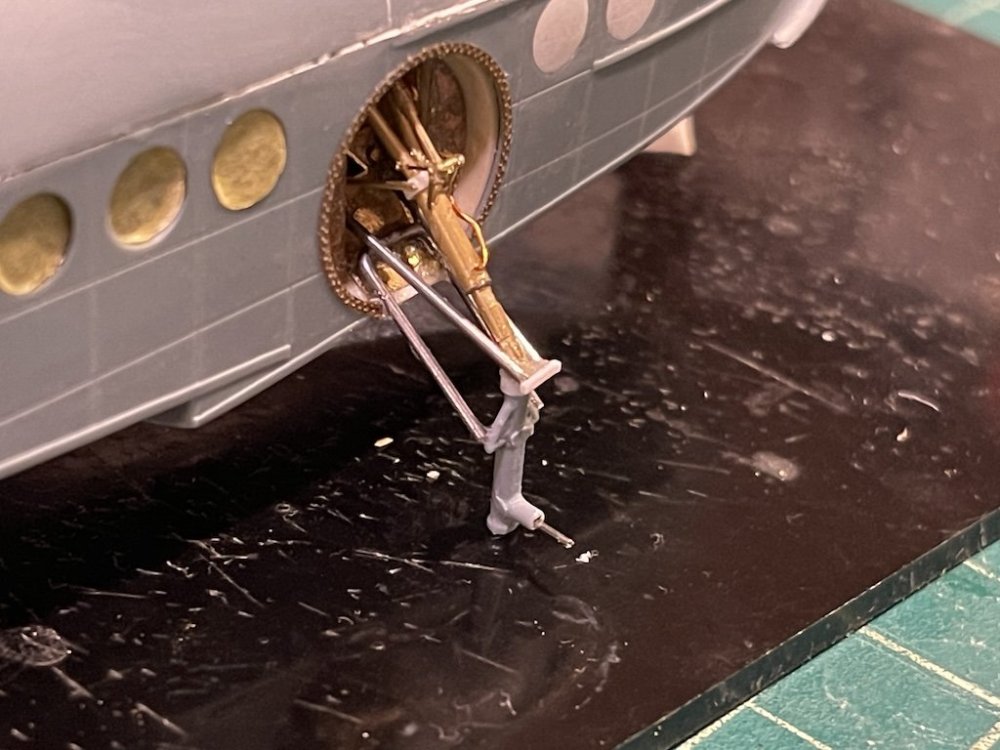
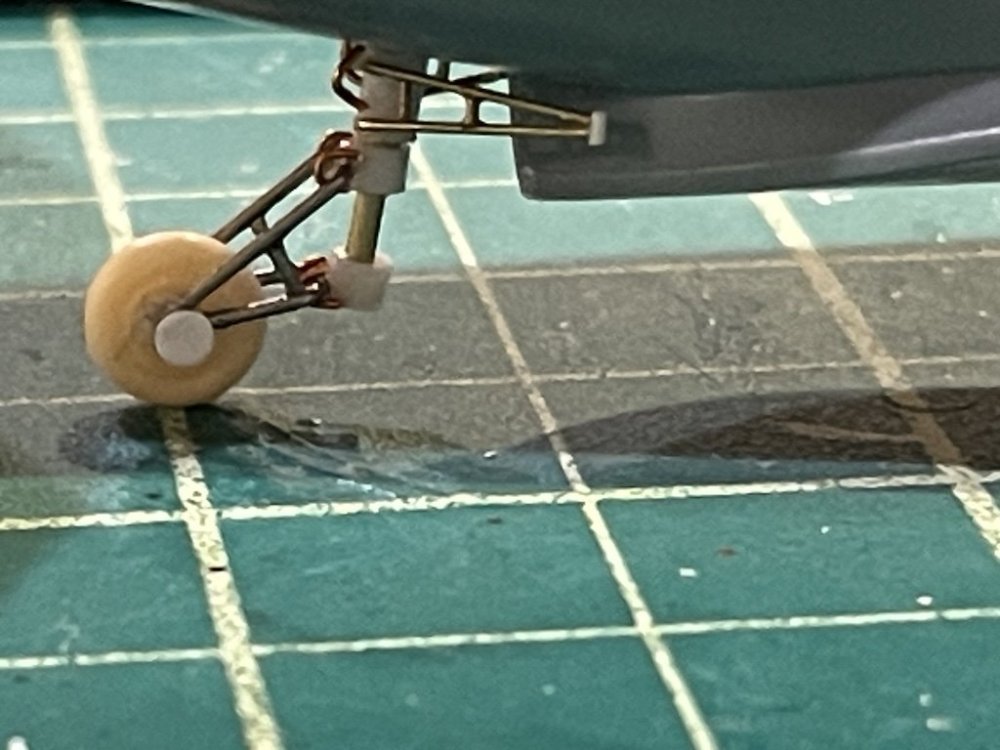
Finally got the landing gear done on the JRS-1. With the CMK resin aftermarket, I was worried that the kit landing gear, which was made up of five parts on some very thin, weak plastic, wouldn't support the model long term. Otherwise, the kit landing gear was a reasonable approximation of the real thing, but the tail wheel assembly was very overly simplified to say the least -- once I saw pictures of the real thing, I couldn't "unsee" it so decided I would scratch it along with the landing gear. I used some kit parts, along with music wire, cut down steel pins, brass and copper wire, brass tubes from Albion (amazing tubes if you need tubes designed to fit within one another), and plastic tubing. With CA and two-part epoxy, both the landing gear and tail wheel are pretty sturdy. Not sure it was worth probably 20+ hours of work, but I'm glad I went through the process as now I'll be able to scratch build the landing gear on the 1/48 PBY-5A Catalina which is notorious for collapsing. Anyway, here are the pictures: The upper part of the wing has been painted with the base yellow from decanted Tamiya Camel Yellow from the rattle can. I first primed with Mr. Surfacer grey, and then lightly sprayed with either Mr. Surfacer white primer or Tamiya white primer (I forget), to get some variation in tone. Then a light spray of the yellow and there's some decent tonal variation so it doesn't look too plastic. Thanks for looking in!


-
Great choices Peter!
-
Sikorsky JRS-1 with AM (Eduard) 1/72
Landlubber Mike replied to Landlubber Mike's topic in The Great Twins Broup Bluild
Ernie, thanks for looking in and for the push. After days of work, I'm just about done with a fully scratched landing gear. I finally have a couple of days to put in some good time on the model, so my goal is to finish this by the end of the month. I've definitely learned a lot working on this kit - not exactly easy for a 1/72 build, but it's a pretty cool subject so fingers crossed it makes it over the finish line. -
I voted sandbox too - I have a ton of AM for this one:
-
Looking great Dave! Nice work on the PE. I have a few 1/700 builds in process now, and I enjoy the challenge of working with the microscopic PE - not easy, but makes for a much better looking model.
-
1/48 Monogram B-58 Hustler - SEA
Landlubber Mike replied to CANicoll's topic in LSM 1/48 Work in Progress
Wow, very cool subject Chris! Great start, this is going to be a sweet one! Vallejo is one of the paint lines that I really want to love, but sometimes their paints and primers are temperamental. On the one hand, I've primed using their Gloss Black and painted with their Metal line and really loved how things came out. On the other hand, I've had problems with paint lifting at times when taped. Some pros out there use Vallejo all the time and never have an issue. At the time being, I'm sticking with using Vallejo for interiors and other parts that don't need to be taped. -
Nice work! And congrats on all the life changes!
-
That storm was nice - cooled things off quite a bit! I'm about to try and get some more yard work done now that temps are more moderate. Did I mention I hate yard work?
-
Wow Rob, that engine and chassis look phenomenal! There are some Cobras on eBay at the moment that look mighty enticing given your pics....
-
Sikorsky JRS-1 with AM (Eduard) 1/72
Landlubber Mike replied to Landlubber Mike's topic in The Great Twins Broup Bluild
Thanks Chris! Really appreciate the kind words. I just made a big step yesterday in painting the wing yellow, which came out pretty well and juiced my mojo for finishing this. I ended up finding a 1/72 concrete display base on eBay a few weeks ago and painted that, so I'm getting closer to finishing. Now I just have to be strategic with some days I'll be out of town but I should be able to finish it. The landing gear is tricky, as the kit has it in five pieces (minus the wheels). I have four parts either done or close to done. The fifth is the trickiest in that it is in a Y shape and probably bears the biggest load. I'll probably have to scratch it completely using metal rod and tubing, which will be a first for me. Good to know that the Catalina also had that window. I don't think I took pictures, but I struggled for a while trying to figure out an approach for it. What I decided to do was: cut out a window in clear plastic, paint the underside of the window black, glue the window to the model (by adding glue to the painted side, I avoided glue smears had I instead painted the model black and then glued an unpainted clear plastic window to the model), cut down the Eduard PE window frame a bit to match the window's size (the kit section for the window looked perfectly sized, but the Eduard PE for some reason was considerably oversized), and built up the triangular section below the window with some plastic sheet so that it matched up with the window. Hopefully I'll end up with something that looks like a window in the end. Speaking of Catalinas, I was eyeing building mine next after getting inspired by yours. It would be nice to get rid of that big box in my closet. We'll see though, as I might join the upcoming Group Build depending on topic and whether I have a kit in the stash or not. -
Just glad that my girls' softball seasons are done. Too hot! I did yardwork earlier this week and needed a few days to recover. Hope you're staying cool!
-
Holy cow Chris!! That came out fantastic! Really great job! Love the name of the plane too!
-
Sikorsky JRS-1 with AM (Eduard) 1/72
Landlubber Mike replied to Landlubber Mike's topic in The Great Twins Broup Bluild
Thanks Kevin for looking in and giving me the push. The funny thing is that I typically have worked on models that weren't the easiest to build. I usually would get frustrated or stuck or otherwise lose mojo, but when I finally completed them, I always looked back and said to myself - "well that actually wasn't too bad." I think once I figure out the landing gear and tail wheel, it shouldn't be too much of a problem. I've got everything else pretty much put together, so it's a matter of slapping the parts together and getting paint on. -
Academy 1/48 B-25PBJ-1D--Finished
Landlubber Mike replied to KevinM's topic in The Great Twins Broup Bluild
Awesome choice Kevin! Looking forward to seeing it come along! You'll probably finish before I finish my JRS-1 🤪 -
Sikorsky JRS-1 with AM (Eduard) 1/72
Landlubber Mike replied to Landlubber Mike's topic in The Great Twins Broup Bluild
Thanks Peter! I might just go with the decals as you suggest. If I go the paint route, it's quite possible I don't get to the finish line. I saw Plasmo on Youtube cut out his own masks for the insignia (it didn't look too hard), but again, it will add time to the build. Part of the concern I had though was I saw someone that had used the decals and the yellow seemed to bleed through the white on the decal a bit. I could always paint a white disc underneath the decal, but if I do that, I might as well cut out masks for the star and the red center dot. Well, I better start working on the landing gear. What a pain! -
Sikorsky JRS-1 with AM (Eduard) 1/72
Landlubber Mike replied to Landlubber Mike's topic in The Great Twins Broup Bluild
Between fit issues, accuracy issues I can't unsee, and issues like the landing gear (see below), I keep losing the will to want to work on the kit. But with the extension of the group build, I feel like I should get this one completed. This kit wants to fight you the whole way, but I've managed to get the construction for the most part completed. The wing took a lot of work to add the various CMK resin parts and PE handles, etc., but it's looking ok I think. After looking at pictures, I decided to move the antennae. The kit has you add it dead center (and standing straight up) in the front between the two engines. It looks like the antennae was actually off center to the right and angled forward, so that took a bit of work. I did get the wing primed, and I'll start adding some pre-shading before painting the upper surface yellow. I'm debating whether to use the kit decals or just try to paint the US insignia on myself. Given the amount of work needed for the top surfaces of the wing, I'm going to take the approach of painting the top of the wing before installing it onto the fuselage. I ended up modifying the nose of the plane to better match what I think I see on pictures of the real thing. I added stringers to the lower section - these were apparently added to strengthen the front (bow?) after water landings caused damage on the earlier models. These were a bit more pronounced than the PE parts in one of the Eduard sets so I built them out of plastic rod. The kit and Eduard PE also seemed a bit off when it comes to where the stringers met at the nose - the yellow taped section seems to be a very small window. So, I replicated that section as best I could. Next up, I am going to tackle the landing gear. The kit parts are very thin plastic, and I worry that the heavier weight of the model with the CMK resin parts is going to cause problems. Plus, the landing gear in the kit is a bit oversimplified. So, I'm planning to use metal rods where I can, epoxied into the fuselage, to help give it a bit more strength. Also, the tail wheel is completely wrong, so I'm going to try scratching that as well. Thanks for looking in!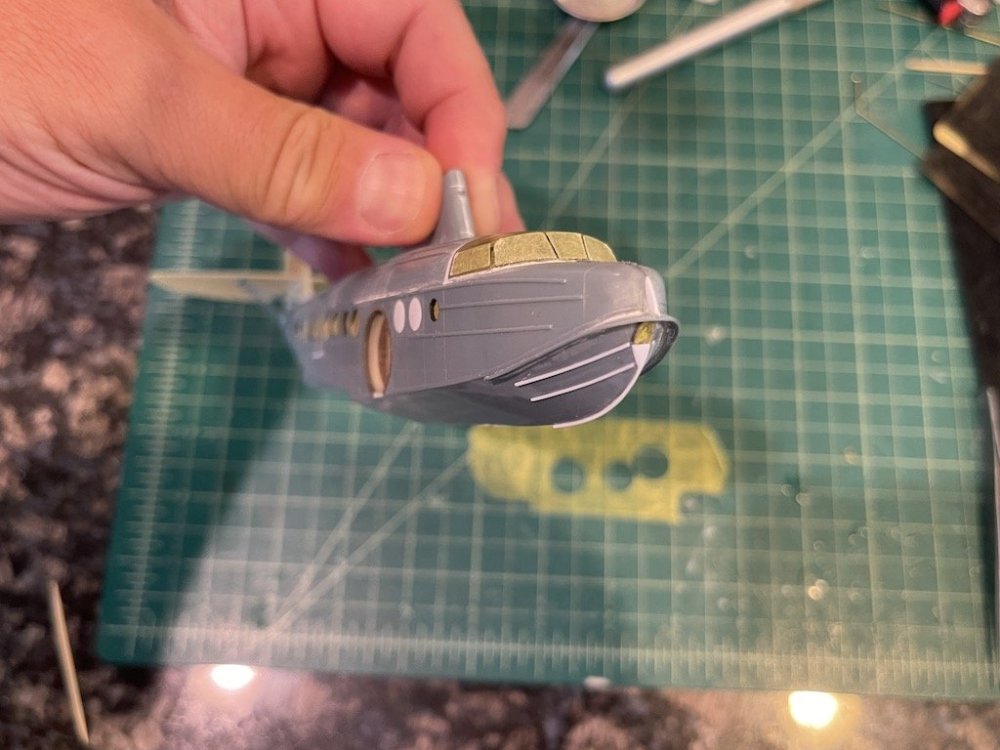

-
Peter, looking great as usual! Nice to have a cooperative kit! Interesting reading the discussion on IPA. I have been soaking parts in dish soap water, but the point about oily fingerprints while handling the model makes a lot of sense. I usually prime with Mr. Surfacer and have never had it lift off, but I might keep the IPA step in mind as part of my prep. I do wash my hands incessantly before touching the model to help keep oils, Cheetos-dust, etc. off the model.
-
Big Tank Crocker - Model Factory Hiro - 1/9
Landlubber Mike replied to DocRob's topic in LSM Armour Finished Work
Wow, what a superb build Rob. MFH should use your pics to sell more of their kits!! -
Wow, that's insanely good! How big will the diorama be?
-
Happy birthday Martin!
-
Wow, that looks great Peter!!
-
McLaren MP4/6 Ayrton Senna Fujimi 1/20
Landlubber Mike replied to DocRob's topic in LSM 1/35 and Larger Work In Progress
Looking great Rob. I feel your pain. I'm in the same state of mind with my Sikorsky JRS-1 build. -
One of my favorite subjects Peter!! Looking forward to this one!
-
Amazing work Rob! MFH really did a nice job with the assembly of those wheels, look so realistic.