Landlubber Mike
-
Posts
1,277 -
Joined
-
Last visited
Content Type
Profiles
Forums
Events
Gallery
Everything posted by Landlubber Mike
-
I have some leftover Vallejo gloss black and will use it on small things with an irregular surface like engines where I will also use Vallejo Metal Colors. Otherwise, I use Mr. Surfacer black and/or Mr. Surfacer Ueno Gloss black if I want to black base for larger flatter surfaces where surface finish is important.
-
Looking forward to following this one Chris! My daughter caught pneumonia back in September. Apparently a lot of kids and adults have been catching it this fall. Hope you feel better soon.
-
Welcome back Peter! Glad to hear the prognosis is good!
-
Happy belated birthday Peter!!
-
Another great one PW!
-
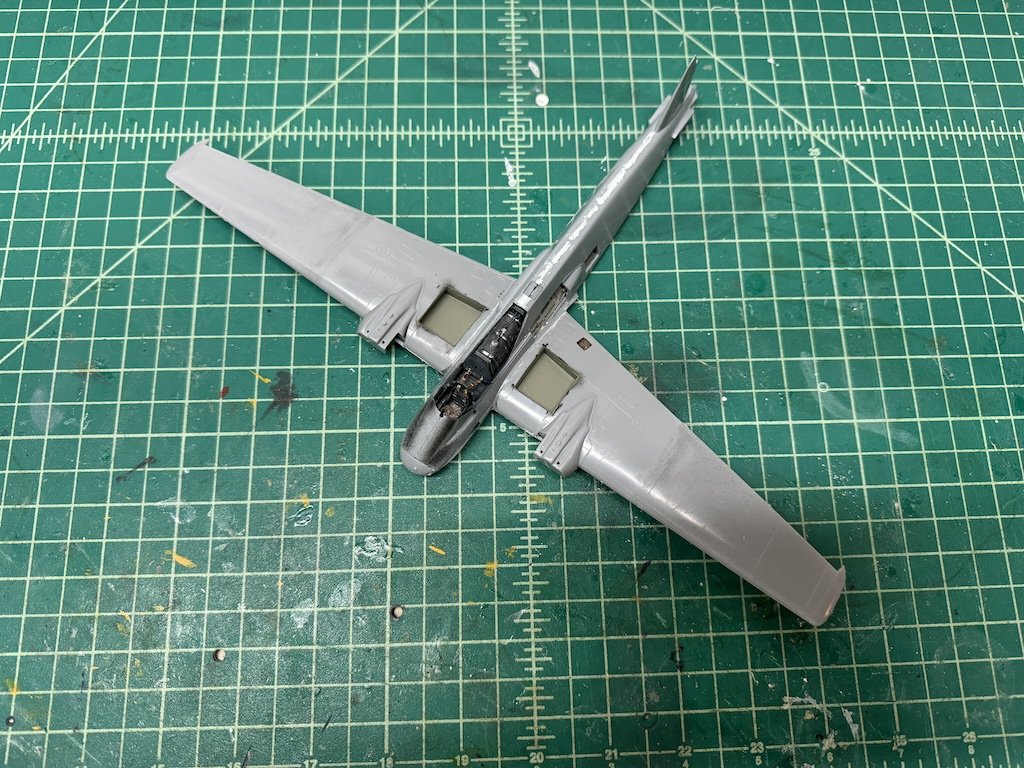
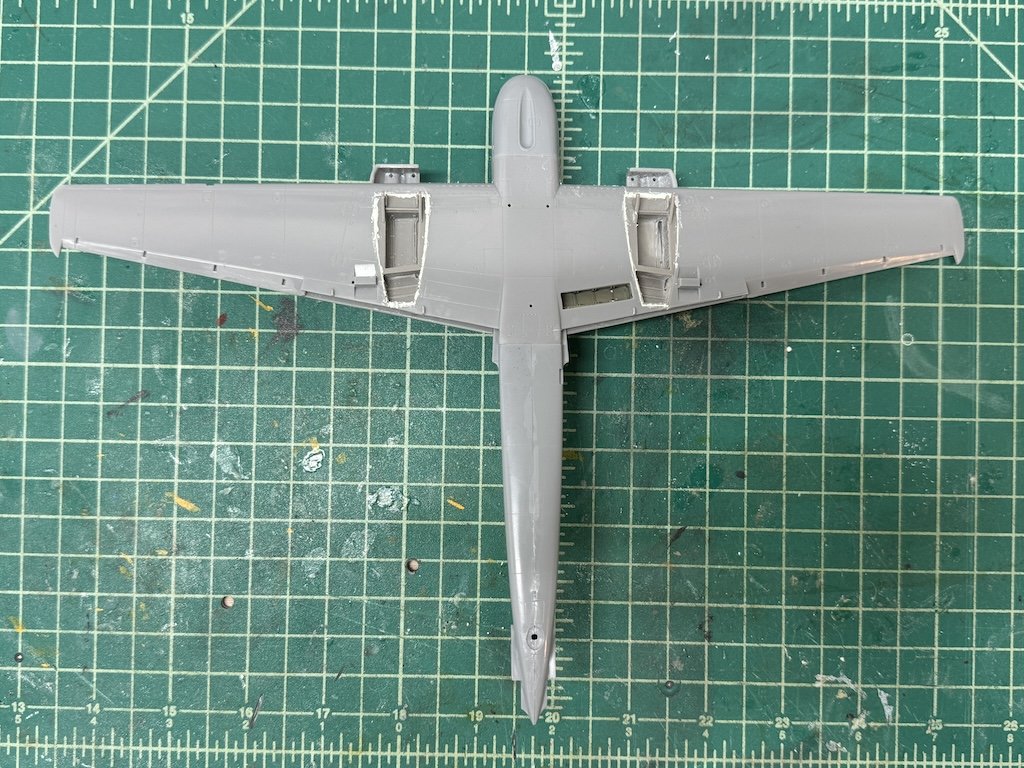
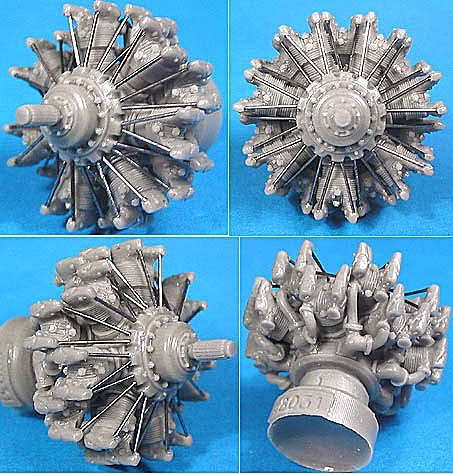
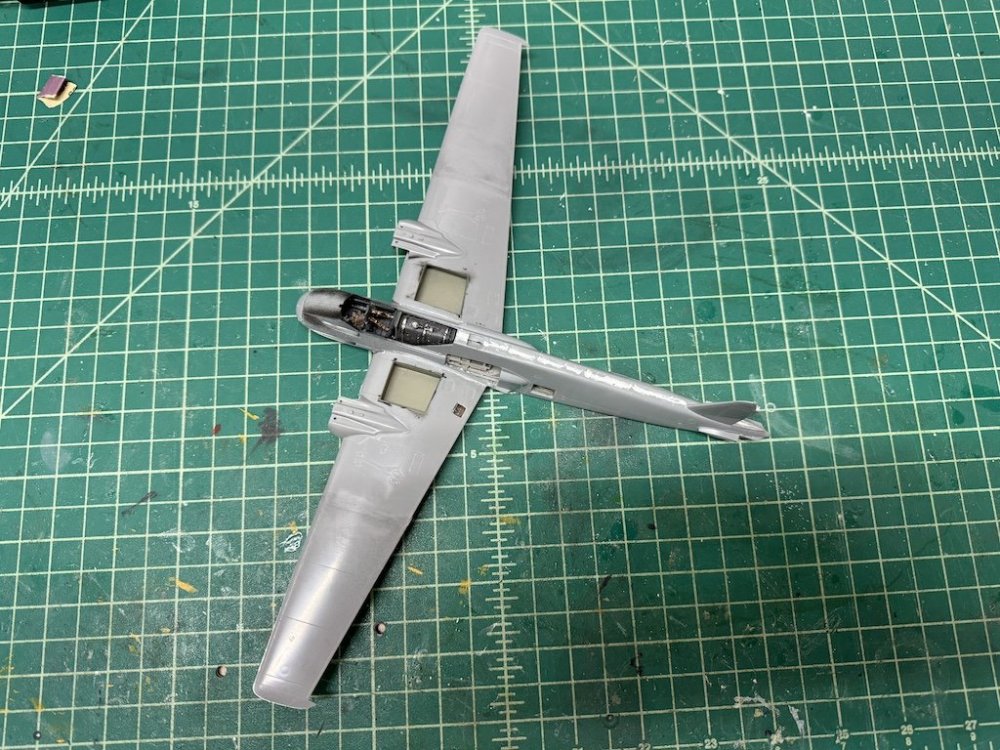
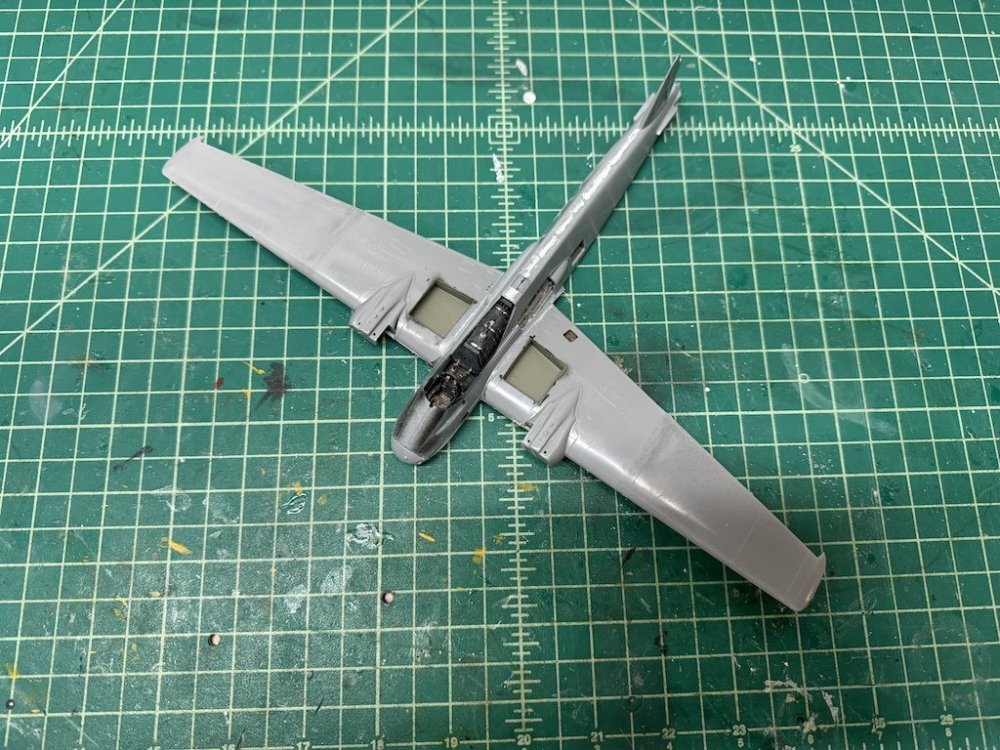
I feel like I've been steadily working on the models but have little to show for it. I did manage to add additional panel lines and rivet the two models. I need to touch things up in a few places with primer, but the rivets look pretty cool. We will see how much of them shows up after painting and weathering. Thanks again @Martinnfb for posting the panel line/rivet diagrams! I also managed to build up the two Vector engines, though still need to add control rods. I'll post pics when they are done, but they are looking very nice as per usual from Vector. I have a couple of Opel Blitz trucks that are resin - took me hours to separate and clean up the parts, and now I can finally start building them. I'm hoping they look ok when done, as I'd rather not have to go out and buy a Tamiya Opel Blitz kit. Other than that, I'm working on landing gear bays at the moment. There's really not too much more I need to do build wise on these, with the exception of the open engines and needing to figure out how to make the Vector engines work with the Verlinden set and the Hasegawa kit. Thanks for looking in!
-
I agree with FullArmor - really nicely done with a great use of negative space to avoid overcrowding. Your dioramas are a big inspiration to me as I start trying to model more diorama scenes!
-
Special Hobby 1/32 -Tempest Mk.VI -Egypt 1949-Finnished
Landlubber Mike replied to KevinM's topic in The Sandbox Group Build.
Wow Kevin, that came out great! I like the finish on it! -
Peter, glad to hear you and your wife are doing well. Best wishes to you both and to your brother!
-
Looking really nice!
-
Special Hobby 1/32 -Tempest Mk.VI -Egypt 1949-Finnished
Landlubber Mike replied to KevinM's topic in The Sandbox Group Build.
Losing pieces is the worst! Hope you end up finding it/them. I've spent many long hours looking for pieces I've pinged off the tweezers myself. I've considered building a four-sided box to surround my work area when using PE. That would help with limiting the trajectory of pieces flying around the house. I've found pieces in the weirdest places - often times, a lot further than one would think they would have bounced. -
Wow Hubert, really nicely done! The interior looks incredible, fantastic work! Also love the camel - I bought a set from CMK and might use one in my Sandbox dioramas.
-
Great job PW! Love this plane and your NMF. Did you use Mr. Color Super Metallic on this one? I used them for the first time on my JRS-1 and really liked the paint.
-
Ugh, sorry Kevin. Thank you for warning the rest of us. Along with them, add Kitlinx to the list. They stiffed me on an order of Taurus engines and despite multiple emails to them, including to the owner Loic himself, everything went unanswered.
-
Thanks Peter! I put a coat of Mr. Surfacer on this evening. Have a few spots to clean up, but hopefully can start the riveting later this week. The Aires MG fit really well. The CMK stuff mostly fit perfectly, though the cockpit tub needed to be thinned down quite a bit. The other CMK sets individually fit really nicely, it was just trying to fit them all together with the CMK undercarriage set that gave me some issues. Definitely a pain when you realize you need to put in time to make their sets fit, but as you say, when you do, their sets look good.
-
Thanks Martin, really appreciate it! Thanks Peter! I didn't catch whether people riveted into just the primer or into the primed plastic. I have some of the Rosie Riveter tools, so I think I'll just take a stab at it and see what happens. Since I usually use Mr. Surfacer, which has some filling properties, I figure I should prime before adding the rivets. If I make them too deep, at least I know I'll have a few layers of paint (the typical German greys followed by the mopped on sand color), and of course a few laters of clear in between. I'm almost wondering how much of the rivets will be visible at all, particularly if I make the models look dusty/sandy at the end. So, given all that, I think these are probably good subjects to experiment on versus starting with a model with a clean paint job. And yes, the Vector engine looks great! And yes, it would have been nice if they included the engine backs but it is what it is - the Verlinden set gives me what I will need I think. I was sold on Vector engines after putting one together for my Walrus build (which reminds me, I need to get that one completed - maybe a good post-Sandbox project).
-
Special Hobby 1/32 -Tempest Mk.VI -Egypt 1949-Finnished
Landlubber Mike replied to KevinM's topic in The Sandbox Group Build.
Looks really great Kevin! The rivets looks nicely done with the NMF finish - great job! -
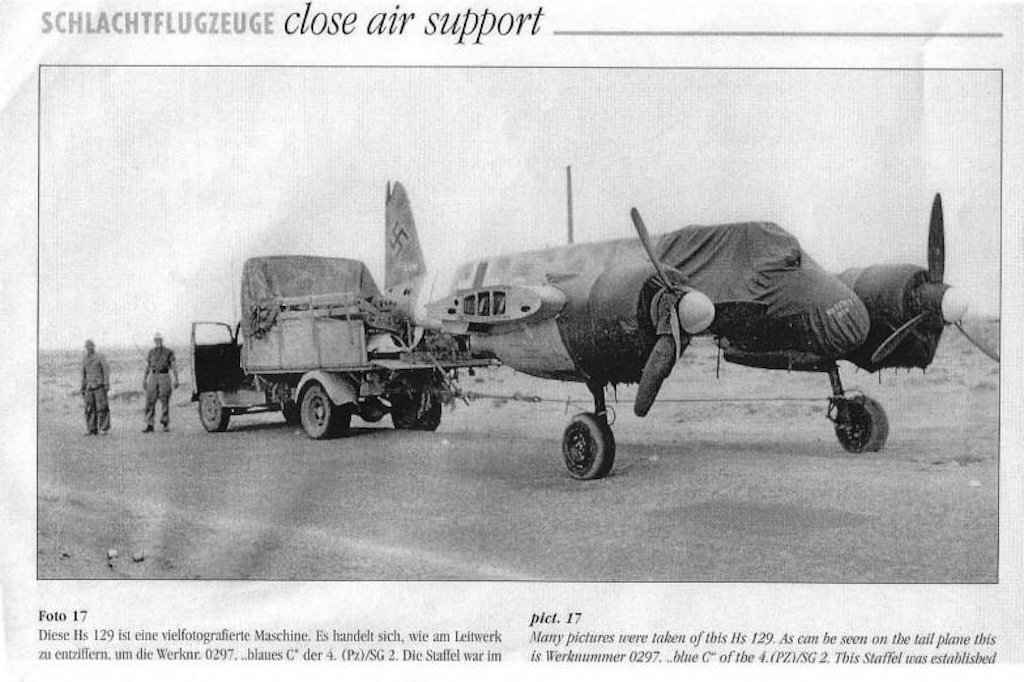
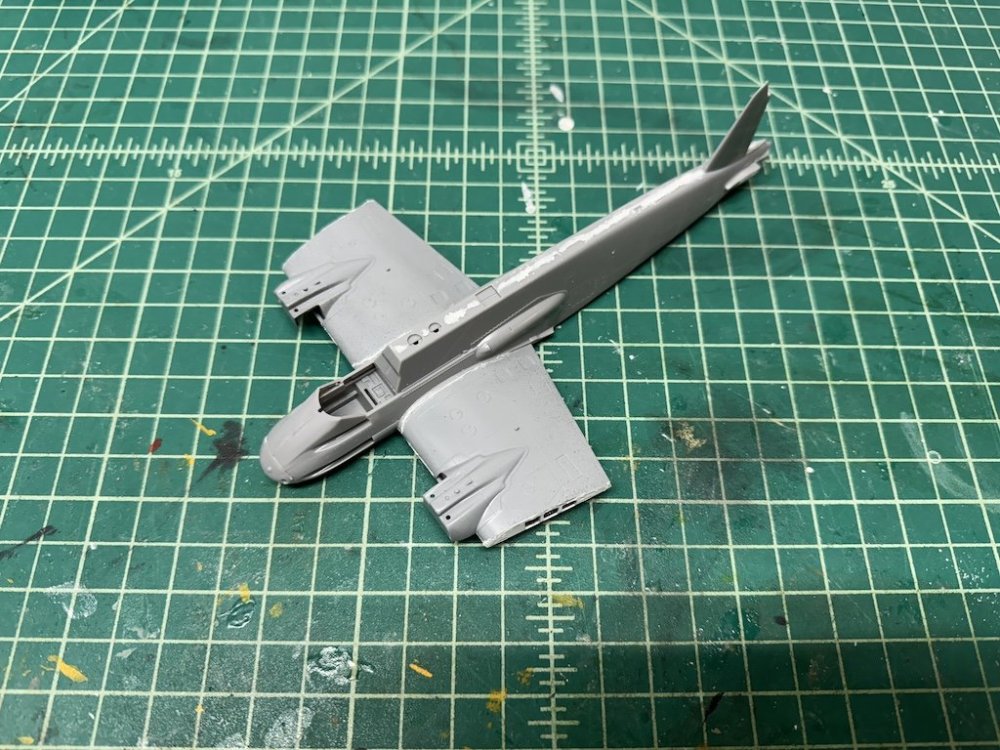
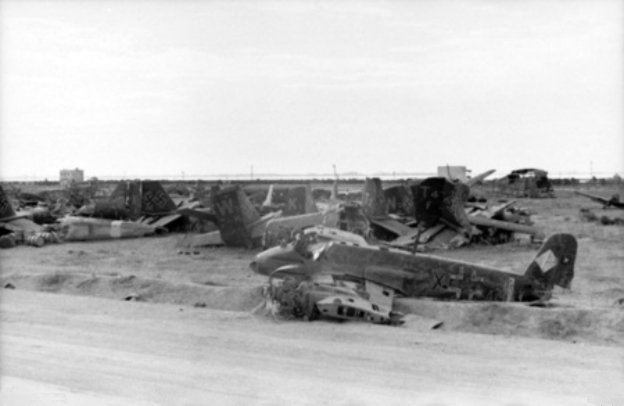
Thanks Peter! Really appreciate the kind words. I let the putty cure 24+ hours and sanded off the excess yesterday evening, and it looks pretty good. I think the next thing I'm going to tackle is adding rivets. Martin's diagrams are very helpful in this regard. I've replaced rivets before on one of my early models, but have never riveted a full model before so I figure I might as well try it out - especially since the lines on the Hs 129 are fairly straight. I have the clipped wing end pieces to practice on too. What I'm thinking of doing is priming the fuselage and wings first, before adding the landing gear encasements, engine nacelles, and other detail pieces to make the riveting easier. Then I can add those things, and spot prime those areas separately. I did some looking online, and it seems that the general consensus is to rivet after priming but before painting. So, I think priming and riveting at this stage probably makes the most sense. The remainder of the builds should be fairly straight forward, but I'd like to show the opened up model with a fully exposed engine. The Hs 129 used a Gnome-Rhone 14M 04/05 engine that ended up being underpowered for the aircraft given its weight from all the armor plating. The Verlinden set has the parts to build one engine exposed - it includes a full engine, including rear part, and the exhaust ring that circles the back half of the engine and then has two exhaust pipes coming out through the top of the nacelles. The perfectionist in me then had me thinking that the open engine would look nothing like the closed engine, so I bought a CMK engine that seems fairly close to what the Verlinden engine will look like. Then I found that Vector makes a very nice Gnome-Rhone 14M engine, so I've been building up two of these: The Vector set doesn't include the engine backs, so what I probably will do is frankenstein the open Vector engine with some of the Verlinden parts. The tricky part there will be to somehow mount the engine so that it is sitting the correct distance from the wing and be parallel with the other engine. Fingers crossed that I can figure that out. The nice thing about the towed Hs 129 is that the engines were tarped, so I'm not too worried about the engine detail and will just build them OOB. Thanks for looking in!
-
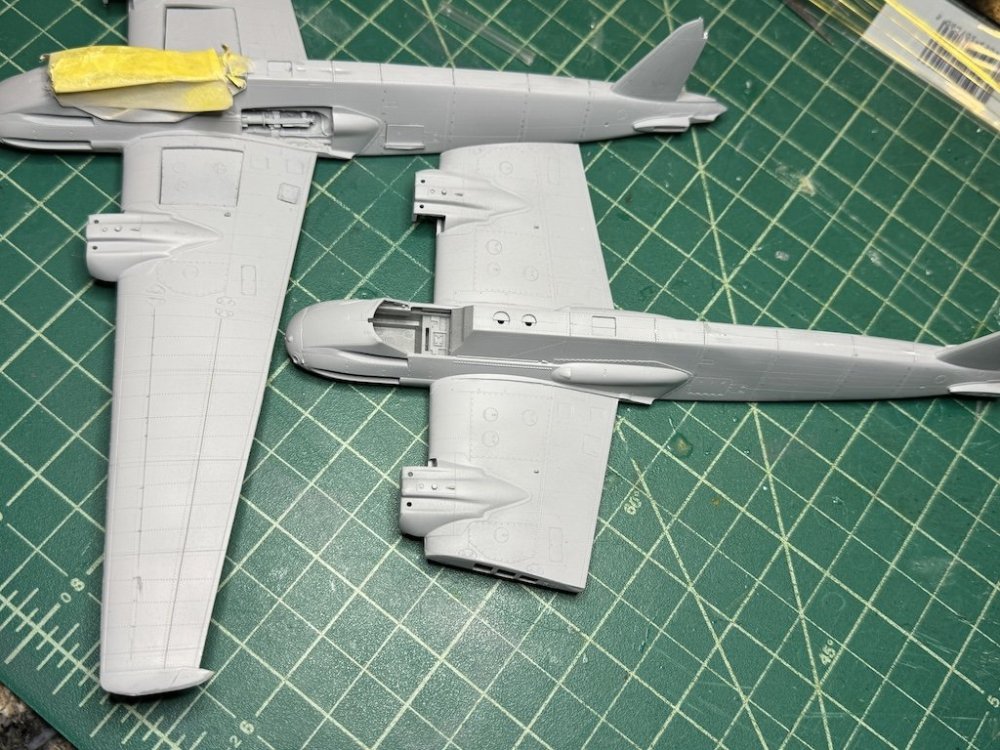
Thanks Kevin! And yes, both are from the Hasegawa 1/48 boxings of the Hs 129. The opened one is actually a Hobby 2000 repop of it. A very well designed kit where everything fits together nicely. The part count is reasonable, so you probably could build one OOB in about a week or two. I'm just torturing myself with the CMK and Aires aftermarket sets and cutting up the second for the diorama. I'm actually thinking I could finish both of these by Thanksgiving, if not pretty close to finishing by the end of the month - which would be a record for me!
-
AK REAL COLORS MARKERS ....are they cheating or smart ?
Landlubber Mike replied to PanzerWomble's topic in Hints & Tips
Looks like a very good product to me. Whatever it takes to get the job done is what I say. Not sure there is any need to be a "purist" when building models. -
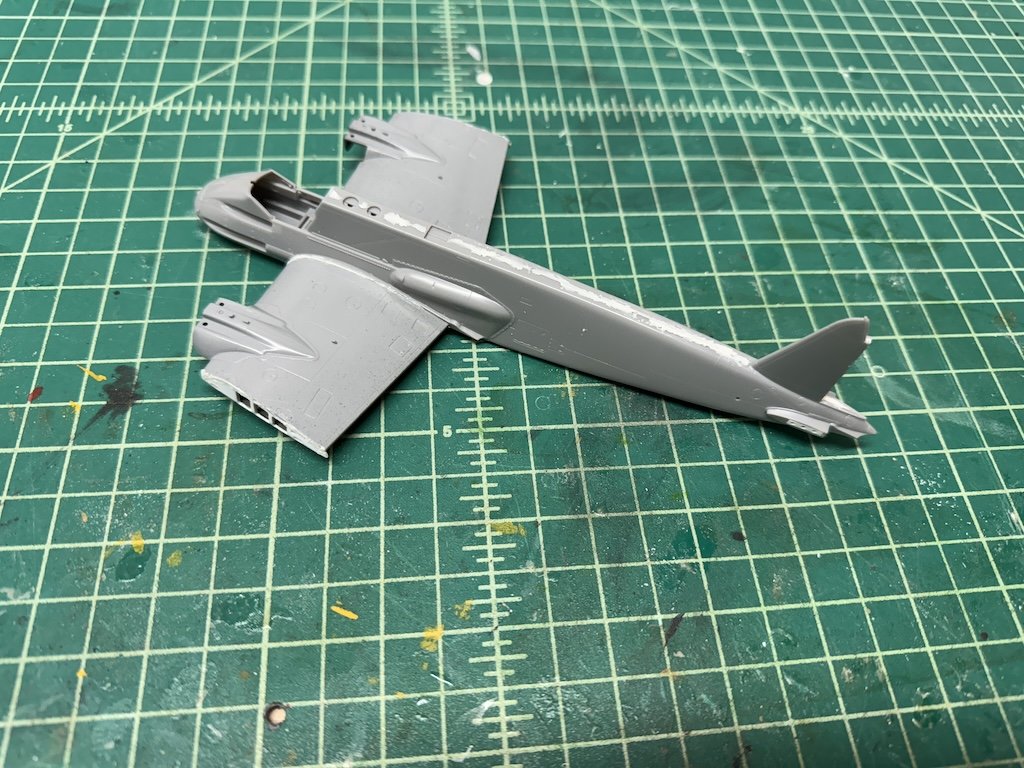
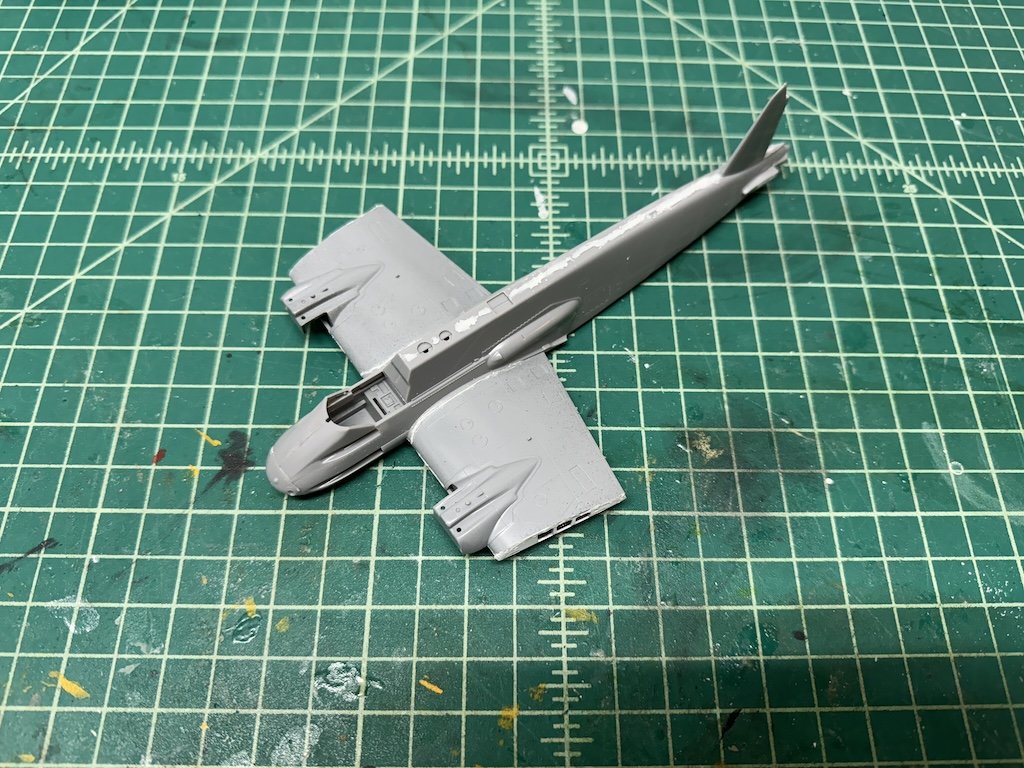
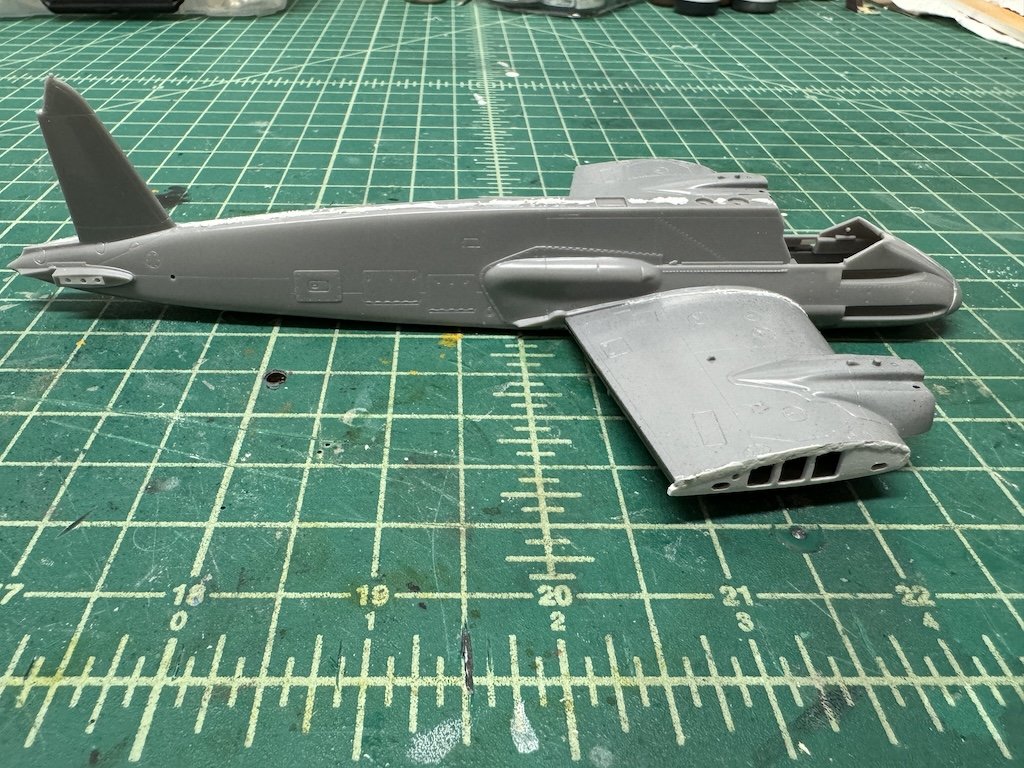
Quick update - I've spent quite a bit of time this week working on the wings for the two 129s. The first one (opened up) was a bit tricky in trying to get the CMK undercarriage set to fit, along with the open panel for the first aid kit in the upper left wing and magazine in the lower left wing from the armament set. I found the undercarriage set not only needed a lot of shaving back along the sides to get the various aftermarket pieces to fit, but I also needed to thin them as they seemed to be a bit too tall and were bulging the wings a bit too much. Given that the undercarriage won't really be seen, if I had to do it again, I wouldn't bother buying/adding that set (which I didn't for the second 129). After a lot of grinding and test fitting, everything looks pretty good. Very minimal filler needed along the wing roots and nose pieces. This kit really fits together like a glove! A nice change of pace from my last few models that required a lot of work to get the fuselage, etc. to fit and close up big gaps. Next I worked on the wings for the second 129 (towed diorama). I removed half the wings as per the pictures. The trickiest part was creating the inserts at the ends of the wing stubs, but I think I managed to get a close representation of what those wing ends look like. Like the first 129, the fit of the wings and nose pieces to the fuselage was amazing and required minimal filler. I figured I'd putty some of the seam lines at this point as well as the hollowed out tails to which I'll attach the aftermarket rudders. While the putty cures (I used Tamiya's 2-part epoxy putty which I really like), I can start working on the engines and nacelles. Thanks for looking in!


-
Eduard Bf 109F-4 Yellow 7 Ellen RFI
Landlubber Mike replied to CANicoll's topic in The Sandbox Ready for Inspection.
That's a real beauty Chris, well done! Camo came out amazing, and love the sandy look. Amazing job! -
Wow, that was quick! Really nice build! Love the color scheme you chose.
-
Really amazing job on that mech armor Rob. I remember you posting it a while back. Along the lines of the discussion above, I've also found dabbling in different modeling areas to really help broaden skills. I hadn't built any models since I was a kid, but maybe a decade or so ago I got into wooden ship models. Since Covid, I've gone into plastic modeling, and I think I've learned a bunch of skills that will definitely carry over on the wooden model side. It's interesting in how even on the plastic side, there are different techniques whether you are modeling ships, planes or cars. I also recently decided to try painting fantasy miniatures, which I did for a couple of years as a kid. I figured it would help me with figure painting for my plane dioramas. Going online to watch various artists, my eyes were really opened to various techniques - zenithal highlighting, glazing, etc. The one thing that really stood out was using very very thin layers of paint to build up to complicated hues like skin color. I've been trying to incorporate those concepts in things like tonal modulation for large sections of uniform colors on planes and ships. Anyway, great discussion and really nice job as always Rob. I always learn a lot from your techniques across disciplines, so thanks for taking the time to share with us.