Landlubber Mike
-
Posts
1,277 -
Joined
-
Last visited
Content Type
Profiles
Forums
Events
Gallery
Everything posted by Landlubber Mike
-
Spectacular build Peter, wow!! Amazing work my friend, truly amazing.
-
That's great news Peter! Glad it turned out that way. Do we get a picture of you in a nurse's cap?
-
Wow, I agree - absolutely beautiful, really great job!
-
AEG G.IV - Creature of the Night - WNW 1/32
Landlubber Mike replied to DocRob's topic in The Great Twins Broup Bluild
Those engines look amazing, especially with the AM exhausts. Great job! -
Sikorsky JRS-1 with AM (Eduard) 1/72
Landlubber Mike replied to Landlubber Mike's topic in The Great Twins Broup Bluild
Thanks Jeff! Appreciate the kind words! -
Wow Carl, that came out great! Your paint work is fantastic, really well done!
-
Wow Peter, those decals really give life to the model. Nice job!
-
So sorry to hear this Peter. Best wishes to Diane for a speedy recovery!
-
AEG G.IV - Creature of the Night - WNW 1/32
Landlubber Mike replied to DocRob's topic in The Great Twins Broup Bluild
Wow Rob, this is looking spectacular! And you're moving really quickly through the build. You'll be done soon at this rate, minus the four miles of rigging this one takes -
Revell Razor Crest - Finished
Landlubber Mike replied to denders's topic in The Great Twins Broup Bluild
Nice job! That last picture in particular is very impressive - love your color modulation and weathering! -
What a cool model! Love the LED effect, great job!
-
Sikorsky JRS-1 with AM (Eduard) 1/72
Landlubber Mike replied to Landlubber Mike's topic in The Great Twins Broup Bluild
Thanks Rob. I've thought about adding brass rod for the struts. I didn't do it on the tail as the connections are very thin plastic, and I had used two brass rods per horizontal stabilizer to connect them to the fuselage so they are pretty secure and I didn't need any additional support. I doubt that the struts for the tail have any holding power anyway. Same thing with the wing struts, though the connection points are a tad bit thicker. The wing looks to be 100% supported by that center column, and I don't believe the struts provide any holding power on the model. I've thought about using thin brass rod to help locate the connection points so that the struts are symmetrically positioned though. Unfortunately, it looks like you need to add the wing first, then determine how and where to add the struts. I'm not too bothered by it, but it would have been nicer to have tabs and the like. -
Wow super cool!
-
Sikorsky JRS-1 with AM (Eduard) 1/72
Landlubber Mike replied to Landlubber Mike's topic in The Great Twins Broup Bluild
In case anyone is interested, I found this short video on the JRS-1 subject I'm building and how it went looking for the Japanese fleet after the attack on Pearl Harbor. Amazing bravery for these guys - the JRS itself did not carry any armaments - the only weapons carried were rifles that Marine and Army volunteers planned to shoot out the back windows if they had to 🇺🇸 -
Sikorsky JRS-1 with AM (Eduard) 1/72
Landlubber Mike replied to Landlubber Mike's topic in The Great Twins Broup Bluild
Haha, thanks Kevin! The crazy thing is that you can't see anything inside the main cabin, maybe just a slight silhouette of the chairs through the windows (which are only 5.5mm in diameter if I remember correctly). I probably spent way more time on the cabin than I should have, but wasn't planning to open it up. -
Sikorsky JRS-1 with AM (Eduard) 1/72
Landlubber Mike replied to Landlubber Mike's topic in The Great Twins Broup Bluild
The original kit from this series is from Sword, which seems to have put the kit out back in 2003. Maybe the lack of attachment points was more common back then than now. The Eduard kit just adds some resin and PE parts to the original molds I believe, along with other marking options. I've seen a few other logs out there, and it looks like most people painted the wing and the fuselage separately, then added the wing with the struts after. In doing so, you can see some gaps in the builds between the connection points. Hard to add filler after you have already painted the parts, which is what I'm thinking would be better to avoid. Maybe this will give you inspiration to return to the Songbird! -
Sikorsky JRS-1 with AM (Eduard) 1/72
Landlubber Mike replied to Landlubber Mike's topic in The Great Twins Broup Bluild
Thanks Ernie, really appreciate the kind words. The kit seems to be pretty accurate when it comes to the real thing, it's just the fit and lack of proper connection points that make this a little tricky. Thankfully there are different options out there for adhesives, fillers, etc. I think i said this earlier, but part of what is making this a little trickier is adding the CMK set. The set is great, though some of the parts could be a little better, but unfortunately CMK is no longer making it - I was very fortunate to find one randomly come up on eBay a few months ago. -
Sikorsky JRS-1 with AM (Eduard) 1/72
Landlubber Mike replied to Landlubber Mike's topic in The Great Twins Broup Bluild
Hi Peter, sorry for the delayed reply. Have been flying solo this weekend with the kids and all their activities, so I haven't been online much. The cowlings thankfully are fine with respect to the engine fairings on the wings. Like almost everything else on this kit, there are no tight fitting connections. There's just a slightly indented edge to the wing nacelles where you locate the engines/cowlings. I only had to add what amounted to less than 2mm of spacers on the cowlings, so we aren't talking much of a diameter increase. The nacelles are hollow though, so I might need to come up with a solution to make sure that the engines are centered though now that I think about it. I agree with you that it's better to glue as much as you can prior to painting, rather than paint first and assemble later. Here I might be able to get away with painting the upper section of the wing before attaching it. I'm a little worried that with all the taping for the chevrons and other non-yellow sections, I could possibly break off the wing from its struts if I assemble it prior. The struts don't even have a locating tab or anything! I assume that practically all of the weight of the wing is borne by the center column coming off the top of the fuselage. For that center column, there was only one tab that fits into a hole into the fuselage, and that tab/hole fit is not very secure. I ended up stuffing the hole with 2-part epoxy putty to help grab the tab, and then used two-part epoxy glue to adhere the flat section to the fuselage (that connection otherwise wasn't very secure either, as the rounding of the bottom of the column didn't really match the rounding of the top of the fuselage). Anyway, the epoxy should hopefully make for a pretty strong bond. I haven't quite reached your point with the Songbird, but all of the test fitting, filling, sanding, etc. has been a bit of a slog and I've been quickly losing interest. But, I think I'm at the tail end of the construction part minus attaching the wing, so it will be nice to move onto painting and wrapping this one up. Thanks again for looking in my friend! -
Sikorsky JRS-1 with AM (Eduard) 1/72
Landlubber Mike replied to Landlubber Mike's topic in The Great Twins Broup Bluild
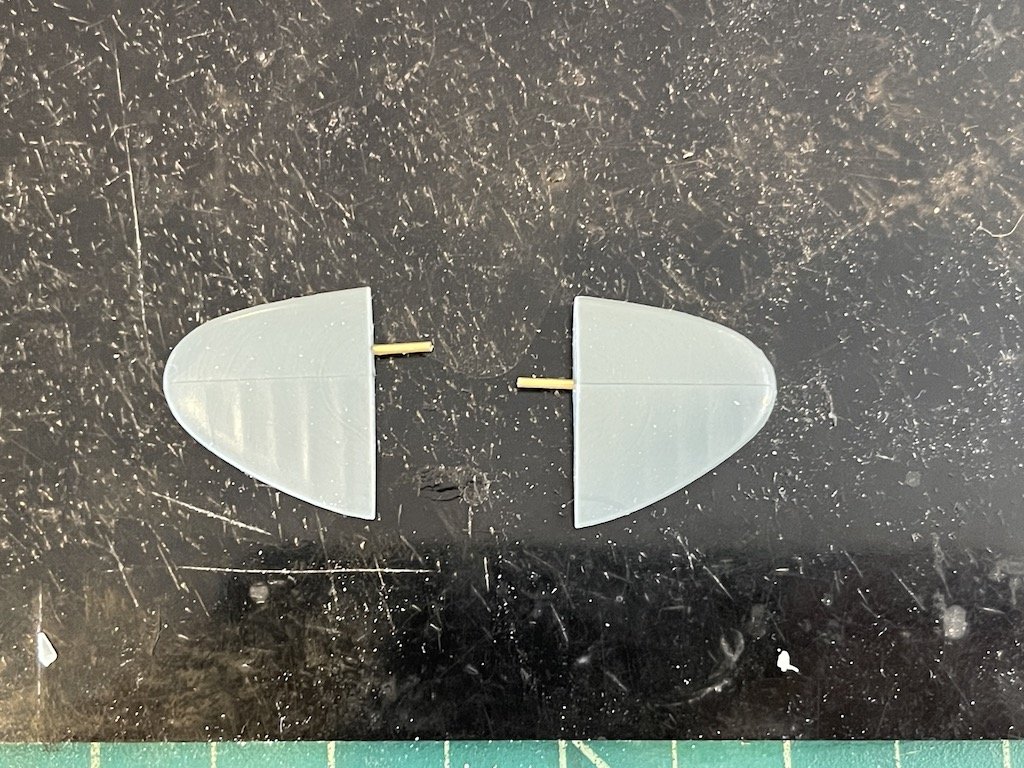
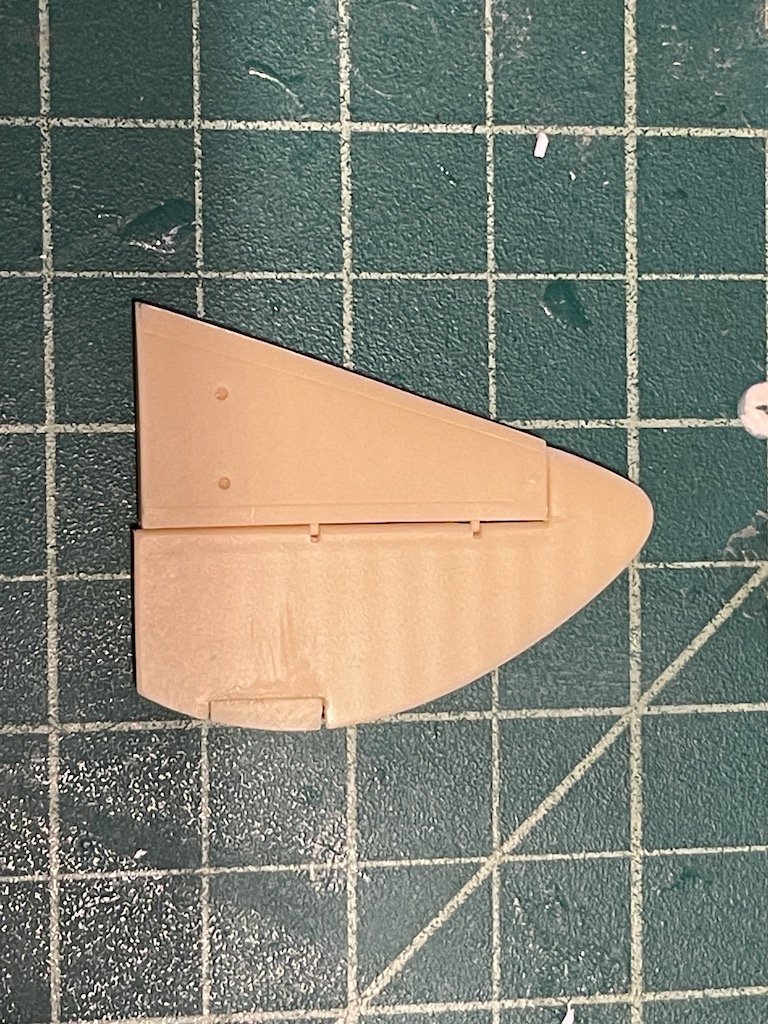
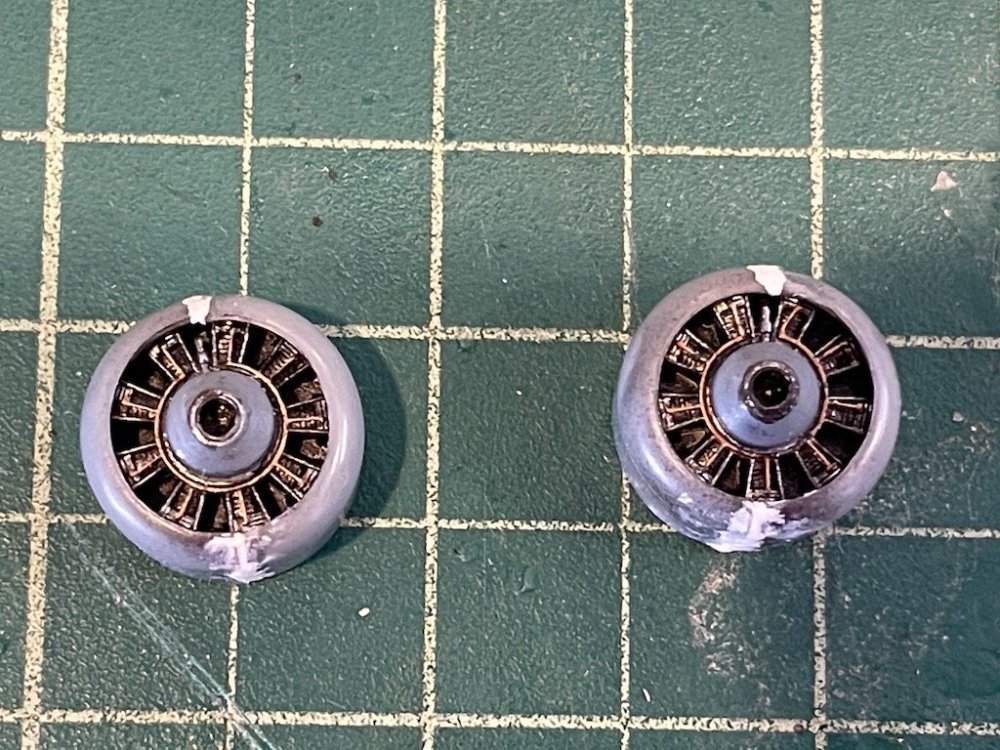
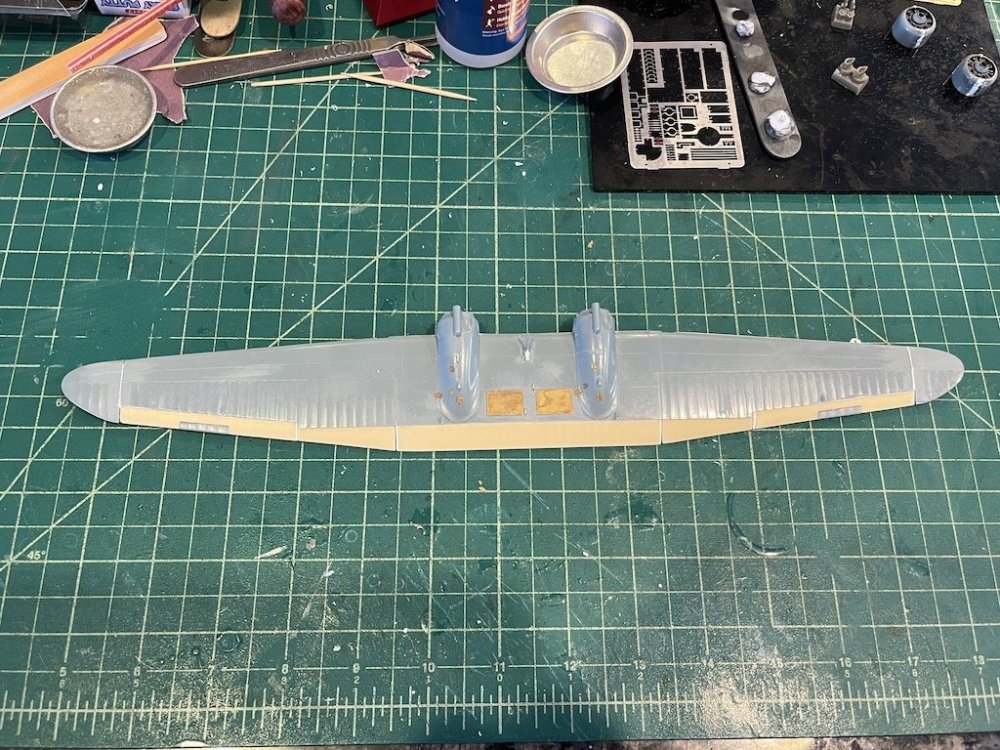
I've been making slow but steady progress on this kit. Part of the slow crawl is my fault in using the very nice CMK aftermarket set. But the main reason is that there are a lot of fit issues and other things like lack of connection points for important parts like the struts holding up the tail section and the main wing. For some examples: - Main wing tips are separate parts (in halves) that you have to glue together and then do some cleanup. I ended up adding brass rod to help secure them: - Engine cowlings are too small, so I added thin plastic strip between the halves to fit the engines. Figured that was much easier than filing down the engines: - CMK tail isn't quite right, needing extra plastic on the fixed part of the tail: At the moment, I'm mostly done with the wing. The CMK set is nice in that it gives you the control surfaces, but still quite a bit of work to add them. I have a few bits of PE to add along with the exhausts, and then of course the pontoons: The body is close to being done as well. I have a few more pieces of PE to add, along with the cockpit and landing gear and some other odds and ends that I'm waiting to add as they are fragile and will likely bust off. But, I think so far it's looking pretty good: I'm still debating how to go about staging the painting sessions. I might end up painting the wing separately, then adding it to the body and painting the body once the wing is installed. Because the wing struts don't have attachment points, I'm a bit worried about glue getting where it shouldn't be. Still a bit to go before I get to that stage so I can think on it a little more. Thanks for looking in!


-
AEG G.IV - Creature of the Night - WNW 1/32
Landlubber Mike replied to DocRob's topic in The Great Twins Broup Bluild
Superb work Rob - really amazing work! The decaling came out fantastic! I always thought the Wingnut lozenge decals looked a bit bright to me, but it's clear they look fantastic on the model. Good to know, as I was a bit worried about pricing out buying Aviattic decals on some of these Wingnut kits. A while back, a bought a Roden 1/72 Staaken kit on one of the FB sites for close to nothing. Ended up spending quite a bit on a set of Aviattic night lozenge sheets, but I needed replacements as the kit ones were a bit messed up. It would probably cost a fortune to cover a 1/32 bird like yours. -
Revell He 111 P - FINISHED!!
Landlubber Mike replied to ScottsGT's topic in The Great Twins Broup Bluild
Looks really good Scott! That's a big model, wow! I have a 1/72 Hasegawa He 111 kit in the stash and it's a decent size. The 1/32 version is a bit bigger! -
Looks great Peter! On the home stretch!
-
By Your Command...Finished!
Landlubber Mike replied to BlrwestSiR's topic in The Great Twins Broup Bluild
Came out great!! Nice job! -
Revell Razor Crest - Finished
Landlubber Mike replied to denders's topic in The Great Twins Broup Bluild
Looks great Dave! Do you guys have a good source in the US for Flory washes? I tried buying them from Hannants and was unable to. -
Oh wow, thank you very much! Really appreciate it!