Landlubber Mike
-
Posts
1,277 -
Joined
-
Last visited
Content Type
Profiles
Forums
Events
Gallery
Everything posted by Landlubber Mike
-
Brabham BT45 - Model Factory Hiro - 1/12
Landlubber Mike replied to DocRob's topic in LSM 1/35 and Larger Work In Progress
Hope everything is cooperating on the fit - a really cool subject to model. -
Nice to see you back. Welcome to the Commonwealth! I'm in Northern VA, but Richmond is a really nice area.
-
I have a similar tool from The Small Shop (I think recently closed up shop) that I use a lot on 1/350 and 1/700 ship models. Really helps to get curves in PE. I haven't annealed my PE parts before, but will try it especially with thicker brass (I think 1/700 brass is probably too thin). Rob is right about the springiness of non-annealed PE. To deal with it, I usually roll to a thinner diameter to account for the spring. Good to know that annealing takes away the spring.
-
Brabham BT45 - Model Factory Hiro - 1/12
Landlubber Mike replied to DocRob's topic in LSM 1/35 and Larger Work In Progress
Looks great Rob. I wouldn't have thought you could get that kind of result from polishing white metal. Very interesting. -
Brabham BT45 - Model Factory Hiro - 1/12
Landlubber Mike replied to DocRob's topic in LSM 1/35 and Larger Work In Progress
Happy birthday Rob! And that engine looks spectacular, really well done! -
It looks pretty good. Someone said something about the wings and tail being a nightmare to fit though 🫣
-
I have the I Love Kit Duck in the stash, but that Lukgraph kit looks amazing - I'm jealous!
-
Glad to have you back Ernie!
-
Really beautiful pens Chris! Love the woods you used - your perfect CA finish really brings the wood to life!
-
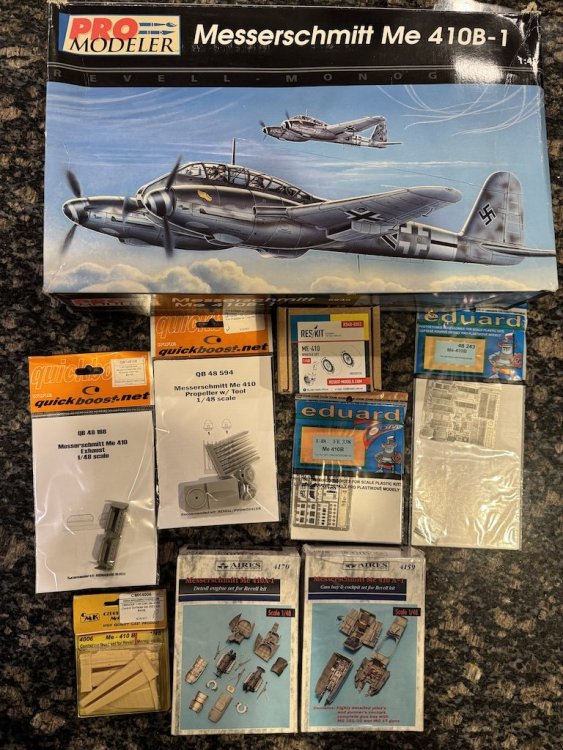
Martin and Kevin, let me know if you guys want any aftermarket. I think between the Aires and CMK sets, I have some cockpit and undercarriage duplicates. Happy to send them to you for free. By the way, looking at the kit parts, they are quite nice! Lots of good definition on the control surfaces, and nice details. Probably don't need much AM but my kits came with them so I'll likely build them (plus, I seem to enjoy hacking up my kits for the enjoyment of making the AM fit). The one exception might be the canopy - apparently from notes I have, that might be a weakness in the kit.
-
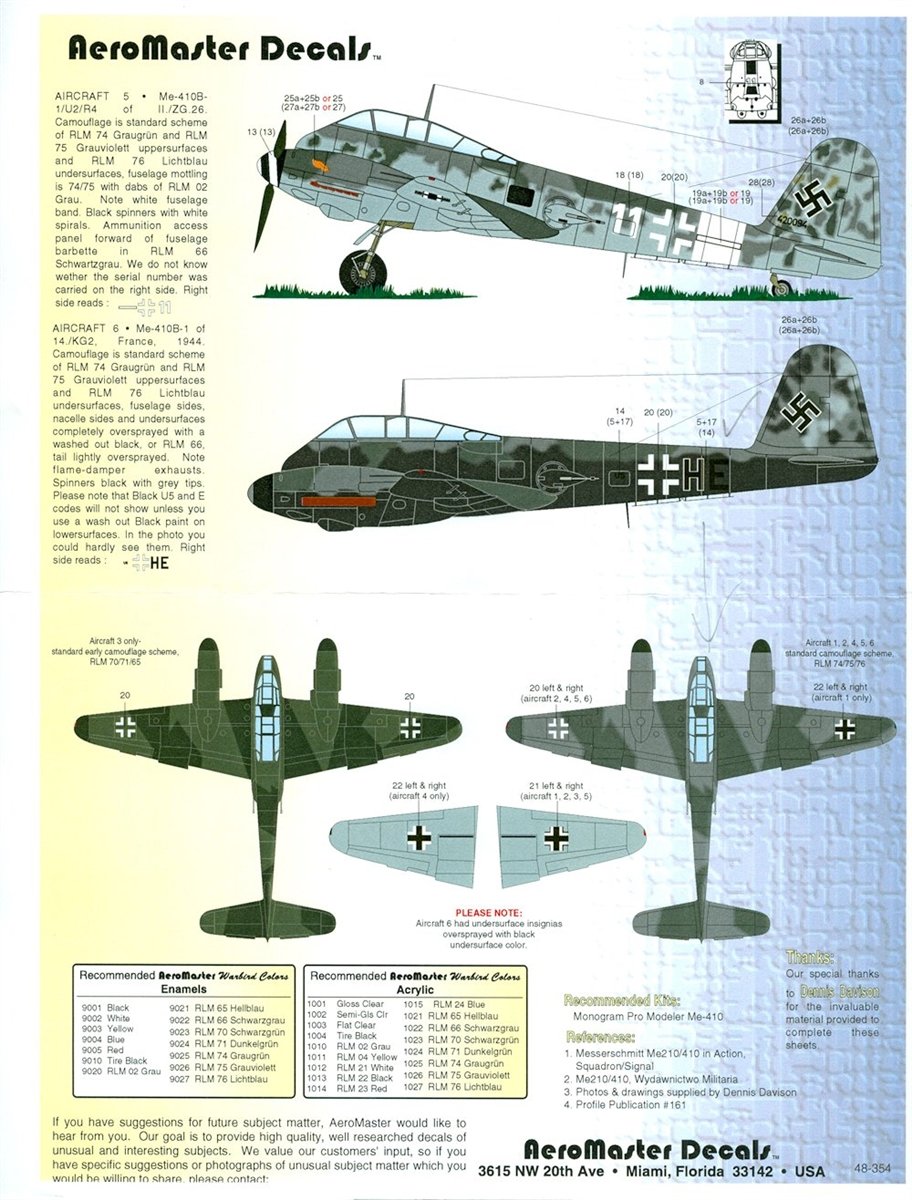
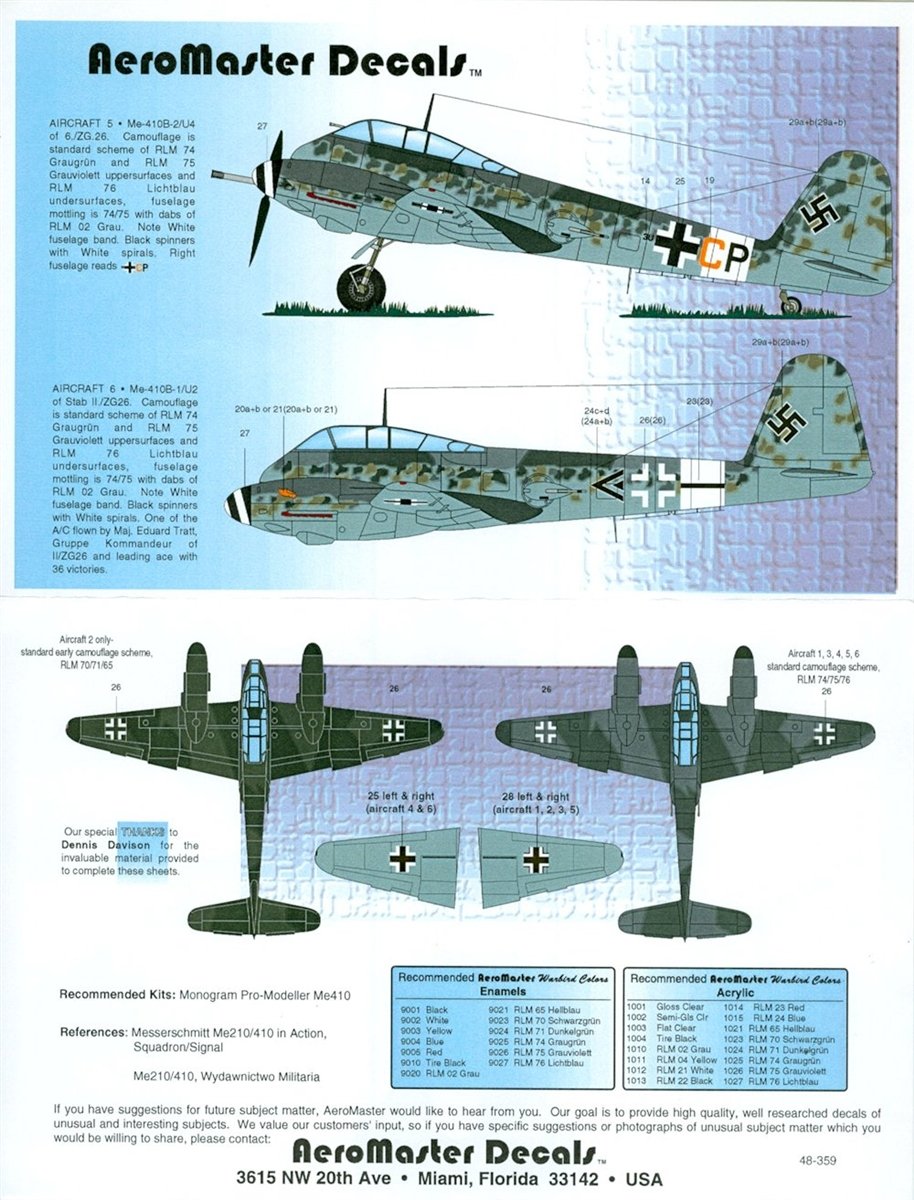
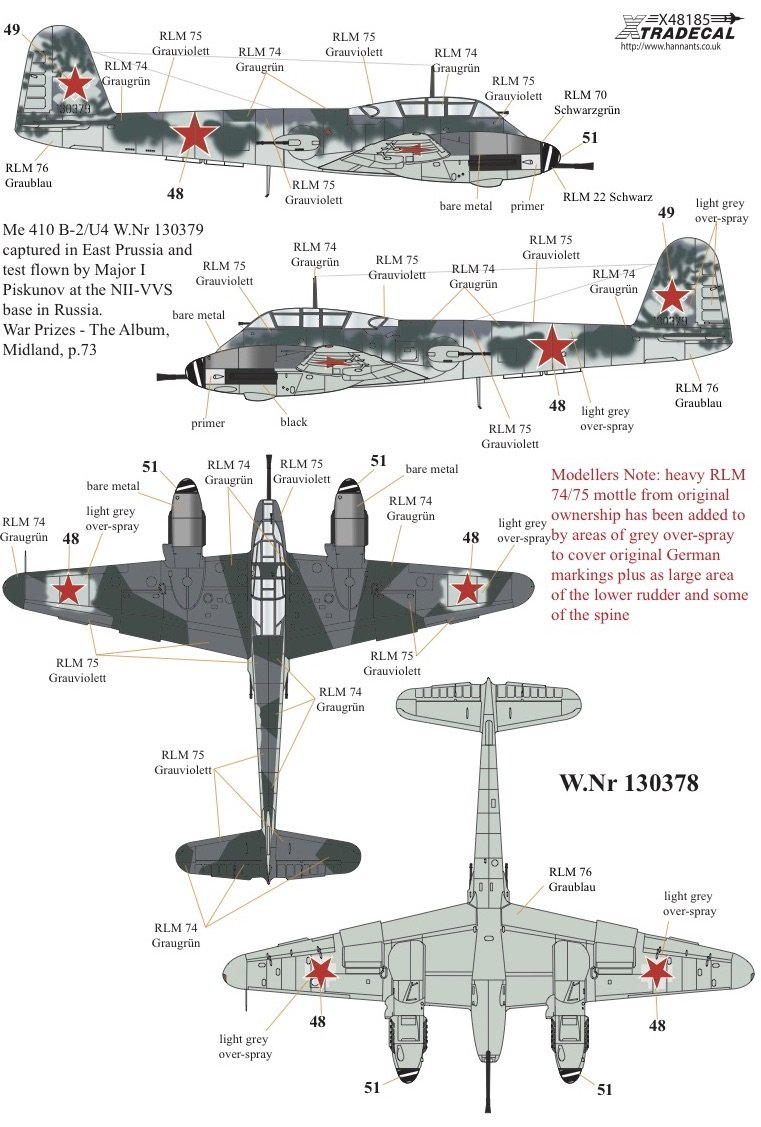
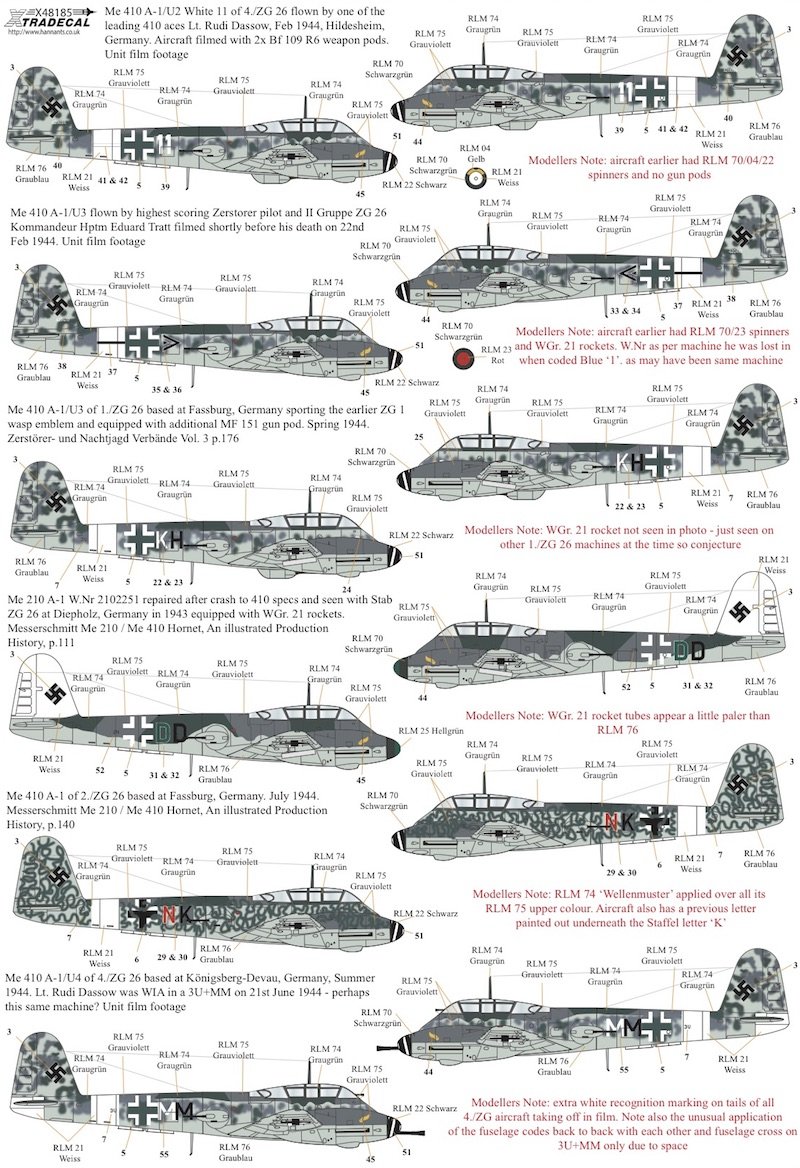
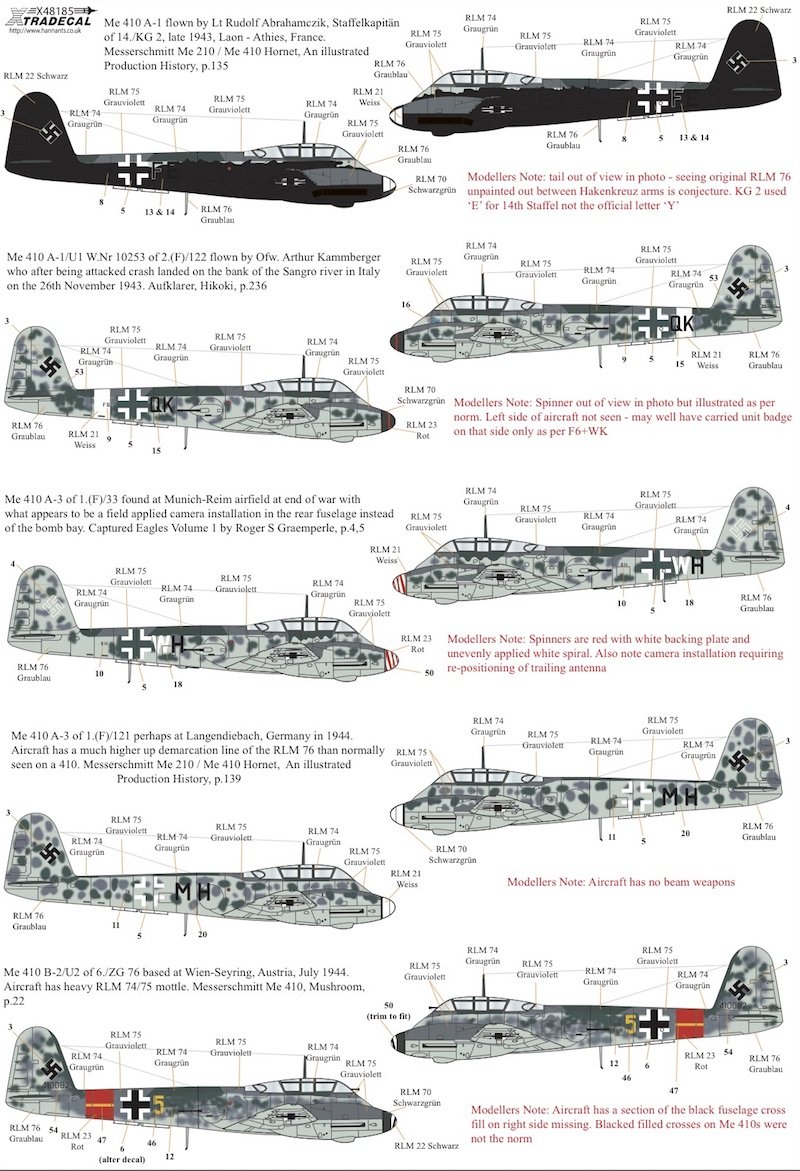
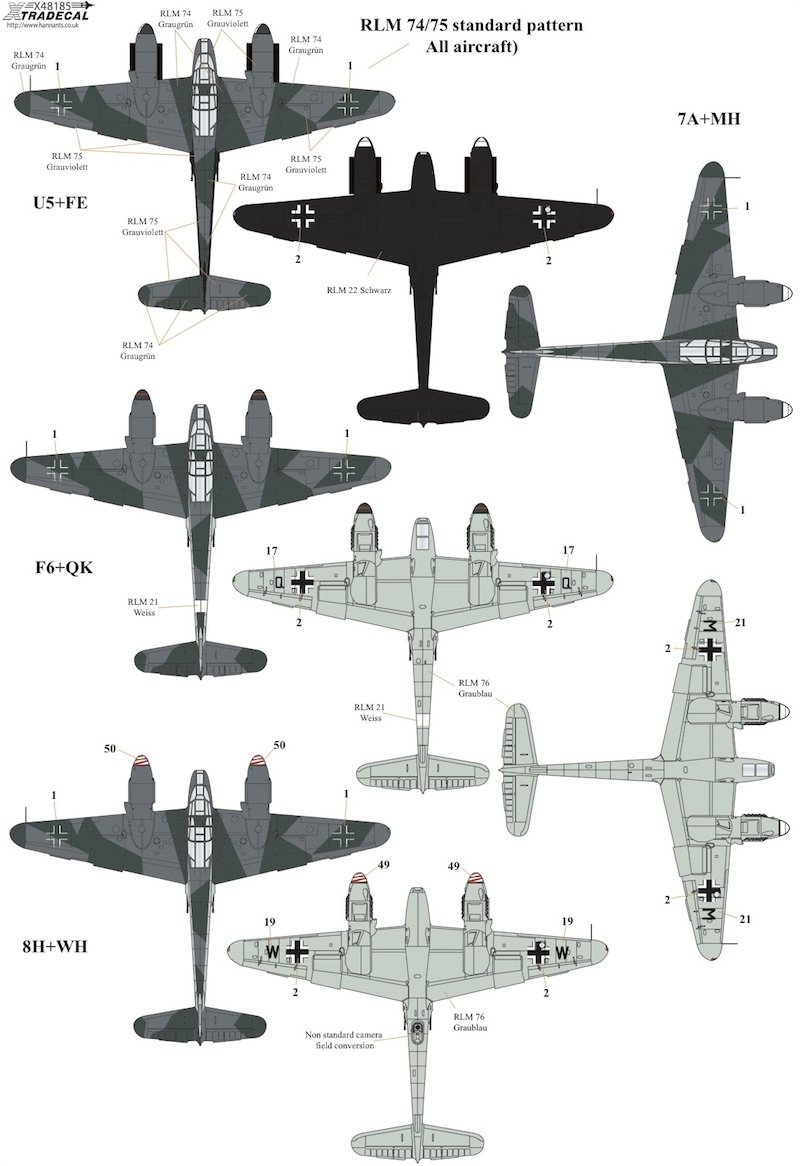
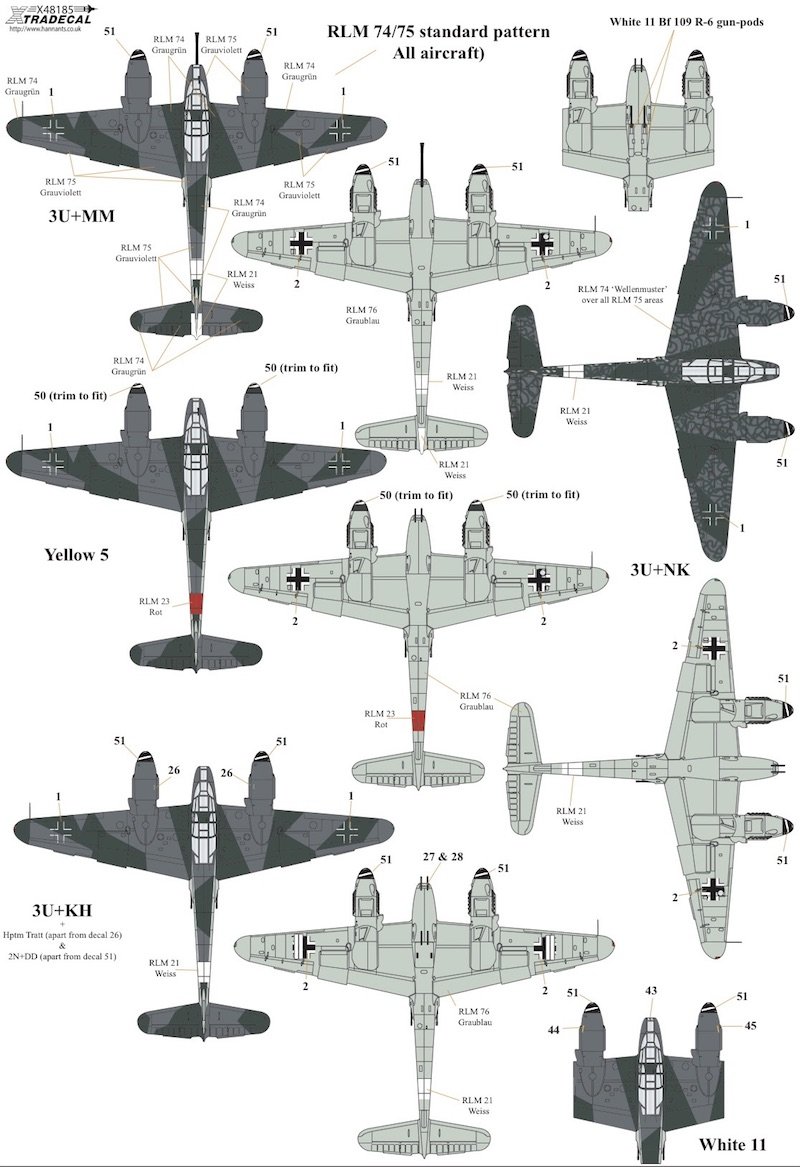
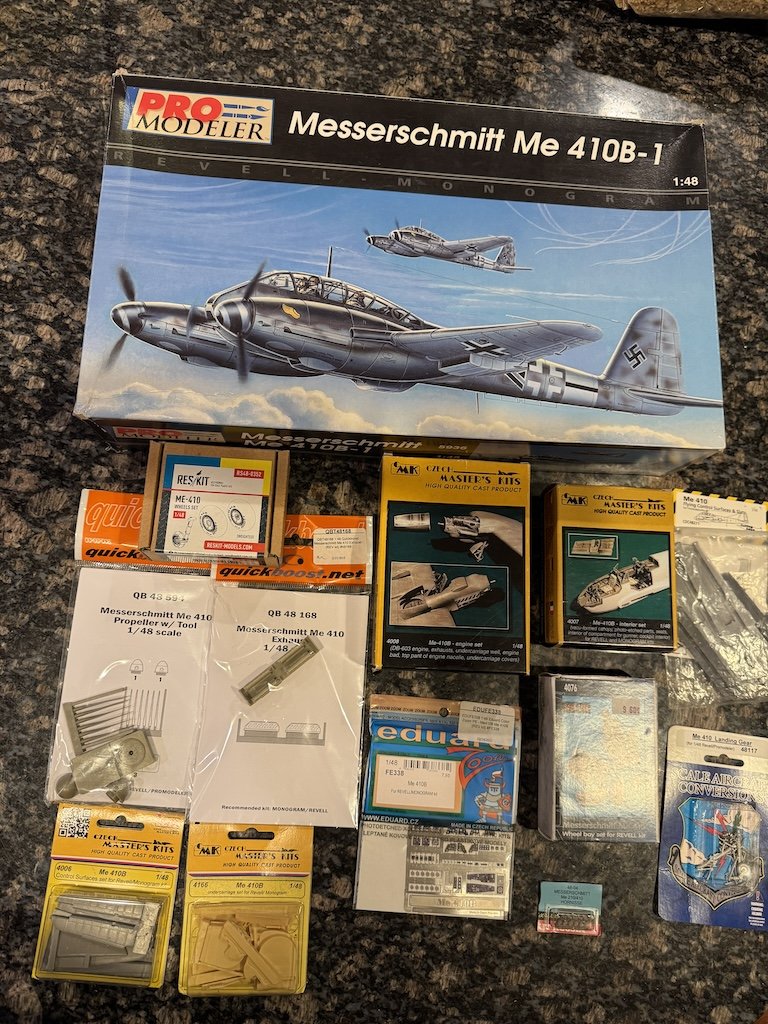
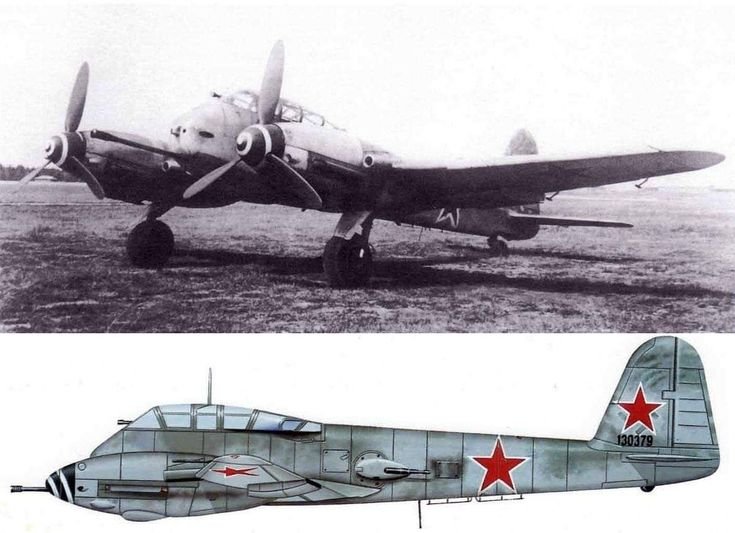
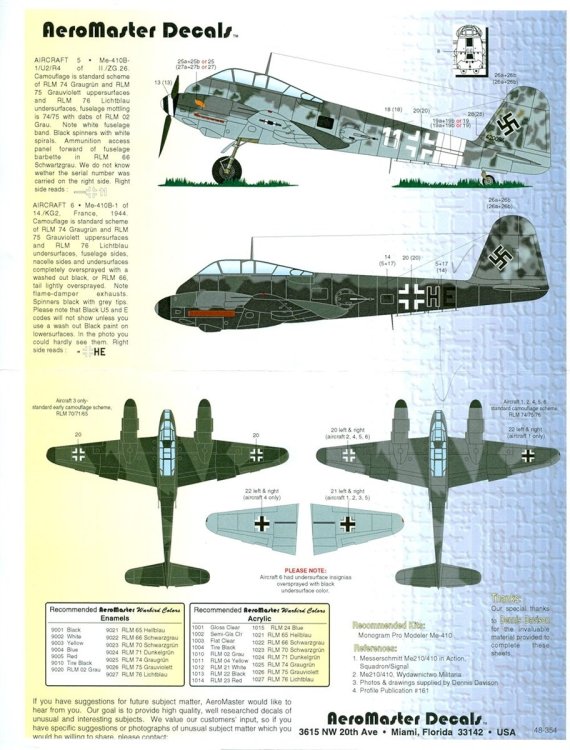
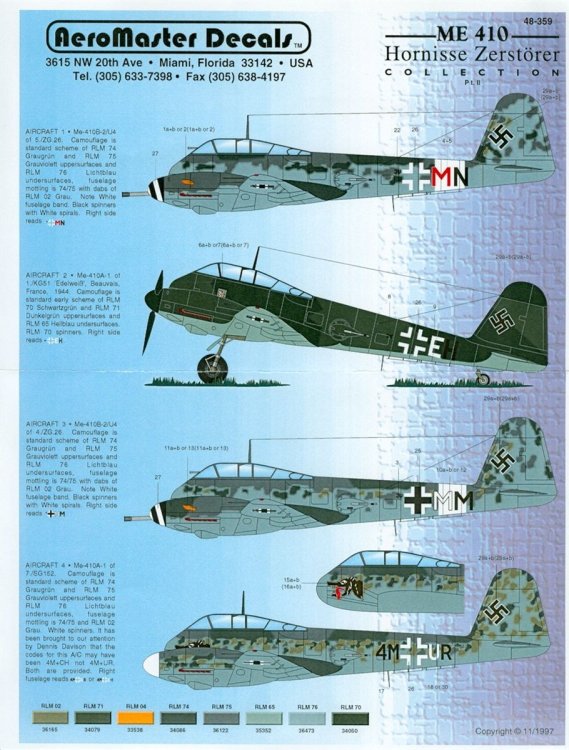
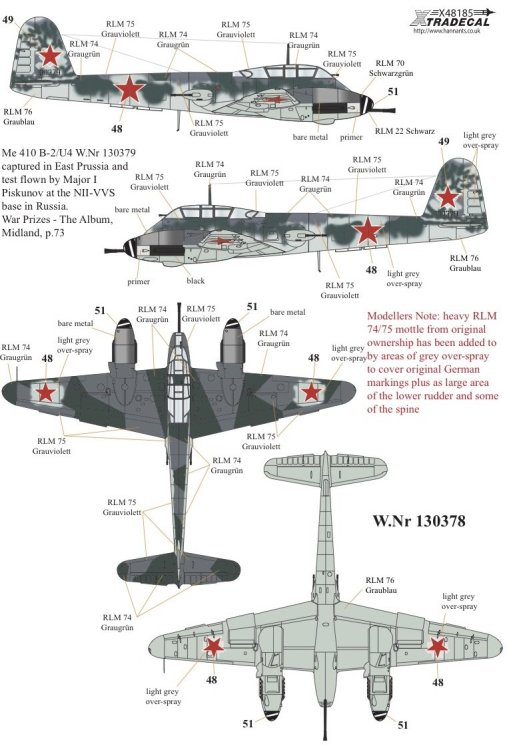
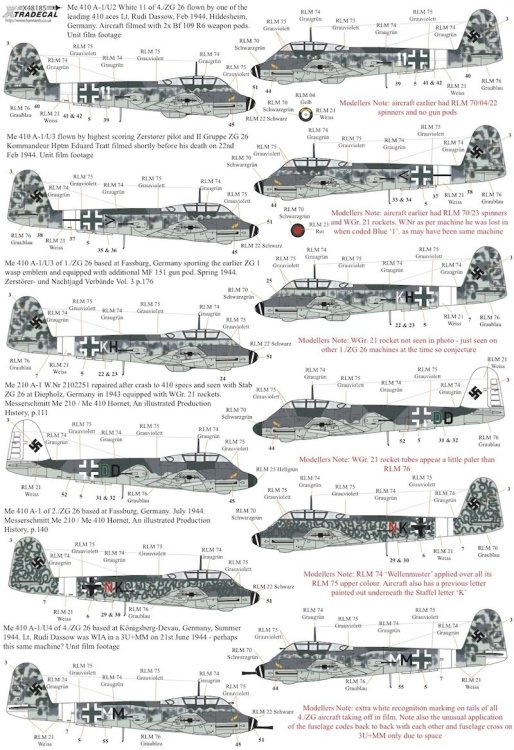
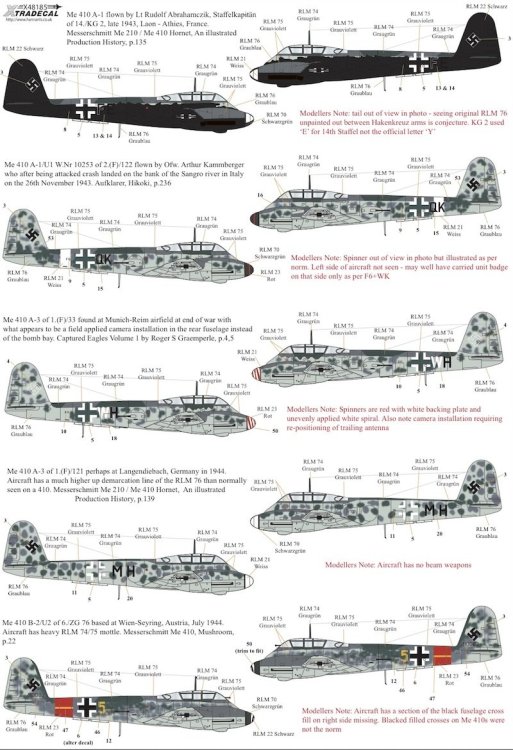
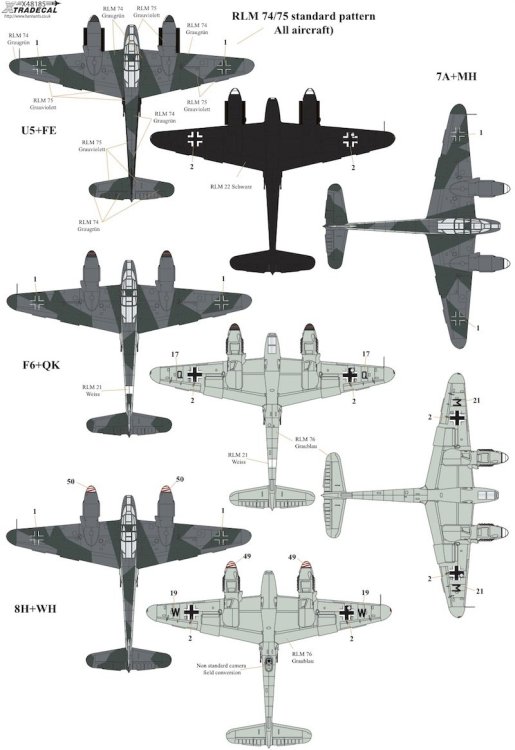
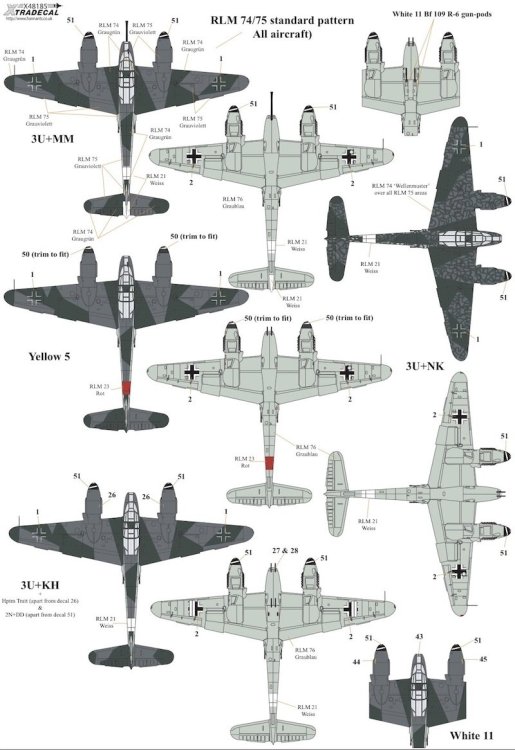
While soaking my parts, I'm trying to decide on which variants to do. The Pro Modeler kit allows you to do a B-1/U2, B-1/U2/R4, and a B2/R2. You can fairly easily do a bunch of the A-1 variants instead of a B variant. There are a ton of different configurations for the 410, so you have to check your sources carefully. I definitely want to do a U4 version with the 50mm BK-5 bordkannon. I'd also like to do an A-1 version as well. For the A variant, I'm leaning towards doing a scheme from the Aeromaster 48-359 decal sheet, in particular, a dark variant A-1 as #2 (or #3 from the Aeromaster 48-354 sheet further below) or maybe the wolf version from 48-359 as #4: Or there are a few options on the Xtradecal X48185 sheet - see first, fifth and sixth options: For the B variant, I'm strongly leaning towards the B-2/U4 version that was captured by the Soviets as something different: Alternatively, if I end up doing the A variant as a U4, I could do #6 from the Aeromaster 48-359 sheet (above) or there are plenty of options from the Aeromaster 48-354 sheet: Or #5 from the Xtradecal sheet: Too many options! Sorry for the long thread, I just wanted to record my thoughts while fresh in my mind!


-
Amazingly, a lot of the AM came with the kits when I got them on eBay for a pretty low price.
-
Hey guys, I had a little time last night to go through my two kits. I forgot how much AM I had 🫣 This doesn't include other AM I have including masks and decals.

-
Lucky man! What a beauty!
-
Brabham BT45 - Model Factory Hiro - 1/12
Landlubber Mike replied to DocRob's topic in LSM 1/35 and Larger Work In Progress
That engine looks fantastic! Really nicely done! -
Hey Chris, good to hear from you, though sorry to hear about the rough ride you've been experiencing. Glad at least you were able to hit the bench for some pens - turning wood is a very relaxing experience, at least for me until something goes wrong Sorry to hear about your mom, but it sounds like at least she is set up somewhere close. My father in law moved in with us and is losing his memory and faculties. While it's just the beginning stages, it's still a handful for us with three kids still in the house and all their activities. Just have to do the best you can do. If you don't mind, show some of your pens! If you're looking for more blanks - wood, acrylic, etc. - I have plenty and can send some your way. Mike
-
Looks really good Hubert, some really impressive work there!
-
Martin, quick question(s) for you. I see you scratched the position lights. Is there a benefit of doing them now before you paint the wings? And for the UV resin, do you need a special UV light to cure the resin? I've never used UV resin before so I'm curious on how you did them. For example, did you dye the resin red and separately green, then put the resin in place and cure it with UV light? Etc. Thanks in advance - I'm already learning a lot for this build!
-
I had the HpH 1/32 kit and that seemed really big! Though, I've mostly built 1/48 and 1/72 planes. Almost too big so I ended up selling it, especially since I had the two Pro Modeller kits.
-
Wow, great start Martin! You're really moving along! A little bummed to hear that the shape may be off on this kit, but it looks pretty darn close to bother trying to "fix" it. I pulled my two kits off the shelf last night to look at what I'm going to be getting myself into. For one I have the various CMK sets, and the other, the various Aires sets. Then for the two, I have a few things like the Master barrels and a bunch of decal sets. I'll try and get started this weekend.
-
Brabham BT45 - Model Factory Hiro - 1/12
Landlubber Mike replied to DocRob's topic in LSM 1/35 and Larger Work In Progress
That Aston Martin is really nice looking! Always good to show yourself some love and treat yourself I never quite understood why people spend all this time working on engines for regular street cars when 99% of the time the hood won't be open. I agree that most look better closed, though some of the race cars where the engine cover is removed is a nice look. I'm not a big race car person, but I do like the exposed engines on some of the cars. The one I just ordered arrived today - it's the Ferrari 312 F1 - 69 French GP. It's 1/24 scale. Got it for a pretty good price (under retail) and it seems like a fairly straightforward build. Probably a good one to start with before I eventually try the Corvette C.1. -
Did you order that stainless wire from that Amazon link? I used cut down stainless steel insect pins for the rigging on my JRS-1, but they aren't very long so I need a source for longer steel rods/wire. For Lone Star, I think it's best if you keep an eye on his Facebook page. I'll send you a PM shortly.
-
Spitfire Mk-VIII by Tamyia-Close to Finish
Landlubber Mike replied to KevinM's topic in LSM 1/35 and Larger Work In Progress
Another beauty in the works - looking forward to following along on this one! -
Brabham BT45 - Model Factory Hiro - 1/12
Landlubber Mike replied to DocRob's topic in LSM 1/35 and Larger Work In Progress
Great start Rob. After seeing your work on these MFH kits, I'm looking at some of the plastic car models I have on the shelf and might sell them to make room for more MFH kits (I just picked up a 1/24 Ferrari F1 kit on eBay yesterday for under retail). What bugs me about the older plastic kits is that the engines are usually molded in halves, and it's very hard to make them look good (in my opinion). So, I likely will just build them curbside and not bother trying to fix the engines or buy expensive printed engines. The MFH kits seem to be a lot better about how their parts are designed so that you can show things off better. -
I think I mentioned this before on one of the other Hasegawa inter-war 1/32 sets, but Lone Star makes a good cockpit set (the kit's set is bare, to say the least) and you can get a Vector engine for it. Starfighter also makes a colorful set of different markings, but is a little tricky to find. I have two of these in the stash that I hope to get to at some point with the YW Kicking Mules set (#32-035) and the Starfighter set (#3201). If you end up building this, maybe I'll pull mine out and build them alongside yours since you'll inspire me