


Landlubber Mike
-
Posts
1,277 -
Joined
-
Last visited
Content Type
Profiles
Forums
Events
Gallery
Everything posted by Landlubber Mike
-
Nice little assemblies Rob. I'm really amazed by the detail of this kit!
-
1/32 Curtiss SC-1 Seahawk
Landlubber Mike replied to BlrwestSiR's topic in LSM 1/35 and Larger Work In Progress
Nicely done! -
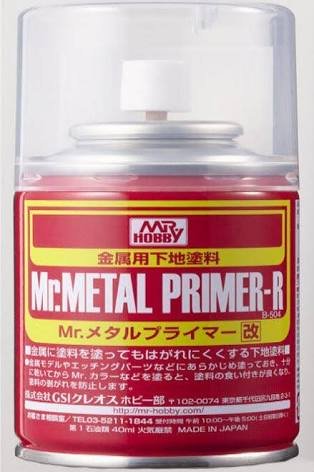
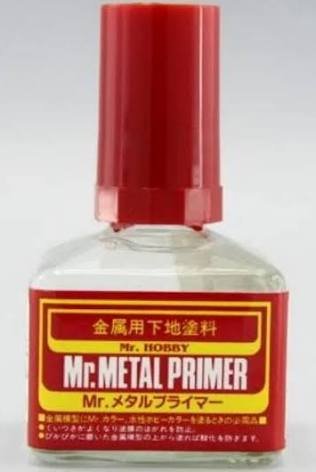
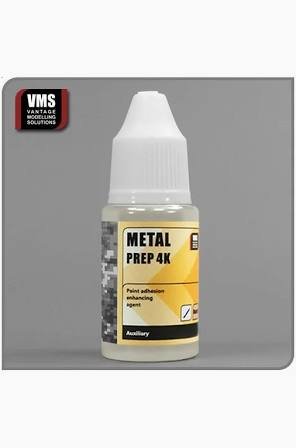
Rob, amazing work! This is a really stellar build, but I have to admit I was very disappointed that the gas cap only had 18 pieces... On the VMS products, I haven't used them enough to learn how long it takes for them to cure. I don't think I noticed too long a curing time, but I'll have to go back and take notes. Probably a bit too late, but instead of CA, have you tried two part epoxy? I've used the 5min and 30min cure time versions in the past, but was curious and saw that there are some that are 1min cure time. Only problem is that the bond is super strong, so you better be sure that the parts are in the right position. I don't know if those products off-gas though. For metal priming on my PE heavy builds like 1/700 warships I've used these metal primers from Mr. Hobby. They work nicely. Paint sticks much better. VMS also seems to have a metal primer:
-
Eduard Spitfire Mk. XVI Bubbletop 1/48
Landlubber Mike replied to CANicoll's topic in LSM 1/48 Work in Progress
Looks really sharp Chris! Love how the markings pop against the more muted base colors of the camo on these Spitfires. -
Hang in there Rob - it's looking spectacular! Take a look at VMS products. They offer a number of CA products, some I believe are designed not to fog.
-
Looking good Kevin - love the colors! Turning out very nice!
-
Wow Rob, the details on this kit are incredible. Am really loving the finish. This is turning out to be quite the stunner, incredible job!
-
Eduard Spitfire Mk. XVI Bubbletop 1/48
Landlubber Mike replied to CANicoll's topic in LSM 1/48 Work in Progress
Looking really good Chris! The paints you used ended up complementing each other very nicely. -
Looking really good Kevin! Not sure what to tell you on the Future as I usually use Mr. Super clear.
-
Eduard Spitfire Mk. XVI Bubbletop 1/48
Landlubber Mike replied to CANicoll's topic in LSM 1/48 Work in Progress
Nice work Chris! The panel liner really did its job! -
I'm just catching up with your log after a long weekend away. My heart sank when I saw your earlier post, but am glad you figured out a solution! Looks great! So where was that gunk from? The Zero clear? After using Zero paints on a couple of inexpensive Gunze Triumph builds where it crazed the plastic, I'm not sure I want to go down the road of using their products. I had a little better luck with their paints the second time around on my Morgan 3-wheeler, but the clear was a little tricky. Likely user error on my part, but I noticed that it tends to almost get what looks like oil residue spots - at least it seemed that way before putting it in a display case. It might just be it's very prone to show finger oils, but it was a bit of a weird thing for me. Hope it all works out on your model!
-
Eduard Spitfire Mk. XVI Bubbletop 1/48
Landlubber Mike replied to CANicoll's topic in LSM 1/48 Work in Progress
Looking great Chris! Maybe I'm color blind, but I tend to be surprised at how colors look when it comes to brown/olive/greens - sometimes a "brown" looks green (or even gray), and a green will look brown. -
I have a couple of the UMM ones, but this one is my favorite as well.
-
That color looks sharp! Really nice!
-
Eduard Spitfire Mk. XVI Bubbletop 1/48
Landlubber Mike replied to CANicoll's topic in LSM 1/48 Work in Progress
Hey Chris, looking good. I'm eagerly looking forward to following your efforts here. I've seen folks do the chipping as Rob did, and have always been curious on how difficult it was to do that. Seems much easier, at least to achieve realistic looking results, with the chipping method as opposed to trying to manually paint those scratches in. -
1/32 Curtiss SC-1 Seahawk
Landlubber Mike replied to BlrwestSiR's topic in LSM 1/35 and Larger Work In Progress
Looking great! The details achieved with resin in this kit is pretty amazing. -
I love this subject Kevin, lots of cool schemes. Looking forward to watching this come along!
-
Thanks! Yeah, it's very high quality. I also have their 0.5mm airbrush for large models which I've used a couple of times and it works very nicely as well.
-
Sure you can. Resistance is futile...
-
Eduard Spitfire Mk. XVI Bubbletop 1/48
Landlubber Mike replied to CANicoll's topic in LSM 1/48 Work in Progress
Looks good. I have Eduards Mk. IX in the stash. I think people have said they are very nice kits. -
Wow, a 1/18 Buffalo? That would be a nice healthy size.
-
Can't wait to see your Buffalo build. I love those chunky planes, and love yellow wings. Martin and Ernie have a Buffalo buddy build thread on here that I joined with my 1/48 model a year or so ago.
-
The Eastern Front version has some really cool schemes. Omask has a lot of goodies for this kit (for example, the cannon pod assembly), but if you prefer to paint on your own insignia, they sell a masking set for the Eastern Front kit. I have their mask for my kit, so can report back on how they were. https://www.omask.eu/34036-1-48-Hs-129-B-2-Eastern-Front-for-Hobby-2000-48011-d250.htm The kit engine is definitely a touch smaller in diameter. For my first diorama, I'm going to have one of the engines fully exposed so I only had to worry about one nacelle thankfully. I used my micromotor to slowly thin out the interior of the nacelle, which was tricky. Thankfully I had a spare to practice on, as one I went too far and had a small hole open up. The second one got thin and warped a bit, so I ended up using Tamiya two-part epoxy and sanded everything smooth. I was able to repair both. That's why I was watching your Cobra log with a bit of nervousness when you mentioned trying to thin down the hood. I also had to take off probably less than 0.5mm off the cylinders as well to make everything fit. With the way the nacelle curves in at the front, the slight modification to the engine won't be noticeable.
-
Really impressive work there Rob. Love the magnet approach!

