


GusMac
-
Posts
2,900 -
Joined
-
Last visited
Content Type
Profiles
Forums
Events
Gallery
Posts posted by GusMac
-
-
Nose is now filled and rescribed, so it's time to set it aside and move onto the rear fuselage.

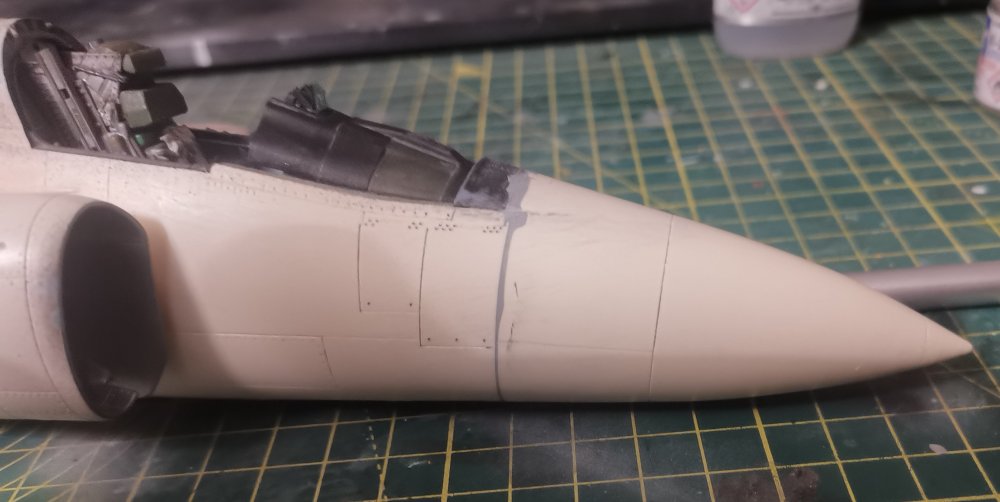
The instructions would have you join this to the rear fuselage next but looking at other builds online that leaves you with a rather large, unwieldy piece to deal with as you attach the wings. So, plan is to assemble the rear fuselage and burner can and attach the wings to that and only then join this forward section.
-
 6
6
-
-
Thanks fellas.
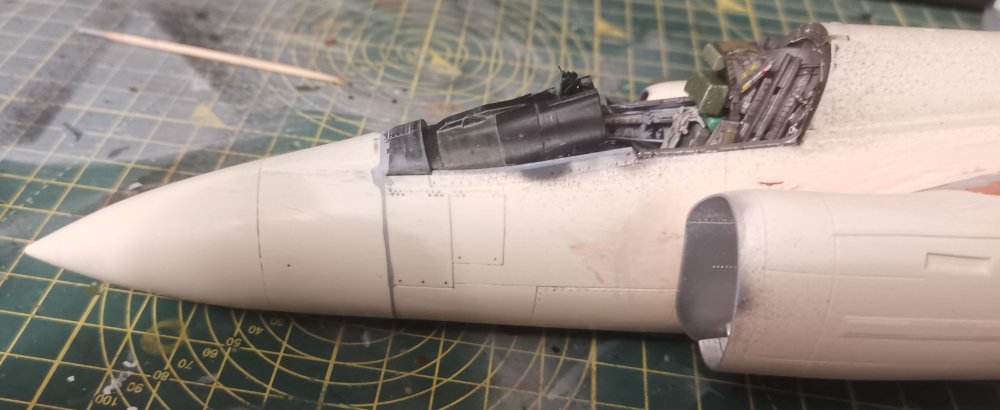
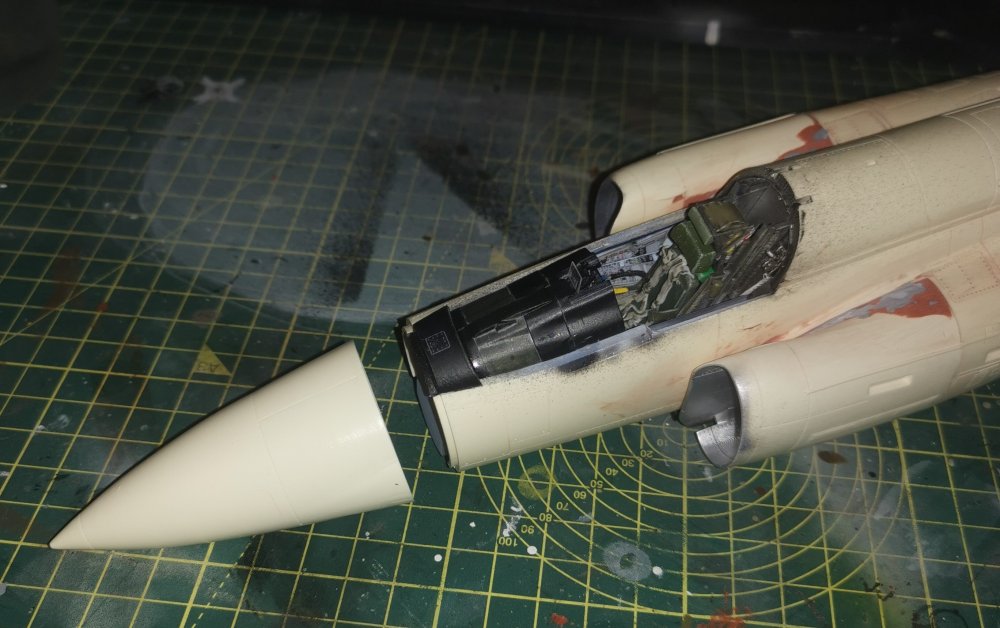
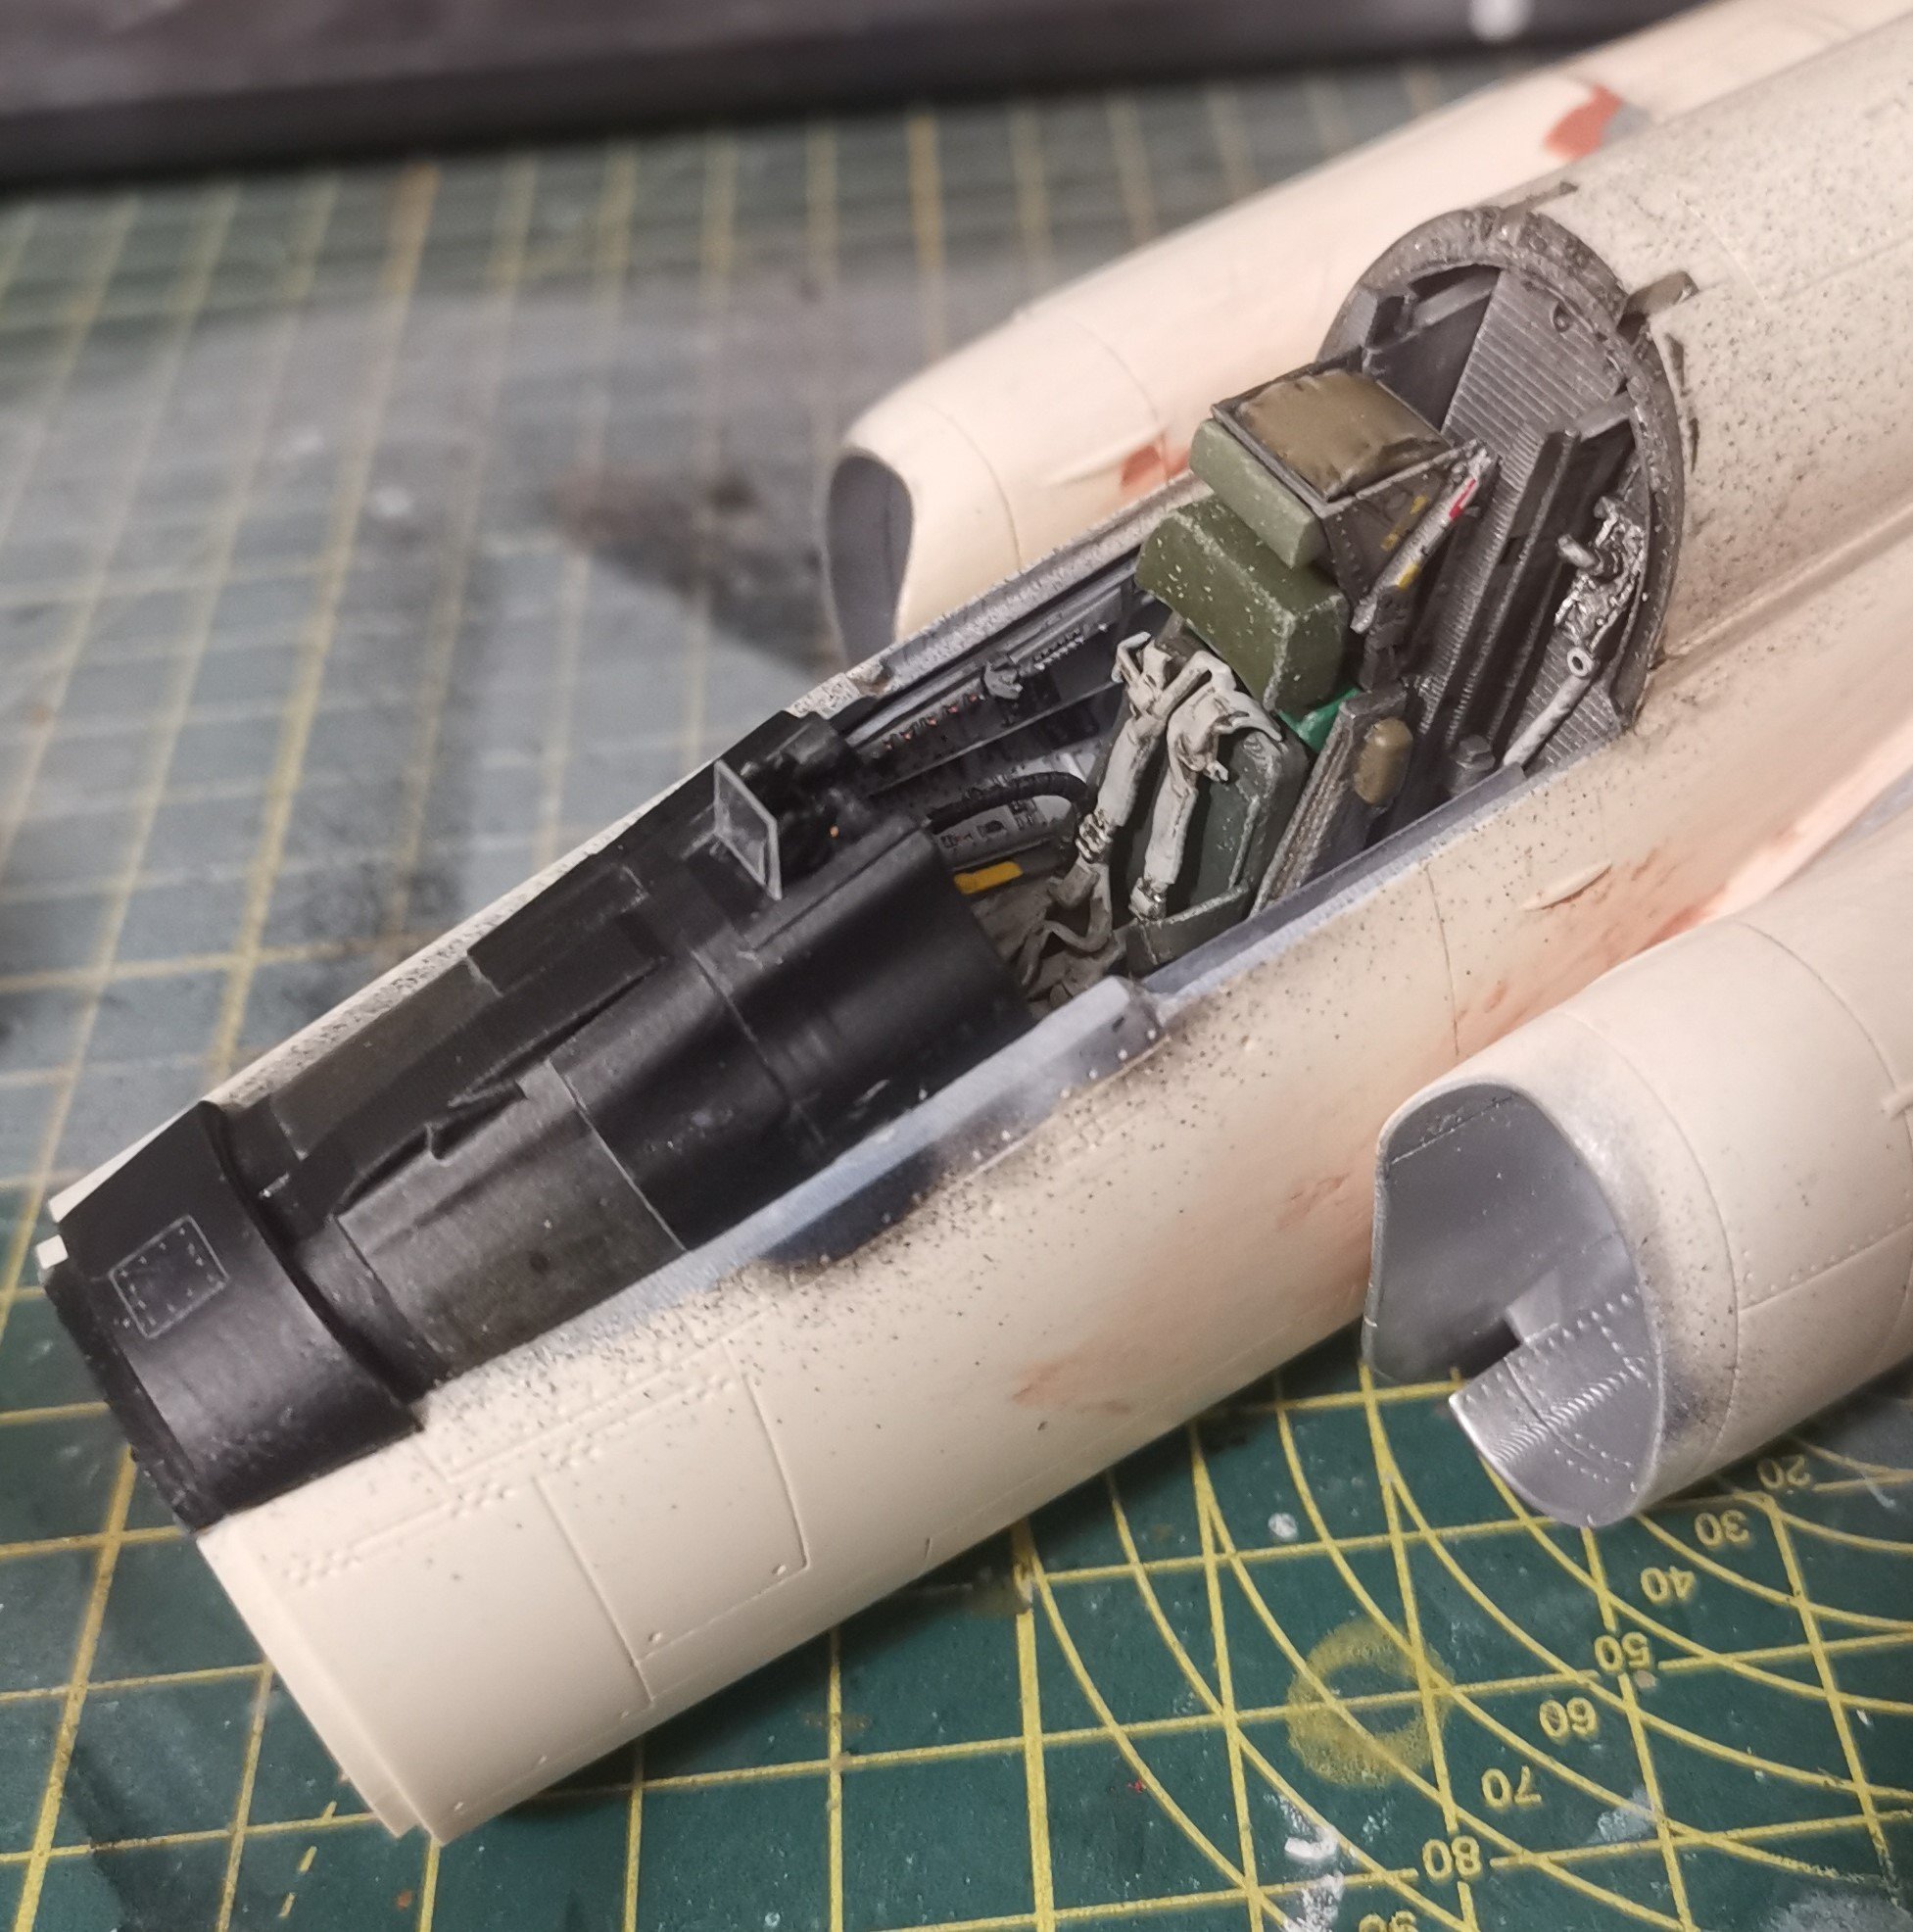
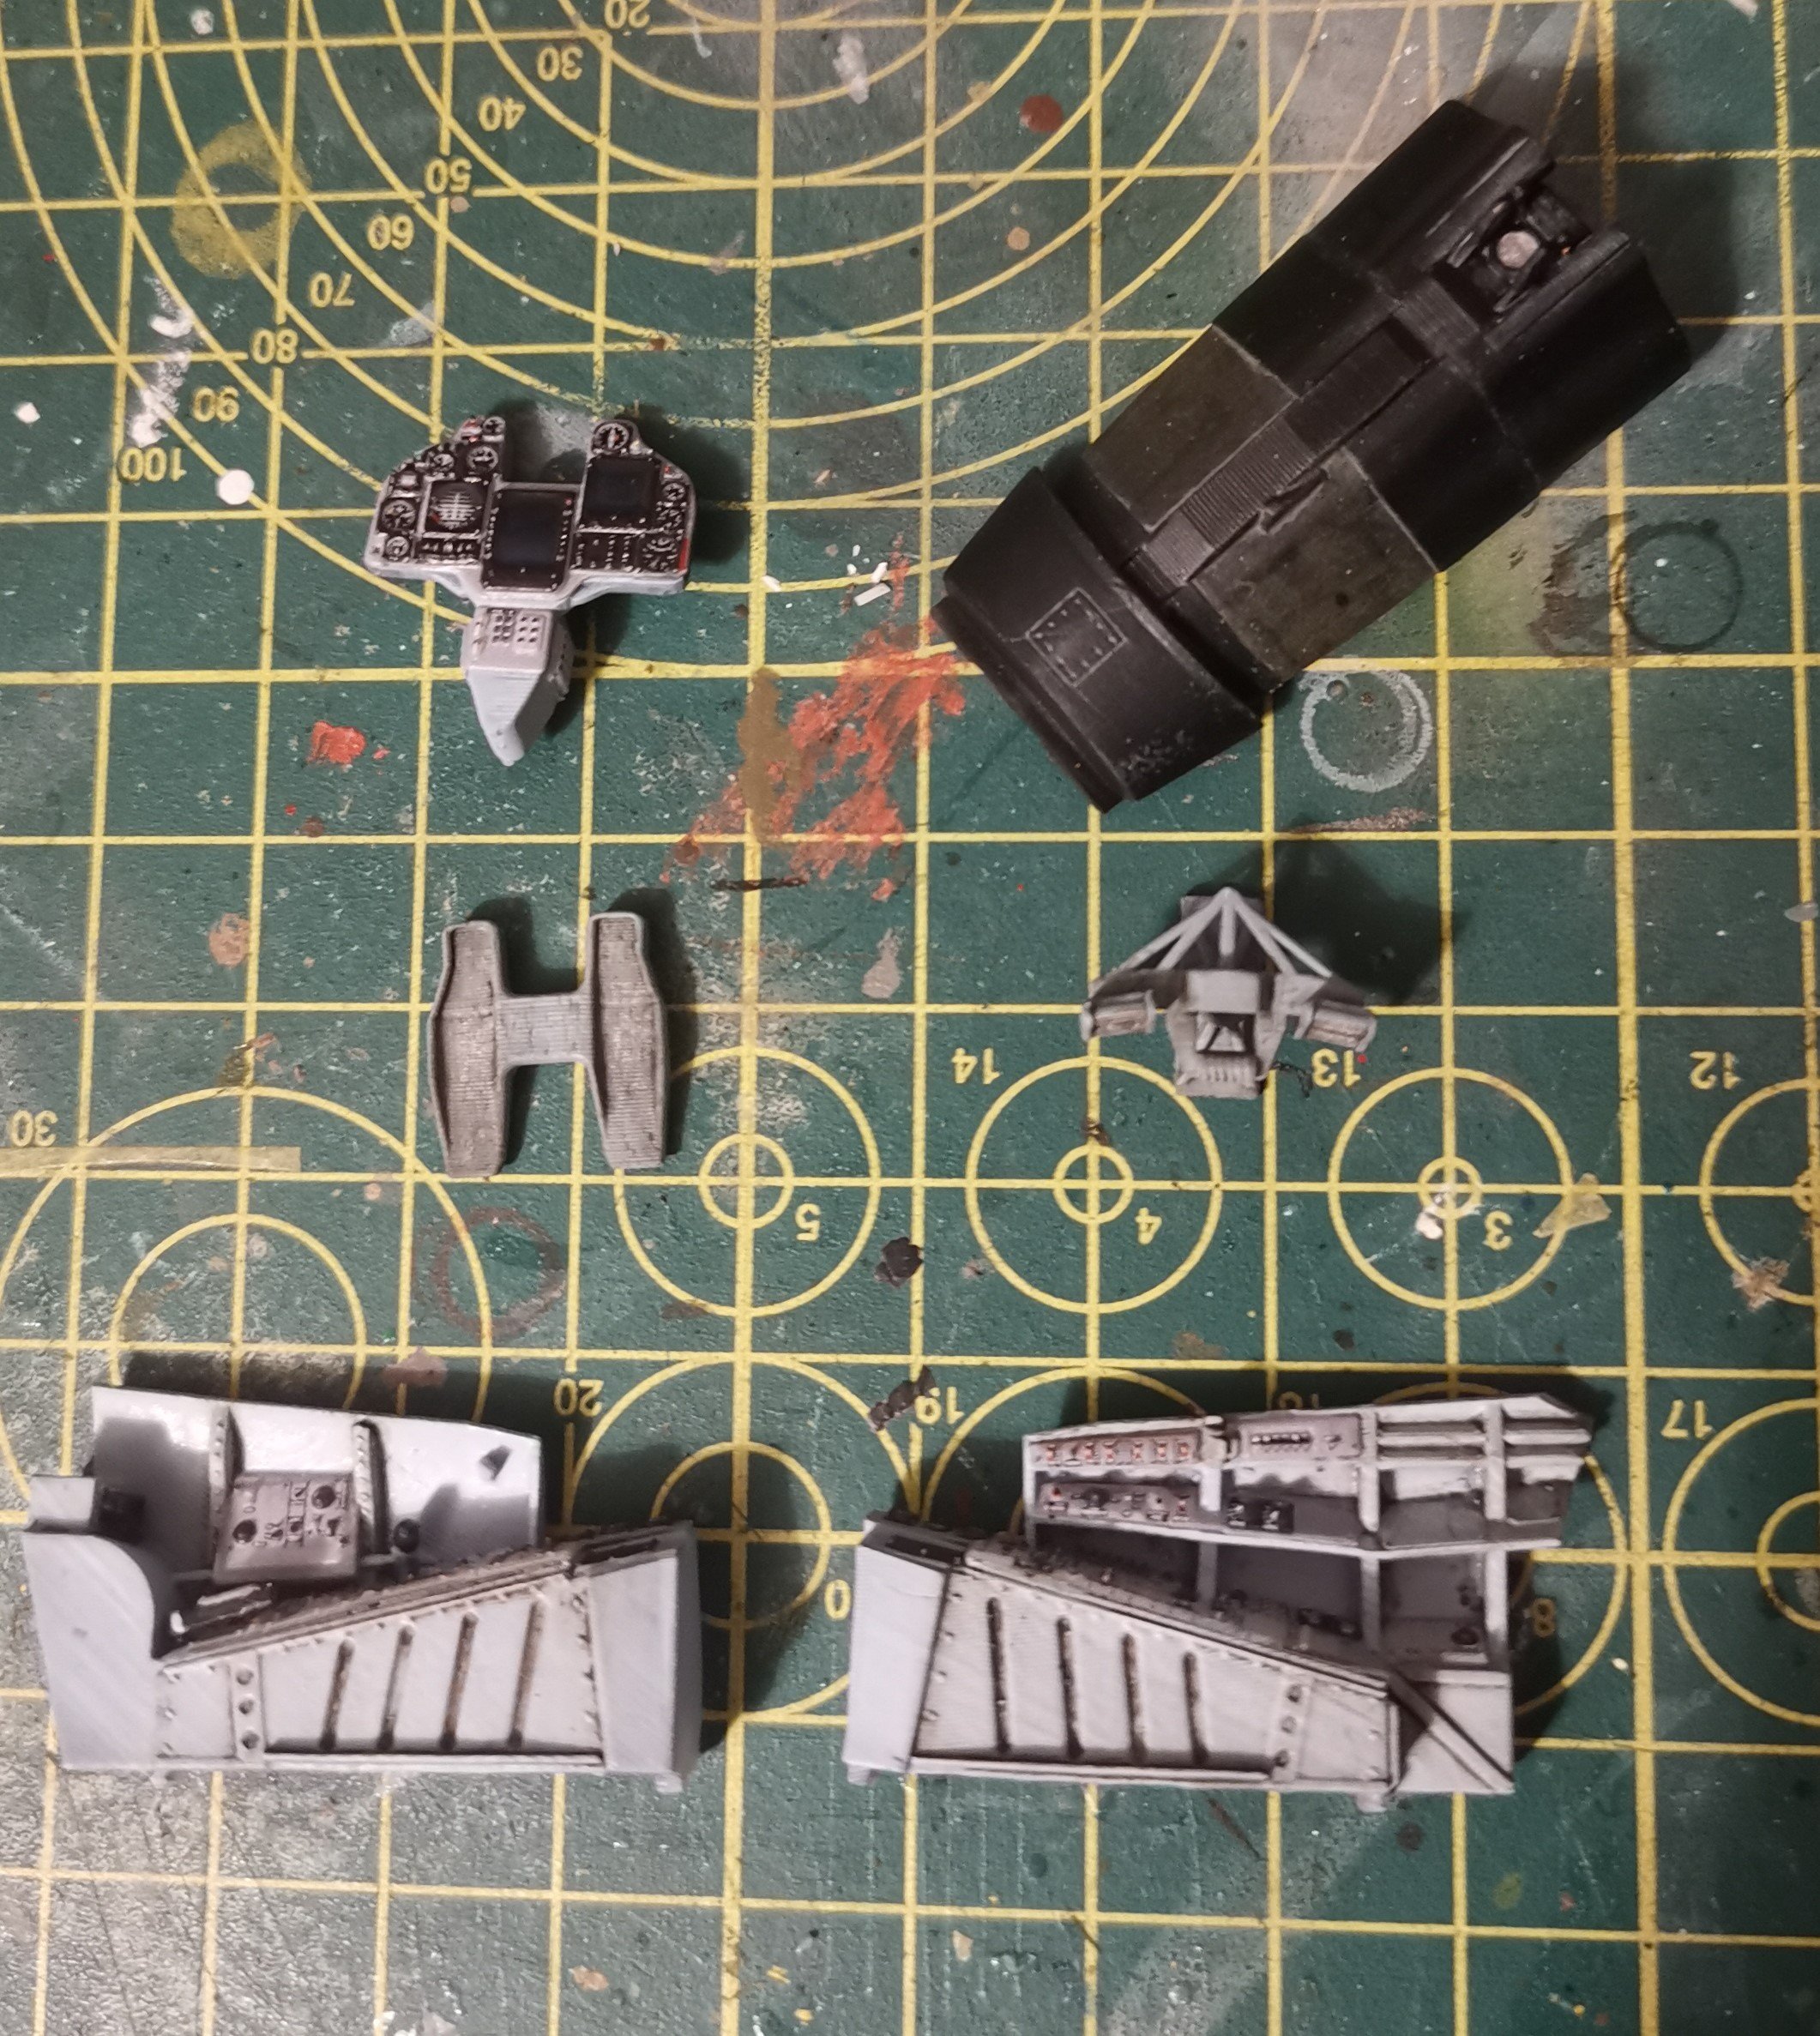
Got the cockpit sills on tonight with a bit of cursing. The 3D printed stuff is so fragile - I managed to snap both sills while trimming them to fit but thankfully the material also glues very firmly with CA so all recovered.
Nose is also attached with epoxy. Will require a bit of filling but thankfully no major sanding, so that'll be tomorrow's entertainment once the epoxy is cured.
-
8
-
-
11 hours ago, DocRob said:
Very nice progress Gus, the cockpit and seat are stunners. Printing lines are always a problem, but I also think the sides of the seat will be invisible. Good, that you got your camo masks ordered, it would be a pain to cut them yourself.
Cheers Rob
Rob, JetMads actually provide a full set of correctly scaled templates in the instructions if you want to cut your own masks but there are only so many hours in the day and my masochistic streak isn't sufficiently developed for that. So, path of least resistance...
-
7
-
-
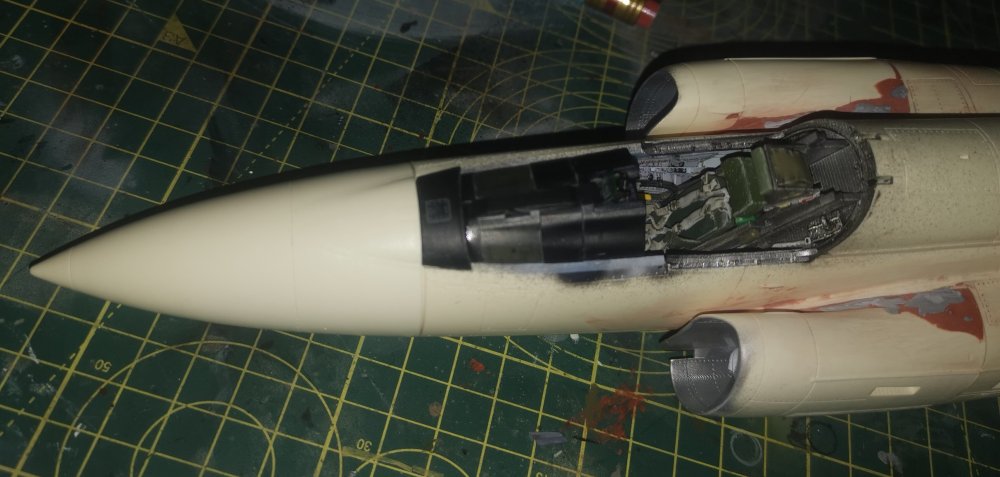
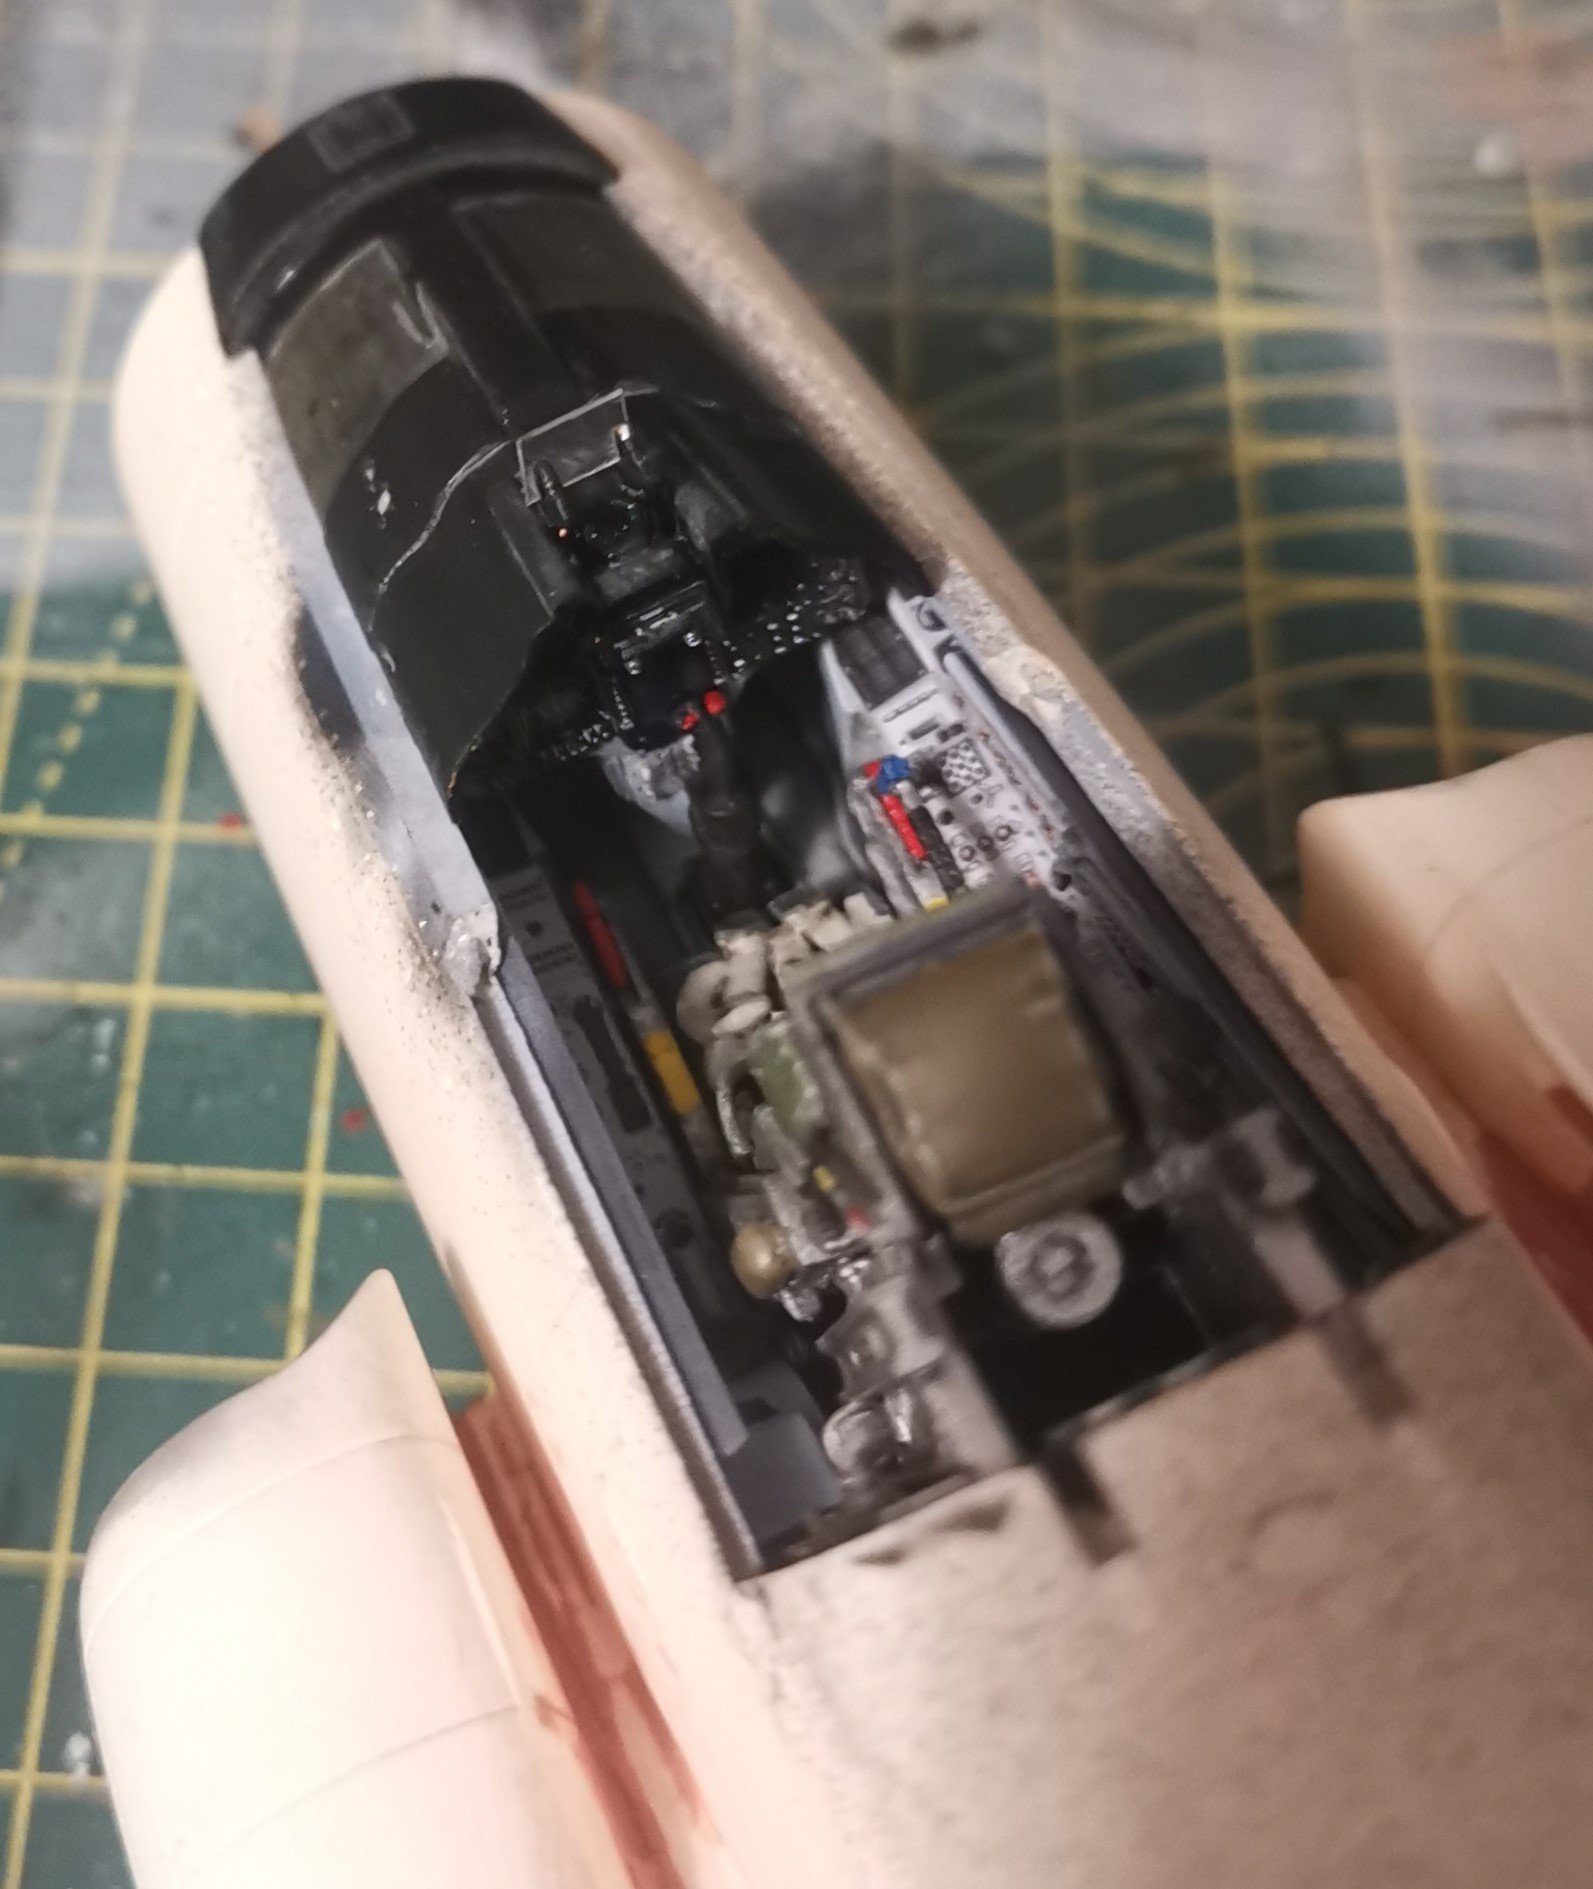
Got the cockpit assembled tonight. It actually went together easier than I expected although everything is so tight that I test fitted the seat and it's now in there permanently! No glue required!

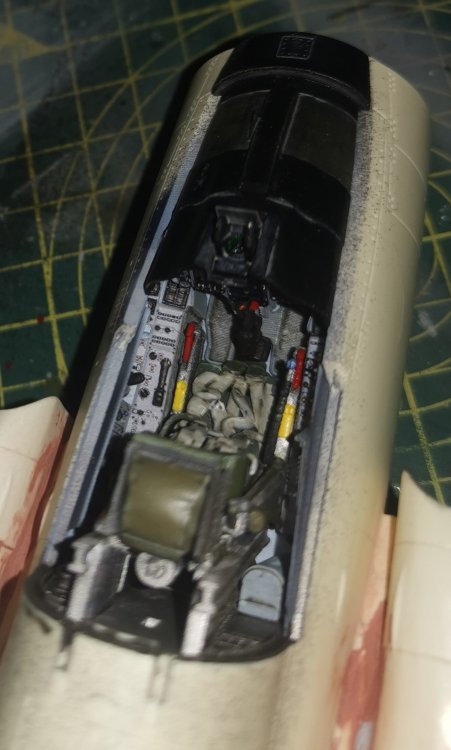
Tomorrow night's job is to get the nose attached. After a quick test tonight it'll definitely need a bit of trimming of the inside to get a snug fit but it shouldn't be too difficult to do.
-
11
-
-
8 hours ago, Peterpools said:
Gus
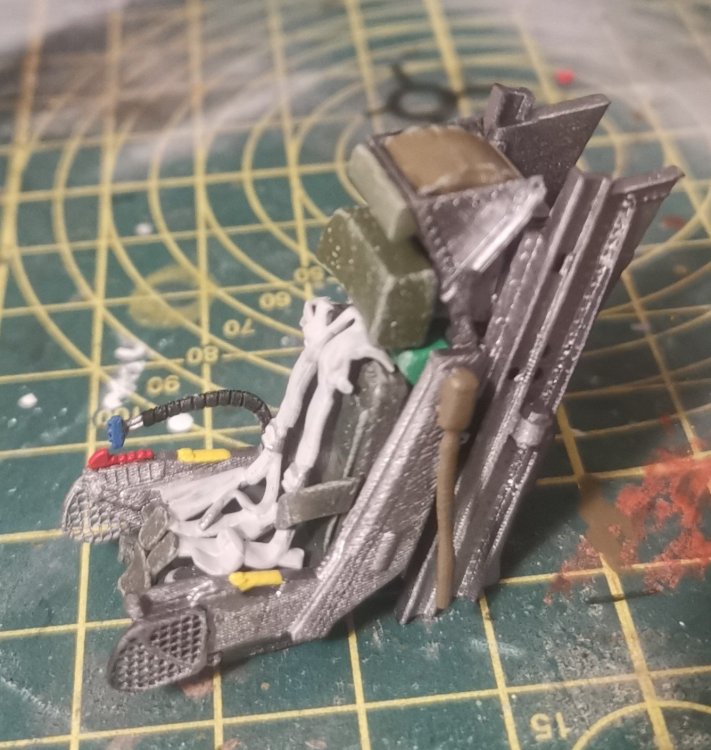
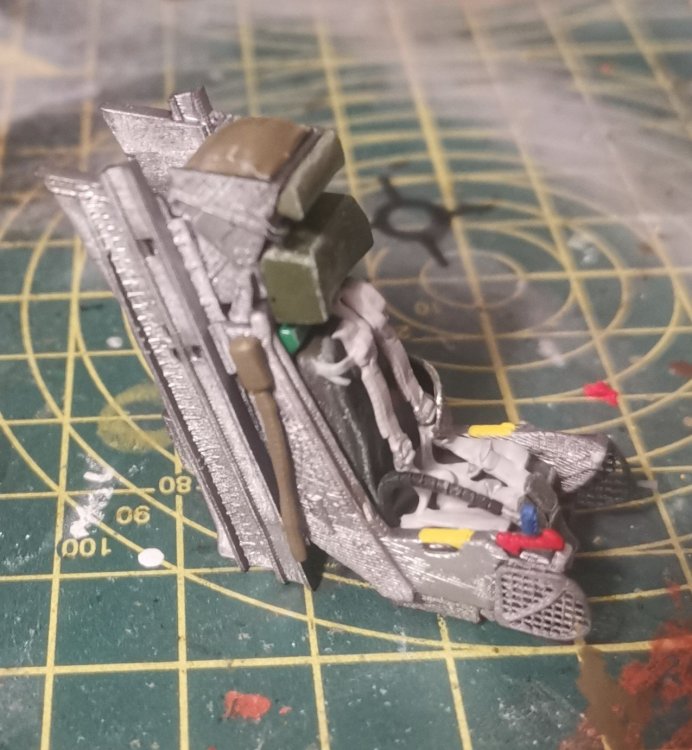
Some terrific work on the major components of the front office and completely agree about how good the 3D cockpit decals are. The ejection seats look amazing with all the molded on details and I only wish every manufacturer would do their seats this way: especially with the molded on belts.
Thanks all. The seatbelts were actually a separate 3D printed part Peter rather than moulded on. The detail and fit are great but it was sooo fragile trying to remove it from the print supports. Amazing what can be done with it now though.
-
3
-
-
Back from our break down in the East Neuk of Fife, so a little more progress made.

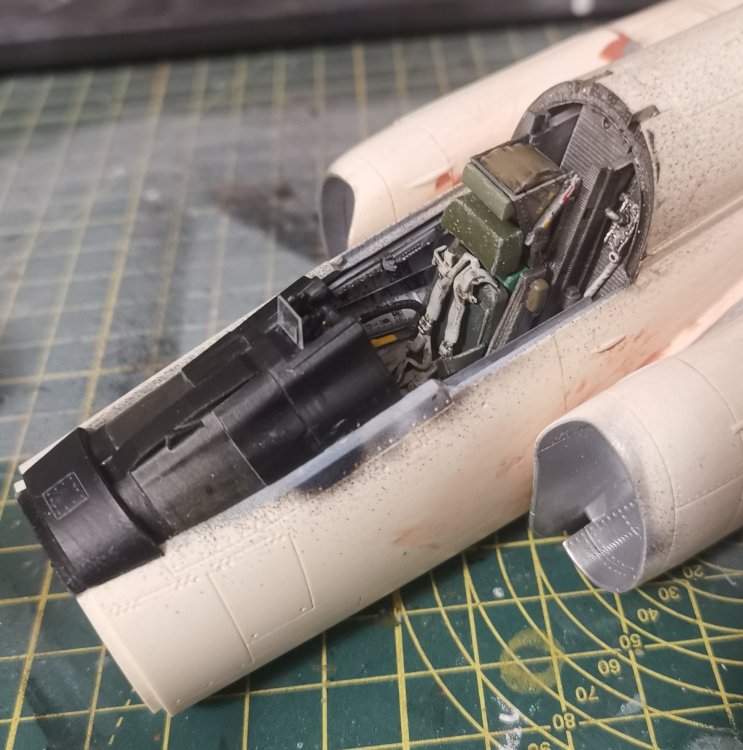
Got all the cockpit components painted, weathered and flat-coated.
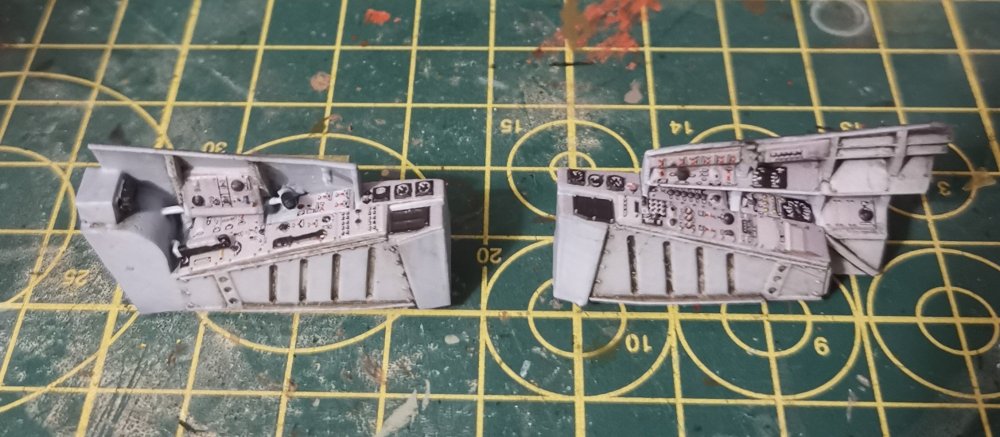
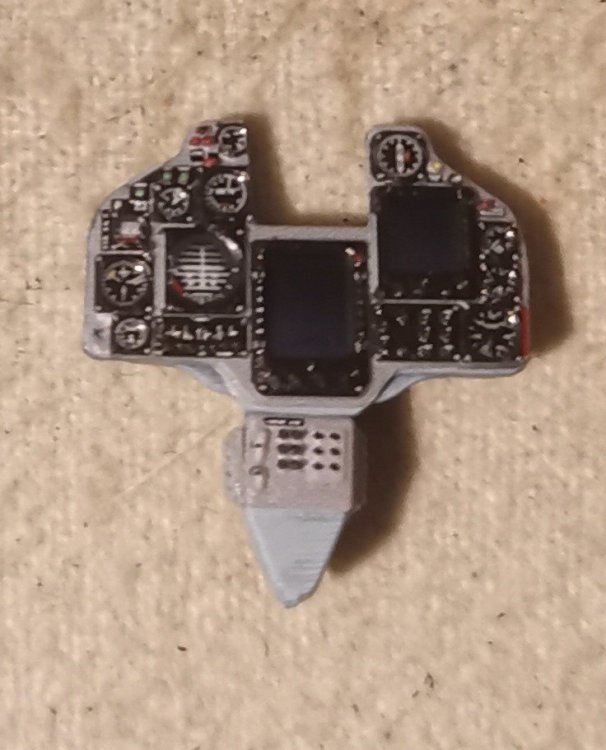
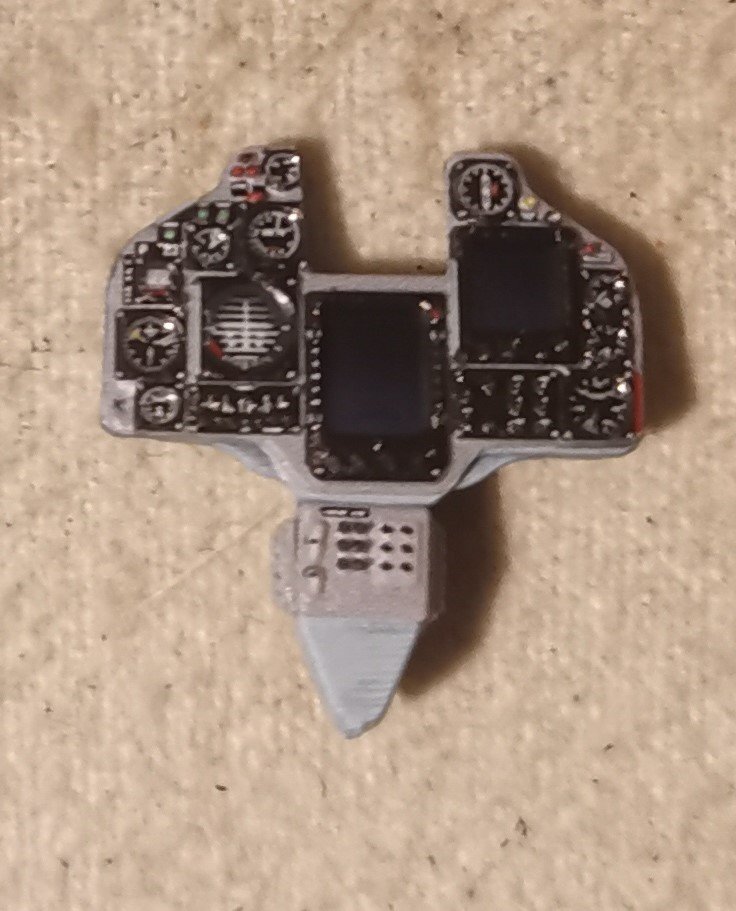
Used the Red Fox 3D decals for the instrument panels as the details are just much sharper than I could achieve with the kit parts and a paint brush. The print layers were also quite noticeable on the main panel which were all sanded away to fit this.
From test fitting the tolerances to squeeze all of this into the available space are tight to say the least, so I'm going to take my time and try not to bugger it up.
Also got the Maestro Models masks for the splinter cammo as I noticed Hannants was down to only two sets in stock and they've become hard to find elsewhere. Think it's going to be a while before I need them though!
-
9
-
-
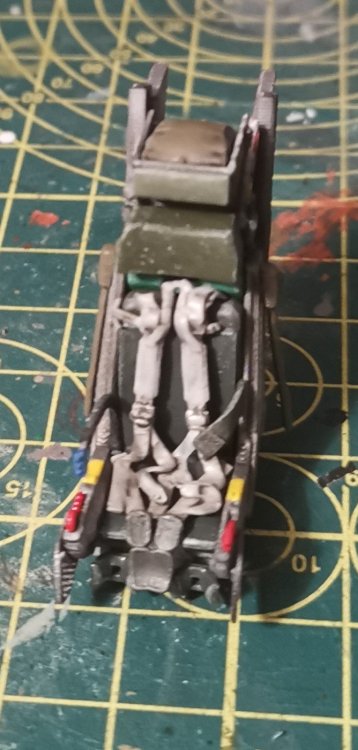
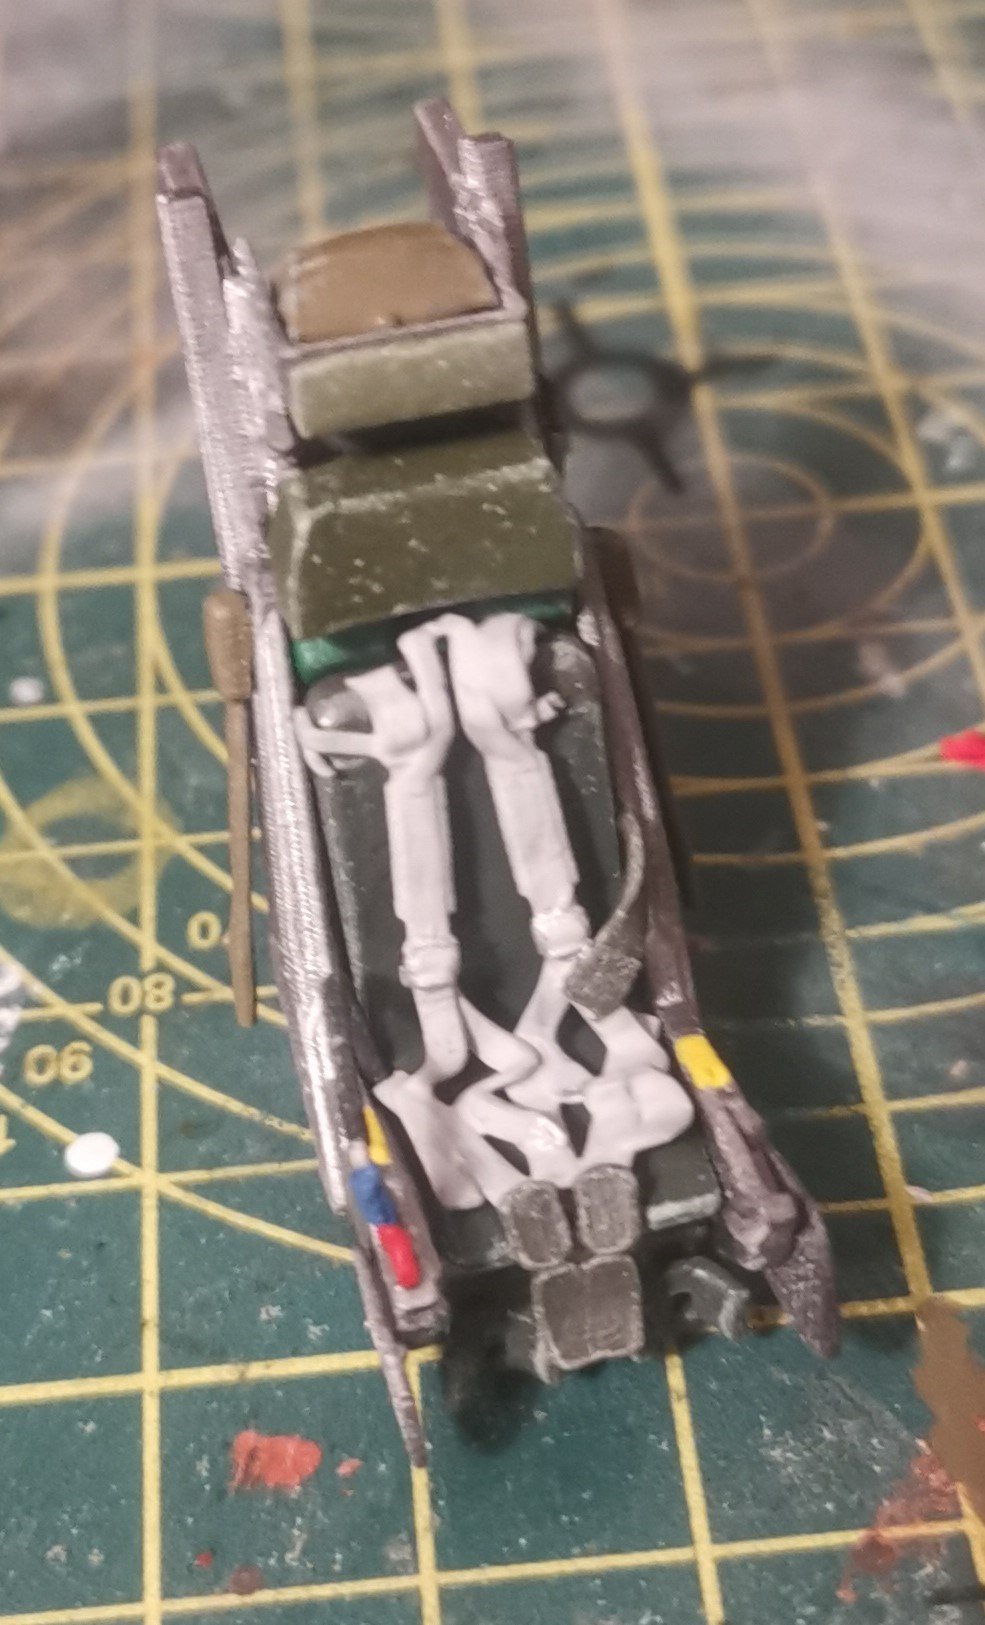
Got the bang seat painted up and assembled.
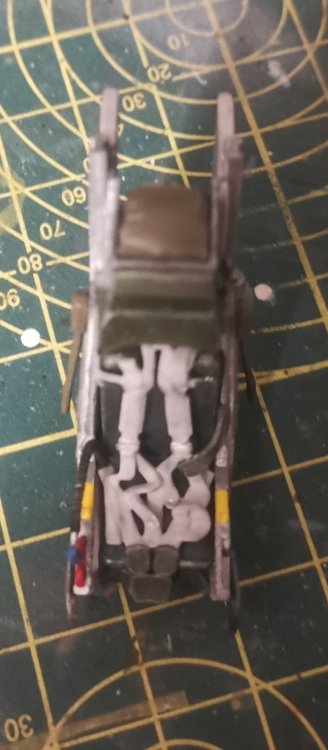

Now needs decals added and weathering. There are a few print lines visible on the sides of the frame but I felt it was better to leave alone and not risk destroying the detail as I suspect they won't be visible once it's in the cockpit.
A la Ernie above, I must have stared at the seatbelts wrong as I lost part of the top section trying to remove a print support which was stopping it bedding in properly against the seat pad. Again, I hope it'll be fairly invisible once it's installed.
Going away for a week on Thursday so not sure there will be much further progress until we're back.
-
5
-
-
Thanks Peter, that's exactly the info I was needing. I tend to paint at about 18 psi so I'll drop it down a bit for this. Think I'll have a few trials on an old paint mule first rather than bugger up this lovely kit.
-
2
-
-
As everyone has said the Merlin has such a distinctive, beautiful sound. Nothing else sounds quite like it.
-
5
-
-
Thanks Phil. I think I'm still at the learner stage as a resin builder but I think a big part of it is the anticipation/dread you build up in your head. If you just take it steadily and methodically it's actually pretty straightforward and really enjoyable.
To be honest, I think the 3D printed stuff here is harder to work with as it's so brittle and the print lines are quite prominent on some pieces due to the print orientation.
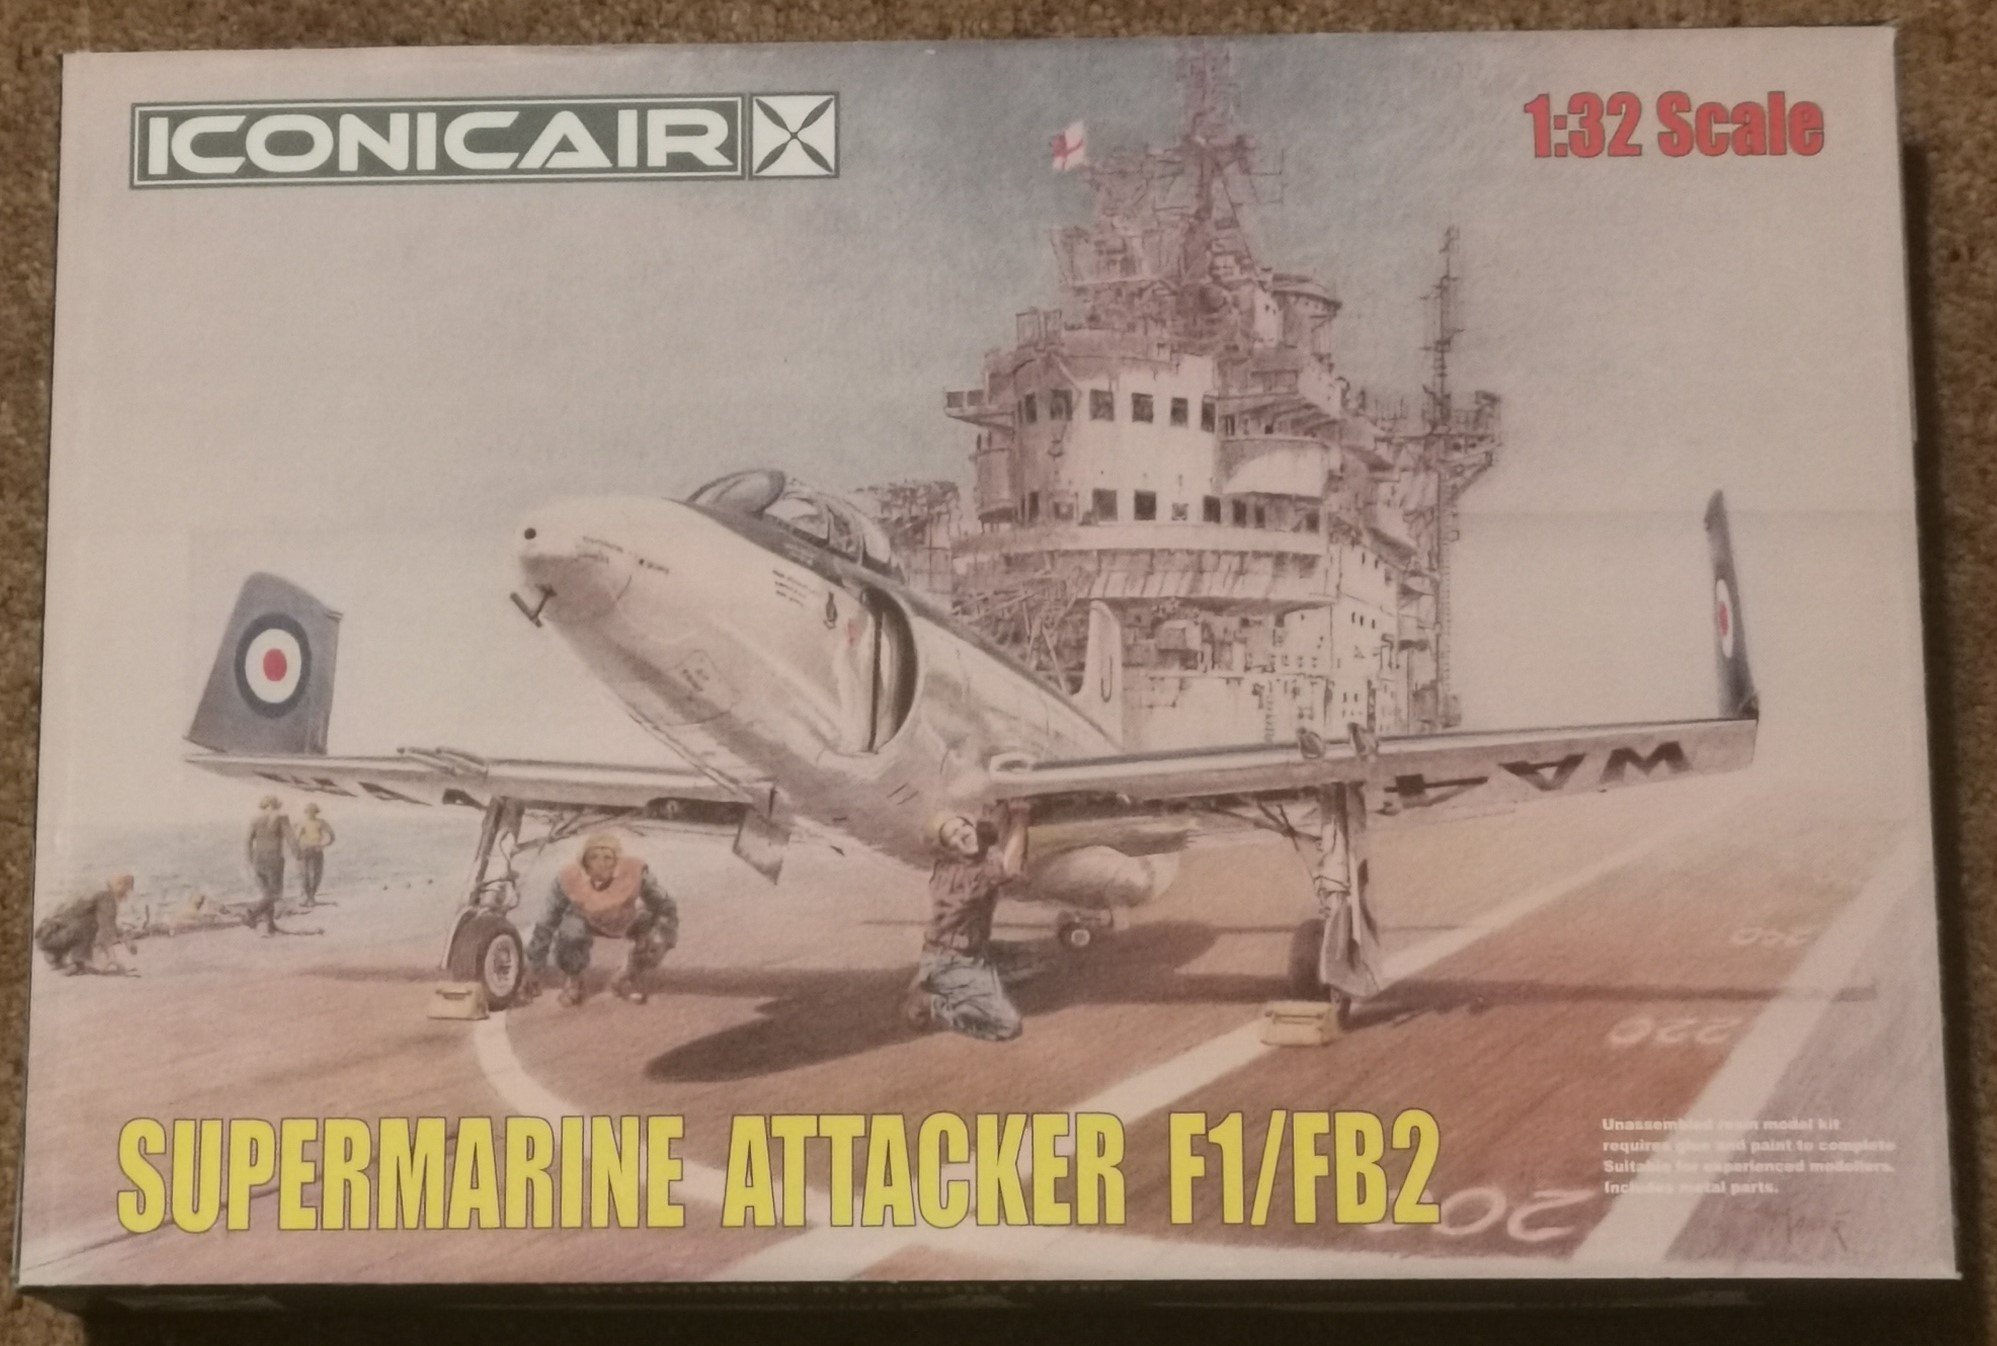
The Iconicair Attacker that I won in the Xmas raffle looks like another beast altogether, resin detail but without the big pour stubs, etc.
-
5
-
-
10 hours ago, PanzerWomble said:
I think you maybe right , i did look at HR Hobbies website last summer ( they had basic colours only then) but now apparently according to some other f'rum ...
It seems Alclad split into a UK and USA operation. So, if you're in the USA, don't worry, it's business as usual. In the UK, Alclad became HR hobbies but Alclad (USA) weren't happy as the two ranges were too similar. So in the end, the UK paint is now distributed by Mig, after slapping a nice little premium on the price !
My thoughts on ammo are they would bottle 2nd hand dogfood and sell it as a "modelling texturing product" if they could ....snake oil salesmen and I've never got on with their bottle paints much . *
*Just my opinion , if you love their stuff thats ok with me , no need to get upset.
Ha ha, yes they do produce an awful lot of 'stuff' which can be achieved by other means and the panel line washes and oilbrushers and things do tend to go off very quickly. I've got tubes of oils which are older than my kids and still going strong!
The paints are finicky and a bugger to get to spray nicely. I've done a couple of builds exclusively using Ammo but they aren't very robust although the colour range is decent.
-
3
-
-
Just got the Mr Paint colours for this today. As a question to those who're experienced with them, what's the best pressure to spray them at?
-
3
-
-
20 hours ago, BlrwestSiR said:
Sue's dad one time had a bottle of Lagavulin where the cork broke. So he found an empty sherry bottle and poured it in there instead. Except he didn't tell Sue's mom. So when she made a trifle and went to add some sherry to it, she ended up pouring in the Lagavulin.
It was quite the surprise for everyone that had it. It certainly wasn't the flavour we were expecting.
Glayva or Drambuie are nice in a trifle, the sweetness takes the edge off them so it goes down nicely. My wife's special trifle has Amaretto biscuits and Drambuie which is really nice as a combination
-
2
-
-
13 hours ago, PanzerWomble said:
Everyone rants about how good they are but they are nearly always out of stock in the UK , TBH given up on the idea of using them , I'm not paying to import them from CZ , or buying endless 'sets ' to get a particular colour.
I'm also not sure what the score with Alclad UK is now either as they seem to have disappeared / rebranded / doubled in price/ half the range they used to have . Meanwhile I can walk into any Hobbycraft and pick up most Tamiya's colours for a coupla quid.
Go BREXIT I thought. 🤮
I think that the metal lacquers sold by Ammo, Mig Jiminez's company, are rebranded Alcald paints. I could be wrong but the bottles look very similar.
-
1
-
-
I can sympathise Guy. I ended up buying the Swedish colours for the Viggen from Super Hobby in Poland. None of the UK or French stockists had much of anything useful in stock.
-
4
-
-
9 hours ago, Peterpools said:
Gus
Enjoy the build and I fully agree, Ernie generosity is incredible.
Further evidence of Ernie's generosity. Here's my Christmas Raffle prize sent direct from Graham at Iconicair.
Looks like a great kit. Ernie seems determined to turn me into a resin builder but if they're all of this quality he might well succeed!
-
12
-
 1
1
-
-
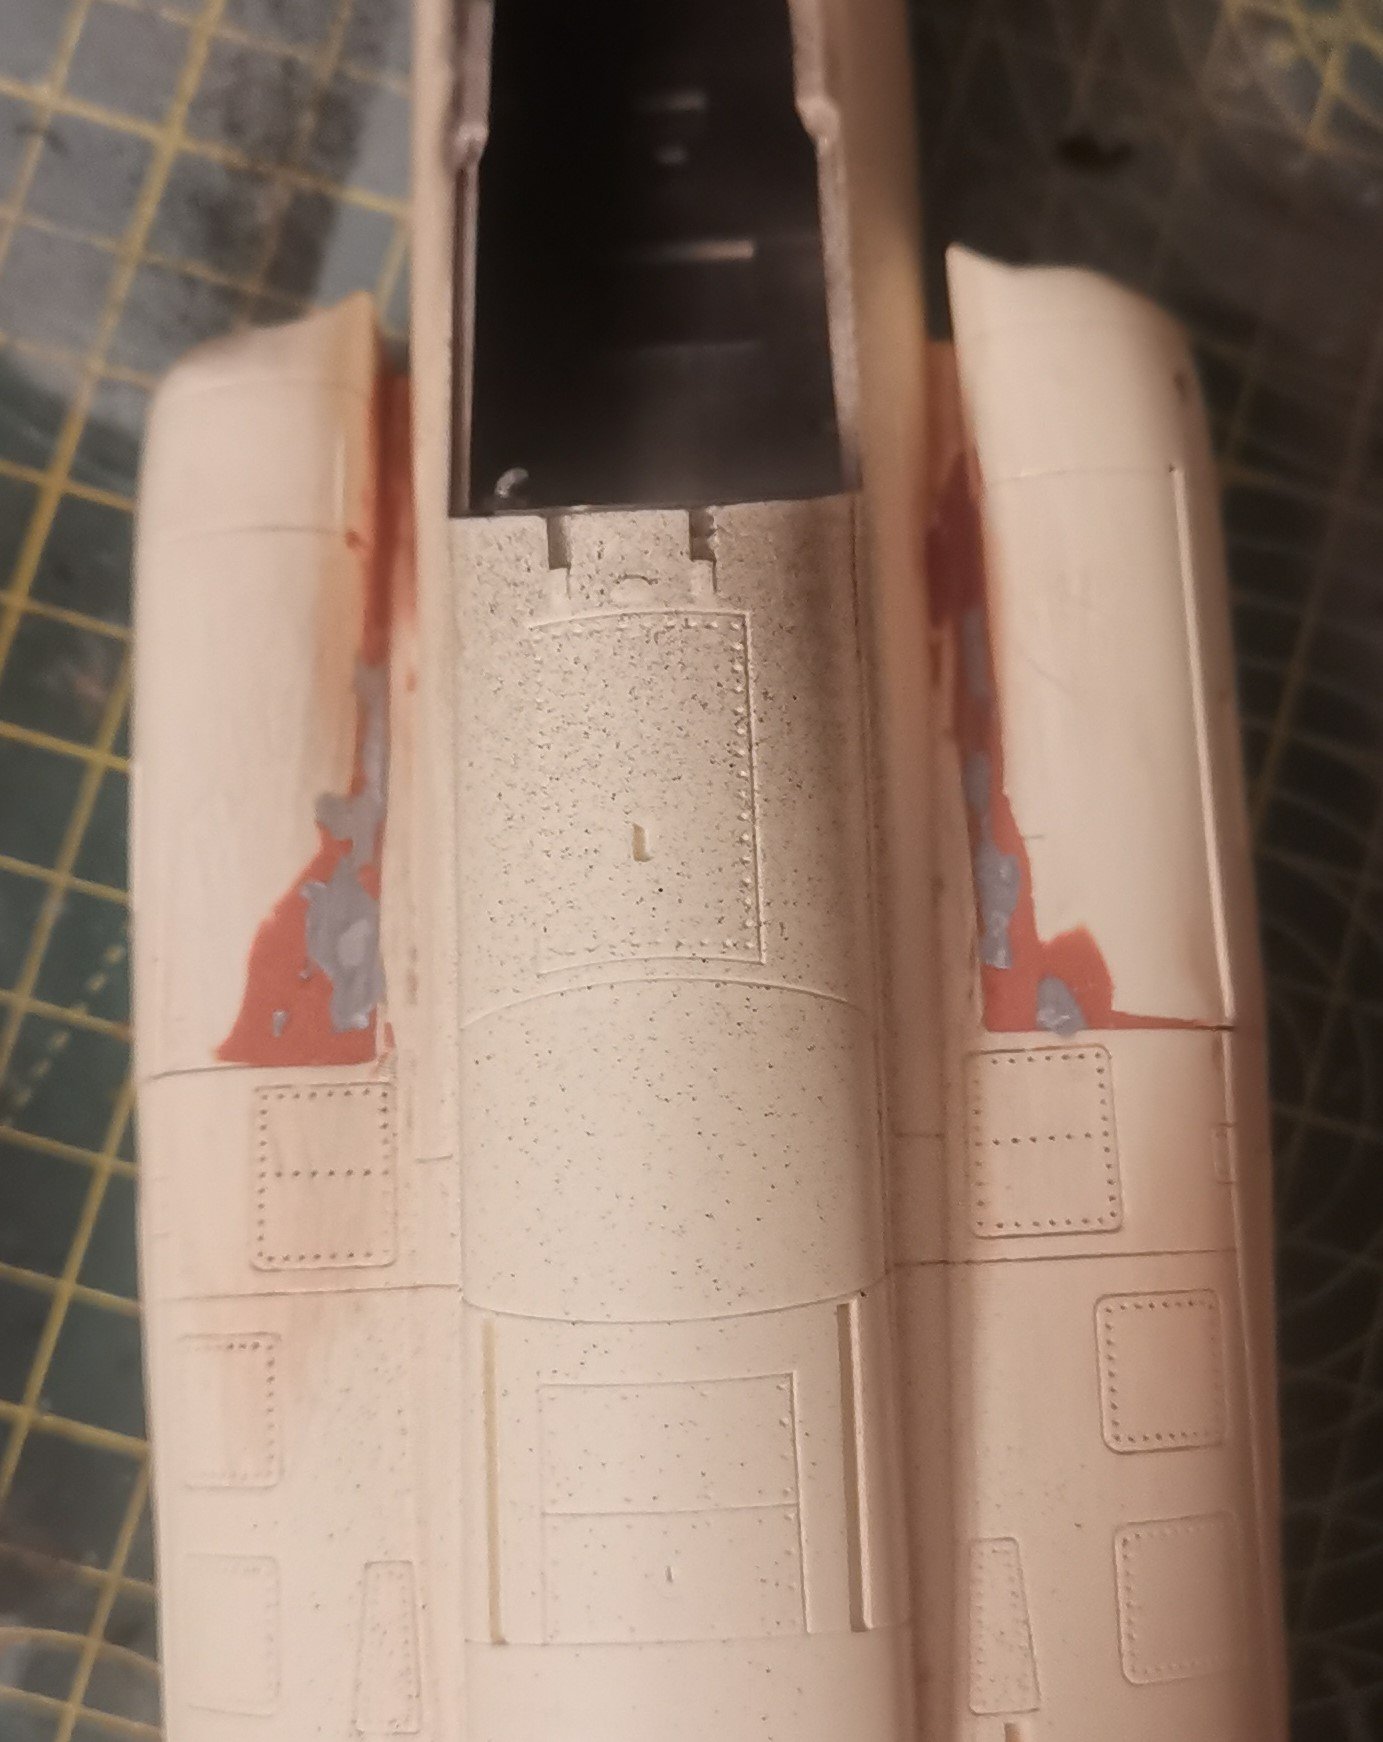
Bit more progress made. Intakes on and all gaps filled and sanded after a few iterations. Used Bondo Glazing Putty for the donkey work and then any smaller imperfections filled with Tamiya putty.
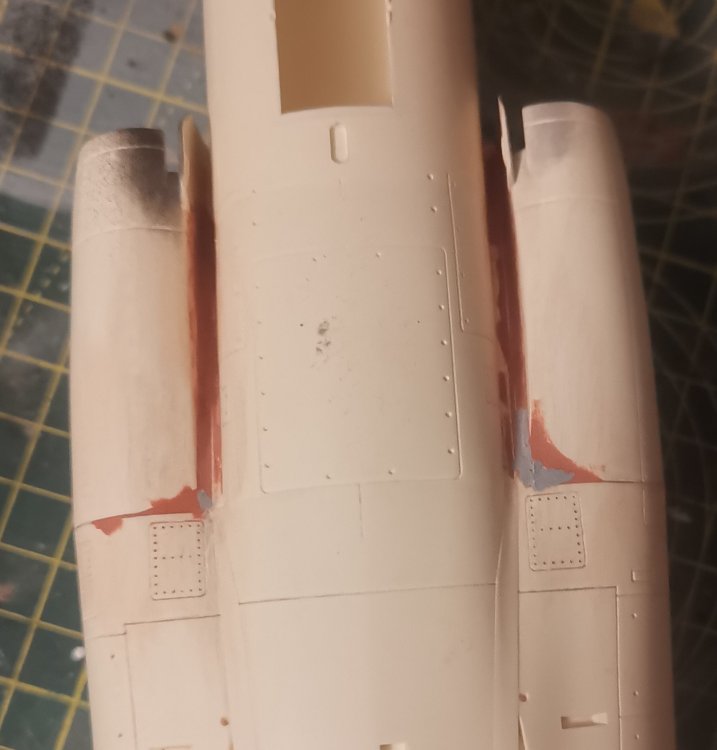


Using 3M 320 grit sanding sheets cut to size for the worst of the sanding and then various grits of Micromesh to finish. All the rescribing has been done as well. That's usually a job I dread but on the evidence so far the resin actually seems to be easier to scribe than the usual injection plastics, I think because it's harder.
The Mr Paint order should arrive tomorrow, so hopefully, I'll be able to make a bit more progress on the cockpit.
-
7
-
-
Nice collection Carl. The Macallan seems to be popular in Canada, well I know it was Neil Peart's favourite.
We were in Orkney last August and went to the Highland Park distillery which did a really good tour and tasting.
-
1
-
-
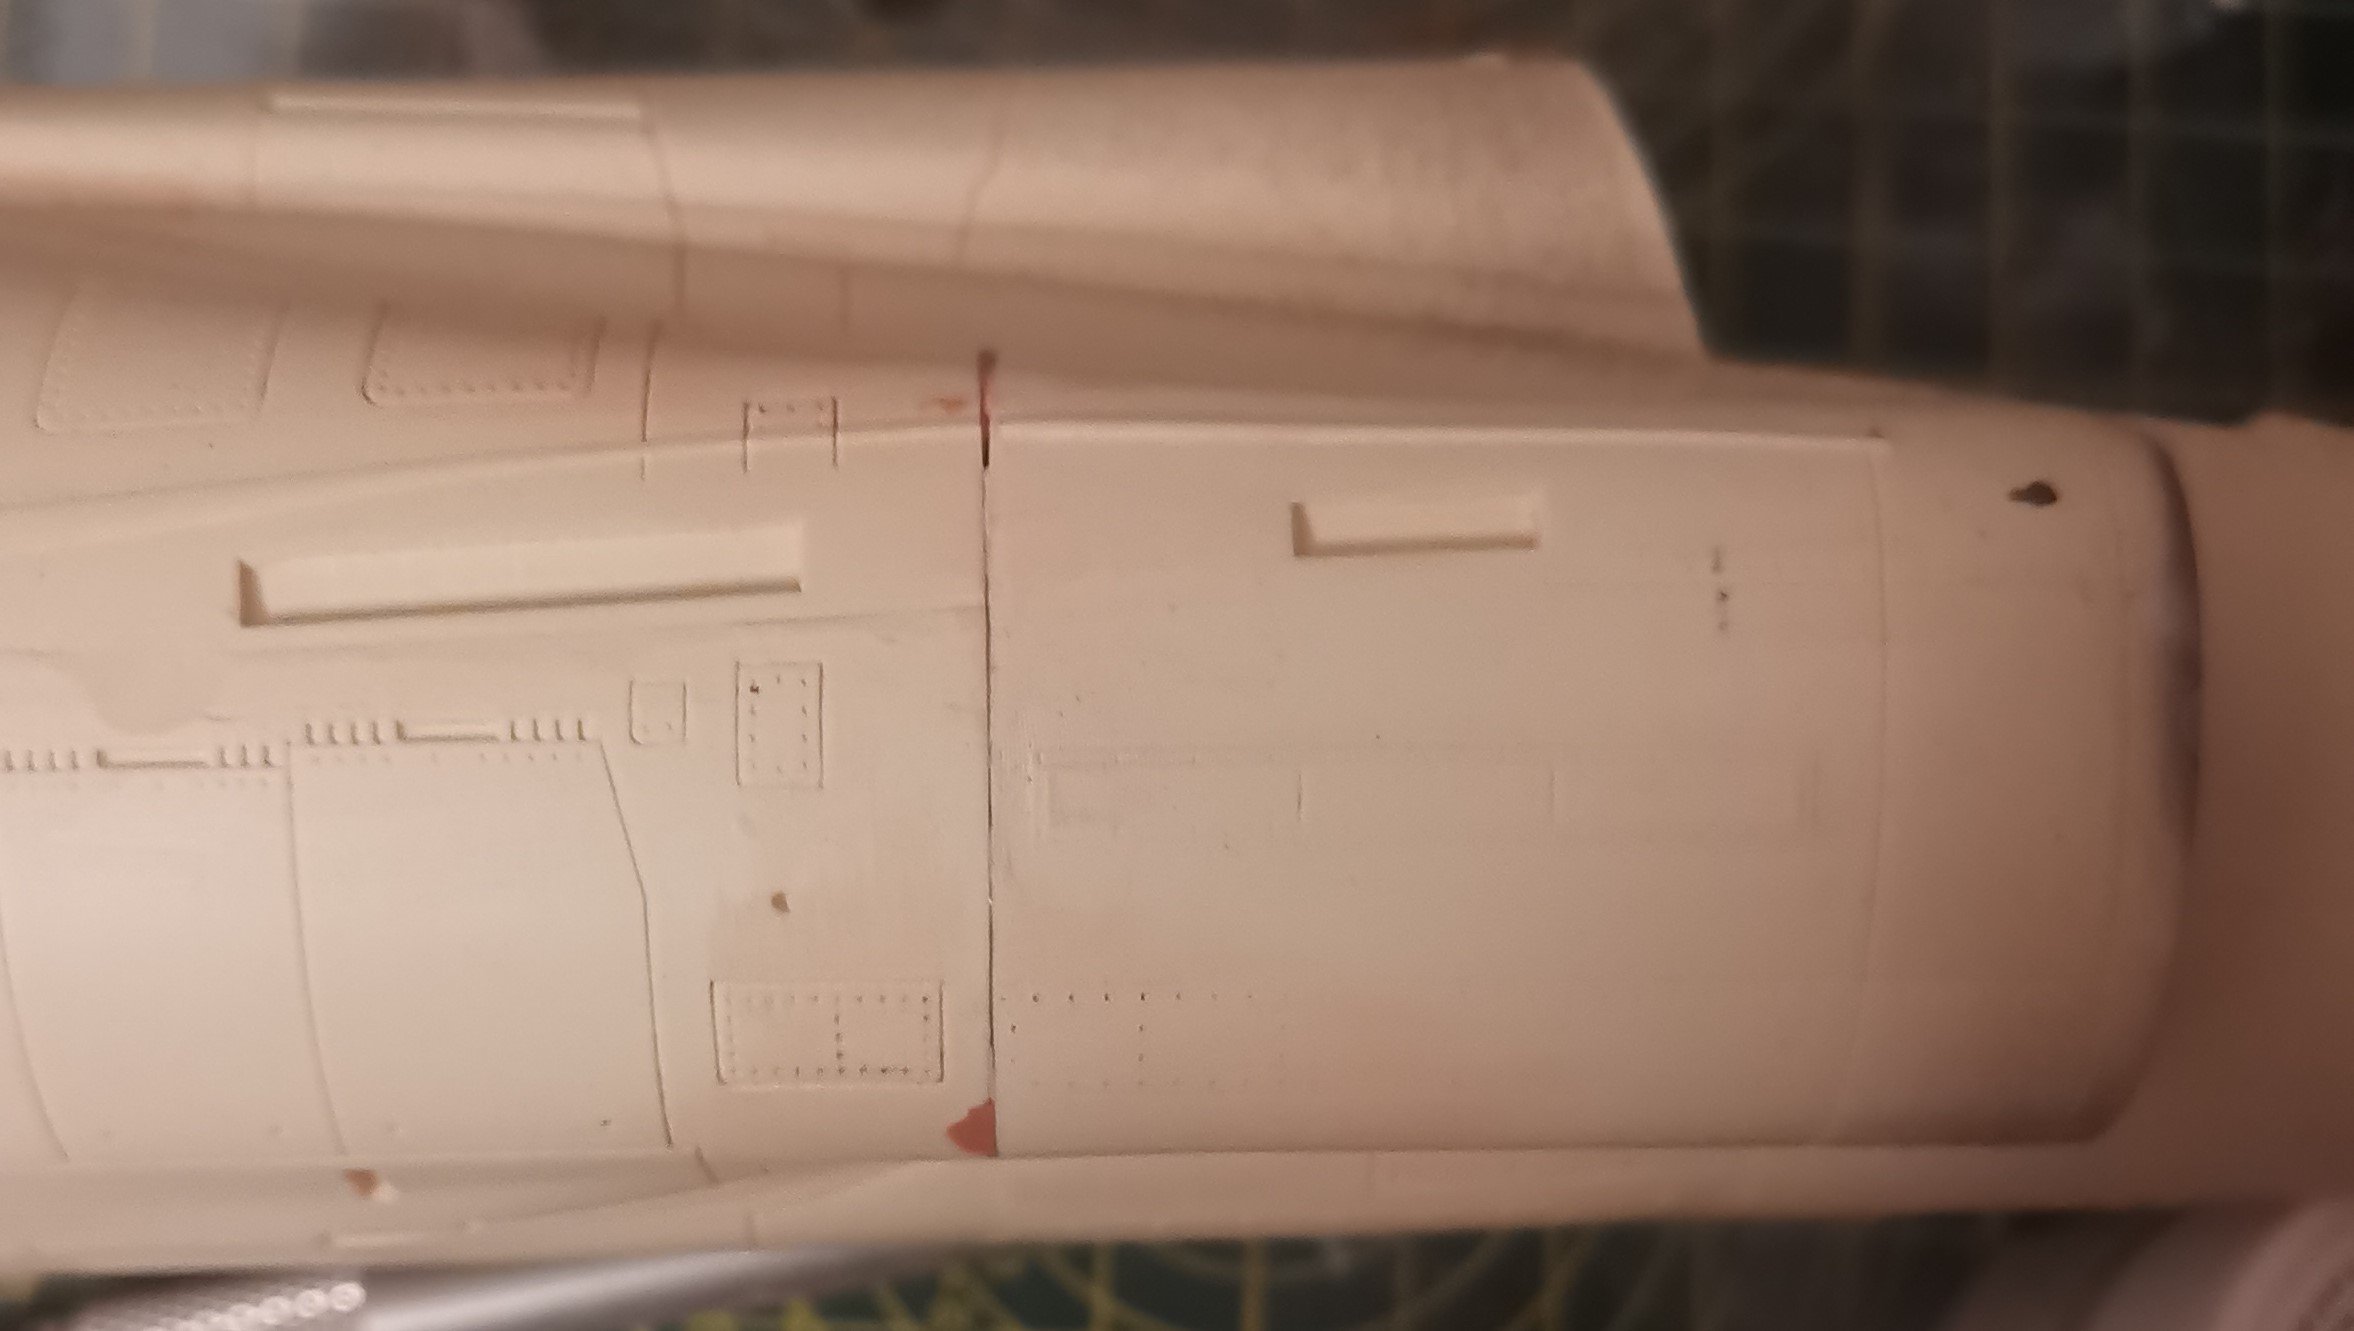
Thanks all. I've got the intakes on with the BSI 5 minute epoxy and filler in all the gaps, so now on to the tedious sanding, priming, checking, refilling, etc cycle. I'll post pics once I have something I'm happy with.
-
4
-
-
13 hours ago, Clunkmeister said:
I'd have loved to have seen these fly more. They were downright brutal machines, and twin Avons with the reheat lit? Good Bloody Night!
The F4s that replaced them just didn't have the same roar.
-
4
-
-
That's a nice Balvenie you've got in the cabinet there Ernie. Those Speyside malts are nice and mellow. I do like a good Islay one occasionally such as Bunnahabhain if I want something to chew on.
-
4
-
 1
1
-
-
Sorry to hear that Bill, hope you make a full recovery.
-
4
-
-
Great kit Peter, it's a joy to build. Have fun.
-
3
-
-
Looking forward to this one Guy.
Remember seeing the 111 Squadron birds at Leuchars in the early 70s. My uncle was an AC2 there, so we visited regularly, and I can still remember the noise they made. My uncle eventually ended up at Lyneham working on the AC-130s, so a bit of a change of pace.
-
5
-


JetMads 1/32 Viggen
in LSM 1/35 and Larger Work In Progress
Posted
Yep, if I'm going to push myself I may as well go the full hog! 😁