crazypoet
-
Posts
826 -
Joined
-
Last visited
Content Type
Profiles
Forums
Events
Gallery
Everything posted by crazypoet
-
*very* nice work!
-
Beautiful!
-

506th FG P-51 Iwo Jima completed
crazypoet replied to JohnB's topic in LSM 1/32 and Larger Aircraft Ready for Inspection
(Complete aside - I sometimes look back at my *own* posts to try to figure out “what the hell was I thinking when I did *that*?!?! 🤣🤣🤣) -
Trumpeter P-47D Razorback
crazypoet replied to crazypoet's topic in LSM 1/35 and Larger Work In Progress
🙏🙏🙏🙏🙏🙏 -
506th FG P-51 Iwo Jima completed
crazypoet replied to JohnB's topic in LSM 1/32 and Larger Aircraft Ready for Inspection
Keep them coming! please 🙏 I don’t look every day, and my own posts tend to be wandering OCD excursions into my slightly neurotic brain 🤣 all that said - I rely *heavily* on the work I see here, done by others, as both inspiration and instruction as I go about my own work. so please leave the pics and posts up, so we can come back and marvel/be inspired/learn something new 🙏💯🙏 -
Nice!!!
-
Trumpeter P-47D Razorback
crazypoet replied to crazypoet's topic in LSM 1/35 and Larger Work In Progress
Just had to vent here for a moment. Shopping for modeling supplies *sucks* just now! 🤣 Amazon doesn’t ship *most* things to Cambodia (notably including such things as solvent-type glues and lacquer paints 🤣🤷♂️🤦♂️), and even when they do, you pay international shipping individually per item, rather than per shipment. So… I recruited a friend in Atlanta to accept some deliveries for me pending a short visit for a business meeting in November. So far so good but thennnn… I discovered that neither Hannants nor Eduard will ship to the US because of the tariff/customs situation. They won’t even offer a guess as to when that might change (one of the customer service folk at Eduard asked me, politely, to elect a new president, so the world can shift a bit back towards to sanity) Soooo I took a deep breath and placed an order from each of them, to my Cambodia home address. Delivery services here are a bit “informal”, and one is never quite sure how local Customs is going to handle things. I’ll keep y’all posted as the adventure continues 🤣 -
Thank you all! This is exactly what I needed to know 🙏🙏🙏
-
I’ve seen several folk use custom-made stencils in their builds over the years, but for the life of me I can’t find references to the sources for them. i have a long-term project that will need stencils for group and squadron markings - I have literally everything else, but those are a bit of a sticking point 🤣 I could *maybe* make some of them with Tamiya tape and a sharp knife, but my skillz aren’t quite up to the finer bits of the lettering any ideas would be most welcome!
-
1/32 P.1101 at Oberammergau / Build review
crazypoet replied to JeroenPeters's topic in LSM 1/35 and Larger Work In Progress
Different tires on the same hub? That’s the only thing that would make sense to me -
Lotus 49C - Ebbro - 1/20
crazypoet replied to DocRob's topic in LSM 1/35 and Larger Work In Progress
I was going to ask why ford positioned their logo upside-down, then I saw that it was on both sides, so could be read either way. obviously I need more coffee this morning 🤣🤷♂️🤦♂️😂 -
Trumpeter P-47D Razorback
crazypoet replied to crazypoet's topic in LSM 1/35 and Larger Work In Progress
Rum absolutely has a part to play in all of this - both as consolation and celebration, depending 😂🤦♂️😎 The truly interesting thing is that neither the kit parts nor the Eduard set match *any* of the references I’ve found, taken as a whole. They each get *some* details right, but neither get the whole picture so to speak. I wish I knew where Eduard got their inspiration - it would be a lot easier if I knew. You're quite right about the photos - there are precious few of them, and none of those match even each other in all details 🤷♂️🤷♂️ Another point that is giving me a bit of headache is the the inside of the panel covering the ammo bay - every photo I’ve found shows it as a simple flat panel, as opposed to the fairly complex panel with lightening holes of varying sizes provided by both the kit and the Eduard set. Again, I wish I could see the reference they used. My best guess is that they found one example from a later version of the bird and went with that. And I've found, so far, exactly zero photos of the inside of the panel over the guns themselves, so I have to just take it on faith that they got it right. My best guess is that the details varied across different versions, different manufacturers, and changes made in the field (replacement of damaged parts and such) Eduard did at least do a *far* better job on the various panels and partitions, and included details that the good folk at Trumpeter simply ignored Soooo… a glass of rum to the rescue, and a hope both that the end result is “close enough” and that I execute it *well* enough to be happy 😎 🙏🙏🙏 -
1/32 Westland Whirlwind
crazypoet replied to JeroenPeters's topic in LSM 1/35 and Larger Work In Progress
Love every bit of this build! -
Lotus 49C - Ebbro - 1/20
crazypoet replied to DocRob's topic in LSM 1/35 and Larger Work In Progress
Engine tubes and wiring aren’t the most fun part of a build, but the results are *so* worth it! I’m loving this so far 🙏 -
Trumpeter P-47D Razorback
crazypoet replied to crazypoet's topic in LSM 1/35 and Larger Work In Progress
Mostly pretty straightforward, except for the curves right where they enter the guns i had to use a toothpick and needle-nose pliers for those 🤣 -
Trumpeter P-47D Razorback
crazypoet replied to crazypoet's topic in LSM 1/35 and Larger Work In Progress
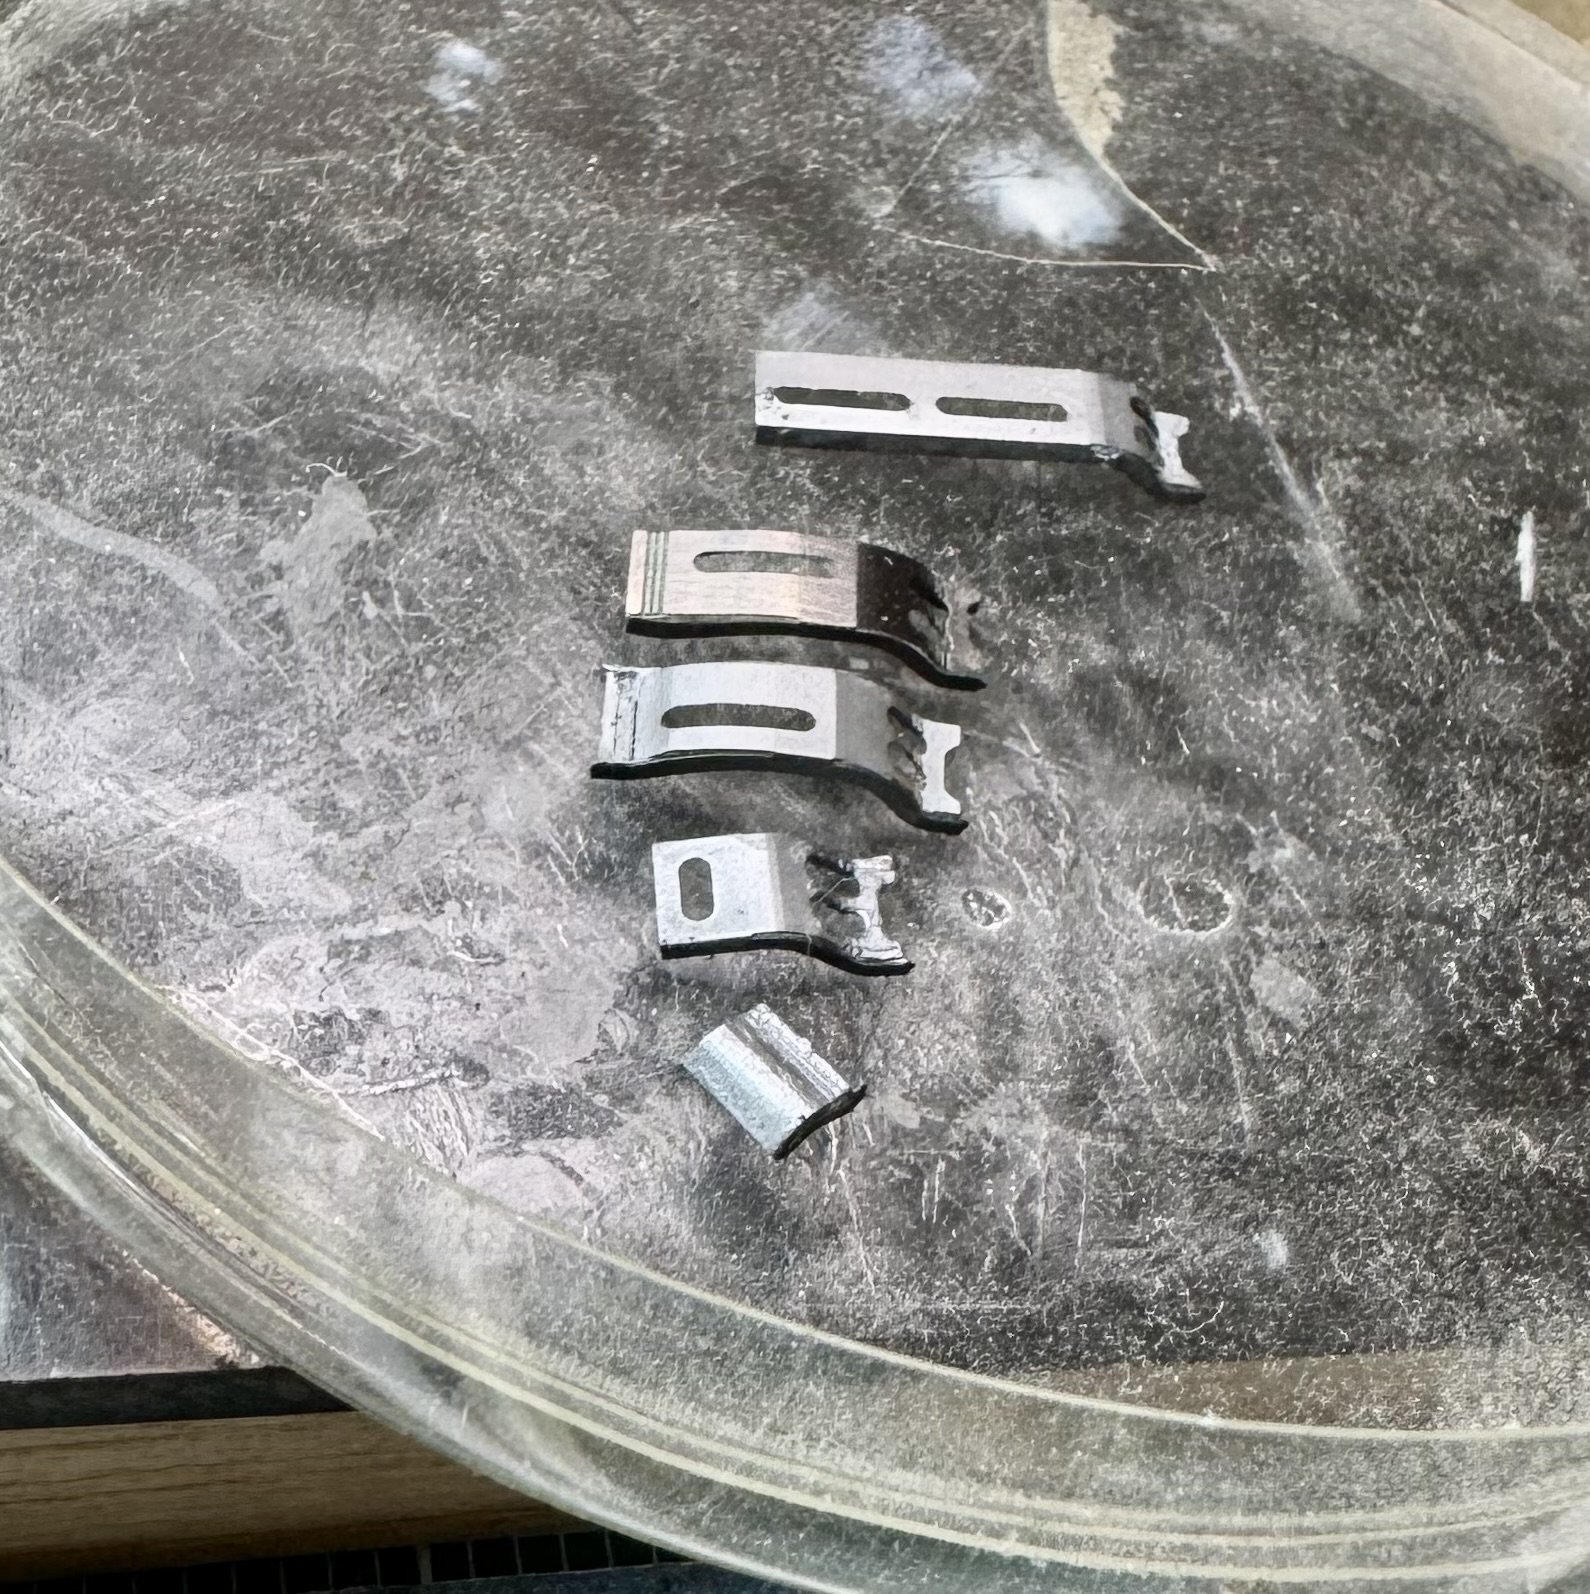
The feed chutes are folded up, glued to hold the edges, primed (super thin coat of Mr Surfacer 1200), and with a single layer of Uschi Steel powder applied (it gets a bit brighter with each layer) The Uschi powder gives what I think is actually a better finish than the bare PE steel, but I’m going to step away for a bit and come back for another look. I folded up a spare gun #2 chute from the closed side to give a contrast of bare steel PE vs the Uschi - it’s waayy too bright for scale, I think The smallest chute has a bit of texture from when I tried using a drop of CA to fill in the bending lines, applied with too-heavy a hand. 🤦♂️ I can also see another that needs a bit of fine-tuning on one edge, plus filling in more of the visible bending lines (Eduard did a pretty good job of putting them where they’re not particularly visible, but you can still see them here and there) I will likely clean these off and do another test with Alclad bright aluminum to see which I like better (and also take a few minutes to smooth down the unintended texture from the CA on the gun #4 chute 😂🤦♂️) at any rate, this is my progress for the day I'm going to do a test fit of the ammo belts, with the chutes dry-fitted, to see how much I need to extend the belts (the kit belts are already a bit short; even more so after filling the chutes where the ammo is visible. I’ll try micro-clear canopy cement to glue the belt ends together, and see if that still gives me a decent drape with no kinks - hoping it does, as that’s the simplest approach Then, it’s off to painting the belts temselves wheeeee!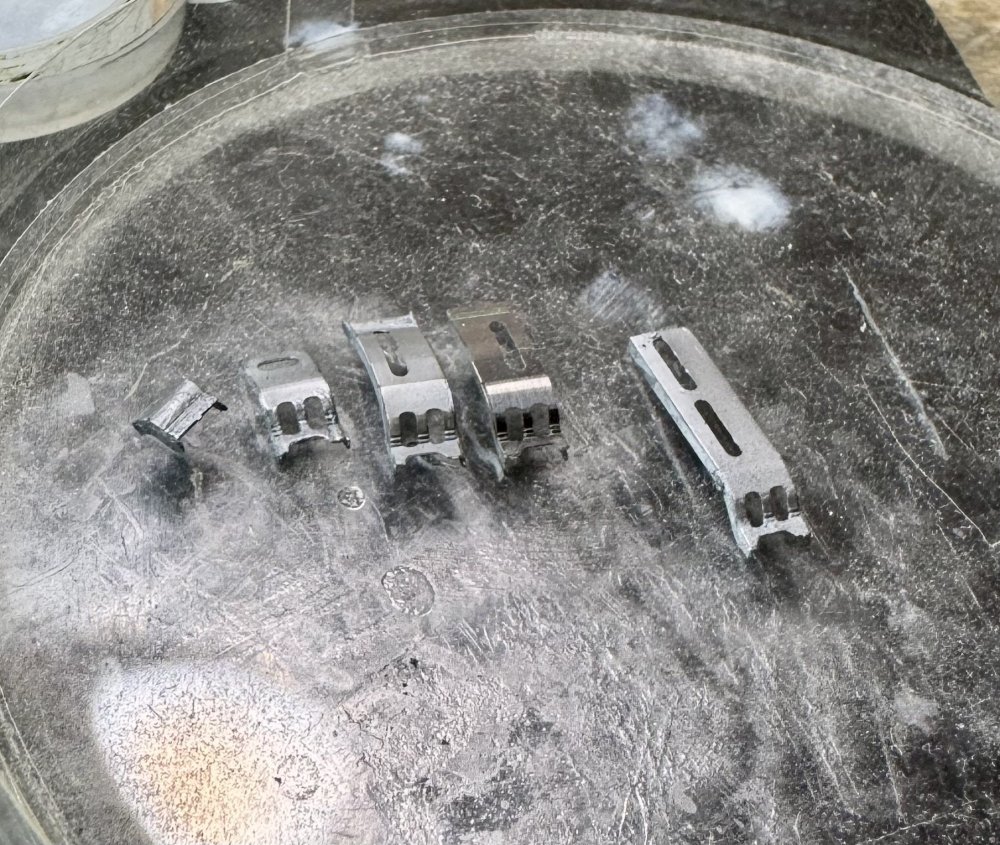

-
1:32nd scale SE5a (Viper)
crazypoet replied to sandbagger's topic in LSM 1/35 and Larger Work In Progress
That beautifully done! I admire the craftsmanship of biplane rigging - it takes a steady hand and the right bits and pieces to make it convincing, and you nailed it -
Damnnnn sweet!
-
Are those control links kit parts or scratch? If they came with the kit, I’m even more impressed that I was already with the quality they build into the box 🙏
-
Trumpeter P-47D Razorback
crazypoet replied to crazypoet's topic in LSM 1/35 and Larger Work In Progress
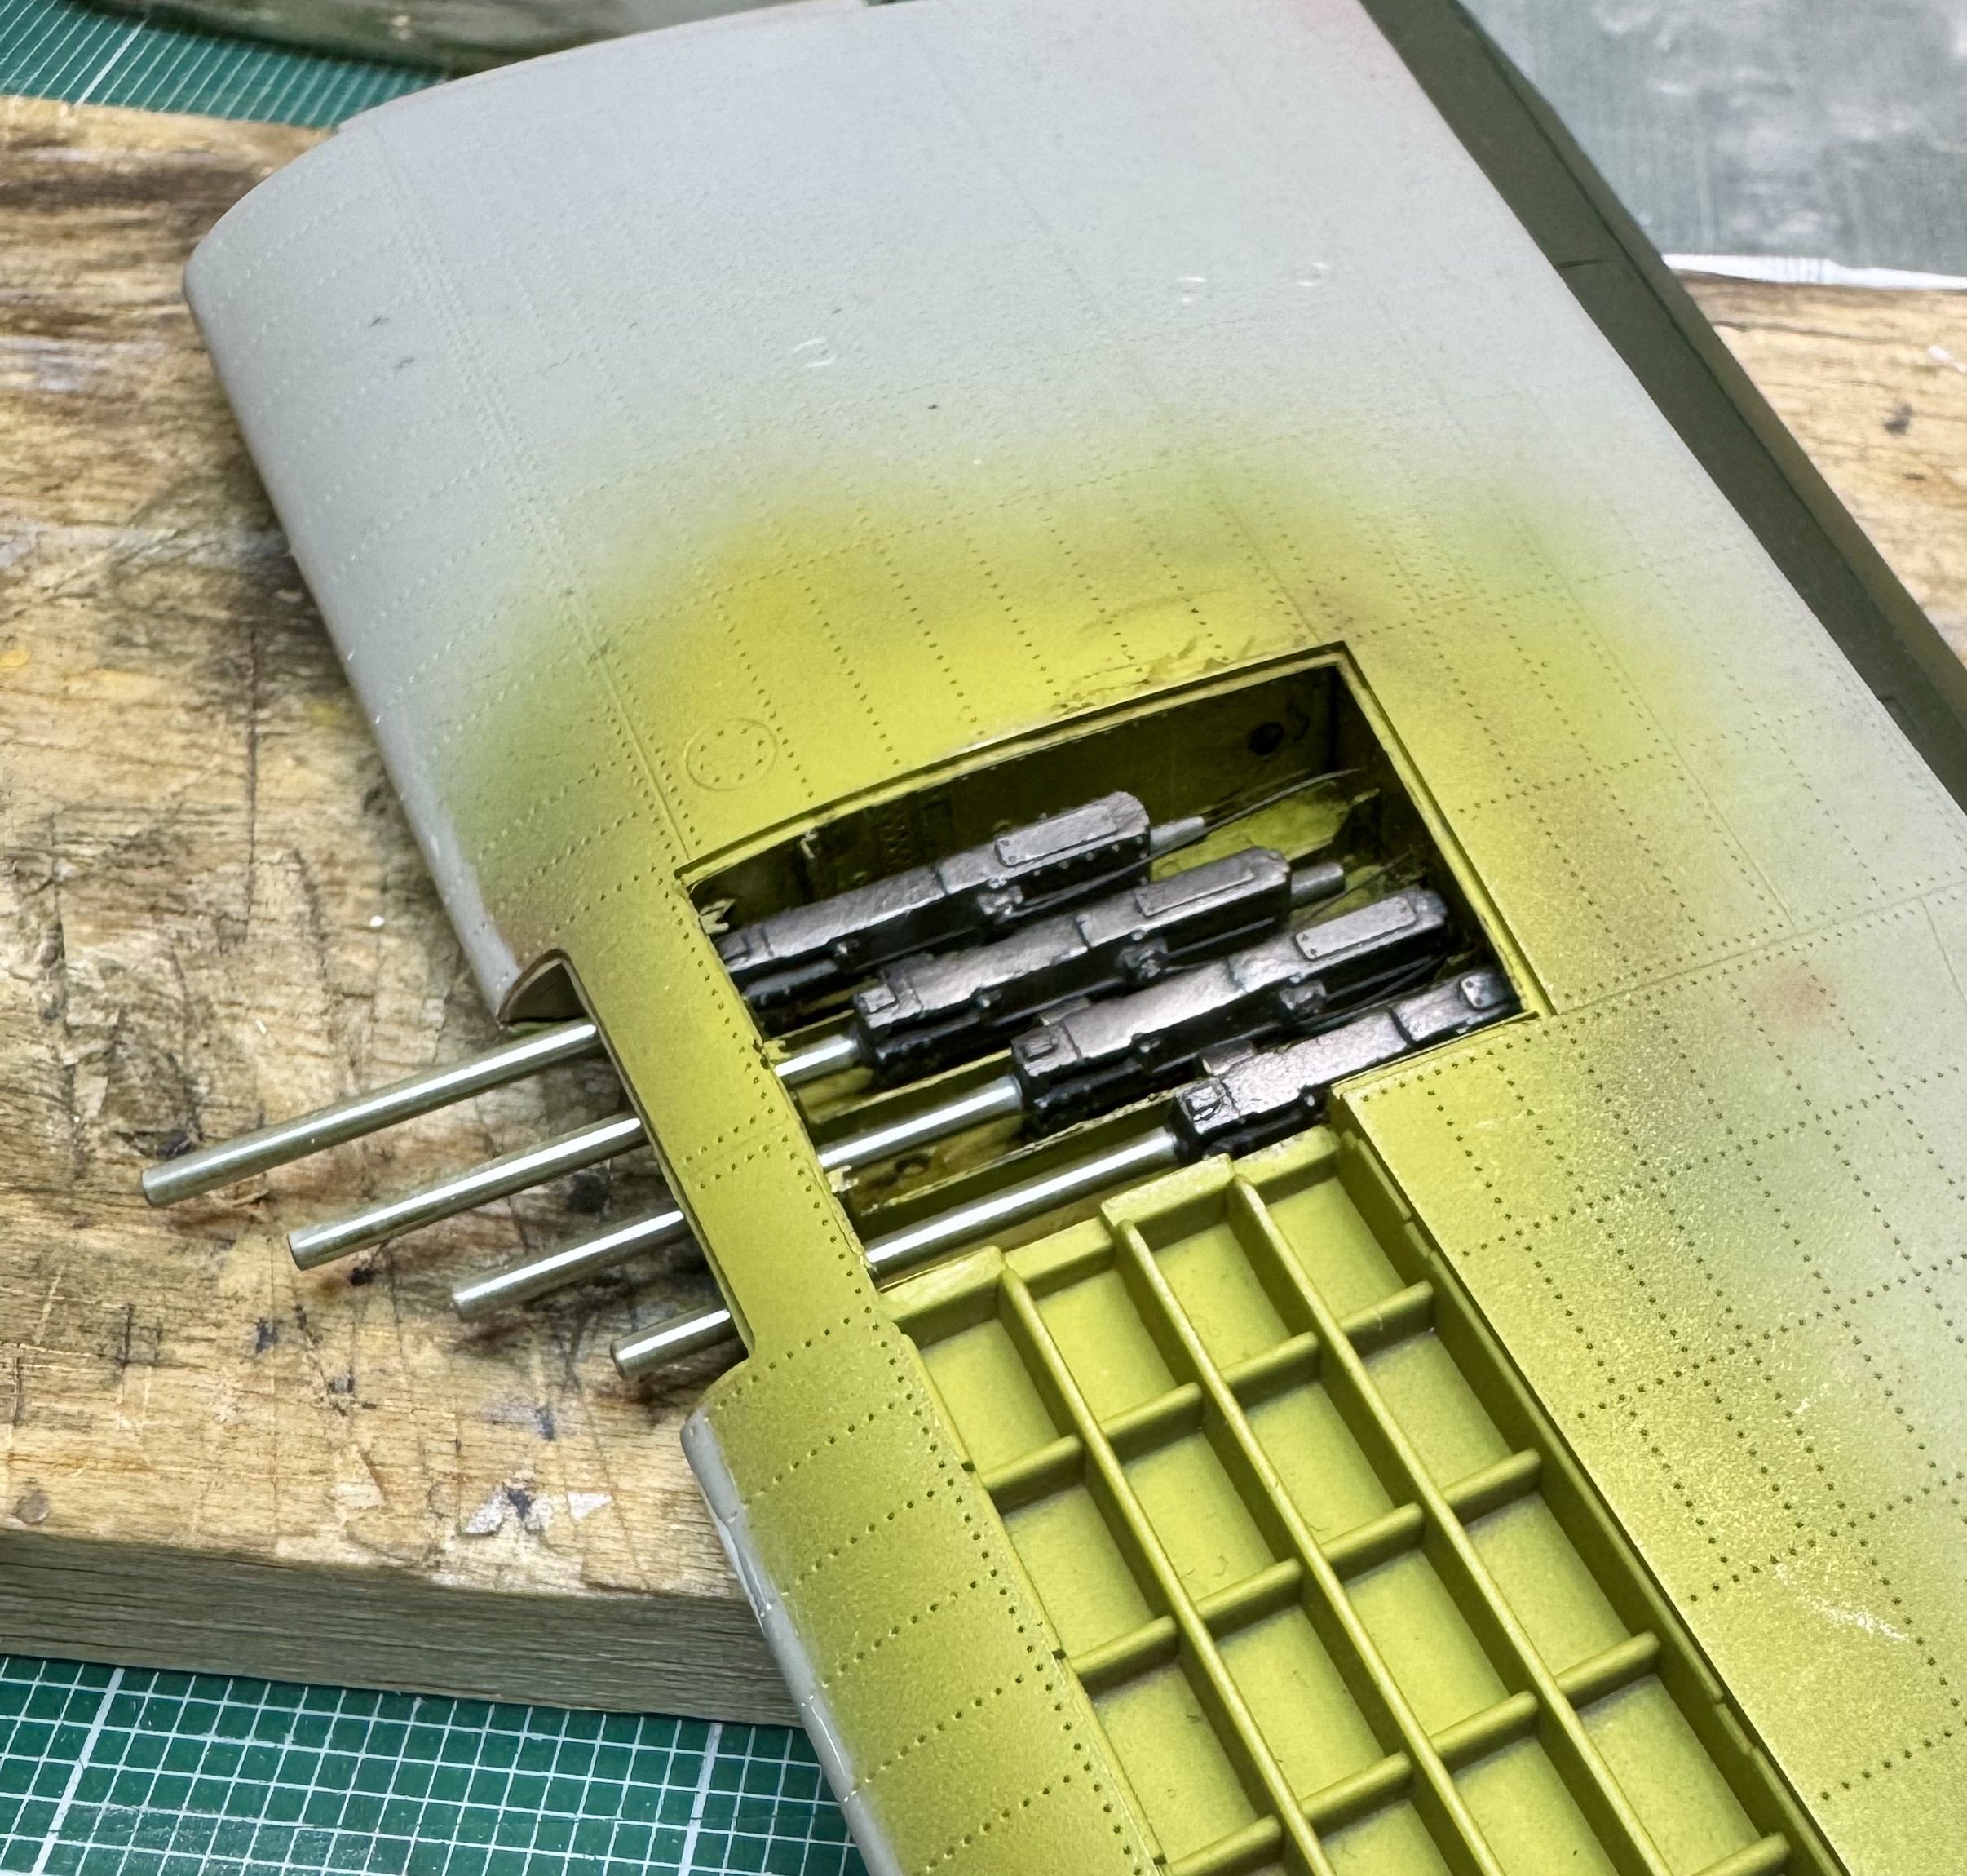
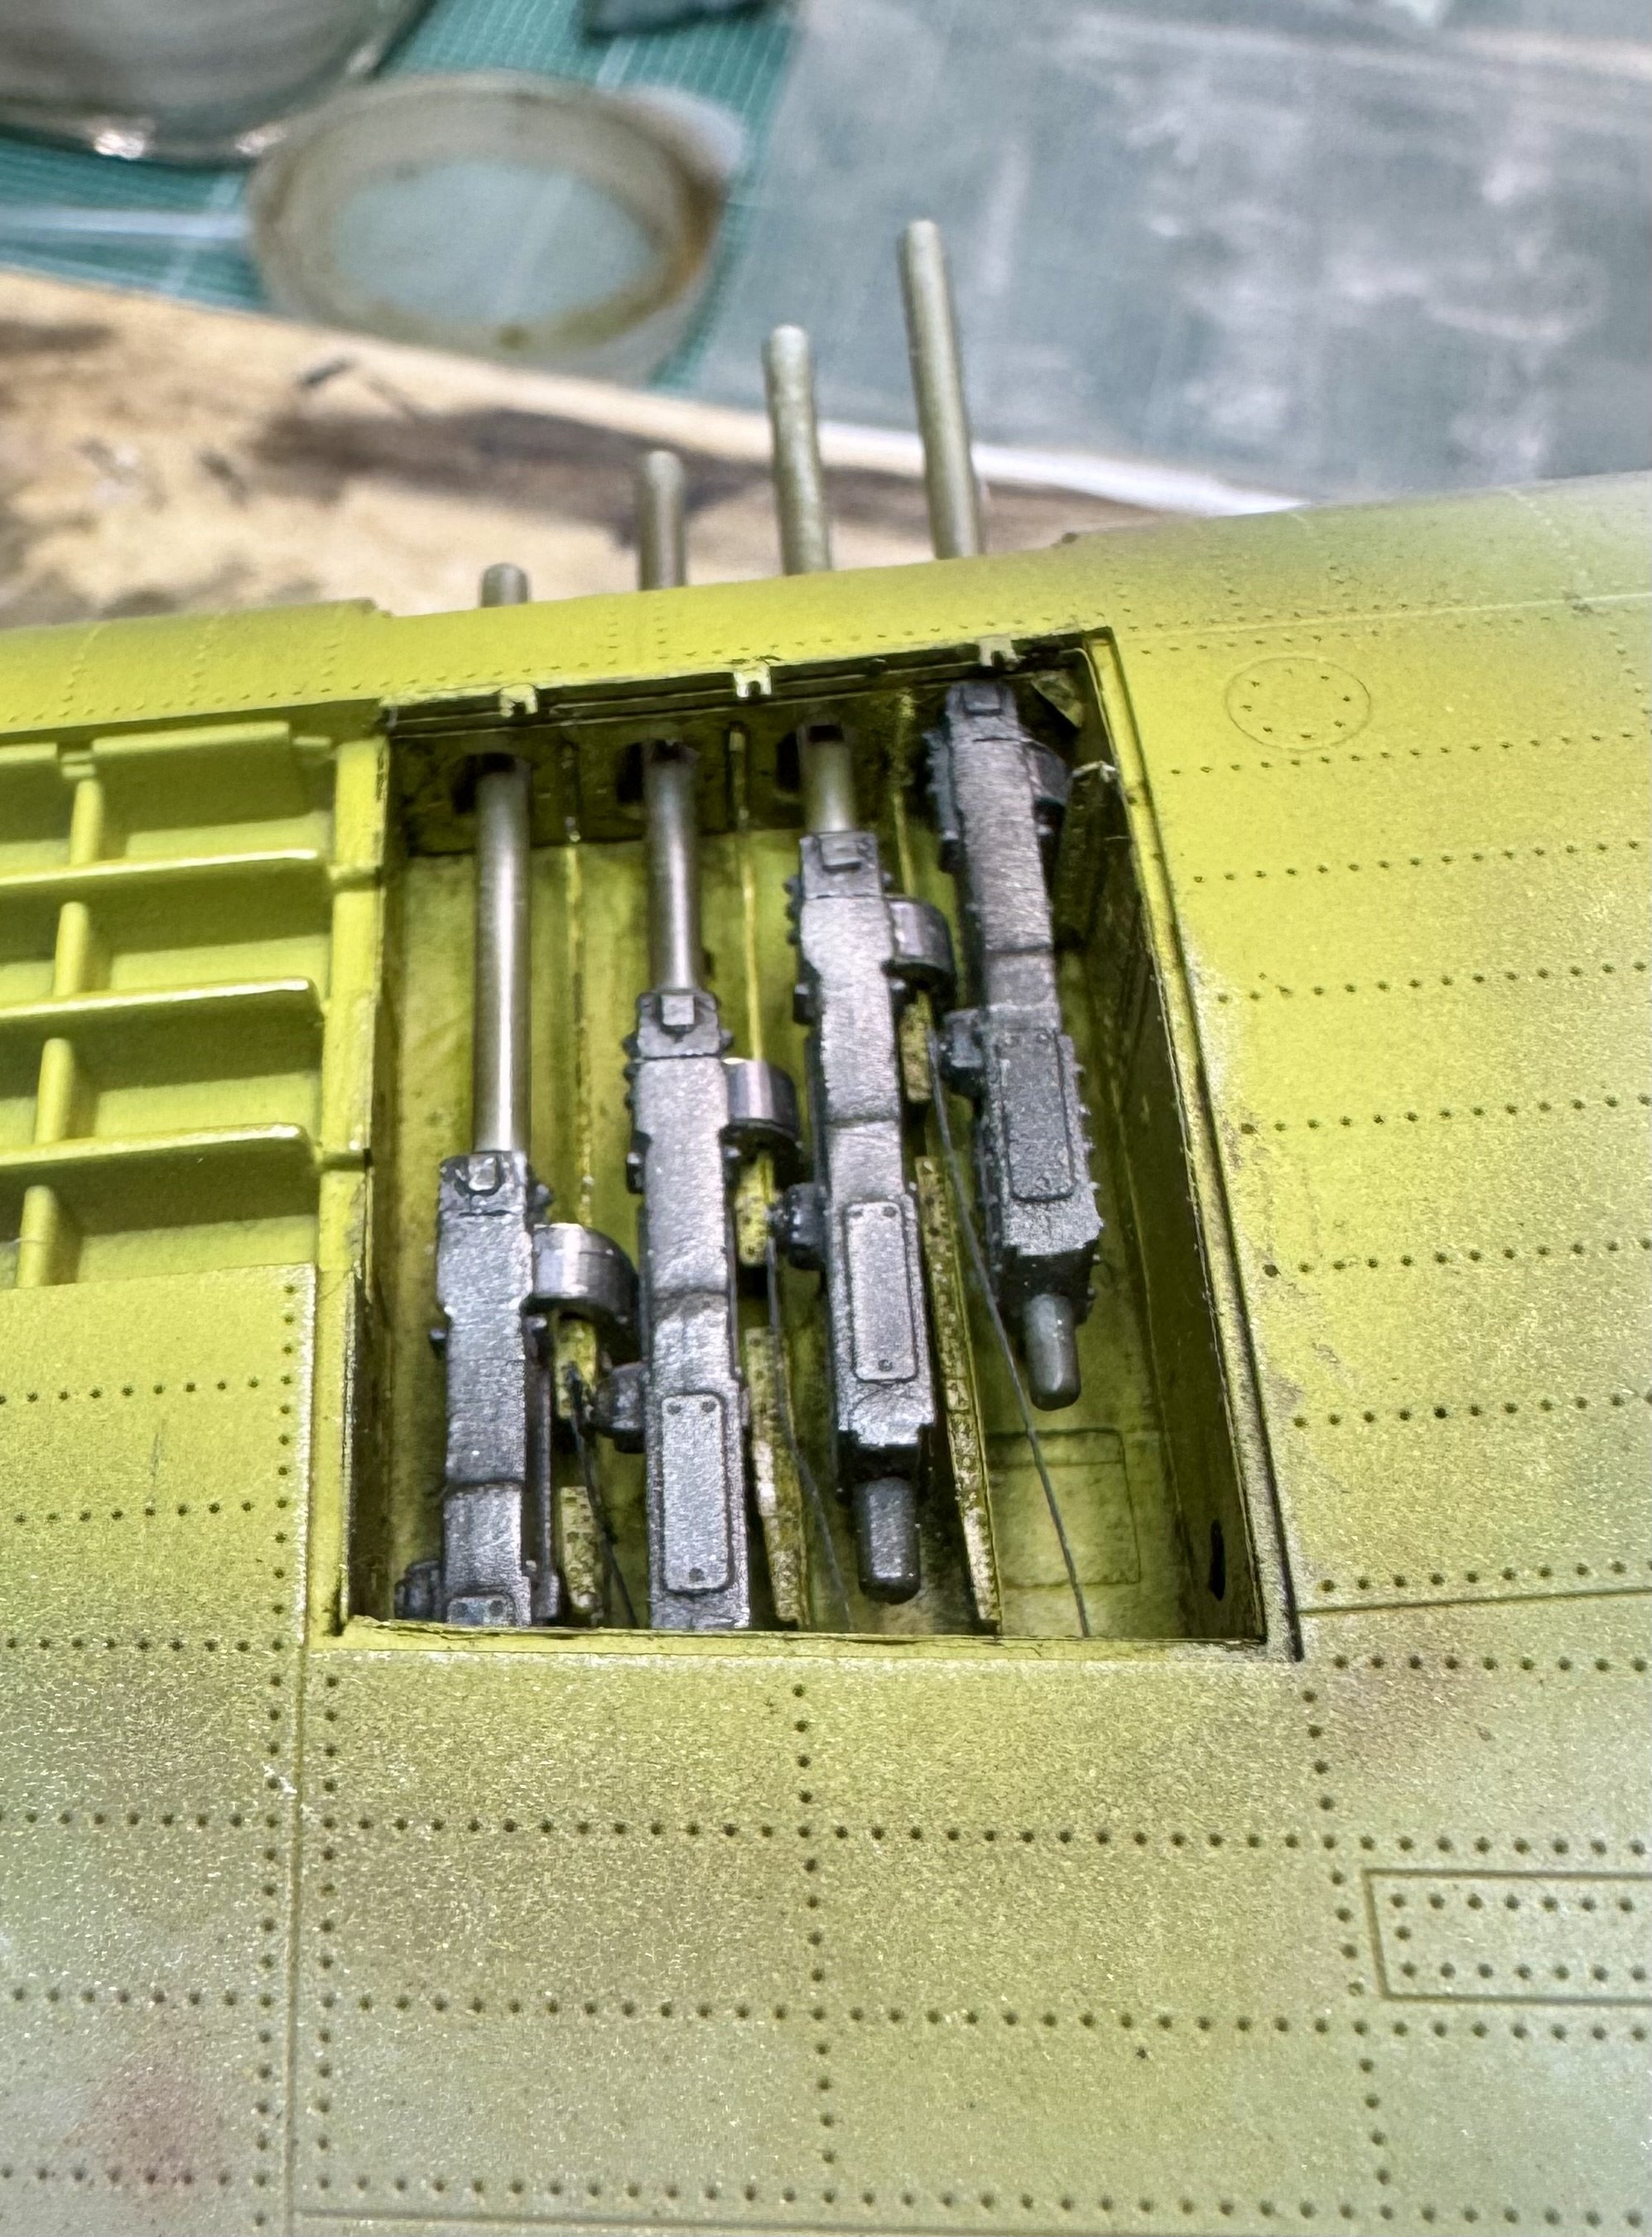
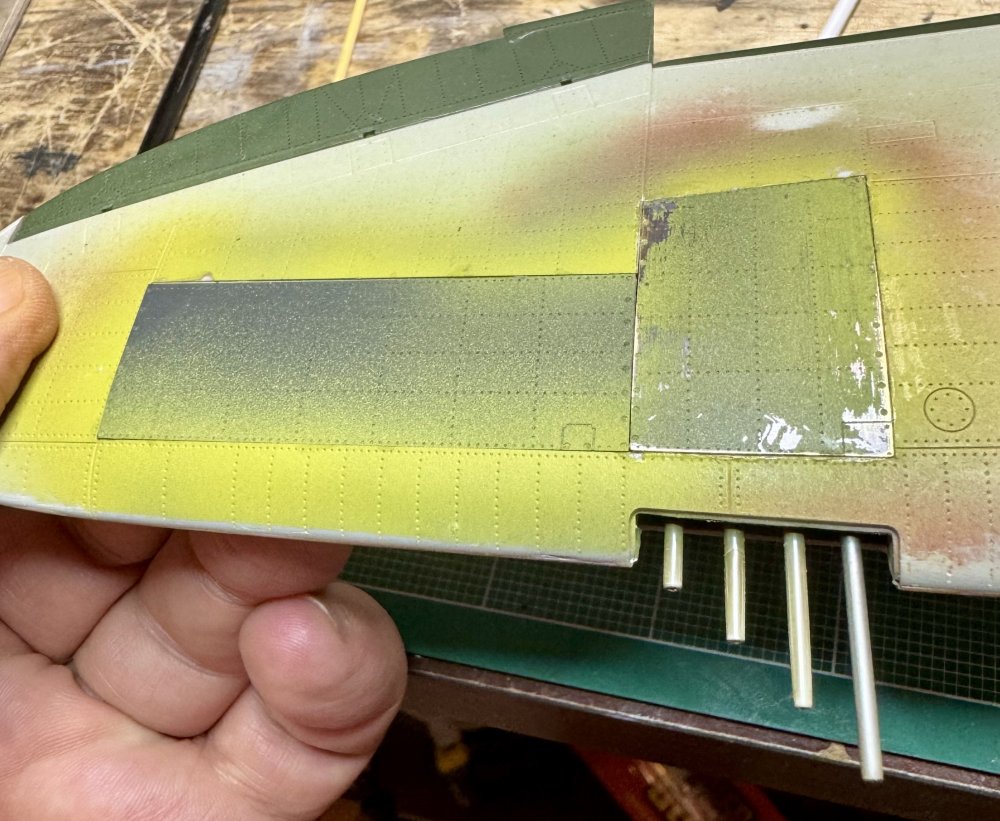
The guns in the open bay are installed, and I’m relatively happy with them. Fit was a bit fiddly because the chutes for dumping the ammo belt links after firing have zero wriggle room, but everything fit with only a minimal amount of cursing. The fun part was wriggling the charging handle cables through their tiny holes in the back of the bay, but again, not too bad - I only screwed up two of them, and fortunately Eduard included spares 🤣 Next up are the ammo feed trays and belts, along with some more PE framing to tie it all together. This is also decision time about the clutter at the front of the bay. There’s a metal rod that appears to be a part of the lock-down mechanism for the bay cover and a couple of hydraulic lines that route who-knows-where from the front of the bay, under the gun barrels and out *somewhere* I’m using the kit vinyl ammo belts, which should be interesting. It will take some judicious use of hot water to get them into proper shape to drape over the ammo bay partitions and squeeze them into the Eduard feed chutes. Then I’ll find out if I have the proper paints for the bloody things 🤣 According to ChatGPT, the paints I have on-hand will work, so I’m at least somewhat confident 😎 (not least because finding model paints here in Phnom Penh is a bit…challenging 😂🤷♂️🤦♂️) Should be fun!

-
Trumpeter P-47D Razorback
crazypoet replied to crazypoet's topic in LSM 1/35 and Larger Work In Progress
Thank you! With a bit of work, I’m hoping to blend them in a bit better 🙏 now I’m working on the open side. The challenge there is that the inboard gun has to go in first, because of the PE chutes for the ammo belt links. I wouldn’t be at all worried except it will only align with the right amount of material added back on. this should be fun! -
Trumpeter P-47D Razorback
crazypoet replied to crazypoet's topic in LSM 1/35 and Larger Work In Progress
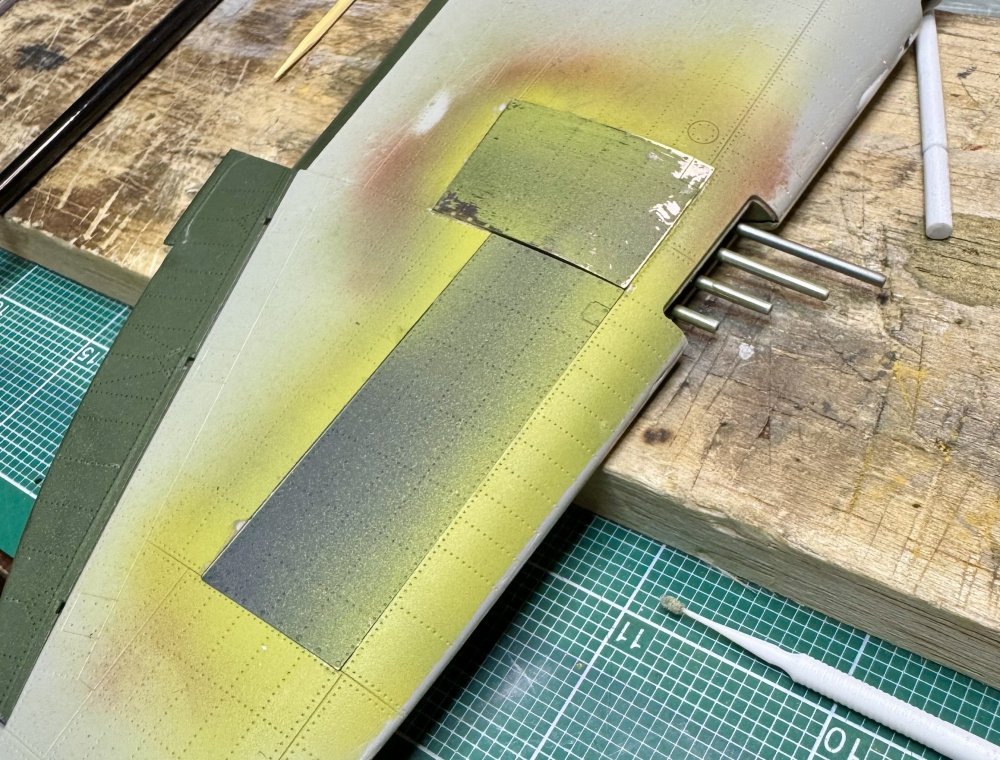
Well, ok. I’m calling the closed bay on the right wing done. I had the unhappy experience of the PE over the guns slightly “springing” up a bit as I clamped it to let the CA glue set (on the one edge where the gluing surface was almost microscopic), and there’s one corner of the ammo bay cover that did the same. I’m not thrilled, but I can adjust with a light application of a needle file, sanding stick, and a bit of filler to bring them into submission. The ammo tray cover was pretty simple, all things considered. The gun bay cover on the other hand, was an exercise in pure frustration. It took a ton of filing to get it to fit into the kit opening (Eduard made it a bit over-wide, for some reason), and it kept wanting to either bend too much or spring back as I was working on the airfoil curve. at any rate, they’re glued down, reasonably presentable (pending some final finishing touches), and I can continue beating my head against the internals of the open bay. The big challenge there is fitting the inboard gun, as there’s not much room to work with and I have to add some material to the base after the Eduard instructions had me removed it. Another example of “test fit things *before* blindly following instructions 😂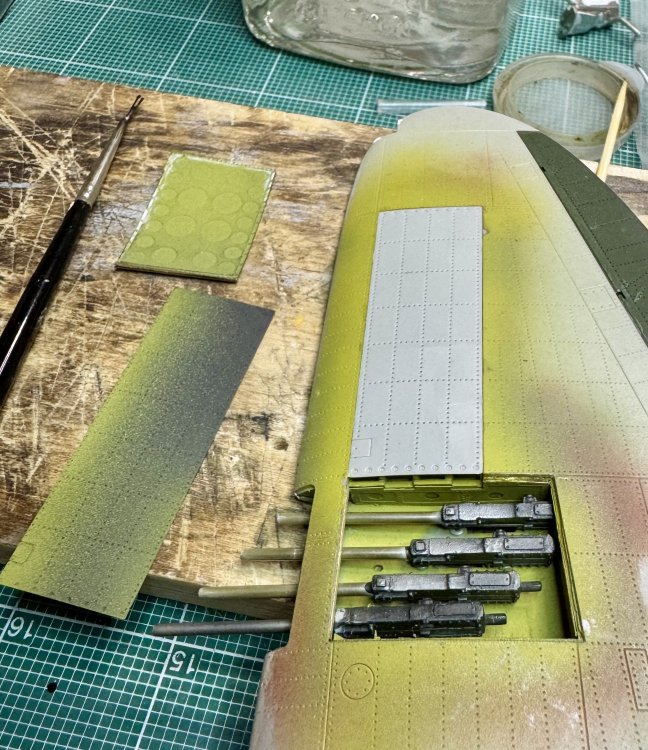
-
Trumpeter P-47D Razorback
crazypoet replied to crazypoet's topic in LSM 1/35 and Larger Work In Progress
No pics just yet, as I’m still working through a couple of finicky fit issues But another hint for anyone else following along this path… if you want to use the Eduard PE panels to close one of the bays… for the panel over the ammo compartment, *first* glue in the kit plastic part, then glue just the top layer of the PE part on top of that. The kit part sits *exactly* low enough that one layer of the Eduard PE panel brings it exactly flush with the wing surface. This also helps to get the airfoil curve set properly on the PE part both the Eduard and Kit parts by themselves sit too low inside the wing when building a closed gun bay, but combined, they come out exactly right the alternative is getting creative with filler or other supports underneath everything, which is kinda hard to get just right (again, ask me how I know! 😂🤣) -
Great work on those seatbelts!
-
1:32nd scale SE5a (Viper)
crazypoet replied to sandbagger's topic in LSM 1/35 and Larger Work In Progress
Beautiful work on both!