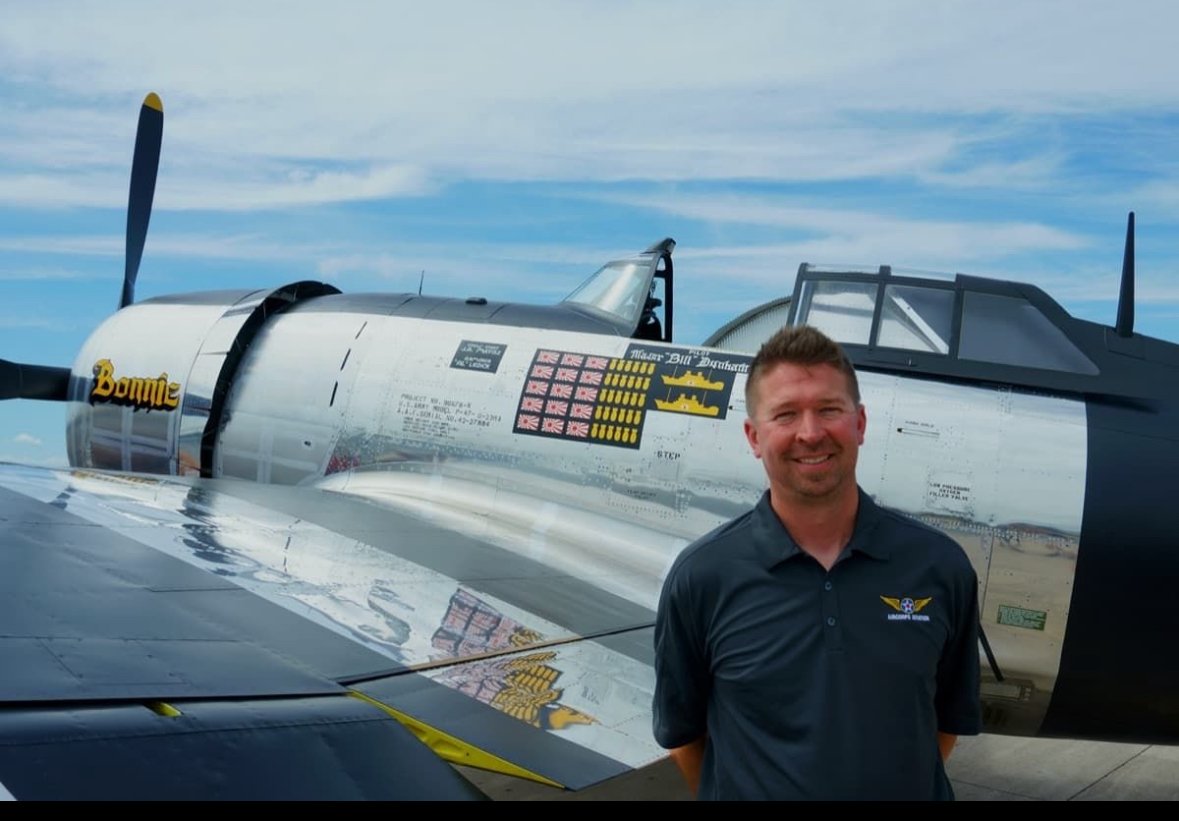
crazypoet
-
Posts
826 -
Joined
-
Last visited
Content Type
Profiles
Forums
Events
Gallery
Everything posted by crazypoet
-

Trumpeter P-47D Razorback
crazypoet replied to crazypoet's topic in LSM 1/35 and Larger Work In Progress
(Also, I still haven’t figured out whether I’m going to try to thin down and drill the oleo scissors themselves - I have an idea about how to approach it, but I really don’t know if my hands are steady enough to not turn them into mangled bits of plastic trash in the process🤣🤦♂️) -
Trumpeter P-47D Razorback
crazypoet replied to crazypoet's topic in LSM 1/35 and Larger Work In Progress
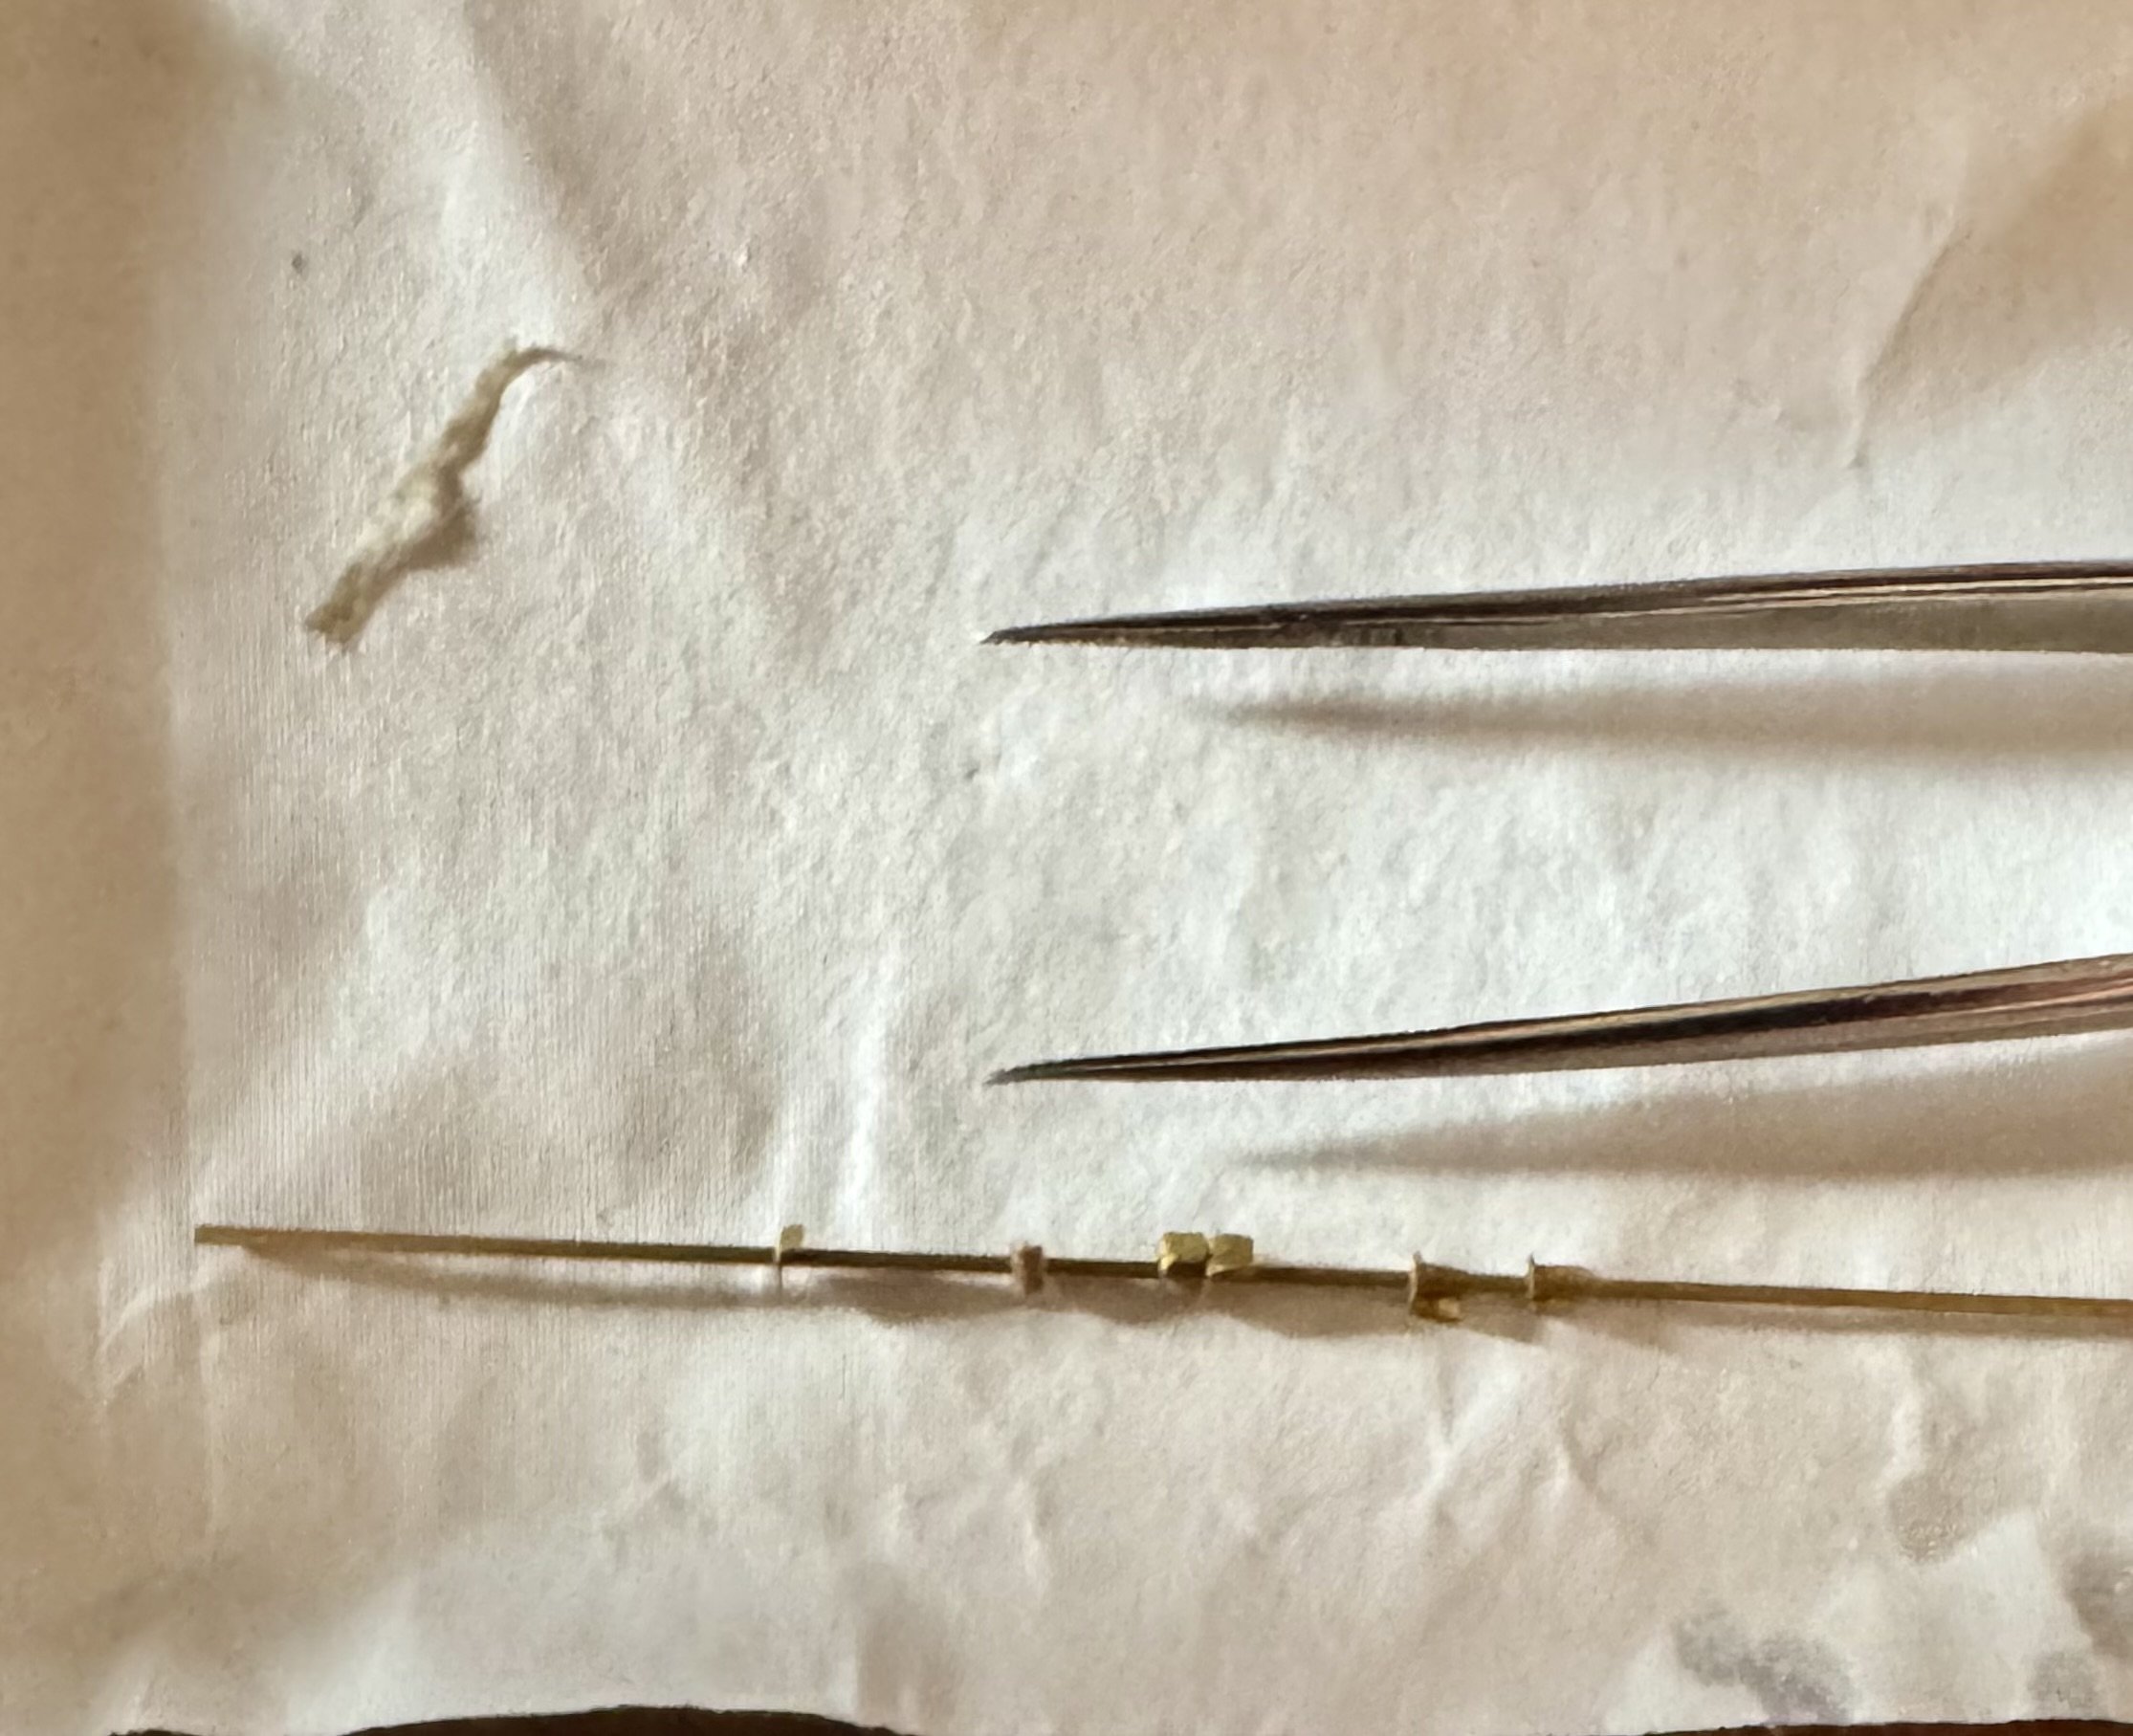
I don’t get much bench time the last two weeks, as my girlfriend’s son was out of school and decided he wanted to hang out with me instead of his grandma while my girlfriend was at work (I think because grandma makes him do more chores than I do 🤣) that said, I have made *some* progress I settled on my approach for the clamps and fittings, and have those ready to start glueing down the fittings for the rigid hydraulic line down each strut are two pieces each - one formed from thin brass sheet and the second a short length of .5mm brass tube i drilled .5mm holes in the sheet, then cut and filed each piece down to 1/32 x 3/64”, and put a bend in to give me a glueing surface for the strut. the tube is cut to 1/16” pieces, which I’ll glue into place once the first bit is attached once all the fittings are in, the struts primed and the first layer of color and clear coat applied, I’ll run the .3mm wire and .5mm braided line sections right now, the individual drilled pieces are threaded onto a length of tubing so I don’t lose them 🤣 ditto the bits of tubing - those are threaded onto .3mm wire for the moment i also made the clamps where the flexible lines attach to the oleo scissors from a bit of foil and CA, and glued those onto short lengths of .5mm braided line, which I’ll cut to length when I install them. this is as far as I’ve gotten with the time I had over the last two weeks; I’ll get to gluing things together this week, and hopefully get a coat of primer on before the weekend .3mm wire and .5mm tubing/braided line are slightly small for scale (should be .4 and .6mm), but they look close enough. I have .4mm wire, but not .6mm tubing for the fittings. So to make everything actually work, I figured I’d rather be too small than too large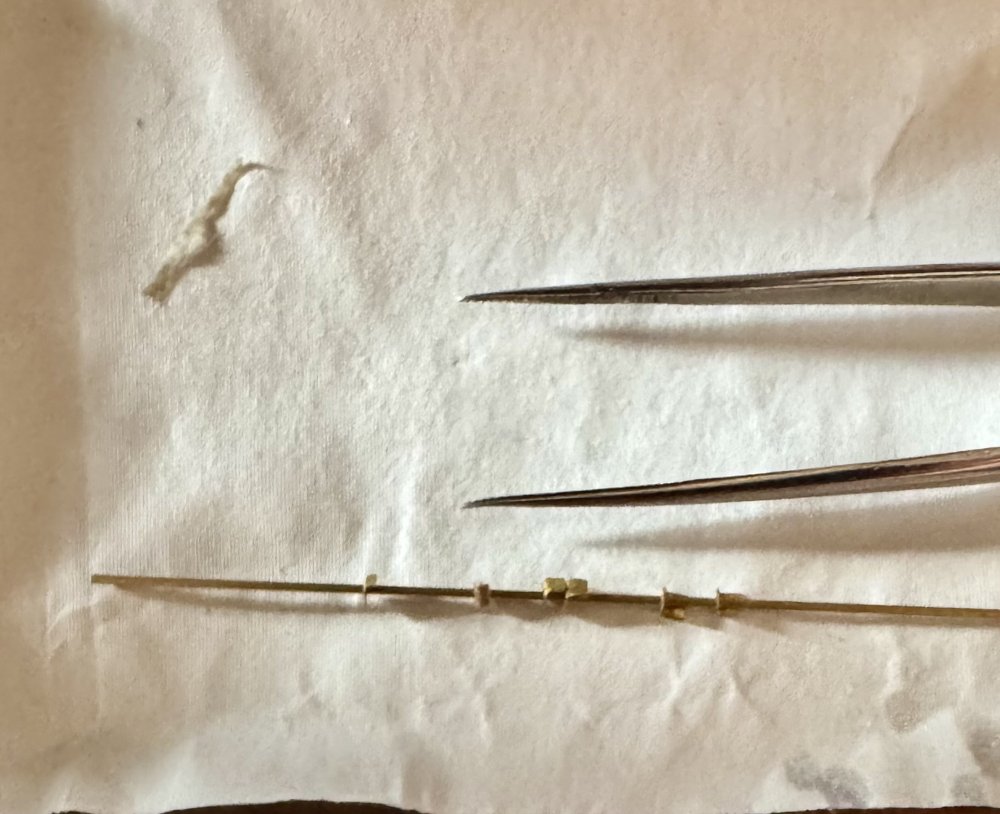

-
Trumpeter P-47D Razorback
crazypoet replied to crazypoet's topic in LSM 1/35 and Larger Work In Progress
That actually does help - and looks amazing, by the way 🙏 it’s close to where I’ve landed with my approach -
Trumpeter P-47D Razorback
crazypoet replied to crazypoet's topic in LSM 1/35 and Larger Work In Progress
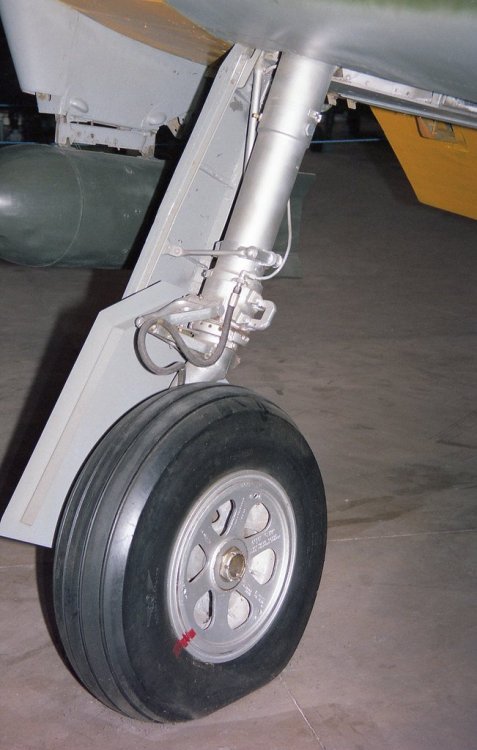
A quick update on this as I’ve been sort of obsessing over the landing gear and associated plumbing, I’ve found some interesting “headaches” with both the kit plastic and aftermarket metal gear struts. these are things that could have been easily fixed - especially in the aftermarket struts, but such is life 🤣 I’m actually a bit surprised that Eduard didn’t include some of these fixes in their otherwise excellent exterior detail set 🤷♂️ ordinarily I’d take these in stride as just the pitfalls of working with the kit as it is. But I’m also trying to be respectful of the subject and make it as “right” as my skills allow so, first and most “obvious” are the oleo scissors. The detail on the edges is fine, but they completely screwed up the most visible faces. every version of these I’ve seen in both original and restored examples show that the scissors were made as light and thin as possible, thinned down and drilled to make them both light and strong. This would be a very simple fix in resin (or if I had the mad CAD skillz and 3D printer access of some of our esteemed colleagues here). As it sits, I’m left to figure out if my own skills with a dremel, micro chisels, and drills are up to the challenge, especially as both external faces of both scissors need to be identical as they’re really quite visible. I’ll give this a shot on a spare set I have lying around, and post my success or failure for all to see 😂😎🤦♂️ next are what appear to be hub braces that help to align and strengthen the connection between the gear strut and the fixed inner hub. Again, these are quite visible in both original and restored examples. These I can scratch out of a bit of evergreen, but it irks me a bit that none of the aftermarket folk though to fix this last, the relative spacing of the gear cover connections, oleo scissors, and uplock lug are waayy off. Visually, this is fine - unless one is trying to properly route the brake lines 😂🤷♂️🤦♂️ as it is, both Trumpeter and the aftermarket metal gear struts made this space so tight (about two scale inches too short) that it’s a bit challenging to properly route the hydraulic line for the brakes and have it fit properly. oh well, part of this hobby is overcoming exactly these kinds of challenges 🤣 I did figure out a different approach to the brake lines themselves that will allow me to build and use period-proper hose clamps, that I’ll scratch from thin brass and some .5mm OD tubing I found in my stash. so. That’s my rant for the day - photos of progress to follow as I figure out what I can/cannot fix, and get these things done so I can move on.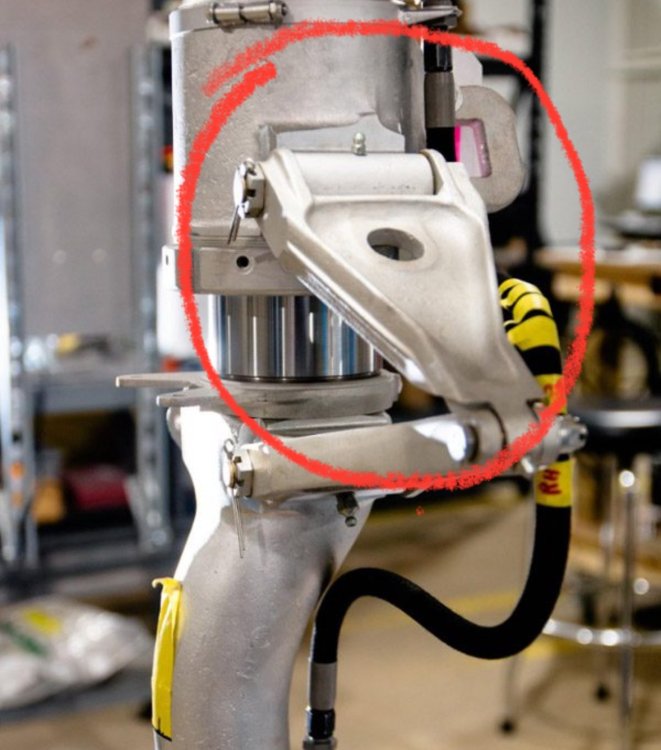


-
Brabham BT45 - Model Factory Hiro - 1/12
crazypoet replied to DocRob's topic in LSM 1/35 and Larger Work In Progress
This is utterly beautiful- much more than a “model” this is a stunning representation in miniature of every fastener and system - more like an engineering prototype beautifully rendered -
Trumpeter P-47D Razorback
crazypoet replied to crazypoet's topic in LSM 1/35 and Larger Work In Progress
@DocRob I did a bit of digging around. I found one maker who *did* 1/32 scale hose and line fittings, but they are sadly no longer in production. Based on this one find, I’m betting there are others. for this particular line I’d need .4mm (plain) and .6mm (flex) fittings. Some of the internal feed lines would work in .8mm, but that would be way too large for this. I’m using .3mm wire and .5mm braided line stretched over the .3mm wire, and that seems to be working size-wise. Absent actual scale fittings, I’ll be painting those in, with maybe some drops of CA that I can sand/file to shape that said, you certainly got me thinking, and I’ll see if I can dig up some of the fittings in all sizes before I start gluing things down 🙏🙏🙏 I appreciate the feedback - that’s part of what I love about this place 🙏💯🙏 -
Trumpeter P-47D Razorback
crazypoet replied to crazypoet's topic in LSM 1/35 and Larger Work In Progress
Oooooooooooooo!!! These could work well for some of these fittings thank you! -
Trumpeter P-47D Razorback
crazypoet replied to crazypoet's topic in LSM 1/35 and Larger Work In Progress
I finally had a bit of bench time today, and sort of got this sorted for one of the struts 😂 getting the flexible parts of the line to look natural while keeping the rest suitably straight, with proper bends in the proper places was a bit of a chore 🤦♂️🤦♂️🤦♂️ but it’s finally “close enough” to match my references. right now it looks a mess as it’s just temporarily taped in place - nothing’s been glued down, no cable clamps yet, and no primer or paint but the fit is finally right, and I can do the final fine-tuning of the bends as I glue it into place I’ll make the cable clamps from 1/32” strips of tamiya tape and CA - there will be four of those on each side I’ll have to prime and paint the brake line and strut separately, so I don’t mess up the braided sections. Then glue the line down, add the clamps, paint the final details and add appropriate oil stains and dust and suchlike. The final connection to the wheel hub will wait until I’m ready to mount the wheels themselves, since I’ll have to add a final 90 degree bend in the line, cut it to length, and glue it to a pinhole I’ll drill in the hub wheee 😂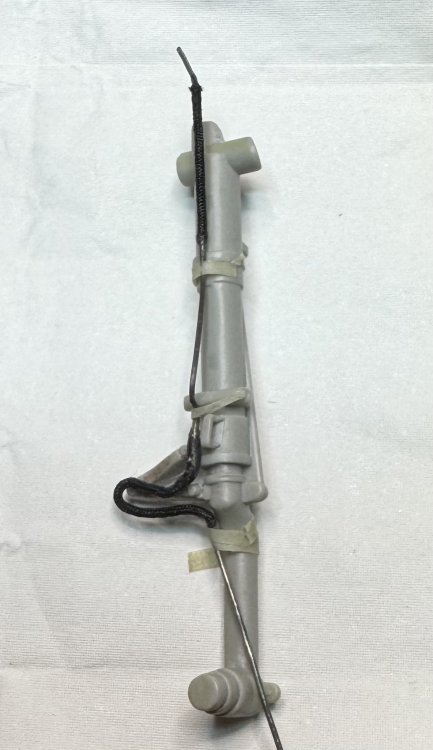
-
Lukgraph J2F-5 Grumman Duck
crazypoet replied to ScottsGT's topic in LSM 1/35 and Larger Work In Progress
This is gorgeous! I also wish they’d been a bit more careful with the support placement, but with 3D printing that’s not always possible 🤷♂️🤦♂️ great work so far! I have a life-long love affair with the Grumman float planes. I have a 1/48 Goose with some resin conversion parts to convert it to the armed military version sitting in the stash - this may motivate me to pull it out and get working 🙏😂 -
1:32nd scale Caudron G.3 (Anzani engine)
crazypoet replied to sandbagger's topic in LSM 1/35 and Larger Work In Progress
There is a practical kind of elegance to this kind of rigging, then done properly you can sort of “read the minds” of the early engineers - seeing how they solved problems and made the structure work - an exercise in practical minimalism this is beautifully done! -
Trumpeter P-47D Razorback
crazypoet replied to crazypoet's topic in LSM 1/35 and Larger Work In Progress
(This is one of many times when I wish I had Jeroen’s mad CAD skills and access to a good 3D printer… 😂) -
Kotare 1/32 Spitfire Mk Ia mid
crazypoet replied to Merad's topic in LSM 1/35 and Larger Work In Progress
Gorgeous! -
Trumpeter P-47D Razorback
crazypoet replied to crazypoet's topic in LSM 1/35 and Larger Work In Progress
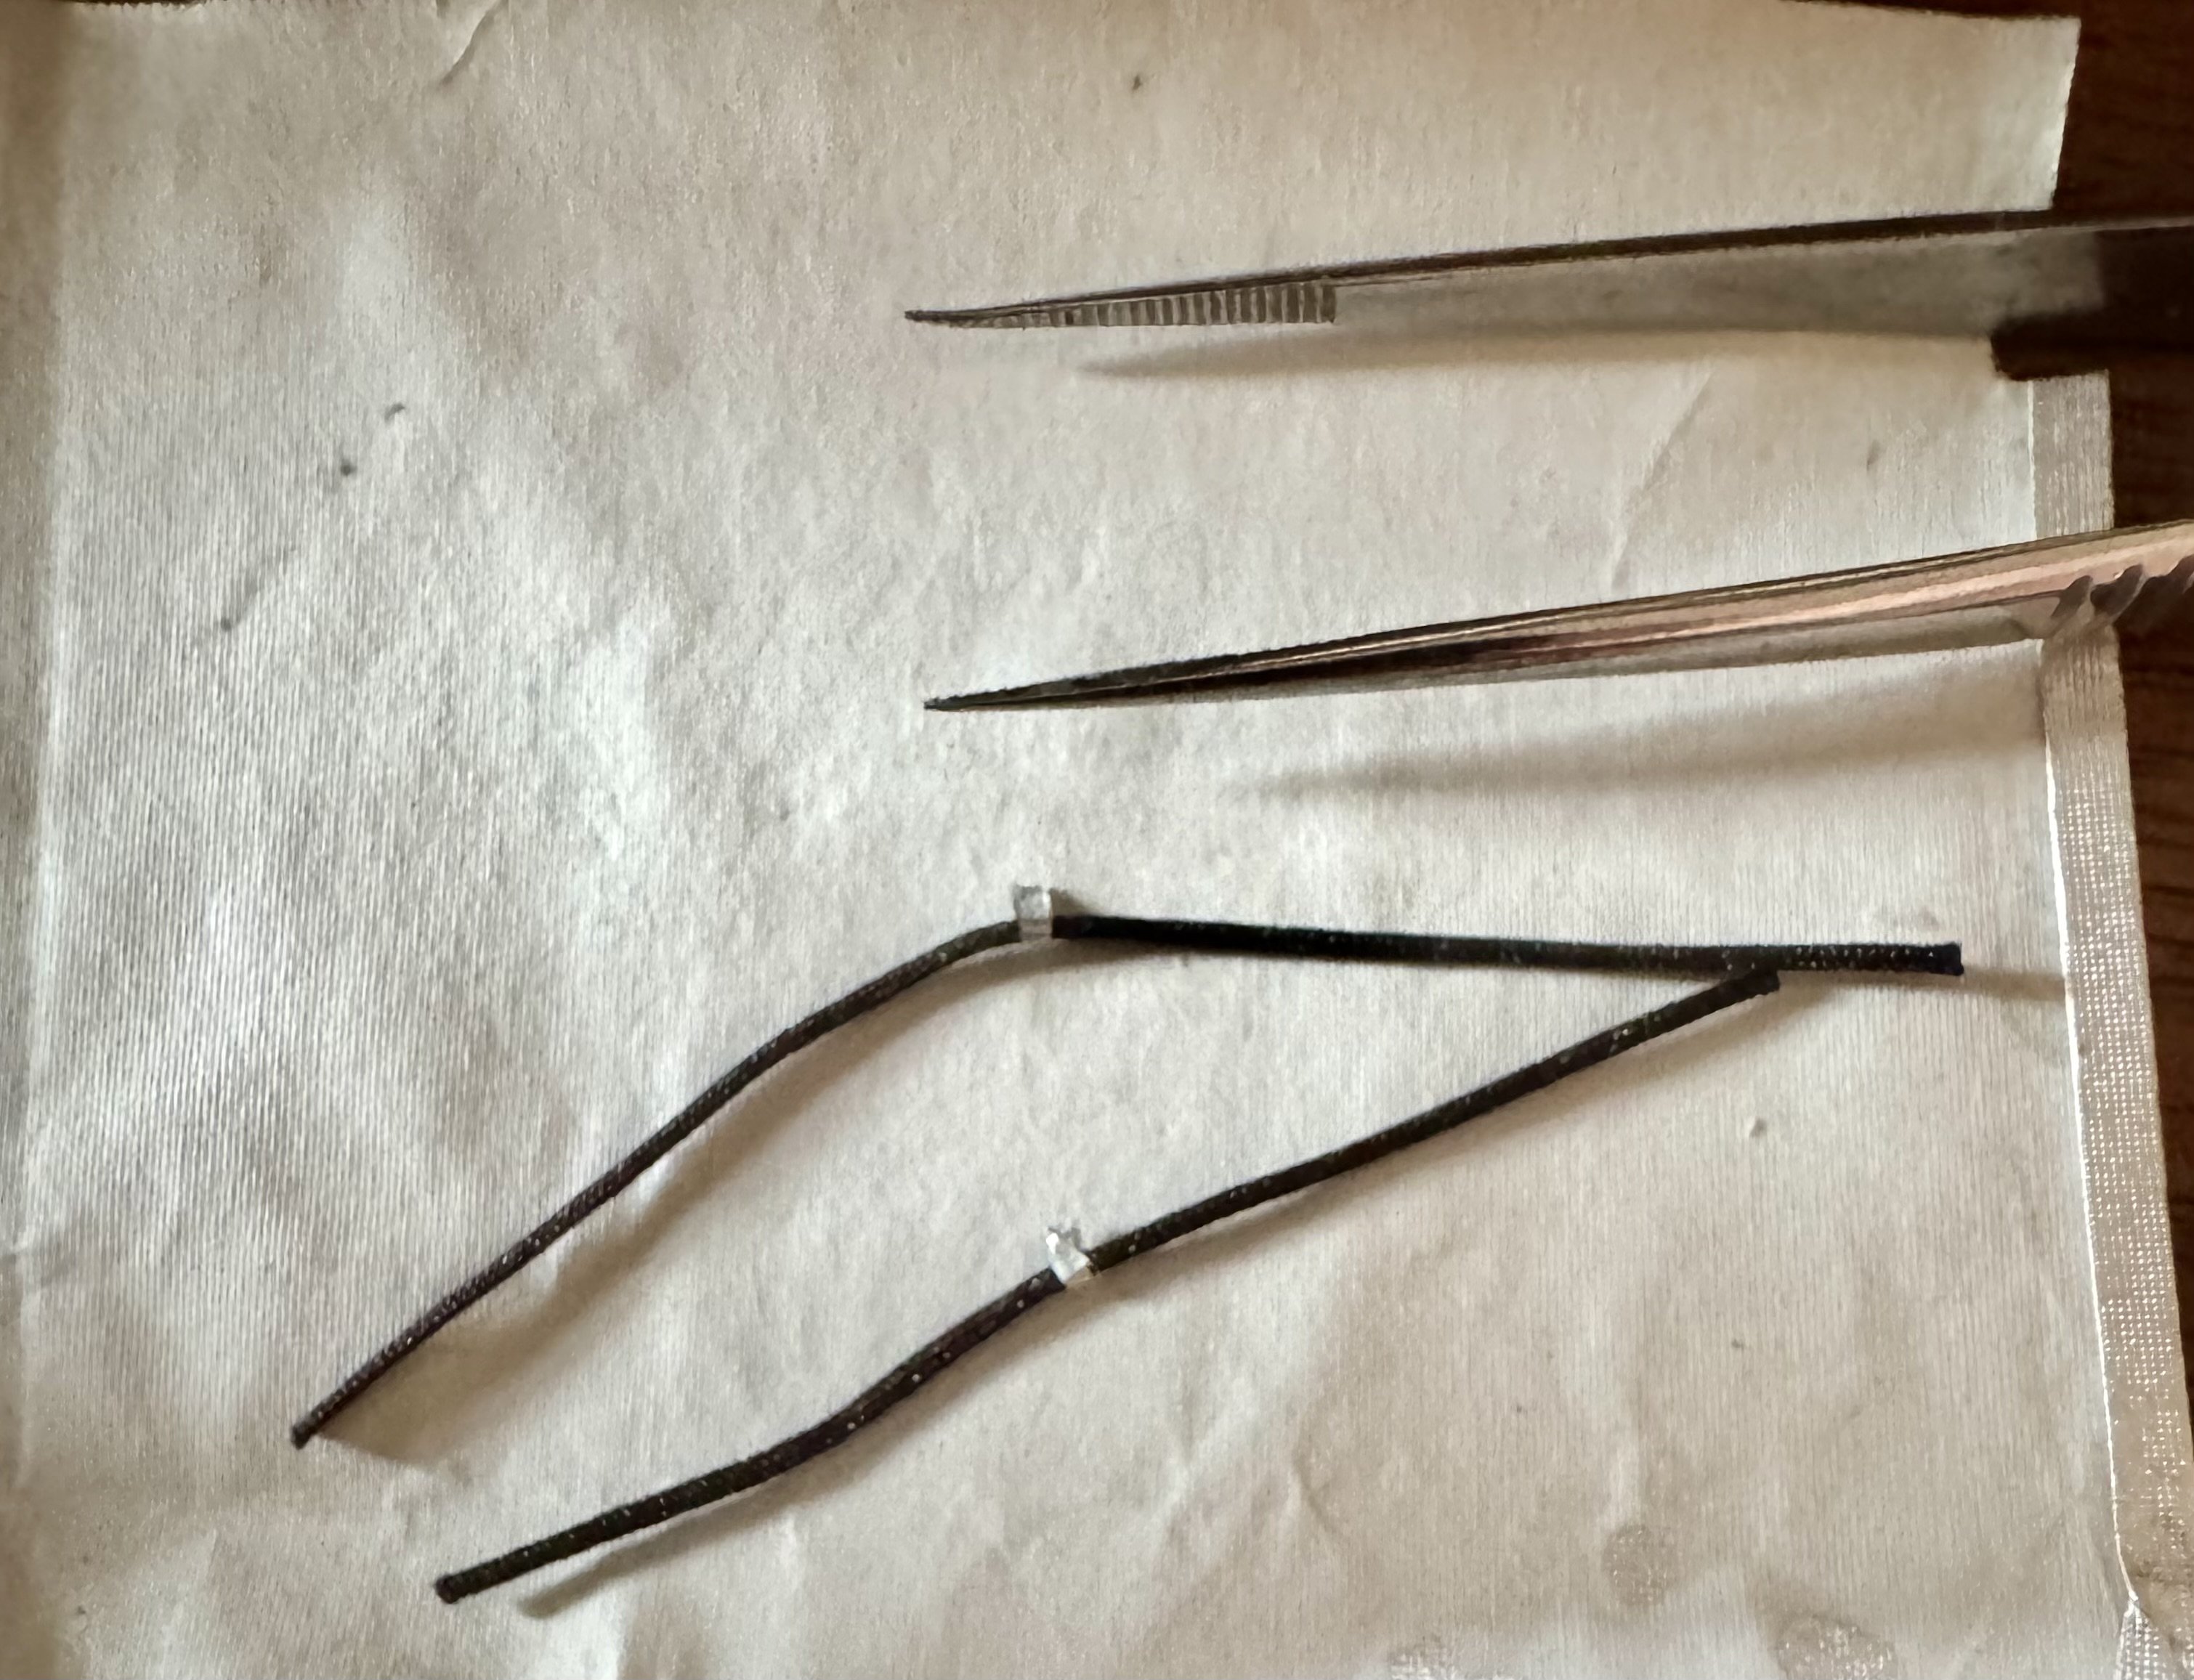
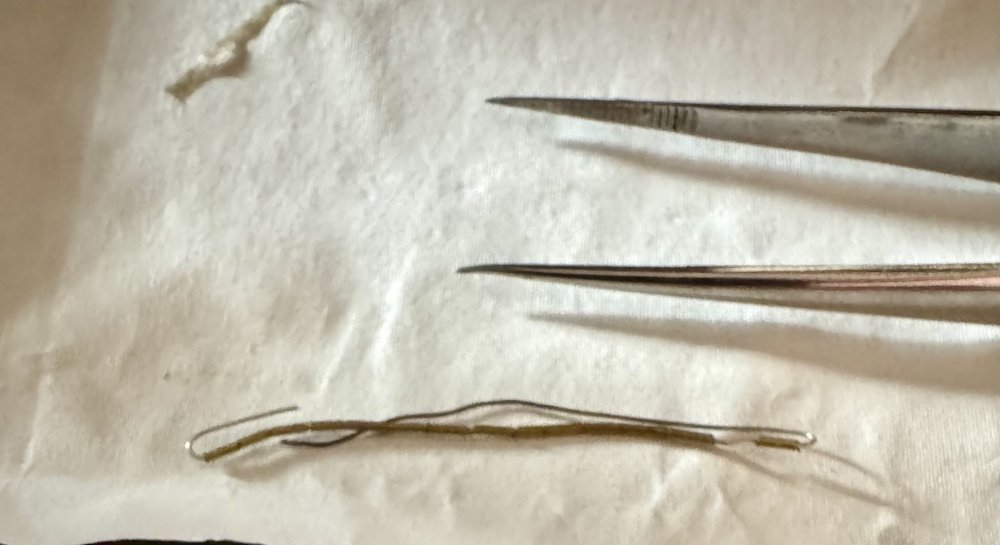
OK…. I’ve worked out the routing, based as closely as I can from different sources (thanks Doc and Denders!) I decided that I’m going to try doing this as a single wire piece on each side. getting appropriate scale wire around here is a bit of a challenge, but I made the happy discovery that the twist-ties used by the local bakery to close their bread bags have steel wire at their cores that is just about perfect in terms of length, scale and flexibility 😎 So my approach to this… I used a bit of too-thick copper wire to build a full-length template from the gear bay to wheel hub, then used a sharpie to mark where connectors and cable clamps will need to be added, and the curves for the flexible hose sections that I’ll replicate with .5mm braided line with the twist-tie wire threaded through so… each piece will have two sections of braided line with line connections at both ends, plus four cable clamps that I’ll make from thin strips of plastic masking tape. The final version of the braided line sections will be a bit more “curvy” than the template, to emphasize that they’re flexible and affected by little things like gravity and being long enough to flex with gear extension and the oleos extending/retracting The gluing, priming, and painting sequence will be a bit of a challenge, without messing up the braided line sections with paint from other areas even so, it’s a lot simpler that doing these lines as different pieces (braided line, then bare metal line, then braided again and so forth) then gluing them down with the proper alignment so here’s one of the copper wire templates (right wing side), next to a piece of twist-tie wire with the first bit of braided line. I’m using drops of micro crystal clear (and a light touch with files and such) to secure the braided line and also form the connection line adapters and such along the length this will be a bit fiddly, but I’m having fun with it

-
1/32 Westland Whirlwind
crazypoet replied to JeroenPeters's topic in LSM 1/35 and Larger Work In Progress
Just spent a happy couple of hours catching up on this build. you're from another planet when it comes to details and research - I can only sit here and stare in awe -
1:32nd scale Caudron G.3 (Anzani engine)
crazypoet replied to sandbagger's topic in LSM 1/35 and Larger Work In Progress
I love your attention to detail on this! The rigging is making me a bit cross-eyed even from here - great work! -
Trumpeter P-47D Razorback
crazypoet replied to crazypoet's topic in LSM 1/35 and Larger Work In Progress
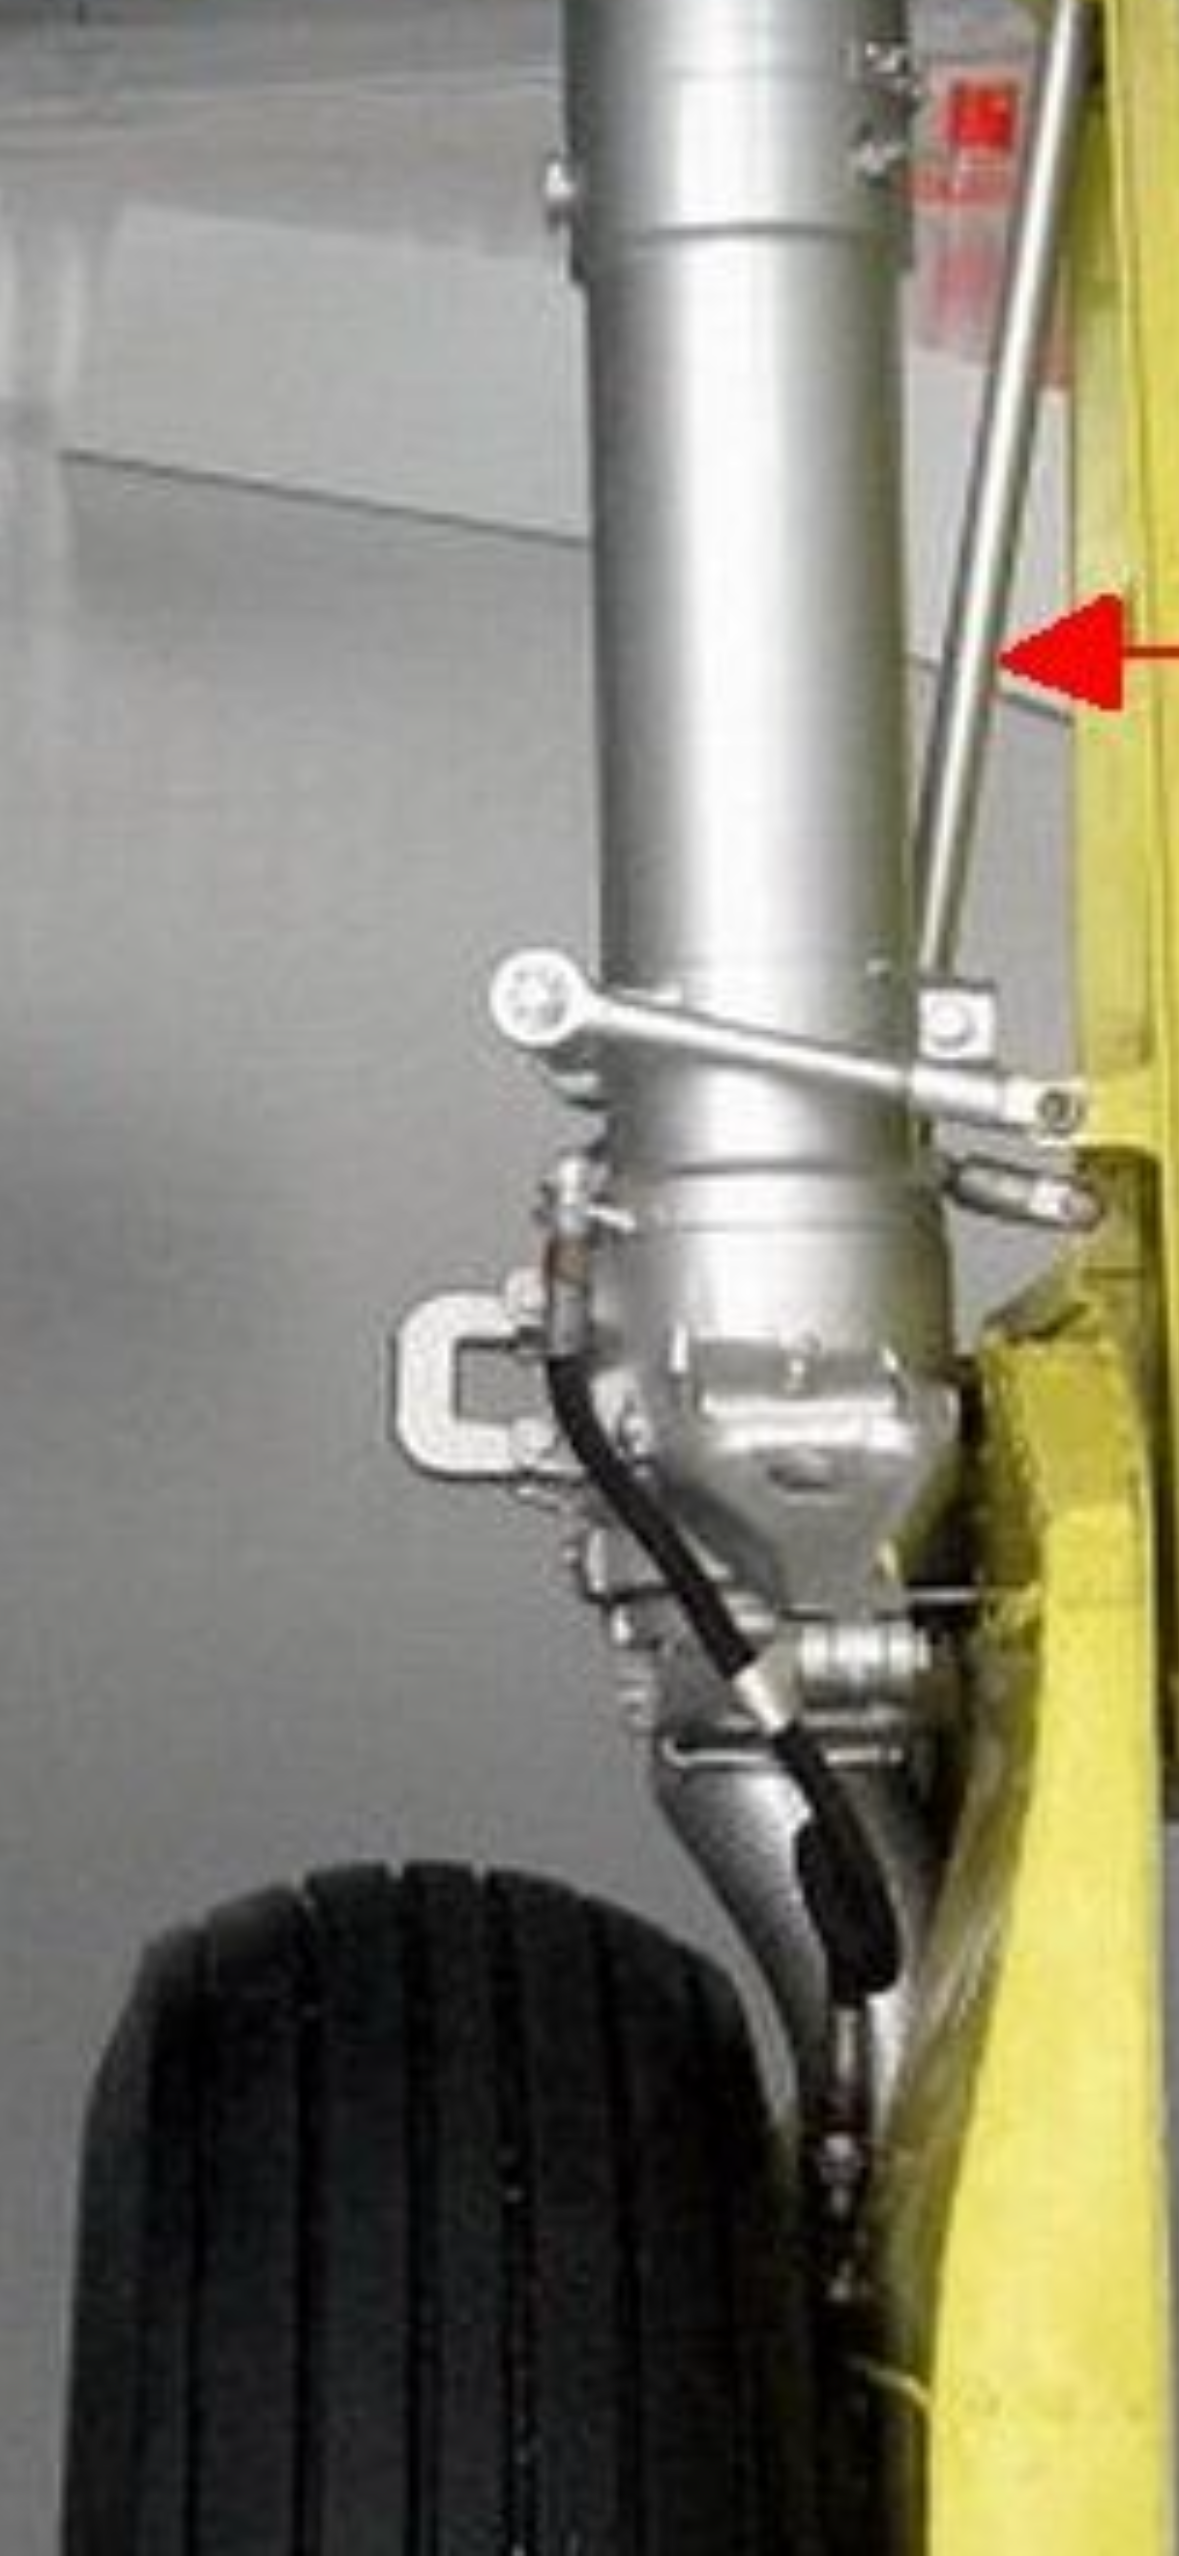
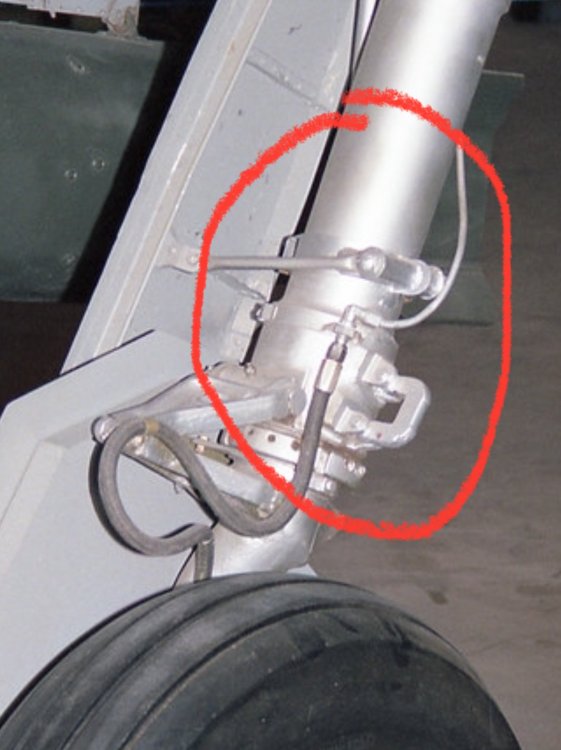
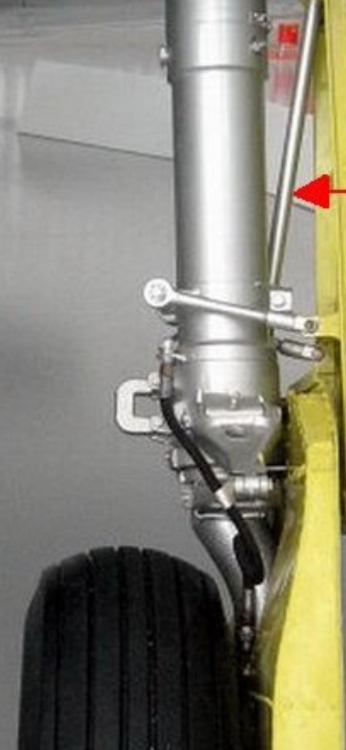
Thanks, Doc! I’ve been digging through every reference I can find, including the docs at Aircorps Library. Even the brake and hydraulic schematics only show the general routing. you'd think that there would be a technical manual on brakes and their maintenance for this bird, but I’ve not been able to find it. I’m going to roll the dice a bit, and plug the lines into the back of the plate at about a 30 degree offset (rotated forward) from the axle. That looks like it would kinda align with what I see in the pic of the salvaged struts I dug up, along with the Corsair pic that Denders found Next is to build these. Along with the clamps that secure them to the struts and the some version at least of the various line connectors i know it’s more than a bit OCD of me 🤣🤦♂️ I’ve watched folk finish entire kits in the time I spend scratching my head over one tiny thing. But I have fun with it anyway 😎 -
Trumpeter P-47D Razorback
crazypoet replied to crazypoet's topic in LSM 1/35 and Larger Work In Progress
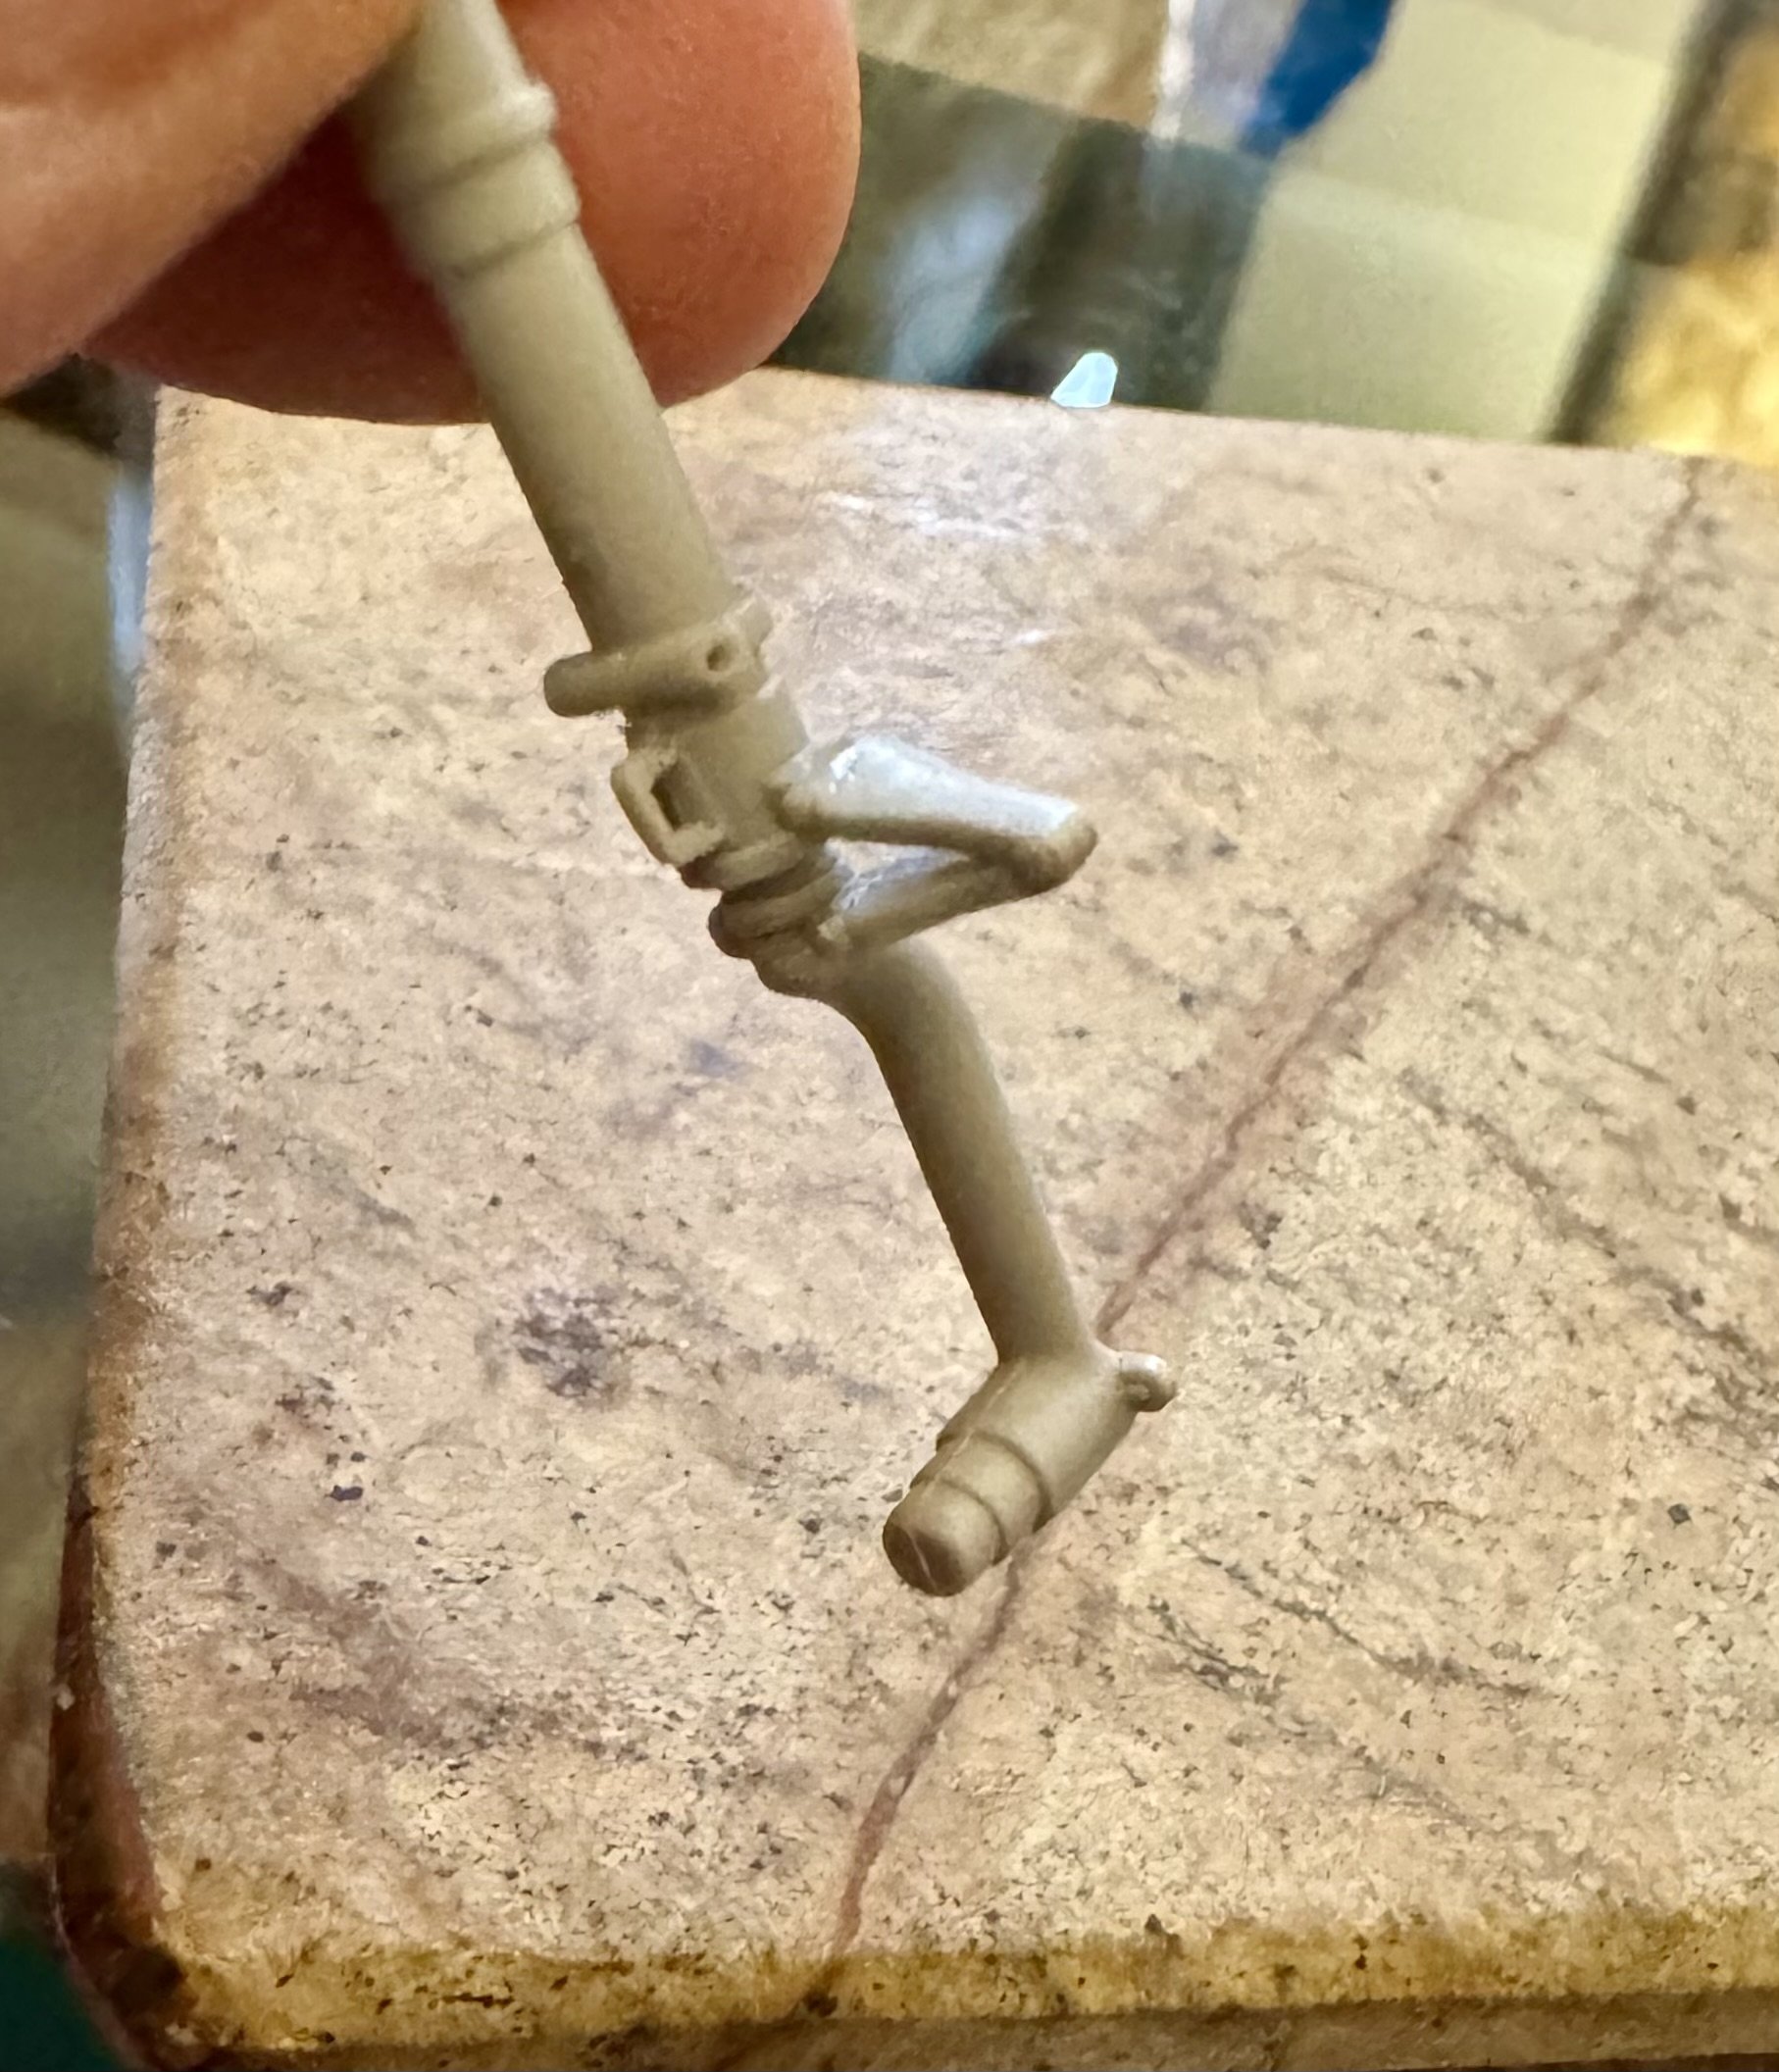
This is truly helpful! I wish that at least one of the half-dozen P-47 books I have had even one shot like this 🙏 I’ve figured out that, yah, it would be overly complicated to route this line through the axel, so there’s that. i *think* I’ve figured out sort of where the line connects to the plate with the brake pistons (ish). This photo actually gives me some good ideas about how to “translate” the pics that I do have. granted that it’s a different manufacturer and engineering team on the Corsair, but there’s only so many ways to skin this particular cat thank you for digging around - it truly helps 🙏 -
This…is beyond cool. I had no idea the Germans did anti-tank as well as anti-aircraft cars for their trains, so I learned something entirely new today 🙏 I am loving this build and I’m breathless at both the scope and scale. Here I am obsessing over single hydraulic lines and you’re busy adding entire kits in that same amount of time 🤣🙏 this is beyond brilliant
-
Trumpeter P-47D Razorback
crazypoet replied to crazypoet's topic in LSM 1/35 and Larger Work In Progress
I have a subscription for AirCorps, but not even their references and manuals (so far) have shown this in detail i agree that it’s a bit of a snug fit between the wheel, gear covers, and strut - but it would be just my luck to have this in a contest and find that I got it wrong 😂 -
Dragon Bf110E - Wolfgang Falck - Finished
crazypoet replied to denders's topic in LSM 1/35 and Larger Work In Progress
Beautiful work, start to finish! -
Trumpeter P-47D Razorback
crazypoet replied to crazypoet's topic in LSM 1/35 and Larger Work In Progress
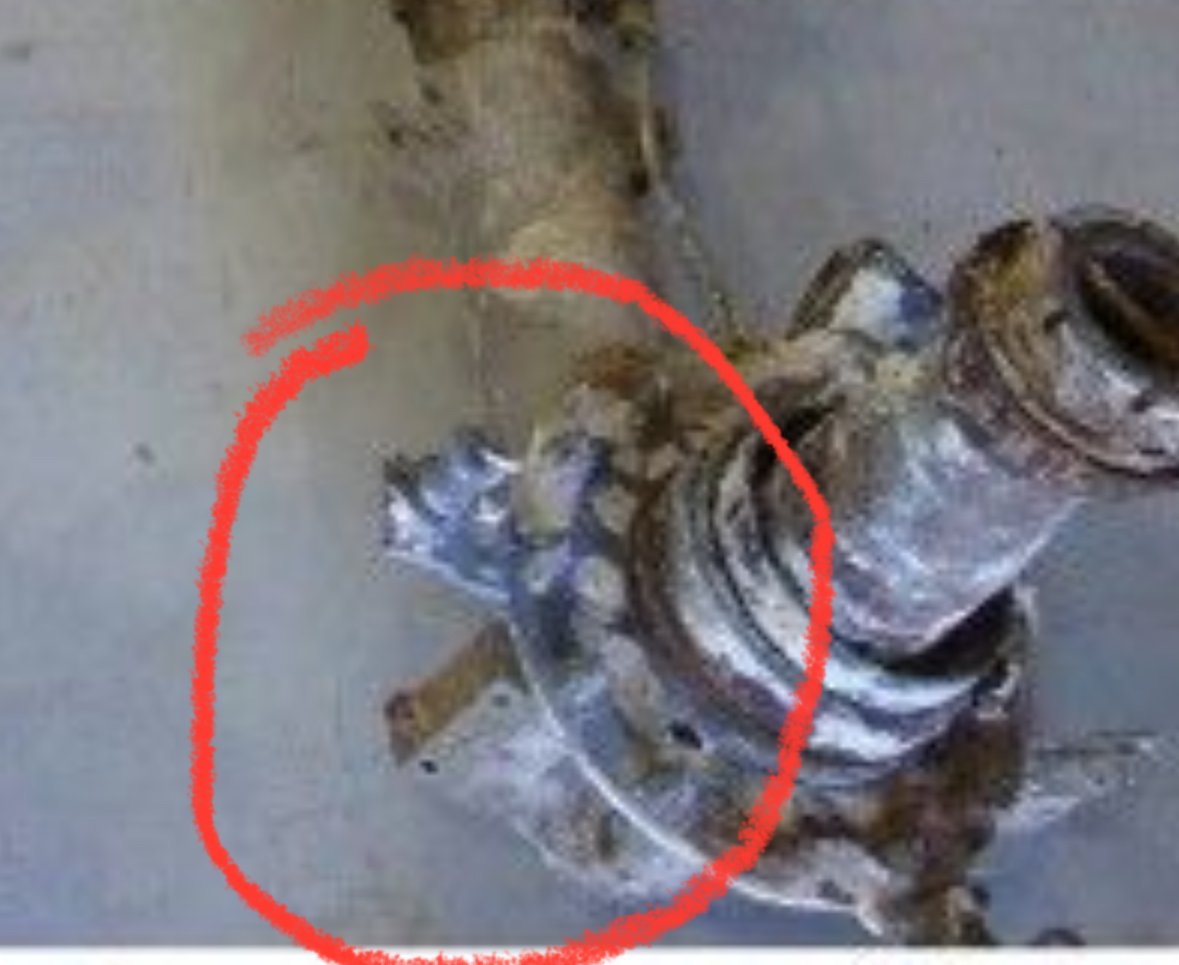
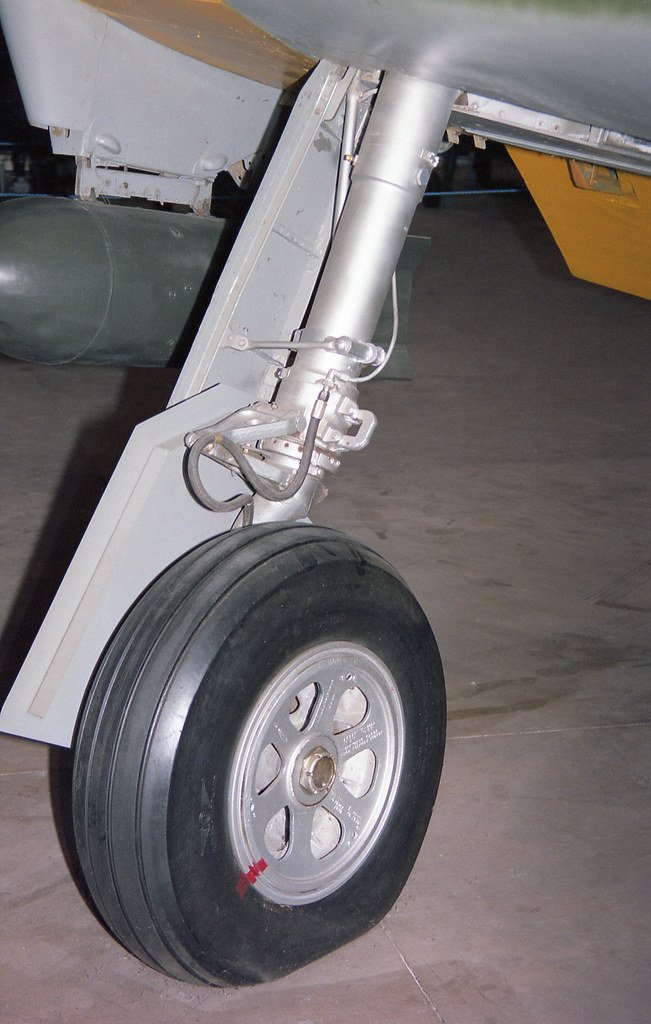
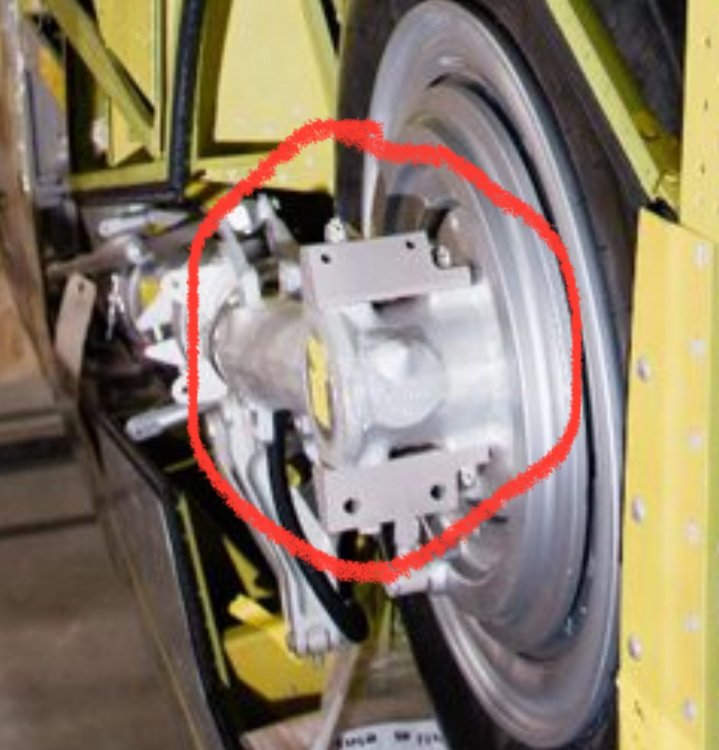
So I’m getting ready to start putting these together. I have a pretty good feel for where they connect in the wheel well. There’s not a line already molded in the kit plastic, but that’s not a problem here - I can just add that as a part of the strut and glue it down when I install it so that part will be fairly straightforward so here’s the tricky thing. This line feeds the brake cylinders on the inside wall of the wheel hub. What isn’t clear is whether the line terminates into the axel (and then internally to the brake cylinders) or connects at some point to the brake cylinders more directly. I’ve found two pics that *sort* of show this end, but neither show that level of detail. so a question to those who’ve trod this path before me - brake line into the axel, or to a point on the inner edge of the wheel, where the brake cylinders are actuated? my instinct (and some excellent YouTube vids on how aircraft brakes actually work) tells me that this line will connect to the plate holding the cylinders - but that’s still not entirely clear from the photos I’ve been able to find im using the excellent resin main wheels from BarracudaCast for this, which include a bit of detail on the brake cylinder side of things, but not enough the make it easy to identify a connection point for the brake line here are the two pics I have that sort of show this. Neither one is taken from an angle that really lets me look at that final connection point, so I’m wide open to suggestions 🙏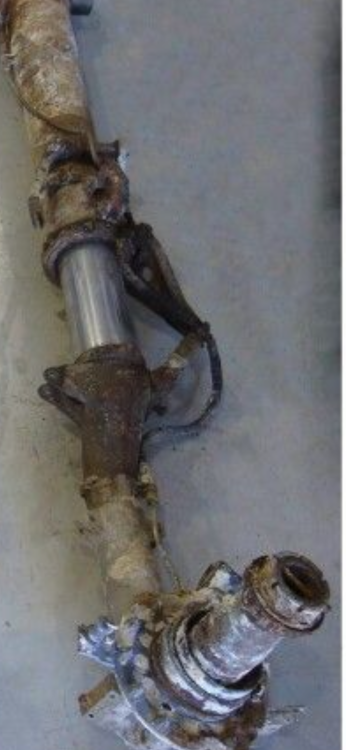
-
Trumpeter P-47D Razorback
crazypoet replied to crazypoet's topic in LSM 1/35 and Larger Work In Progress
Thank you! These lines are pretty visible, if one cares to look - and the line that feeds the brakes is even more so. I couldn’t let these go unfinished and feel good about it 🤷♂️🤦♂️🤷♂️ -
Trumpeter P-47D Razorback
crazypoet replied to crazypoet's topic in LSM 1/35 and Larger Work In Progress
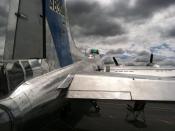
For my next trick - planning a *little* bit ahead this time 🤣🤦♂️ - I’m going to work on the hydraulic line that snakes down each of the main gear legs the challenge here is in properly locating the end points - where it connects both at the top end and down near the wheels photos of restored examples show a variety of routings in between, from which I can extrapolate how it’s routed along the struts pretty well. Unfortunately, they’re kinda missing the points of connection top and bottom The only photo I’ve found that shows the whole length is from a pair of gear struts that look to be salvages from a wreck, and it’s a bit fuzzy thus should be fun!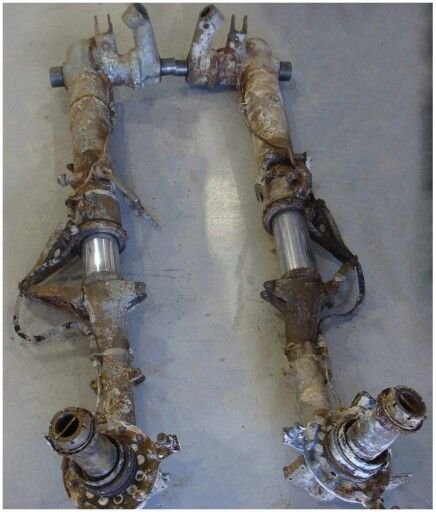
-
Trumpeter P-47D Razorback
crazypoet replied to crazypoet's topic in LSM 1/35 and Larger Work In Progress
a bit more on this topic, as I had time to do a bit more research this weekend It took a bit of digging, since there were three different iterations of the Paddleblade prop for the P47 - two from Curtis Electric and one from Hamilton Standard. the best info I’ve been able to find is that is was the Curtis Electric C542S-A114 wide-blade symmetrical prop which was first distributed in the field and retrofitted to earlier versions of the Jug, starting in Spring of ‘43 the Hamilton Standard paddleblade was introduced later, and was also used as a field mod, but given the timing of things, I’m going with the Curtis Symmetrical prop for this build Curtis also did an asymmetric paddleblade even later, which was *also* retrofitted to some jugs this makes things more than a bit confusing when building to a specific point in time 😂

-
Boulton Paul Defiant.
crazypoet replied to Clunkmeister's topic in LSM 1/35 and Larger Work In Progress
I’m looking forward to seeing you take this to the next level, as always 🙏