


BevanBrooks
-
Posts
432 -
Joined
-
Last visited
Content Type
Profiles
Forums
Events
Gallery
Everything posted by BevanBrooks
-
BF 109K-4 Revell
BevanBrooks replied to wackyracer's topic in LSM 1/32 and Larger Aircraft Ready for Inspection
Great stuff! Can't recall ever seeing this scheme done before. Always good to see something different. Cheers Bevan -
Mig 3 1:32 Trumpeter
BevanBrooks replied to Jacek K's topic in LSM 1/32 and Larger Aircraft Ready for Inspection
Hi Jacek, looks like a lot of hard work payed off. Love the wing root wear and added details to the cockpit and wheel bays. Cheers Bevan -
Revell 1/32 Heinkle 219 "Uhu"
BevanBrooks replied to BevanBrooks's topic in LSM 1/32 and Larger Aircraft Ready for Inspection
Thankyou everyone for your kind words much appreciated -
Looks like a mountain of work John! I'm sure that the hard work will pay off. Cheers Bevan
-
Revell 1/32 Heinkle 219 "Uhu"
BevanBrooks replied to BevanBrooks's topic in LSM 1/32 and Larger Aircraft Ready for Inspection
Thanks guy's appreciate the comments. Rick...Wip photos are still in my folder in the computer just didn't realise that deleting them out of photobucket would delete them from here as well. You live and learn I guess. I was flipp'n out when I realised what I'd done, all that work and I went and ruined it. I guess you could say there was a bit of a following on the wip and I feel I've let them all down in some way. Cheers Bevan -
Revell's rather large 32nd scale 219 finished pretty much from the box with only minor enhancements and scratch. Looking at photos of end of war 219's they looked pretty beaten and weathered so this was what I was trying to replicate to some degree. Anyone who was following my wip thread will know about my methods of weathering and what not but I've seem to of accidently erased the photos clearing some room in my photobucket account, to which I'm a little embarrassed not to mention angry with myself. It's a mistake I wont make again. My apologies. So I guess a quick run down is in order:- Paints used throughout the build were pretty much Gunze aquarious thinned with gp thinner. Weathered with oils, sharp Derwent coloured pencils, Prisma colour watercolour pencils and pastel dust. Flat coat was Testors Model Master Acrylic thinned with water. Aerial wire is smoke coloured invisible mending thread. Added was some wiring in the cockpit, removed then replaced levers with fine wire and white glue for knobs as well as HGW's textile seat harness set. The pitot tube is made from brass tube and plastic rod. Sorry for ALL these photos hopefully I haven't bored you too much with them. The photos were taken outside on a slightly overcast day as apposed to artificial light at night in the "tin shed" As a side note the nav lights in the wing tips DO NOT FIT. I suggest to fit these during assembly sand, polish, mask then paint. All in all a pleasurable kit to build, I hope I've done it justice but jeez I'm glad it's done!! Thanks for looking cheers Bevan
- 24 replies
-
- 13
-

-
1/32nd scale Halifax: *project complete*
BevanBrooks replied to ThomasProbert's topic in LSM 1/35 and Larger Work In Progress
Hi Thomas, I really like your exhaust staining. Its funny how that alone adds so much to a model especially when done well. One question, did the staining from the inner engines carry onto the horizontal stabilizers? Your scratch building is awesome BTW. Cheers Bevan -
Or you can reduce the tackiness of the tape on the back of your hand or on your forhead. I guess anything low tack is a "must" you can also put two pieces of tape sticky side together with just 2-3mm showing. This stops the whole sticky side coming into contact with the decal if you catch my drift!
-
Nice work so far. If your feeling brave and your confident the decals have adheared properly I would suggest to carefully mask off the offending area in small sections at a time ie one point at a time and spray some pretty well thinned white, two bits of masking tape with no cuts and your away. Just my two cents worth..... cheers Bevan
-
1/32 Trumpeter Me 262A-2A
BevanBrooks replied to alpinestar's topic in LSM 1/32 and Larger Aircraft Ready for Inspection
Hi Chris you've done a fantastic job on the 262, it really looks like you've put you're heart and soul into the paint and weathering and it's come up awesome. Have you got a build thread, I'd love to see some pics of the cockpit wheel wells etc. Again great job cheers Bevan -
Nice, going for a derelict - abandoned look? Thanks for the feedback cheers Bevan
-
Following this!!.............? What did you use for the "muddy" effects on the cockpit floor? Cheers Bevan
-
Very nice indeed Mike. I think you have done a fantastic job on the camo, nice and tight. Stella!! Cheers Bevan
-
1/32 Revell Heinkel 219 wip
BevanBrooks replied to BevanBrooks's topic in LSM 1/35 and Larger Work In Progress
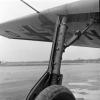
Thanks everyone for your kind comments, much appreciated. After some advice from one of my favourite modellers I went back to the wheels. On his suggestion I used the sponge method to add some "spatter" effects. I've never had much success with the sponge in the past and tend not to use this method but thought what the heck I'll give it another shot. The results certainly add a lot more interest and help tie the wheels together as one but to my eye looks a little "un-natural". Being the application not the method! I'll definitely be experimenting with this method on my wheels in the future as I think with more practice I'll get a more natural looking tyre. I used thinned Xf 57 buff and Xf 68 nato brown with the sponge. I also used Derwent coloured pencils Gunmetal 19-69, Bronze 19-52 and Sepia 19-53. Prismacolour water colour pencils Goldenrod wc21034 and Black wc2935. I've also started work on the prop blades. They were painted with Gunze H65 RLM 70 Black Green then randomly "whatever'ed" with a 1:1 mix of H65 and H421 RLM 81 Brown Violet. Scratches and stuff were added with Derwent's, Olive Green 19-51 and Cedar Green 19-50. A watery mix of Xf 85 Rubber Black was added using a sponge. A "B" grey lead pencil was used for the chipping along the leading edges. Needless to say more work is needed cheers Bevan. -
Hi Aaron, if you have Tamiya colours a mix of XF19 sky grey 1ml, XF2 flat white 10 drops and XF18 2 drops will match this pretty well. I matched this to Ken Merrick's "Luftwaffe Camouflage and Markings 1933-1945 volume 2 which has colour chips made with (don't quote me on this) original paint formulas. Spaying the colour may slightly alter it but not very much, hope this helps
-
Great start. Always hard to decide on a 109 scheme, so many to choose from. I will follow with interest cheers Bevan
-
1/32 Revell Heinkel 219 wip
BevanBrooks replied to BevanBrooks's topic in LSM 1/35 and Larger Work In Progress
Thanks guys, The exhaust stains were created using a mix of Gunze flat clear (3ml) with 6 drops of Gunze H12 flat black and 2 drops of Tamiya XF10 flat brown Obviously concentrating around the exit of the flame dampener and fading off to the rear of the engine nacelle. I sprayed vertically at first to try and give the illusion of a slightly rippled panel, where the high spots would catch more staining. the panel lines caught some extra as well. Then sprayed lightly following the length of the nacelle. This will all be finished off with varying shades of pastel dust after flat coating the model. The exhausts were first of all sprayed with a mix of Tamiya X10 Gunmetal (1.5ml) XF 85 Rubber Black 12 drops XF2 Flat White 4 drops, you can see this colour on the ends of the sprue "sticks" The pastels came next. Using a stubby brush the pastels were rubbed into the paint until the desired effect was achieved. The wheels. Tyers were painted with a 1-1 mix of Xf85 Rubber Black and H416 RLM66. Wheel hubs were painted H12 flat black. Mr surfacer was liberally brushed on around the join seam then, on the end of a paint brush handle "rolled " on a piece of scotch bright to create some wear. the Mr surfacer was blended into the side wall with an 800 grit sanding pad. Its safe to say that these still need work. Thanks for looking in cheers Bevan -
1/32 Revell Heinkel 219 wip
BevanBrooks replied to BevanBrooks's topic in LSM 1/35 and Larger Work In Progress
Hi guys, it's been a while but I have done a fair bit on the 219, certainly the biggest kit I have ever built hence the drawn out build!! I was pretty happy with the way the camo came out but there's nothing like some decals and some weathering to make it all come to life!! Oils were used (black and burnt umber) to achieve a dirty look to the 76. A stippling/ dabbing motion with a rolled up piece of rag and a piece of sponge was used to reach the desired effect. Also a brush was used to create the streaking along the fuselage sides while the oils were still wet enough to move around. With the top camo I tried a white oil wash which seemed to "fade" the paint somewhat which is kind of the effect I'm going for. ( End of war sitting around derilect sort of thing) may still need some more work. Thanks for looking cheers Bevan -
1/32 Revell Bf 109G-14
BevanBrooks replied to Beychevelle's topic in LSM 1/35 and Larger Work In Progress
Indeed it is a good looking 109, beaut job so far. Looking foward to the painting stages cheers Bevan -
HK B-25J Ave Maria +extras
BevanBrooks replied to CruZz's topic in LSM 1/35 and Larger Work In Progress
Brilliant!!!! Mad skills in action. You really do make it look easy. Cheers Bevan -
Silver Wings Hawker Hart
BevanBrooks replied to Flip's topic in LSM 1/35 and Larger Work In Progress
Beautifull work Flip, nice and busy with plenty to look at cheers Bevan -
Trumpeter F14-D Tomcat and Zacto intakes
BevanBrooks replied to pfuf's topic in LSM 1/35 and Larger Work In Progress
Can't believe how good this is looking......... really very nice. You're airbrush skills are top notch, cheers Bevan -
Ki-84 Hayate 1/32
BevanBrooks replied to CruZz's topic in LSM 1/32 and Larger Aircraft Ready for Inspection
More awesomness.... cheers Bevan -
Bf-109 G6 Lászlo Molnár
BevanBrooks replied to CruZz's topic in LSM 1/32 and Larger Aircraft Ready for Inspection
The Germans certainly had some "out there" camoflage schemes. Great skills and awesome result Cruzz. Cheers Bevan. -
1/32 Revell Heinkel 219 wip
BevanBrooks replied to BevanBrooks's topic in LSM 1/35 and Larger Work In Progress
Thanks heaps guy's. Dave, the clear I use is an acrylic automotive one (Spies Hecker). Since I'm in the trade I can come across this fairly easily and at no cost and it goes a long way. You need to thin it with gp thinner so you need to be careful not to apply it tooo heavily. Kahunaminor, your welcome. I did it in 4 sittings adding up to about 10 or so hours give or take.