DocRob
-
Posts
7,045 -
Joined
-
Last visited
Content Type
Profiles
Forums
Events
Gallery
Everything posted by DocRob
-

Cobra Coupe - Le Mans - Model Factory Hiro 1/12
DocRob replied to DocRob's topic in LSM 1/35 and Larger Work In Progress
No chance Chris, there are a lot of points against doing so and I will name just a few: - A forum is exchange, if I write a WIP, I got ideas, help and hints from other members, so it´s a two way benefit. - I keep a build log as a personal file, like a notepad, but not more. - I have no idea, how much Cobra´s MFH produces. There can´t be many and most of them will never get build, I guess, so where is the target of an ebook? - I don´t want to spent more time on more professional photographing, editing, layout and texting. - English is not my mother tongue as you may have guessed . - For such a rare kit, there is a very thorough video documentation in YouTube (Pooh´s) and another more casual, but also helpful one. - I don´t need deadlines in my life. - If I decide to sod the kit, it´s only up to me. - I recommend used products on my personal view and experience, which is more difficult, if you earn money from your log. - It is a hobby to me and I have many others. I never get bored and don´t need other distractions. These are only some points, others, I don´t want to mention here. I used only one ebook accompanying my Wingnut Wings AEG G.IV build. It was very helpful and written by the much more talented modeler Karim Bibi Cheers Rob -
Cobra Coupe - Le Mans - Model Factory Hiro 1/12
DocRob replied to DocRob's topic in LSM 1/35 and Larger Work In Progress
Thanks Peter, at least I try and physical exhaustion helps a little. Next week, I will go to Berlin for a bit, enjoying my new unwanted freedom . MFH kits are very good, but they can´t be perfect, as a non mass product, with lots of different materials involved and a huge parts count. After the next steps, there will be bodywork and today, I started to clean body and bonnet, along the doors and started to pre assemble these, to show, if everything fits. Spoiler alert, it doesn´t. The doors need to be adjusted and the bonnet doesn´t close entirely, as I had expected, after Pooh had the same problem in his YouTube video build. It seems, I have to thin the hood, where the funnels sit, as they interfere. I hope, there is enough material. To sort this out, will take some time, as I will do it properly, the look of the finished car depends on these steps. Cheers Rob -
Cobra Coupe - Le Mans - Model Factory Hiro 1/12
DocRob replied to DocRob's topic in LSM 1/35 and Larger Work In Progress
Thank you for your condolences Mike, beside my wife, my dog was closest to me the last years, so yes, it still hurts. The Cobra Coupe kit is indeed amazing and you tend to forgive what little shortcomings there are, as it is very motivating to continue with all the detailed stuff. Tamiya LP colors are extremely good to airbrush, but you can use a brush as well, good for touchups. The black tones are especially recommended, wit an extra notion of the semi matte black, which is outstanding. Most of the metal tones are very good as well. Gloss white and red doesn´t have the same coverage as the others provide, but are still usable. Cheers Rob -
Cobra Coupe - Le Mans - Model Factory Hiro 1/12
DocRob replied to DocRob's topic in LSM 1/35 and Larger Work In Progress
No worries Chris, the discs doesn´t look too bad and like you said, little can be seen through the wheels. Thank you for commenting about the photo quality. I try to keep my standards and possibly enhance them a bit, but they hardly pass for professional products. I could do better, but my focus is on modeling and proper documenting my builds here. Cheers Rob -
Cobra Coupe - Le Mans - Model Factory Hiro 1/12
DocRob replied to DocRob's topic in LSM 1/35 and Larger Work In Progress
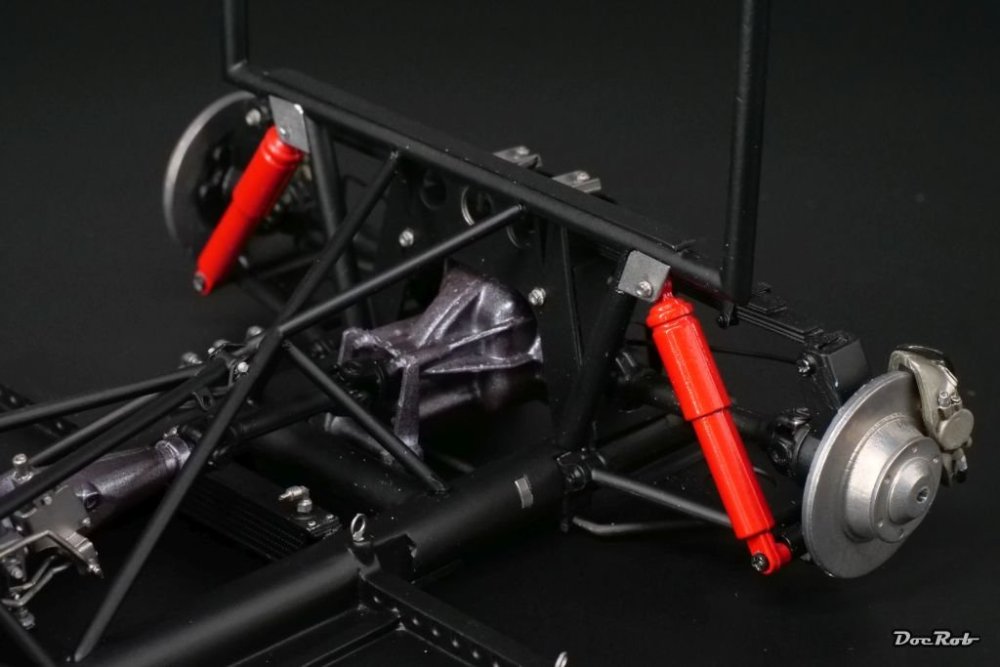
Thank you Chris and Carl, the kit is indeed a gem detail wise, but sometimes getting everything together proves difficult. @CANicoll: I have to admit, I haven´t thought about the braking disks. Maybe they look like this, after a race. Usually, there are PE parts for the shiny surface, but here it´s pure cast white metal and I can´t do anything about it. Cheers Rob -
Cobra Coupe - Le Mans - Model Factory Hiro 1/12
DocRob replied to DocRob's topic in LSM 1/35 and Larger Work In Progress
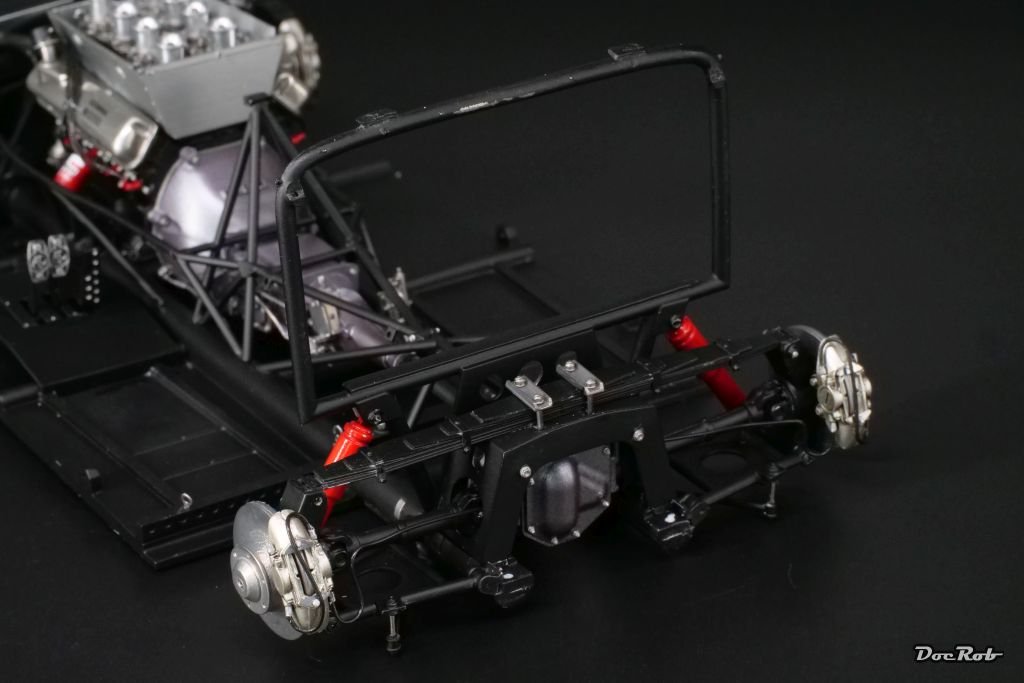
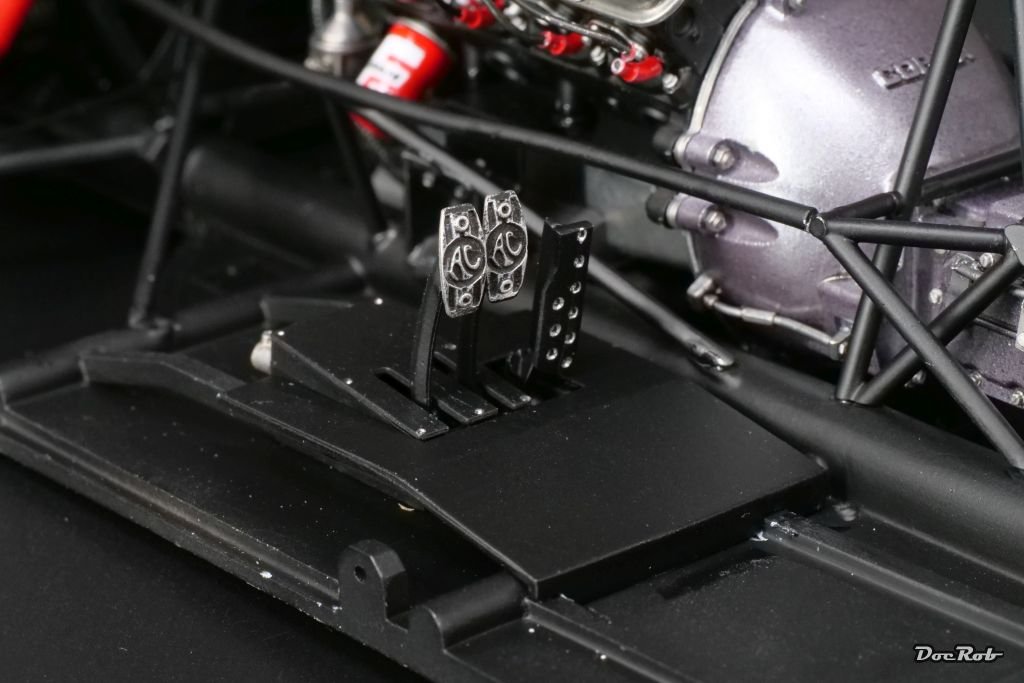
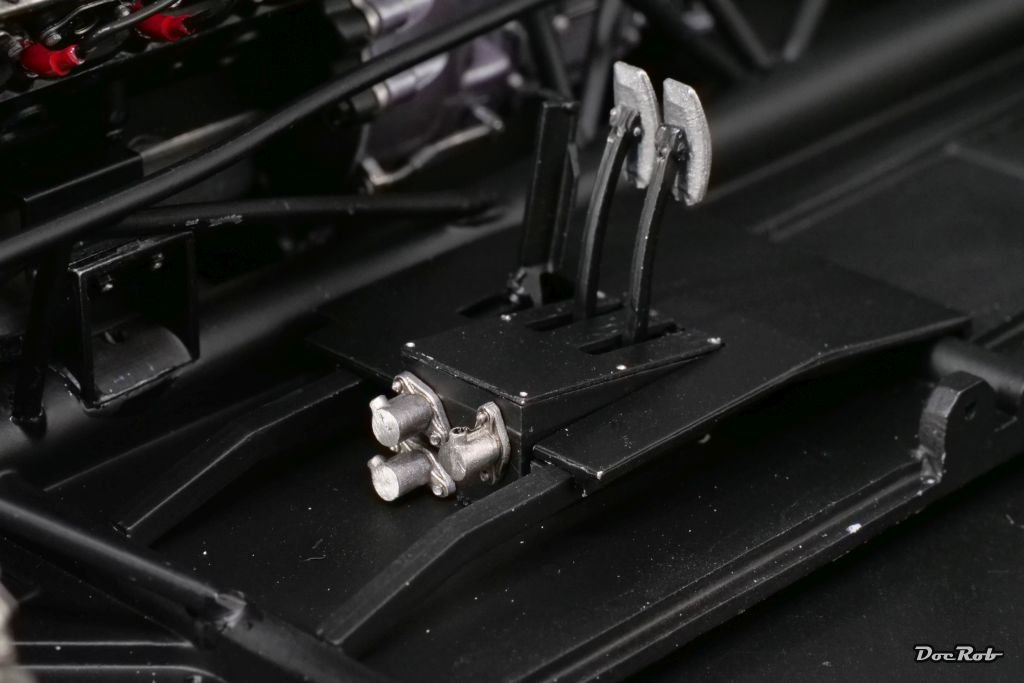
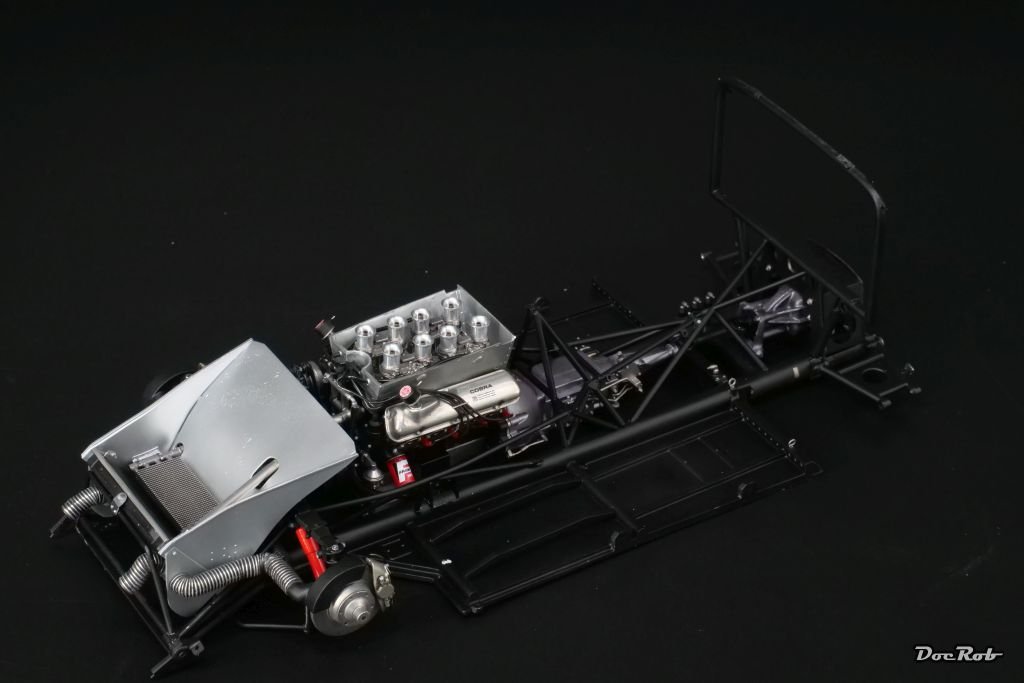
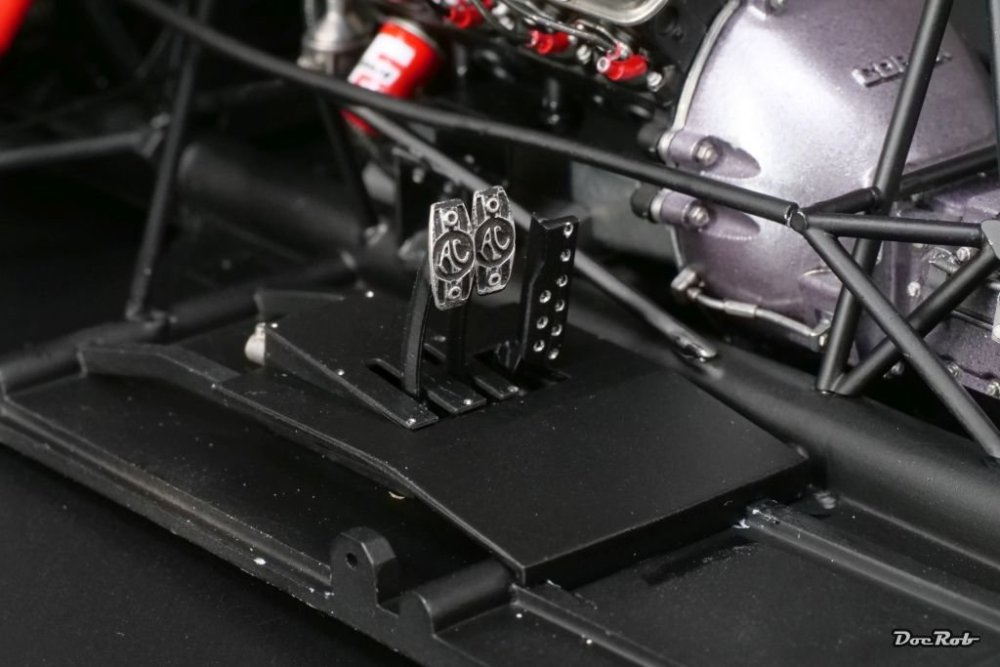
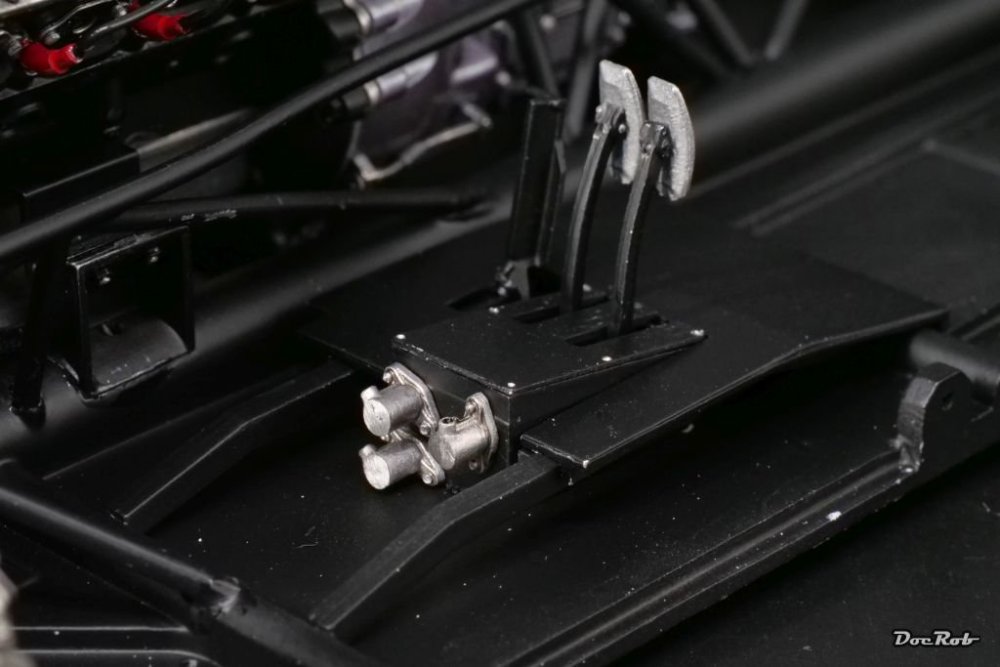
Progress is slowly due to off bench issues and a healthy dose of sports every day, trailrunning, surfing or swimming and mountainbiking, to get the head free. Nonetheless, I finished the rear suspension, brakes and drive shafts. My normal process with MFH kits is, select parts for the next step, cleanup and drill parts, priming and finally airbrushing, before the real fun begins, assembly. This time, it was not so much fun, unfortunately. All parts mount to the outer suspension part, which later accepts the wheel. Somehow this was impossible and I identified the drive shafts as too long. I have no idea, if this was my fault, but the main shaft leading to the differential was also to long. It needed a bit of metal surgery to get everything to fit and there are some touchups to be made. I also started with the pedals, which means, interior is next. Of course, there will be hydraulic lines later from the pedals cylinders. Cheers Rob

- 418 replies
-
- 10
-

-
Cobra Coupe - Le Mans - Model Factory Hiro 1/12
DocRob replied to DocRob's topic in LSM 1/35 and Larger Work In Progress
Thank you Peter, I hope time will heal some of the wounds and indeed I smile often over memories I have about times with my dog, despite the loss. The Cobra is a great subject to focus onto and yes, when there ever is the perfect kit, we will add some not so perfect aftermarket item, if only for the rant . Cheers Rob -
Cobra Coupe - Le Mans - Model Factory Hiro 1/12
DocRob replied to DocRob's topic in LSM 1/35 and Larger Work In Progress
Thank you Phil, but I meant the illness of my dog, before he passed, not mine. I´m healthy, but the soul isn´t. Actually, we don´t plan to get another dog soon, but lets see. Weather, well, it´s been crazy lately. We have a heat wave, but not where I live. It´s humid and around 20 degrees Celsius. only a kilometer away and less then 100m of altitude up, it was 32 degrees Celsius at eight in the morning. We have some strangely layered weather as of lately . Ah forgot to mention, down by the sea, there is a heavy blow going since weeks, up in my house, nearly nothing. Cheers Rob -
Cobra Coupe - Le Mans - Model Factory Hiro 1/12
DocRob replied to DocRob's topic in LSM 1/35 and Larger Work In Progress
Thank you for your heartful words, amigos. I can feel that you´ve been where I am now. The only good thing, I keep saying to myself is, my dog had very good eight years of life and he died with dignity and didn´t suffer much. Can´t say the same for me, as he was my steady companion and friend through the last years, so close, only rivaled by my wife. Some hours in the cave help at least a little, to free my mind. Cheers Rob -
Cobra Coupe - Le Mans - Model Factory Hiro 1/12
DocRob replied to DocRob's topic in LSM 1/35 and Larger Work In Progress
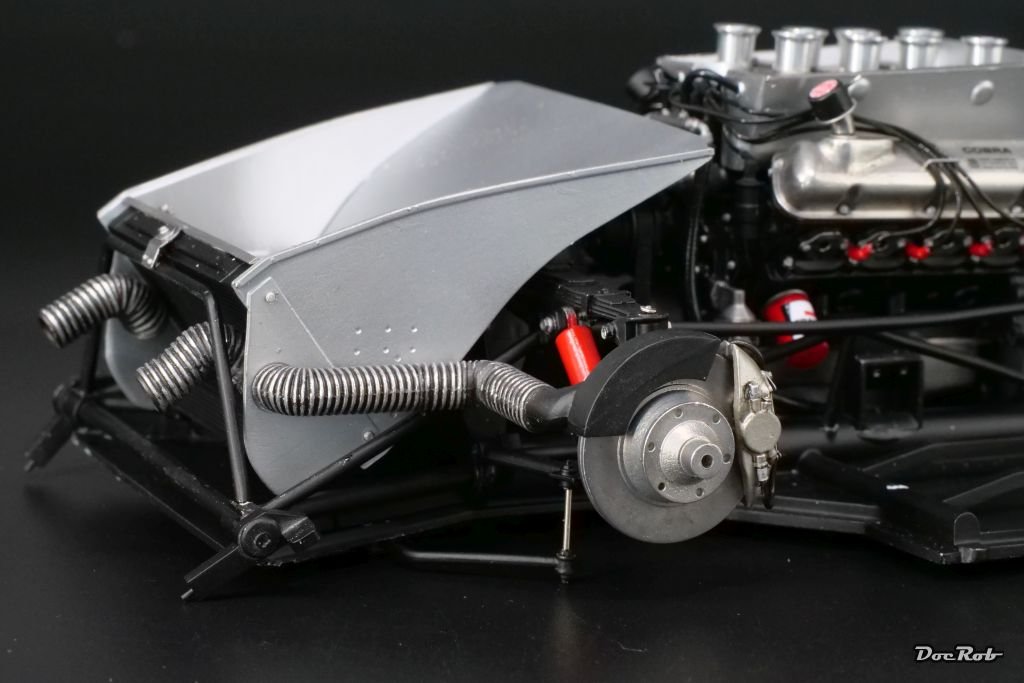
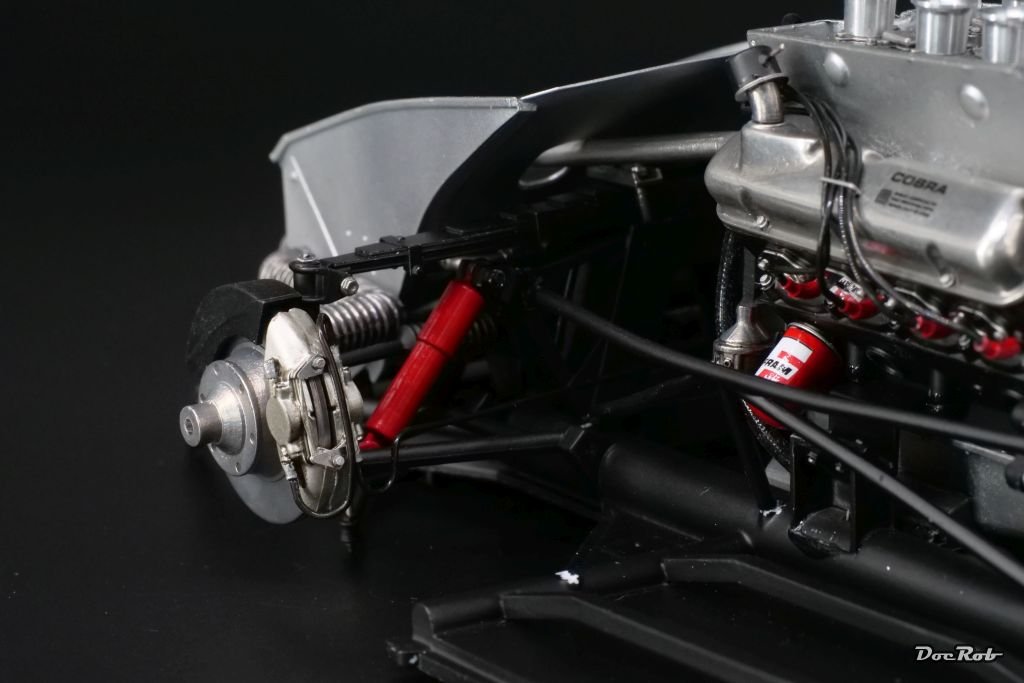
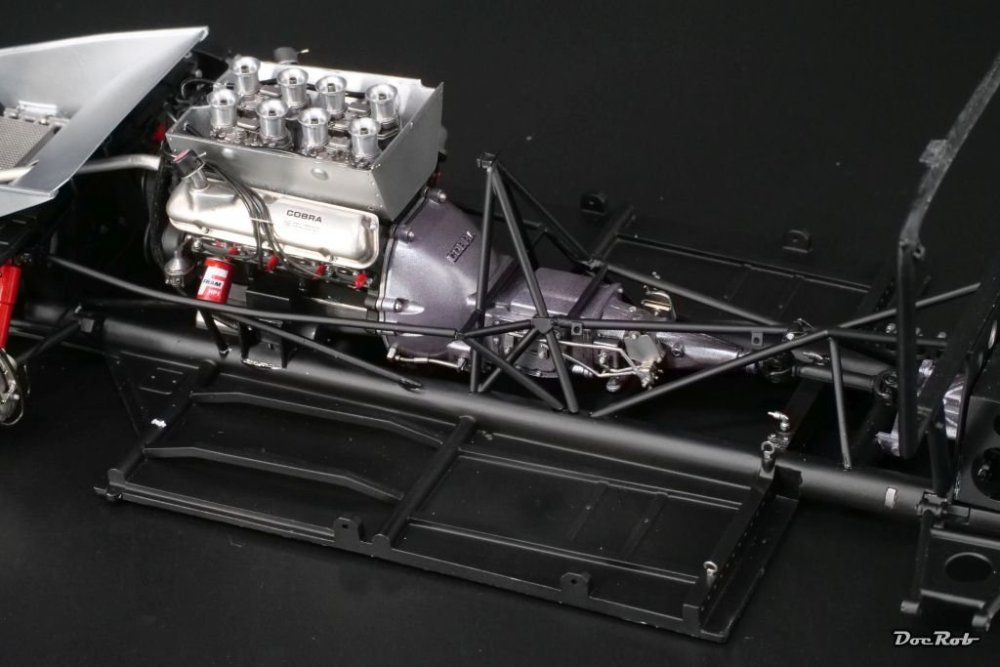
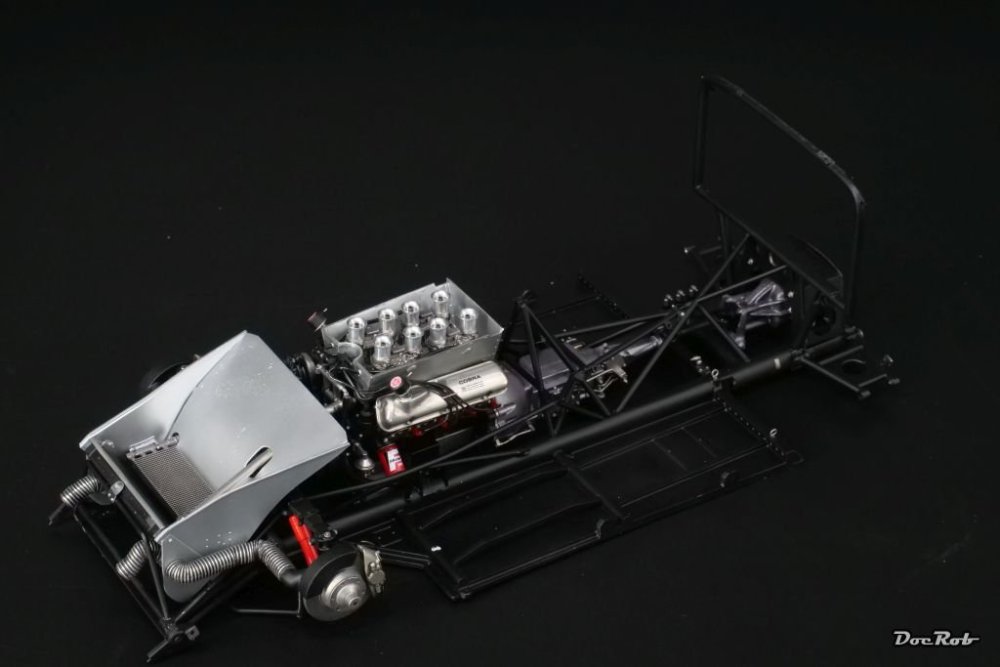
Due to illness and passing of my beloved dog, I haven´t been attending here lately. I have to get back to normal somehow and continued a bit with the Cobra, when time and mood allowed. I added the front cooling section, a fairly large and detailed affair. After that, it was time to mount the missing parts of the front suspension and braking system. The large venting tubes were sprayed with Tamiya LP brown metallic and then sanded over the risen parts for effect. Fit was very good again, but I had to re-drill tiny PE parts again, as either the bolts (part 308) are too wide or the holes to small, annoying. Another disturbing issue is, there are wires or tubes, where there is no mention, where they lead to. You have to search the hole manual for a fit, but some are not shown. The manual of the Crocker motorcycle always stated the section of the manual, where you could see the other connecting side, but that´s not the case here. I think long and thorough, before altering the building sequence from the manual, but decided to add the tube framing before the cooler section, to have mor wiggle room. The part around the engine proved to be a bit delicate, the more complex rear part was easy in comparison. The engine and drive shaft is now permanently built in and I´m ready for the rear suspension now. The chassis is quite heavy now and I will add spacers to relieve the suspension. Cheers Rob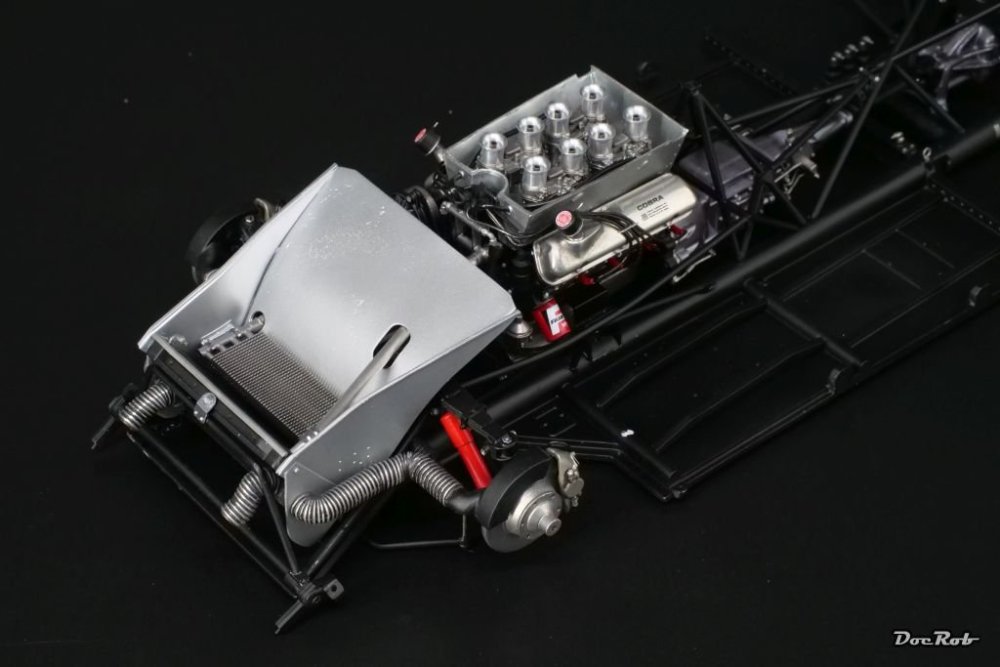


-
Cobra Coupe - Le Mans - Model Factory Hiro 1/12
DocRob replied to DocRob's topic in LSM 1/35 and Larger Work In Progress
The sheer size of 1/12 car models astonishes me as well, when inspecting a new kit. So much bigger than 1/24 or 1/20 cars and this one is heavy. I will add the spacers under the chassis, to prevent the cast metal suspension from bending. Cheers Rob -
Roden 1:32 Nieuport 28c1 build
DocRob replied to AOE4's topic in LSM 1/35 and Larger Work In Progress
Very much like Hubert said, I used Albion slide fit brass tubes and Albion Connecto connectors for the job and flattened the tubes with inserted brass rods between wooden pieces i a vice. I described the process here in my build thread of said Fokker. Cheers Rob -
Cobra Coupe - Le Mans - Model Factory Hiro 1/12
DocRob replied to DocRob's topic in LSM 1/35 and Larger Work In Progress
Sure Peter, here is the link: Cheers Rob -
Roden 1:32 Nieuport 28c1 build
DocRob replied to AOE4's topic in LSM 1/35 and Larger Work In Progress
Nice work and welcome to LSM. Unfortunately, I can´t help with Roden build experiences, but built some WWI kits from WNW Mikro Mir and Eduard. If there is doubt about alignment or rigidity, I always pin the struts with brass rod with my builds. With the Mikro Mir Fokker D.VIII I even substituted the struts with flattened brass tube ones, I fabricated by myself. Cheers Rob -
Cobra Coupe - Le Mans - Model Factory Hiro 1/12
DocRob replied to DocRob's topic in LSM 1/35 and Larger Work In Progress
Thank you Peter, the grade of detail is indeed amazing. I feared the hose clamps a bit, specially with that springy stainless steel PE strips, which were a tad to long also, but somehow, I managed. On YouTube, there is a thorough build video made by Pooh, which helps a lot. He substituted the PE by chrome foil. In case of failure, I would have followed his idea. Cheers Rob -
Cobra Coupe - Le Mans - Model Factory Hiro 1/12
DocRob replied to DocRob's topic in LSM 1/35 and Larger Work In Progress
I´m completely innocent (devils advocate on four wheels chuckle) Cheers Rob -
Cobra Coupe - Le Mans - Model Factory Hiro 1/12
DocRob replied to DocRob's topic in LSM 1/35 and Larger Work In Progress
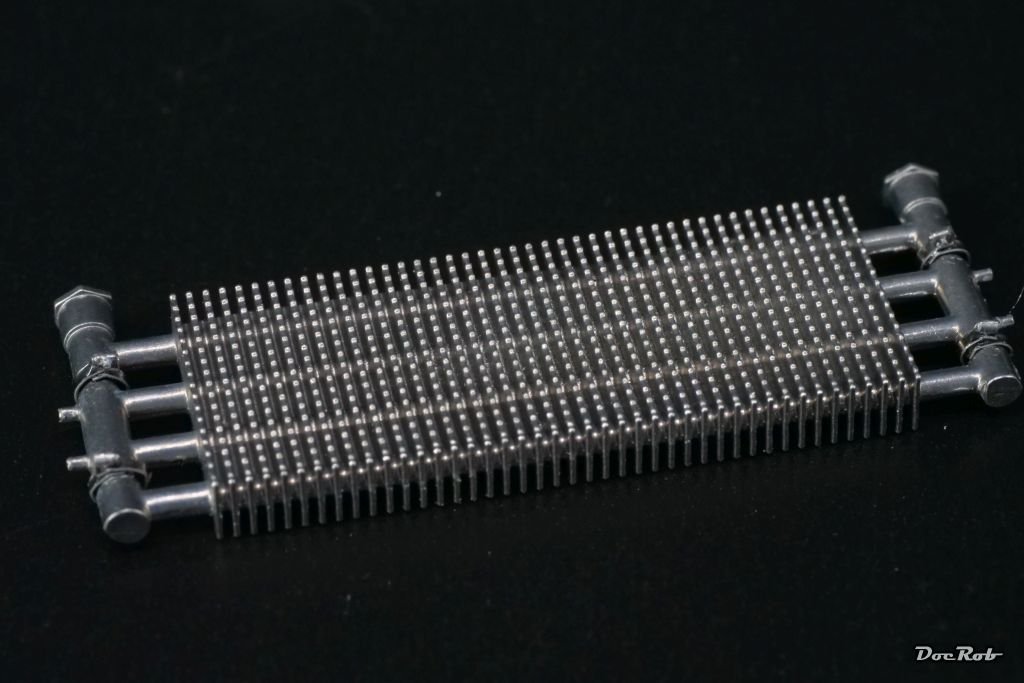
Just a tiny update, while I prepare the cooler parts and some internal framework. If you wonder, why MFH kits are special, then look for this magnificently casted white metal part. genius and madness are sometime close, as you have to replicate four hose clamps from steel PE strips with the screw parts being tinies casted parts . Cheers Rob
- 418 replies
-
- 11
-
-

-
Cobra Coupe - Le Mans - Model Factory Hiro 1/12
DocRob replied to DocRob's topic in LSM 1/35 and Larger Work In Progress
Thank you Carl, poco a poco like they say here. I don´t have a lot of time lately, but the Cobra keeps me motivated. Cheers Rob -
Wow Peter, your Spitfire crossed the finish line fast and in beautiful fashion, as is your trademark. It´s a camo, but highly vivid and eye pleasing. Nobody would have noticed the missing rearview mirror, but now that you spoke about it... . Cheers Rob
-
Your engine looks sweet, Jeff. Tons of detail everywhere. I hope the hood opens easily to show everything. Cheers Rob
- 57 replies
-
- 2
-
-
- peterbilt
- highway tractor
- (and 1 more)
-
Cobra Coupe - Le Mans - Model Factory Hiro 1/12
DocRob replied to DocRob's topic in LSM 1/35 and Larger Work In Progress
Pocher kits can be demanding, to say the leas, from what I read. Ixo Collections is a France based company, producing kits in 1/8 scale with pre painted parts and some even with lights and sound. Cheers Rob -
Cobra Coupe - Le Mans - Model Factory Hiro 1/12
DocRob replied to DocRob's topic in LSM 1/35 and Larger Work In Progress
Thank you Mike, the offers on ebay are a bit pricey, I find. Unfortunately the Cobra is not available from MFH directly unfortunately, they have the best prices by far. Cheers Rob -
Cobra Coupe - Le Mans - Model Factory Hiro 1/12
DocRob replied to DocRob's topic in LSM 1/35 and Larger Work In Progress
Thank you Chris, I guess, you can´t come much nearer to the original thing, than with a MFH kit. There are other companies, like Ixo or Pocher, but I never built their products. Build threads to me are a two way benefit, as I very much profit from the input from fellow forum members a lot. Another selfish aspect is, I can look for my own color call outs, later in the build, when I forgot, which exact hue was used. Cheers Rob -
Cobra Coupe - Le Mans - Model Factory Hiro 1/12
DocRob replied to DocRob's topic in LSM 1/35 and Larger Work In Progress
Thank you Peter. When mistakes lead to good ideas, you got a hole manual, which would be highly appreciated by me in form as a drilling diameter guide. I meant the Whole manual , when I wrote it. Nearly everything mounts to the chassis and you have to identify every part throughout the Whole manual find it in the stashing boxes and measure it´s connecting pegs. In case of screws, you have to identify which parts are passed by them and in which they need to cut in. I use the same HSS drill bits as ever, as they are generally angled for most metals and the cast white metal is relatively soft. Some bits for drilling printed circuit bords are not so convenient, as they are harder, more brittle and therefore break easier and their sloping angle is for fiber plastics and doesn´t go too well through metals. The latter are a bit more comfortable to handle, because the shaft diameter is always the same and you can put them into a collet. Generally, I´m astonished, how few of the bits I managed to break during the two MFH builds. Cheers Rob -
Cobra Coupe - Le Mans - Model Factory Hiro 1/12
DocRob replied to DocRob's topic in LSM 1/35 and Larger Work In Progress
Thank you Phil. Not all of the detail will be lost, the Cobra has a huge openable hood. The drive train and differential will be buried unseen though. Cheers Rob