DocRob
-
Posts
7,060 -
Joined
-
Last visited
Content Type
Profiles
Forums
Events
Gallery
Everything posted by DocRob
-

Land Rover Defender 110
DocRob replied to BlrwestSiR's topic in LSM 1/35 and Larger Work In Progress
Nice surgery and kit bashing, Carl. Cheers Rob- 10 replies
-
- 2
-

-

-
- c1 models
- land rover
- (and 1 more)
-
Only to show, why it takes some time for the next bigger update. These are the parts for the gearbox and rear suspension cleaned up, drilled (the most time consuming part) and ready for primer and paint. Cheers Rob

-
Very nice and vivid, FA. I love the contrast between body and blue interior, a beauty for the display shelf. Cheers Rob
-
Thanks Martin, it´s the same amount of work to get it together like with the real one, I guess . Cheers Rob
-
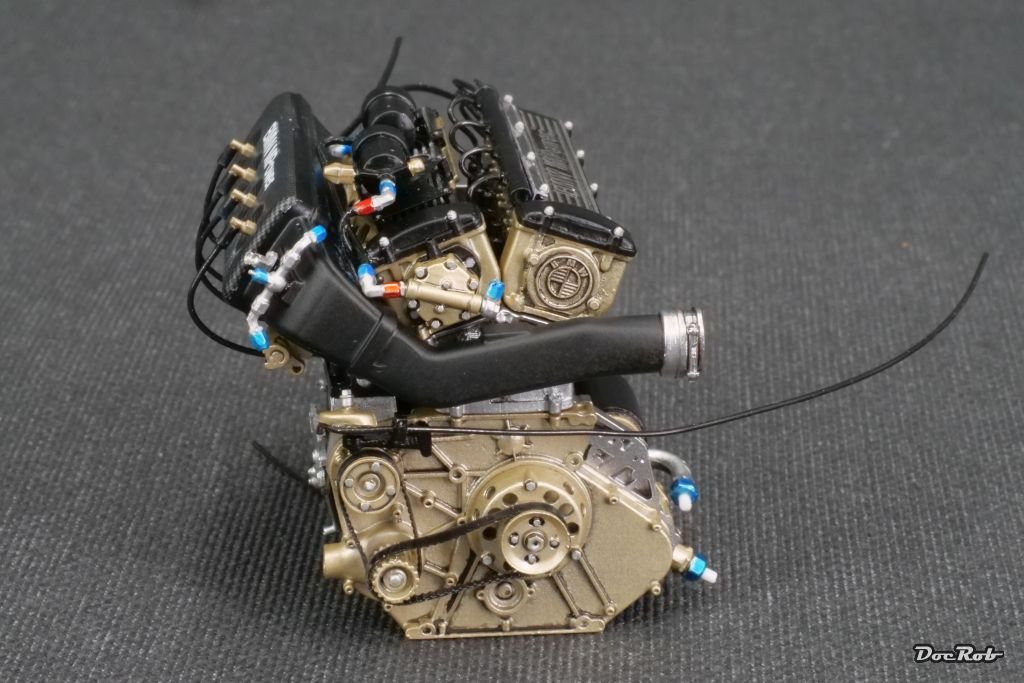
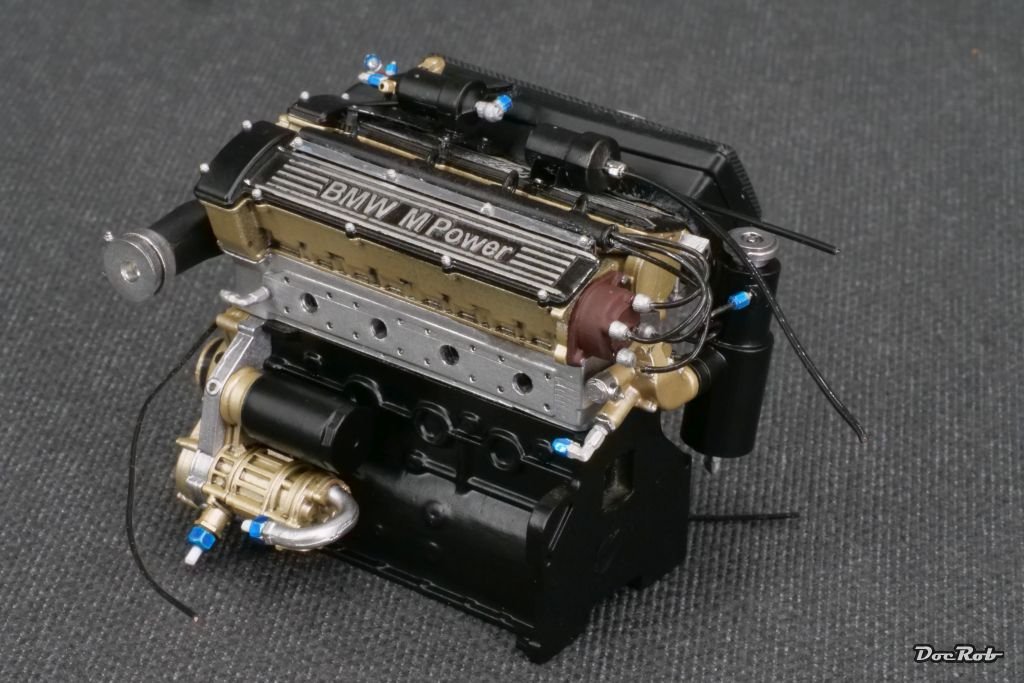
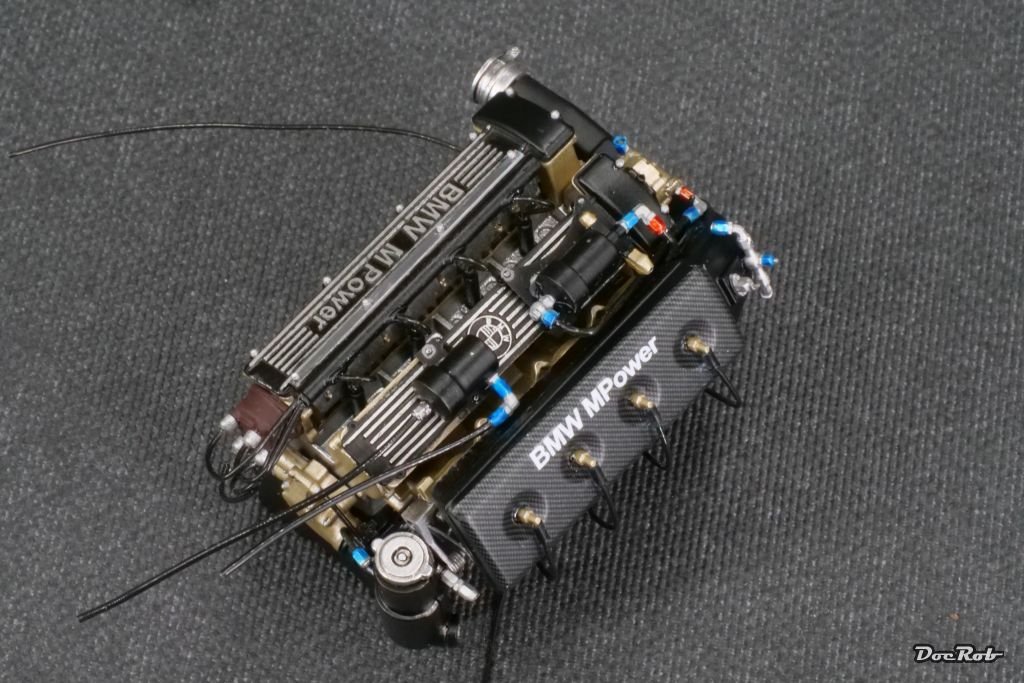
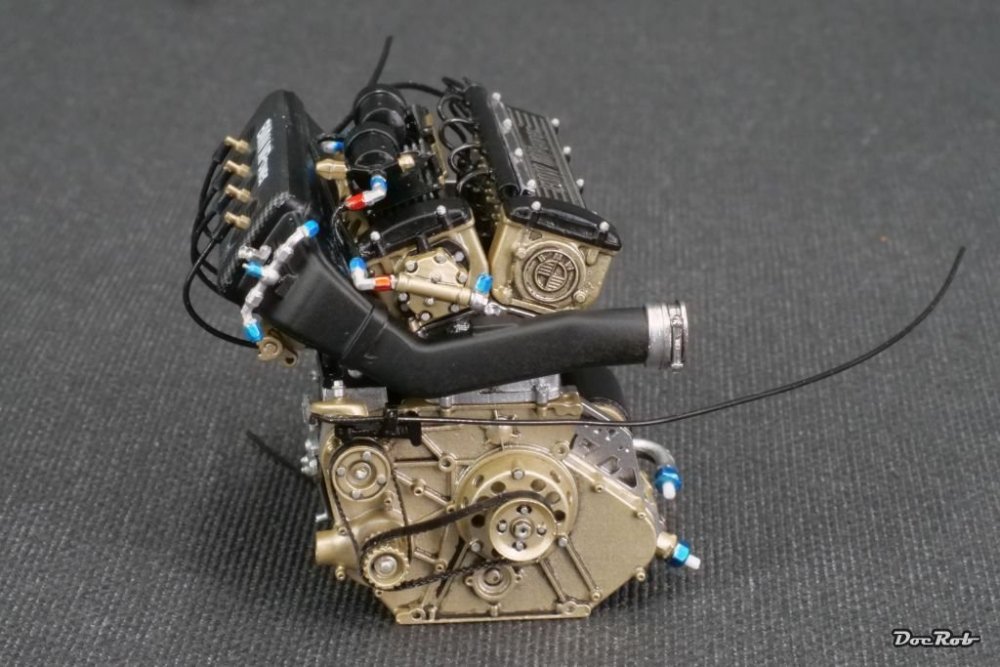
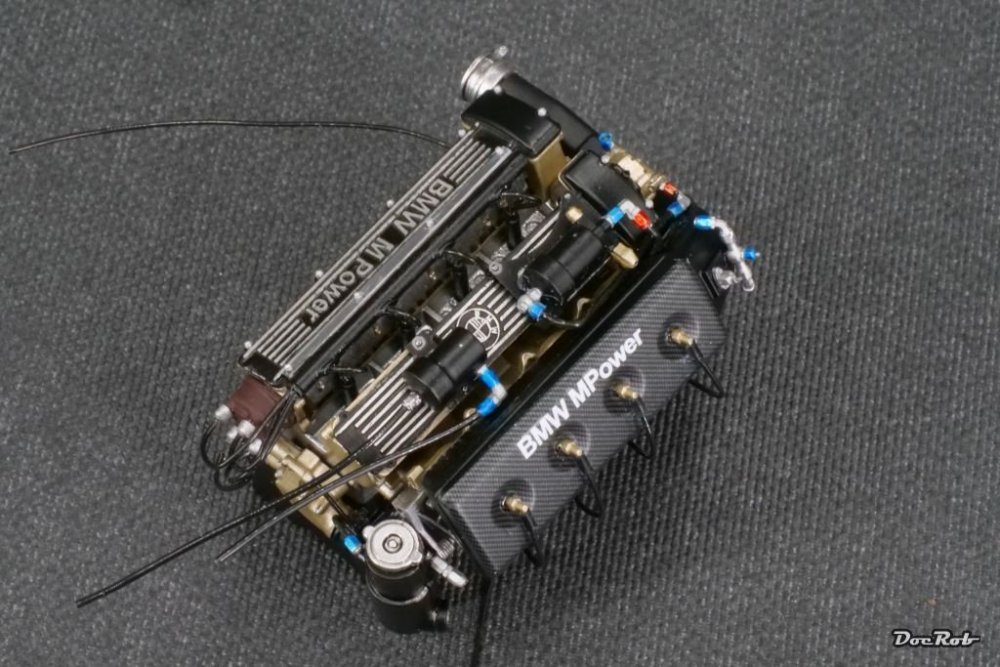
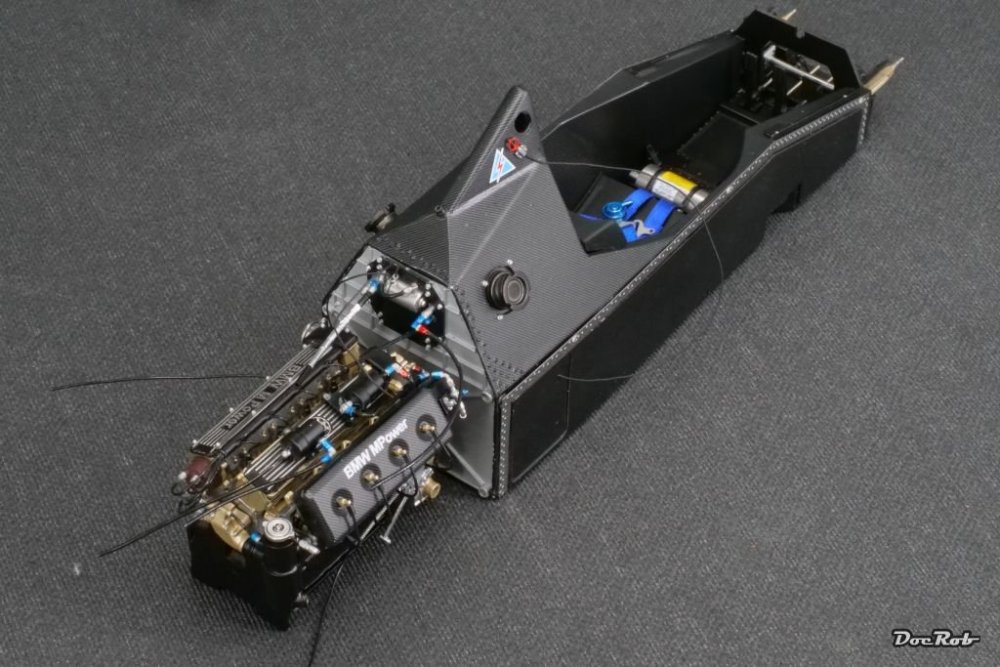
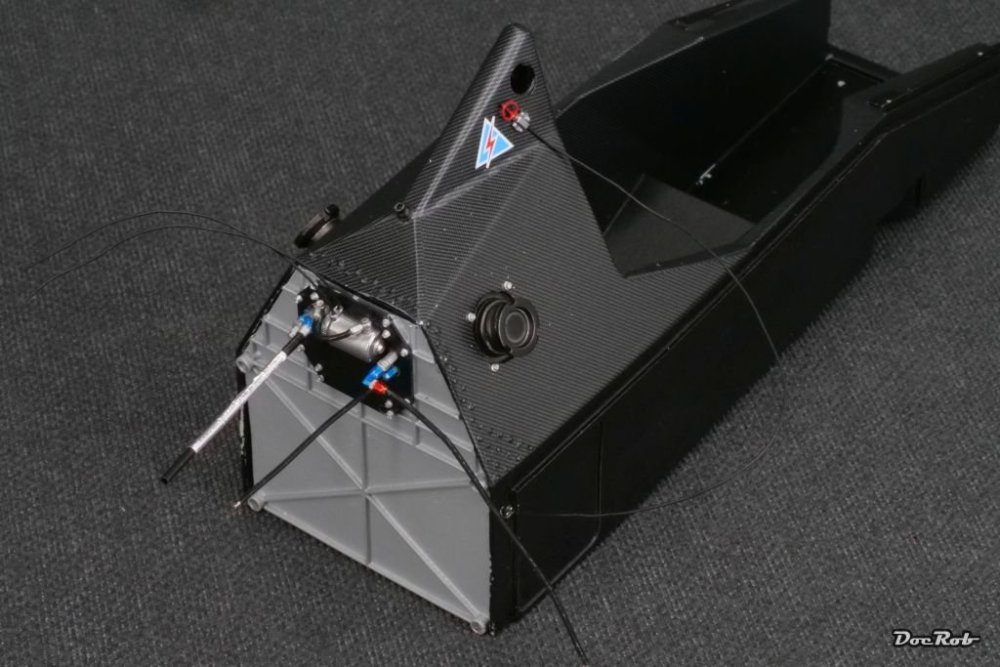
The engine is nearly done, missing only some details and some wires and tubes, which I will add later. Speaking of wiring, the manual is terrible, showing, where a wire starts, but often not, where it leads. This means permanent page turning in the manual, and often, I can´t find the receiving end. Another complain is the 0,8 mm wire which is very rigid and therefore difficult to fit. Some other aspects of the kit are a bit annoying as well, like the suggestion to butt glue 0,6 mm ignition wiring onto the 0,6 mm end of the spark plugs, impossible. I made tiny connectors from vinyl tube from my spare box. With a rest of the supplied carbon fiber decal, I applied the CF onto the airbox (?), because my reference shows it belongs there instead of being painted black. In this state, the engine is very fragile and I permanently broke some parts or wires loose. A mock up pic with the monocoque laid in front: Cheers Rob

-
Thank you Carl, you should try to build a MFH kit yourself and you´ll notice it´s all there. You need to put in some effort and it needs some skill adjustments from plastic modeling, but it´s not that hard to get these results with fantastic kits like this. Cheers Rob
-
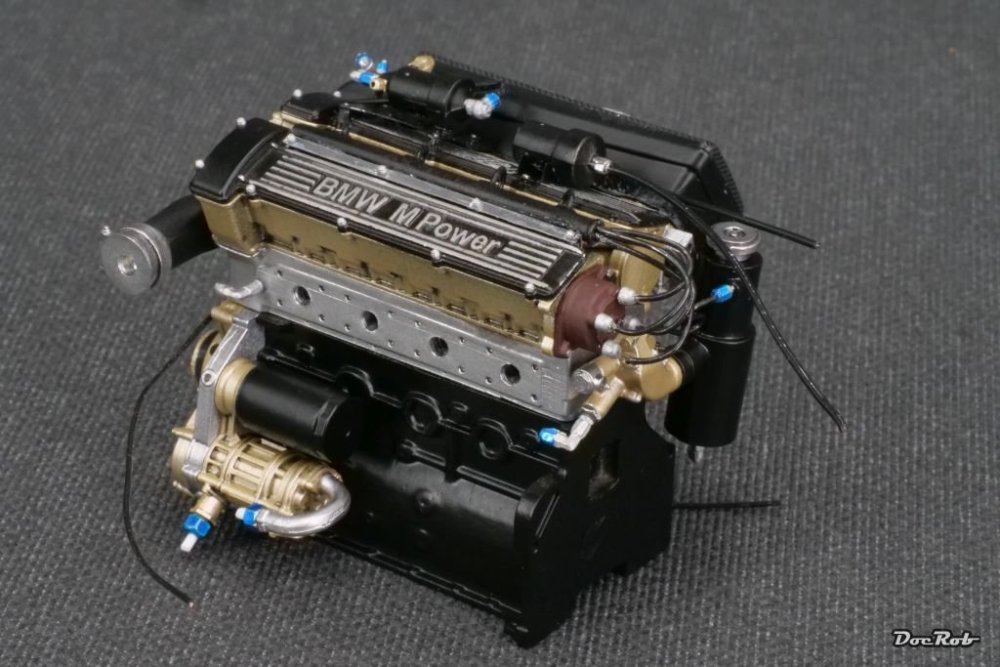
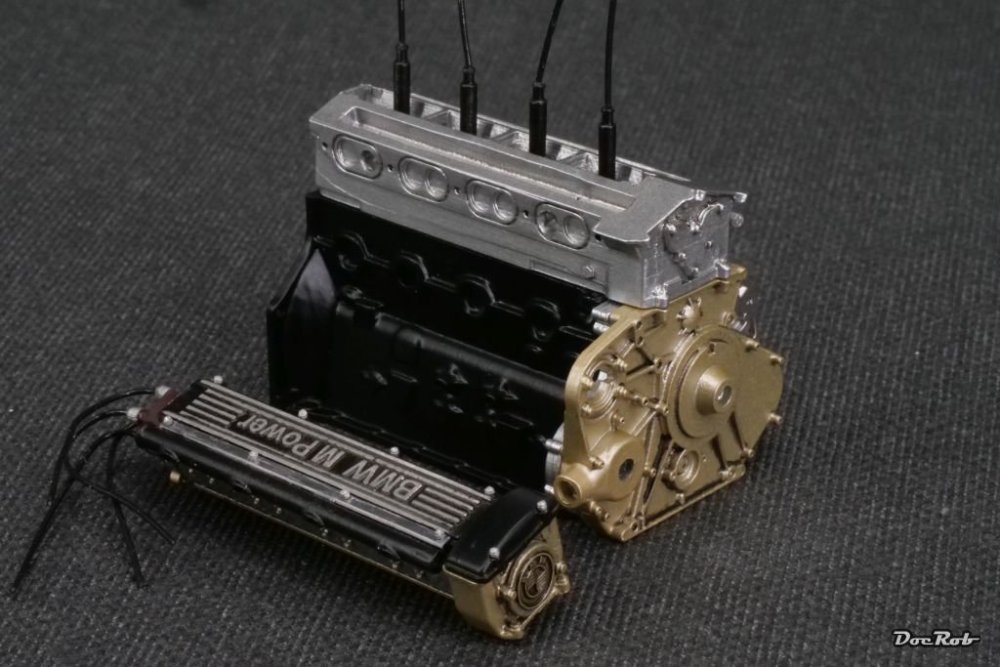
With the recent flood of car builds here, I have to swim with, showing a little progress. In fact, I´ve been working hard to clean up, drill, prime and paint or decal all engine parts. There are a lot of parts and the assembly will be delicate. There are some drawbacks though, e.G. the black tube for the ignition harness should be fixed to the BMW MPower part with what MFH calls UV band. These are like 3D-decals, extremely brittle and nearly impossible to get them around the part and riveted into place with super tiny rivets. I will fake this later with some wine cap foil, as I broke the bands. Second obstacle id drilling numerous tiny wire connectors to accept 0,8 mm wire. They are so small and sometimes not so well cast, that it is nearly impossible to drill them without causing damage. But now, all this is done for the engine, I start to assemble it Colors are AK Extreme Metals aluminum for the silver parts, Tamiya LP titanium gold and Tamiya LP-5 semi gloss black. The lettered parts were scraped with a tiny sharp chisel, to remove the black paint on top. Tamiya black panel liner was used for accentuation and nuts and bolts were painted with a silver marker. Cheers Rob
-
What is on your bench right now ? Share a picture :)
DocRob replied to Martinnfb's topic in Modelling Discussion
The Landy in the back tries to hide, stop it, otherways there will be no WIP anymore. Cheers Rob -
I hope you´ll build this one. I have three kits in different scales, one from MFH in 1/12 scale, another from MFH in 1/43 and one in 1/20 from Fujimi. They should display nice, when build. Cheers Rob
-
Land Rover Defender 110
DocRob replied to BlrwestSiR's topic in LSM 1/35 and Larger Work In Progress
Three car builds on LSM at the same time must be a record Great work with the Defender, Carl. Bummer that there is no thorough documentation with the conversion kit. Love your version, but don´t like LED lights too much on classic off road cars . I opted for very good conventional lights on my 1/1 scale Jeep. Cheers Rob- 10 replies
-
- 4
-
-
-
- c1 models
- land rover
- (and 1 more)
-
Good to see another one building a car kit here. Your CF work looks great and your scratching will pay off in the end. Cheers Rob
-
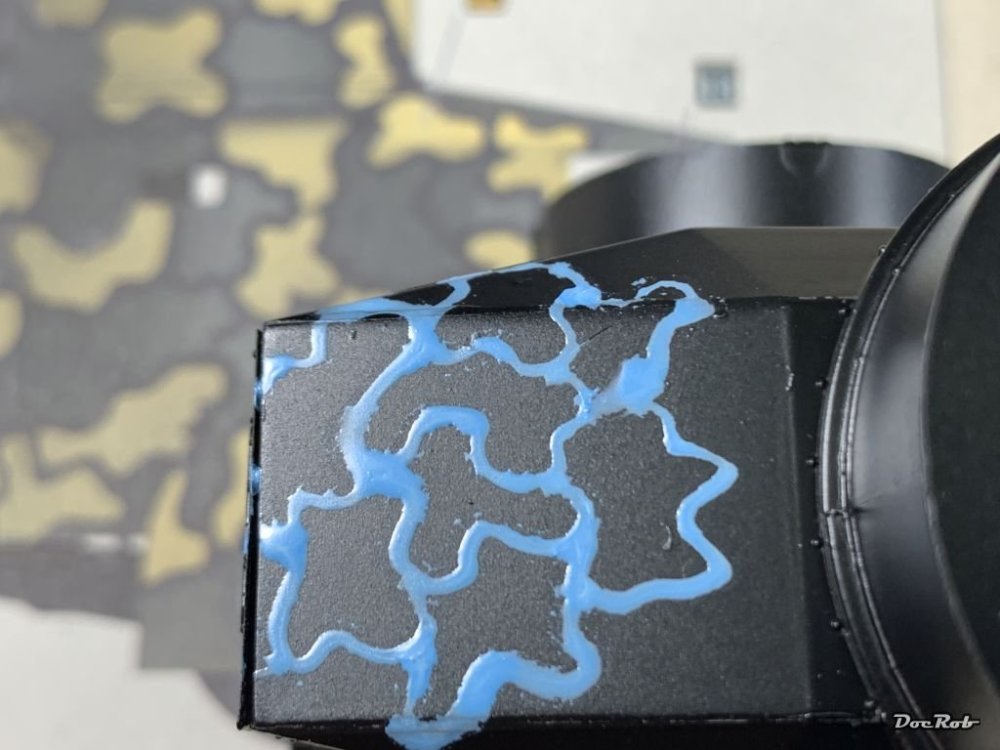
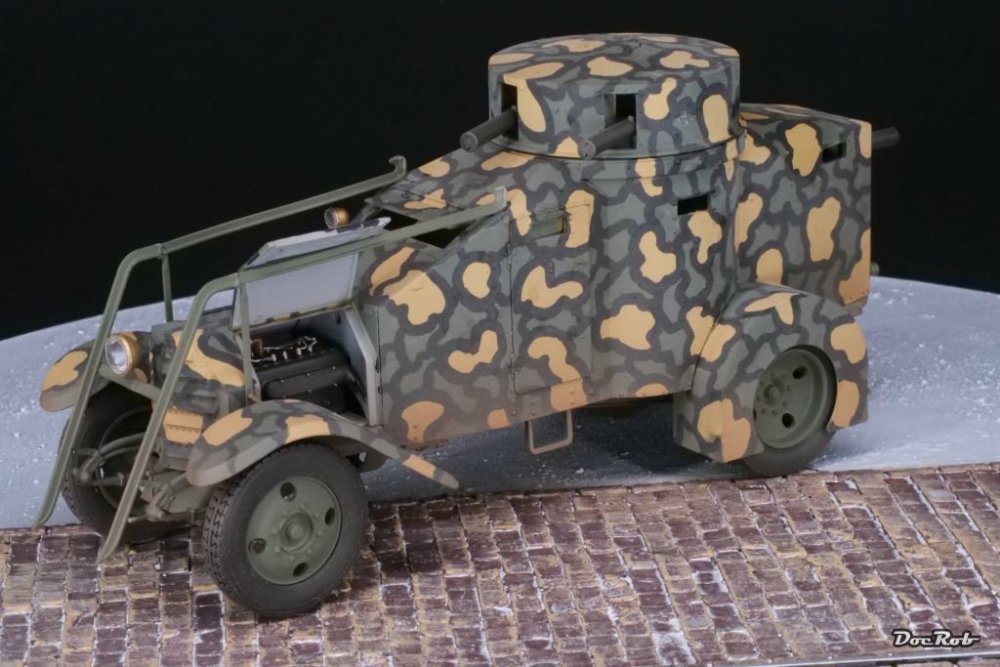
I once tried to apply liquid mask from a marker for a similar paintjob, of course an Italian one, but it didn´t work out, the application of the mask was too irregular due to the thick medium. I used a marker then. I tried different masking fluids: ...and finally used the marker: Cheers Rob

-
HurricaneMkIIc-Fly Models-1/32-Finnished
DocRob replied to KevinM's topic in LSM 1/35 and Larger Work In Progress
...but you fought her back, Kevin, she´s a beauty. Cheers Rob -
Airfix 1/48 P-51D Miss Kentucky/Bunnie
DocRob replied to ulvdemon's topic in LSM 1/48 Aircraft Ready for Inspection
Nice and colorful rendition of a P-51 and also interesting, considering the story behind the Tuskegee airmen. Cheers Rob -
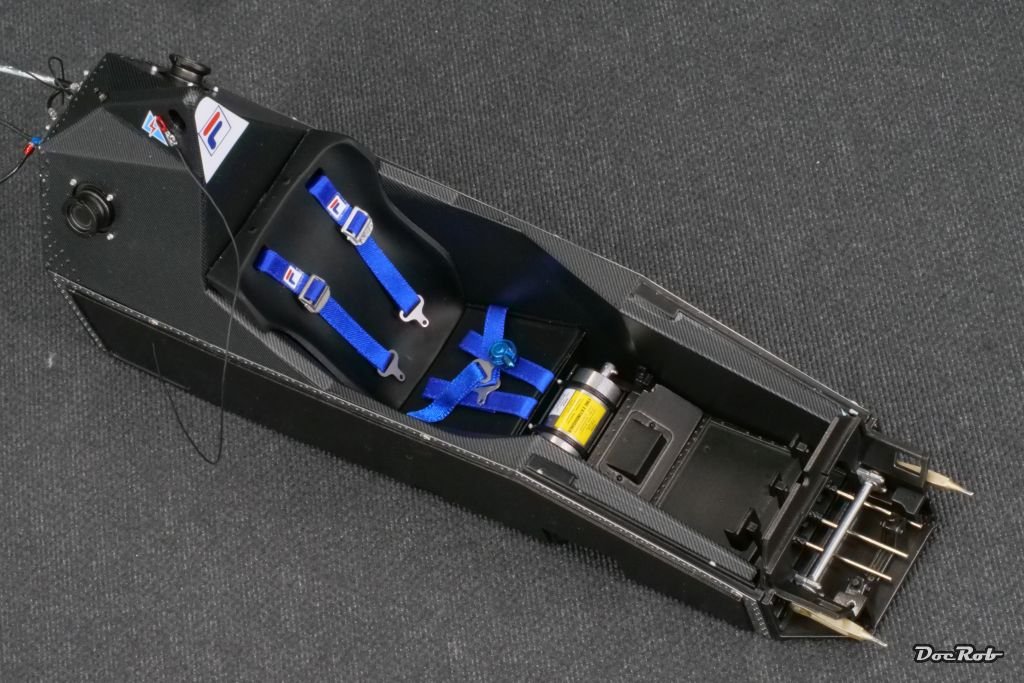
Starting to get into a kind of building flow, big decisions block my progress, but nonetheless, some steps were finished. I added the first front part of the suspension housing, seat and seatbelts. The latter are a joy to assemble, compared to lets say HGW belts. MFH supplies double sided adhesive type for assembly and placing the belts, easily done. The seat parts are made from black rubber and there is no need for painting. I also added some PE frames for the sideskirts, which can hardly be seen on the picture. The next step would be adding the prepared front suspension, but wait, one of the arms needs to be fiddled through the sideskirts, which needs to be painted in bodycolor. I want to prepare and airbrush all body parts together, to prevent color variations and I´m not up to do that now, which means, I will start with the 1500 horsepower heart of the missile soon, plan changed. Cheers Rob

-
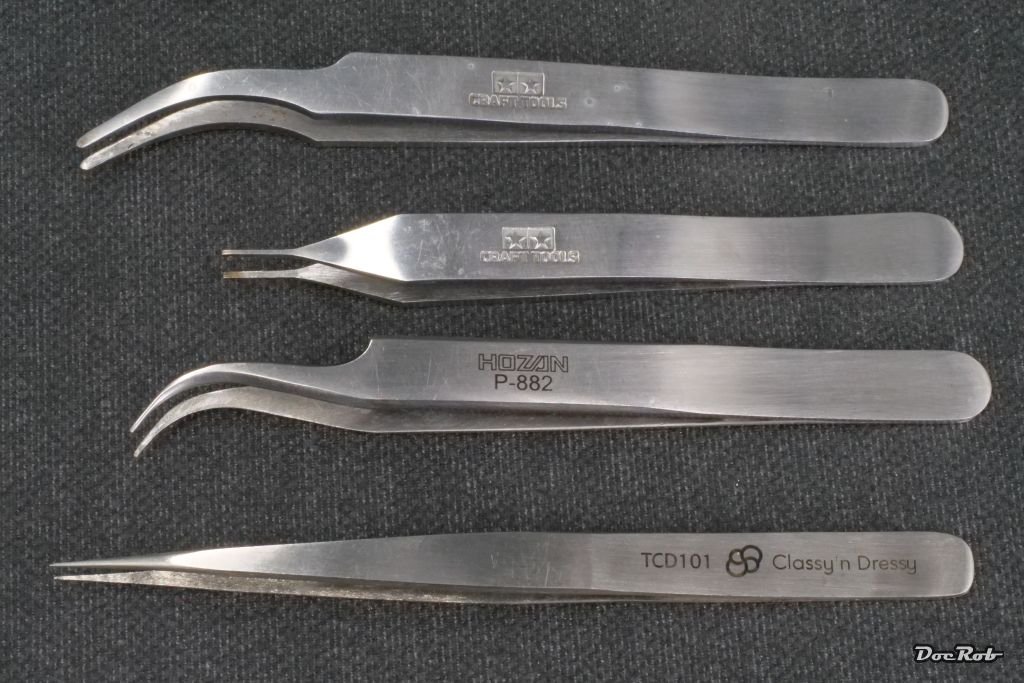
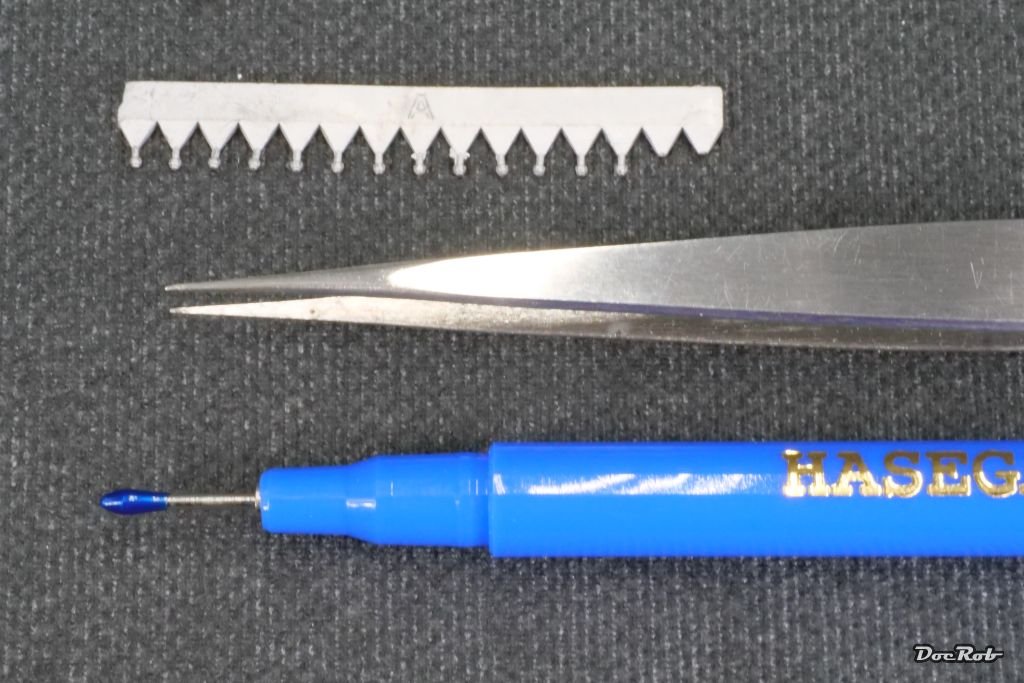
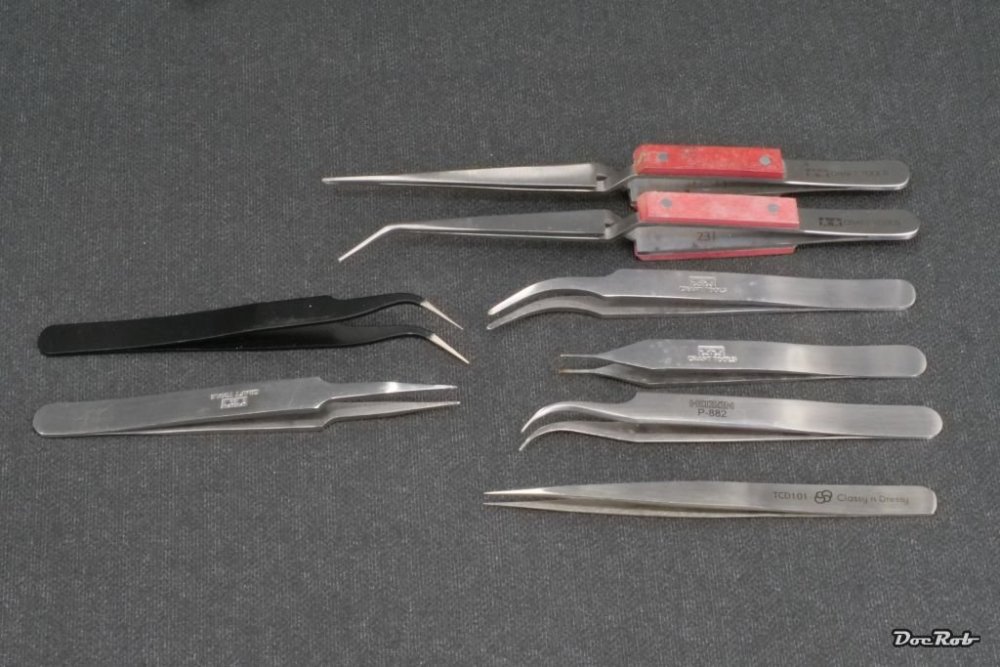
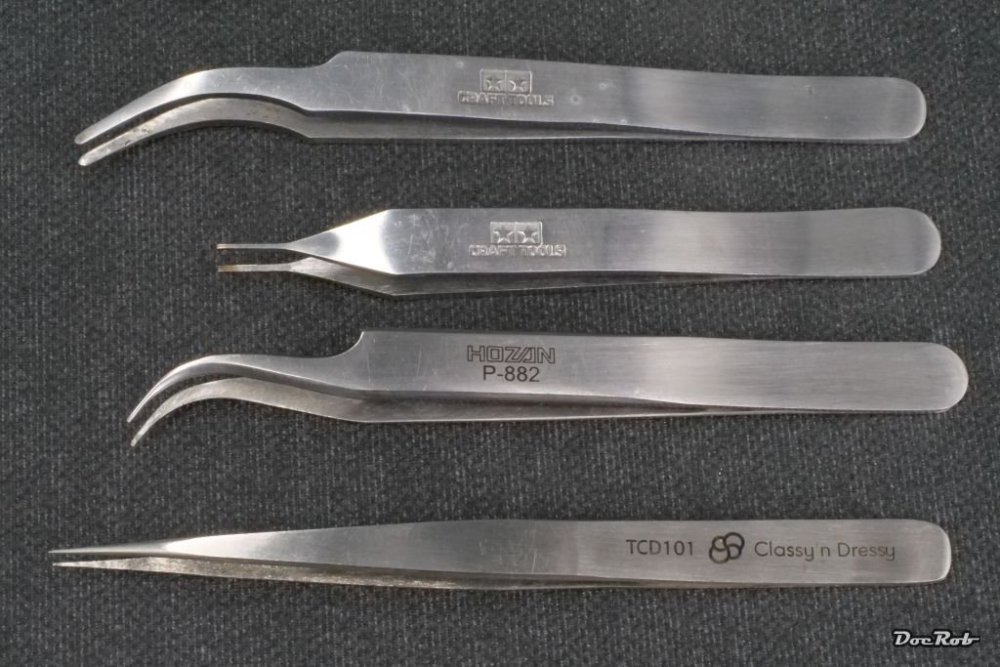
Well hombres, I had to laugh about the twanger thing , but it´s part of the tweezer reality. I have lots of tweezers and use them permantely for different type of builds. There are wooden ships with rigging, WWI biplanes with rigging and of course the MFH kits with tons of rivets to set. Strangely some well made tweezers are worse than others, which were much cheaper, there is no way, other than testing. On the right side are my good tweezers for different causes, the lower you get, the more useful they are. The ones on the left are twangers, and the lower one from Tamiya looks good and is well made, there is no obvious reason for not trusting it, but it´s a fail. These, I use permanently, with the second from above being especially helpful with turnbuckle tubes for WWI planes and for bending tiny PE parts. My relatively new kid in town is the one on the bottom, where despite the sharpness of the tip, the twang factor is relatively low. Here is where I bought it: Classy 'n Dressy Tenir Tweezers (Standard) Here is a picture, showing some of the tiny whit cast rivets of the kit. You can imagine, how hard it is to grip these, apply CA glue and let them slide into their tiny hole. BTW: I frequently hone the inside of my tweezers tips with a fine sandstone, after freeing it of CA residues with a blade. Dirty, ragged tips are the number one culprit, making tweezers to twangers to my eye. The Hasegawa small parts applicator with it´s sticky tip is not tested yet, but will soon, lets see, how that compares. Cheers Rob

-
Thank you PW and Paul, most parts of the MFH kits are not overly difficult to build, but as you mentioned PW, patience is necessary. The kits seem to be overwhelming at the beginning, but with some discipline and a good building process, all is manageable. I´ve built plastic models with higher swear factors, but the MFH kits are definitely more rewarding than these. Cheers Rob
-
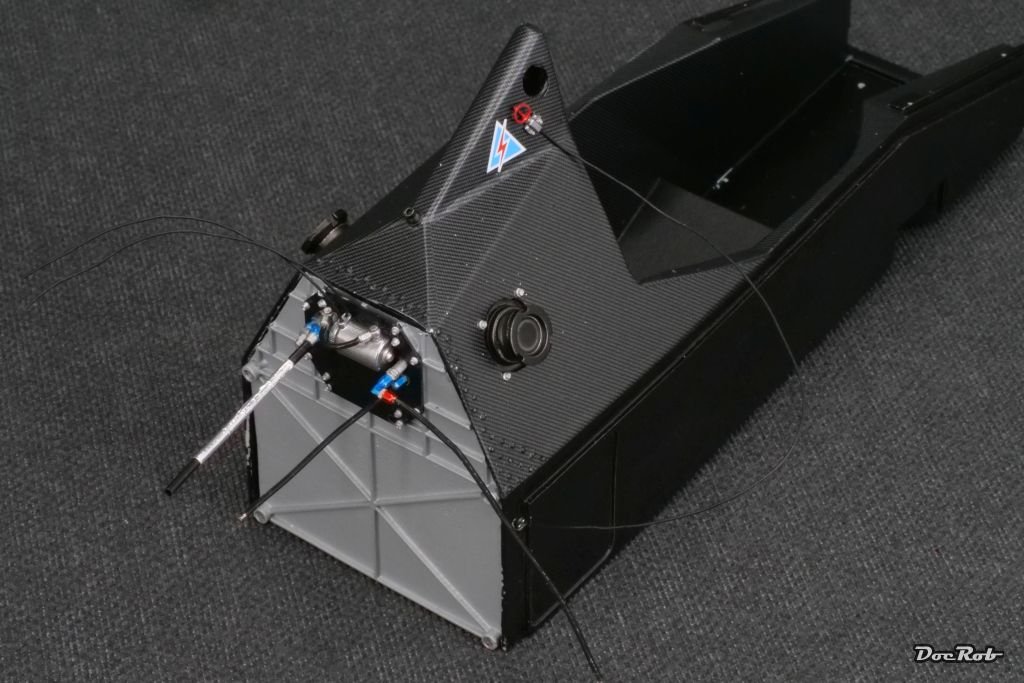
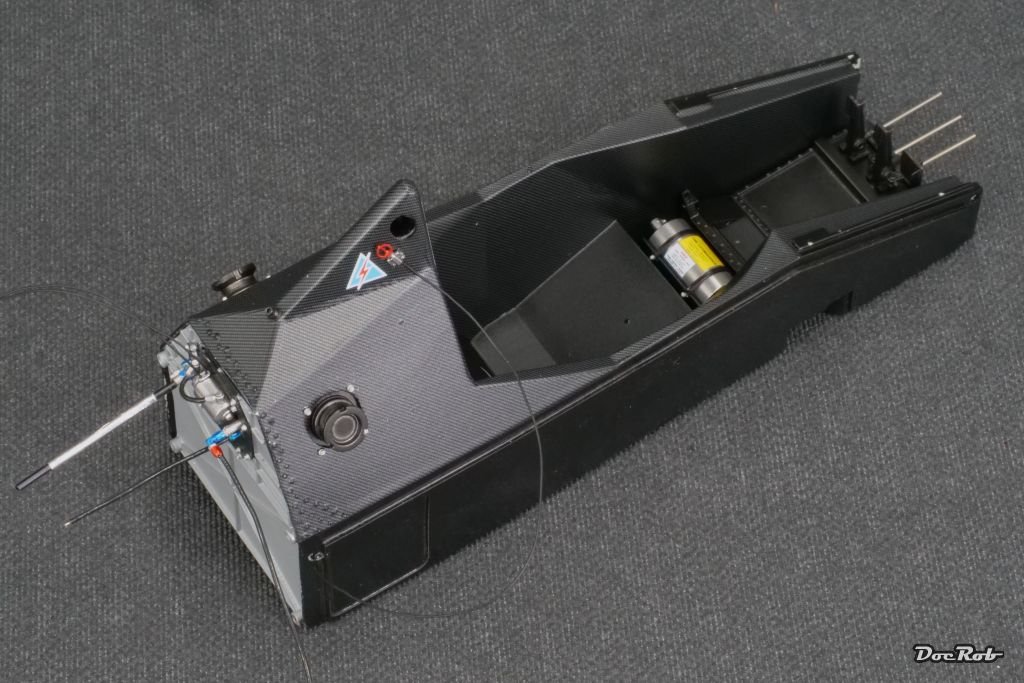
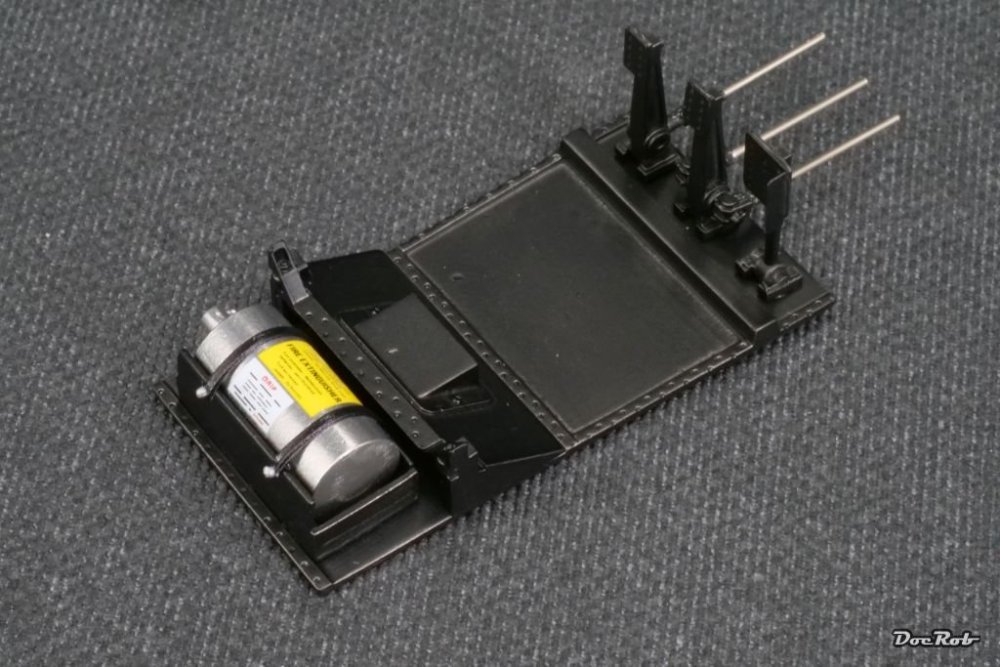
After loads of prep work, I have finally some progress to show. I usually prepare all the parts needed for the next three or four steps in the manual, to get a grip of how everything fits together and which order is best. Preparation means, drilling a LOT of holes, sanding and filing parts smoot and to fit, TEST FIT and then priming and airbrushing. As there is a lot of blackness in the monocoque, I used an airbrushing technique on top of the brushed on clear metal primer, to slightly break up the dull blackness. I spray the semi gloss black Tamiya LP5 highly thinned at about 50% with leveling thinner. After application, everything is black, but during the curing period the protruding parts slightly get a hint of metallic sheen looking through. The floorboard with the fire extinguisher looks simple, but wasn´t, due to the extremely fragile belts around, fitted with super tiny rivets, not an easy task. The firewall got detailed and again, getting the tiny rivets in place was an eye straining task. They are about 1,5 mm long in total and you need good tweezers to place them correctly. I added all the hoses and wires, which will be connected in later stages. The monocoque in it´s actual state. Cheers Rob

-
Thank you Martin, it´s a splendid kit, not as refined as some of the newer MFH kits I own, but still fantastic. Cheers Rob
-
Nice one, Paul. they were called Gummikuh (rubber cow) back in Germany at the time, because they lifted the backside as a reaction of the cardan drive train when accelerating. I visited the Berlin BMW motorcycle factory, when I was young and they had specialists there, doing the pinstriping by hand. BMW motorcycles were never my cup of tea, too streamlined, well thought and downright boring, but undeniable they are classics. Cheers Rob
-
HurricaneMkIIc-Fly Models-1/32-Finnished
DocRob replied to KevinM's topic in LSM 1/35 and Larger Work In Progress
I have to chime in, Kevin. Your Hurricane looks fantastic, I love the tonal balance with paintjob and weathering and you near finished a Fly kit, always a reason to cheer. Cheers Rob -
1:32nd scale Jeannin Stahltaube
DocRob replied to sandbagger's topic in LSM 1/35 and Larger Work In Progress
The turnbuckles look much better than the kit PE, I plan to do the same with mine, when time comes. Your "mottling of the engine fairings came out great, I have some untested plans for mine as well, lets see. Cheers Rob -
What is on your bench right now ? Share a picture :)
DocRob replied to Martinnfb's topic in Modelling Discussion
Careful drybrushing or with a weathering pencil. Cheers Rob -
1/35 M4 HST Olive drab is so last year
DocRob replied to PanzerWomble's topic in LSM Armour Finished Work
I guess the OD went some years ago and got converted to CP (corroded primer). Love the boxy vehicle and what you´ve done with it, although I think speed tractor might be an exaggeration. Cheers Rob -
What is on your bench right now ? Share a picture :)
DocRob replied to Martinnfb's topic in Modelling Discussion
There you go with your signature weathering of some heavy metal, FA. Your Panther looks great. Cheers Rob