DocRob
-
Posts
7,045 -
Joined
-
Last visited
Content Type
Profiles
Forums
Events
Gallery
Everything posted by DocRob
-
 You put yourself under some pressure with such an ambitious project, Hubert. I really like the results of your printing efforts, albeit the described methods and software usage are just plain Chinese to me. Bummer with the landing gear struts. Finding long drill bits with the needed diameters will be difficult, but maybe you could push a heated steel rod through, especially when there are at least some remains of the projected channels left. As a better guide, you could drill as deep as possible with the bits available. You could also slice the struts and epoxy some rods in. Cheers Rob
 -
Well, that´s good news, like Carl, I will be in the buyers lane. Cheers Rob
-
Roden 1:32 Nieuport 28c1 build
DocRob replied to AOE4's topic in LSM 1/35 and Larger Work In Progress
Yes, I meant drilling and inserting brass rod not tubes. i use mainly 0,5 mm brass rod for the task and glue these into the drilled holes with CA glue. If more strength is required, I use the method, I described in my Fokker D.VIII build log, using flattened brass tube with brass rod inserted. The brass rod protrudes at the ends and can be glued into the wings holes. Cheers Rob -
Sorry to hear about your health conditions Peter. I hope you respond well to your medication and don´t need to be hospitalized. All the best my friend. Cheers Rob
-
Cobra Coupe - Le Mans - Model Factory Hiro 1/12
DocRob replied to DocRob's topic in LSM 1/35 and Larger Work In Progress
Thank you Phil, no plans to purchase kits though, but some AM for my sandbox project and others. Let´s see how long these intentions last, when I enter the LHS . Cheers Rob -
Cobra Coupe - Le Mans - Model Factory Hiro 1/12
DocRob replied to DocRob's topic in LSM 1/35 and Larger Work In Progress
@FullArmor, @Bomber_County, @HubertB, @CANicoll, @BlrwestSiR, @belugawhaleman, @Landlubber Mike, @Martinnfb, @Peterpools and @KevinM Muchas gracias x10 hombres . There will be no more updates for some weeks, as I will be traveling a bit and when I´m back, I have to start playing in the sandbox with you guys. Cheers Rob -
Pure Mad Max kick ass style and on the other hand looking so outdated and improvised. Great choice of quirky subject Martin, Chassis and wheels are looking good. Cheers Rob
-
Cobra Coupe - Le Mans - Model Factory Hiro 1/12
DocRob replied to DocRob's topic in LSM 1/35 and Larger Work In Progress
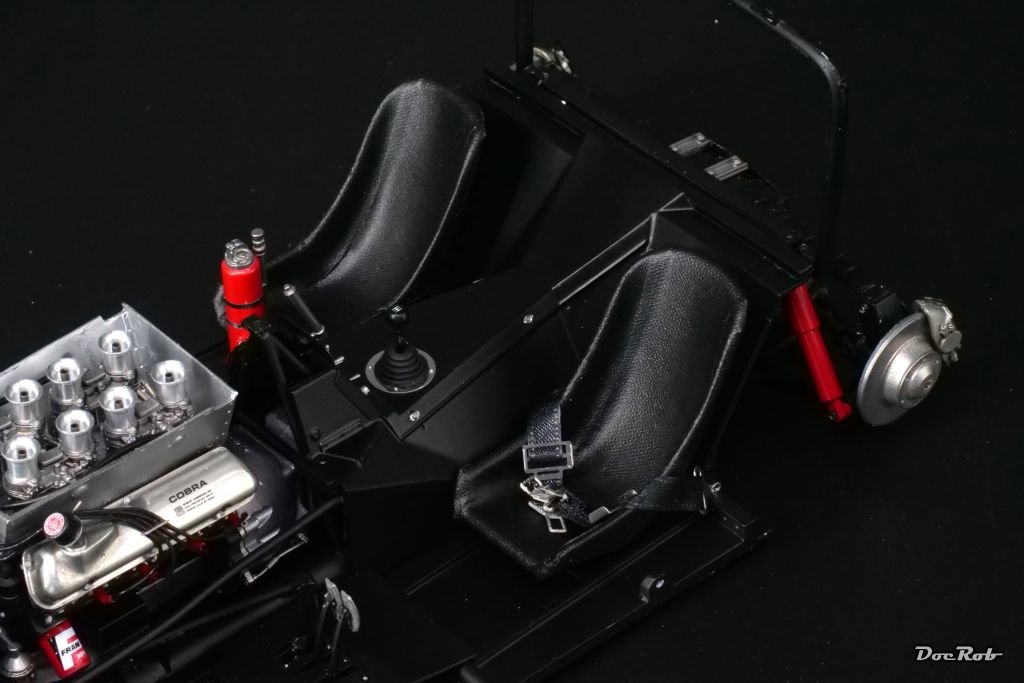
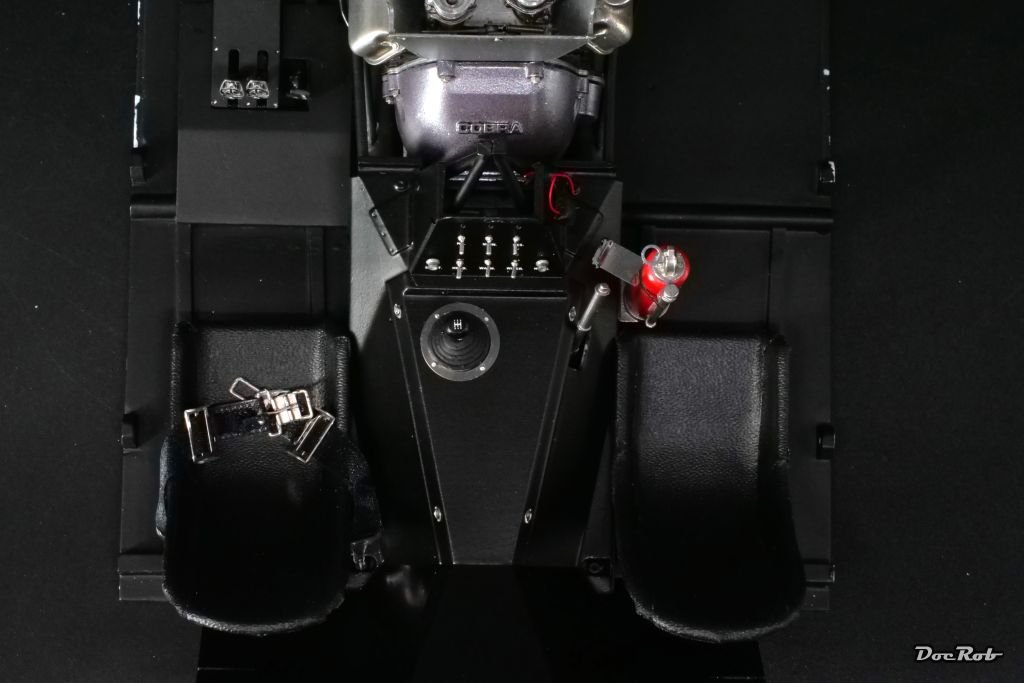
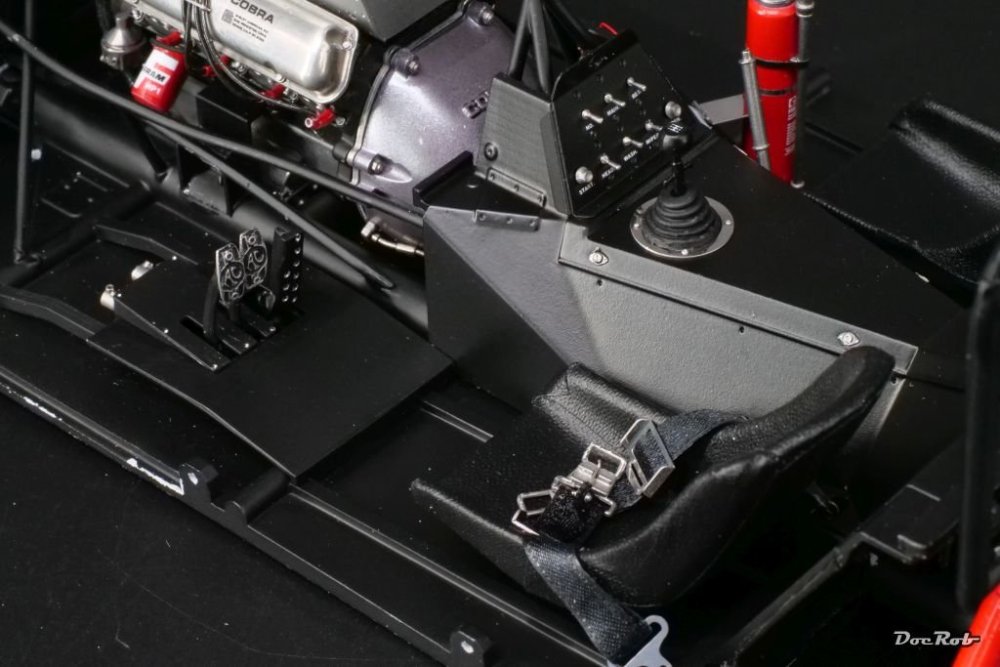
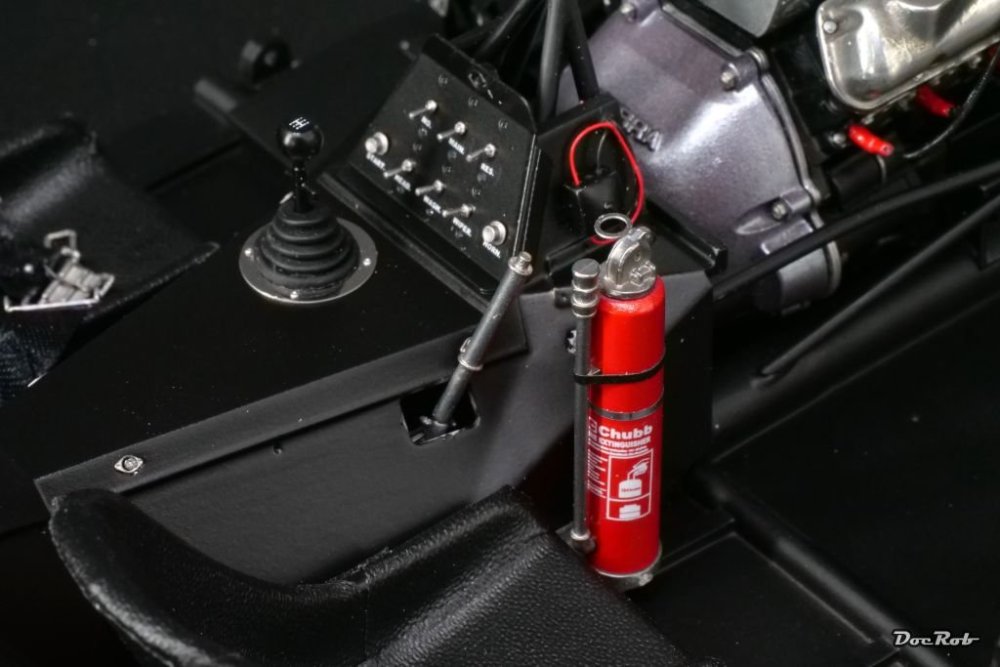
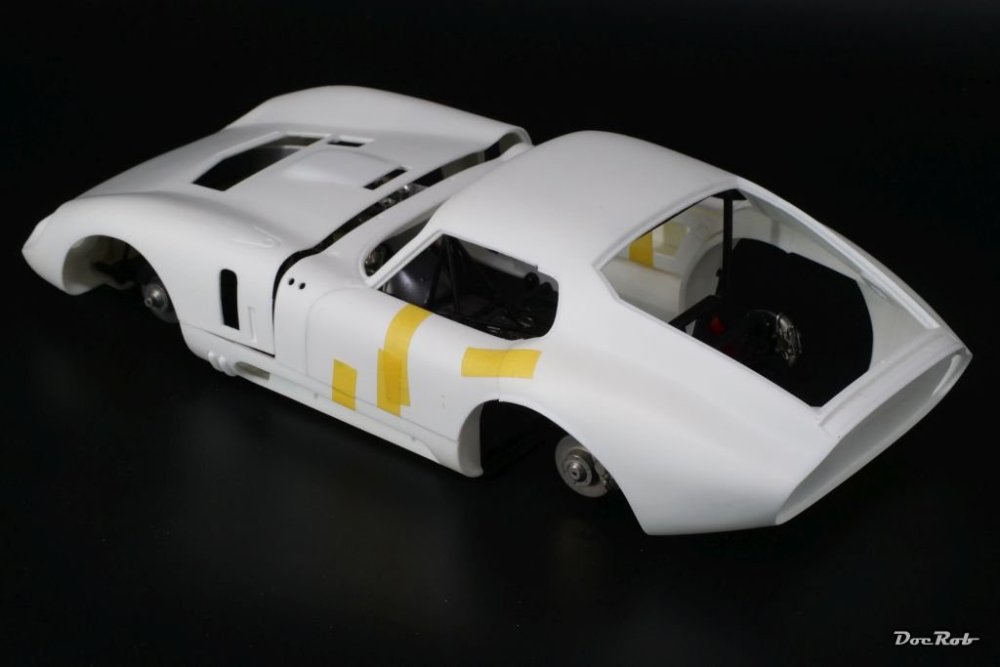
Somehow, I managed to get rid of this post in its original place. Luckily, I could copy it from MSW, so it´s only slightly out of order. I worked on the interior of the Cobra Coupe, lately, installing and decaling the switchboard first, then matte clear sprayed over the decals. Last were the switches, which are glued from the backside. Next was the shifting lever, which was not easy to install cleanly, with the tiny rivets to add. Last for these steps was the fire extinguisher, which is fantastically detailed. The chrome band is made from chrome adhesive tape, instead of the kit´s springy PE part. Then the tub was installed onto the chassis, followed by the seats and seatbelts. I love MFH seatbelts, as they provide double sided adhesive tape for mounting and installing them. No risk of CA blotches, smart. Cheers Rob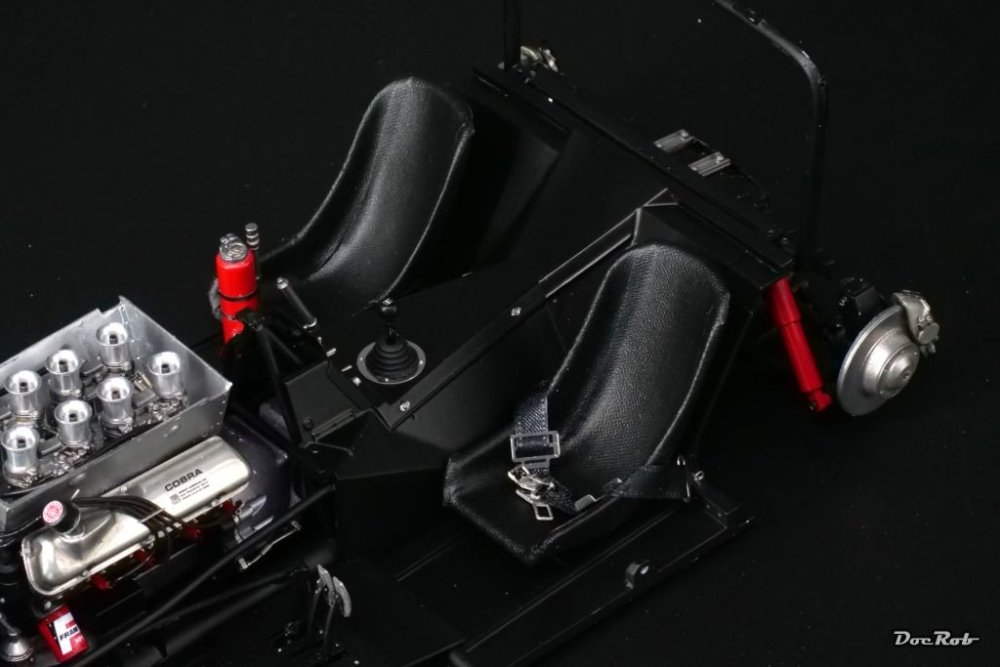

- 418 replies
-
- 12
-

-

-
Cobra Coupe - Le Mans - Model Factory Hiro 1/12
DocRob replied to DocRob's topic in LSM 1/35 and Larger Work In Progress
Thank you Seiran, it´s my second MFH build in after my recently Crocker motorcycle build and these kits are somehow addictive. If you are willing to build high detail car or bike kits oob, this is the way to go. They definitely need another approach, as there is a lot of white metal and resin and other materials involved, but to me there is more fun into building these, as there is in most plastic kits. Cheers Rob -
Cobra Coupe - Le Mans - Model Factory Hiro 1/12
DocRob replied to DocRob's topic in LSM 1/35 and Larger Work In Progress
@ScottsGT Cool techniques Rob! When I built my 1/72 Space Shuttle I used cloth medical tape cut into squares and applied to the exterior to simulate the thermal blankets the exterior was covered with. I had to use very thick enamel paint forced into the weave to fill them up. Thank you Scott and Chris, there are indeed a lot of techniques, to come closer to realistic results in builds. Some of them I learned of here or in other places, others, I developed myself, like the cigarette paper technique. Only recently, a fellow modeler over on MSW showed a technique for replicating 1/12 carbon fiber, using tulle fabric over a metallic grey base and then spraying black over it. After removing the tulle fabric and sealing everything it looked very good. I stored the idea for later use. Cheers Rob -
Interesting, what was in the box, Martin. Always good to replace as many parts on a Italeri kit . The meshes came out great way better then the plastic blobs. Will stay in your sandbox and watch you progress. Cheers Rob
-
I will add another wow to your already expanding collection Peter. Cockpit and especially the seat look fantastic. You are right about the sable brush prices, but there is no real way around them for figure and detail painting. I have some, but use them only for these purposes. I always clean them immediately and form the tip. For other occasions some good synthetic brushes are good enough. Cheers Rob
-
What is on your bench right now ? Share a picture :)
DocRob replied to Martinnfb's topic in Modelling Discussion
This looks so good, Carl. I was tempted to buy one, but now I am even more so. Cheers Rob -
Nice start on the cockpit Peter and as others mentioned before the seat is a gem. I really like these high quality parts and it is demanding fun to paint them properly. Better than having to guess, where parting lines are due to soft moulding. I wonder why Eduard could or would not solve that rasterizing prob with their IP´s. I had one, which was close to unusable, the dots were visible with the bare eye. Others are so much better, like you mentioned Quinta, but printed PE ones as well, like Yahu produces. Cant wait to see your meticolous paint work with that four tone camo. Cheers Rob
-
Thanks for the hint, Mike. Never heard of MN Hobby, but a new chance to lay my hands onto this kit. Cheers Rob
-
Cobra Coupe - Le Mans - Model Factory Hiro 1/12
DocRob replied to DocRob's topic in LSM 1/35 and Larger Work In Progress
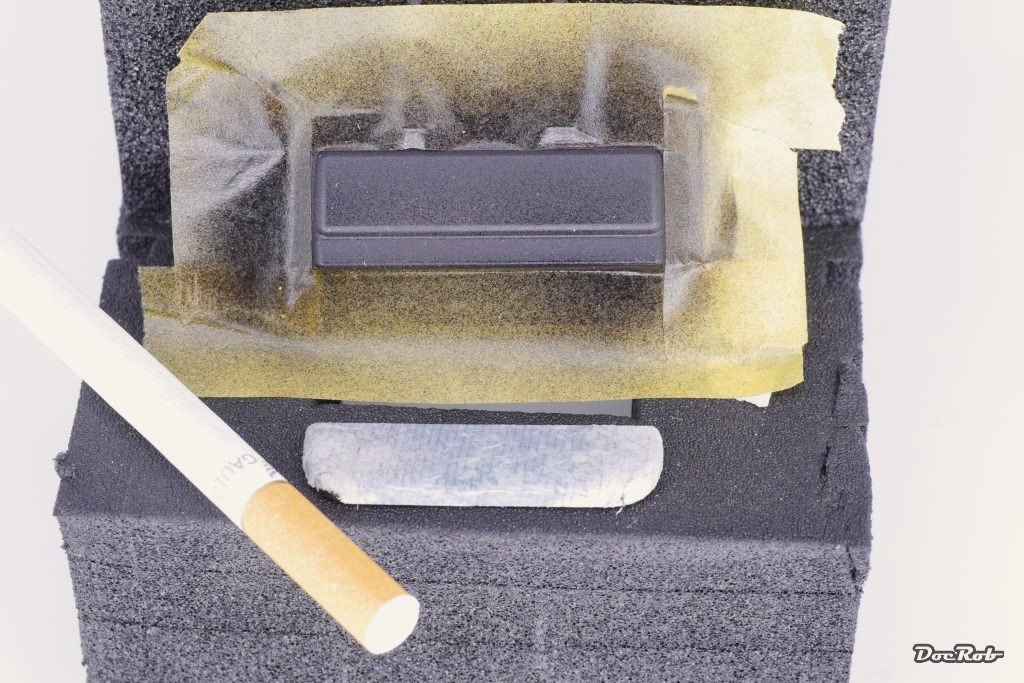
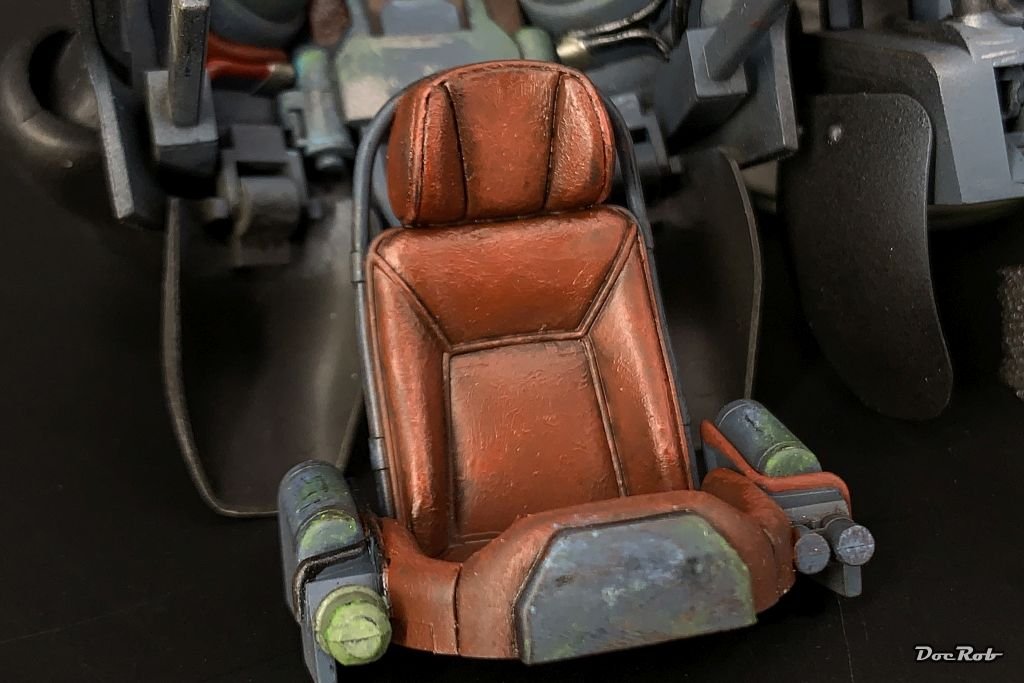
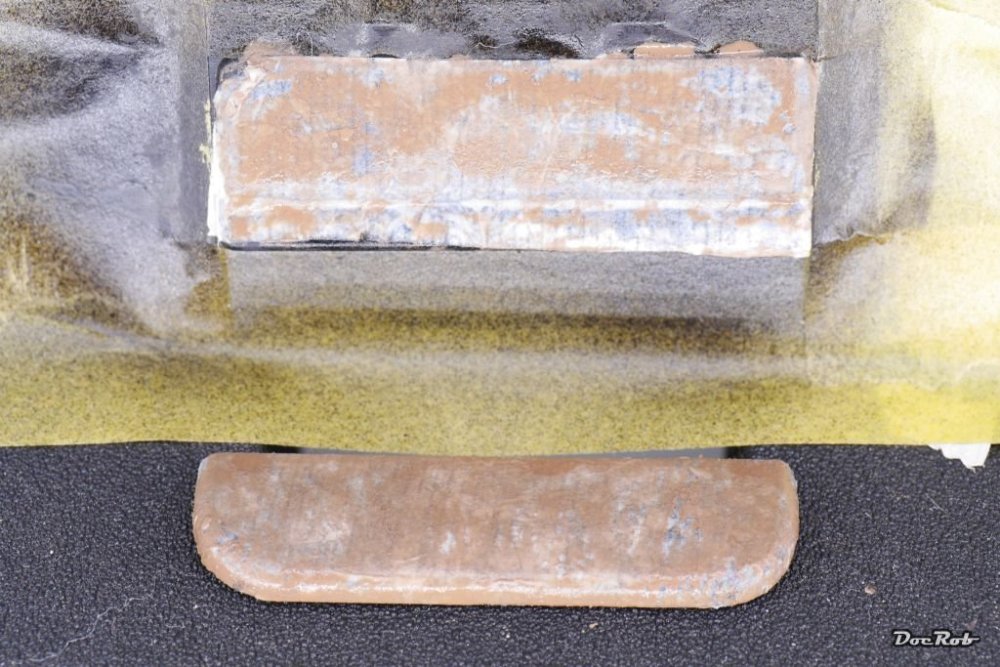
Thank you Peter and Chris. The leather cover was on my to learn list since a while. I would only use it for larger scales. Even with 1/32 seats, I would either paint the leather effect or apply other techniques, like I did once with my Skoda RSO. Luckily my wife was still smoking by that time, so I took one of her cigarettes, cut the paper to fit over the bench and backrest with diluted white glue. Then I dabbed on some brownish tones with a stiff brush for tear and wear. Followed by carefully applied black tones, also dabbed on with a stiff brush in very thin layers, et voila looks like very old leather. Cheers Rob
-
Cobra Coupe - Le Mans - Model Factory Hiro 1/12
DocRob replied to DocRob's topic in LSM 1/35 and Larger Work In Progress
I´ve been blamed for worse things Mike . Nice find with the Cobra. The MFH leather sheets are really thin and very stretchy, which helps a lot. I don´t know, if I would use it for smaller scales like 1/24. I often use oils or oils over acrylic, when I paint leather. It´s a bit time consuming, but looks great in the end. With normal thinner or matte thinner you can `steer´ the shininess. The AmmoKnights seat was painted with oils over acrylic: The leather jacket and gloves are solely painted with oil colors. Cheers Rob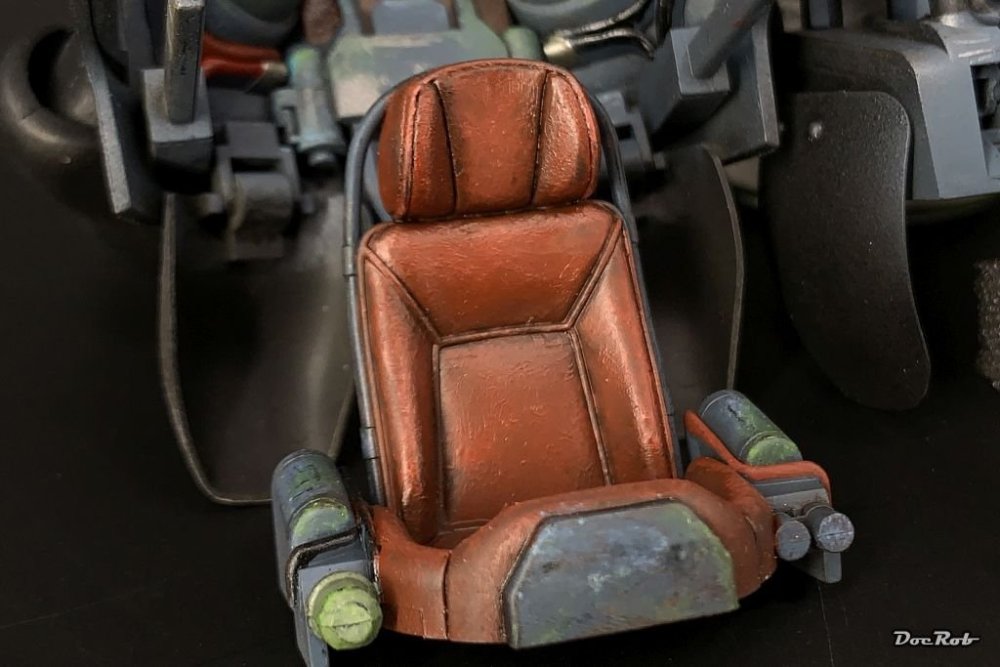

-
Cobra Coupe - Le Mans - Model Factory Hiro 1/12
DocRob replied to DocRob's topic in LSM 1/35 and Larger Work In Progress
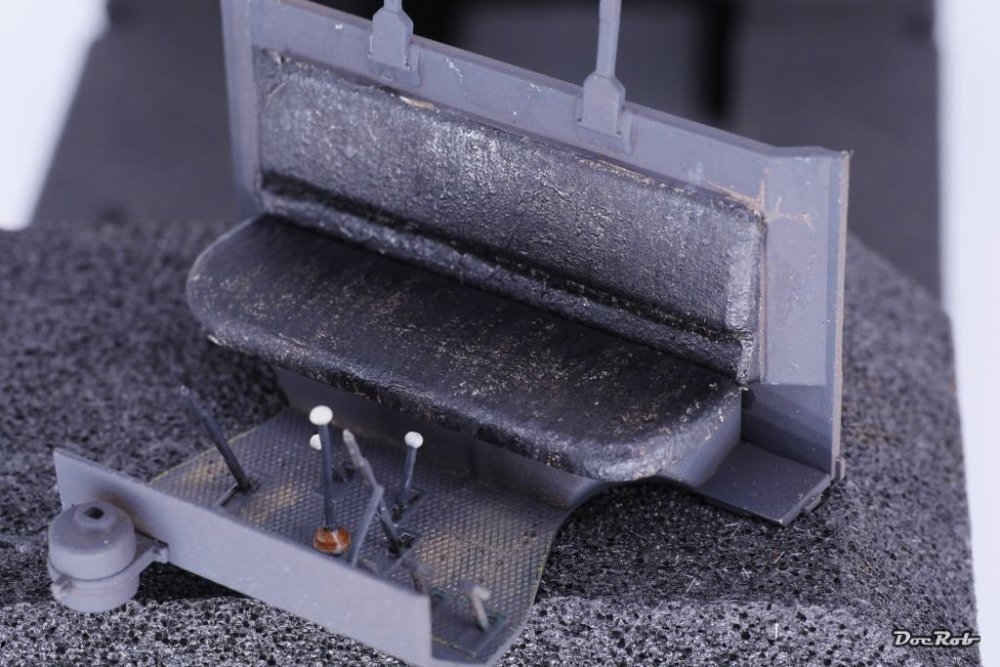
... meanwhile, the Cobra Coupe isn´t vegan anymore. I bought some self adhesive leather from MFH lately and decided, I give the seats a try with this. What looks better than the real thing . The seats were primed and sprayed semi matte black and then, I cut the leather patches roughly to contour. The shape of the seats is a bit difficult to cover, but the leather is luckily very thin and flexible and adheres very well. I think, with the seat belts applied and some final trimming, they will look good. Cheers Rob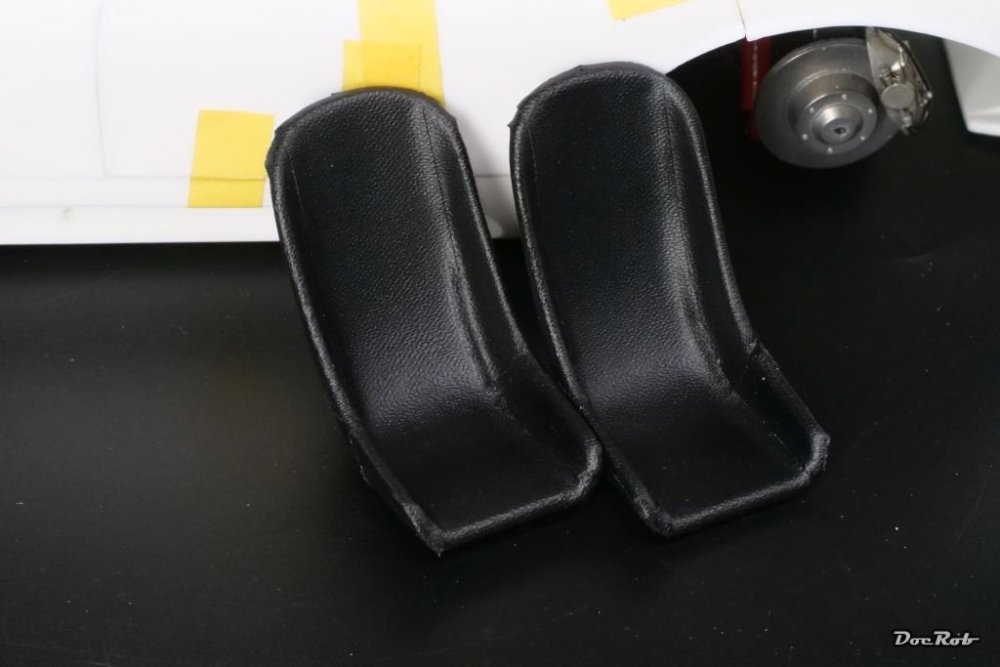
-
Cobra Coupe - Le Mans - Model Factory Hiro 1/12
DocRob replied to DocRob's topic in LSM 1/35 and Larger Work In Progress
I think it´s not as bad as it looks in the pictures Carl. I hope, I can sort it out. Cheers Rob -
Cobra Coupe - Le Mans - Model Factory Hiro 1/12
DocRob replied to DocRob's topic in LSM 1/35 and Larger Work In Progress
Thank you Chris and Peter, until now, I have only ideas about how to solve the fit issues. I will add some more internal components for further evaluation and will decide then, how to tackle this. I will take my time with these issues as they are make or brake kind of probs. Cheers Rob -
Great choice Mike, I thought about building this one too. The camo on the box looks not as boring as most of the desert schemes look. Hard to replicate, though. I could only find the Eastern Front boxing, so the Henschel was no more an option. Cheers Rob
-
Like Carl, I have three boxes for leftover parts, one for planes, one for armor and one for cars and bikes. I store only selected parts in there, where can see a chance, using them later on. I rarely store whole sprues, but cut the parts loose, which could be useful. Cheers Rob
-
Cobra Coupe - Le Mans - Model Factory Hiro 1/12
DocRob replied to DocRob's topic in LSM 1/35 and Larger Work In Progress
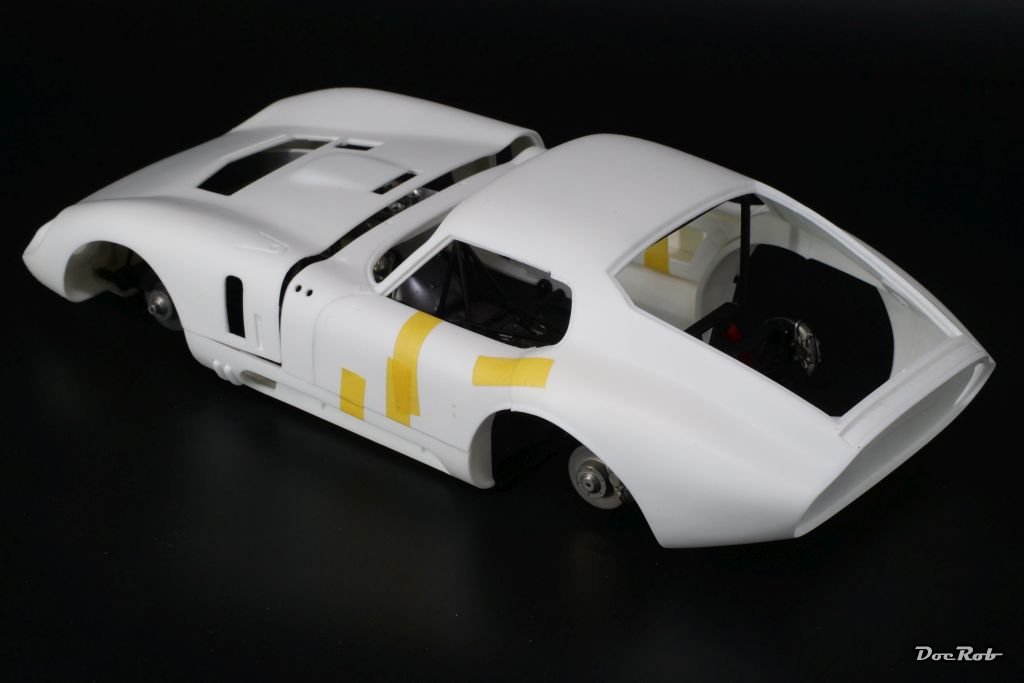
Well, it was about time, to see how the body, hood and doors will fit to the chassis. I cleaned the excellent casted body parts and drilled all the needed holes and joined the hood to the chassis. There are cast metal hinges and the hood will be openable. When adding the body, which is not screwed on for now, I got what I feared, a gap, the hood being to high, because the air funnels don´t have enough room under the hood. I was prepared, as Pooh described the same problem in his YouTube build video. It looks a bit worse on the pics than it is in reality, because, I can lift the back of the body slightly. I inserted the doors on their metal hinges and found the right one fitting too low and the left one was ok. I´m close to the body painting stage and the fit issues has to be solved thorough and now, so next is analyzing, what to do best. Cheers Rob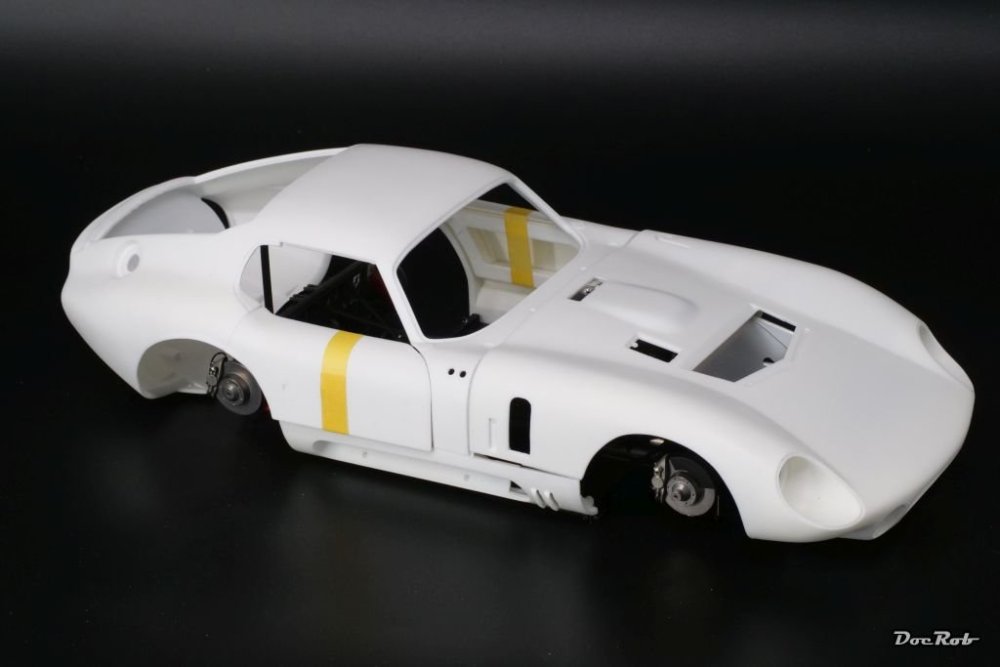
-
The sandbox theme didn´t excite me a lot, initially. In my huge stash, I found only some sandy kits. A 1/48 Do-17 in desert camo, a Meng M3A3 Bradley, yawn, I have a Jeep kit and conversion along figures for a LRDG Jeep, better, but not satisfactory either. There is a hardly startet Meng D9R Doobi kit, but then I had an idea.... I will start late, as I need to buy some stuff during my Berlin trip, starting next week. Cheers Rob
-
Sikorsky JRS-1 1/72 - Bu. No. 1063
DocRob replied to Landlubber Mike's topic in The Great Twins Broup Bluild
What a great looking plane, Mike. The yellow wings and green tail make it a vivid eyecatcher. Later, when the eye is pleased so far, there are lots of detail to discover, like rigging and landing gear. I had always a soft spot for amphibious planes, but yours is one of the nicest. Cheers Rob