DocRob
-
Posts
7,045 -
Joined
-
Last visited
Content Type
Profiles
Forums
Events
Gallery
Everything posted by DocRob
-

Cobra Coupe - Le Mans - Model Factory Hiro 1/12
DocRob replied to DocRob's topic in LSM 1/35 and Larger Work In Progress
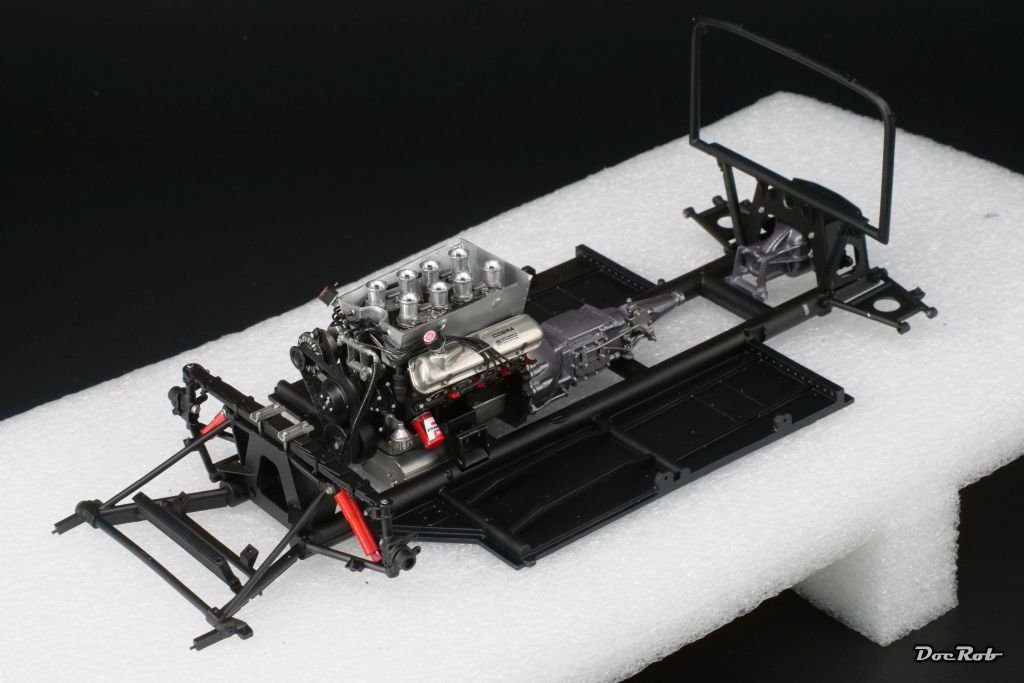
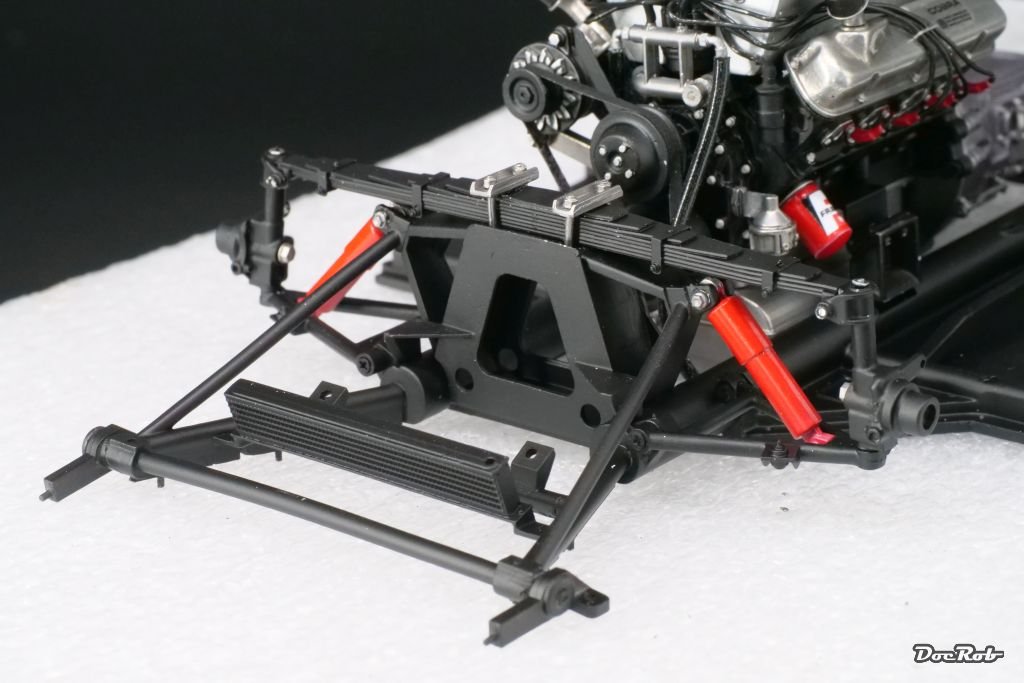
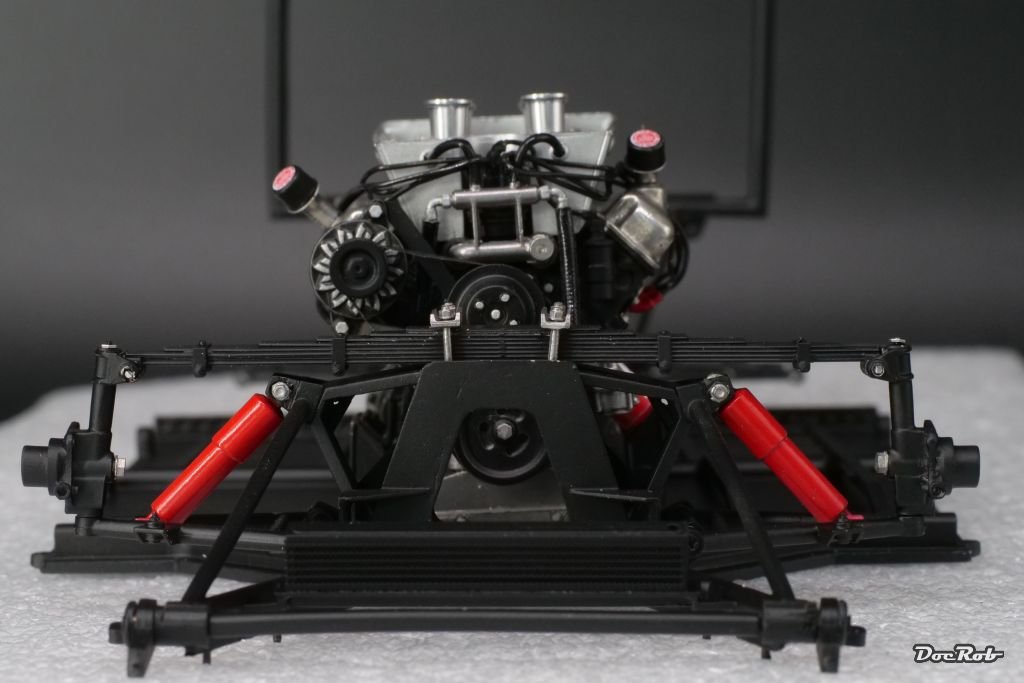
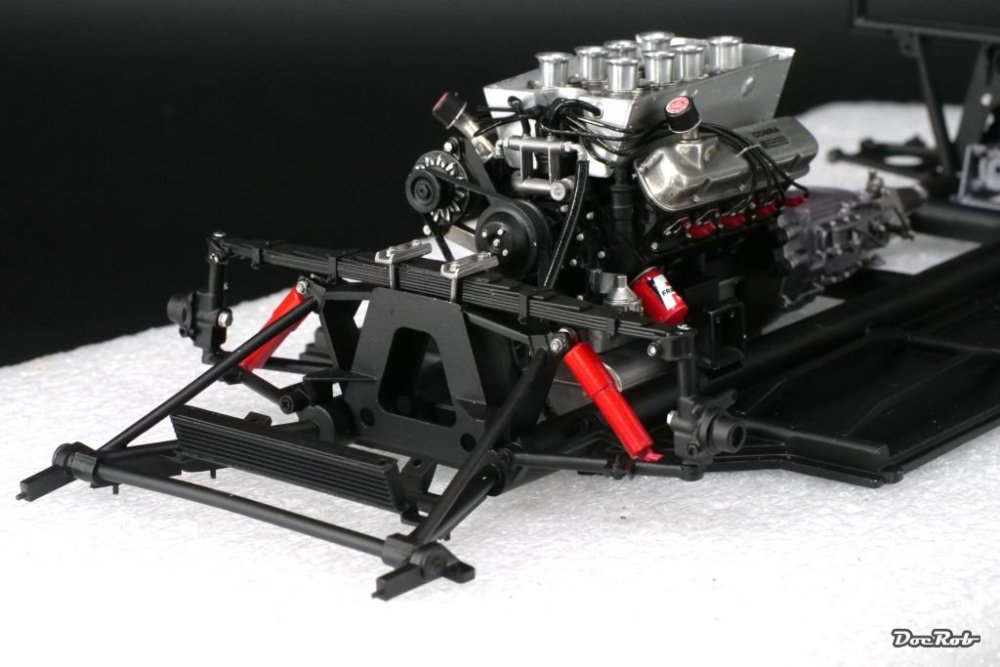
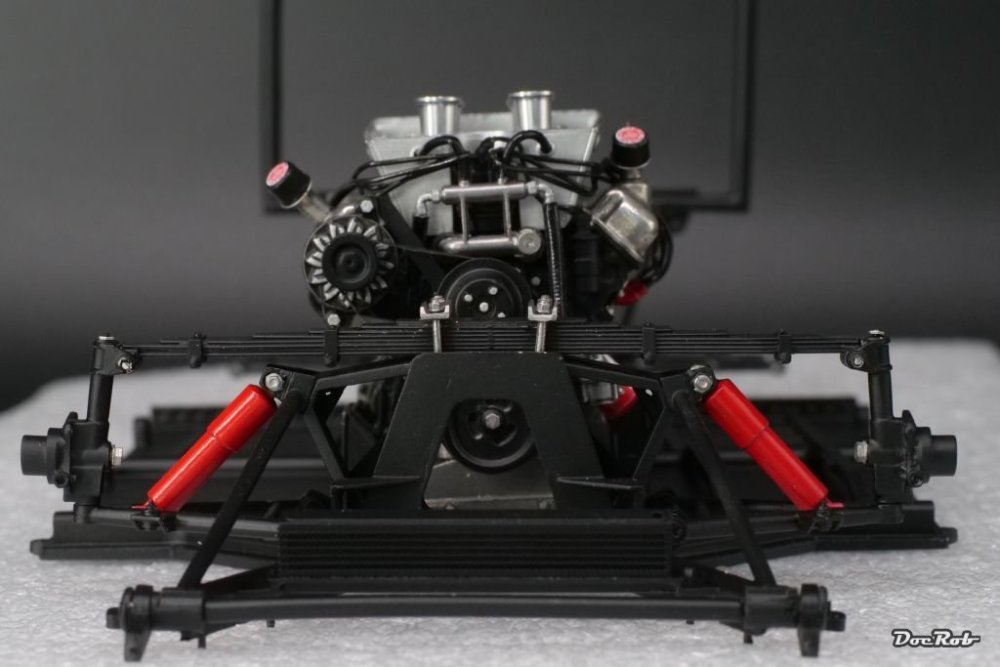
I am shipping some difficult waters lately, not with the kit though and that´s why I made myself sparse. Nonetheless, some progress with the mighty Cobra. Having thought, everything would build up easier than the engine was partly untrue. The chassis as the central element has so many parts to add, that you need a lot of patience and discipline to get it right. Every hole - and there are many - needs to be drilled with the proper diameter. To achieve this, you have to identify the various parts or sub assemblies through the hole manual and understand, how it joins and what is used for joining, nuts, bolts, screws, pegs, whatever. Finally, I build up the suspension arms and completed the front axle and tubing with a real metal leaf spring. Steerable wheels are not planned with the kit. I made some mistakes on the rear end with the differential housing, but managed to correct that without too much damage. Again Tamiya LP semi matte black proved to be the perfect weapon of choice for the black chassis parts. The engine is only loosely attached for now. Cheers Rob

- 418 replies
-
- 13
-

-

-
Cobra Coupe - Le Mans - Model Factory Hiro 1/12
DocRob replied to DocRob's topic in LSM 1/35 and Larger Work In Progress
Thank you jep and Andy, you need some patience and a methodical approach to tackle these kind of kits. Somehow everything goes together as should. Cheers Rob -
JetMads 1/32 Viggen - Xmas Raffle Prize
DocRob replied to GusMac's topic in LSM 1/32 and Larger Aircraft Ready for Inspection
A fantastic paint scheme on a great build, Gus. I like the vivid aspects, like tail, wing numbers and missiles, as they add a lot of detail. Like you mentioned, resin kits are not so much harder to build than plastic kits, if the casting quality and engineering is done well. Congratulations to a well earned prize, which now transferred to a beauty in your display shelf. Cheers Rob -
Congratulations to your new 1/1 scale ride, Peter. I wish you lot of joy and plenty of fun miles with your Kia, BUT, where are the photos of yours? Cheers Rob
-
1/32nd scale Bristol Scout 1264
DocRob replied to sandbagger's topic in LSM 1/32 and Larger Aircraft Ready for Inspection
Fantastic result, Mike. The translucent effect on the wings is outstanding. Cheers Rob -
Thank you, you dropped in right for the first ride, as it is in the finished builds section . Cheers Rob
-
Astra Militarum Baneblade warhammer tank
DocRob replied to FullArmor's topic in LSM 1/35 and Larger Work In Progress
Wow, love it, the turret looks great. I specially like your chipping, which looks very real. Cheers Rob -
Great detail work in the landing gear bay and with the riveting job, Hubert. I never used them, but Eduard has 3D rivets launched lately, which are possibly an alternative, if Archer will not be available. Cheers Rob
-
Fantastic result Gus, the Viggen looks absolutely super bueno and will be a jaw dropper displayed in your shelf. I always wanted to build one with the splinter camo scheme in 48 scale, but chickened out. Cheers Rob
-
Cobra Coupe - Le Mans - Model Factory Hiro 1/12
DocRob replied to DocRob's topic in LSM 1/35 and Larger Work In Progress
Thanks Peter, I´m looking forward to some more relaxing steps, like building up the chassis. The engine was a test of patience at times, with lots of parts involved in a tiny space. It became more and more difficult to even handle it. Cheers Rob -
The first time, I used cello tape, because I had no sheets of transfer foil and it worked. Now I have bought some transparent adhesive foil sheet for that case. Cheers Rob
-
Cobra Coupe - Le Mans - Model Factory Hiro 1/12
DocRob replied to DocRob's topic in LSM 1/35 and Larger Work In Progress
Thank you Carl, there is more than enough clearance for the exhausts to fit in. It´s an optical illusion, with the area angled and no blockages are to be expected. Cheers Rob -
Like Spitfire said, the 1ManArmy masks are fantastic. I used them on two builds now and despite a lot of masking work, the results were fantastic. The stencils are very sharp and you don´t have the typical decal issues. It´s a lot of work, especially, when the stencils are multi colored. When applying the larger roundels, 1MA recommends using transparent transfer film for placement. I would strongly recommend doing so, especially on rounded surfaces like the fuselage sides. Cheers Rob
-
Cobra Coupe - Le Mans - Model Factory Hiro 1/12
DocRob replied to DocRob's topic in LSM 1/35 and Larger Work In Progress
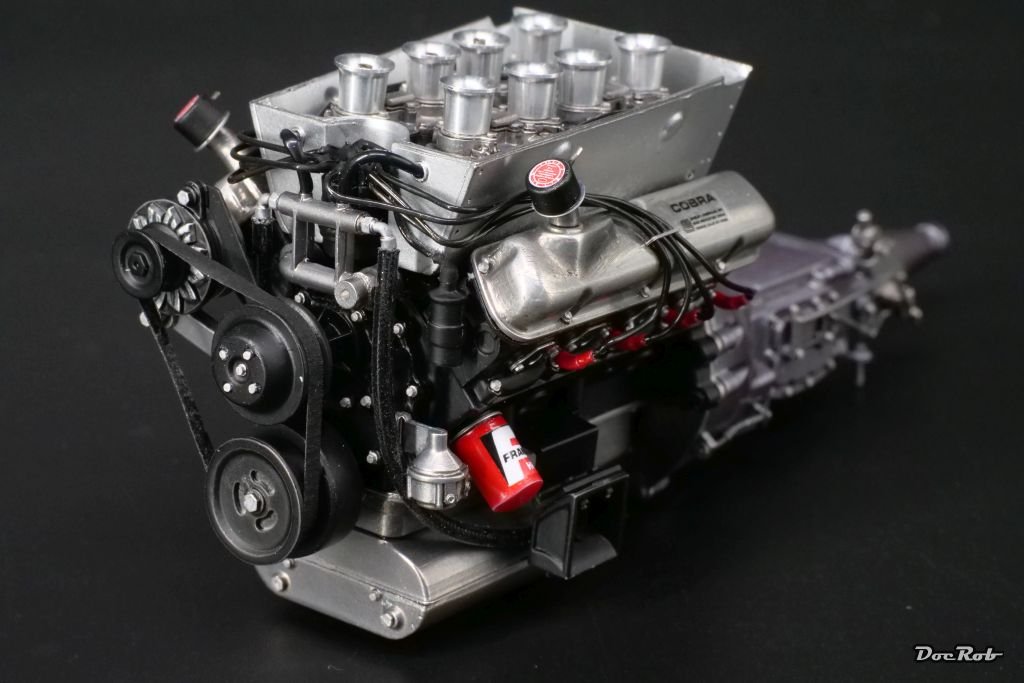
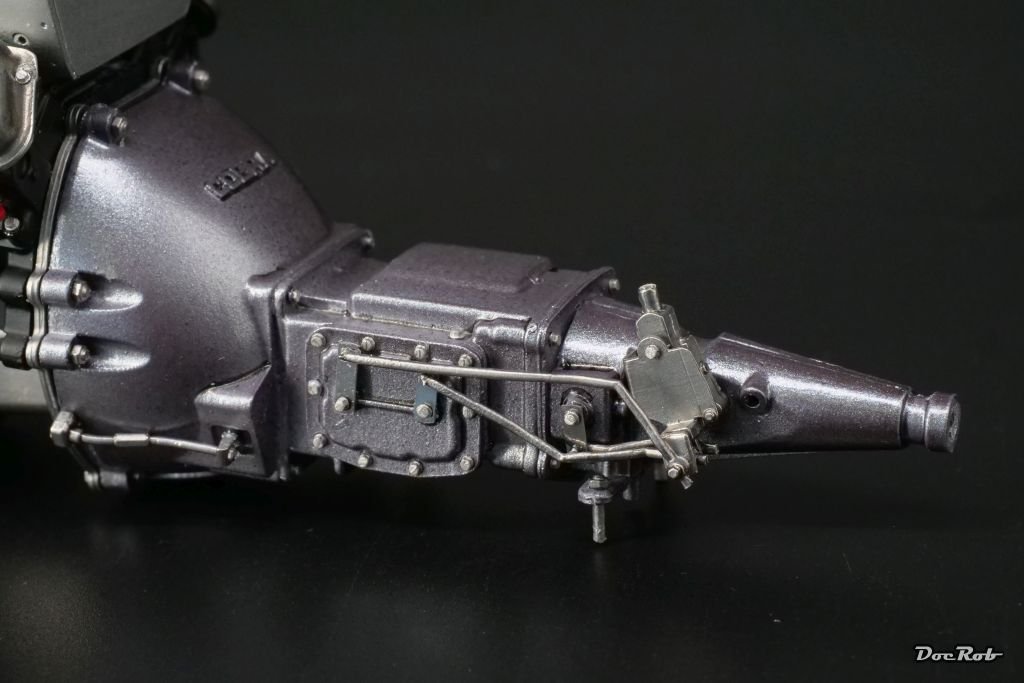
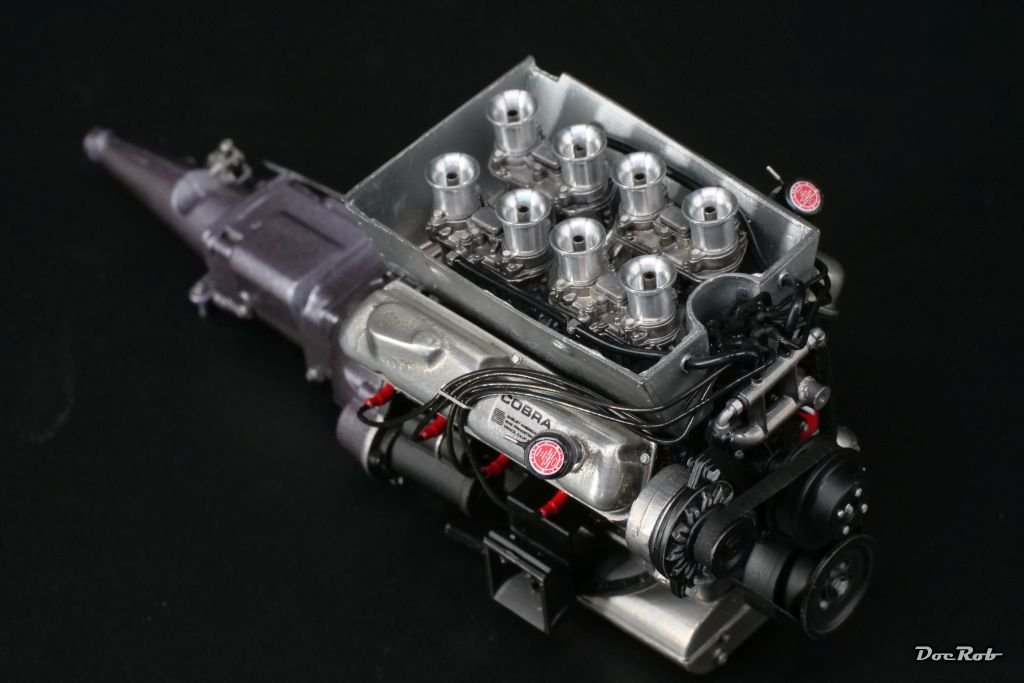
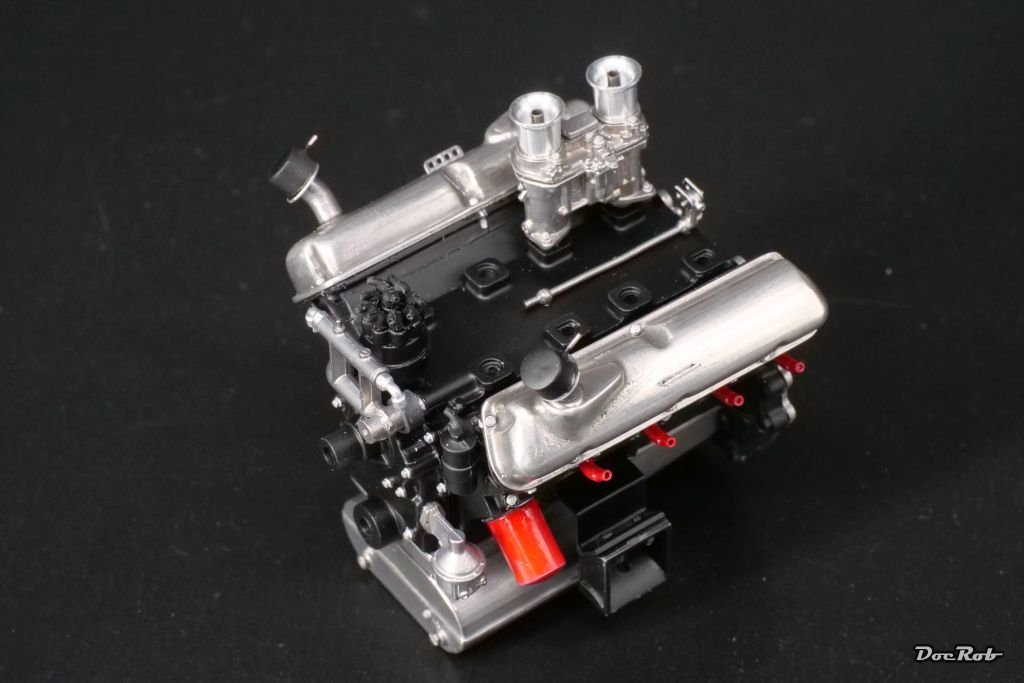
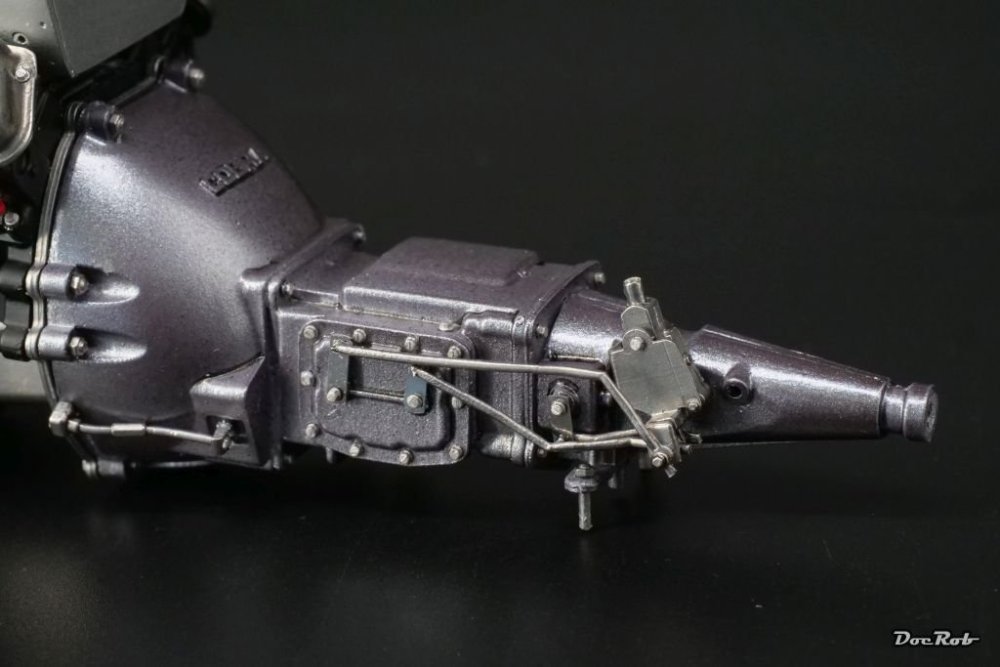
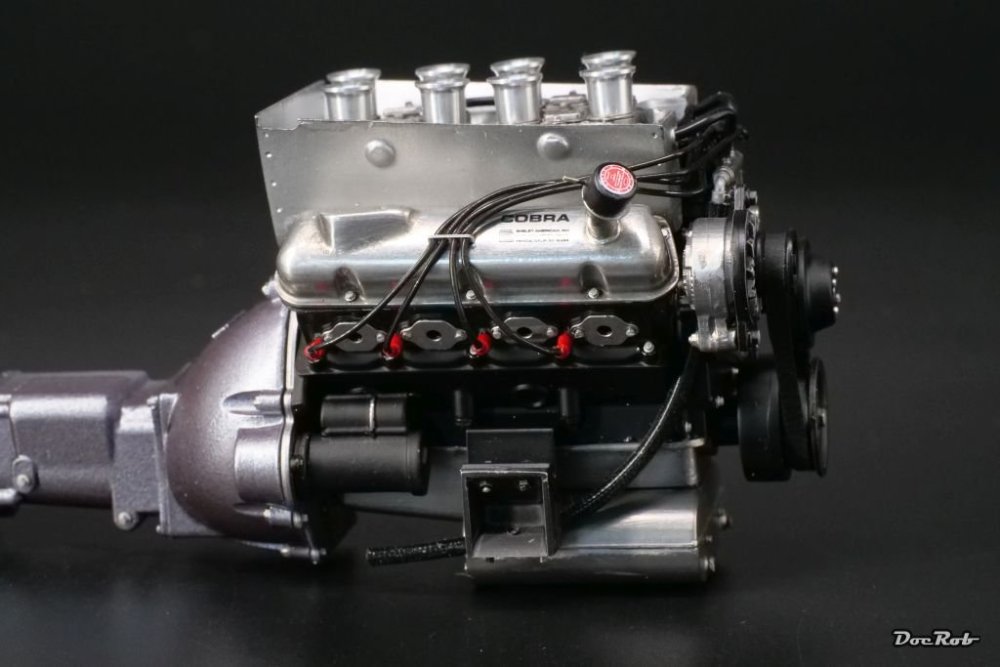
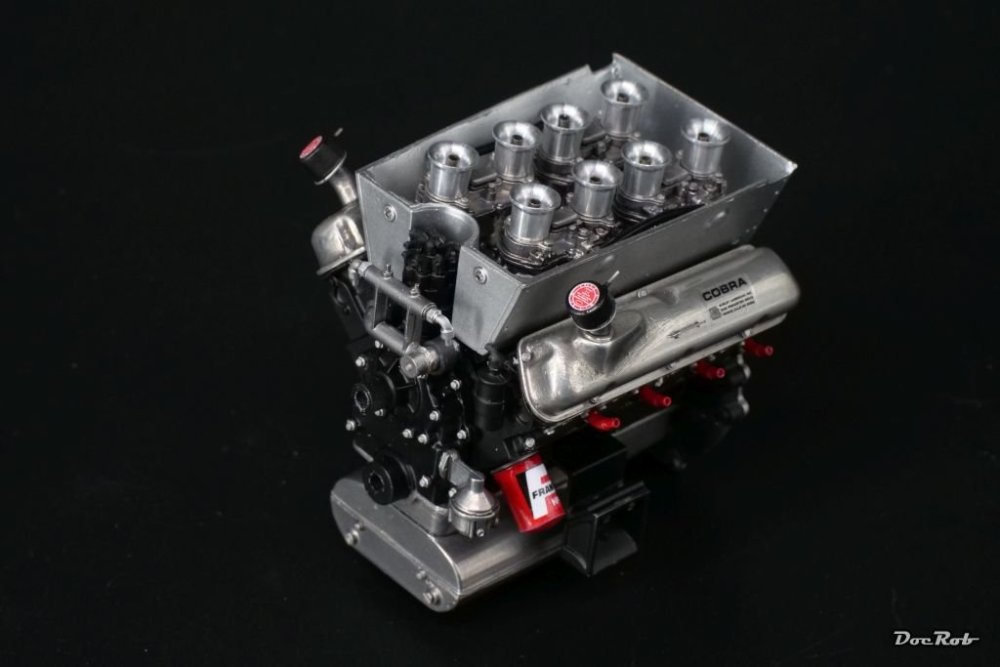
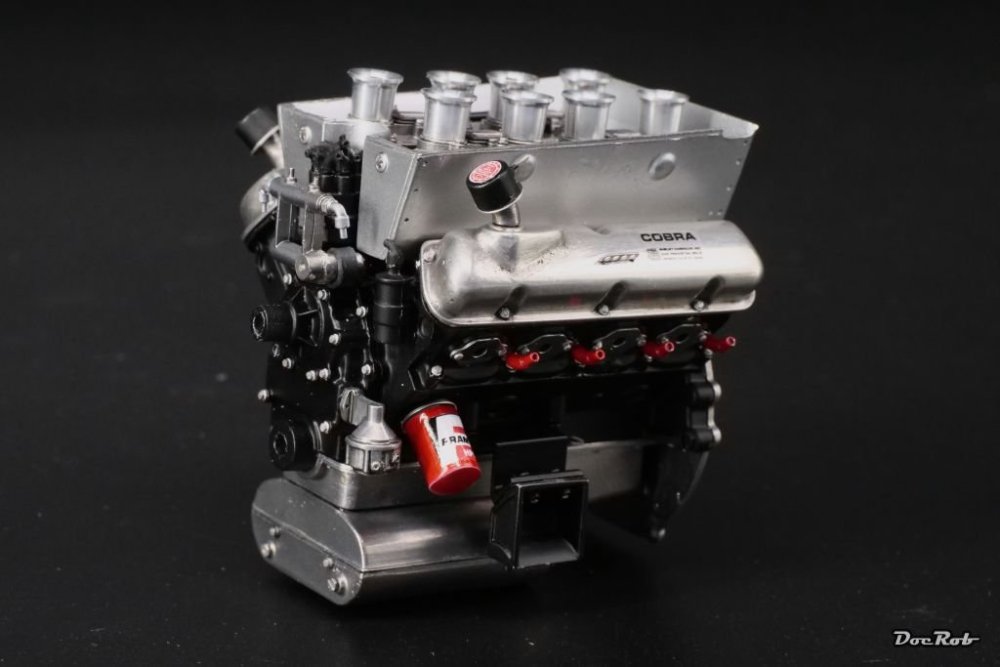
Today, I reached the first real milestone, finishing the engine and transmission. The ignition wiring was a bit delicate and needed a lot of CA to proper glue everything together. Using tiny rubber connectors seemed not to be the best idea from MFH to my eye. The provided wire is very rigid, which helped to pre bend each single wire before gluing them in. Now Tamiya have a look, here is something to learn. the belt on the front of the engine is black adhesive tape over cast iron wheels, looks way better, than Tamiya´s rough cast parts on the 1/12 kits I knew. The transmission housing is made of a mix of resin and metal parts, with whit metal gear shifting rods added. The manual suggested steel color for the housing, but I went with metallic grey, to have a cast iron appearance. I read, later modified or rebuild chassis got an aluminum casing, but the original was cast iron. So much for weight reduction . Cheers Rob


- 418 replies
-
- 13
-
-
-
Cobra Coupe - Le Mans - Model Factory Hiro 1/12
DocRob replied to DocRob's topic in LSM 1/35 and Larger Work In Progress
Thank you Chris, it hasn´t been an easy kit so far, but the engineering and detail is absolutely fantastic and I hope, I can fight my way through the build. Cheers Rob -
Cobra Coupe - Le Mans - Model Factory Hiro 1/12
DocRob replied to DocRob's topic in LSM 1/35 and Larger Work In Progress
Thank you Peter and Carl, I started with the belt drives and transmission and next will be the wiring. Main problem will be to insert the wires into the per drilled rubber connectors in crammed space. I tried the first and most complicated one, but gave up for breakfast. Luckily it´s not a 12 cylinder engine . Cheers Rob -
AEG G.IV - Creature of the Night - WNW 1/32 - Finished
DocRob replied to DocRob's topic in The Great Twins Broup Bluild
Thank you Chris, well the figures. I like the mechanic, but he´s far from perfect. The bug eyed boy, err, ... On the other hand, the figure of the boy gave me the story line from the first view in some online shop. Cheers Rob -
Tamiya F-4E "Little Chris" 388th TFW, Korat: RFI, Take 2
DocRob replied to CANicoll's topic in The Great Twins Broup Bluild
Wow (Little) Chris, what a beauty and well worth the extension of the GB deadline. If this F4 is not to your standards, then I´m really eager to see what is . Cheers Rob -
Cobra Coupe - Le Mans - Model Factory Hiro 1/12
DocRob replied to DocRob's topic in LSM 1/35 and Larger Work In Progress
Thank you Peter and indeed, the final assembly steps were a bit higher on the cuss scale. Next will be the wiring, which won´t be easy too, but the detail MFH supplies is well worth a bit of suffering. Cheers Rob -
Cobra Coupe - Le Mans - Model Factory Hiro 1/12
DocRob replied to DocRob's topic in LSM 1/35 and Larger Work In Progress
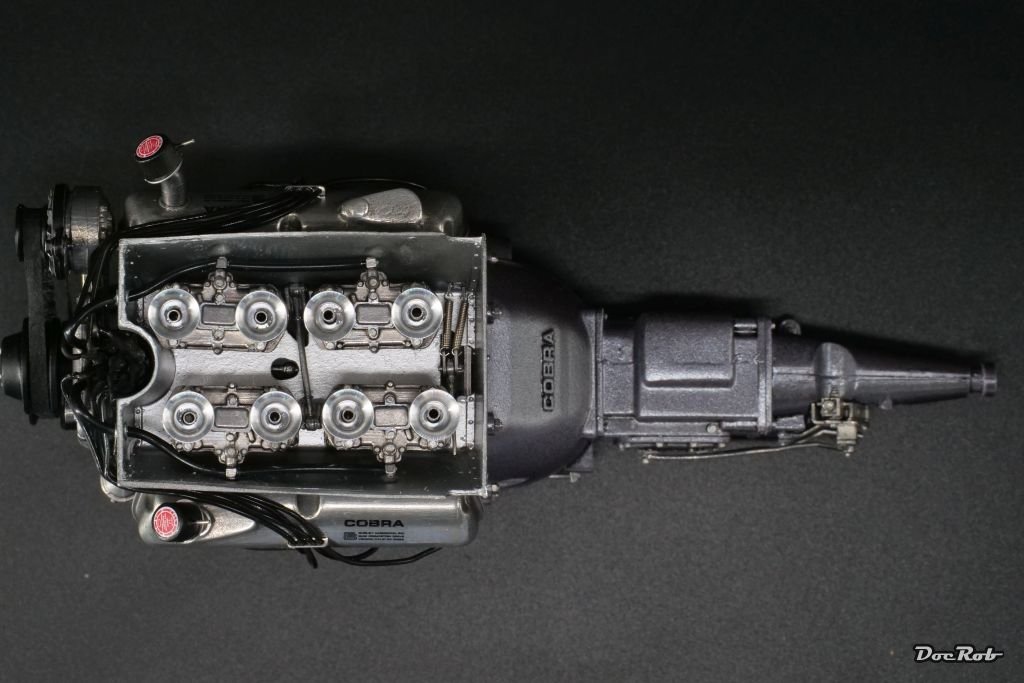
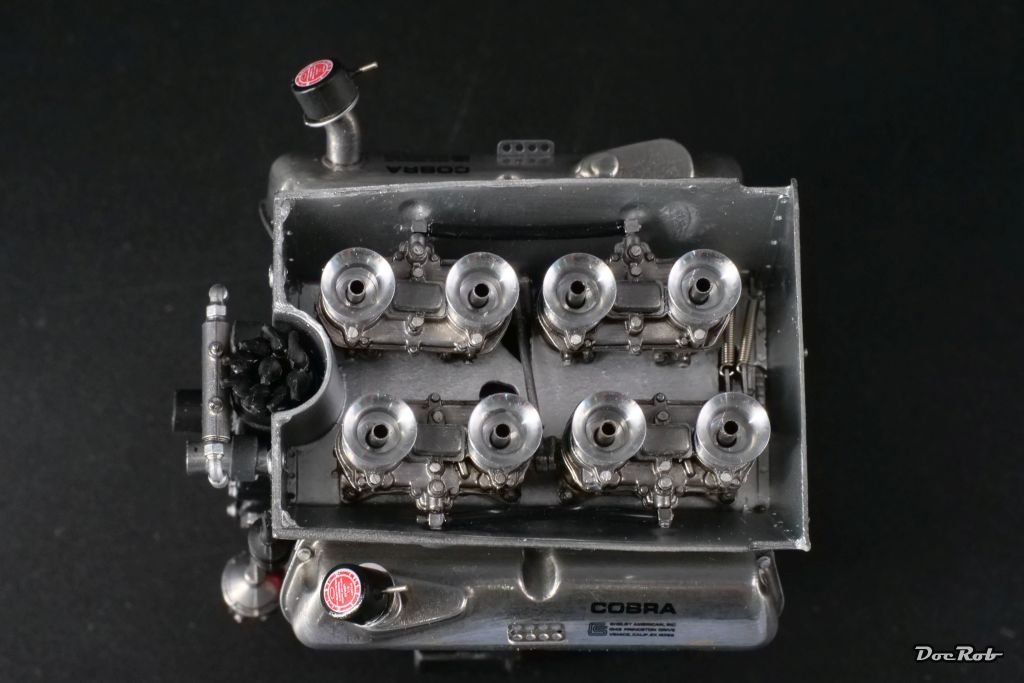
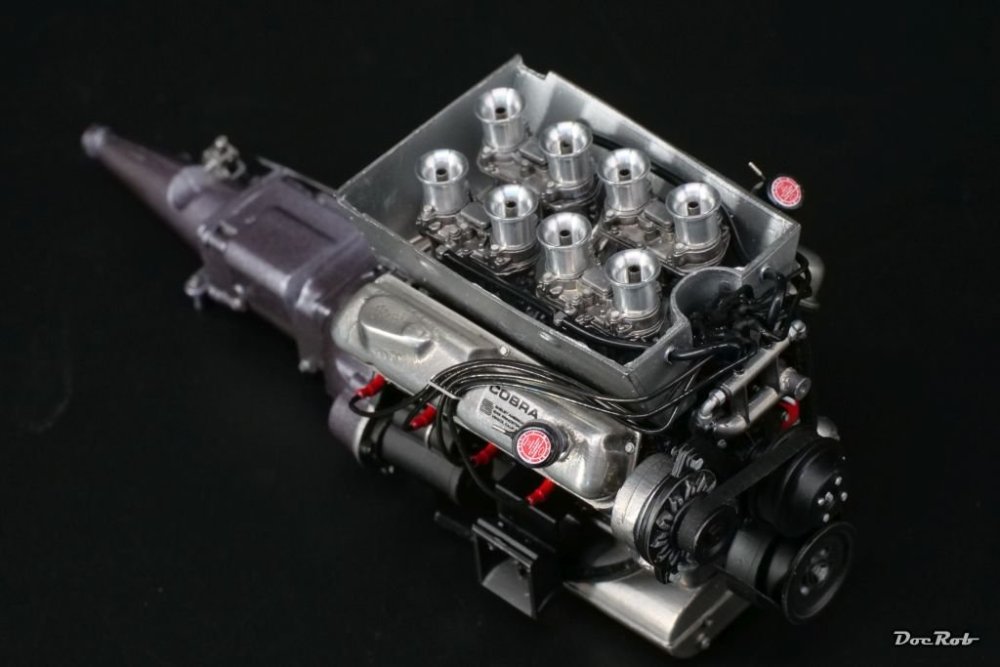
The engine got near finished, lacking the ignition wiring and the belts in front. To mount all the carburetor parts into the tub was extremely difficult, done by the manual, it would have been impossible. I spare you the details, but you should put in the four carburetor blocks at the same time, only connected with a fragile steering rod and then add the coil spring mechanism with no wiggle room. It took some thinking and manipulating of parts to get it right. The carburetor housings were beforehand accentuated with black panel liner. I also added some decals onto engine parts. Cheers Rob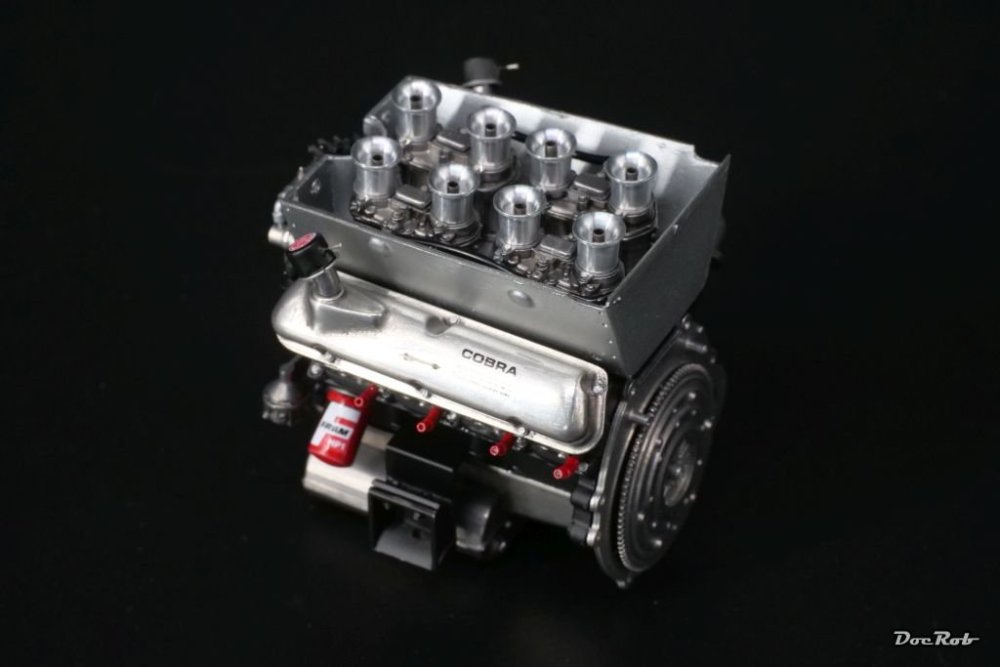

- 418 replies
-
- 10
-
-
-
The Scharnhorst 1/200 by Trumpter-Operation Paderborn
DocRob replied to KevinM's topic in Non LSM 'WIP
Great display case, congratulations Kevin. Cheers Rob -
Ready to go, Peter. All the prep work looks great and will ensure a nice and easy paintjob. Cowlings look good to me, it´s bent sheet metal with a bit of structural parts on the real thing and will never sit perfectly. Cheers Rob
-
Cobra Coupe - Le Mans - Model Factory Hiro 1/12
DocRob replied to DocRob's topic in LSM 1/35 and Larger Work In Progress
Thank you Peter, I don´t know what happened with the holes in the PE. Maybe MFH chose to change the bolts, but forgot about the PE. Generally spoken, the Crocker kit had been a bit more refined, but maybe it´s easier to work metal only. Luckily it´s no major issues until now. The stainless steel PE makes sense with the kit, as it is visible and doesn´t need to be painted. Brass would have been more work in the end. Cheers Rob -
Cobra Coupe - Le Mans - Model Factory Hiro 1/12
DocRob replied to DocRob's topic in LSM 1/35 and Larger Work In Progress
Thank you for sharing your thoughts, Hubert and Carl. I finally got the tubes cut and precisely to length, luckily. I thought about using the cutting disc on my Proxxon, but it would have been much more difficult to hold the tube in place and cut it exactly to measure. I would have put it on a brass rod for support, but luckily I got it finished in my mitre, without flying tube parts. I have lots of Albion tubes, but most are brass tubes and I want to keep the tube material visually as thin as possible, which means without painting. Aluminum tubes, I have only for WW! turnbuckle diameters, but I guess the thickness of the material would have been also too much for me in aluminum. Brass and aluminum tubes cut easily rolling under a sharp blade, but the stainless steel tube from MFH was a bit of a beast. Cheers Rob -
Cobra Coupe - Le Mans - Model Factory Hiro 1/12
DocRob replied to DocRob's topic in LSM 1/35 and Larger Work In Progress
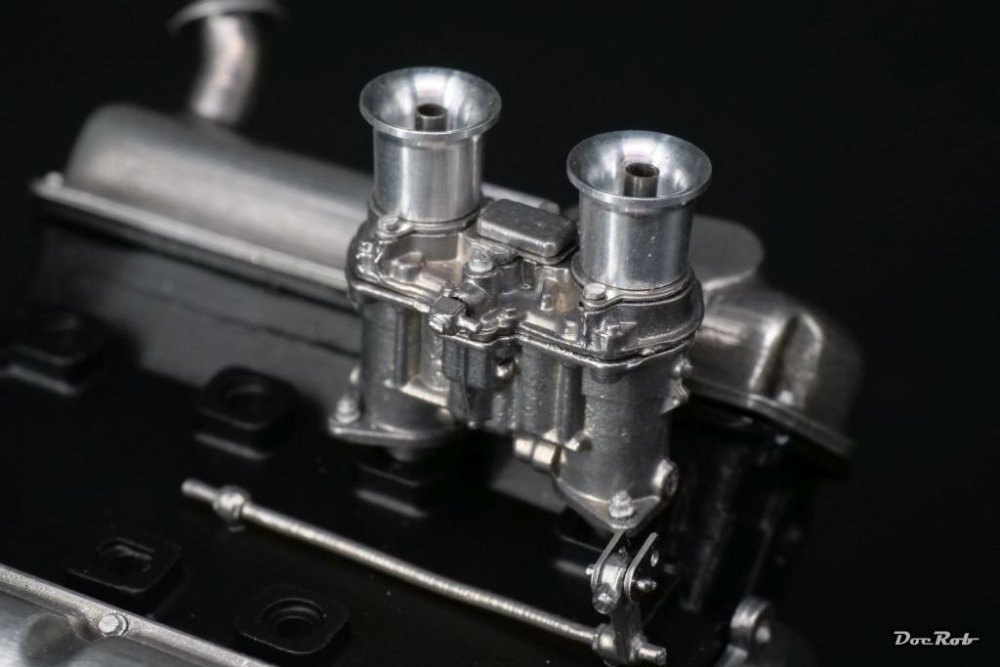
Today, I prepared all the carburetor parts and finished assembling the first pair, which consists of almost thirty parts. The inox pipe in the middle of the funnel was pretty rigid. It had to be cut from a tube and the manual suggests rolling it under a sharp blade. I tried, but no success. I took out my mini mitre and razor saw and managed to cut eight parts, while loosing all the teeth on the blade. Again the holes on the PE parts were to small, to accept the bolts and needed to be re drilled. Pretty annoying, given it´s not brass, but very rigid stainless steel. I also added the distributor, where tiny rods of steel rod are glued into each connector for accepting the tiny rubber isolators. These needed to be drilled wit a 0,3 mm bit to later (hopefully) accept the ignition wiring. Cheers Rob