DocRob
-
Posts
7,045 -
Joined
-
Last visited
Content Type
Profiles
Forums
Events
Gallery
Everything posted by DocRob
-

Another one bites the dust - Maschinen Krieger Friedrich - 1/20
DocRob replied to DocRob's topic in The Sandbox Group Build.
I spare you the smelly pics, the next two layers on the Kampfanzug were hairspray for my planned heavy sandblast chipping. I use the stuff directly from the can. For those, who don´t know the technique. I made a steel base layer, then hairspray and on top I apply the two tone camo. When everything is dried, I dampen the surfaces, where I want to chip, which activates the hairspray and loosens the adhesion of the two tone camo layers. With different tools, I can now scratch the top layers away. Next was the base layer of my planned camouflage, using Tamiya XF-64 red brown as the darker tone. It´s a bit bring to show all the layers here, but I did, to describe the process. Cheers Rob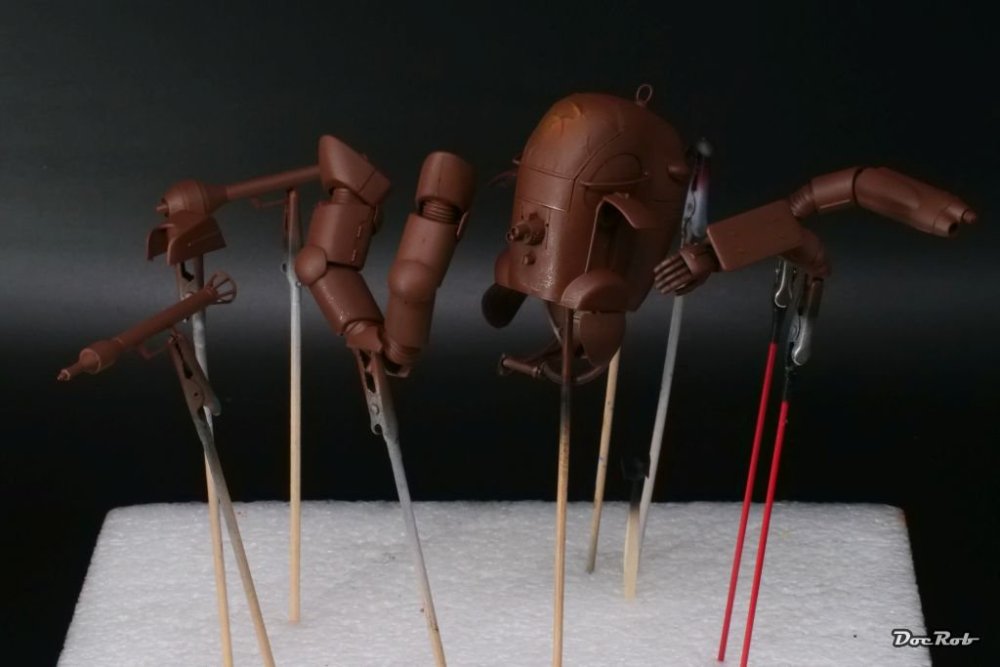
-
Another one bites the dust - Maschinen Krieger Friedrich - 1/20
DocRob replied to DocRob's topic in The Sandbox Group Build.
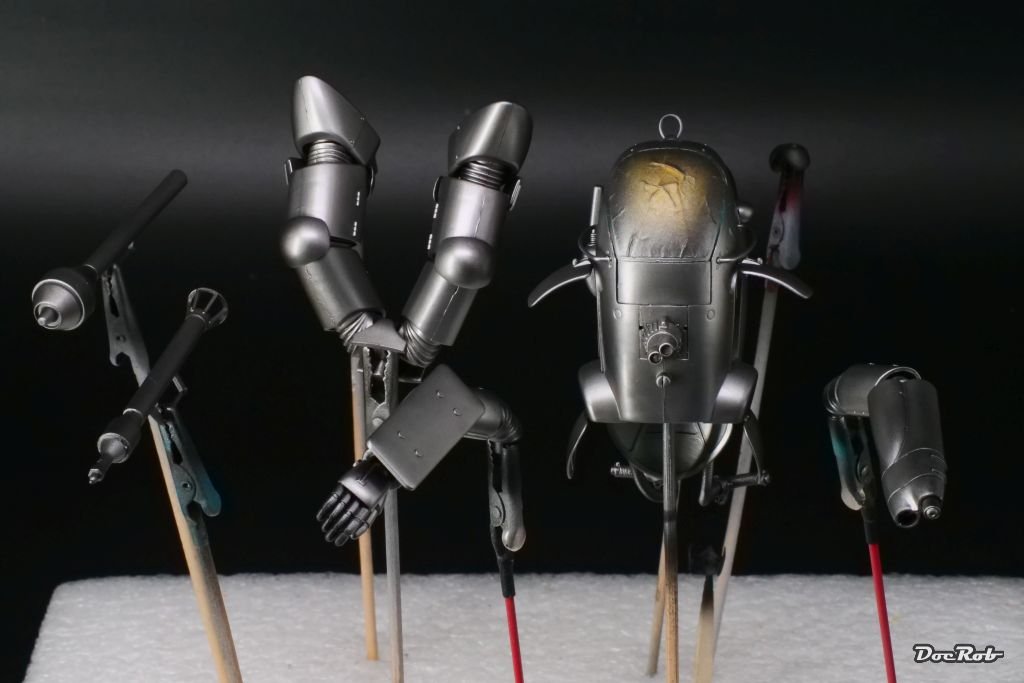
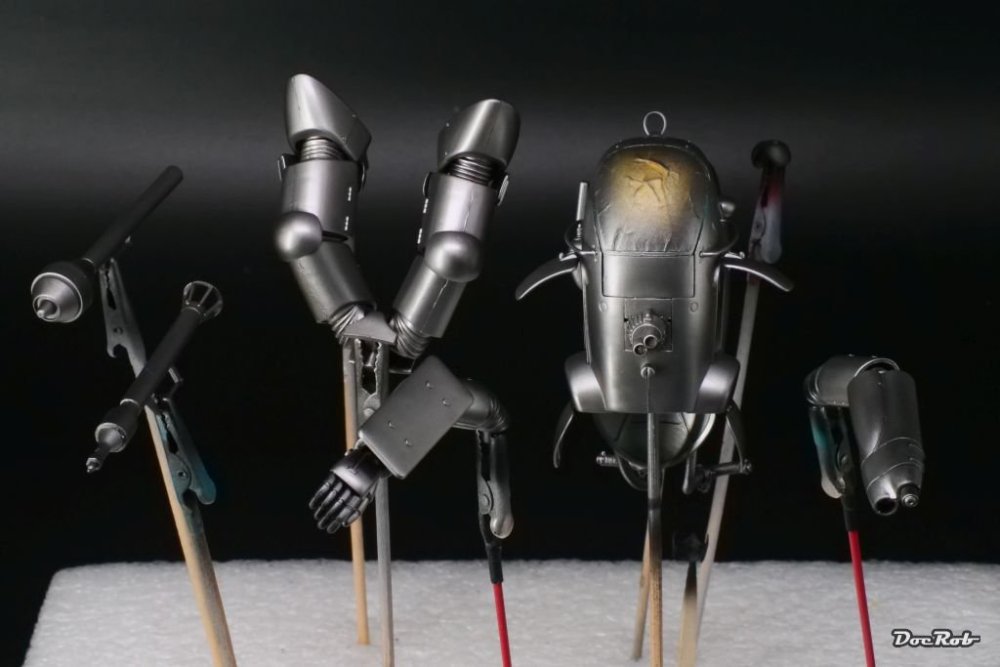
After burying the fellow in his steel grave, I masked the front window and inserted it temporary with some diluted PVA glue. I added the missing bits and pieces to the Kampfanzug and sprayed it with Mr. Surfacer 1000 black as a solid base. Next was a coat of AK Extreme Metallics steel as the base coat. Cheers Rob
-
What is on your bench right now ? Share a picture :)
DocRob replied to Martinnfb's topic in Modelling Discussion
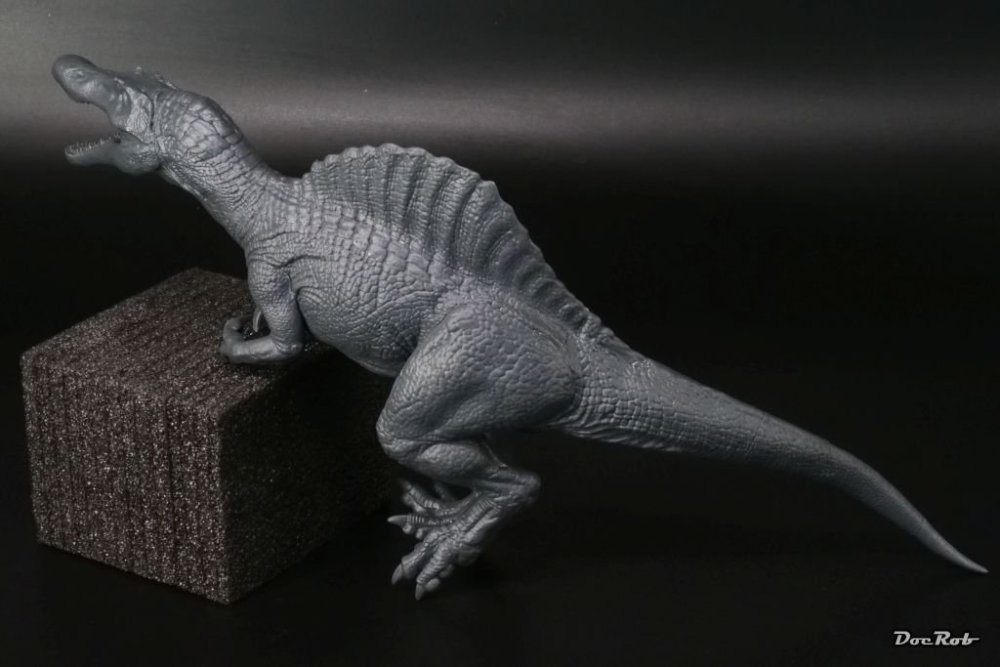
I wanted to be a bit Carlesque and started a parallel build . It´s a 1/35 X-Plus Spinosaurus sans tongue for easier painting later. The build took only three hours. Cheers Rob
-
I can imagine, how hard it is to get all the measurements of the fuselage parts right during the design process. It´s so easy, to miss a millimeter here or there, but it definitely shows when mounted. Clear resin looks pretty good and your build log is a clinic for 3D printing, a way, I´m not willing to take myself right now. I can see myself designing and printing smaller parts, but not whole kits. In my case it could also be troublesome to get the needed materials, so I will relay on AM producers or just buy MFH kits . Cheers Rob
-
What is on your bench right now ? Share a picture :)
DocRob replied to Martinnfb's topic in Modelling Discussion
Wow Carl, yummy. I love my Kamado as well, perfect for everything except Bronto Burger. I even cold smoke Tuna and Wahoo in there. Cheers Rob -
Another one bites the dust - Maschinen Krieger Friedrich - 1/20
DocRob replied to DocRob's topic in The Sandbox Group Build.
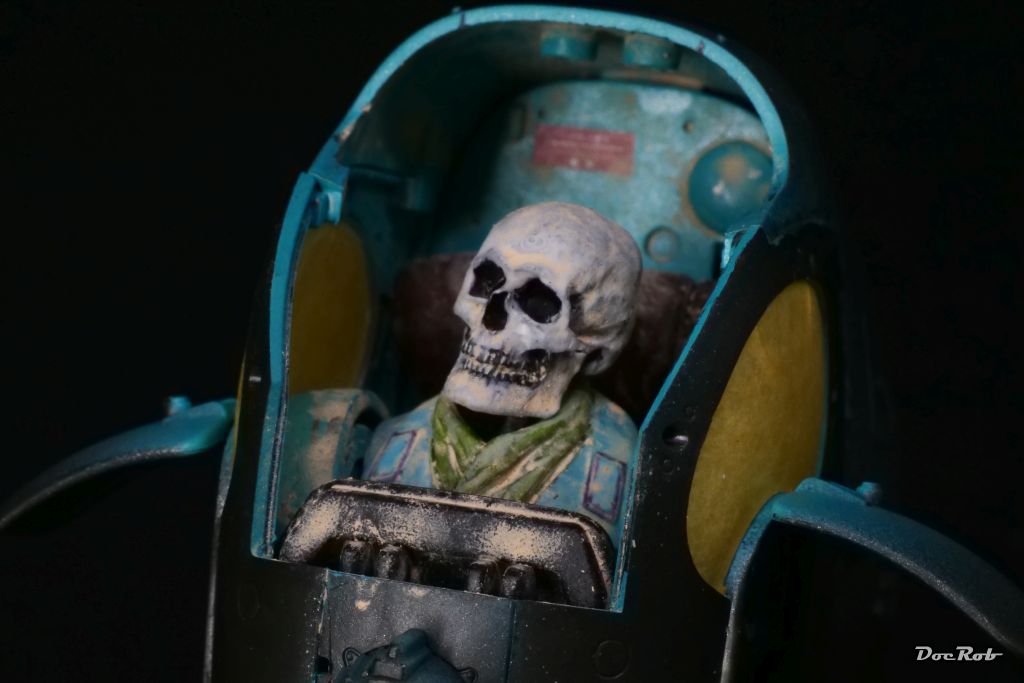
Meanwhile, I managed to close the body of the Kampfanzug. Which sounds like a simple task, but wasn´t. A huge amount of pegs have to intersect and they had really tight tolerances. I had to use pliers at some points, always hoping, the side windows don´t pop out. Most of the kit could be build without glue, that´s why there are so many pegs. I masked the cockpit front window with kabuki tape and sawed off the huge mounting part, because it disturbed the view to the inside. The interior of the suit got water dampened to activate the hairspray and then chipped with various tools. This was followed be DAK sand effect, a kind of wash with pigments in it. I liked the effect a lot and applied it onto the poor pilot as well, before I buried him in his steel grave. I will leave the weathering for now, but I´m pretty sure, I will add more later. Cheers Rob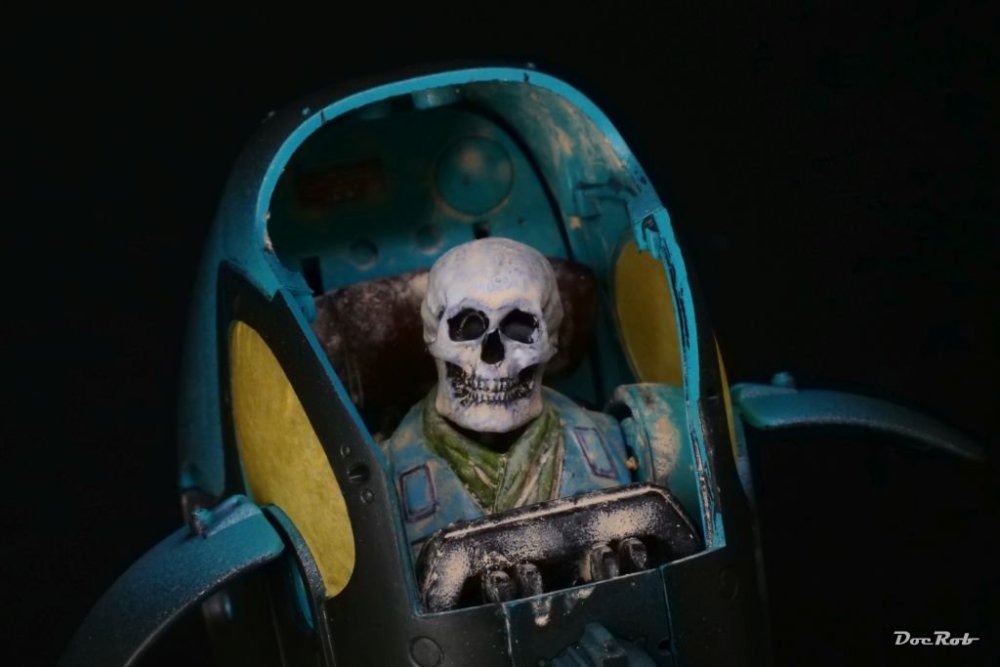

-
Another one bites the dust - Maschinen Krieger Friedrich - 1/20
DocRob replied to DocRob's topic in The Sandbox Group Build.
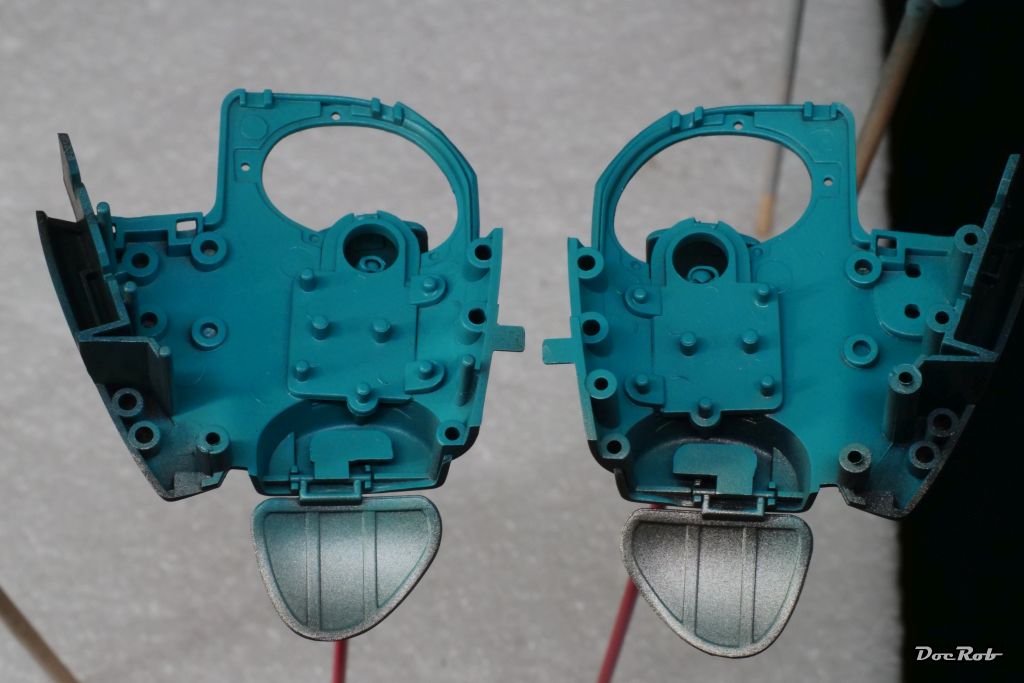
Indeed Peter, I had checked an array of different colors for the interior beforehand, ranging from duck egg, sky blue, sand tones, RLM 02 and others, but after surfing, it was clear, I need some contrast for the sand heavy finish planned. Cheers Rob -
Ugly bugger, the plane I mean, tipped me over and I hit the buy button, thanks PW . Cheers Rob
-
Special Hobby 1/32 -Tempest Mk.VI -Egypt 1949-Finnished
DocRob replied to KevinM's topic in The Sandbox Group Build.
Bummer, a new species Kevin, the hardwood floor monster, but gear bay doors . You should fill the gaps, they must be canyon like . I once searched for an airborne PE part for about an hour and after giving up, I found it, while having breakfast, adhering to my sweat shirt. Riveting looks good and I like the rockets as well. Cheers Rob -
Another one bites the dust - Maschinen Krieger Friedrich - 1/20
DocRob replied to DocRob's topic in The Sandbox Group Build.
Surfing is not to everybody´s liking Kevin. It´s often cold and obviously wet and you get bashed a lot. On the other hand, it´s rewarding and a great workout, but I start to feel my age after these kind of long sessions. I sometimes move to Sci Fi or steampunk projects for a change, because they are a great canvas to test new techniques and go freestyling with my ideas. You should give it a try, if only there is the slightest interest. Cheers Rob -
Another one bites the dust - Maschinen Krieger Friedrich - 1/20
DocRob replied to DocRob's topic in The Sandbox Group Build.
After two days of bodyboarding in nice waves, three hours in the water each day, I´m broke, muscles ache, but hey, it was a lot of fun. Why am I telling this here, because it brought me to a decision for the interior color of my Kampfanzug. What looks so beautiful, when you start surfing a wave, looking down in the direction of the ground, right, bright turquoise and then it hit me, why not painting the interior like a Russian jet with that strange shade of turquoise. Cheers Rob
-
Love it Gus, You made the plastic look like real metal, almost feeling the weight of it. Weathering is spot on. Cheers Rob
-
Another one bites the dust - Maschinen Krieger Friedrich - 1/20
DocRob replied to DocRob's topic in The Sandbox Group Build.
This GB entry was a spontaneous idea, while grudgingly breeding over the firstly unloved sandbox theme. I hope, I can get my idea out believable with the painting stage of the Kampfanzug coming. Cheers Rob -
Another one bites the dust - Maschinen Krieger Friedrich - 1/20
DocRob replied to DocRob's topic in The Sandbox Group Build.
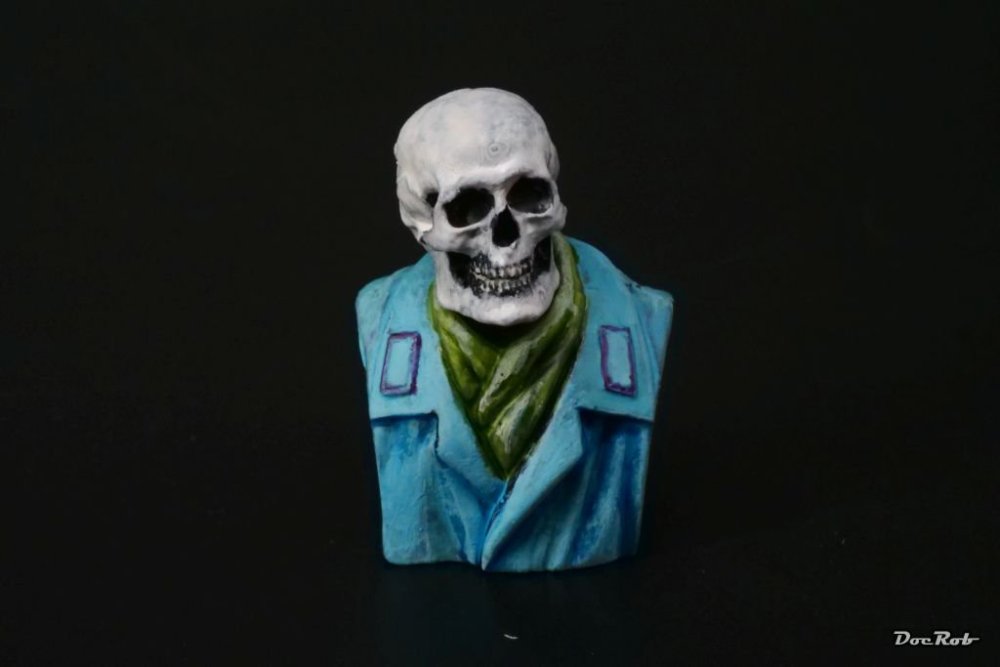
Rub it in Carl, I haven´t done much modelling and more blabbing with the GB . The shirt is not finished yet, I will do weathering and blending on a later stage, to get a fitting appearance. I wanted a comic like harsh contrast base with the ex pilot as a canvas. Cheers Rob -
Another one bites the dust - Maschinen Krieger Friedrich - 1/20
DocRob replied to DocRob's topic in The Sandbox Group Build.
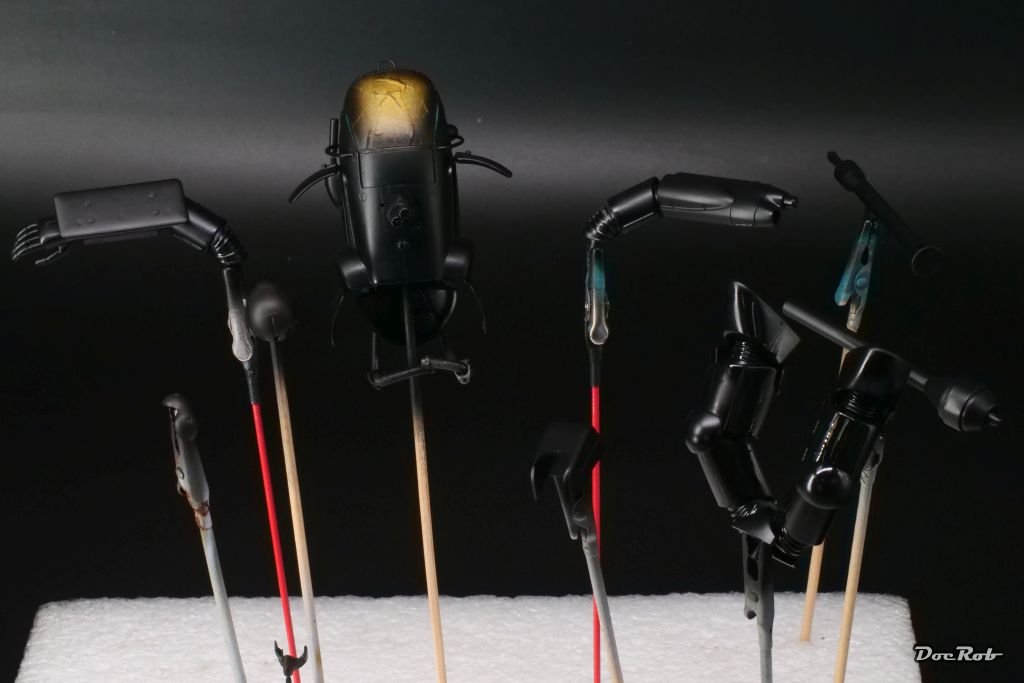
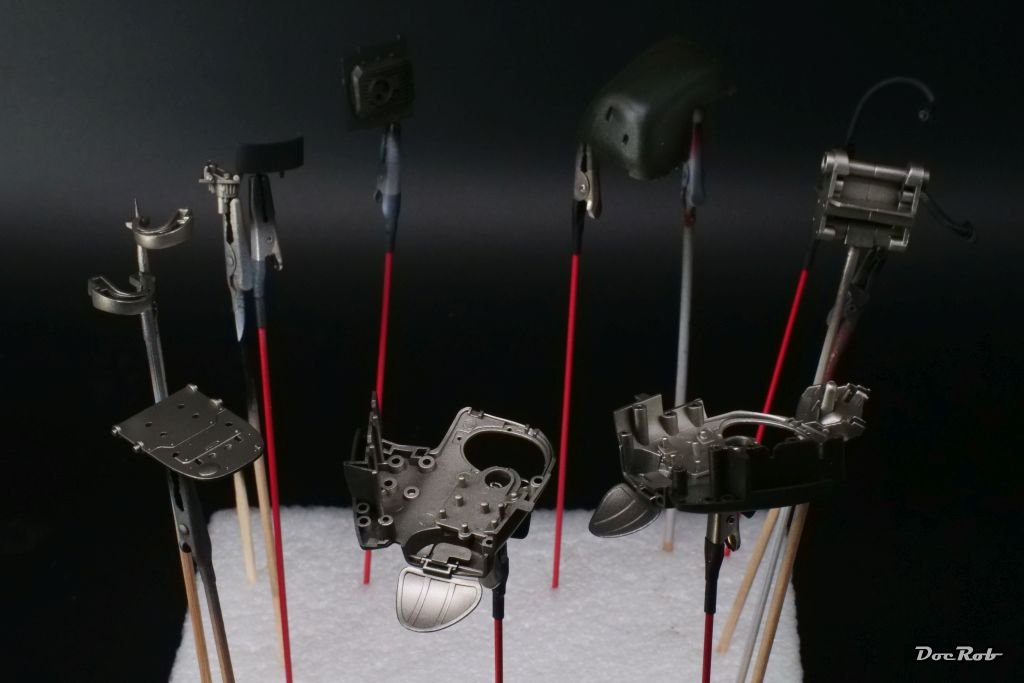
I didn´t had much time recently and made only small progress, but achieves some small steps. The deceased pilot got built and painted up. I used a guitar string for the spine, but the head is not fixed into position yet. I normally don´t like to show death and suffering in my builds, but this one should be a bit different, like black humor and so, I decided to give the figure a bit of a comic look through the paintjob, using heavily thinned acrylics and various shades of inks on top. The Kampfanzug (battle suit) was primed black, then the insides were sprayed with Extreme Metals duraluminum. I wanted to go titanium, but liked the shade of the duraluminum better. After that, the insides received a heavy dose of hairspray. Cheers Rob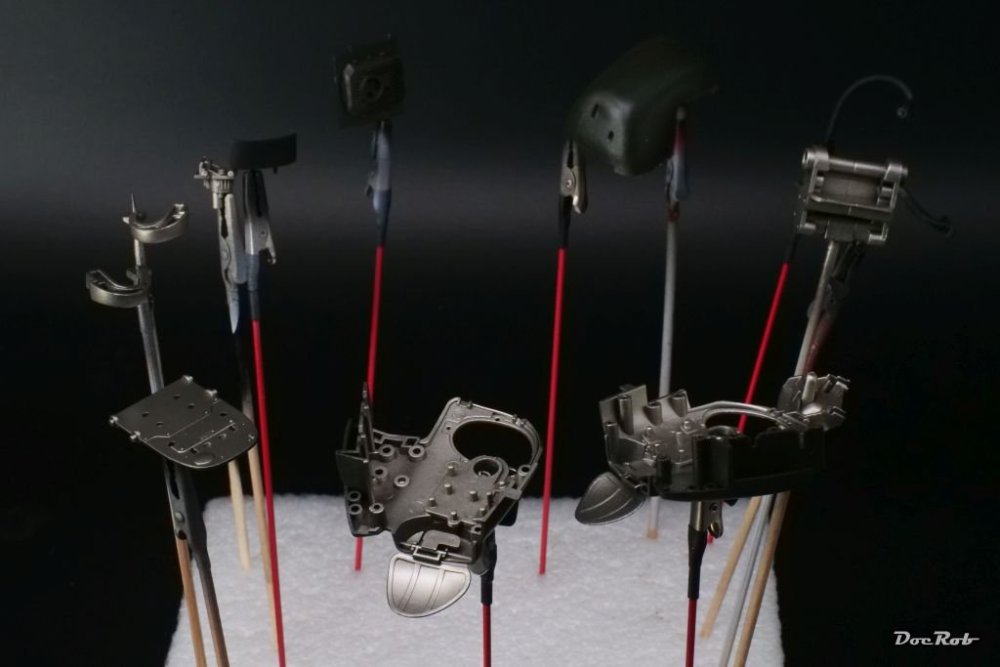
-
Another one bites the dust - Maschinen Krieger Friedrich - 1/20
DocRob replied to DocRob's topic in The Sandbox Group Build.
Unfortunately, it wasn´t like that. The huge model railroad was kind of refugee for my father and I was only allowed there on rare occasions, but hey, that might inspired me to do better in modelling than him which was easy and in every other aspect as well. Subtext, we had not the easiest of relations . Cheers Rob -
1/48 Tamiya P47-D Chunderbolt , NMF RFI
DocRob replied to PanzerWomble's topic in LSM 1/48 Aircraft Ready for Inspection
Nice anodized and weathered look to the Jug, PW, I like it. The checkerboard contrasts beautifully. Cheers Rob -
Try tapping on the object of desire on your screen while using the IPhone, it helps sometimes with better light metering. There are better camera Apps out there as well. I use ProCam, which is cheap and enhances the possibilities of the Iphone camera. Cheers Rob
-
The interior looks super bueno Hubert. Worn and comfy like an old glove with lots of details and different materials on show, always a highlight on era planes to me. Shame that not much will remain visible. You may like to think about, removing some panel/cloth on the fuselage sides for better insight. The hunchbacked desert mule looks also good. Spot metering is the key for showing the modulation better. Cheers Rob
-
I have different kinds, but none is an all out recommendation. My most used are the Mr. Hobby Sol or Sol Neo. The latter is thinner and water based, if I remember it right. For canopies in addition with Kabuki masks, I prefer the thicker Sol. I also tried the Abteilung 502 blue masking fluid, which comes in a larger bottle and is similar to Mr. Hobby. I once tried to do an outlined camo with it, where the fluid was brush applied for the thin borders of the camo, which unfortunately didn´t work. Worst of all is Microscale Micromask, which spreads well, is relatively thin, but absolutely terrible to remove. I once masked the cylinders of a Corsair engine and spent hours cleaning the stuff. I can´t live without liquid masks, but I try to use them as seldom as possible. One little dot in the wrong place means drying time and redoing it. Cheers Rob
-
This is all looking very good Peter, despite the issues you had. That no PE is supplied for the mesh screens is a shortcoming, indeed. If the supplied PE is too rigid and made from brass, you can anneal it with a candle or a lighter. Heat it until there is a blue hue visible on the brass, not more. This erases the tensions in the crystalline structure of the brass and bending becomes easier afterwards. Cheers Rob
-
I do miss the strong stuff, because it is really hard to find decent decaf´s. I had to search and try a lot, until I found a few good ones. My high blood pressure came instantly without warning three years ago. It was hard to adapt that fast from old habits, like my beloved very strong roasts. I have to take my blood pressure medication, which sucks, but besides, I actually have no health issues. The machine is indeed a really nice one and I like it a lot. The only weak point is the power switch, which I had to change once and this one seems to be on the end of it´s lifespan as well. No big deal, I always have a spare one at hand. I wouldn´t like to miss a perfect brewed and prepared cappuccino in the morning with fresh ground coffee. I don´t drink huge amounts of coffee, but the two per day really count. Cheers Rob
-
Excuse me for not digesting all mentioned parameters, Hubert. I had no idea, what it takes to get decent printed results and you only described the slicing process. I know the feeling, when you thought you did everything right, but no success, but I guess, the thorough way you do it is more than a bit of pioneering. I like your wooden framing, but if you want to let it look less uniform, you can always add some matted or semi matte clear tones in orange or yellow shades or rub in some brown pigments. Cheers Rob
-
What is on your bench right now ? Share a picture :)
DocRob replied to Martinnfb's topic in Modelling Discussion
I wonder, if the Whirlwind got some Godzilla legs as UC or some catio parts added . How do you keep track of all your started builds, Carl? Cheers Rob -
Special Hobby 1/32 -Tempest Mk.VI -Egypt 1949-Finnished
DocRob replied to KevinM's topic in The Sandbox Group Build.
I also like the metal finish, correct or not, Kevin. When I build mine, it will be NMF too. Cheers Rob