1to1scale
-
Posts
1,767 -
Joined
-
Last visited
Content Type
Profiles
Forums
Events
Gallery
Everything posted by 1to1scale
-

Trumpeter P-40B Pearl Harbor attack
1to1scale replied to JohnB's topic in LSM 1/35 and Larger Work In Progress
Yes, John got the right picture, for some reason there used to be a lot of confusion the aircraft numbers on the side. The large numbers on the side of the plane were there because the young pilots in training would always buzz the girls on the beach, of course, when the pilots were questioned about it, it wasn't them. So the commander had large block letters painted on each aircraft (flight line numbers), so the aircraft doing the buzzing could be identified. Some model companies interpreted the BU No or serial number as the large numbers, which was wrong. Some models and decals of these planes had 284 (damaged & repaired), 300 (Minor damage & repaired), 308 (Movie "Flyboys"), 317 (confused with Taylor's), 325 (confused with Welch's), 335 (featured in mini documentary), and 337 (heavy damage) as the ID numbers, which were wrong. I am glad that there is more information out there now and that people are using the correct 155 and 160 for their aircraft. -
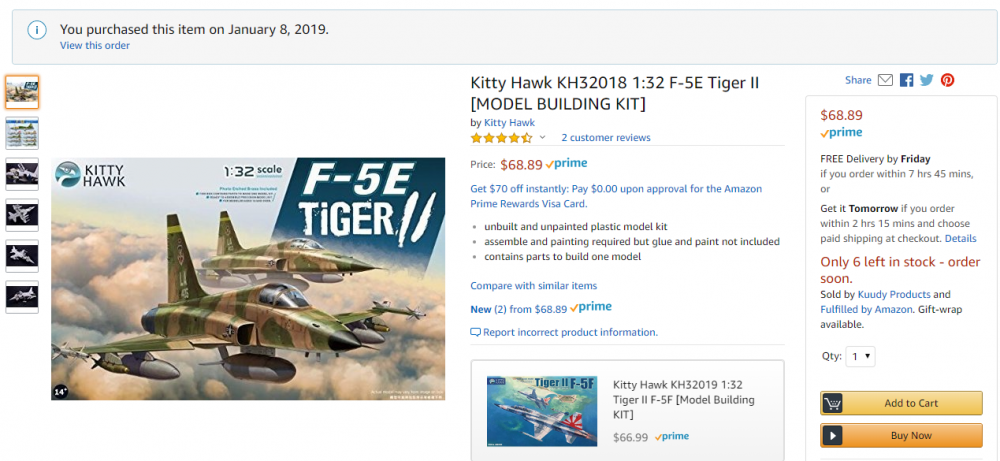
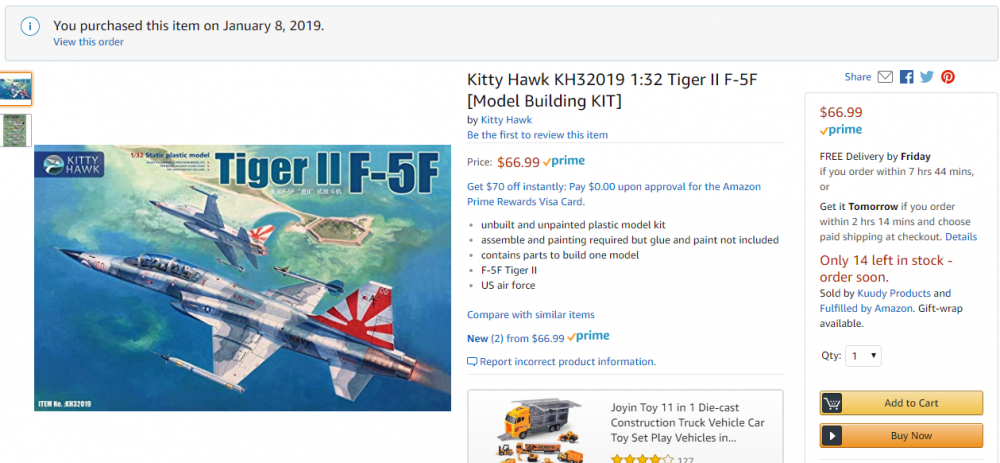
Good Deal Alert! F-5E & F-5F cheap! AGAIN!?!?!
1to1scale replied to 1to1scale's topic in General Discussion
Yes, deal alert #3 and #4 at Spruebrothers! Ironically, I just got a box from them yesterday, and I have my F-5F arriving today.
-
john, I used the Montex set, 300 is easily changed to 160. You will have to make your own 1, which is easy.
-
I must be crazy, B-24J on the bench.
1to1scale replied to 1to1scale's topic in LSM 1/35 and Larger Work In Progress
Ron, the front turret is all wrong. completely, the outside shape, barring the seam line and alignment pins, is almost accurate, although the gun spacing is too close and it looks a little short. the insides leave you head scratching, because it only resembles an Emerson A-15 turret in that it has two guns. However, if someone makes a replacement outer shell, they could be used. The rear turret is actually much more accurate. it could be used as is if it wasnt for the seam line. This only really needs a new top. In theory, if you could get another turret and clear sprue, you could build a plane that had 2 A6 turrets. -
Trumpeter P-40B Pearl Harbor attack
1to1scale replied to JohnB's topic in LSM 1/35 and Larger Work In Progress
Copycat.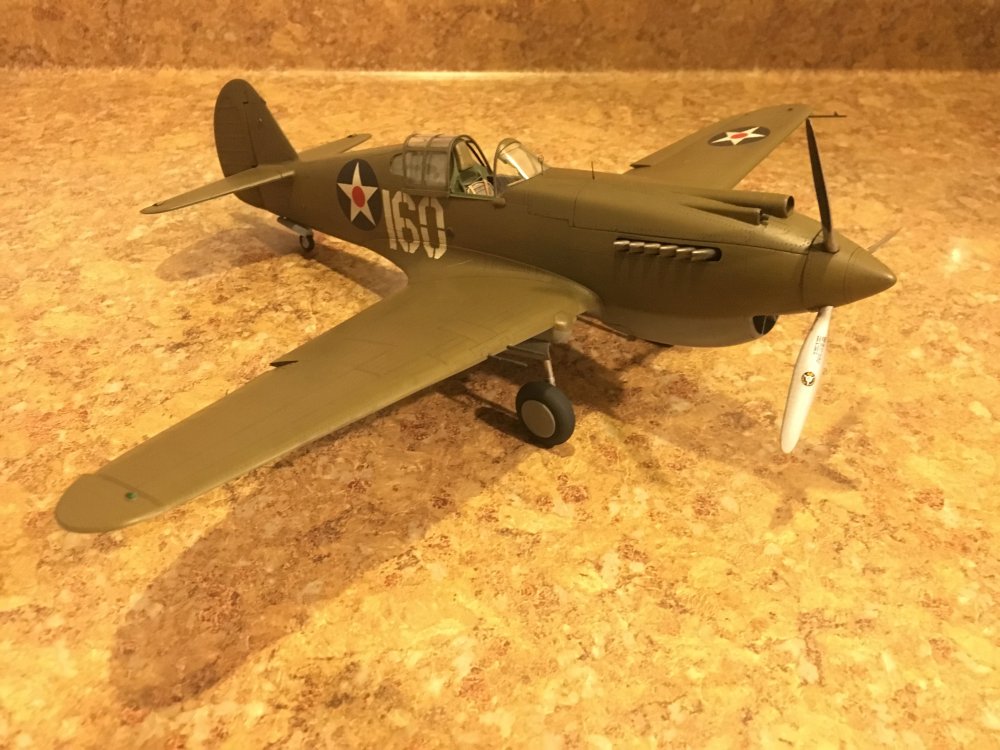
-
I found two awesome deals on Amazon, I bought both. These are the cheapest prices I found shipped by at least $40. There were a few F-5E's priced around $80 + shipping, but they were out of stock. Yes, you can buy them from China for less, but these are in stock in the US and to your door in 2 days.
-
Trumpeter P-40F build! Checkertails?
1to1scale replied to 1to1scale's topic in LSM 1/35 and Larger Work In Progress
Thank you, Ill keep that in mind, Ill probably paint the checkers and insignia anyway, ill just use the small decals. -
I must be crazy, B-24J on the bench.
1to1scale replied to 1to1scale's topic in LSM 1/35 and Larger Work In Progress
They were a nightmare, they actually published a book because of all the different "plants". My research nearly drove me crazy. Right now, I believe that the Hobby Boss B-24J was a Consolidated/Fort Worth (CF) built airplane with a Ford knock-down forward fuselage, as this plane represented in the kit does not match a pure bred from any of the factories. Although, its also possible that it was built by one of the other factories using knock down parts from other factories. Each Liberator practically needs a detective to decode. This info I got from the web of the most produced variants: Consolidated/San Diego, CO; Consolidated/Fort Worth, CF; Ford/Willow Run, FO; North American, NT; and Douglas/Tulsa, DT B-24D......Total: 2,696: 2,381 Consolidated, San Diego; 305 Consolidated, Fort Worth; 10 Douglas, Tulsa, Oklahoma B-24H......Most H model aircraft were built by Ford at the Willow Run factory with an Emerson A-15 nose turret. Total: 3,100 B-24H......The J model was the only version to be built by all five factories involved in B-24 production. Most were made by Ford, Ford used the Emerson turret mostly, Consolidated used the A6B. (Total: 6,678) B-24L......The L was a J but lightened, and with various turret configurations B-24M......B-24M became the last production model of the B-24, a lightened version of the L; At this point there were more planes than pilots, and many sat on airfields waiting assignment, a number of the B-24s built flew only the course between the factory and the scrapheap. (Total: 2,593) -
I must be crazy, B-24J on the bench.
1to1scale replied to 1to1scale's topic in LSM 1/35 and Larger Work In Progress
that photo is of a very early D, it was from a Life magazine article of the 8th AF. But keep in mind, these bombers were built in 5 different places, with parts from other plants, there was reason they called them a consolidated mess. They would have been a lot of variation between planes, but I have really only seen photos of early D's with the full bulkhead. -
I must be crazy, B-24J on the bench.
1to1scale replied to 1to1scale's topic in LSM 1/35 and Larger Work In Progress
i beleive the D's came with a full wall, but, later planes were open on one side, plywood square on the other. -
I must be crazy, B-24J on the bench.
1to1scale replied to 1to1scale's topic in LSM 1/35 and Larger Work In Progress
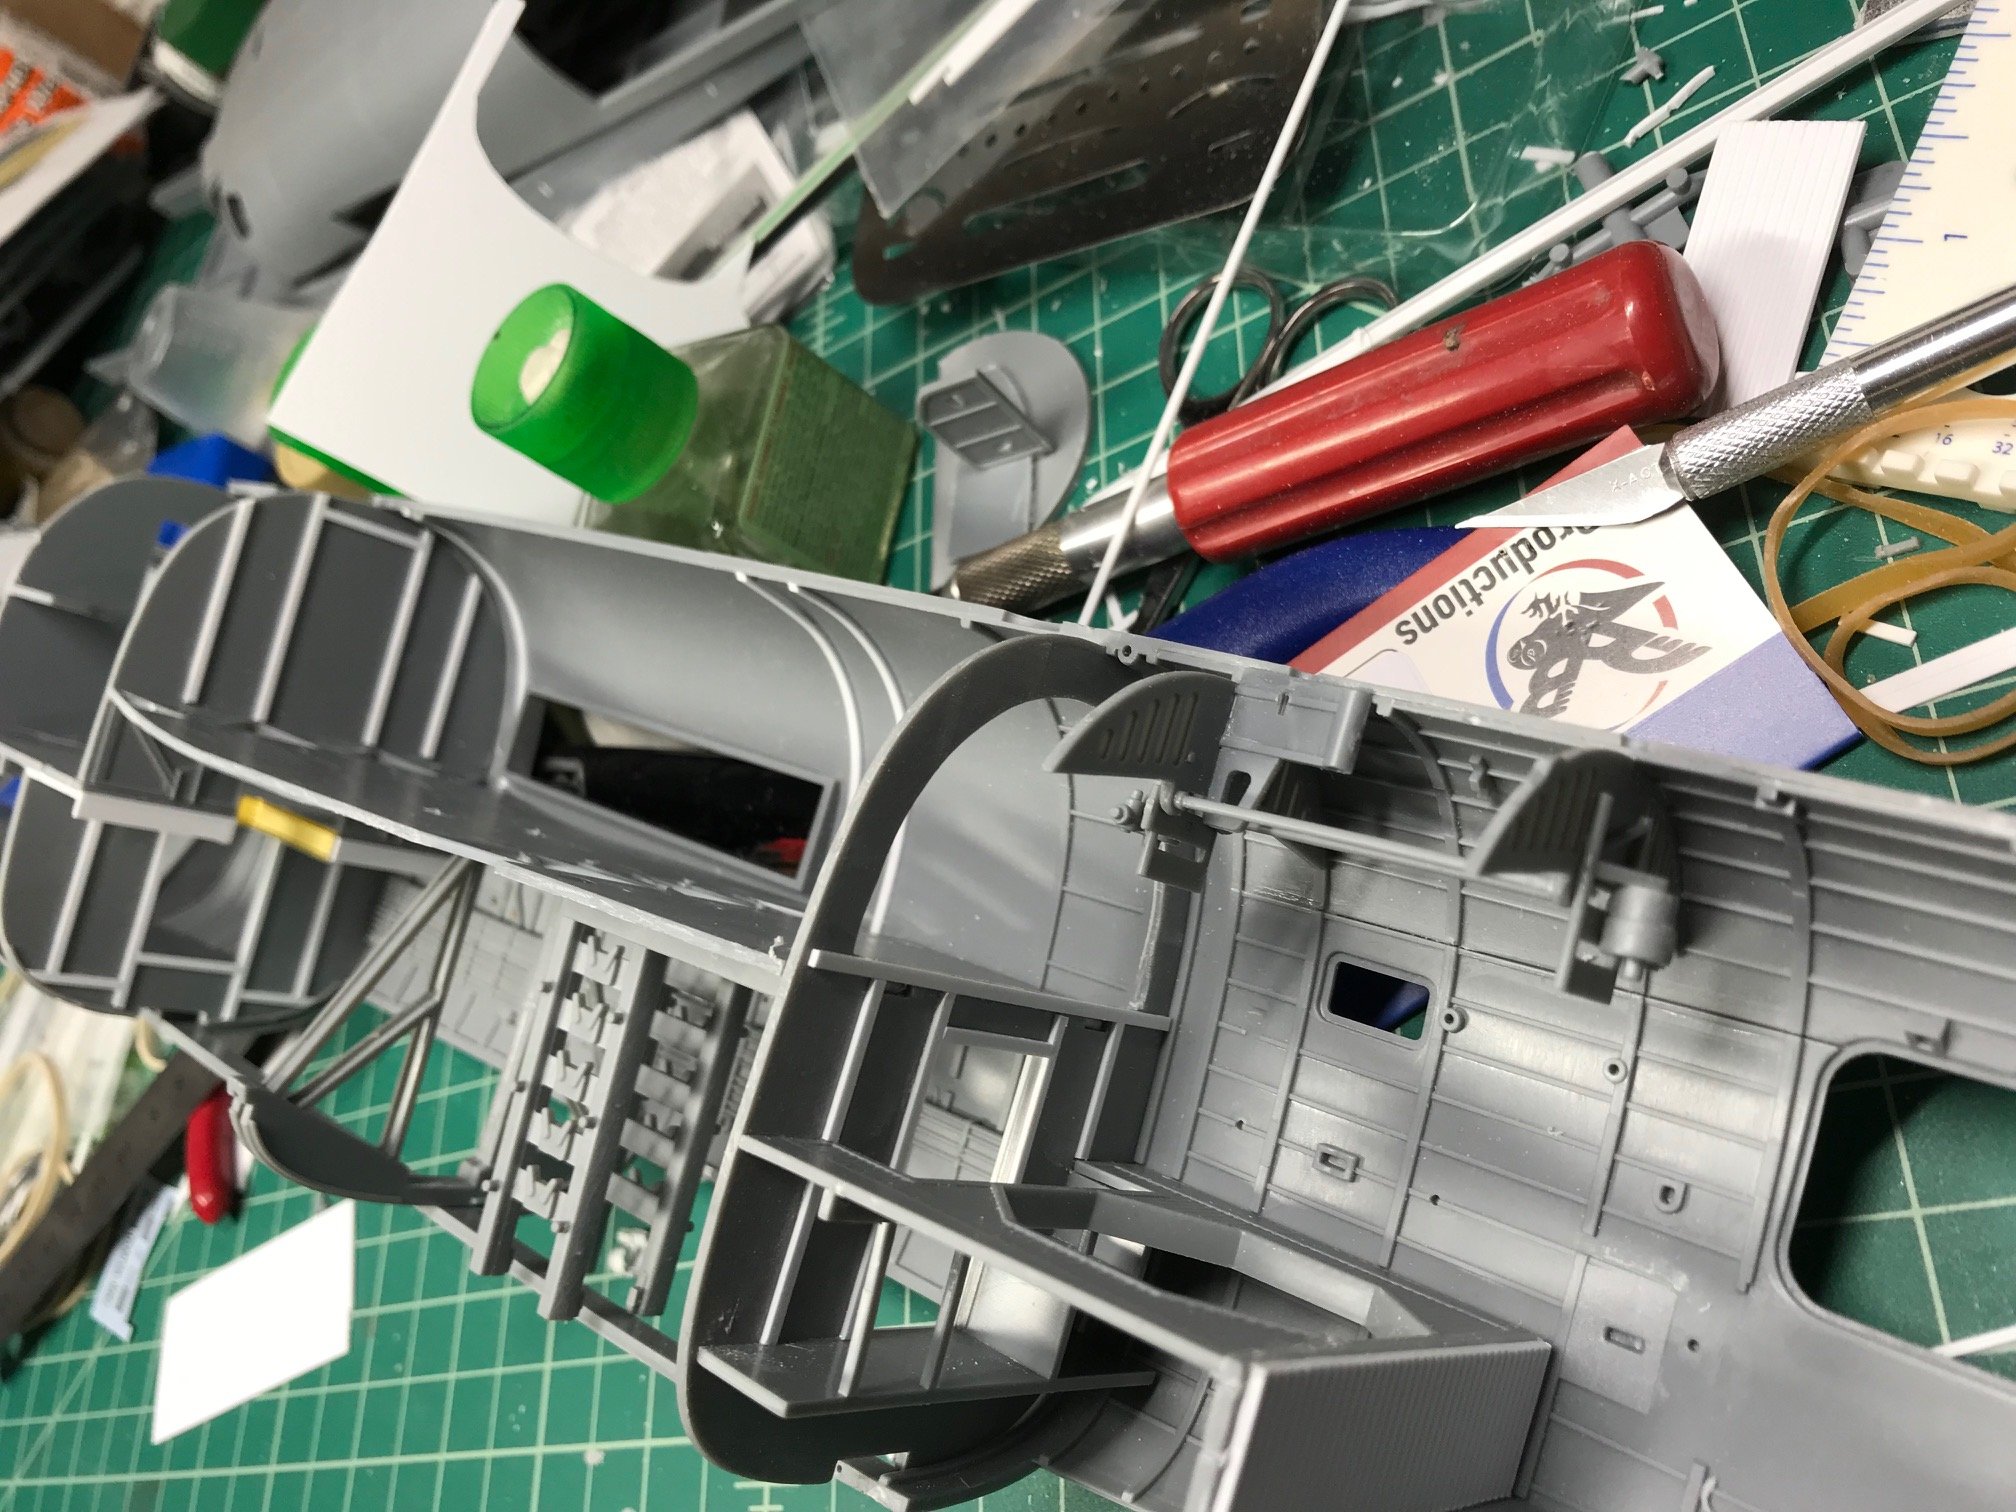
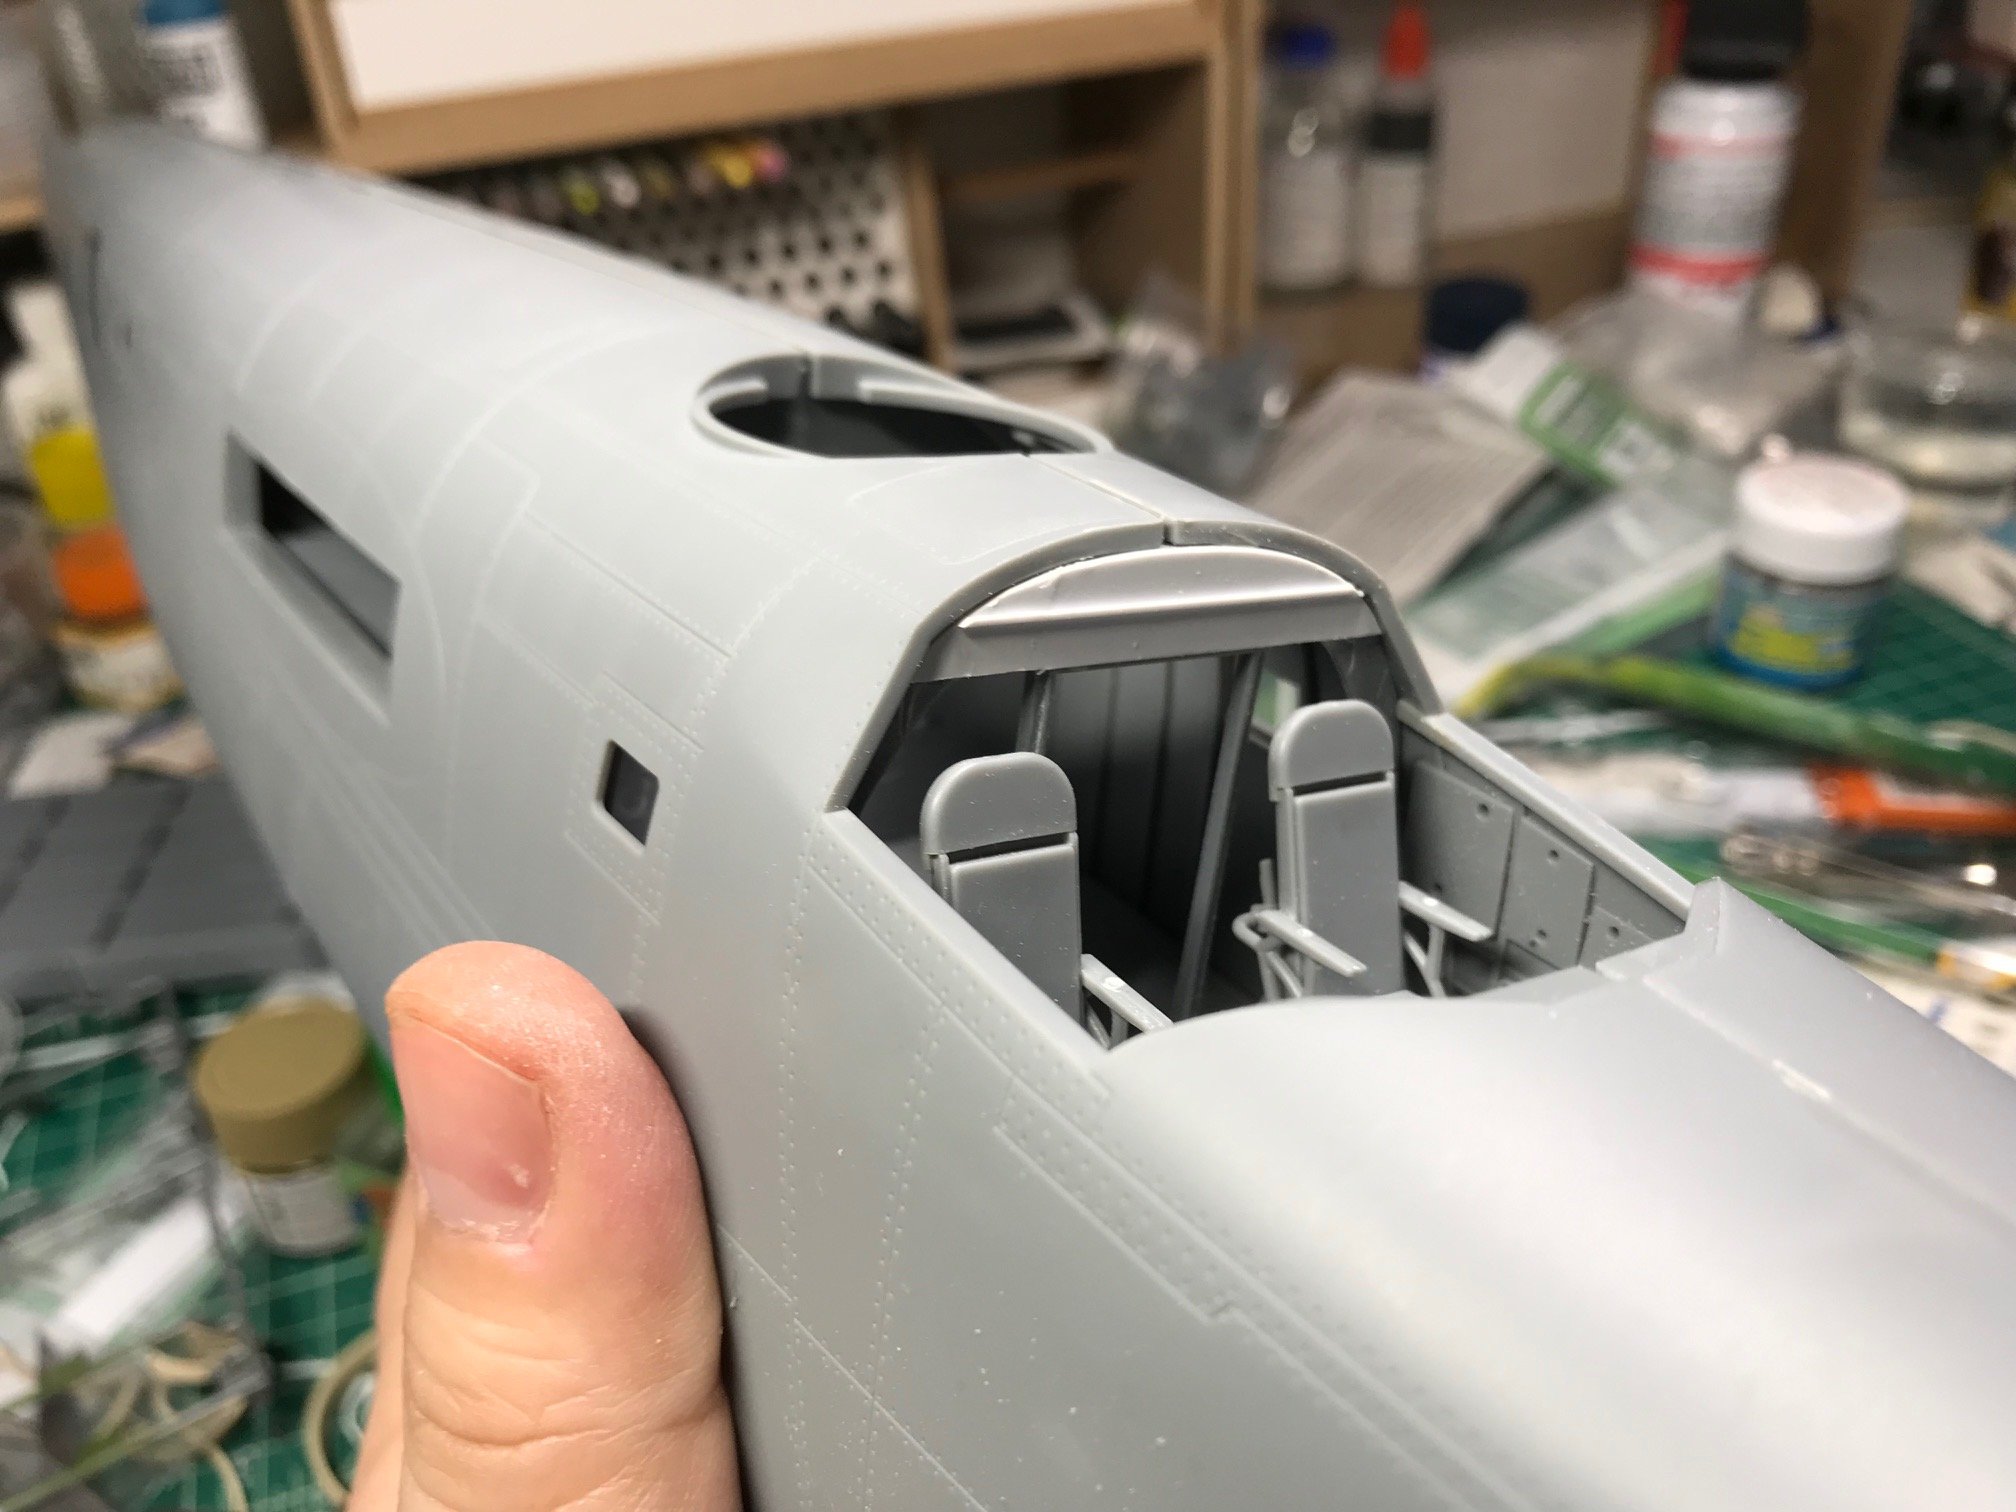
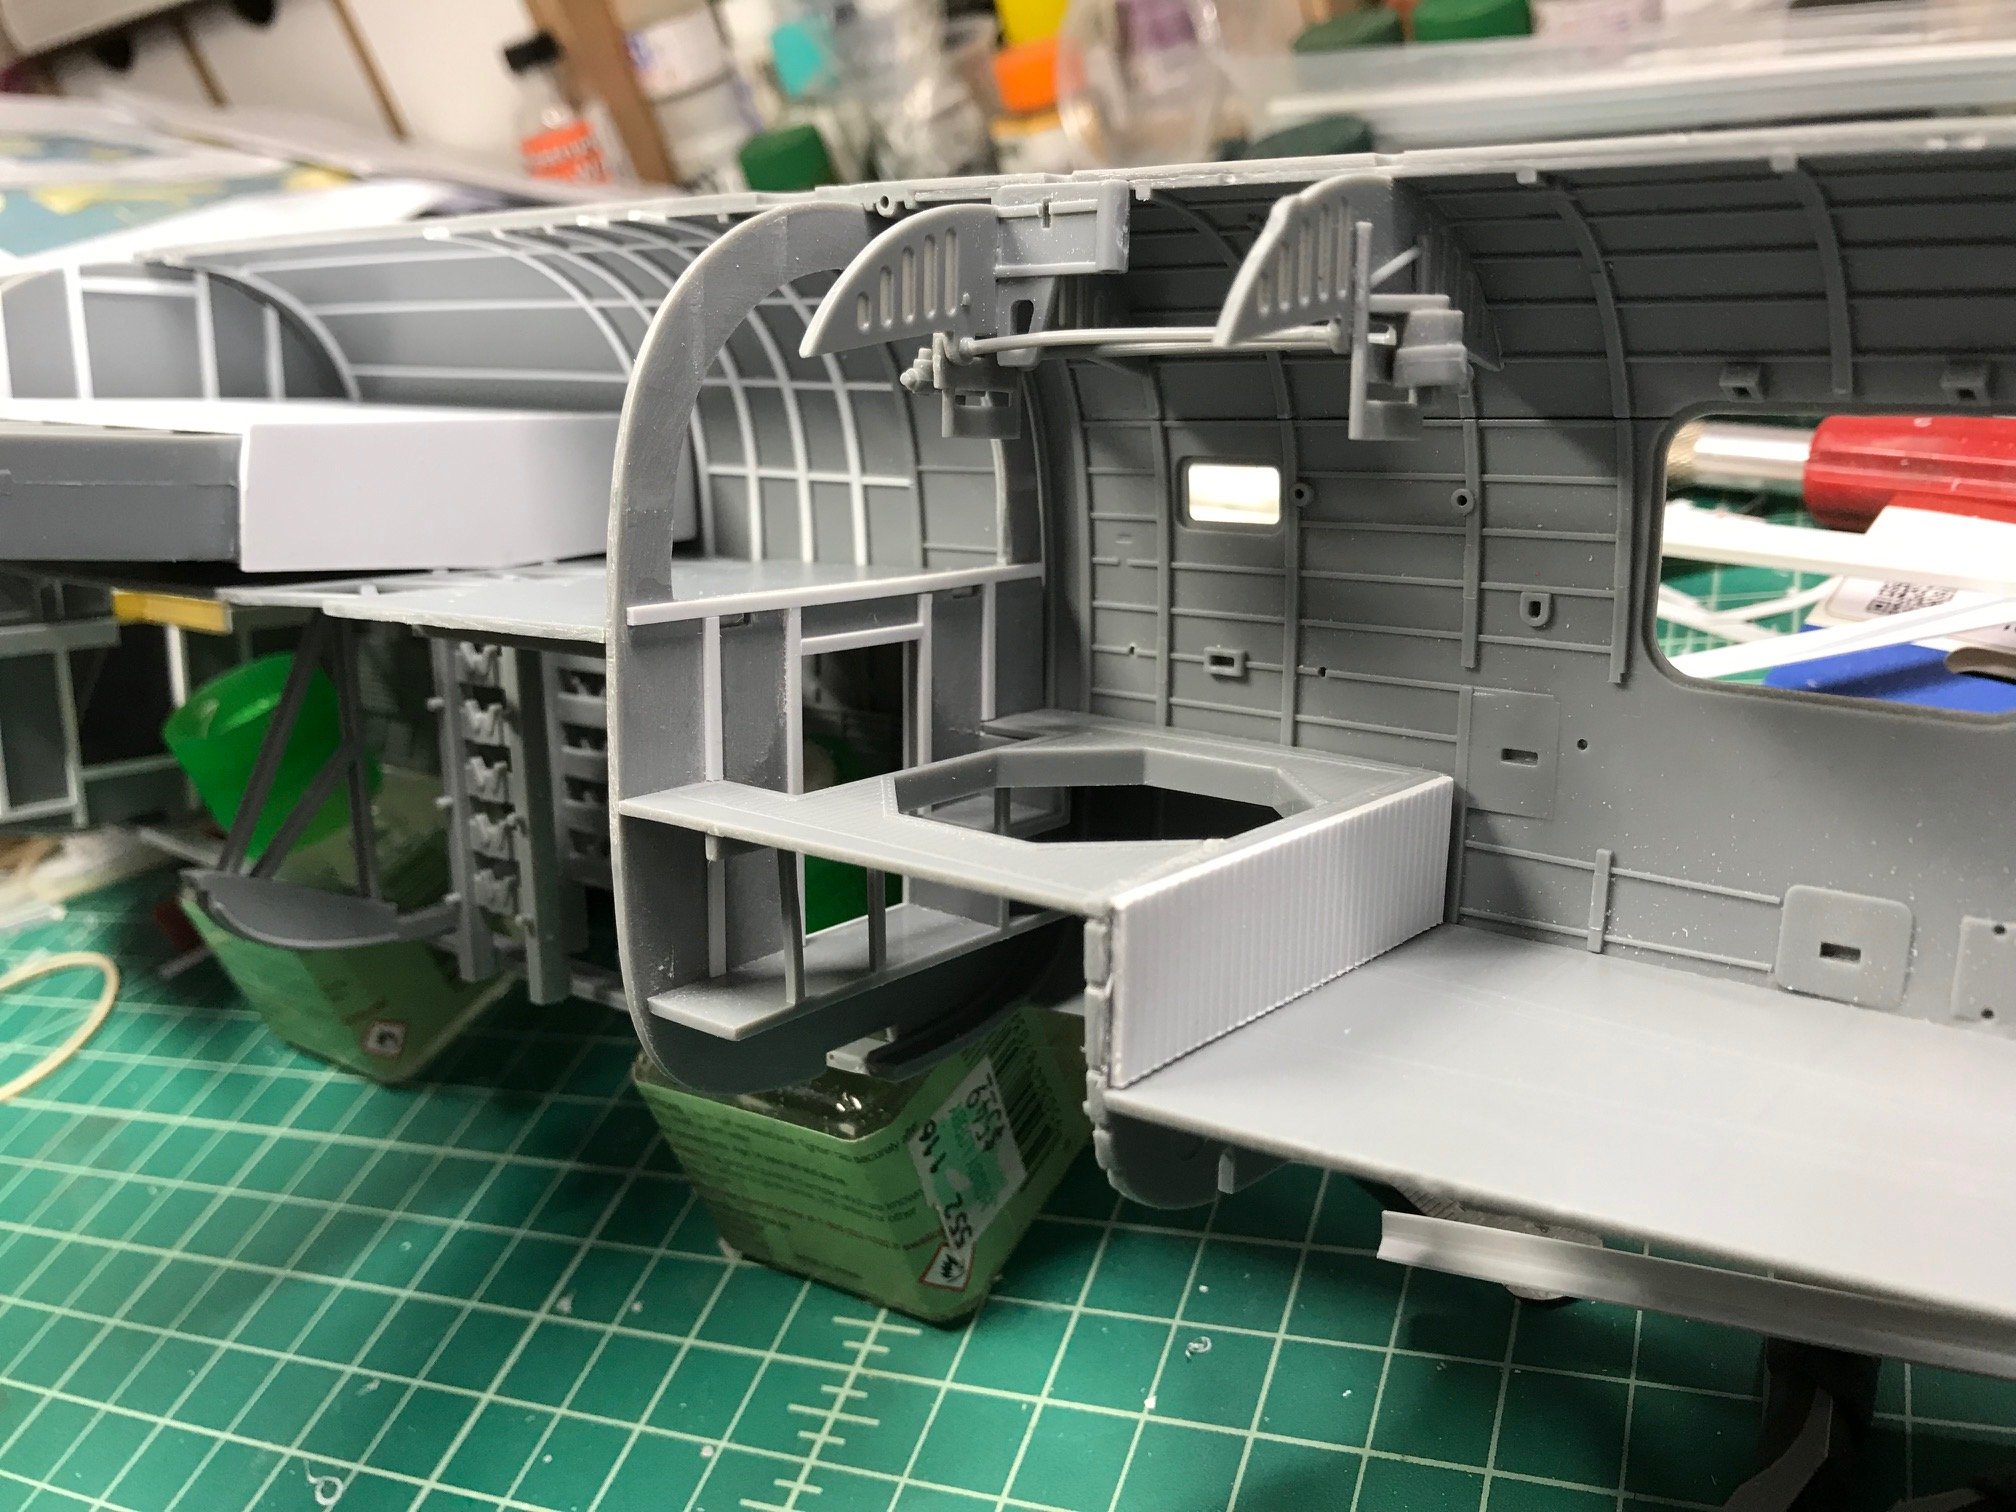
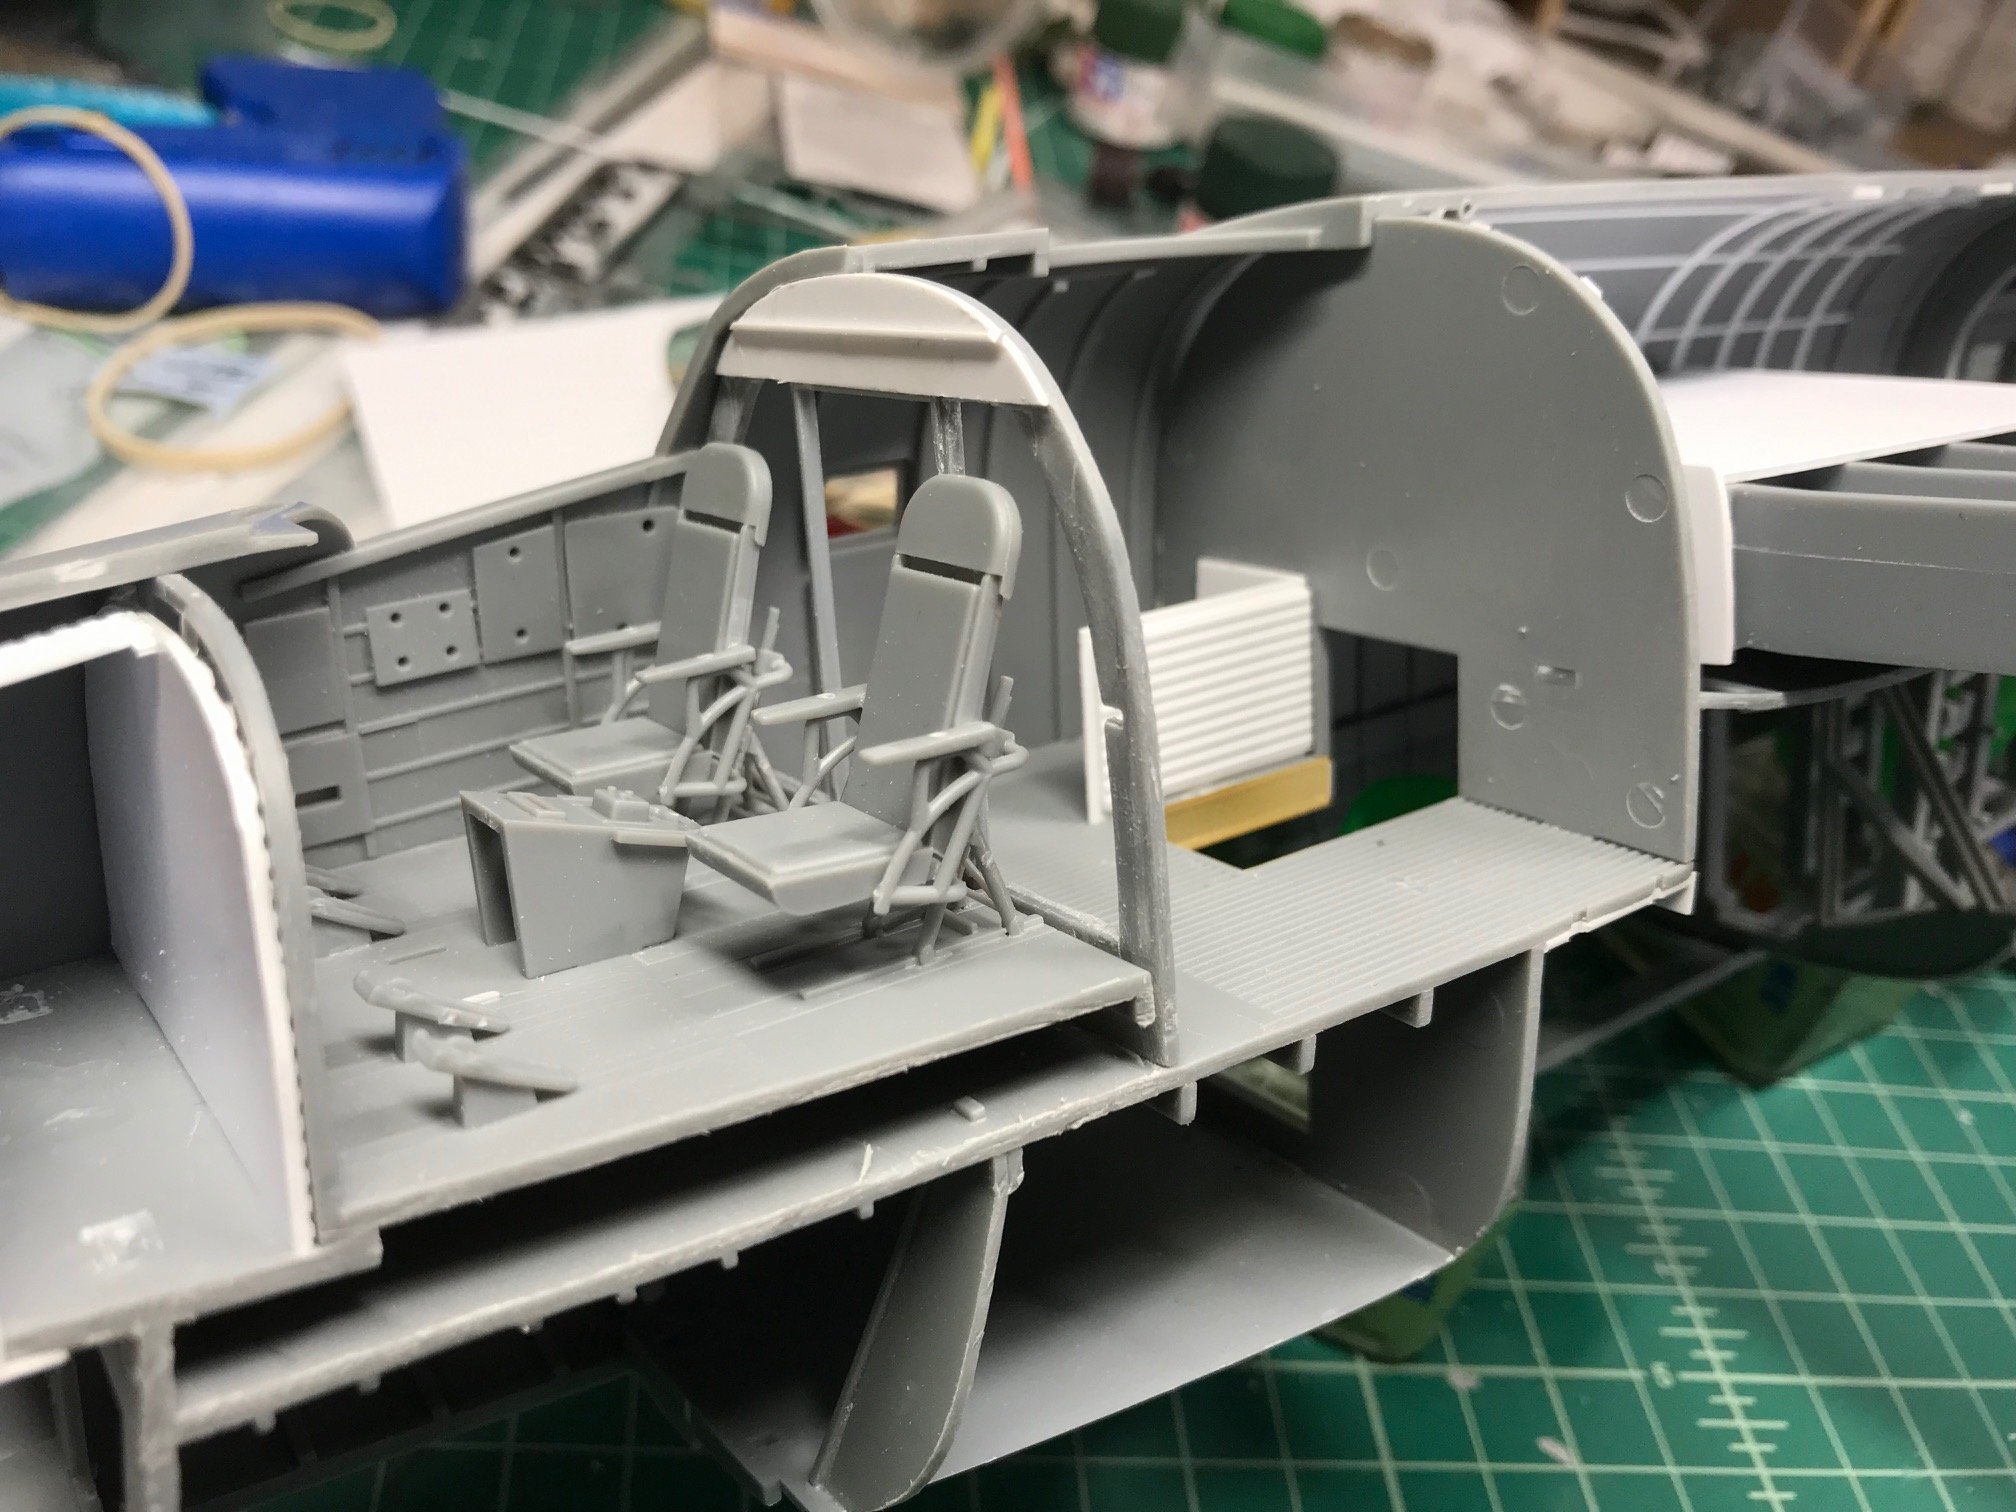
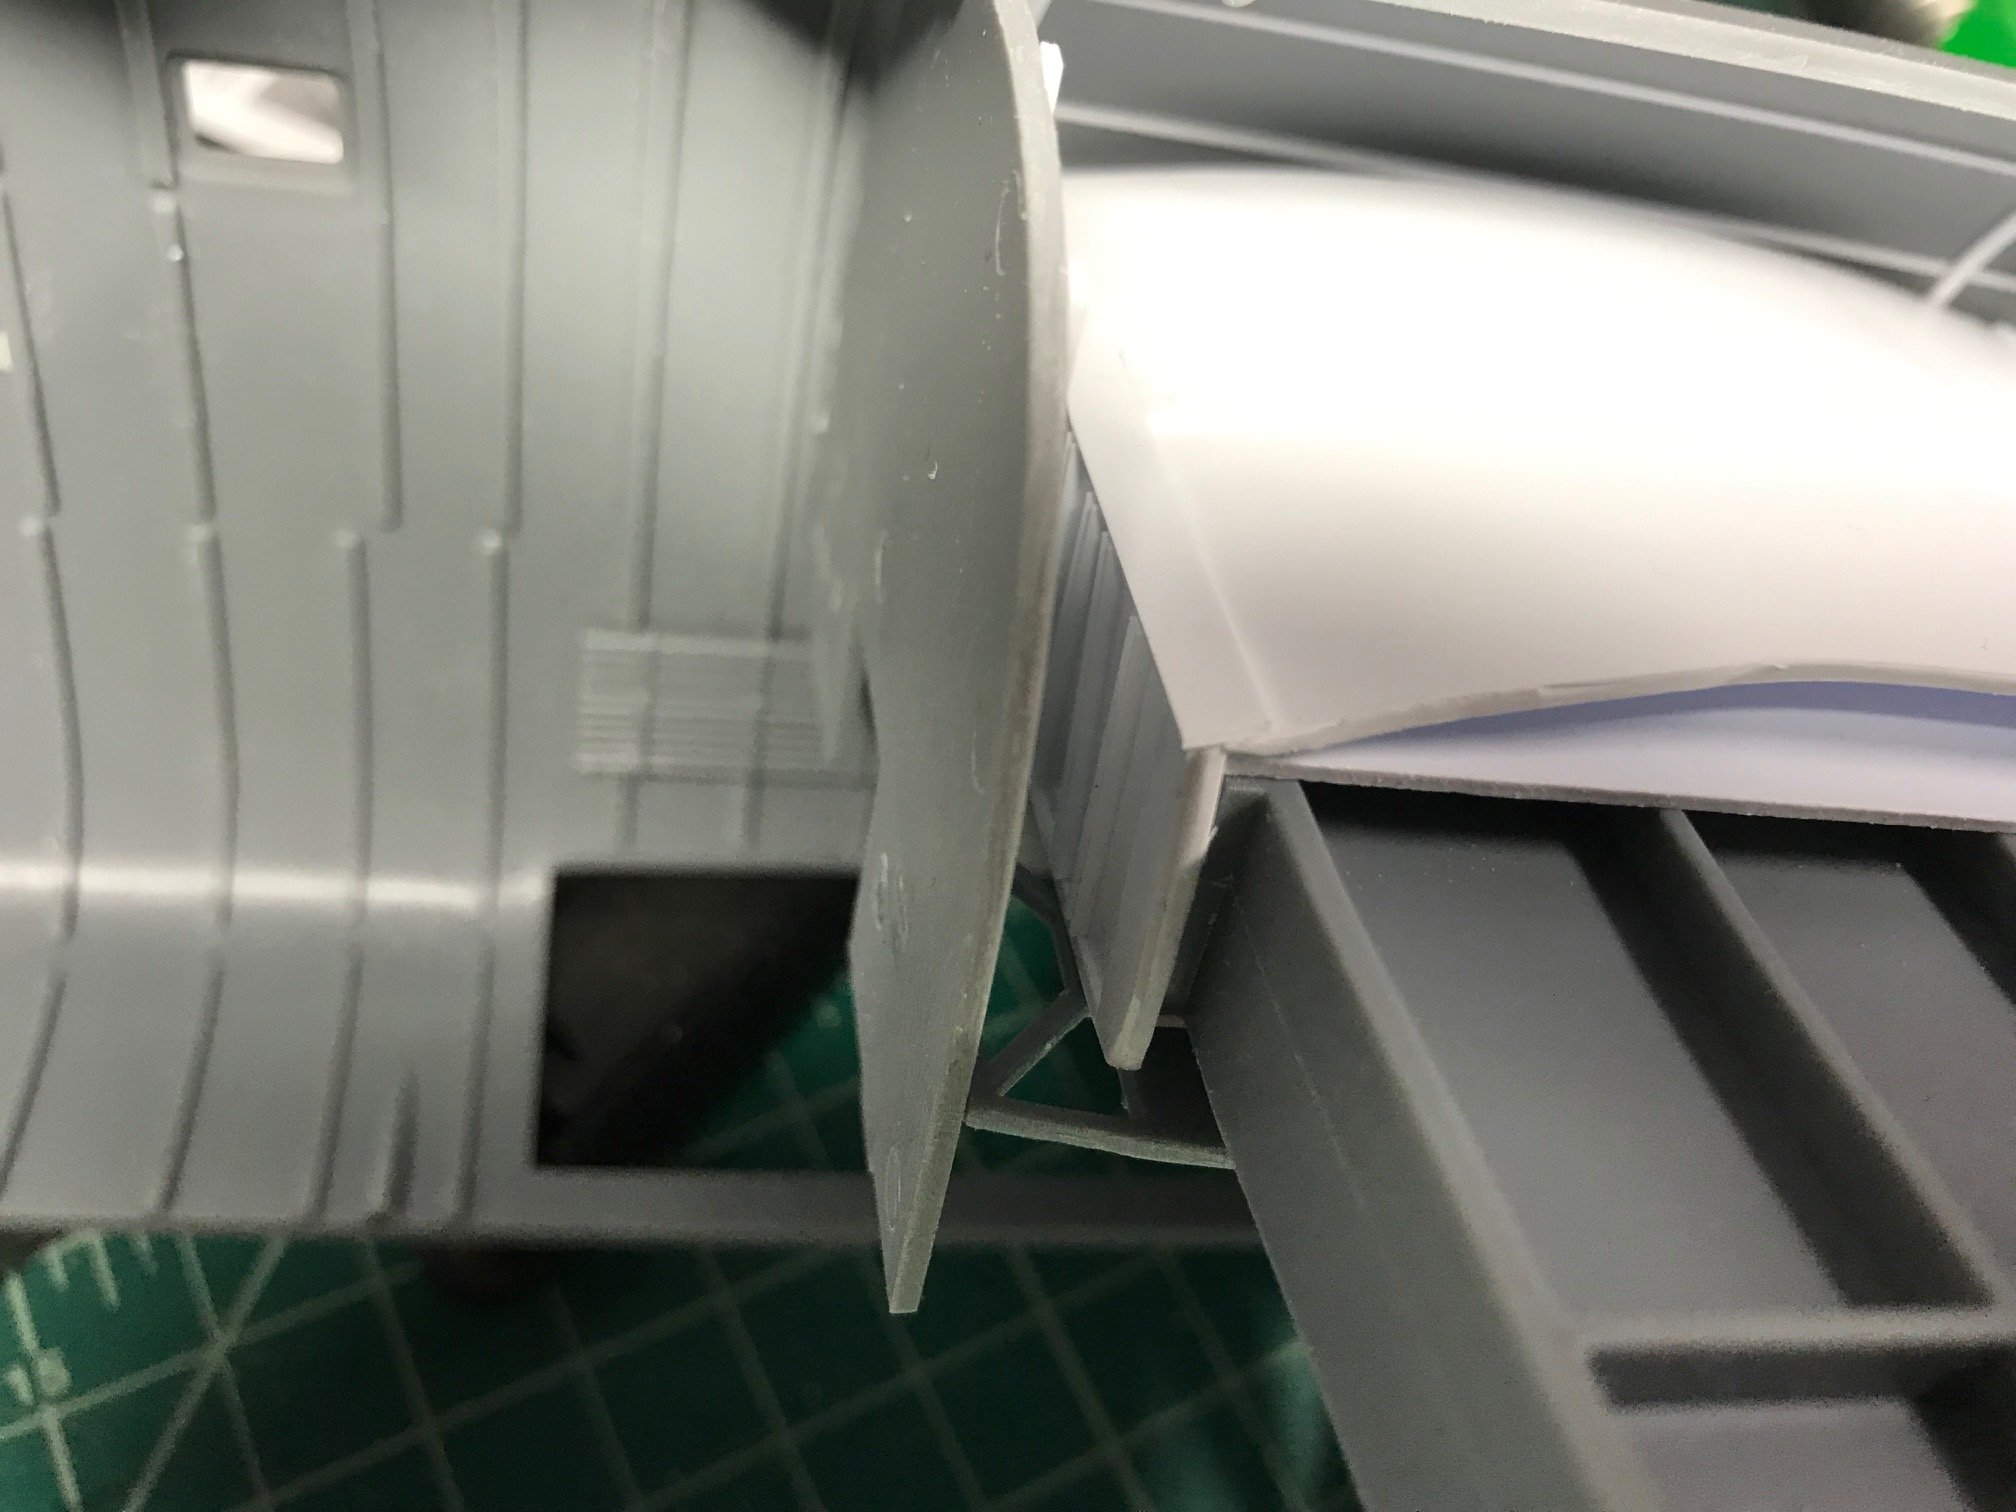
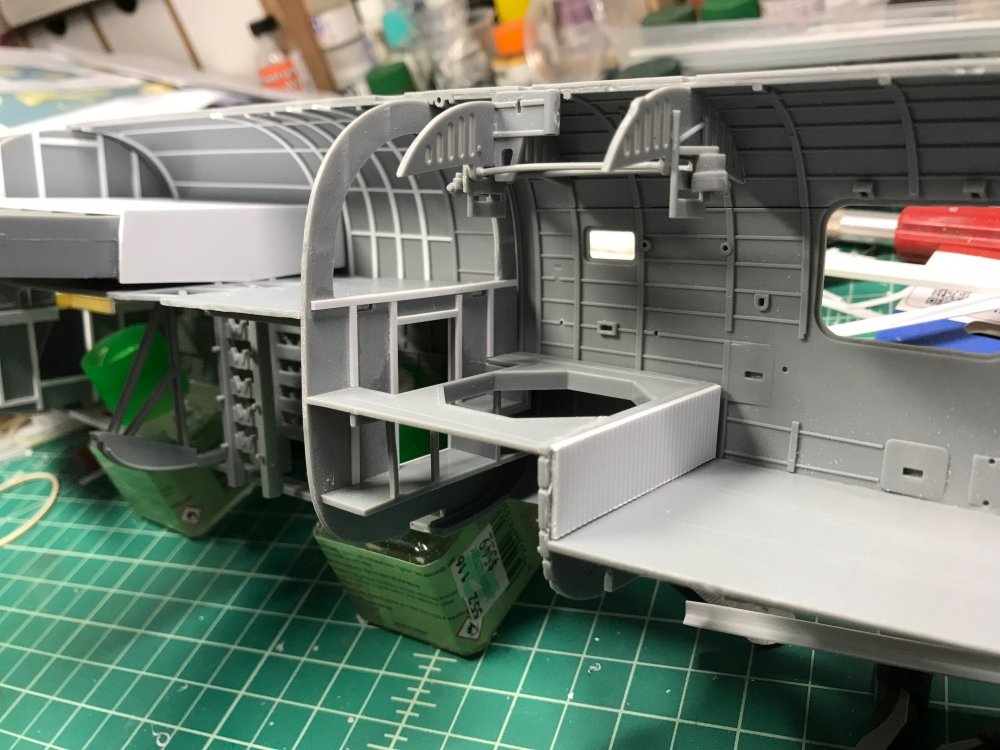
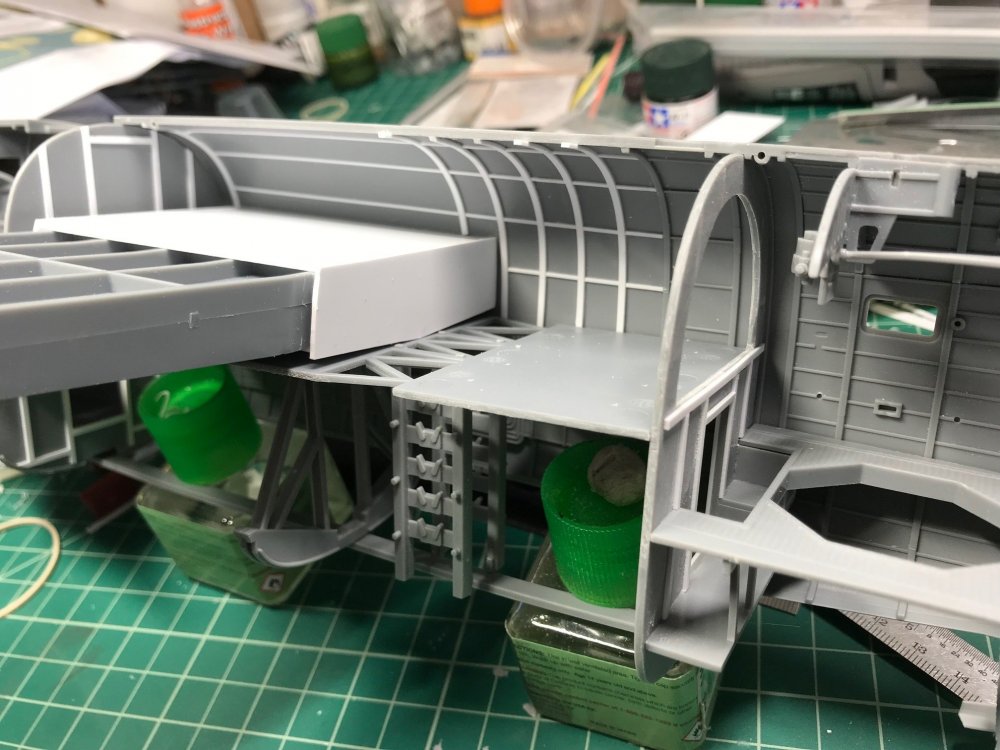
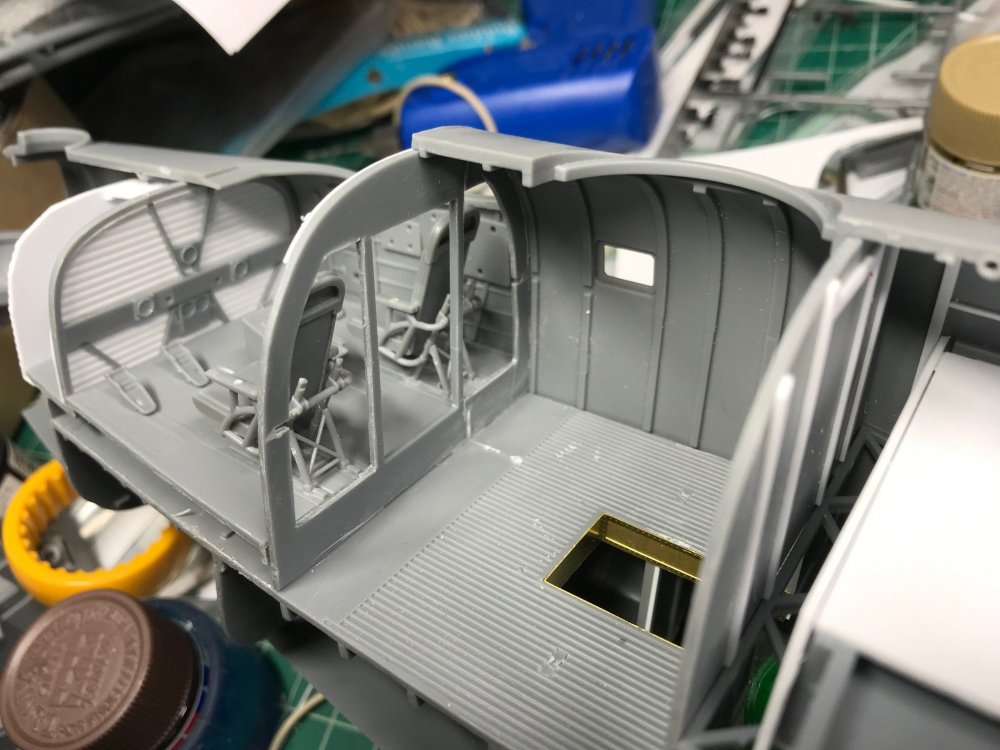
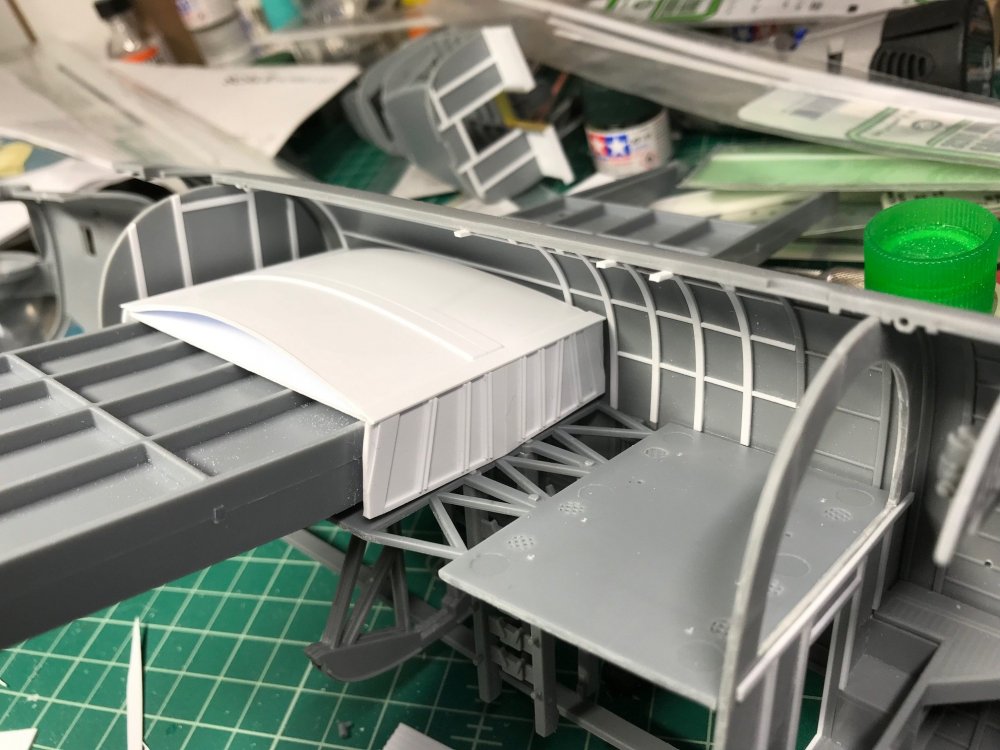
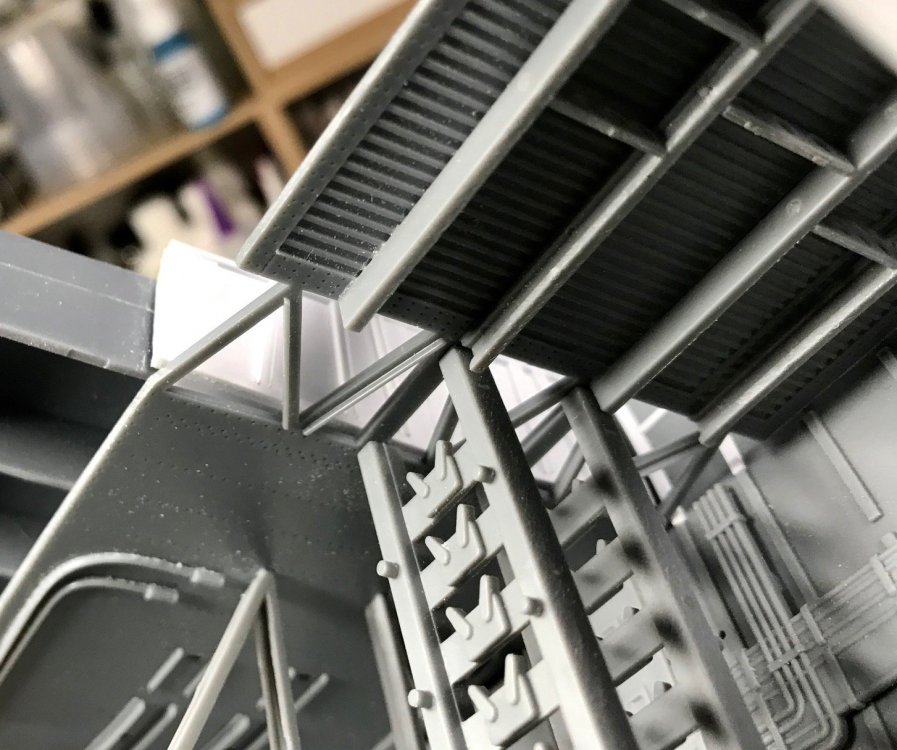
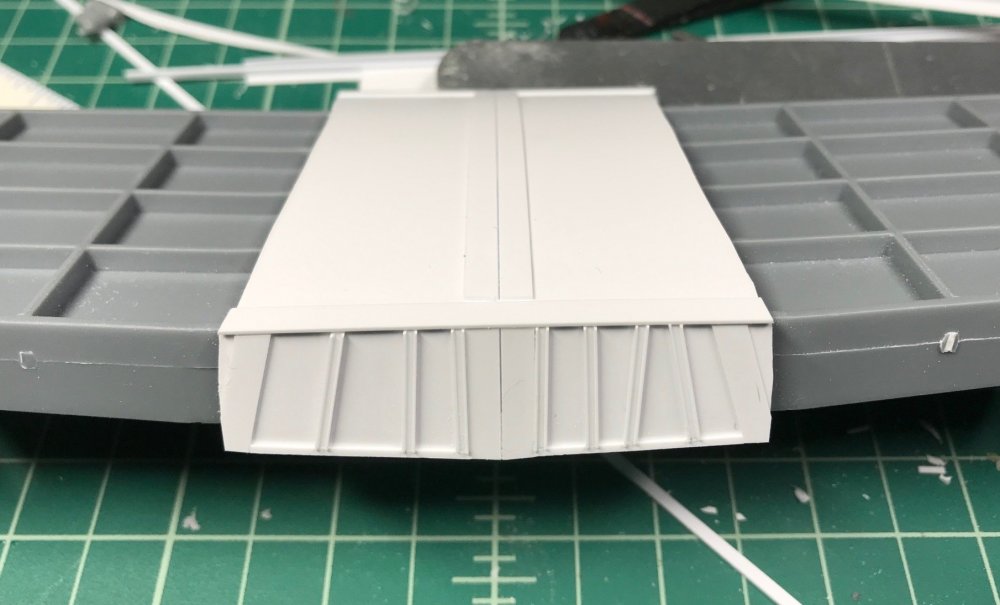
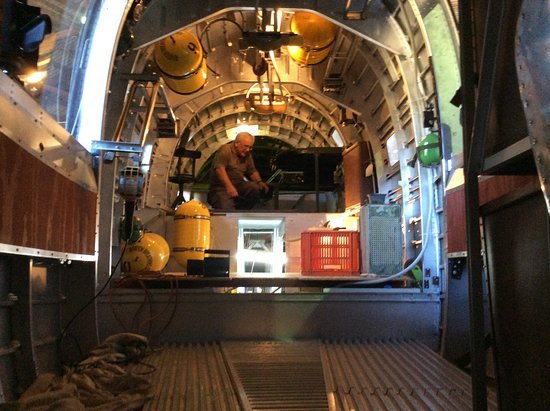
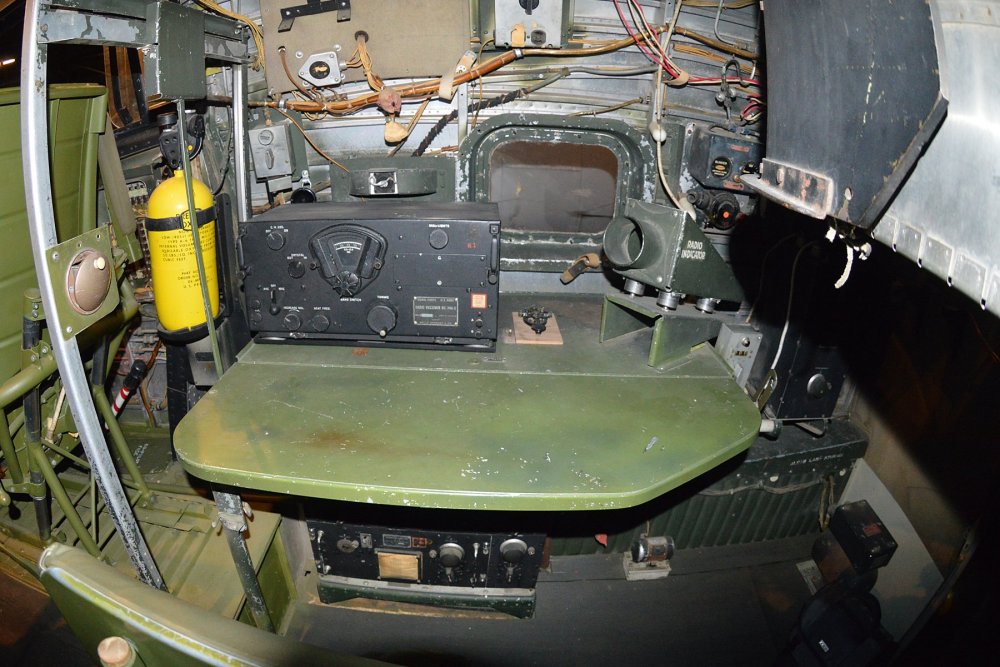
Picture update, some details of what I have changed. First order of business, I did not like that the Kits wing spar was visible from the bomb bay, as well as from the rear hatches if you open up the bulkhead. I built up a new one from Evergreen, I started with the front and rear wing sections, the bottom is tapered with the dihedral, but the top is flat, as I was able to observe in pictures. I then added various strip stocks reproduce the pattern, riveting comes later, I still have to fine tune the fit. As you can see, also visible from the front of the bomb bay. I also plan to open the front bukhead from the navigator's room, as well as the top life raft hatches. New detail visible below The spars will go all the way forward, thet may not be 100% accurate, but they are spaced to match the Hobby Boss detail. This platform behind the spar will have all the Radios mounted on a shelf, another small radio operator's table, and a chair. On the left side will be an oval tank, (i believe this was installed in Pacific Liberators for extra range). A corrugated floor was glued in after the pics were taken. Since I am adding all these details, I decided to add a few micro smd LED's to illuminate the insides. The back bulkhead was opened up using a circle cutting tool. I revisited the cockpit and took apart the pilot's bulkhead, I cut out the solid panels as most later bombers were open. I will be adding a plywood square behind the pilot to mount oxygen bottles on, and the co-pilot's side will just have some bracing. A very empty navigator's room, the tables will go back in, but new bracing will be scratched. Also the channels on each side of the floor will be built, a set of radios were ordered, and a mount for the liaison radio will go under the table. A new door was built for the floor, as the HB one is no where near accurate. Although if anyone has pictures of this door, I would like to see it. I have a few blurry or partial pictures, but they don't give me enough detail. This was the door I built, but I have since questioned whether this is accurate, the back kick-up seems wrong, I need to know if it opens to one side, or folds back upon the door itself. The rear nav bulkhead appears to have removable snap in canvas cover on some, open on others, and a door on some.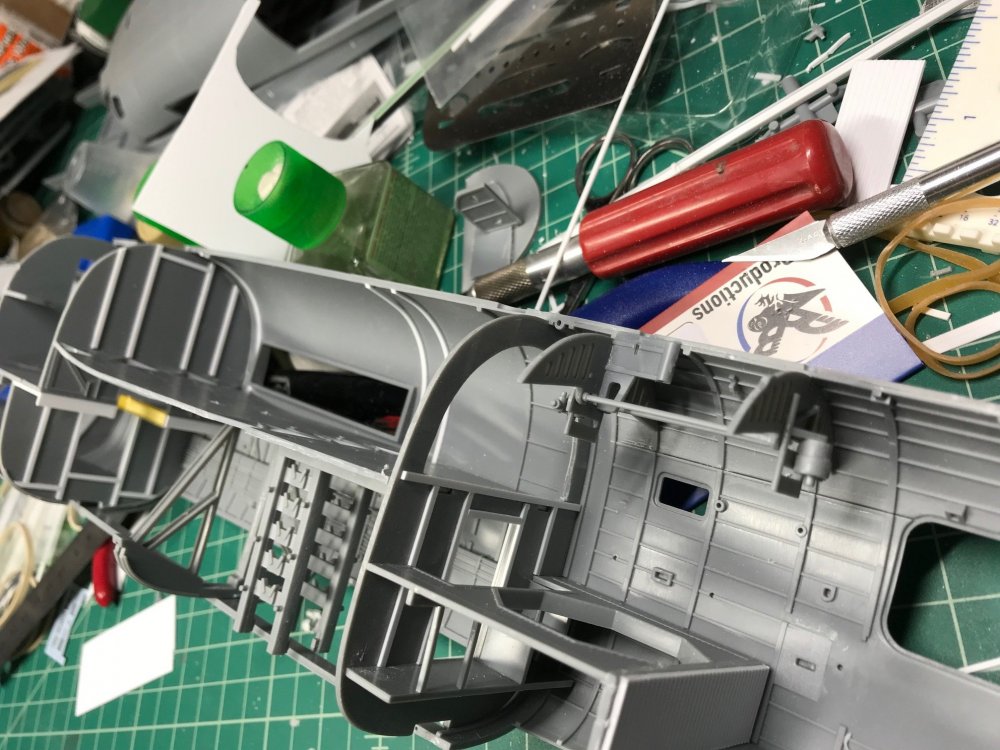


-
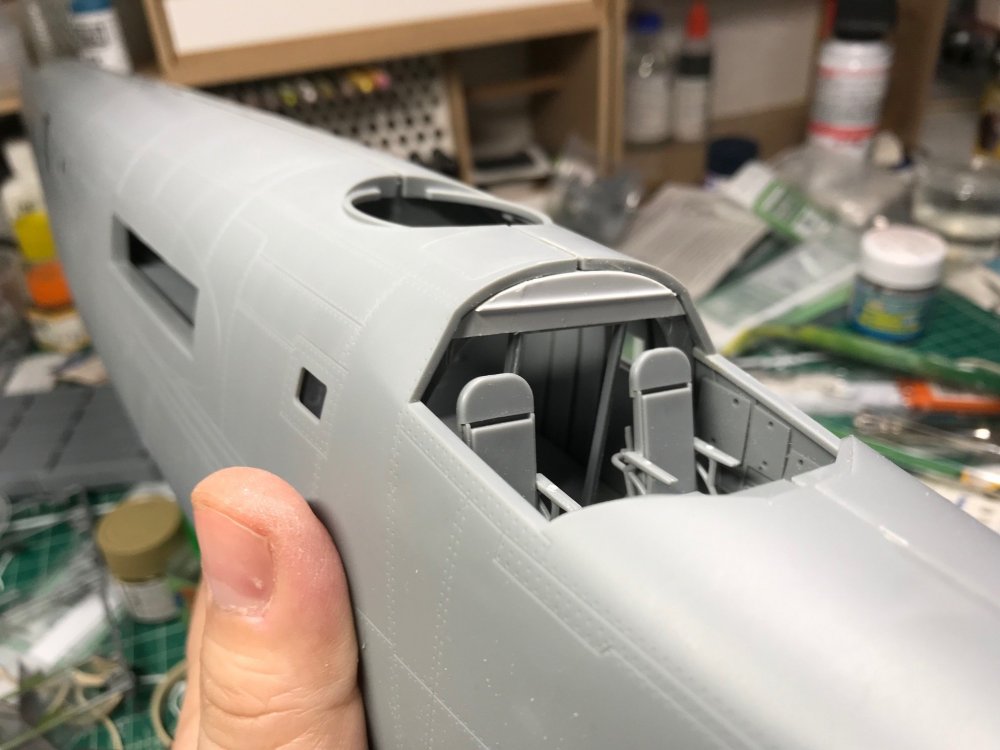
Kitty Hawk F-5F done.
1to1scale replied to Clunkmeister's topic in LSM 1/35 and Larger Work In Progress
I don't see anything wrong with it! Nice. -
2019 IPMS USA Nationals. Chattanooga, Tn
1to1scale replied to Clunkmeister's topic in General Discussion
My entry has changed, I was working on the P-61, but the B-24 will be my entry, maybe a P-40 or two or three. -
2019 IPMS USA Nationals. Chattanooga, Tn
1to1scale replied to Clunkmeister's topic in General Discussion
That's quite a happy face! -
HB Models B-24 Hints, Tweaks, Tips
1to1scale replied to Clunkmeister's topic in Modelling Discussion
Good thread, I was thinking about summarizing what i have found and changed in the kit. I am absolutely having a blast working on this kit, adding detail, scratch building it all myself. I have more pictures to share, but I use my iPad for almost everything, and I destroyed the screen on it last week, so Im waiting for repair. -
I must be crazy, B-24J on the bench.
1to1scale replied to 1to1scale's topic in LSM 1/35 and Larger Work In Progress
Last night I tore apart some of the built and detailed bulkheads, I scraped off and sanded down all the styrene strips on the three middle bulkheads and re-engineered them to better reflect the real aircraft. The aft bulkhead between the wing and ball turret got the proper cutout, the navigator room rear wall got a proper floor hatch, and the forward wall got cut out also. I plan to add the needed bracing and the correct "plywood" squares behind the pilot. Ill post pictures later if I can. -
Im now 1 year away from AARP! Im actually looking forward to taking my son to the movies and getting a child and senior rate!
-
-
All well done, you definately take the prize for completions!
-
I must be crazy, B-24J on the bench.
1to1scale replied to 1to1scale's topic in LSM 1/35 and Larger Work In Progress
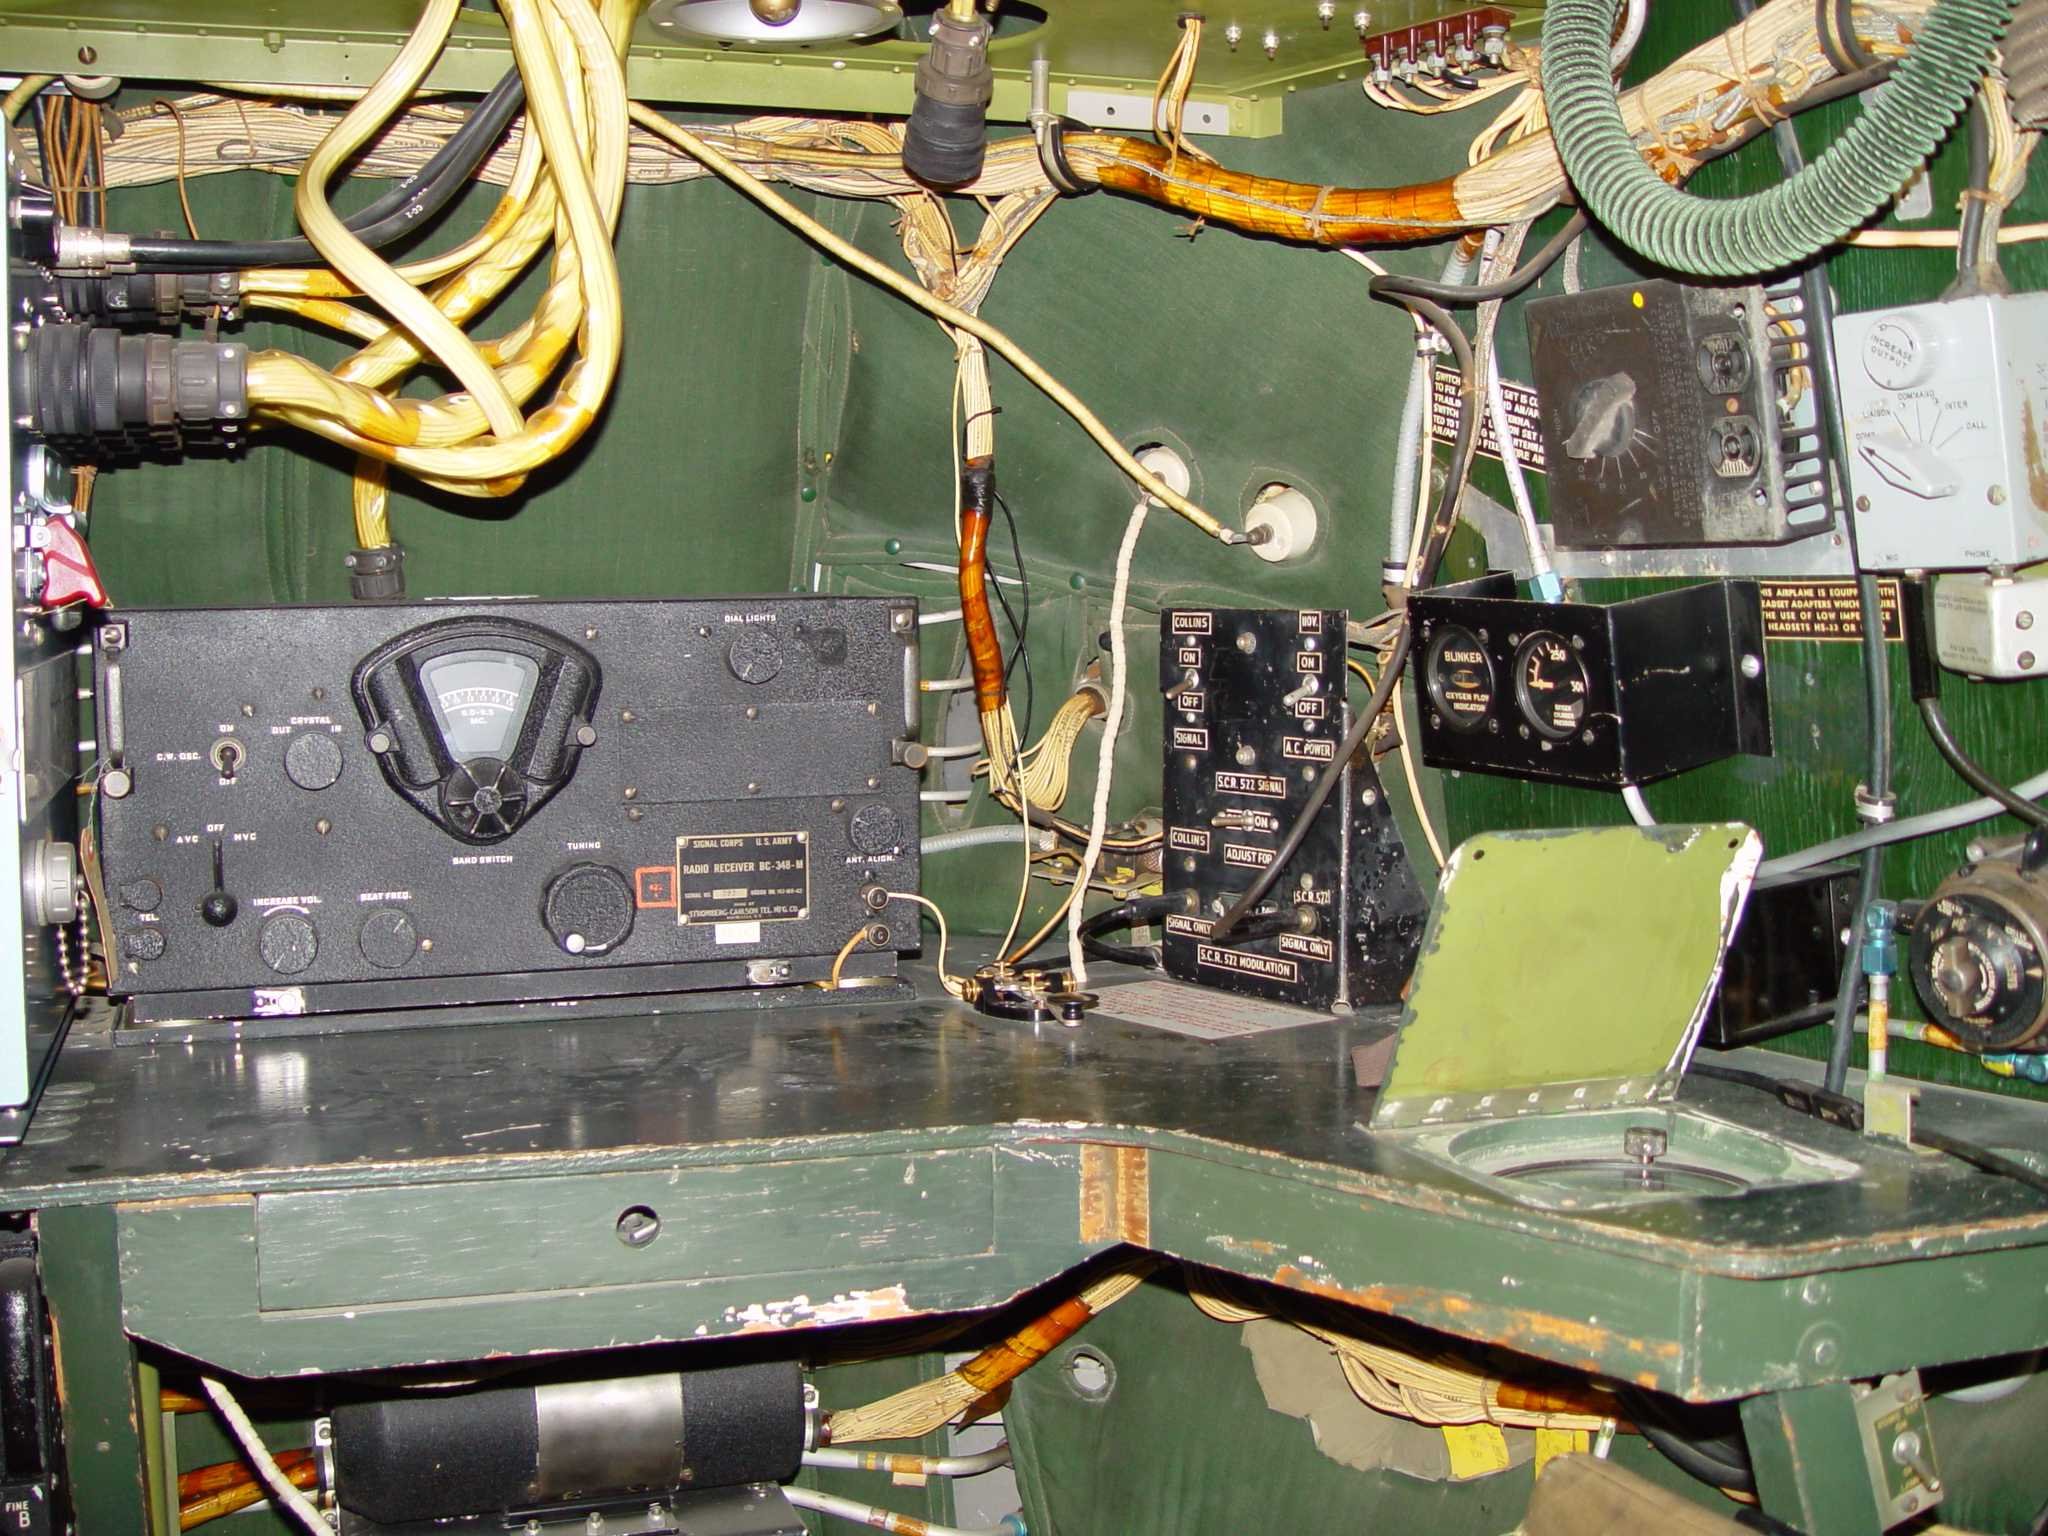
I ordered a set of Liason Radio receivers in resin, as HB gives you nothing, and they are very visible from the cockpit. The small set goes on top of the navigator table, the large set goes under it, and the other receivers go above the bomb compartment, and can be seen from the waist gunner area and partially from the bomb bay. For $9, these are a must.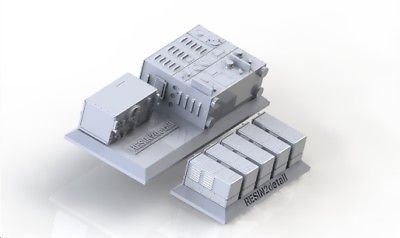

-
I must be crazy, B-24J on the bench.
1to1scale replied to 1to1scale's topic in LSM 1/35 and Larger Work In Progress
Dennis, excellent observation, I had to go to the books to research that one. It looks like the seats slide back on tracks for crew access, and Hobbyboss chose to make the mounting notches in the far aft position. There is a lever on the floor near the bolkhead that releases the slider. This is an easy fix, just cut new notches in the rail. I think I will go back and re-mount mine. -
If you haven’t yet, then BUY THIS TOOL!
1to1scale replied to Clunkmeister's topic in Modelling Discussion
I found and ordered a few of these today at Megahobby.com -
Kitty Hawk F-5F done.
1to1scale replied to Clunkmeister's topic in LSM 1/35 and Larger Work In Progress
Looking pretty good, I always liked the three tone blue and three tone tan birds. -
I must be crazy, B-24J on the bench.
1to1scale replied to 1to1scale's topic in LSM 1/35 and Larger Work In Progress
The one I ordered cost me $174, that’s because I hit the exchange rate on a high day. I actually have 2 now, I’m probably going to trade it soon. -
Honestly, it used to freak me out, but when I built the snipe, it turned out to not be a big deal. It just takes time, one wire at a time, give it an hour a night, and you will be done in a week.