JohnB
-
Posts
7,296 -
Joined
-
Last visited
Content Type
Profiles
Forums
Events
Gallery
Everything posted by JohnB
-

Tamiya P-51D "Happy Jack's Go Buggy" is next
JohnB replied to JohnB's topic in LSM 1/35 and Larger Work In Progress
For sure Chris! LOL -
Tamiya P-51D "Happy Jack's Go Buggy" is next
JohnB replied to JohnB's topic in LSM 1/35 and Larger Work In Progress
Progress for today so far.
-
Tamiya P-51D "Happy Jack's Go Buggy" is next
JohnB replied to JohnB's topic in LSM 1/35 and Larger Work In Progress
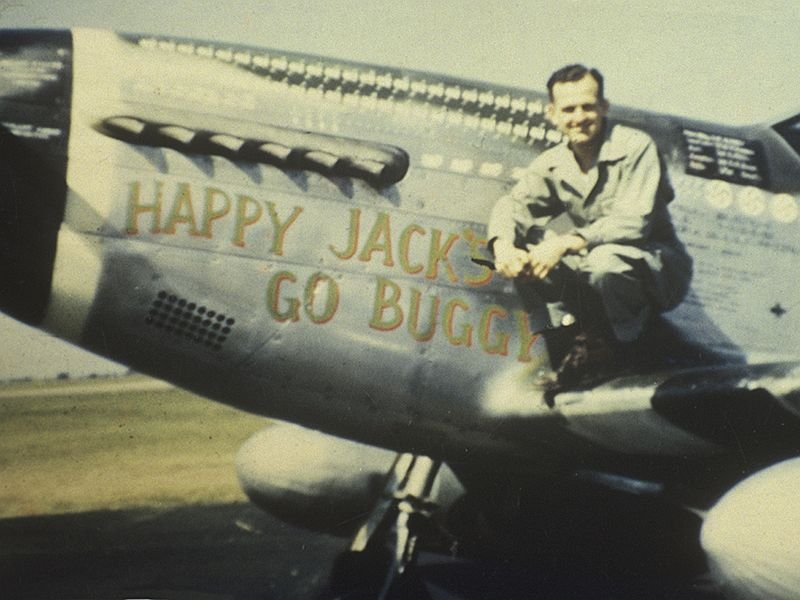
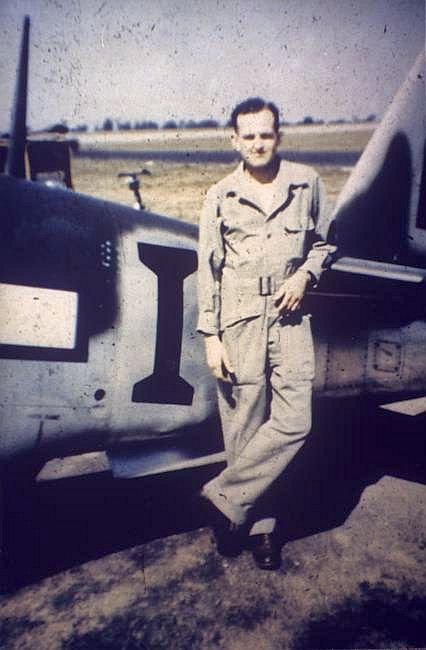
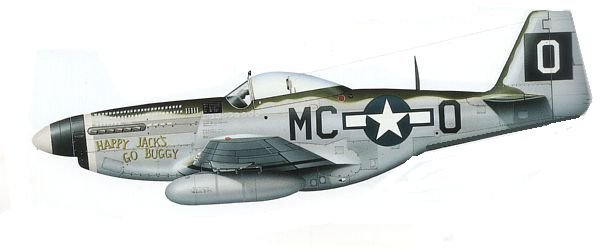
Agreed Carl. The only decals I know of for this a/c are the one's from Draw Decals. They are okay for one that you might see at air shows but aren't accurate for the WW II a/c. They provide a "I" for the squadron markings and the WW II bird was "O". Also, the WW II a/c was a earlier "D" without the tail fillet. So those two things are inaccurate on the Draw sheet. They are however great decals and do have good personal markings for the name, mission markings and the first two letters of the squadron ID ( "MC"). To do a accurate WW II bird the Tamiya, and Revell, kits are good since they come with both tails. Clear as mud Carl? LOL CHANGE OF PLANS: After doing some "research" I find that MC-O was lost and Ilfrey evaded capture and returned to England in 6 days! He was allowed to go back on ops and his NEW P-51 was "I" which was a P-51D-5 w/no dorsal fillet. It also had invasion stripes so the Draw Decals are correct except for the dorsal fillet. So now I plan to do "I".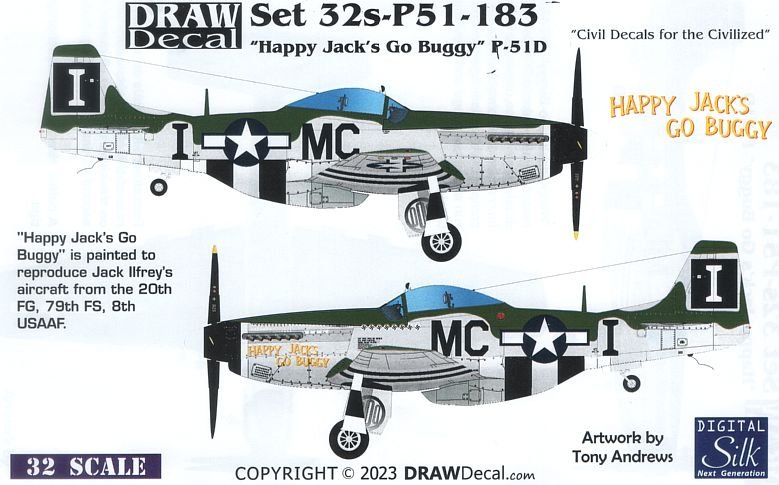

-
Should make a nice looking model. Change of plans: "I" is now the one I'll do.

-
Sounds like some marginal airplanes Ernie. How was their mechanical condition? Let me know how the Valom kit stacks up as I don't want to waste any $$$ on one if it's as crappy as the old William's Bros. kit.
-
LOL Ernie. I'm glad you like it. I initially planned to do it in NMF but decided on the OD/Gray instead. I'm going to see about the Valom kit and if it's a better kit I'll see about getting one and doing it in NMF. Should look good next to this one.
-
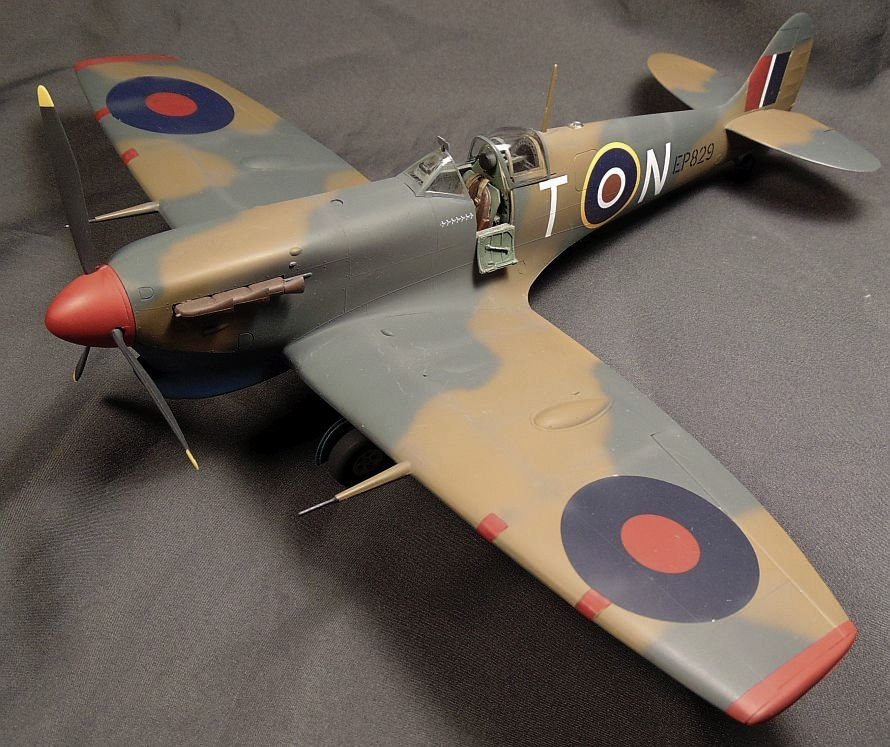
Spitfire Mk VIII RFI
JohnB replied to JohnB's topic in LSM 1/32 and Larger Aircraft Ready for Inspection
Thank you! I'm glad you like my work. -
Hasegawa 1/32 Spitfire Mk V Malta
JohnB replied to JohnB's topic in LSM 1/35 and Larger Work In Progress
Thanks Peter! -
Spitfire Mk V Malta finished
JohnB replied to JohnB's topic in LSM 1/32 and Larger Aircraft Ready for Inspection
Thank you Peter. I'm glad you like it. -
Spitfire Mk V Malta finished
JohnB replied to JohnB's topic in LSM 1/32 and Larger Aircraft Ready for Inspection
Thanks Dennis. I'm glad you like the results of my efforts. -
Hasegawa 1/32 Spitfire Mk V Malta
JohnB replied to JohnB's topic in LSM 1/35 and Larger Work In Progress
Finished with this one. https://forum.largescalemodeller.com/topic/19648-spitfire-mk-v-malta-finished/ -
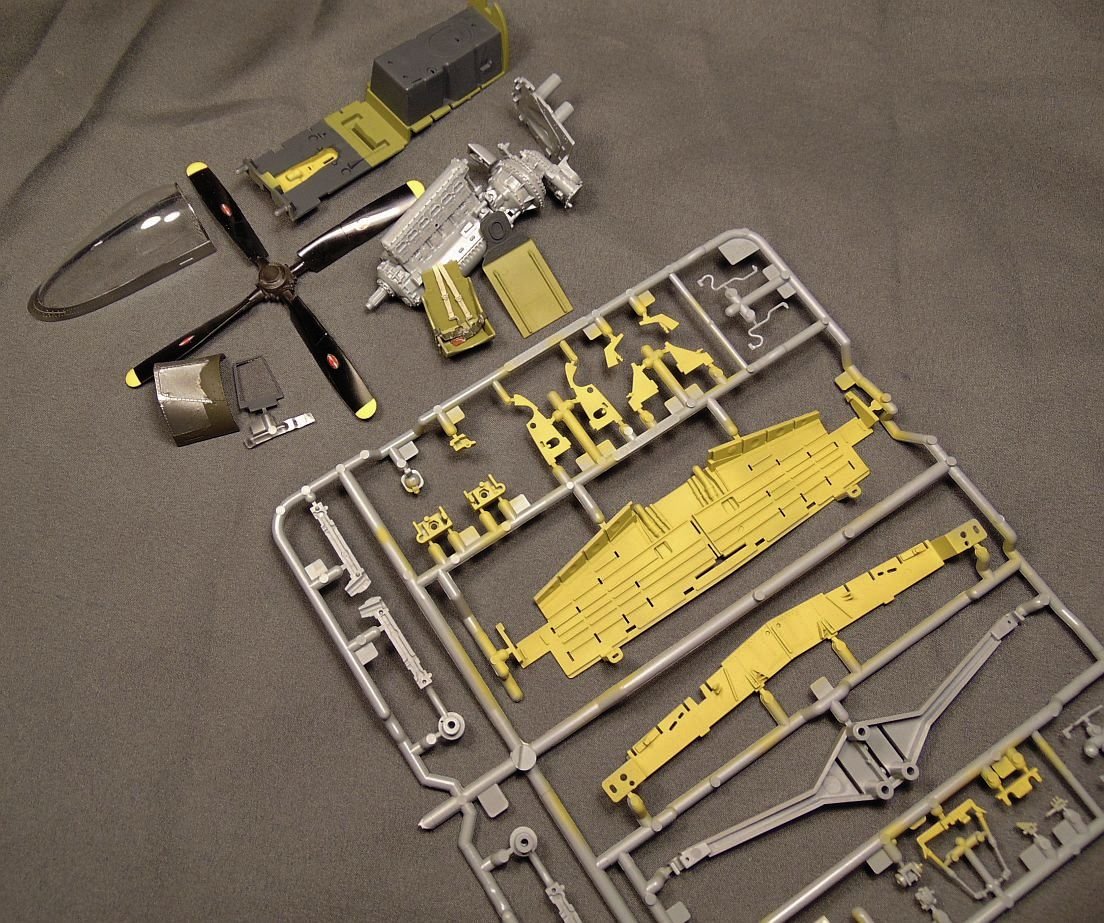
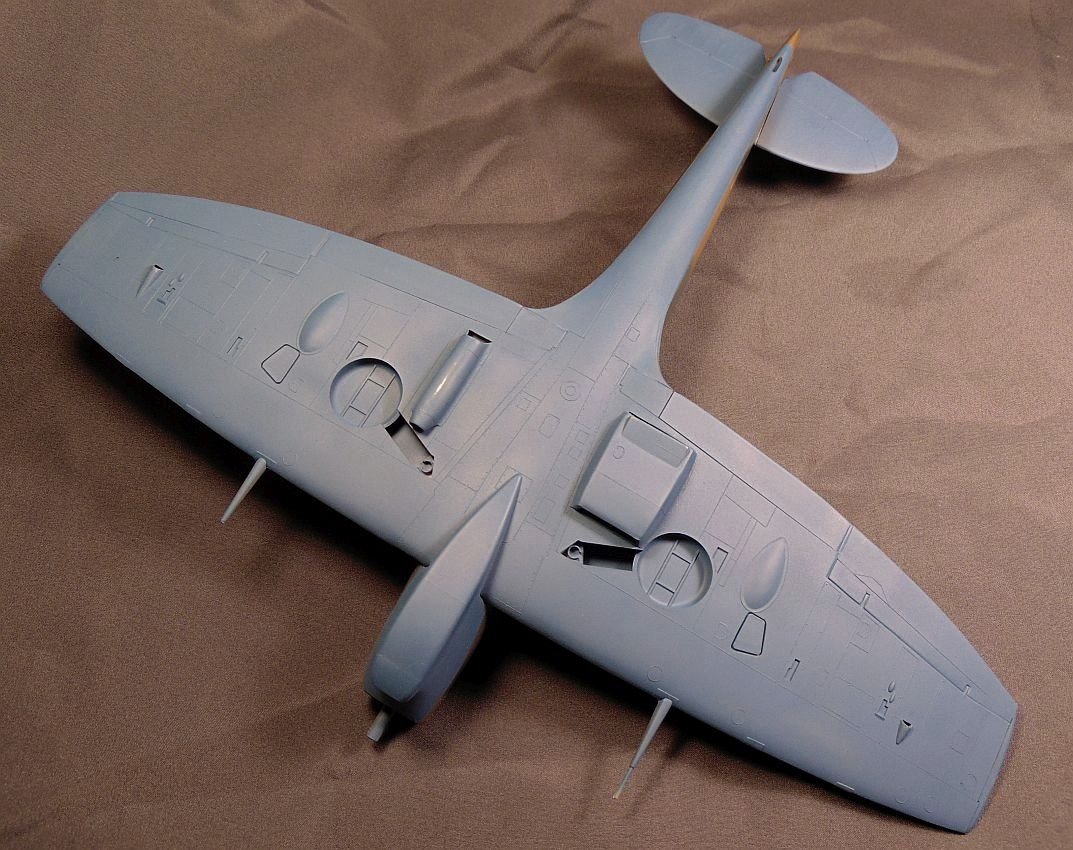
This is the OLD Hasegawa kit that has been on my shelf for a long time. I decided it was time to go on and build it. A VERY basic kit but accurate in outline and dimensions plus the parts fit okay. I replaced the kit cockpit with a Aires set which has much better detail, etc. Otherwise it's OOB except for the Xtradecal squadron markings and national markings from my decal stash. The Dark Mediterranean Blue undersides are Mr. Color Intermediate Blue which I think is fairly close. The uppers are Xtracolor while the interior is MM RAF Interior Grey Green. I found several different photos and art for this a/c and ALL were different. So I decided to build it like this with Volks filter and clipped wings. A easy build for sure. I hope you like it but, I have to say, I'm not entirely happy with it. For some reason it just doesn't appeal to me all that much. Go figure.......


-
Thank you Chris. It was way over due to be finished, etc.
-
Hasegawa 1/32 Spitfire Mk V Malta
JohnB replied to JohnB's topic in LSM 1/35 and Larger Work In Progress
LOL Bill. -
1/32 Advanced Training Unit P-40N
JohnB replied to KUROK's topic in LSM 1/35 and Larger Work In Progress
Looking good! -
Looking real good Peter! Very nice work.
-
Hasegawa 1/32 Spitfire Mk V Malta
JohnB replied to JohnB's topic in LSM 1/35 and Larger Work In Progress
Thanks Dennis. -
Poorly engineered kit for sure Peter. Too bad but I see Valom released one a while back but I don't know much about it. Might be a knockoff of the Williams Bros. kit.
-
Hasegawa 1/32 Spitfire Mk V Malta
JohnB replied to JohnB's topic in LSM 1/35 and Larger Work In Progress
Thank you Peter. I need to do SOMETHING to store all those models. I've started putting some of them in card board boxes and storing them in closets, etc. LOL 🤪 -
Hasegawa 1/32 Spitfire Mk V Malta
JohnB replied to JohnB's topic in LSM 1/35 and Larger Work In Progress
About done with the camo except for a couple of touch ups. The Extra Dark Ocean Grey/Dark Earth/Dark Mediterranean Blue scheme sure makes for a different appearance. (I don't have any Dark Med. Blue so I substituted some Mr. Color Intermediate Blue which, to my eyes, is fairly close. The upper camo is Xtracolor.) Decaling soon!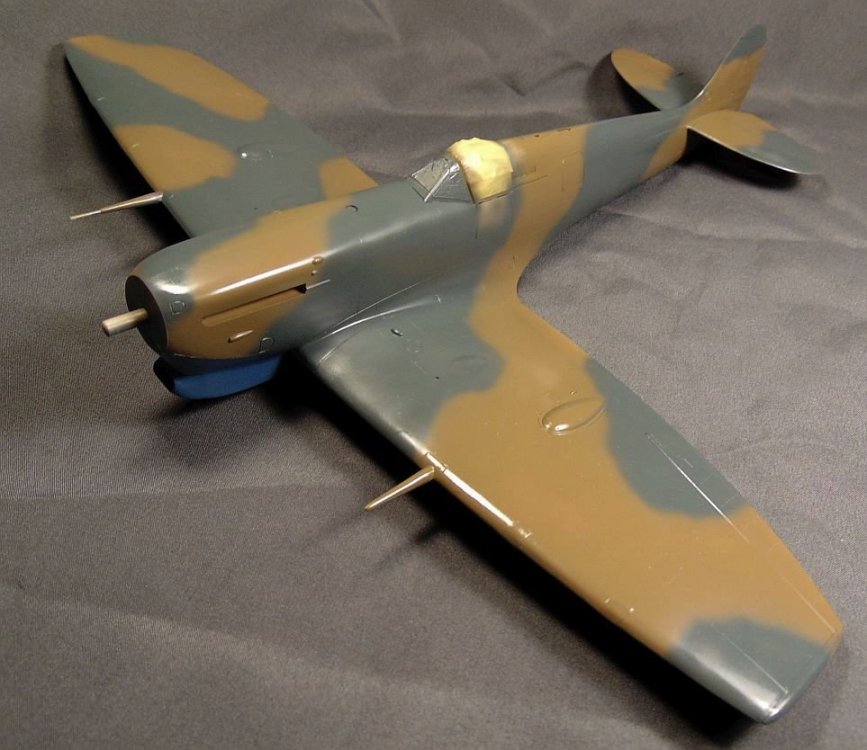

-
WestLand Whirlwind 1/48 Classic AirFrames-Finnished
JohnB replied to KevinM's topic in LSM 1/48 Work in Progress
I don't remember for sure Kevin but I probably glued them to the floor then set that assembly in place. Sounds like a good approach. -
Thanks Peter. I'm glad I was able to save this one from the SOD. It turned out okay.
-
WestLand Whirlwind 1/48 Classic AirFrames-Finnished
JohnB replied to KevinM's topic in LSM 1/48 Work in Progress
I built that kit a few years ago and it turned out very well. I think you will enjoy the build. -
Hasegawa 1/32 Spitfire Mk V Malta
JohnB replied to JohnB's topic in LSM 1/35 and Larger Work In Progress
A nice change from green/grey and dark earth, etc.