CrankyCrafstman
-
Posts
1,350 -
Joined
-
Last visited
Content Type
Profiles
Forums
Events
Gallery
Everything posted by CrankyCrafstman
-
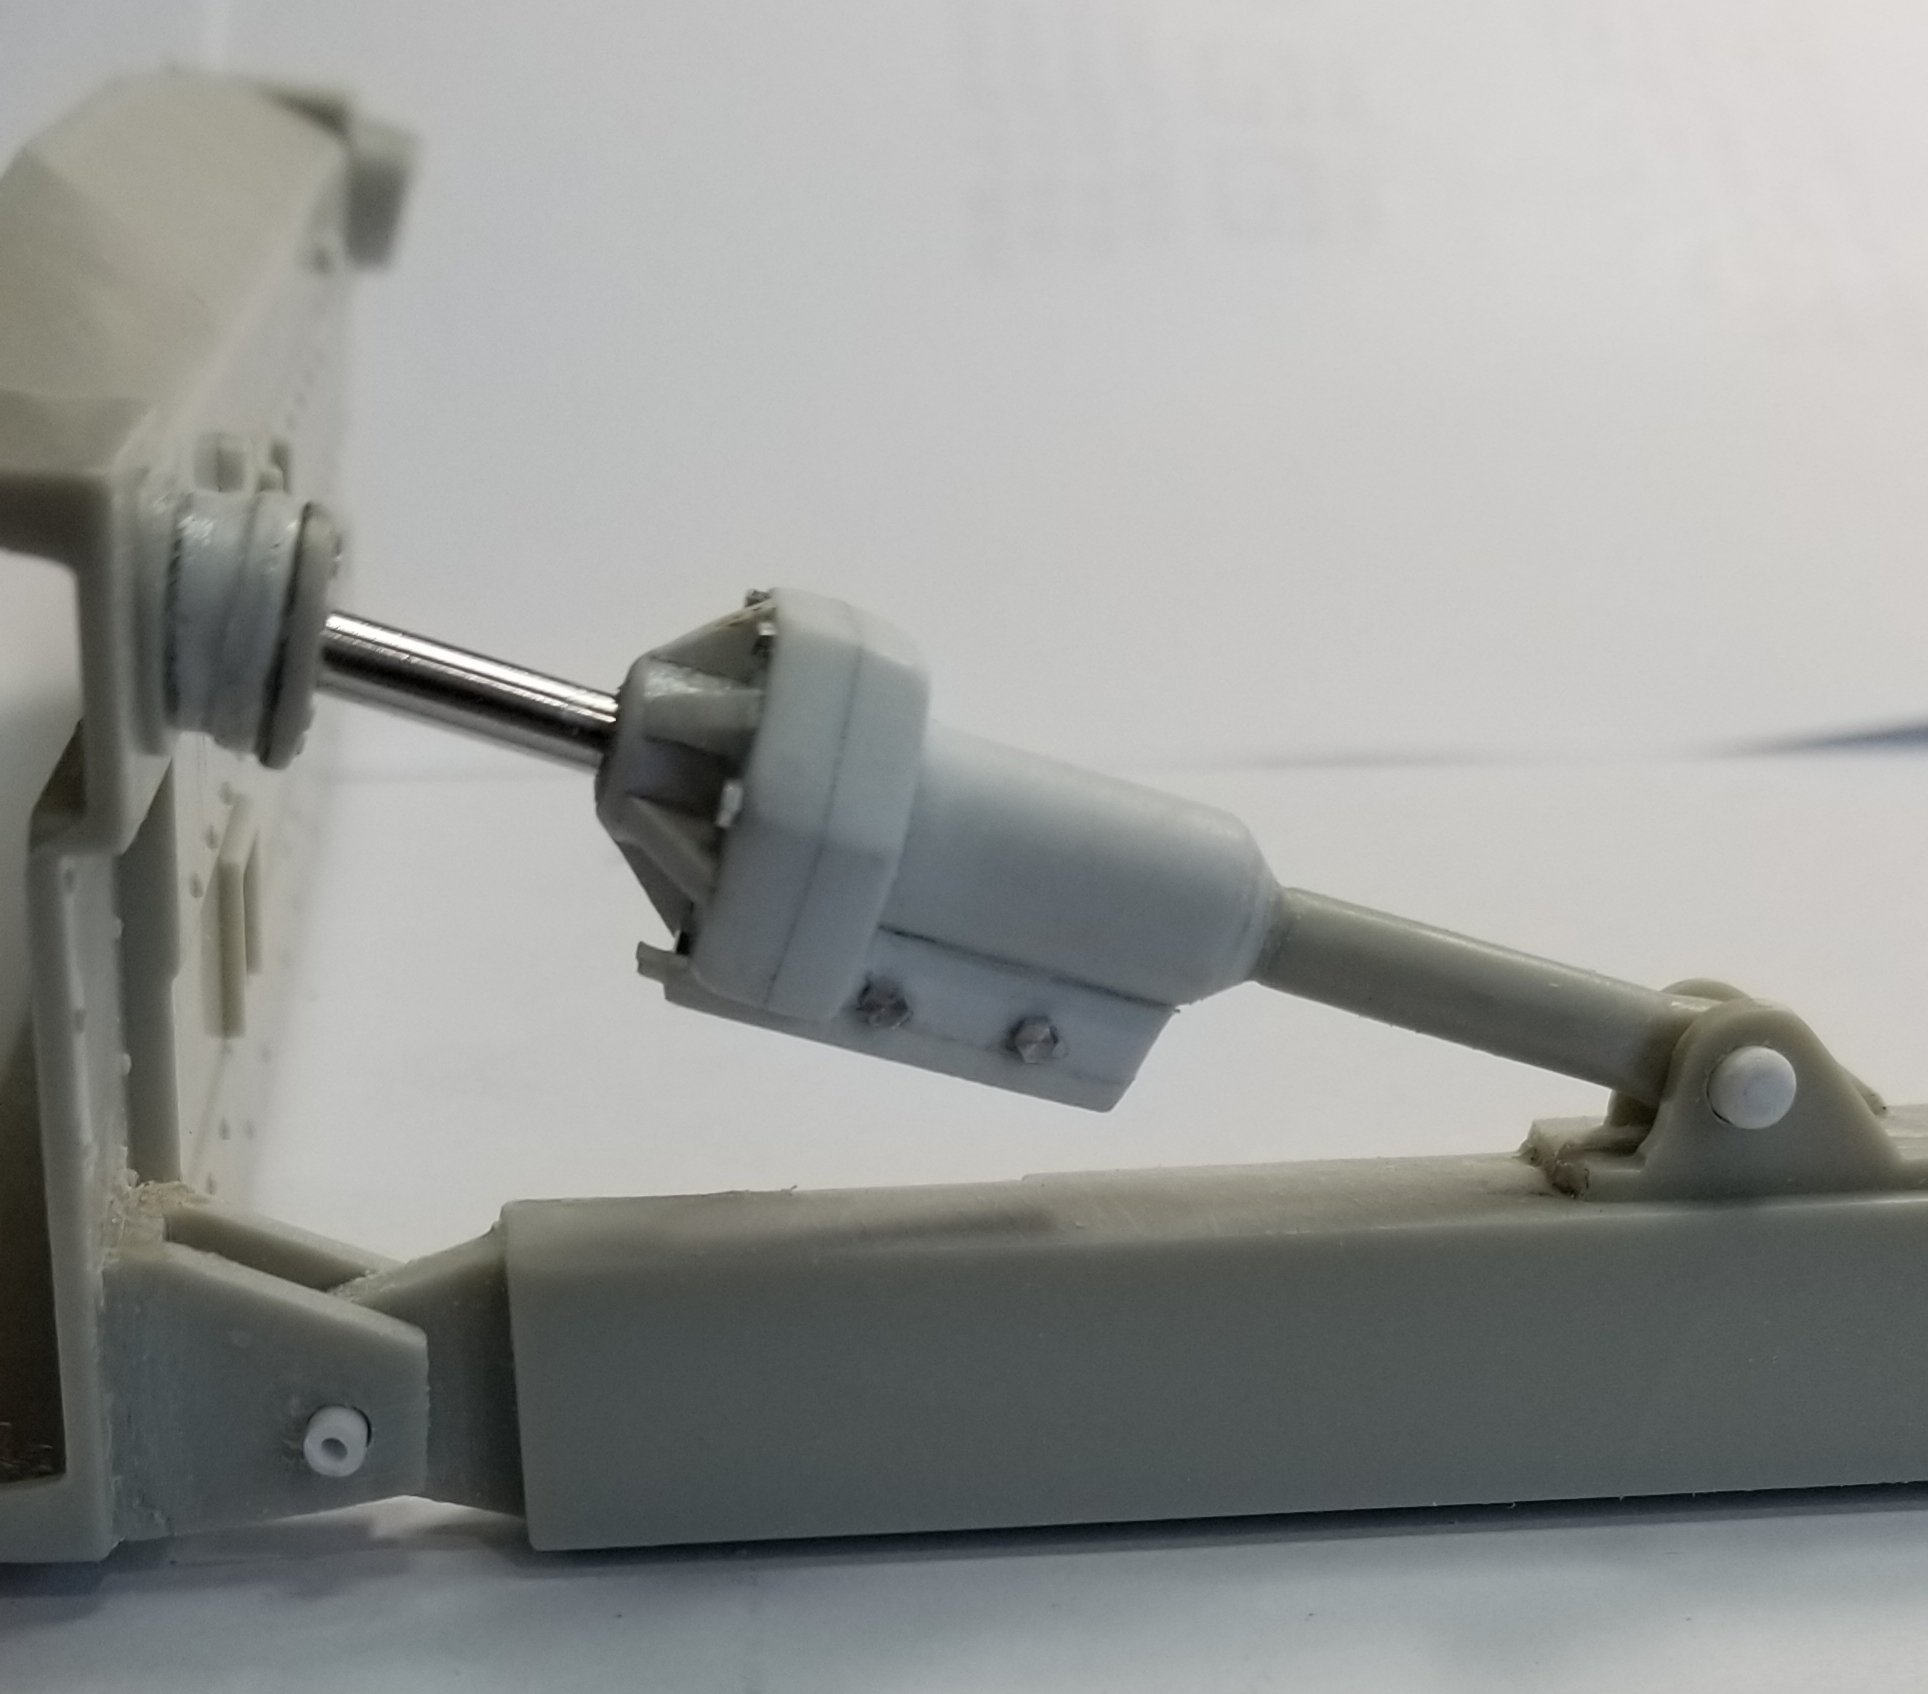
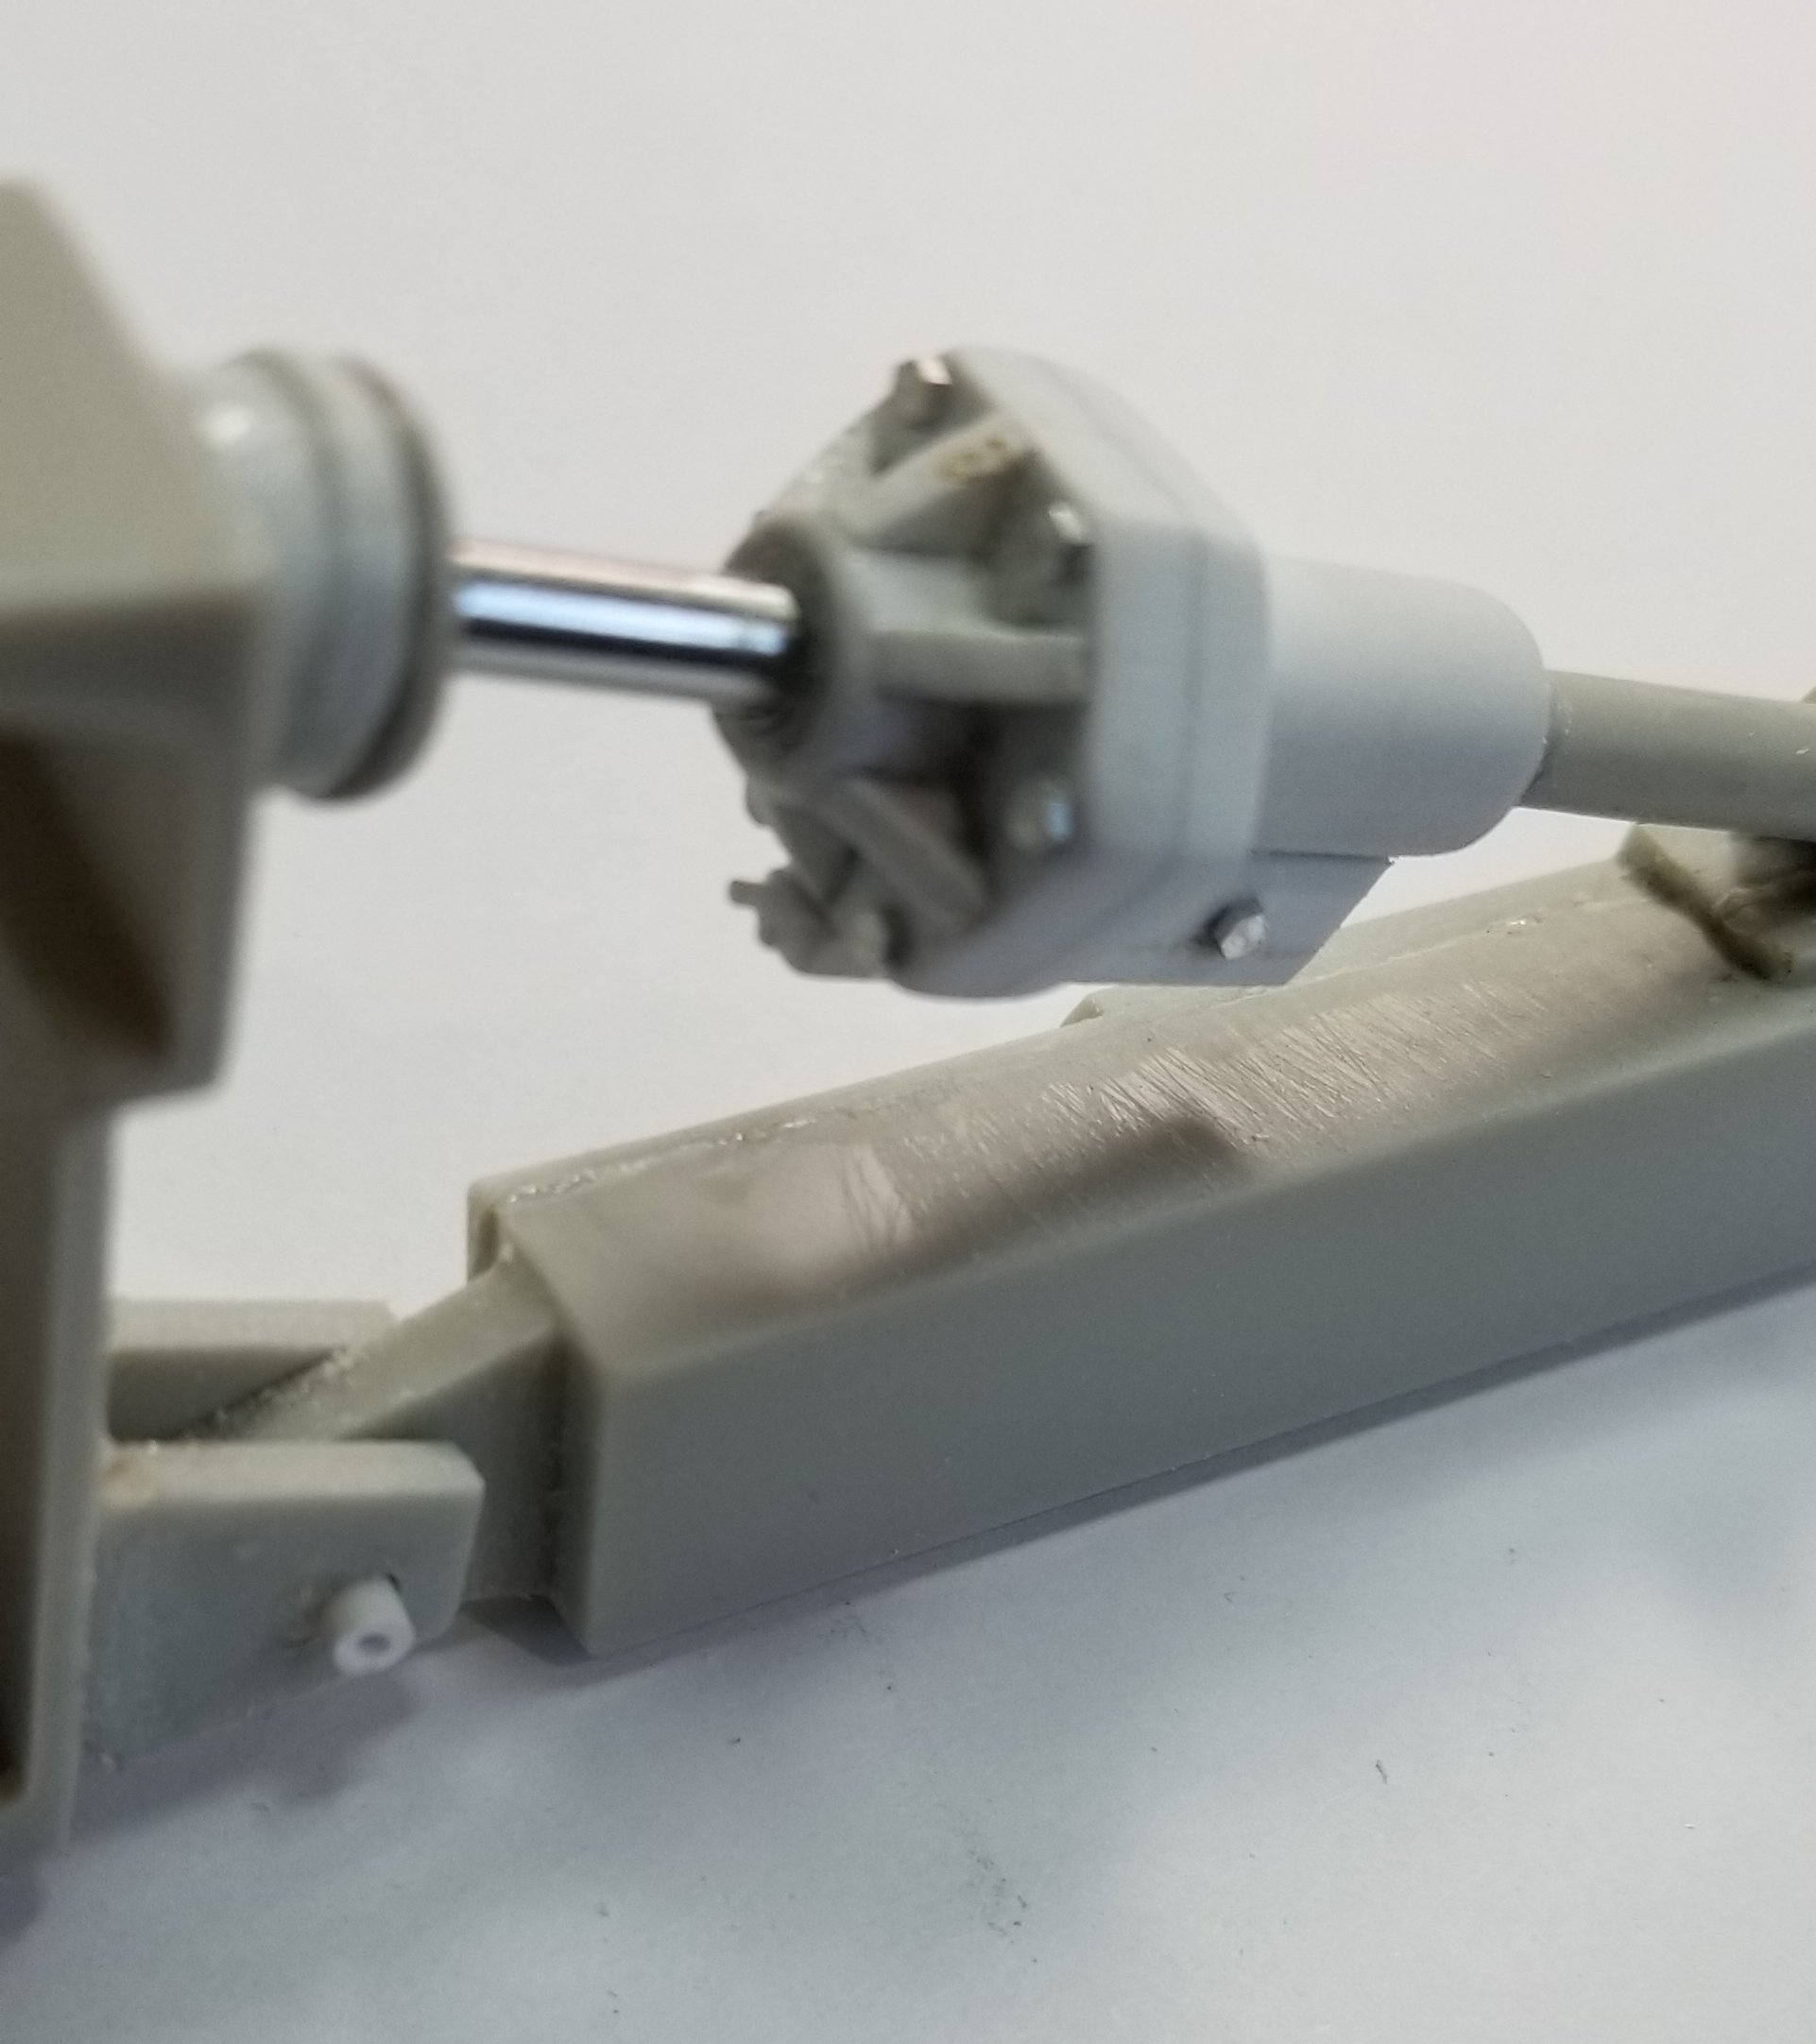
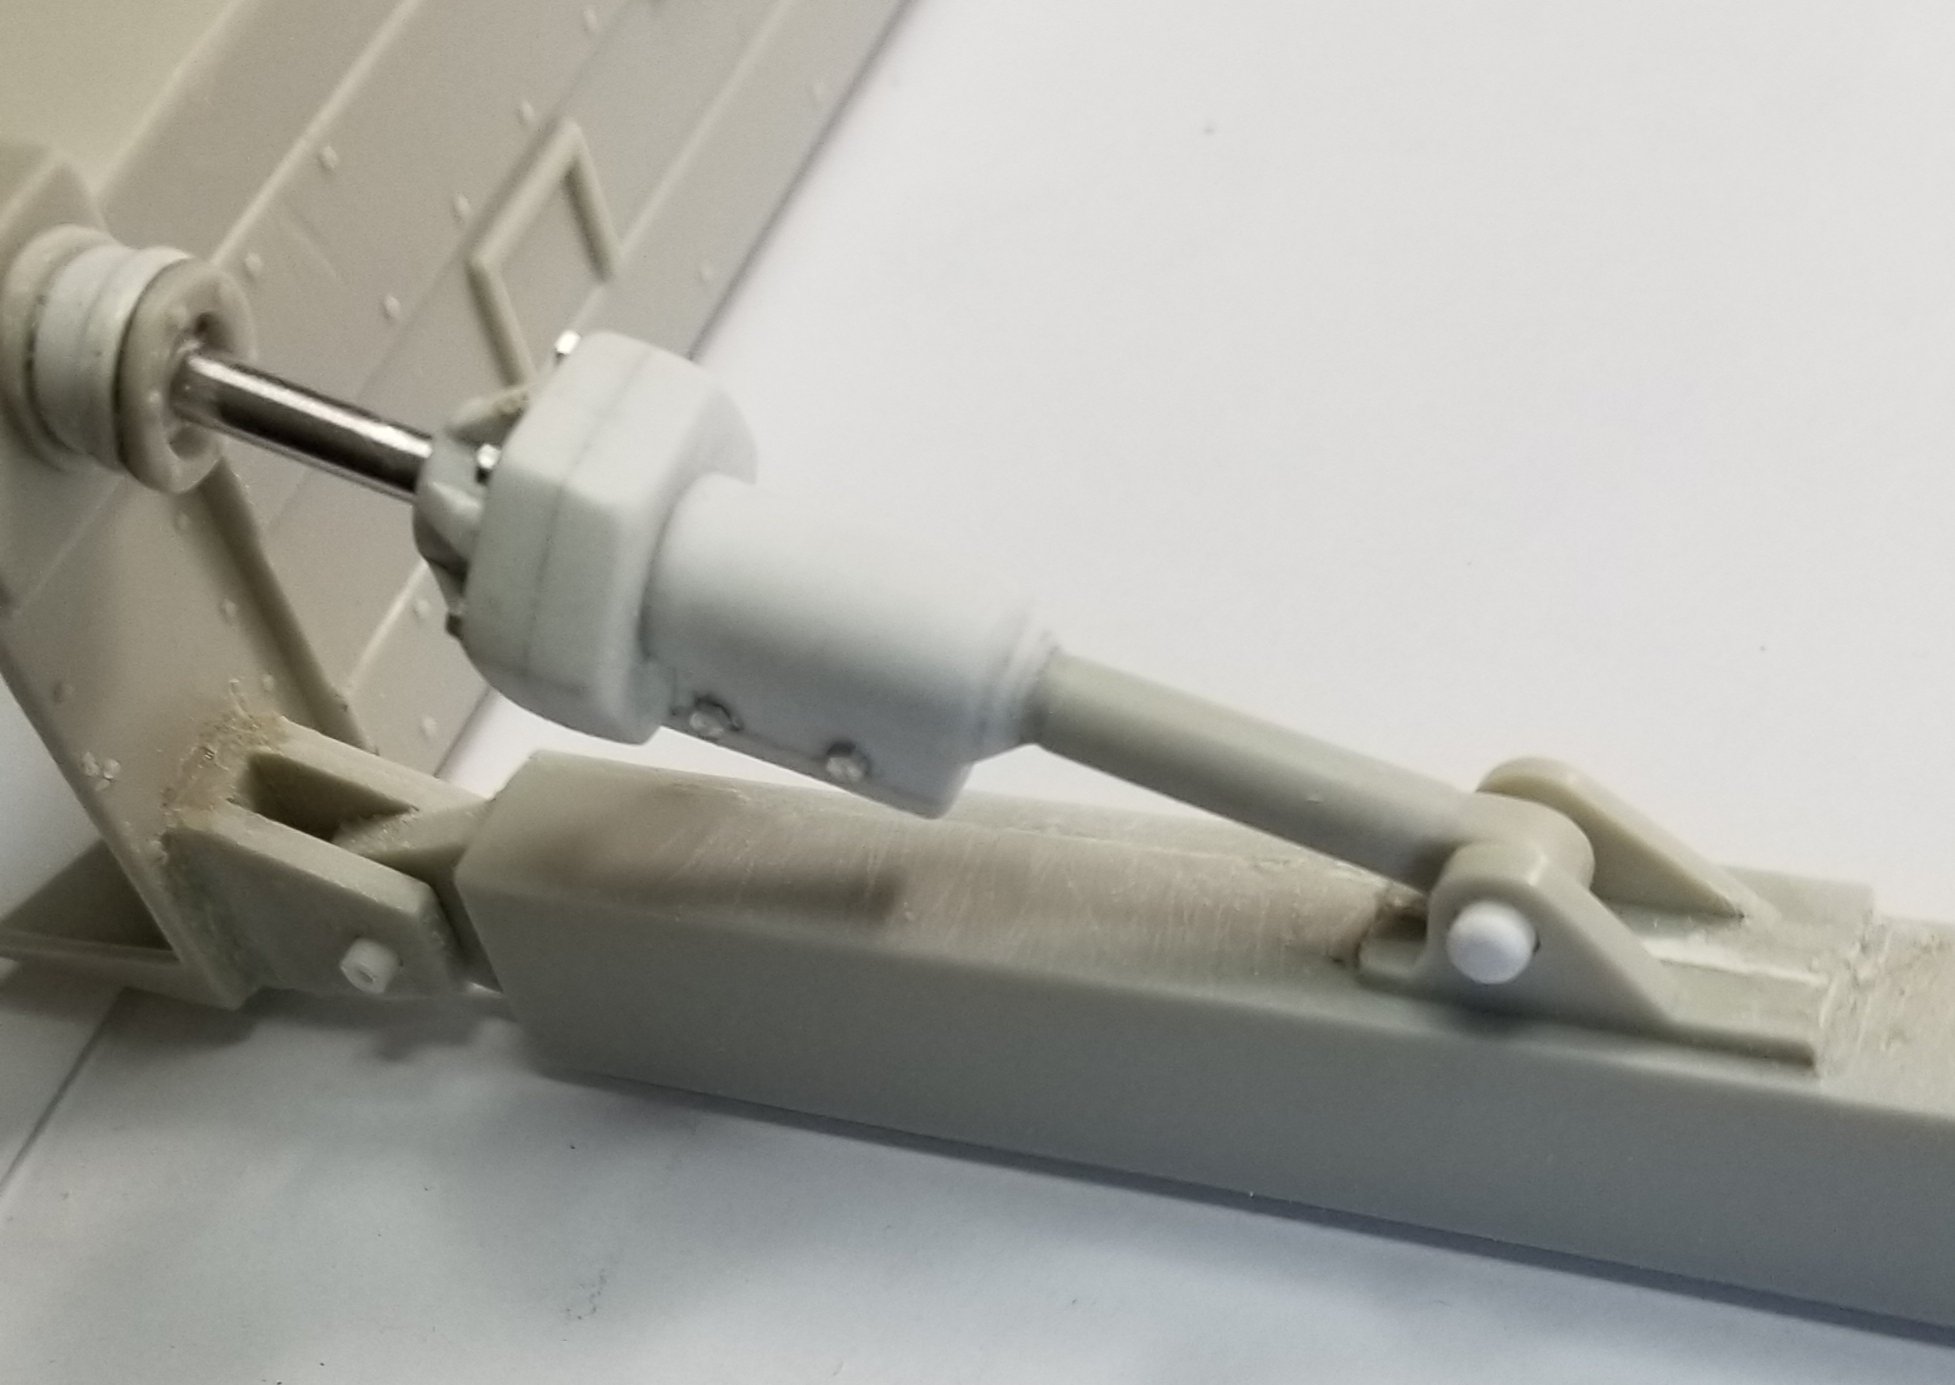
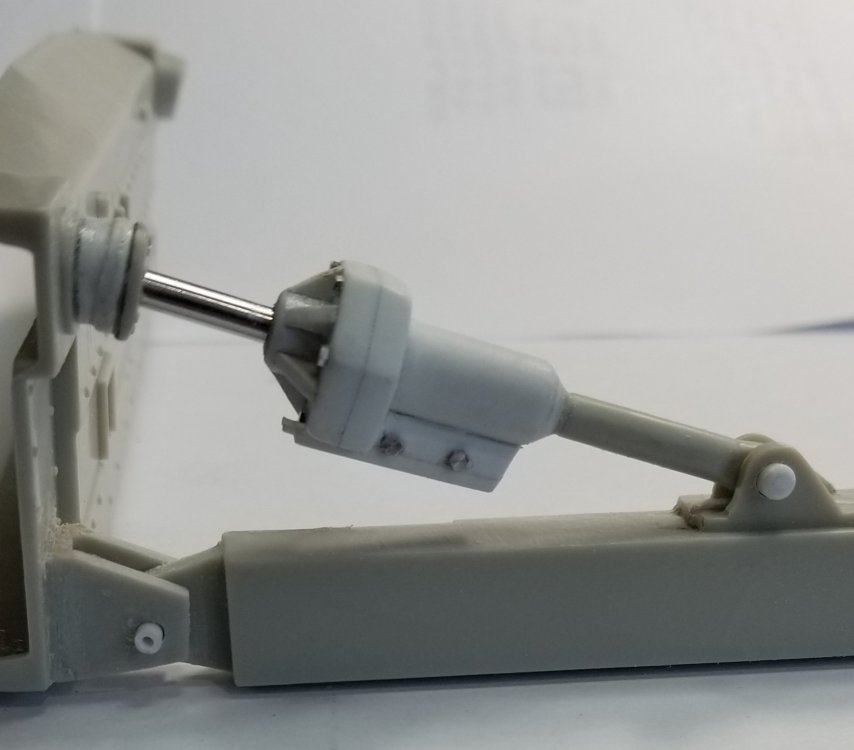
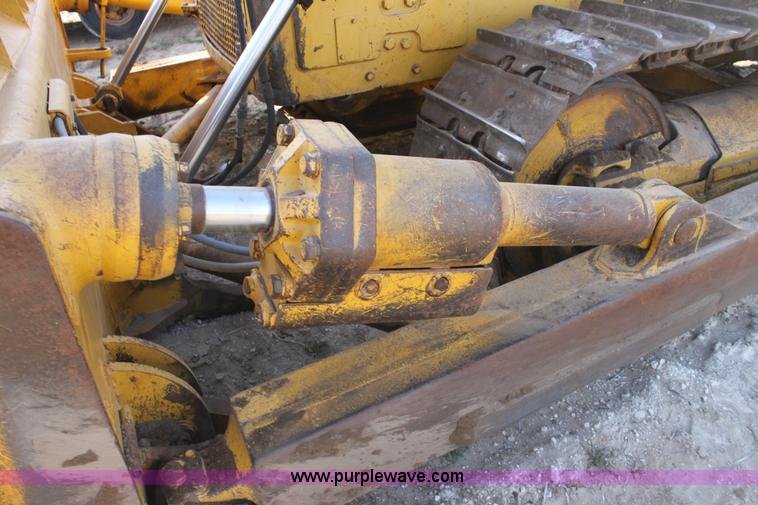
 Hey all Just another small update. I worked on the blade tilt cylinder and the blade connection arms. I cut off all the pins on the kit parts because they were to small for the holes in the connection arms and the small plate pieces that attach the arms to the blade rear piece. I replaced them with 3/32" & 1/8" dia. Plastic rod pins. view showing the left side blade mechanism. this view shows the blade tilt cylinder. this view is of the real thing. close up view of the tilt cylinder, this is totally from scratch. I added the small aluminum nuts, this are from RB Motion. view showing the rear of the tilt cylinder. this is a mock up view. Well that's it for now be back soon with more. Ron G
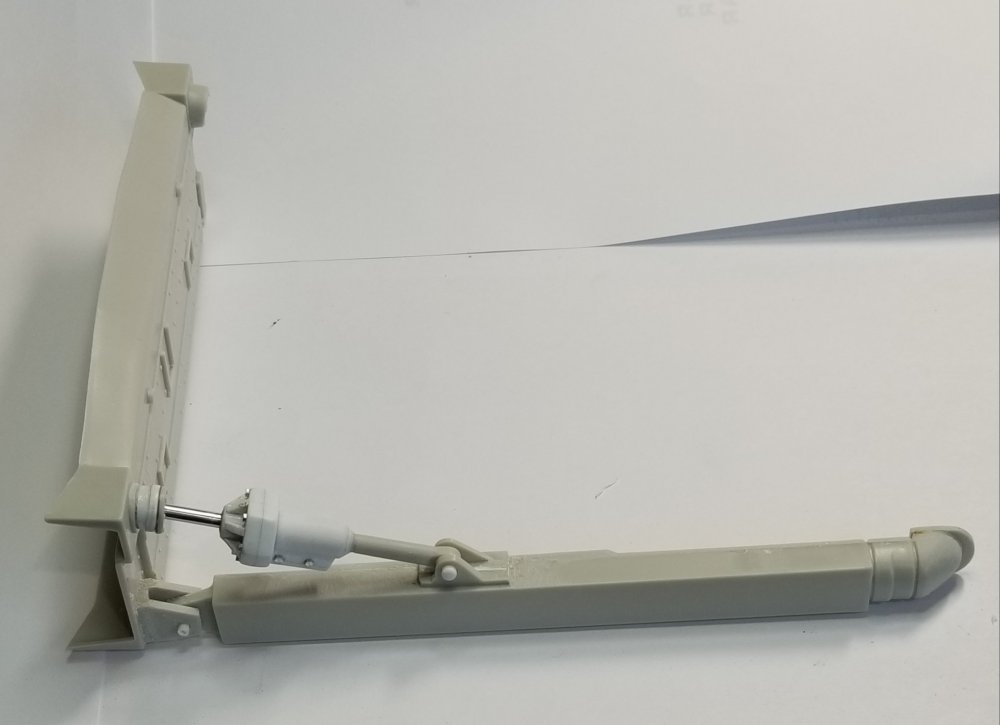


-
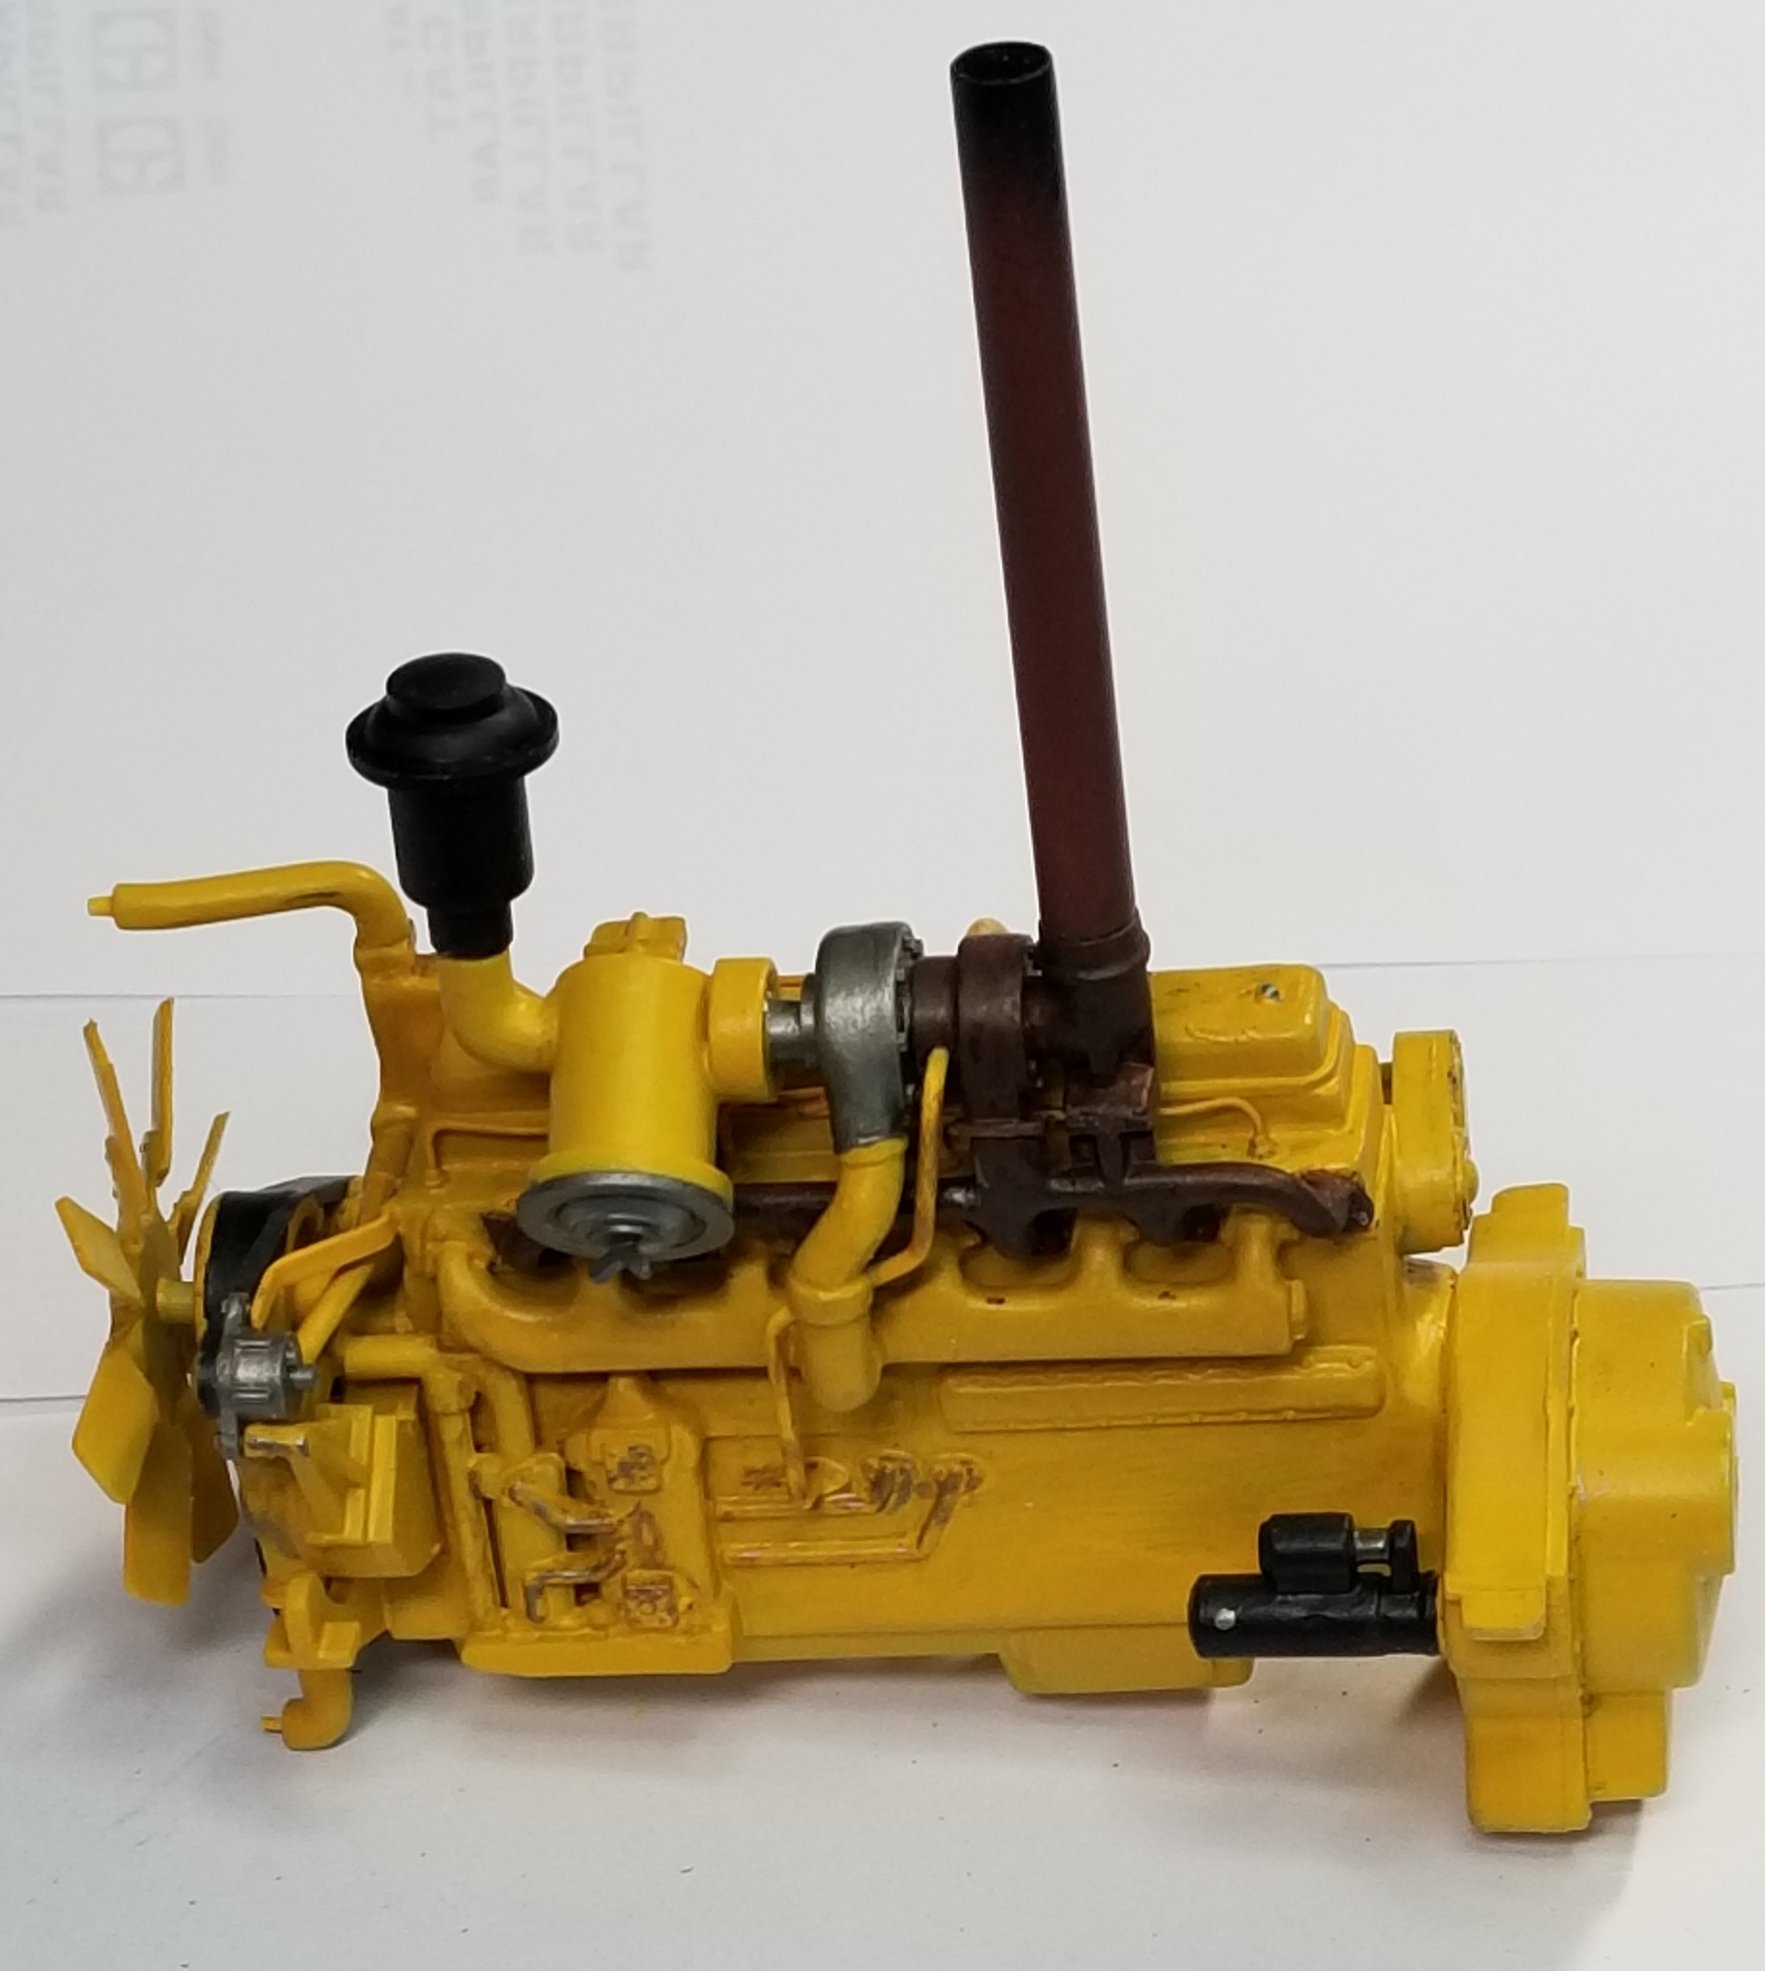
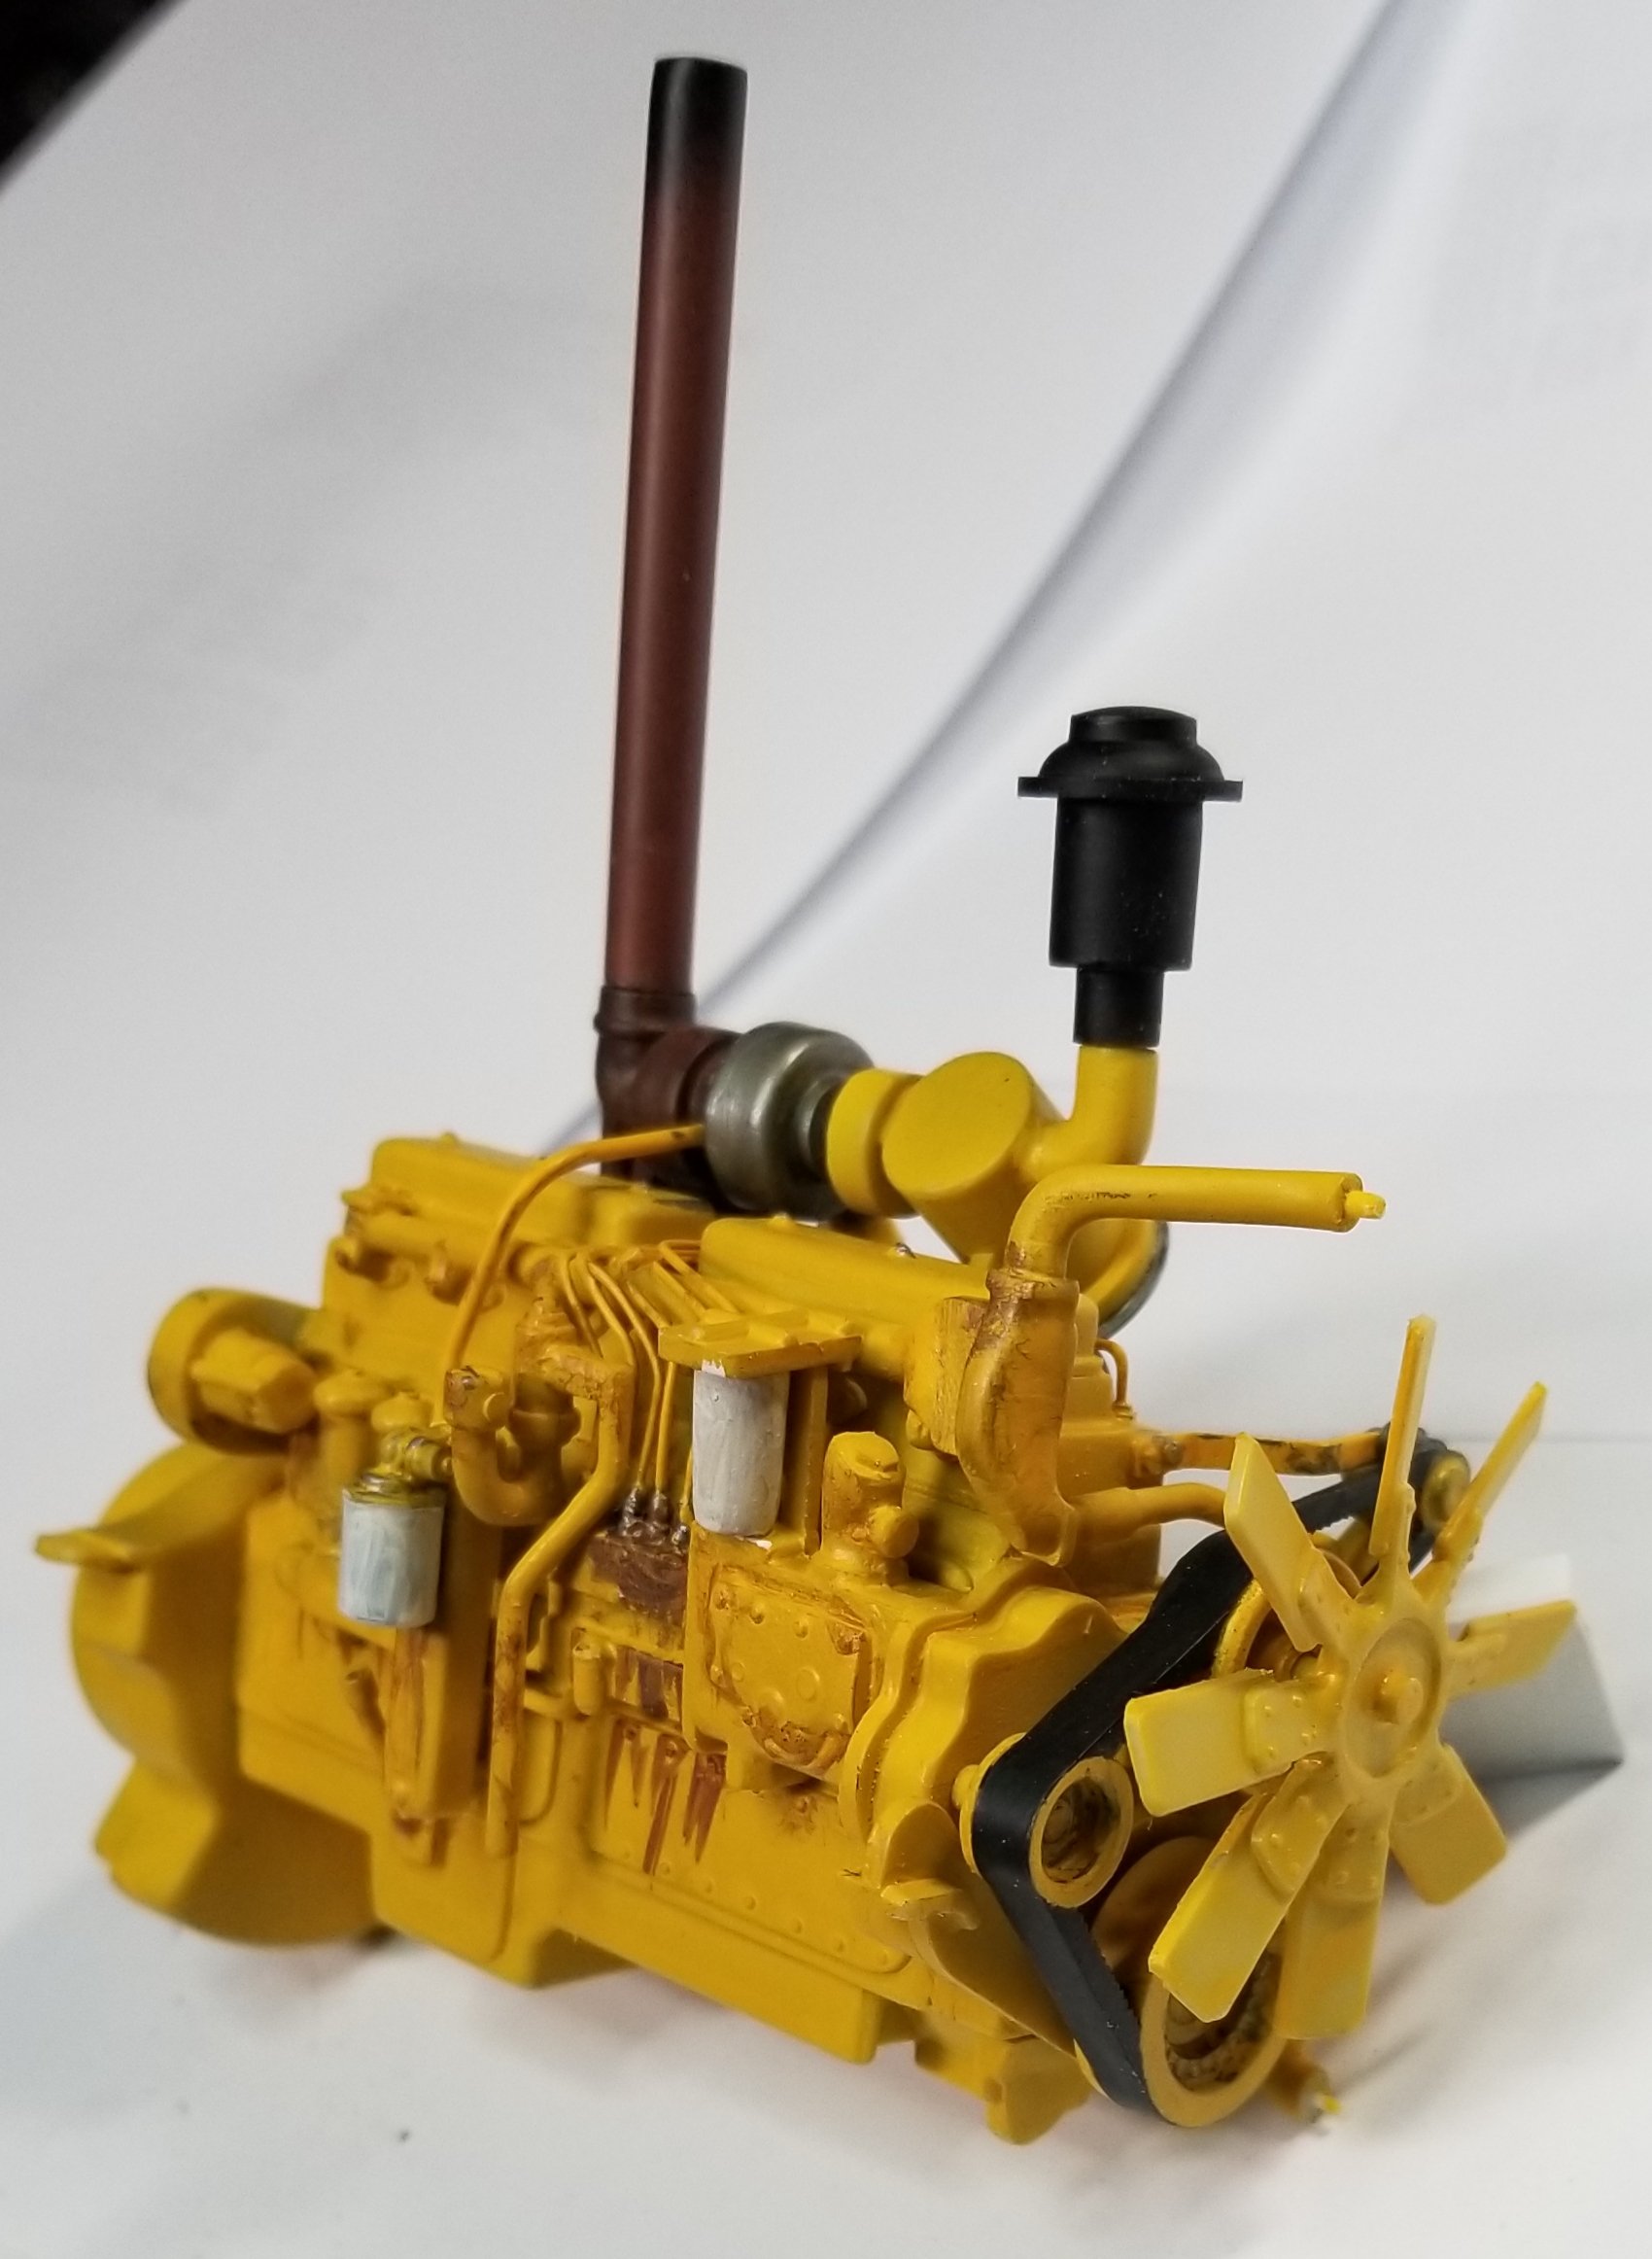
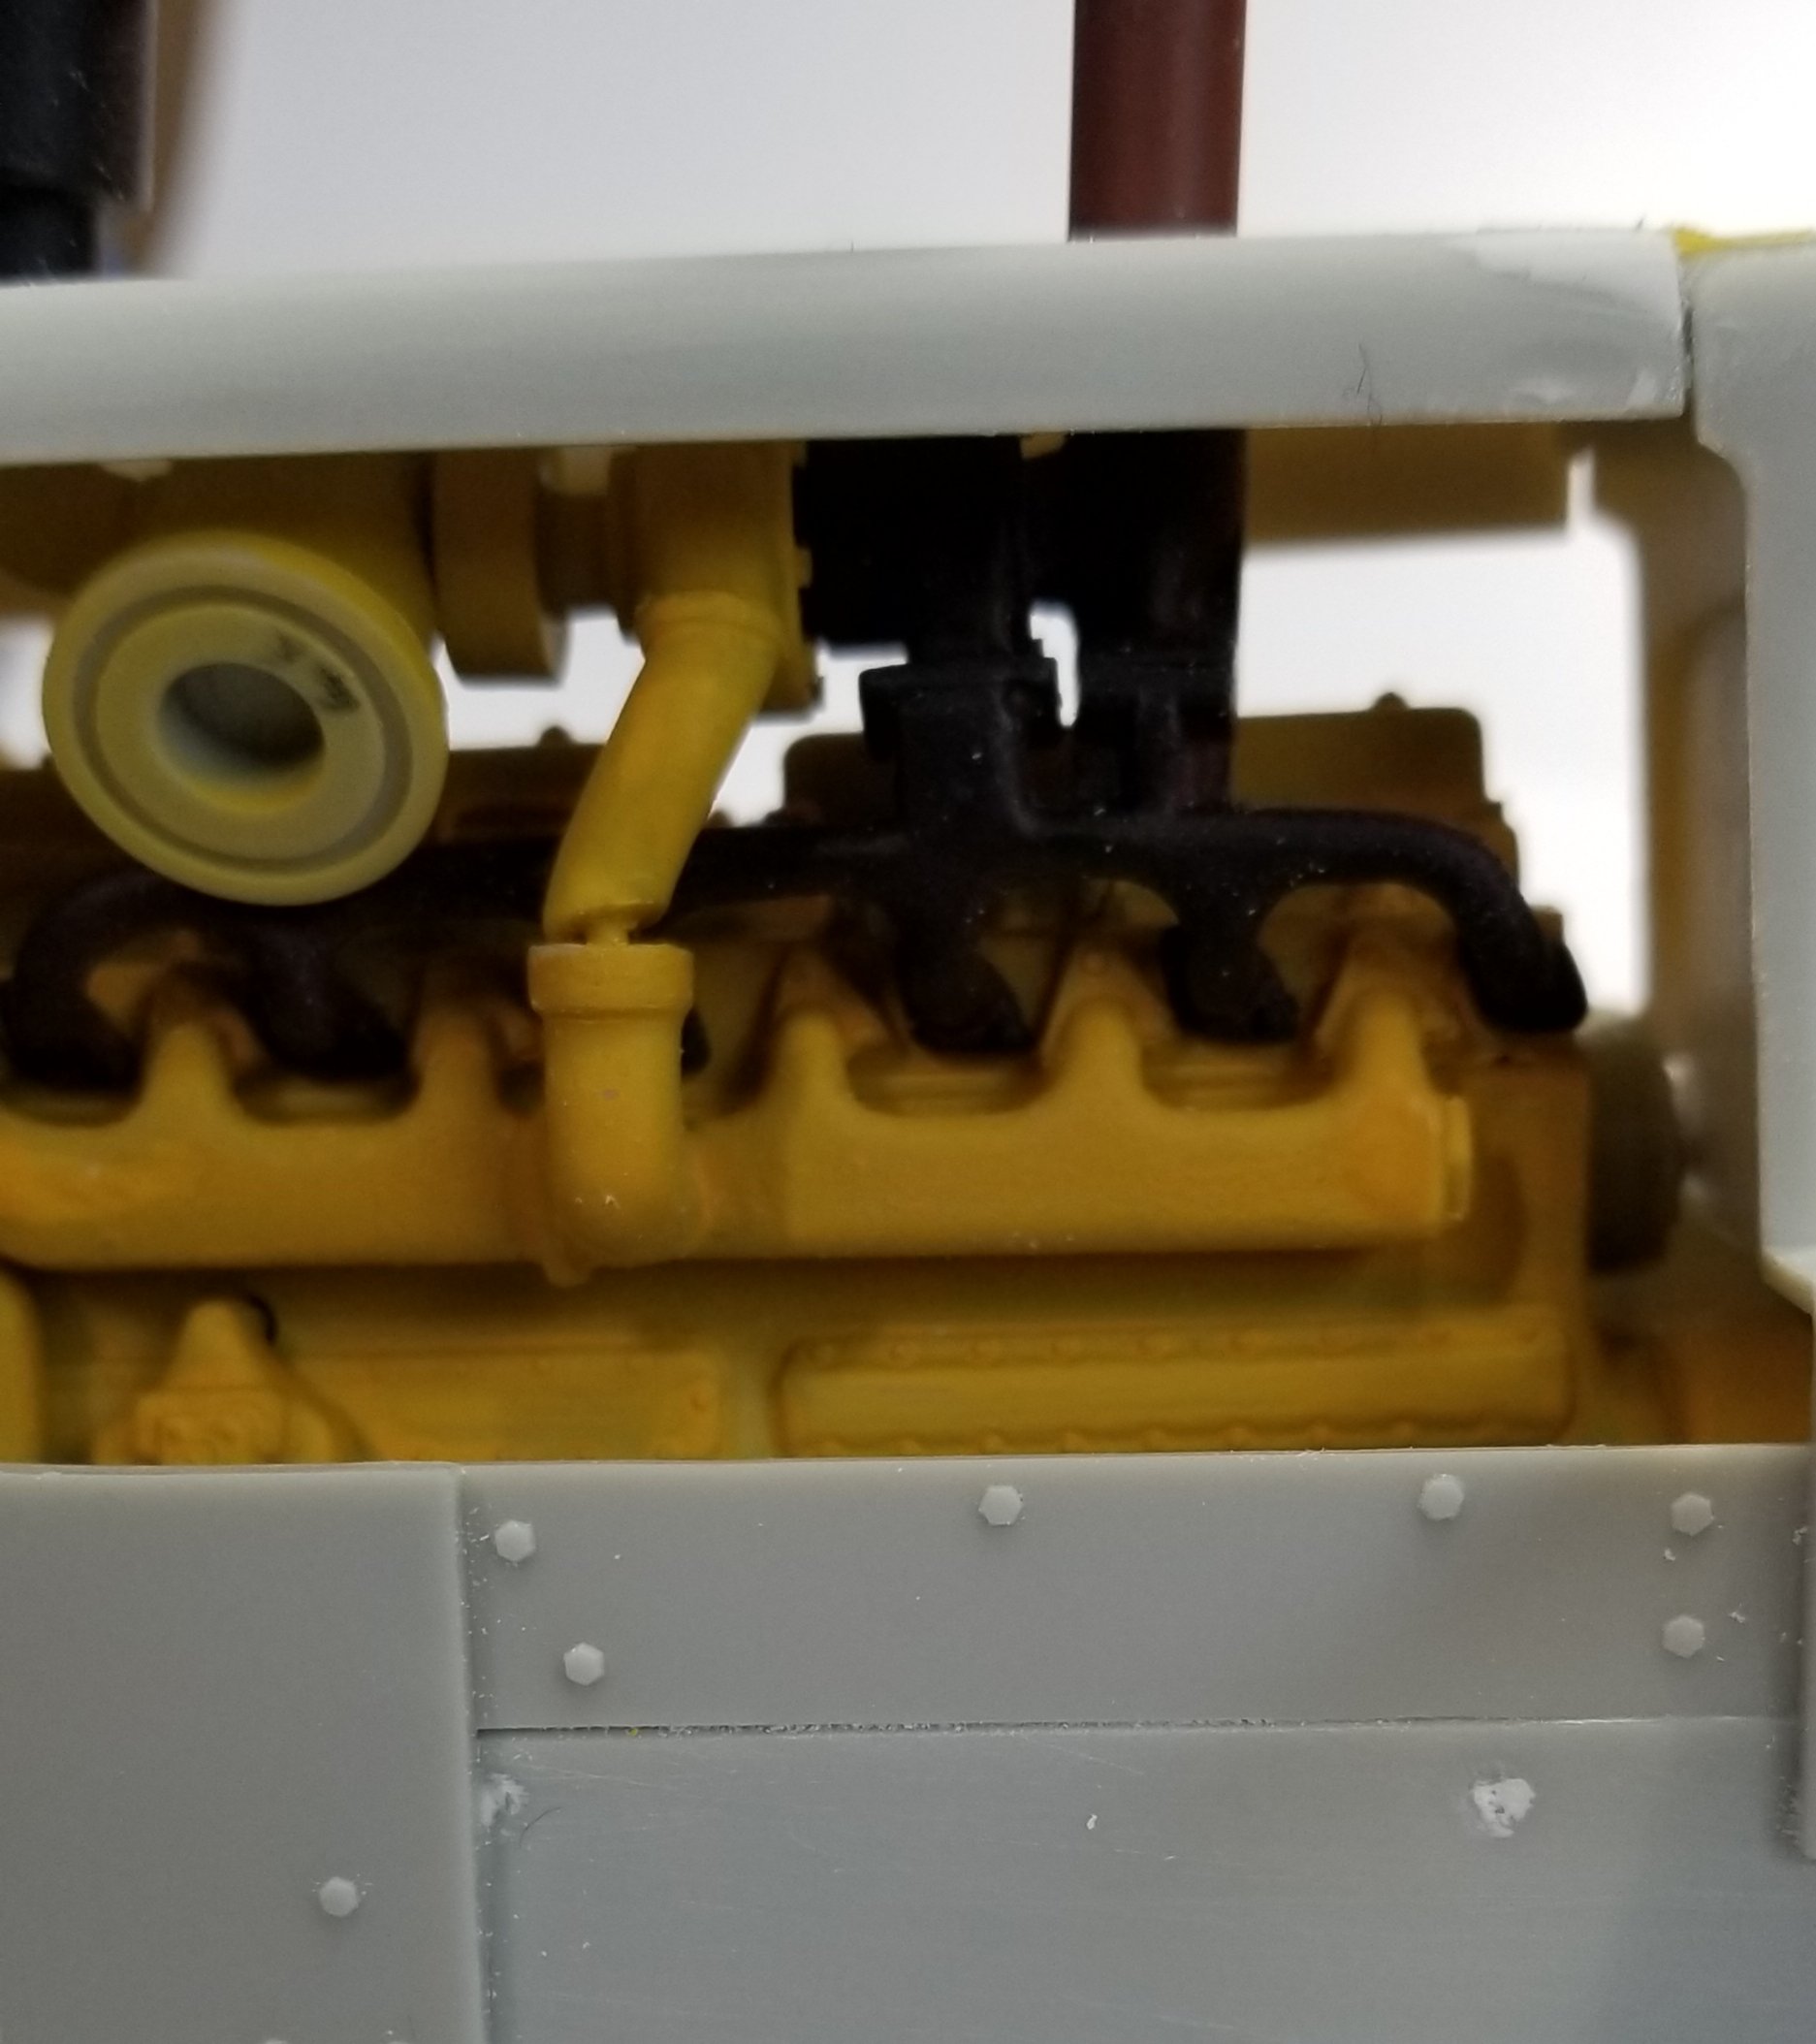
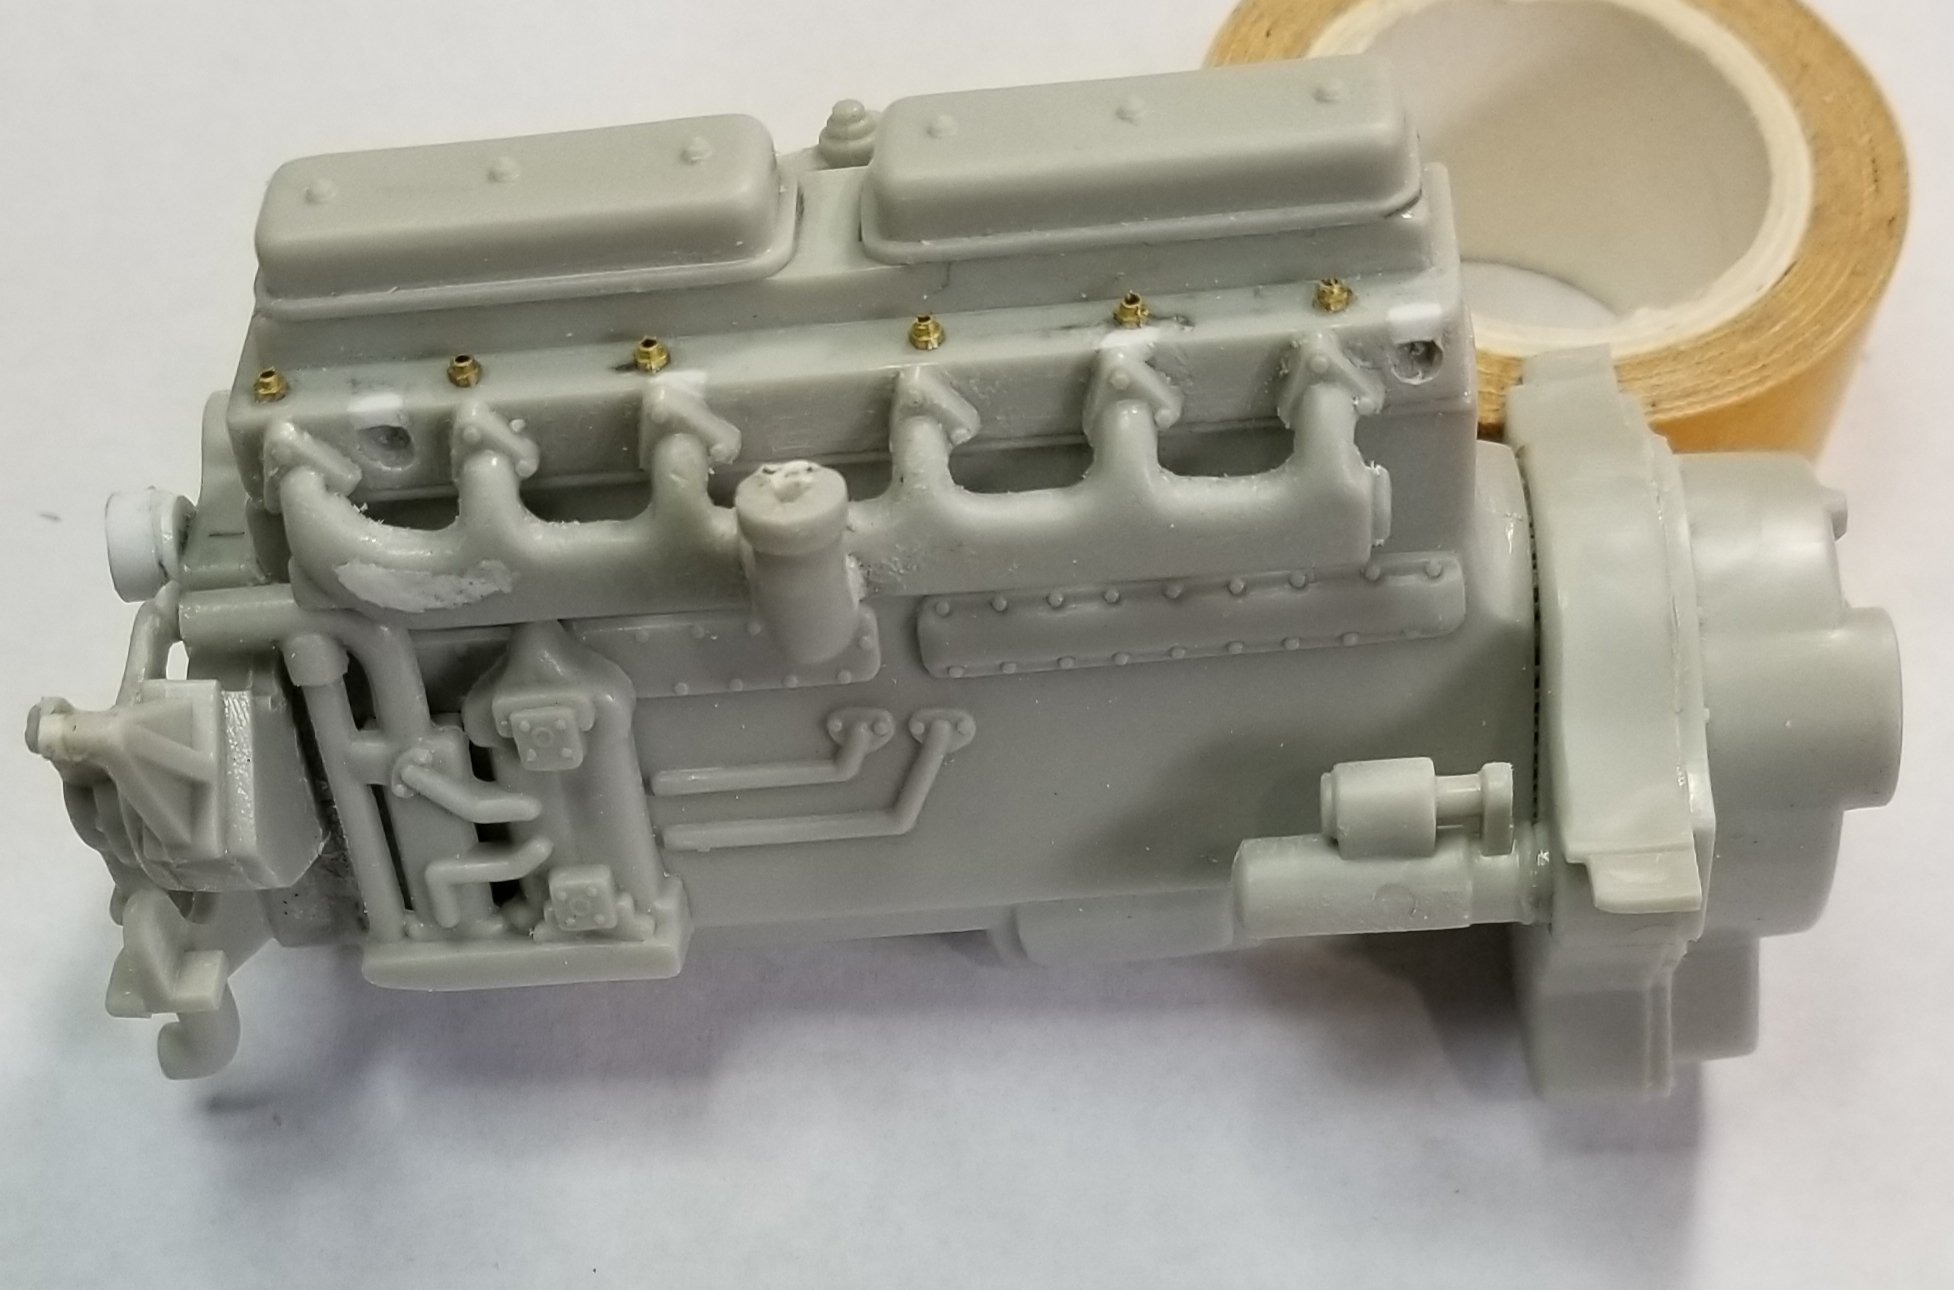
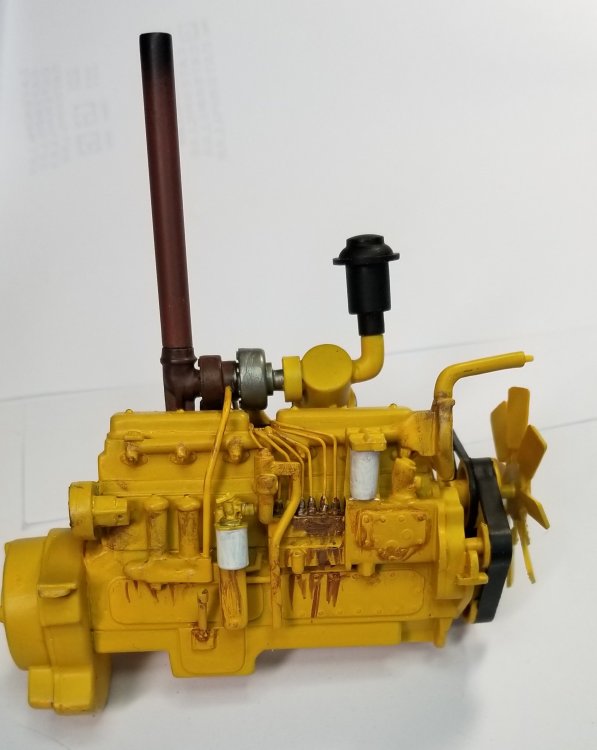
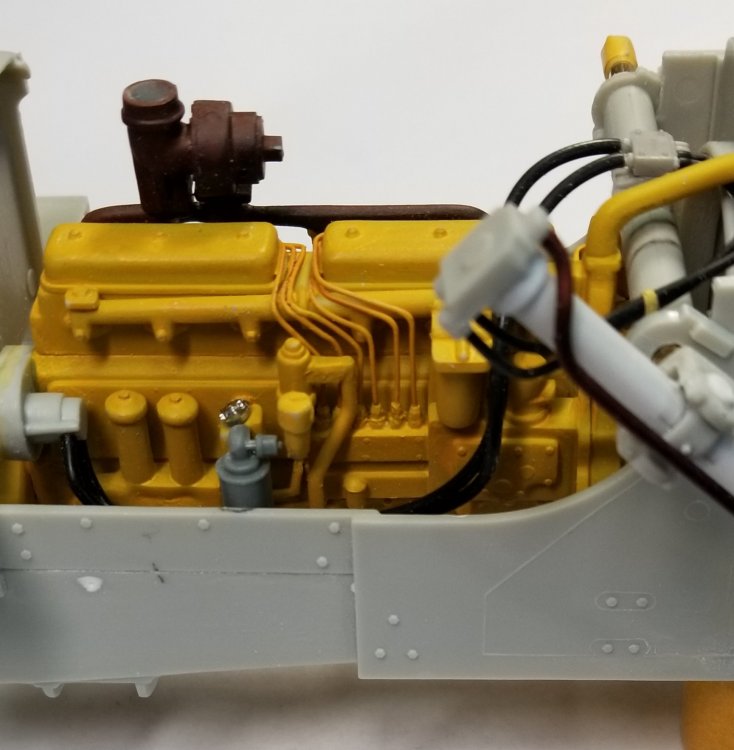
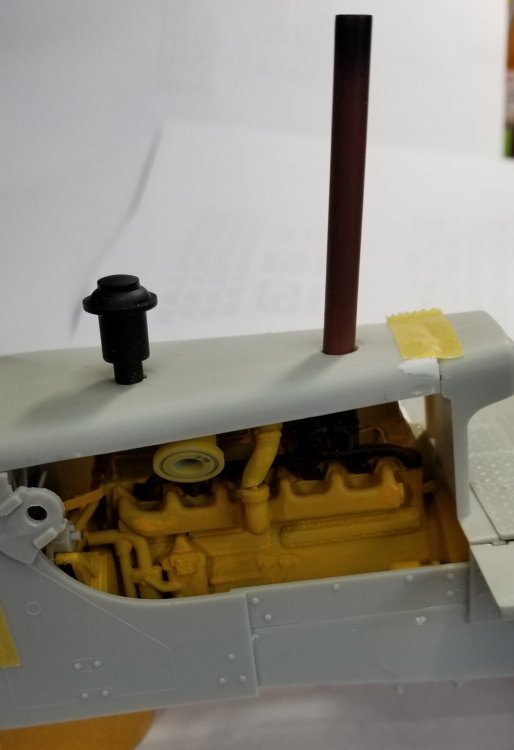
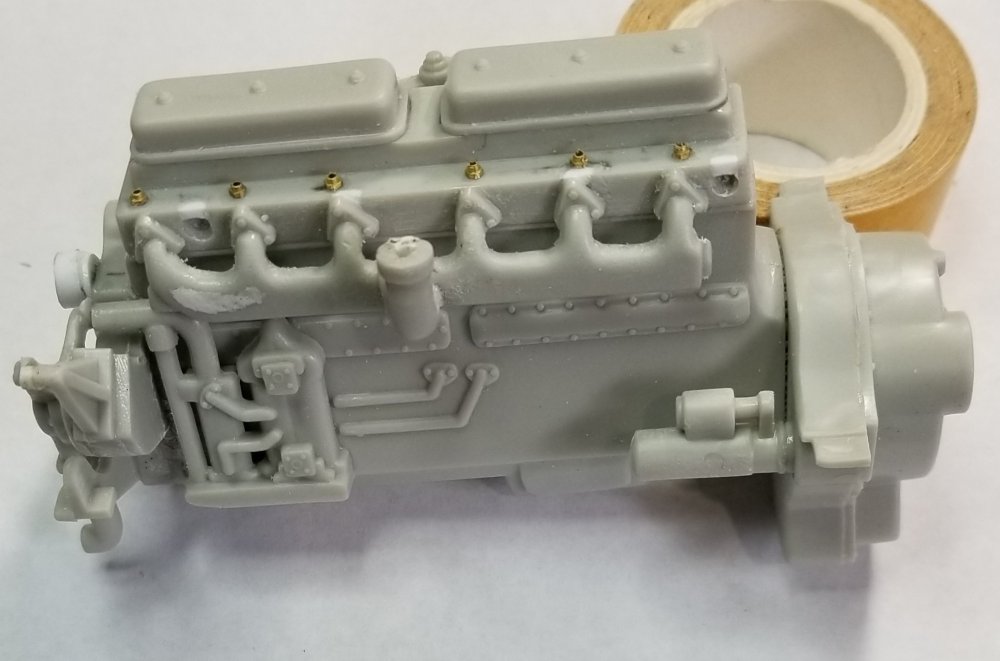
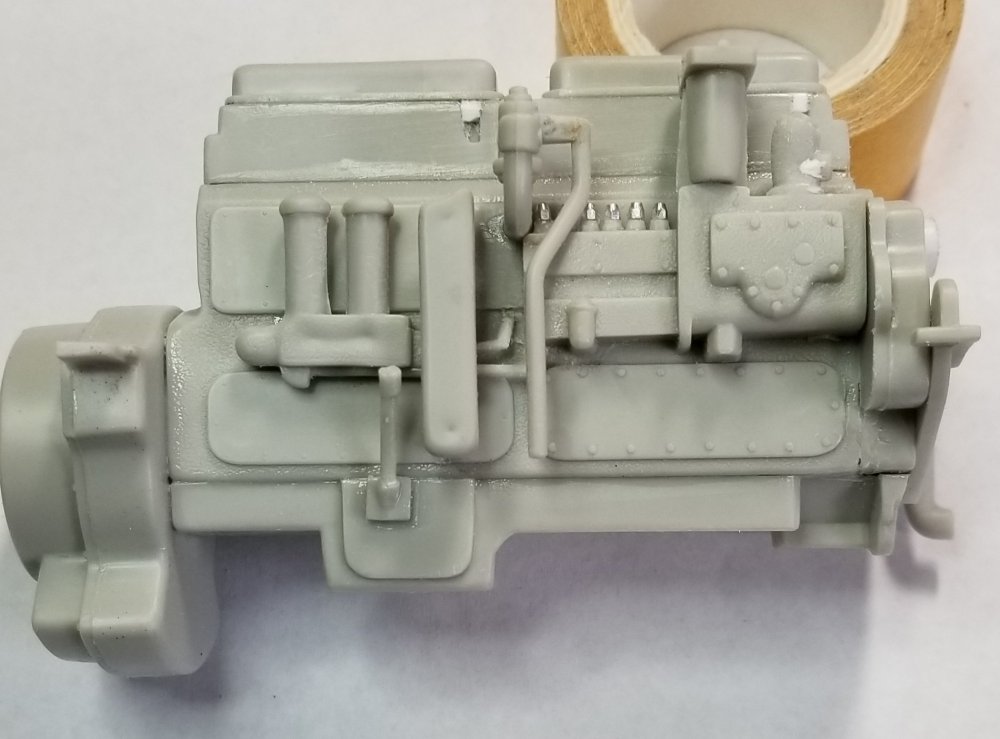
Hey all Small update, did some work on the engine. I added some pipes and removed the exhaust turbo and mount so I could rework them so they fit correctly. They were pointing down toward the front, which caused the exhaust stack and air cleaner to not line up with the holes in the hood. I also did some painting and started some weathering. this view shows the intake turbo now painted steel. The pipe that goes from the part between the exhaust turbo and the intake turbo down to the side of the block. This is a piece of plastic rod bent to shape. I painted the starter black. I added a piece cut from a truck air cleaner and fitted it to the air cleaner on the Dozer and painted it silver. I painted the fan belt rubber black and the pulleys and fan Cat yellow and I painted the alternator silver. this view shows the hydraulic pump is now painted Cat yellow and the filters are painted an off white. I added the pipe that goes from the area between the turbos down to the part on the block. this view shows the fan and fan belt. this is a close up view of the air cleaner and the wing nut I made from a piece of plastic card stock. You can also see the strap that I made for the alternator. You can see the pipe from the turbo to the side of the block, I made the small plate/fitting that it goes to, and the two nuts that hold it on. Thats all for now be back soon with more. Ron G


-
Yeah Vandy I did, thanks Ron G
-
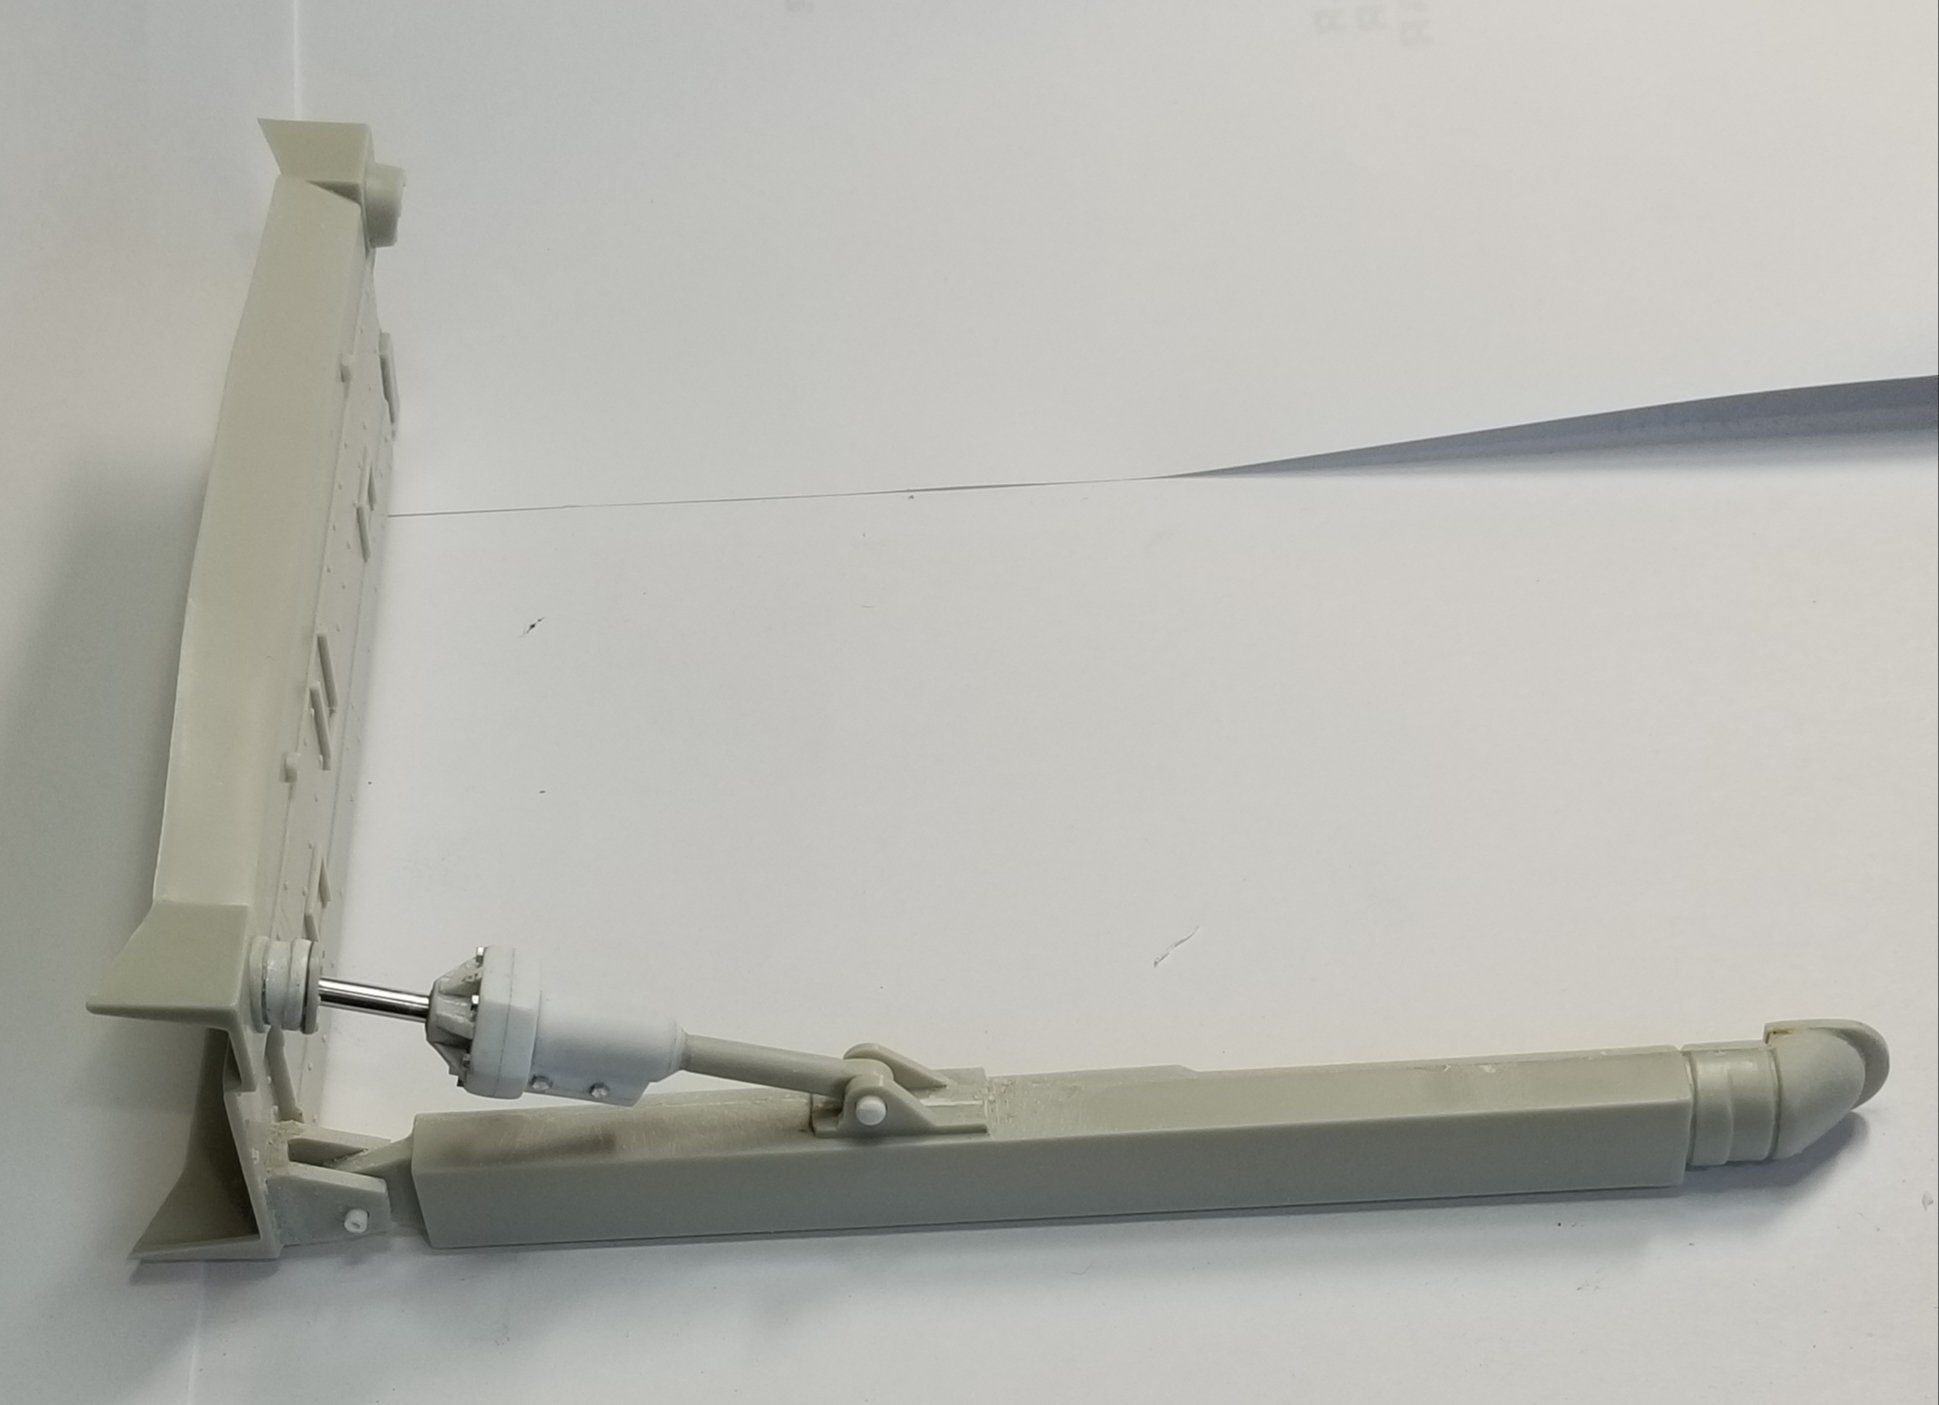
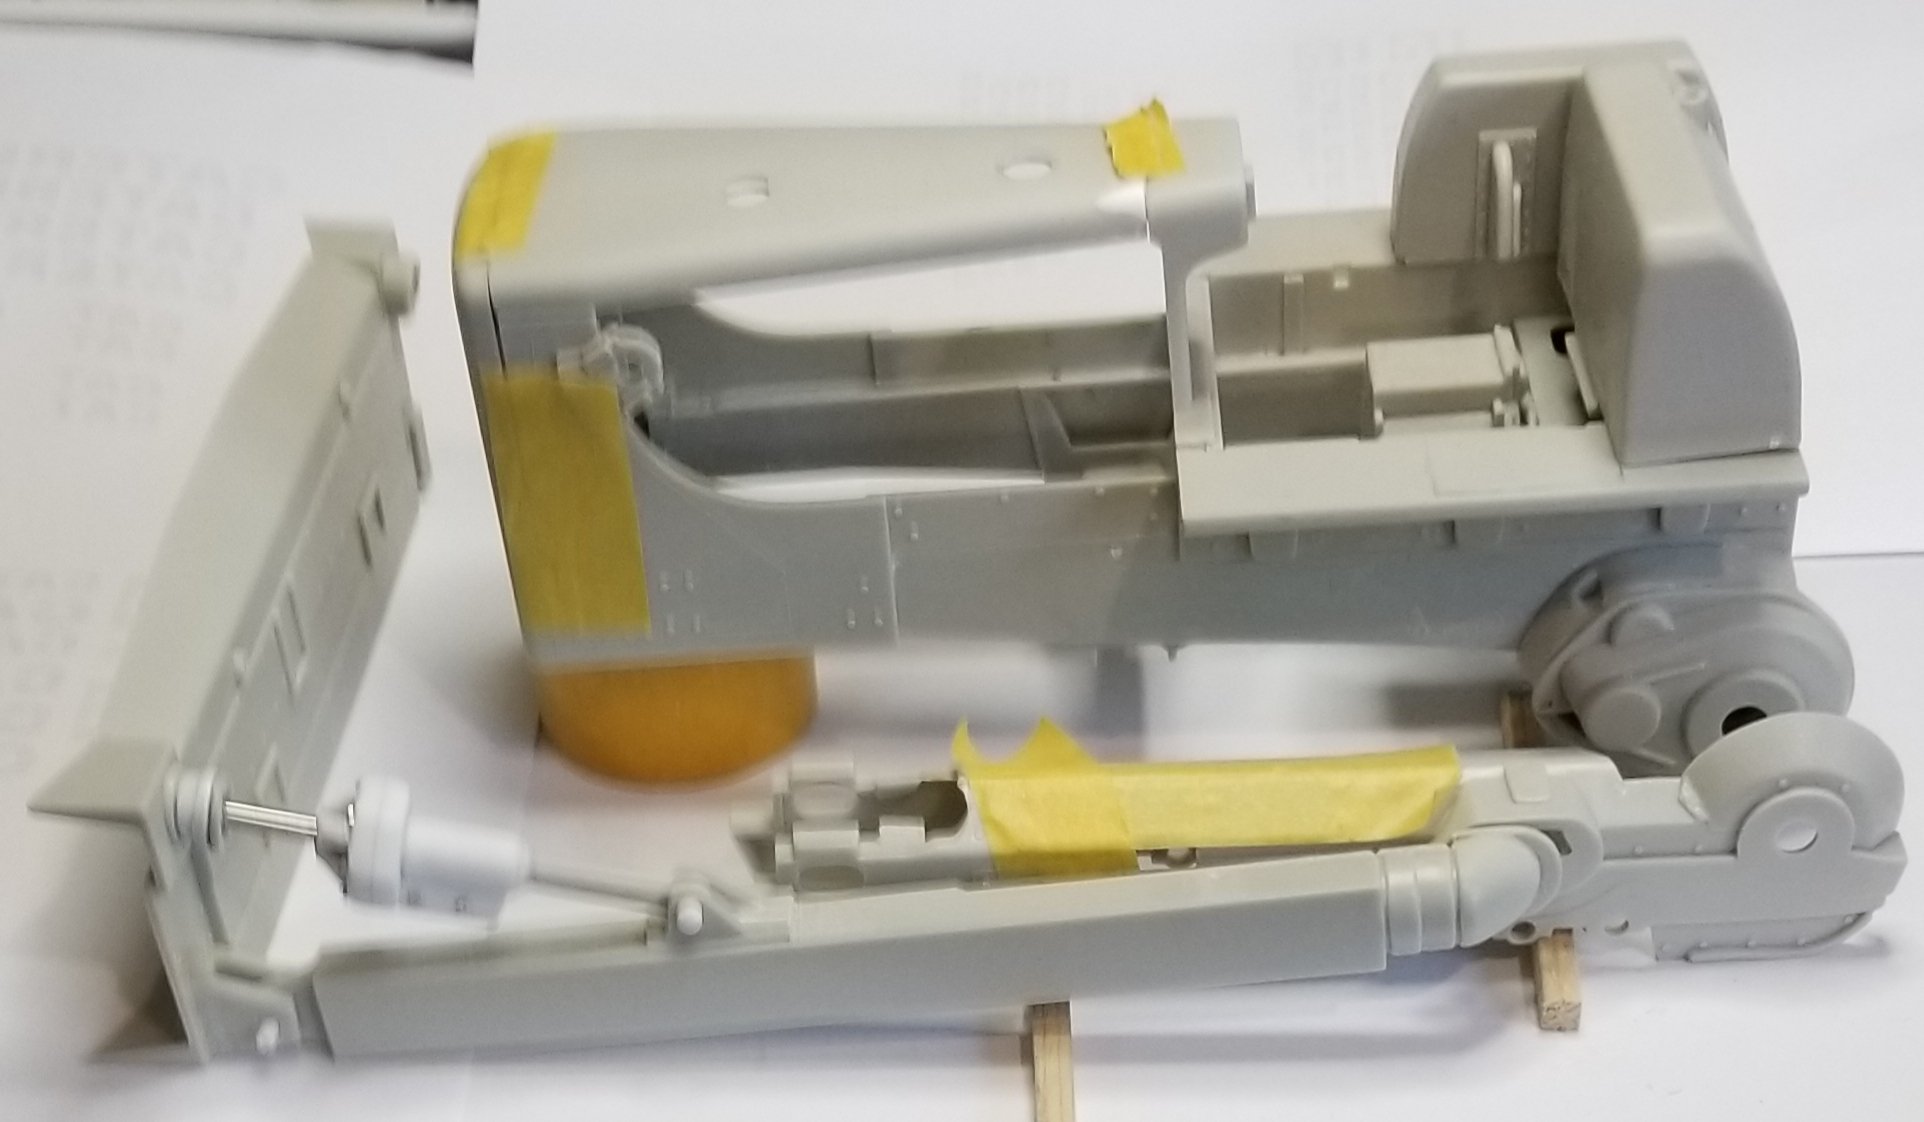
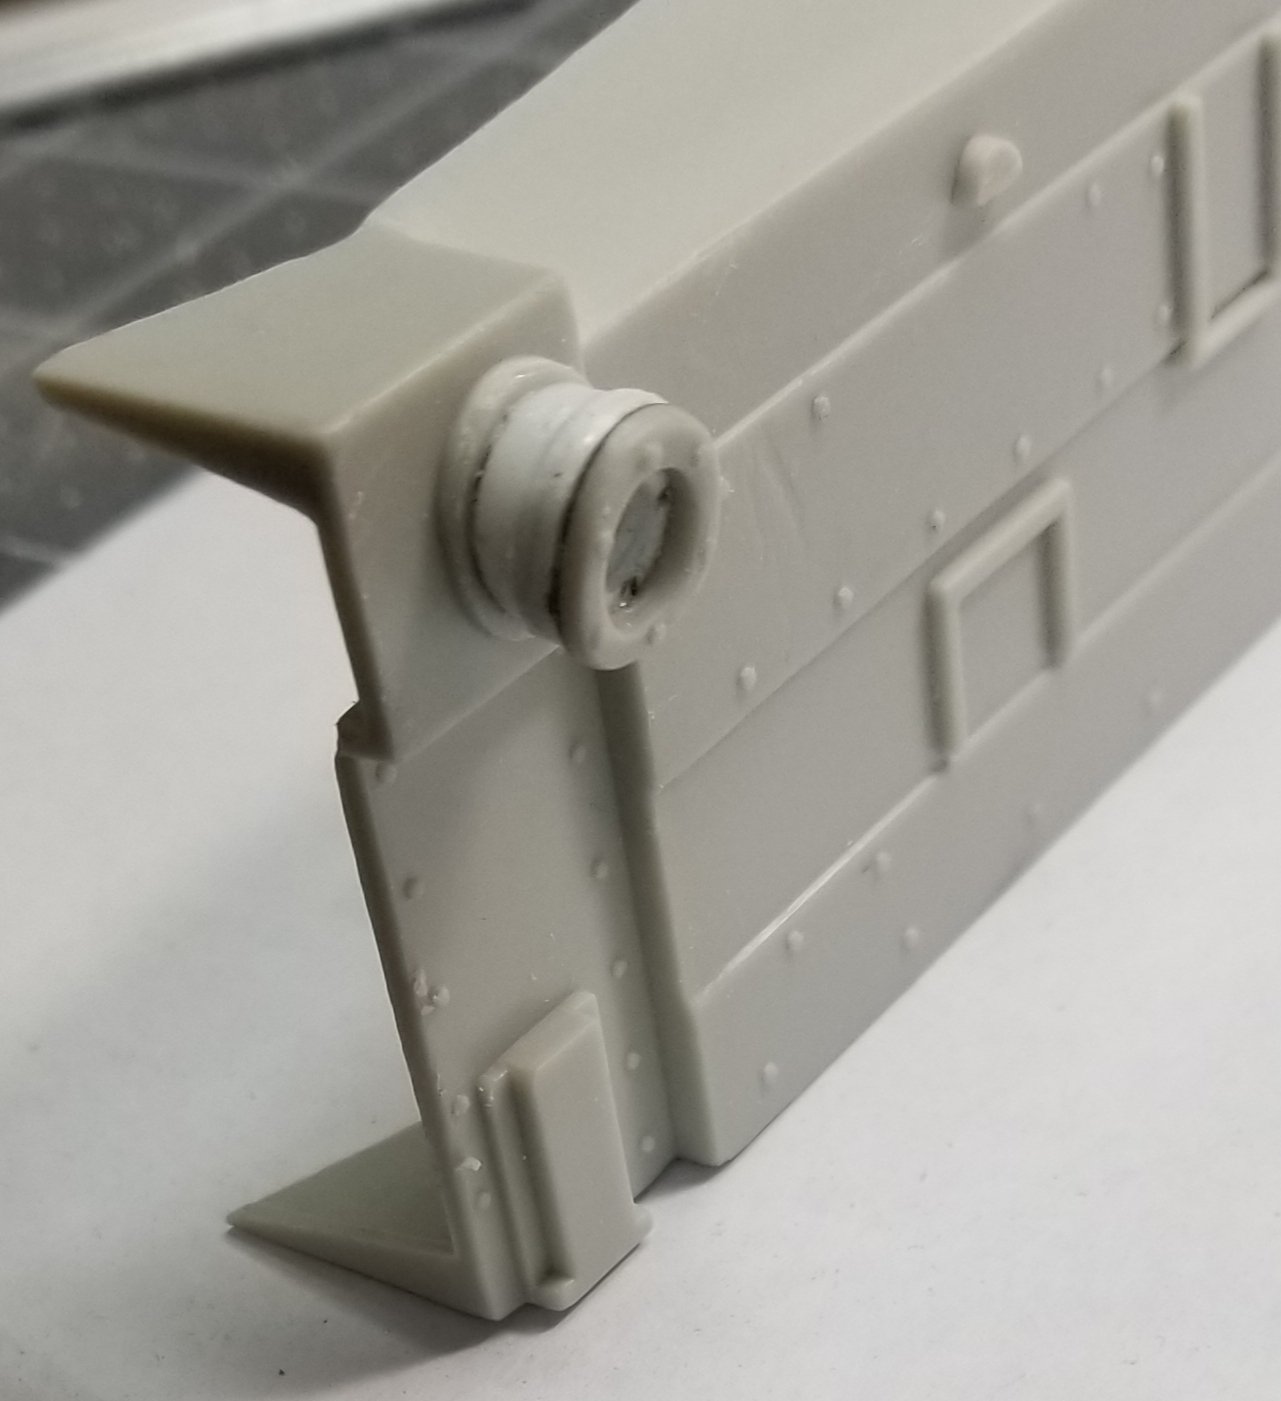
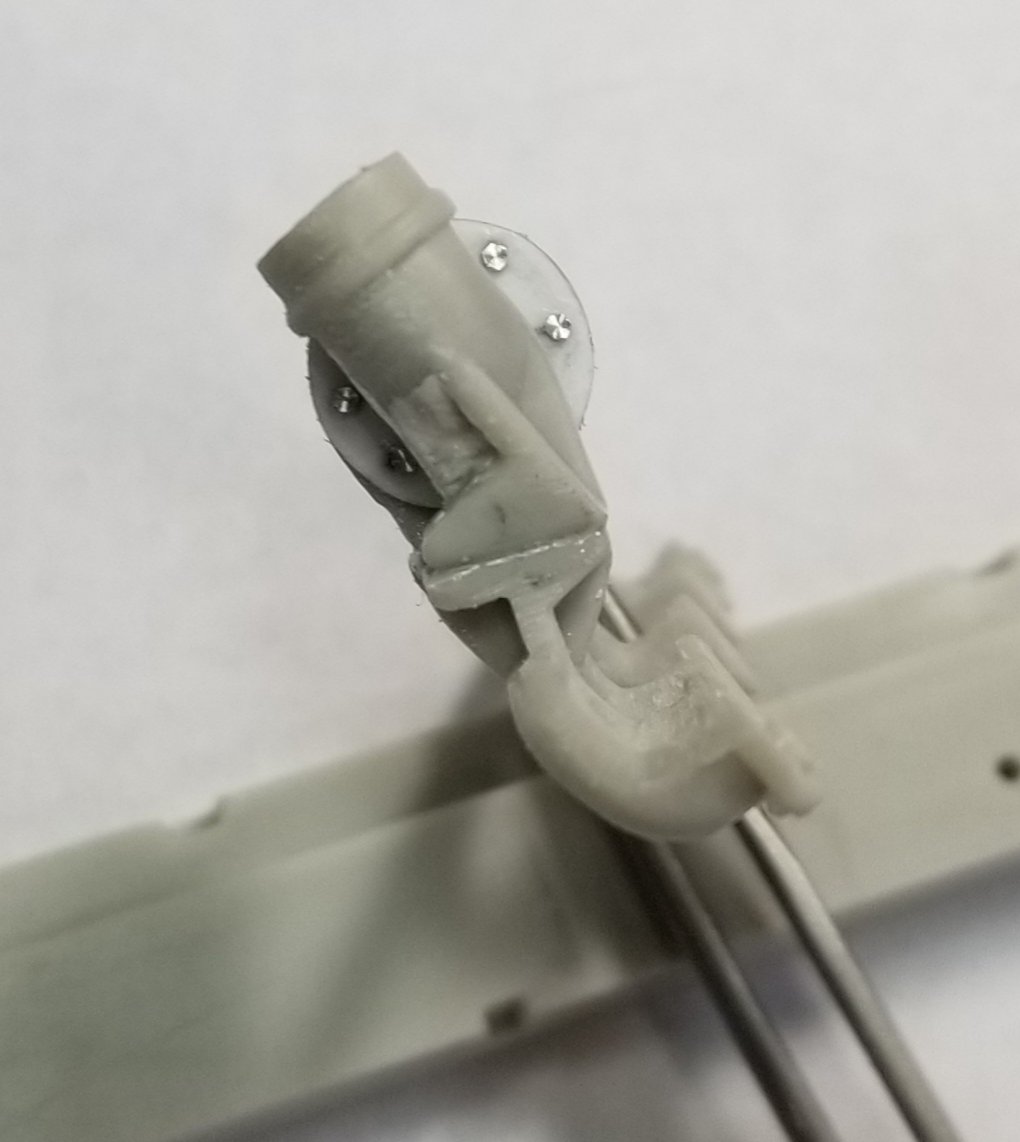
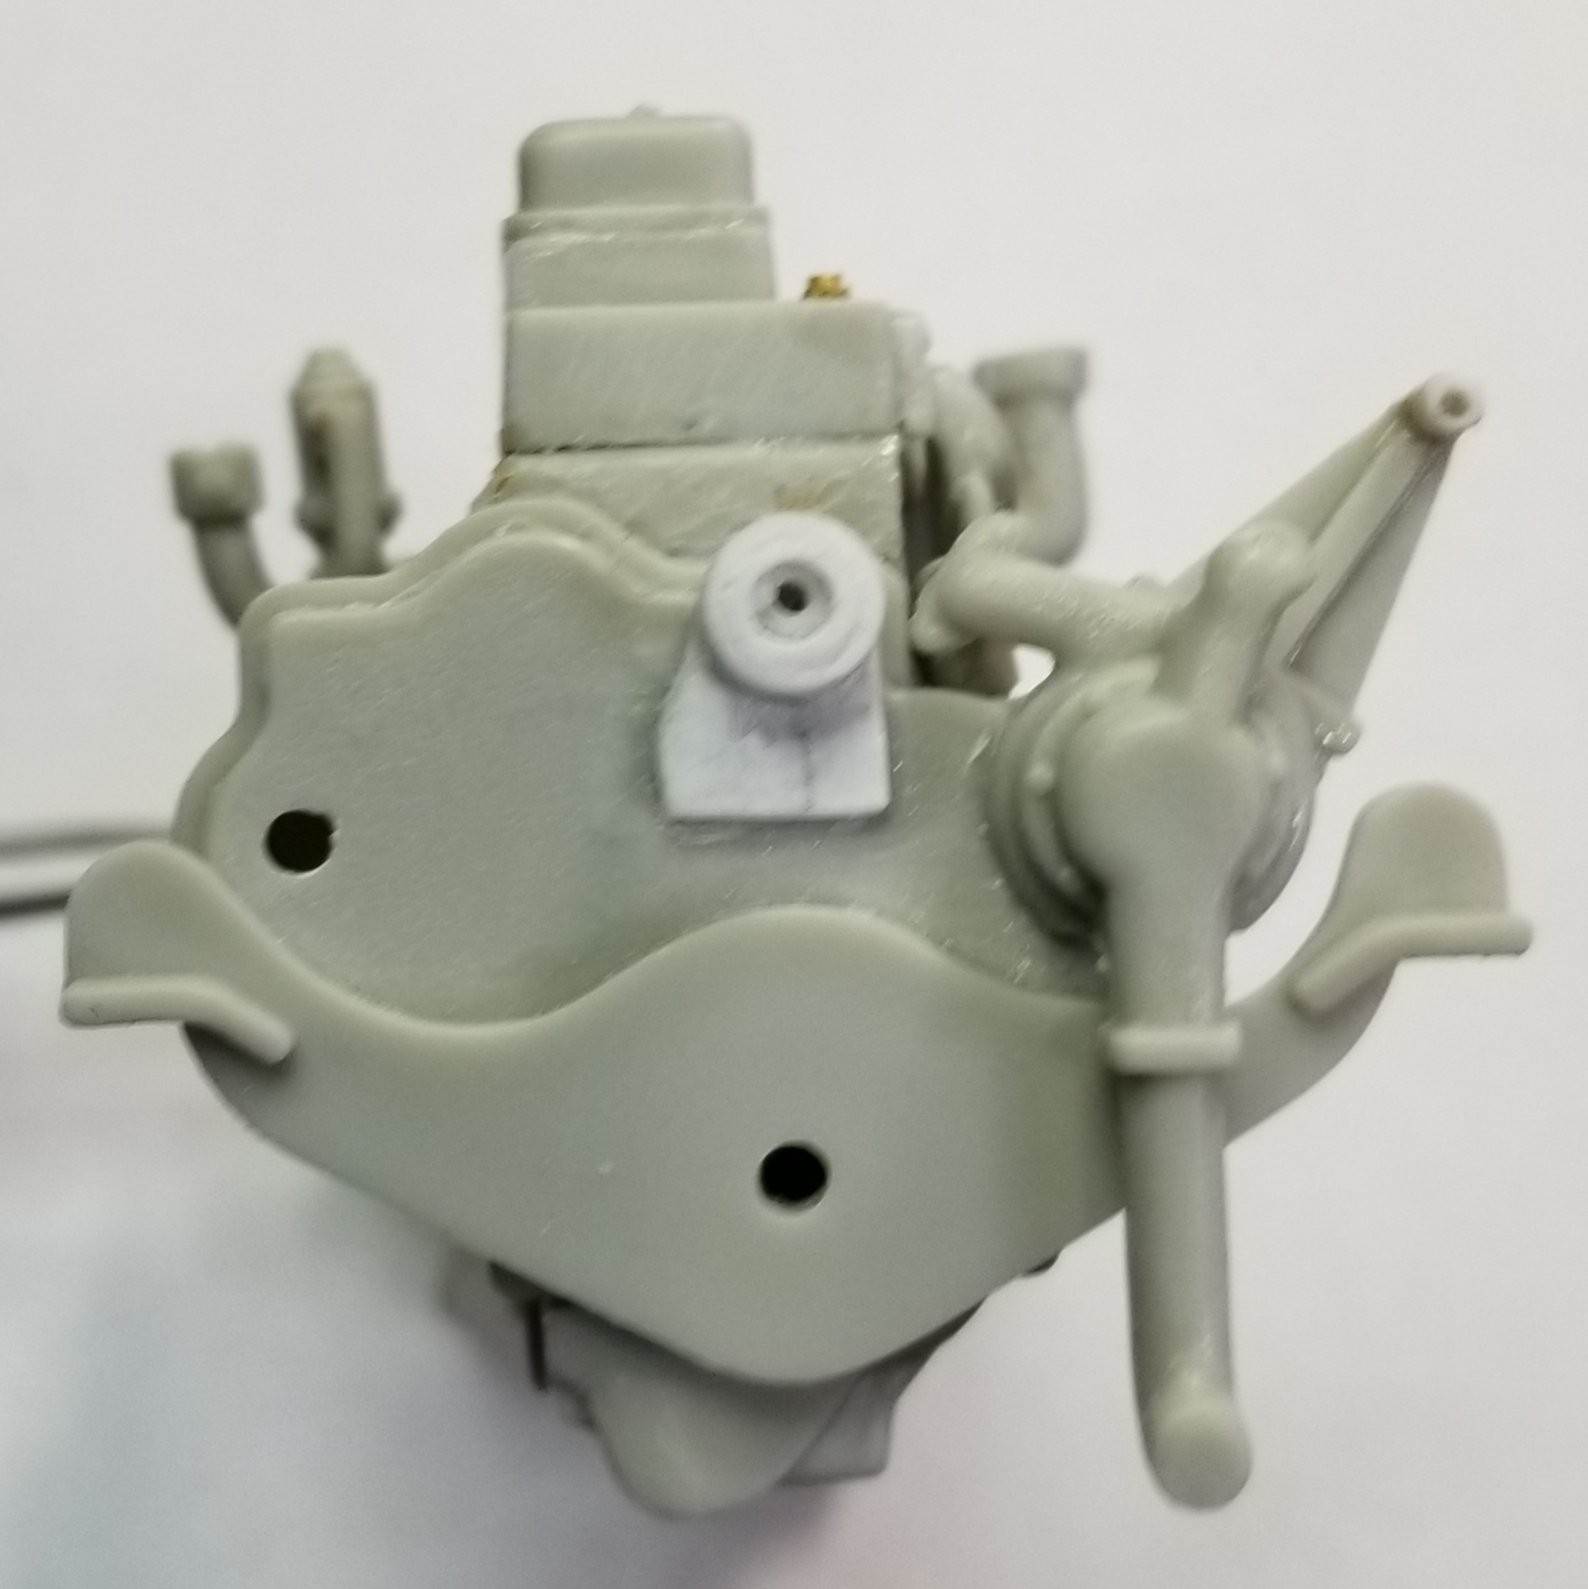
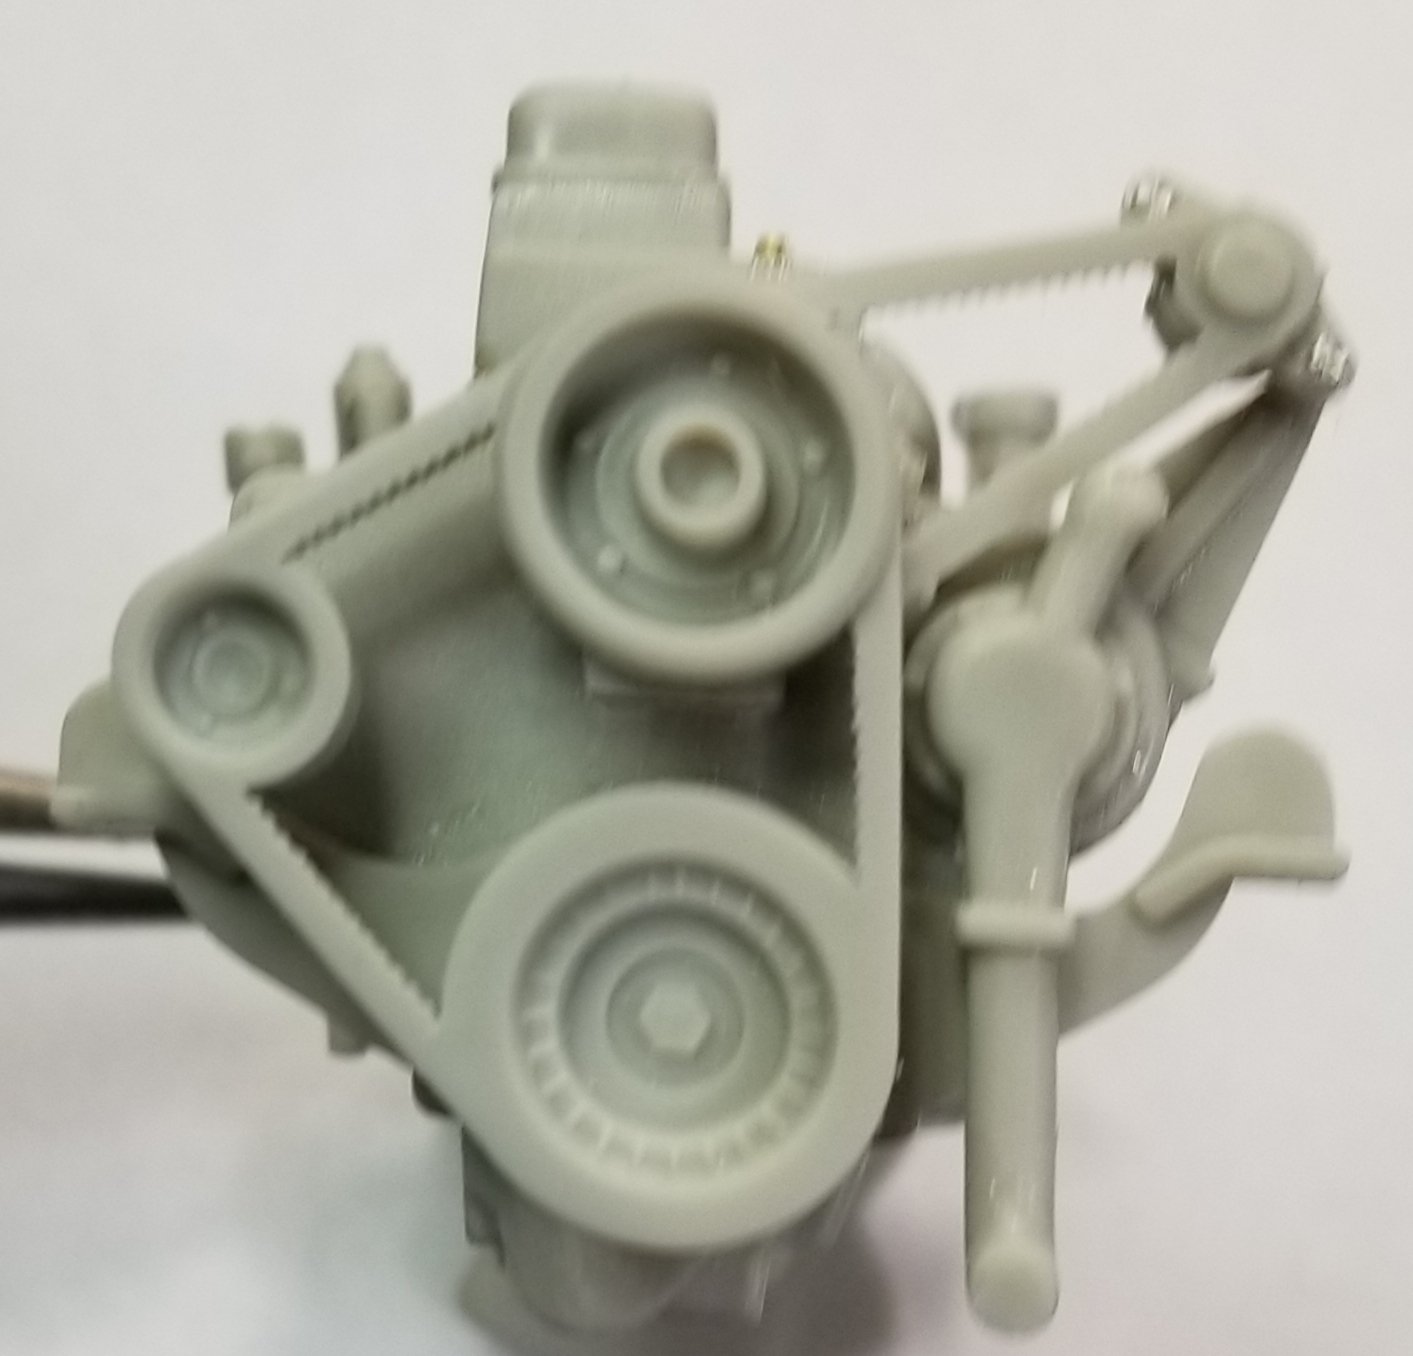
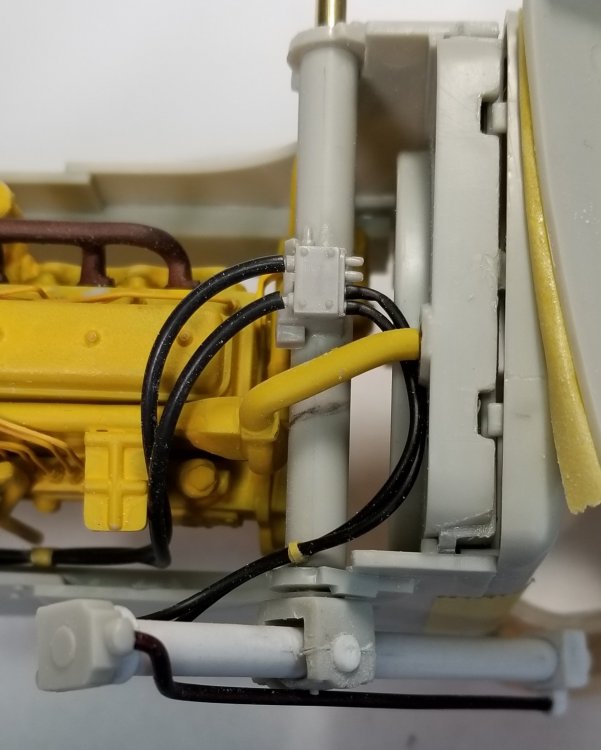
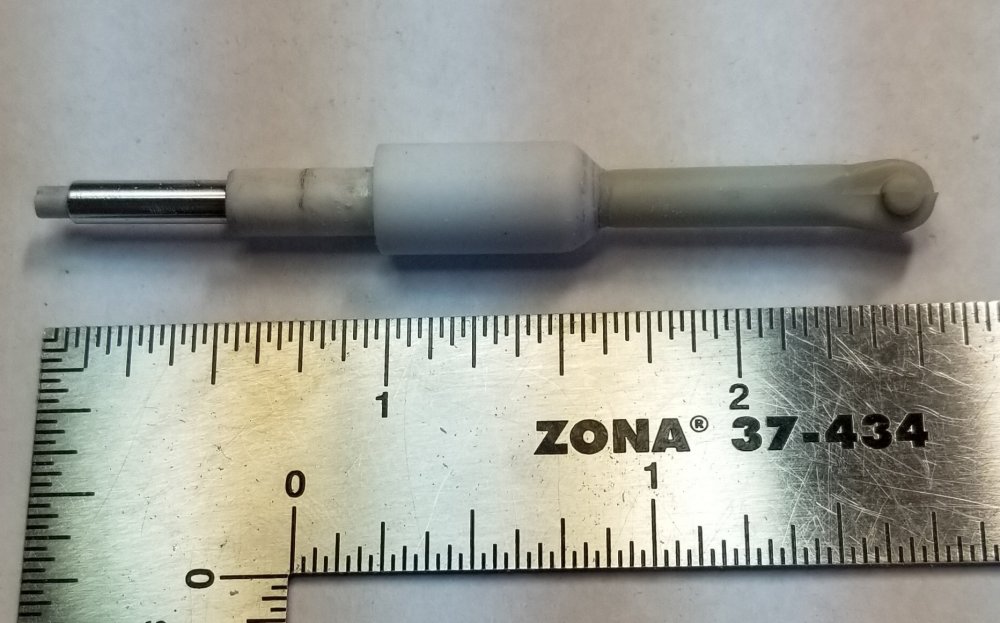
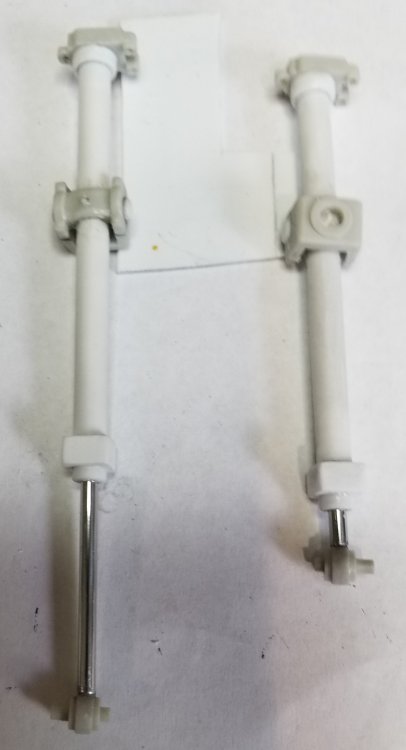
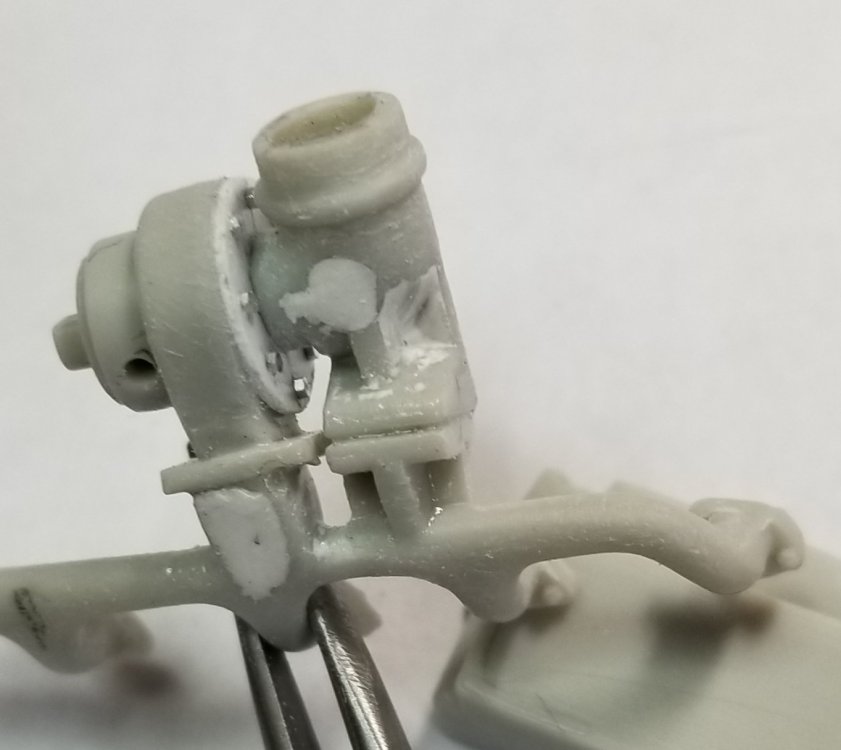
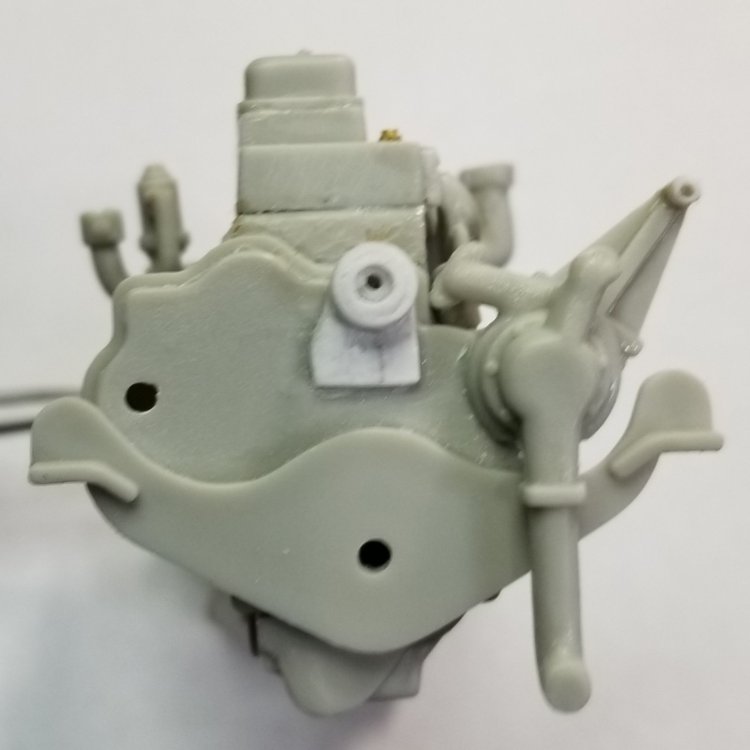
Hey all I'm back with more updates. I worked on one of the blade cylinders, added a pipe from the back of the cylinder to the front of the cylinder, as per prototype. I added some hydraulic lines, I'm not sure if I have it right or not, but I think it's pretty good. I also started on the blade tilt cylinder. The kit doesn't have this option, so I reworked one of the support rods for the blade into one. view looking down on the top of the Dozer. view showing blade cylinder. The dark copper wire is the pipe I added. this view shows the oil filter I added to the trans cooler. view showing hydraulic lines from hydraulic pump (the grey part at the rear of the engine) to the hydraulic manifold on the blade cylinder support tube. I scratched this from spare parts. And the lines from that manifold to the blade cylinder. view showing the hydraulic manifold on the support tube. Also the cylinder lines. I had to modify this side of the blade so I could attach the blade tilt cylinder. this is the blade tilt cylinder I made from one of the blade support rods. Still needs work. this is what it will look like when I'm done with it. Thats all for now be back with more soon. Ron G


-
How does the Liang stencil work? Is it sticky like masking tape? Or do you just hold it against what you are going to paint? And where did you get it because I think it would work great on my D8H Caterpillar build to add that rusty look. Ron G
-
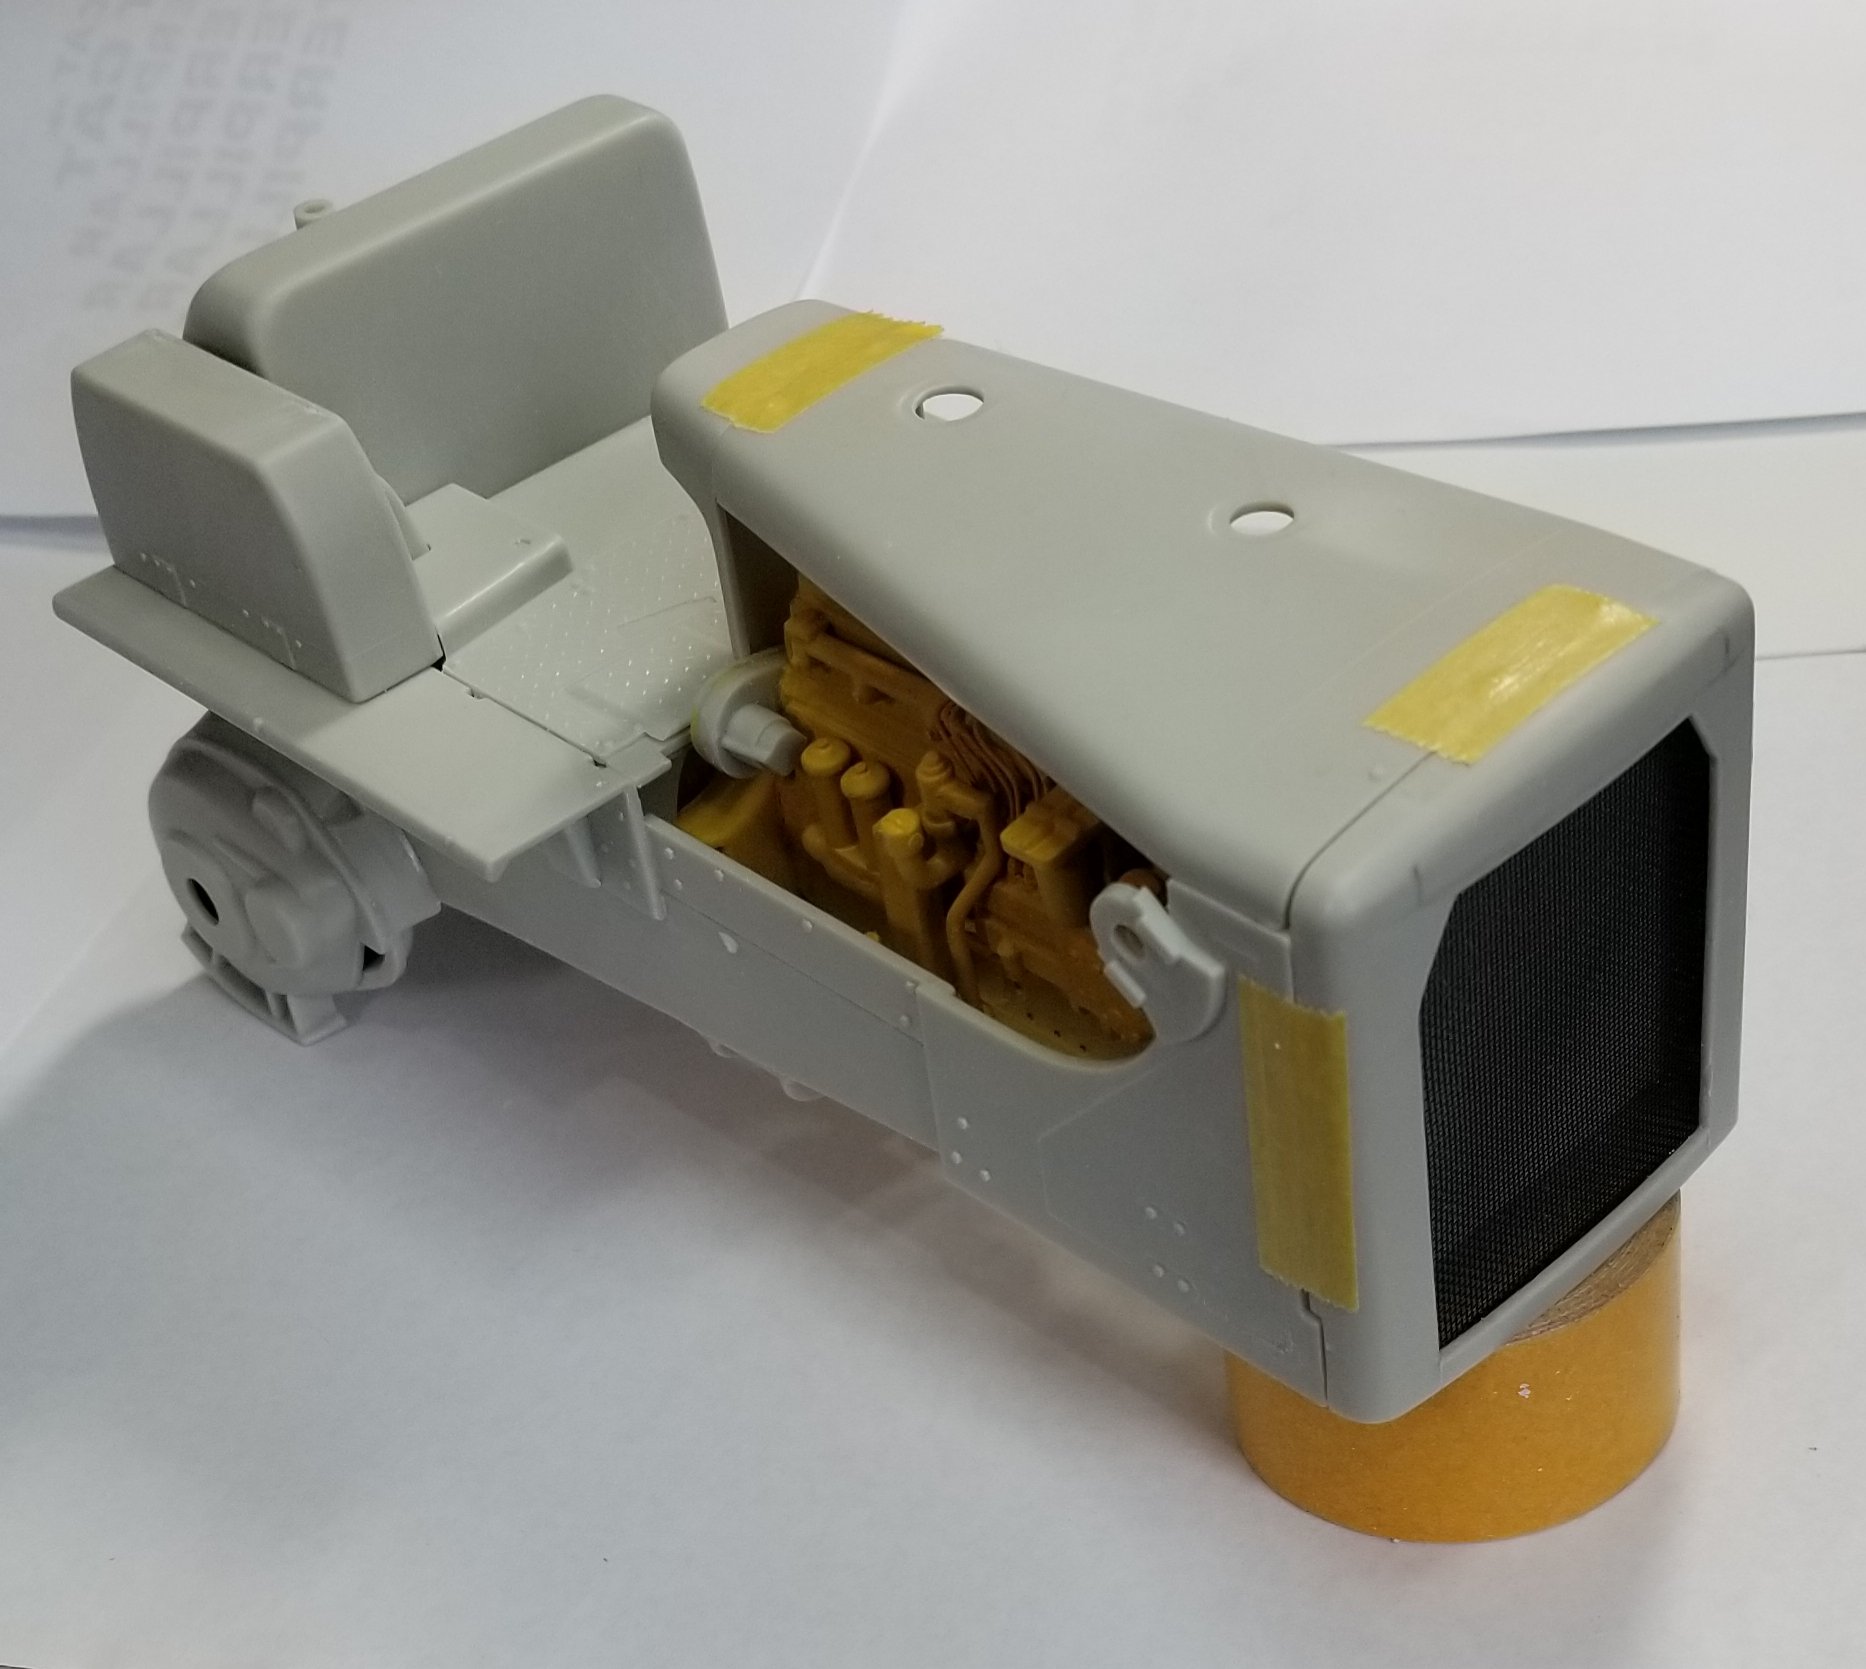
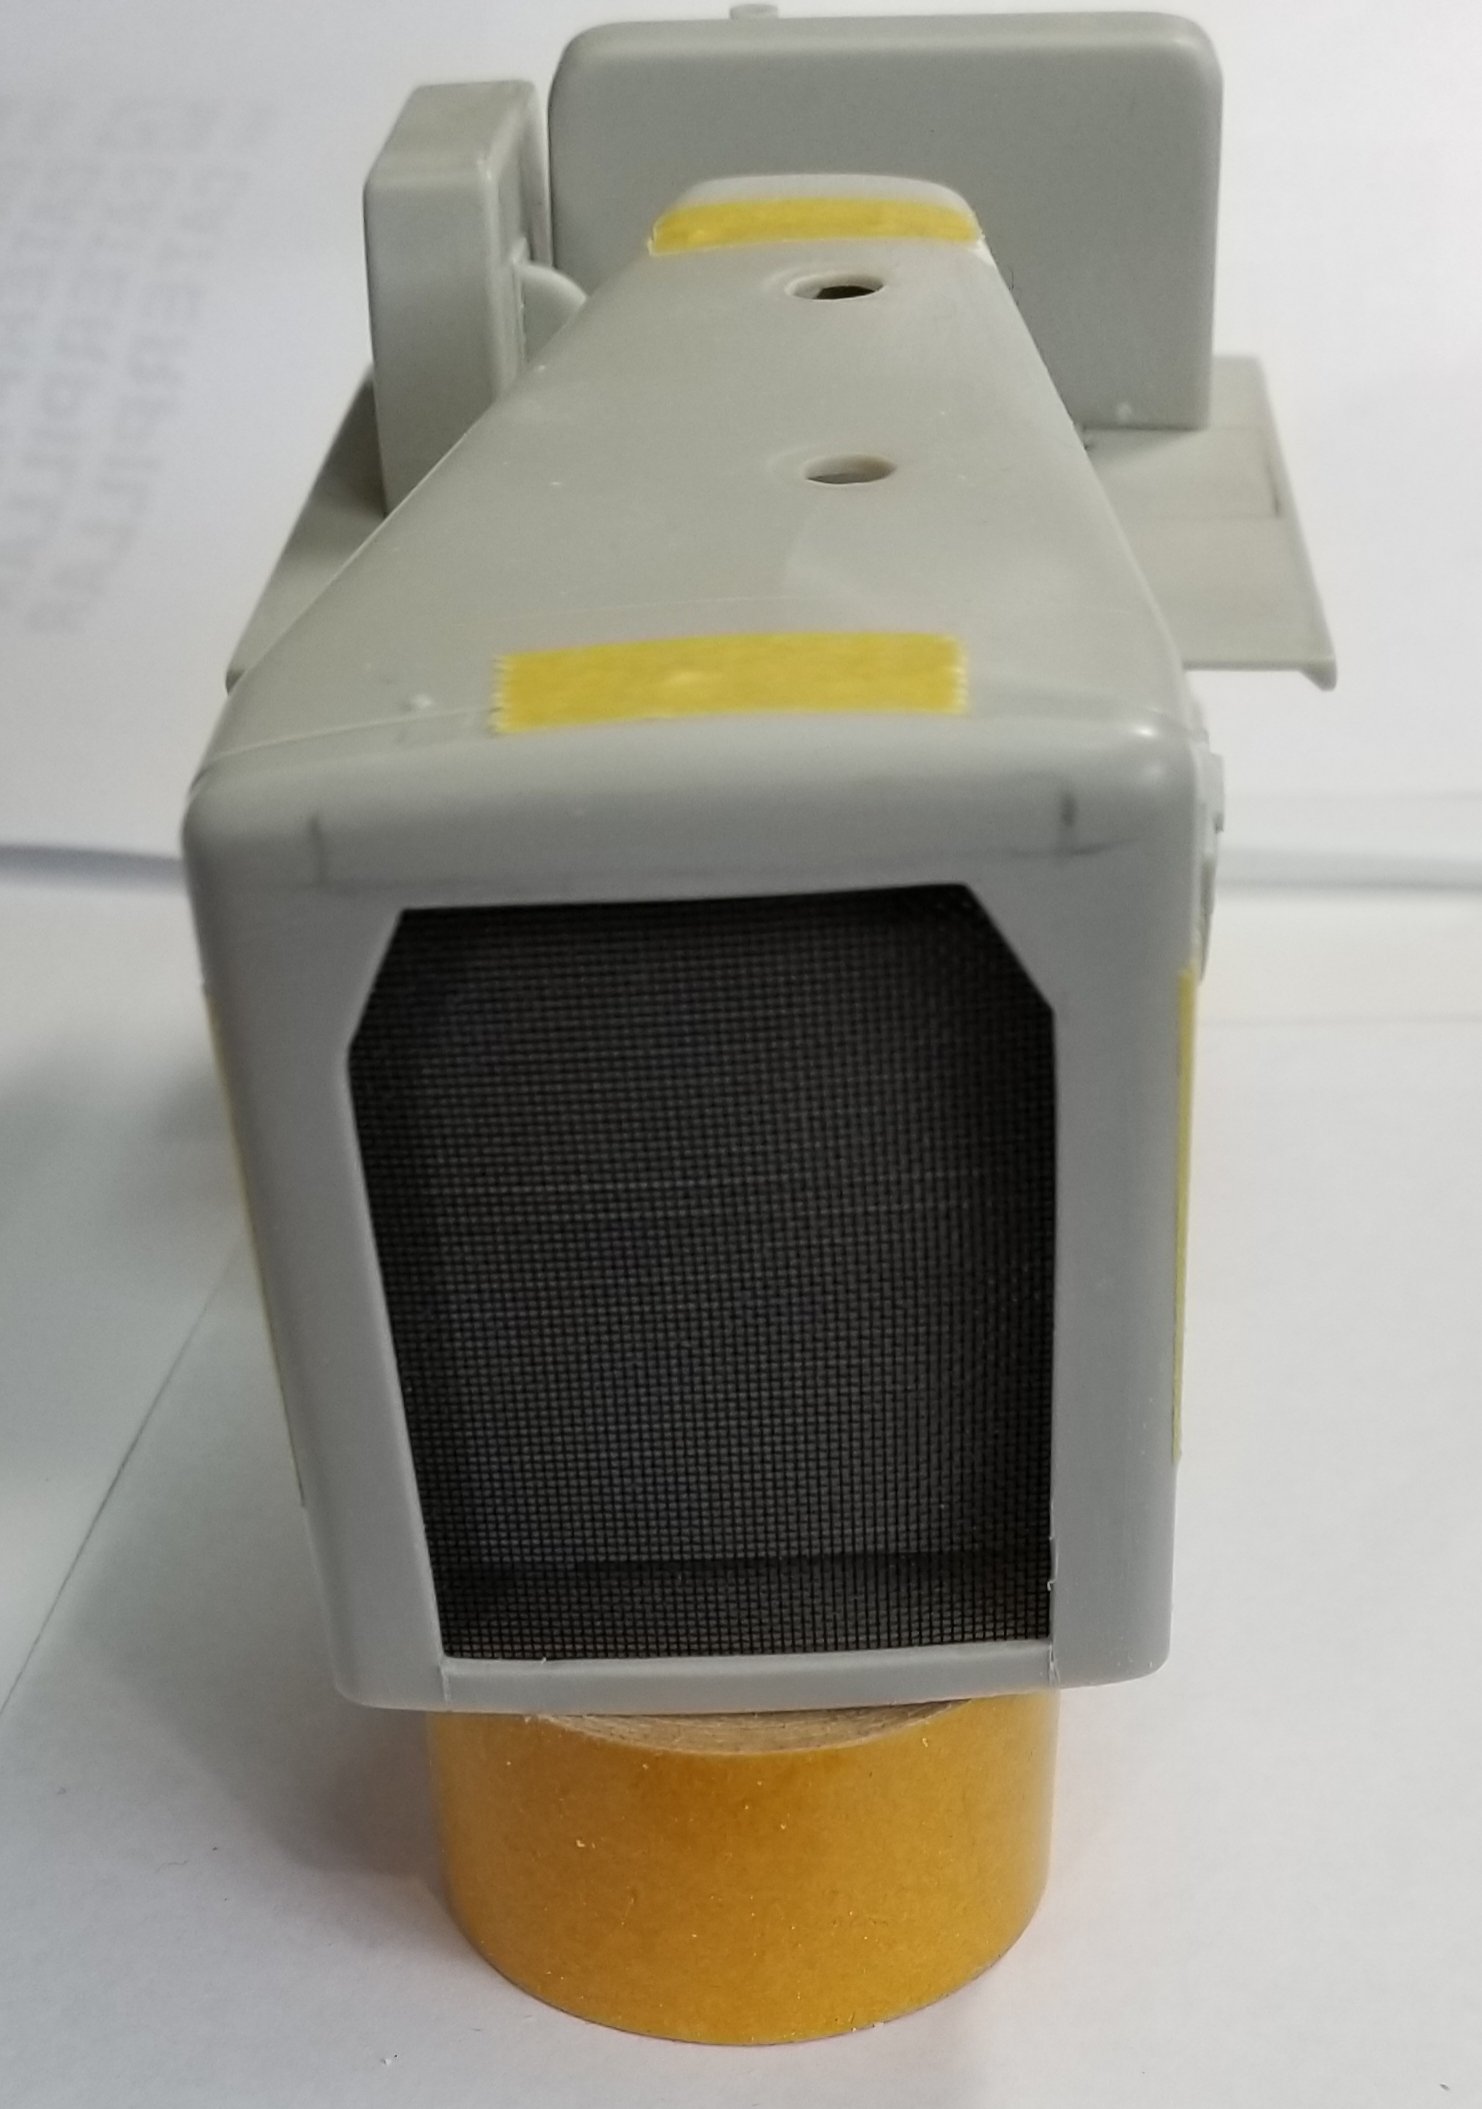
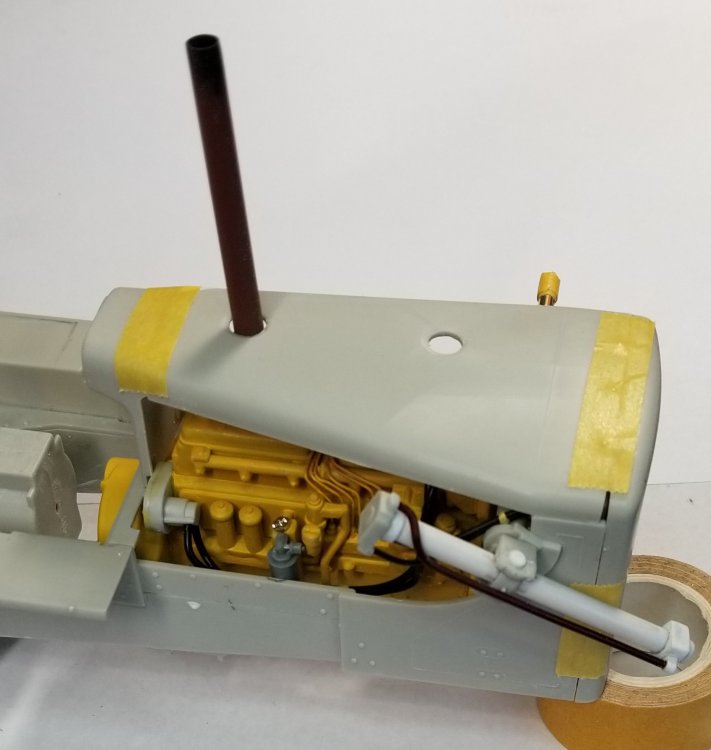
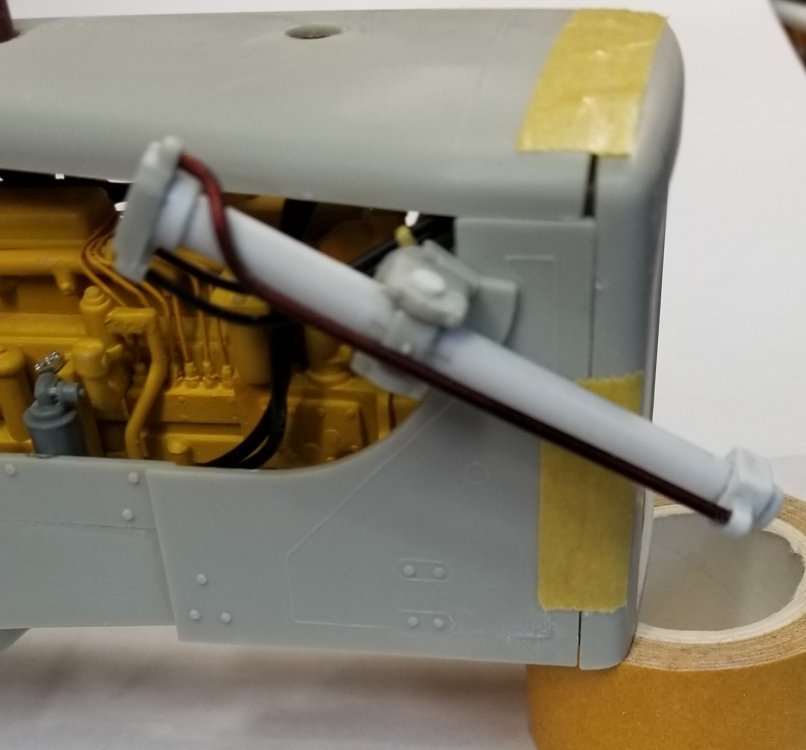
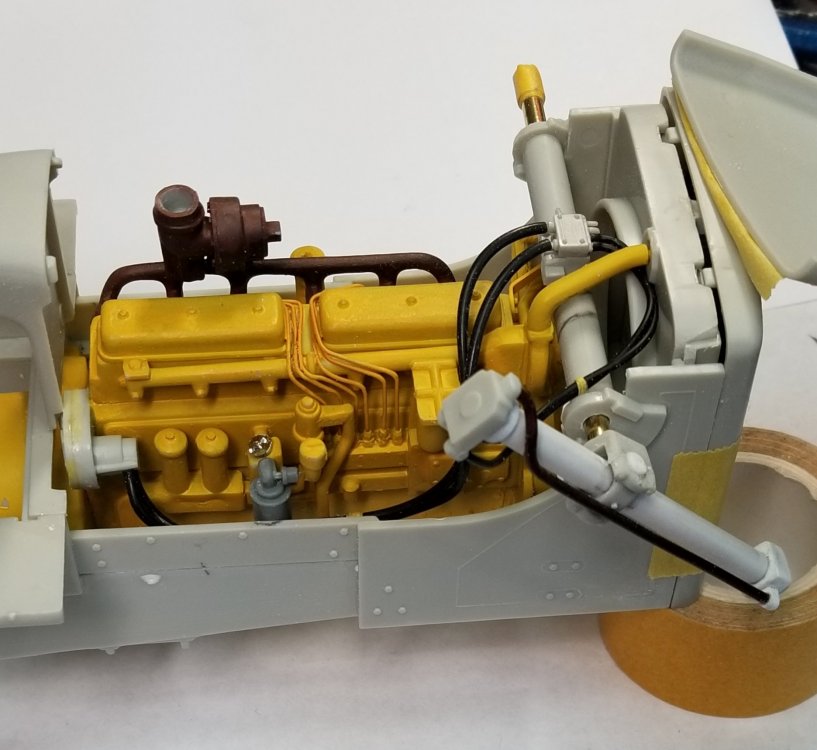
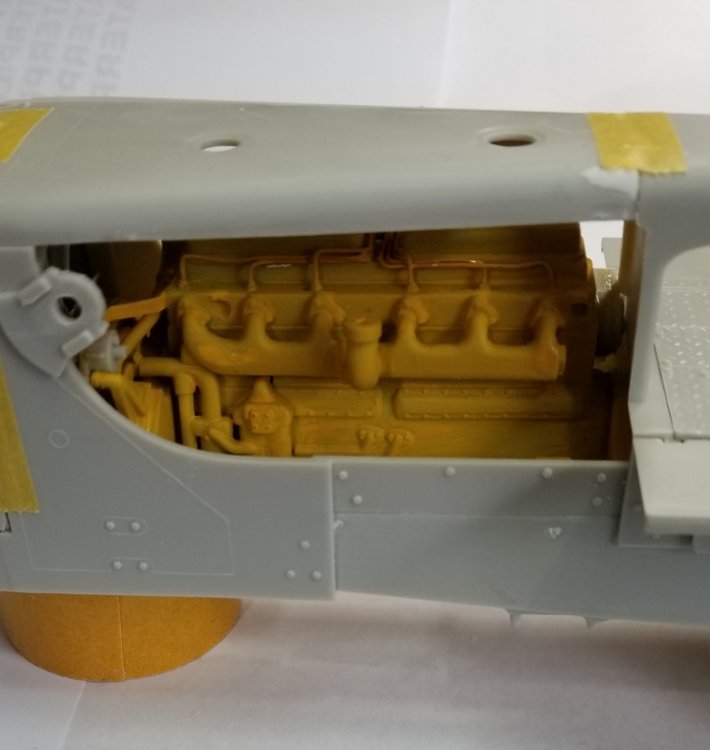
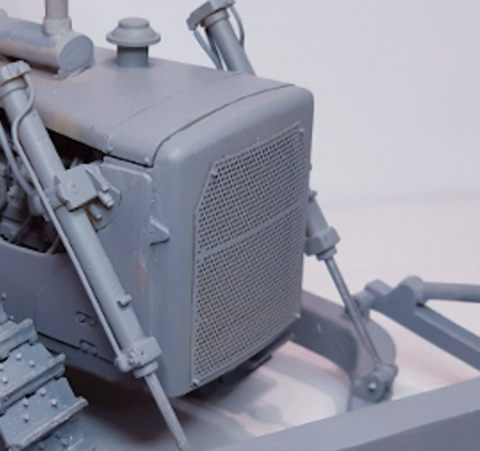
Thanks everyone Well got some more done. I assembled the frame work, except for a few pieces, this is so I can install the engine later after I paint everything. I have it partially put together, but just temporarily for photo purposes. here's a view from the front looking back. this view shows the cutout in the grill shell thet I did with my Fordom tool. I added some black screen from an old truck model kit, this is only temporary. I have a photo etch grill coming in the mail. intake/exhaust side of the engine. the other side shiws the water manifold and fuel pump with the lines. view from the rear. The ripper will attach here. I bought another kit, so now I have three ripper blades to put on. It's going to look cool with all three rippers installed. I couldn't resist so I temporarily put on the exhaust manifold, intake turbo and air cleaner then added the exhaust stack. better view of the turbos. OH. I almost forgot to add these photos. This is a picture of the photo etch grill. And this is a picture of the photo etch fan shroud. These photos are from Pappyhobbys. Thats it for now more later. Ron G


-
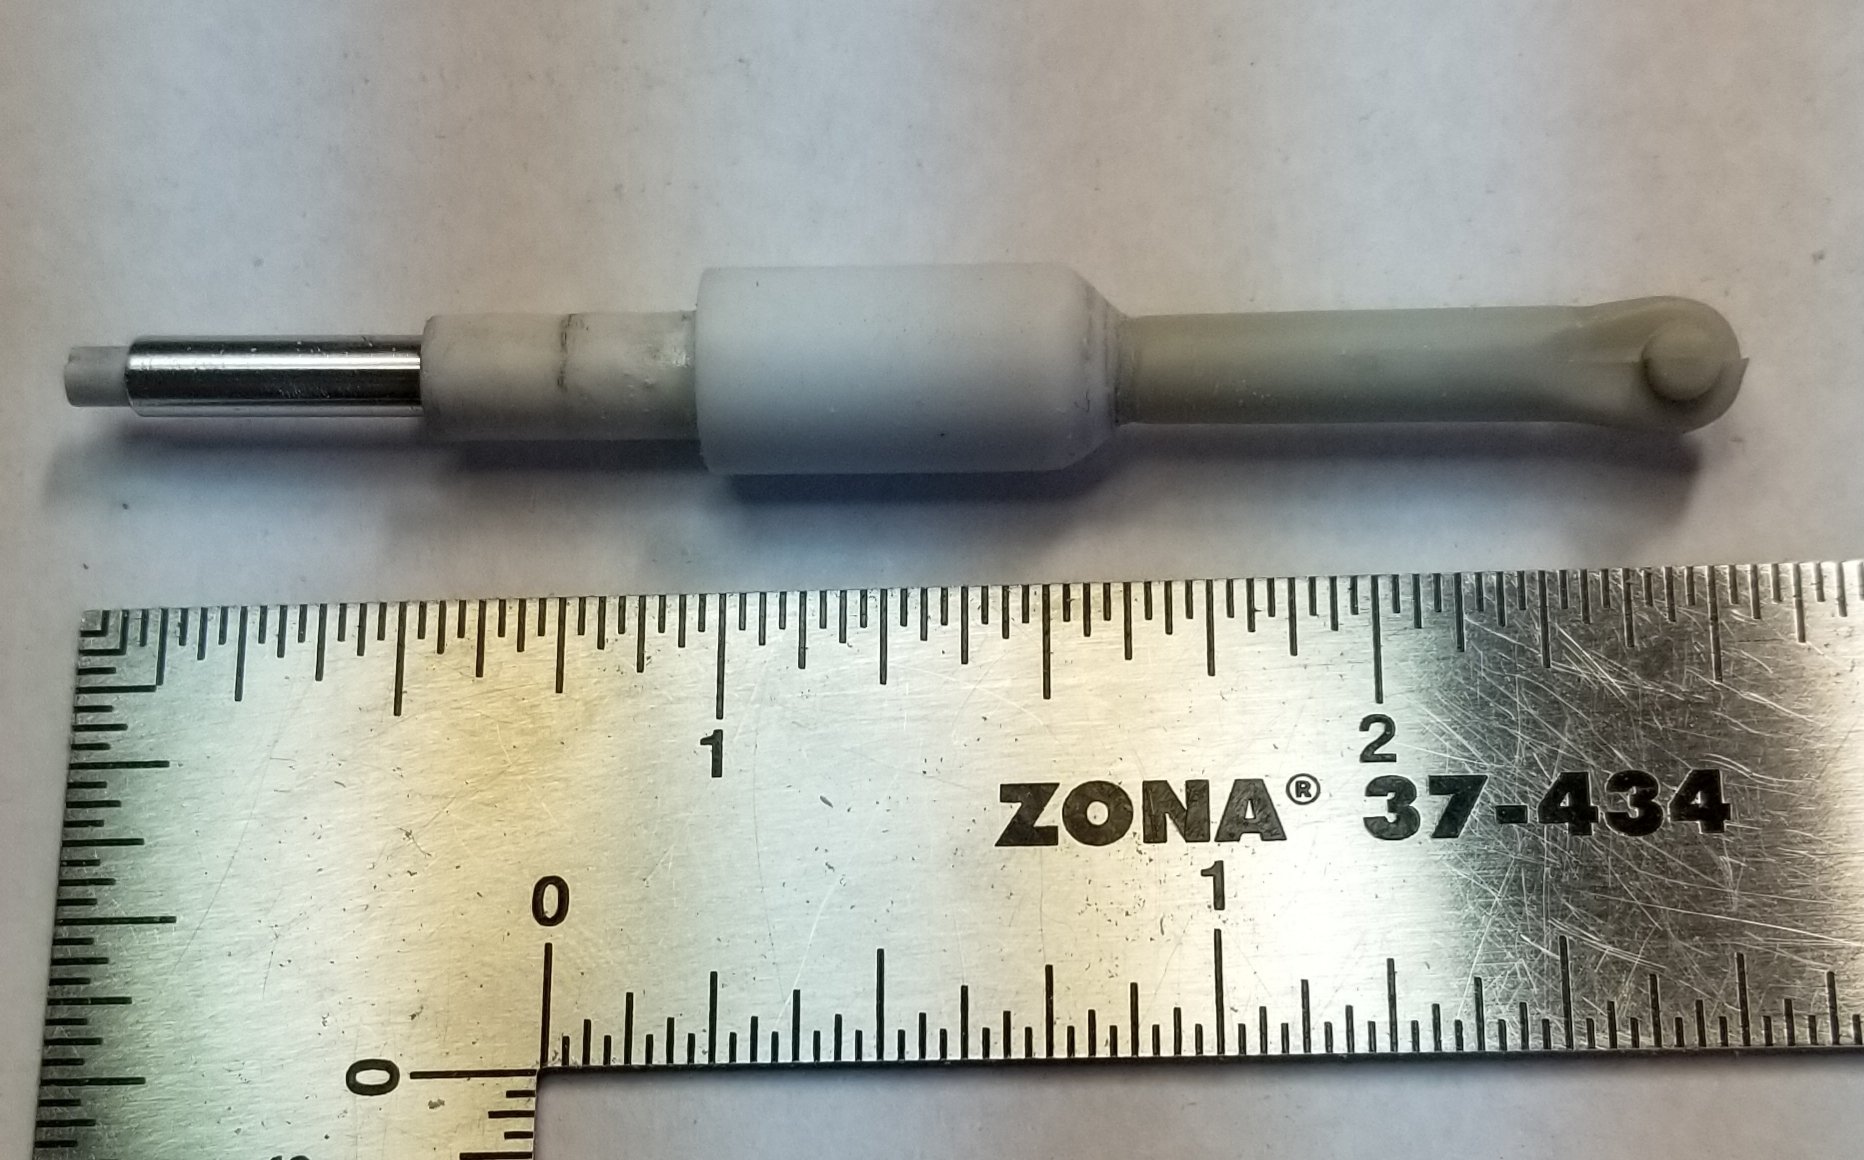
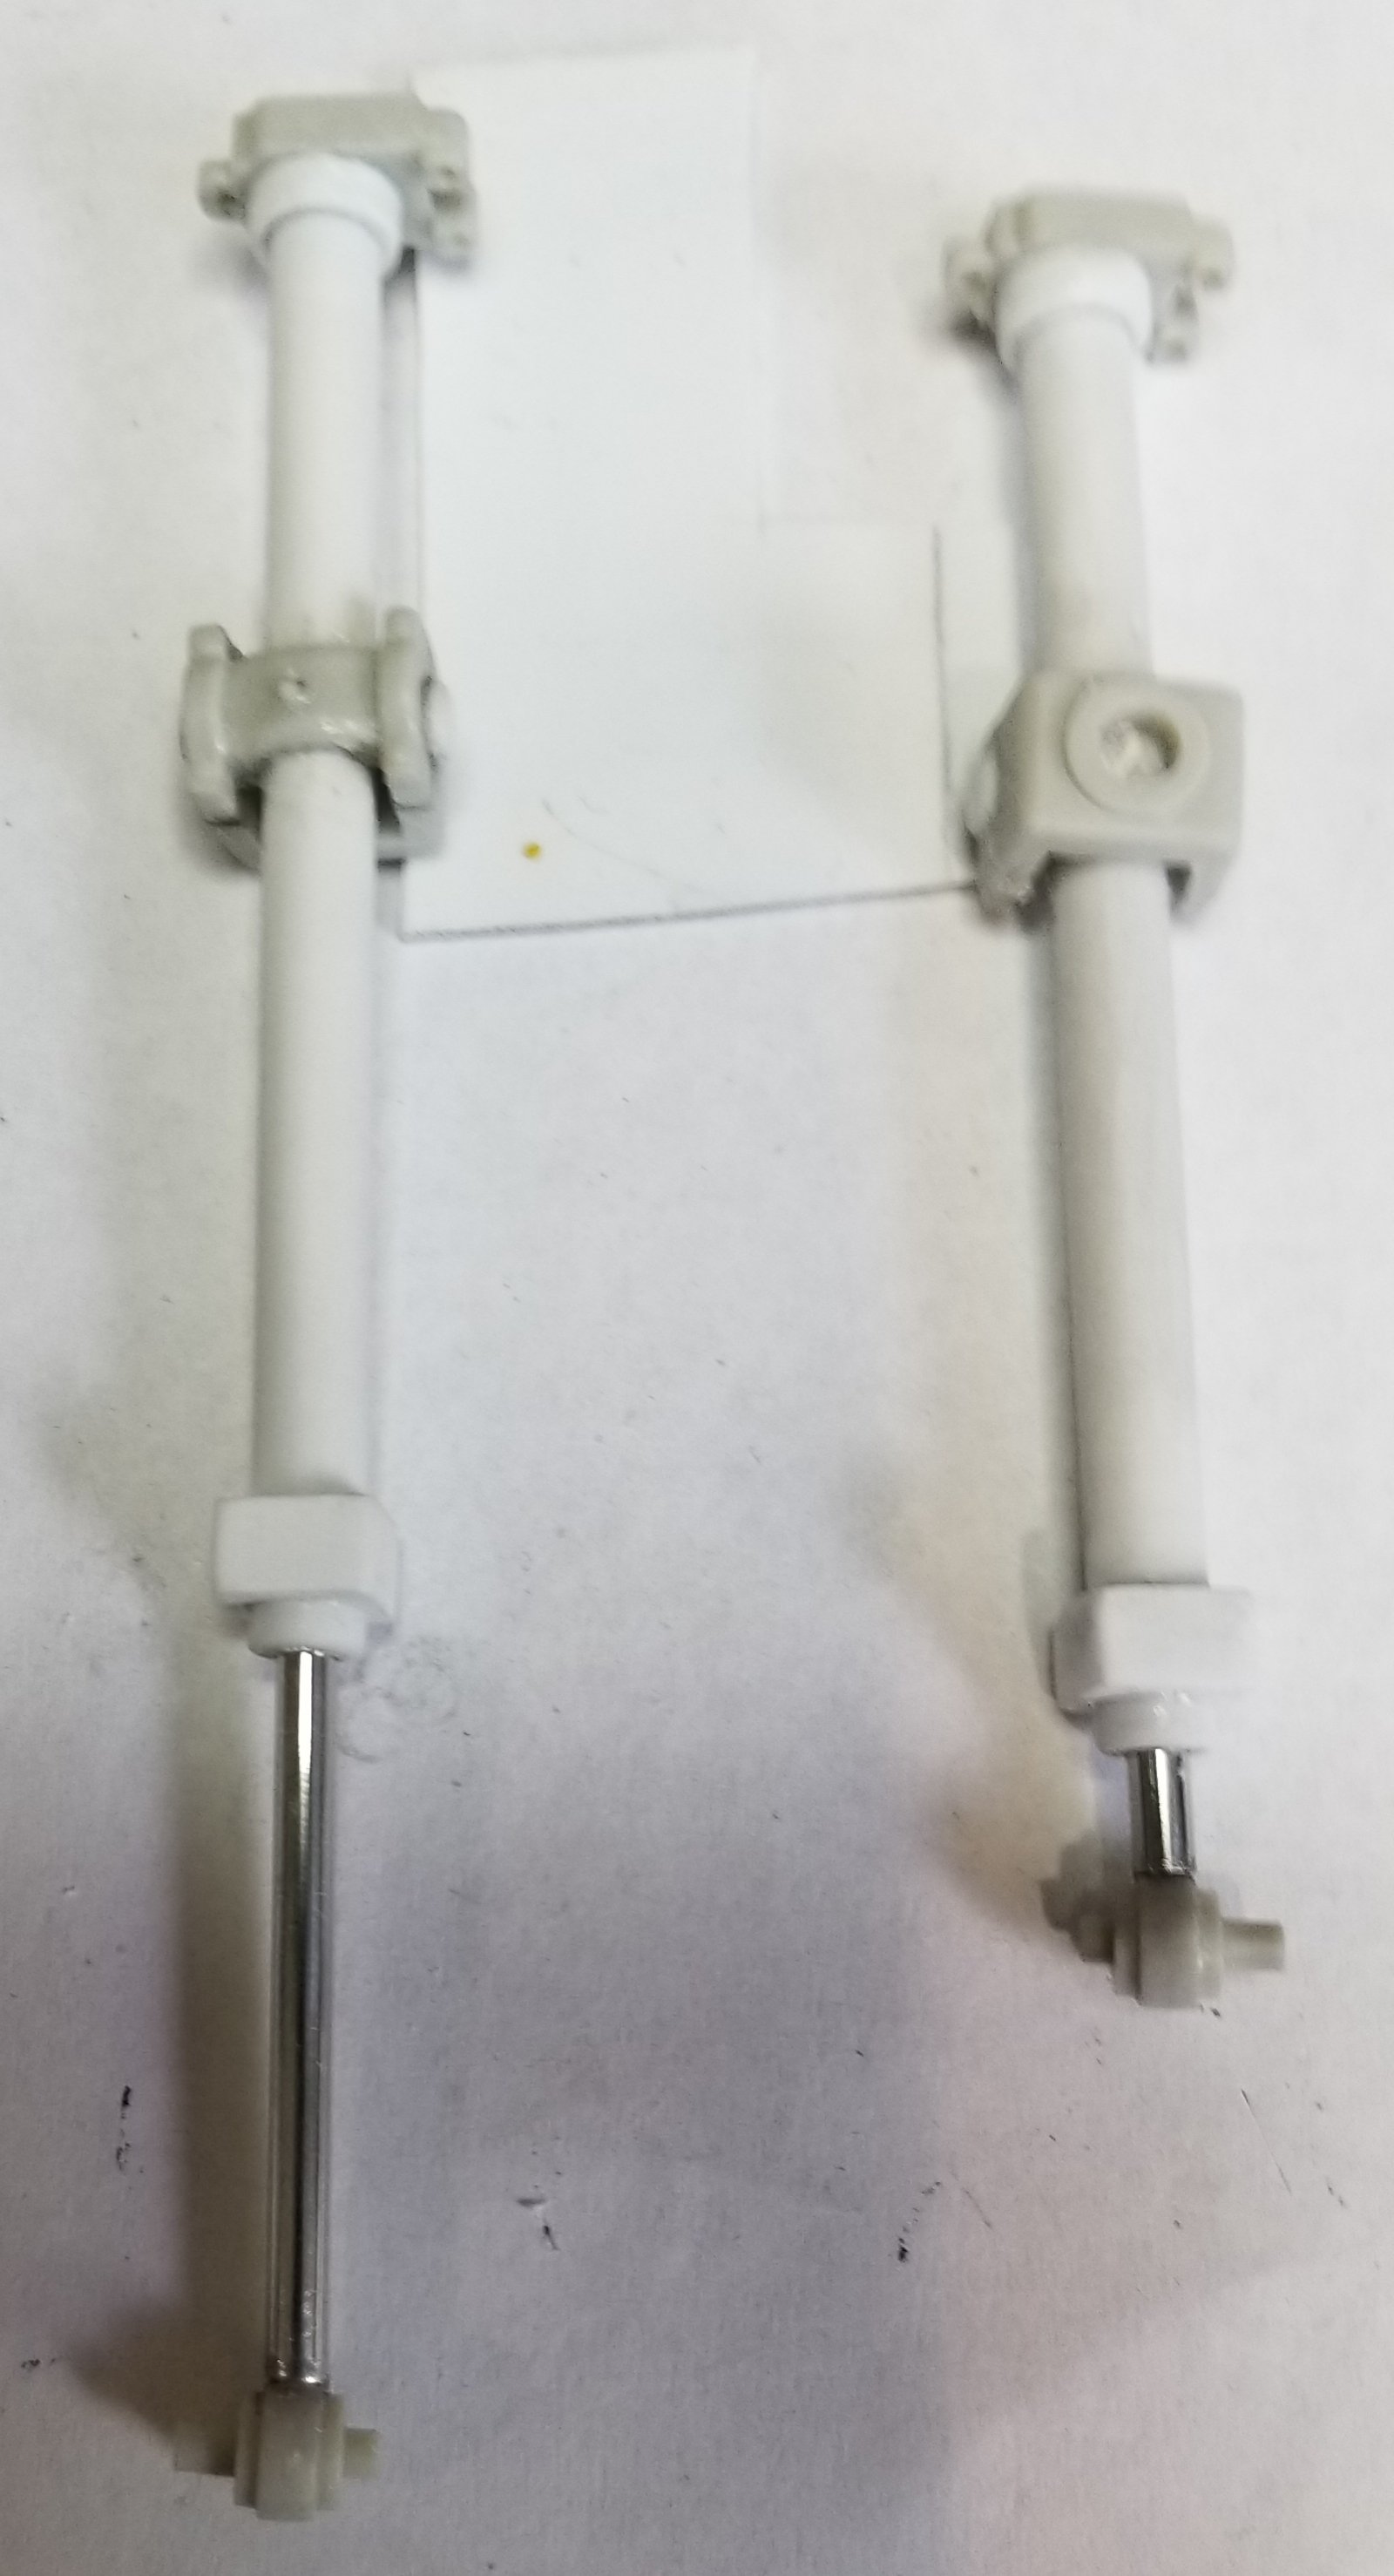
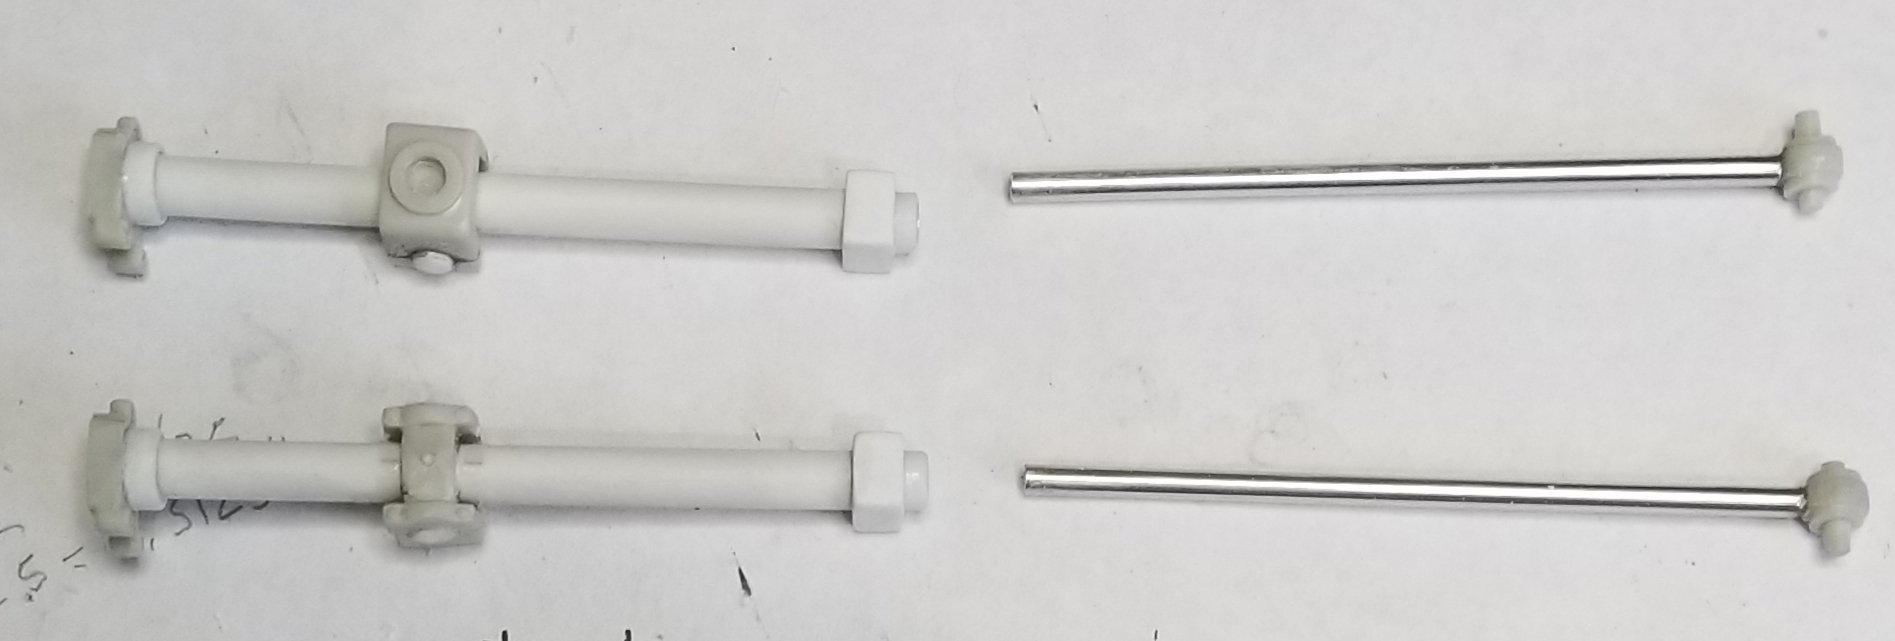
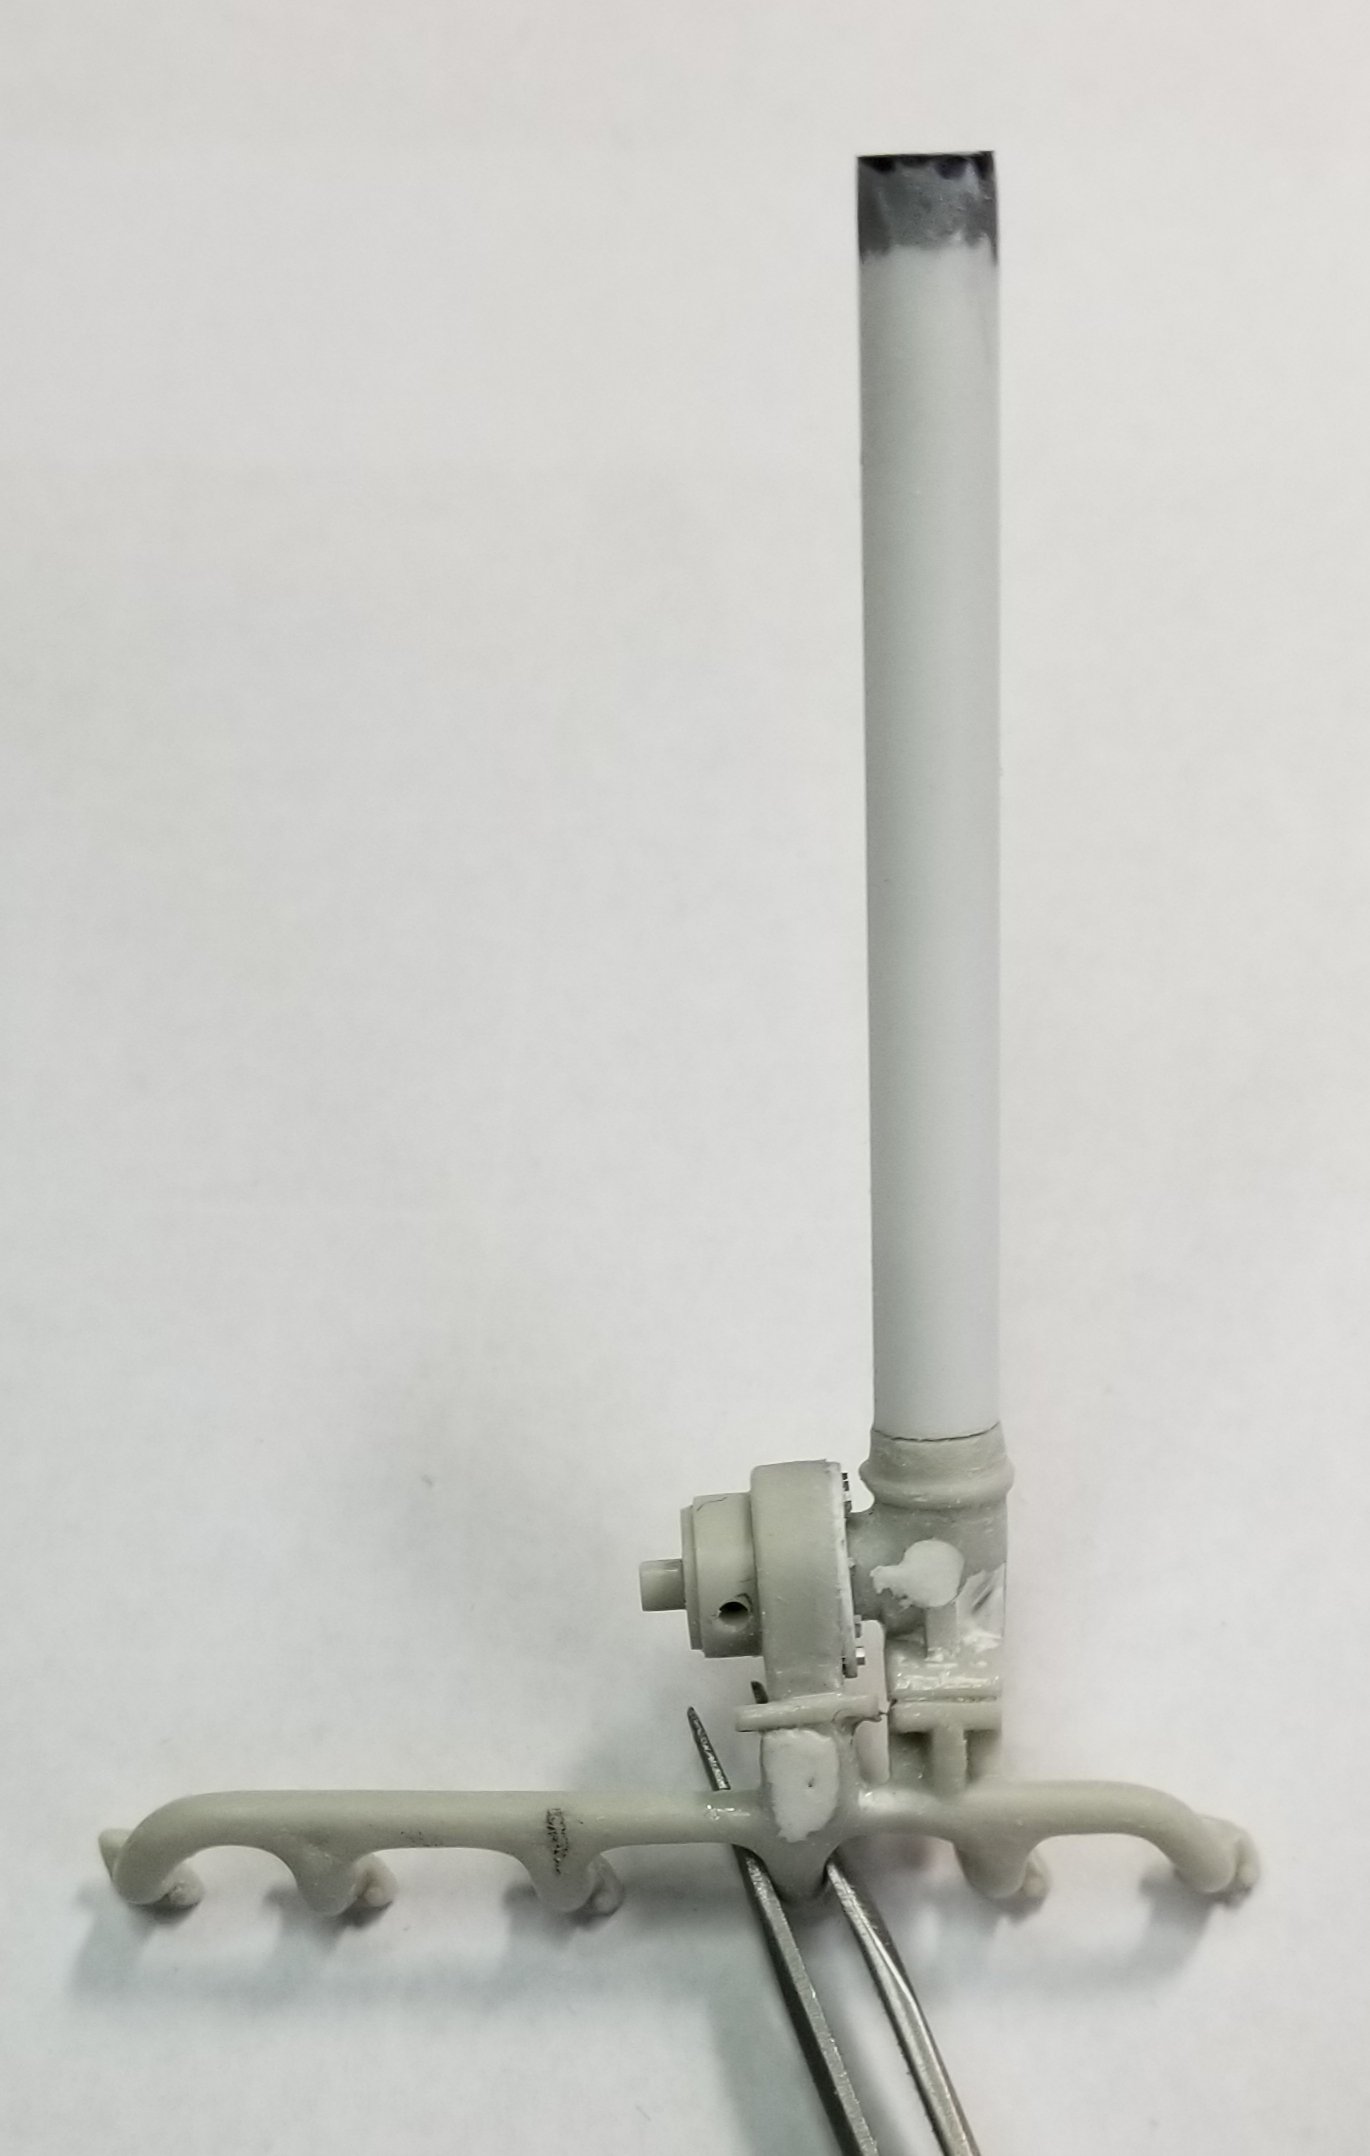
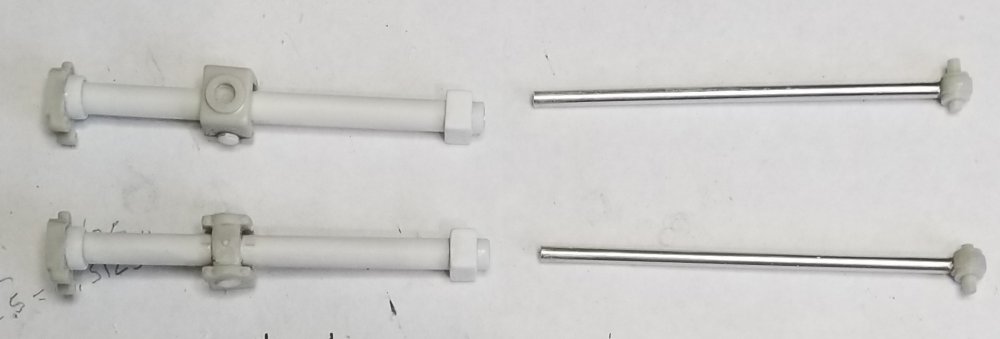
Hey all Small update. I scratch built the blade lift cylinders. The kit ones weren't up to snuff. I used pieces from them along with some brass and aluminum tubing and some plastic tubes and a piece of 1/4" x 1/4x piece of plastic stock. I still have to add the hoses and the piece of pipe that runs from the upper end block down to the square block at the end. Well that's it for now. More later Ron G

-
Hey Jeff Its RB motion, but for some reason his site is down right now. Ron G
-
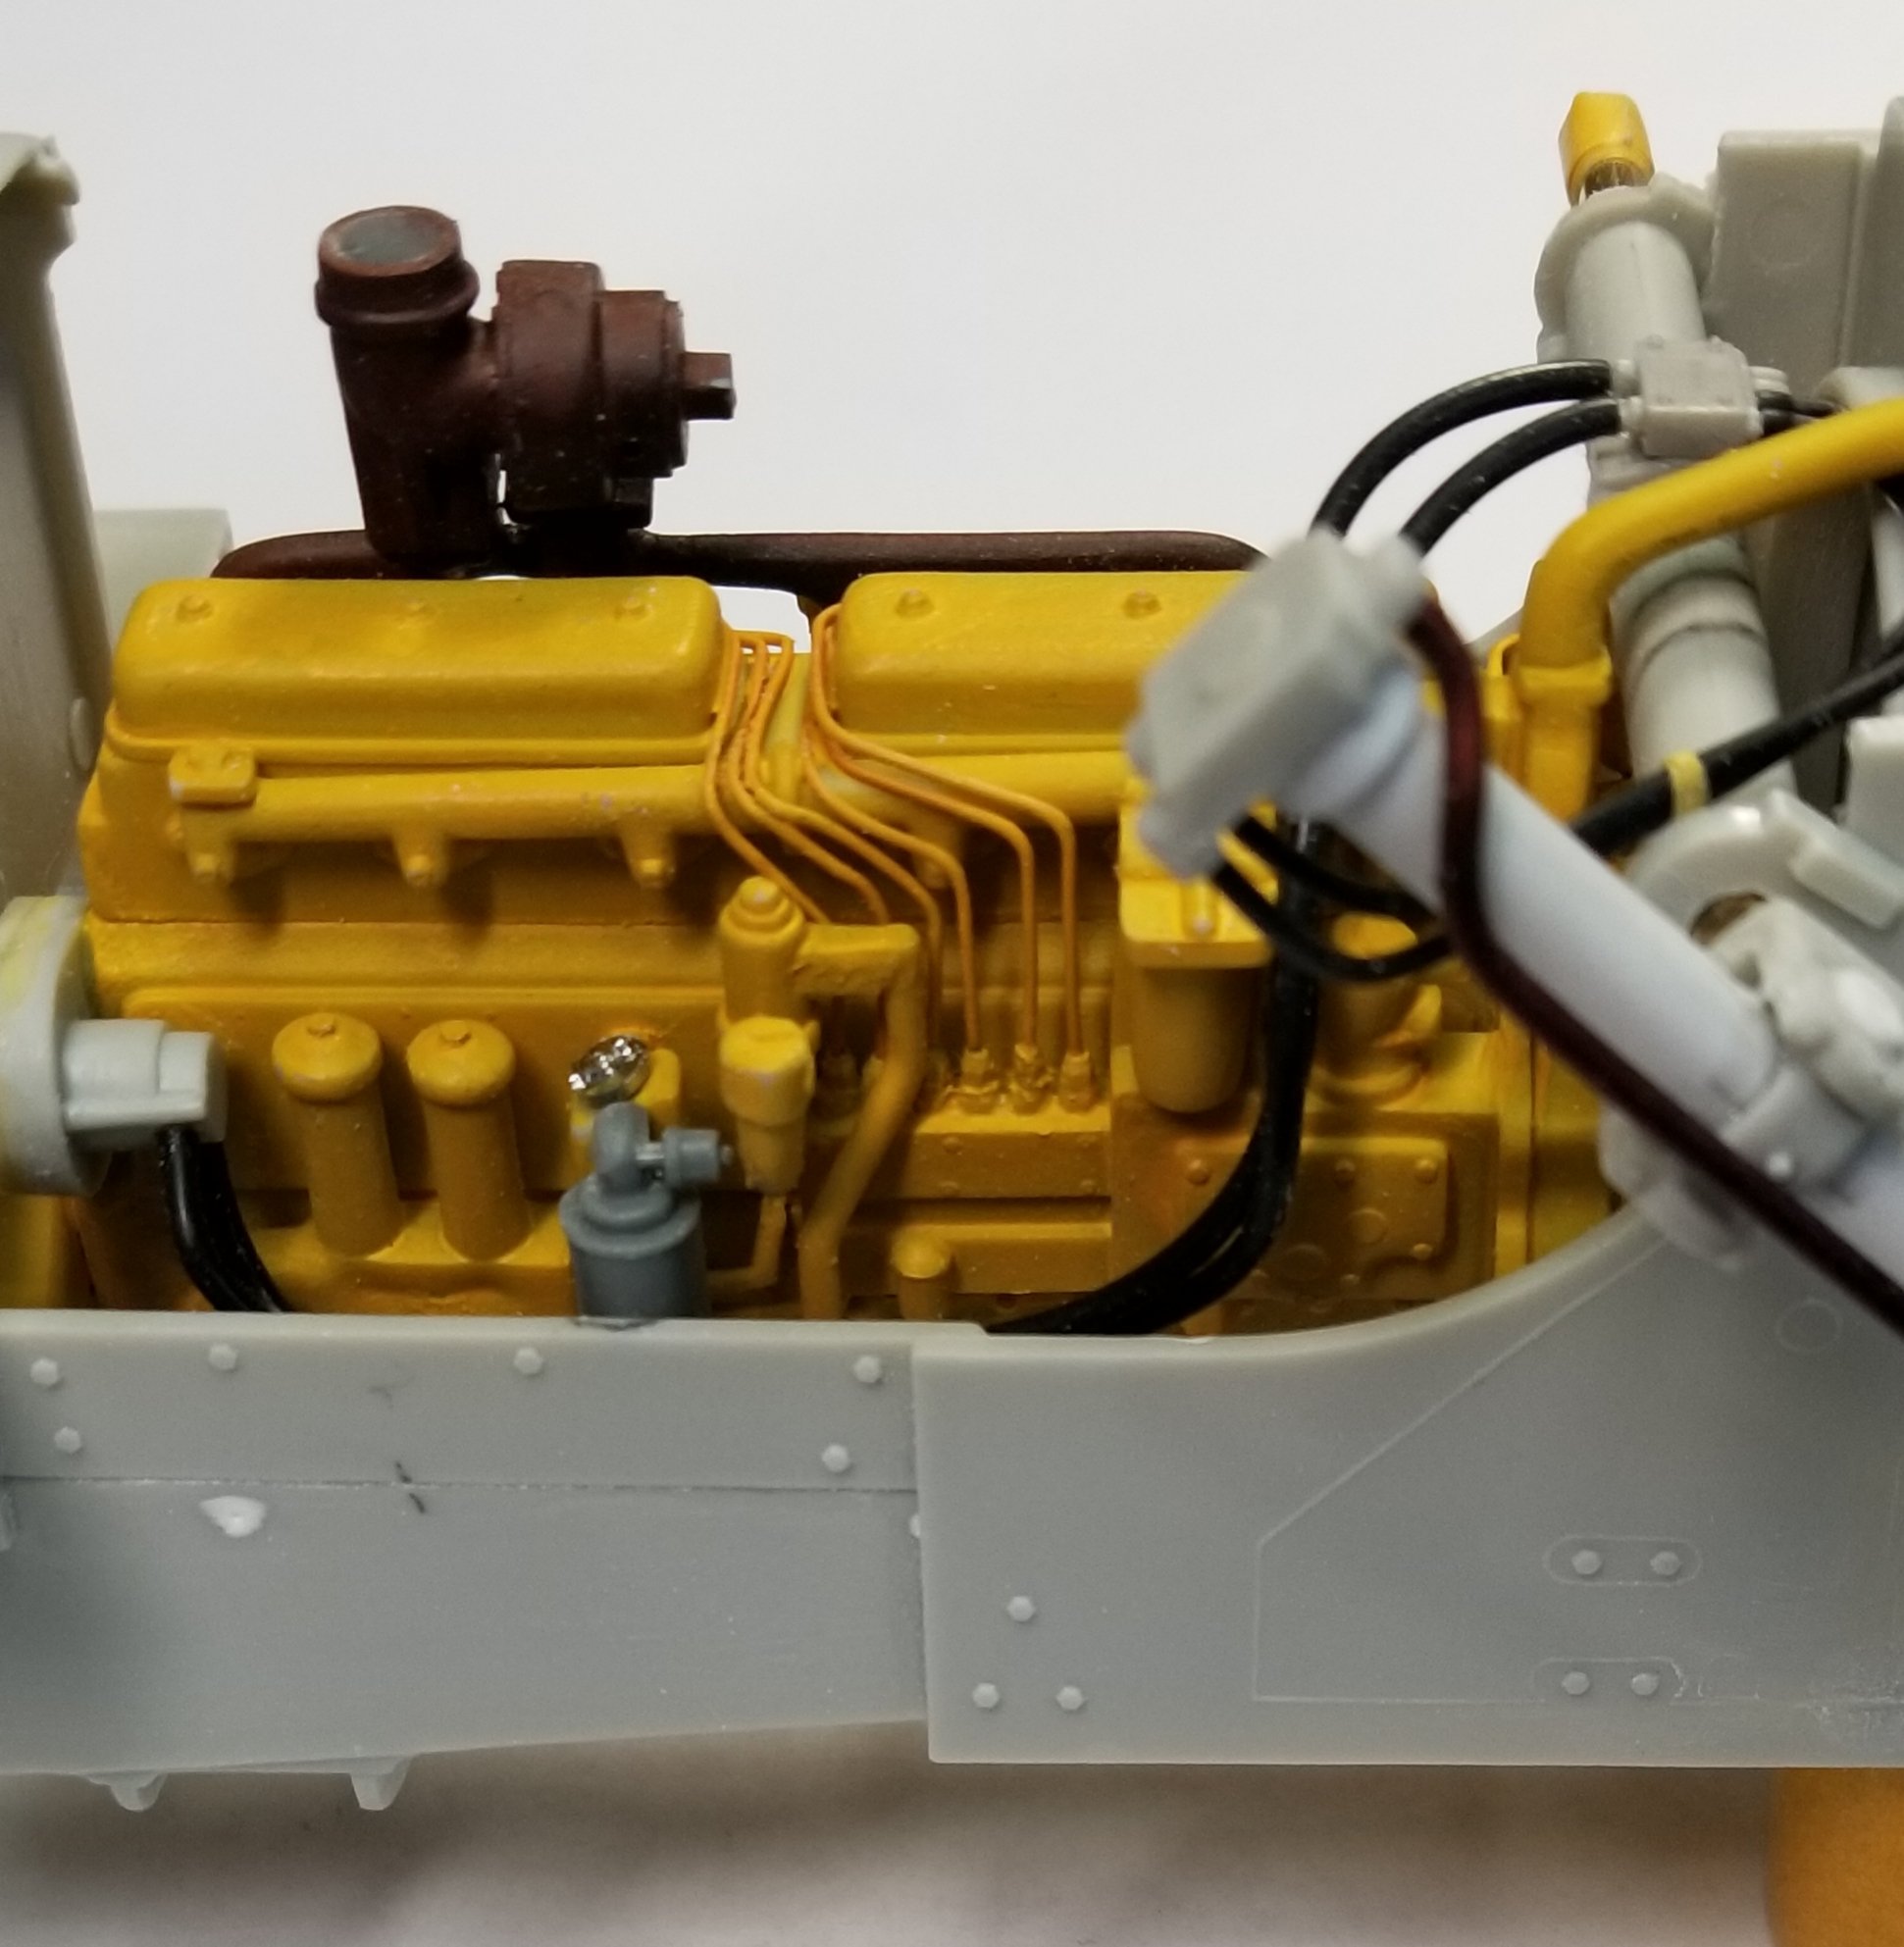
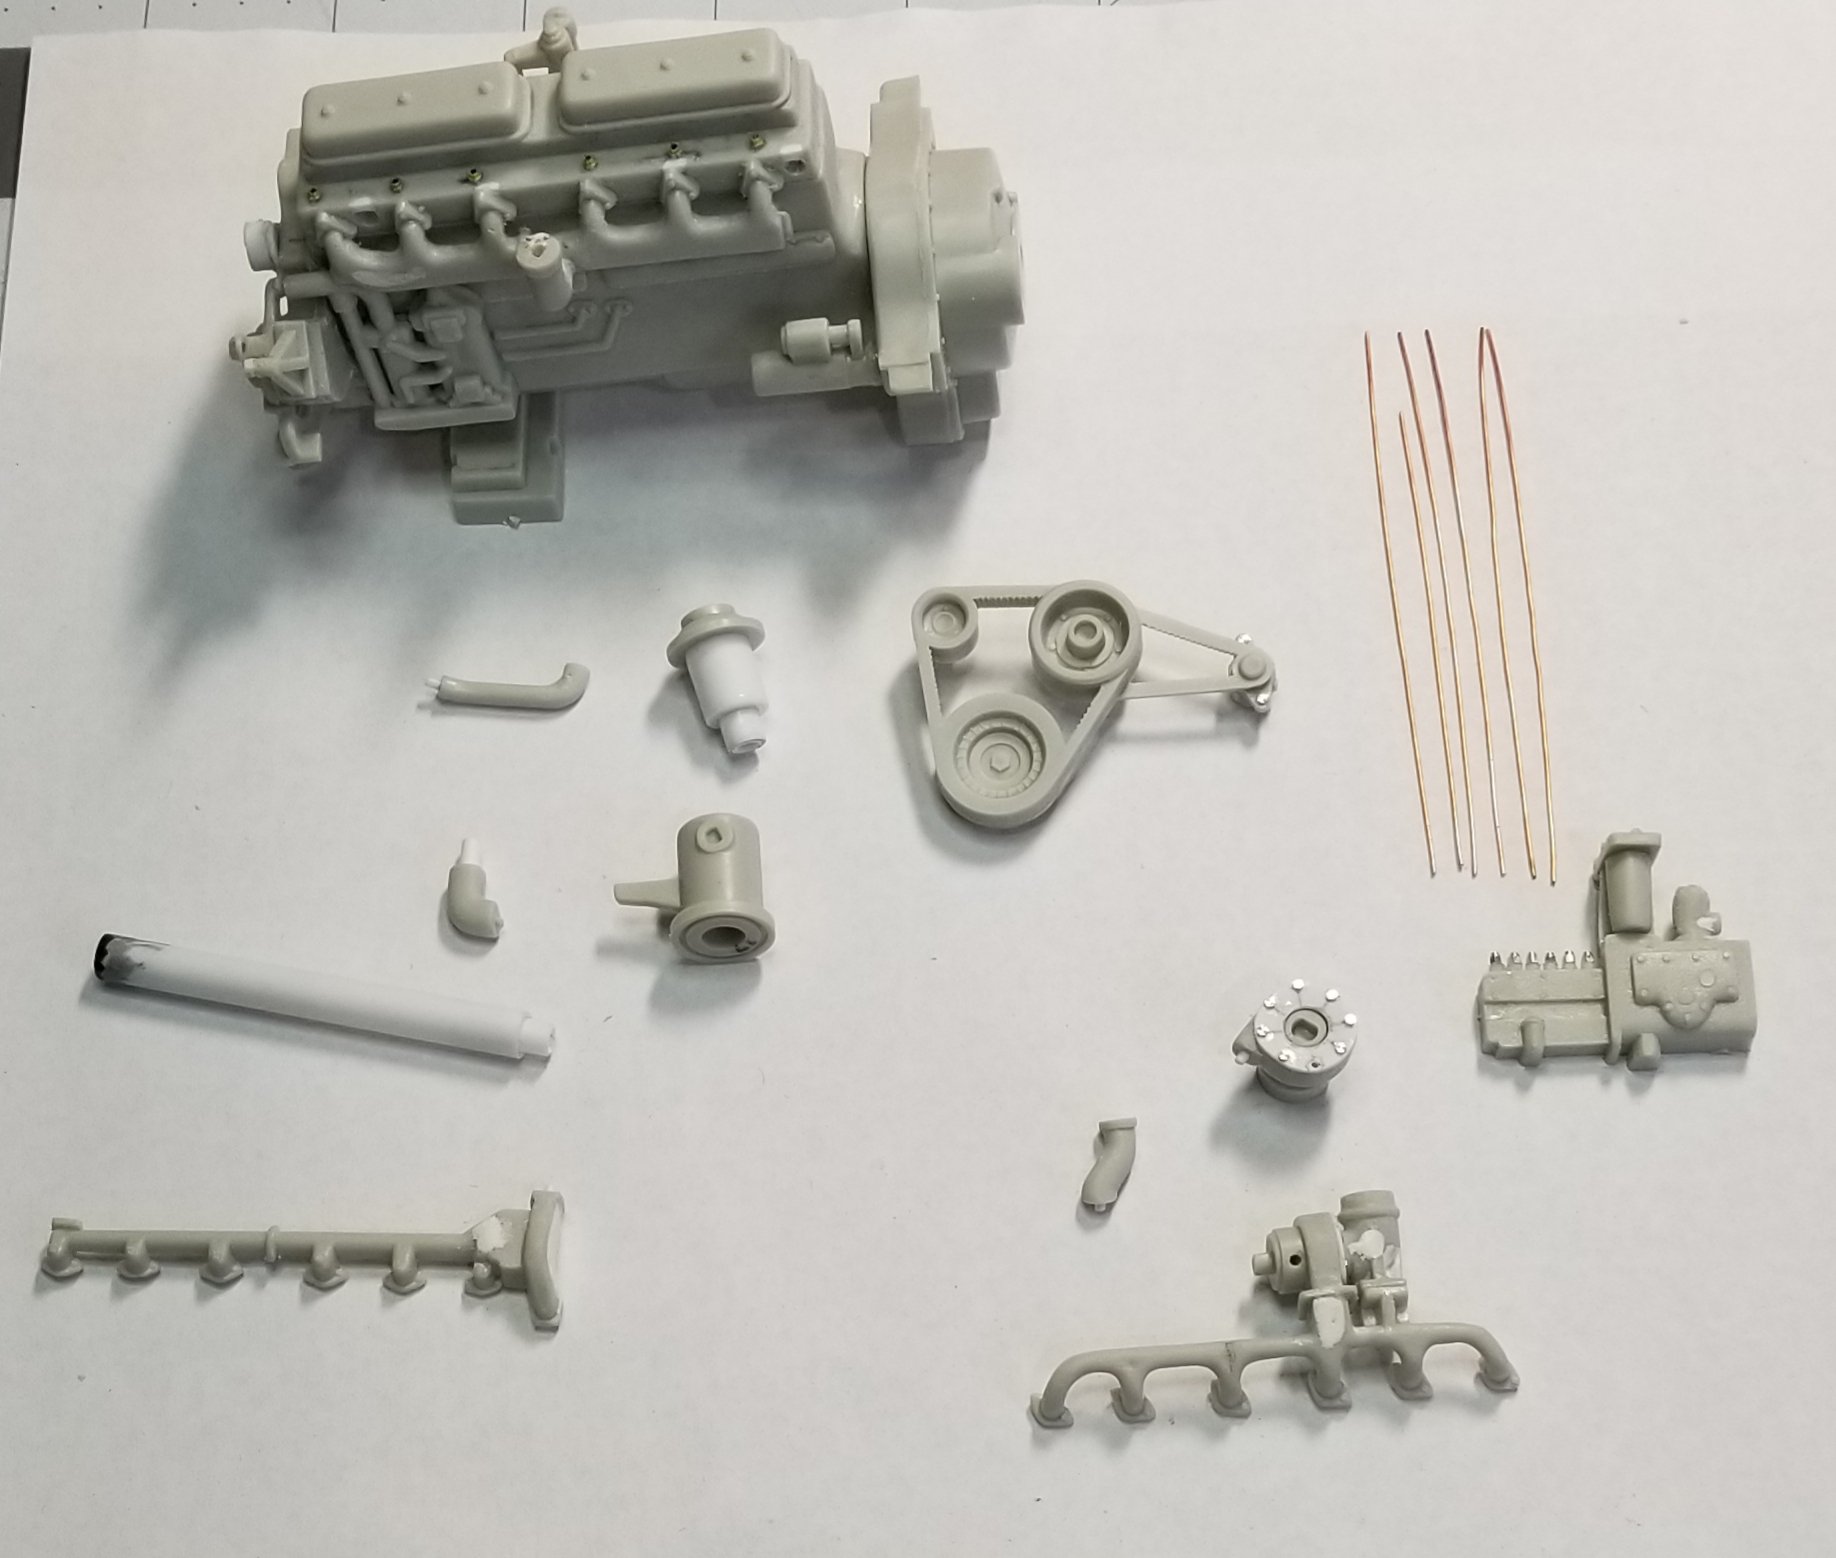
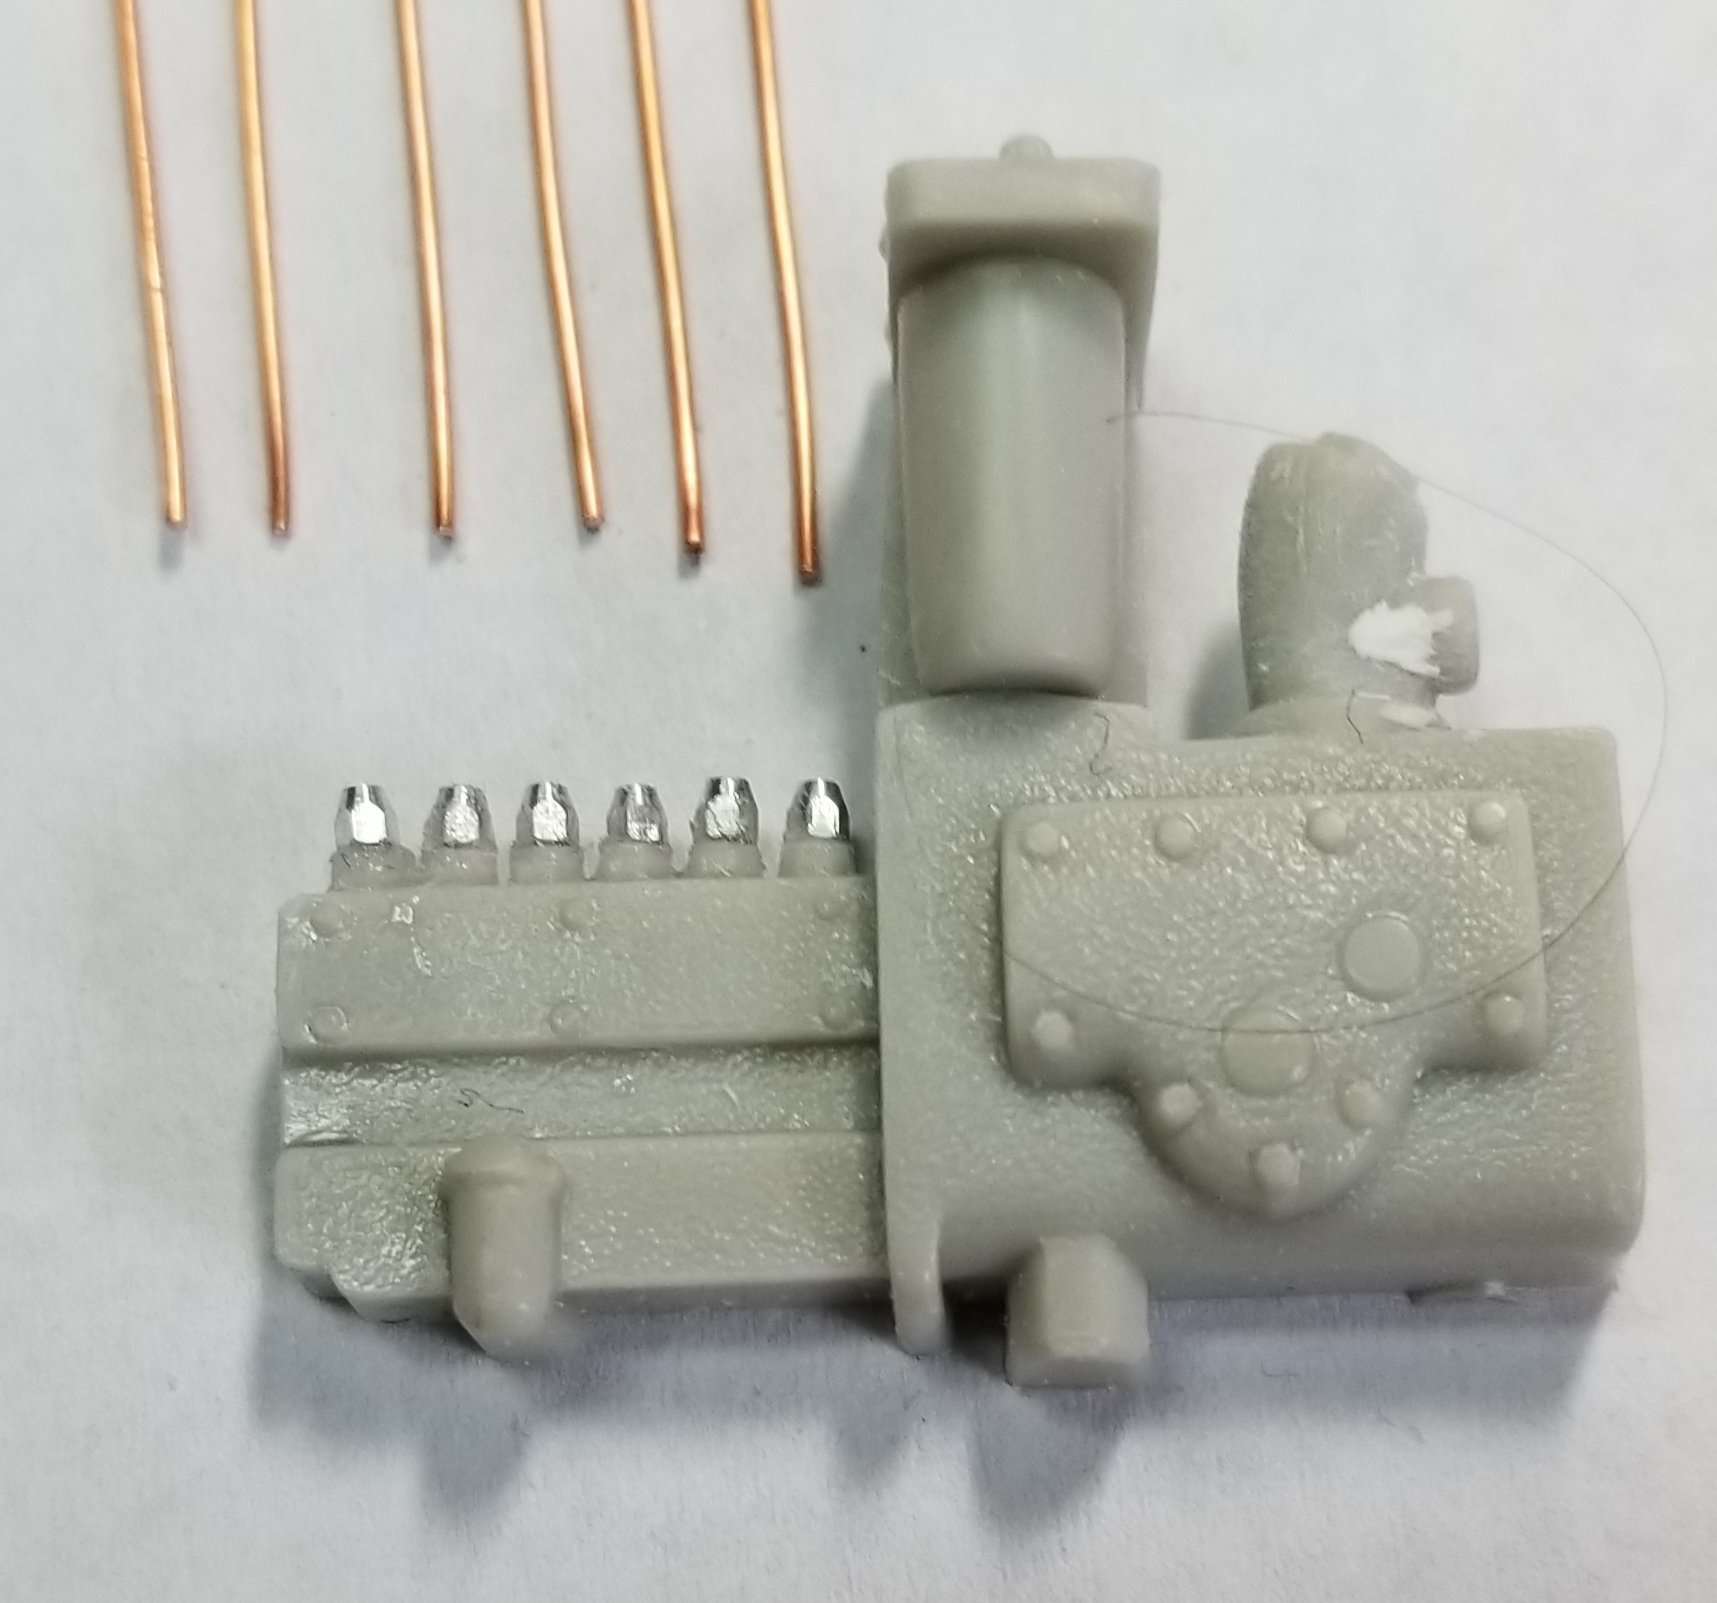
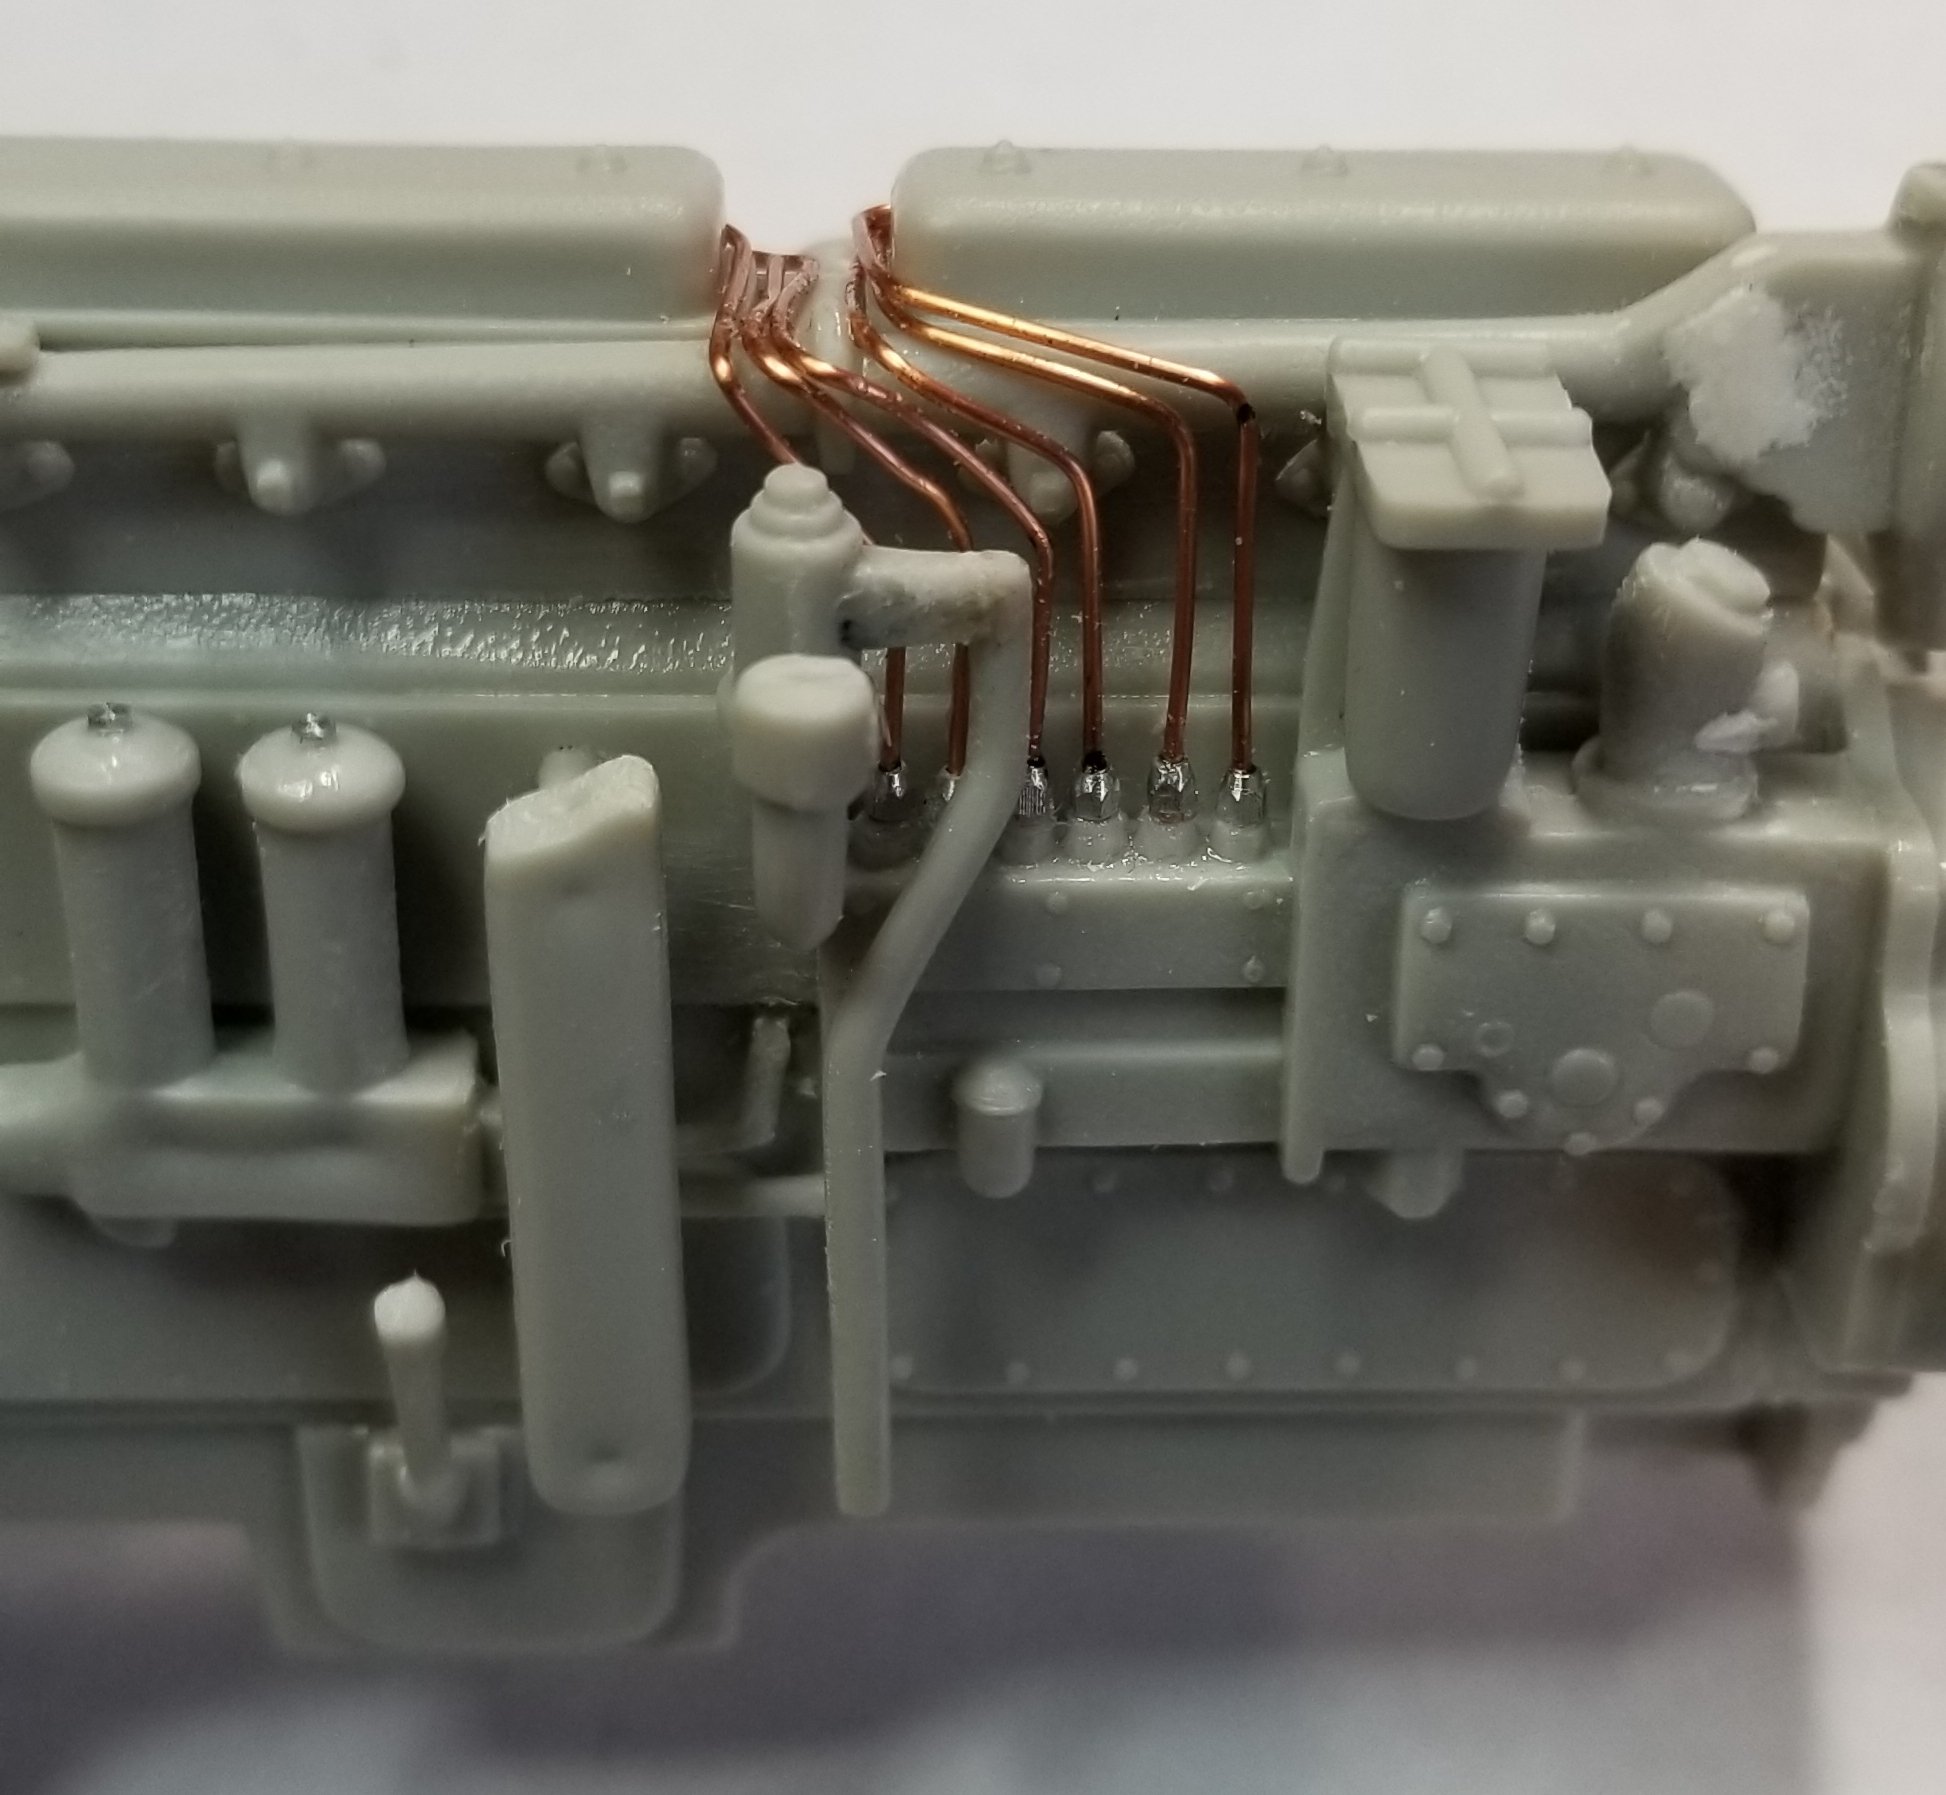
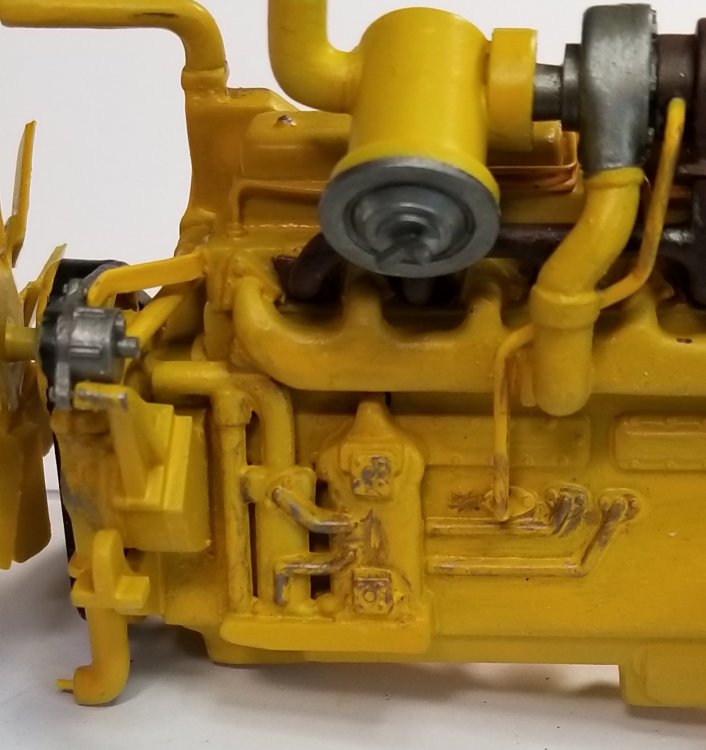
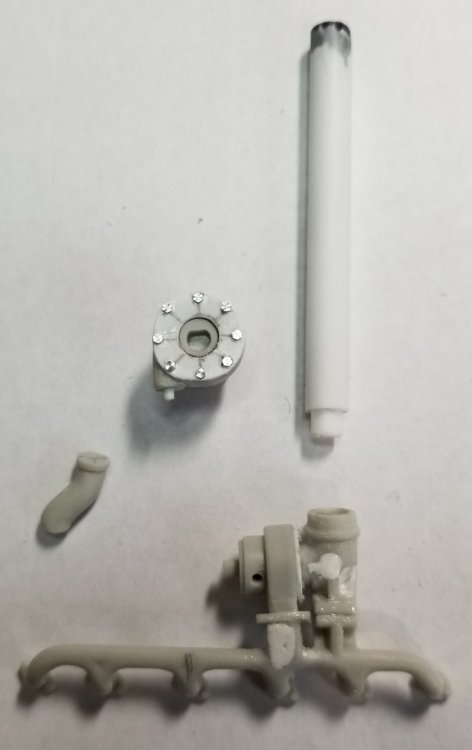
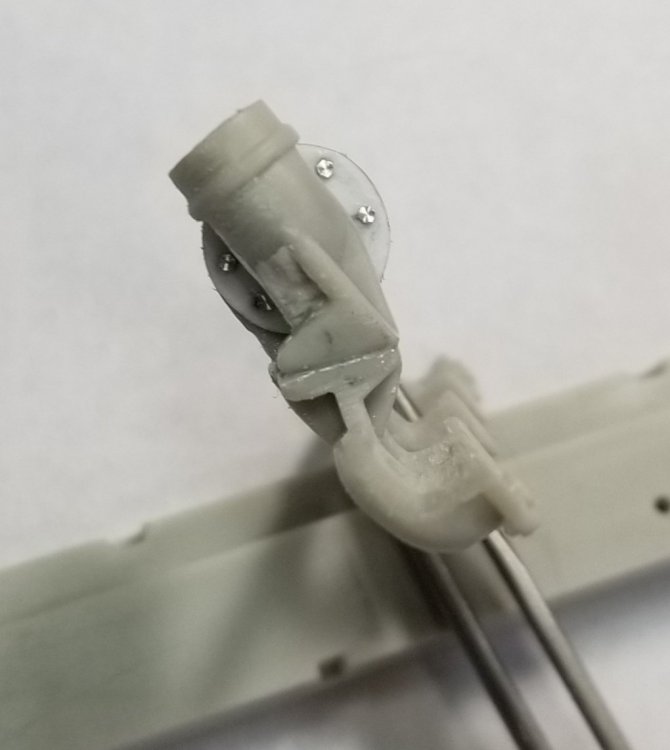
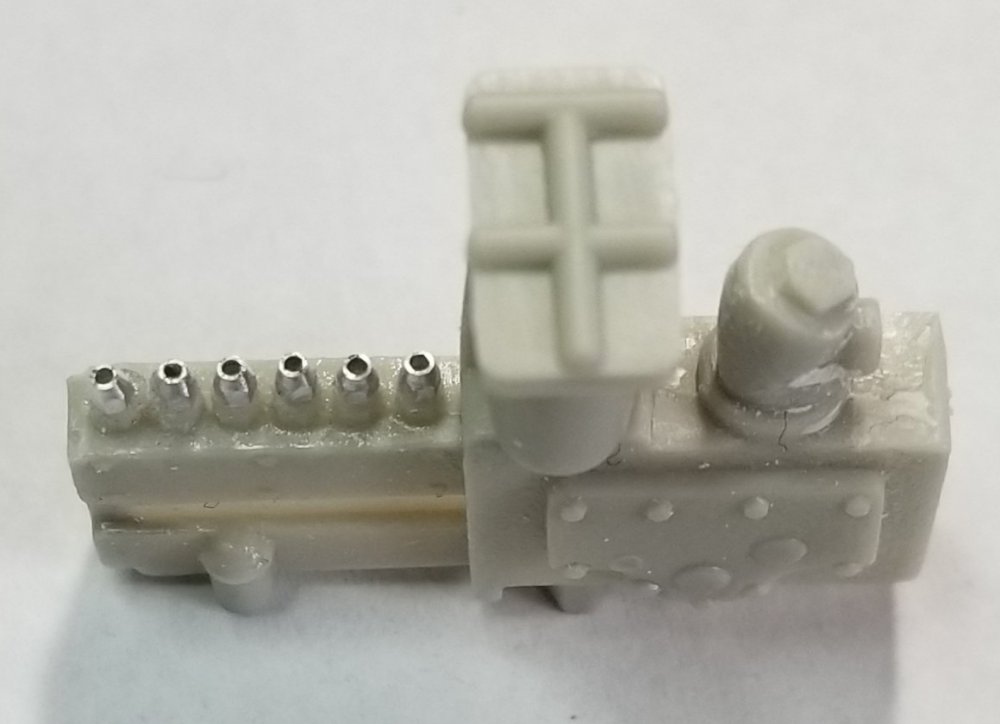
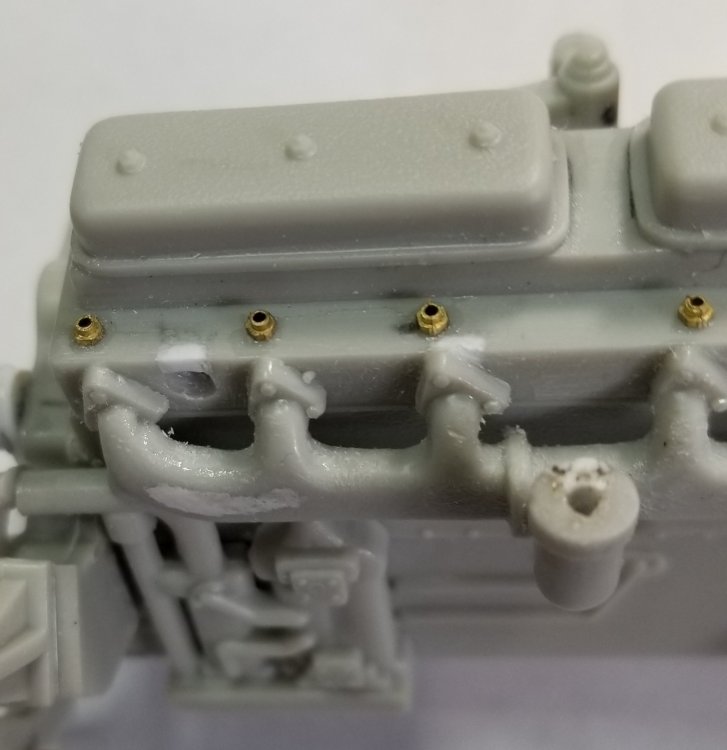
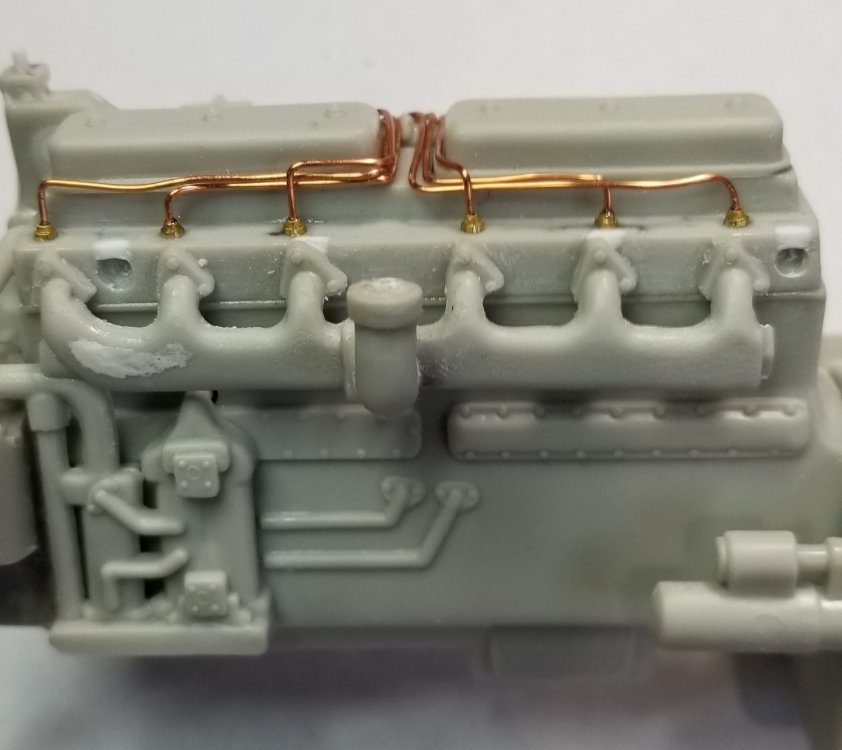
Hey all Next installment. Like I said I started on the engine. here is the engine and some engine parts. Some I have modified. this is the intake turbo. You can see the round white plastic cover plate that I added to cover up the void in the kit part. I also added 8 small hex bolts. To the right is the exhaust pipe I made from 7/32" round plastic tube. Below these are the pipe that connects the intake turbo to the intake manifold. Also the exhaust manifold with the exhaust turbo and the piece that is attached to the exhaust manifold that connects to the exhaust pipe. this view shows the plastic cover I added to the exhaust turbo to cover the void in that part. Also another view of the part that is attached to the exhaust manifold and to the exhaust pipe. another view of the exhaust turbo. view with the exhaust pipe on. this is a view showing the fuel pump. The silver colored nuts I added are for the fuel lines which will be made from the brass 0.04" wire above it. view showing the nuts where the fuel lines connect. view showing the intake manifold. This view also shows the six brass fittings that I added to the head for the fuel lines. close up view of the fuel line fittings. Also you can see the part of the intake manifold where the small bent pipe connects to the intake turbo. view showing the fuel pump on the engine. this view shows the pieces that I added to the front cover for the upper fan belt pulley. AMT forgot to add this to the kit, go figure. view showing the fan belt with the alternator attached and the small bolts I added. view showing the fan belt attached. view showing the fuel lines attached to the head fittings. this view shows the fuel lines connected to the fuel pump. These are supposed to go under the water manifold, but to late to fix it now. More to come later as soon as I get back to modeling. Ron G


-
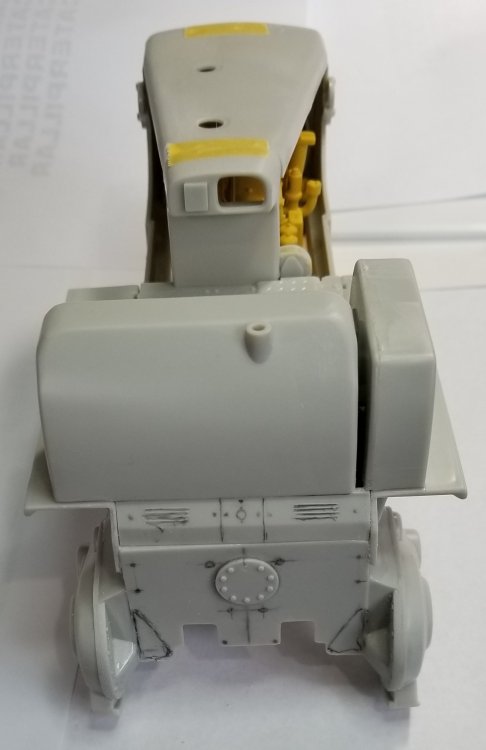
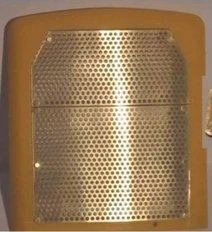
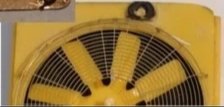
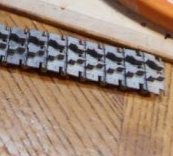
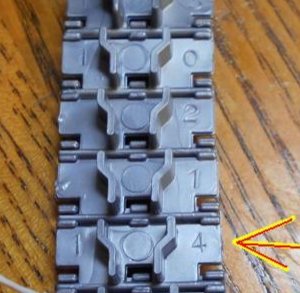
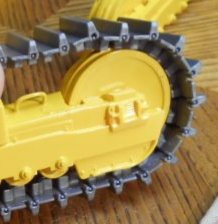
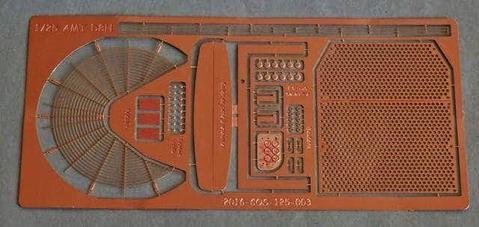
Hey all Well here I am again with another build thread. A little history first. I started this kit almost 16 years ago. I had plans to convert it into a modern D9T high drive, I even scratch built part of the D9T drive mechanism, but alas I came to the tracks. These are really bad and it's why I shelved this kit back then. The tracks connect together in a way that AMT most of thought of on one of there acid trips! Because they don't connect anywhere like the prototype. These are done like tank tracks. If AMT would have gotten this right it would have been a superb kit. The other bad part of the kit is the grill. There isnt one! Well there sort of is you get a plastic part but there is no grill opening not one hole. You get a sticker with dots that are supposed to represent the grill, pretty poor AMT. The newer kits have decals (3) different ones for the grill. Ok enough ranting, on with the build. Like I said I started this a while back and had two kits to work from. I bought a third kit today in order to get one more ripper blade. The kit only comes with one but has postions for three and I want three on mine. The left over parts I will make into another dozer later. Here are the kit tracks You can see they don't go together like the real thing at all. They even have numbers cast into them, on every track all 84 of them!!! They just don't look real and unless you completely cover them in mud and gluck they look like crap. "So what do you do" you say, well I found a cure for the crappy tracks, albeit a little expensive. $112.00 per set, thats 100 links. Now these are really sweet! They are for a newer D8T, but they are almost perfect for the D8H. There a little wider by about a 1mm, but they actually were made for someone who used the AMT kit parts to create there D8T from so they will fit the drive sprockets, idle wheels and rollers. There are 50 links per set, I only need 42, so there will be some extras. They even have the 4 bolt heads on the upper or outer side of the tracks, these represent the bolts that hold the shoe to the actual links. There from a guy on Shapways who designed them for a customer. [DW Toys] I also found a place in Canada with some stuff [pappyhobby.com] that has a photo etch set for this kit. You get a grill, you have to cut out the opening in the kit part so you can add the photo etch grill over the cut out. You get a photo etch fan shroud that looks just like the real ones wire shroud, you have to modify the kit part to make it work. You also get pedels and some other small bits, I'll know more when it gets here. these is the photo etch set. here is a picture of the grill installed on some ones model I got from the internet. I have some more stuff done. I started on the engine and have it mostly put together. I painted it yellow but it didn't come out very good, I'll look at it Tomorrow and see how bad it is. I'll post some more later, right know I'm beat. Ron G


-
American trucks......my soft spot......
CrankyCrafstman replied to a topic in LSM 1/35 and Larger Work In Progress
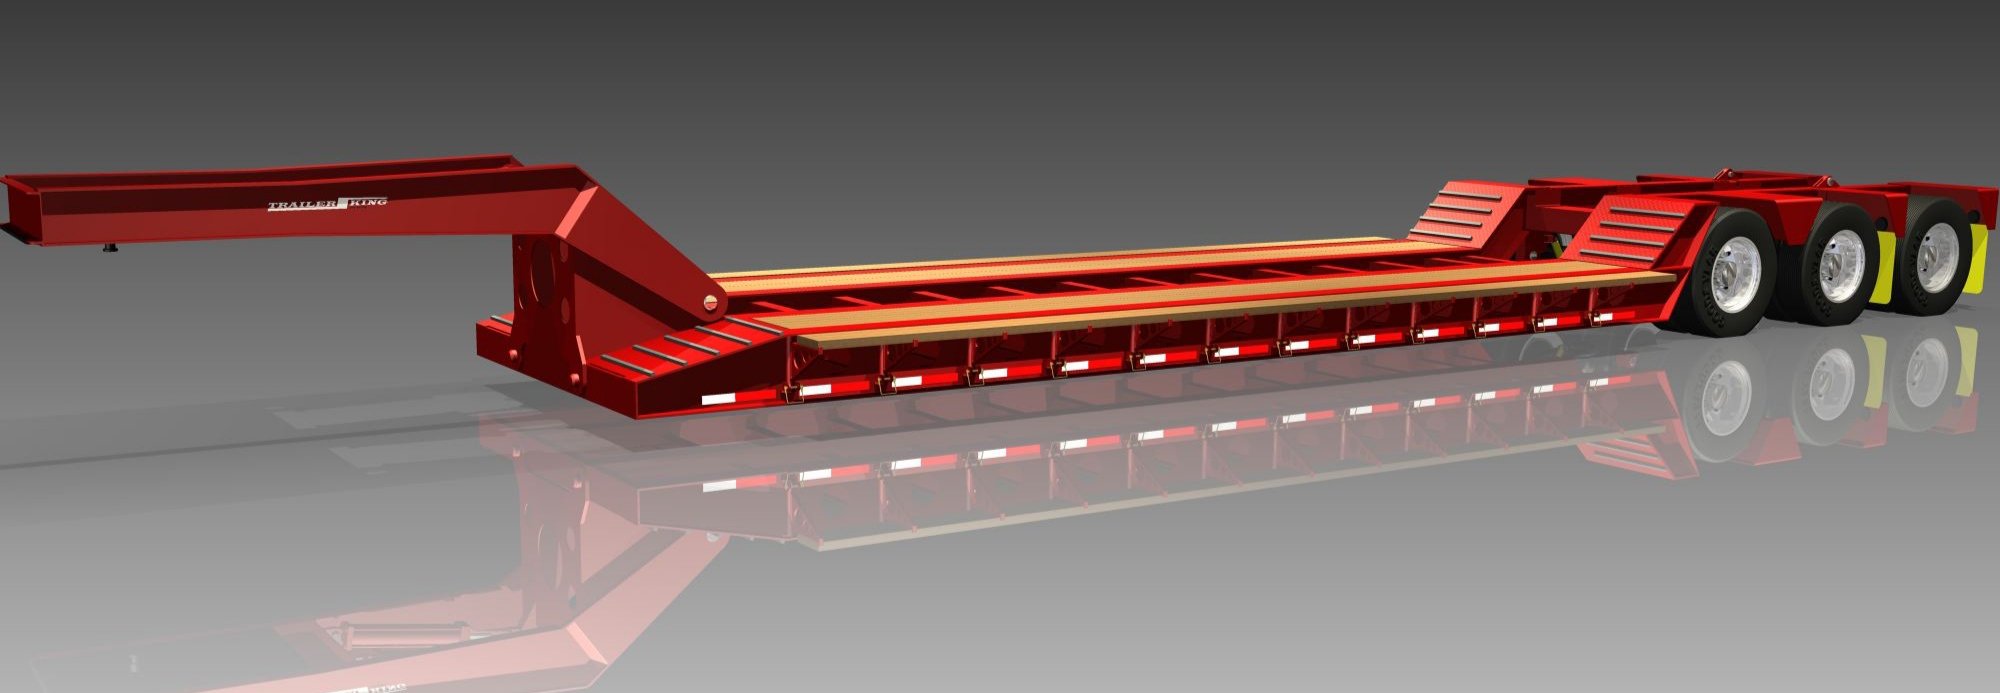
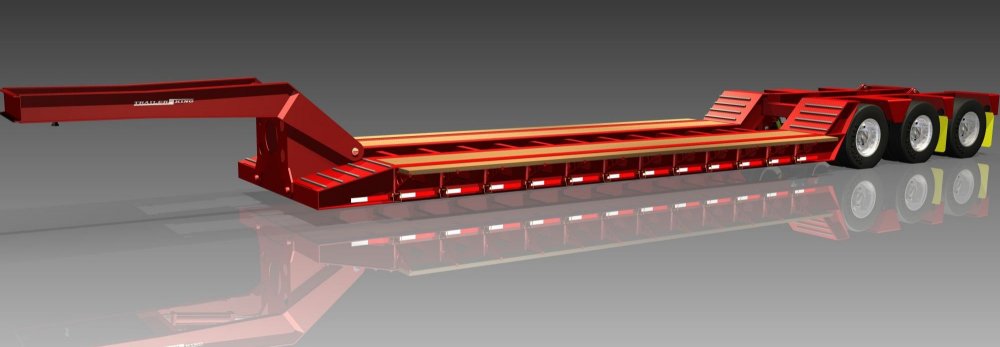
Hey Jeff If you look back, I am building a 50 ton drop nose lowboy to haul the dozer and a three axle Peterbilt 359 tractor to pull it. This whole setup is going to be around 36" long! I'm going to need a big shelf for this...lol Ron G -
American trucks......my soft spot......
CrankyCrafstman replied to a topic in LSM 1/35 and Larger Work In Progress
Hey all Well I ordered the tracks $112.00 bucks!, but they are going to look amazing, and really make this Cat pop! I've started on the bulldozer kit. I'm working on the engine right now, doing small things like filling in sink marks, drilling holes for plumbing this beast. I have a lot of pictures I've pulled off of the internet. The tracks won't be here till around the end of July, takes awhile to proceess, print and ship, when they get here I'll post some pictures of them. I'm probably going to do a build thread on this for those that want to follow in the tracks of this beast. Ron G -
American trucks......my soft spot......
CrankyCrafstman replied to a topic in LSM 1/35 and Larger Work In Progress
Hey all Ok, I found some aftermarket stuff for the bulldozer. 1st - scale tracks, there for a D9T, but they are almost the same in real life. And these work just like the real ones! The kit tracks are actually kinda toy like, and they don't work like real ones. They pivot from the wrong place! You can see where they actually have numbers stamped in them...really guys. And from this you can see how crappie they are. This was the main reason I shelved this kit 10 or 12 years ago. 2nd - I found some photo etch stuff for this kit. A new proper grill, a wire fan shroud just like the real one, petals and other small details. not the greatest picture, but you can see the grill and fan shroud. This is from a guy in Canada. here you can see it on the model. (This is not mine). You have to cut out the opening behind the grill and you need to modify the fan shroud part from the kit to get the photo etch one to fit. With some wiring and weathering its going to look cool! The guy in Canada (papyhobby.com) also has a cab. this is for a D8K but I think I can make it work on the D8H. He also has different blades, rear rippers, rear winch and coversions for a D8K. I found all this stuff late Friday after spending hour after hour on the web with no luck and then bam! I lucked out and found this stuff. Oh! I almost forgot the tracks are from a guy on Shapways (DW toys). He has five links, which is the picture I posted, and a complete set. Since these are for a D9T there are more links then you need to do a D8H. I'm waiting for him to contact me about some questions I have concerning the tracks when I here from him I'll post an answer. That's it for know. Ron G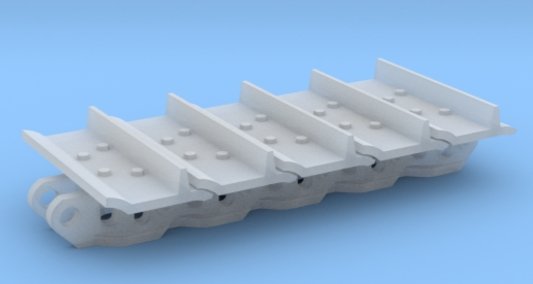


-
Tamiya Spitfire Mk XVI
CrankyCrafstman replied to JohnB's topic in LSM 1/35 and Larger Work In Progress
Hey John Check out the Rexx exhausts they are really a great upgrade for this kit. They are abit delicate but perfection comes with a price...lol Ron G -
American trucks......my soft spot......
CrankyCrafstman replied to a topic in LSM 1/35 and Larger Work In Progress
Well I have the trailer pretty much figured out. I printed some pictures of the CAD model stl file. Form them I drew a scale plan on some large format paper, so that I can build over it. The CAD model isn't printable as it came in the download. There are a lot of descripencys, such as beams running through other beams, etc. The good news is it is at least modeled in separate components. As soon as I can get it loaded into Unigraphics I can start to fix it. After that it should be printable in pieces. I hope. Ron G -
American trucks......my soft spot......
CrankyCrafstman replied to a topic in LSM 1/35 and Larger Work In Progress
I found them...whoopi !!! -
American trucks......my soft spot......
CrankyCrafstman replied to a topic in LSM 1/35 and Larger Work In Progress
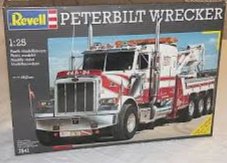
Thanks for the pics Jeff Got a problem. DUMBO!!! (thatxs me) lost the instructions to the Revell wrecker kit #7541 or 85-1508 either one will work the last one is a repop. So my question is does anyone have this kit and are you willing to send me a copy. A pdf would be fine. I've scowerd the interweb but no luck. ,Any help would be greatly appreciated. Ron G -
American trucks......my soft spot......
CrankyCrafstman replied to a topic in LSM 1/35 and Larger Work In Progress
Hey Danny I do have the 3 axle drop nose in a cad stl file that I could print on my resin printer, but I think I'm going to try and make it from scratch as much as possible. I may do some things with the printer but only things that are repetitive so I don't have to recreate them multiple times. Ron G -
American trucks......my soft spot......
CrankyCrafstman replied to a topic in LSM 1/35 and Larger Work In Progress
Hey all Here's a little project I've been mulling around on for a few years. Here are pictures of the kits. this will be built pretty much OOB with alot weathering. this is mostly going to be used for parts. I plan on scratch building a 53' drop nose lowboy using the parts from the AMT lowboy. It will look like this. This will be converted into a 3 axle tractor with alot of extra detail work. All will be painted in construction yellow. At least thats the plan. Ron G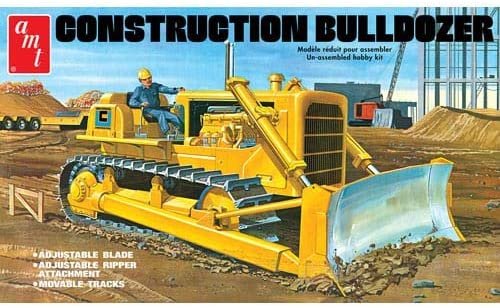
-
Thanks everyone Well one eye done and all is great so far. I'm almost to 20/20 in it, left eye, which is really strange not having to wear glasses, sunce I've worn them since the 7 grade, wow!! thsts a loonngg time ago. They are doing my right eye on the 16th, so everyone cross your fingers all goes well. Thanks Ron G
-
Hey all I'm looking for the torpedo from the Trumpeter 1/32 fairey swordfish, I need it for my Beaufighter build. If anyone has one that isn't going to use it, I'm very interested. If anyone has one that is willing to let me use it to copy it so I can model it up on the computer so I can print it, I would be interested in this also. I will return it when done. Please let me know. Thanks Ron G
-
- 3
-

-
Thanks everyone
-
Hey guys Yeah they lazer cut the cataract and then removed it and replaced it with Crystlen lens implant (brand name). My Doctor is the only one in Michigan that does it and it ain't cheap it's $3,500.00 per eye. So far after my surgery on Tuesday I went in for post op exam and they said everything is perfct so far. Ron G
-
Hey all Just thought I would take this time to let you all know whats going on. Yesterday I had my first cataract surgery on my left eye. In two weeks they do the right eye. I had the crystalen emplants which will alow me to not have to wear glasses. This is going to be really weird, since I have worn glasses since I was in the 7th grade. I will only need readers for up close work, which I used when I was modeling anyway. The great thing is it's supposed to give you 20/20 vision so my shooting is going to improve alot...lol Unfortunately this means I won't be able to do any modeling or work on the computer for at least 5 weeks or more. So all my projects are on hold for now. As soon as my vision returns I will be back at the Beaufighter build. Thanks guys Ron G
-
Thanks everyone I know that there is not a lot of progress right now, but I am working on it on the computer, but right now theres not much to show. When I do have something I will post pictures. Ron G