


rkranias
-
Posts
1,743 -
Joined
-
Last visited
Content Type
Profiles
Forums
Events
Gallery
Everything posted by rkranias
-
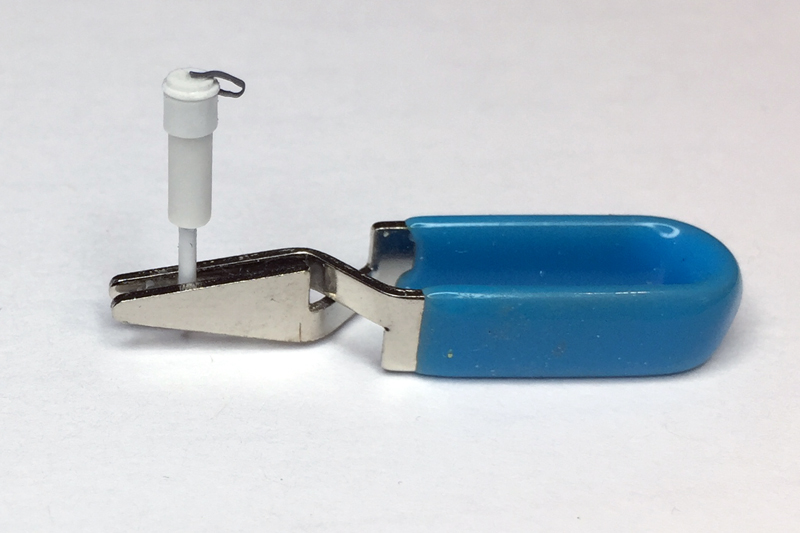
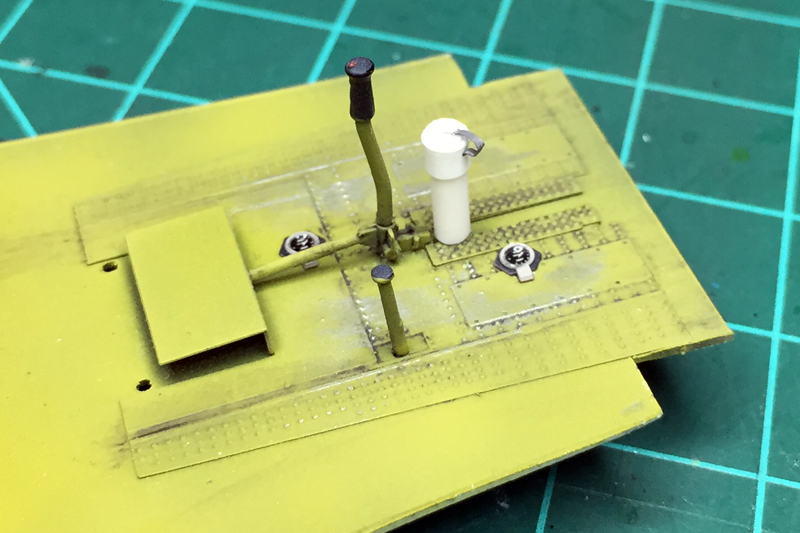
N-2A gunsight complete. Bottom is painted NATO Black and the removable cap is Alclad Duraluminum. I added some cockpit stencils. Assumption there was a "remove before flight" note on the cap. Meh, close enough. Detail picked out with panel line wash.
-
Ta-152H-0 awaiting restoration at the NASM
rkranias replied to JeroenPeters's topic in LSM 1/35 and Larger Work In Progress
exemplary work Jeroen! PM inbound. -
RB seatbelts done. These are the best textile belts I have ever used. No need to stain or wash as substrate is colored. Just some gloss applied for leather look and boom! Done. Ready for assembly Cockpit all buttoned up. Fuselage buttoned up. Spine and tail dry-fitted. Now on to the engine.
-
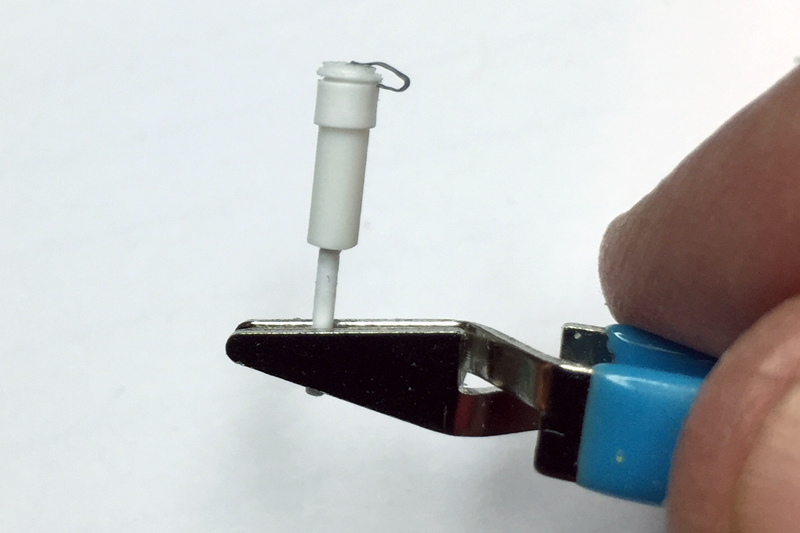
Kit came without N-2A gunsight so it's back to some scratchin'. 2.4mm styrene tube with a .3mm x 2.0mm strip wrapped around top for lens. Then a 2.5mm disc and 2.0mm disc are punched out of styrene card and placed on top of lens cover to replicate removable cap. Cap strap created using a piece of flattened out .3mm lead wire. A 1mm rod is slid inside the tube to serve as a mounting pin. Test fits looks good. It's hard to see, trust me it's there, the lens cover cap is touched off with a secure nut punched out of styrene card.

-
Danny, I'll respond later. I'm up to my ears with all things parenting, all good. I have plenty to say so far...tail plane, wheels, cockpit. Later....
-
To say I have a love hate relationship with photo etch is an understatement. Using Eduard's interior the seat an belts are put together. Textile belts, RB and HGW, have spoiled me so. Seat bended, folded painted and some light weathering along with the lap belts. Now to do some aggressive bending and secure with epoxy. Belts bended and secured with epoxy. Apologizes for crummy pics. Some final touch up and weathering then on to final cockpit work.
-
welcome to LSM. Nice pics. Look forward to see your WIP posts.
-
Cheers Coolbox! oh yeah, I'm well schooled on kid linguistics. Cheers Jorge. Thanks Jonathan. Progress in small steps.
-
Profimodeller Fi103 V1
rkranias replied to JeroenPeters's topic in LSM 1/35 and Larger Work In Progress
love the LSM Resin GB Art! -
Thanks Cees!
-
Had same issue with my UCS. The MG exits were a mess, one was completely closed up. I drilled out the exits, got lucky!
-
Cockpit painted. Added some Eduard bits and pieces. Wiring & radio line made from lead wire and painted. Pretty basic stuff to busy things up. Will shoot with some gloss, pick out details and begin weathering.
-
More work on the wheel wells. Using .25mm (.010") styrene card I punch out 1.9 dia and 1.25 hex for canvas wheel well attach points. I secured the discs with white glue then the hex nuts secured with thin cement. There will be plenty of debate regarding the arrangement of the canvas secure points. I've seen photos of the canvas boot secured tight as a drum head with multiple fasteners and canvas boot secured with no apparent fasteners and the canvas boot looks like the roof liner of my VW draping on my head. This is how I will represent the canvas wheel well boot liner. Test fit looks good. After I button up the wings I will do a final trim and paint the canvas covers (boot).
-
Thwarting Trumpy's "Mad Riveter". Phase I.
-
Great review James. Those belts are cleverly manufactured. I'm a big fan of textile belts. However, this manufacturing method looks like a real time saver.
-
RB Productions 1:32 Me262B-1a/U-1 Updates from RB Productions
rkranias replied to JeroenPeters's topic in Aircraft Reviews
Good stuff Jeroen. Love Radu's textile belts. They are indeed superior. -
Great call Jan. Not sure where I saw this method, it was online somewhere. Worked quite well. Kudos to the unknown modeller. All dry, time for some cutting. Gentle pressure slight twist, lift and remove. This just might work. Fit good. Carefully draw cut line. A little work required. Will punch styrene dots for fasteners.
-
:thumbsup2:
-
A little bench time today. New knee cooperated and gave me almost an hour of standing time. Playing with white glue, little paper towel squares and water. What are these? Stay tuned.
-
Ta-152H-0 awaiting restoration at the NASM
rkranias replied to JeroenPeters's topic in LSM 1/35 and Larger Work In Progress
effects look great! -
On the upside you learned something new. For me, any day I learn something I remind myself it was worth waking up that morning.. Cheers! I too, am looking forward to this.
-
Lamborghini Huracán LP 610-4 - 1/21 by Aoshima
rkranias replied to elmarriachi's topic in Non LSM 'WIP
it's going 230kph at a stand-still. -
Hasegawa 1/48 Bubbletop Typhoon 'Sharkmouth'.
rkranias replied to Woodshedwings's topic in Non LSM 'WIP
One of my favorite WWII ground pounders. Looking good. -
The second kit of my summer '16 start with hopes to finish by 7 Dec for 75 anniversary. Pearl Harbor P36, P40B, A6M2b. Life hit the fan and bench time kept to minimum. My wrecked knee kept me from working at bench as it's 36" (91cm) high and I stand to do my work. Tamiya's very nice A6M2b will be base kit for my Pearl Harbor subject. IJNAF pilot Shigenori Nishikaichi's A6M2b "B11-120" will be the subject. I've always been fascinated about the story of the "Niihau Incident". Nishikaichi crash landed his aircraft after receiving damage during the second wave attack at Pearl Harbor. The events that followed for the next 6 days is nothing short of epic. Moral of the story, "Don't mess with the Big Kahuna". Nishikaichi was based on the carrier Hiryu. After crash landing on the island of Niihau Nishikaichi set his aircraft afire. This photo was taken 17 December, 1941. Fire damage is visible and well as some parts already scavenged. This aircraft is now on display at The Pacific Aviation Museum at Ford Island, Pearl Harbor. Ejector sink marks removed with putty and sanding pen. Following primer of Gunze 1500 Black I applied Gunze 127 Interior for cockpit area and tub assembly. Moving forward to detail paint and Aotake finish applied with mix of Tamiya clears (11 parts X19 Smoke, 10 parts X23 Blue, 1 part X25 Green). Heavily thinned then a few passes on a silver base af Alclad Aluminum. IP complete using kit decals and clear lenses.
-
Cheers!