JeroenPeters
-
Posts
4,866 -
Joined
-
Last visited
Content Type
Profiles
Forums
Events
Gallery
Everything posted by JeroenPeters
-

Trumpeter F14-D Tomcat and Zacto intakes
JeroenPeters replied to pfuf's topic in LSM 1/35 and Larger Work In Progress
You do amazing work... I just love the paintwork you do. Very convincing.. -
Heiden, Germany, Model Show 2014 (and a bonus)
JeroenPeters replied to JeroenPeters's topic in General Discussion
That will be Cees! -
Fokker E.IV 161/16 flown by Lt. Hans Müller
JeroenPeters replied to JeroenPeters's topic in Eindecker GB
And the resin cowling fitted to the fuse. Not glued yet. Engine goes in first!- 93 replies
-
- 1
-

-
- fokker
- fokker E.IV
- (and 1 more)
-
Fokker E.IV 161/16 flown by Lt. Hans Müller
JeroenPeters replied to JeroenPeters's topic in Eindecker GB
And here's the wooden prop. I sanded it down completely. (Sorry Doug!). Sprayed very thinned wood lacquer. Sprayed gloss coat. Added decals. Painted gloss with wide brush and polished. The prop boss is my 3D printed one. Only needs a dark wash. -
I am using the Wood paint on the the Rumpler project. Both from the airbrush and brush. I'll post the results here!
-
Soviet War Colors 1936-1945 Gordon Forrester / Fernando Vallejo AK Interactive Profile Guide Series Available from AK Interactive for € 21,50 and paint set available for € 13,20 What we have here is quite an impressive book filled to the rim with colour profiles. Actually 180 of them! The first thing that struck me was the attention to lay-out. Every chapter is introduced by a spread large artwork in the concept of this edition: Soviet WW2 propaganda. The chapters cover: • Light AFV • Medium AFV • Heavy AFV • Light Vehicles, Crawlers and APC • Lend lease • Photo references The second thing that appealed to me are the 3 view profiles. How many times did you find a profile online or in a book, only showing the left or right side. Leaving you guessing what’s happening on the top, front or back? Admittedly not all 180 profiles provide 3 views, but the ones’ that need ‘m, have ‘m. The artwork is crisp, clear and really well done and are accompanied by background information on the subject. The last chapter is a bonus and gives us full color walkaround photo’s of surviving subjects. Material The book is printed on sturdy, high quality paper. The soft cover is printed on a double folded matt laminated heavy material that oozes quality. The back is glued. Total is 102 pages. Conclusion This book is a must have for any armour modeller that is tempted to tackle any Soviet subject. It’s full of inspiration, variation and gives you a more than good sense of what colors to use. Speaking of colors… Soviet Camouflages (Soviet Tank Colors from 1935-1945) Paint set nr. AK 561 A good base to start your Soviet color collection with comes in this set, that is linked to the Profile Guide book as descriped above! The AK Interactive paints can be used directly in you airbrush or handpainted on. When spraying with a fine needle you might want to use thinning agent. AK Interactive suggests using their Acrylic thinner: AK-712, but other brands might work too. I myself haven’t tried a different brand so feel free to chime in. The bottles are the typical bottles we have come to know. 17 ml and shake well! The colors included in this set are: AK 746 • 4BO (Russian Green, used as primer, protection from corrosion from 1941) AK 747 • 6K (Russian Brown) AK 748 • 7K (Russian Tan) AK 750 • Protective Green AK 749 • 3B AU (Basic Protector, used as primer, protection from corrosion from 1935 – 1939) AK 751 • Washable White Paint (for creating faded white washes camouflage) Very highly recommended Our sincere thanks to AK Interactive for the review sample. To purchase the book directly, click HERE. To purchase the paint directly, click HERE. Kind regards, Jeroen Peters
-
Junkers Ju 88 Bomber variants Maciej Noszczak Kagero Books Topdrawings Number 16 (7016) Scales 1/72, 1/48 and 1/32 Available from Kagero for € 16,46 The Topdrawings range focusses on drawings. Click this link to see the entire range. This edition covers the bomber versions of Junkers’ famous Ju-88. Line drawings are provided in the three popular scales (up to 1/32!) and the artwork is impressive. Anyone looking to build an accurate, detailed Revell 1/32 Ju-88 should get a copy of this book. It not only shows the location of all the hatches, but also every single rivet there is to count. Since the drawings are available in 32nd scale, you can practically use the drawings as a template. Check out the amazing detail: After having rivetted (and possibly rescribed) your Ju-88 you can choose to paint it as per one of the four included colour profiles. Decals are (as always) provided for these four versions by Cartograf: Junkers Ju 88 A-4 coded + KS of 8./KG77 based in the Mediterranean area 1943 Junkers Ju 88 A-11 Trop L1 + OK of 2./LG1, North Africa 1942 Junkers Ju 88 A-5 coded B3 + EX of 10.(Erg)/KG 54 based in the Mediterranean area 1943 Junkers Ju 88 A-1 coded 9K + HL of 3./KG 51 this aircraft force landed in the UK possibly due to lack of fuel. Conclusion Another simple but comprehensive set dealing with this versatile bomber. Decals by Cartograf are in perfect register and include swastikas albeit in two parts. Showing again the attention to detail that Kagero is known for. Very highly recommended Our sincere thanks to Kagero Publishing for the review sample. To purchase directly, click HERE. Kind regards, Cees Broere / Jeroen Peters
-
Fokker E.IV 161/16 flown by Lt. Hans Müller
JeroenPeters replied to JeroenPeters's topic in Eindecker GB
Well.... the resin engine fits the resin cowling! Ready for 'mating'- 93 replies
-
- 1
-
-
- fokker
- fokker E.IV
- (and 1 more)
-
Heiden, Germany, Model Show 2014 (and a bonus)
JeroenPeters replied to JeroenPeters's topic in General Discussion
Hi Paul, I believe it's a JS-1 tank. Josef Stalin. Full of bullet holes... -
Hi Guys, Today Cees and myself went to the model show in Heiden, Germany. Just across the dutch border. A medium sized show with amazing models, nice deals, big names and german beer. At the show we met up with our own Erik Bosch. Sadly we missed Uschi and Mig Jimenez. Filled to the rim with inspiration Cees and I went to the dutch Liberty museum in Overloon. Housing a huge collection of tanks, weapons, planes etc... from ww2. Enjoy: Next... Overloon: Cees marvelling over the huge Dora shell and grenade...
-
1/32 Hasegawa Bf-109G-6 "Hartmann"
JeroenPeters replied to efrick's topic in LSM 1/35 and Larger Work In Progress
Lovely! Sharp demarcation lines! I like it a lot. Really cool.. -
Bi-Plane build: Double Rumpler!
JeroenPeters replied to JeroenPeters's topic in LSM 1/35 and Larger Work In Progress
Well... waiting YES! For the Rexx exhaust to arrive! -
Wow! That's quite special.... Thnx.
-
British WW1 fighter / trainer - Bristol M1C
JeroenPeters replied to petr@specialhobby's topic in Special Hobby
Wow!!!! What detail! Thnx for sharing this here. I'll definitely get one... -
REXx Model Accessories Model exhaust sets, various scales
JeroenPeters replied to Grant's topic in Aircraft Reviews
Oh wow!! Order placed! How sweet. I always loved the Moskit exhausts and treasure a couple for the 109 in my stash. Great stuff grant... -
Fokker A.III "A8", Austro-Hunarian Navy, 1916
JeroenPeters replied to Fran's topic in LSM 1/35 and Larger Work In Progress
Nice Fran! Love the wsh of the seat belts. Great pit.. -
Bi-Plane build: Double Rumpler!
JeroenPeters replied to JeroenPeters's topic in LSM 1/35 and Larger Work In Progress
PS. I'm also using Steven Robson's amazing spoked wheels and a Doug Craner Wooden prop. It's by no means a contest. I hope by not being in the lead, I can avoid mistakes by letting Jim make them first. I'm awaiting your first post Jim...- 20 replies
-
- 3
-
-
- wingnut wings
- wnw
- (and 1 more)
-
Fokker E.IV 161/16 flown by Lt. Hans Müller
JeroenPeters replied to JeroenPeters's topic in Eindecker GB
- 93 replies
-
- 3
-
-
- fokker
- fokker E.IV
- (and 1 more)
-
Fokker E.IV 161/16 flown by Lt. Hans Müller
JeroenPeters replied to JeroenPeters's topic in Eindecker GB
Thnx guys, Small crappy pic here. Showing this build is not stalled. Hairspray. Works better for me than the 'branded' kinds.- 93 replies
-
- 2
-
-
- fokker
- fokker E.IV
- (and 1 more)
-
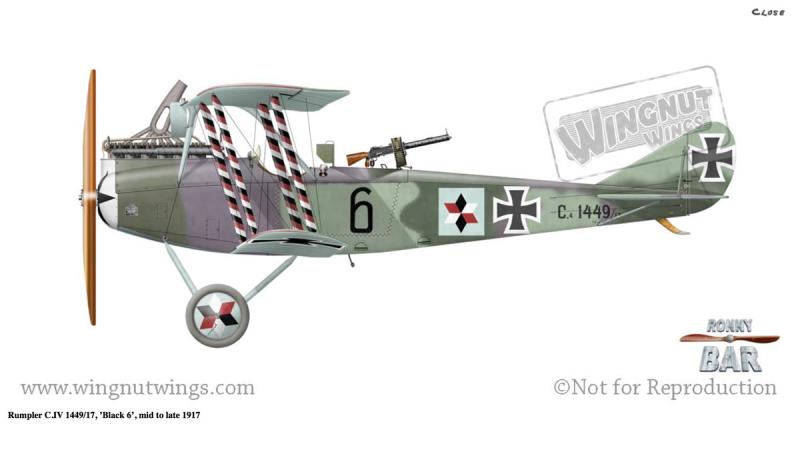
Hi all, One or two builds ago James Hatch and myself decided to do a duo build of the Rumpler. You don't see these getting build too often, so we're setting the score straight in one go! I'll be using the full HGW upgrade for the interior, exterior and seat belts. James will rough it and do without! James will (might) be doing the Late version in colorful livery: And I will do an early one in this flashy scheme: Stay tuned! This is going to be fun!!
- 20 replies
-
- 3
-
-
- wingnut wings
- wnw
- (and 1 more)
-
Wow! Great work there Doug! Love the landing light. The kit is great in it's own right but with a little love it can turn into a winner. You are putting a lot of love in it! Really nice...
-
Roland DVIa Jasta 23B
JeroenPeters replied to Johnny Doogong's topic in LSM 1/35 and Larger Work In Progress
Welcome Johnny! What service do you use to host your photo's? I myself use Photobucket. Cheers! Jeroen -
It may not be huge, but it sure is tidy!! If i have the guts I might post a pic of mine this weekend. A small suggestion: Add another light just like that (on the right side) to eliminate shadows on your work!
-
B-25J Ave Maria
JeroenPeters replied to CruZz's topic in LSM 1/32 and Larger Aircraft Ready for Inspection
O..... Wow... What a great faded effect. Just lovely. Congrats on an amazing build sir! -
Fokker E.IV 161/16 flown by Lt. Hans Müller
JeroenPeters replied to JeroenPeters's topic in Eindecker GB
Aaaaaand..... Fuse closed!- 93 replies
-
- 2
-
-
- fokker
- fokker E.IV
- (and 1 more)