ArnieC Posted August 9, 2013 Posted August 9, 2013 Hi Guys, I will try to do the 1/32 Hasegawa Fw-190D-9 with a conversion set from a french (?!) companie. It is intended for a D-13, b ut I think I can tweak it to make it into a D-11. Pictures will follow later. I will start this build after the Scale model world (IPMS UK) in November. Cheers, Arnold 1
Daywalker Posted August 9, 2013 Posted August 9, 2013 Welcome aboard Arnold, looking forward to seeing your build!
ArnieC Posted August 10, 2013 Author Posted August 10, 2013 Thanxs guys, Here are the pictures of what is in the box. When I bought another one from a American living in Holland, He gave me loads of extra's with it. All the masks and PE from Eduard I got in the deal. He also gave me some decals for free. Thanxs Burny. I don't know if I will use it all, because I am not a huge fan of PE. The cockpit, wheels and exhausts are from MDC. I don't know if I will use the exhausts, maybee I will get some from quickboost. O, the conversion set is from Renaiccance. The box content. The goodies. The converion set The decals from Eaglecal. The scheme I want to do. This is it. Cheers, Arnold 1
Members Mikester Posted August 11, 2013 Members Posted August 11, 2013 Nice, first time I've ever seen that conversion set. 1
Wumm Posted August 11, 2013 Posted August 11, 2013 Renaissance is Etienne Dhont from France Mike... He makes mostly 1/43rd and 1/24th scale auto and 1/12th scale MotoGP bike kits, conversions and decal sets. I have some of his 1/24th scale WRC stuff, and it's pretty good quality, especially the decals. Not as good as Studio 27, but close. Haven't seen his aircraft resin parts in person yet though... Link here: http://www.renaissance-models.com/bis/ S 2
ArnieC Posted September 12, 2013 Author Posted September 12, 2013 Hi Guys, A small update. I have done some work on the model last weekend at a modelshow. I have sawn of the nose and replaced it with the one from the conversion set. The brake was on a panelline and very easy to do with a fine saw. Then came the trouble. because the brake line is on the edge of the firewall, you can't use some plastic plate to strengthen it. Now it's secured with only some super glue. When I will put the fuselage together I will see how to strengten this. Here's a picture. Cheers, Arnold
Jamme Posted September 12, 2013 Posted September 12, 2013 NIce start, Arnold. Will follow this one, for sure. Cheers, Jamme 1
Matt_ Posted October 2, 2013 Posted October 2, 2013 Arnold Why not temporarily use some tape to secure the join. Once you have the upper gun cover, engine insert and the wings attached there'll be plenty of support. It's just a bit vulnerable until it's all together.. Matt
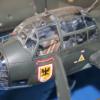
ArnieC Posted December 22, 2013 Author Posted December 22, 2013 It hase been some time for me to be back here. I have done some work recently on the model. It's not great, but it is comming along. Here are some pictures. The engine insert. The fuselage including the tail (witch is not jet attached. The nosejob. And finally the wings were I have used some inserts from a A8 for the wing armament. This is how far I have got yesterday and today. Cheers, Arnold
Administrators JeroenPeters Posted December 22, 2013 Administrators Posted December 22, 2013 Hi Arnold, Nice to finally put a face to a name last saturday. Nice going on this conversion. As said: i have the same in my stash, but will you even the road Cheers, Jeroen 1
ArnieC Posted December 26, 2013 Author Posted December 26, 2013 Nice to see you as well Jeroen. Again some more done these last few days. I have made the gun holes in the wings for the MK-108 canons. the ones in the A8 kit are to small for the fitting of the masters MK-108 gun barrels. So I hade to improvise with some plastic tubing. Here are a few pictures. The start with the tubing fitted after making the holes a little bit bigger. I also hade to make a trench behind the hole so the barrels would sit right. I forgot to take a picture of that, sorry. Here is the tubing after I have put some Mr. surfacer 500 on it and rubbed it down. I have put some silver paint on it to check for faults. I have also put on the tail and this is how far it is at the moment. Cheers, Arnold.
Members Mikester Posted December 26, 2013 Members Posted December 26, 2013 Looking good, Arnie! I've been wrestling with my conversion set for a few weeks now too, almost there!
ArnieC Posted December 27, 2013 Author Posted December 27, 2013 Thanxs Mikester. It was indeed a little bit of a strugle. A real strugle is the air inlet. This don't conforme to the sidewall. But after some sanding it was looking OK. The only downside of a D-11 is that you also have to change the wings for the MK 108 canons. I have been doing some work this morning on the MDC Cockpit. That is now almost complete to be painted. I have also found a resin seat with seat belts already moulded on from a previous bild. If the cockpit is ready and placed I can finally put the wings on. Cheers, Arnold
ArnieC Posted February 11, 2014 Author Posted February 11, 2014 I don't know what happend, but I am not gonna make it. There were some other project that hase taken more time than I wanted to. I am sorry for that. I hope to finish this one later this year. Cheers, Arnold
repeater Posted February 12, 2014 Posted February 12, 2014 Damn! Sorry to hear Arnold. I hope you can finish the build whenever time permits. 1

Recommended Posts
Create an account or sign in to comment
You need to be a member in order to leave a comment
Create an account
Sign up for a new account in our community. It's easy!
Register a new accountSign in
Already have an account? Sign in here.
Sign In Now