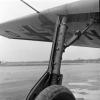
BevanBrooks Posted October 9, 2015 Author Posted October 9, 2015 Wing join has been bit of a bitch. No gap on one side and a gap on the other, you can just see it next to the clamp. The cocktail stick is wedged in to raise the height of the top wing half to the same level as the wing root. This join is rather ugly, but not as bad as the last one I did. Or is it??!! The wings have no dihedral at all, so I used masking tape from wingtip to wingtip to bring the tips up a little. On measuring the height of the tips from the bench top one was much higher than the other, but there was no gaps at the roots. I released the offending tip a little and got equal heights although this resulted in the gap at the root I've now got to deal with. We'll get there in the end. Thanks for looking, Bevan 1
JG26 Posted October 9, 2015 Posted October 9, 2015 You'll get there chief. I recognise the cocktail stick trick, I recall doing the same.....my Emil rear join was like your 2nd pic. Near identical. Such a double-edged sword- ultra fine rivet detail but they design it with that insane rear wing to fuselage join...... It'll all be forgotten once you're laying on that RLM65! Regards, Dan M
BevanBrooks Posted October 12, 2015 Author Posted October 12, 2015 It'll all be forgotten once you're laying on that RLM65! I hope so Dan.
BevanBrooks Posted October 12, 2015 Author Posted October 12, 2015 Fuselage all buttoned up and lost rivet and panel line detail restored. Only used super glue and accelerator for the gaps. The rear part of the cockpit where the stowage compartment is was 5 min epoxied in so I could get it into position, it kept falling through the hole. Thanks for looking, cheers Bevan 2
wackyracer Posted October 12, 2015 Posted October 12, 2015 Great work Bevan. I've got halfway through an Eduard E-3 with all the same problems. Frustrating that some areas are so good then others so bad. Interesting that you've got a 2 tone kit as well. Mine was all beige and the 2 weekend versions in the stash are also all over beige. Keep going, looks like your through the worse.
BevanBrooks Posted October 12, 2015 Author Posted October 12, 2015 Great work Bevan. I've got halfway through an Eduard E-3 with all the same problems. Frustrating that some areas are so good then others so bad. Interesting that you've got a 2 tone kit as well. Mine was all beige and the 2 weekend versions in the stash are also all over beige. Keep going, looks like your through the worse. Thanks Aaron, yeah I was surprised at the different coloured plastic as well. At a loss to explain that one! I guess sometimes it's good to be challenged in the building stages, you really know your modelling then. Also keeps the skill levels up and is pretty rewarding when it turns out well. I think the idea behind the olive/beige plastic to be a base of RLM 02 which, in the early stages, was what they were primed in. 1
rieser Posted October 12, 2015 Posted October 12, 2015 Good stuff Bevan. Great to see the persistence paying off. Hope the airbrush is ready to go! Cheers, Ralph. 1
BevanBrooks Posted November 13, 2015 Author Posted November 13, 2015 I can hear you all saying "what the hell has he been doing!" Half an hour here half an hour there in between finishing off an Academy 1/72 F35 Lightning in Aussie markings for my neighbour, glad that's finished Paint is on. The top wing 02 pattern was taken from a top view of an E4 in one of Kagero's Battle of Britain mini top colours 26 for lack of any better reference Chipping on the wing roots was done by laying down Tamiya Xf11 flat aluminium enamel. Humbrol Maskol was sponged on then painted with the camo colours. It has been slightly rubbed to get a more feathered edge may need a little more. Decals next, should really come alive then. During this I'll mask and paint the canopy. Thanks for looking Bevan. 4
rieser Posted November 13, 2015 Posted November 13, 2015 Great to see your progress. Already looking very interesting from here. 1
JG26 Posted November 13, 2015 Posted November 13, 2015 He's back! The GB has sprung to life! Looking good mate, keep at her..... Regards, Dan M 1
BevanBrooks Posted November 16, 2015 Author Posted November 16, 2015 Cheers Guy's, seem to have a roll on this one.... Not a lot of evidence of stencils being applied to these birds I suppose because of their unique paint schemes. I applied what I could see in the Kagero art work and guessed what wasn't on them from other art work if that makes any sense! Spent the afternoon with a toothpick going over the panel lines and a pin to re rivet the decals.... may have to start trying those wiz bang paint mask thingy's. Cheers Bevan 3
mywifehatesmodels Posted November 16, 2015 Posted November 16, 2015 While masks are nice, from what I can see, you're doing just fine with decals. Wow! Really looking good and starting to come to life, Bevan. John
JG26 Posted November 16, 2015 Posted November 16, 2015 The misplaced hatch lid, love it. Very striking scheme now the markings are on. 1
Members Mikester Posted November 16, 2015 Members Posted November 16, 2015 Day-um that's looks great, Bevan! 1
BevanBrooks Posted November 24, 2015 Author Posted November 24, 2015 And rolling right along......some weathering. Not long to go now. Ralph, Dan hope the wheels are up to par. Thanks for looking. 4
wackyracer Posted November 24, 2015 Posted November 24, 2015 That weathering is out of this world. Bevan this is a true masterpiece. 1
rieser Posted November 24, 2015 Posted November 24, 2015 As said in the Gary Larson cartoon, "She's lookin' good, Vern." Is there still an opportunity to add the the end of the blast tube to the spinner assembly? 1
kahunaminor Posted November 25, 2015 Posted November 25, 2015 Great, great annnnd......great! Regards, 1
BevanBrooks Posted November 25, 2015 Author Posted November 25, 2015 As said in the Gary Larson cartoon, "She's lookin' good, Vern." Is there still an opportunity to add the the end of the blast tube to the spinner assembly? Dont know........ its all glued up. Are you not meant to see the shaft in there? 1
rieser Posted November 25, 2015 Posted November 25, 2015 Have a look at your refs - or at Dan's build. You should see the end of the blast tube. Any suitably-sized piece of tubing will do the trick. 1
kahunaminor Posted November 25, 2015 Posted November 25, 2015 Forgive me for butting in Bevan, Punching a bit above my weight but here is a photo of my Eduard E-4 build last year with the blast tube. I created it from a cotton bud tube, obviously removed the cotton from each end, drilled out a bit more and cut to length: Regards, Kent

Recommended Posts
Create an account or sign in to comment
You need to be a member in order to leave a comment
Create an account
Sign up for a new account in our community. It's easy!
Register a new accountSign in
Already have an account? Sign in here.
Sign In Now