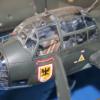
ArnieC Posted August 13, 2016 Share Posted August 13, 2016 Gi Guys, It has been a while sins I have been on the site. But I am to restart my conversion of the Hasegawa Fw-190 D-9 into a D-11 with a Renaissance conversion for a D-13. I was building this in the Arrow Wolf'sFocke Wulf GB in 2013/2014. When I was doing a Fw-190 A5 on a other site did I came across this model again. So I picked this one up as well and do a duo build there. I will start here the update as well. Here are some pictures of the model how she was before the restart. the box. The decals from Eaglecals The Renaissance conversion set. And some pictures of the old build. And now the pictures of what has been done last week. I painted the cockpit tub. What a great looking set is this from MDC. The tub was put into the fuselage. The seat still needs to be done.But I will do that later. After the tube was placed wasit time to cleane up all the seams on the wings and the tail. That done was it time to mate the wing to the fuselage. That is it for now. I hope to set further next week. Cheers, 5 Link to comment Share on other sites More sharing options...
BevanBrooks Posted August 13, 2016 Share Posted August 13, 2016 Looking good so far, hope to see some paint getting splashed around soon! Cheers Bevan 1 Link to comment Share on other sites More sharing options...
Administrators JeroenPeters Posted August 14, 2016 Administrators Share Posted August 14, 2016 You've done a bang job on blending that resin in! I've tried my hands on a couple of Renaissance models sets and know they are not a walk in the park. 1 Link to comment Share on other sites More sharing options...
Members Mikester Posted August 15, 2016 Members Share Posted August 15, 2016 Glad to see you back at it, Arnie! 1 Link to comment Share on other sites More sharing options...
Mark 'ozzy' Ostler Posted September 1, 2016 Share Posted September 1, 2016 Nice kite, always been one my favourites, keep up the good work! Oz 1 Link to comment Share on other sites More sharing options...
ArnieC Posted January 5, 2017 Author Share Posted January 5, 2017 Again it took me some time to move on with this one. I have finished the cockpit with the seat and I have also closed the conopy. Here is a picture of the model before I started painting. There is still some tape to keep the canopy in place while the glue is drying. [/url]"> And here after I have painted the model on the underside white. As you can see I have already placed the masking tapes for the stripping. [/url]"> Finally the red has gone on today. Here is she after removing the tape. [/url]">http://s1064.photobucket.com/user/arnoldcremers1/media/Fw-190%20D11/IMG_3663_zpsk10u4fbw.jpg.html'> I hope to do the other colours this weekend. Cheers, 6 Link to comment Share on other sites More sharing options...
coolboxx Posted January 5, 2017 Share Posted January 5, 2017 Excellent work, looking forward to this. 1 Link to comment Share on other sites More sharing options...
ArnieC Posted January 9, 2017 Author Share Posted January 9, 2017 I have finally finished the painting last weekend. Here are some pictures. I first did the RLM 76. And finally the two top colours. I used Gunze for this. The colours are for the grey RLM 75 and for the green RLM 81. I painted them free hand. Now it needs a Klear coat for the decals. Cheers, 5 Link to comment Share on other sites More sharing options...
Administrators JeroenPeters Posted January 10, 2017 Administrators Share Posted January 10, 2017 Liking the mottling. What paint did you use for the RLM colours? 1 Link to comment Share on other sites More sharing options...
ArnieC Posted January 10, 2017 Author Share Posted January 10, 2017 Hi Jeroen, I used Gunze (waterbased) paint for the colours. These were thinned with some Tamiya acrilyc thinner (X-20A). The airbrush I used was my trusted Evolution with a 0.3 needle and head. Cheers, 1 Link to comment Share on other sites More sharing options...
tomv1987 Posted January 16, 2017 Share Posted January 16, 2017 That's a nice scheme there--excellent work! 1 Link to comment Share on other sites More sharing options...
ArnieC Posted January 20, 2017 Author Share Posted January 20, 2017 Finally a update. Last week I have been doing the decals, panel lines and a dull coat. Here are some pictures. The underside. The top side. That is it for now. I hope to do some more work on her next week and finish it. Cheers, 5 Link to comment Share on other sites More sharing options...
ArnieC Posted January 22, 2017 Author Share Posted January 22, 2017 And she is finished. Here are some pictures. Cheers, 1 Link to comment Share on other sites More sharing options...
levier Posted January 22, 2017 Share Posted January 22, 2017 Nice! 1 Link to comment Share on other sites More sharing options...
coolboxx Posted February 20, 2017 Share Posted February 20, 2017 Very nice liking the colour and pattern , great build.. Thx 1 Link to comment Share on other sites More sharing options...

Recommended Posts
Create an account or sign in to comment
You need to be a member in order to leave a comment
Create an account
Sign up for a new account in our community. It's easy!
Register a new accountSign in
Already have an account? Sign in here.
Sign In Now