
James H
-
Posts
3,257 -
Joined
-
Last visited
Content Type
Profiles
Forums
Events
Gallery
Everything posted by James H
-
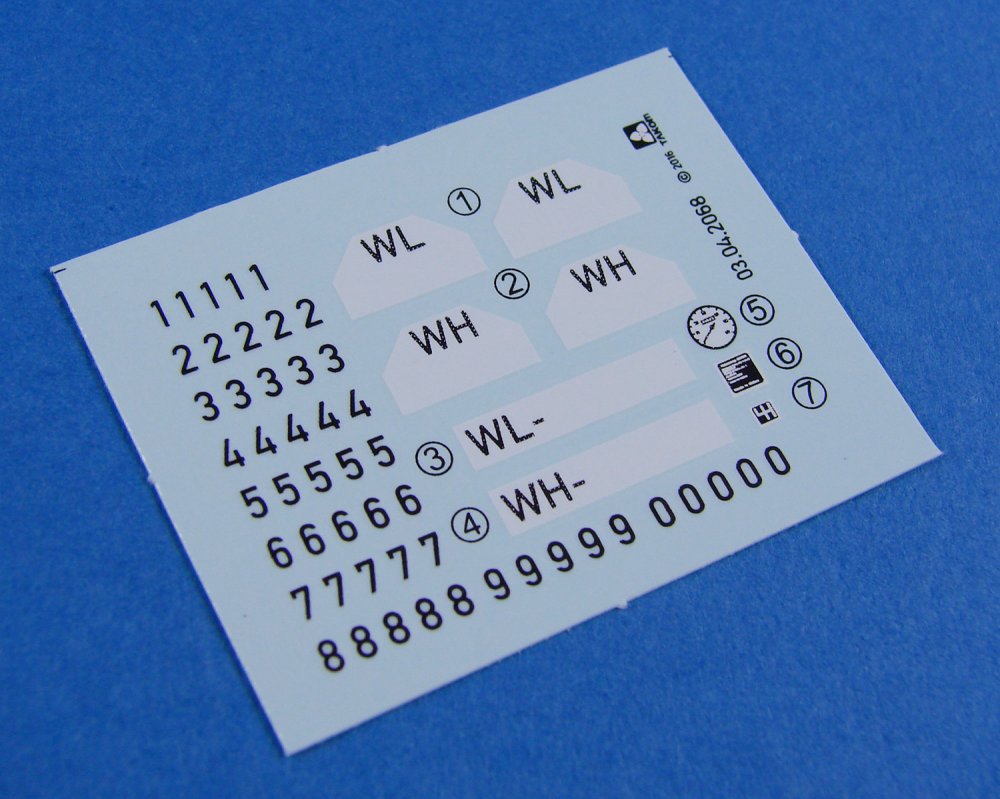
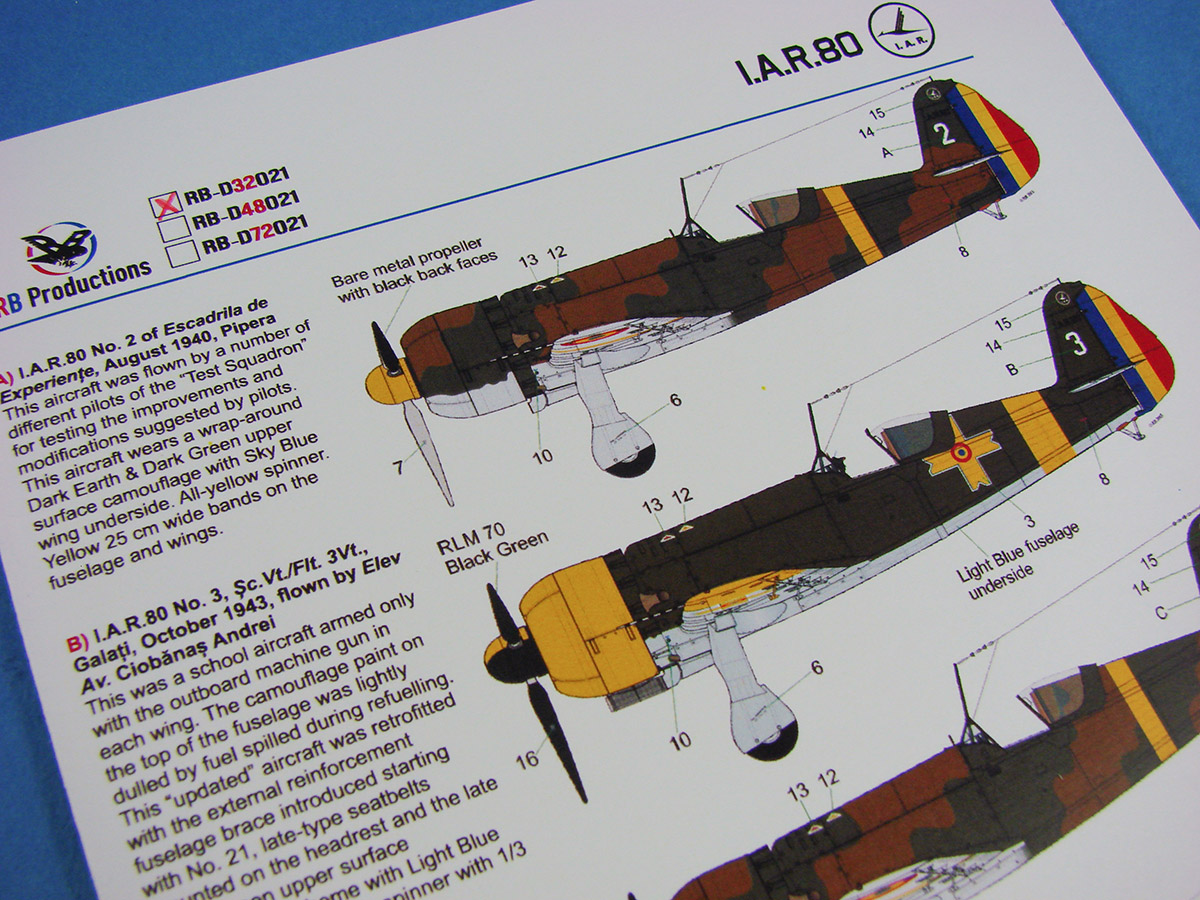
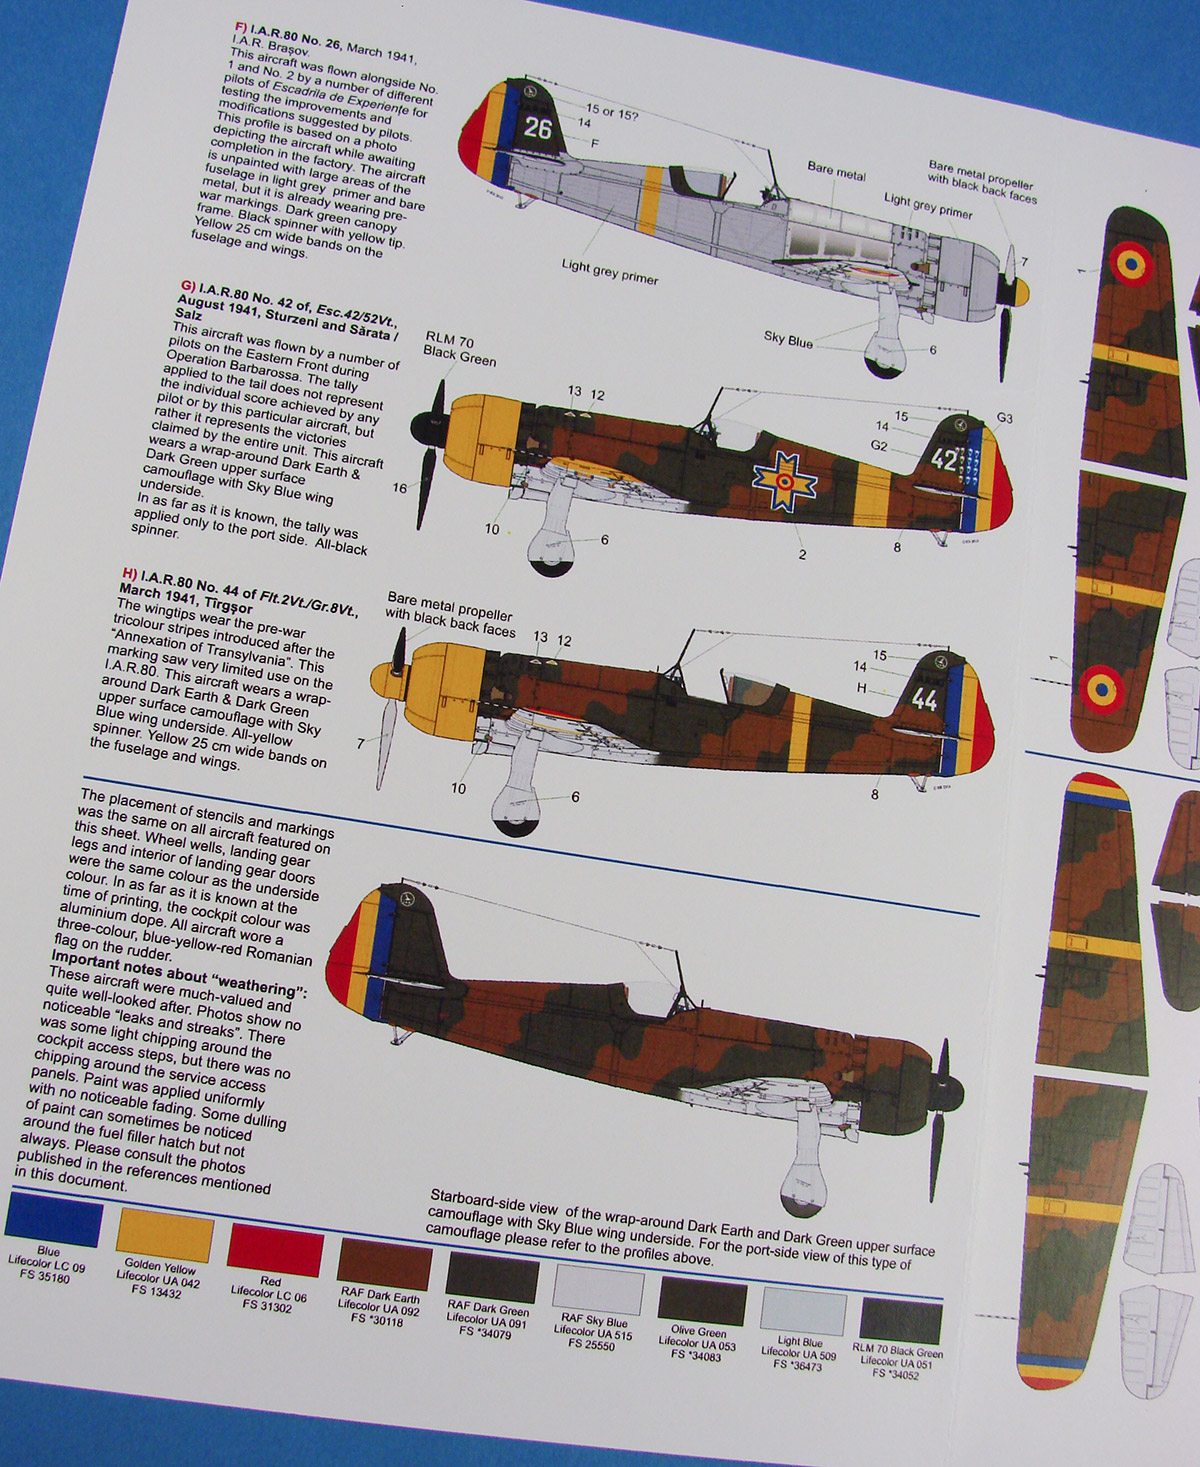
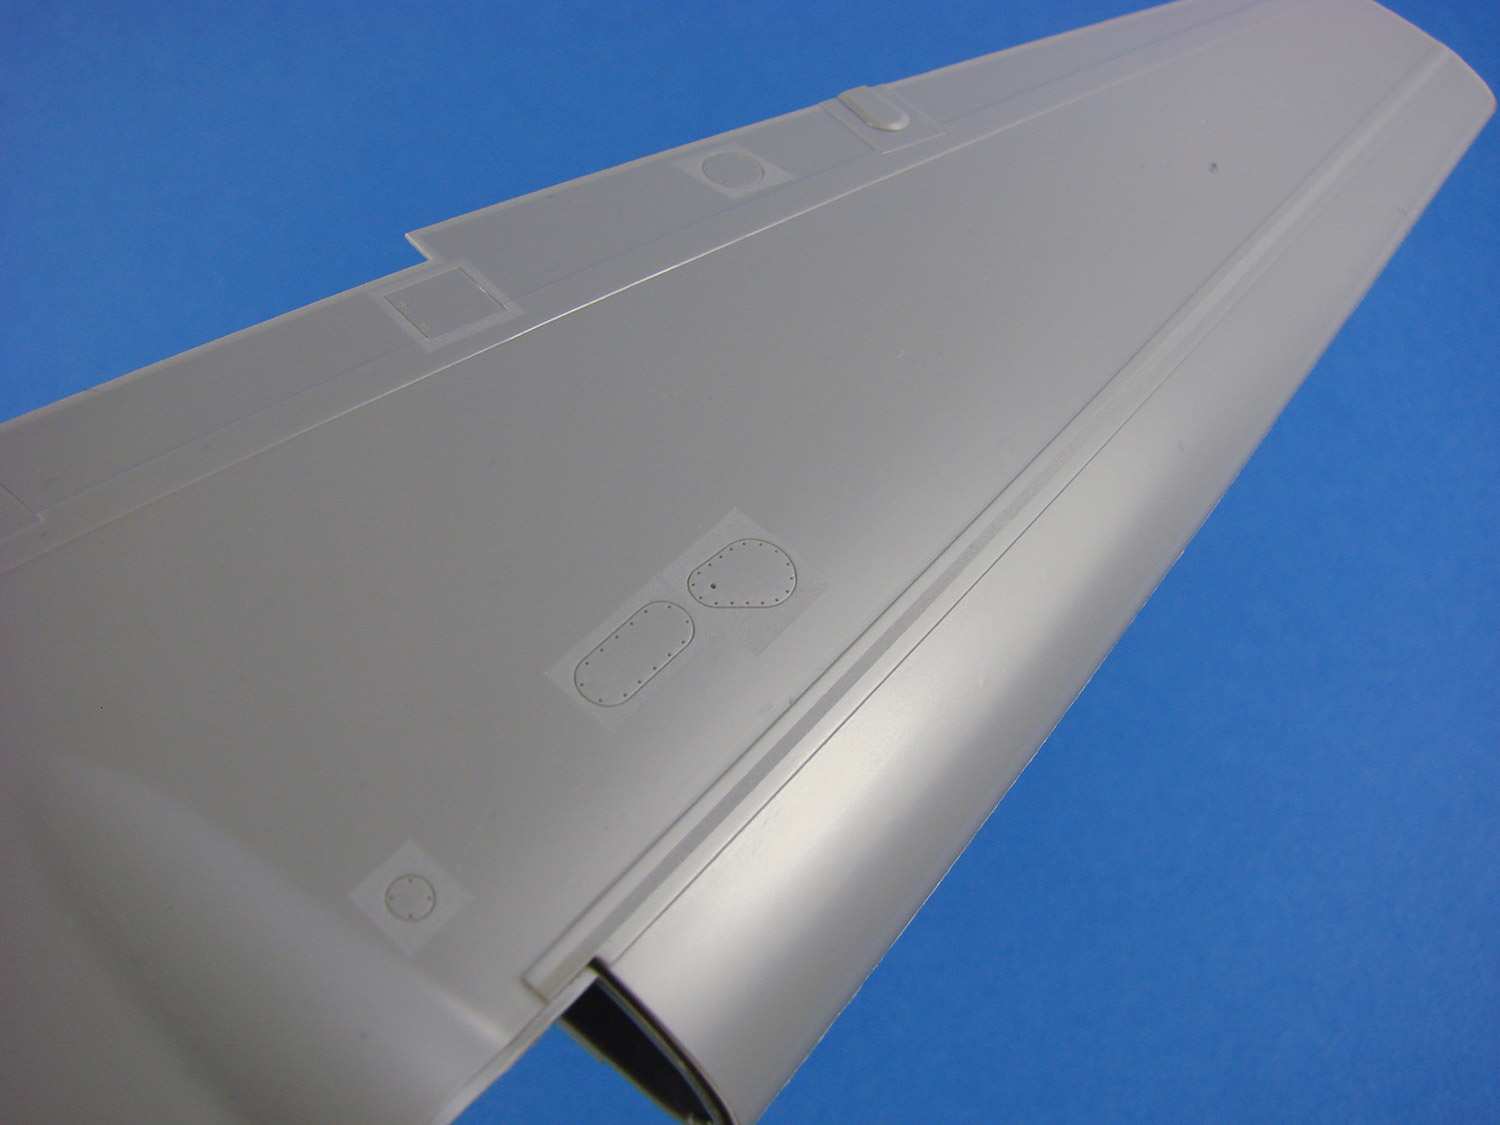
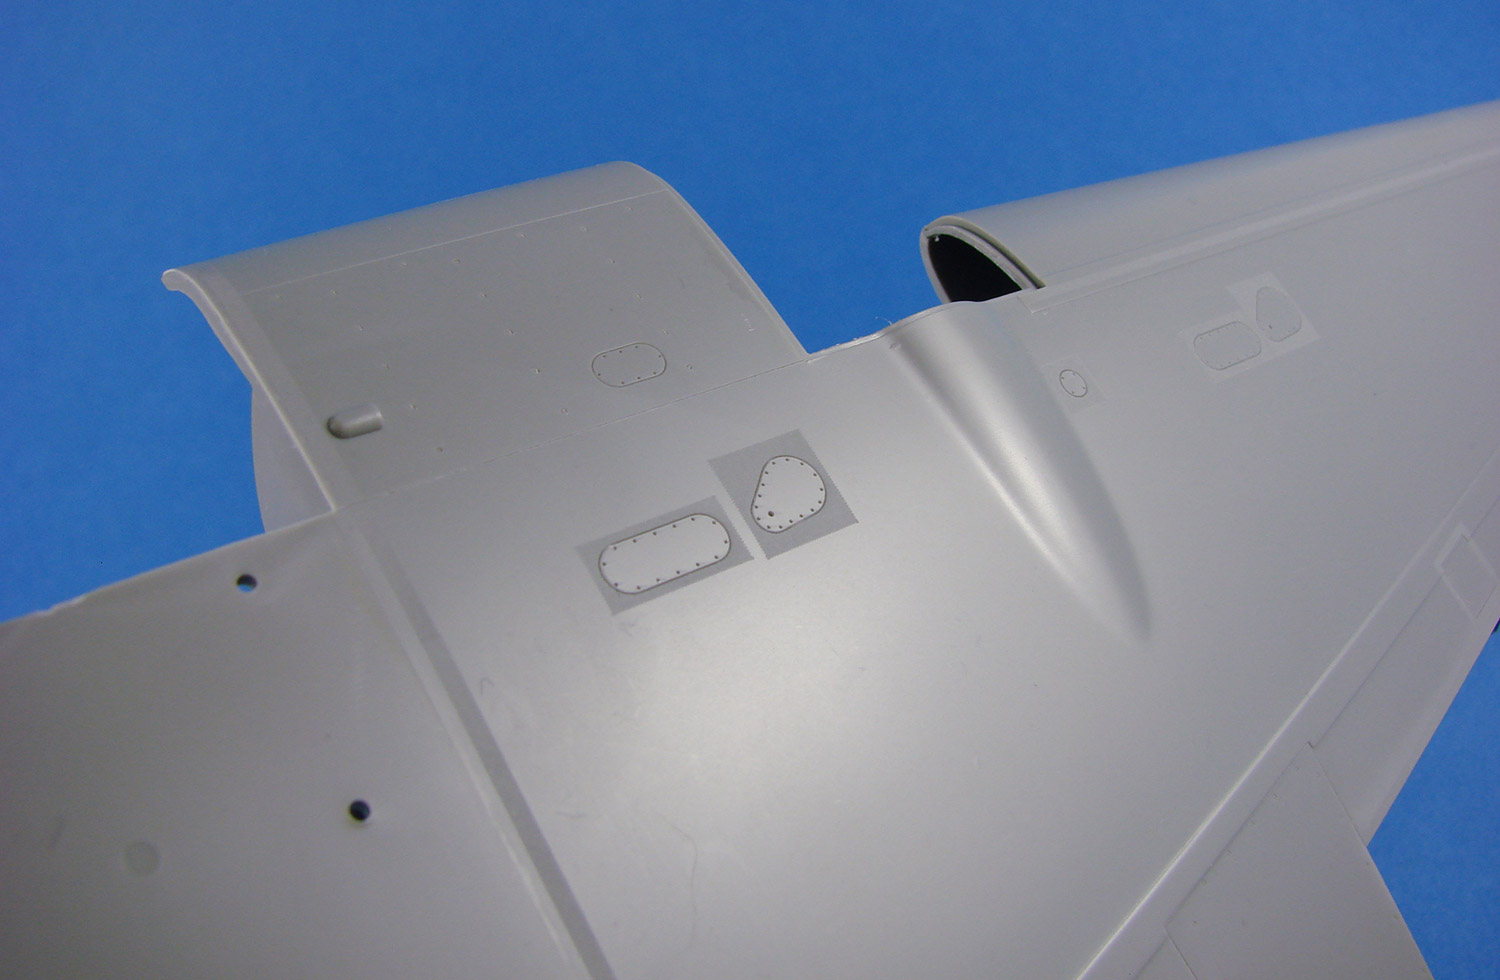
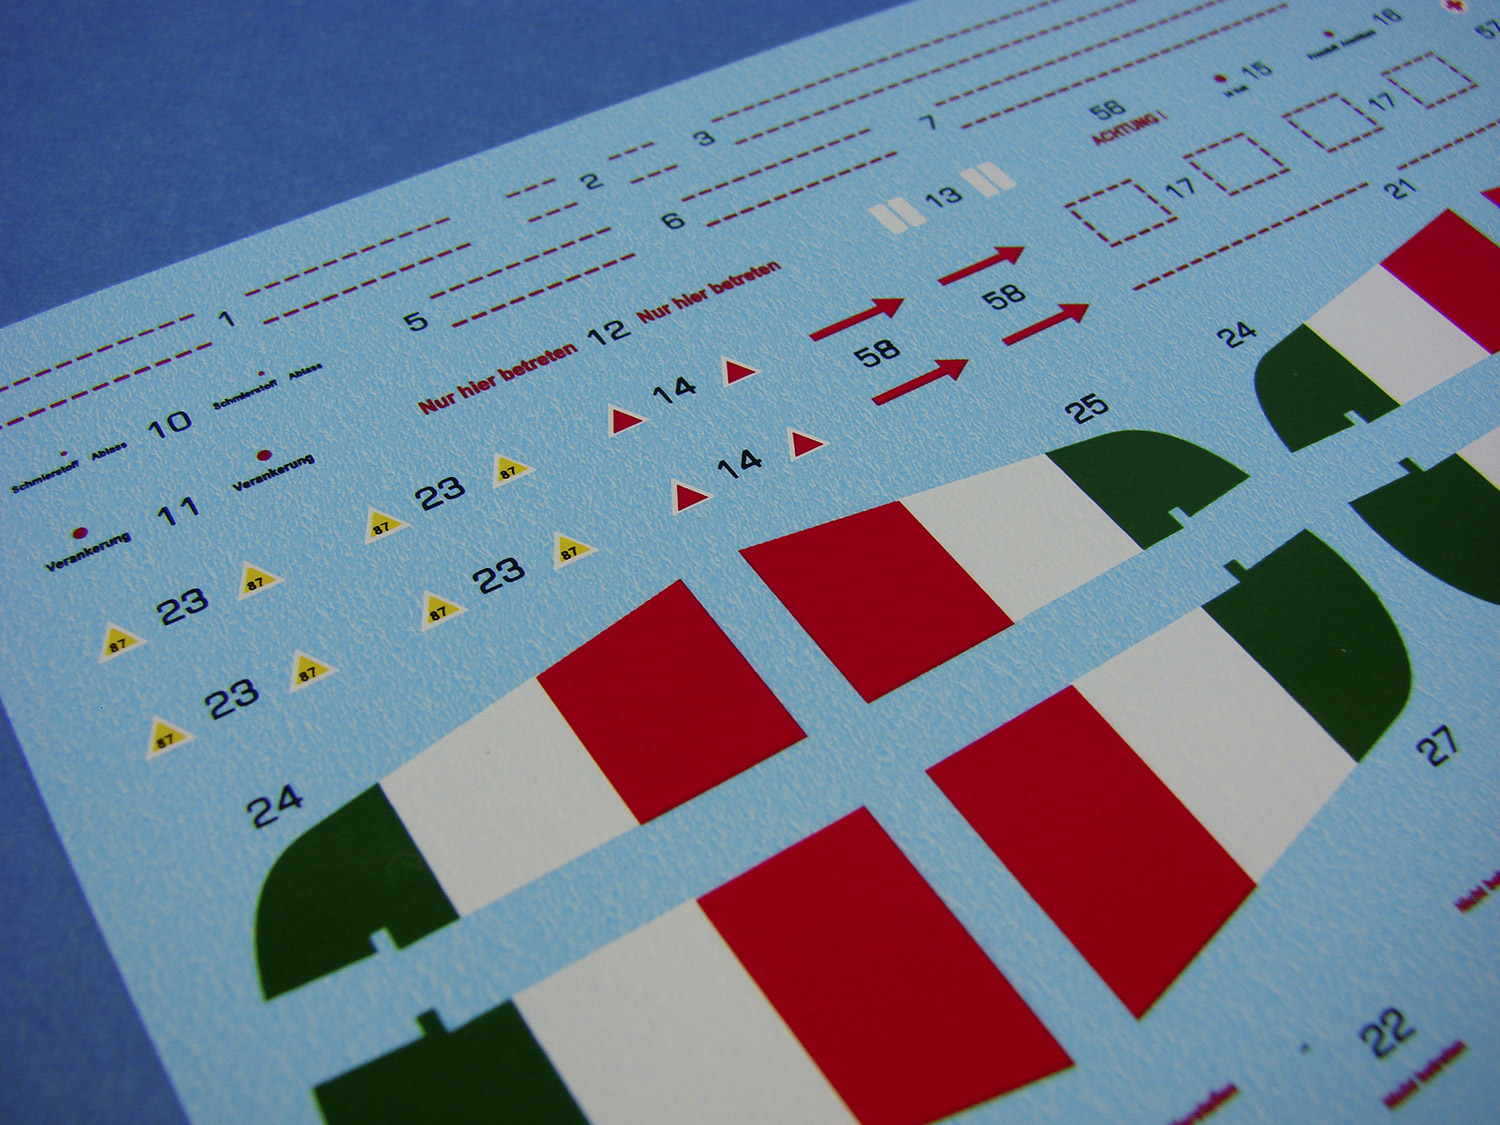
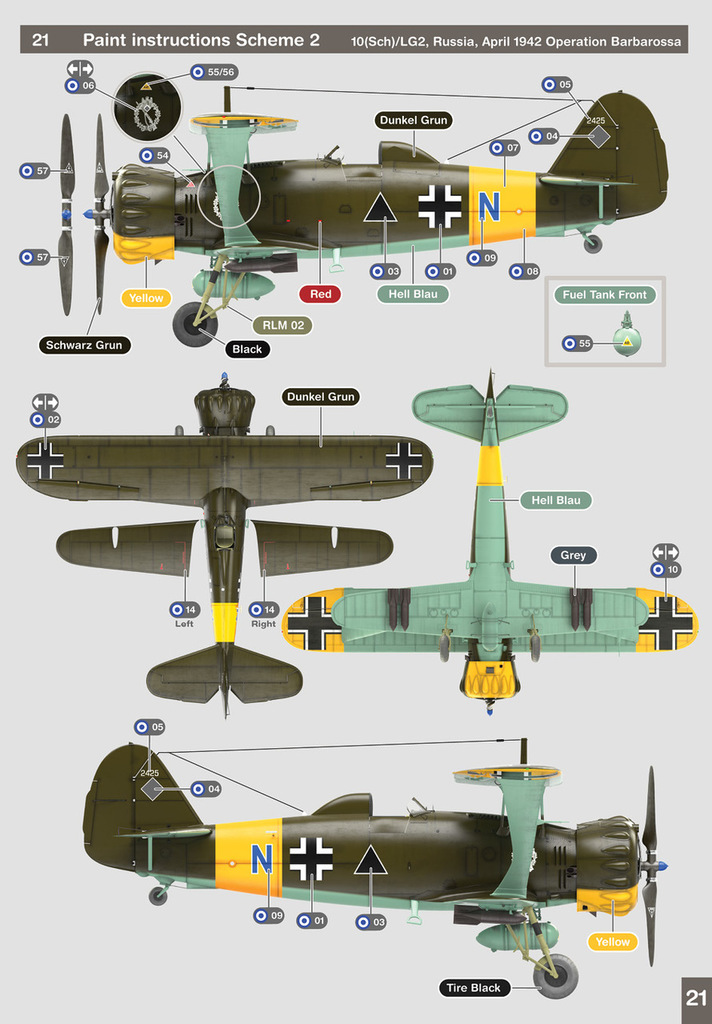
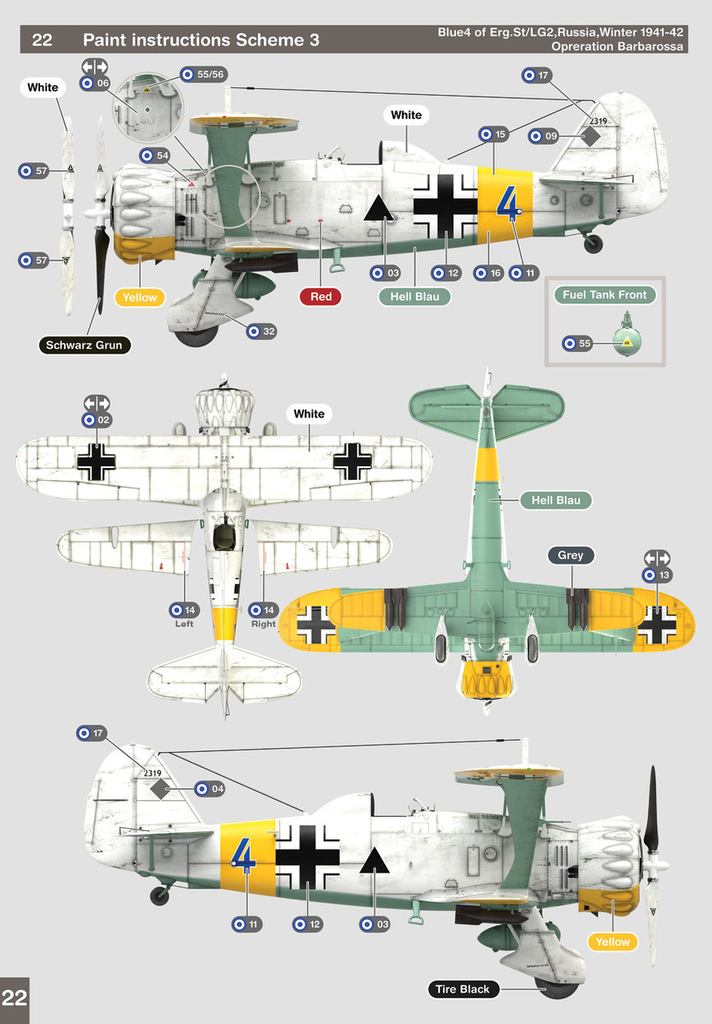
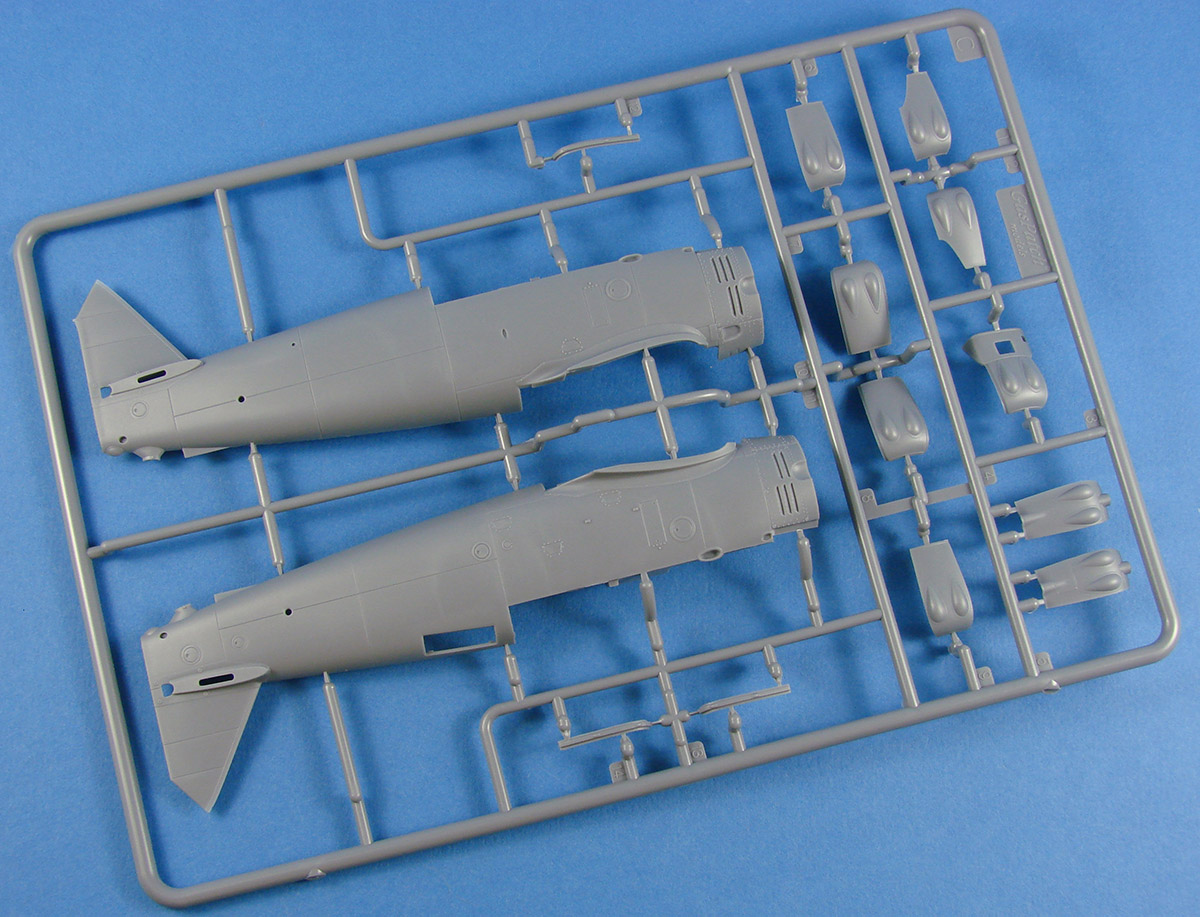
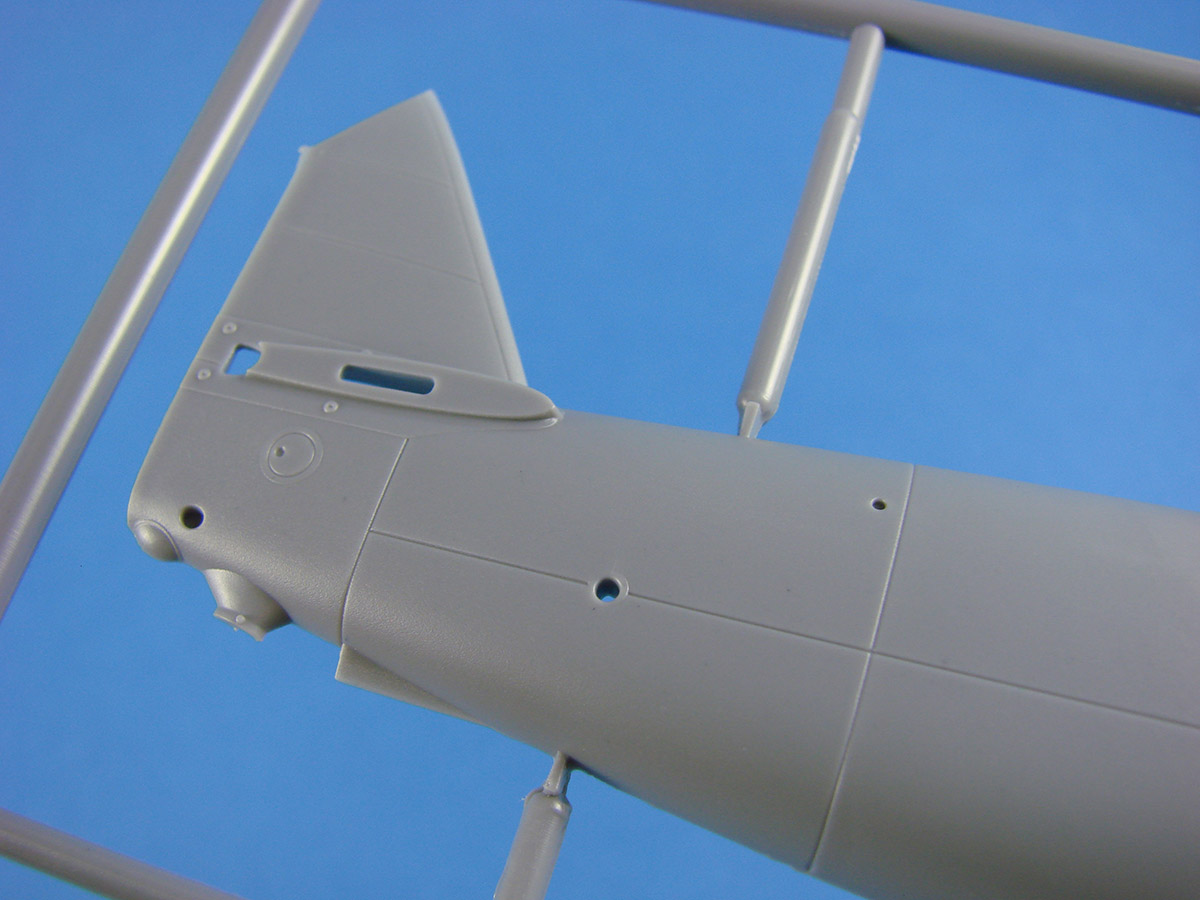
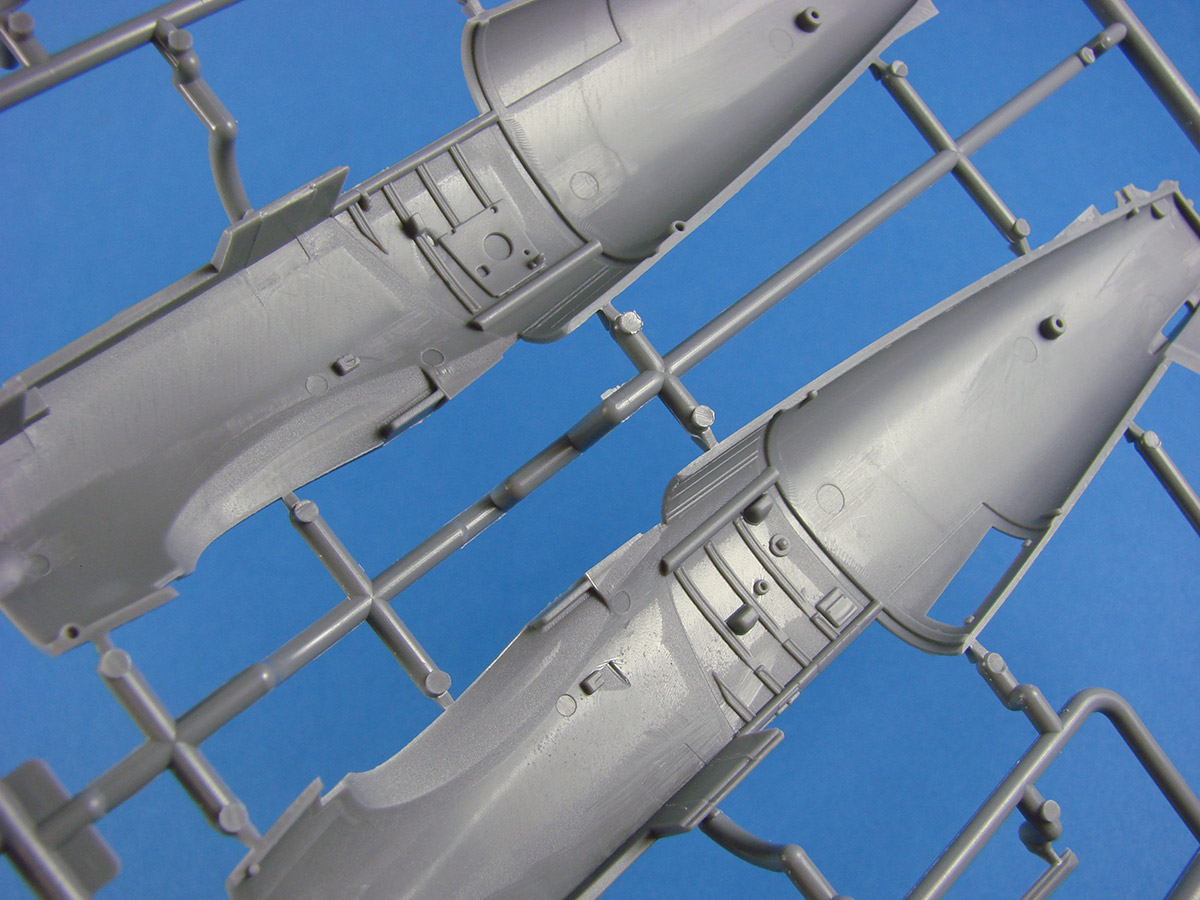
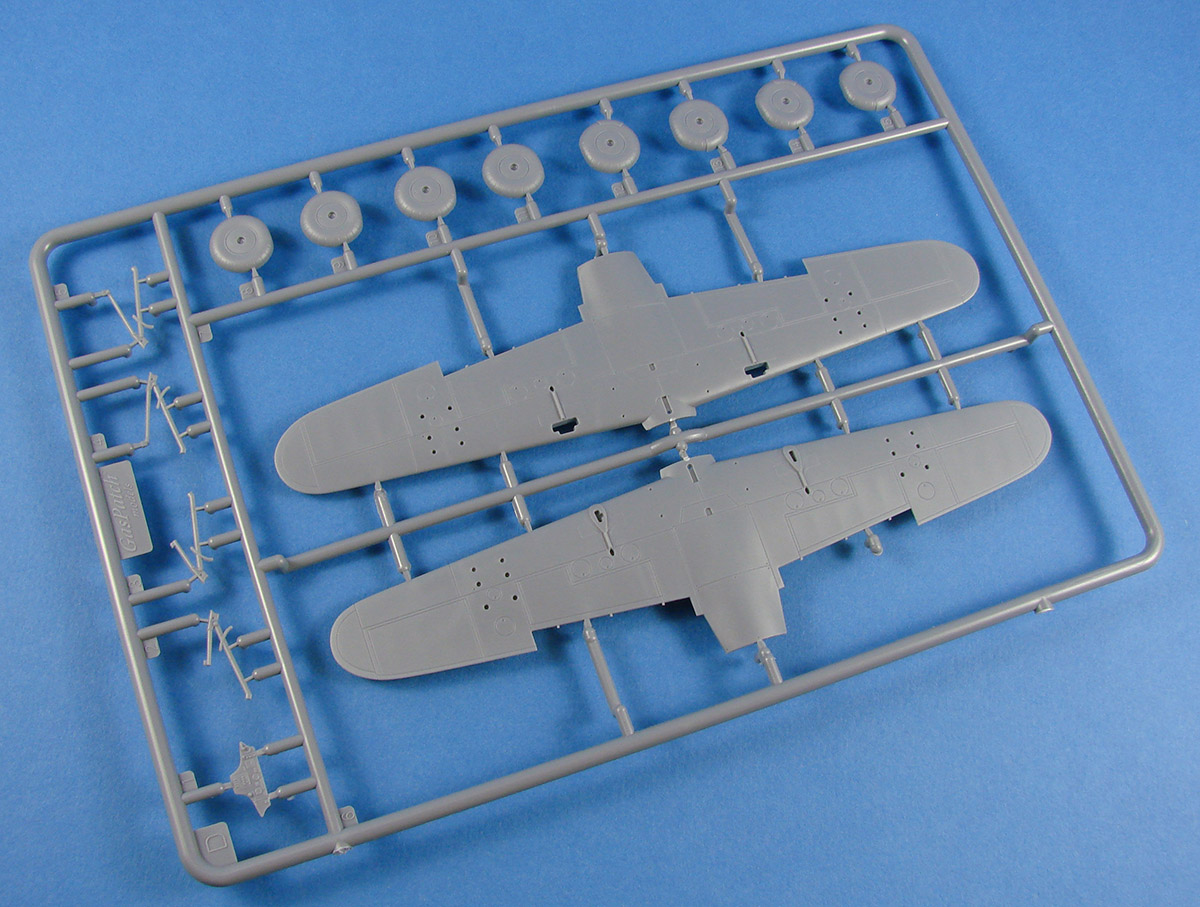
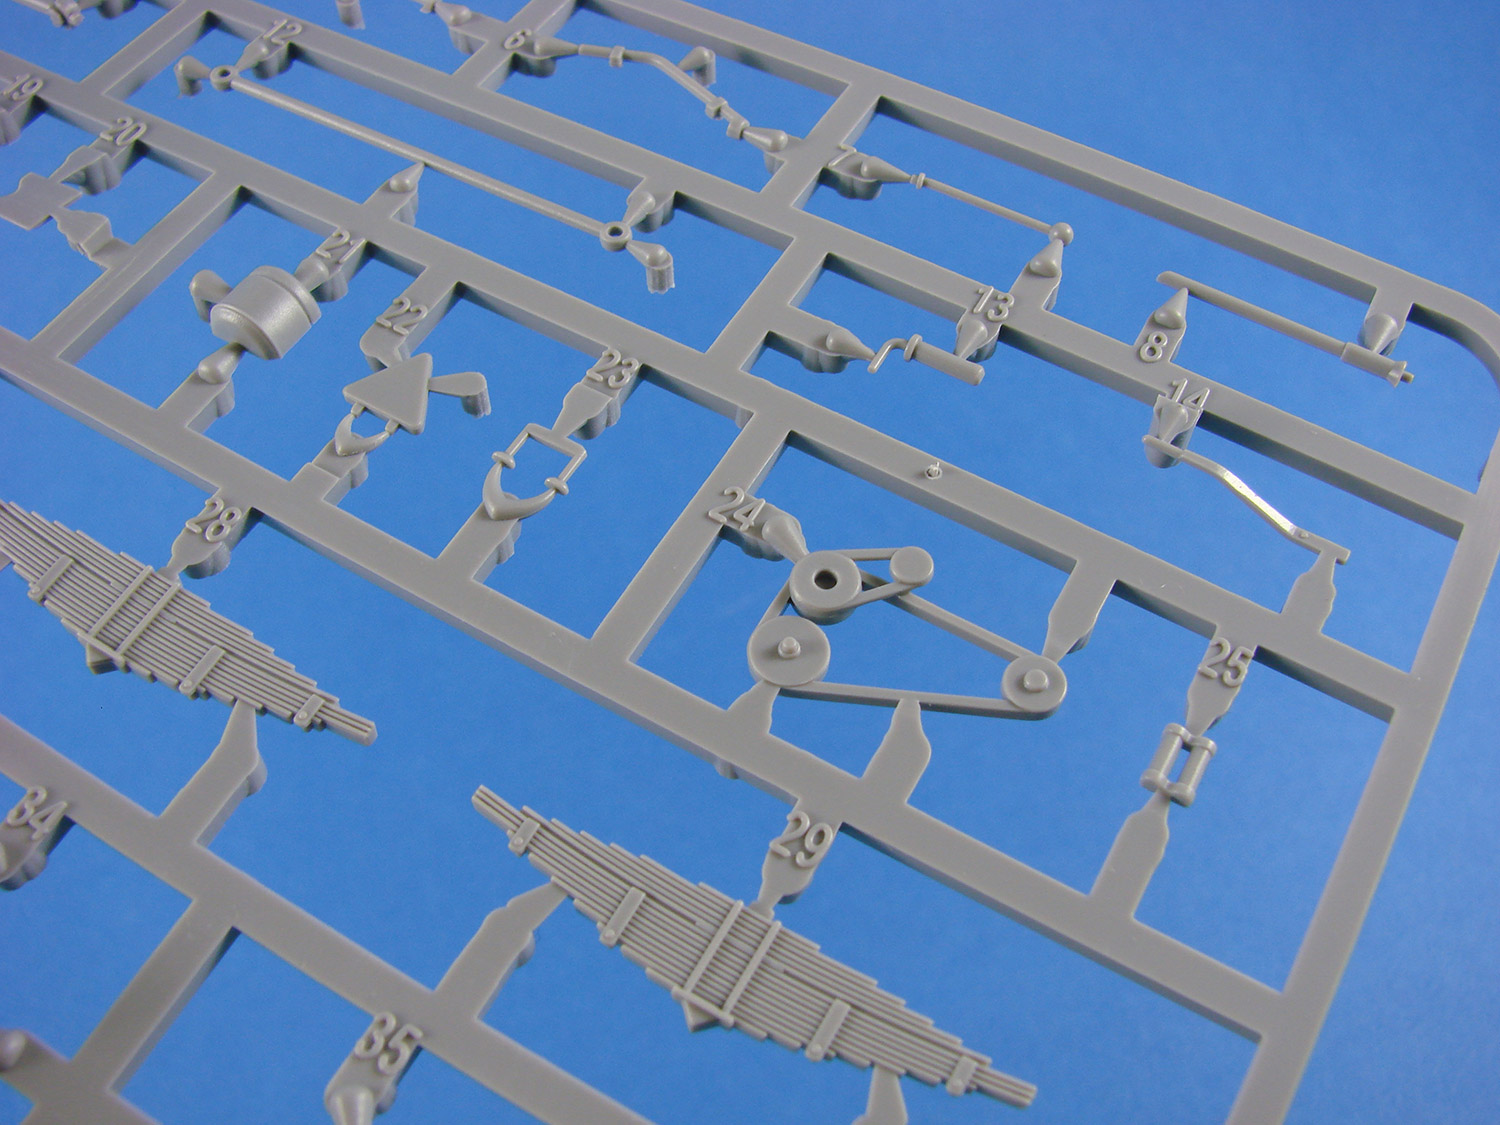
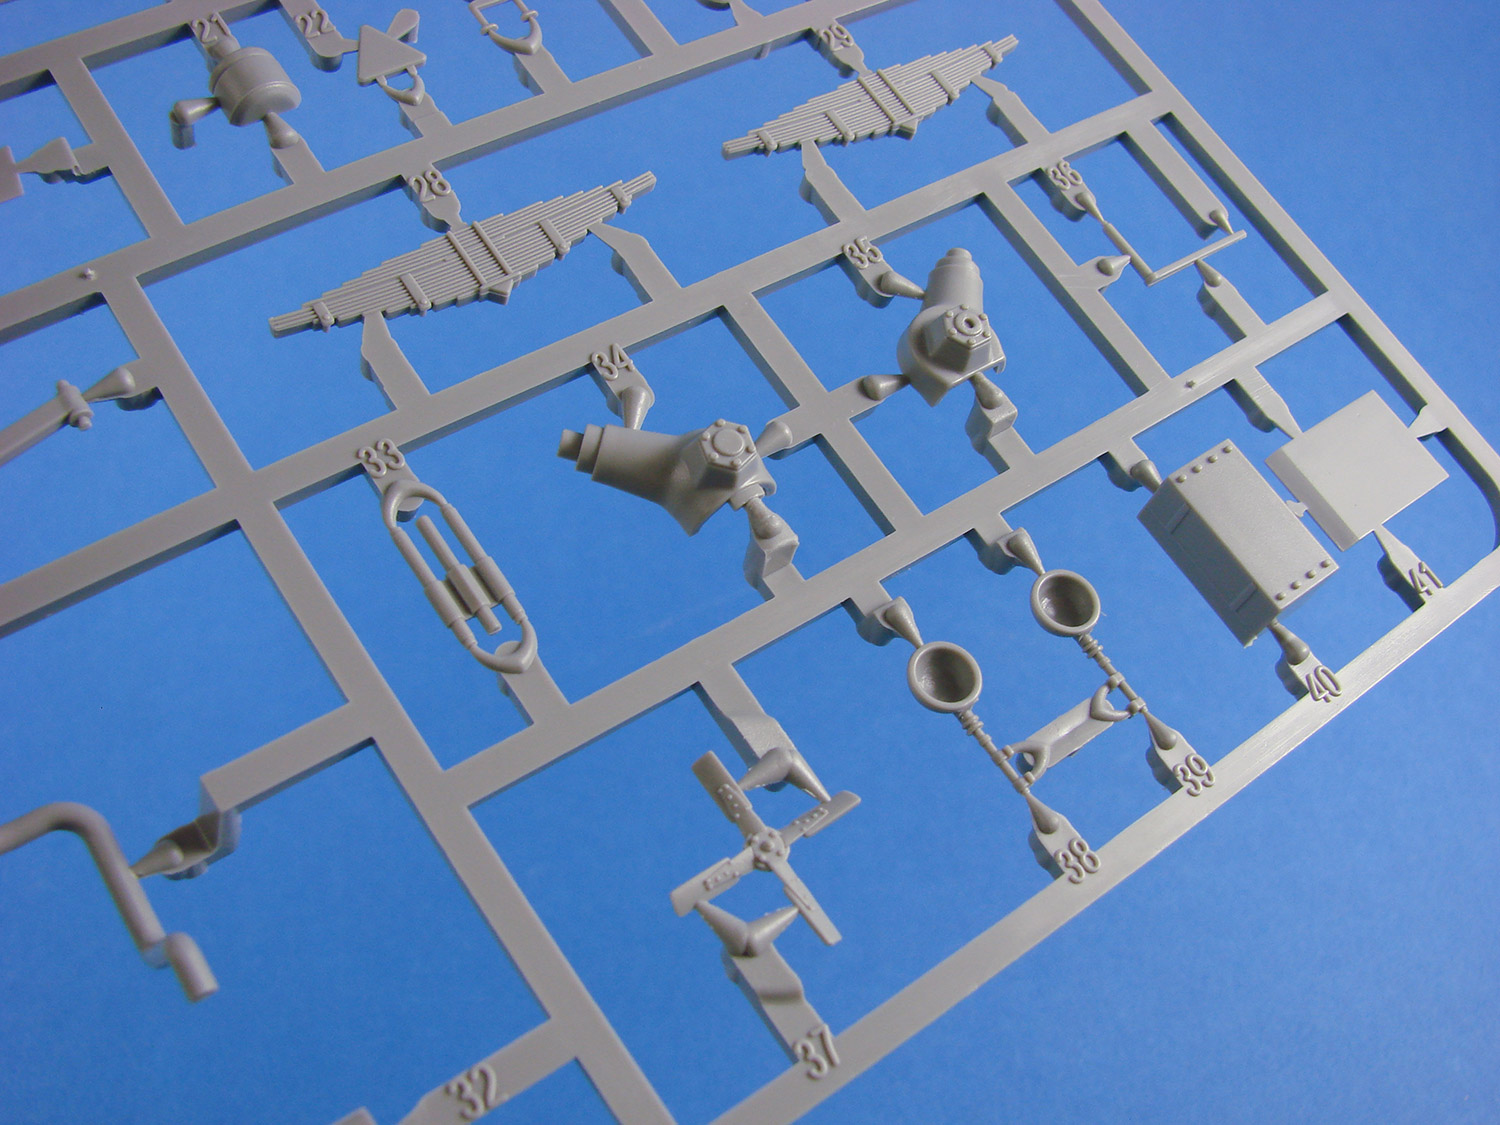
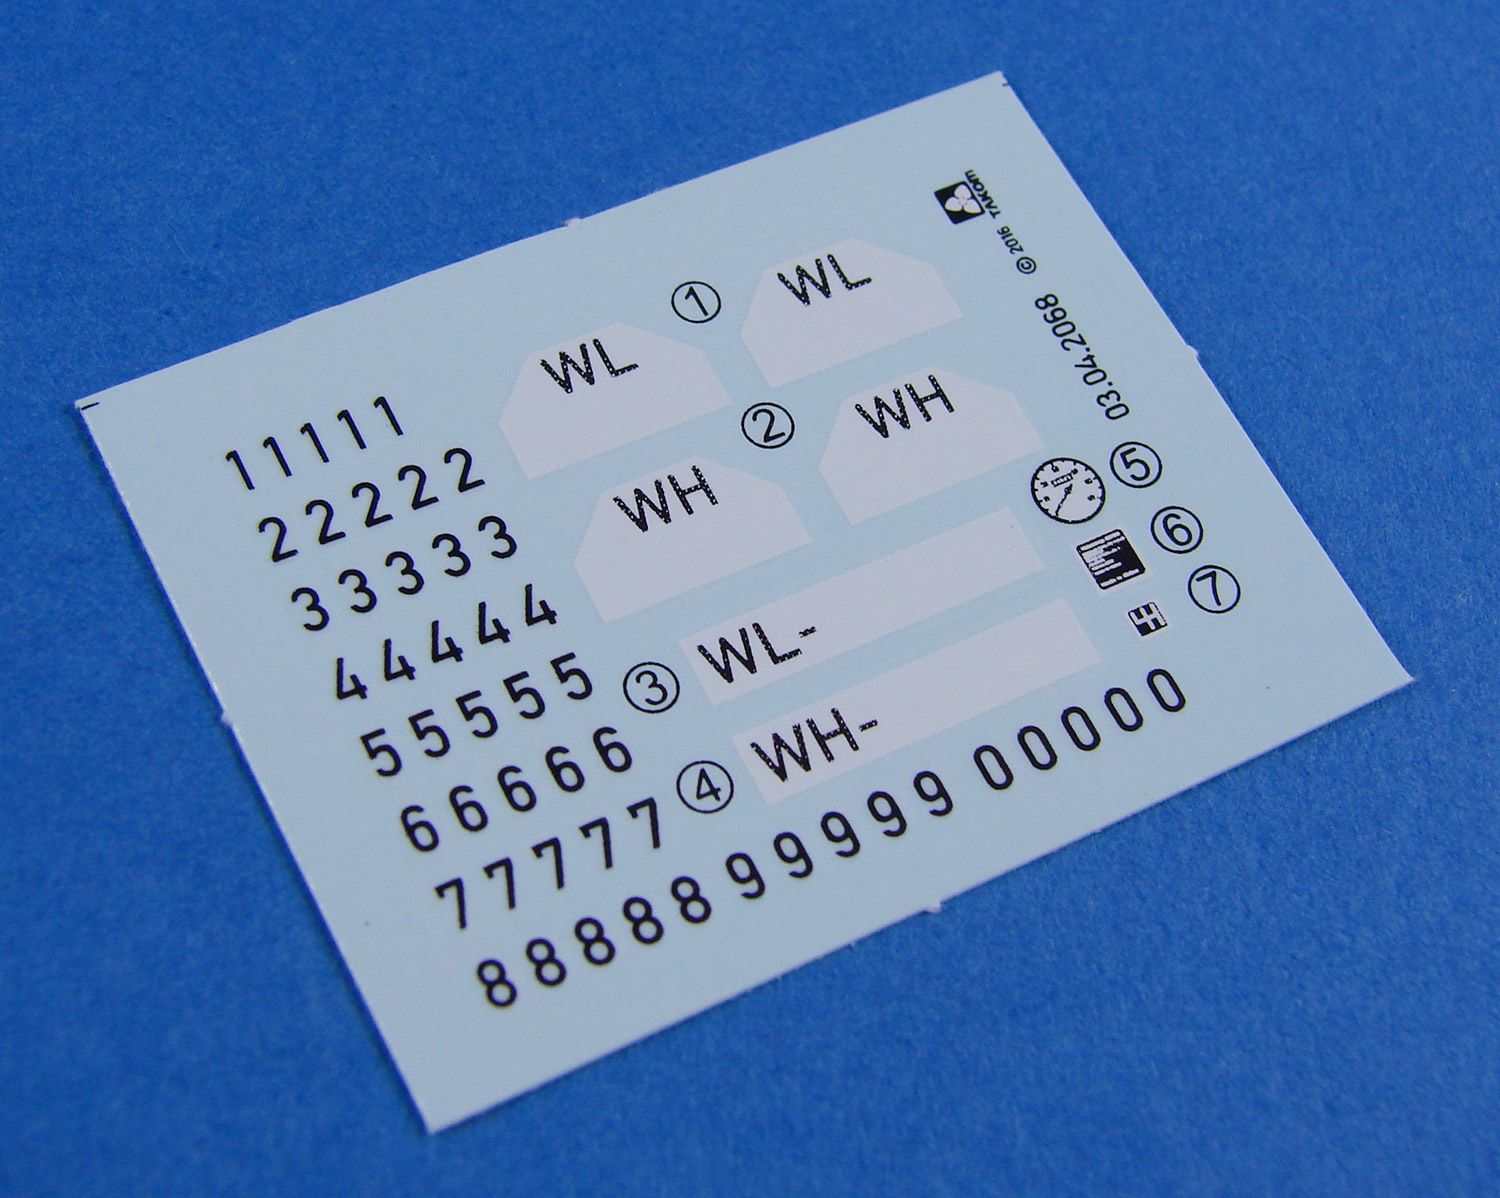
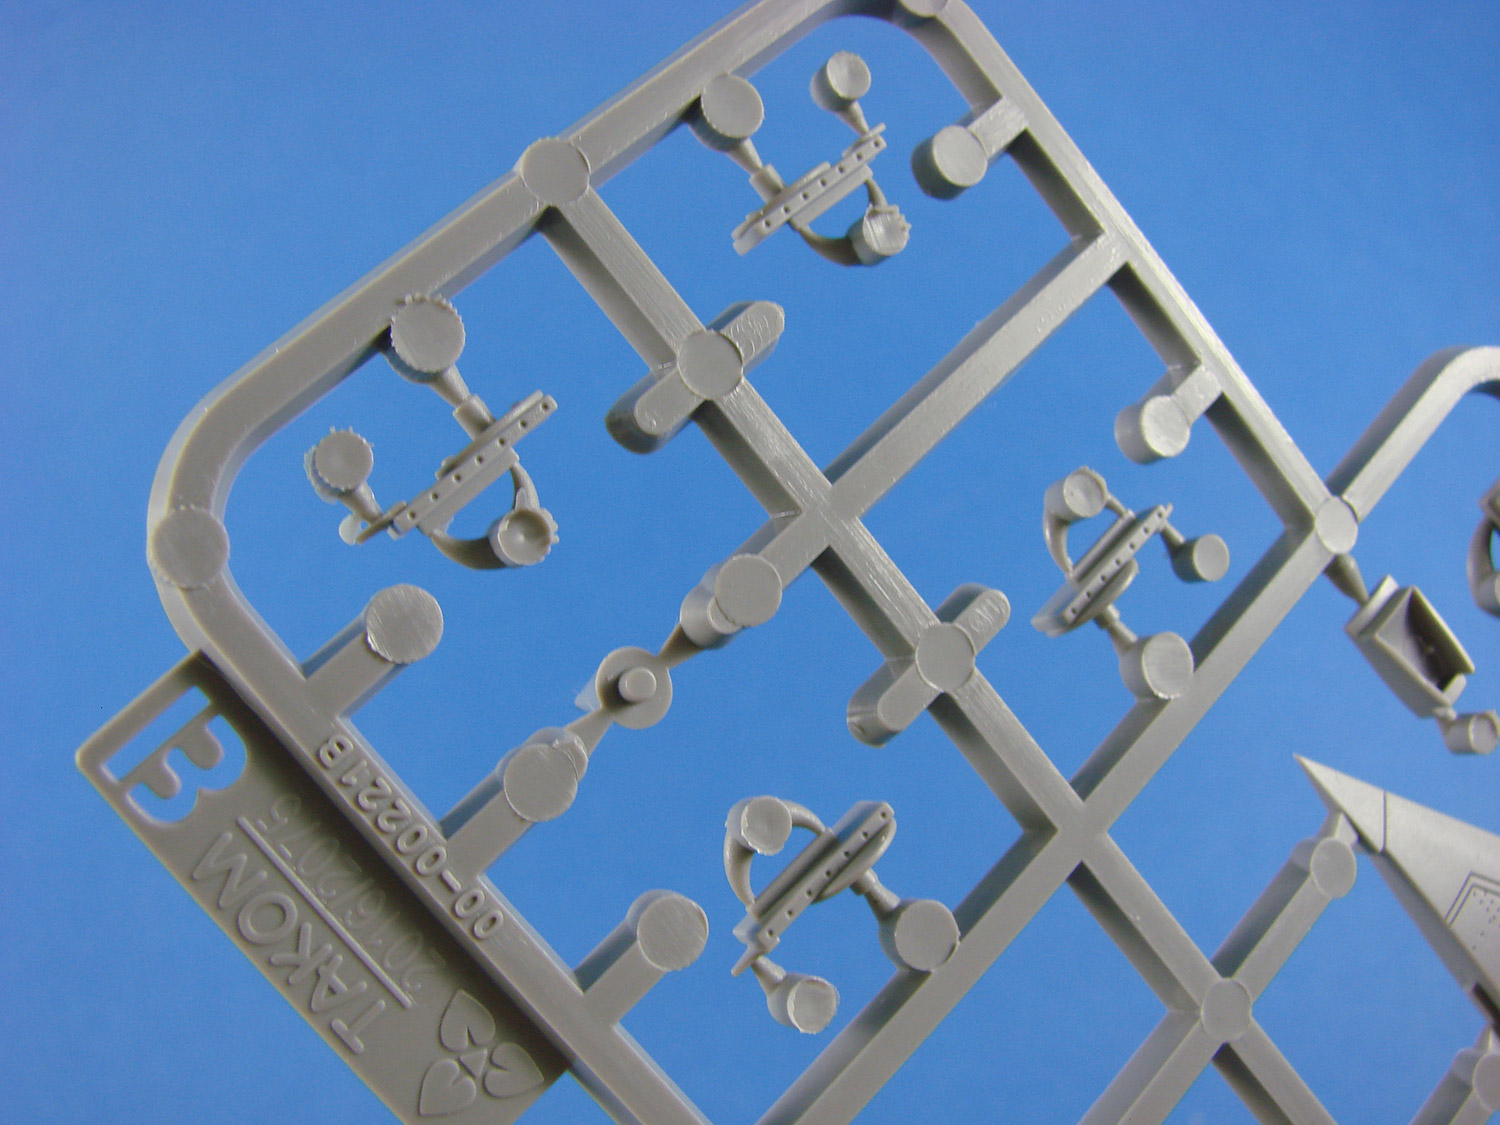
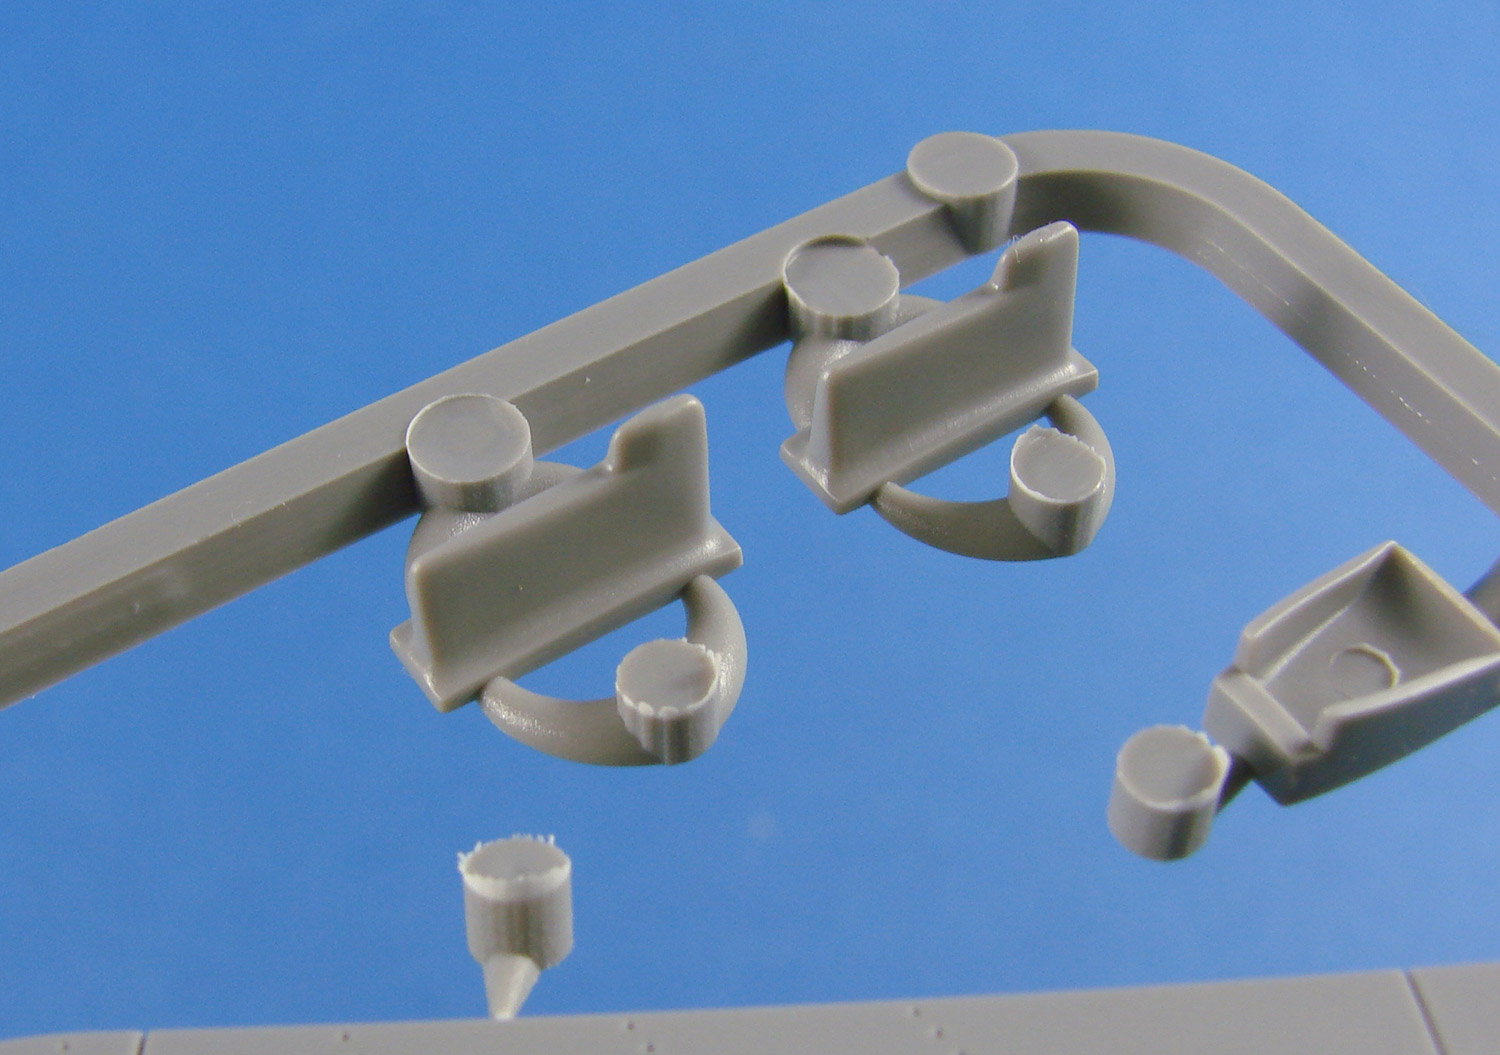
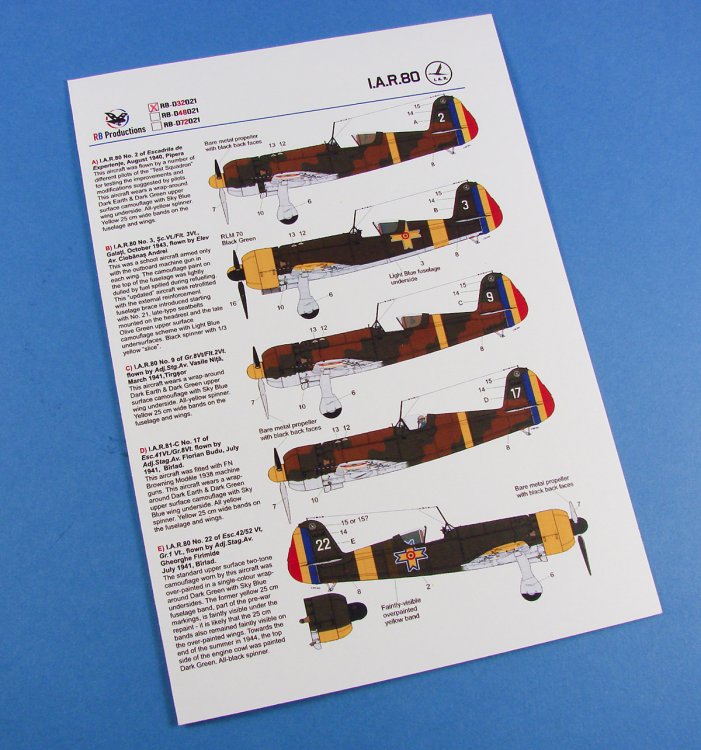
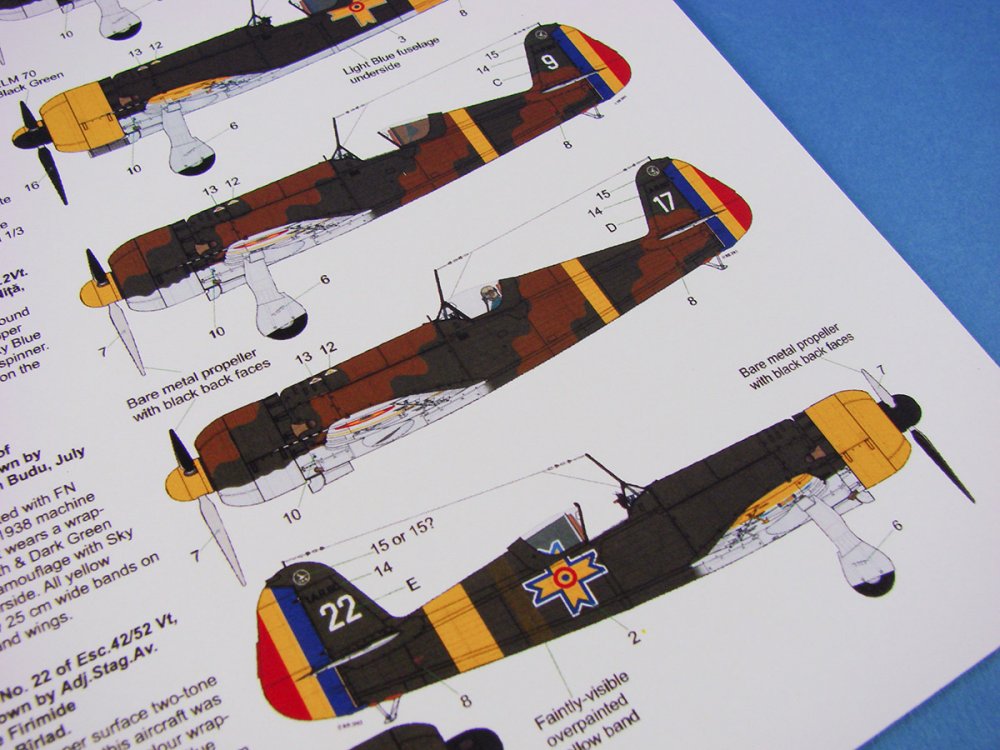
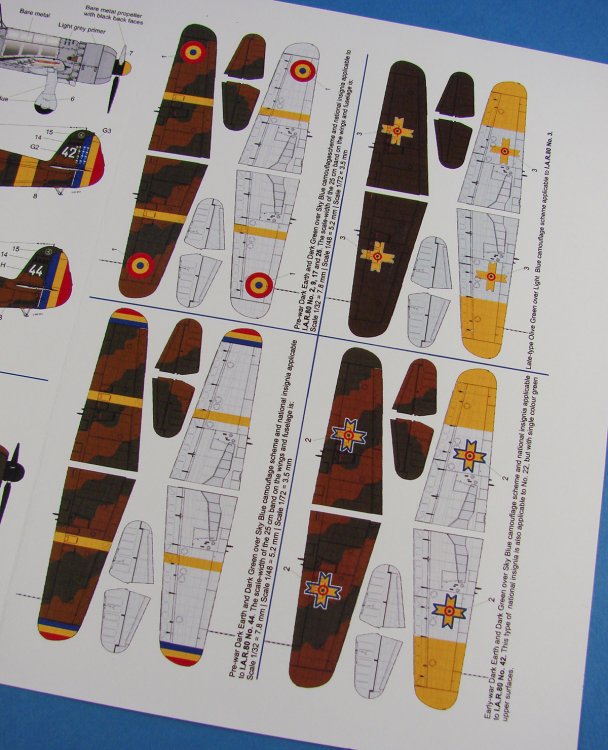
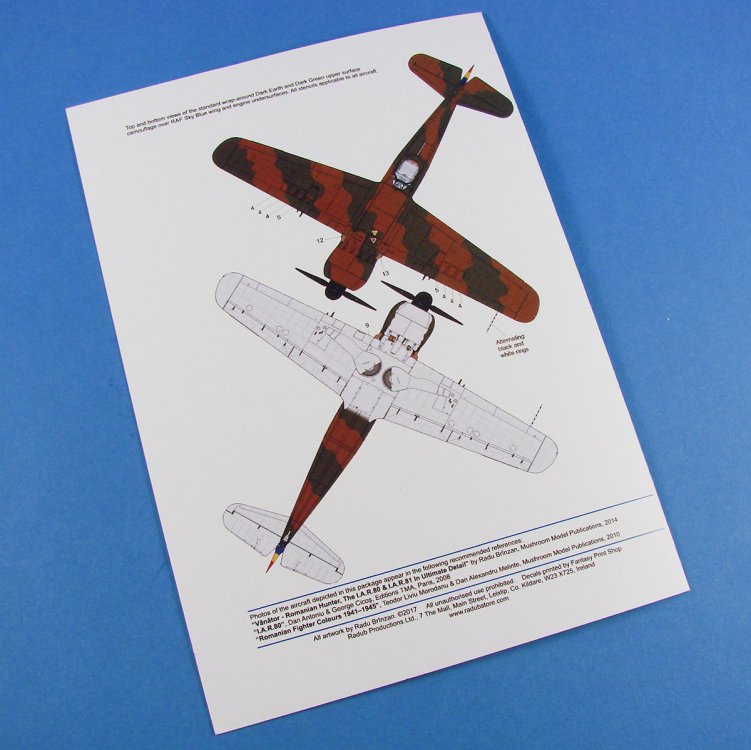
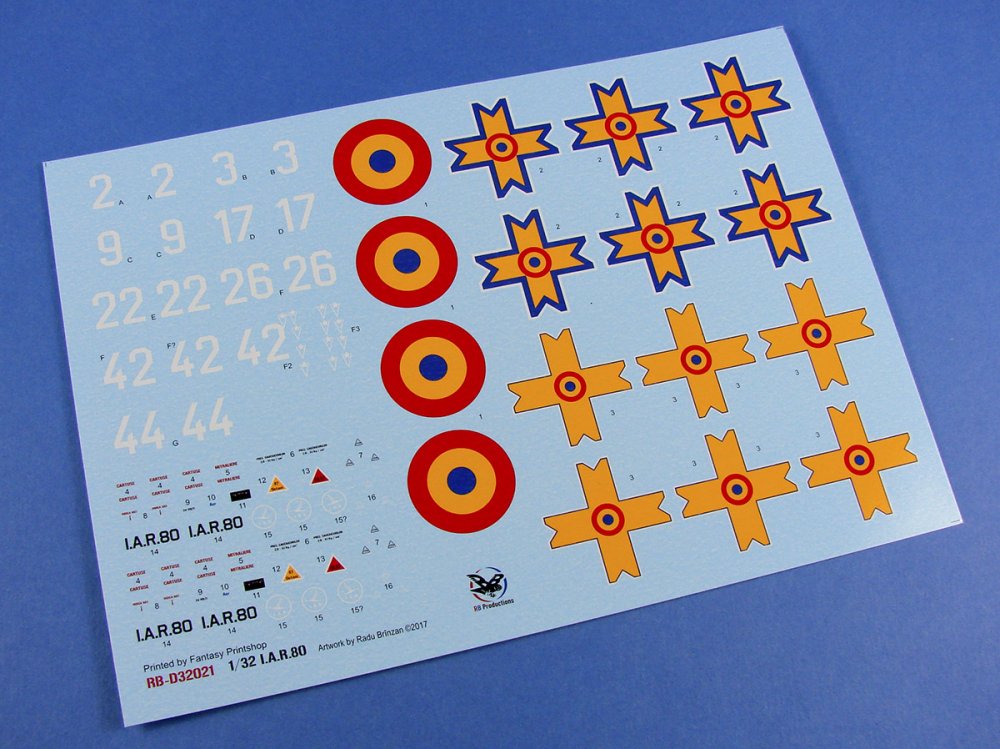
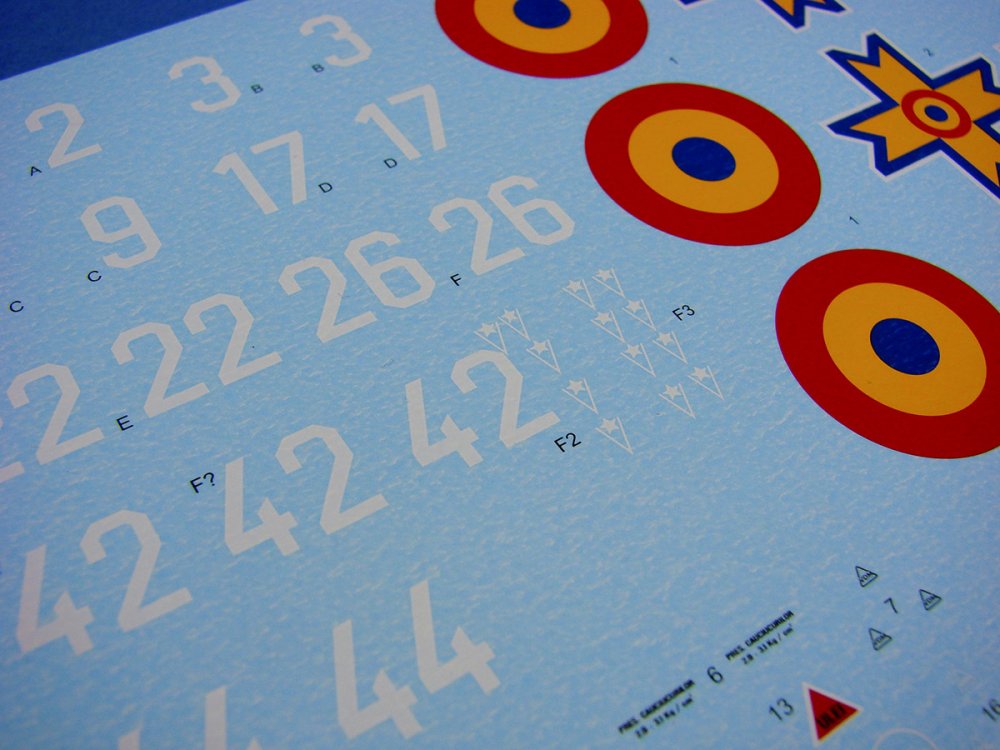
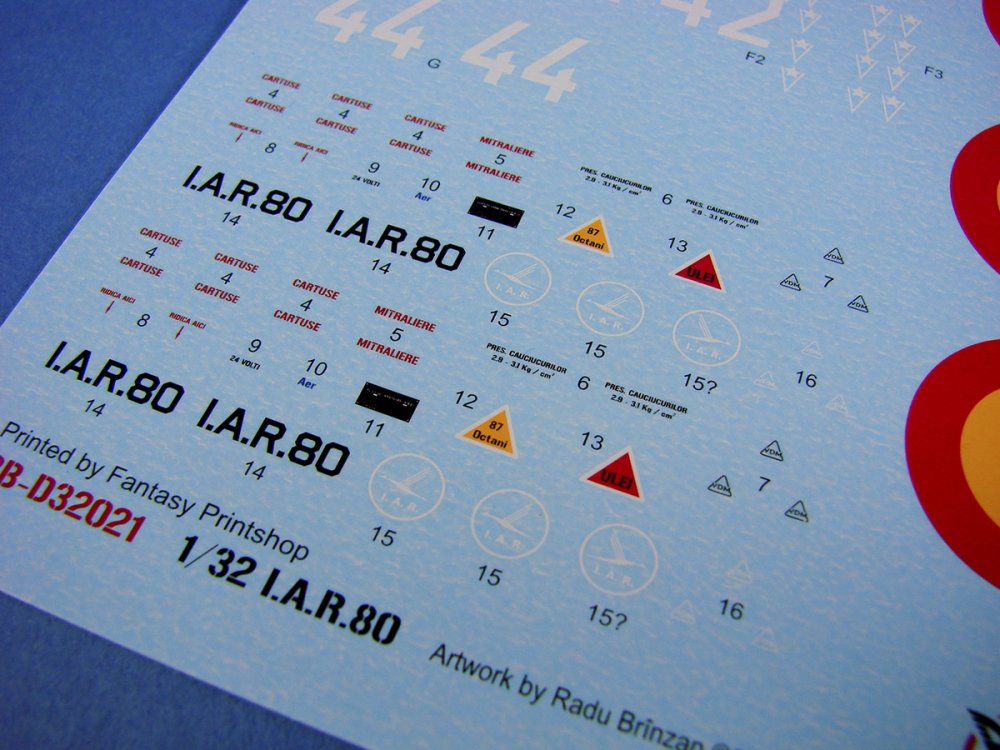
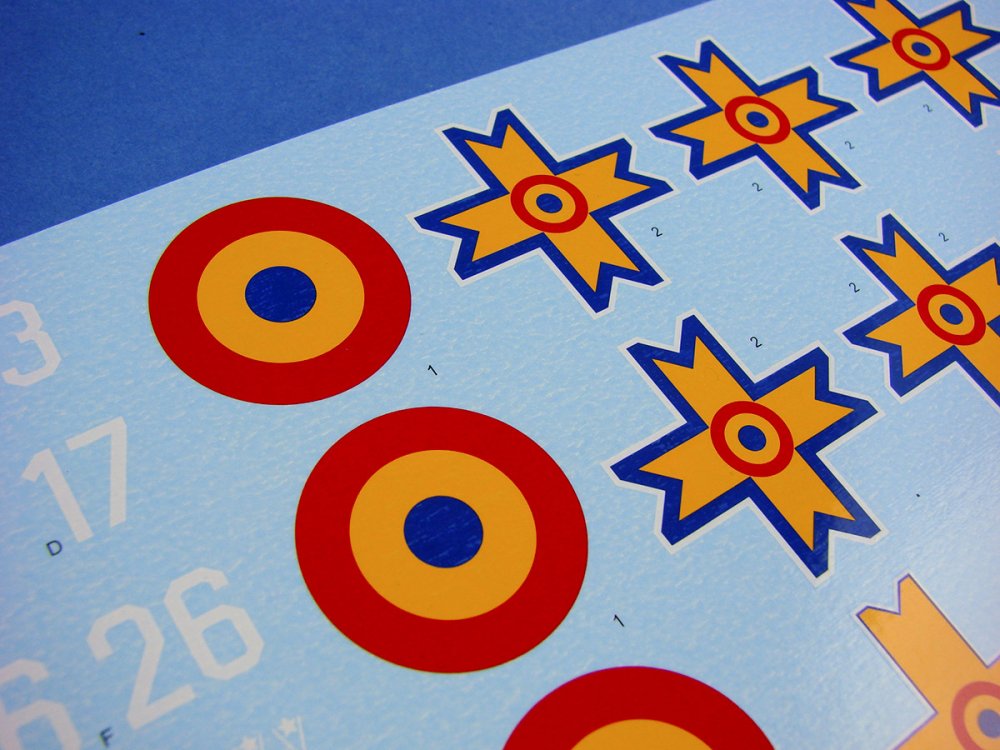
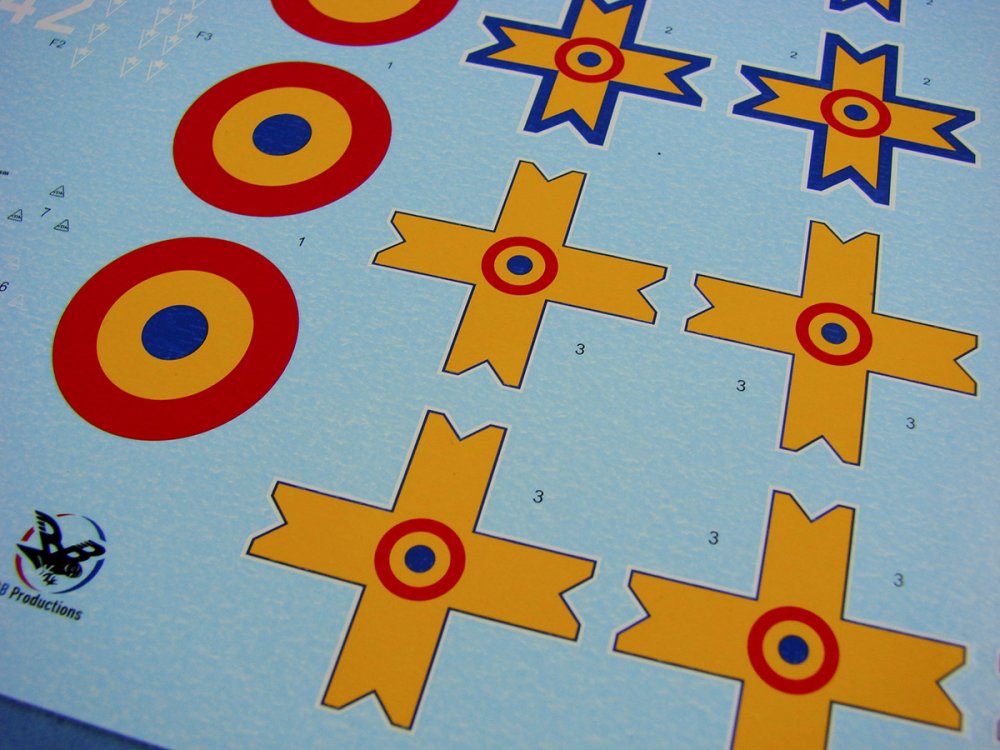
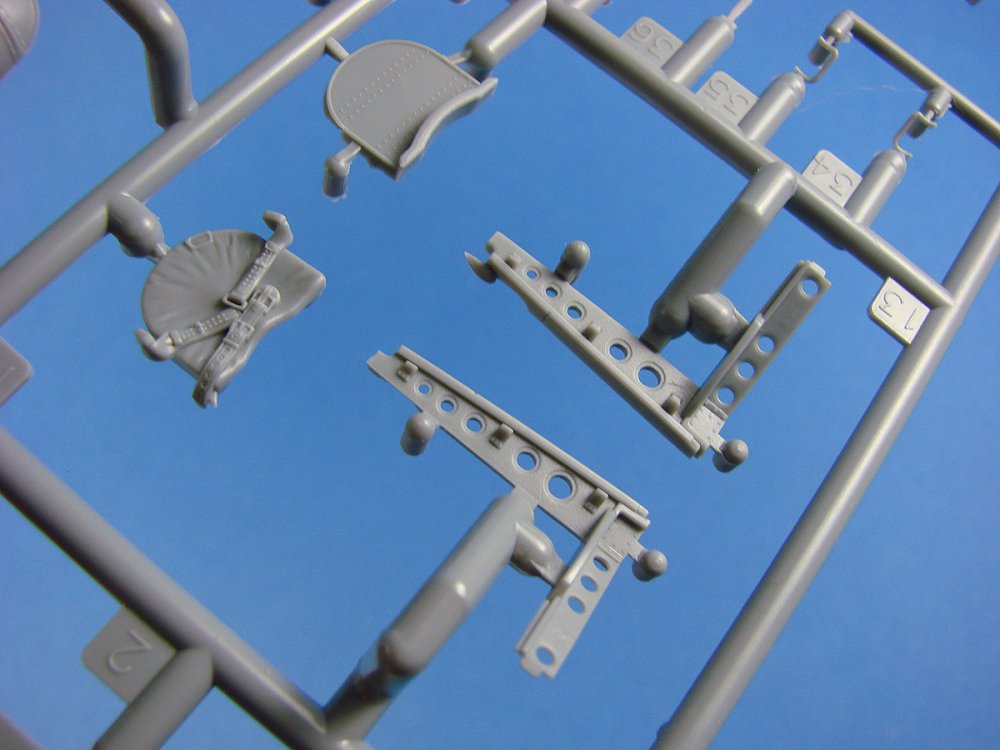
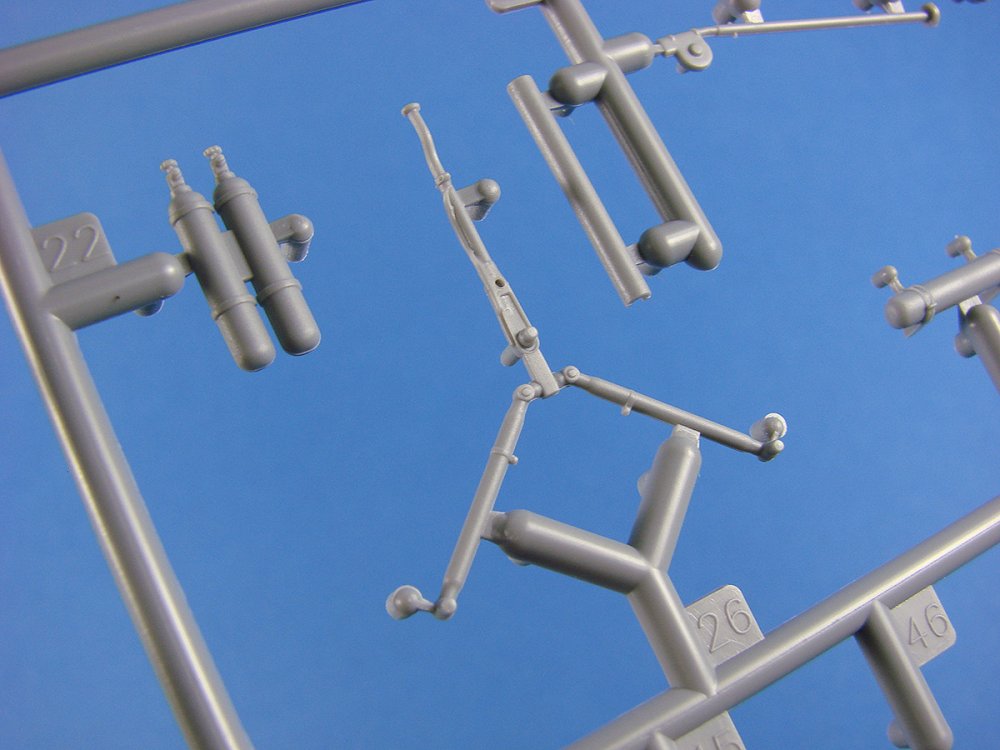
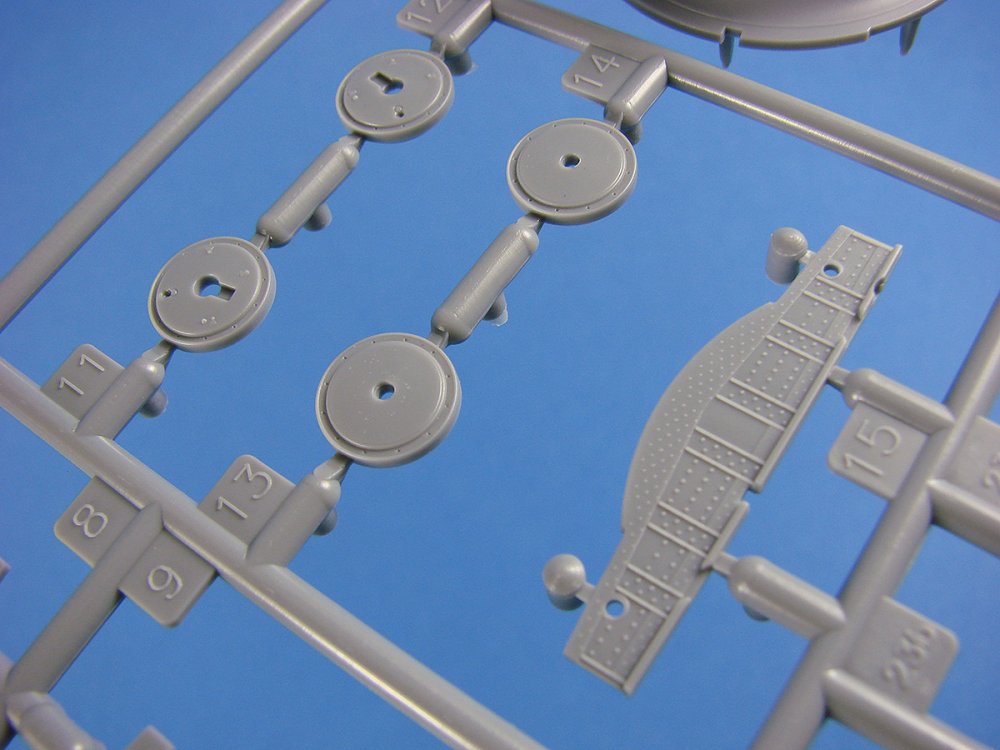
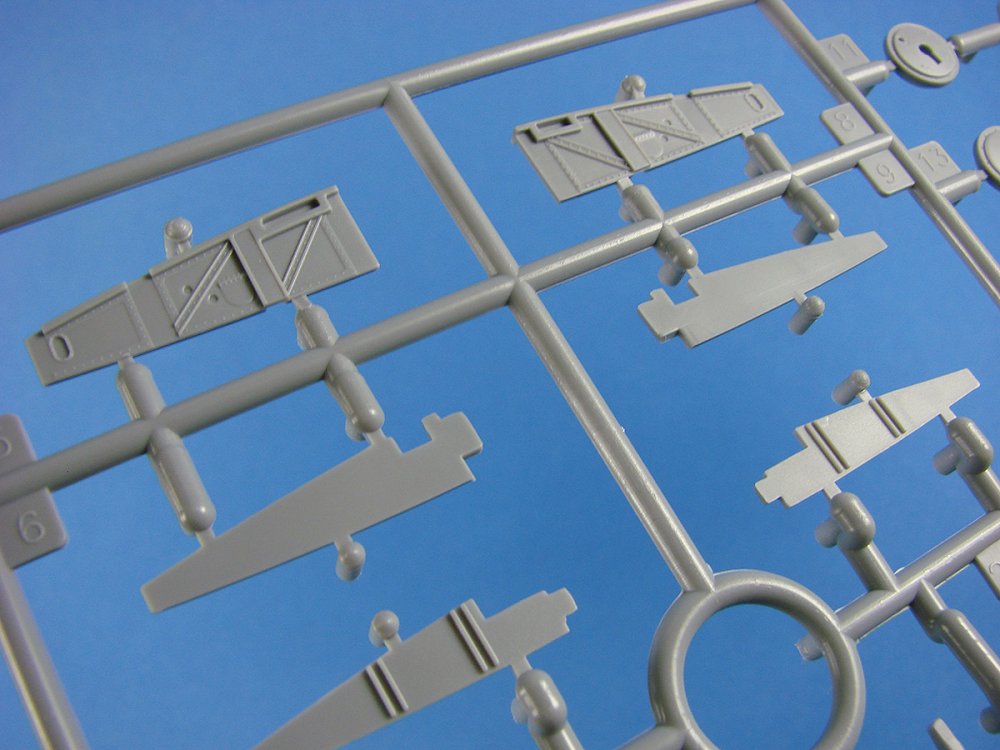
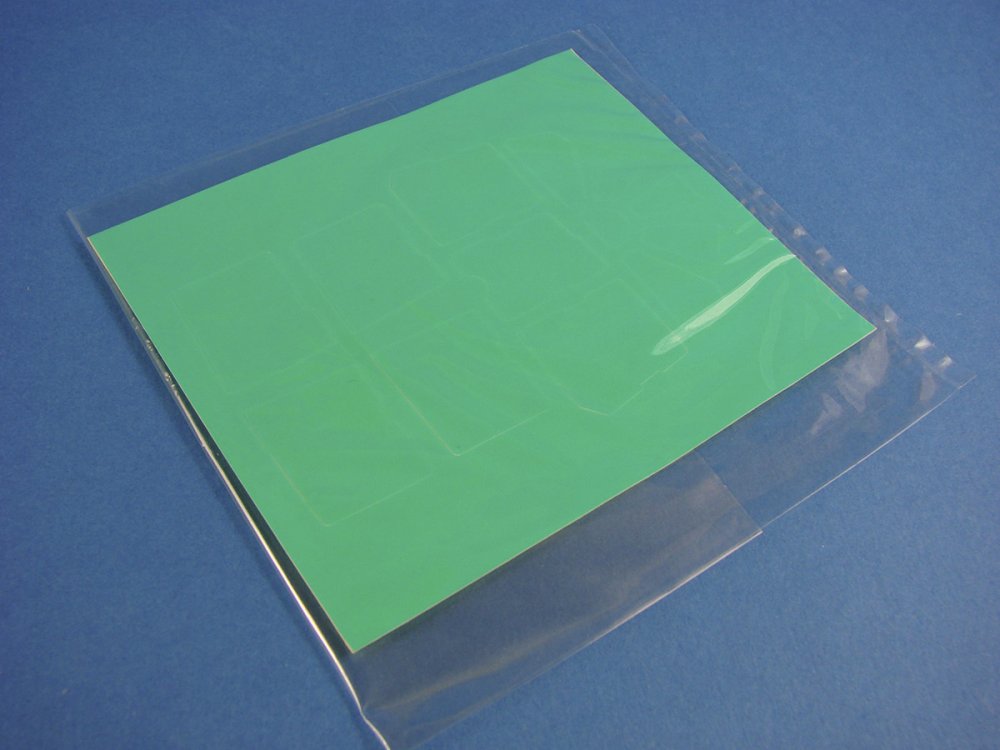
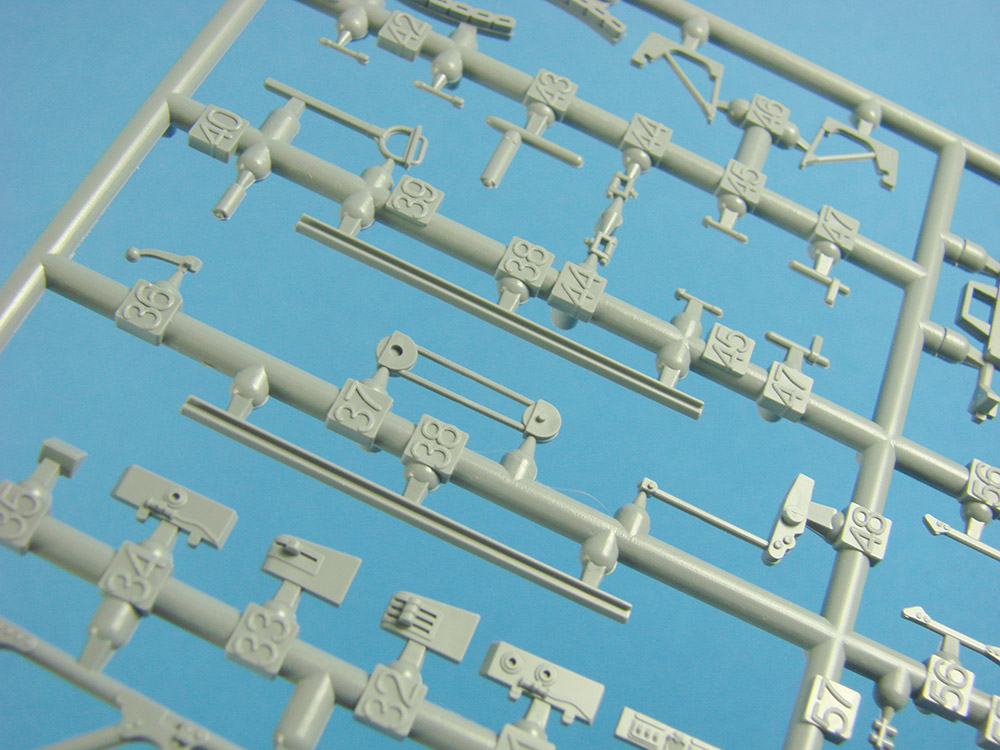
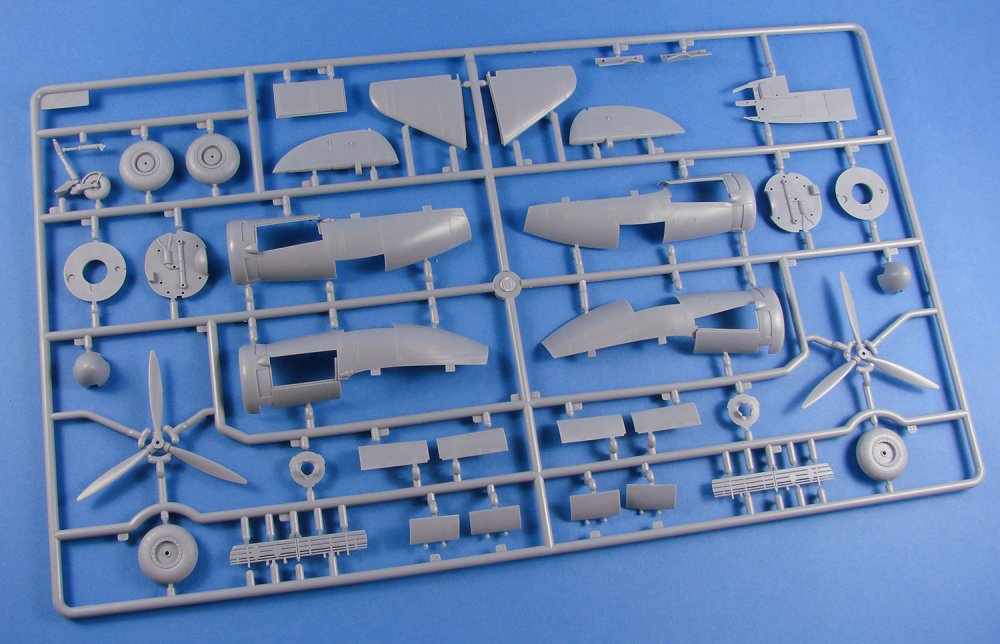
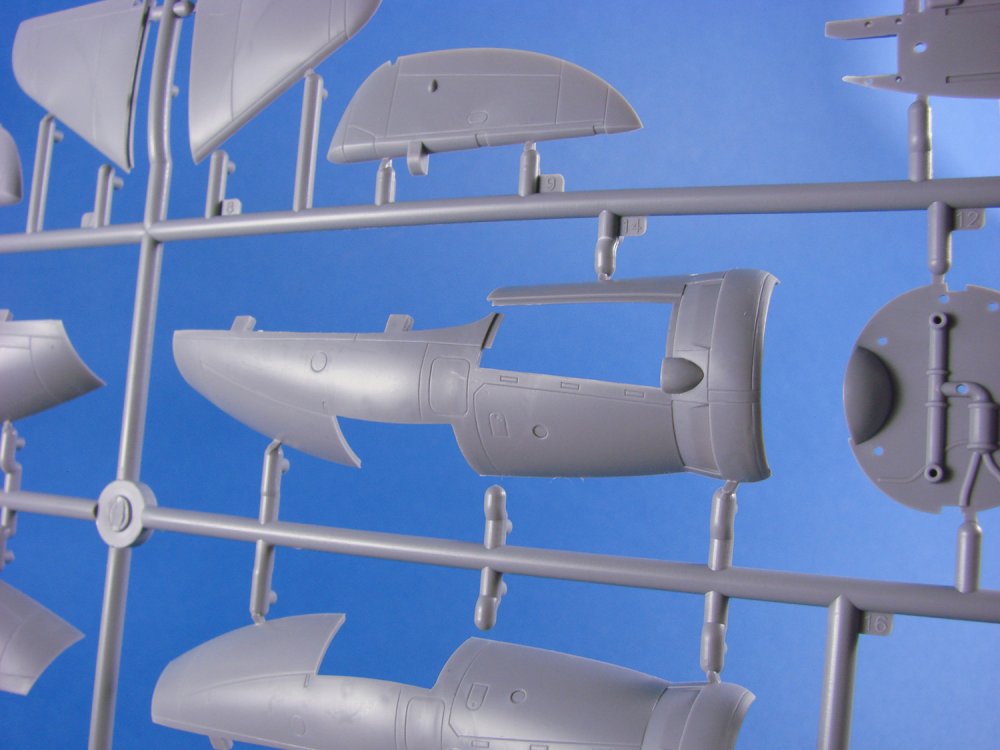
1/32 I.A.R.80 decals RB Productions Catalogue # RB-D32021 Available from RB Productions for €14,75 Romania’s I.A.R.80/81 was certainly as advanced, if not more so, than many contemporary fighter aircraft of that period, yet it is one which I imagine is far less known than those operated by other belligerent countries during that conflict. If anyone is best-placed to research and design a set of decals for the I.A.R.80, it’s Radu Brinzan. Having already written two books on this subject (which are superb, indidentally!), Radu is incredibly knowledgeable about this specific type, and being Romanian himself, it’s most certainly a passion. RB Productions have released decals for the I.A.R.80/81 before, with sets being available for the I.A.R.80-M (modified 80/s1 series machine) in all main scales, but this one concentrates specifically on the I.A.R.80, and what appears to be the earlier machines. Whilst the forthcoming I.A.R.80A to be released by FRROM would be the ideal candidate for the 1/32 version of these decals, you source the initial Azur/FRROM release. To utilise these on the I.A.R.80A though, you would need to make a small modification to that kit. As the I.A.R.80A was fitted with 6 guns, you would need to delete the outboard gun and associated access panels on each wing. NOW you can use this set safely! RB Productions new decal set (available in 1/32, 1/48 and 1/72), comes in a re-sealable clear sleeve, with an attractive, folded A4 sheet with the EIGHT schemes printed in full colour. Print quality is superb, and very sharp, depicting five fuselage profiles on the front, and a further three within. Each of these is provided with a small paragraph of specific information next to the image. Each profile is also annotated with key colour details, as well as the main colours themselves being given in Lifecolor and FS codes. To use other makes, you’ll need to cross-reference. Inside the sheet, a further opposite side profile is given for the standard camouflage application, with notes on stencilling and weathering. Four images are supplied of the upper and lower wings, and you will need (quite easily) to tie the correct one to the specific scheme profile you will choose. Dimensional information is included for wing stripes. The back page shows the camouflage scheme in planform, with the wraparound fuselage paintwork. A single decal sheet is included, printed by Fantasy Printshop in the UK. My experience of their decals is that they are as good as the main contemporary manufacturers, and every bit as good as Eduard’s own in-house production, which incidentally, I very much like. I’ve found they also work well with decal setting solutions, where required. Printing is also flawless, with the decals being nice and thin, and having minimal carrier film. Colour reproduction is excellent and everything is in perfect register. One thing I do know is that Fantasy Printshop are sticklers for quality! As well as the various national marking styles that were applied to these machines, a seriesof stencils is also included. In fact, two sets are included, meaning it’s perfectly possible to build at least two models from this sheet (more, if you don’t count the stencils!). The supplied marking options are: I.A.R.80, No.2 of Escadrila de Experienţe, August 1940, Pipera I.A.R.80, No.3, Şc.Vt/Flt.3Vt., Galaţi, October 1943, flown by Elev Av. Ciobănaş Andrei I.A.R.80, No.9 of Gr.8Vt/Flt.2Vt., flown by Adj.Stg.Av. Vasile Niţă, March 1941, Tirgşor I.A.R.81-C, No.17 of Esc.41Vt./Gr.8Vt, flown by Adj.Stag.Av. Florian Budu, July 1941, Bârlad I.A.R.80, No.22 of Esc.42/52 Vt., Gr.1 Vt, flown by Adj.Stag.Av. Gheorghe Firimide, July 1941, Bârlad I.A.R.80, No.26, March 1941, I.A.R. Braşov I.A.R.80, No.42 of Esc.42/52 Vt., August 1941, Sturzeni and Sărata/Salz I.A.R.80, No 44 of Flt.2Vt./Gr.8Vt., March 1941, Tirgşor Conclusion Radu has chosen some beautifully varied machines here in terms of styles of Romanian markings used, and in colourful terms also. Certainly a very welcome accompaniment to the Azur/FRROM kit. A very well researched product that is printed in superb quality by Fantasy Printshop. There really is nothing NOT to like here! Highly recommended My sincere thanks to RB Productions for the review set seen here. To purchase directly in 1/32, click HERE.


-

Profimodeller Fi103 V1
James H replied to JeroenPeters's topic in LSM 1/35 and Larger Work In Progress
Jeroen is my hero. His work is so frickin cool! -
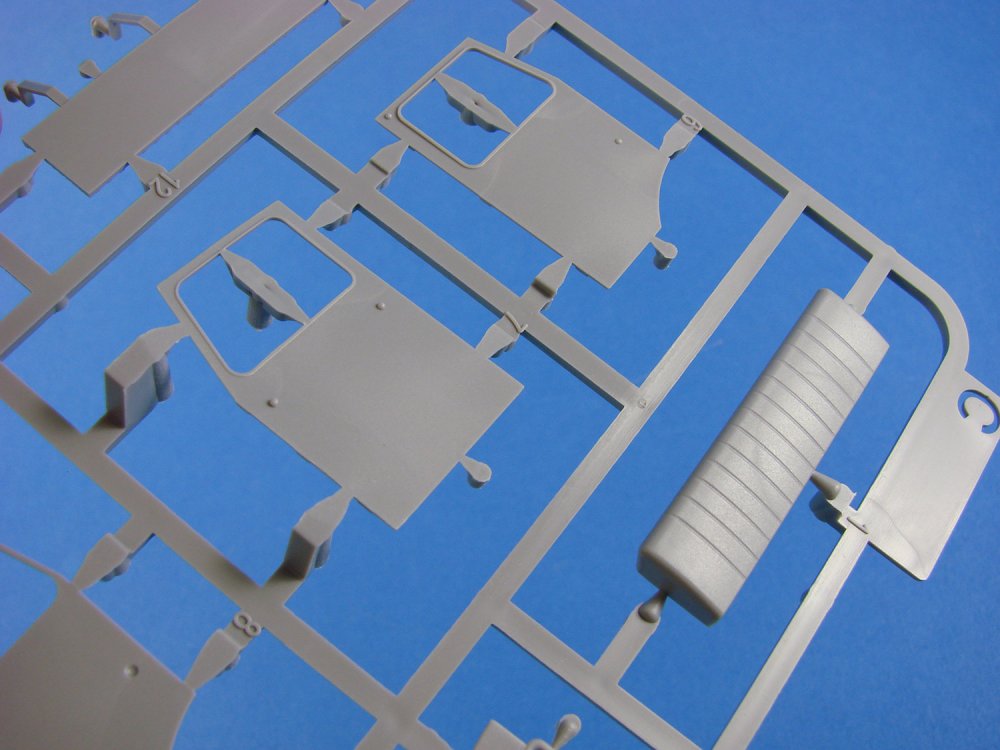
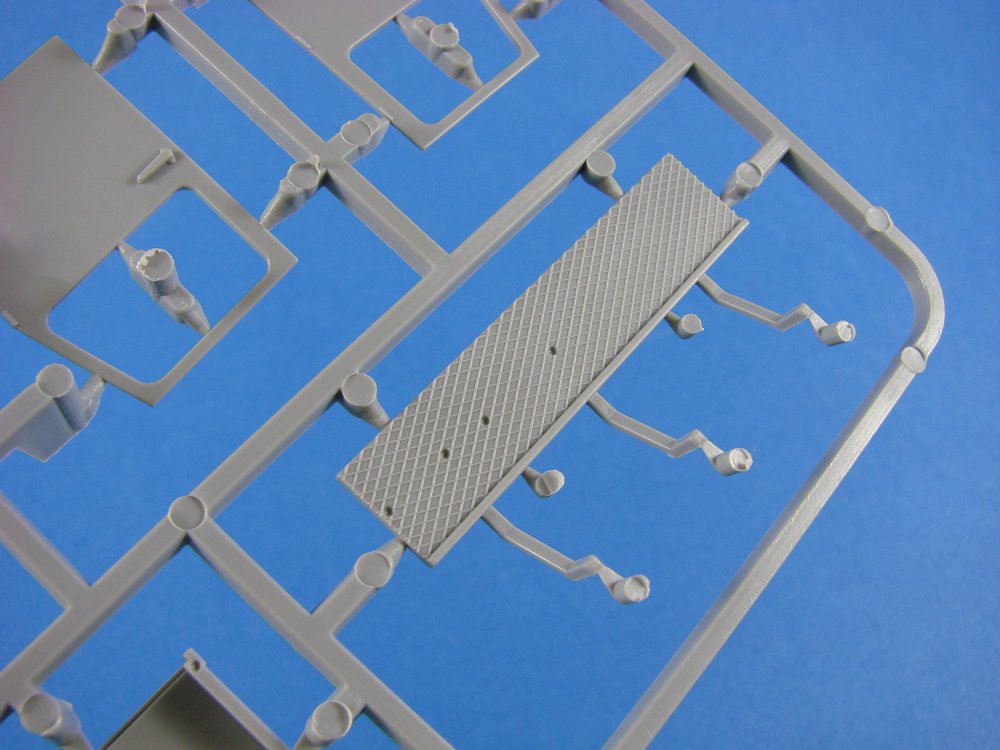
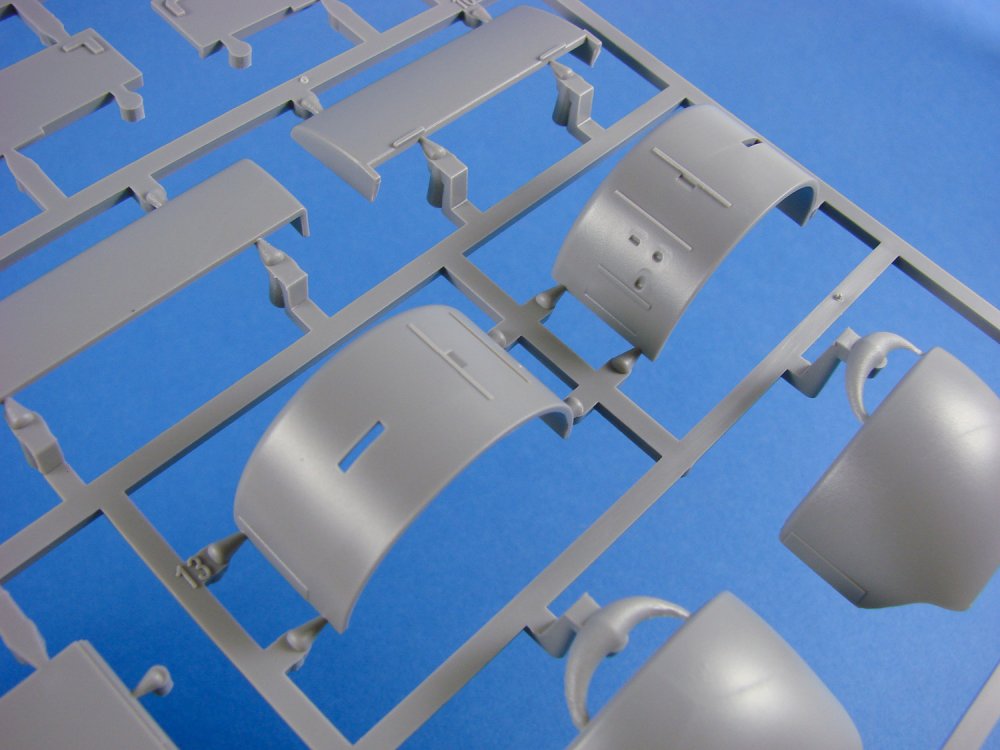
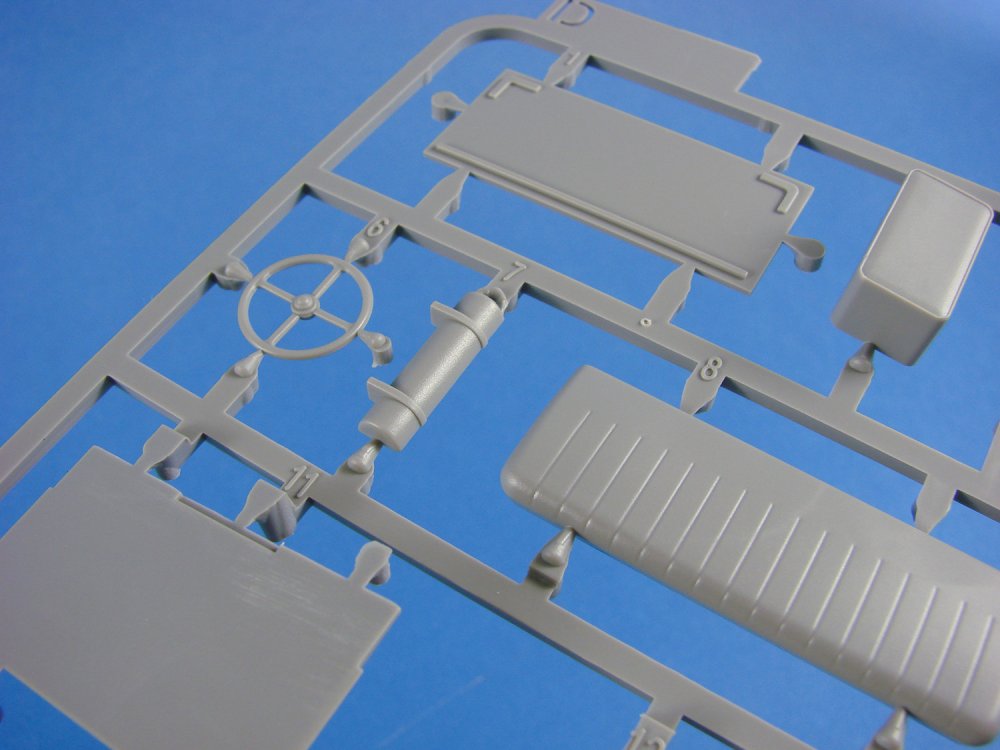
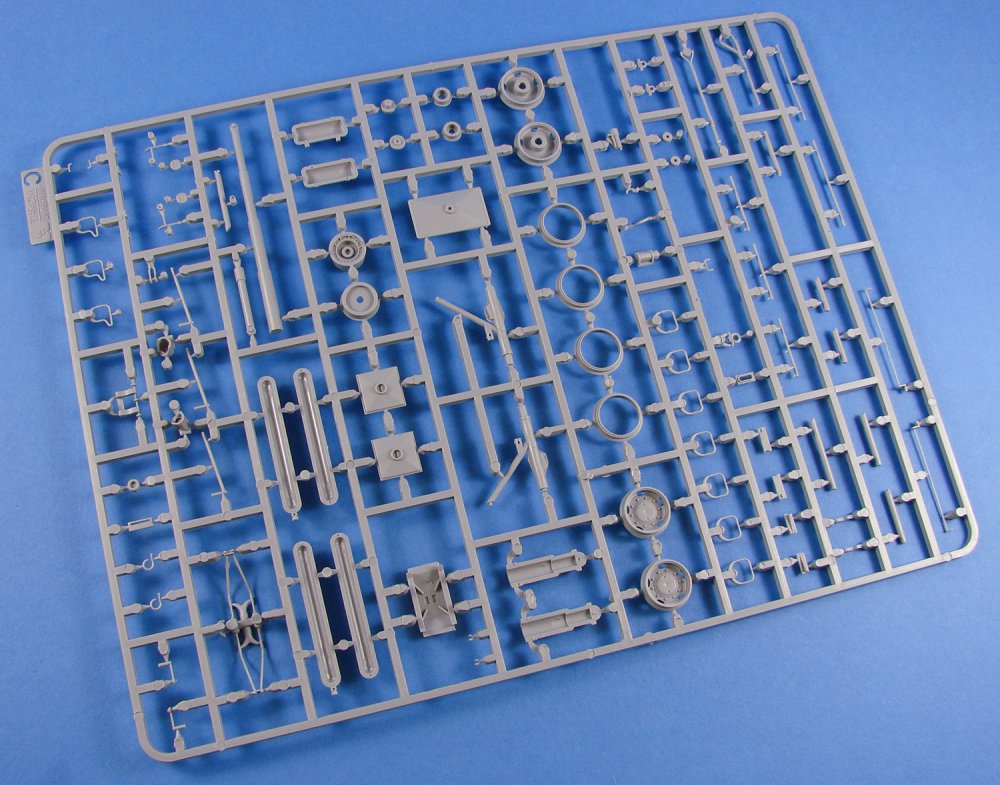
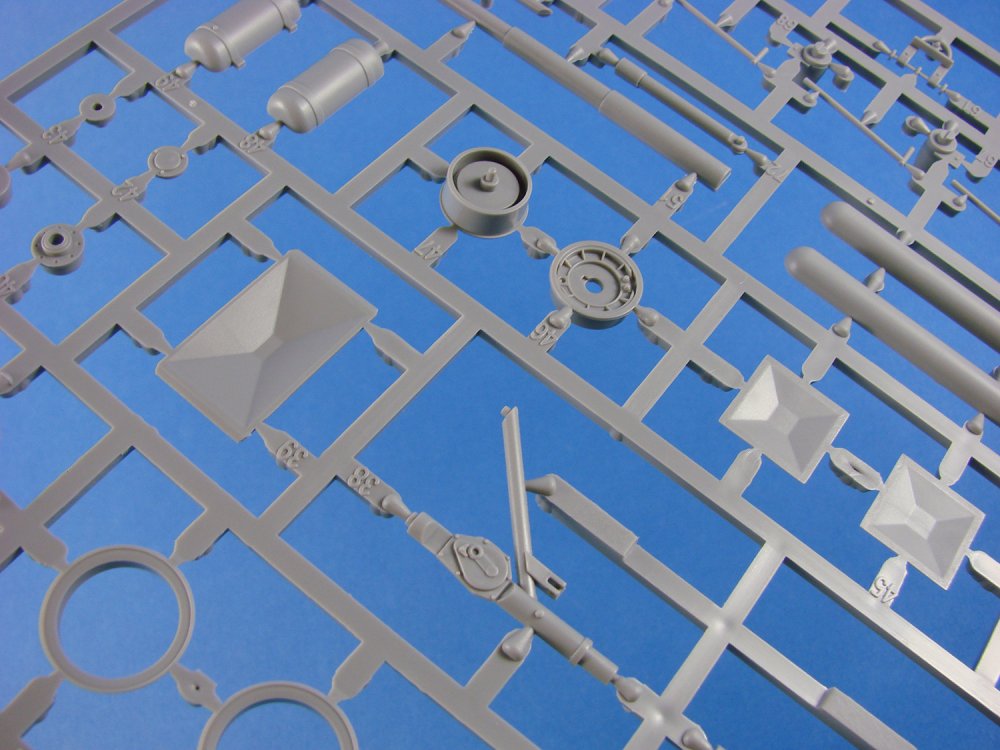
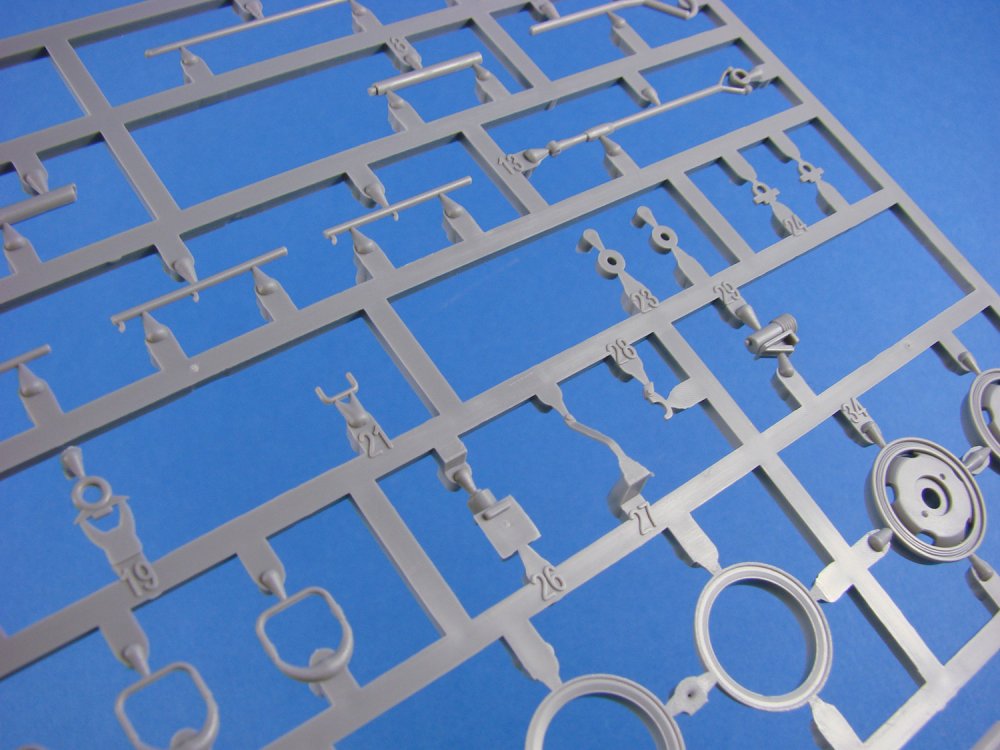
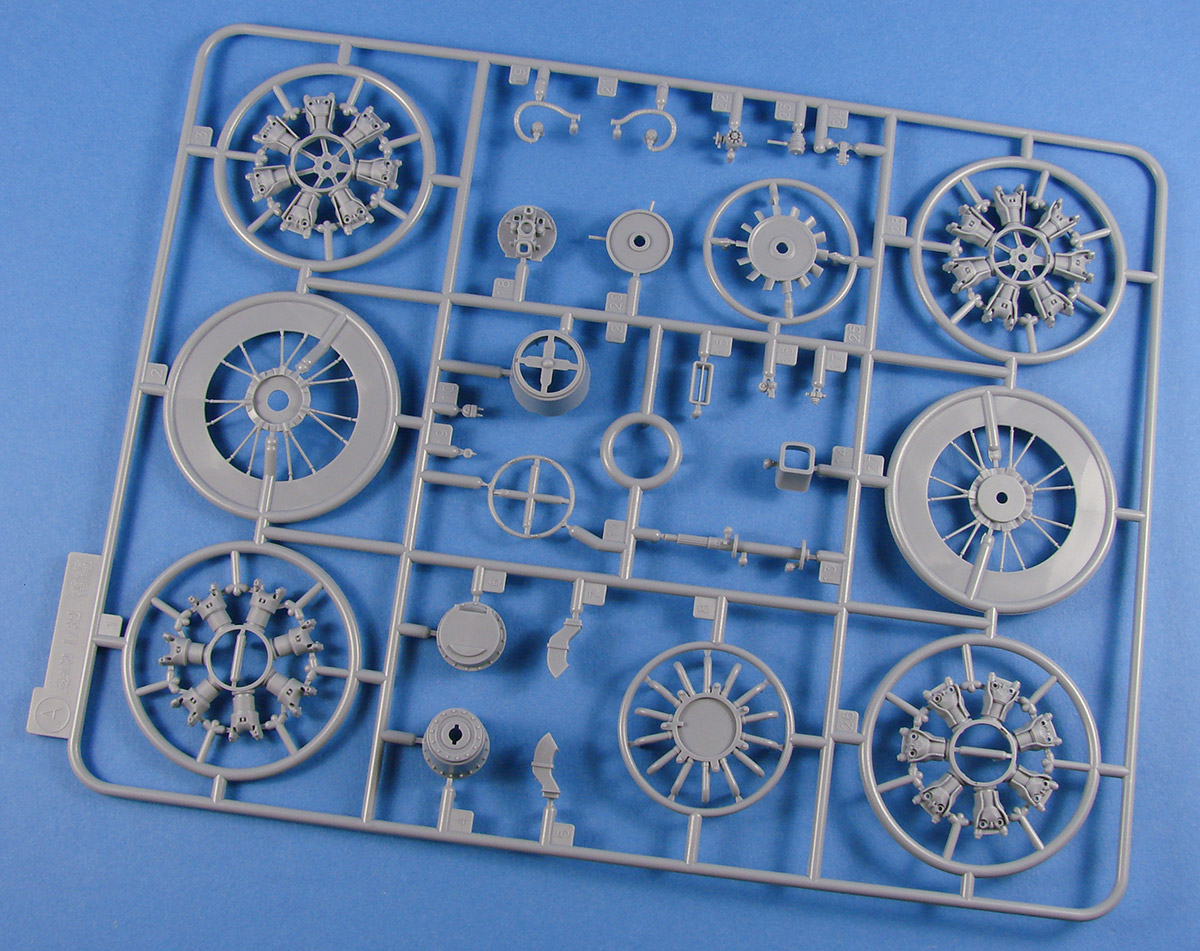
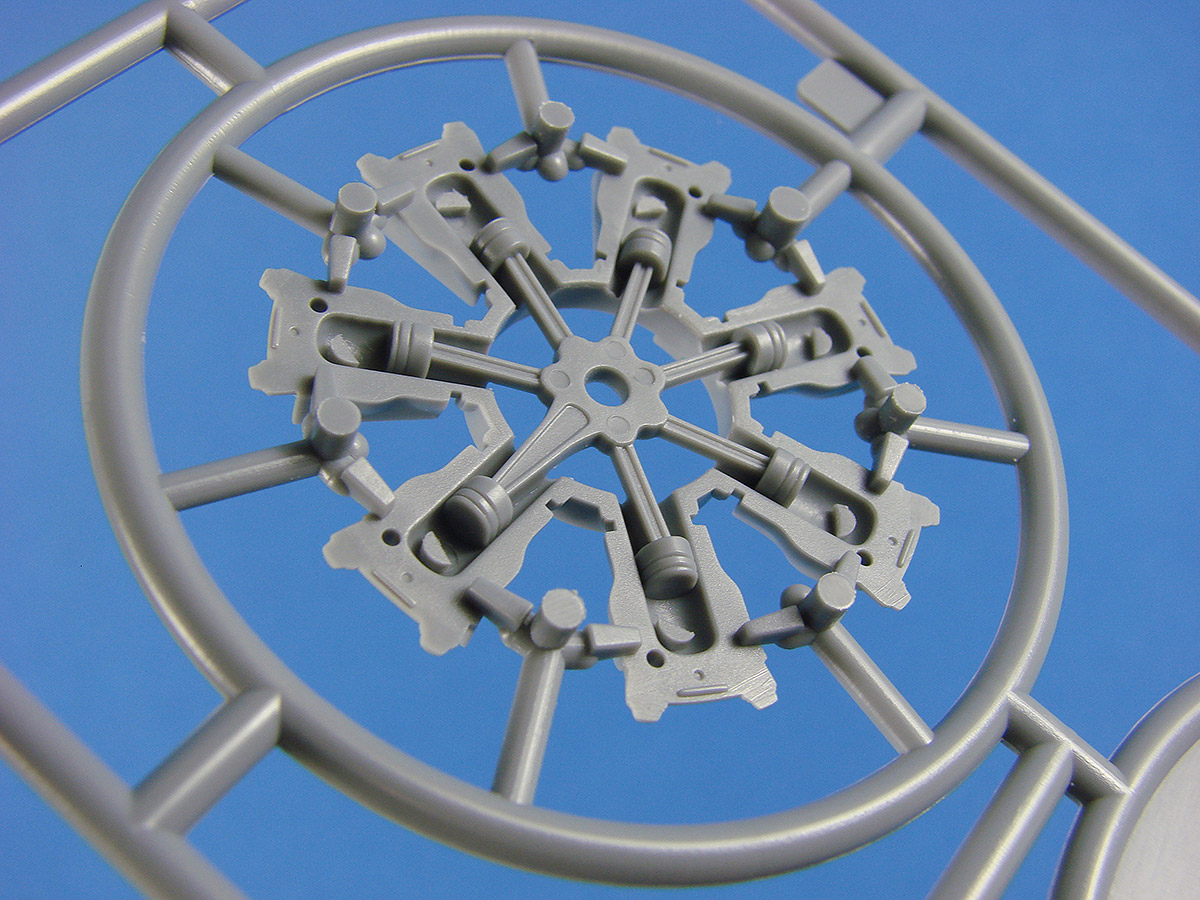
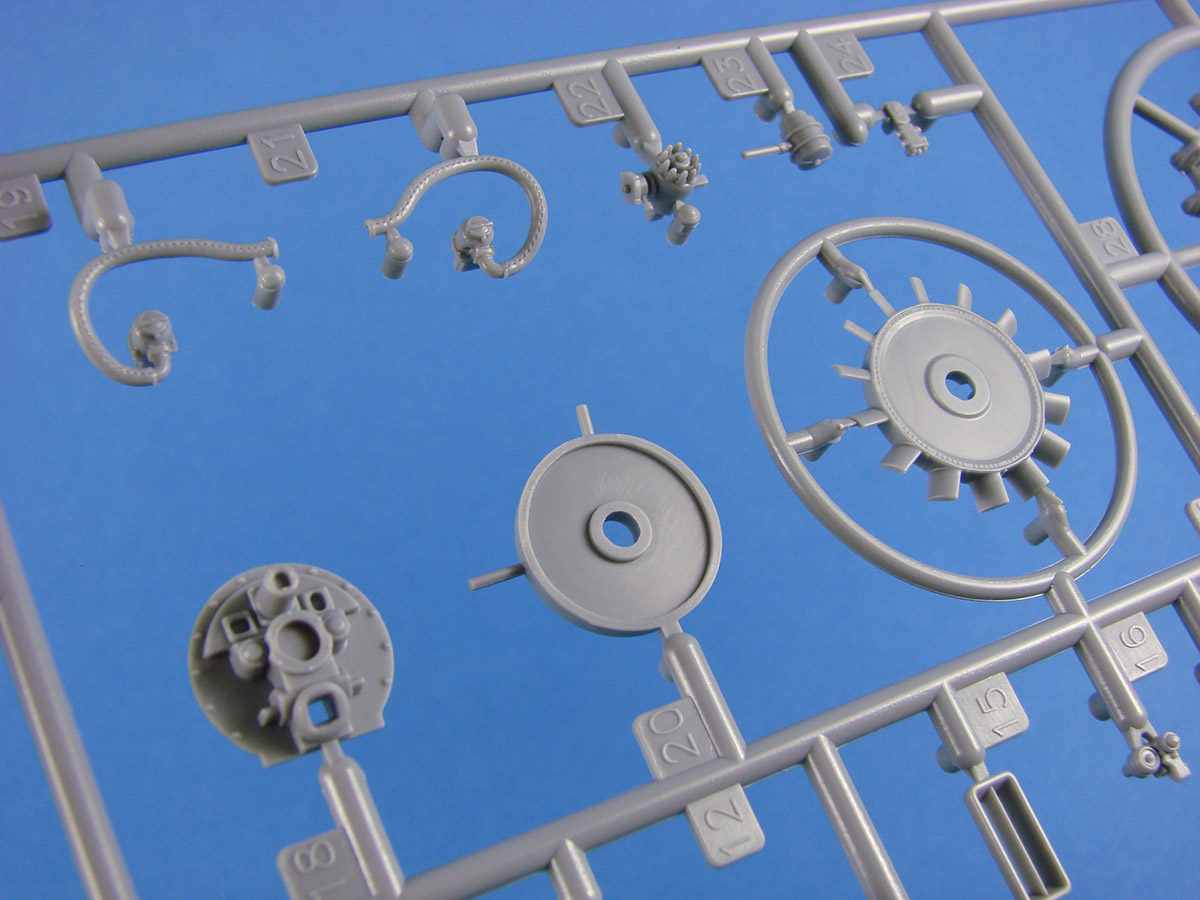
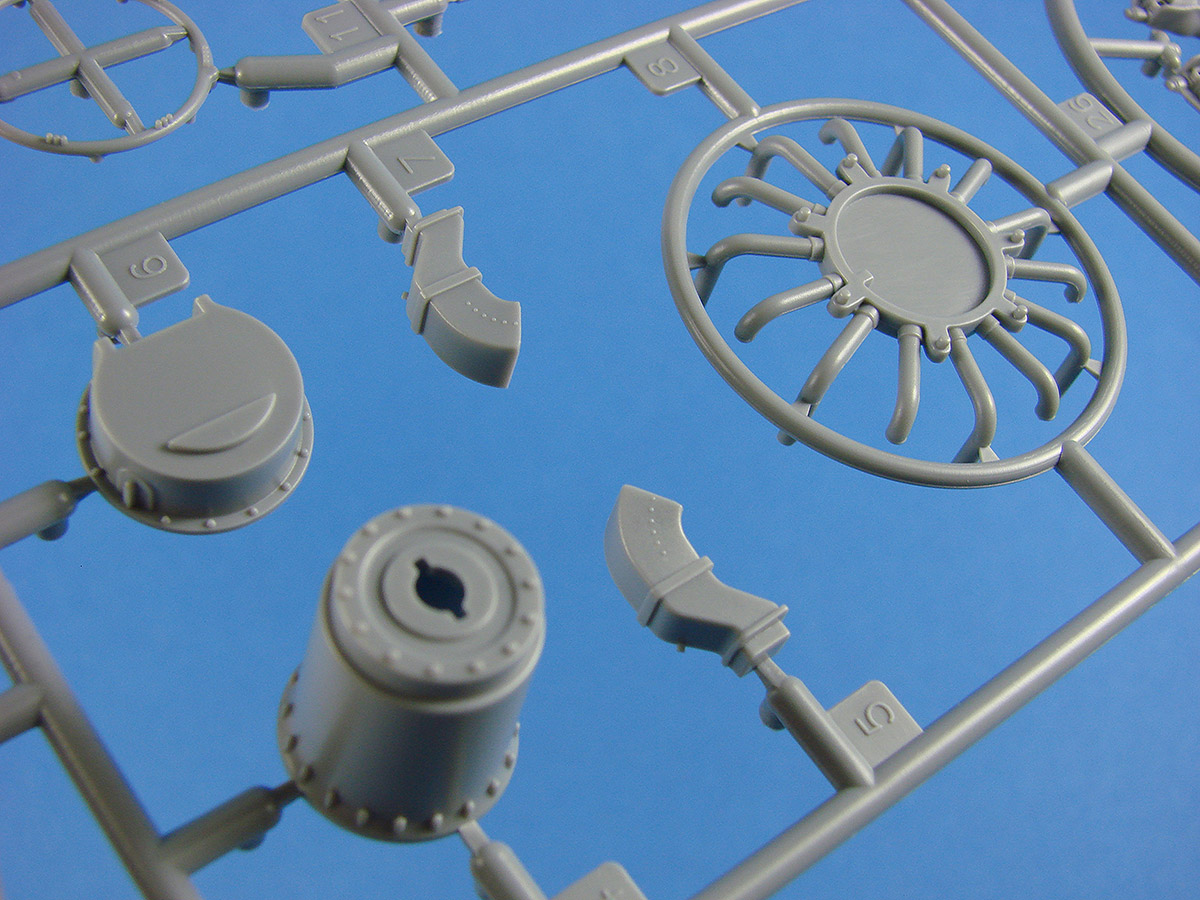
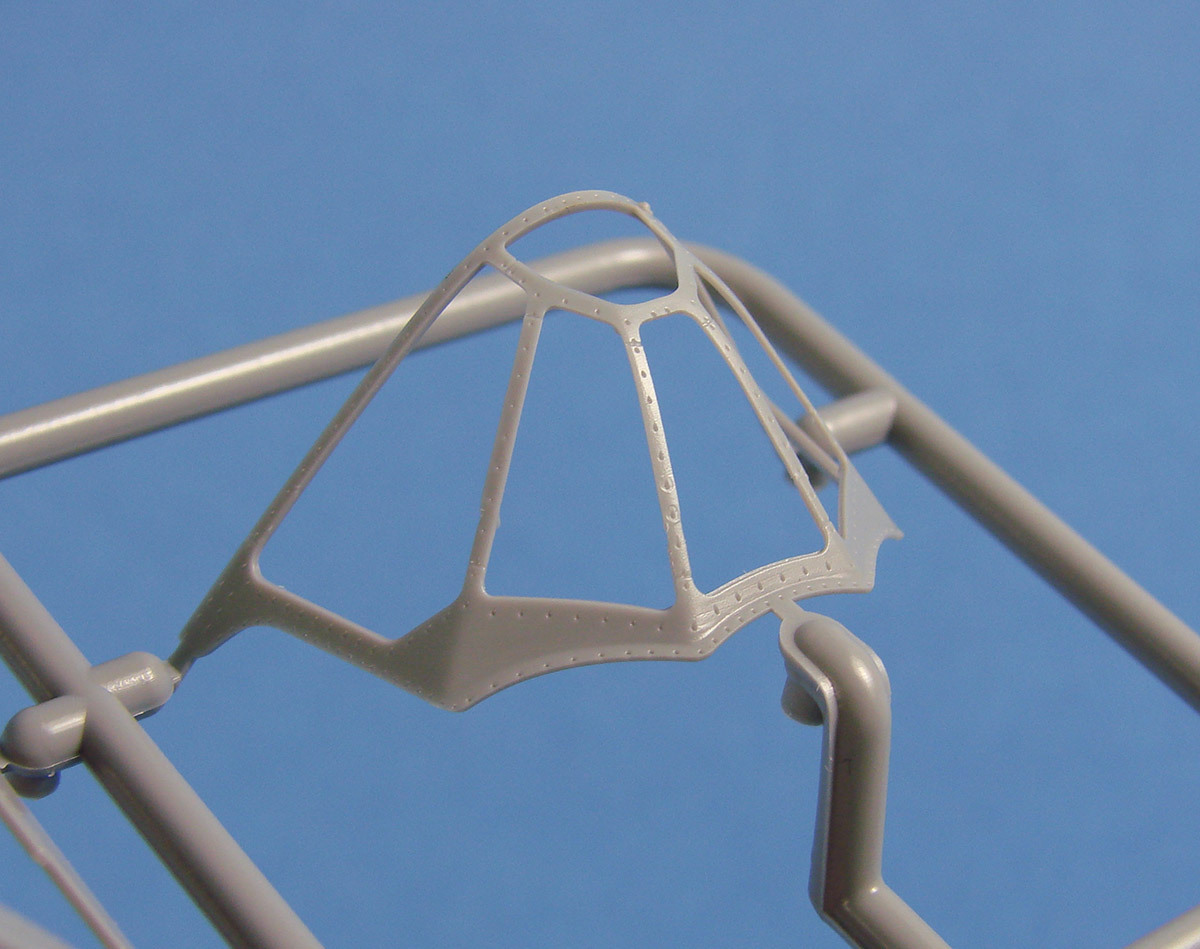
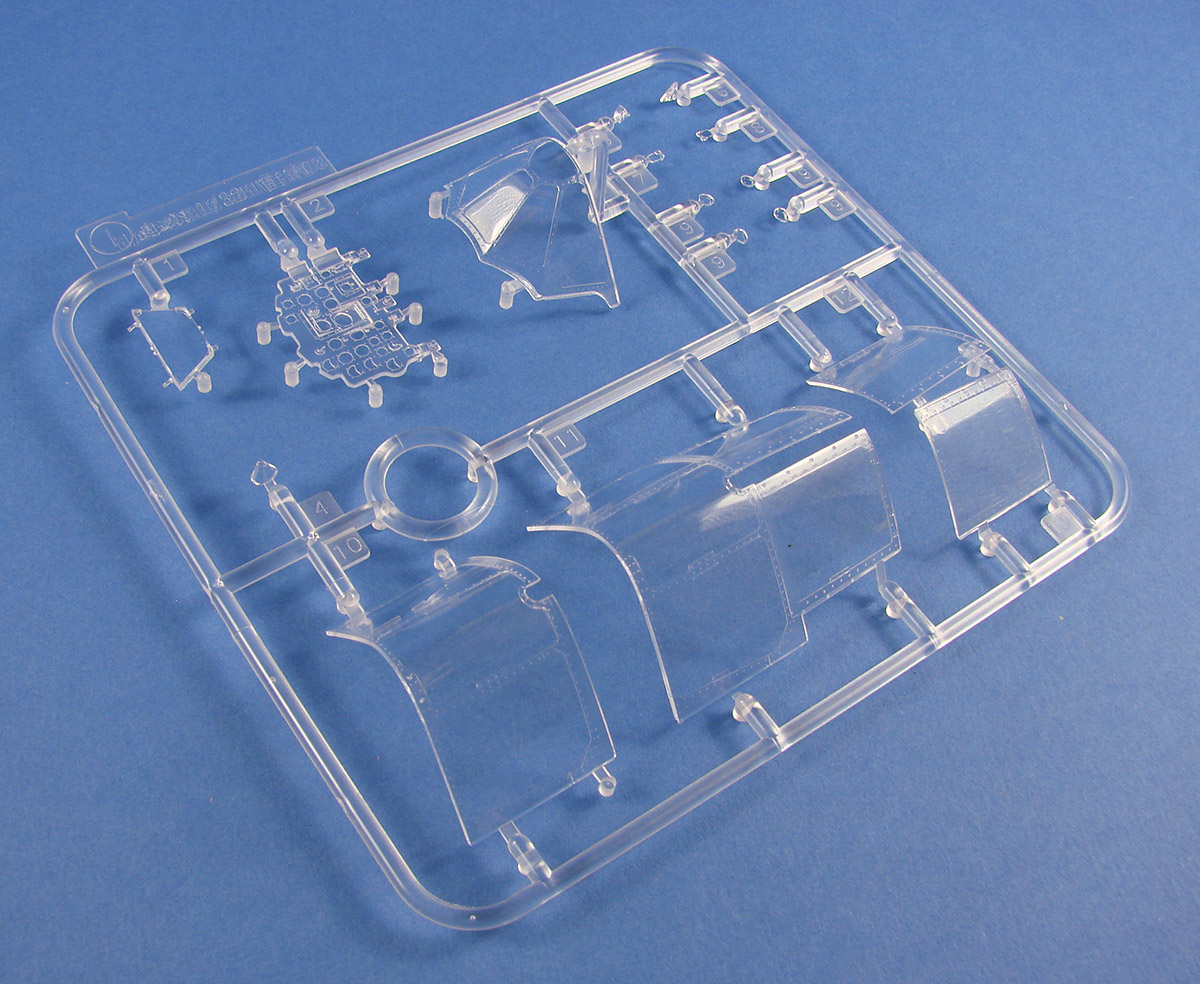
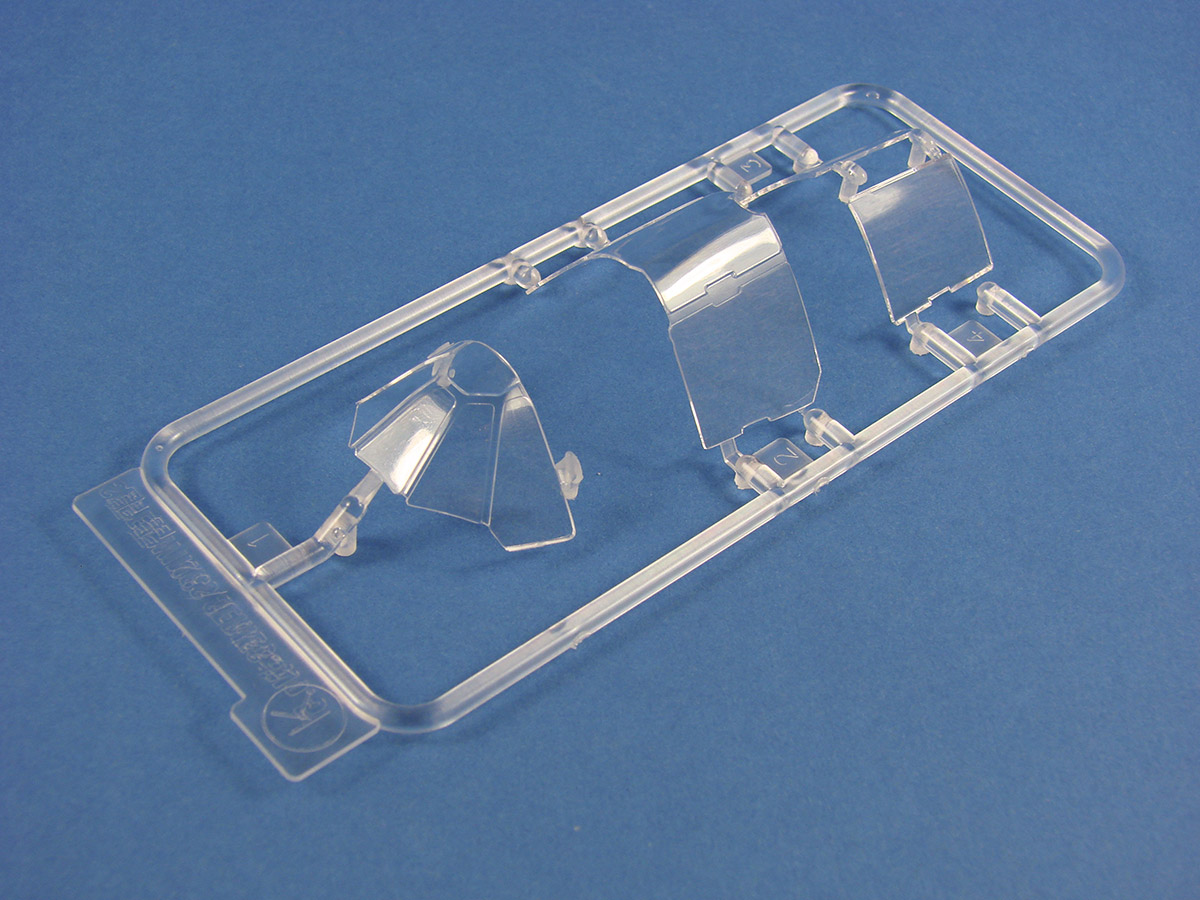
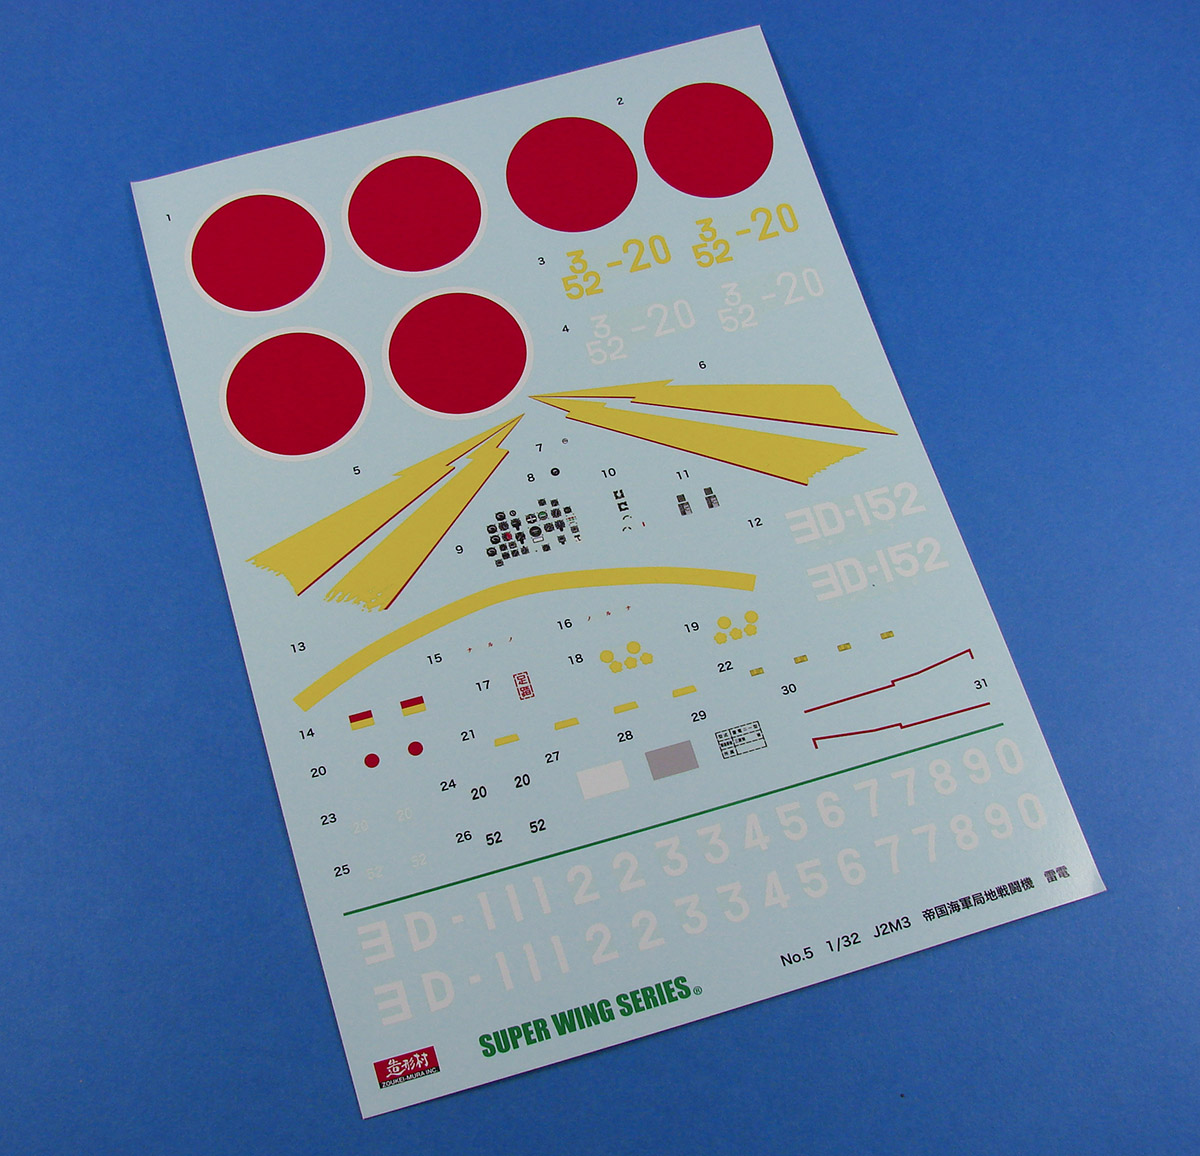
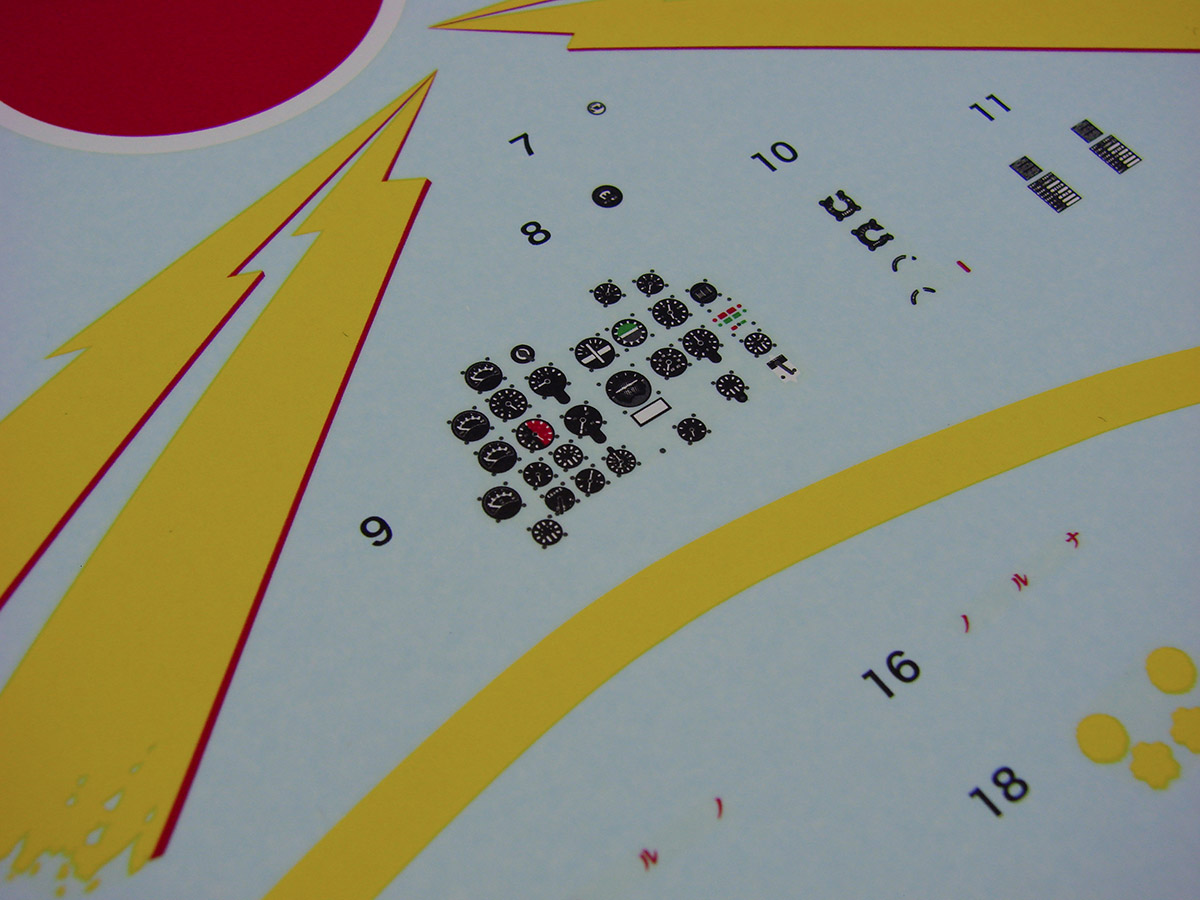
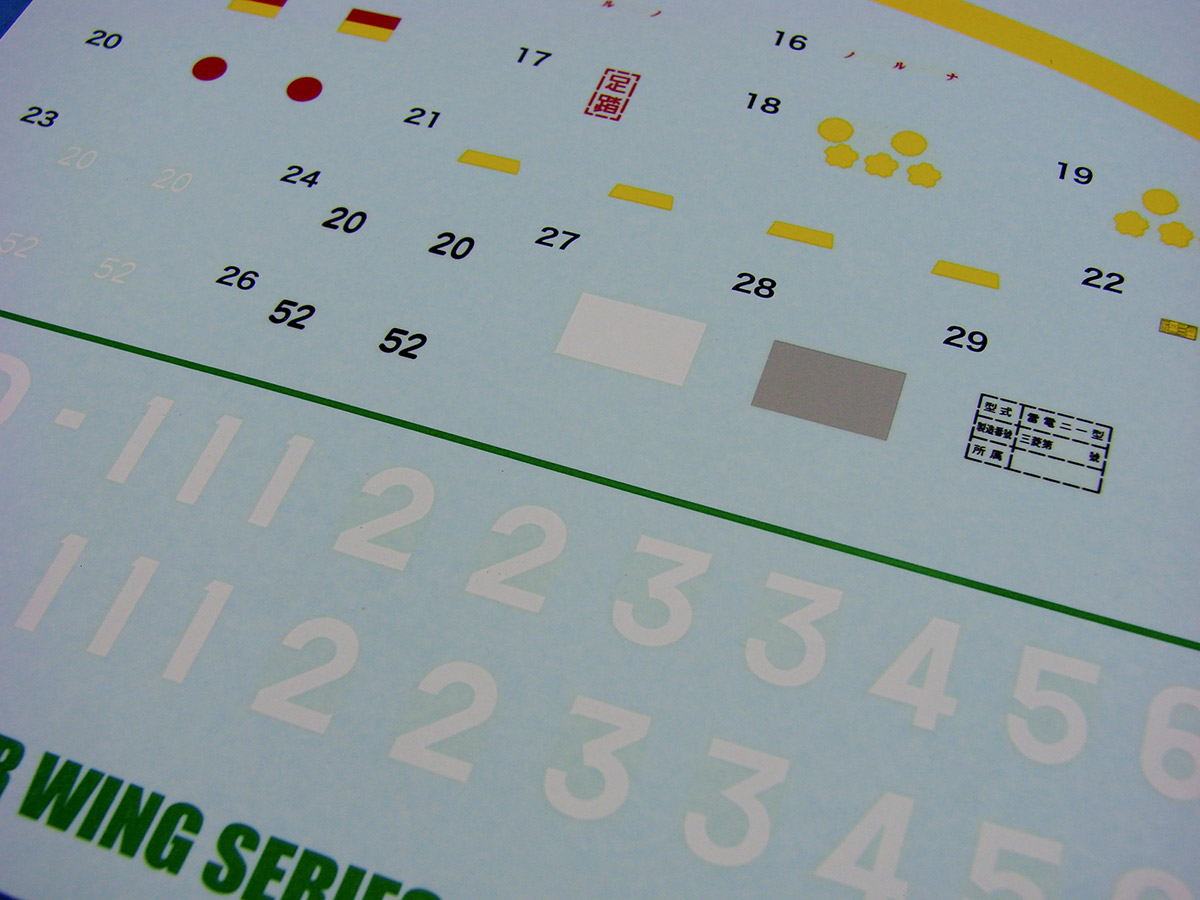
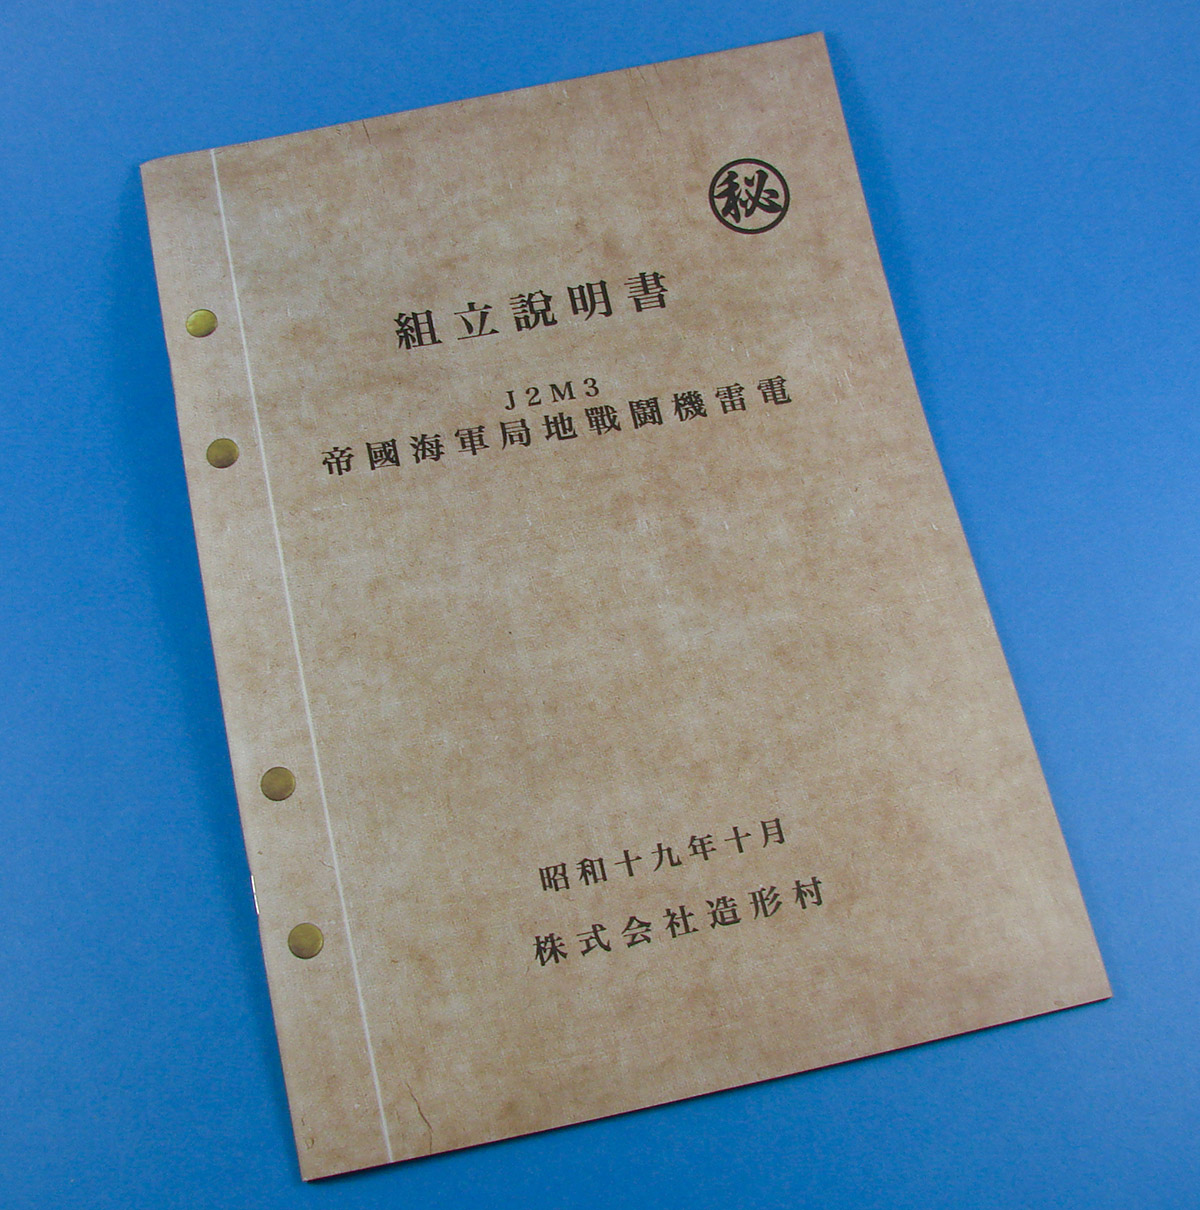
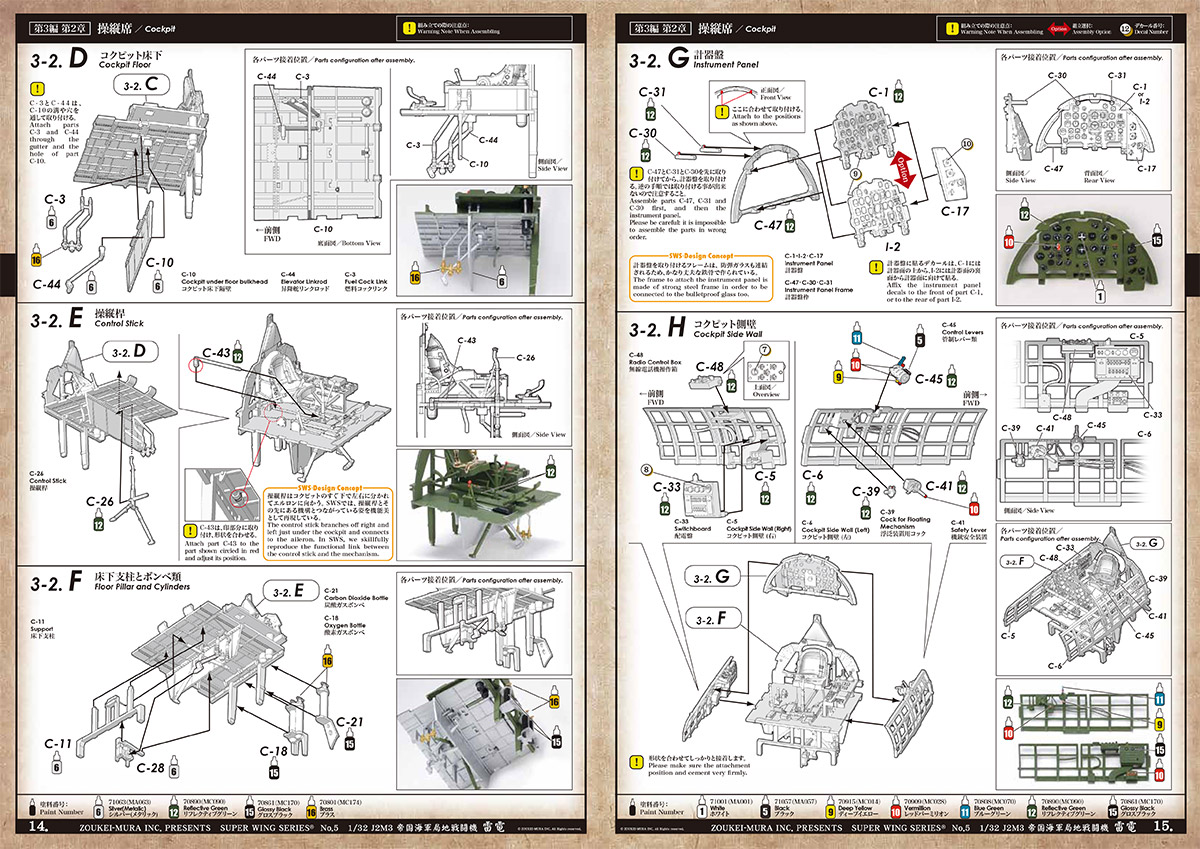
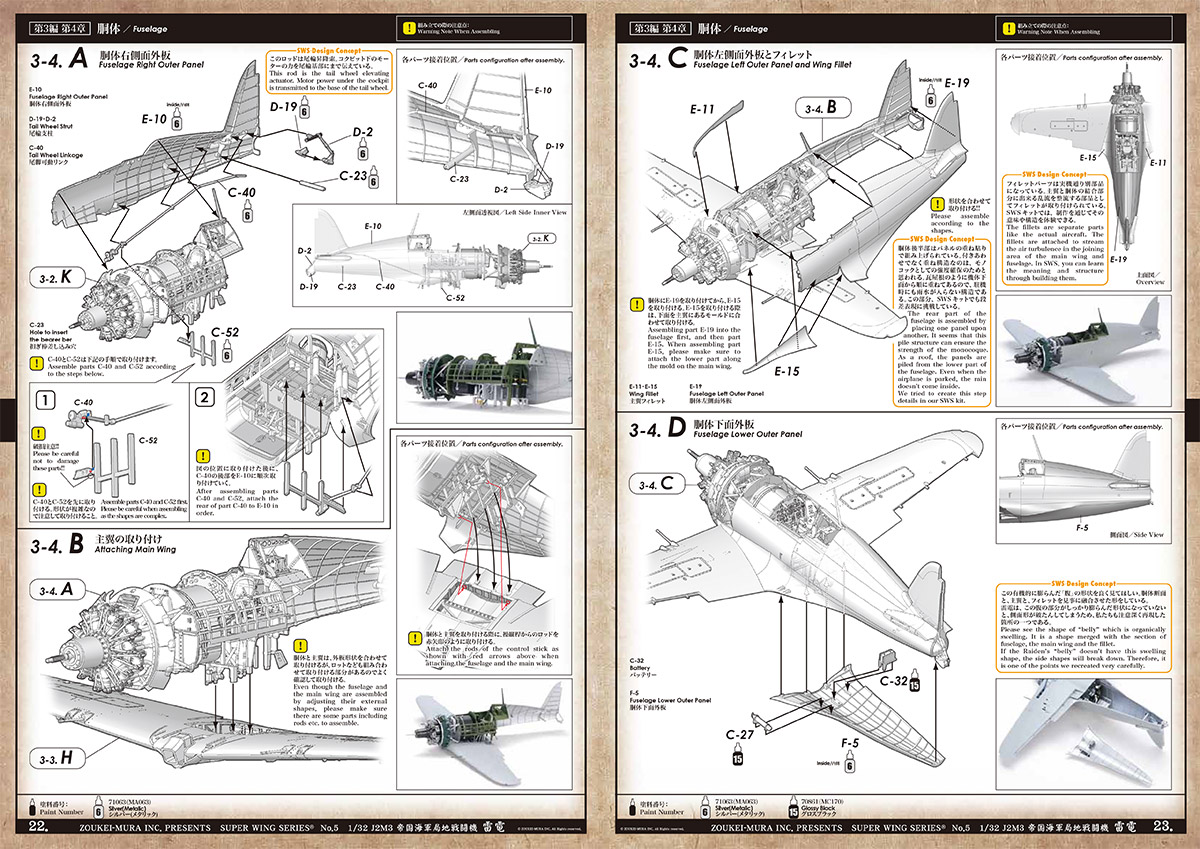
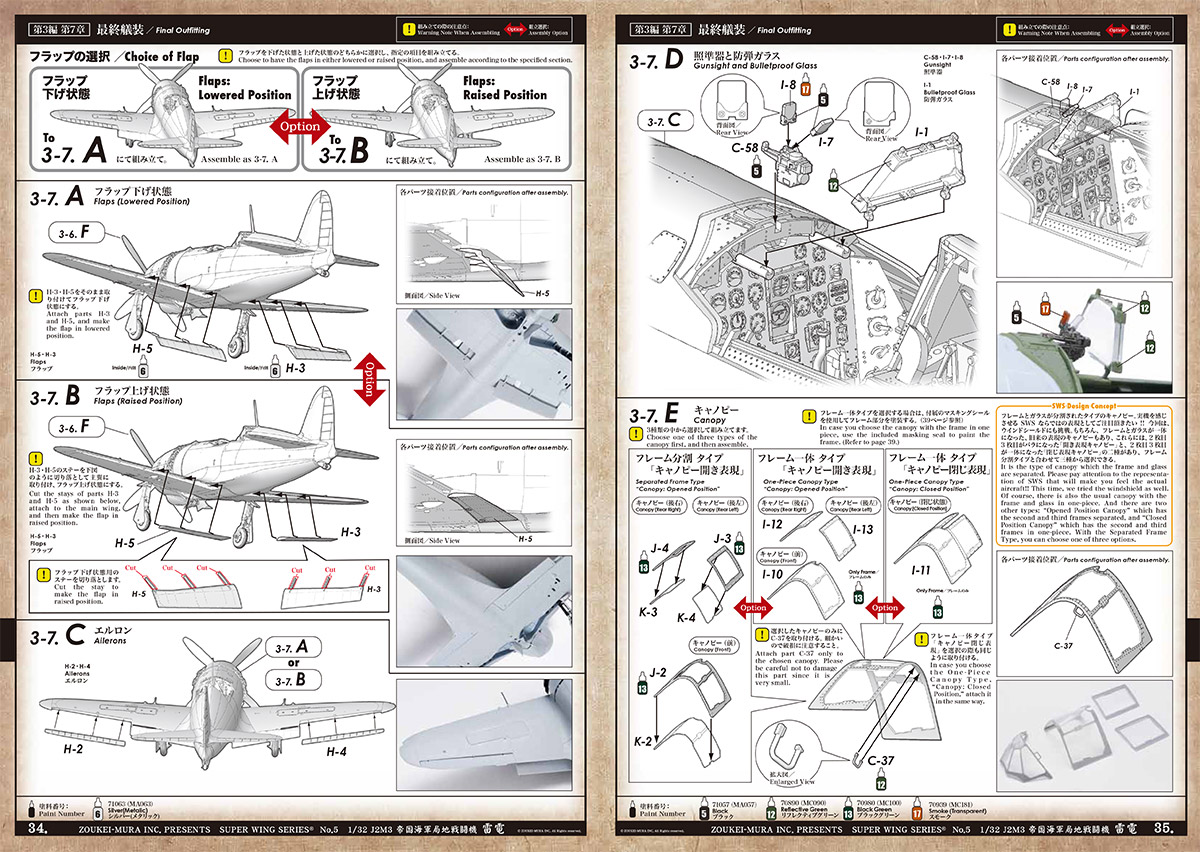
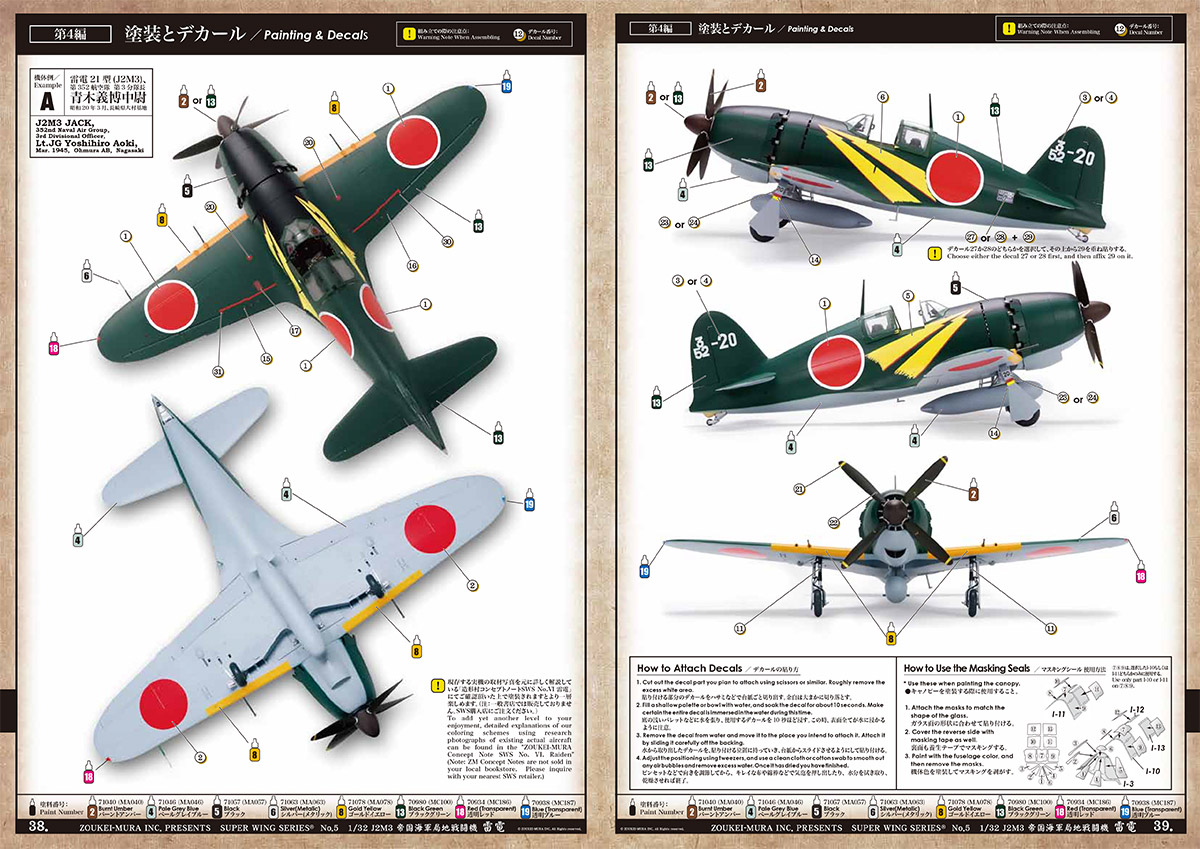
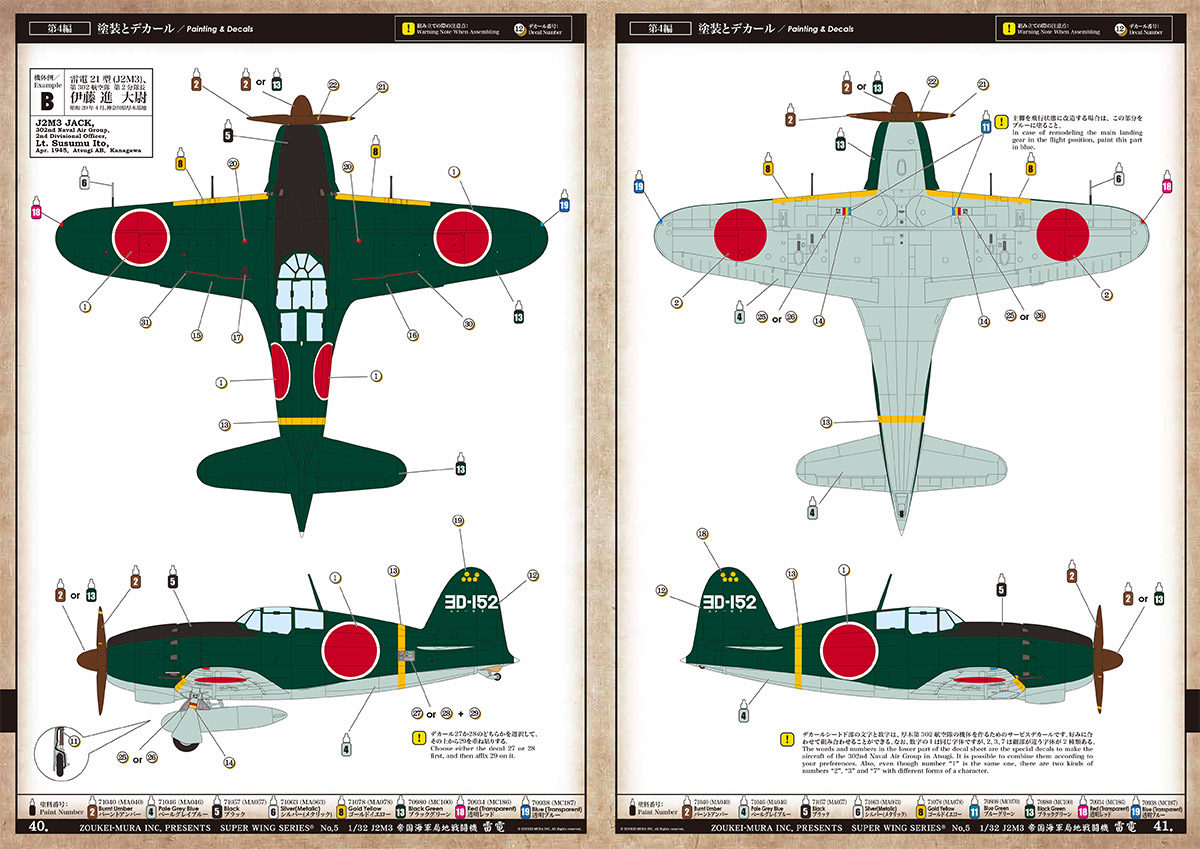
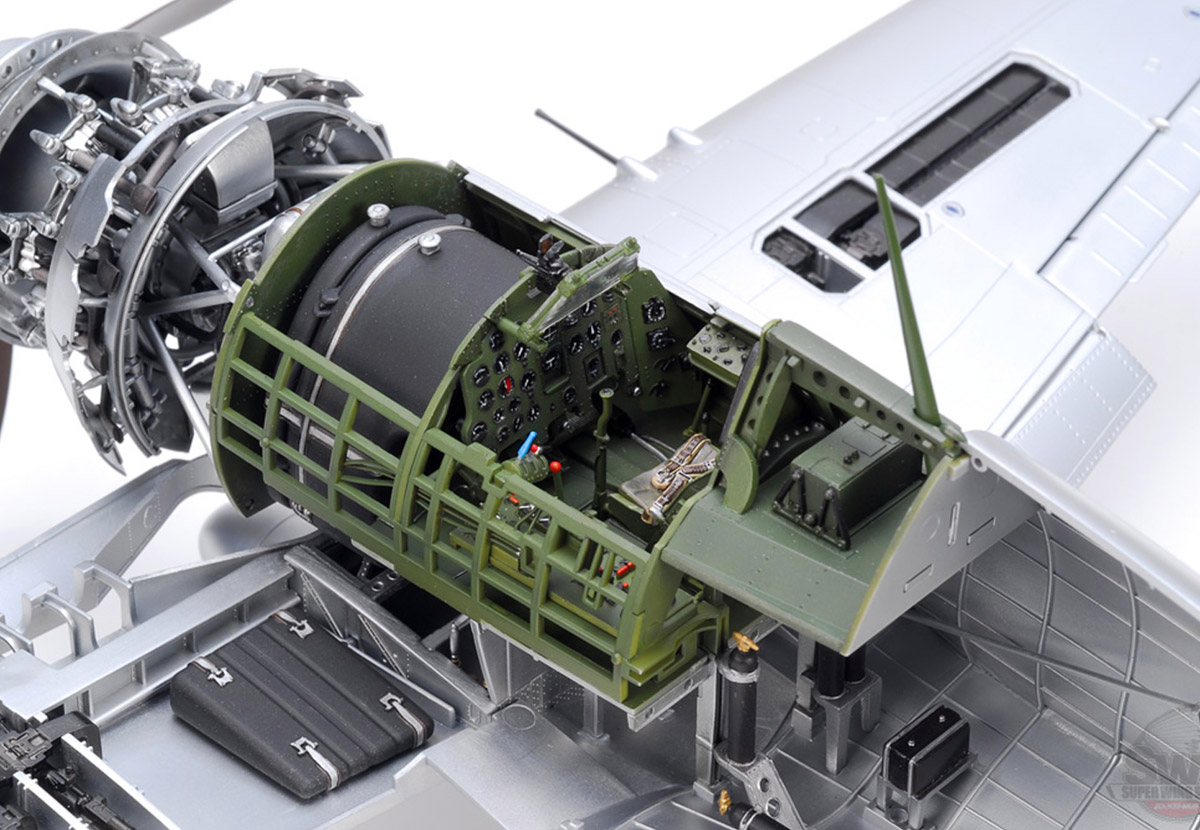
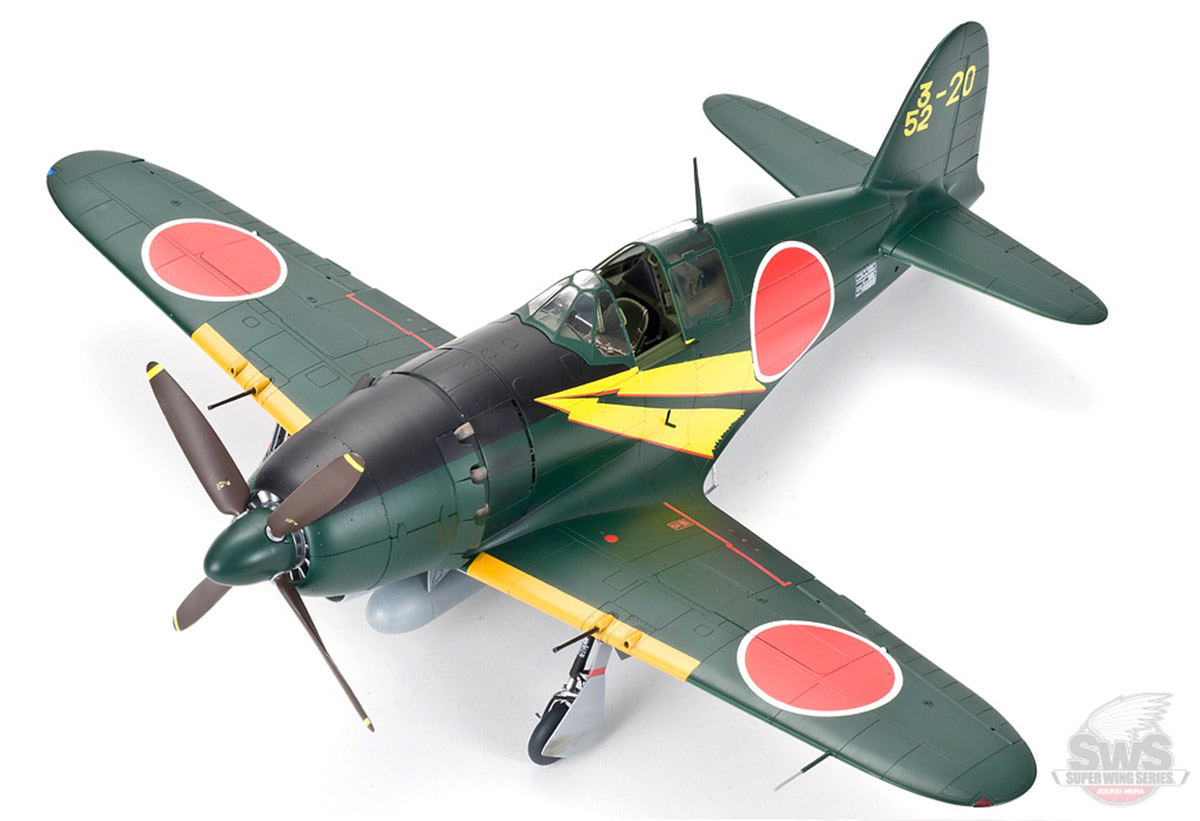
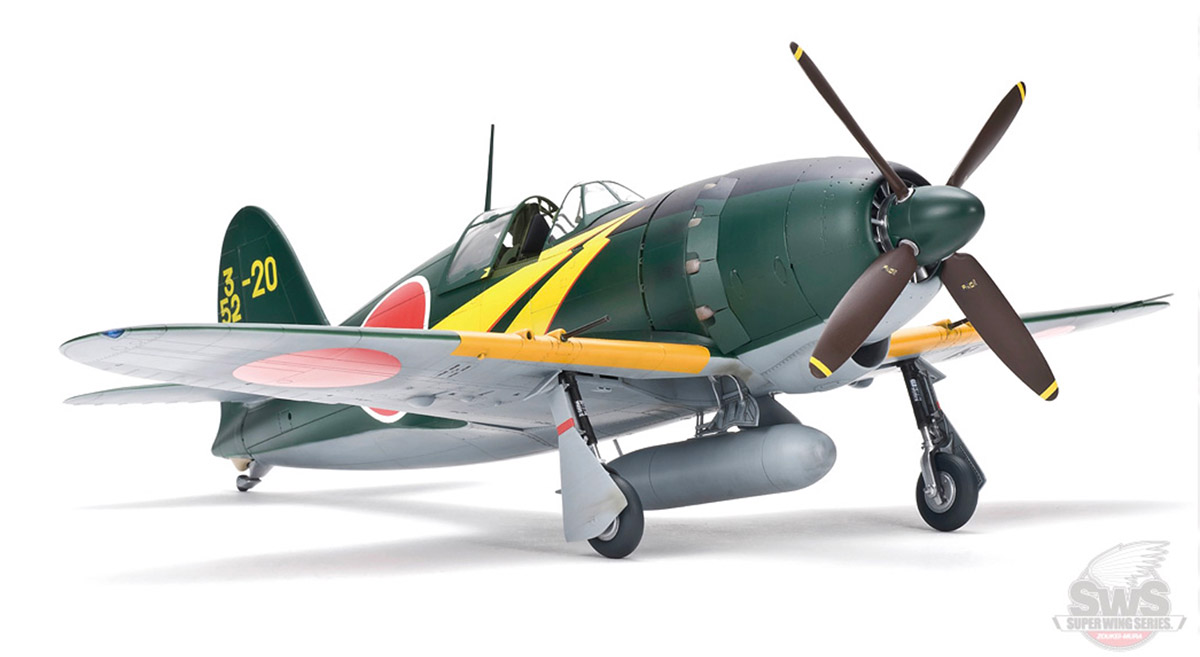
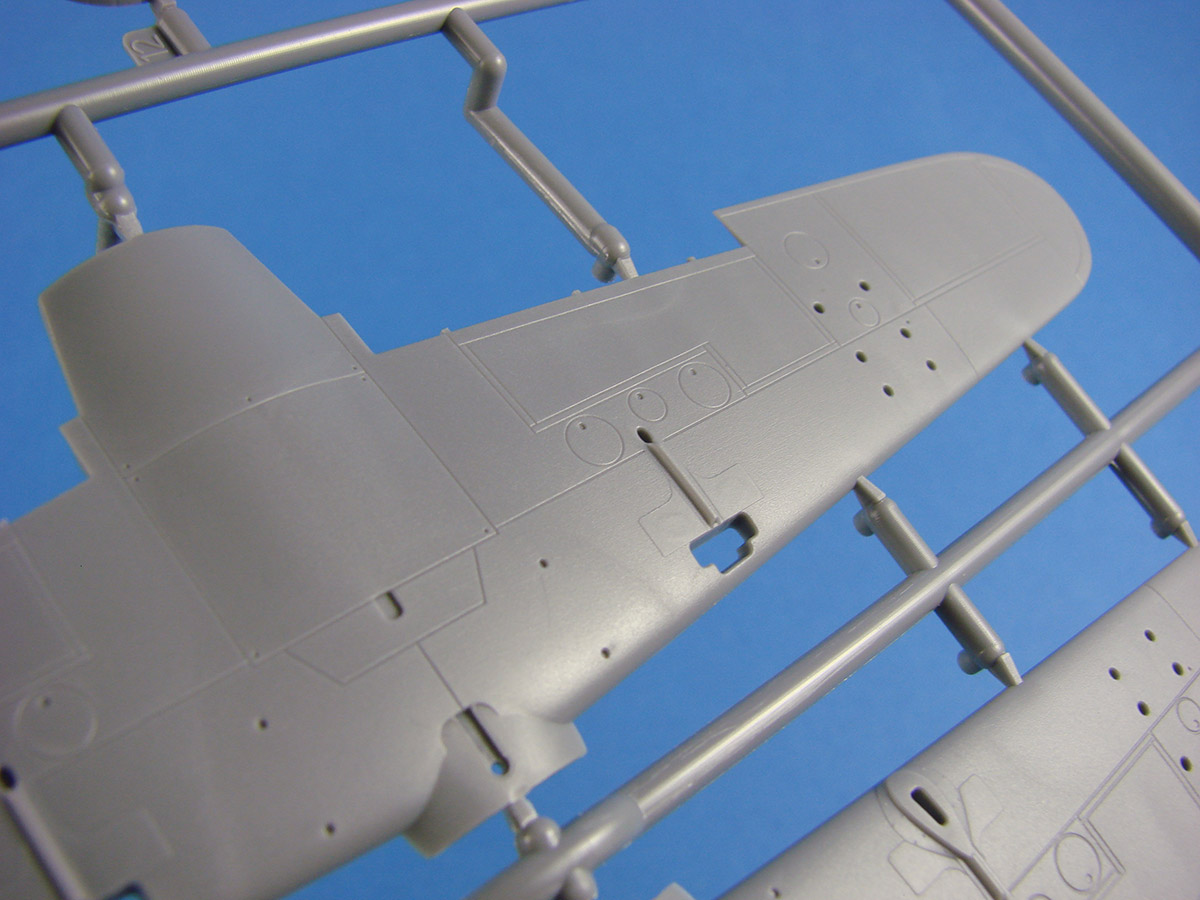
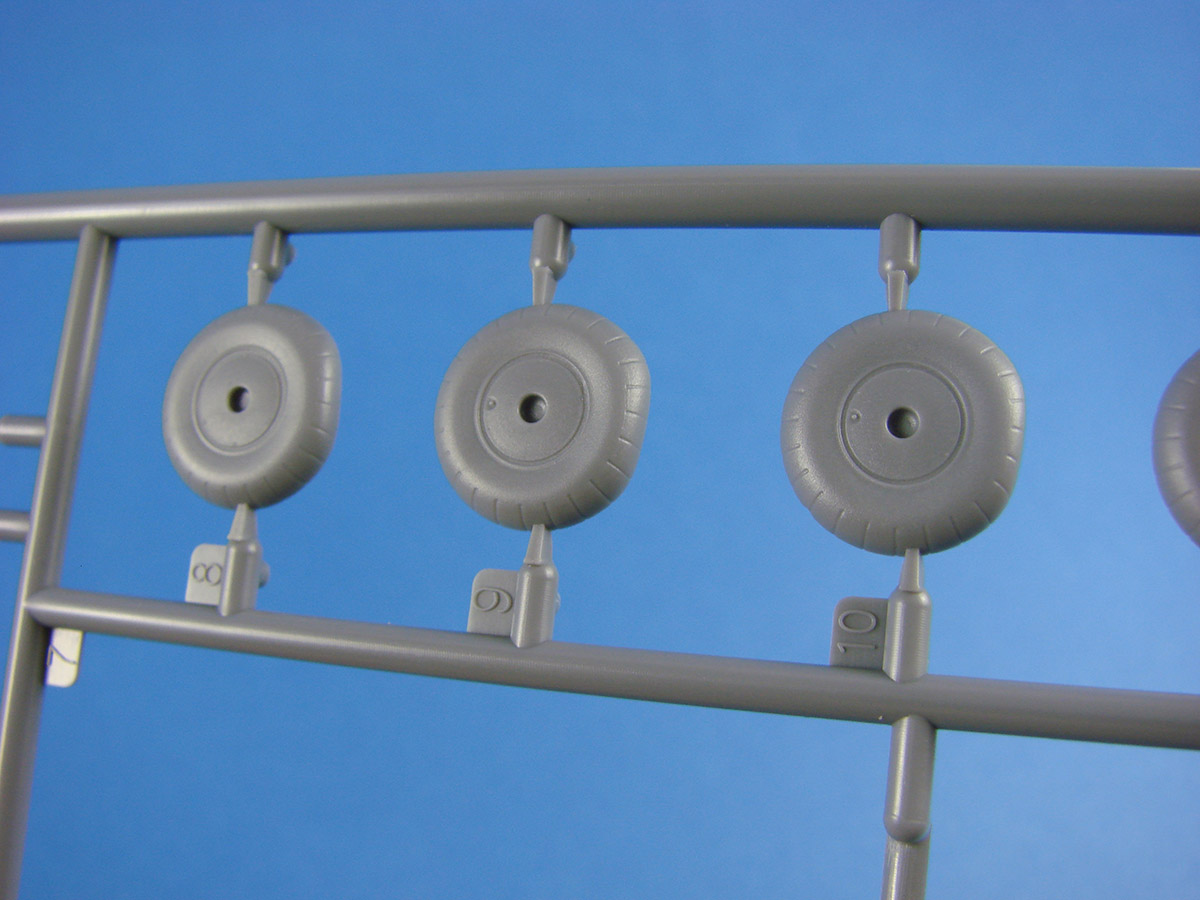
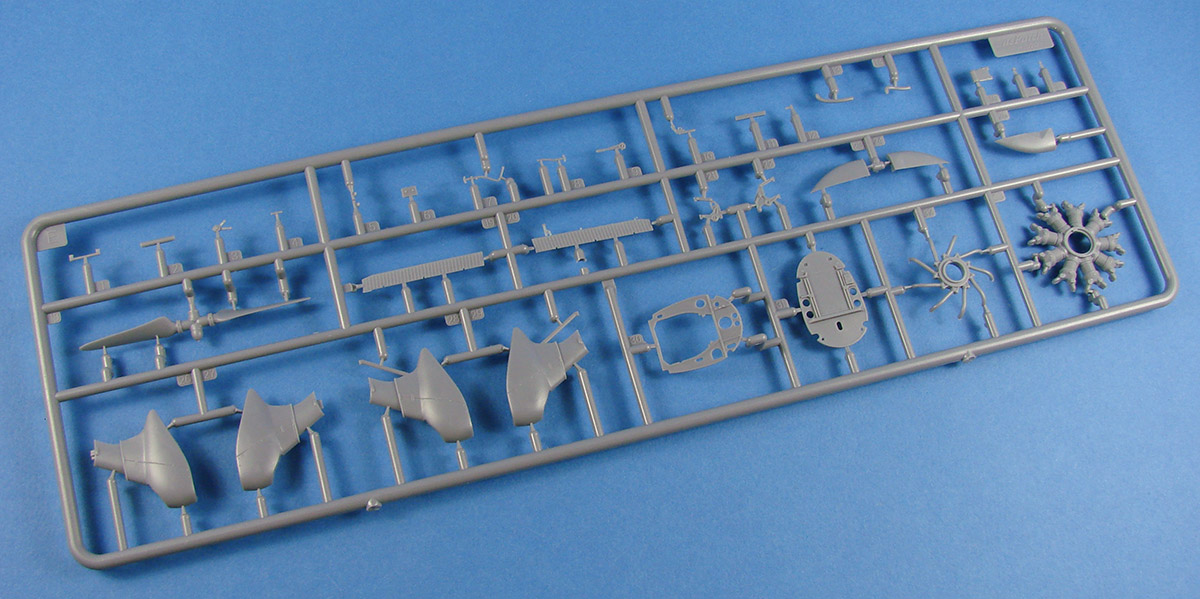
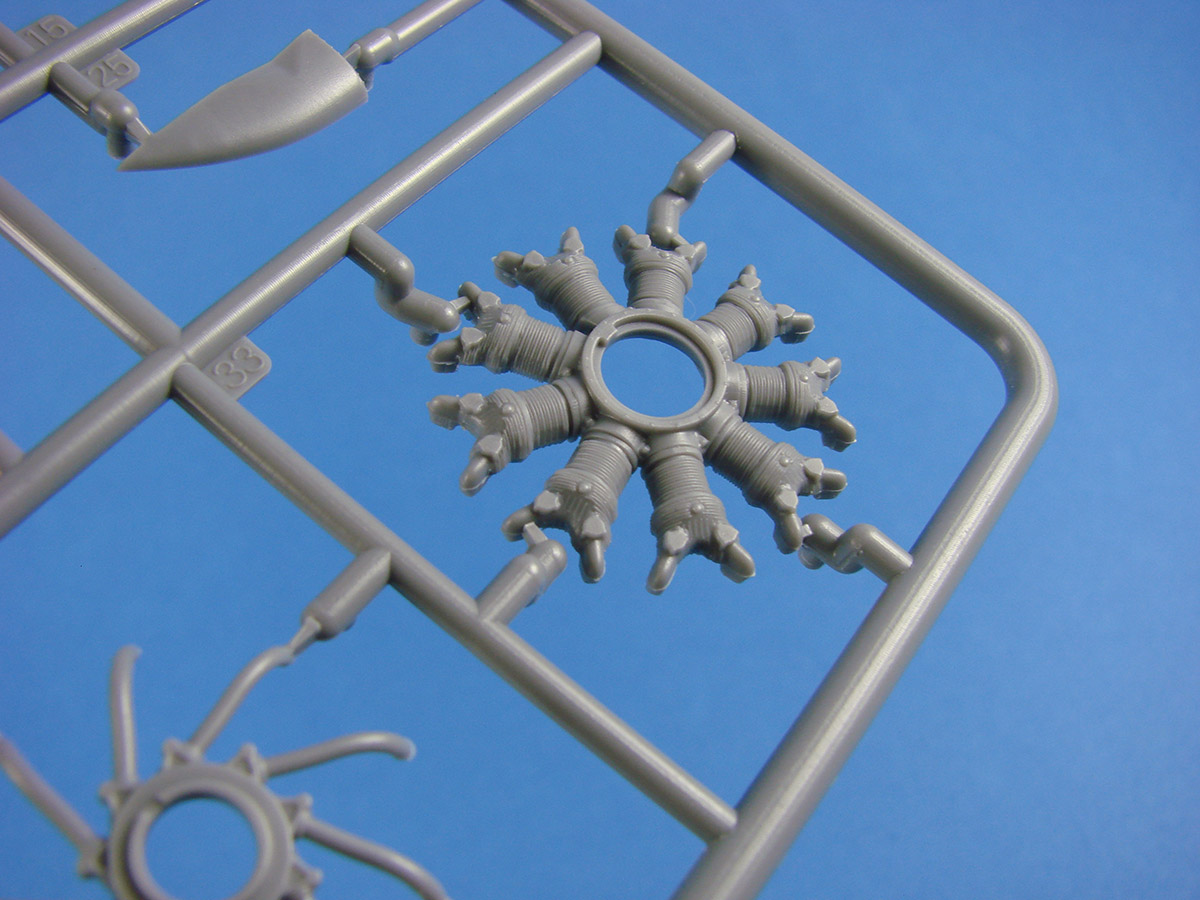
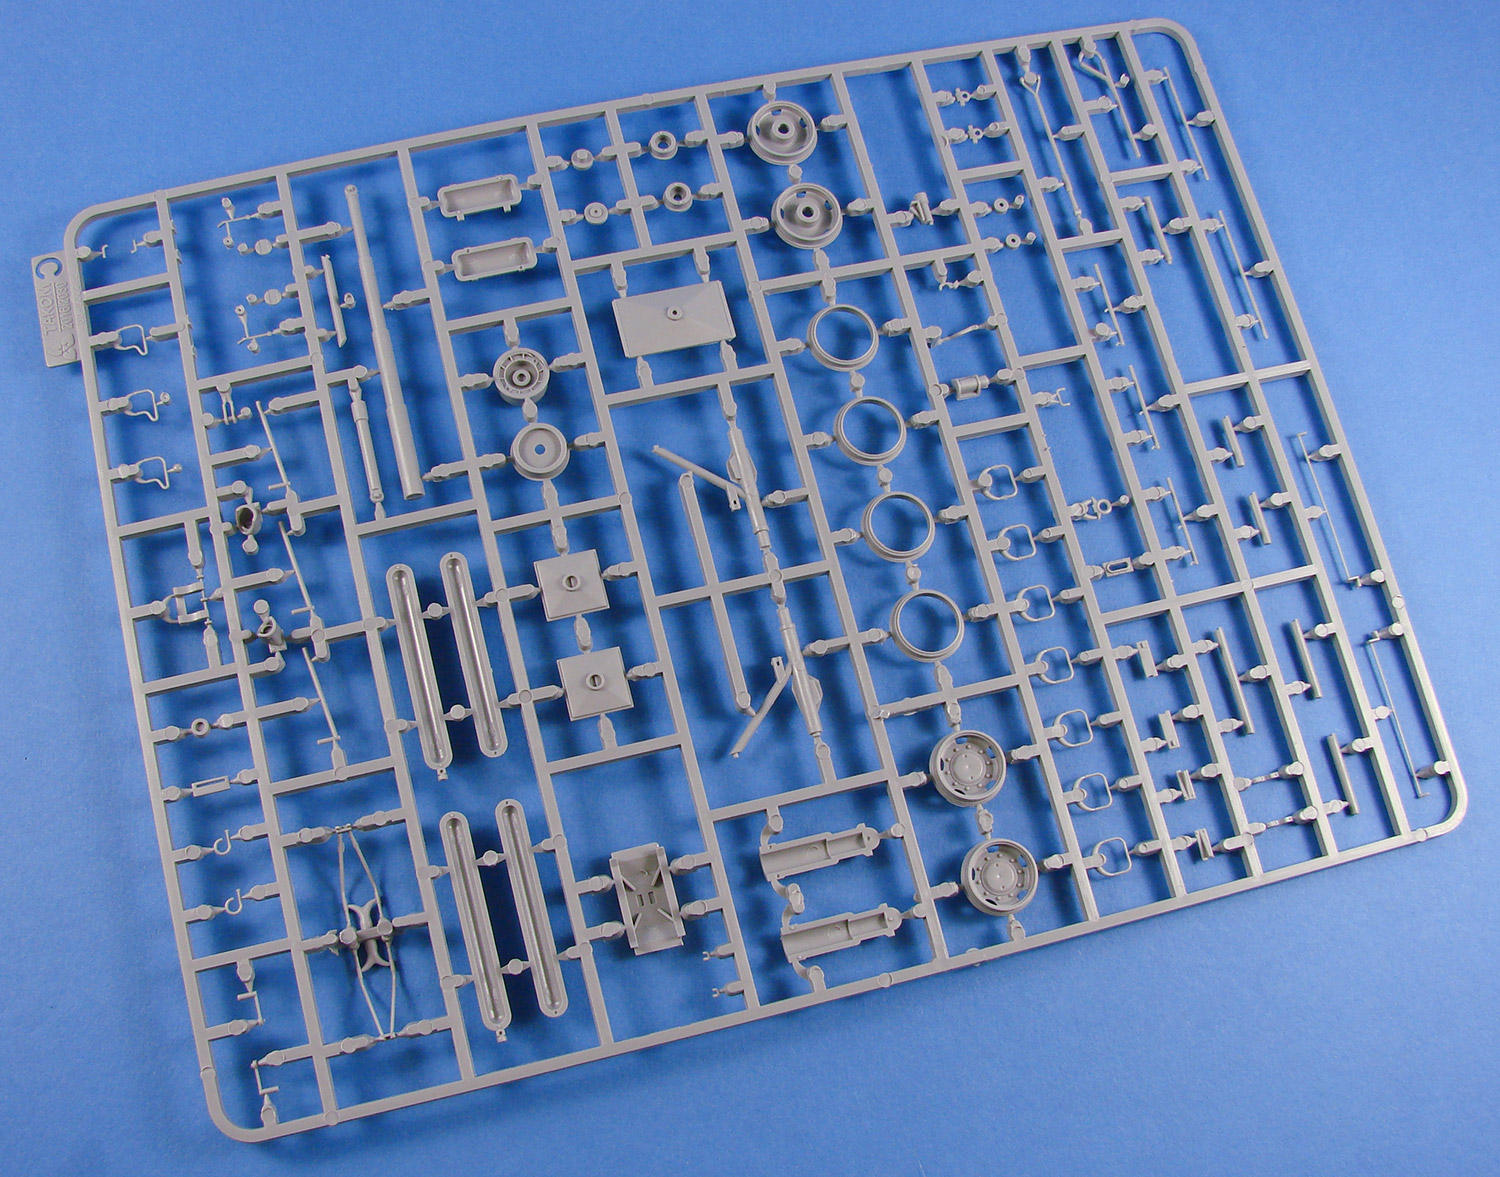
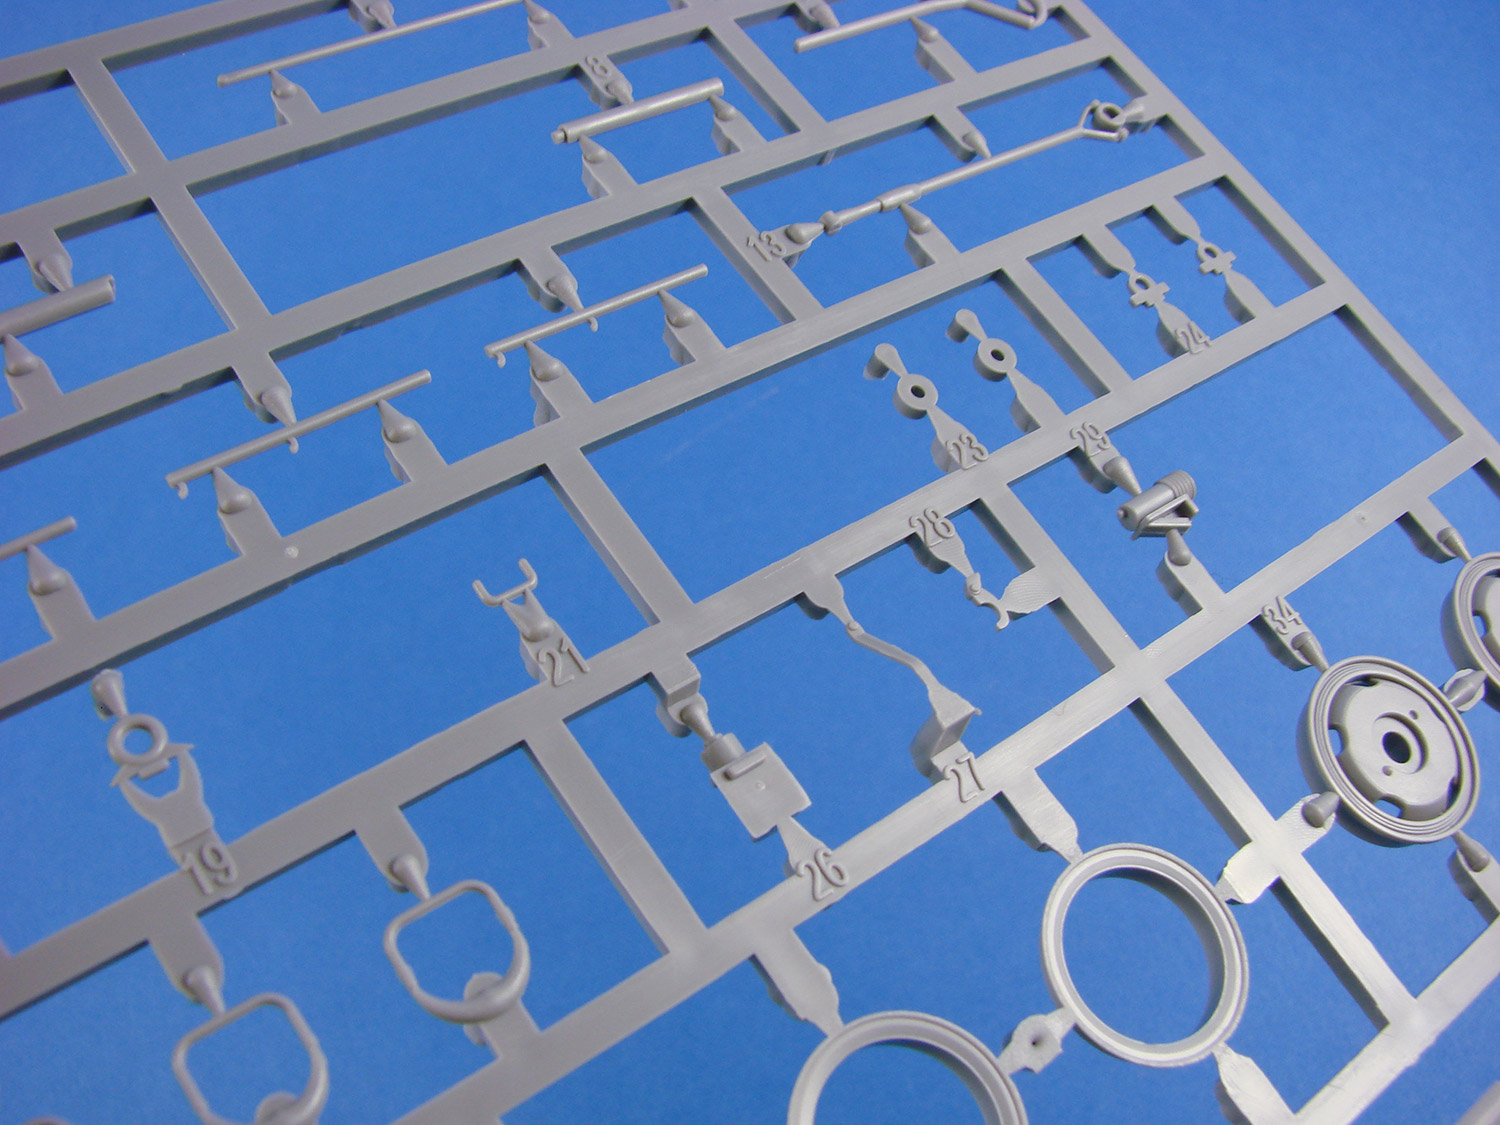
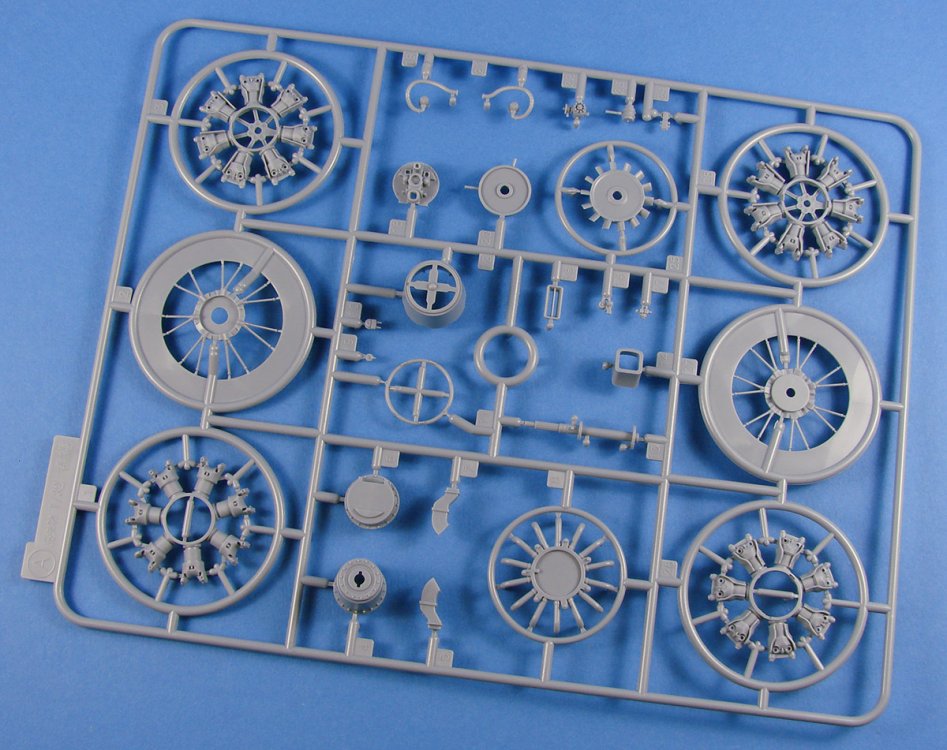
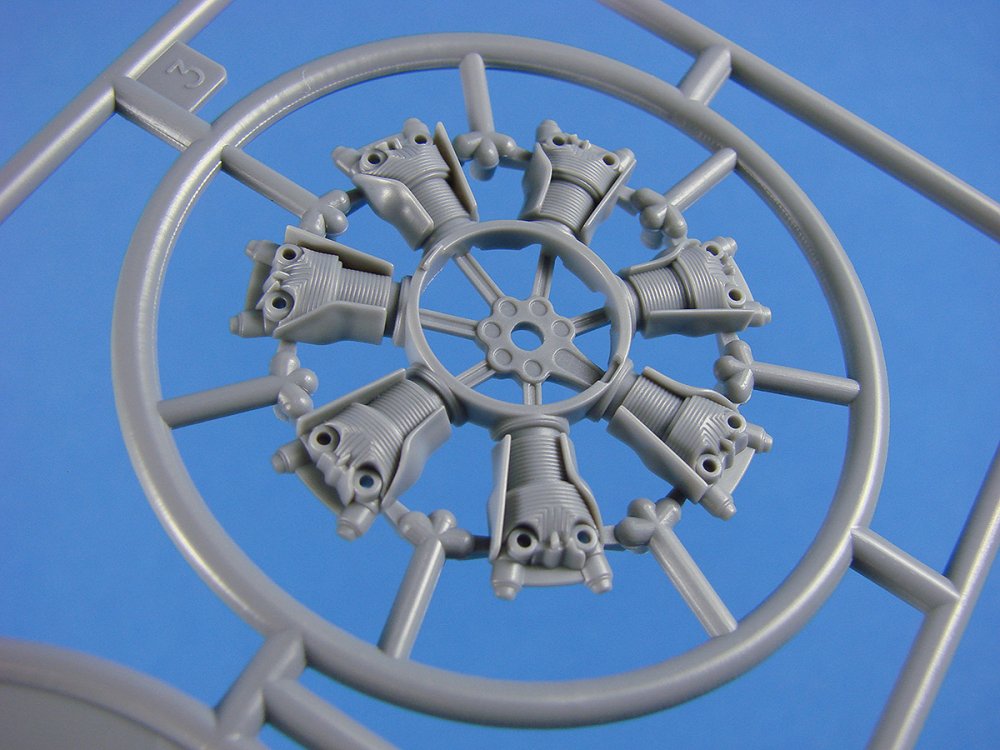
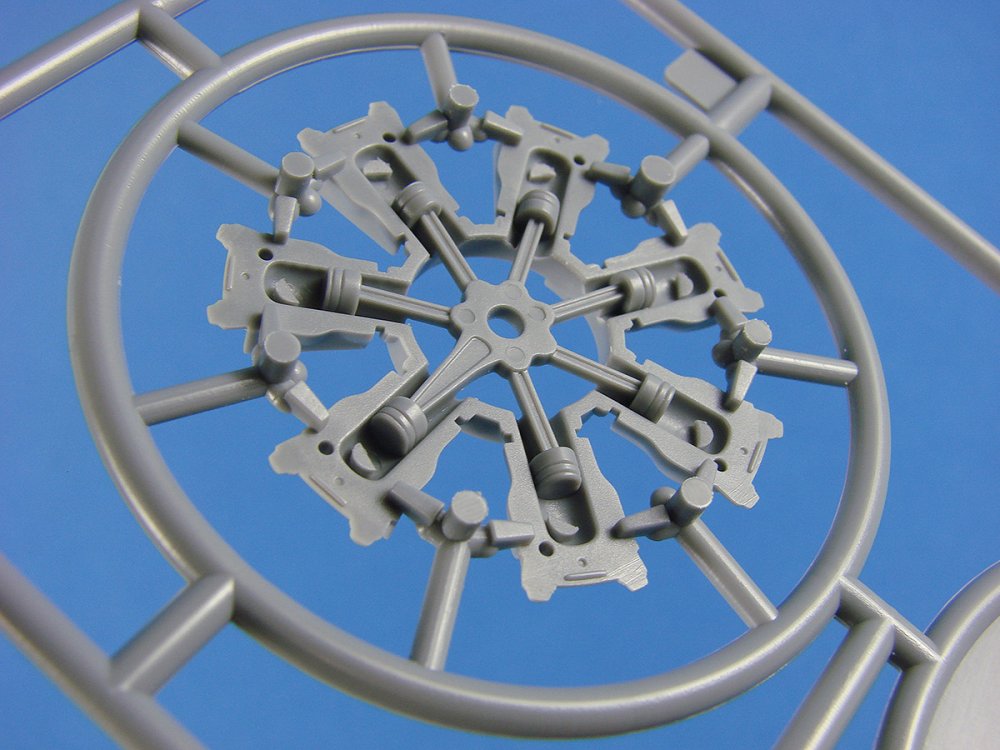
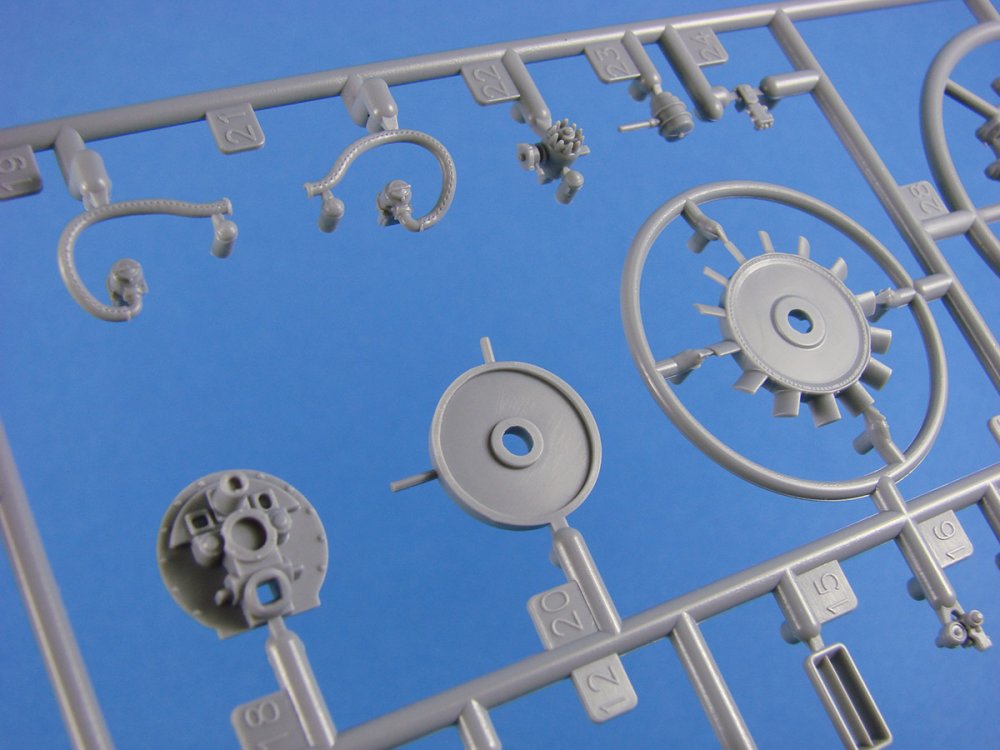
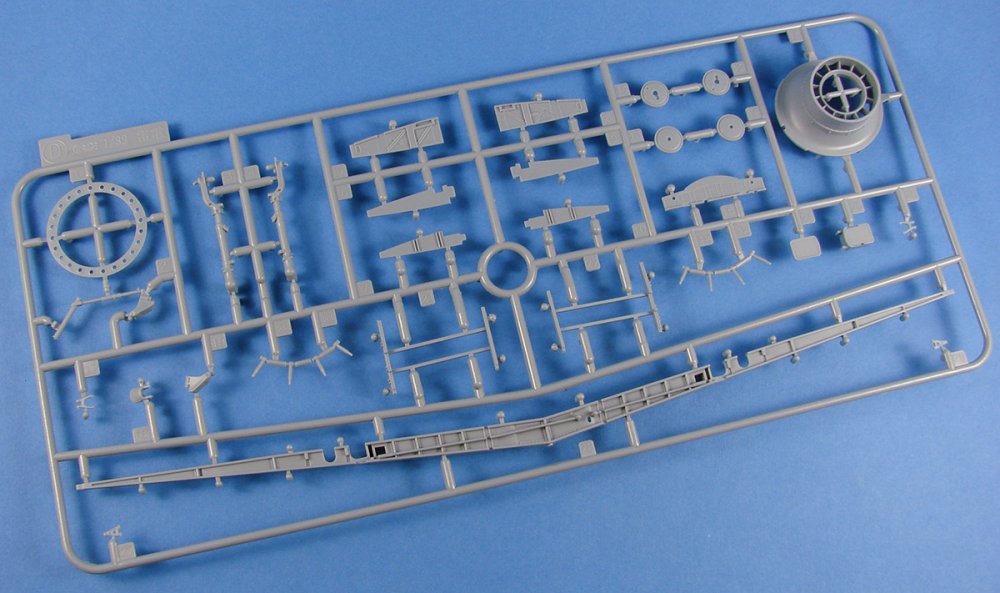
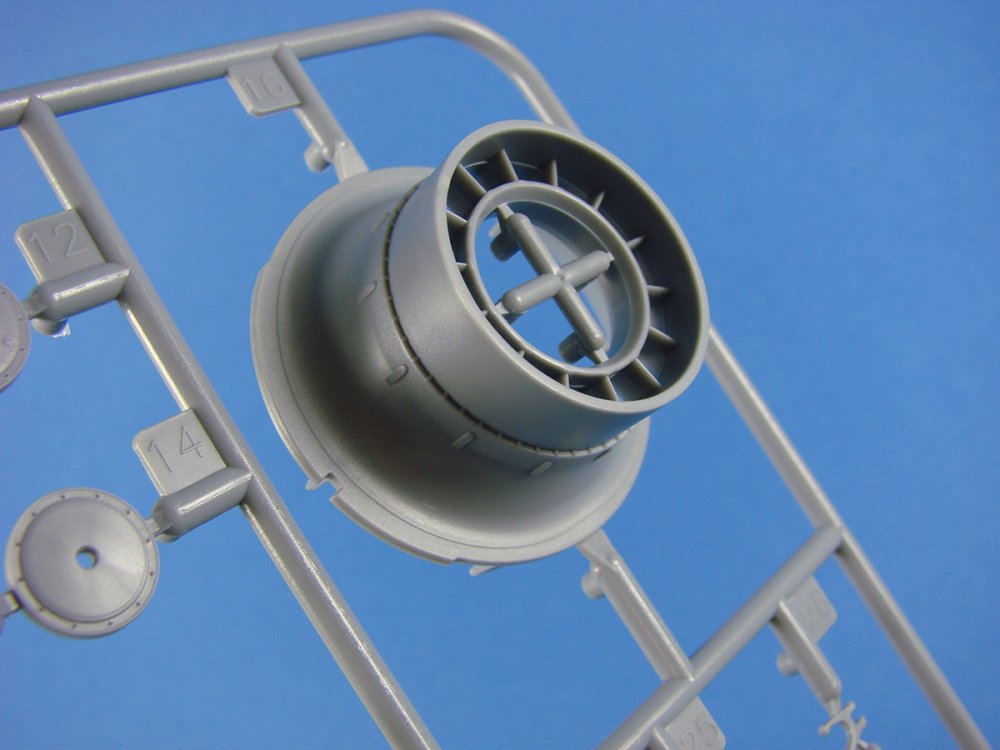
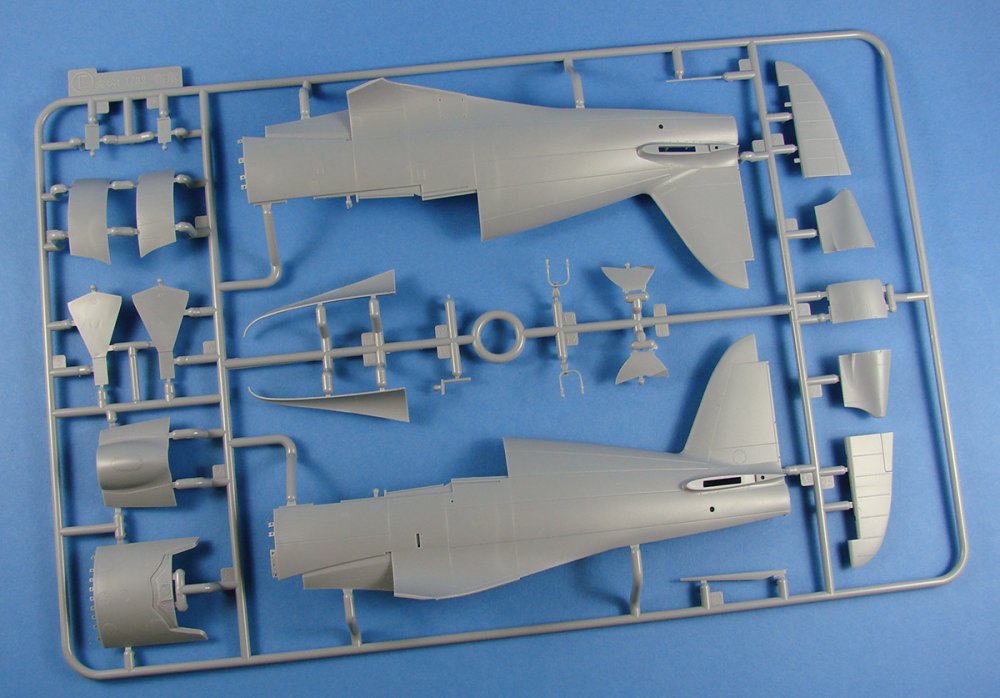
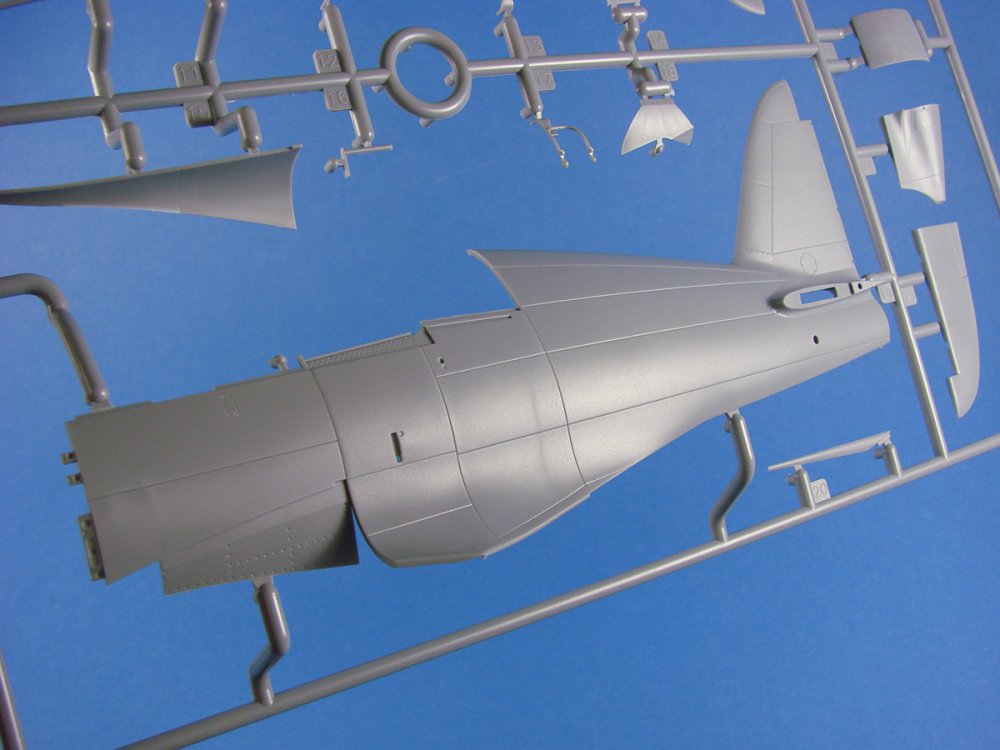
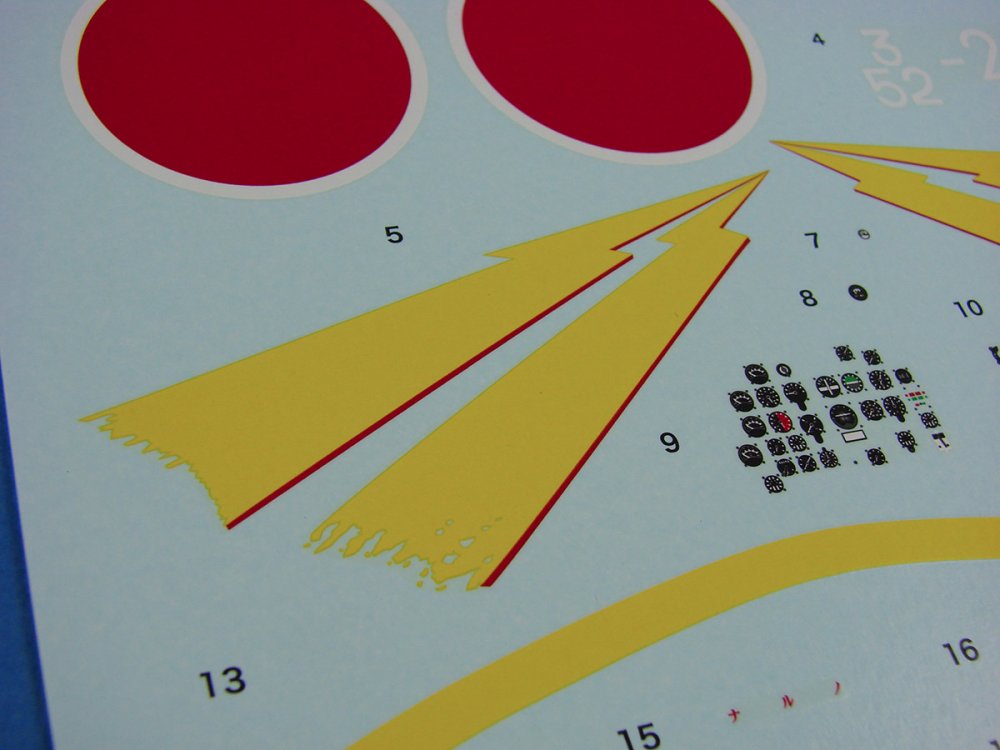
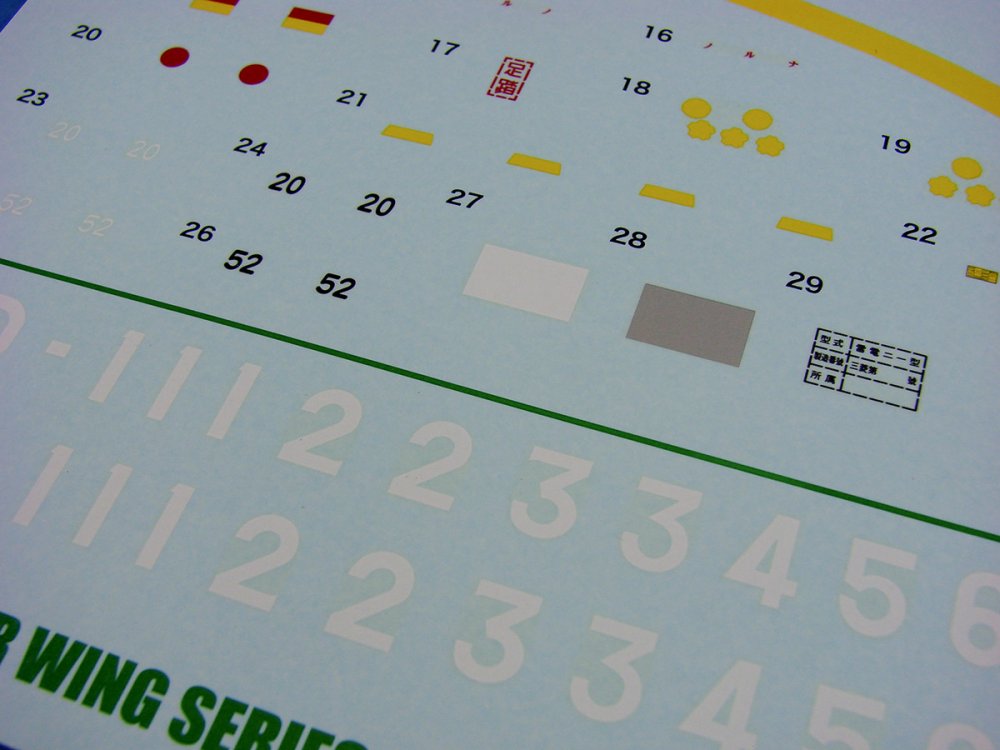
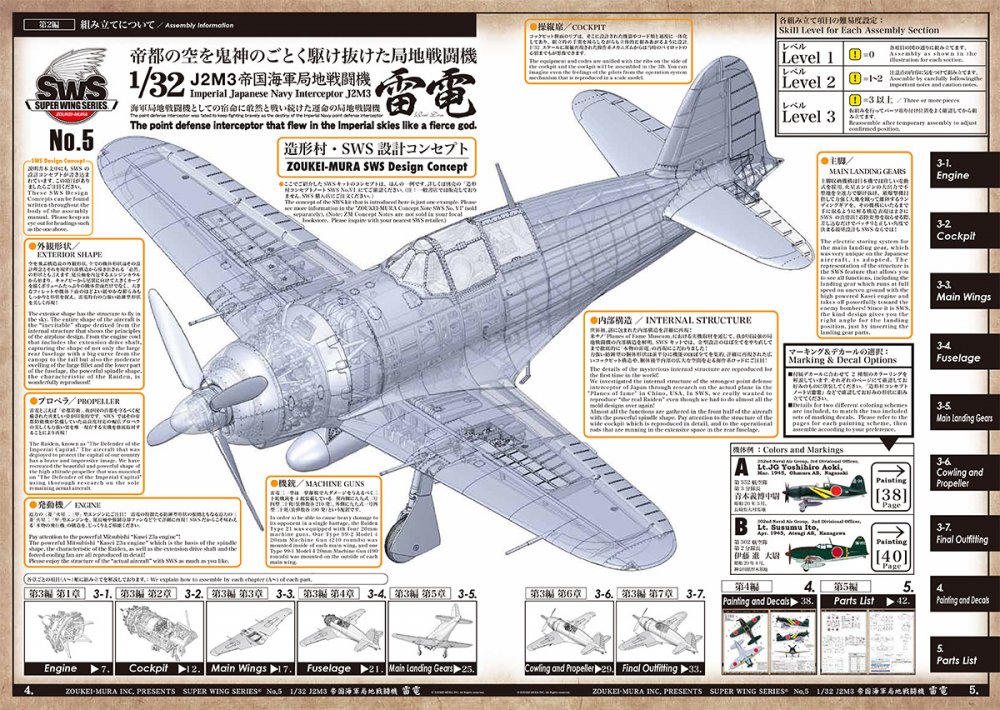
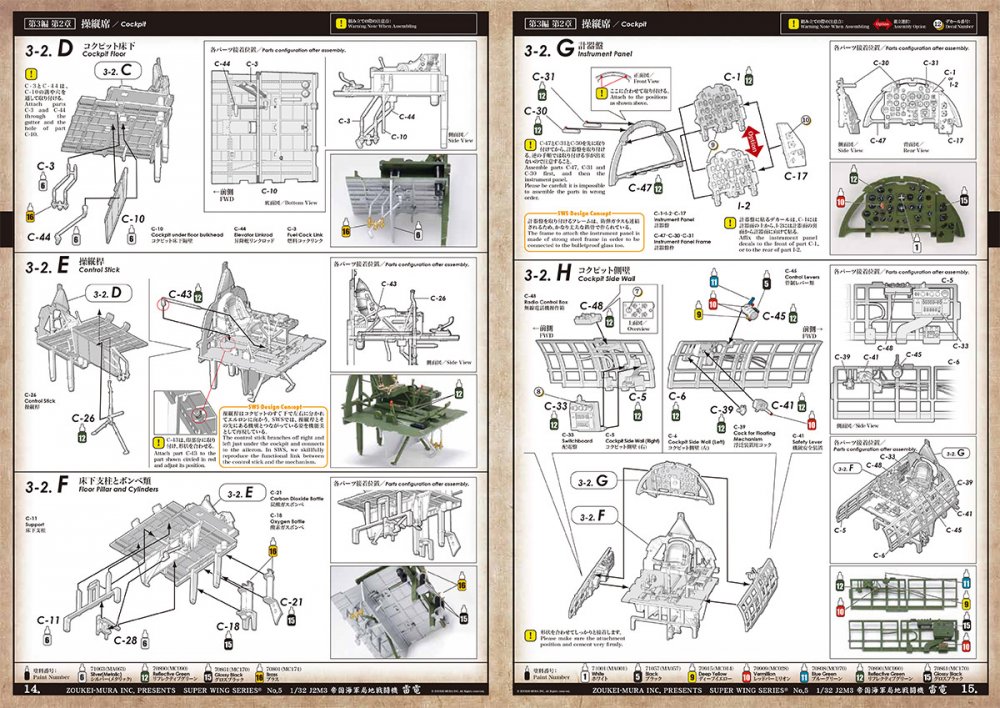
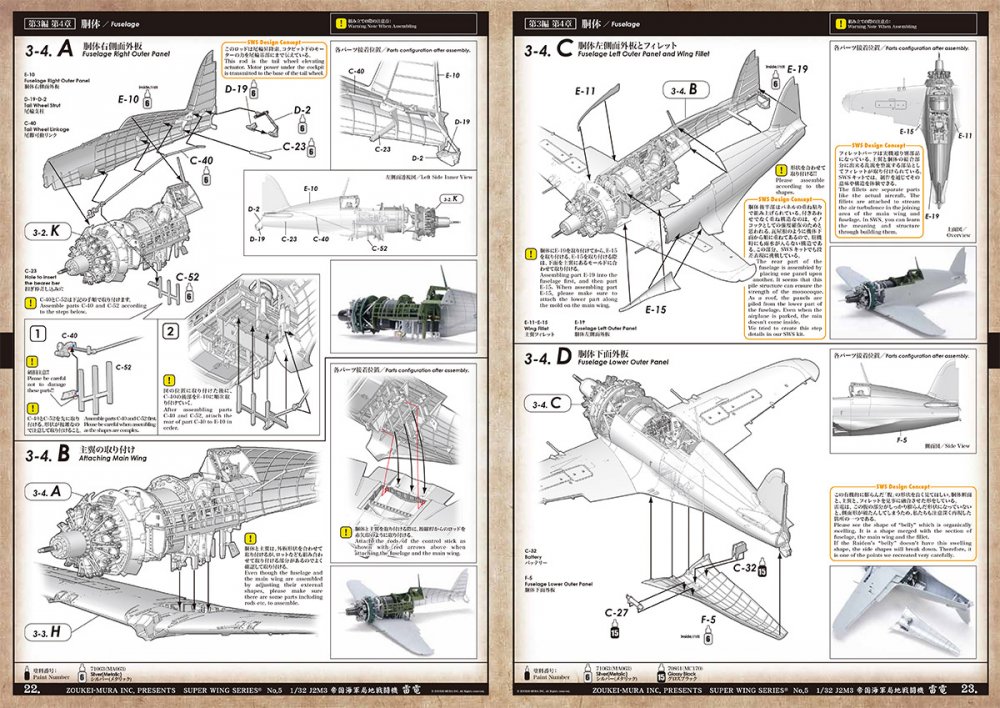
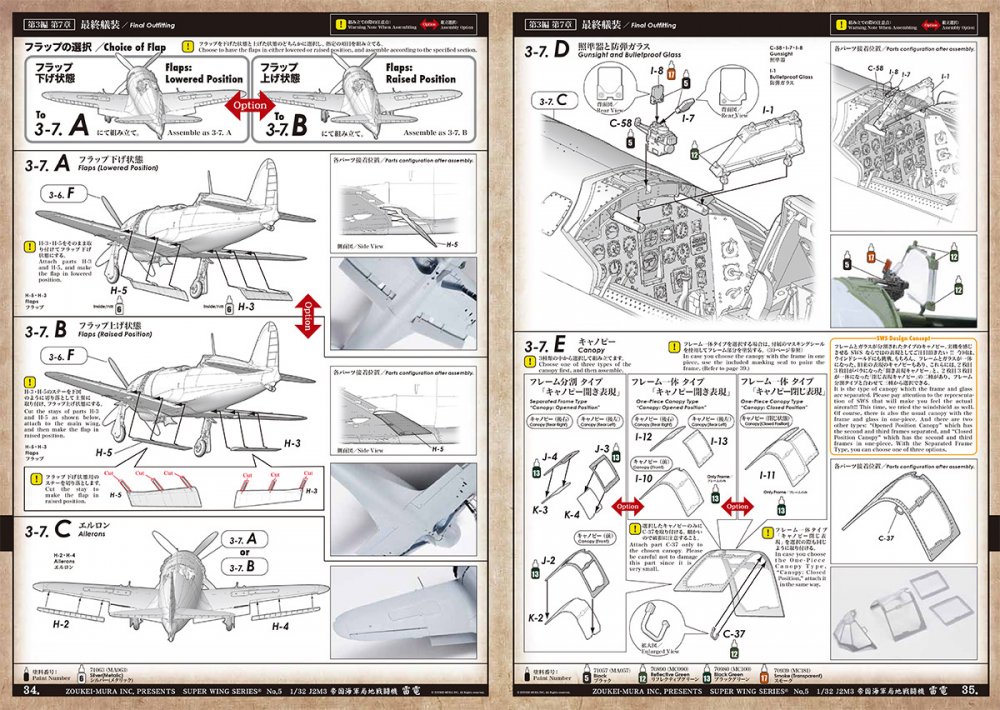
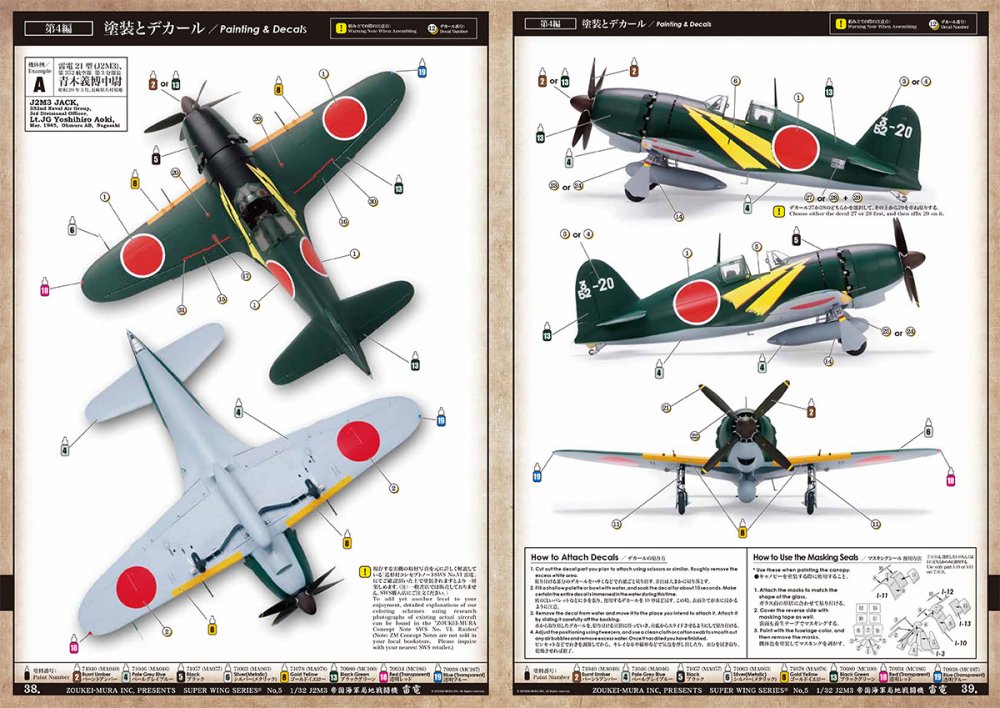
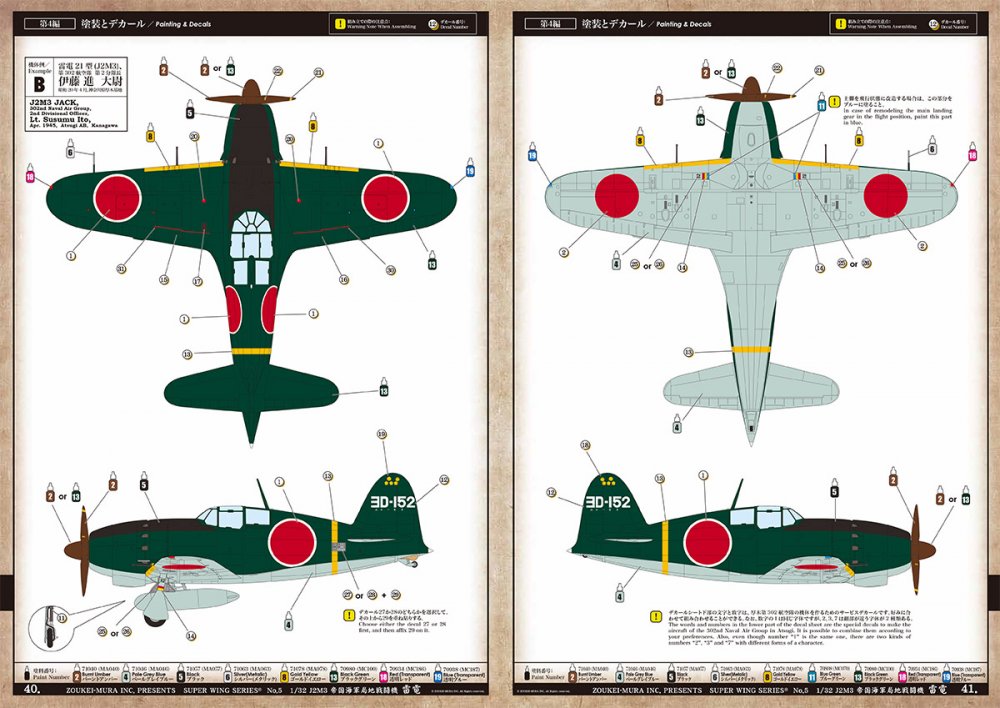
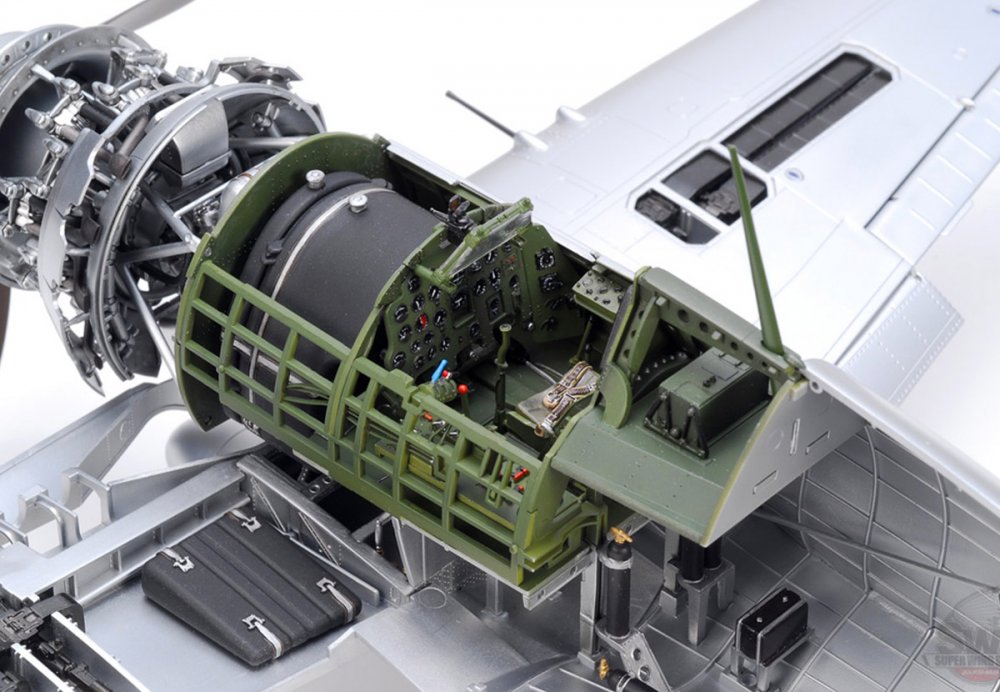
1/32 J2M3 “Rai Den” Zoukei-mura Super Wings No.5 Available from Black Mike Models for £79.95 The Mitsubishi J2M Raiden (雷電, "Thunderbolt") was a single-engine land-based fighter aircraft used by the Imperial Japanese Navy Air Service in World War II. The Allied reporting name was "Jack". The J2M was designed by Jiro Horikoshi, creator of the A6M Zero, to meet the 14-Shi (14th year of the Showa reign, or 1939) official specification. It was to be a strictly local-defence interceptor, intended to counter the threat of high-altitude bomber raids, and thus relied on speed, climb performance, and armament at the expense of manoeuvrability. The J2M was a sleek, but stubby craft with its oversized Mitsubishi Kasei engine buried behind a long cowling, cooled by an intake fan and connected to the propeller with an extension shaft. The first few produced J2M2s were delivered to the development units in December 1942 but severe problems were encountered with the engines. Trials and improvements took almost a year and the first batch of the serial built J2M2 Model 11 was delivered to 381st Kōkūtai in December 1943. Parallel with the J2M2, production of the J2M3 Raiden Model 21 started. The first J2M3s appeared in October 1943 but deliveries to combat units started at the beginning of February 1944. The Raiden made its combat debut in June 1944 during the Battle of the Philippine Sea. Several J2Ms operated from Guam and Saipan and a small number of aircraft were deployed to the Philippines. Later, some J2Ms were based in Chosen airfields, Genzan (Wonsan), Ranan (Nanam), Funei (Nuren), Rashin (Najin) and Konan under Genzan Ku, for defence of these areas and fighting against Soviet Naval Aviation units. Primarily designed to defend against the Boeing B-29 Superfortress, the type was handicapped at high altitude by the lack of a turbocharger. However, its four-cannon armament supplied effective firepower and the use of dive and zoom tactics allowed it to score occasionally. Insufficient numbers and the American switch to night bombing in March 1945 limited its effectiveness. (Edit Courtesy of Wikipedia) The kit As you probably already knew, unless you live in a cave, this kit isn’t a new release. In fact, this kit first hit the market in 2013, having been demoed at Scale Model World, Telford, in November 2012. I was then one of the ZM team who wore their voices out in showing the test-shot to many, many hundreds of people over that weekend, prior to its release a few months later. Despite this, I never actually reviewed this one, having skipped to the later Ho 229. I’m also going to take advantage of the fact that it’s possible that numerous looks at this kit may have prematurely died when Photobucket started to ransom its members and cut off external-linking (LSM hosts its own images). Zoukei-mura’s J2M3 kit comes in a fairly sizeable and attractive box with a pretty atmospheric painting of a J2M3 diving back into night-time cloud cover after a strike on a B-29 Superfortress. Probably one of the most evocative contemporary images of the Raiden that I’ve seen. Congratulations to ZM for using that image. The box sides show various images of the test shot that is oh so familiar to this writer. That lid is also pretty airtight and takes some effort to remove. Inside, we have NINE sprues, moulded in light grey plastic, and TWO in clear. All sprues are separately bagged to prevent scuff damage, and to complete building materials, a single set of vinyl masks is included. ZM kits don’t contain photo-etch parts as standard, with the idea being that the model can be built perfectly well without such extras. Lastly, a single decal sheet is included, as well as ZM’s instruction manual with its historical and informative instructional content. Two plastic sprues are very fragile, and these are the parts which include the canopy glass and separate frames. To protect these further, the lower inside of the box has its own cardboard wrap that separates these from the rest of the parts. Looking at those parts, that was an essential move. Sometimes, I write reviews by looking at each individual sprue, but as this one is quite complex, I’ll look at each area in turn, and the features/options available to the modeller. Engine Construction starts in this area, with quite a remarkable representation of the Mitsubishi MK4R-A Kasei 23a 14-cylinder two-row radial engine that was the beast at the heart of this rather clunky looking aircraft. Both rows of cylinders are separate, with each row being supplied as halves. In line with ZM’s quirky design policies. The inside of these parts has the pistons within. Of course, you won’t see this when assembled, but it’s a nice touch nonetheless. Pushrod rings, intake pipe and collector ring are also separate parts that will need careful alignment in order to progress to later stages. As the engine was sat further back in the nose, presumably to facilitate a correct centre of gravity and the semi-streamlined cowl, an extender shaft had to be fitted to the engine, and this is represented here, along with its housing. ZM has made some extensive and clever use of slide-moulding in this kit, with all of the eight separate exhaust pipes having hollow ends, saving you from having to work on these yourself. With these parts in place, you can start to fit the engine mount and the rather large mount cover, plus ancillary features, such as the carburettor, water injection pump, mixture adjustment valve and fuel injection pump, to name a few. Another real bonus with the tooling of this kit is the single piece main mounting bracket for the engine. Whereas other companies may tool a number of brackets to build this item (the new Revell 1/32 Fw 190A/F series, as an example), ZM has included this as a single part, meaning you won’t have any tricky alignment problems that multipart assemblies can introduce. Parts are supplied to pose the cowl flaps open, as default. If you want to keep these closed, you will need to trim plastic from the actuator arms, as shown in the manual. The flaps themselves are moulded in both open and closed positions. Cowls can be left off the model, so you can display the engine. These have simplistic rivet divots on the outside, and no real representative internal detail. The four-bladed propeller also has some nice hidden detail within the spinner, in the shape of the main fastening nut and the prop pitch counterweights. A nice touch if you plan to pose this with the spinner removed. Cockpit This really is an event with this kit, and also highlights just how spacious the cockpit of the Raiden was. This seems to have even more room than its American namesake, the Thunderbolt. The width of the cockpit floor is impressive! As with the engine, there is plenty of detail here that you also won’t see, unless you start to build this as a cutaway model, such as the underfloor bulkhead, linkages, valves, CO2 and oxygen bottles, and the control stick linkages that are moulded onto the stick part itself. As for the office itself, two versions of the seat are offered, as they did in the later Ho 229. These are for a plain seat, and one moulded with belts in place. Before you think that the latter option is probably terrible, I can tell you it isn’t. It’s actually quite neat, and I used that option on my Ho 229 that I built for Military Illustrated Modeller. The cockpit is built around a solid and detailed floor, highly detailed sidewall frames, a rear bulkhead, and an instrument panel bulkhead. Other parts to cram into this area include a multipart seat adjustment shaft/leaver/support, rudder pedal bar, head rest, oil pump lever, oil pump, landing gear lever, instrument consoles, oxygen bottles, and various avionics panels that fit to the sidewall frames. In all, a very comprehensive effort. Two instrument panel options are given. One of these is the standard grey plastic one with moulded dial detail (yuck!) and the other is a clear panel with bare lenses. I would opt for the latter, and punch out the individual decals for the instruments, from the sheet supplied. A far better option. In order to maintain the finesse of the parts without pesky ejector pin marks, a series of small ejection points are moulded externally to some parts, and you’ll need to clip these off and clean up any remains. This is same tried and tested system that is now seen on brands such as WNW, and indeed ZM put it to good use on the Ho 229 release, with its numerous tubular frames. With the tub complete, a forward firewall will fit to the cockpit, complete with a fuel tank and an oil tank. The completed engine assembly will eventually mount to this firewall. Another cockpit assembly area concerns the radio turtle deck behind the pilot. This includes the radio itself, rear bulkhead, roll bar and even the antenna which does appear to require installation as this stage. When I mentioned the clever use of slide-moulding, the radio set is an example of this, with the unit being moulded as two parts, and the joints being hidden around the edges of the unit. The moulding here allows for two faces to be moulded with full detail, at right angles to each other. Fuselage interior and exterior detail Behind the cockpit, there is a vast area of emptiness that has been detailed with internal fuselage constructional elements, such as the tail wheel linkage. I’m a little bit at a loss here as to why ZM didn’t also include the elevator and rudder pushrods too. It makes sense if they are going to include the one supplied. Still, there’s plenty of scope to do that if you wish to go that route. There are a few ejector pin marks inside the rear fuselage, and these look easy to remove, if you are that way inclined. With the fuselage assembled and the cockpit installed, there is a whole raft of detail underneath the cockpit floor, and this corresponds with detail that is fitted within the wing section. ZM has moulded the forward wing fillets as separate parts. Whilst I found this problematic on their Ta 152 kit, completed models of the Raiden show this to be a better fit. There are slots on the wing to allow correct placement of these parts. Externally, the fuselage is quite sparse, apart from neat panel line and port access detail, a ‘la Hasegawa’s style. I quite like a riveted surface and would look at adding this detail with a flush rivet tool. Japanese aircraft were known for their flaking paint, and of course, this would also centre around rivet lines, so these are a must for me. MDC’s flush rivet tool is perfect for this. The rudder is moulded separately to the fuselage, as are the elevators to the stabilisers. With a little bit of work, they could be made poseable too, by removing the square plug that they would fit together with. Please note that the lower, rear fuselage is also separate to the main fuselage, much in the same way that Airfix did their 1/24 Typhoon kit. This joins along a panel line, and from the finished thing, this appears to work very well. Internally, that lower part has the same internal, constructional details as the main parts. Wings There are only two main wing parts; full span single piece upper and single piece lower panels. Ailerons are separate parts, and the gun bays are moulded with the panels off, allowing you to pose them and display the detail within. Work begins by gluing in a full span main spar into the lower wing part, followed by a small series of ribs that form the lower part of the cockpit tub. More linkage detail is to be fitted, as well as port and starboard wing fuel tanks. Again, you’ll not see the latter unless you cut panels away. The weapons bays are formed around more spar and rib details, along with some beautifully moulded Type 99 20mm machine guns. These have nicely detailed recoil springs etc and it wojld be a shame to close those bays up and ignore this detail. Of course, the guns also have their ammunition magazines and feed belts. Multipart wheel well walls help to create this area, along with a very nicely detailed gear bay roof that is moulded onto the underside of the top, full span wing panel. Before you can finally glue the upper and lower panels though, the oil cooler needs to be installed. Wing external detail is commensurate with the fuselage styling, and again will benefit from some work with a riveting tool. You will be able to pose the landing flaps too. They are moulded with a series of plugs that are suitable for the default down position, and you will need to snip them off for raised. The instructions have this the wrong way around, so beware. A correction sheet is included, but as this kit is now 4yrs old, I’m surprised ZM hasn’t corrected the manual itself. A very nifty bit of slide-moulding has been used to mould the machine gun ports into the upper wing panel. This negates having to use a separate leading edge insert for this purpose. Undercarriage No provision is made for a model with a retracted gear, so if this is what you want, you will need to do some work. I think the one thing that annoys me here is that the wheels aren’t weighted. Not a problem really, but if you wanted them weighted, you’d need to fork out more money for their own resin wheel set. Wheels are moulded as halves, complete with separate hubs. The struts are crisply moulded as single pieces, with a two-part oleo scissor to attach. Brake cables are also supplied, and the undercarriage doors are superbly detailed. Wheel door actuators are supplied for the inboard doors, with clean and positive placements provided for these. Canopy Two options are provided here. A standard set of clear parts are included, whereby you mask the panels as per usual, and then paint. The other contains the glass and separate frames, which are incredibly fragile. This is quite an attractive proposition, but I still feel you would need to mask the canopy as normal, as it’s pretty common to fit the glass before you paint the airframe. I’ll have to work out how I approach this. If you want to pose the canopy in a closed position, then the standard canopy parts supply a single piece hood and rear canopy for this purpose. This option isn’t available in the separate glass/frame style. Masks A single sheet of green vinyl is supplied, with sharply cut masks for the canopy only (traditional style), and not the wheel hubs. That’s a shame. My experience of this masking material from other ZM kits is that you really need to make sure it’s firmly applied as it can lift in places. Decals All decals for the two schemes are printed on a single sheet. These seem to either be in-house, or from somewhere in Japan maybe. They certainly aren’t Cartograf. I find ZM’s decals to be a little disappointing in that they have poorly defined details and are fairly thick. That applies here too, although they aren’t unusable. Maybe think of doing the markings with aftermarket decals or masks. Stencil and instrument details are also included here. The two schemes on offer are the same as those in the Hasegawa kit, so nothing original in the slightest. Thankfully, separate numbers are included to change the serial for one of the options. These two schemes are: J2M3 Jack, 352nd Naval Air Group, 3rd Divisional Officer Lt. JG Yoshihiro Aoki, March 1945, Ohmura AB, Nagasaki J2M3 Jack, 302nd Naval Air Group, 2nd Divisional Officer Lt. Susumo Ito, April 1945, Atsugi AB, Kanagawa Instruction Manual ZM has their own style of manual, in the same way that WNW has their specific approach. For ZM, it’s all about educating the modeller as to the internals of the aircraft, and the design. A history of the J2M3 is included, followed by a treatise on the Raiden, along with a sort of X-ray of the aircraft. Each chapter deals with a specific constructional section of the model, with more SWS explanations throughout, along with some superb illustration that should make assembly straightforward. Colour references are made throughout for both Gunze and Vallejo paints. The last pages are taken over with the two schemes, printed in colour. These are rather dark and murky in places, but easy to overcome. Decal placements suffer a little from the gloom too, so use any references you have. A parts plan is also included. Conclusion Has this kit withstood the last 4 years in terms of approach? Yes, without a doubt. This is most certainly the best J2M3 in any scale, and most certainly in 1/32. Some details are quirky, but that’s the name of the game when it comes to Zoukei-mura’s SWS approach. I think that the engineering approach to this is sensible, and a little novel in places. This certainly isn’t a perfect kit, but can you name one that is? I’m a little disappointed about the lack of weighted wheels, especially for a premium product, and the rather substandard decals. However, this is still a gem of a kit, and one I’d been chasing down for a little while now. I really can’t wait to crack this one open and commit some glue and paint. Highly recommended My sincere thanks to Duncan at BlackMike Models for getting this out to me so quickly. To purchase, head over to their website.


-
Profimodeller Fi103 V1
James H replied to JeroenPeters's topic in LSM 1/35 and Larger Work In Progress
That looks better. Far more natural. When do you glue the wings on? -
RPToolz. All you will ever need. http://rptoolz.unas.hu/en/
-
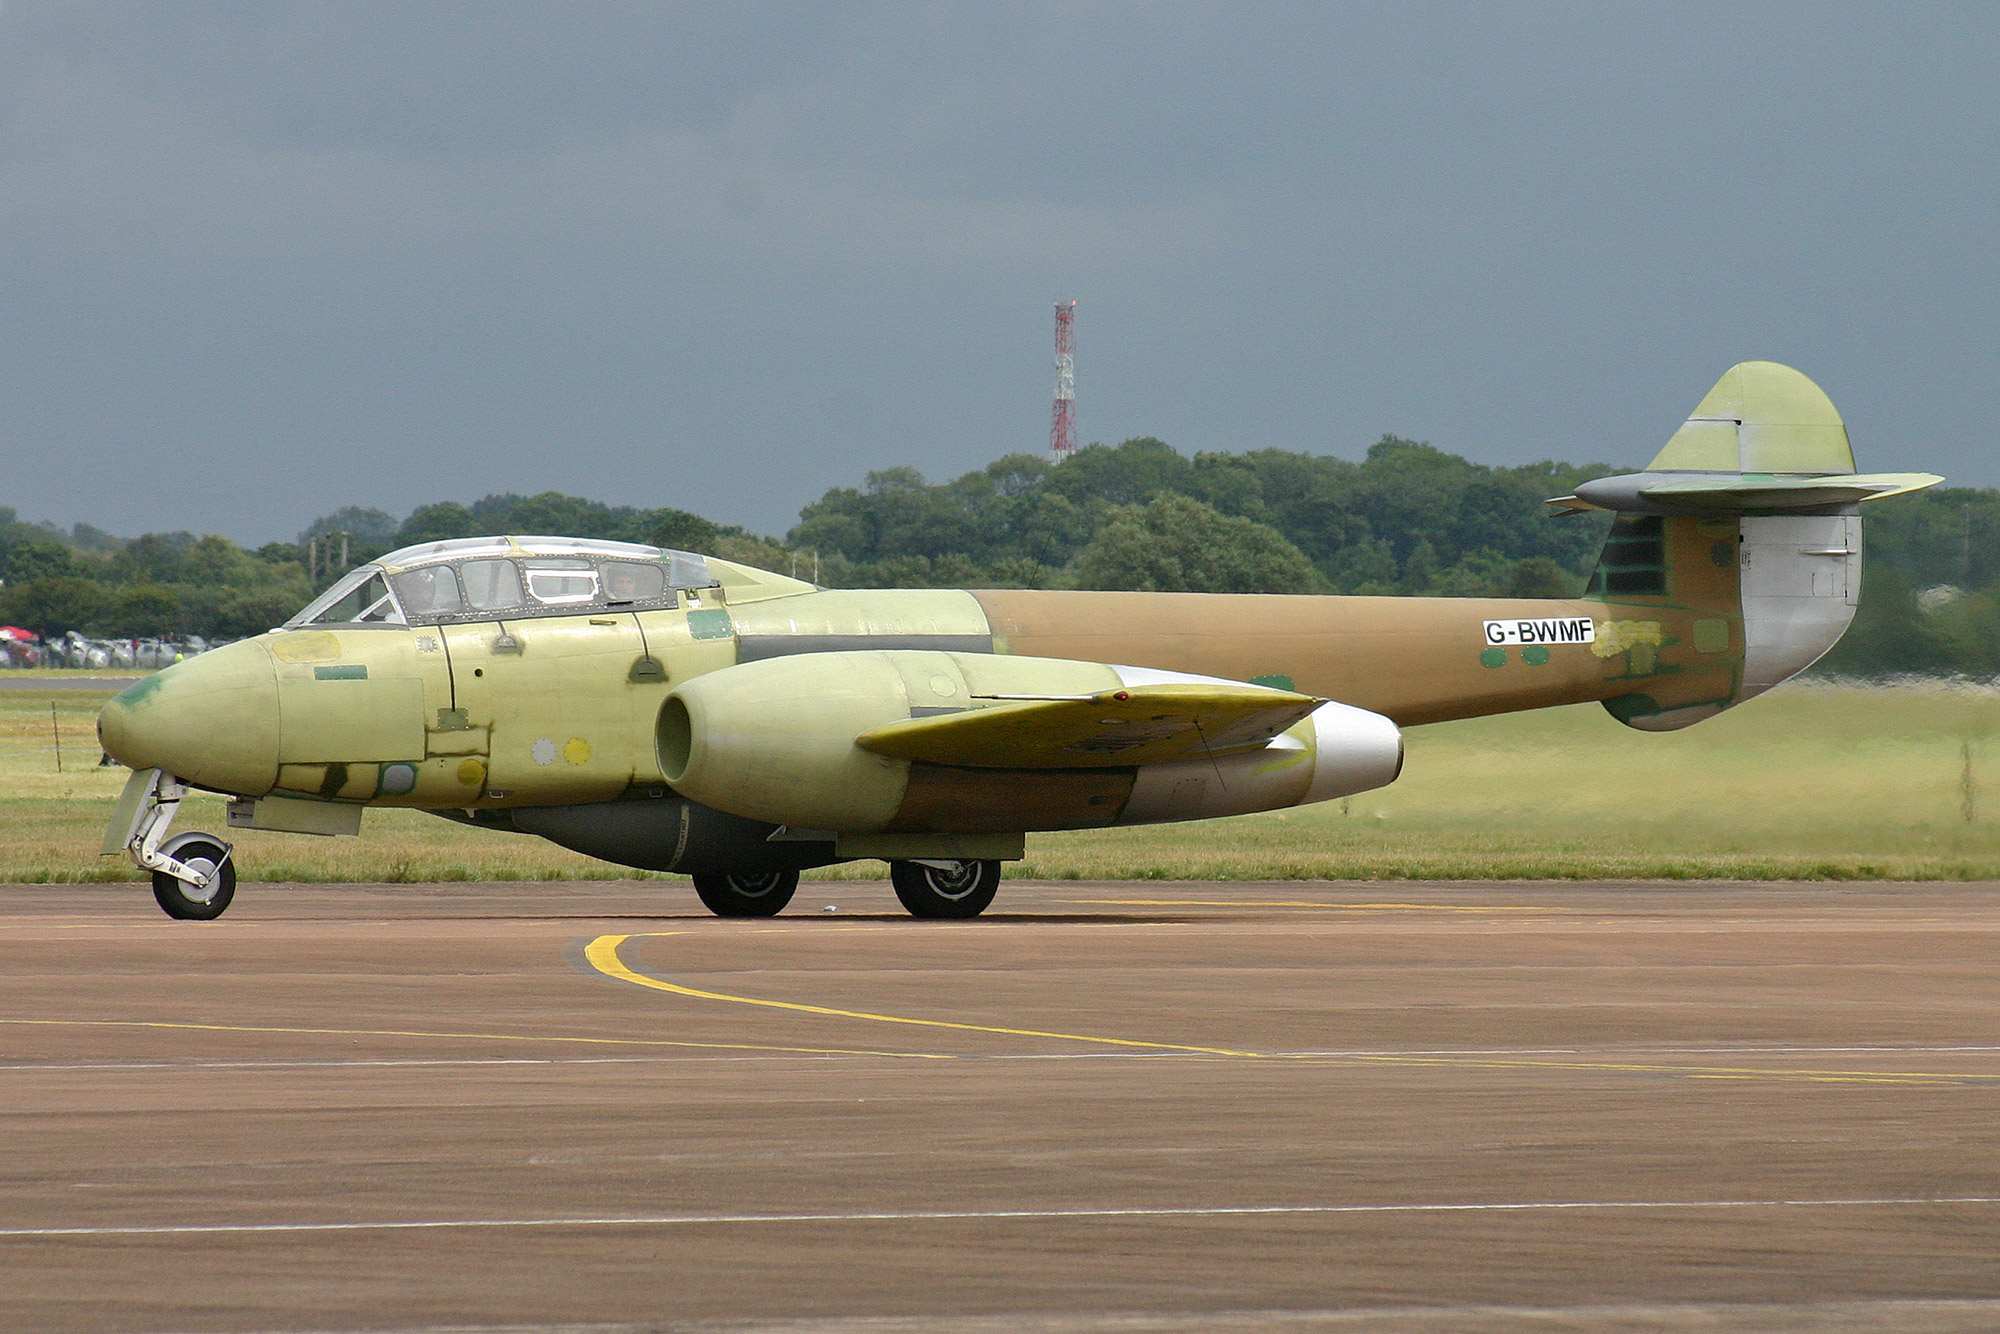
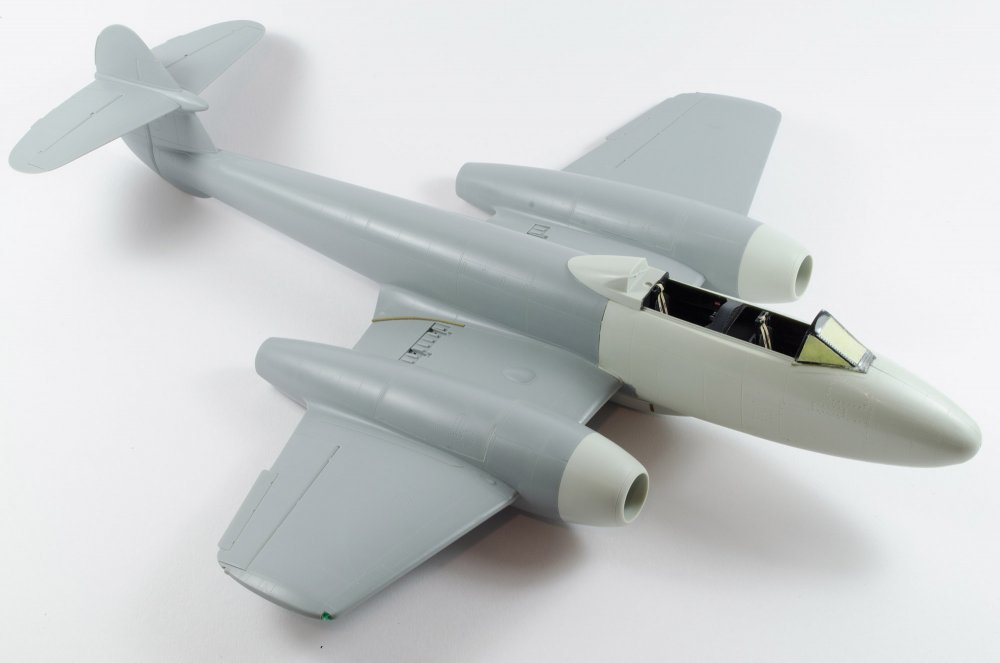
hkm Meteor T.7, G-BWMF
James H replied to James H's topic in LSM 1/32 and Larger Aircraft Ready for Inspection
This is only a post-restoration primer coat, and it did test fly in that before being shipped off to a paint shop where she was given a silver overall scheme and reverted to military serial of WA591. WA591/G-BWMF is the oldest flying jet aircraft.- 6 replies
-
- 1
-

-
- meteor
- hong kong models
- (and 2 more)
-
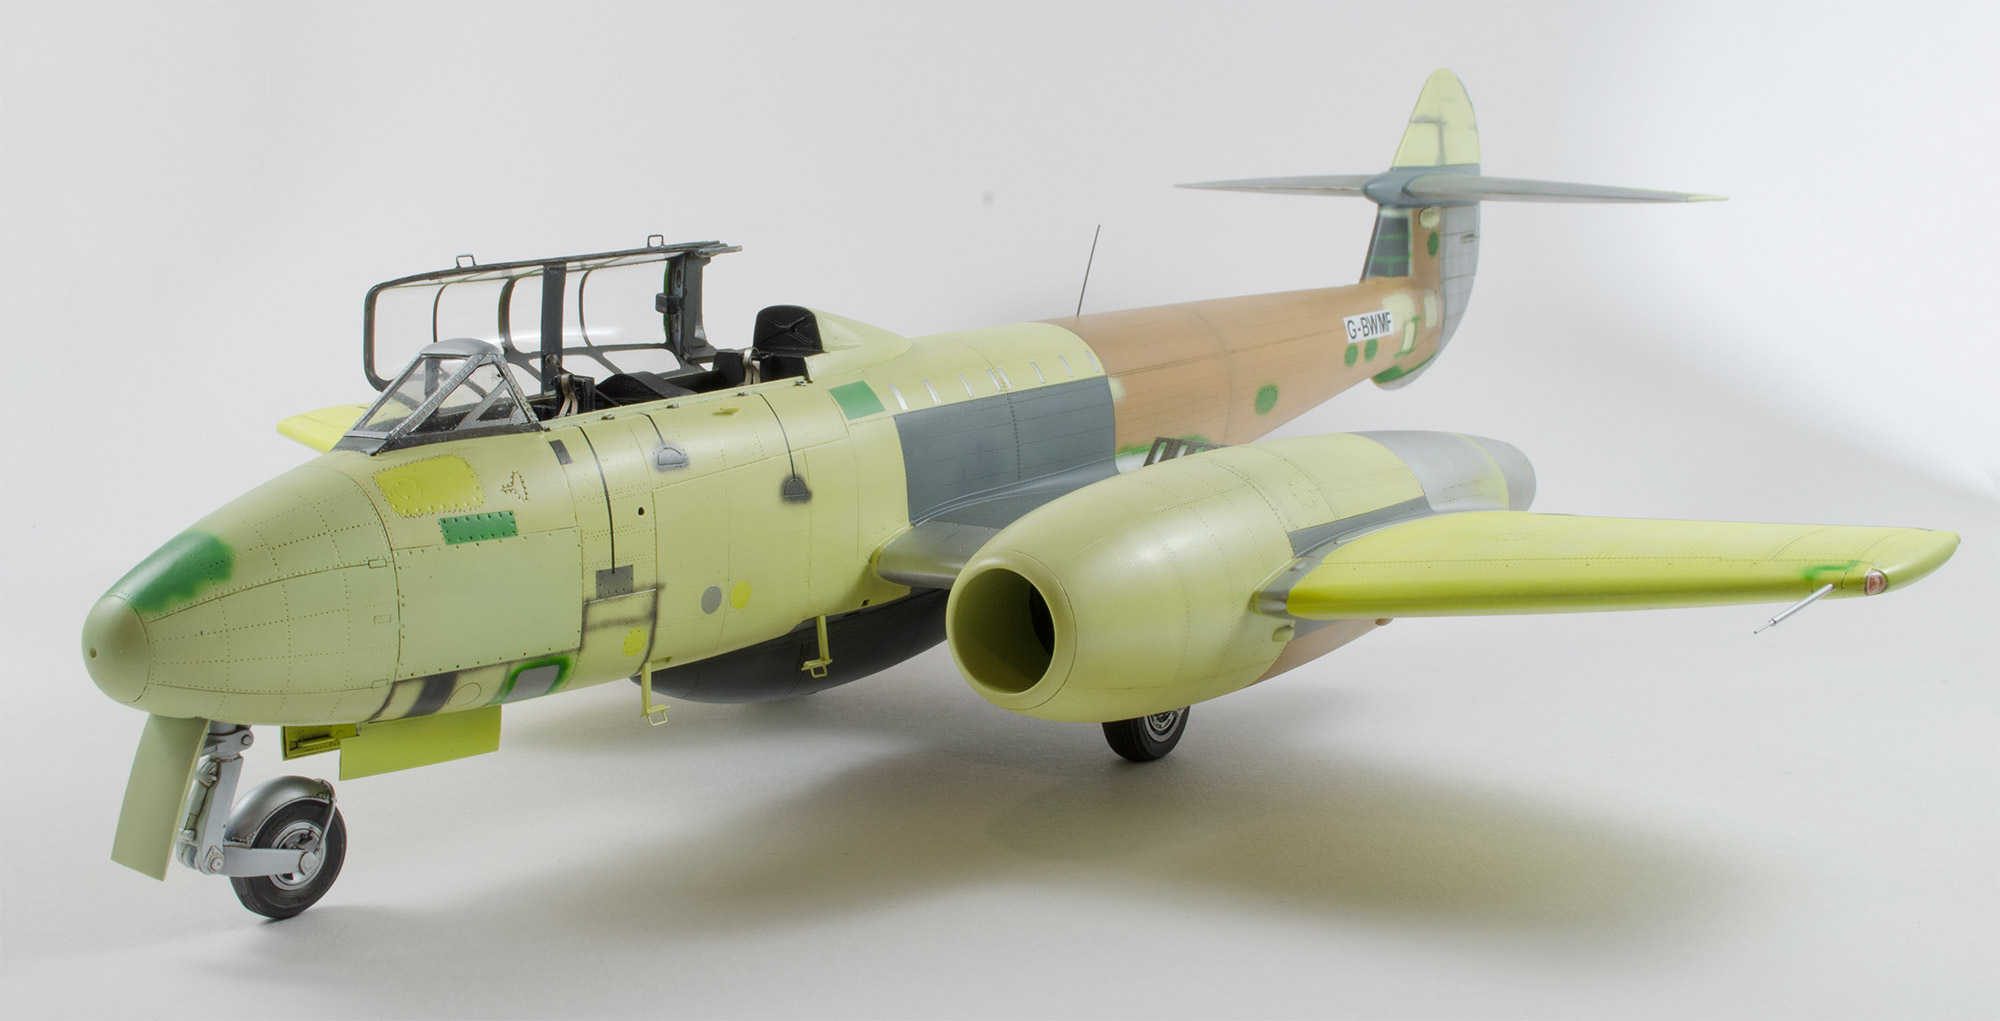
Hi all, This is my HK Models Meteor F.4, converted into a T.7 using the Fisher Models resin set, incorporating the narrow chord intakes that are specific to the majority of T.7 aircraft. I've also added a smattering of Eduard stuff around this build, for landing flaps, seatbelts, wheels and mudguards etc. It's a little worrying when you hack off huge sections of your expensive model kit with a razor saw, but this one built up just beautifully. I've used MRP (Mr Paint) for all colours, such as Sulphur Yellow, Basalt, White Aluminium, Lemon Grey and Syrian AFV Yellow-Brown etc. Also some nice Airscale bezels and decals on the instrument panels. Watch out for this one in the November edition of Military Illustrated Modeller (No.79), due out around mid-October 2017.

- 6 replies
-
- 8
-
-
- meteor
- hong kong models
- (and 2 more)
-
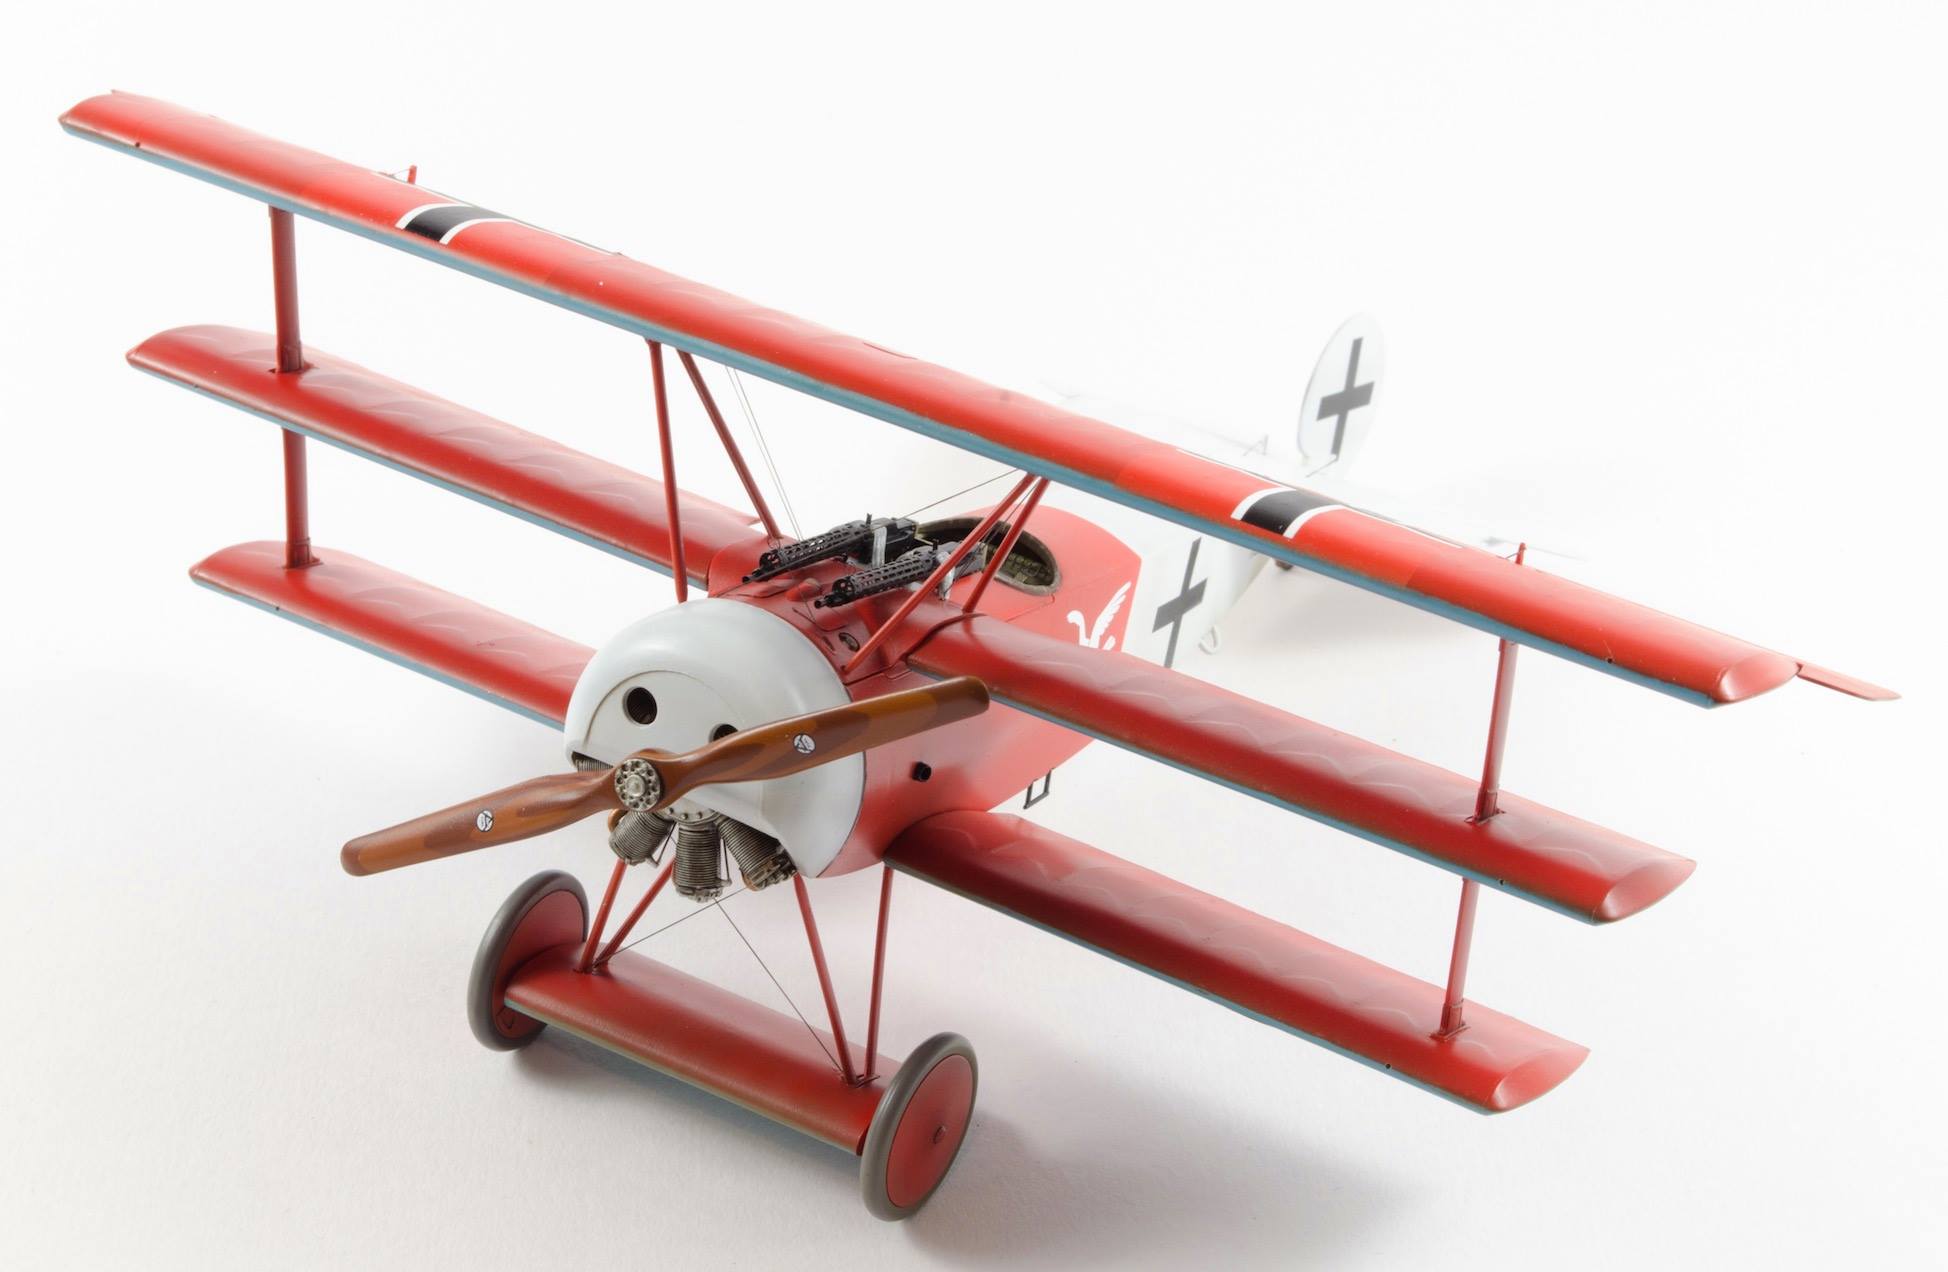
Hi all, This is my recently finished Fokker Dr.I in the colours of August Raben's bird. The decals are Eagle Editions and the paint is MRP. Some use of Aviattic rib tape and fabric decals, as well as some Uschi wood decal. Guns are MASTER, and the prop is from a WNW Fokker D.VII kit. Used ammo chutes are also from the WNW Fokker D.VII kit. For this build, I used the Roden F.I kit, but used the parts for the production Triplane version. As well as some of the Encore PE extras, I also used stuff from the PART PE set, such as the ammo bins etc. Quite a lot of thinning of the upper cockpit deck and modification to comfortably use the new ammo bins. Watch out for this build in the next issue of Military Illustrated Modeller, available at all good newsagents and the online store!

-
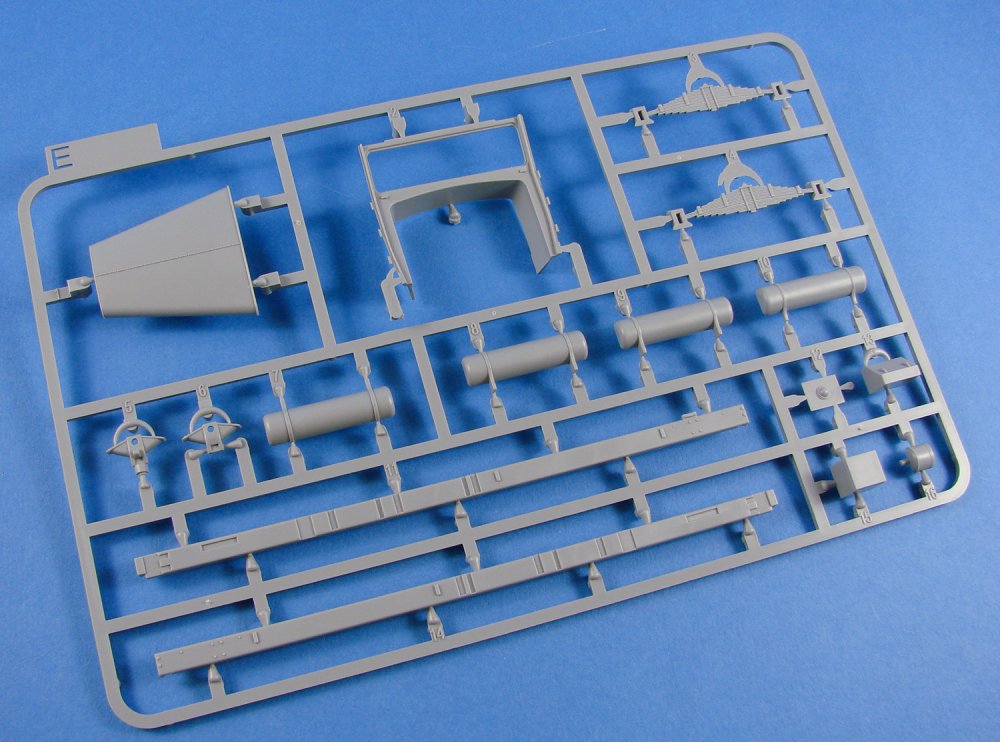
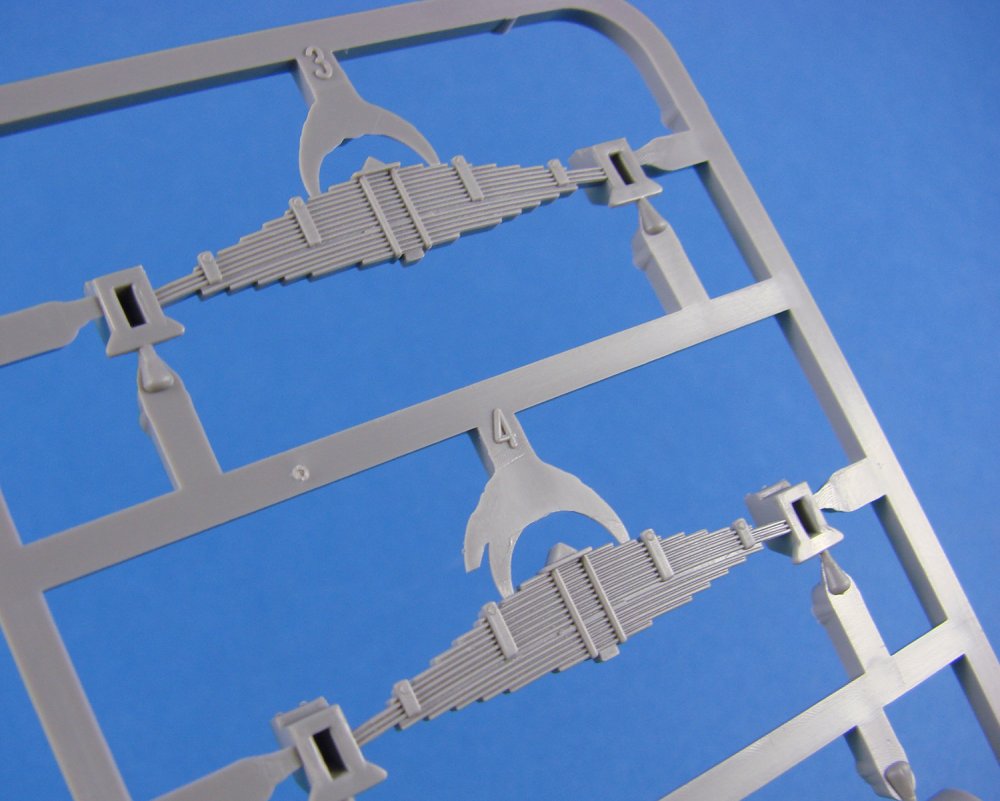
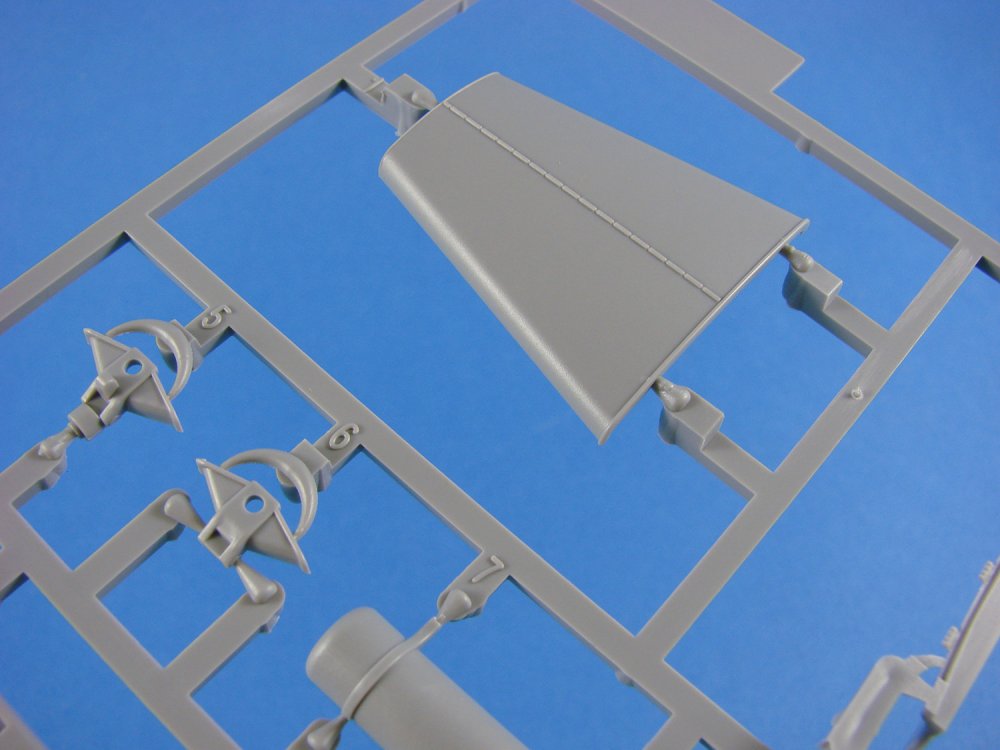
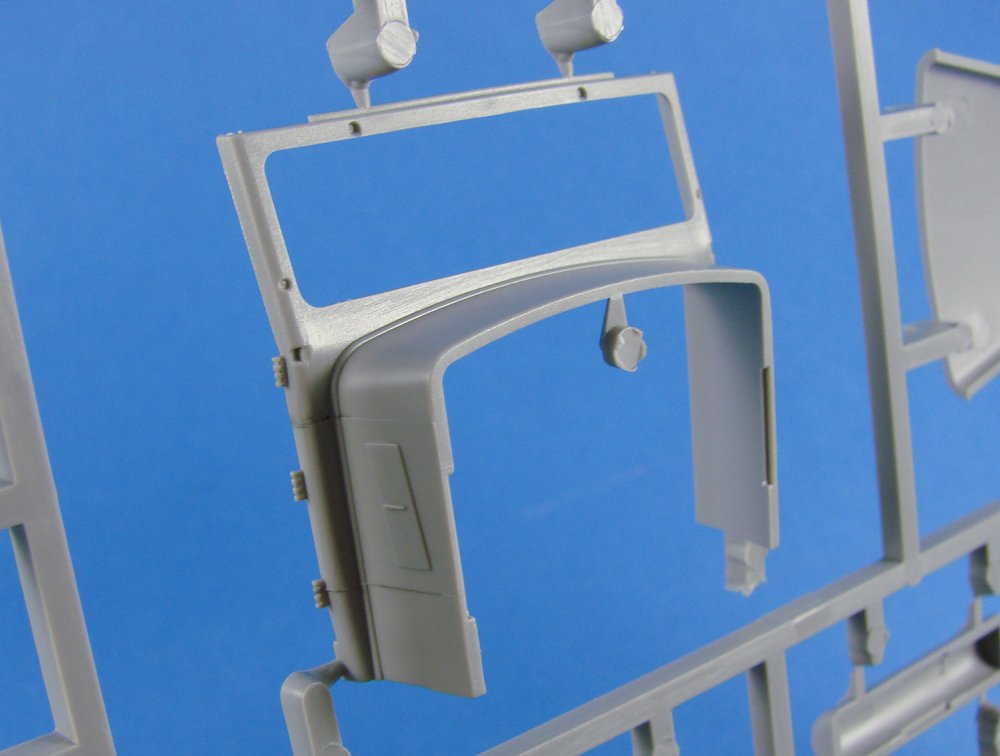
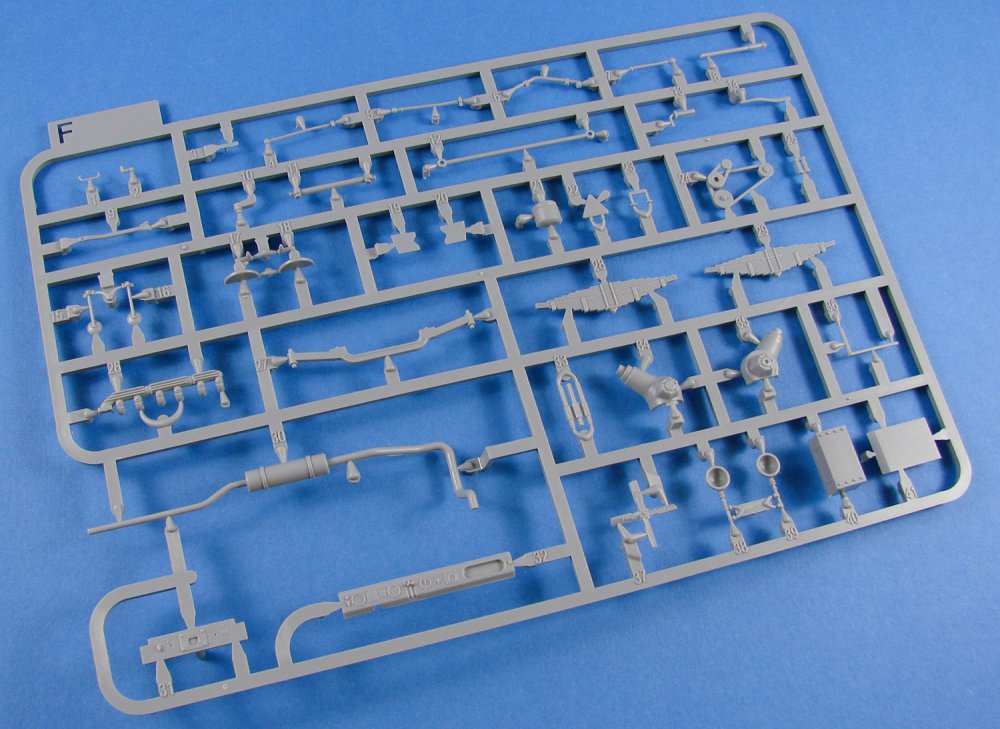
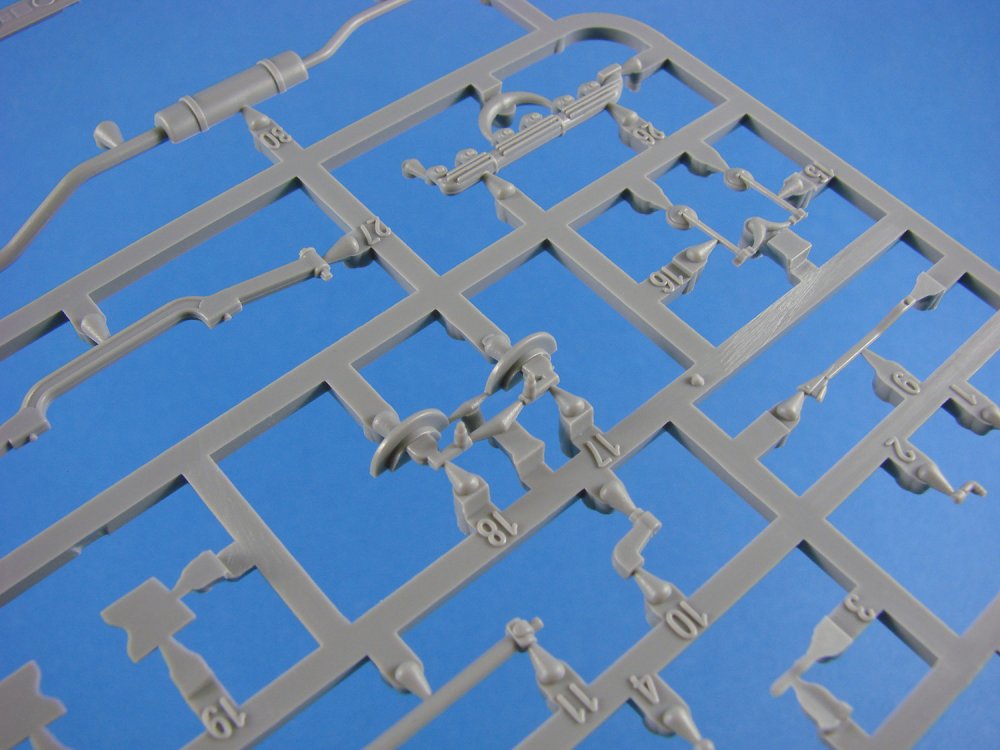
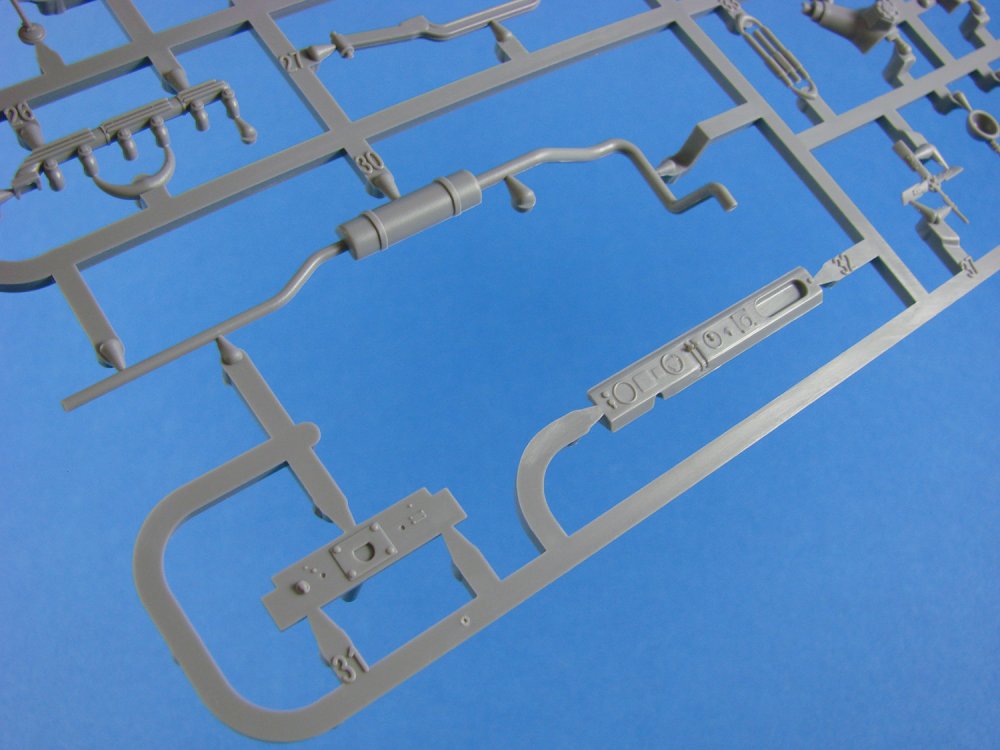
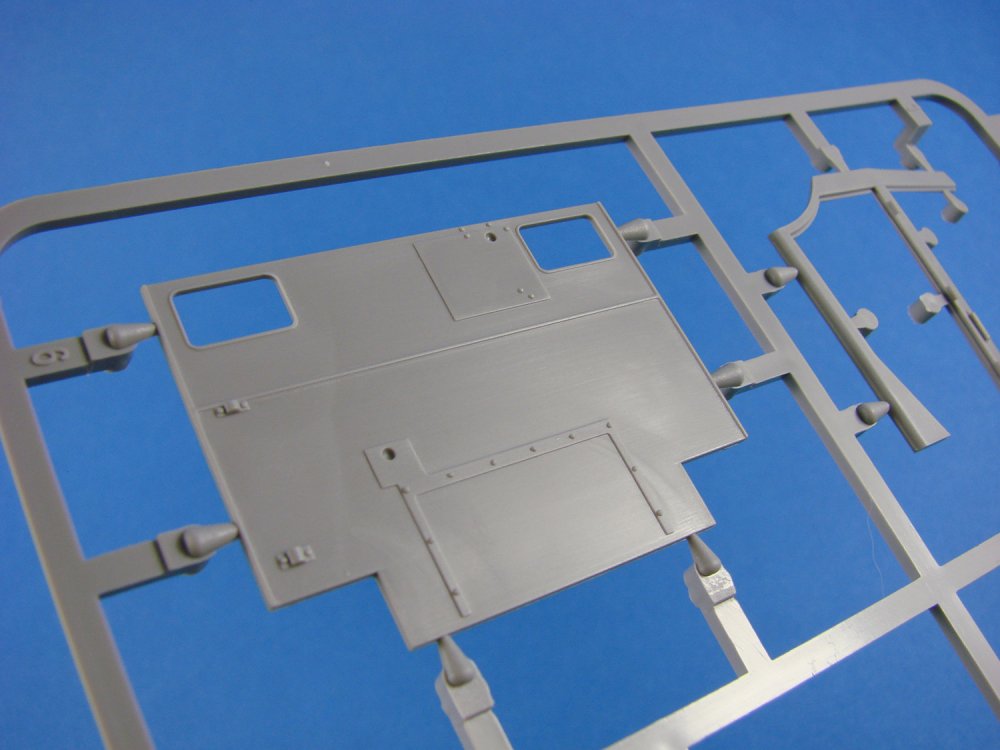
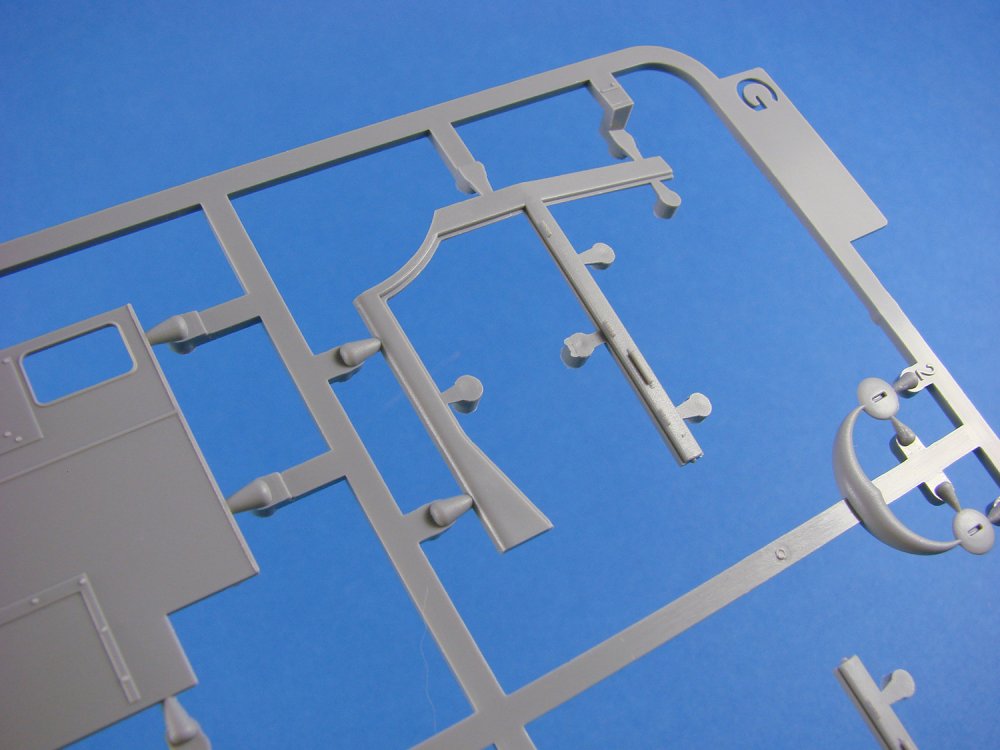
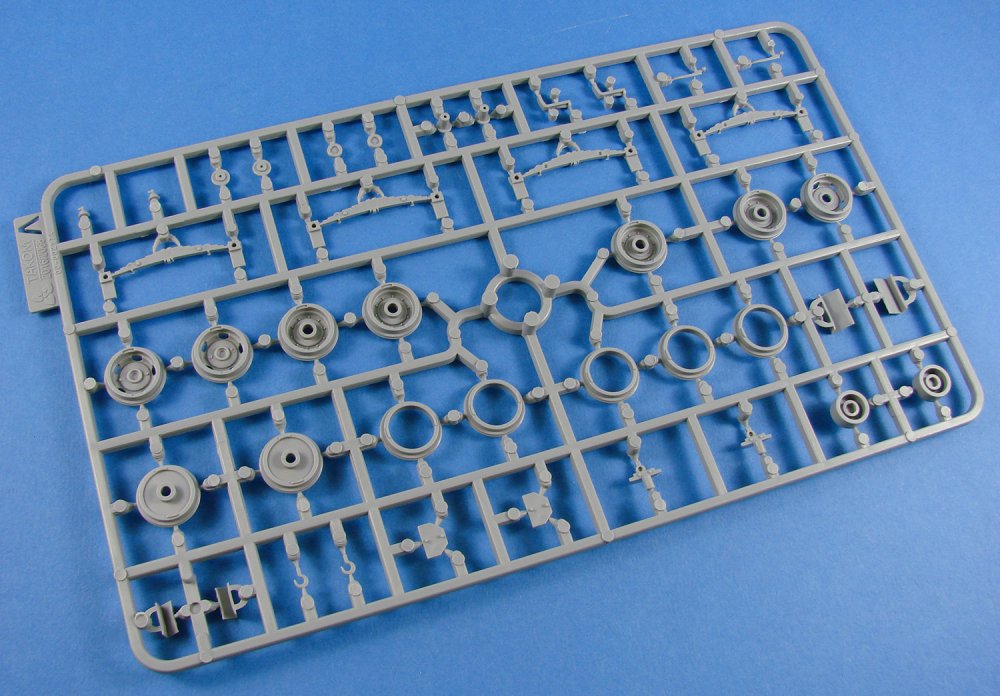
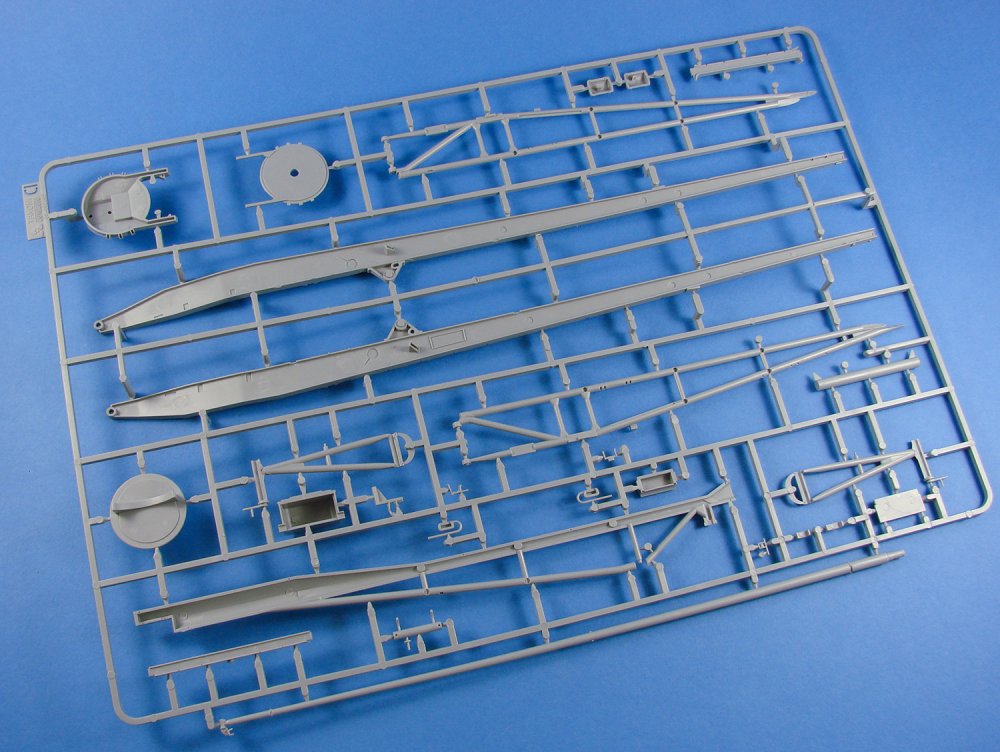
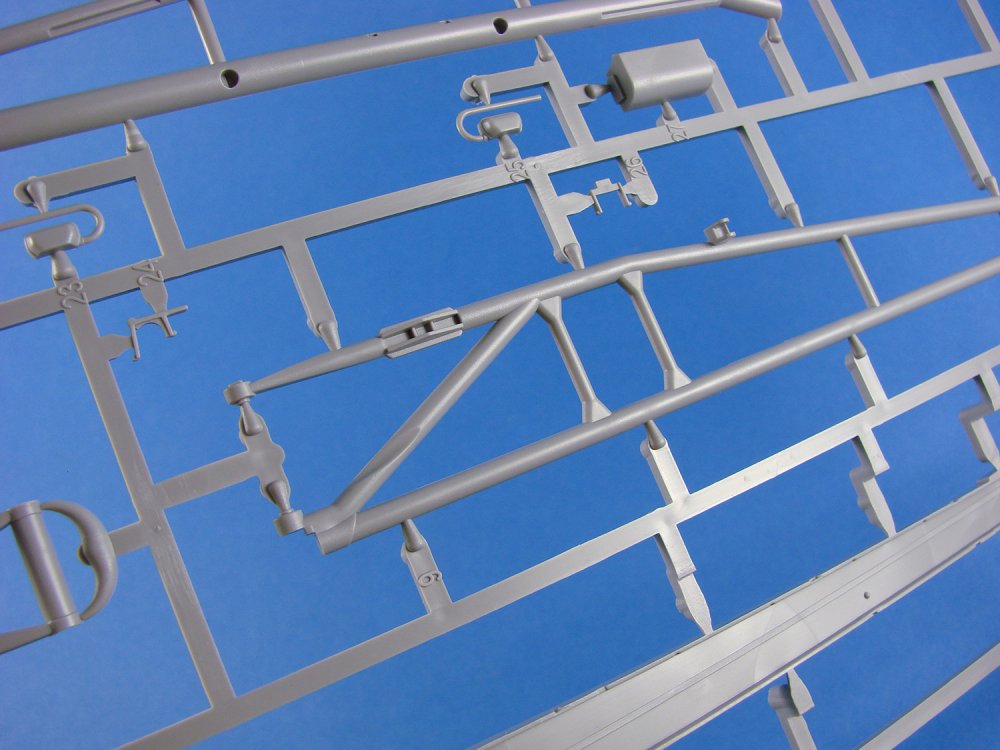
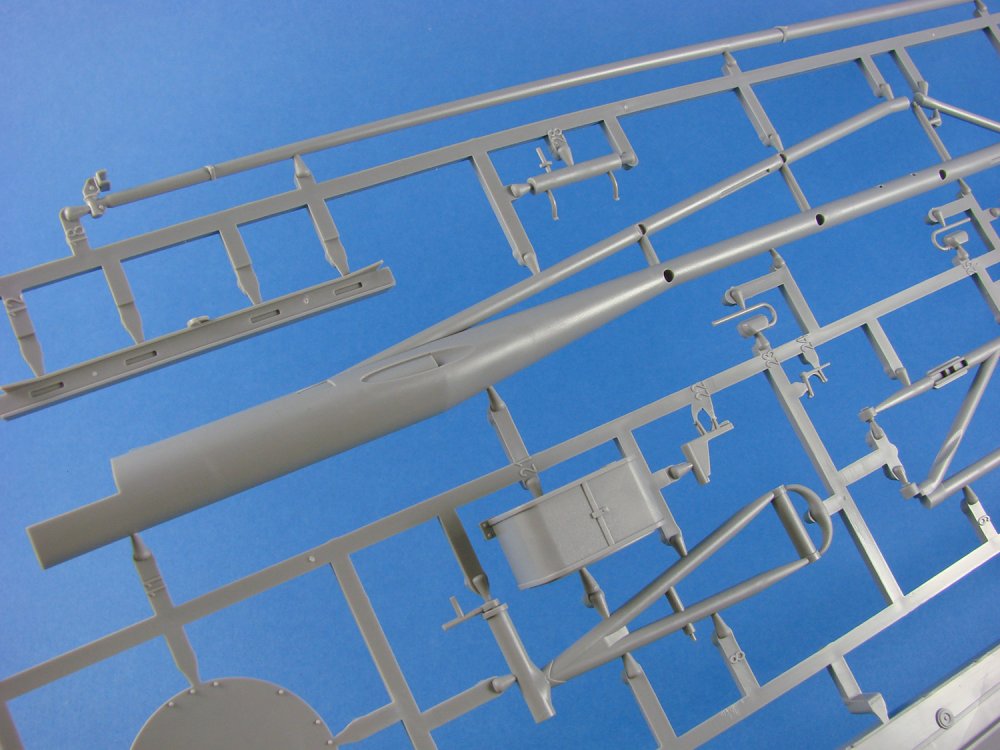
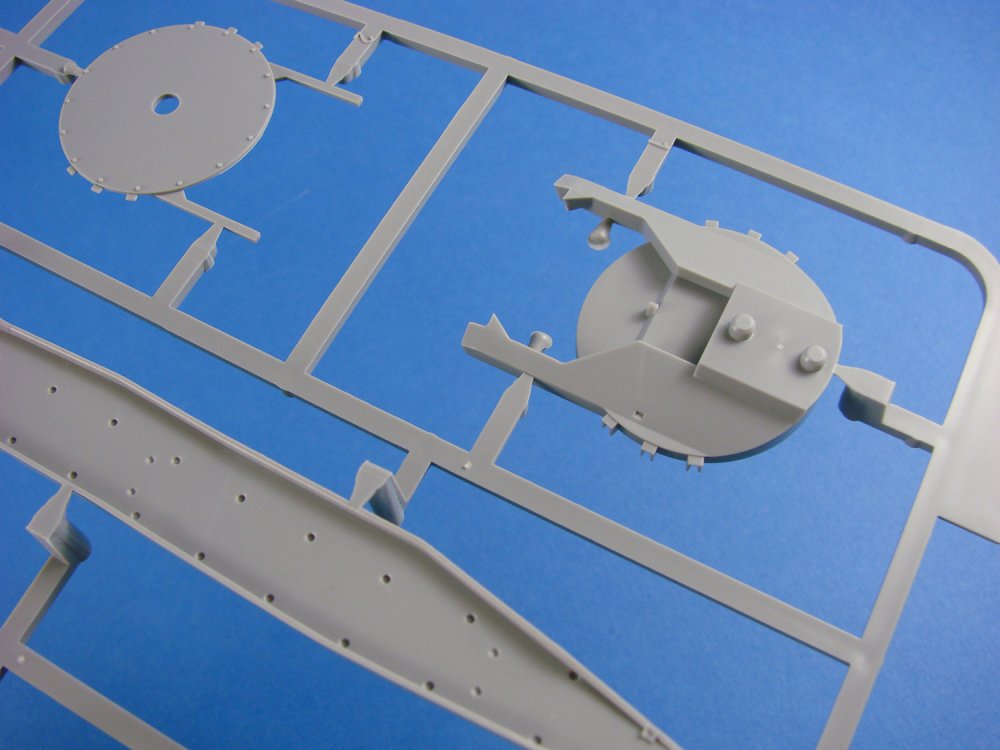
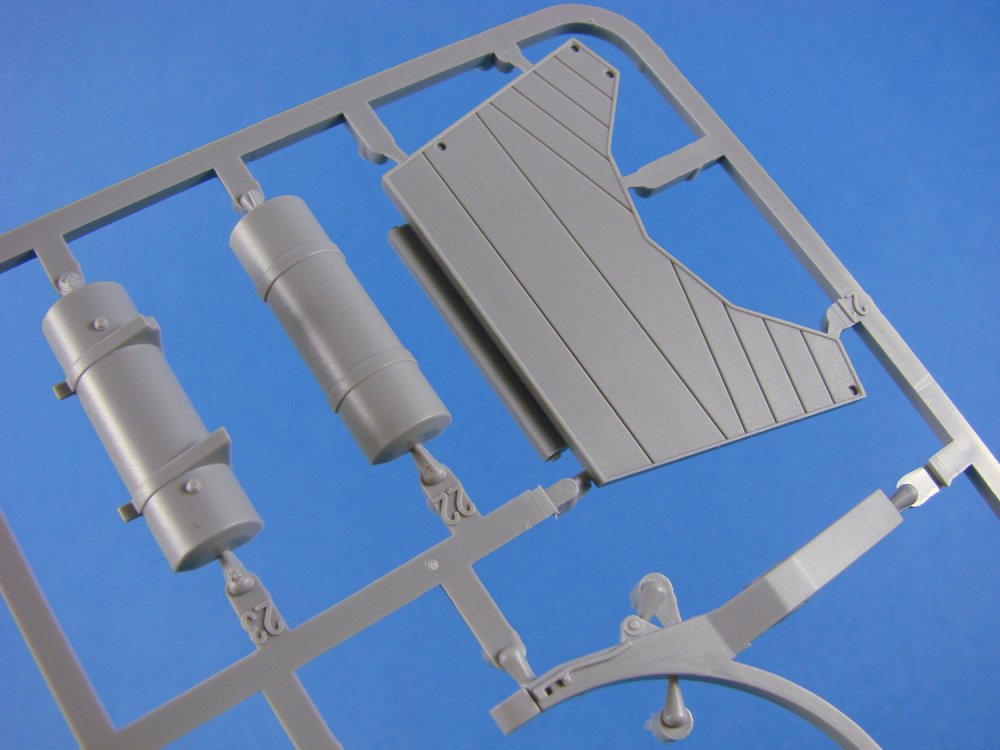
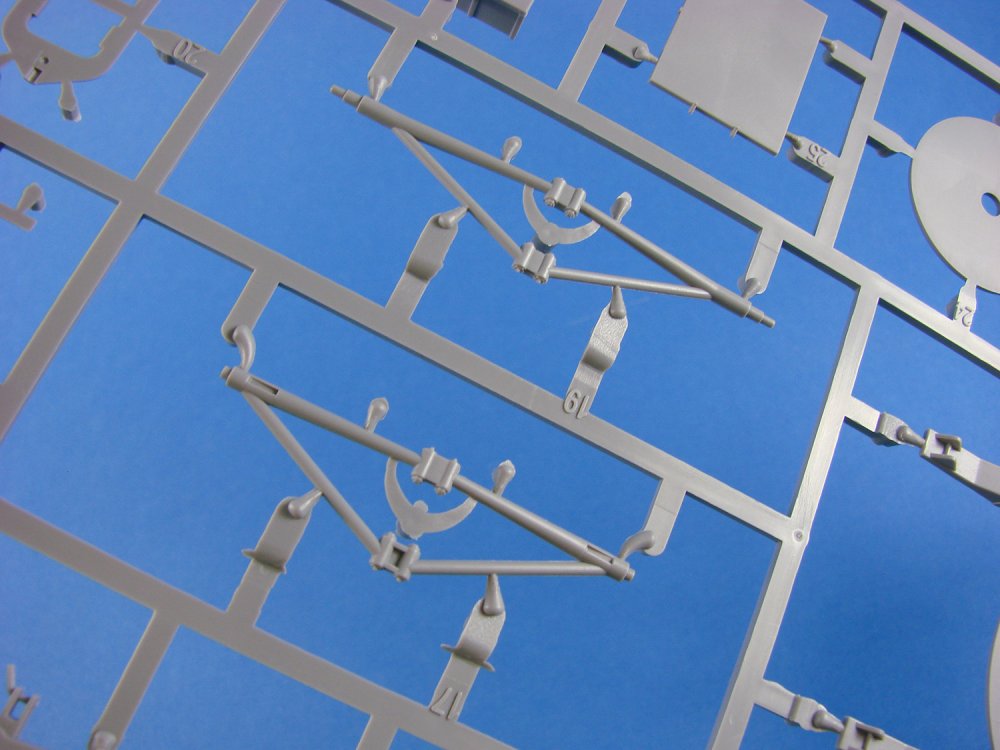
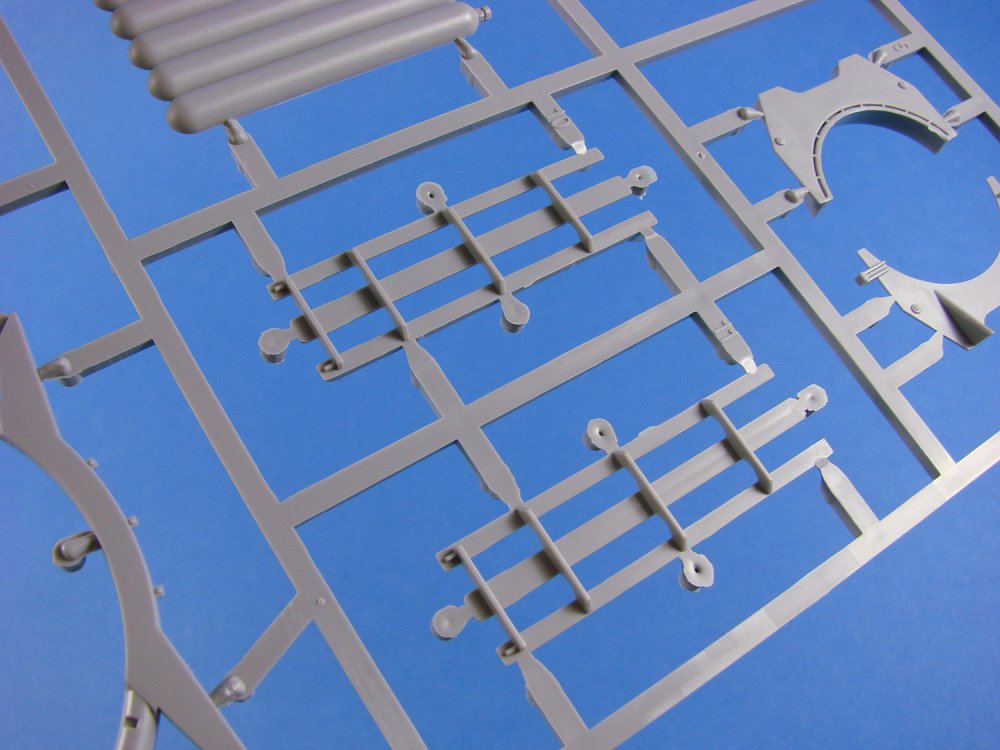
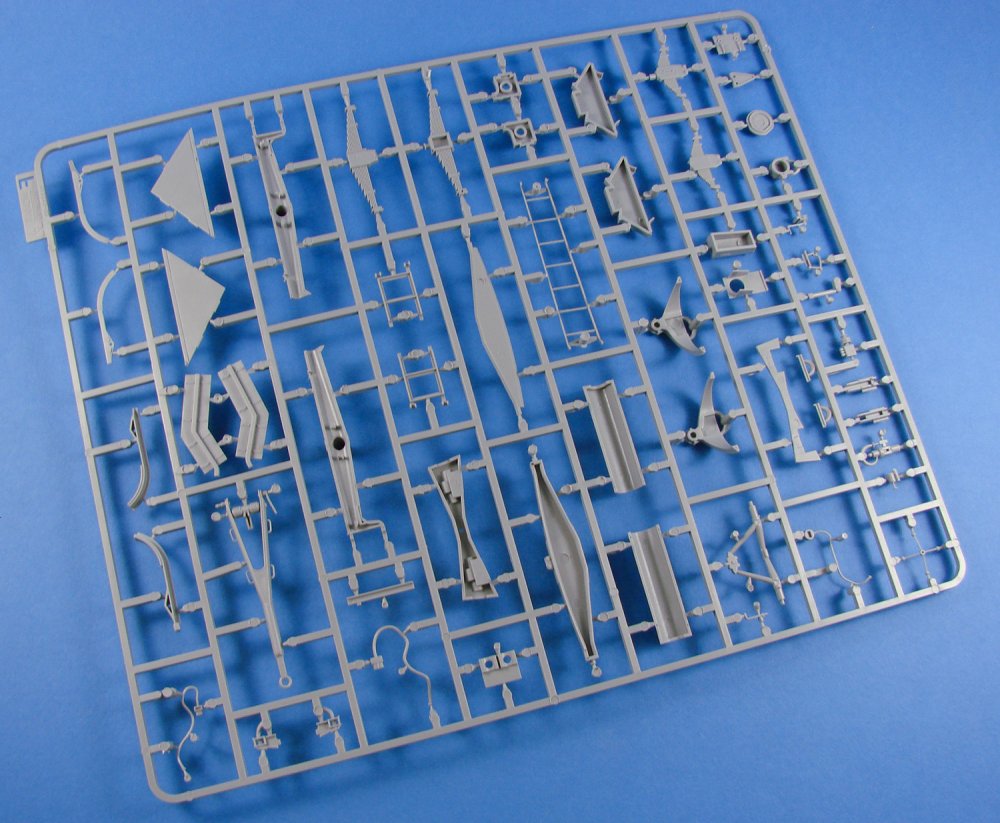
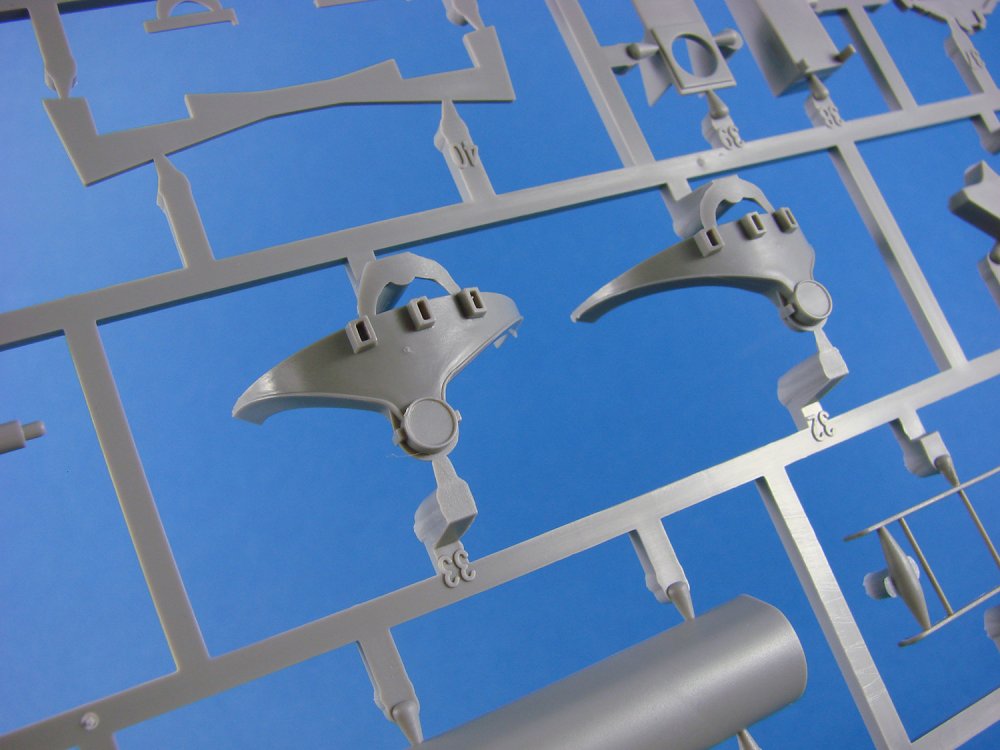
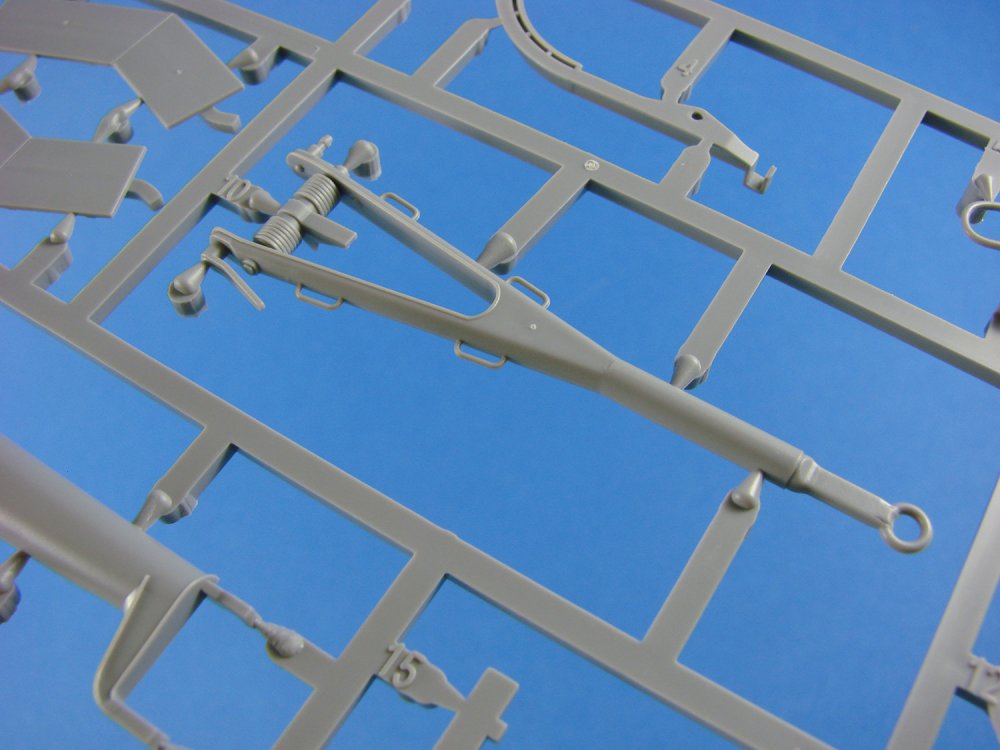
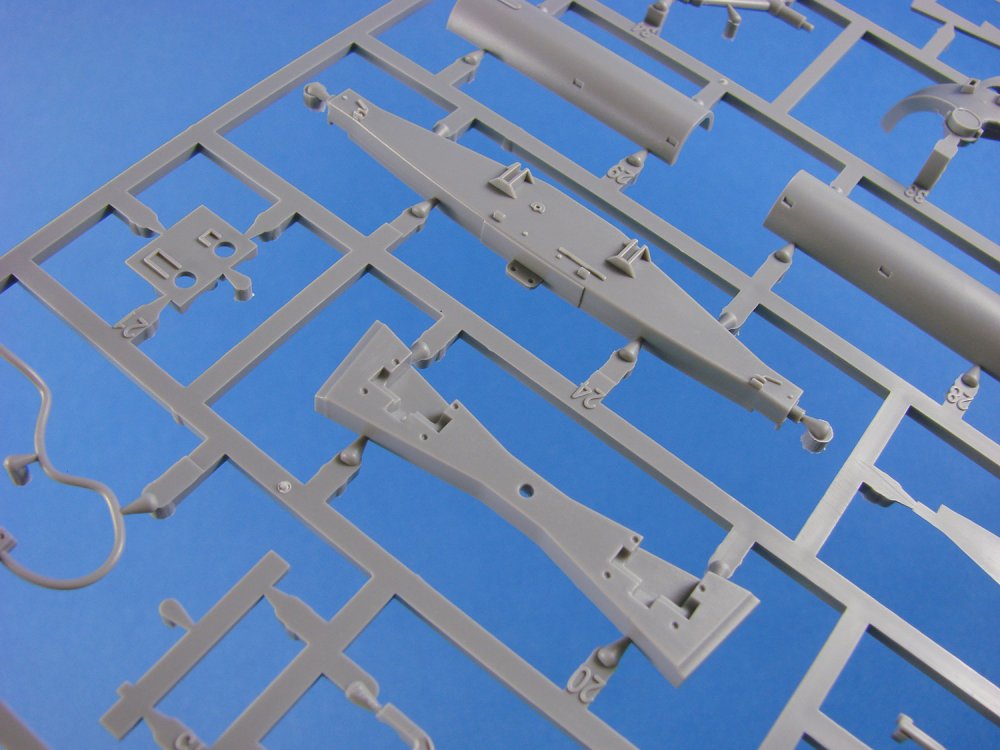
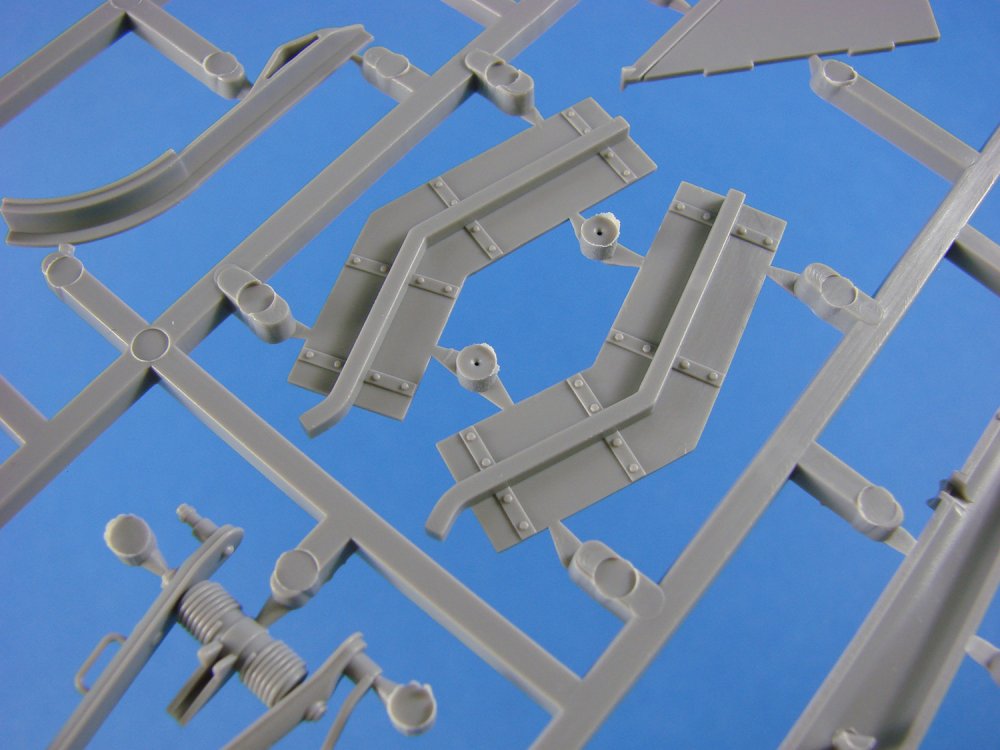
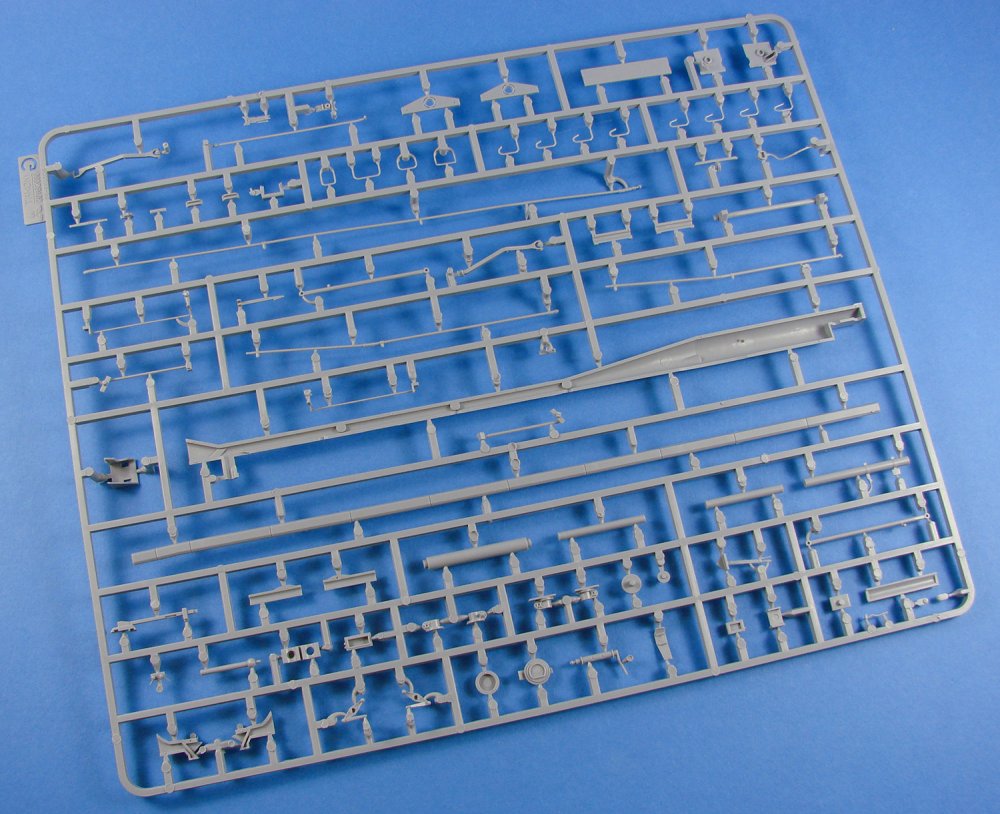
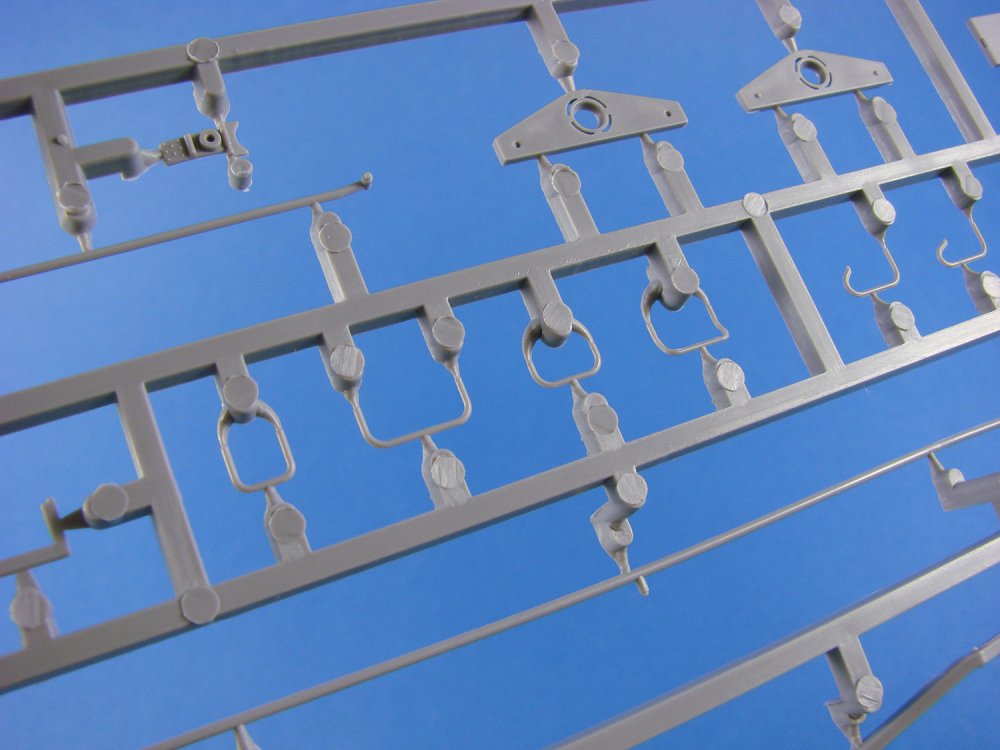
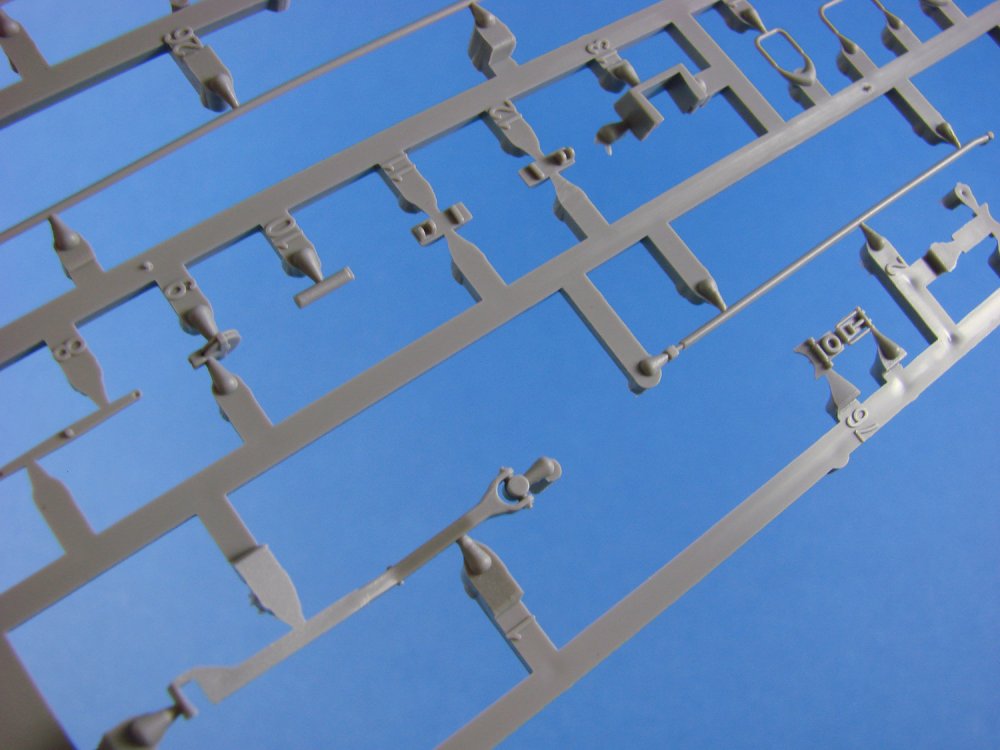
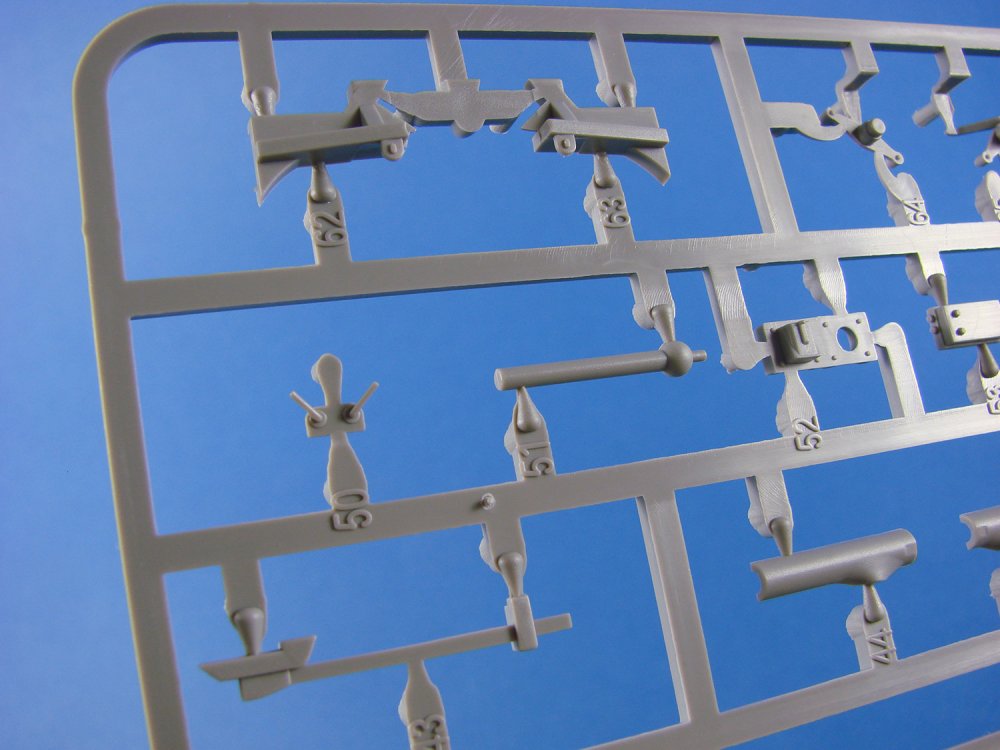
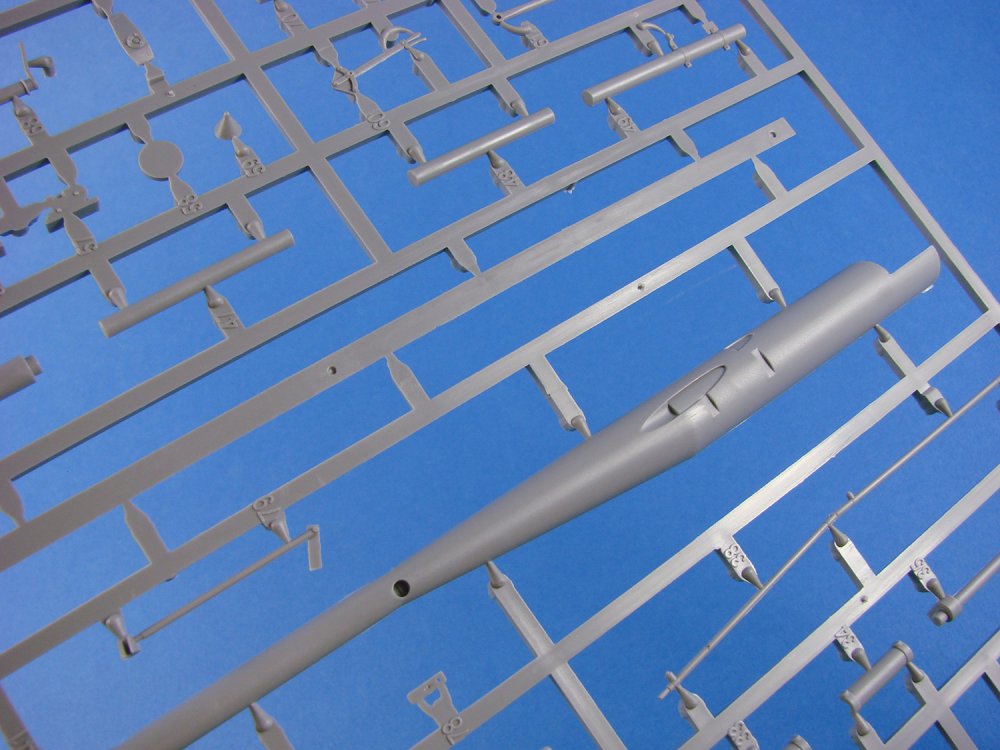
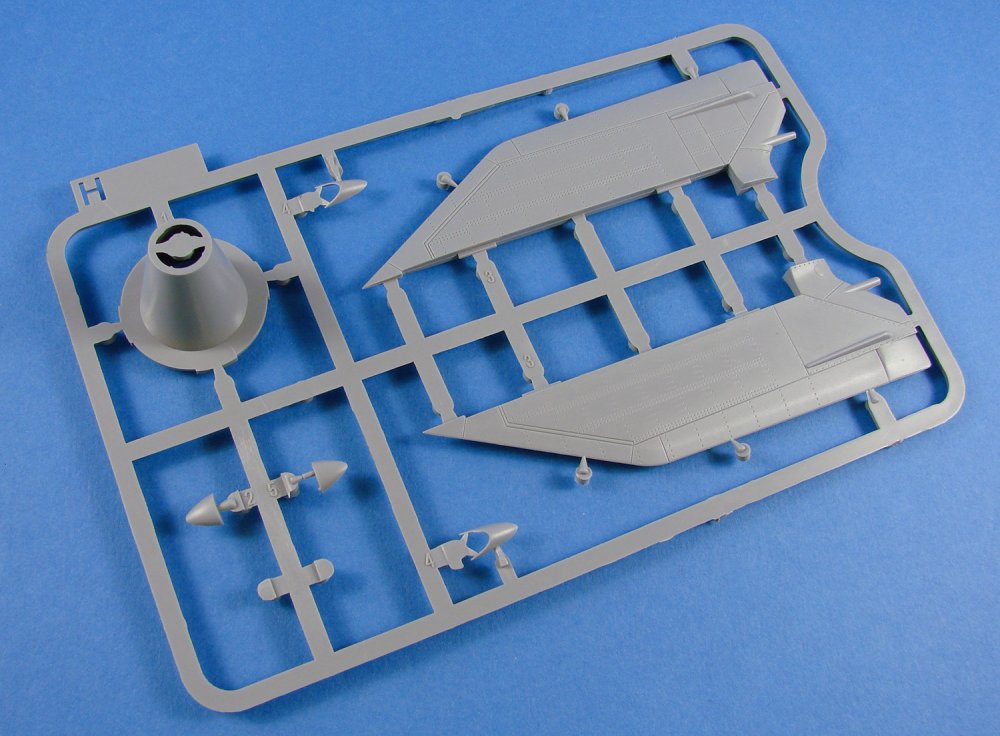
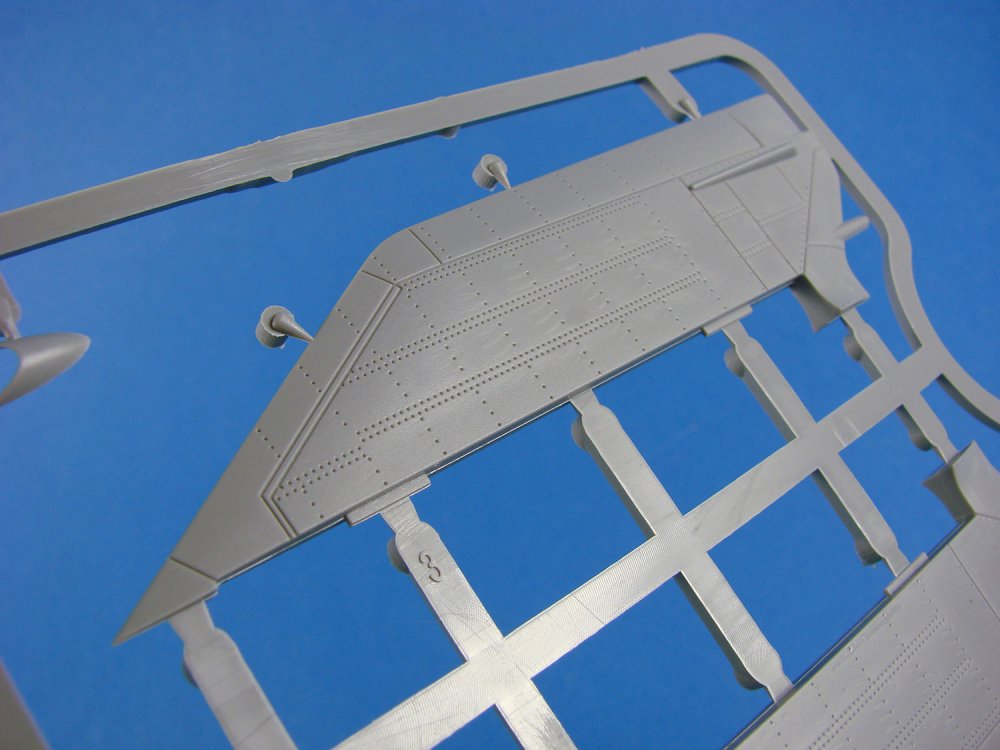
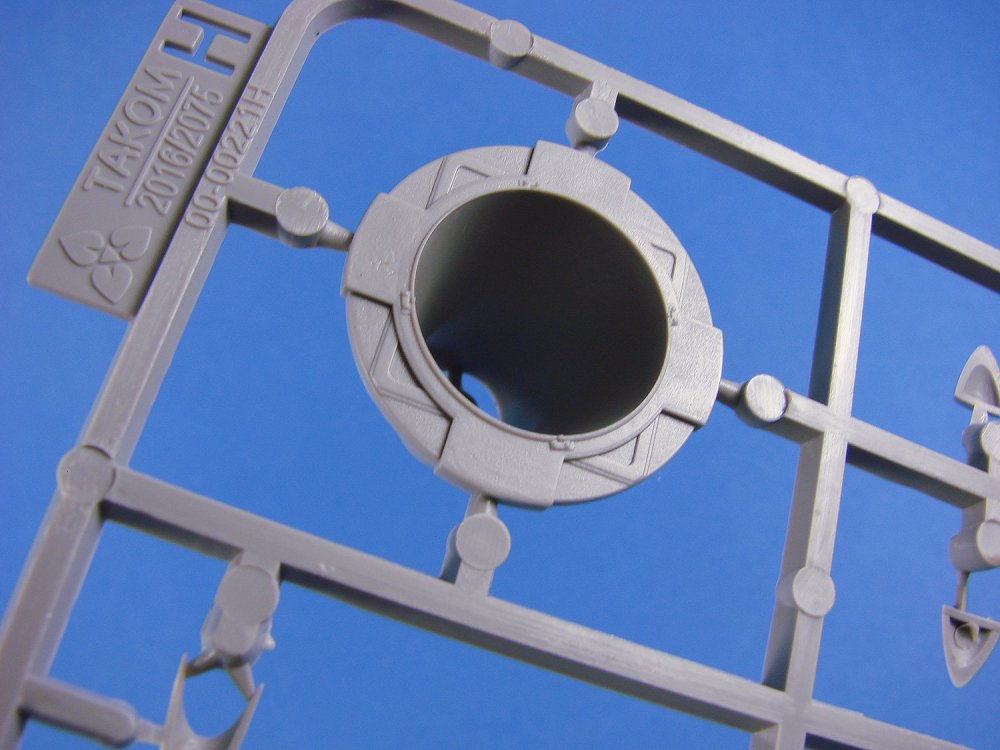
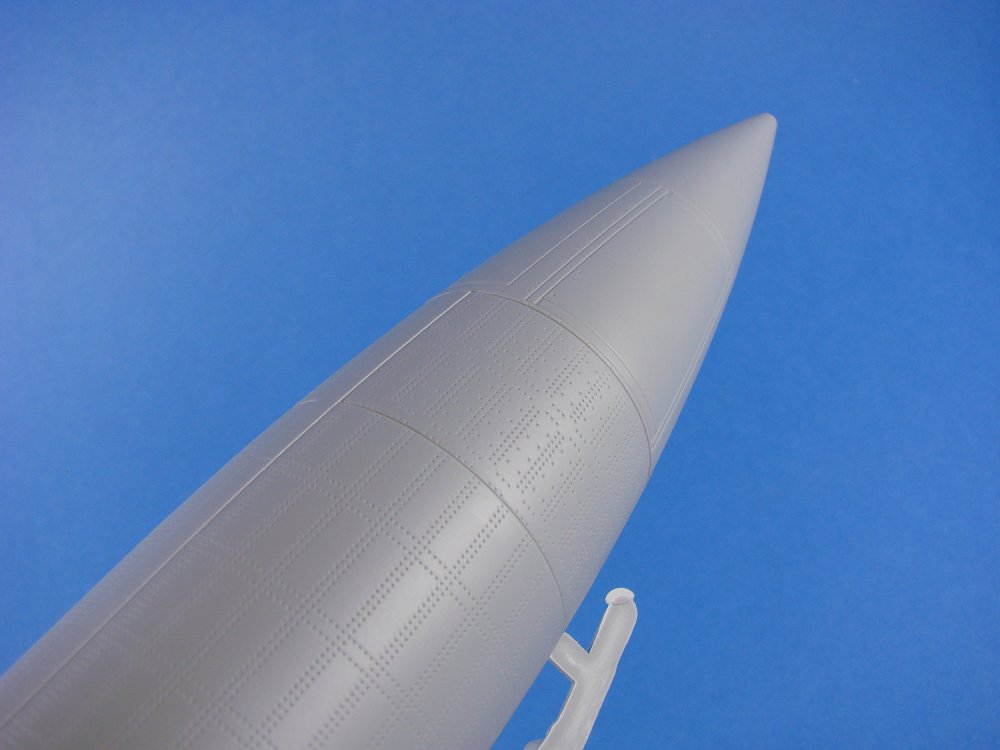
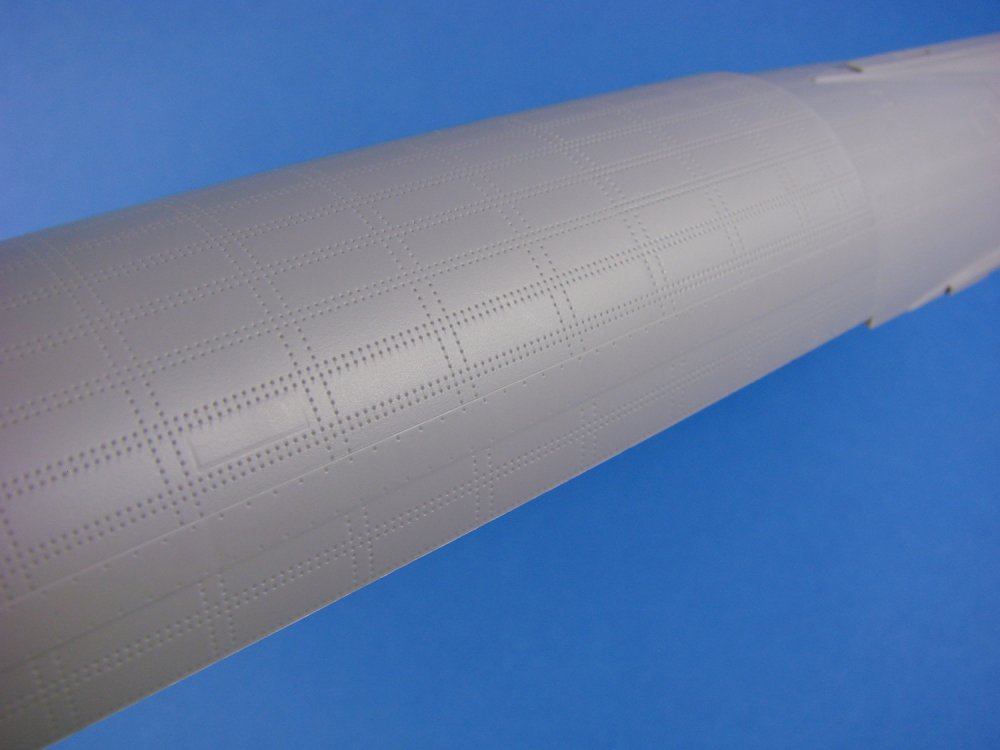
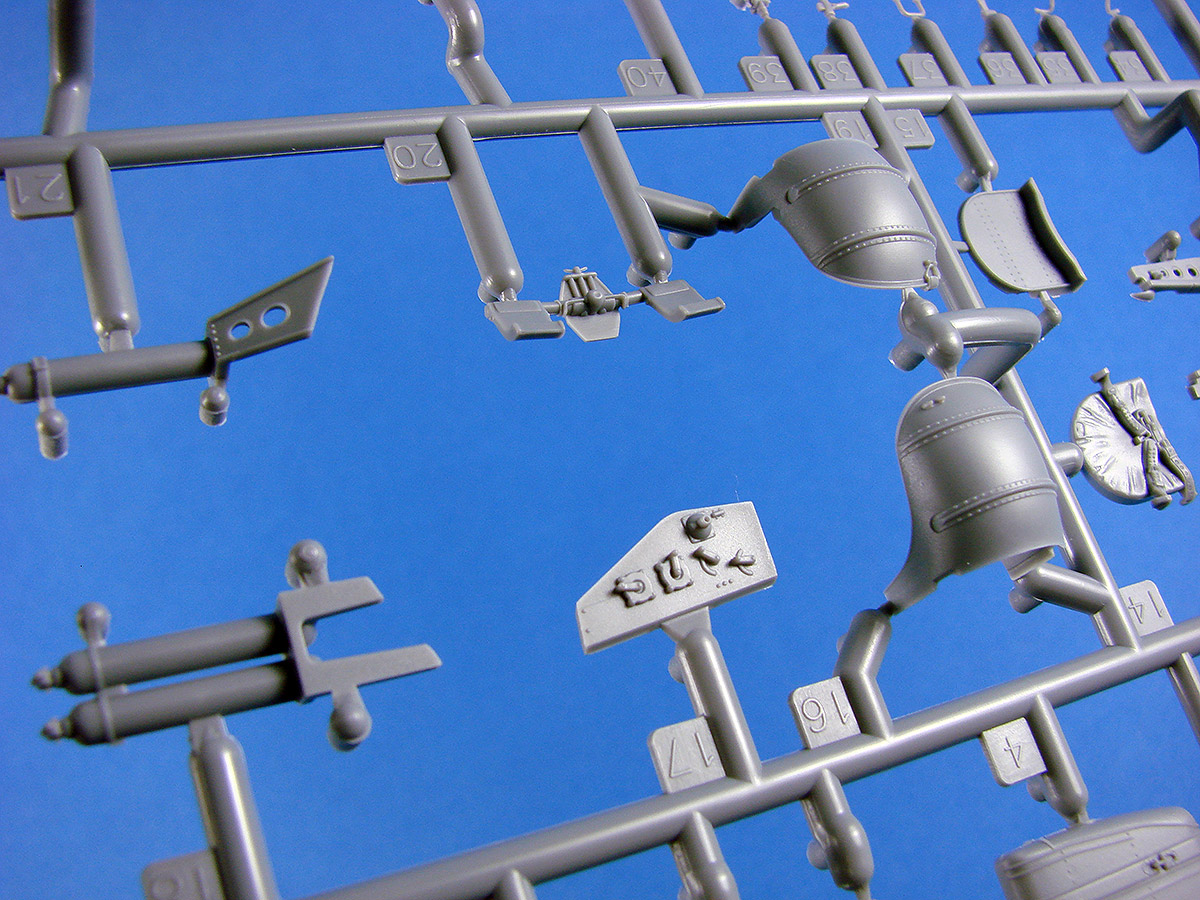
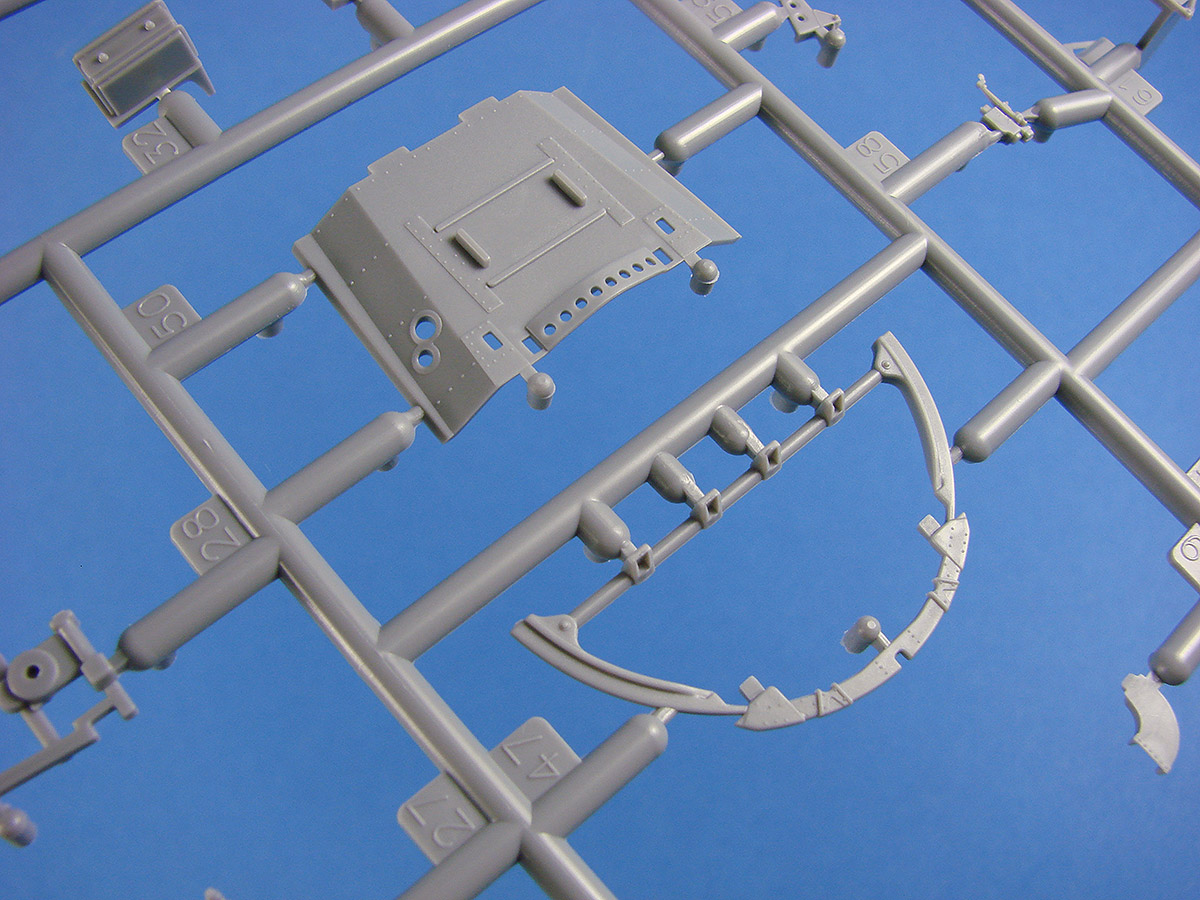
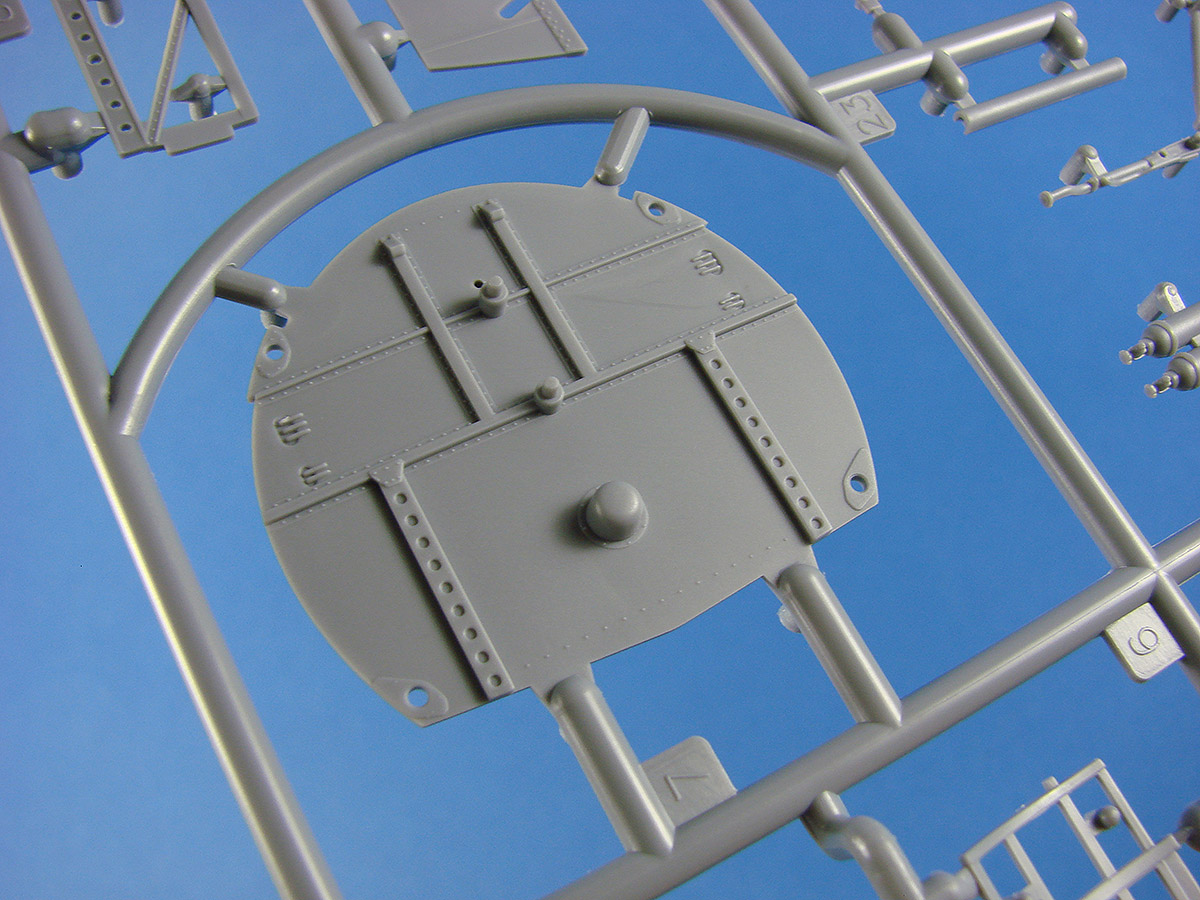
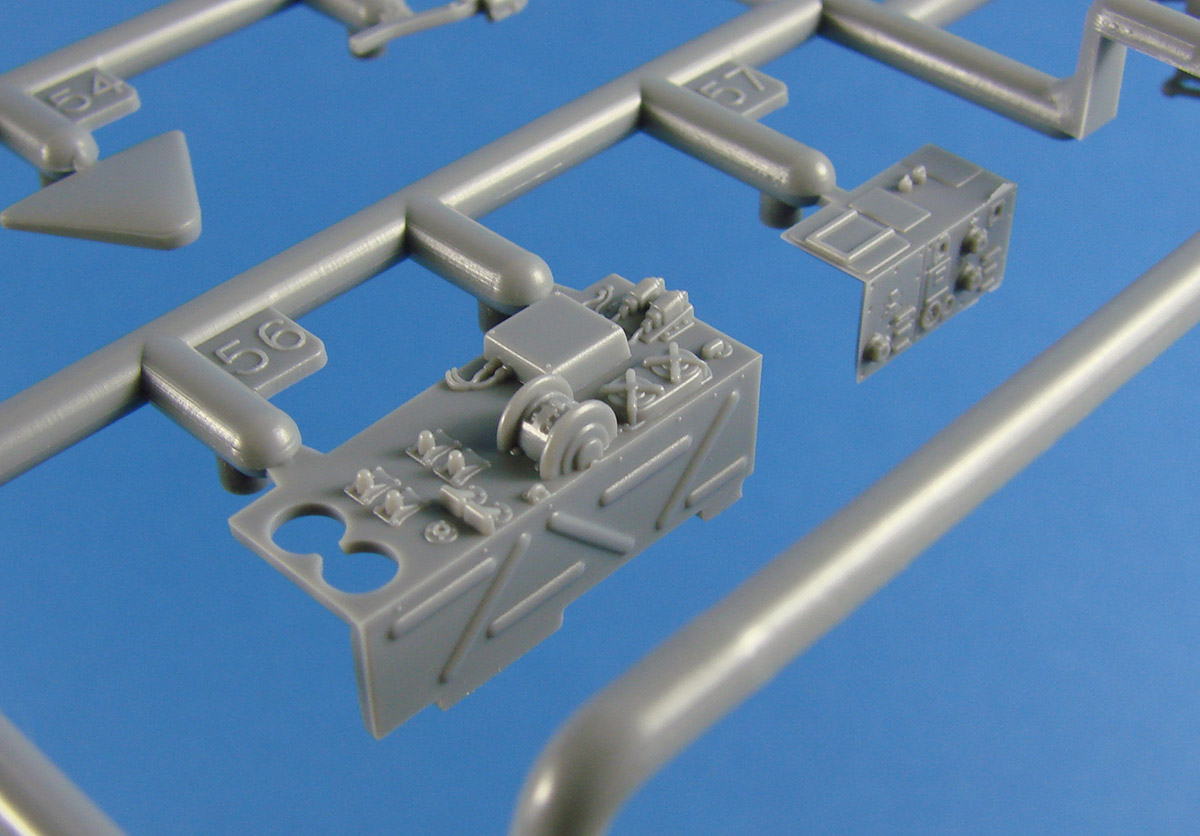
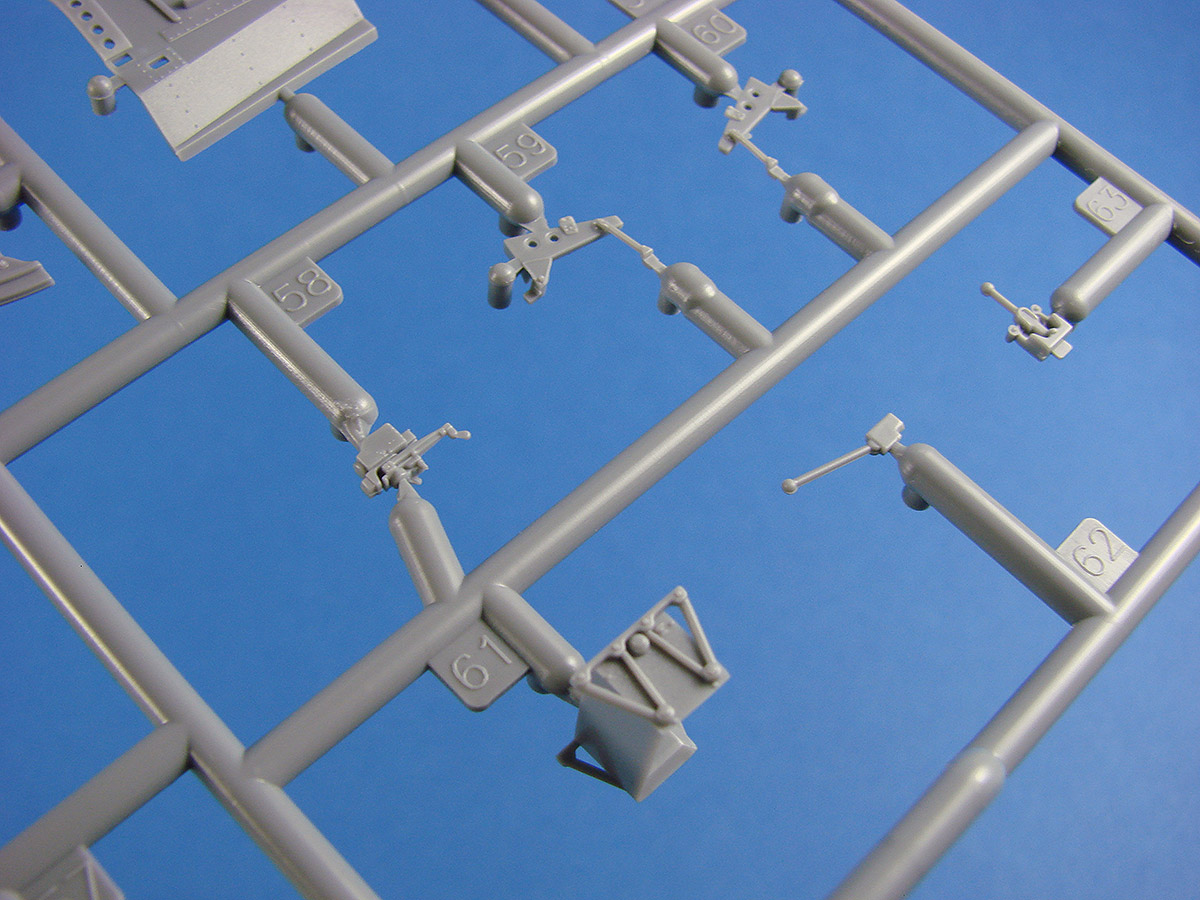
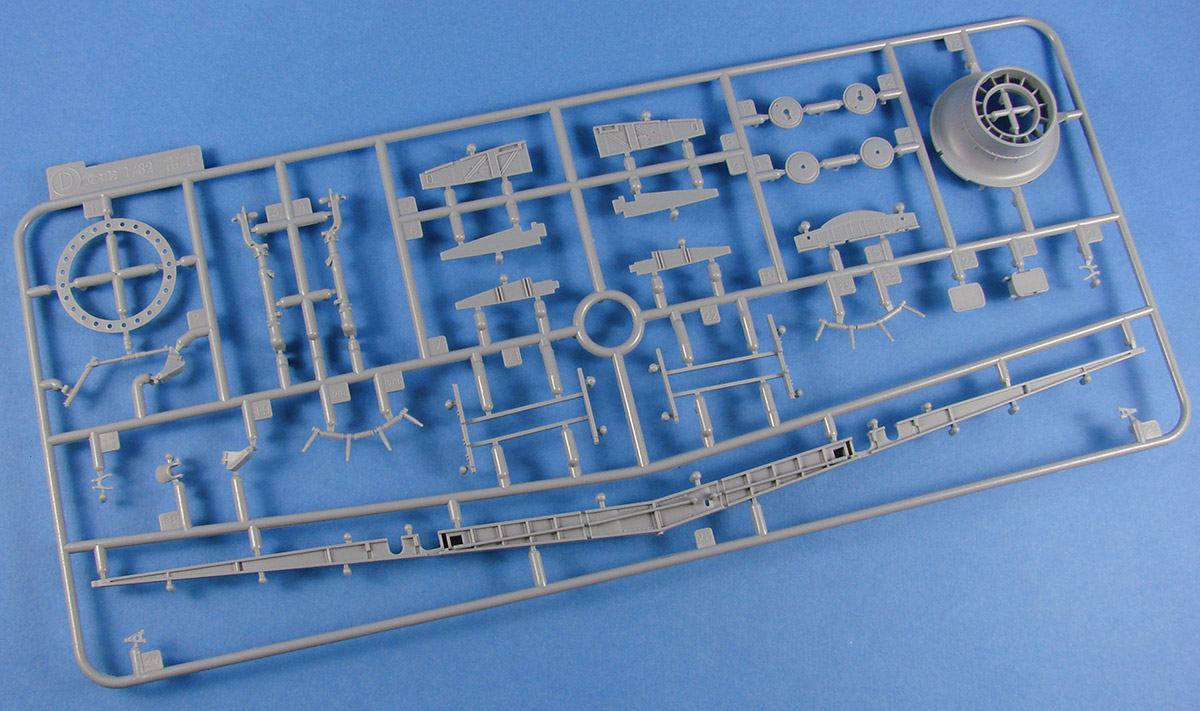
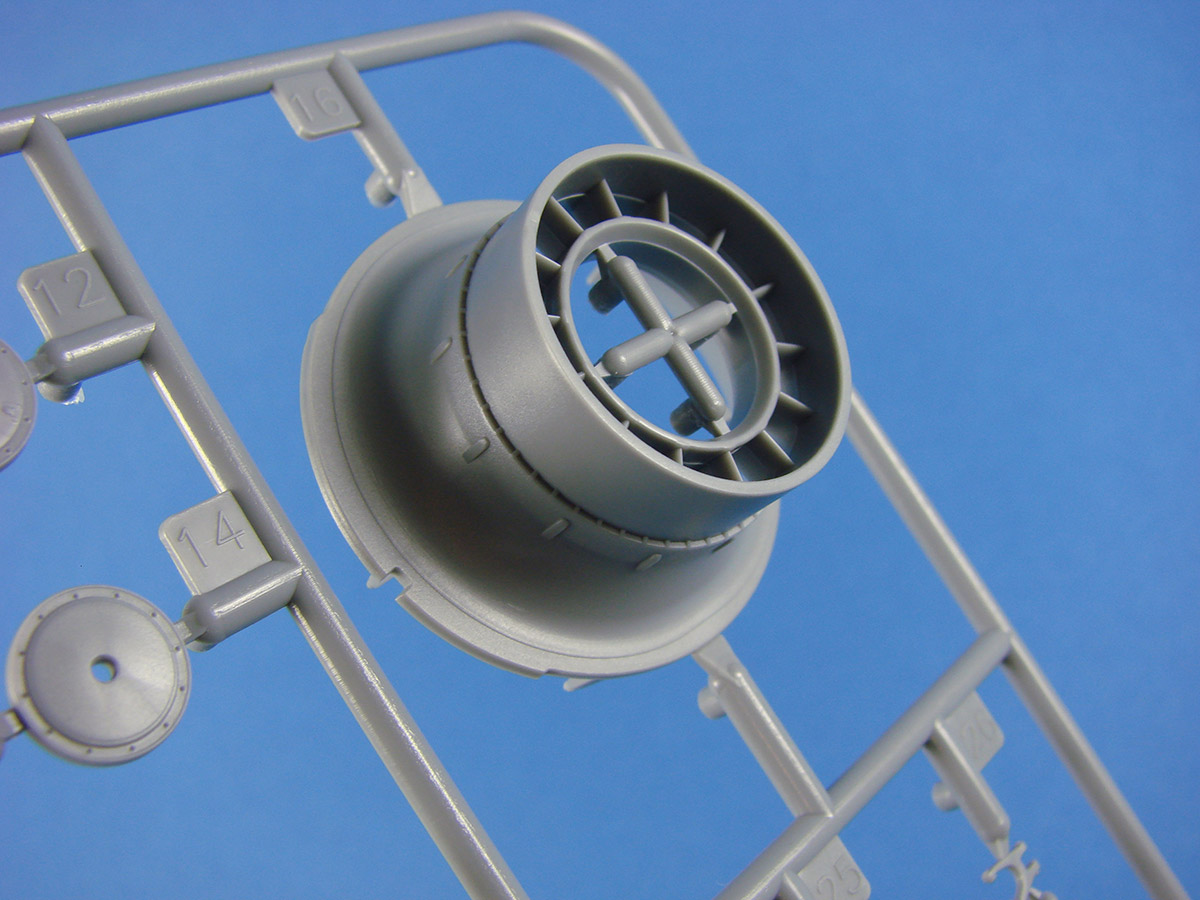
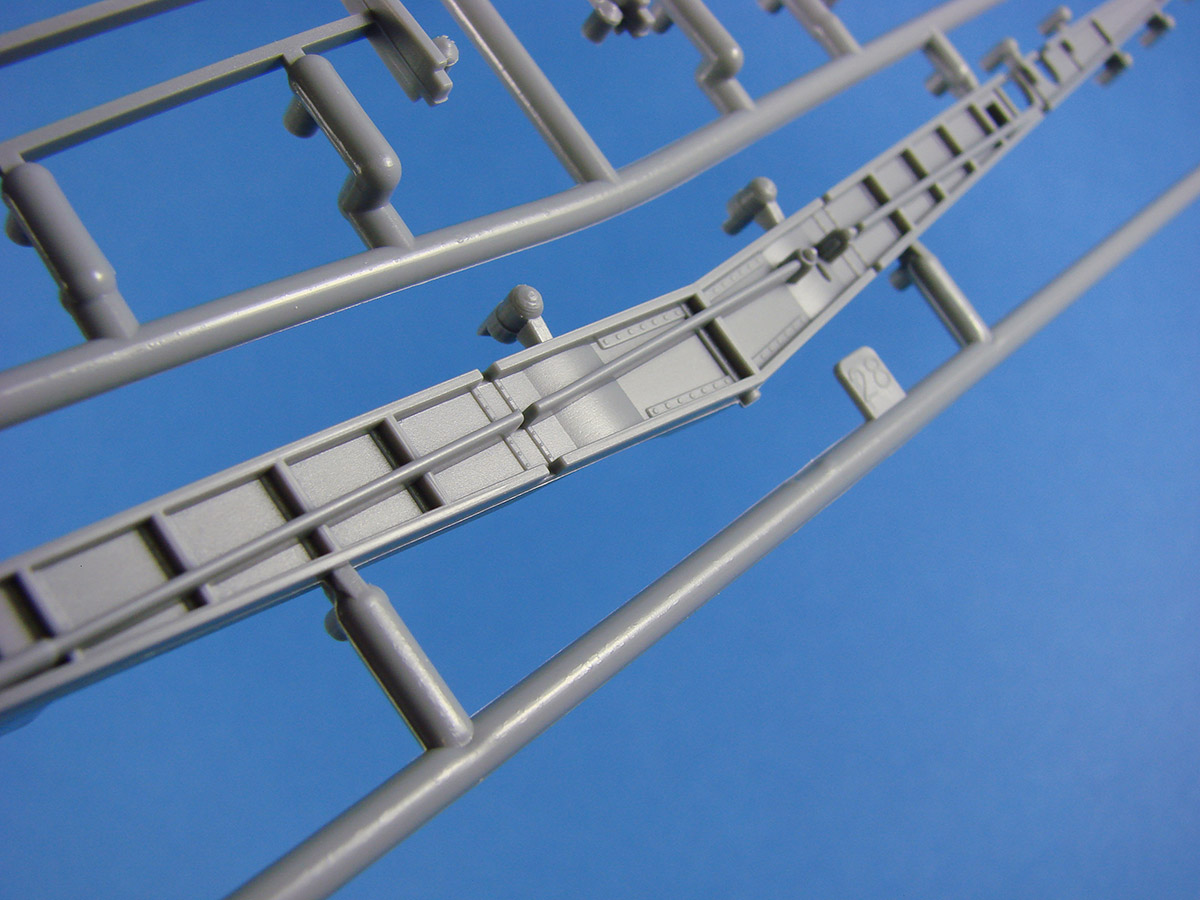
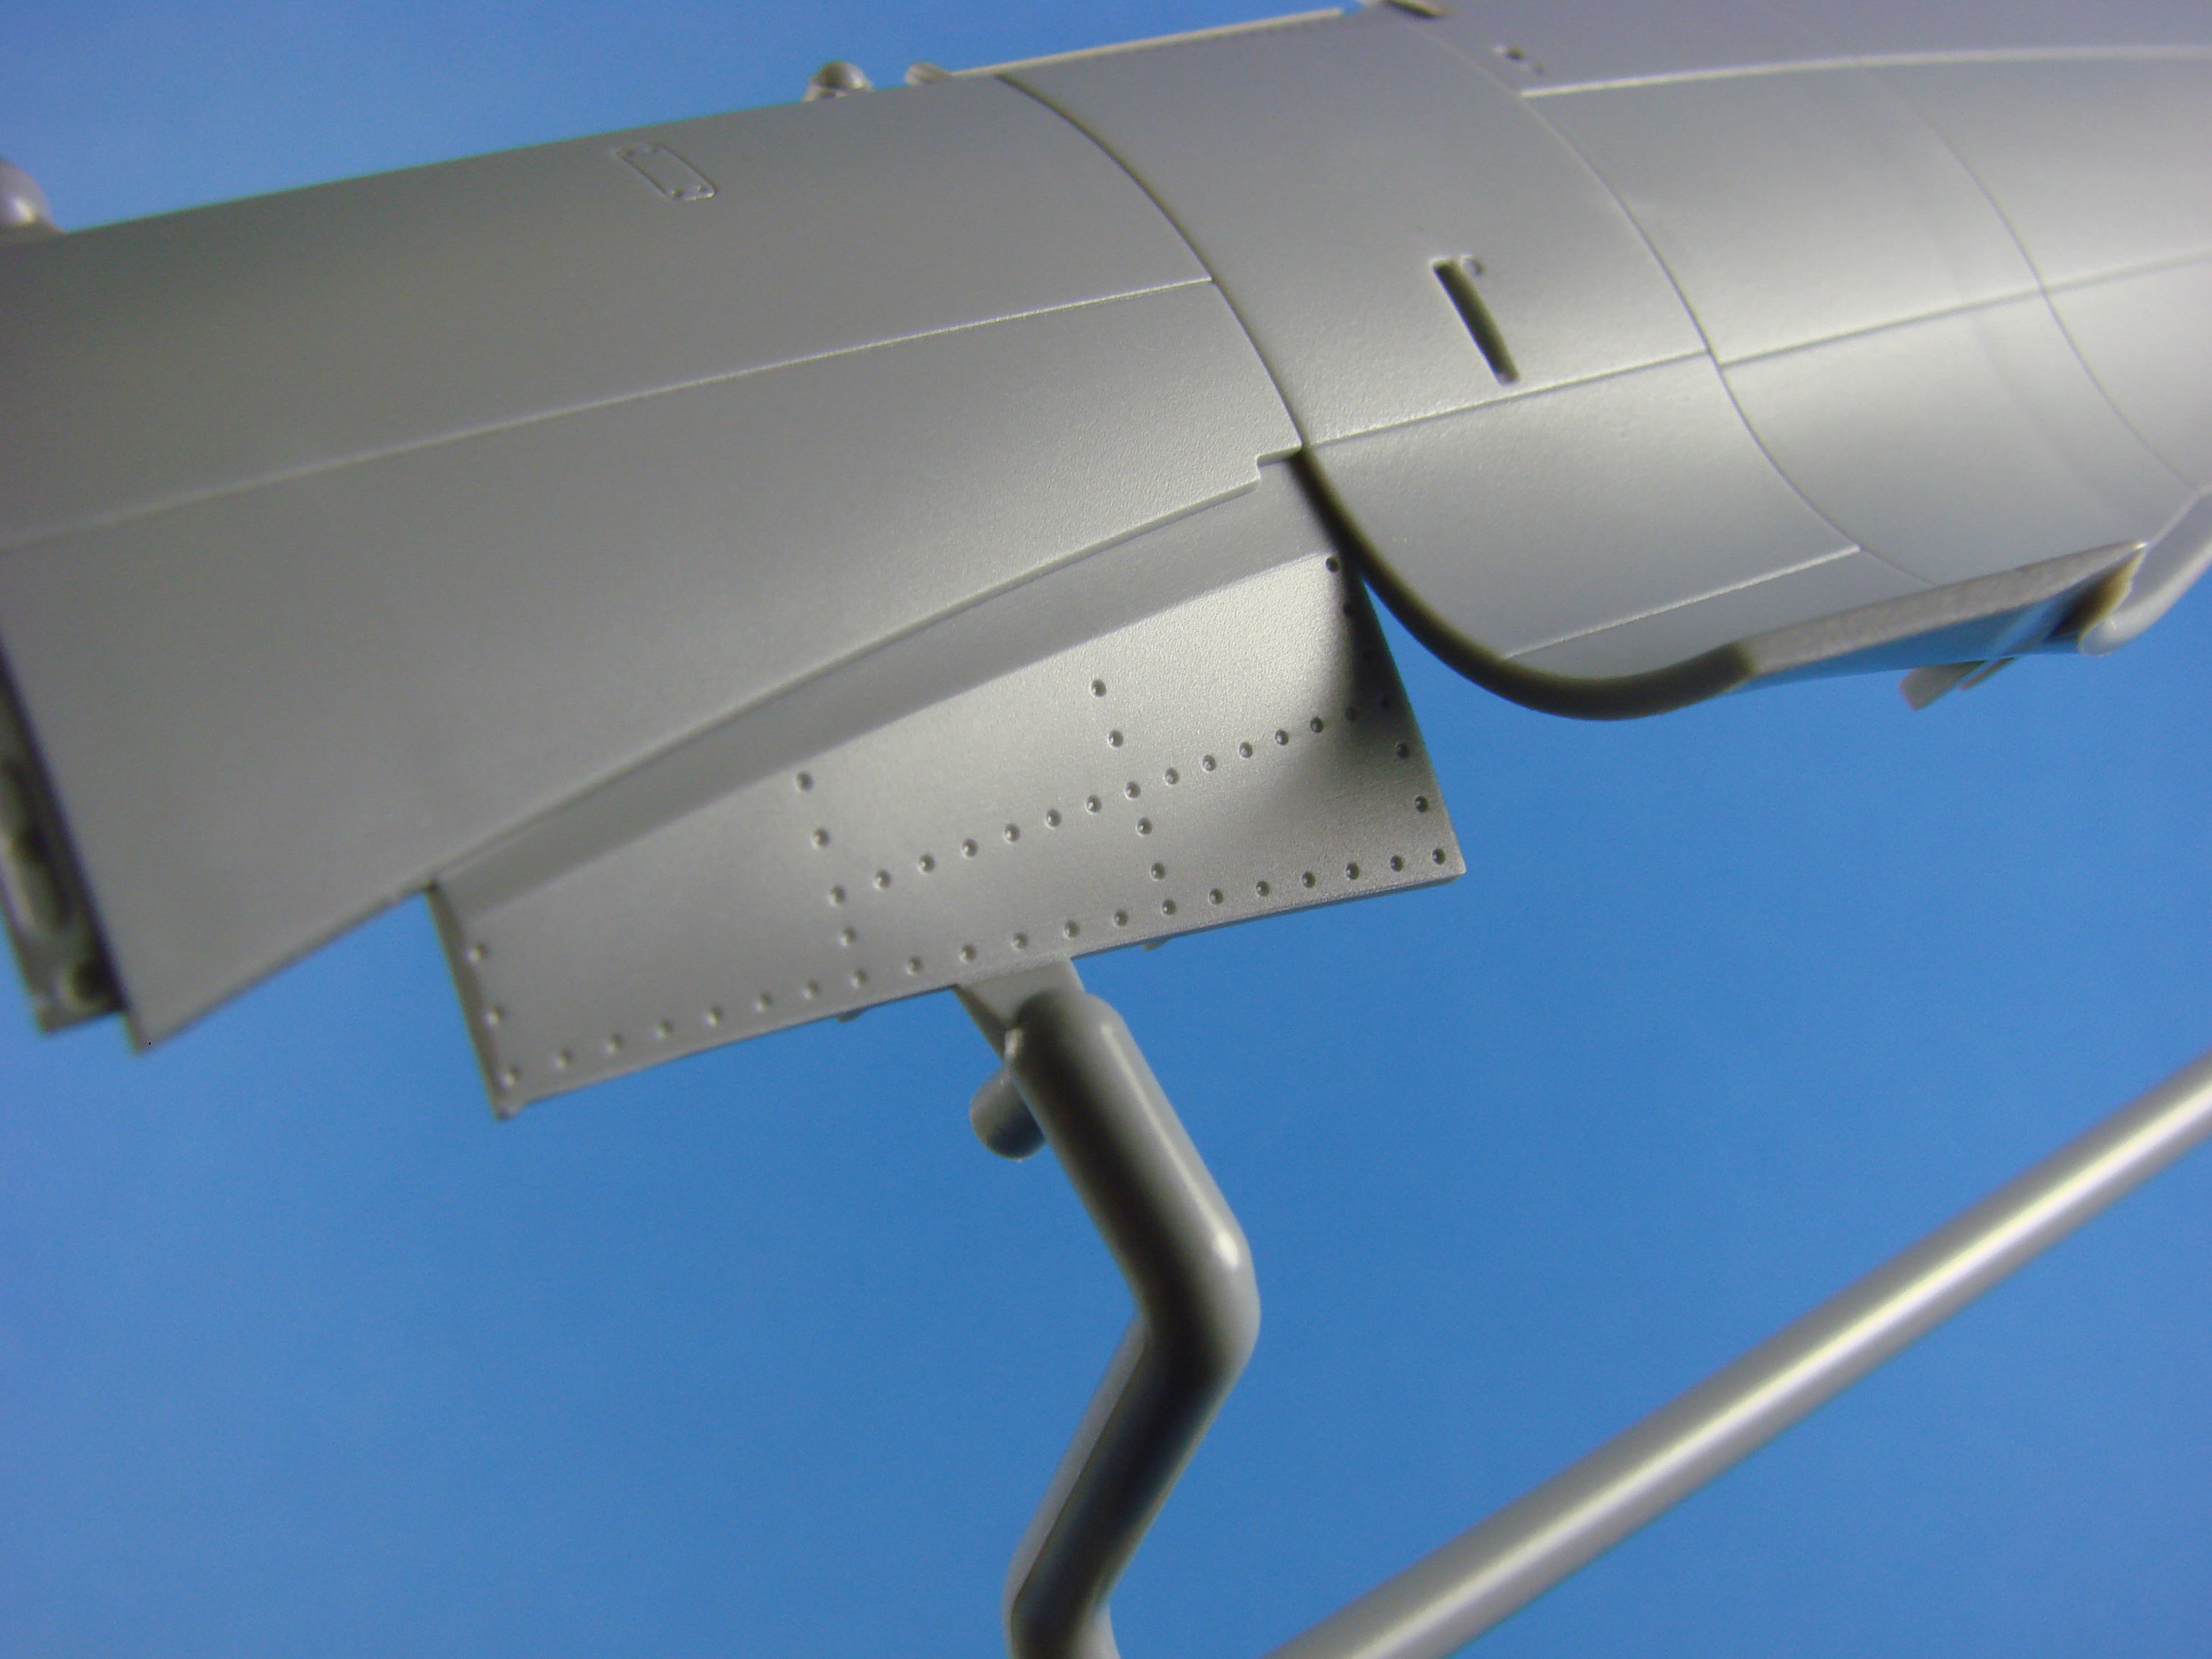
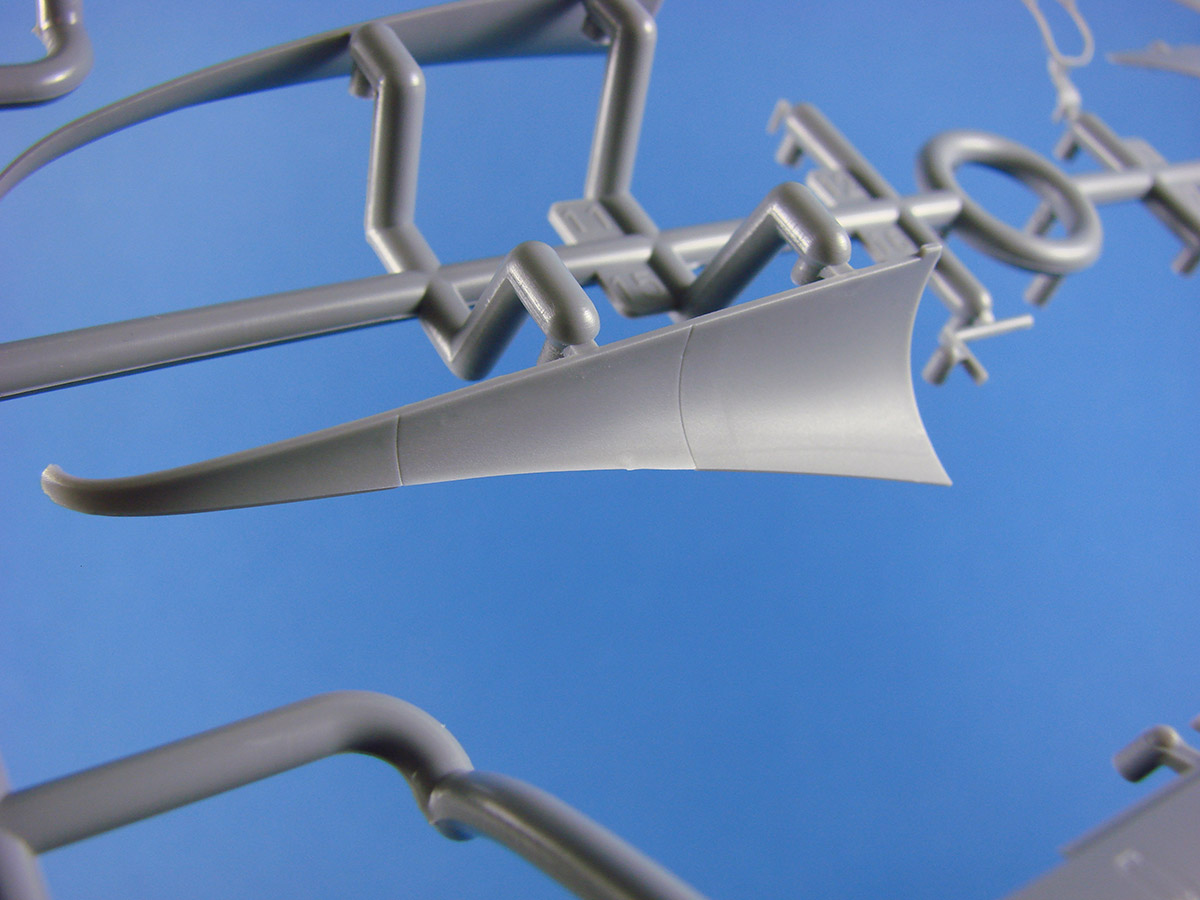
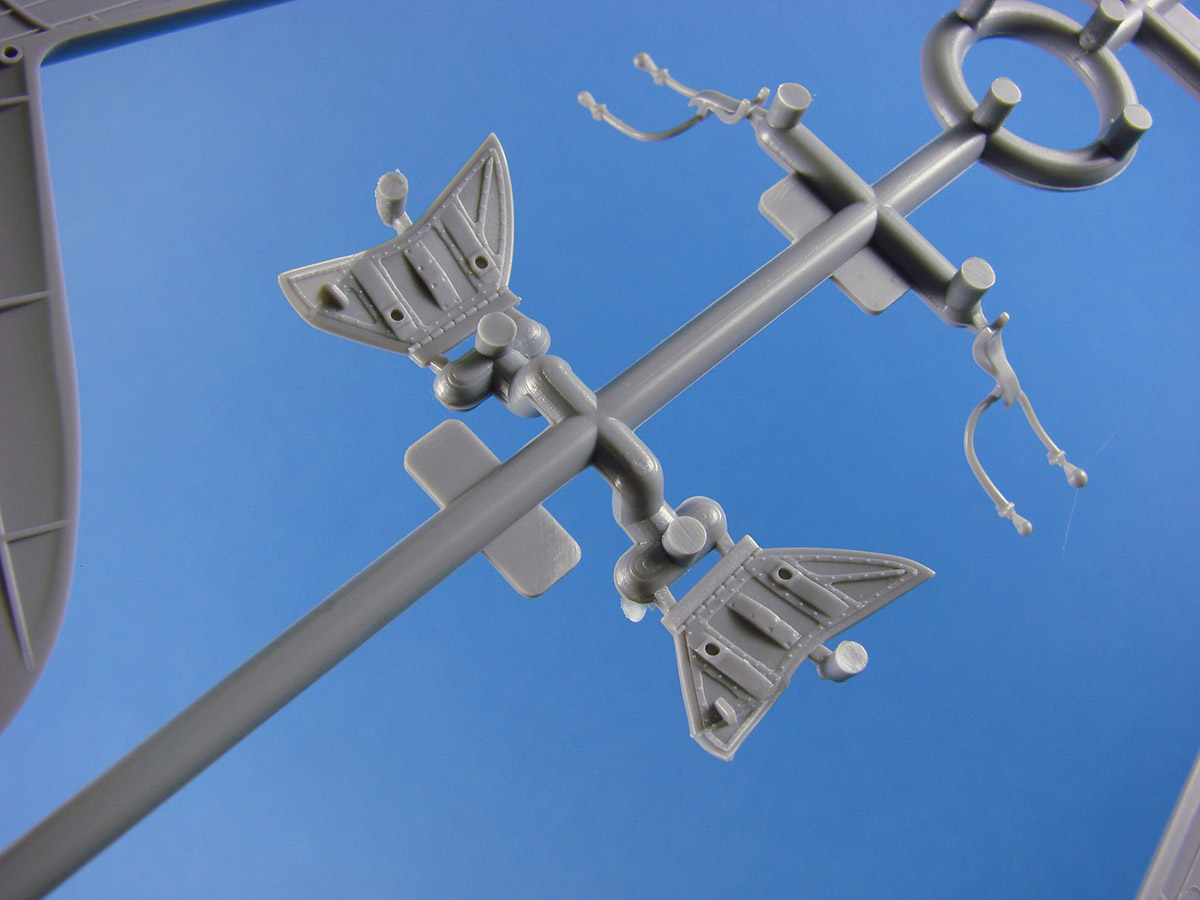
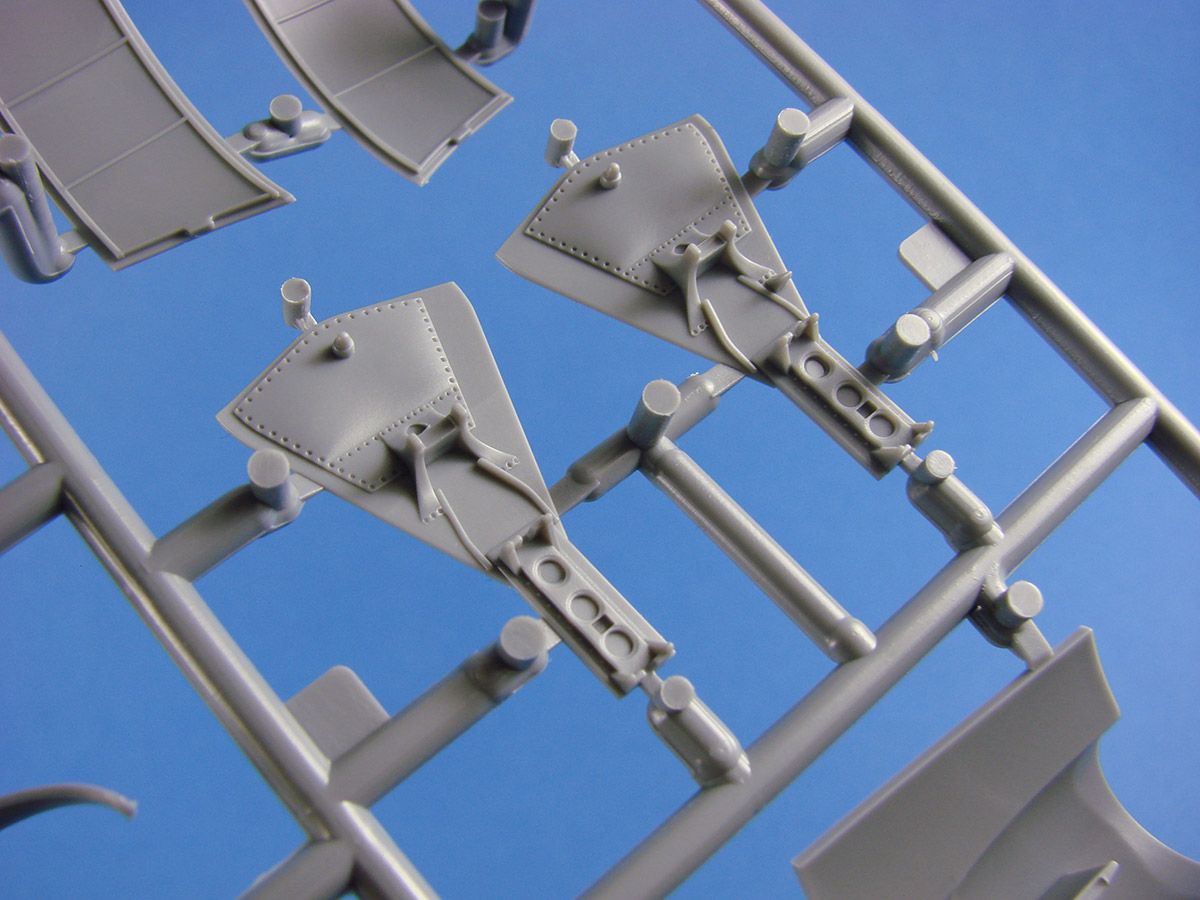
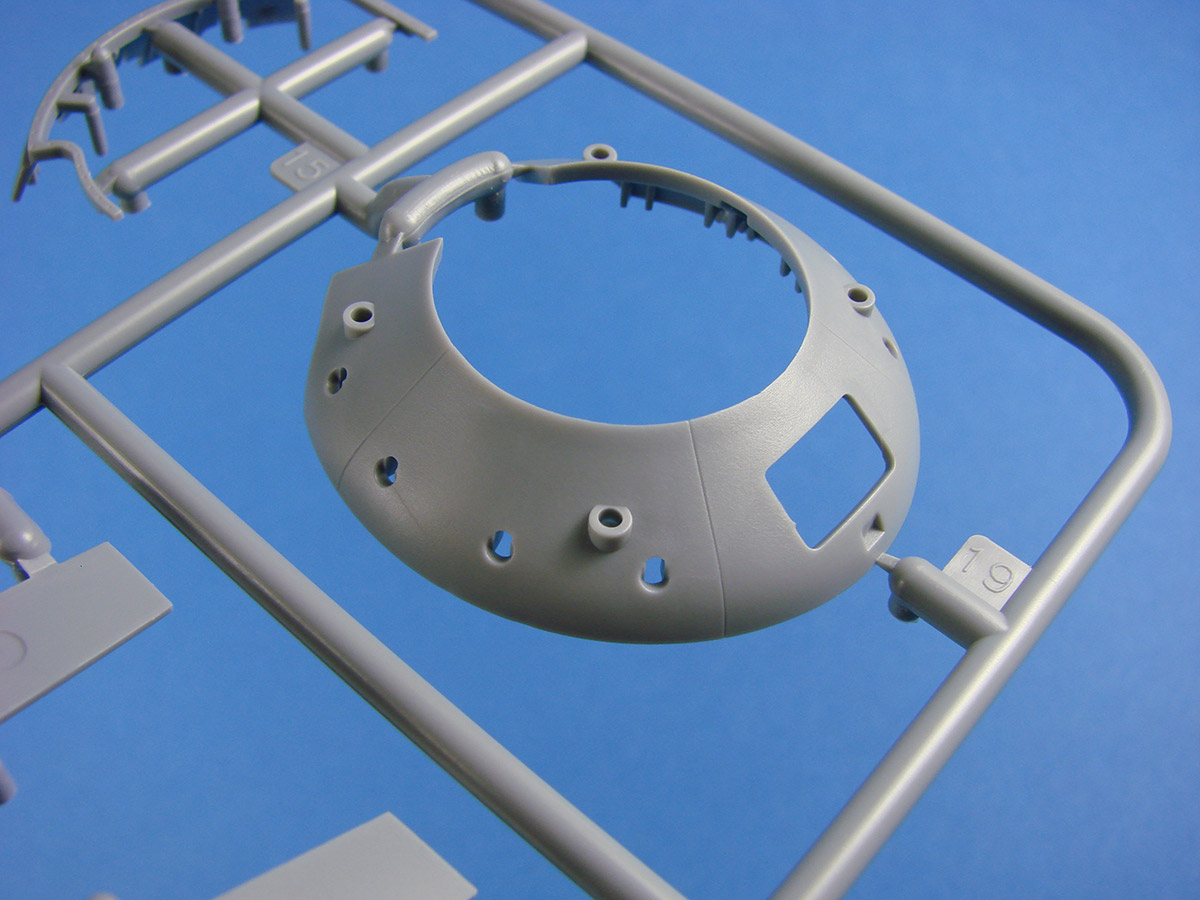
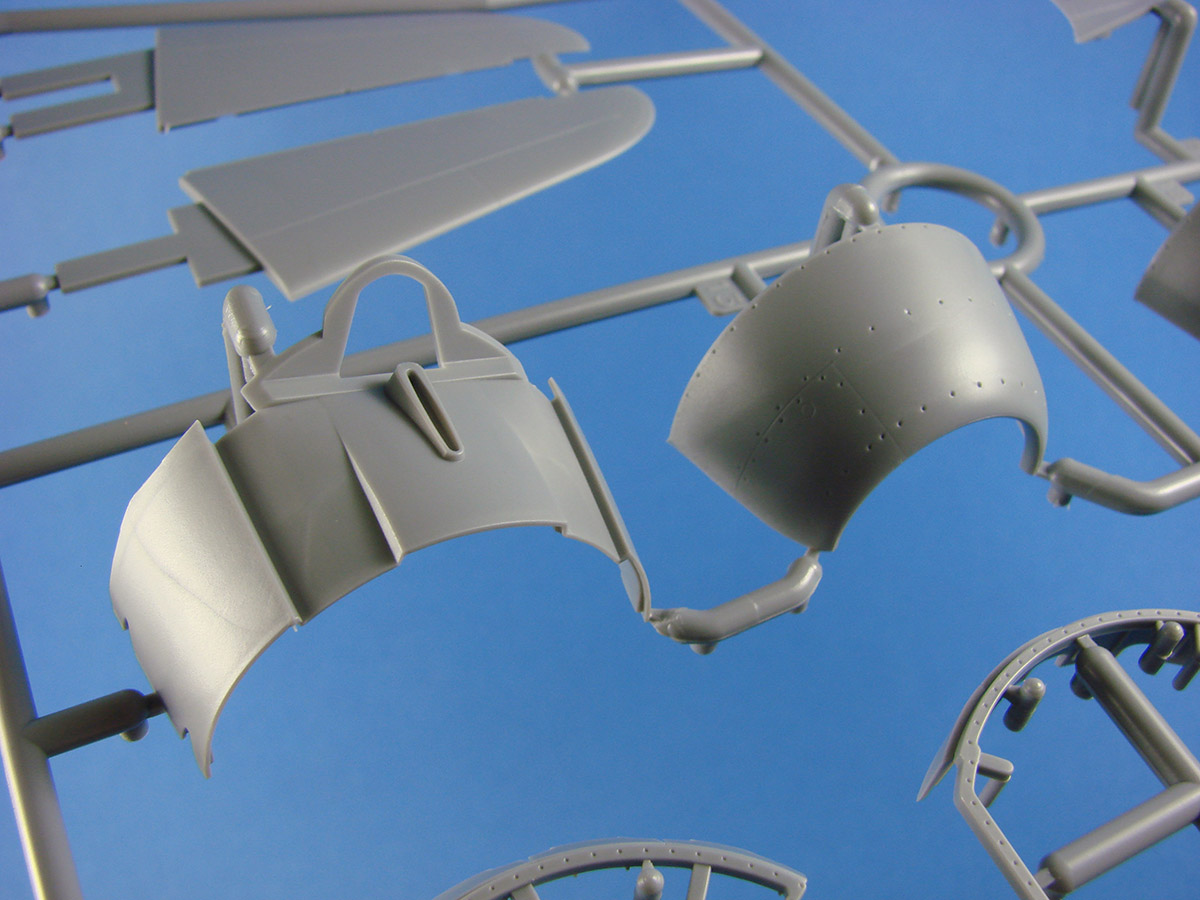
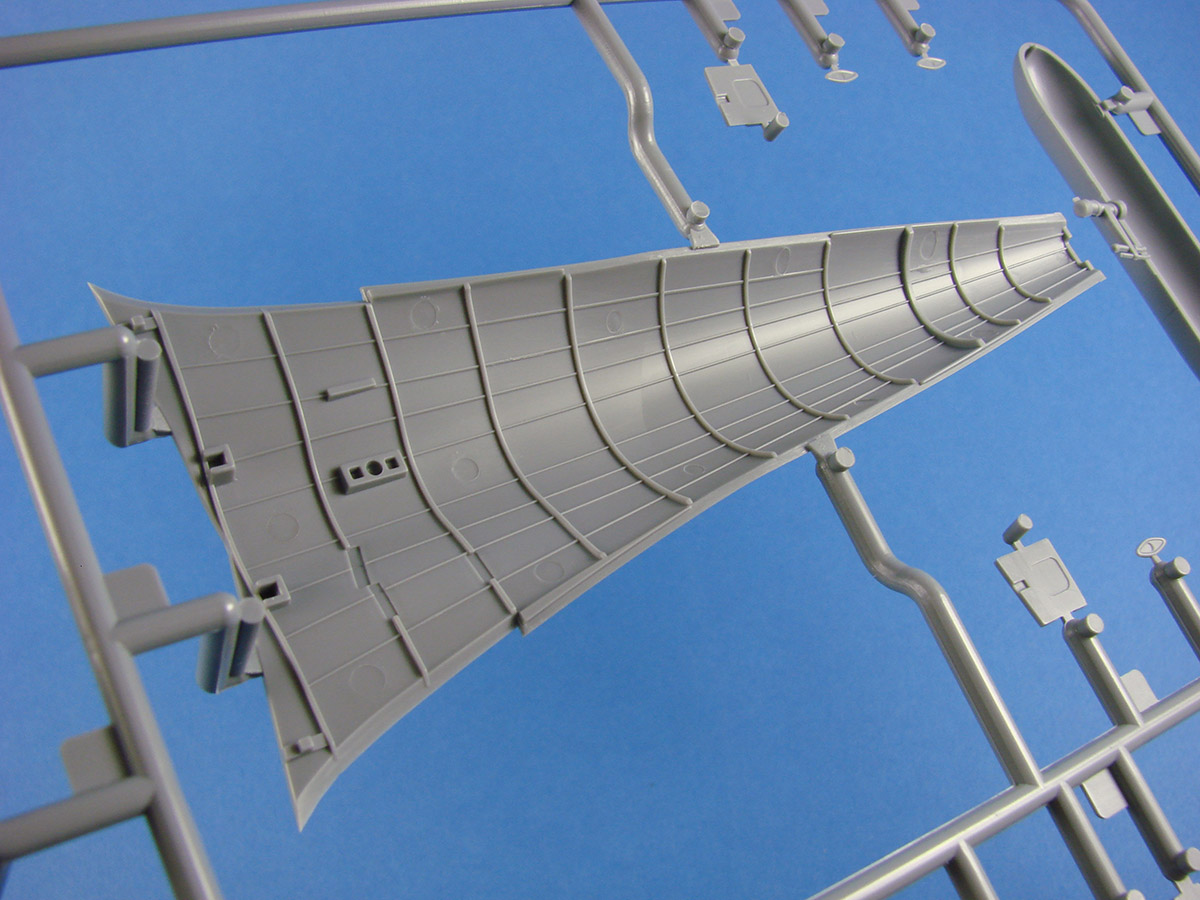
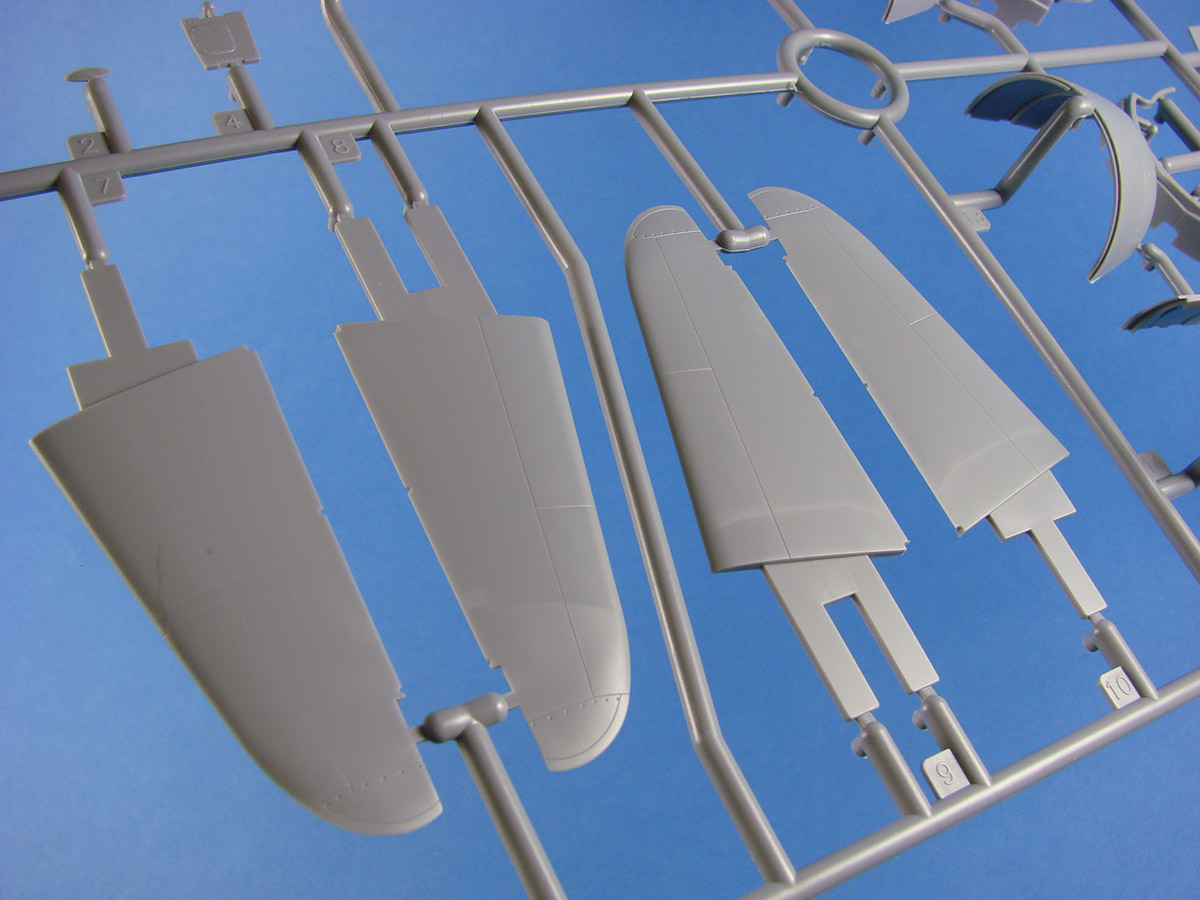
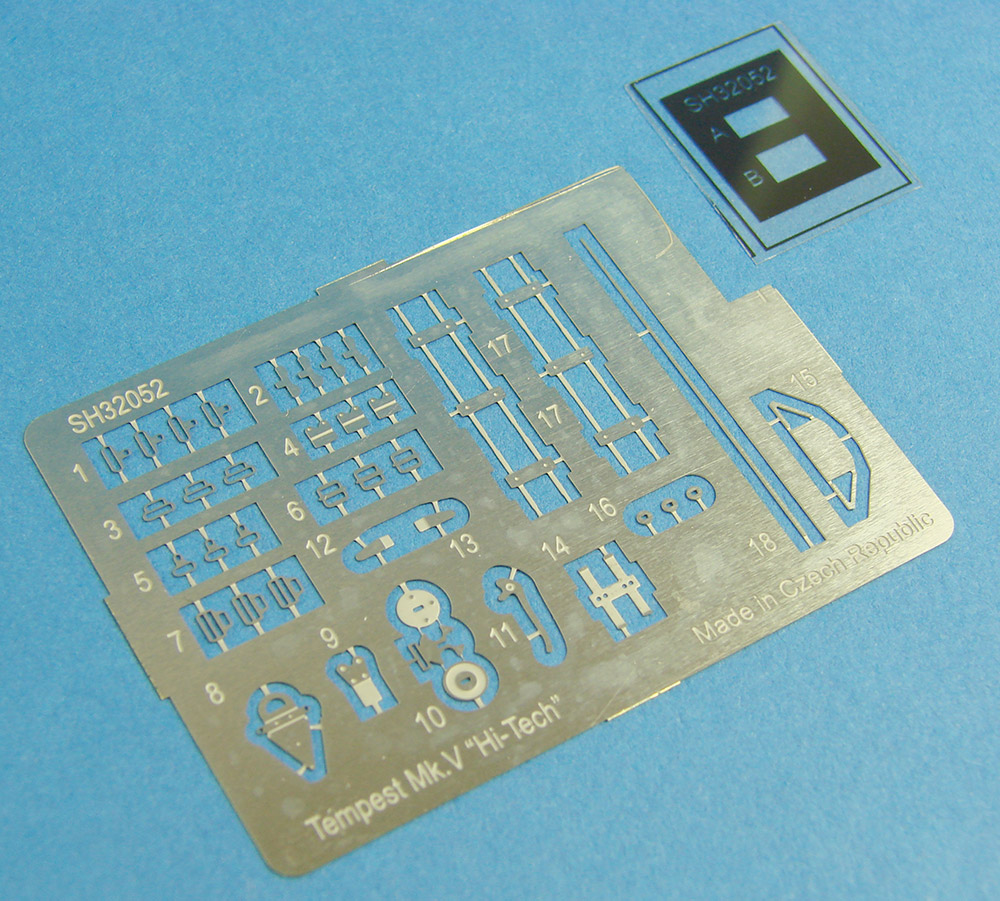
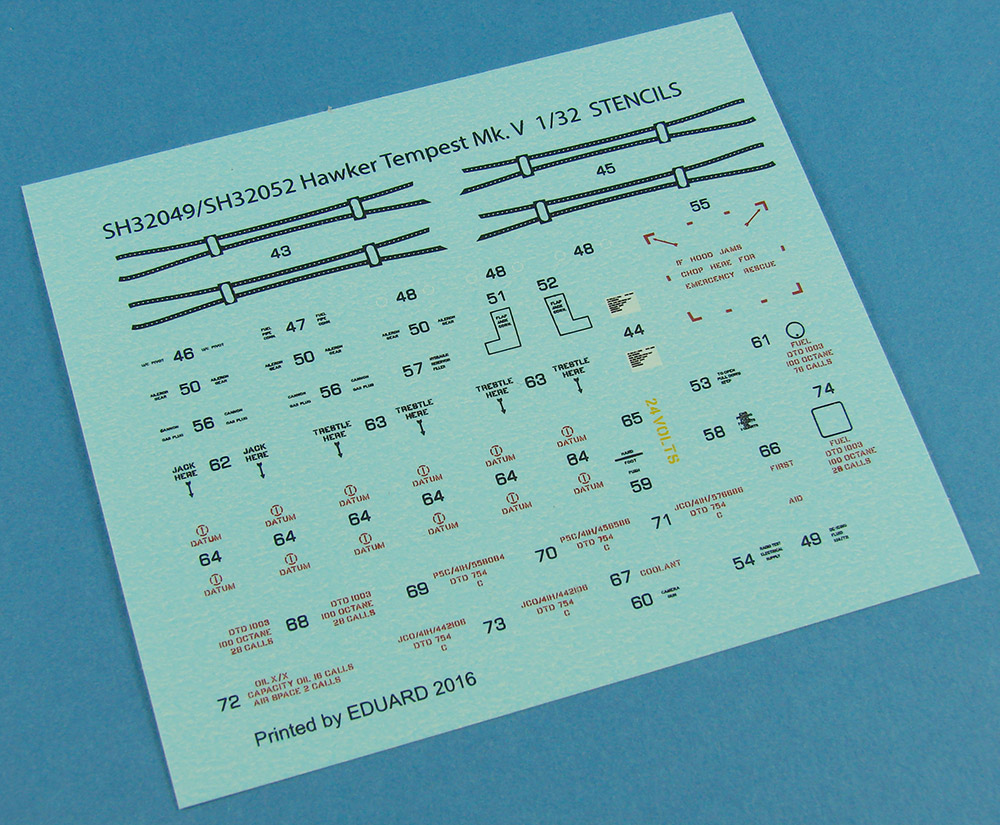
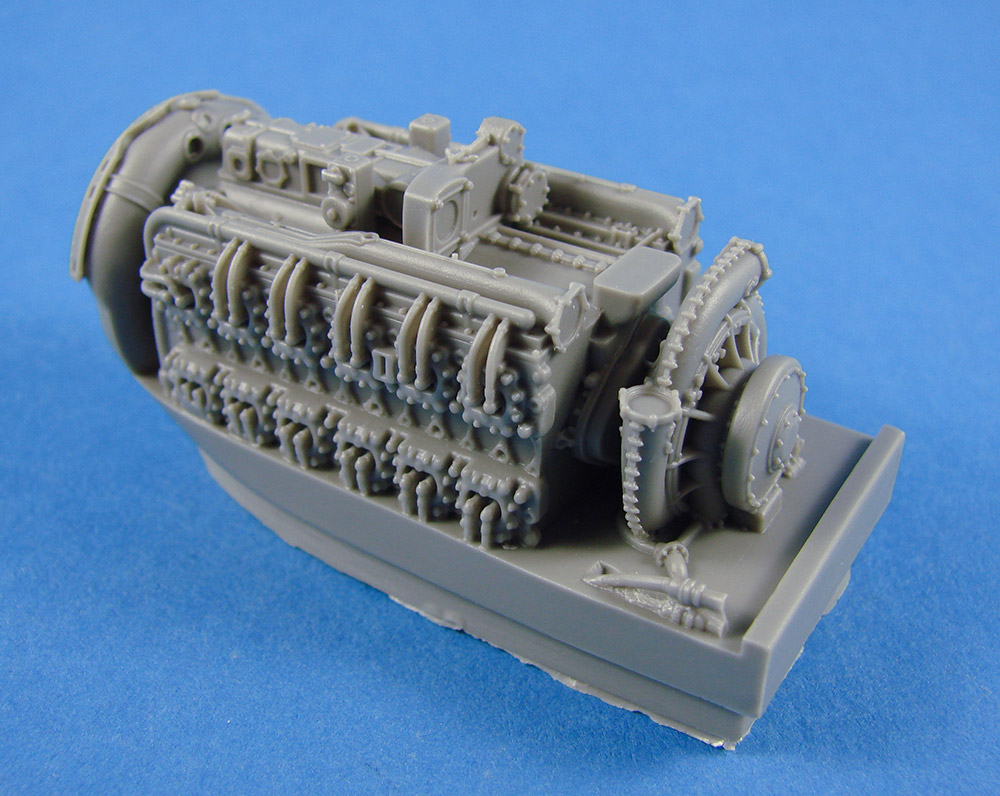
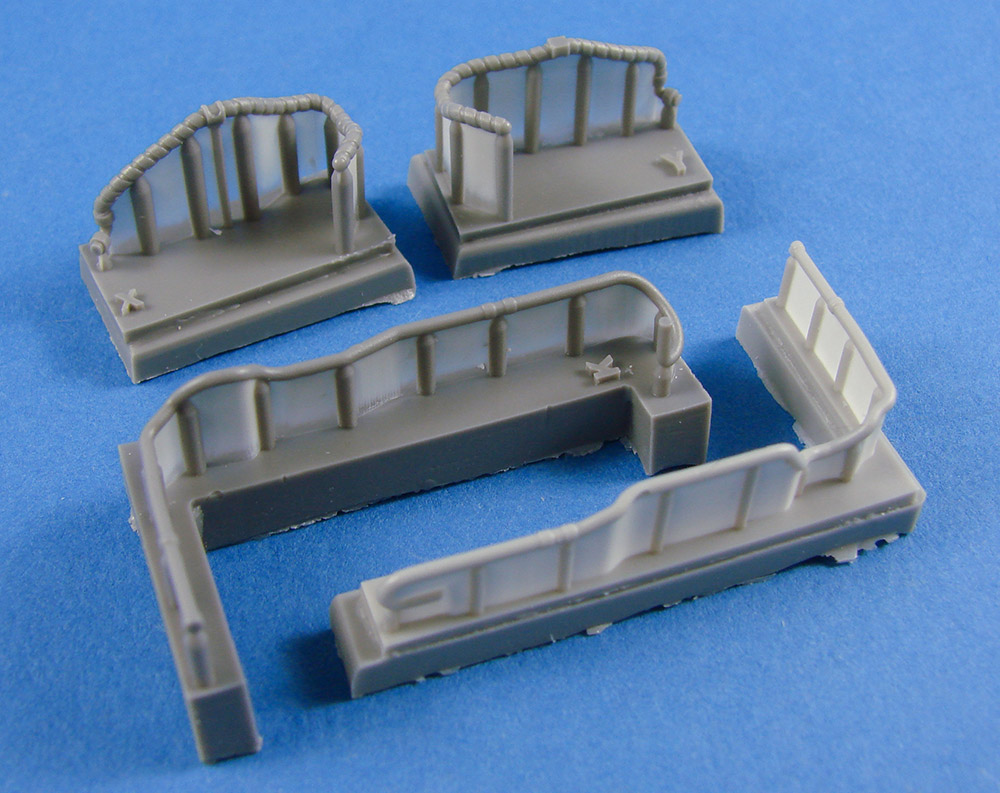
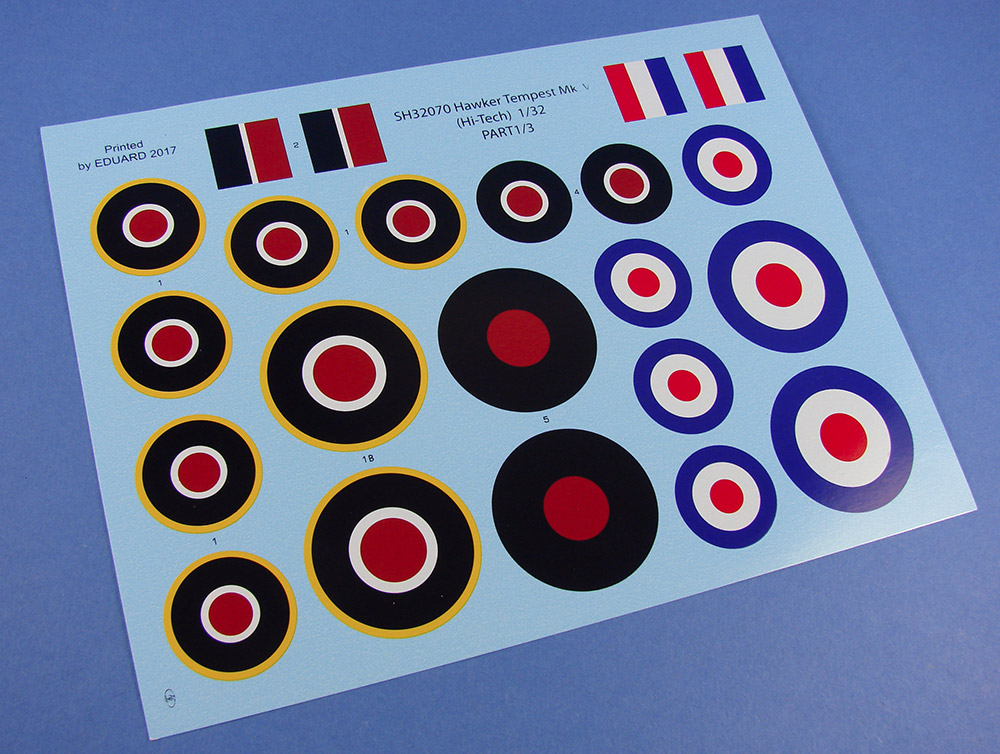
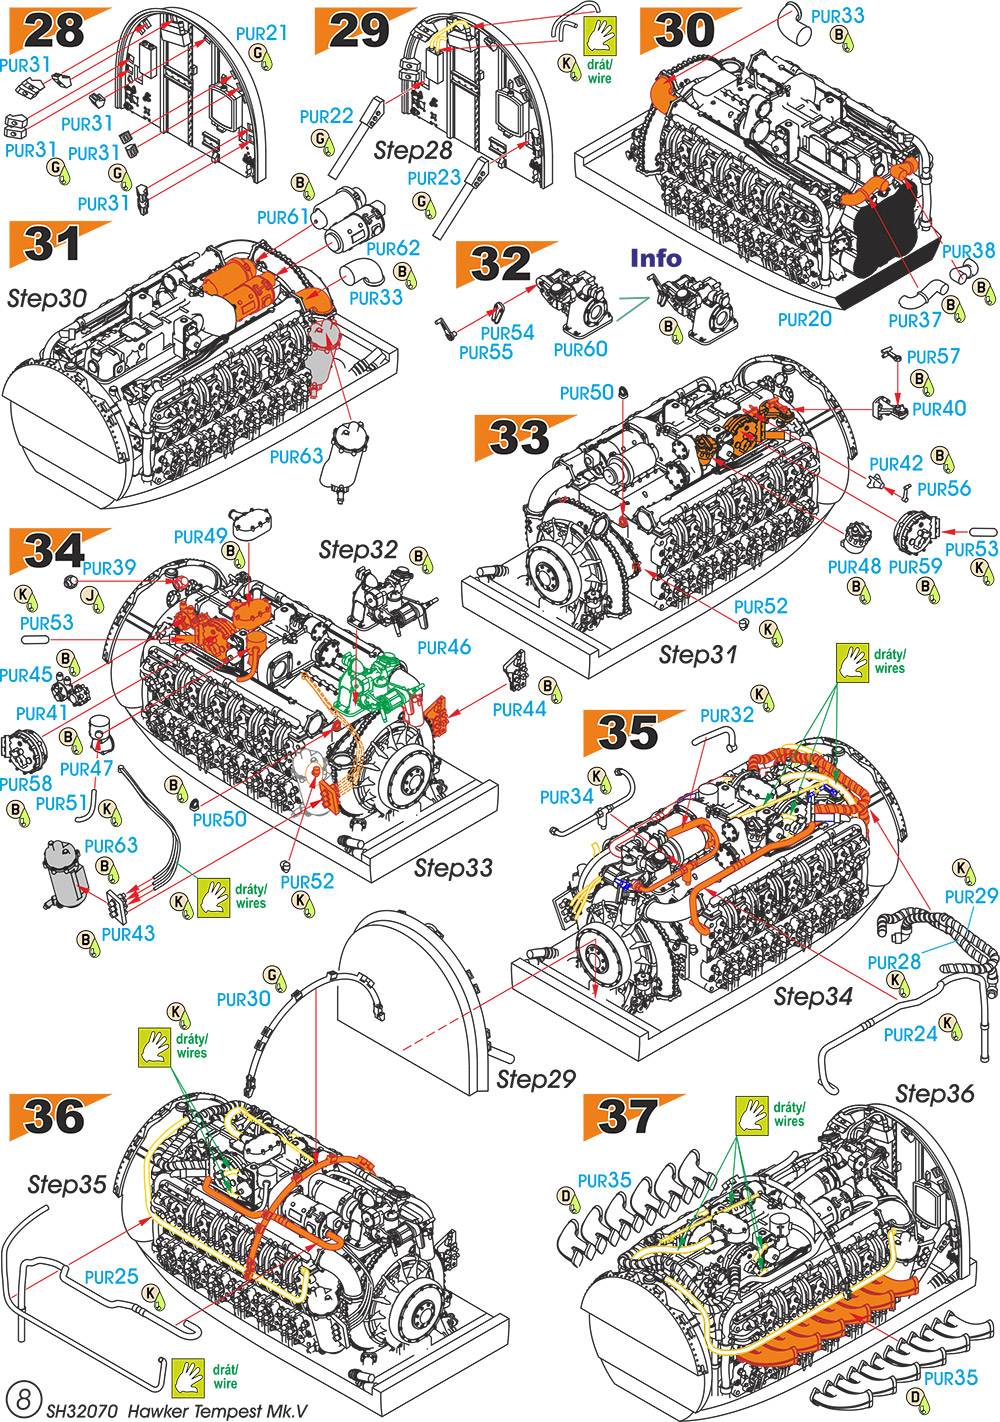
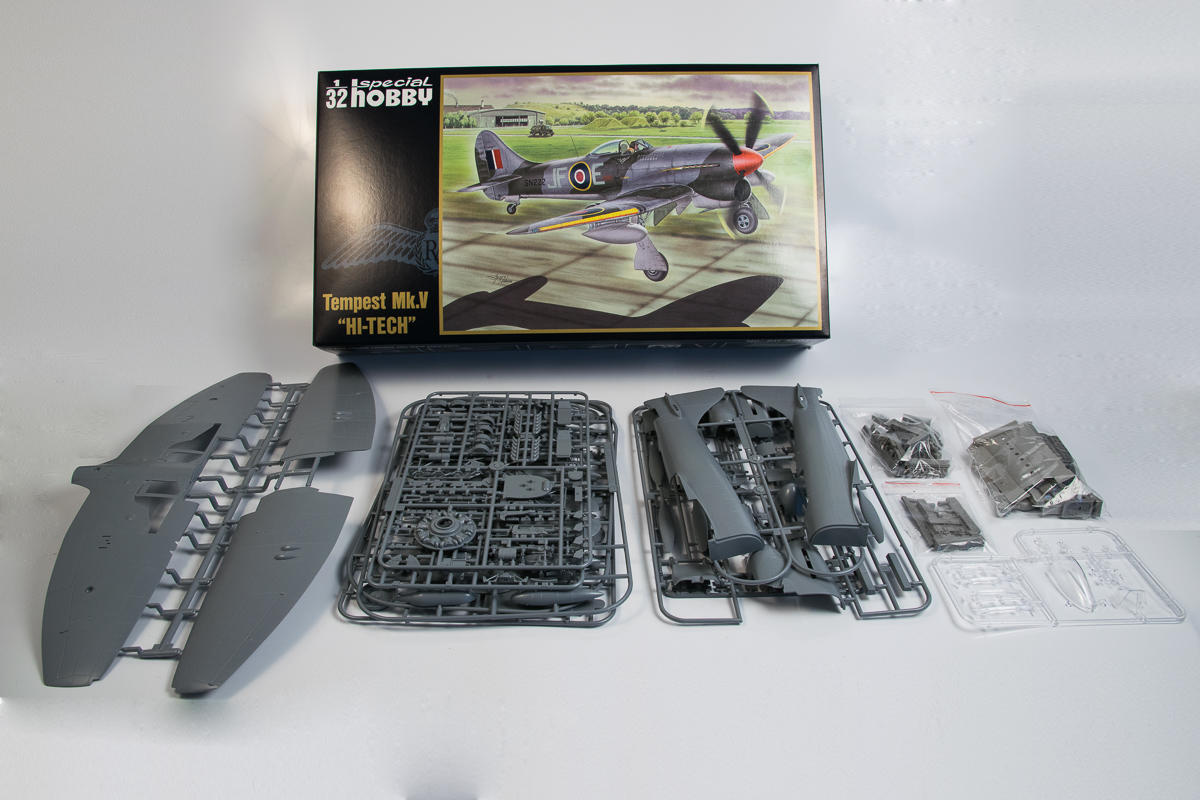
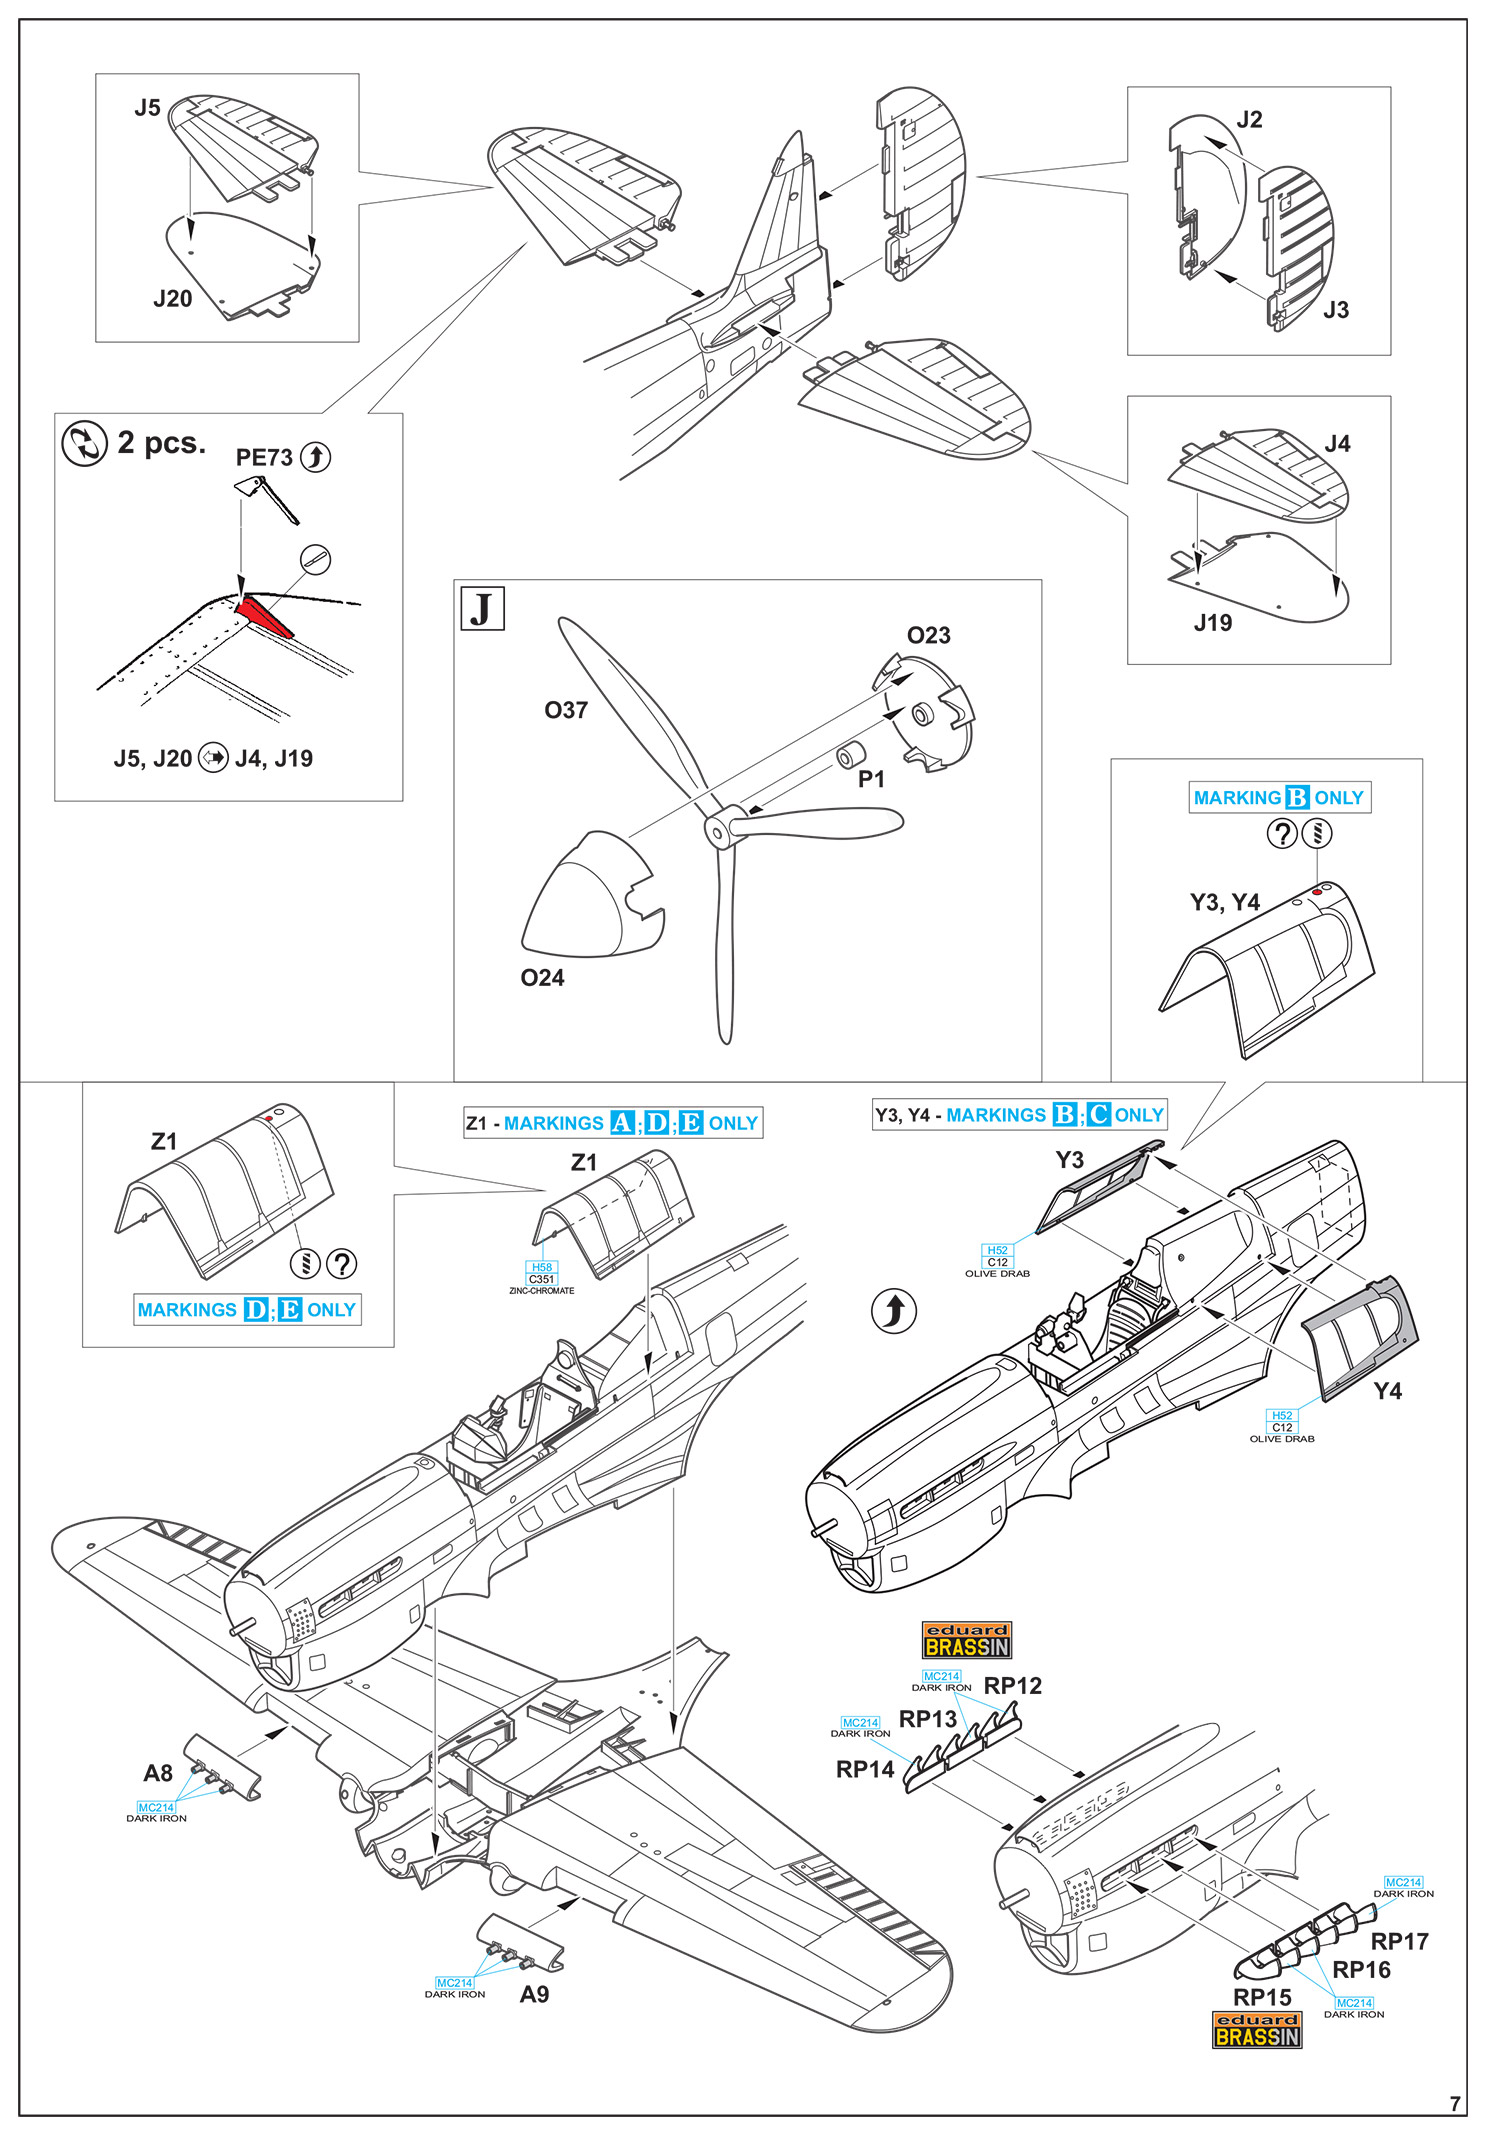
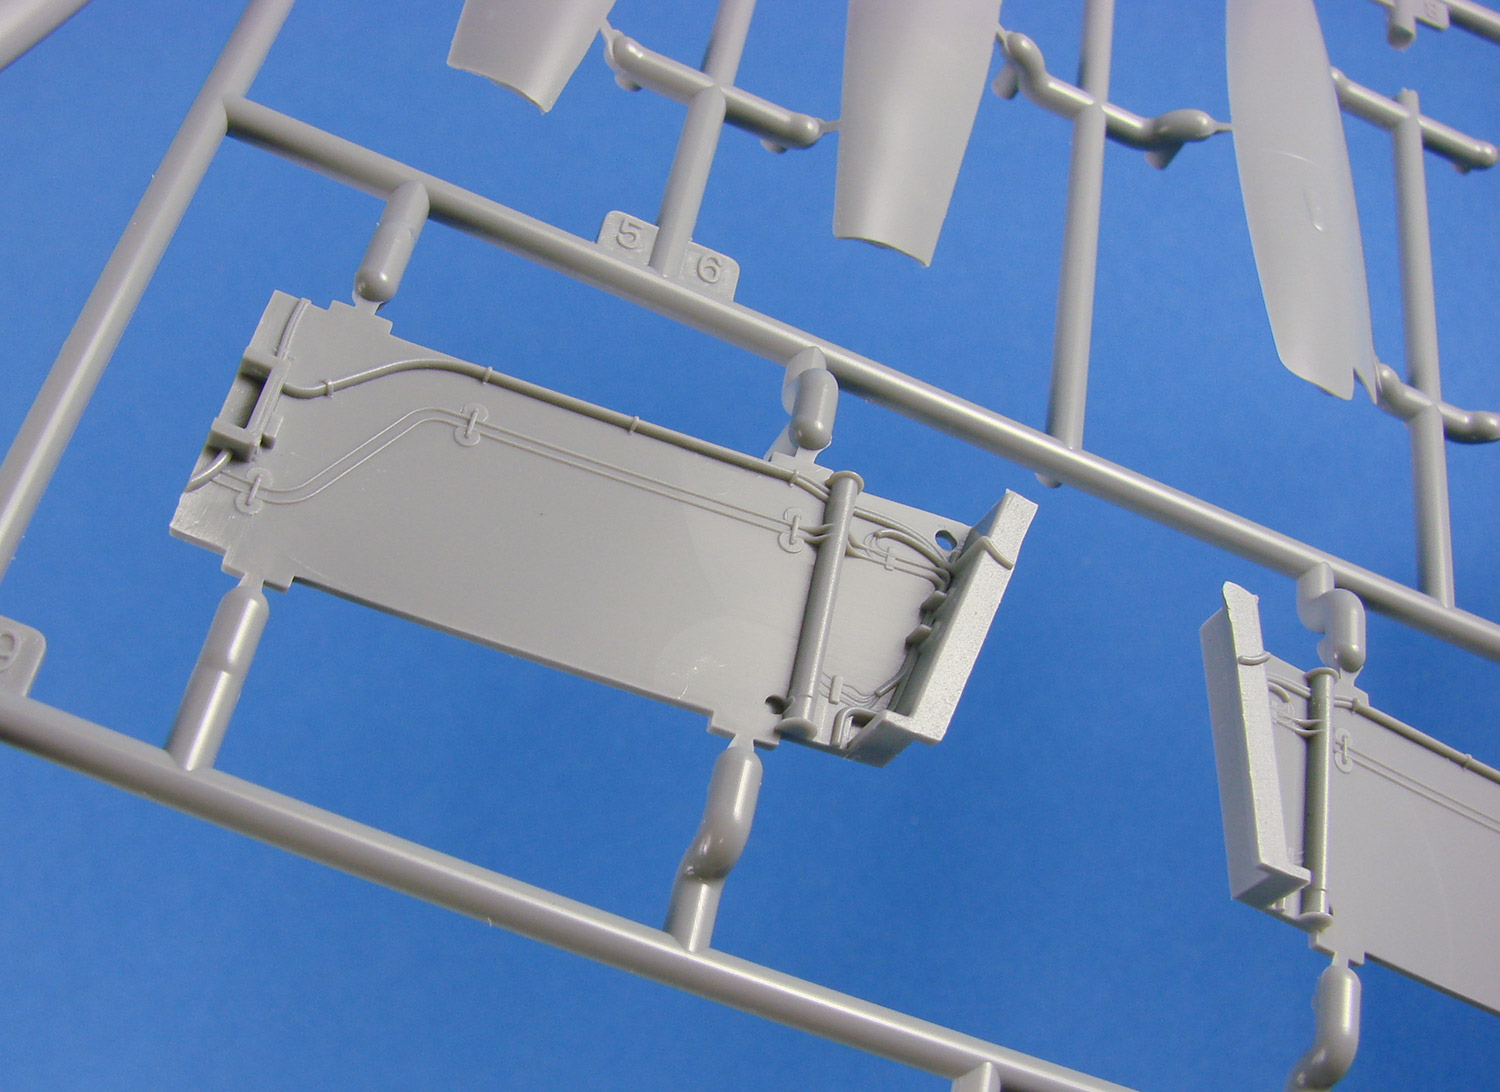
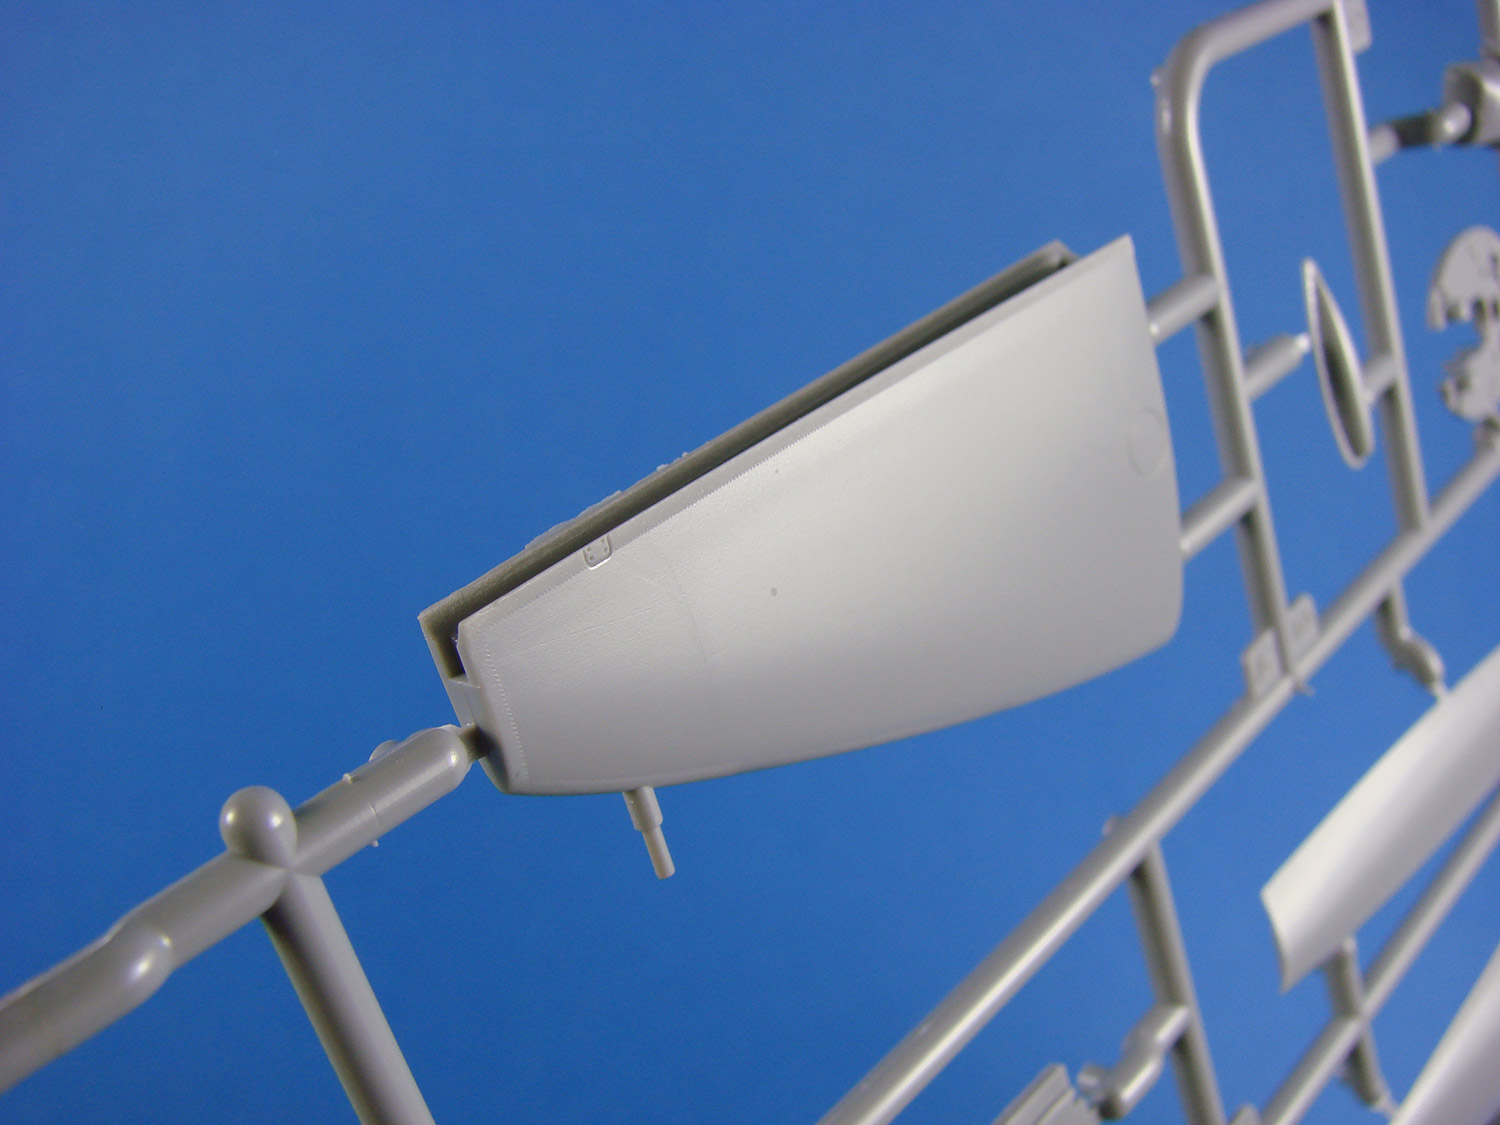
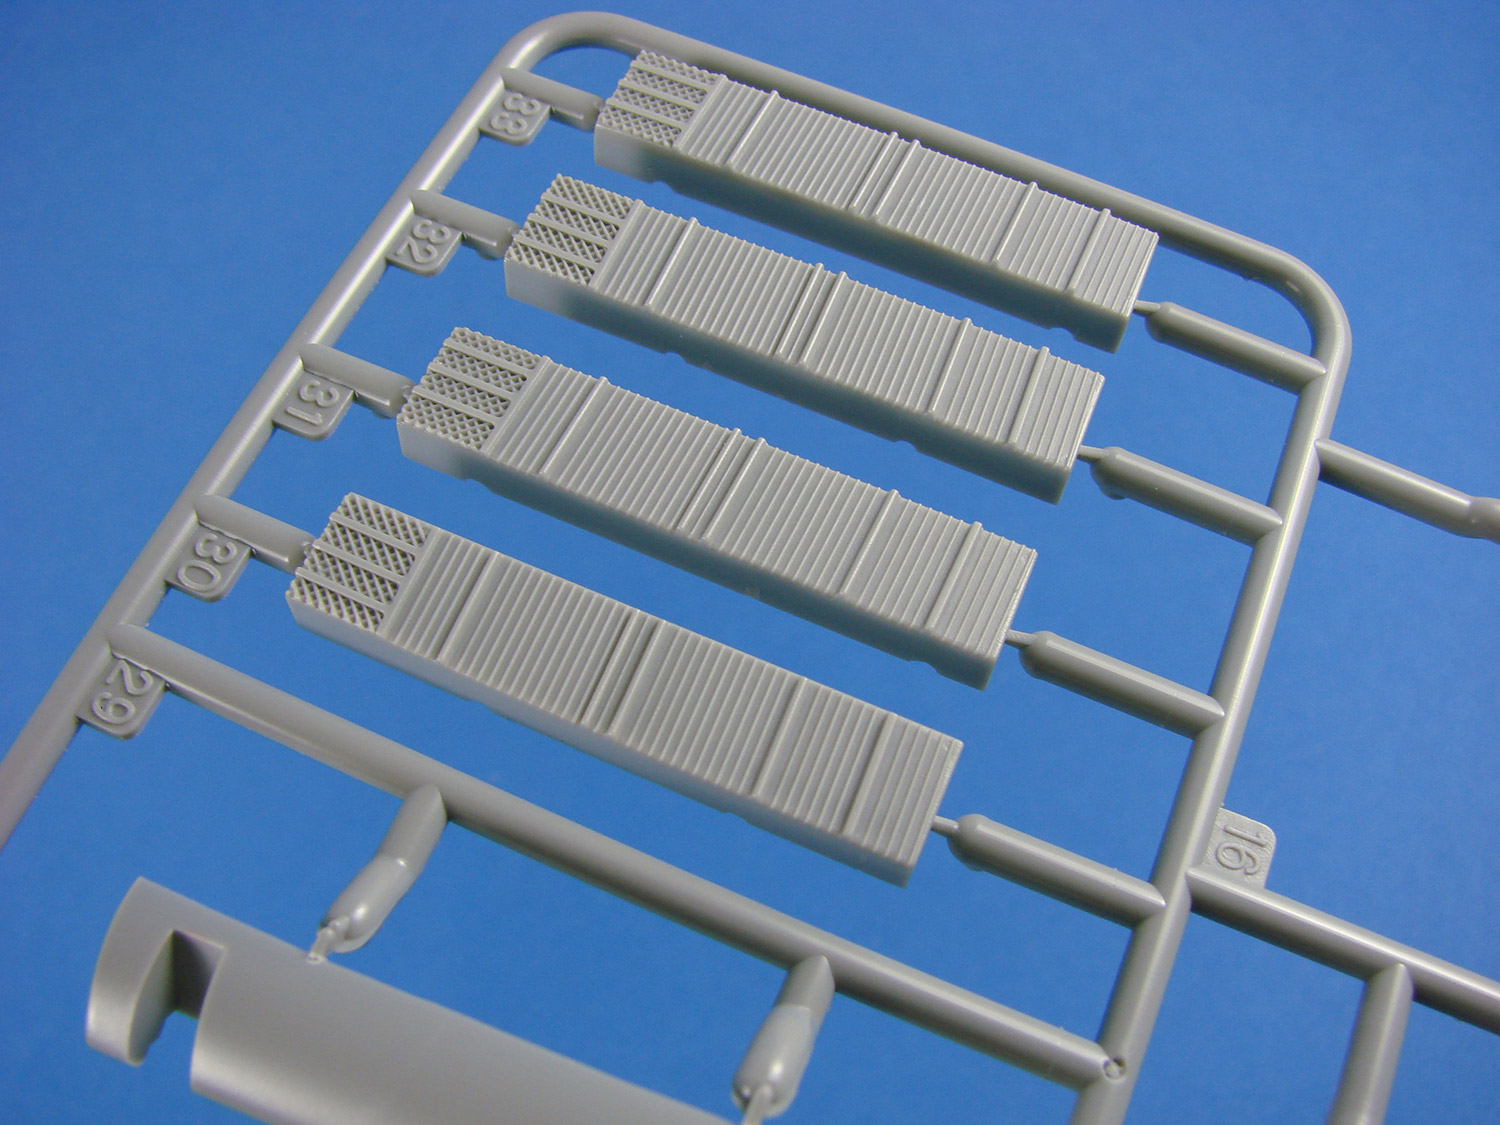
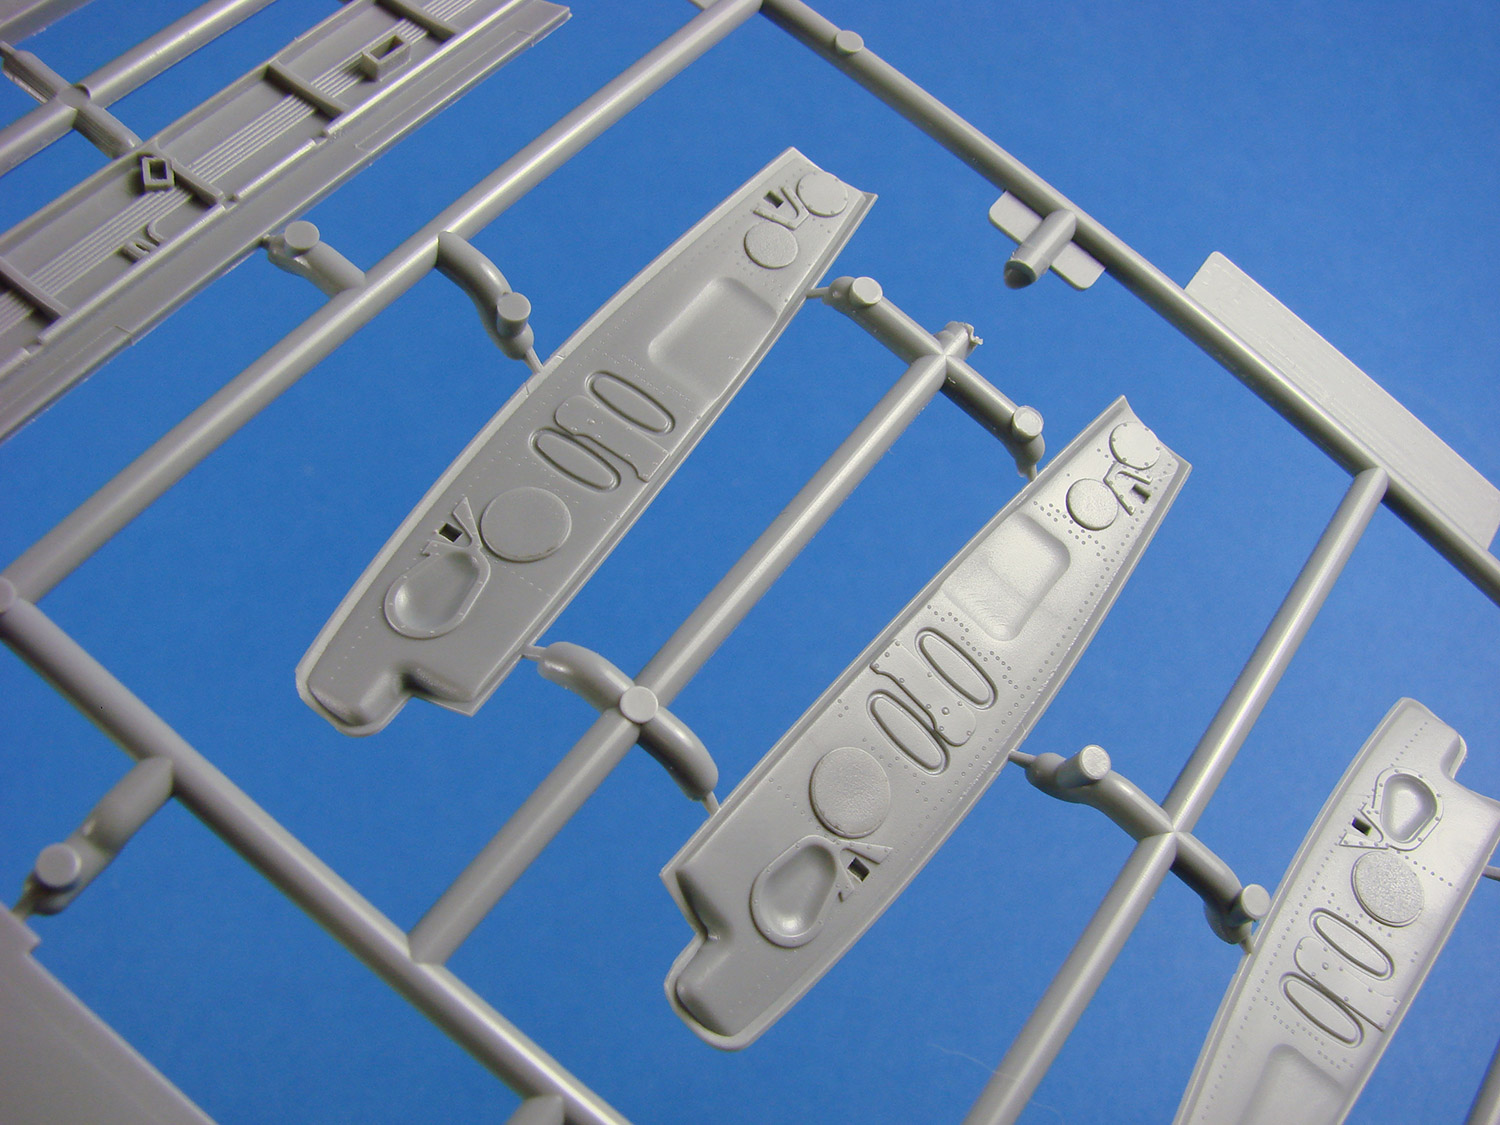
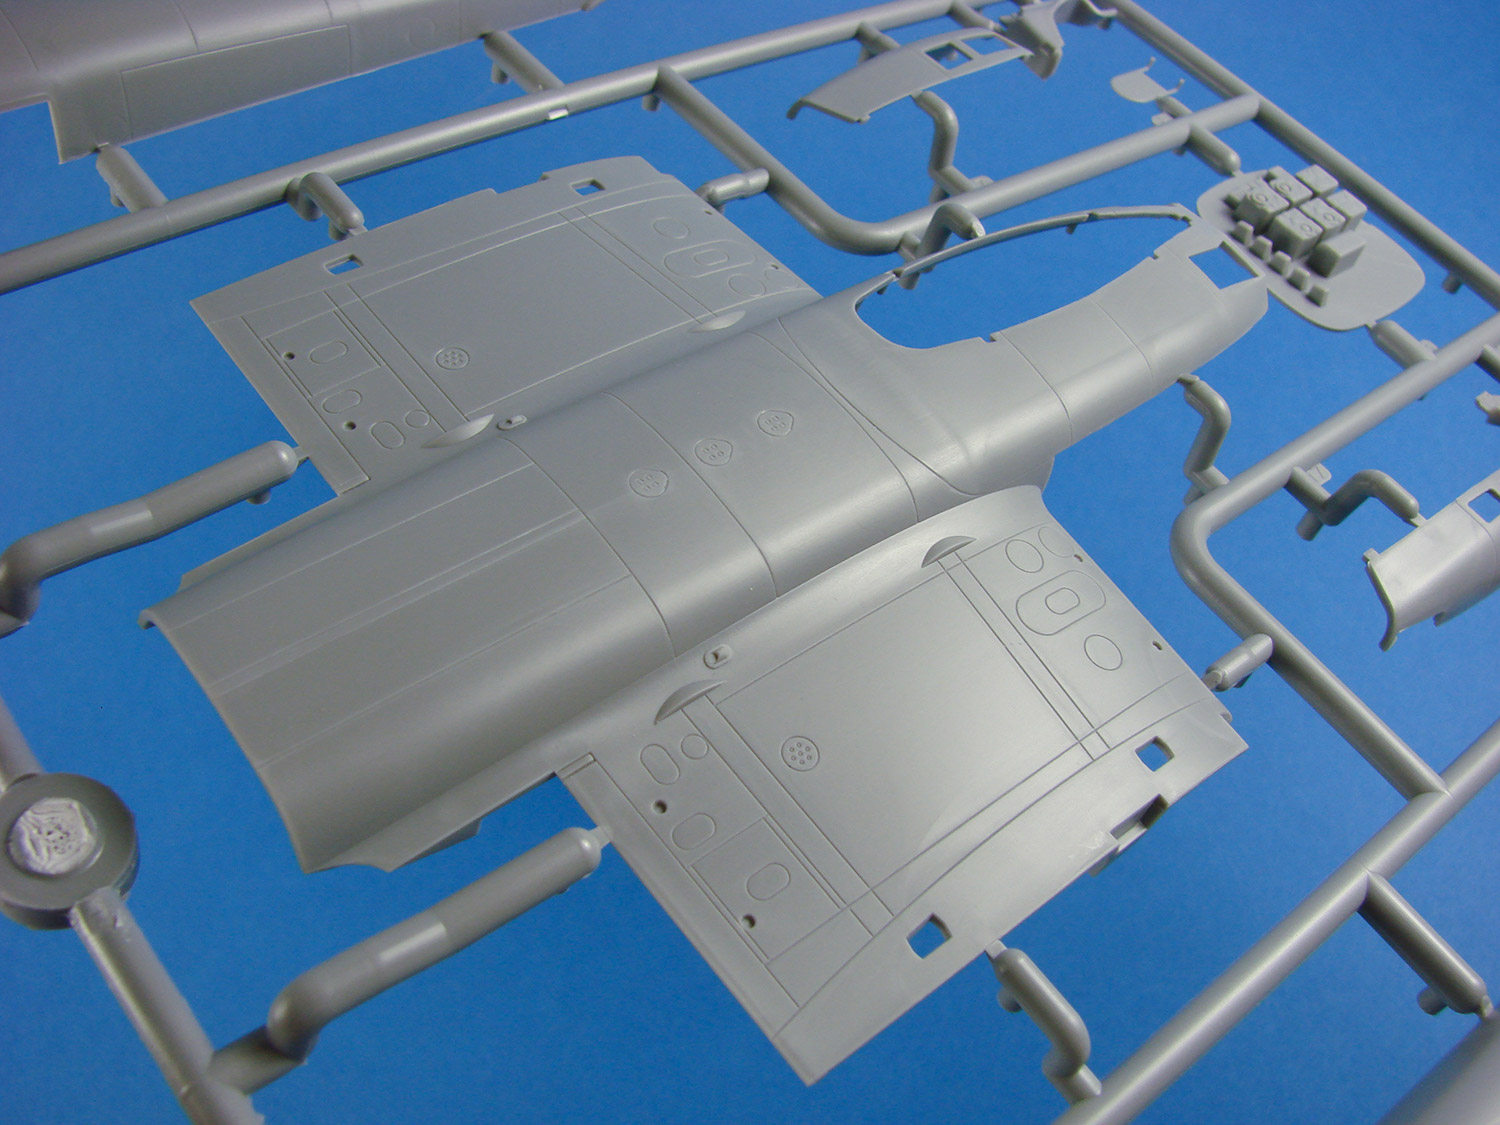
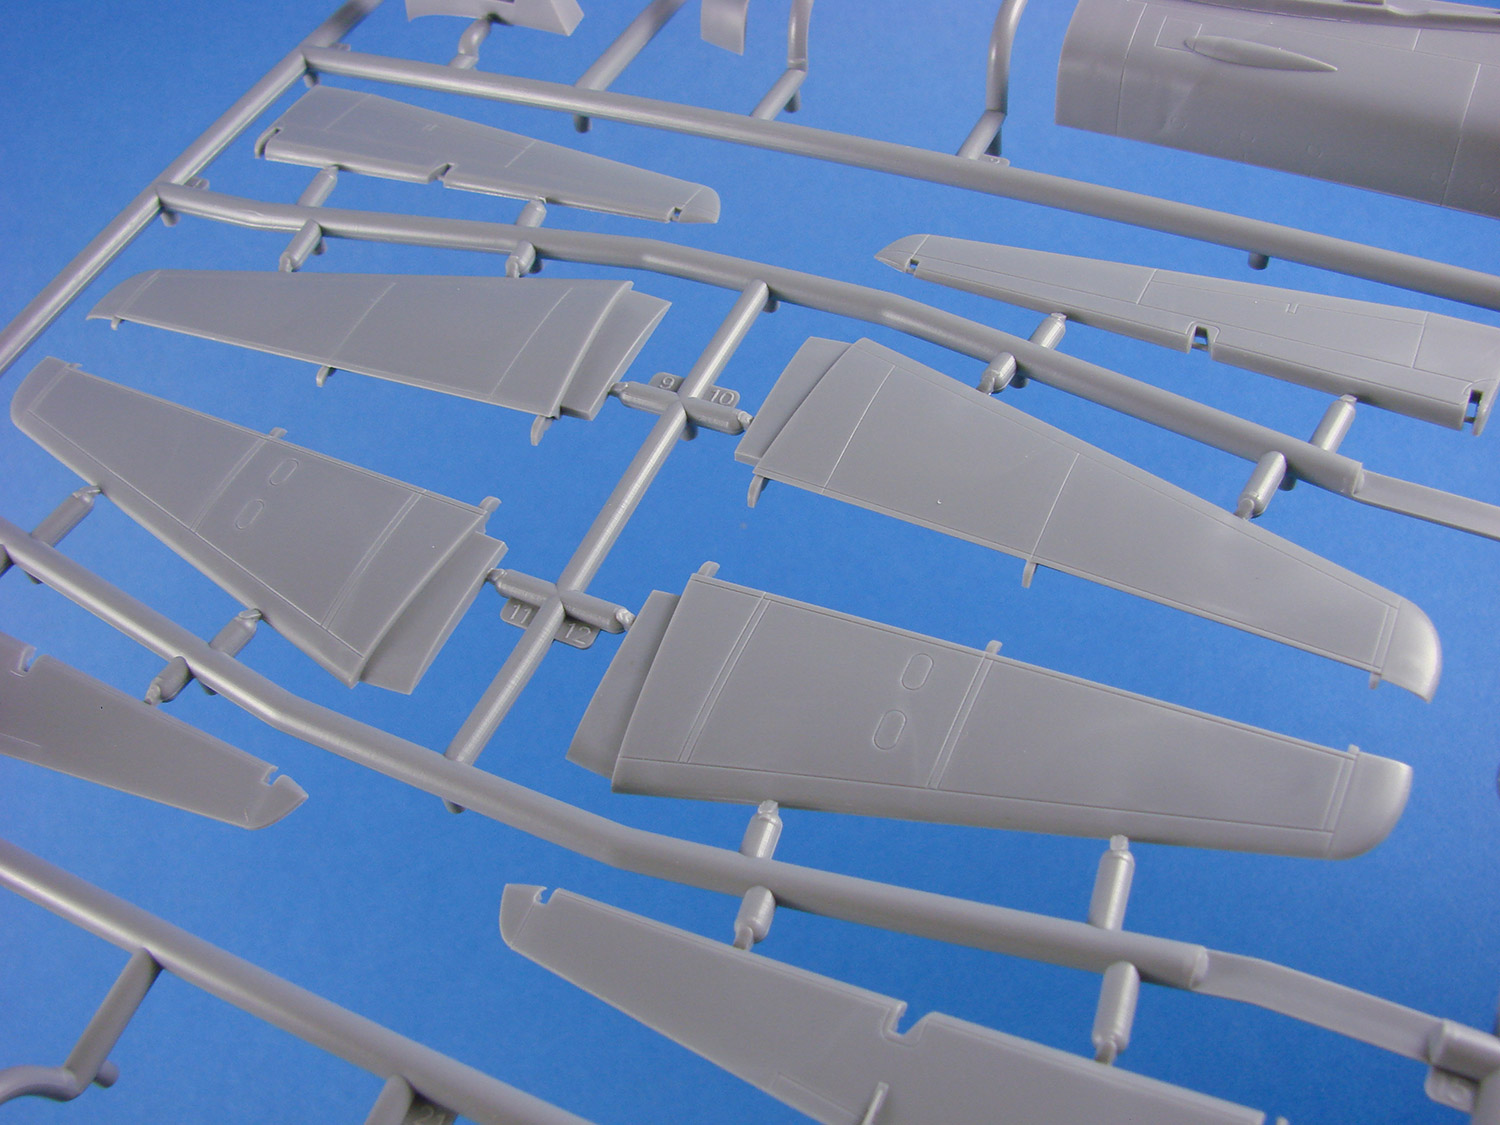
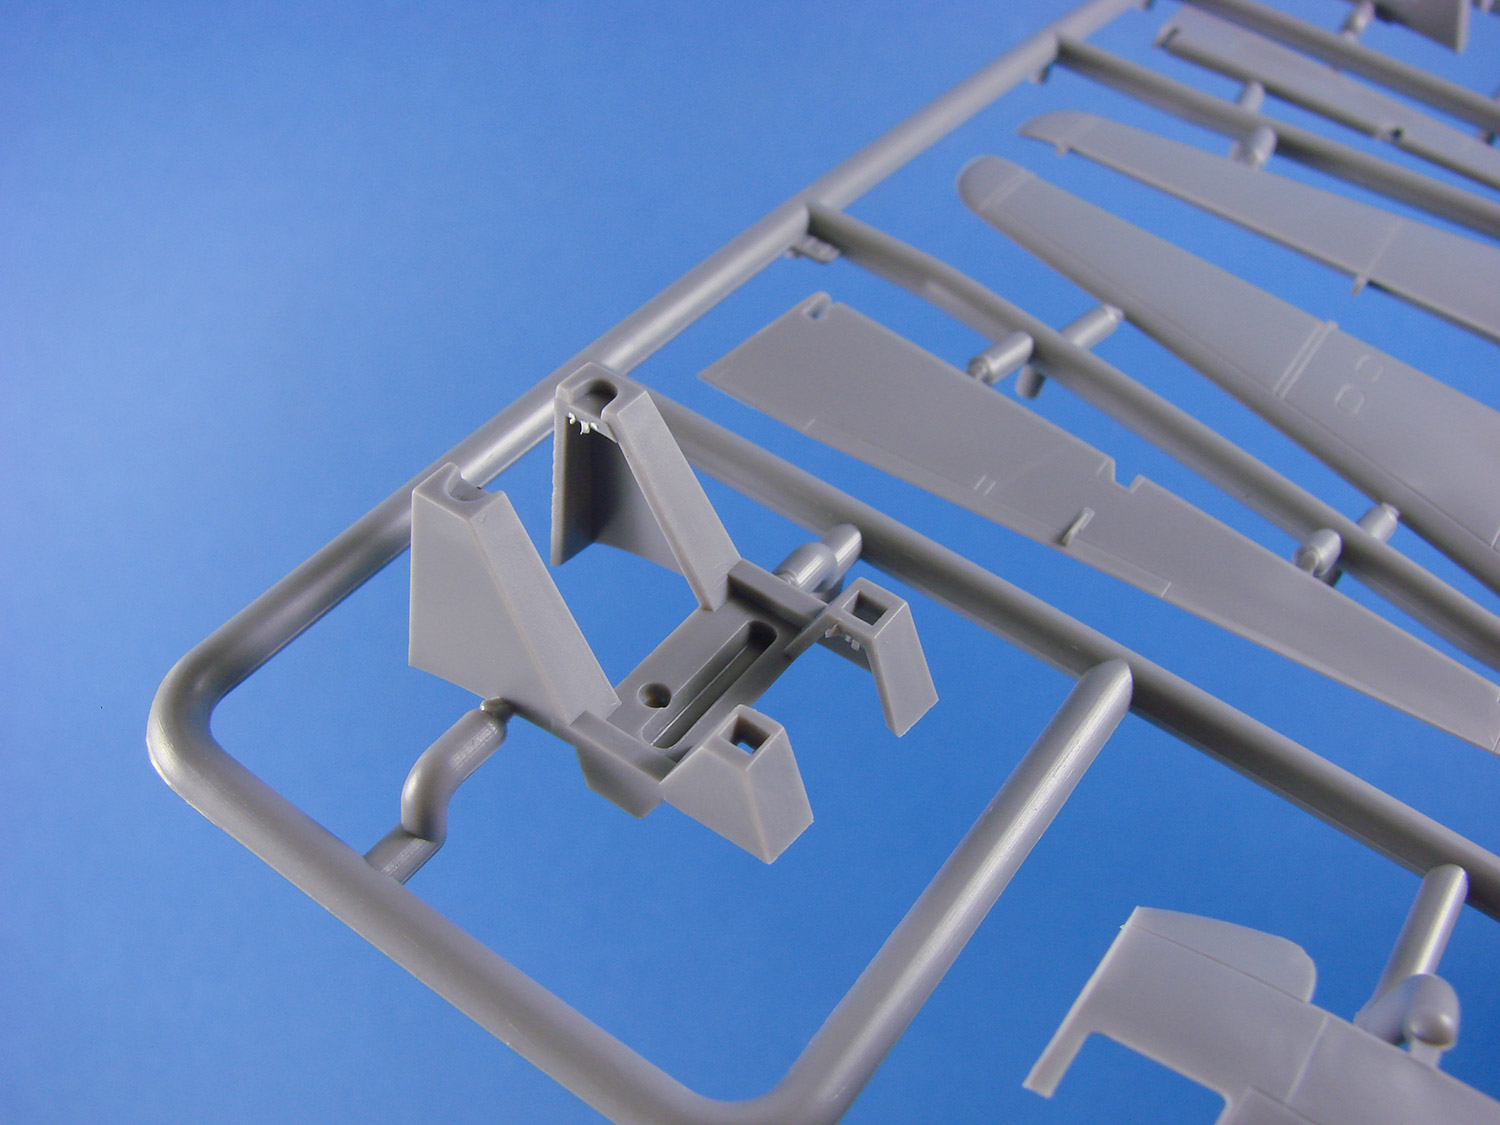
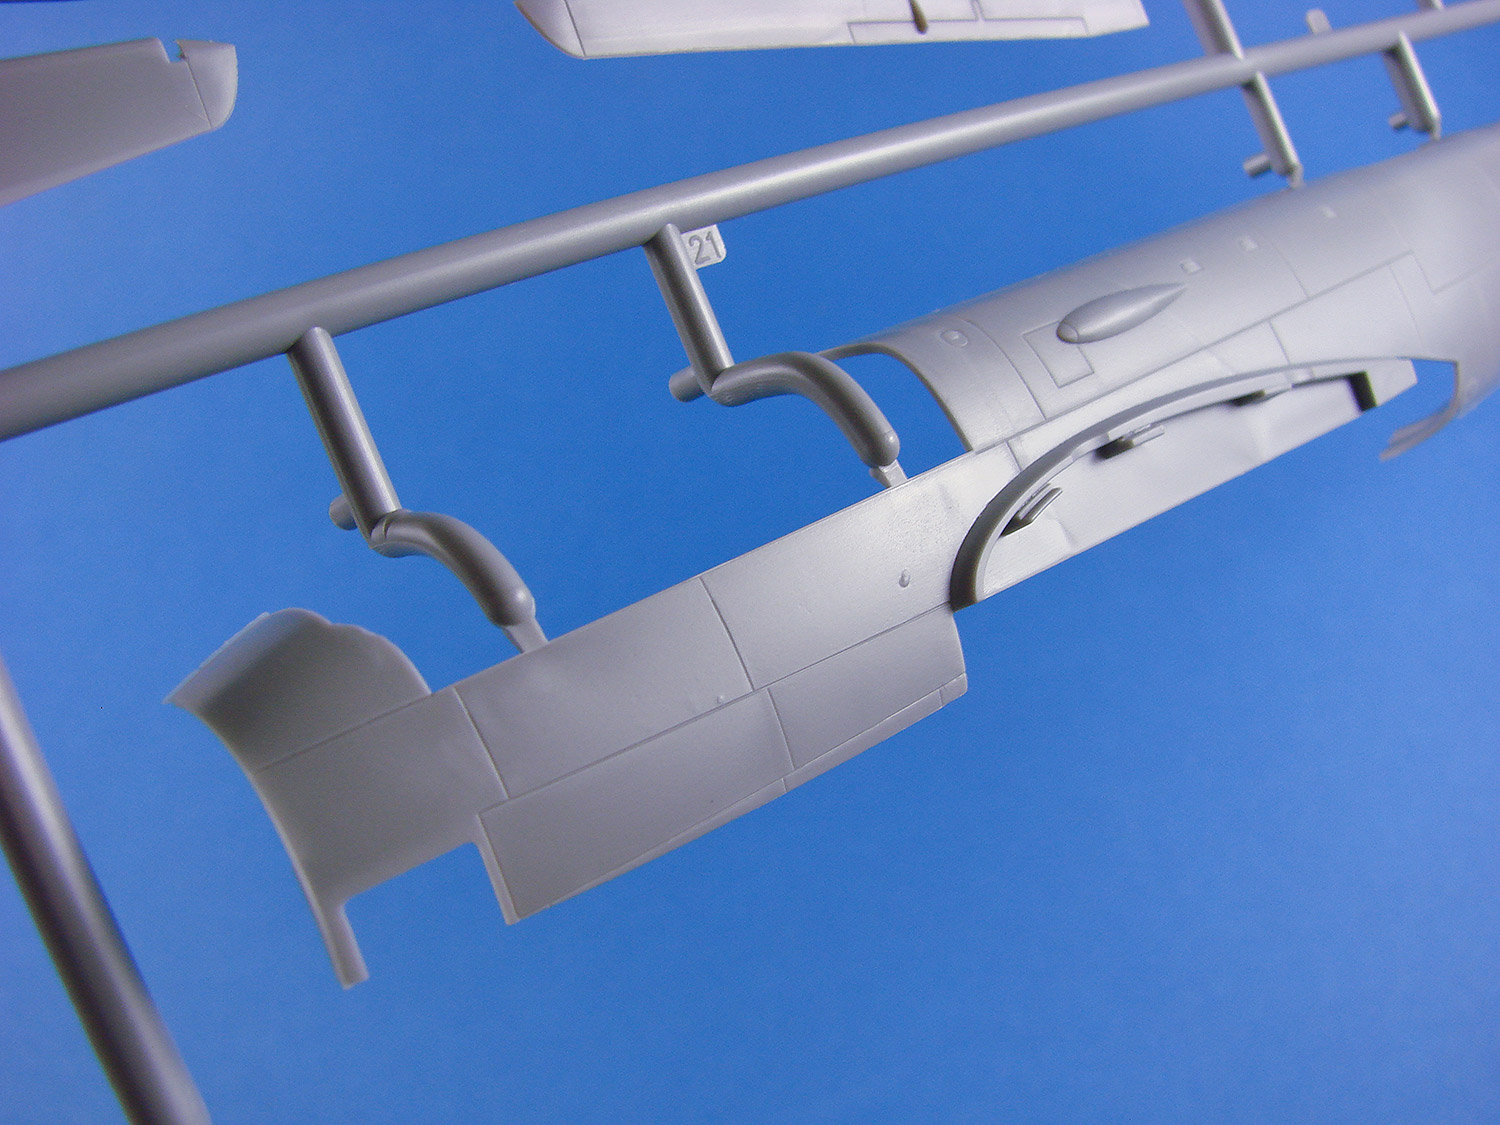
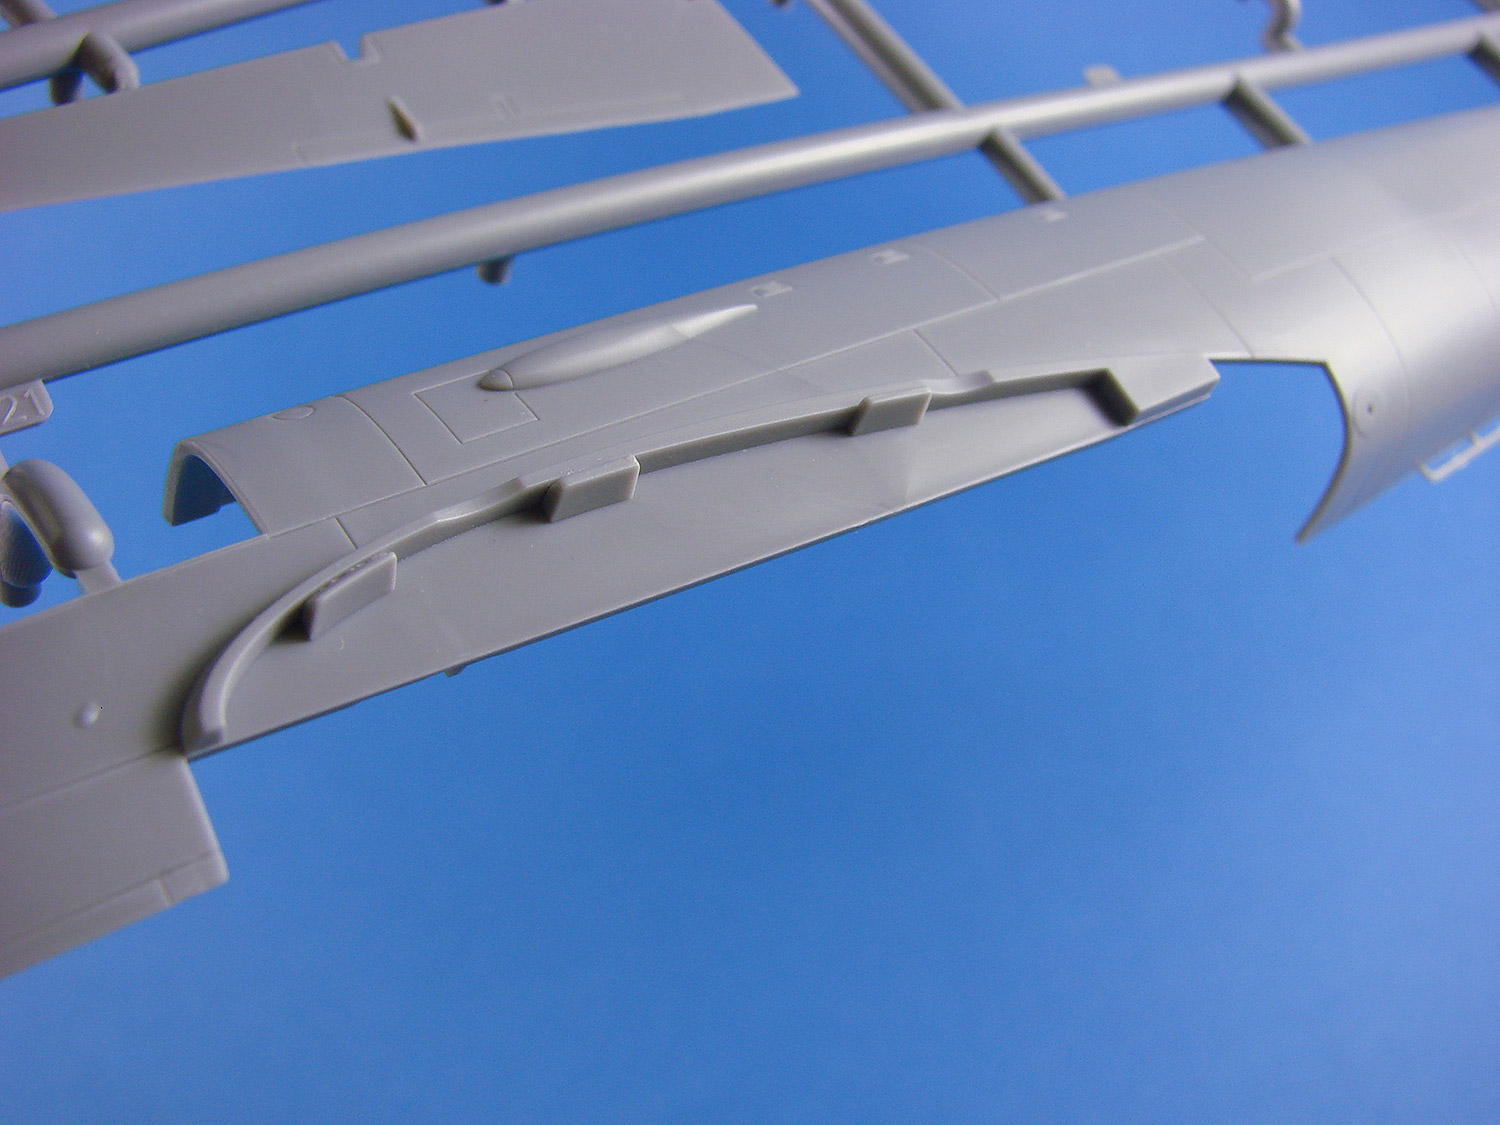
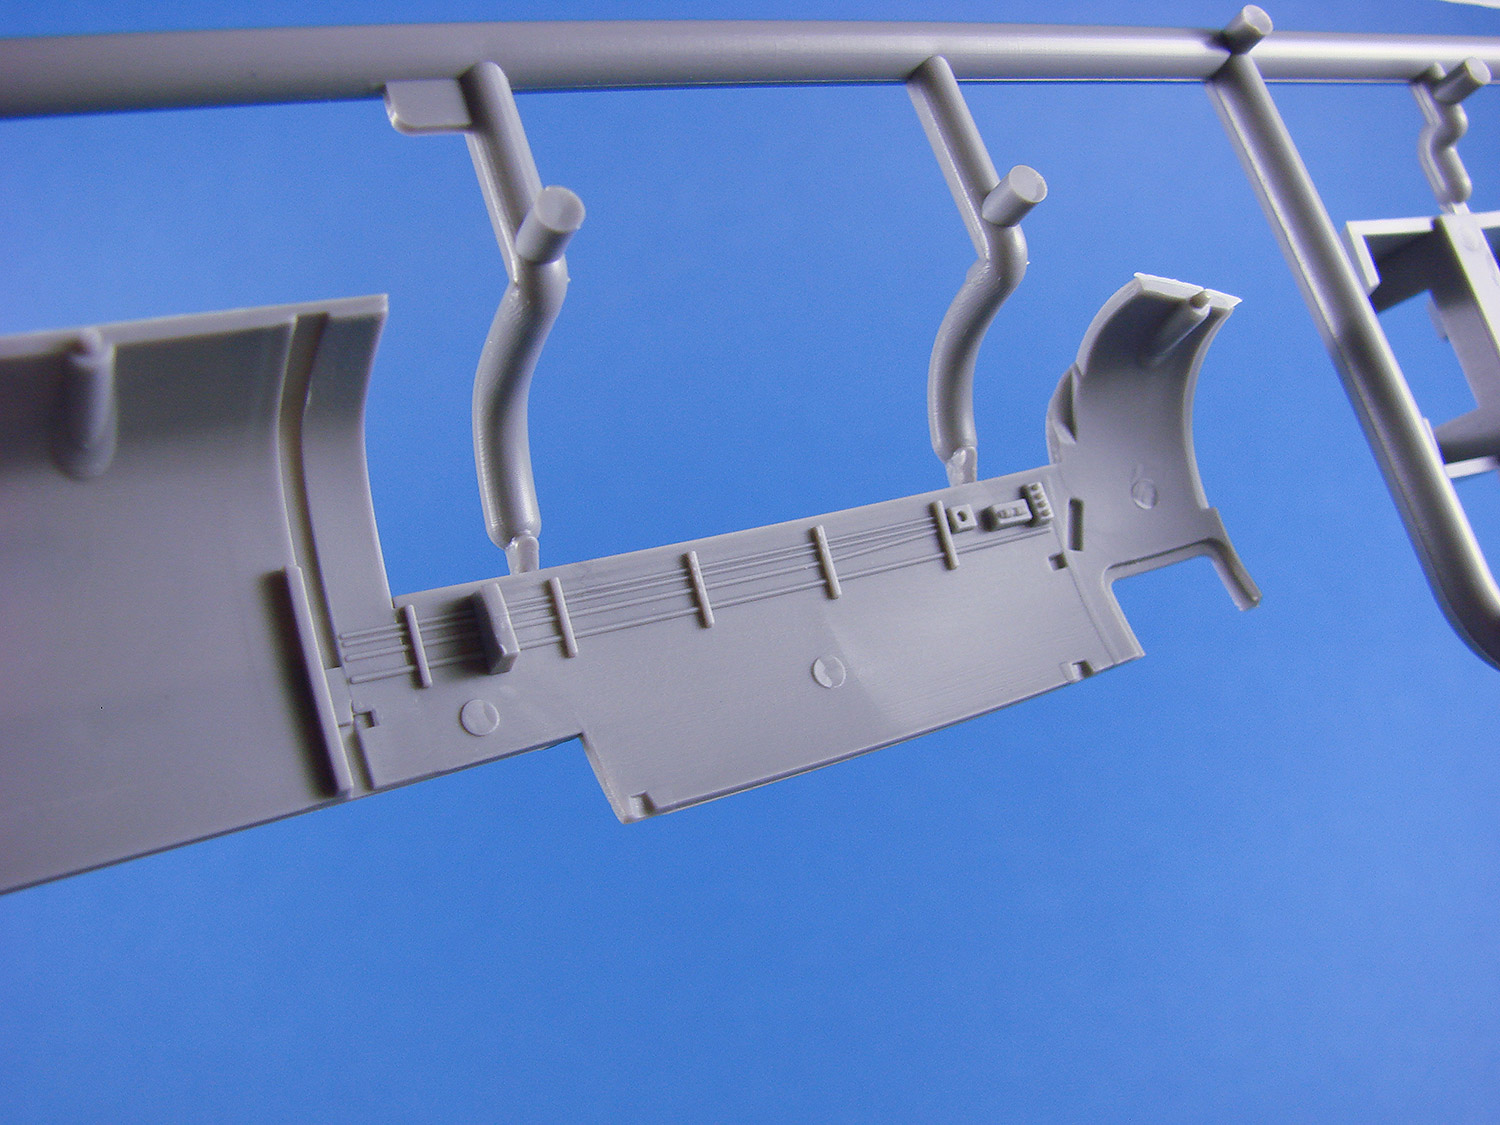
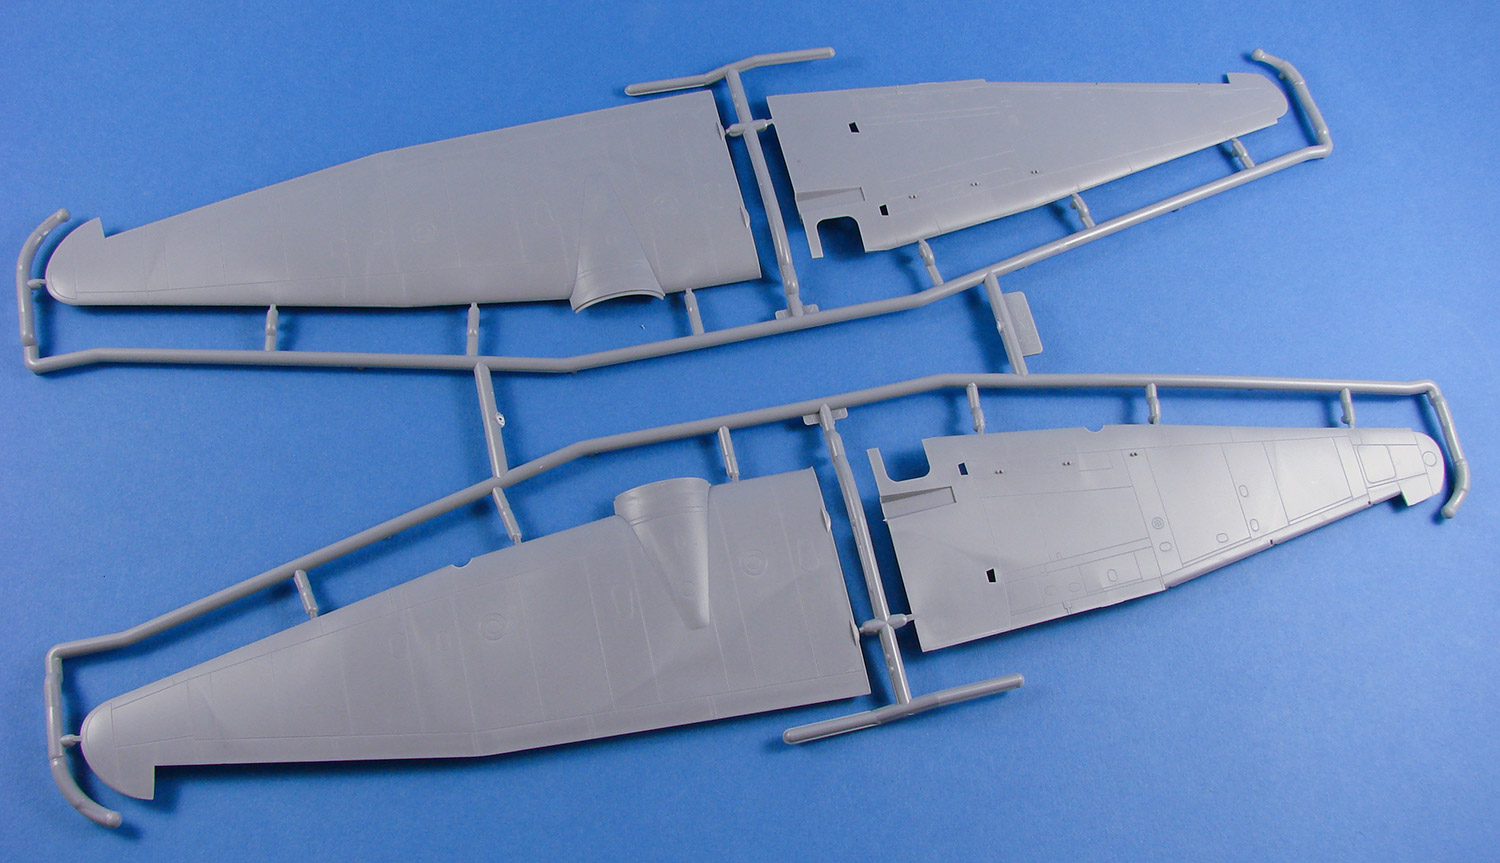
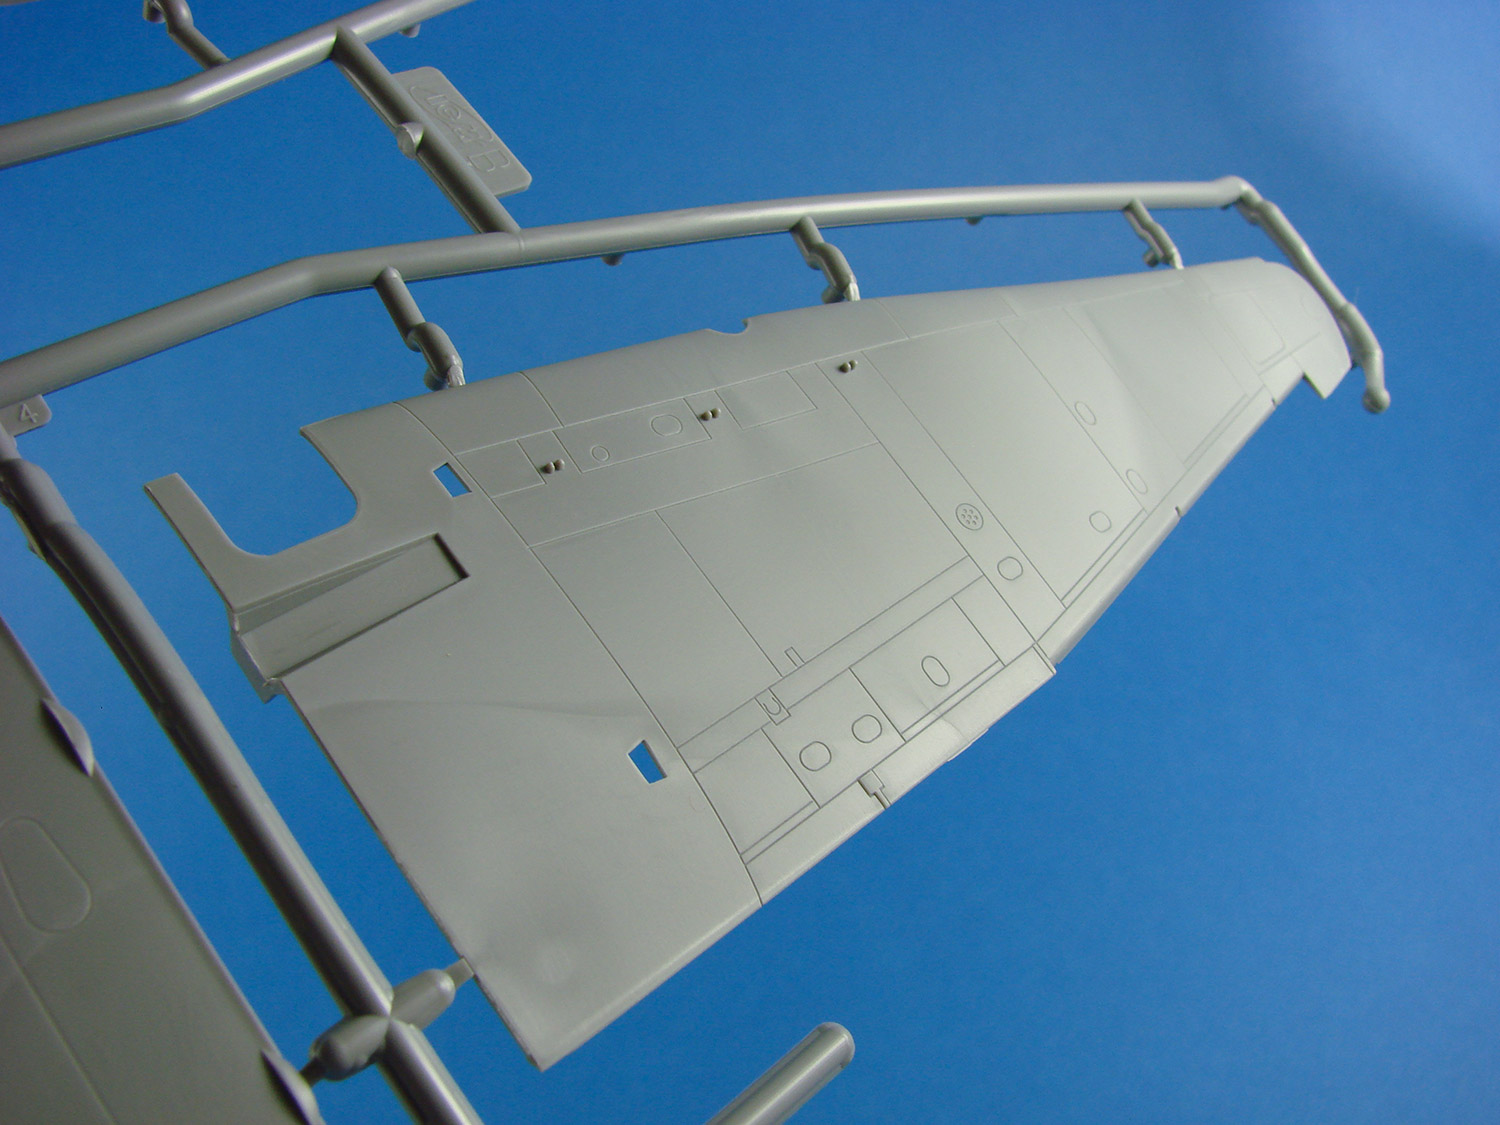
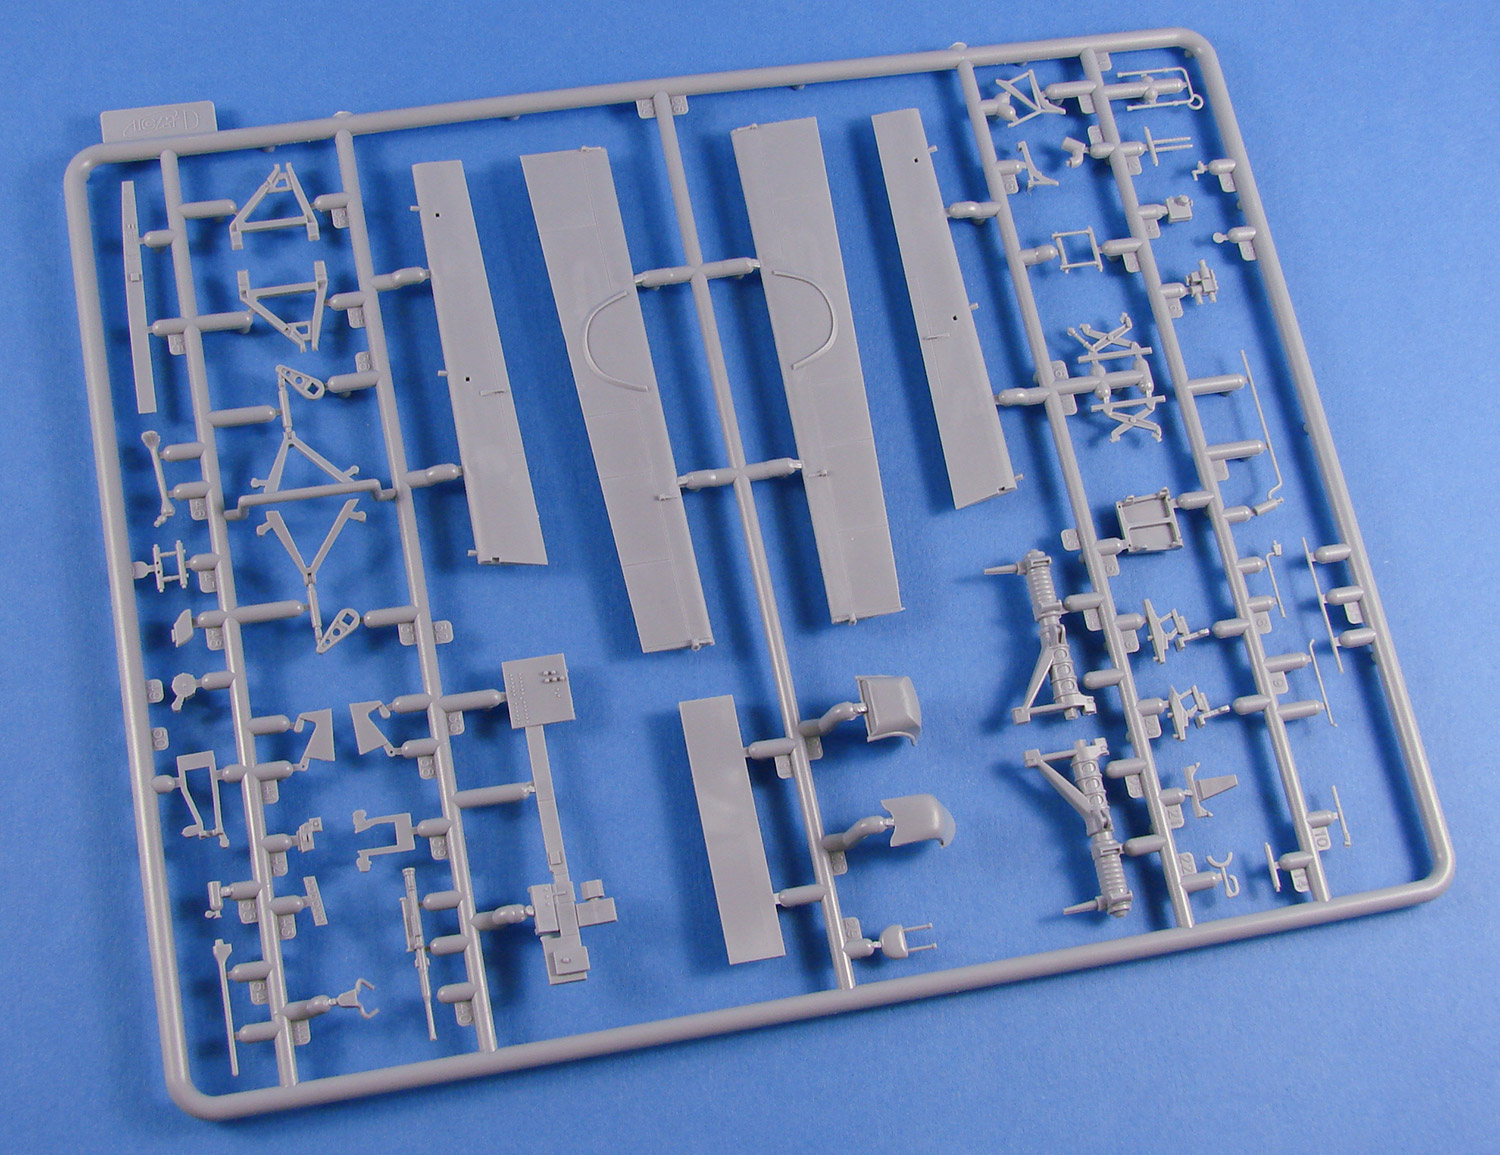
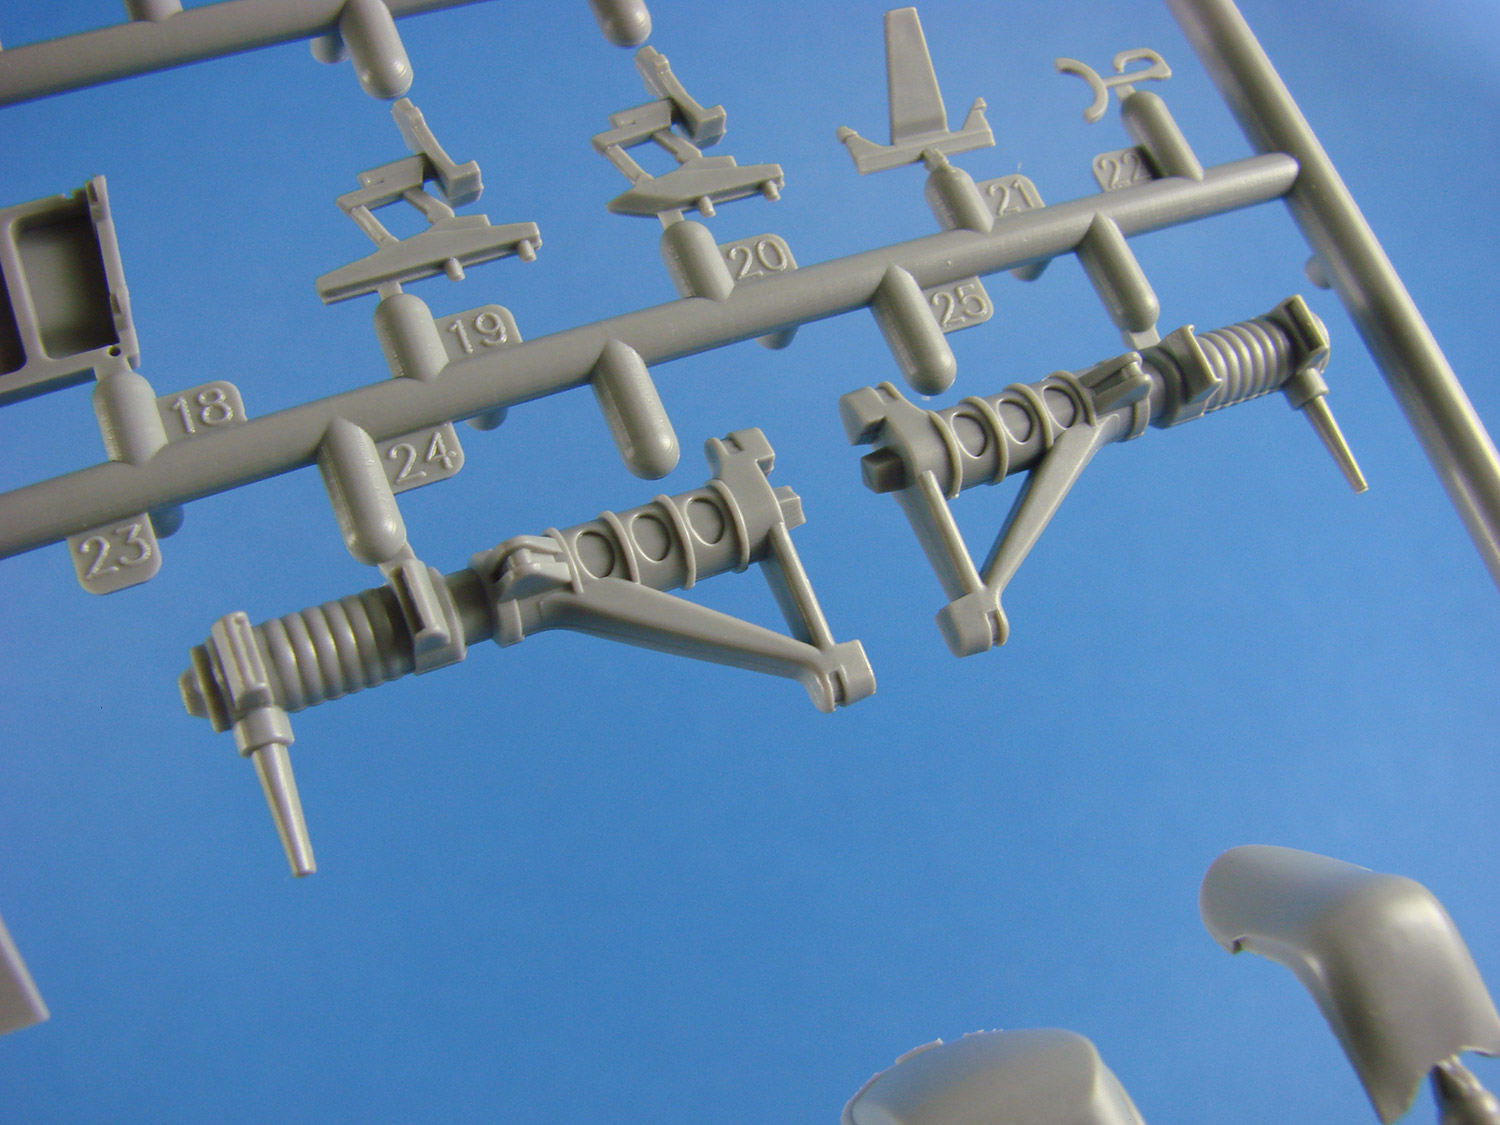
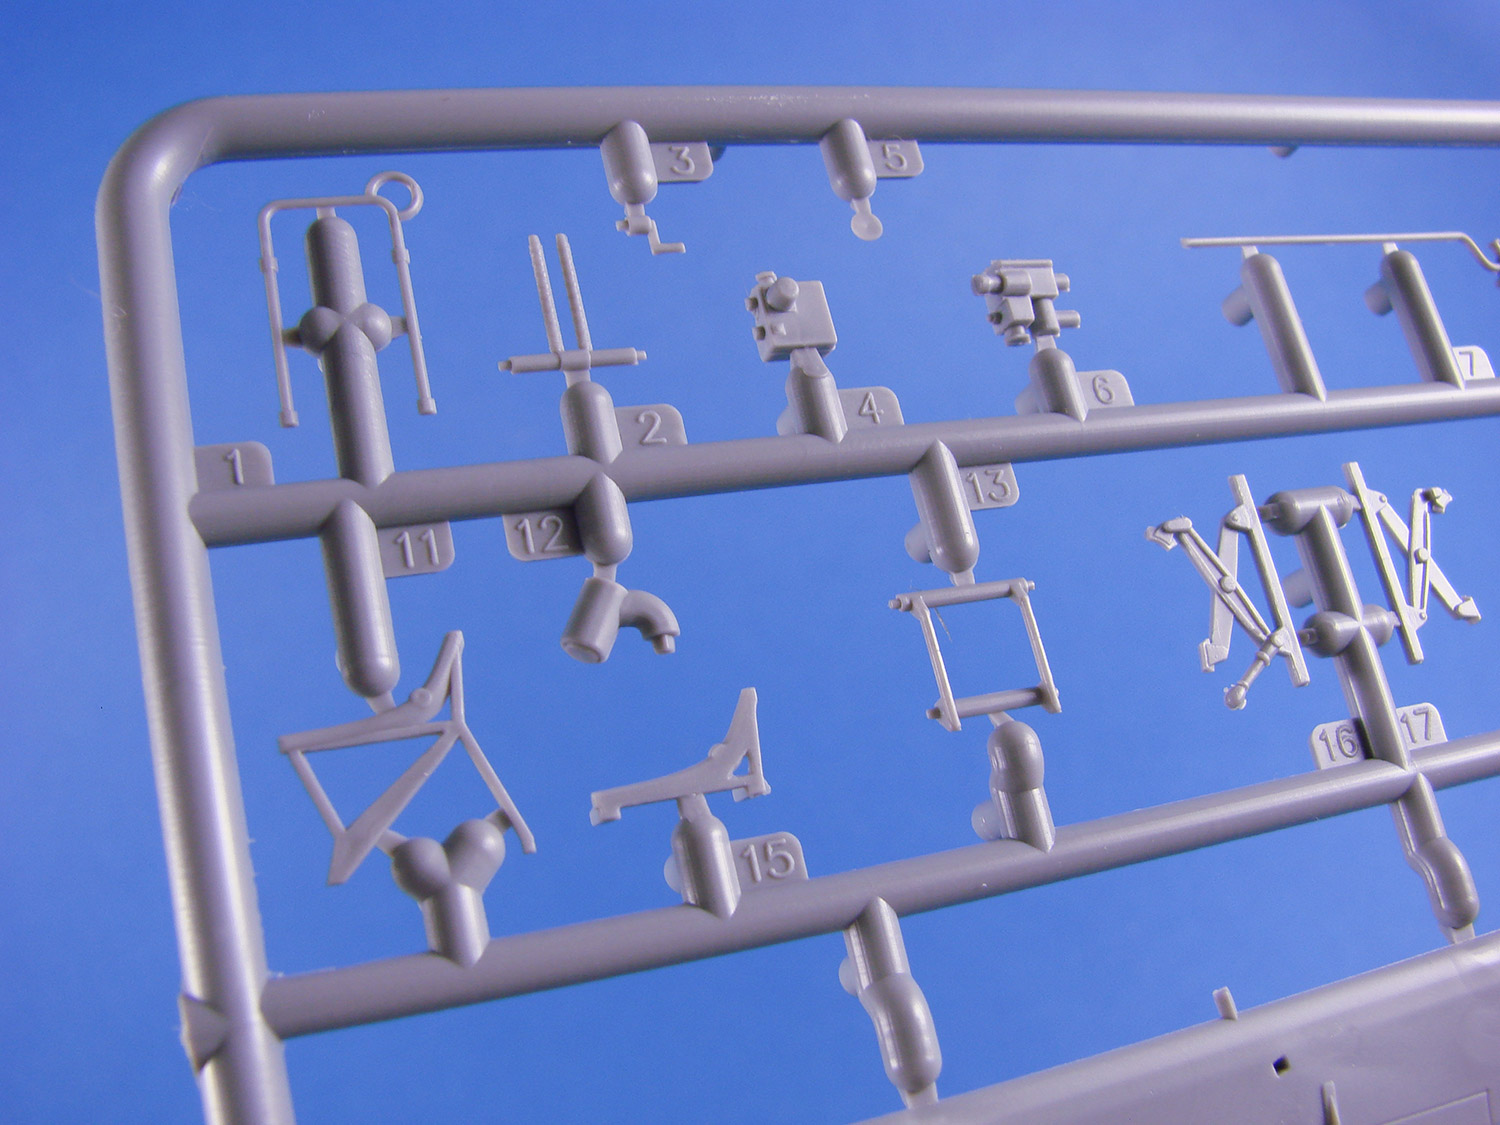
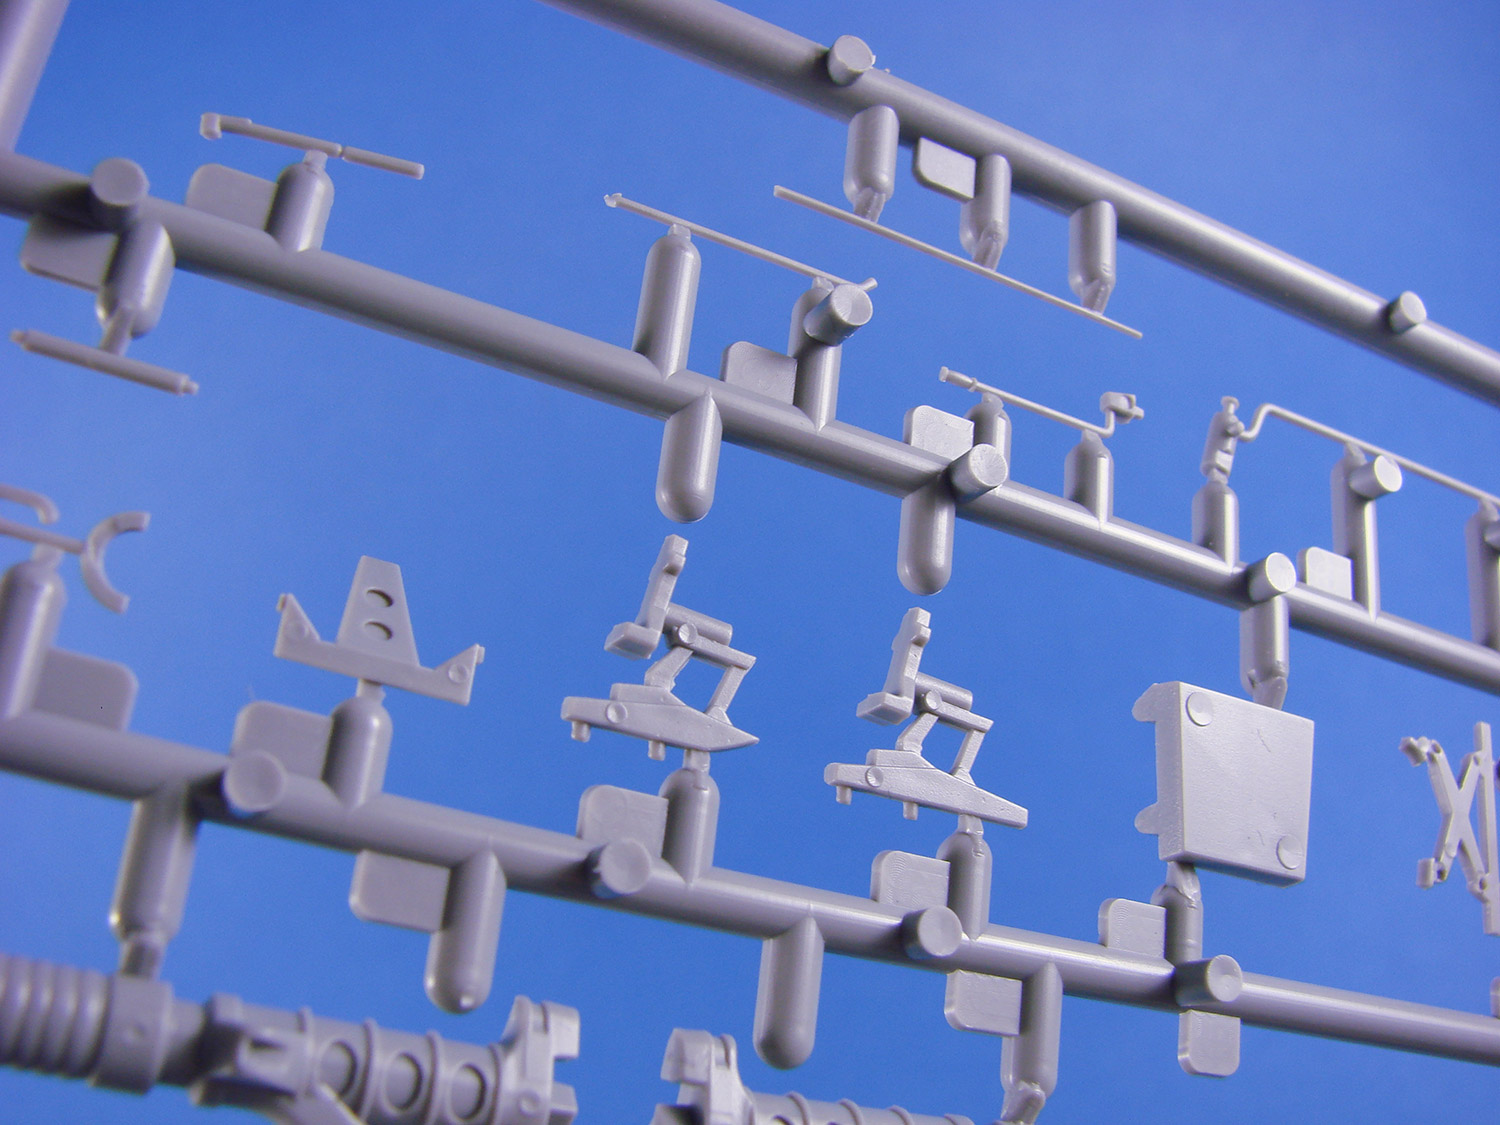
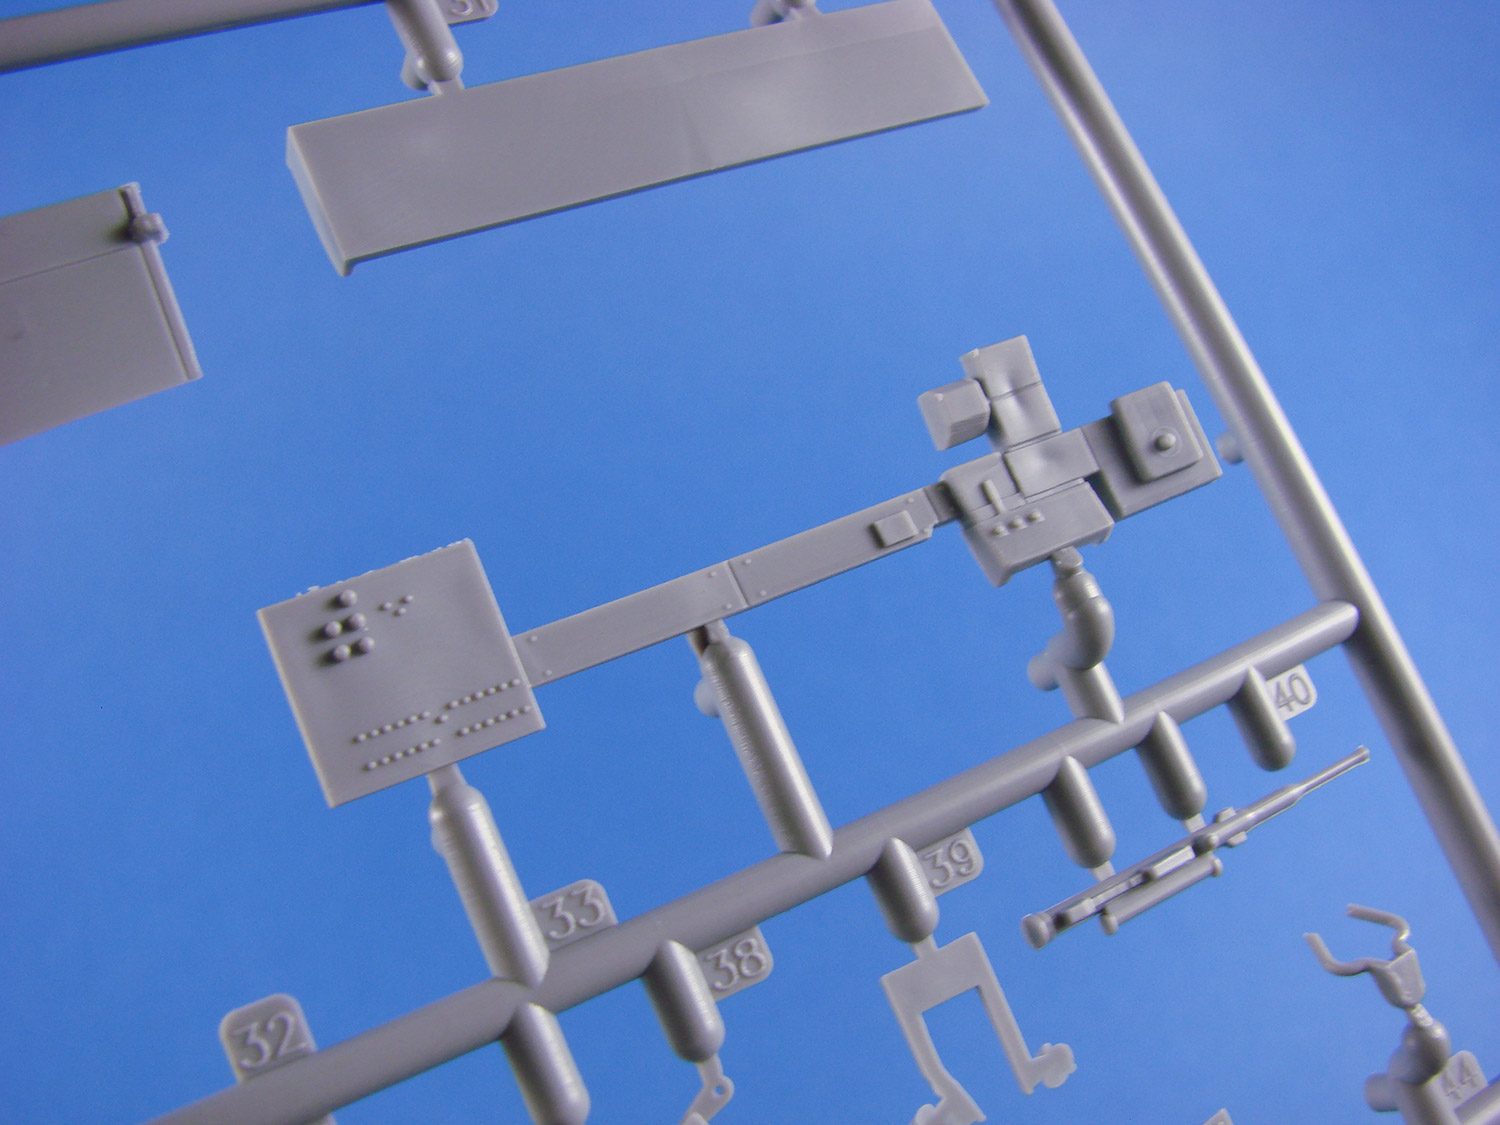
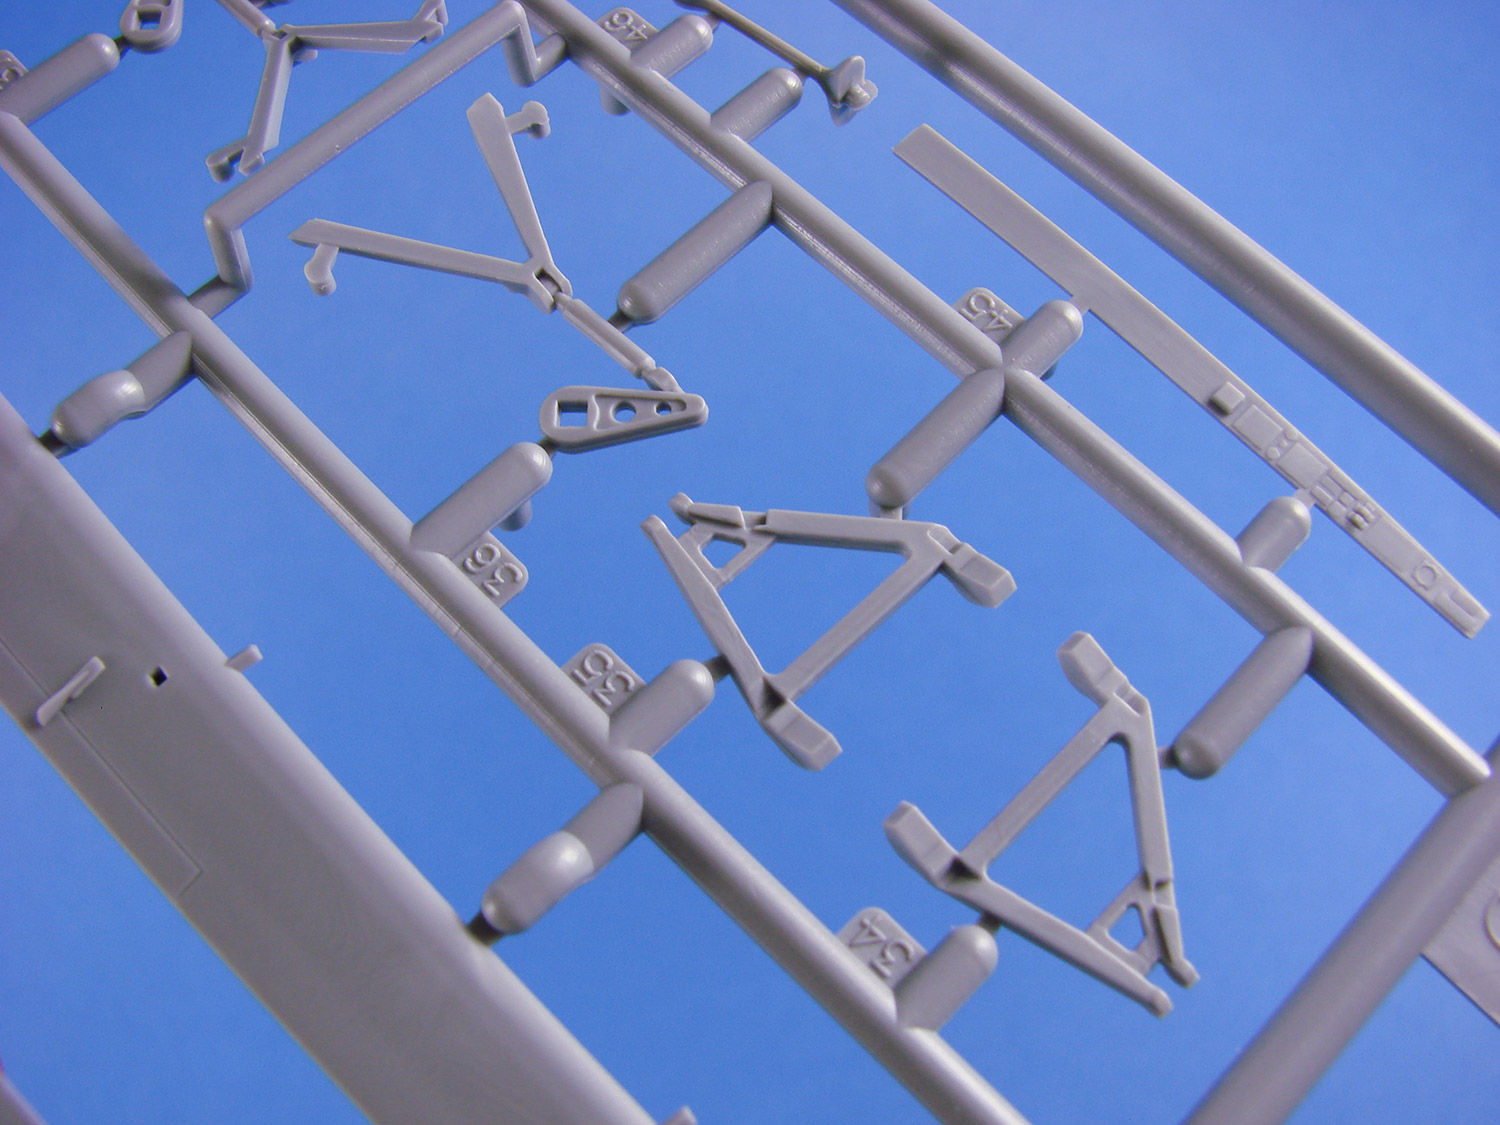
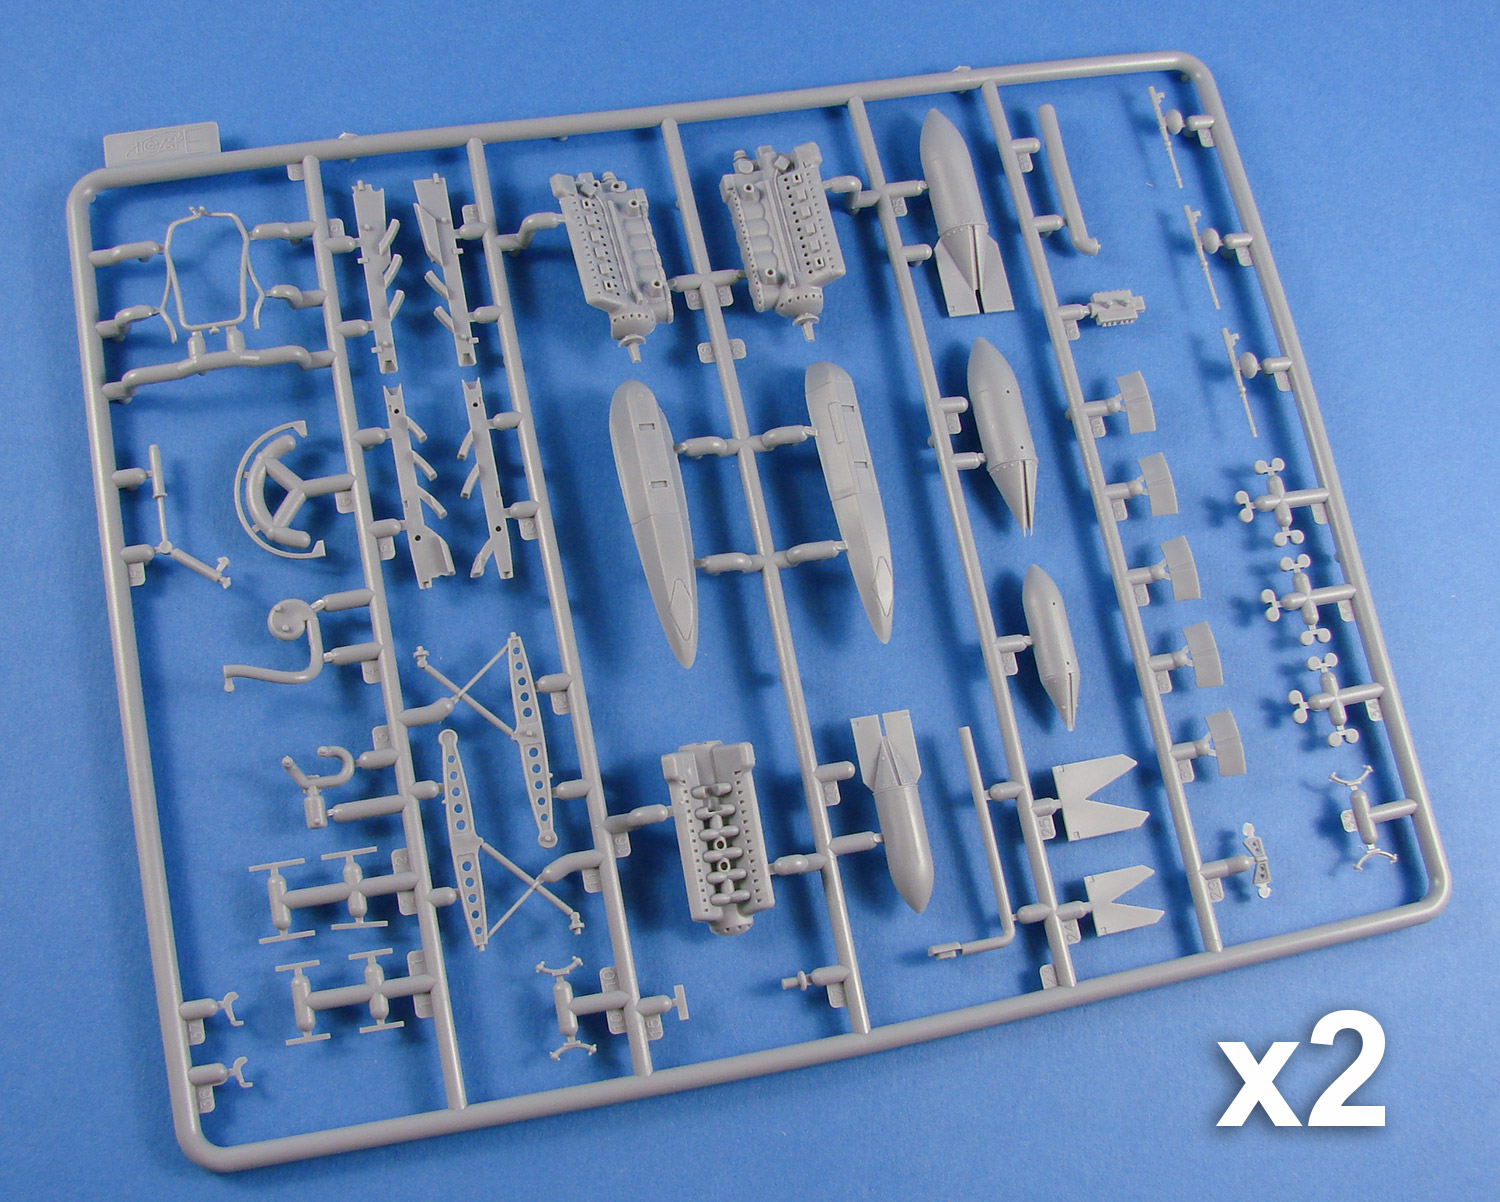
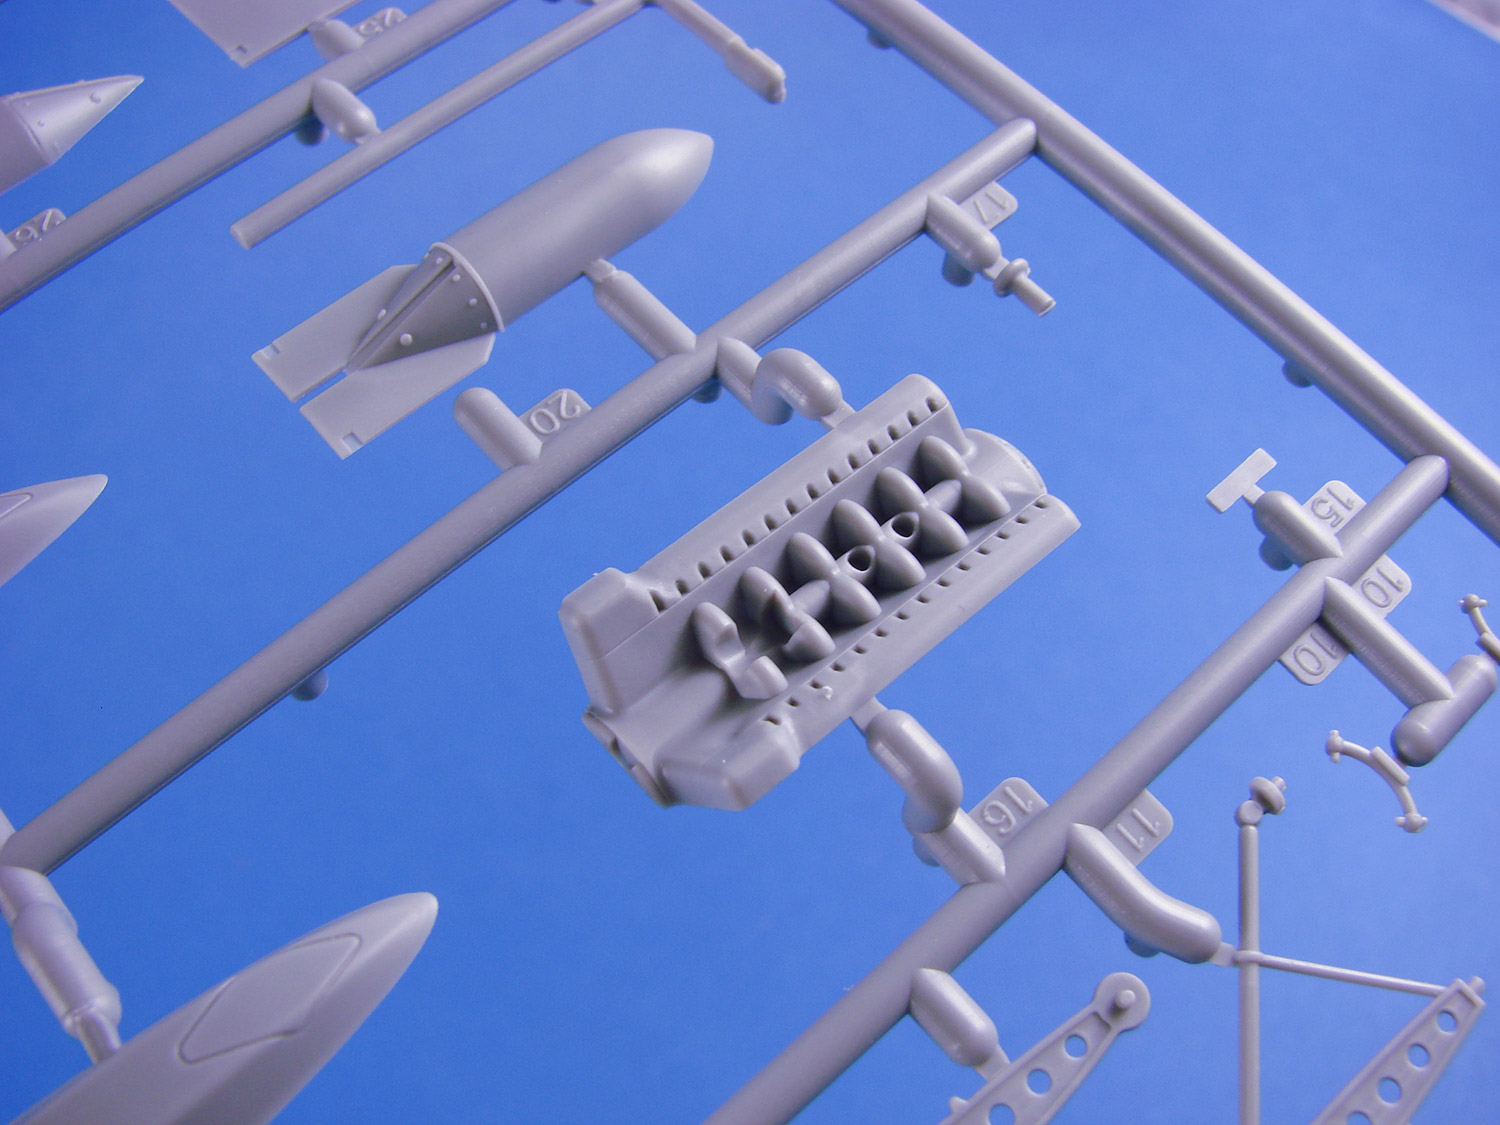
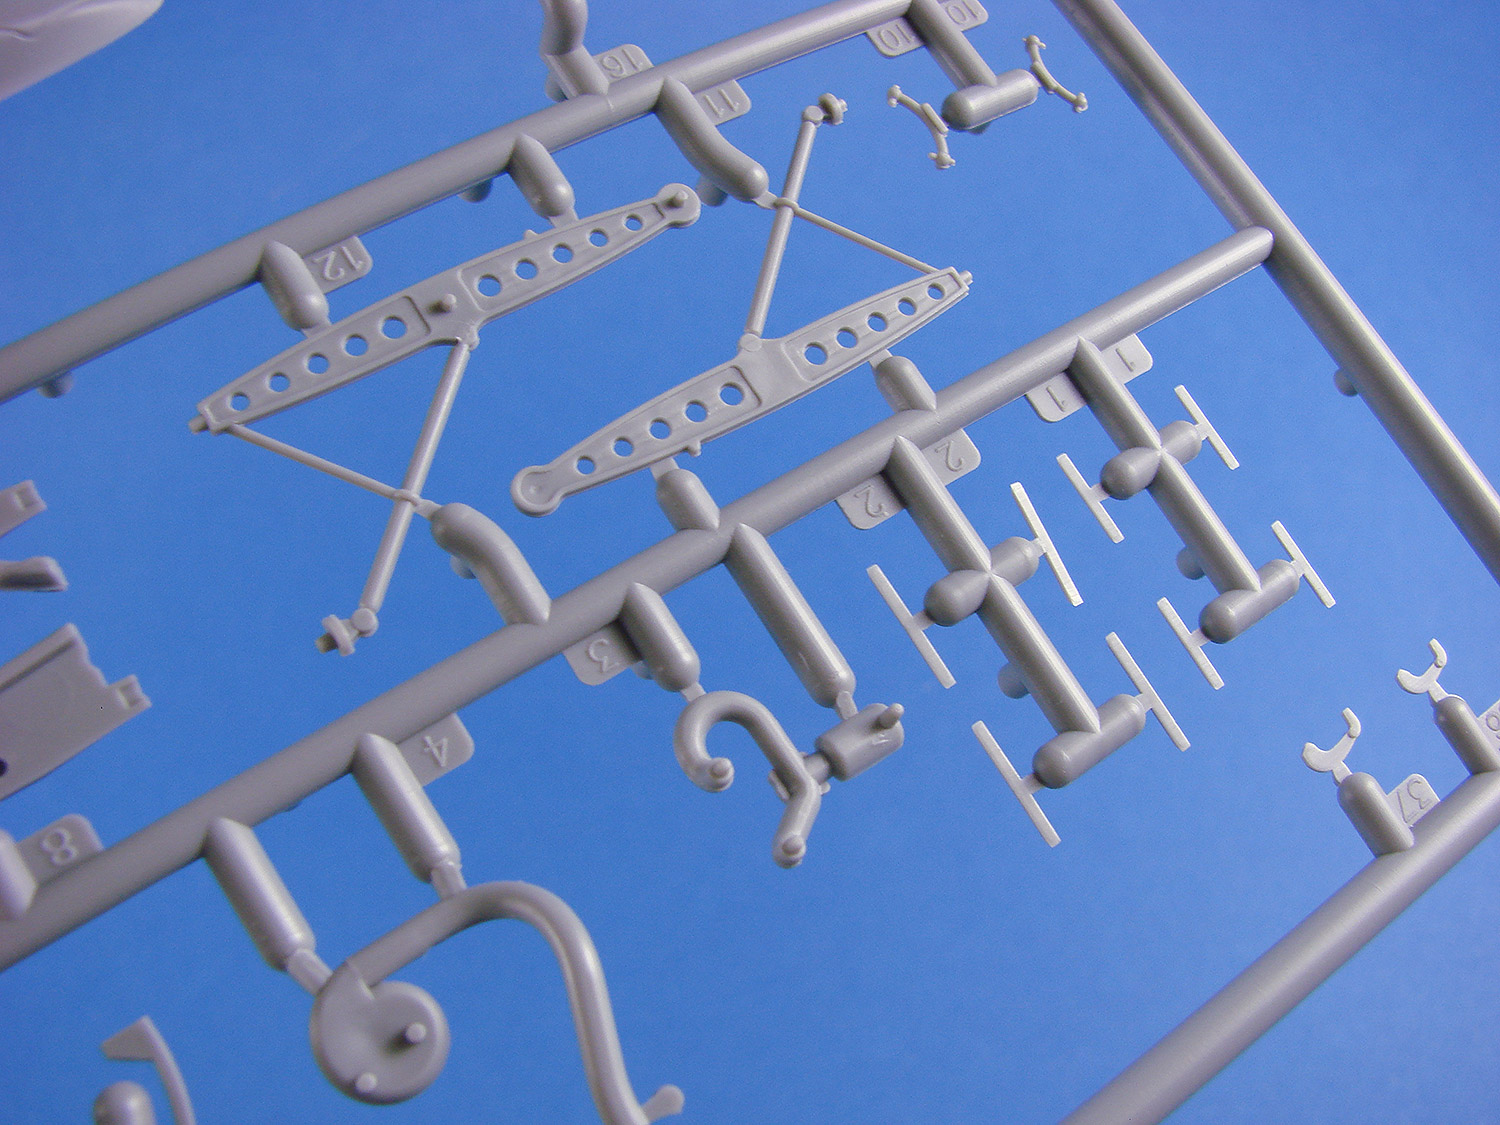
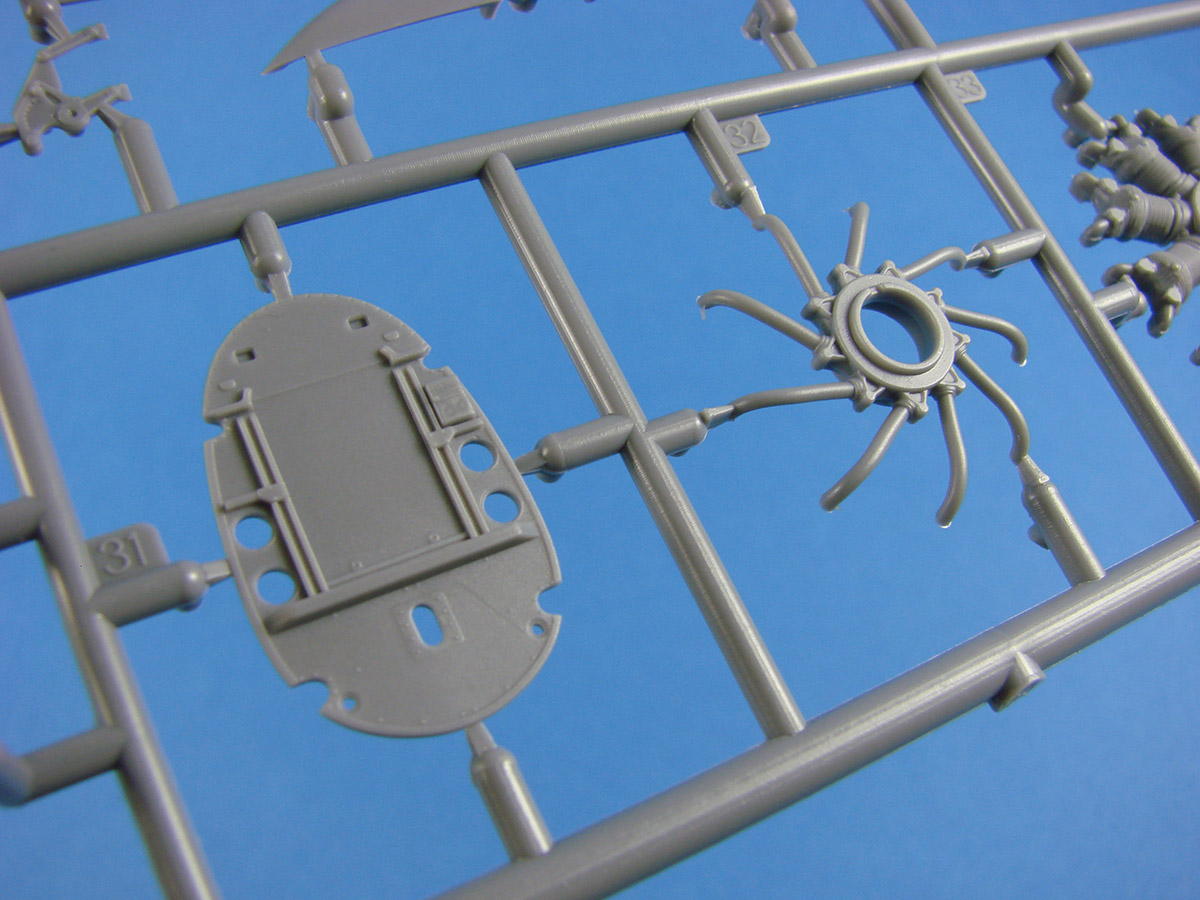
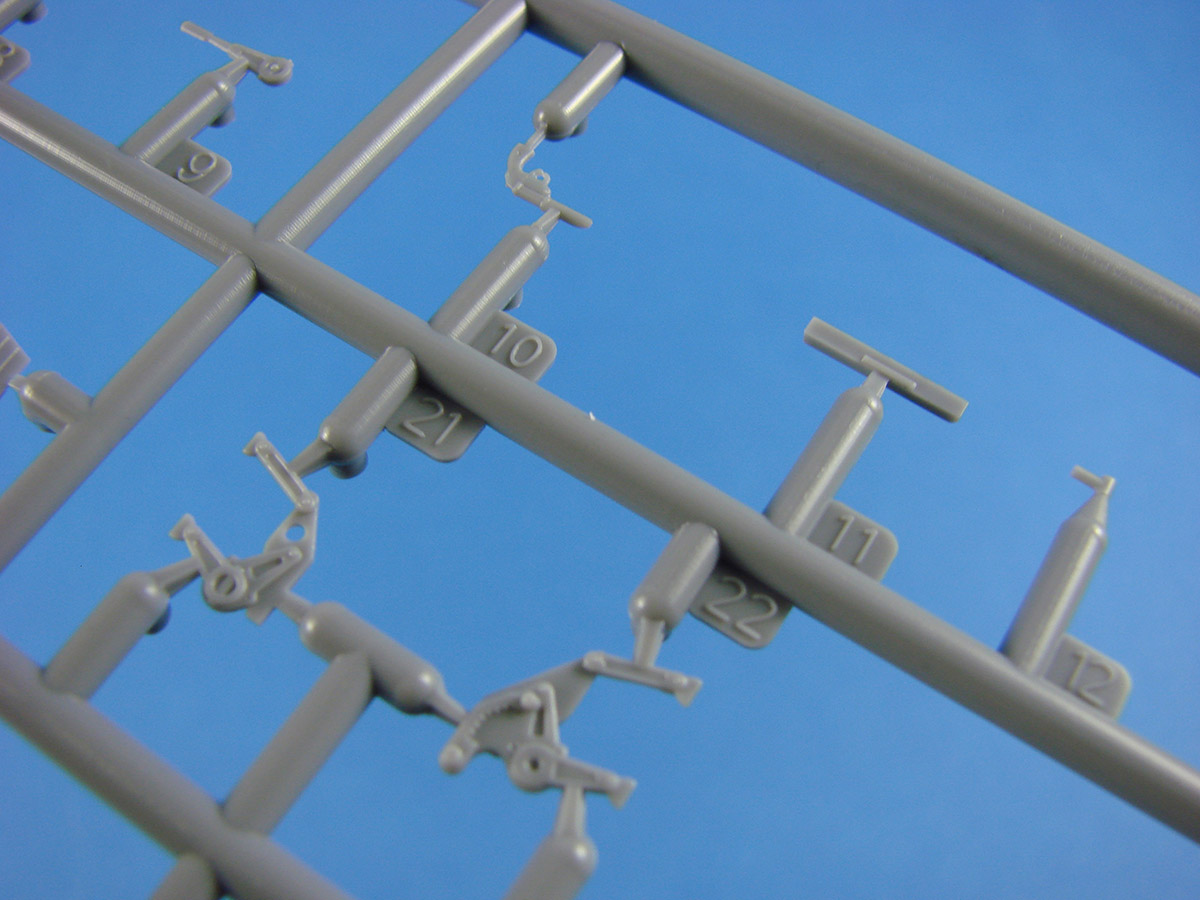
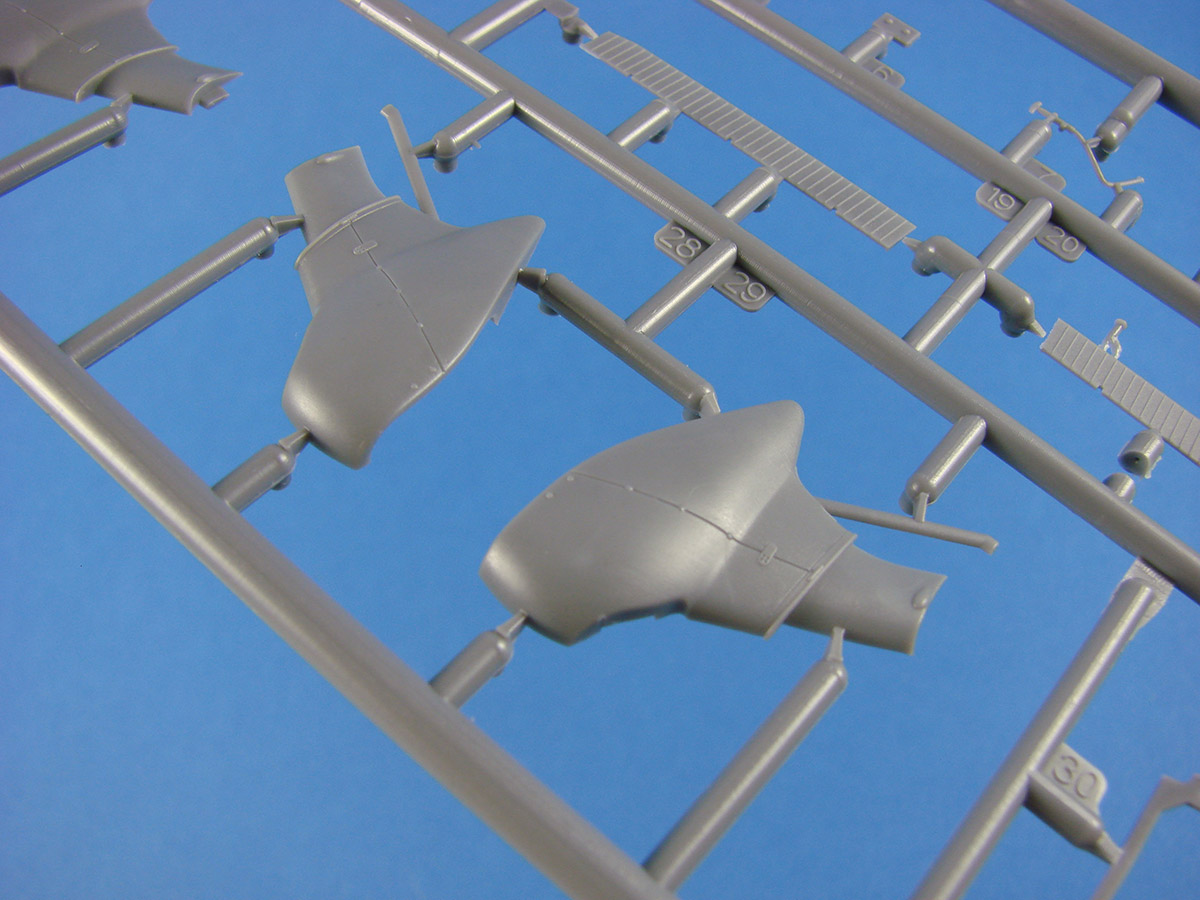
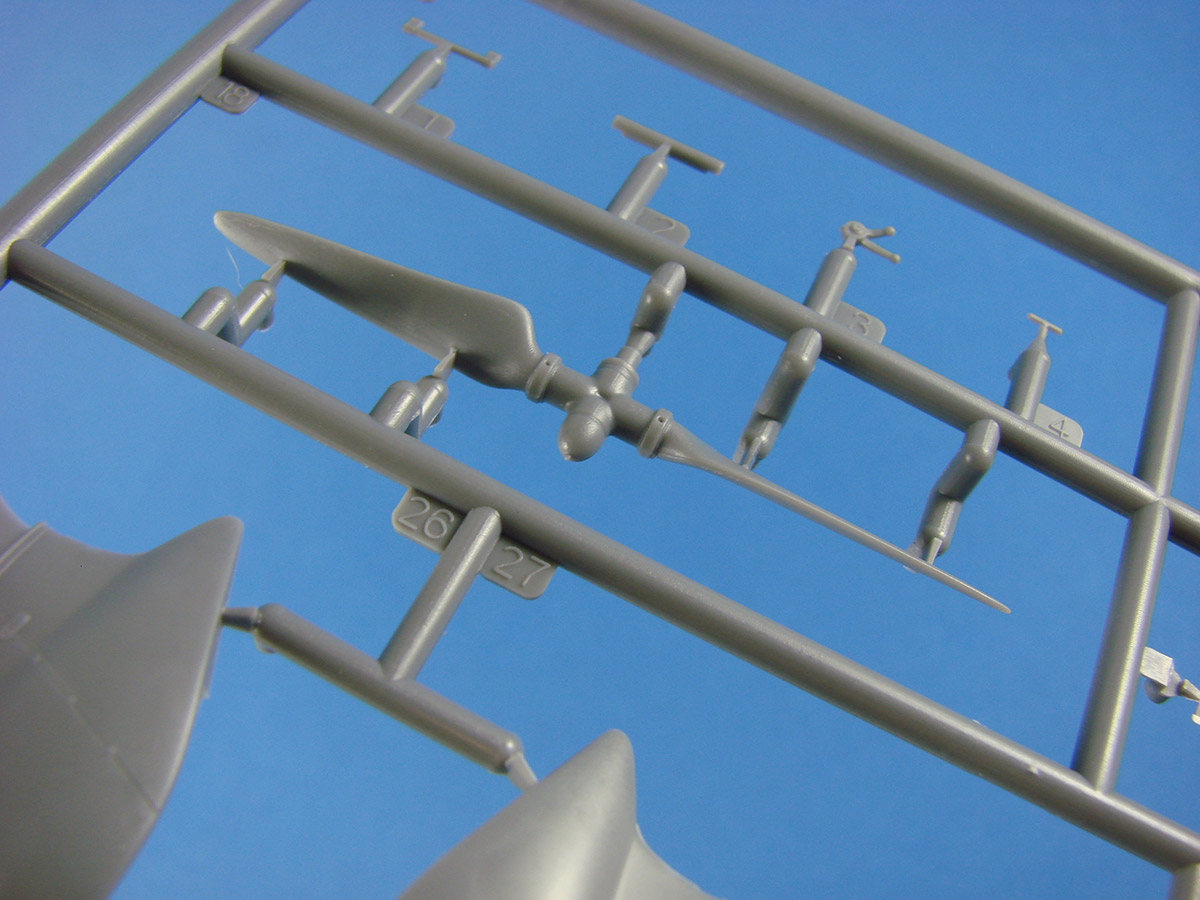
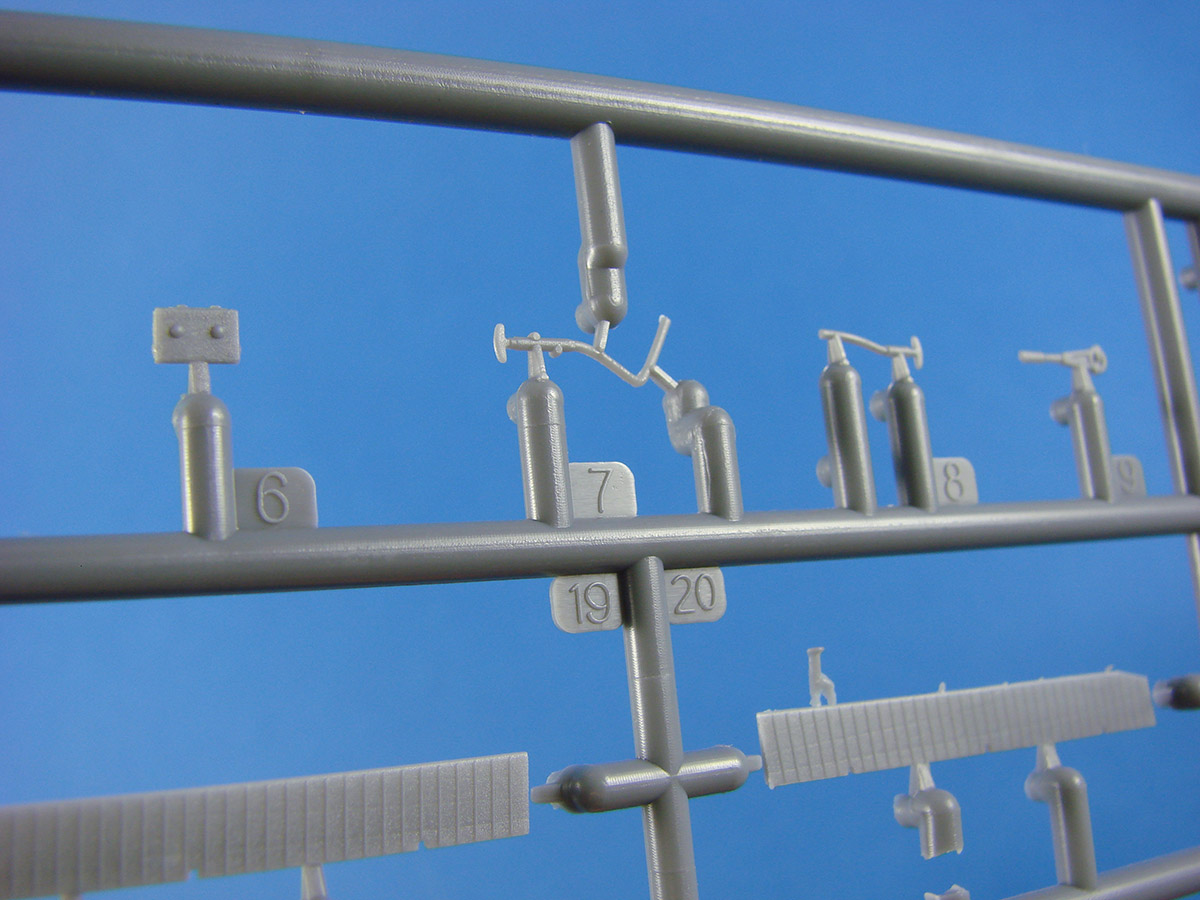
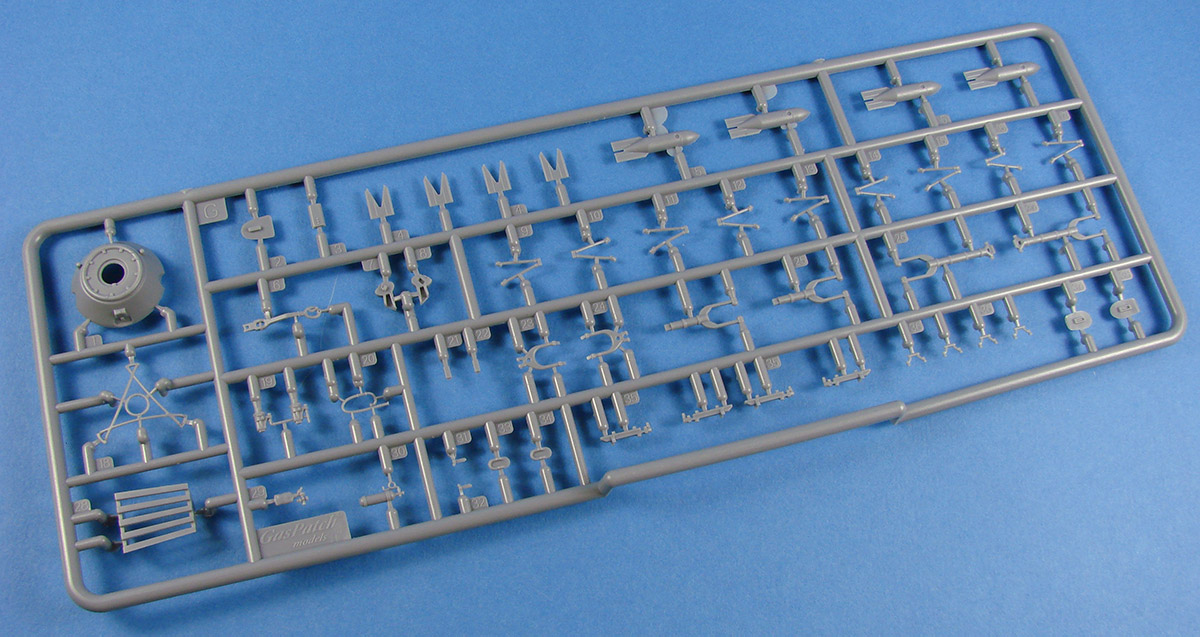
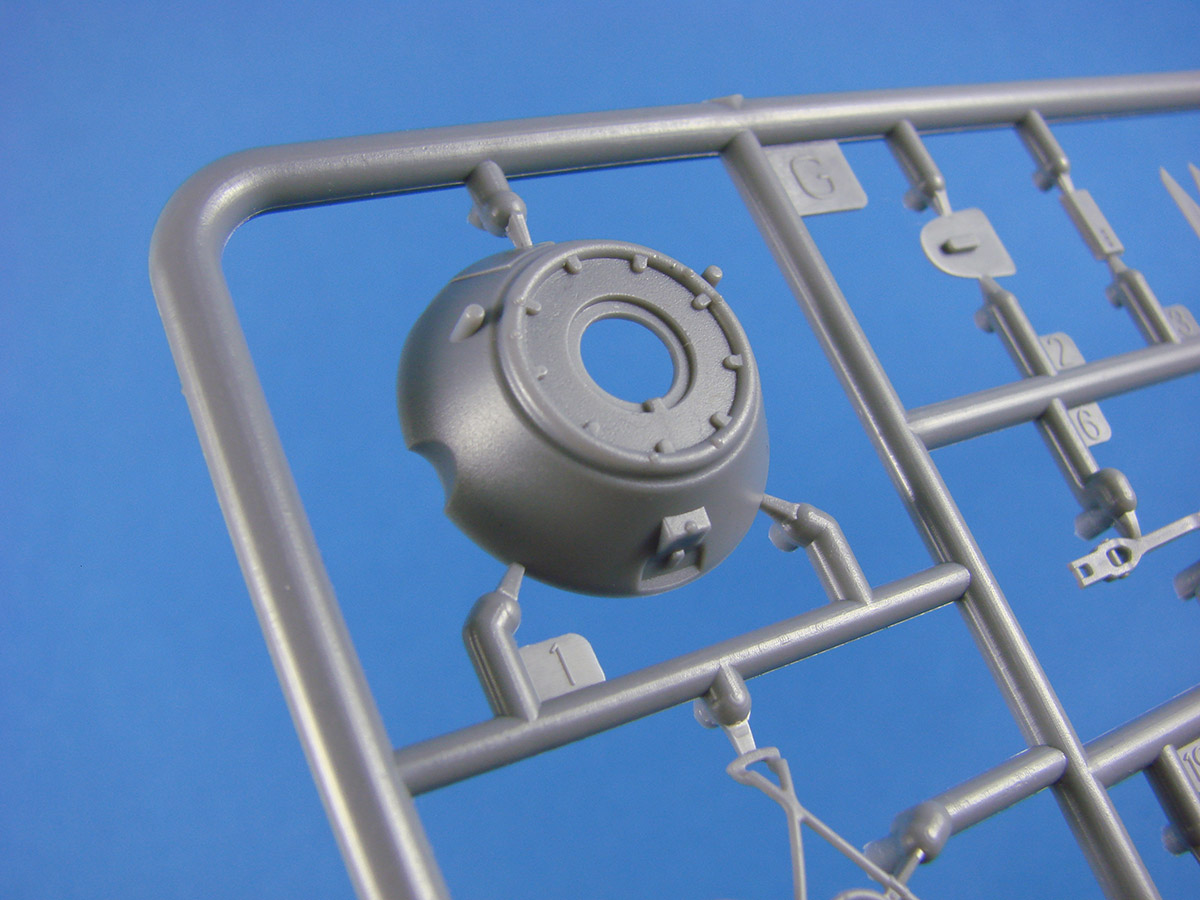
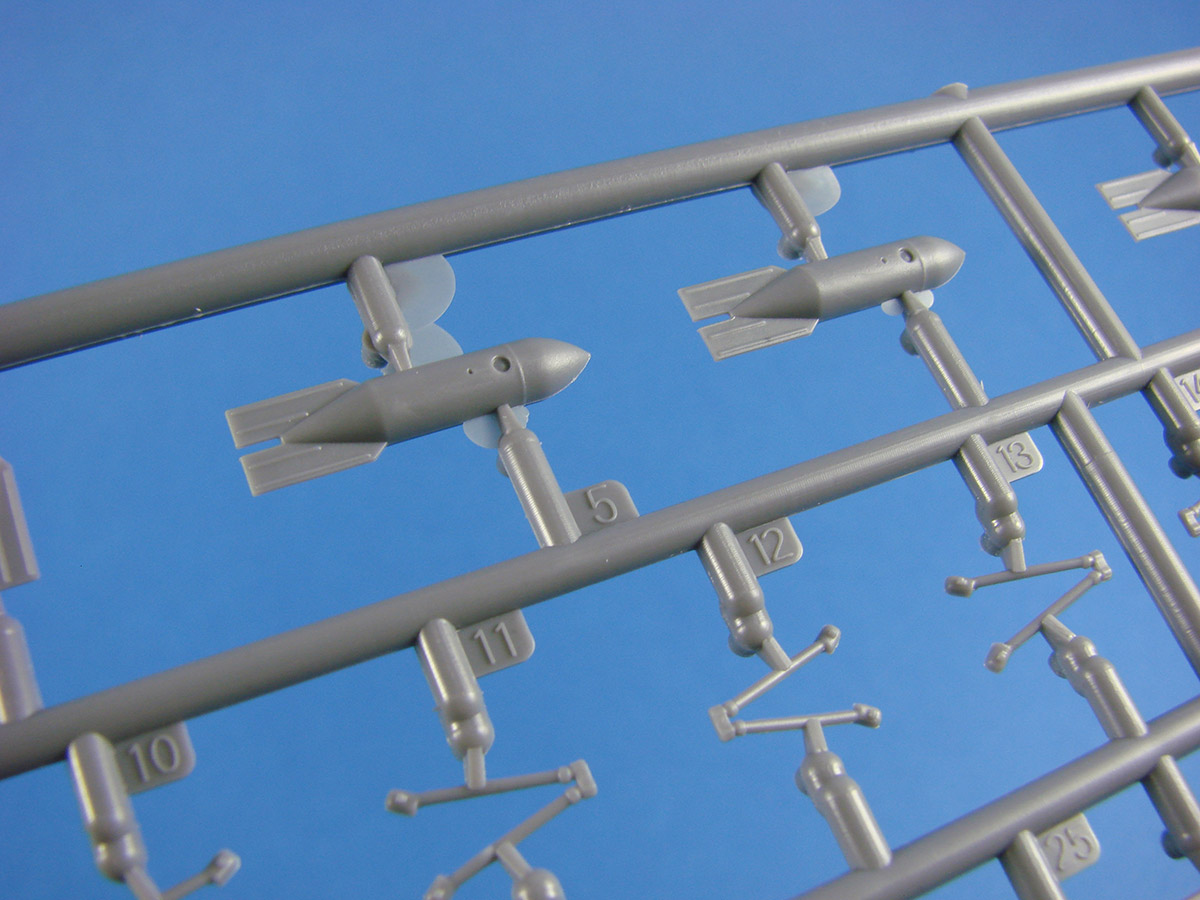
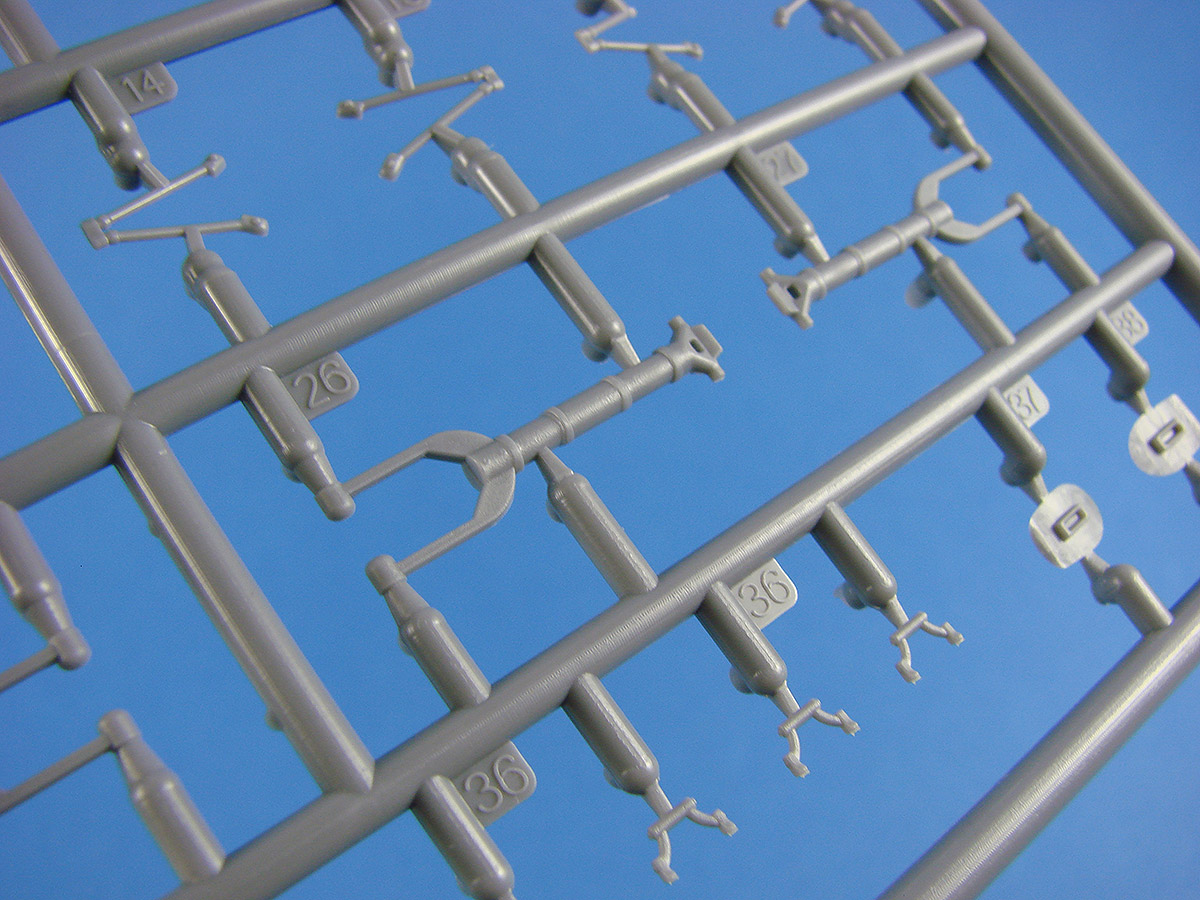
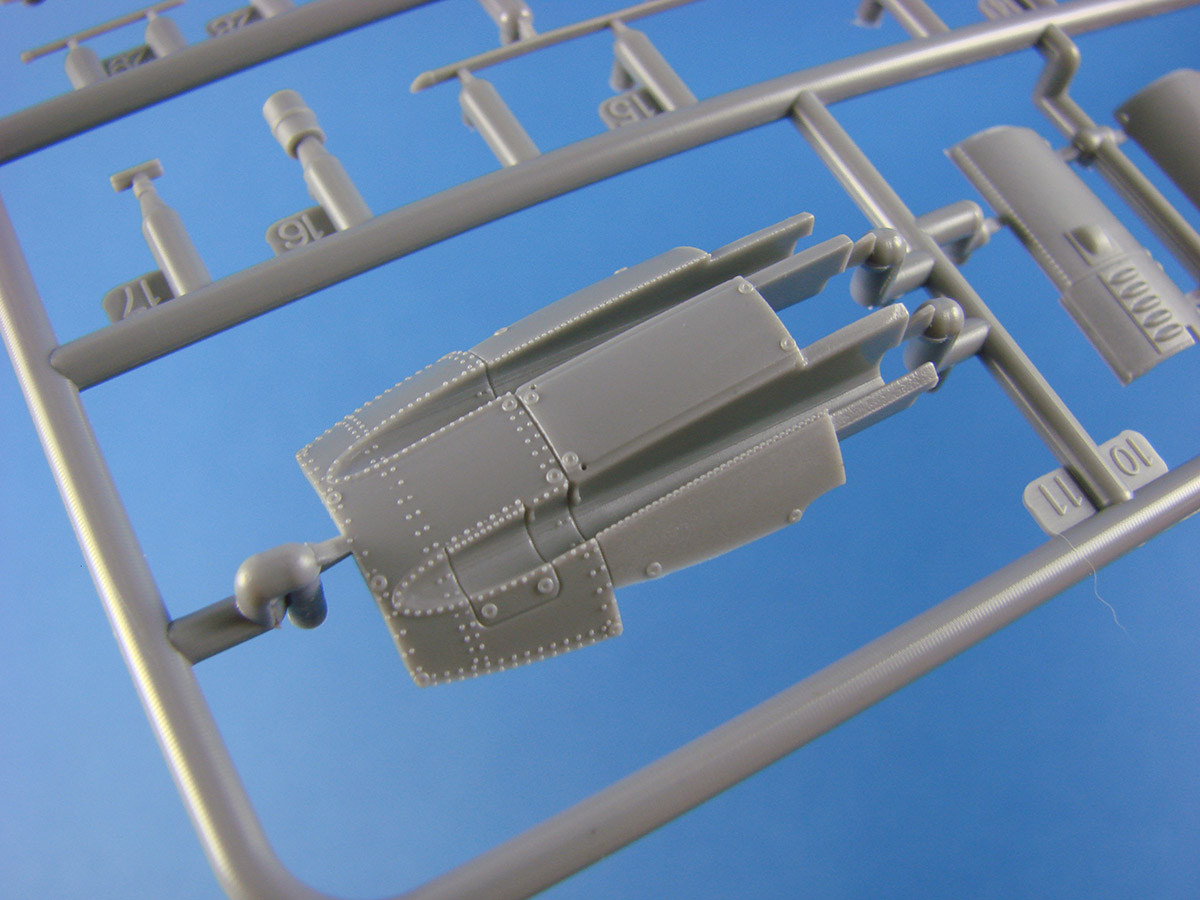
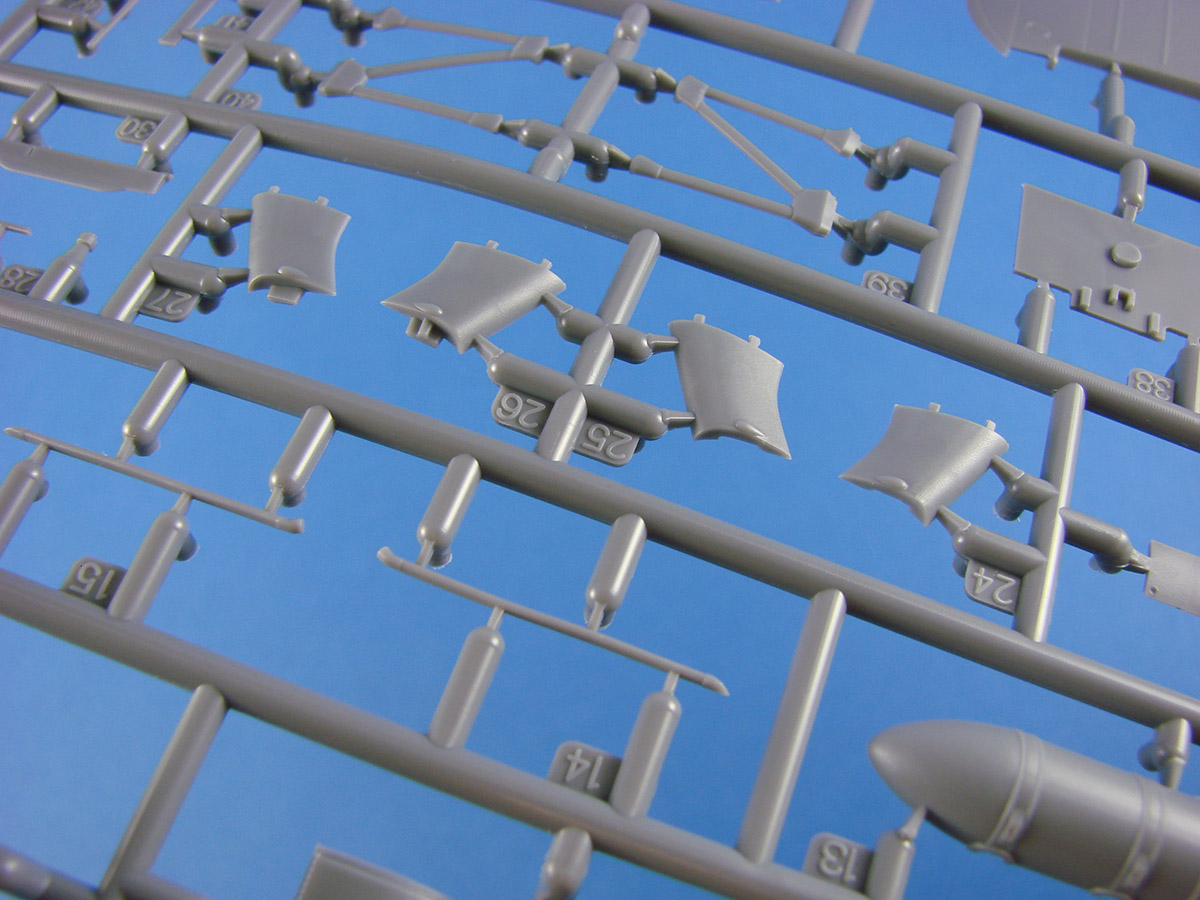
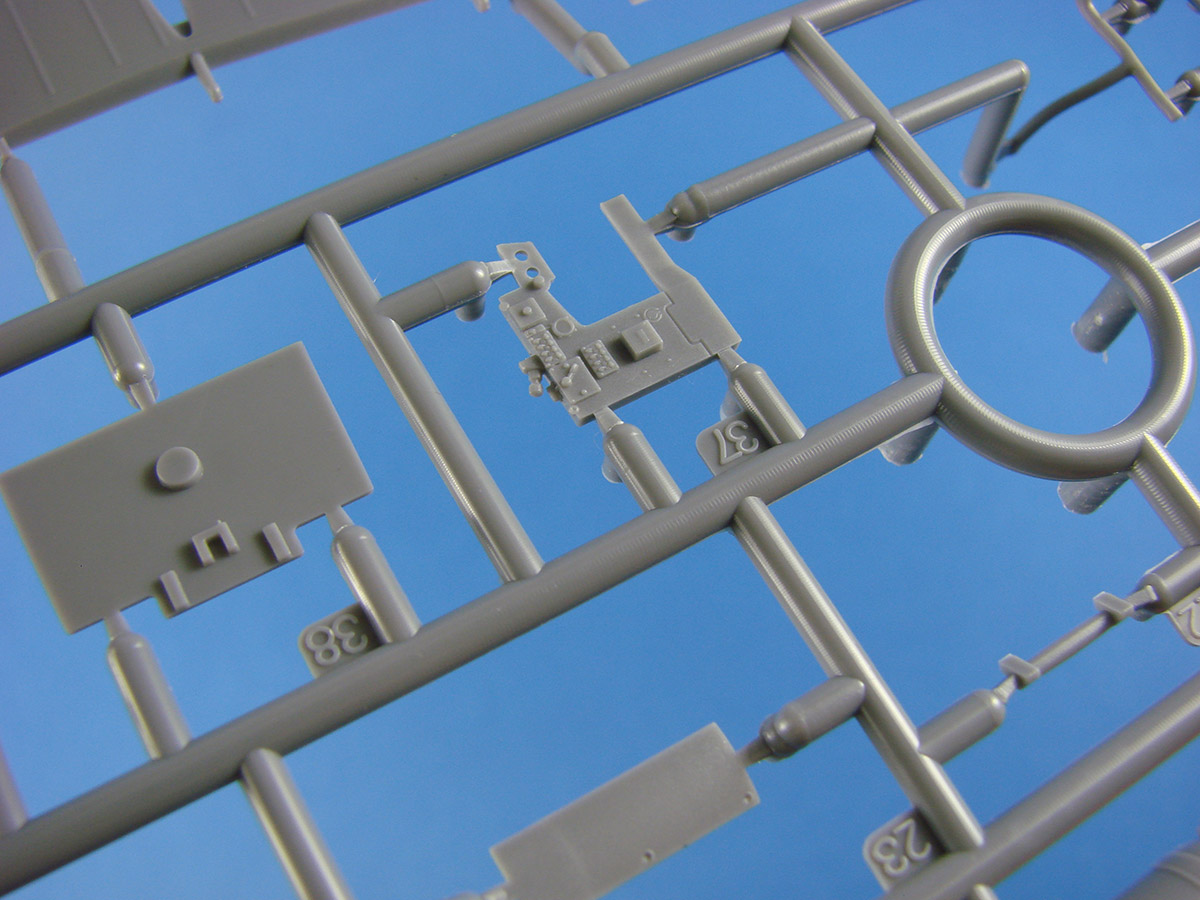
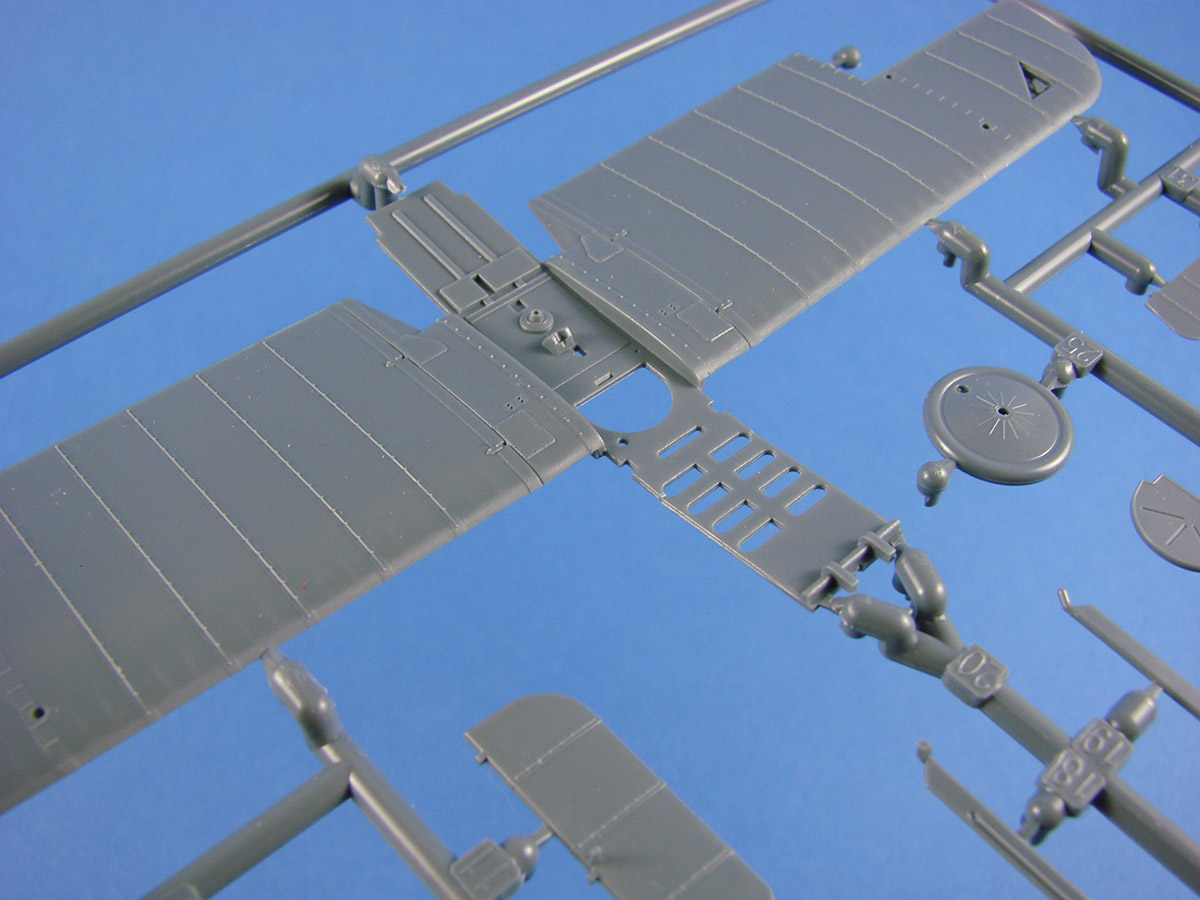
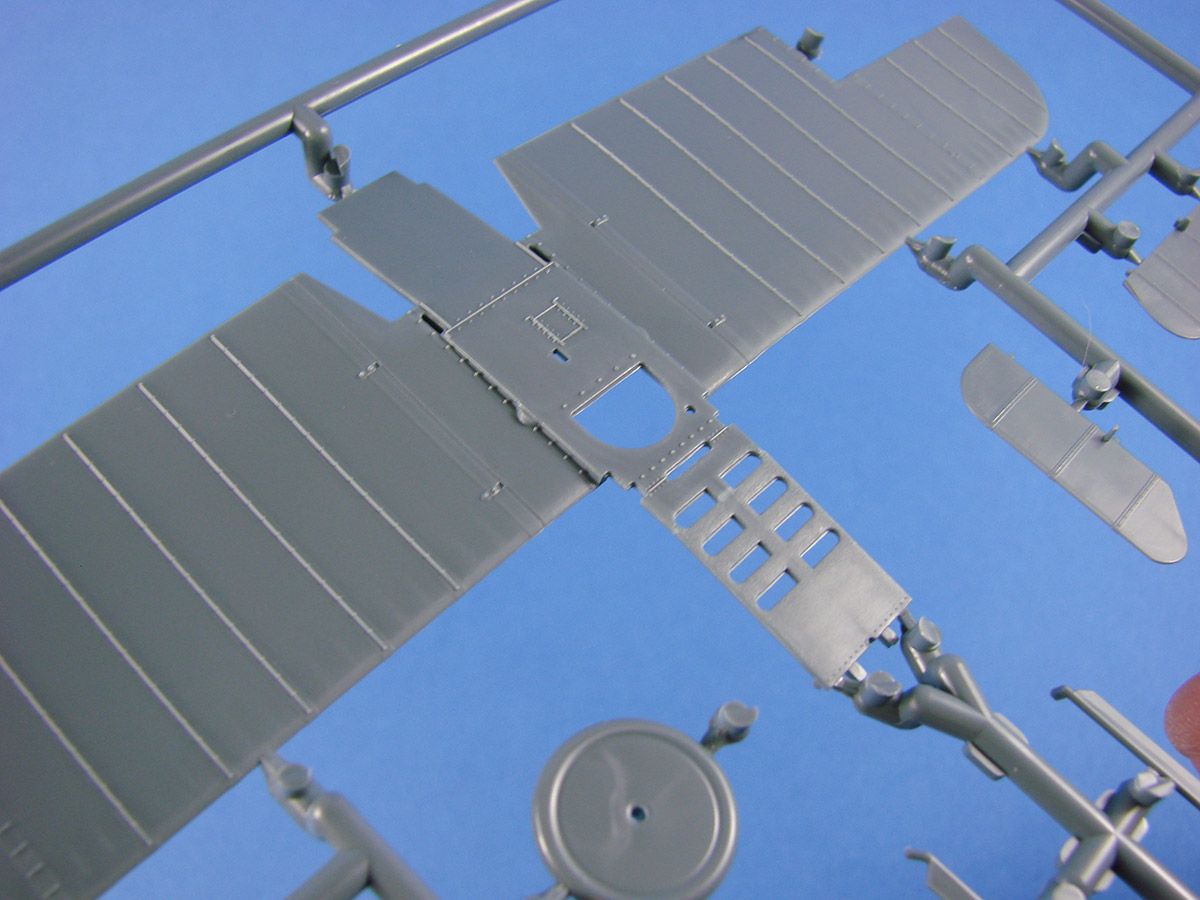
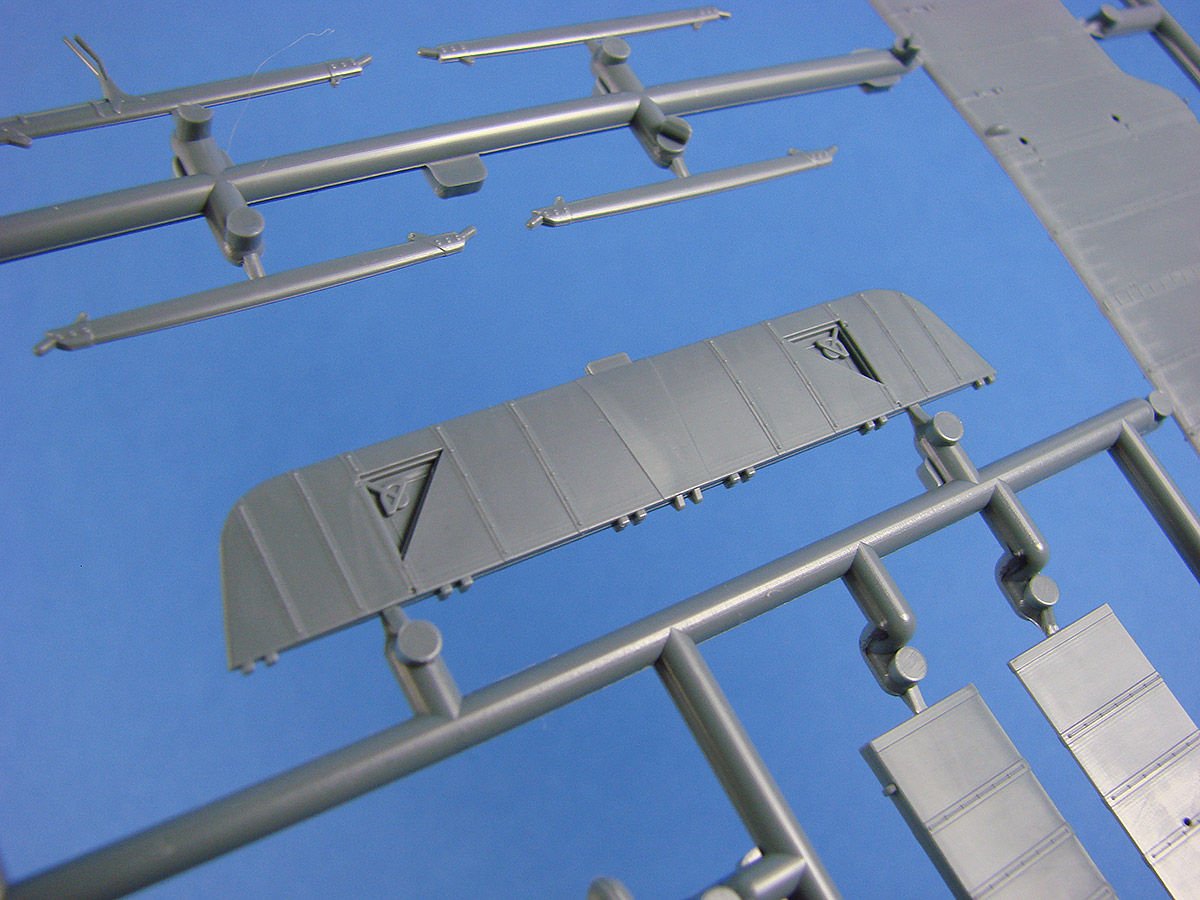
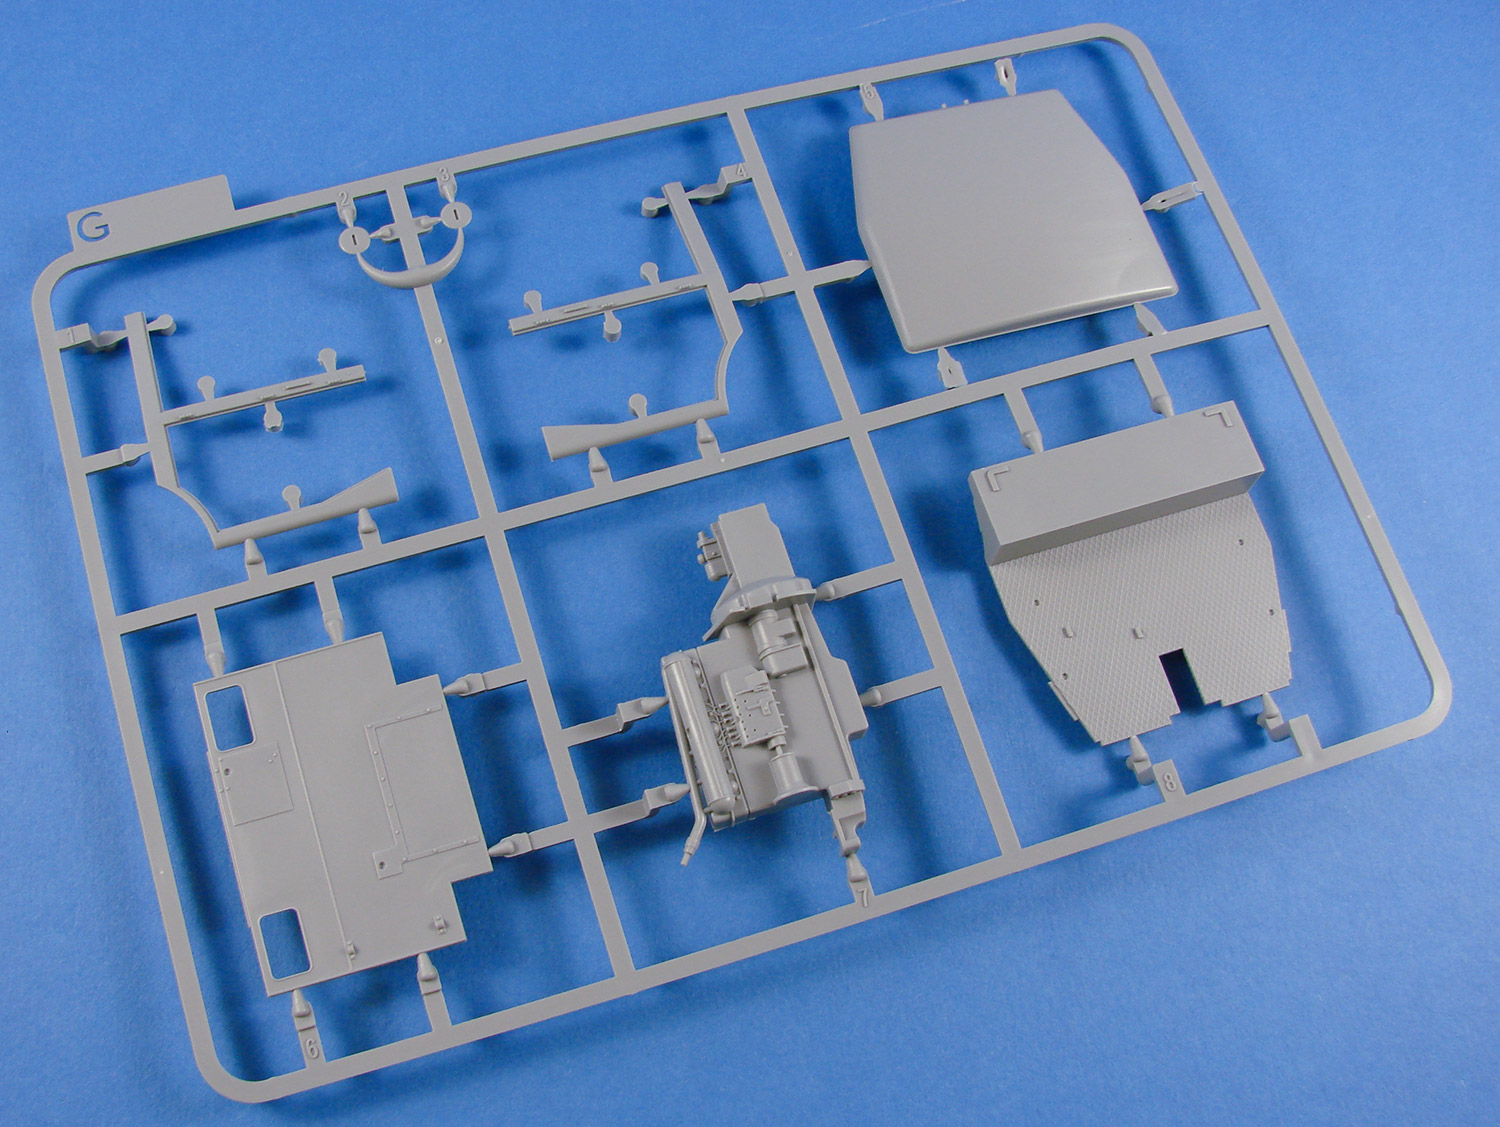
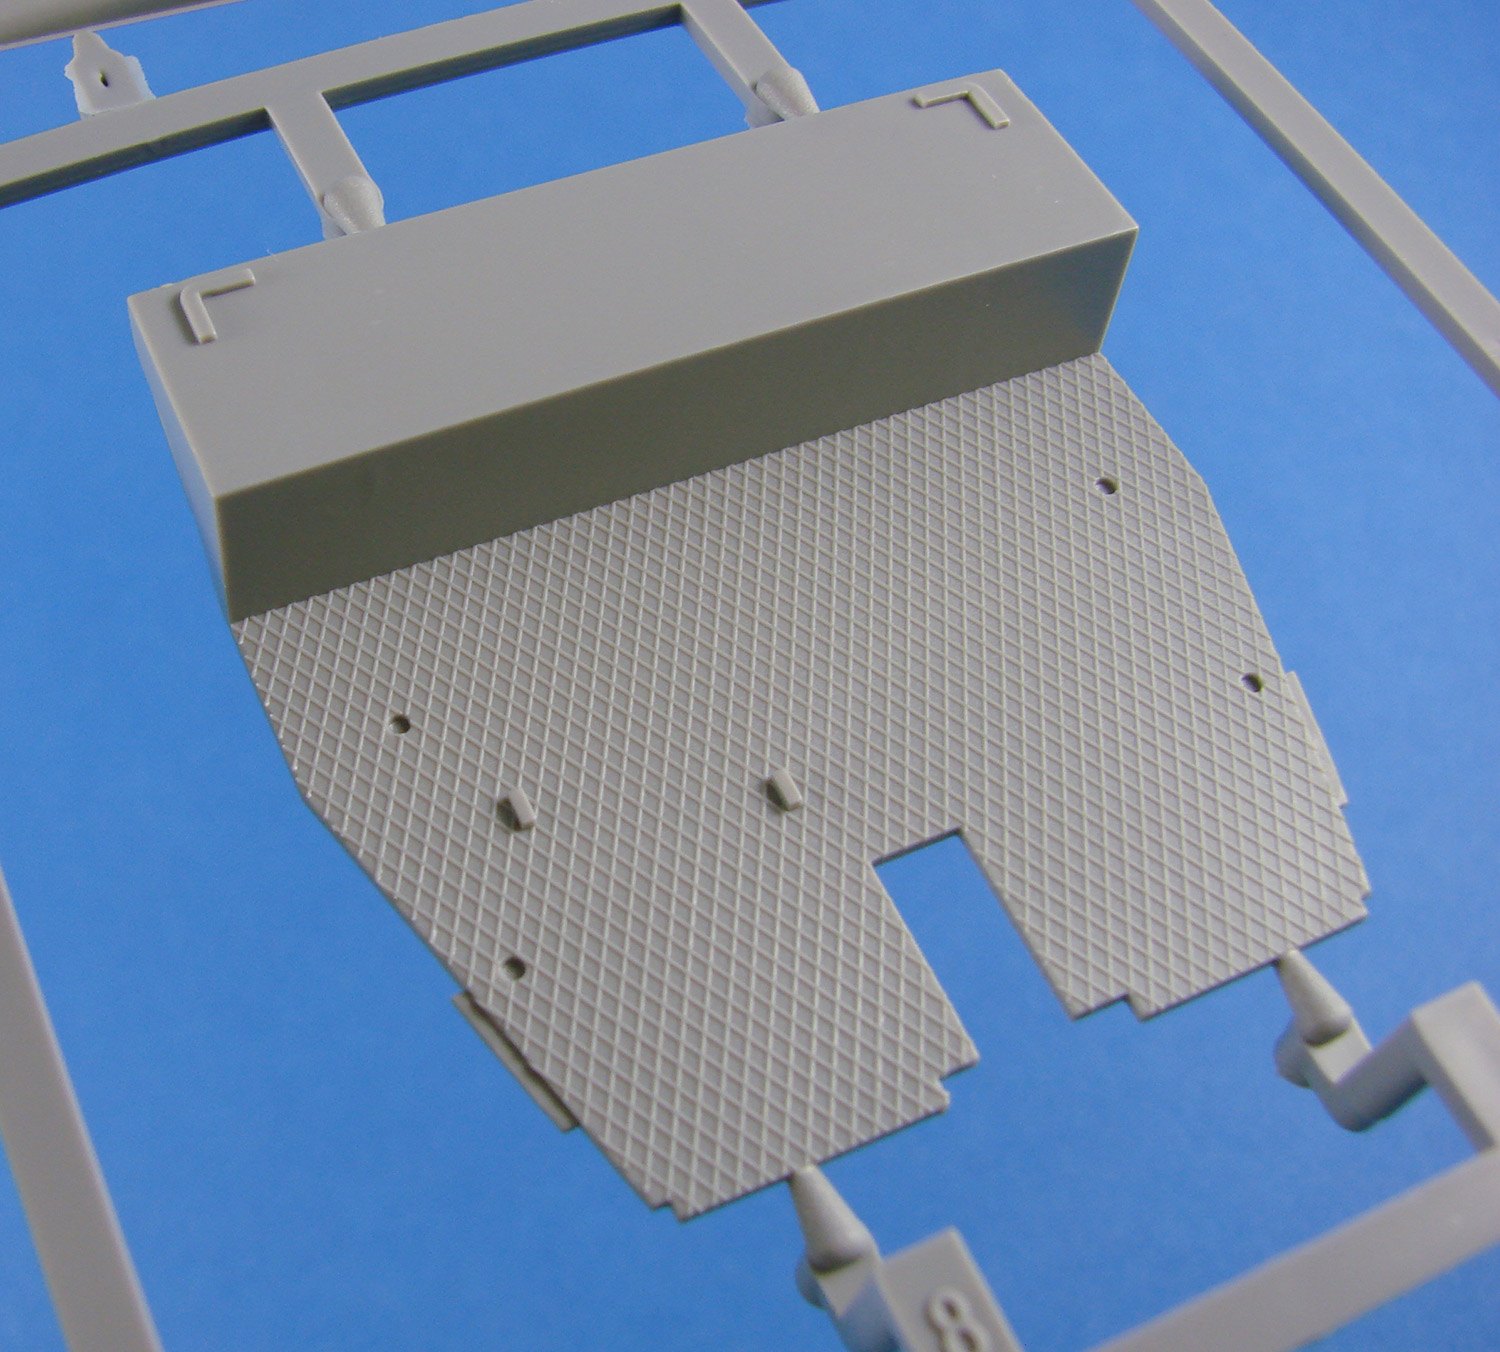
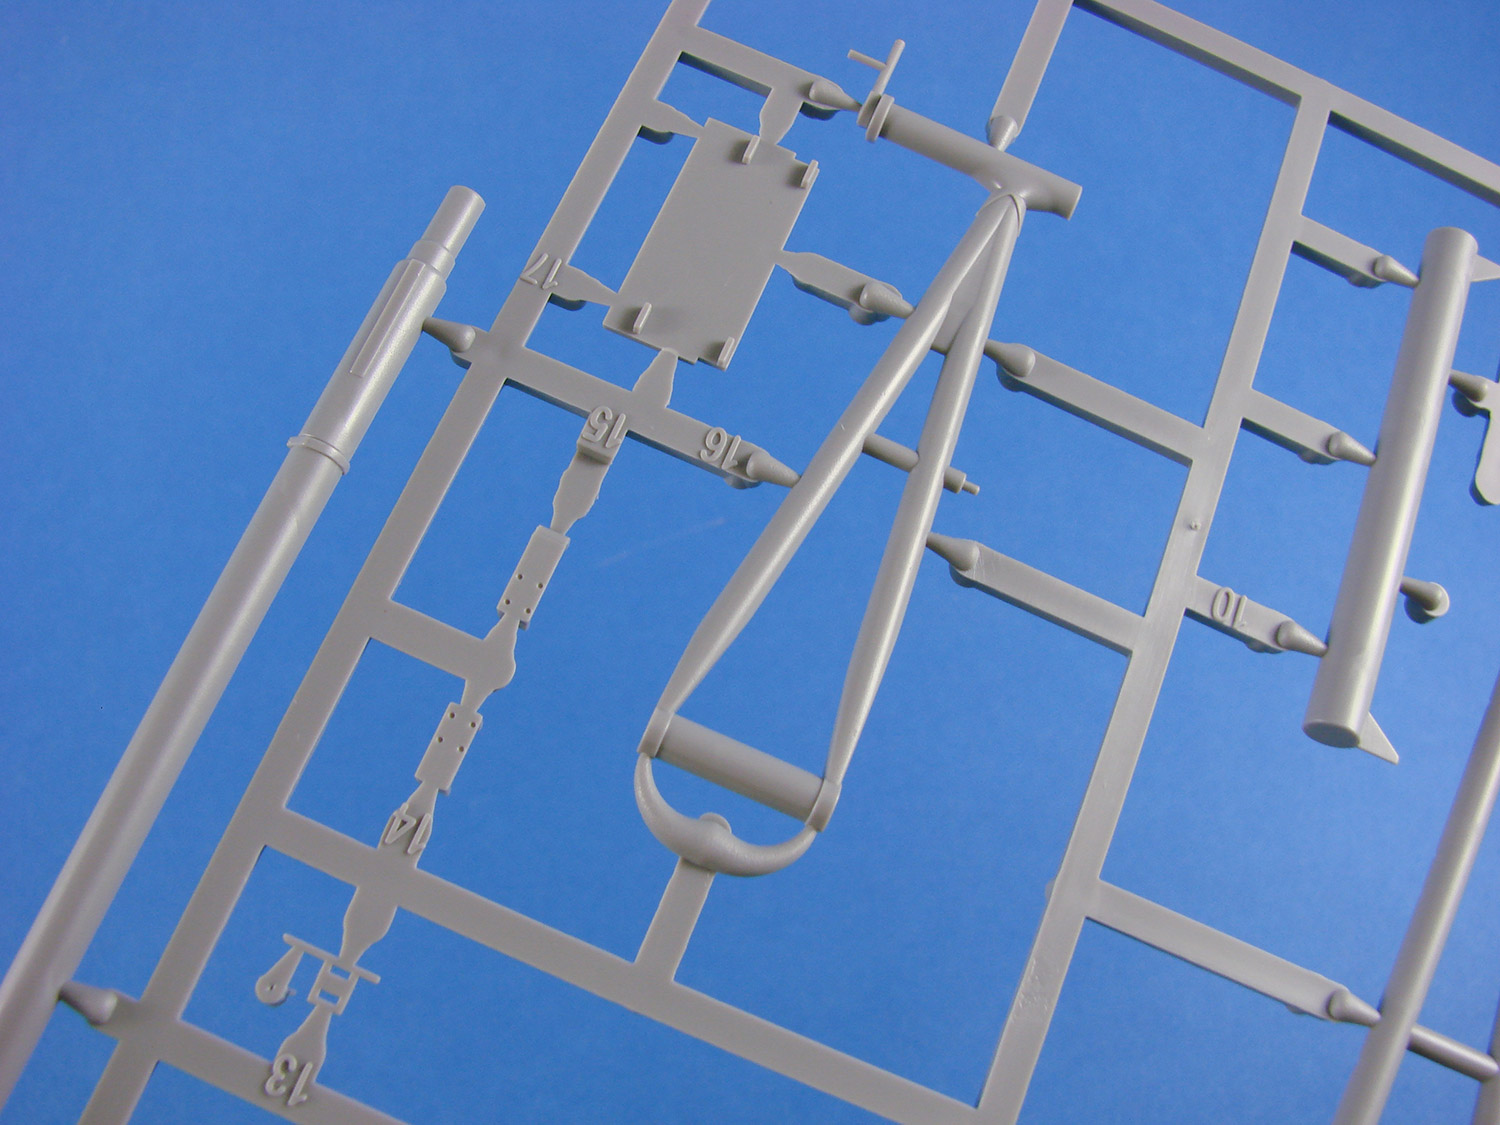
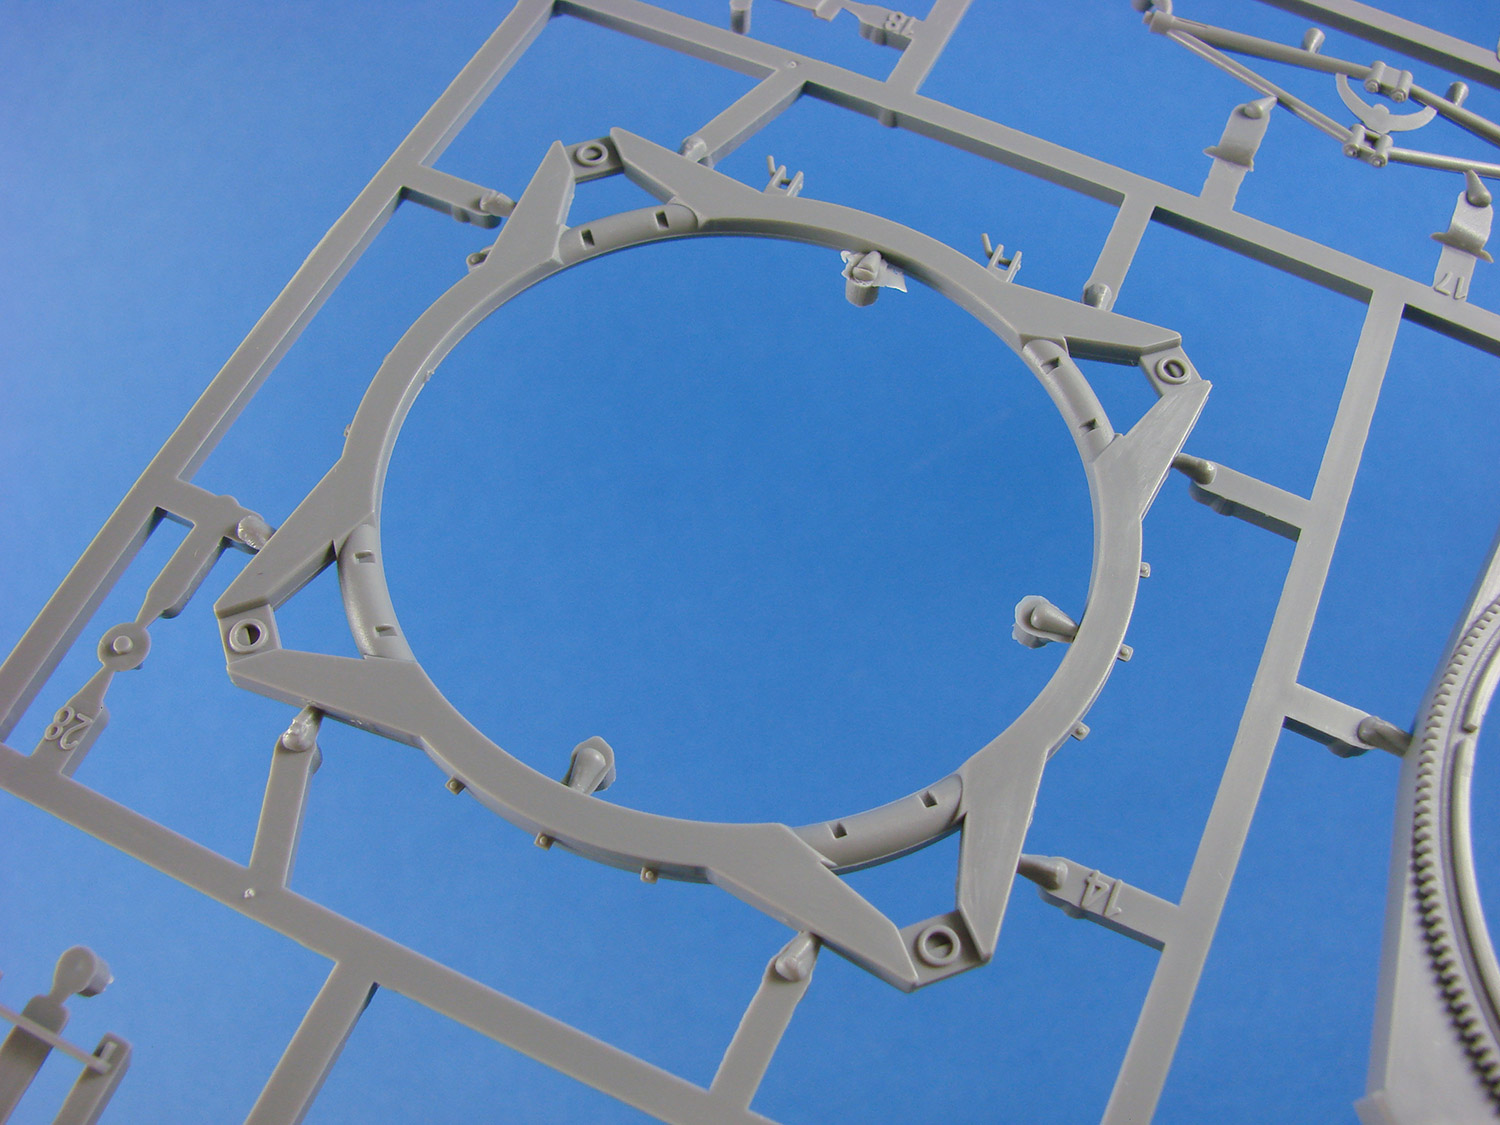
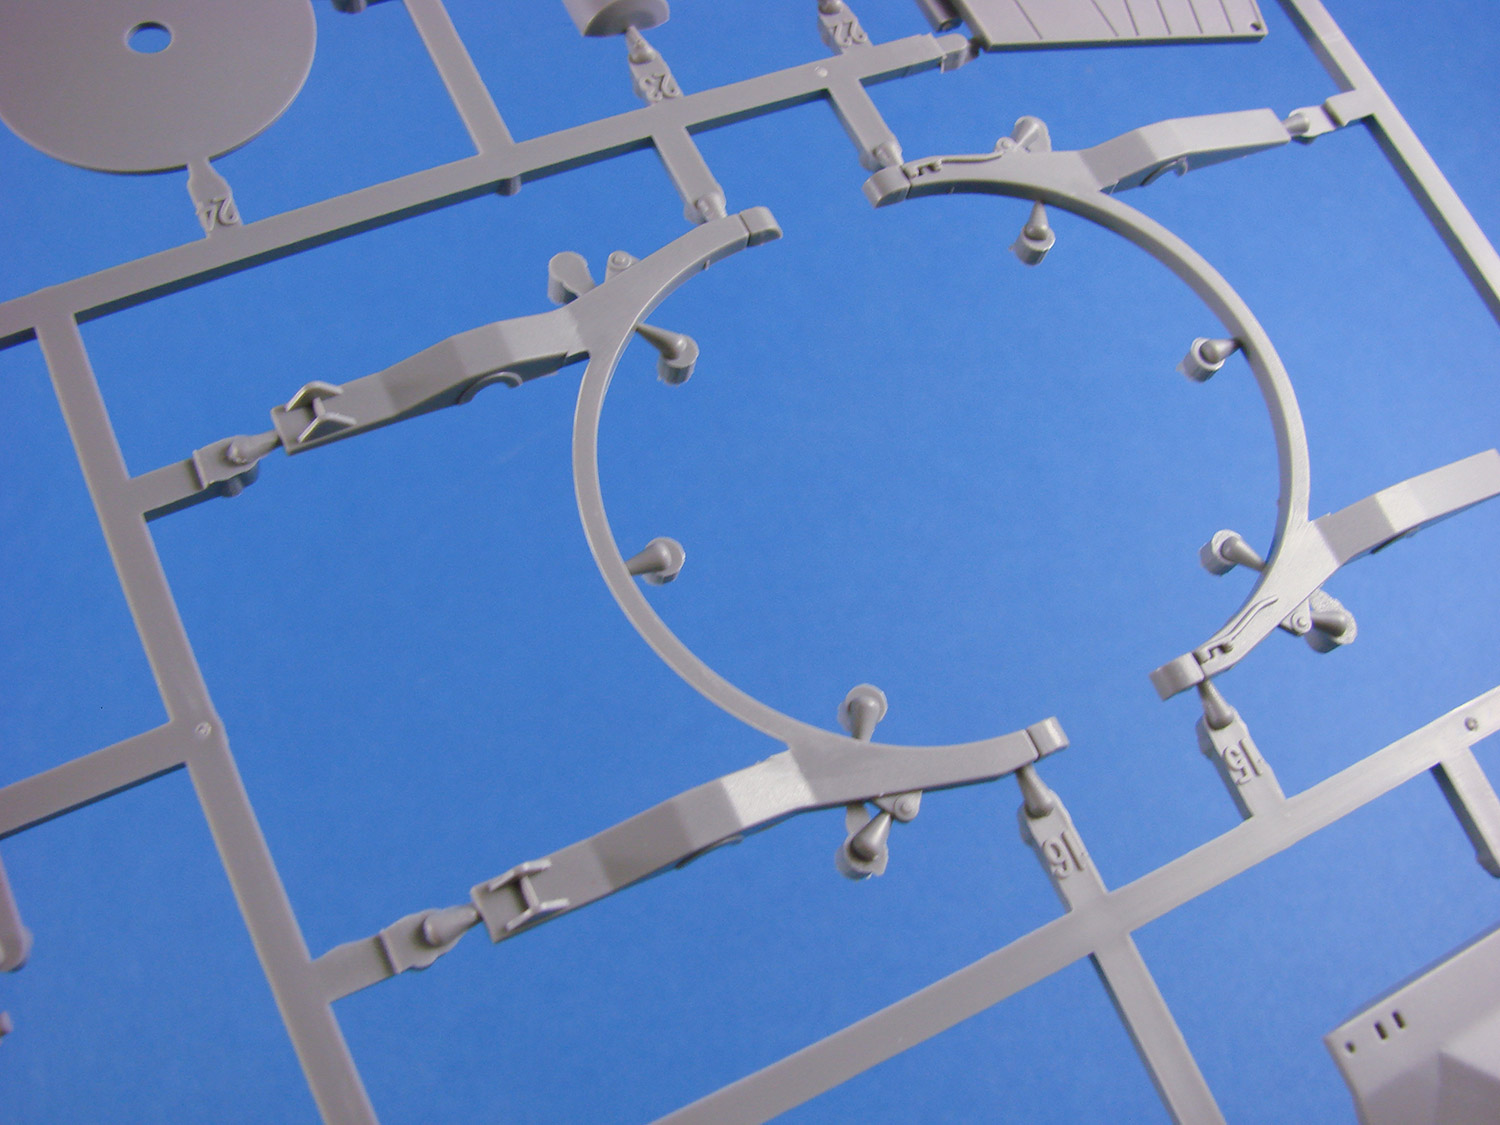
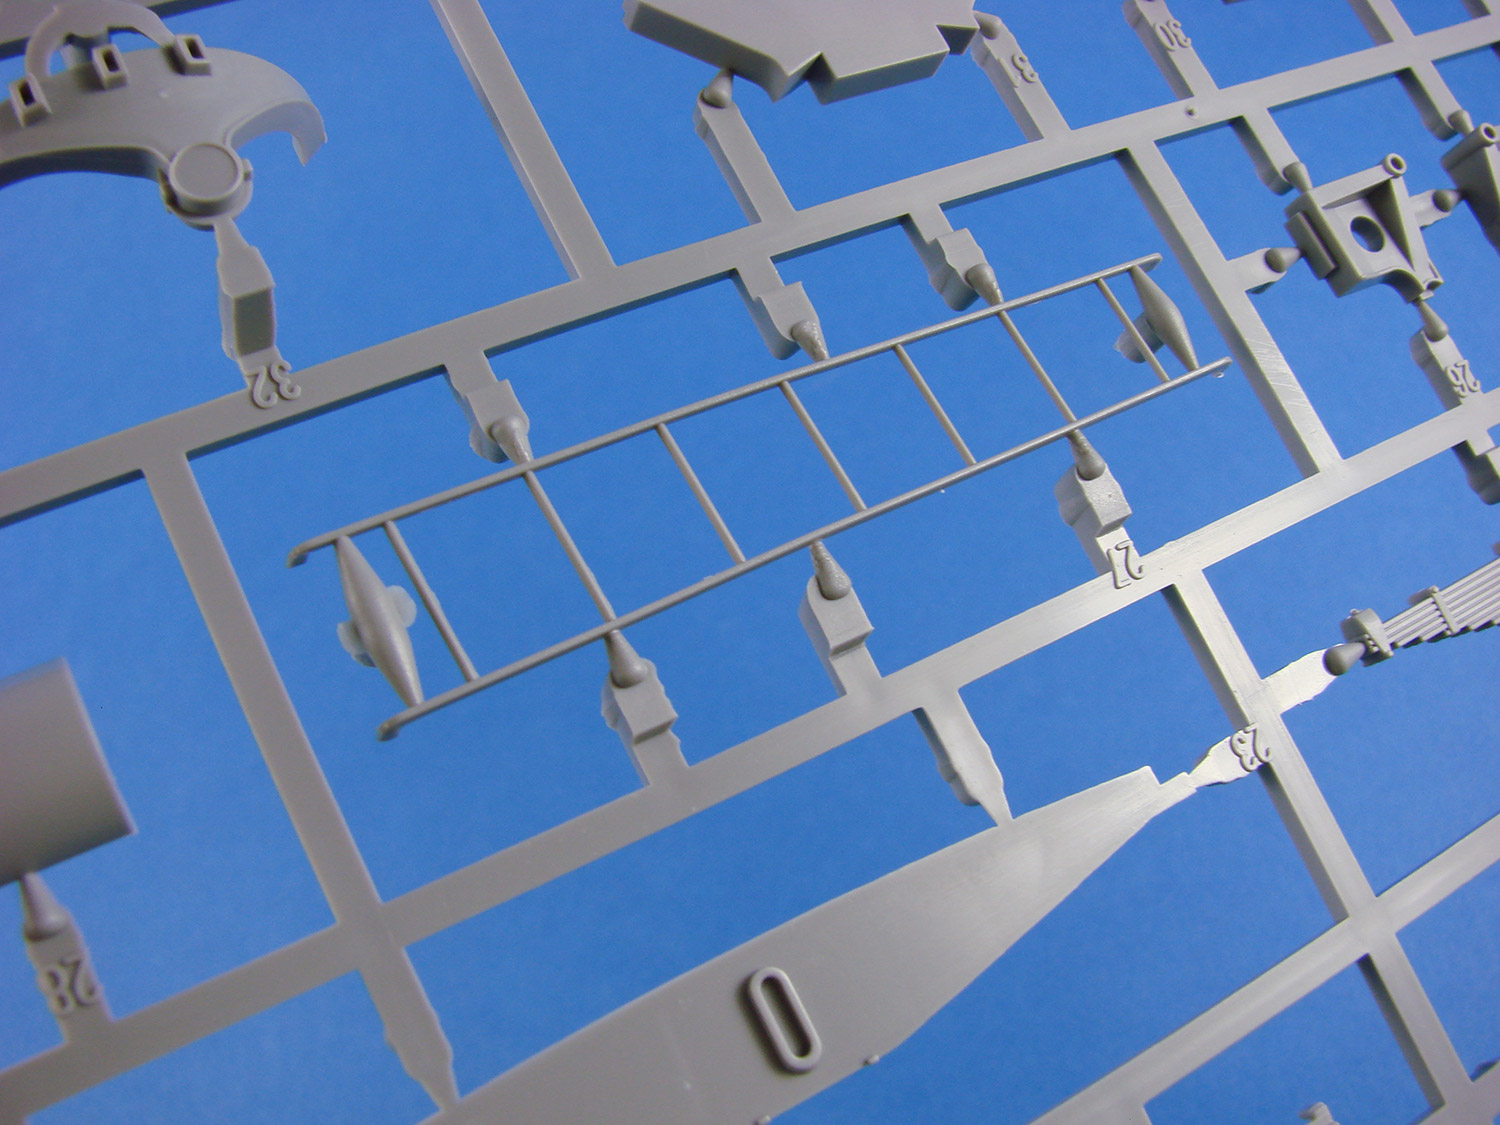
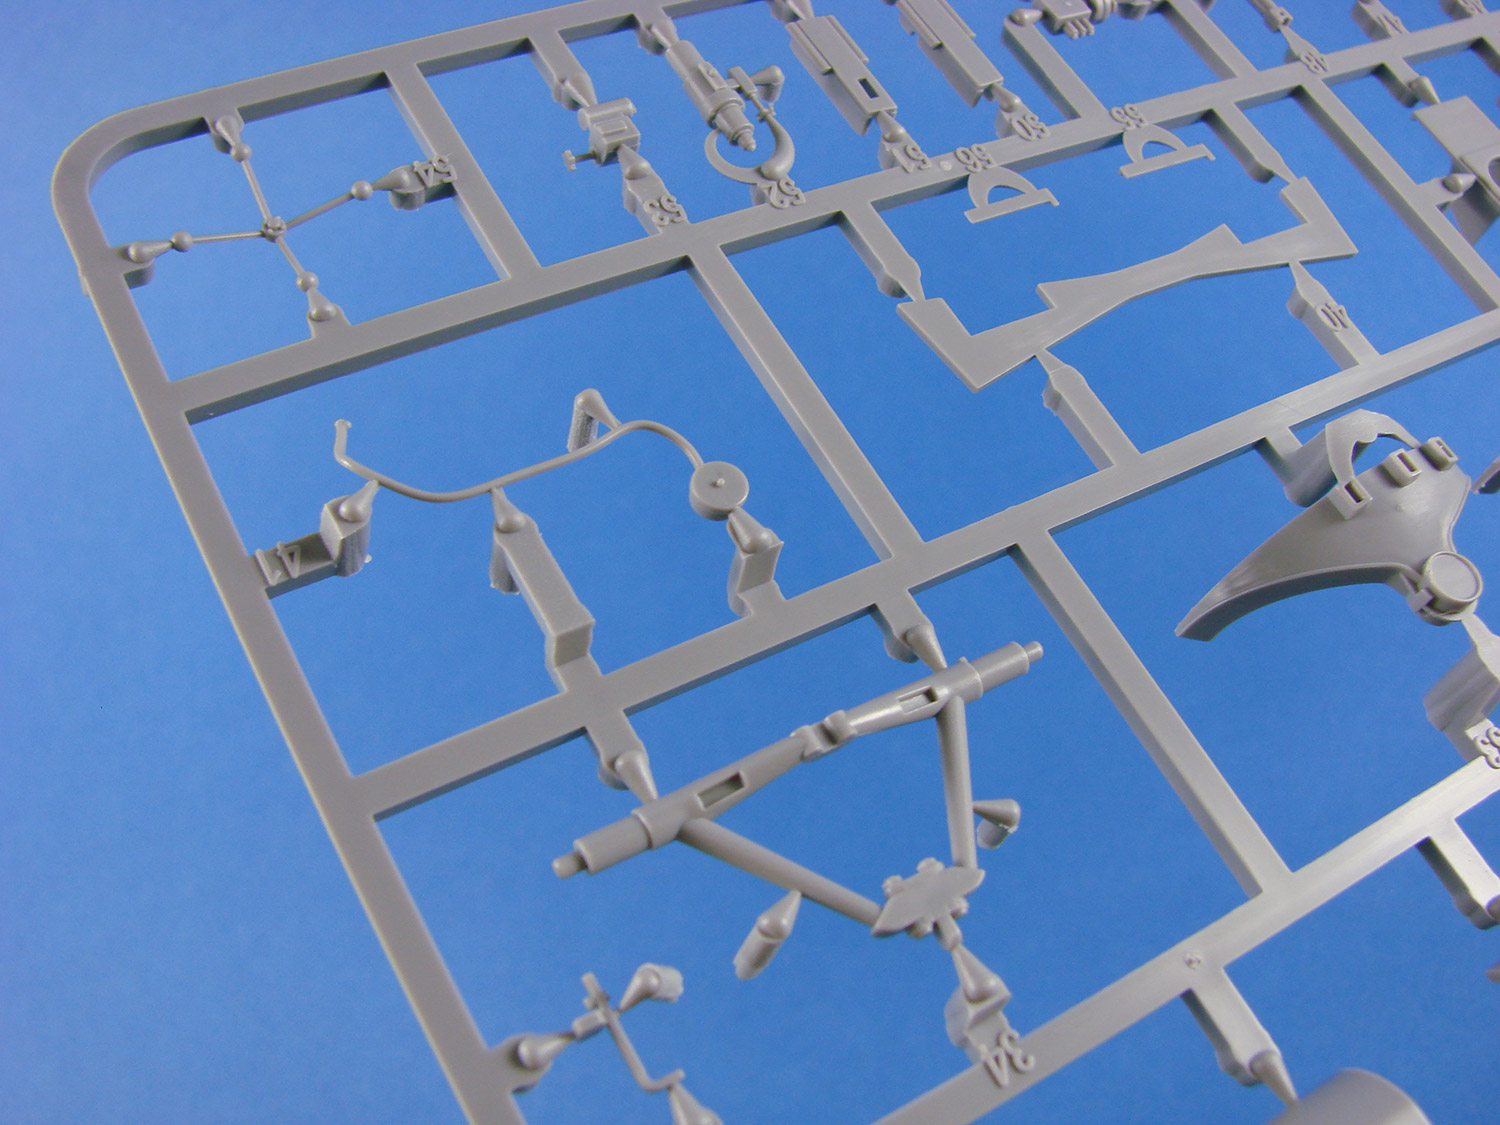
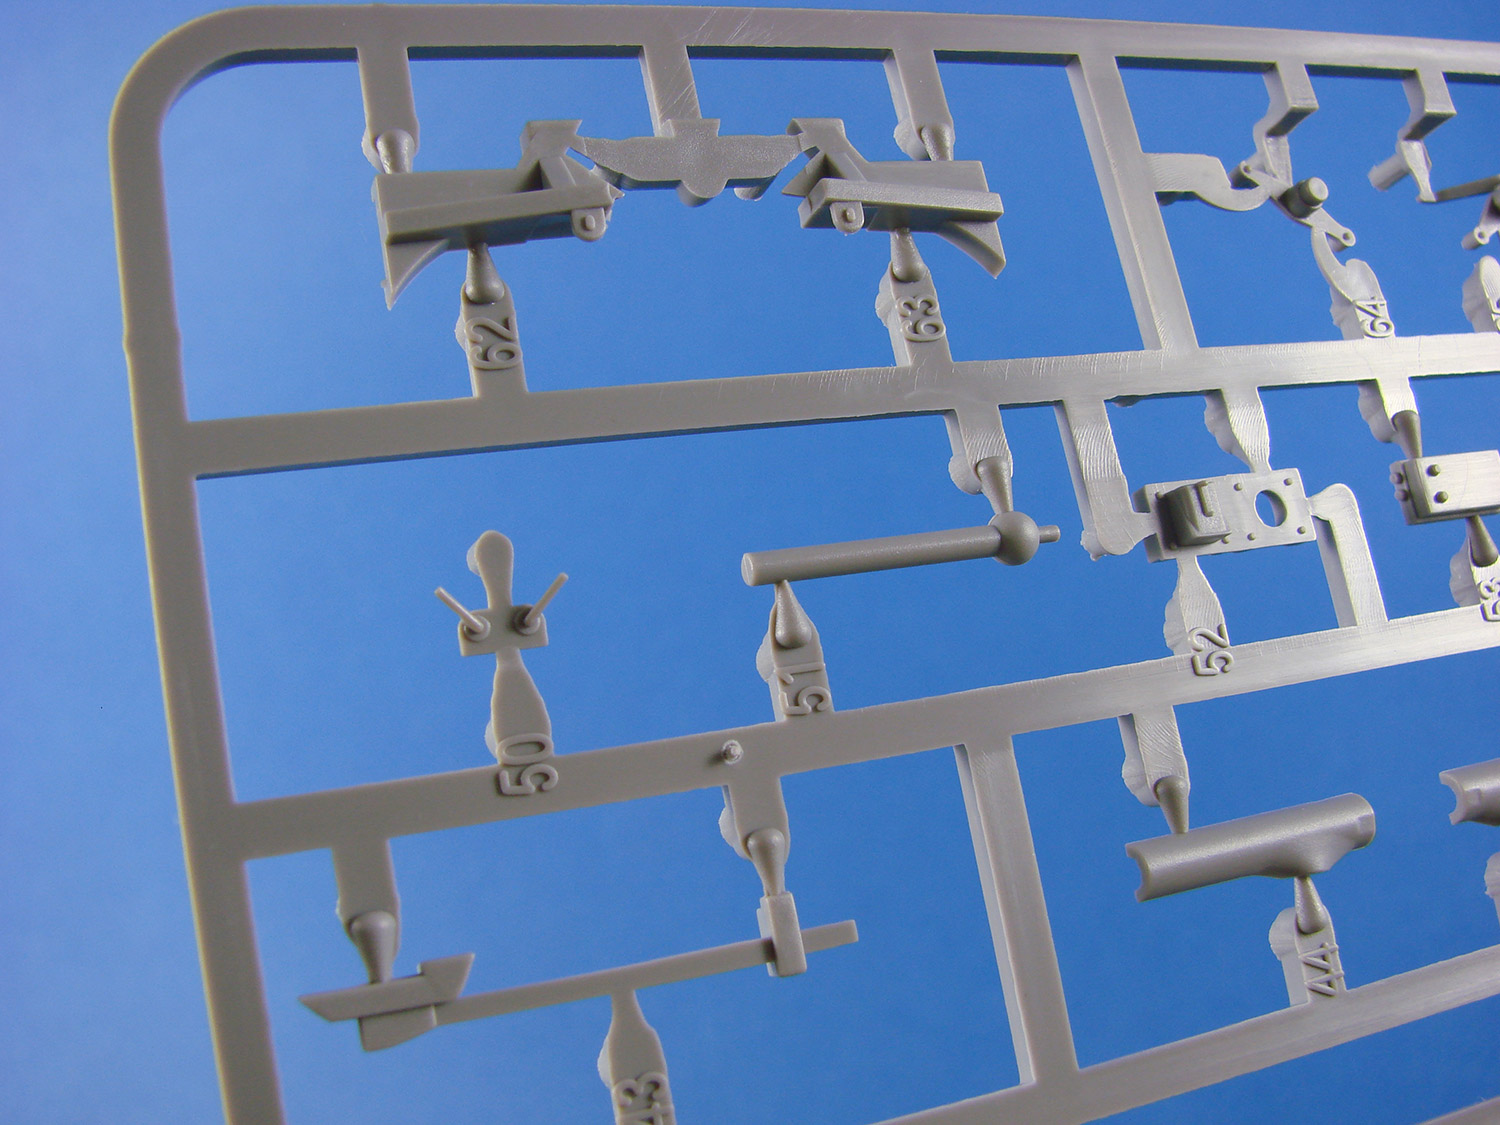
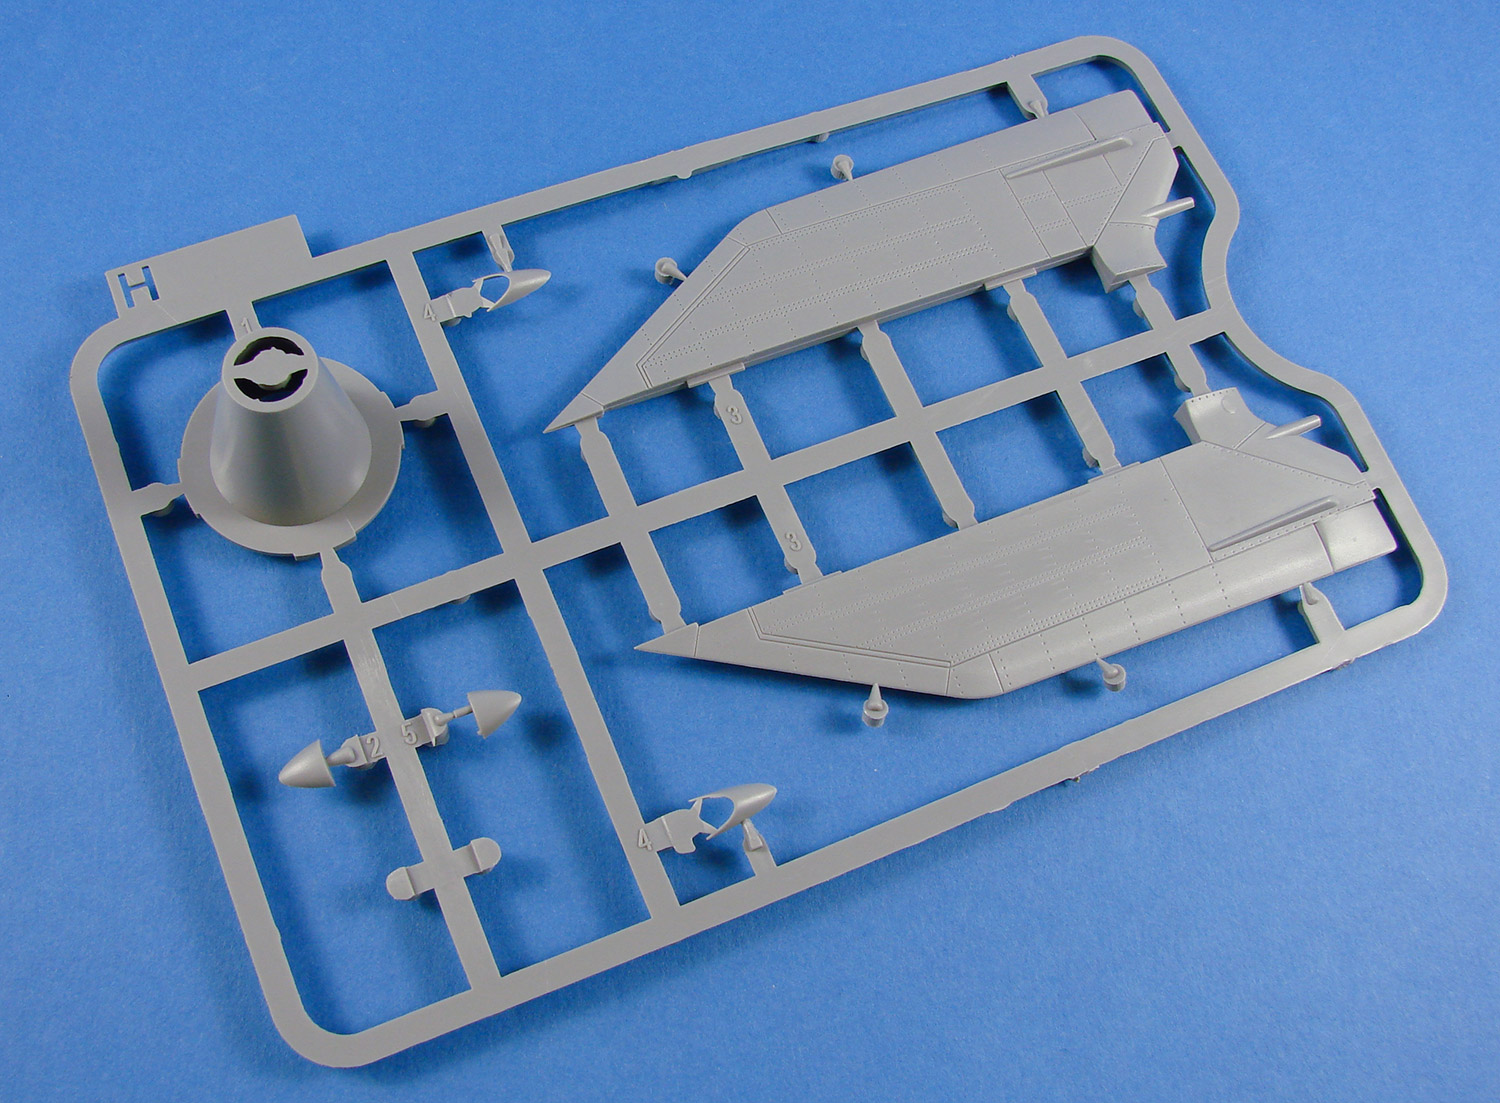
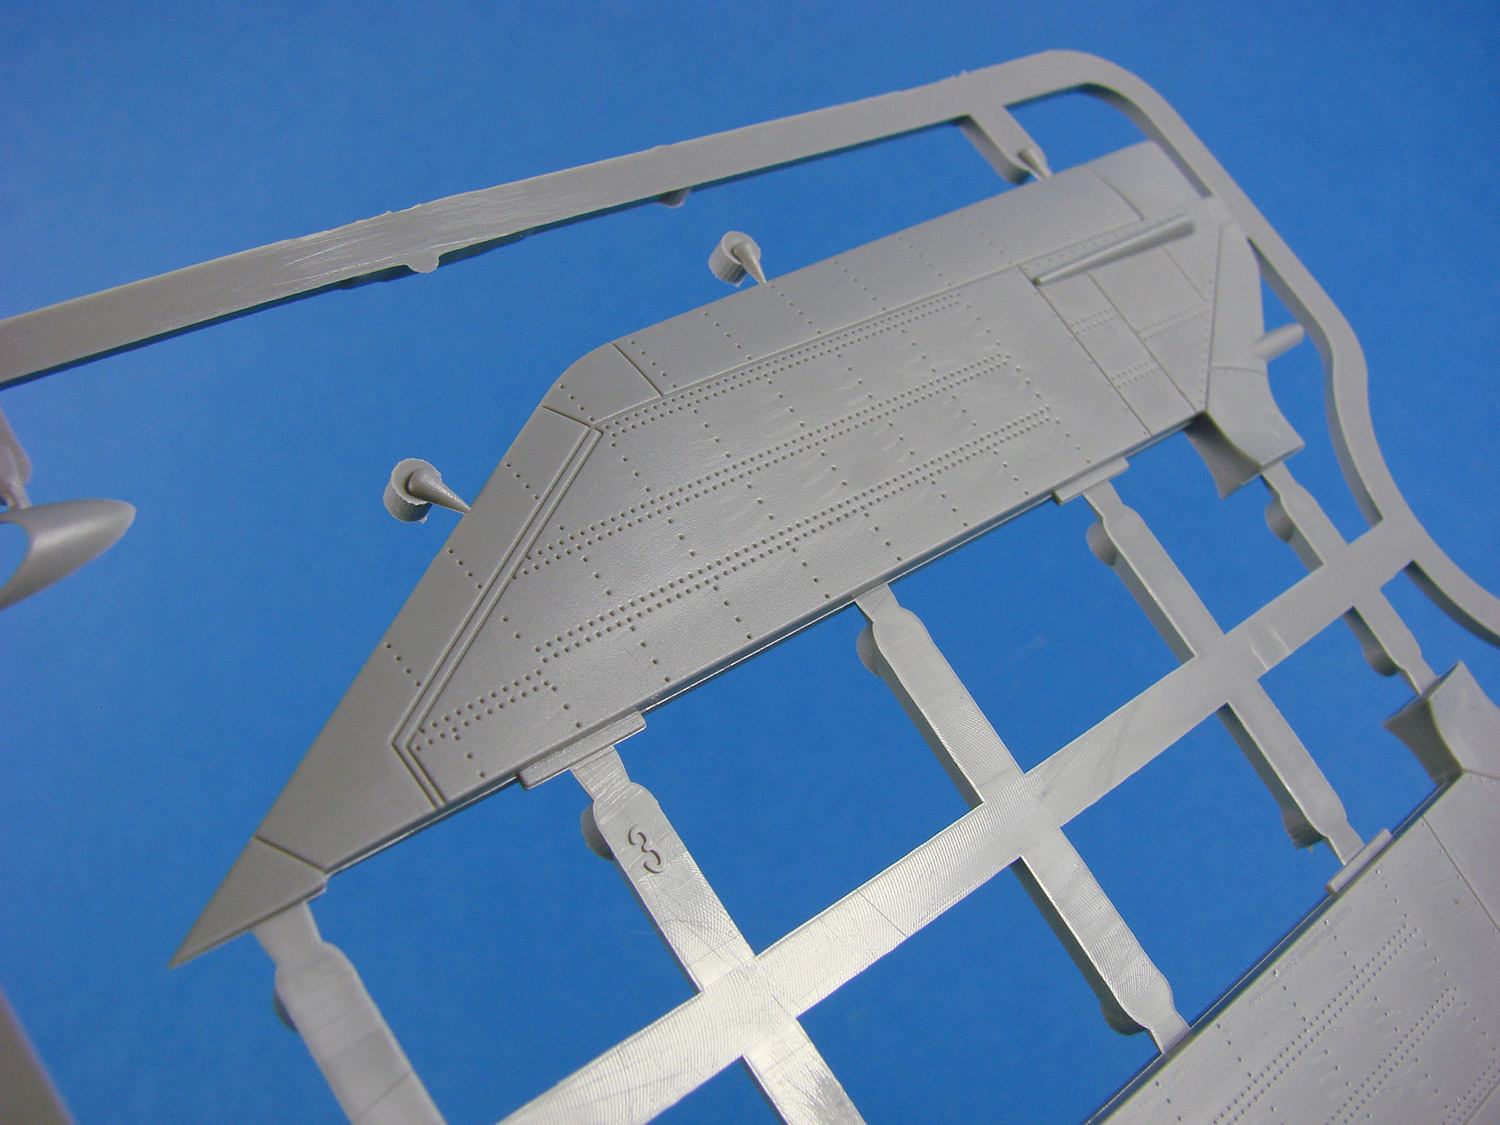
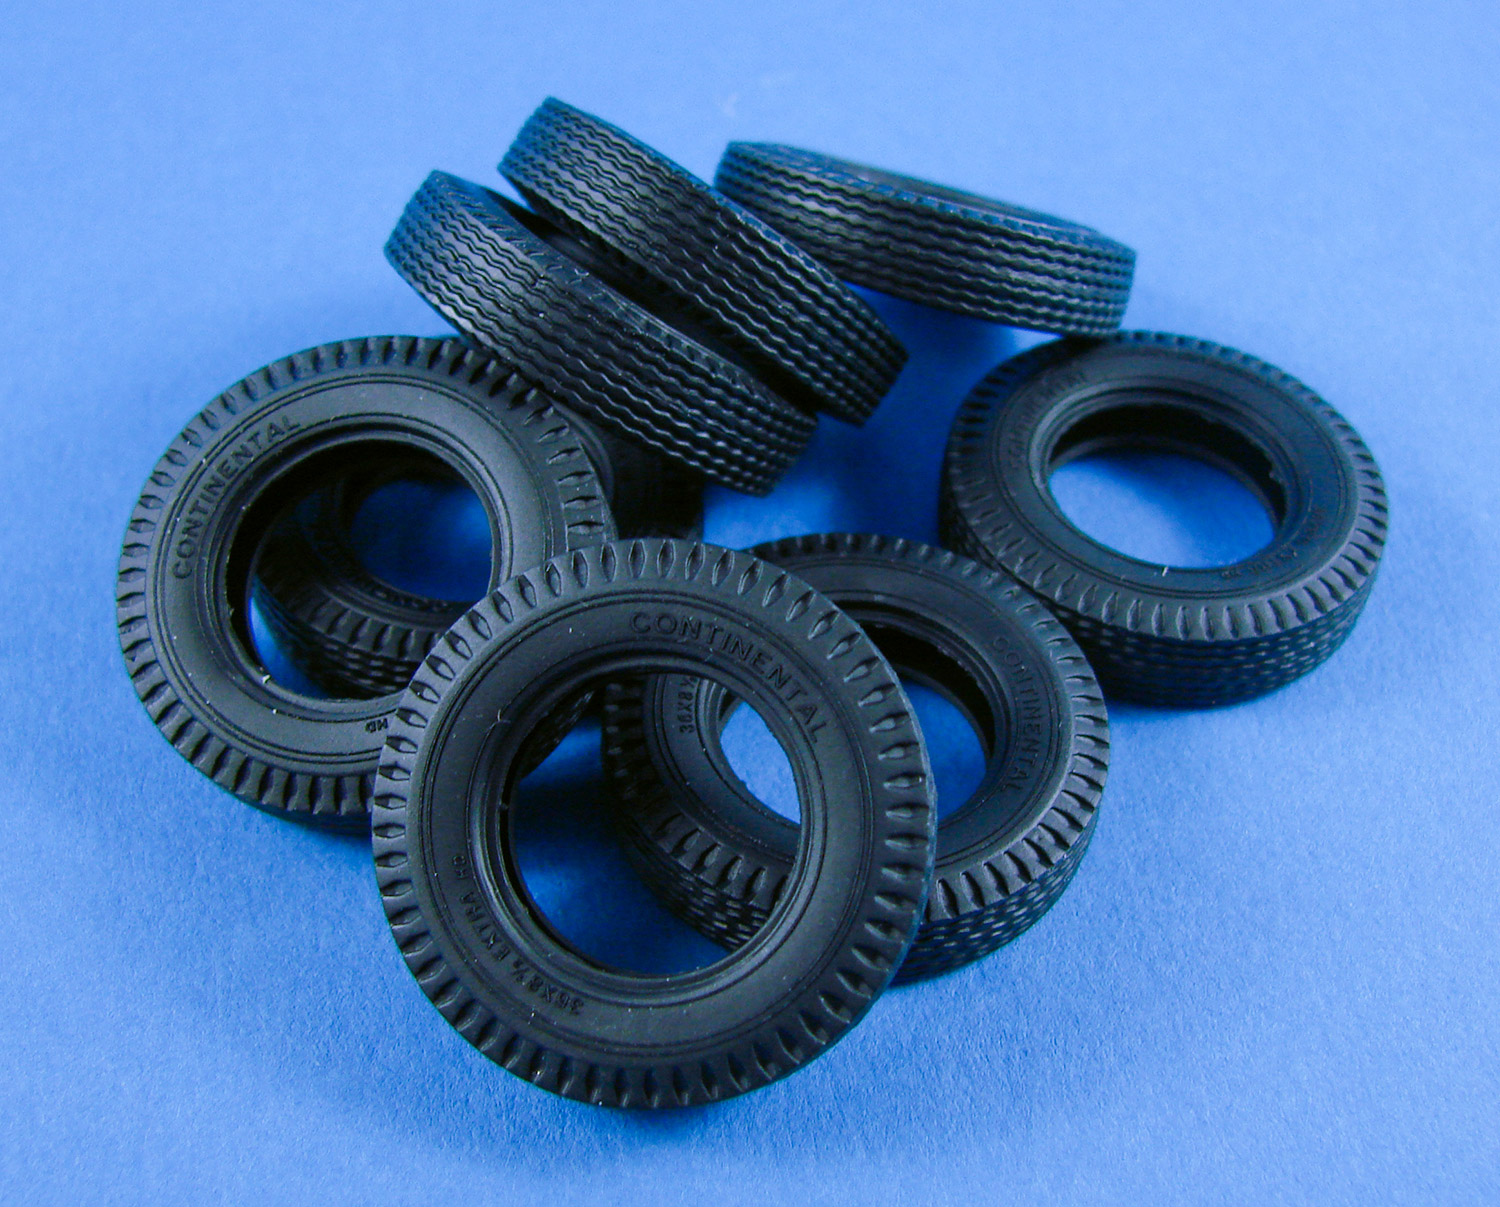
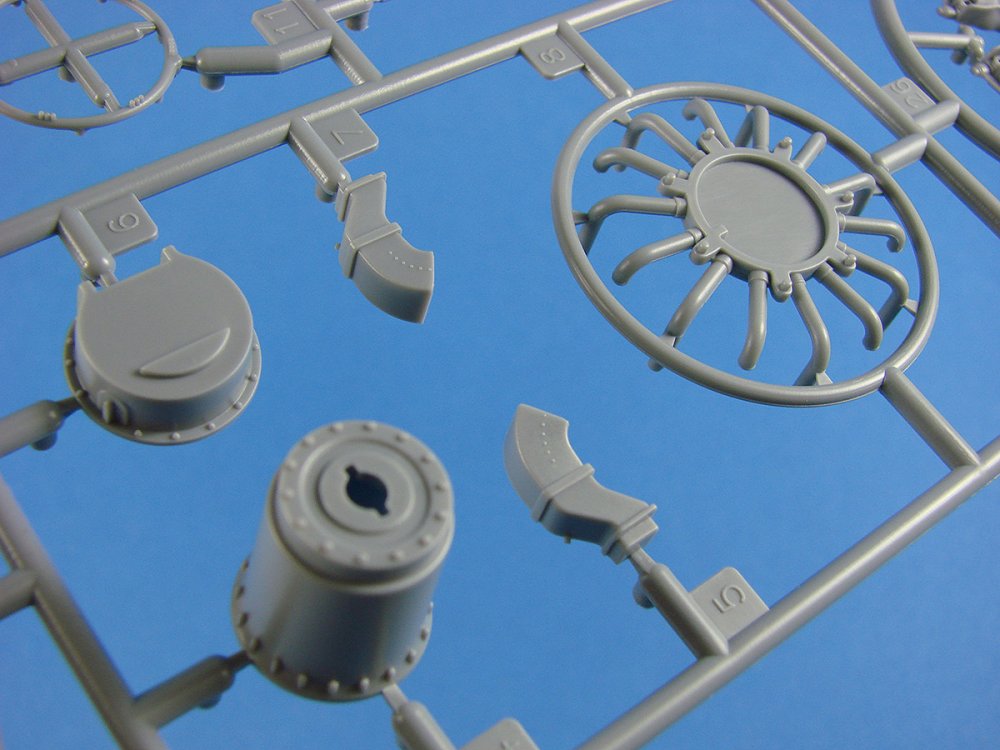
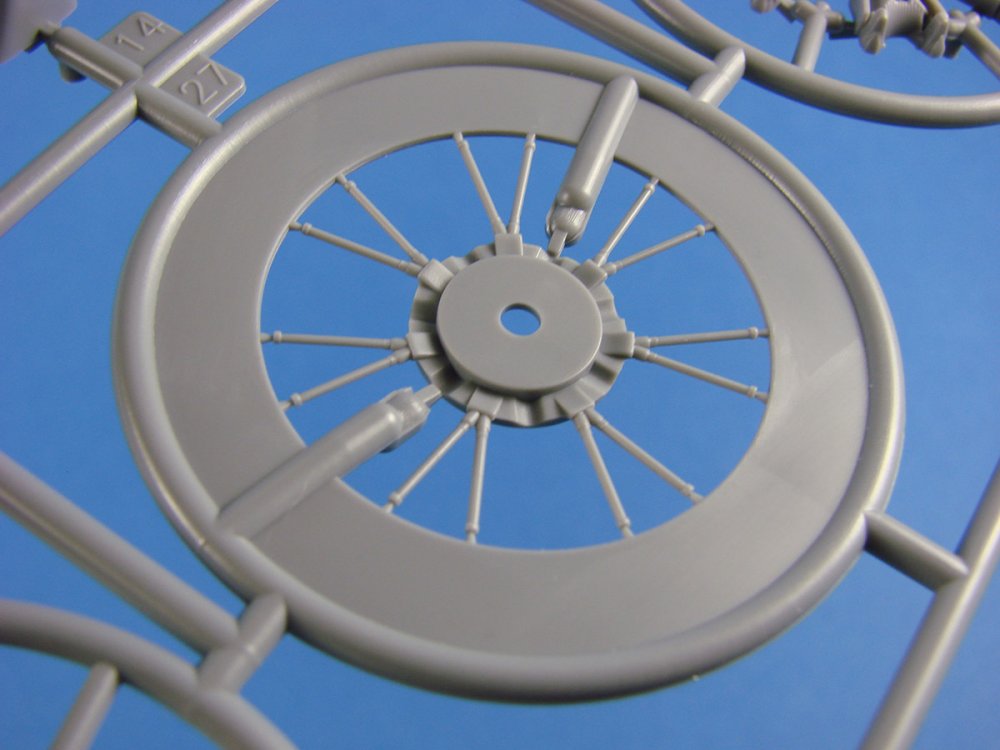
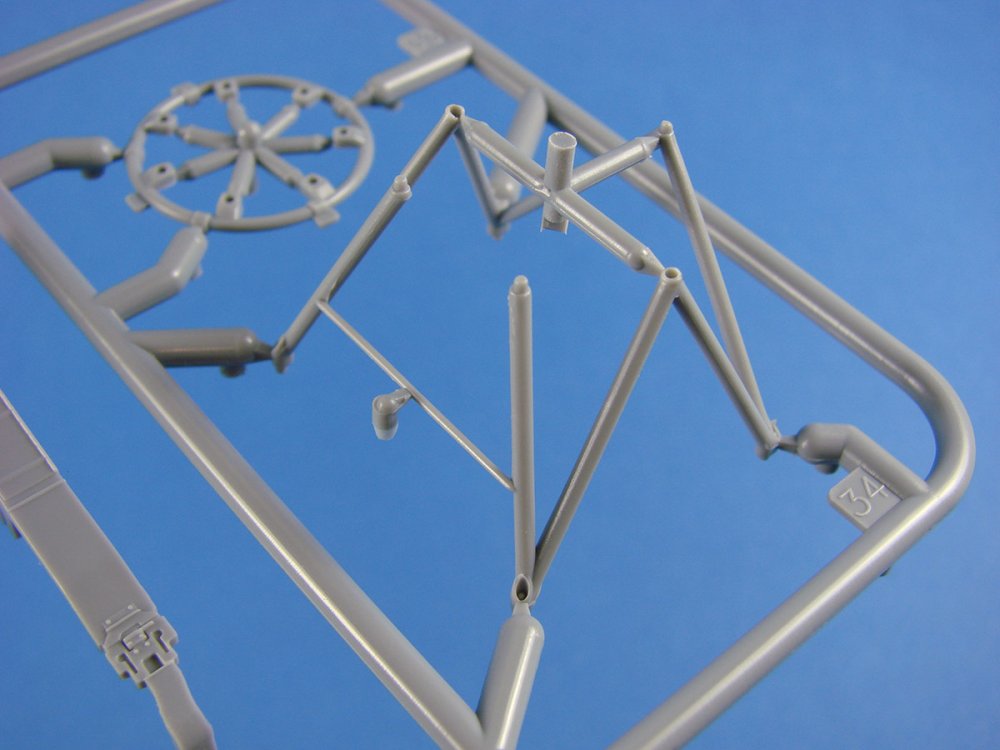
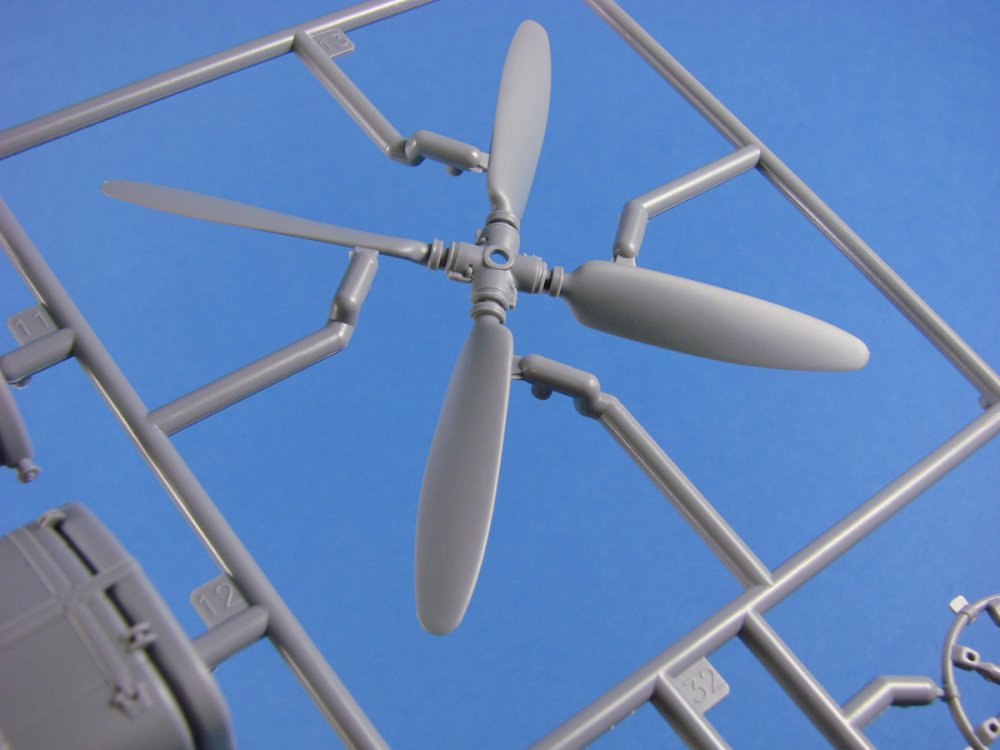
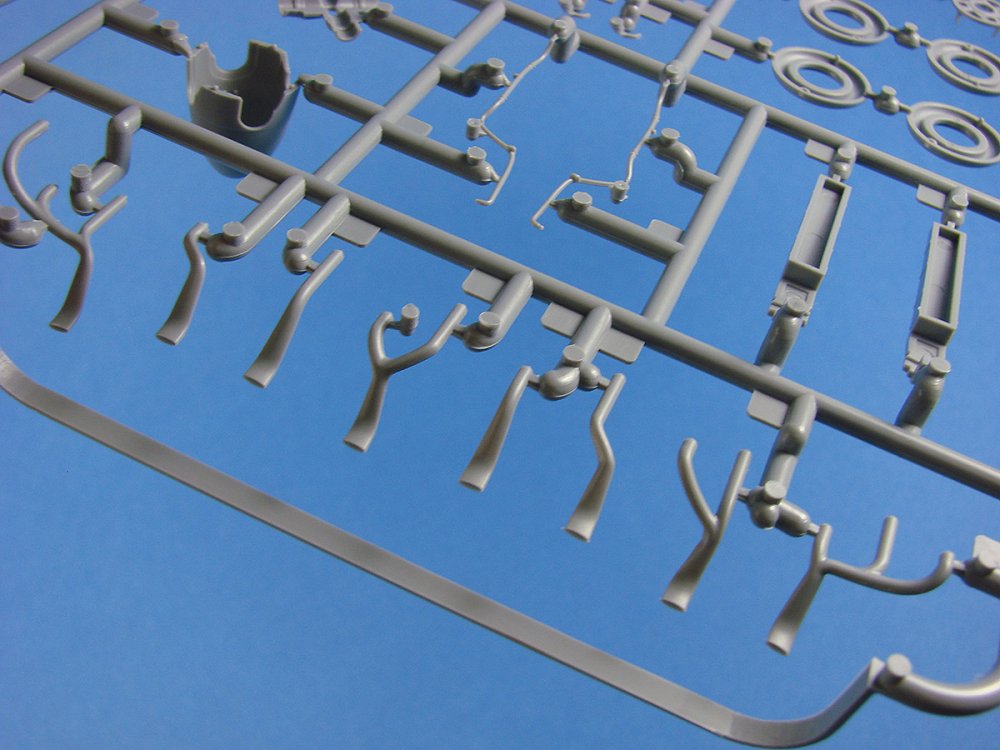
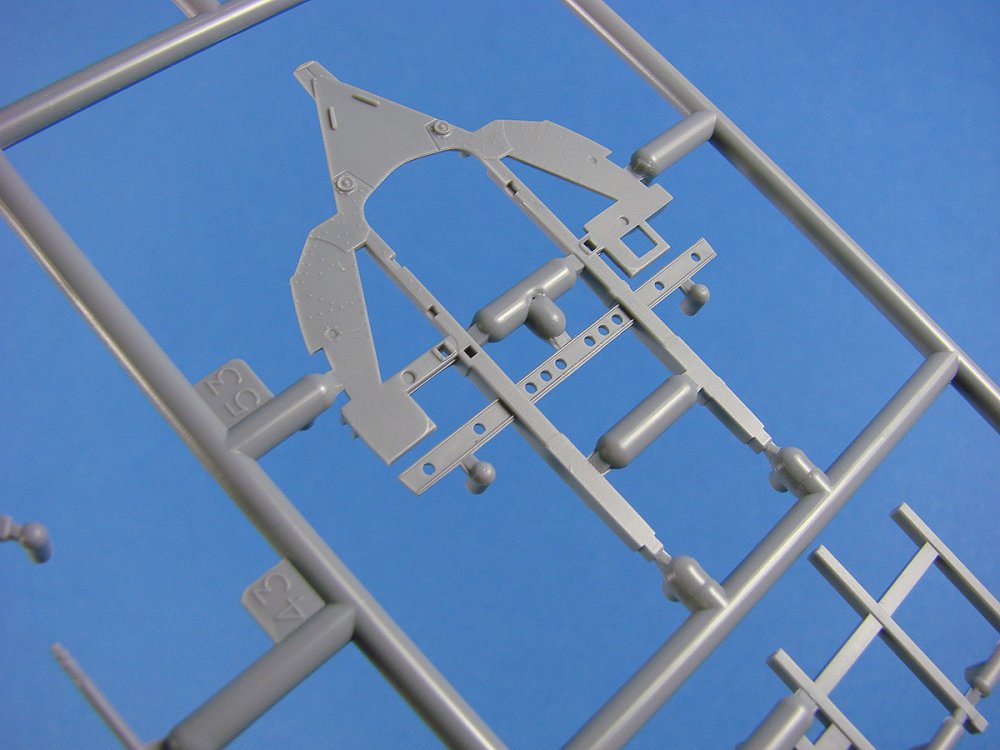
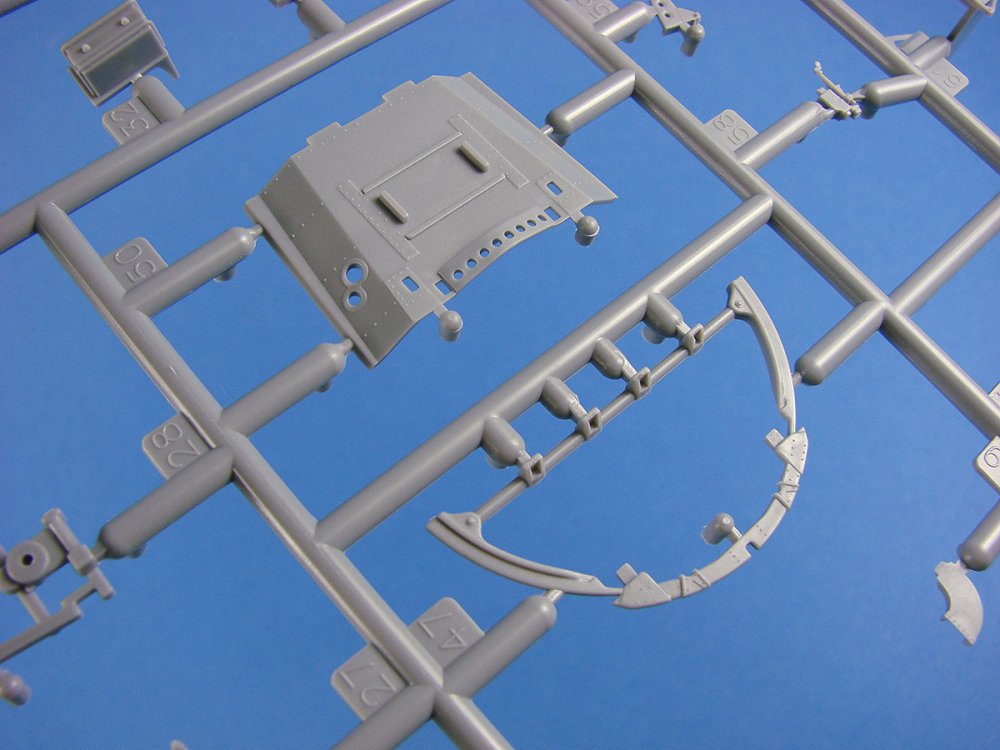
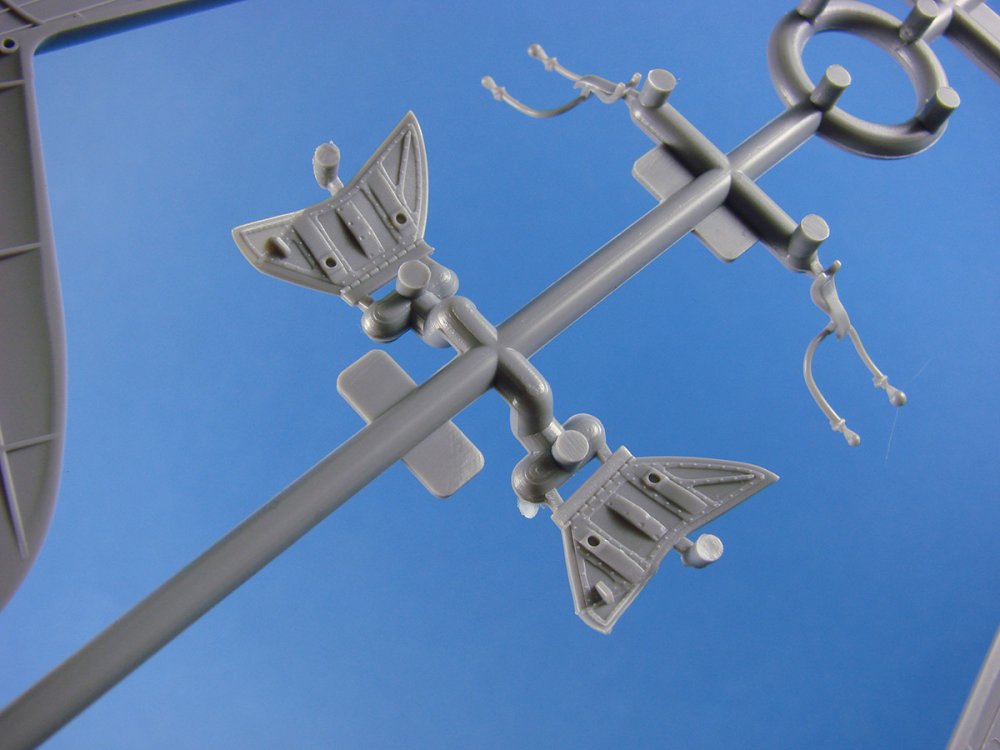
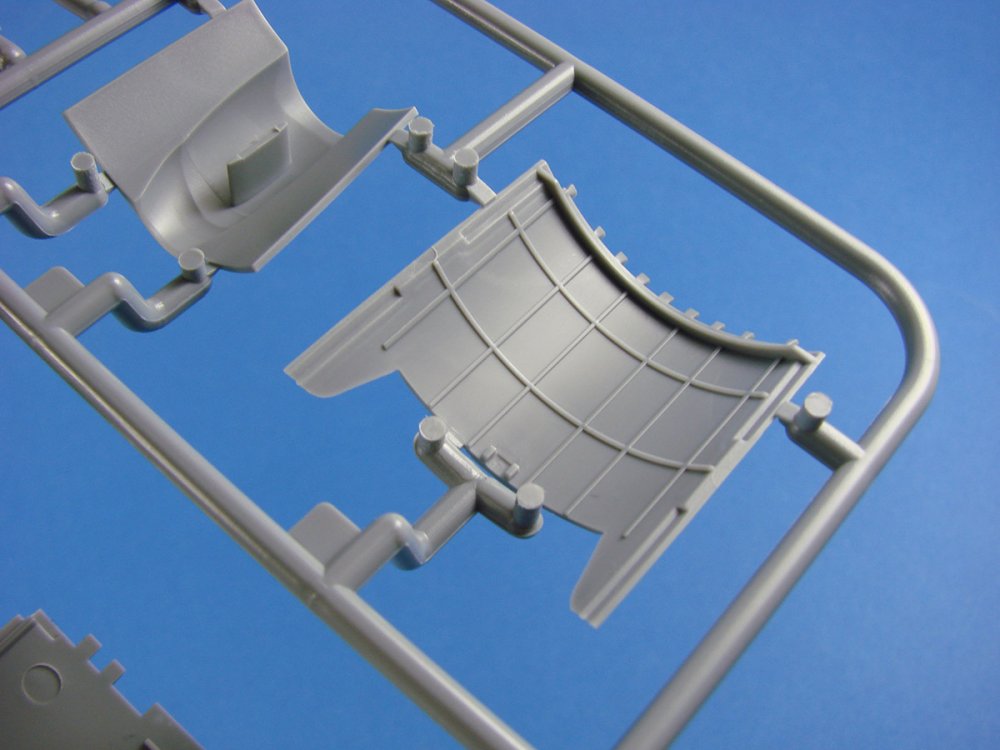
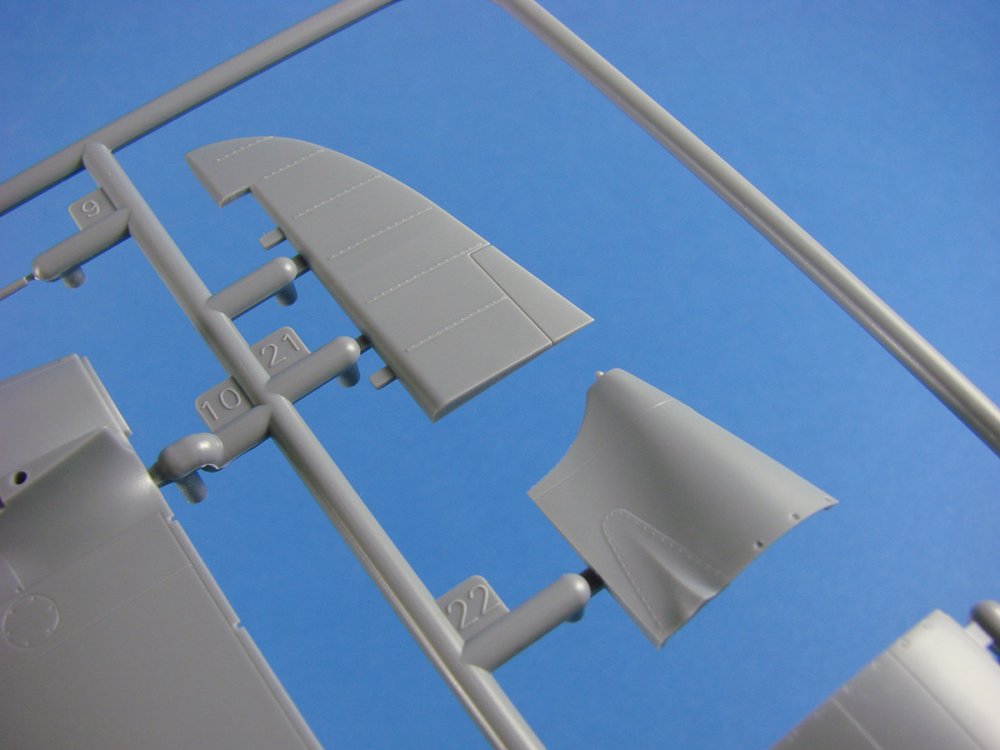
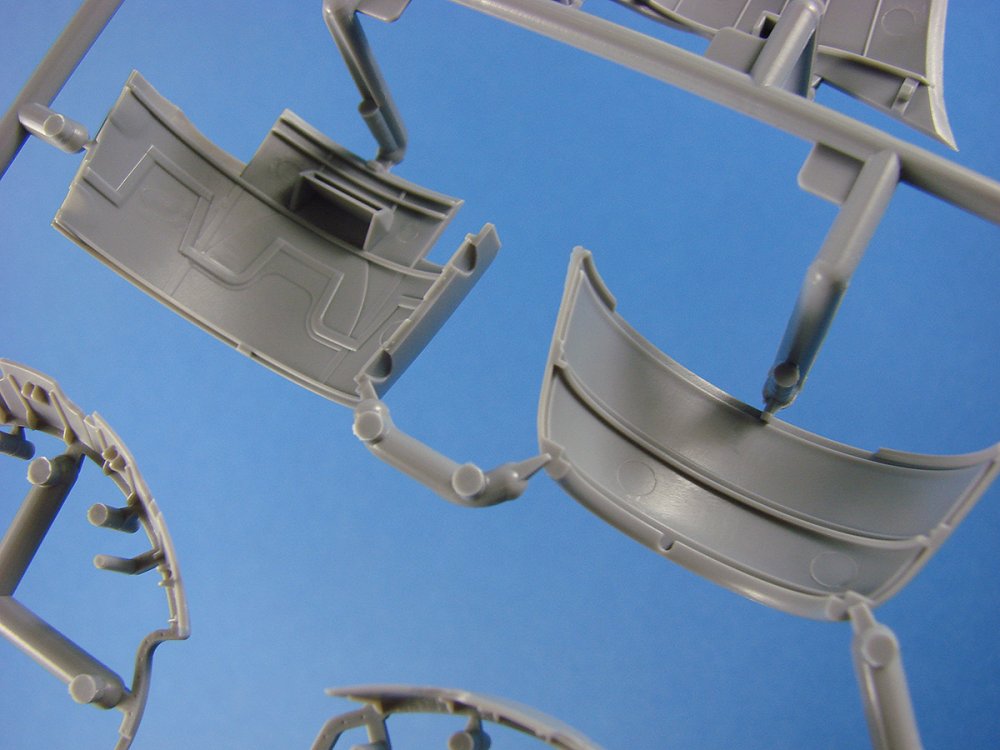
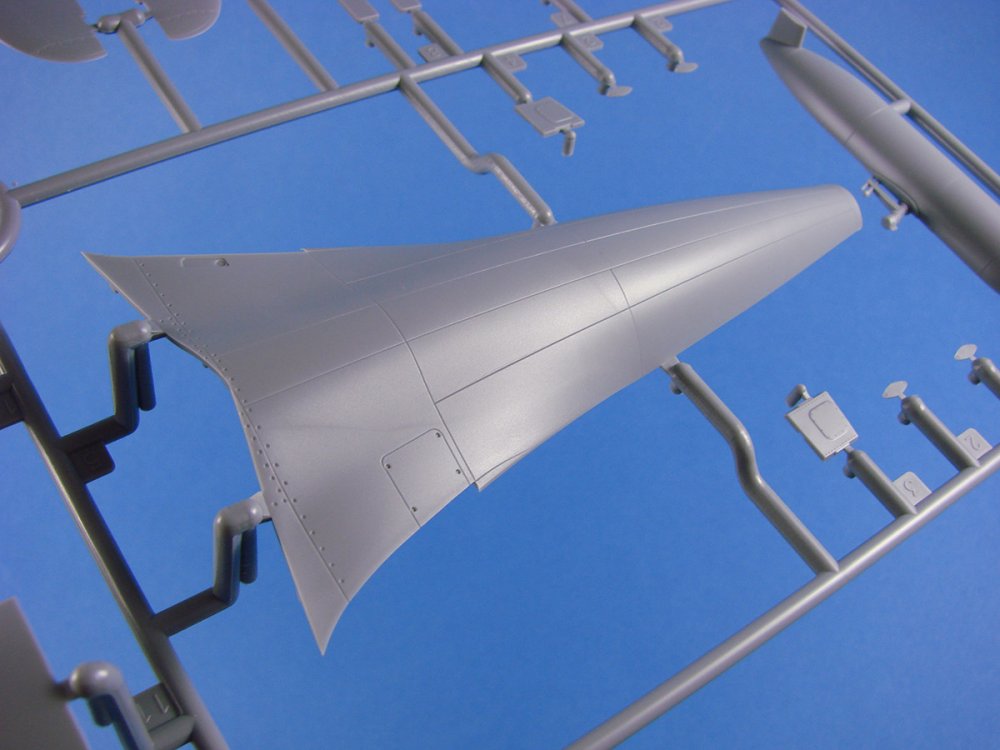
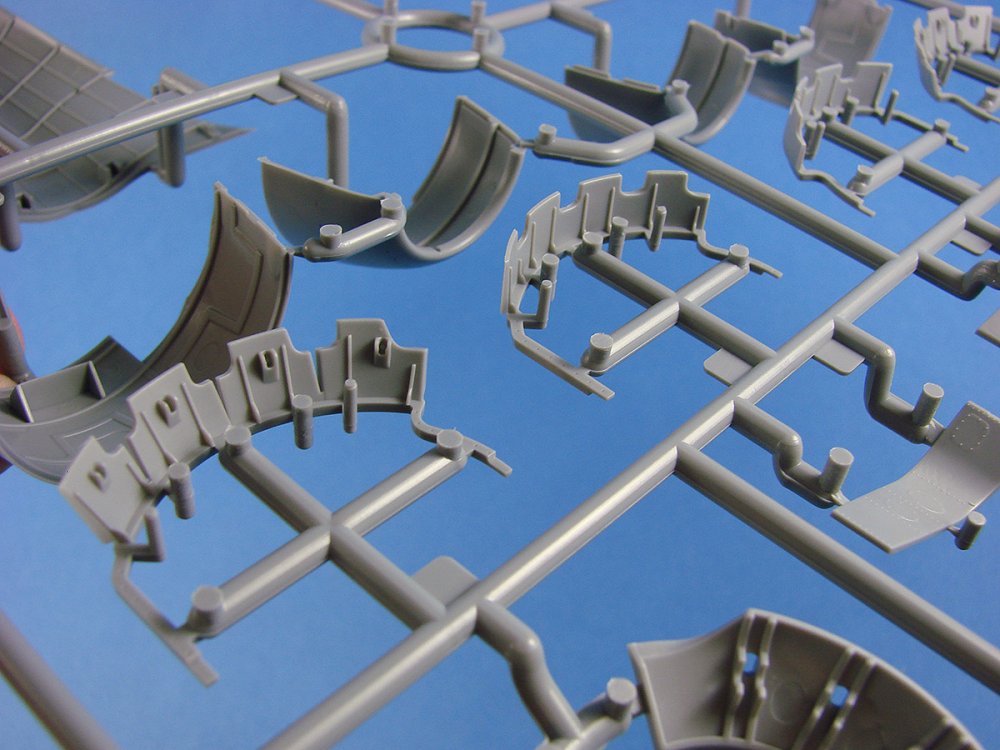
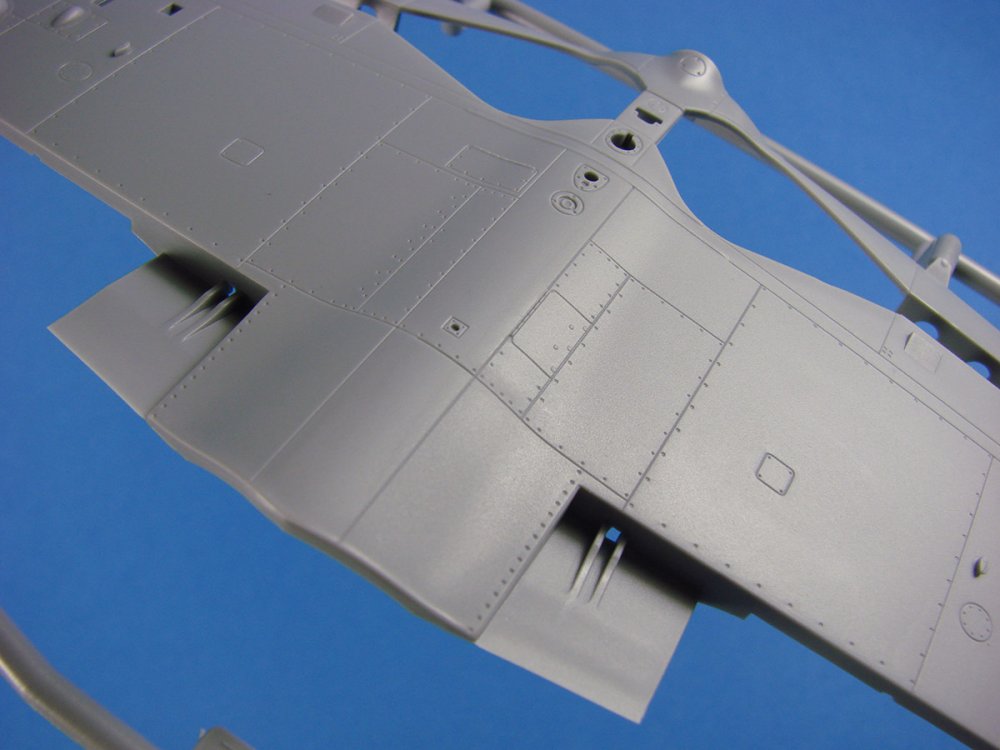
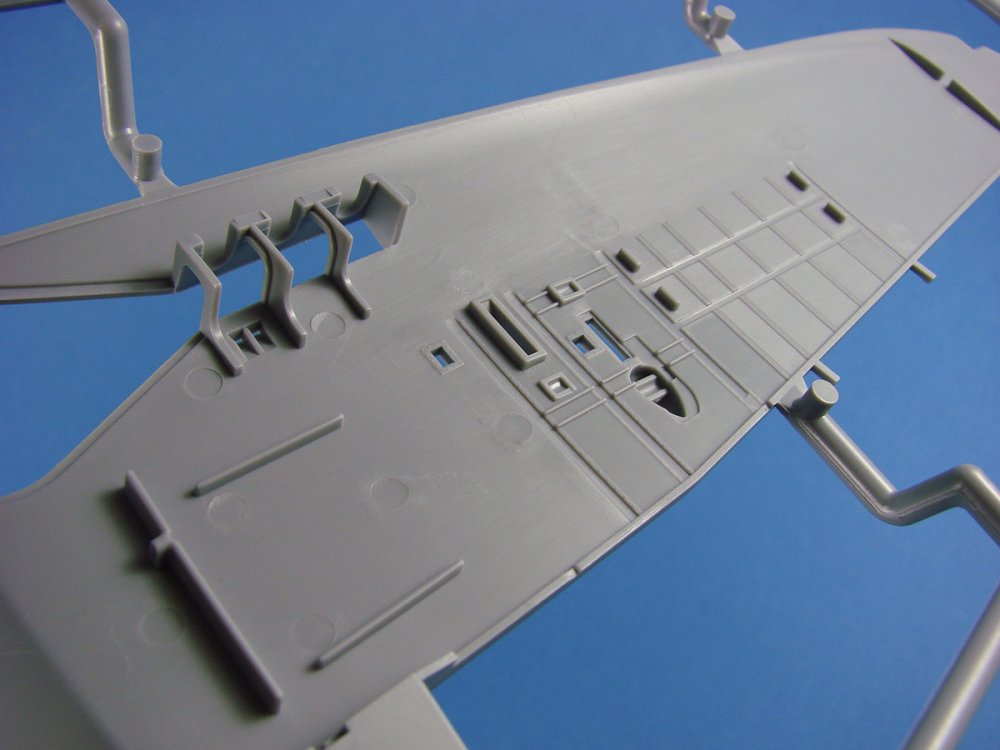
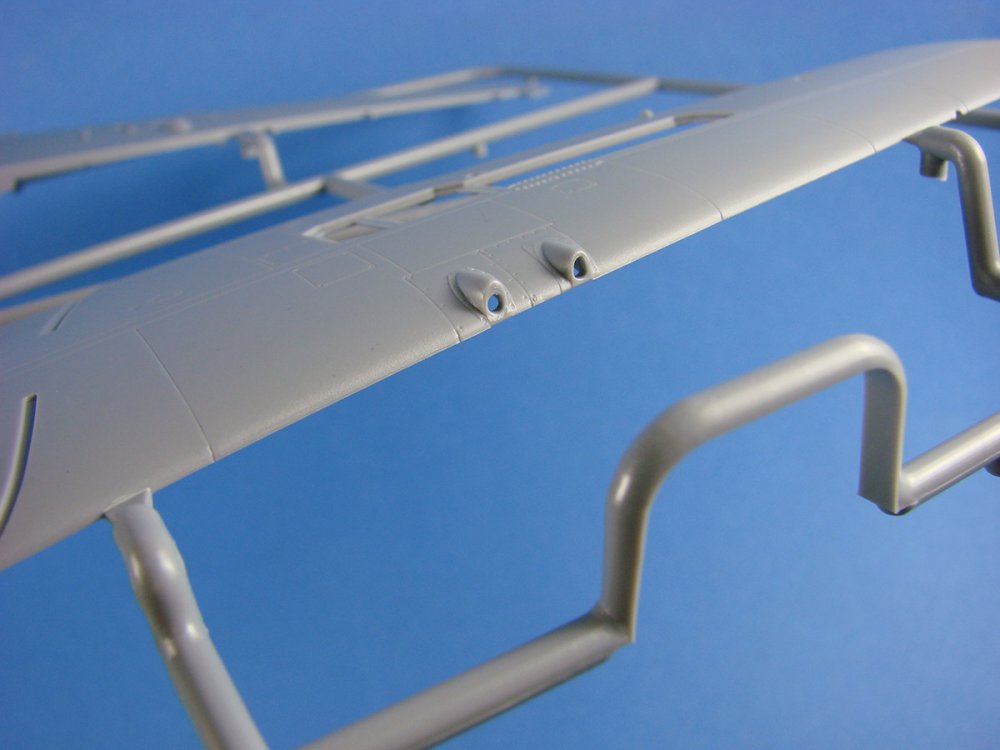
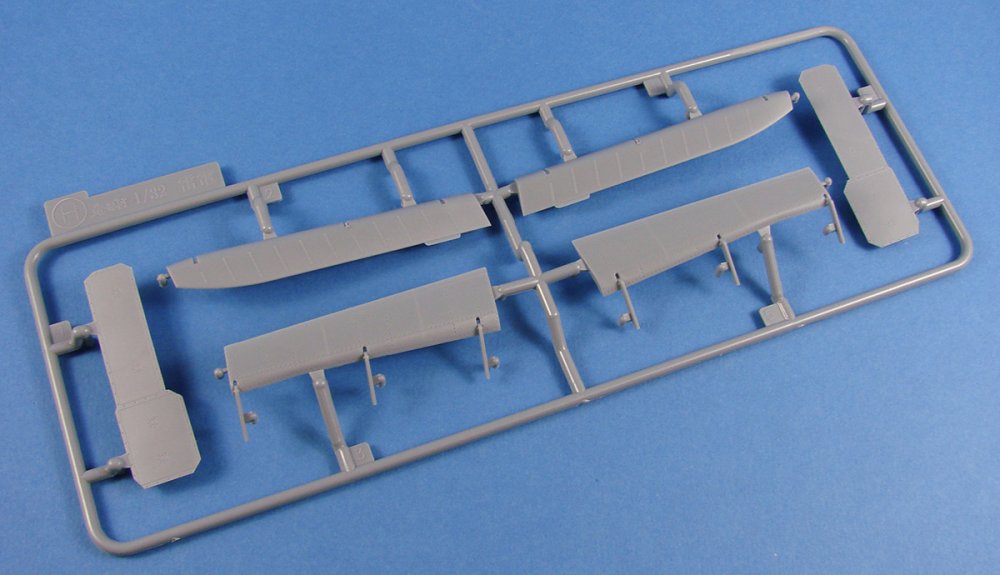
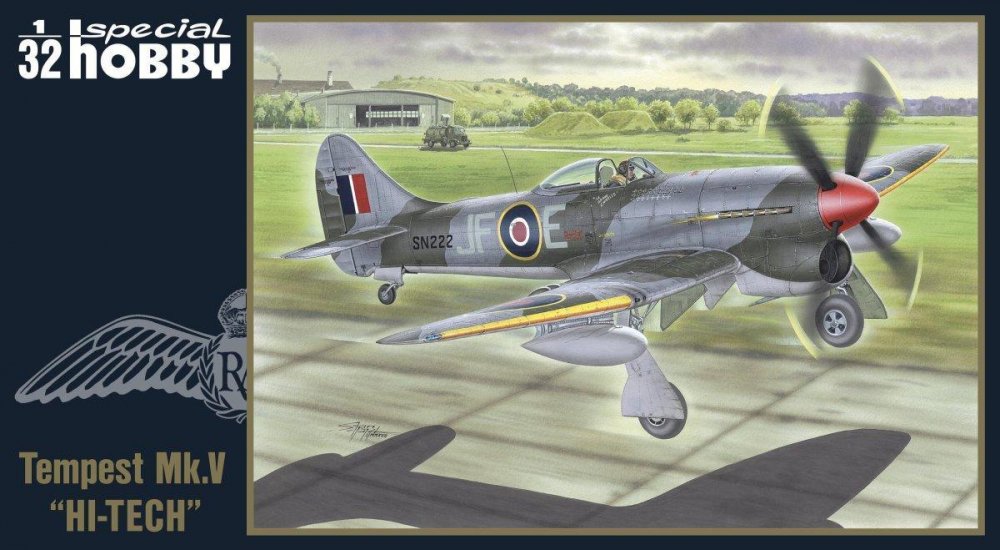
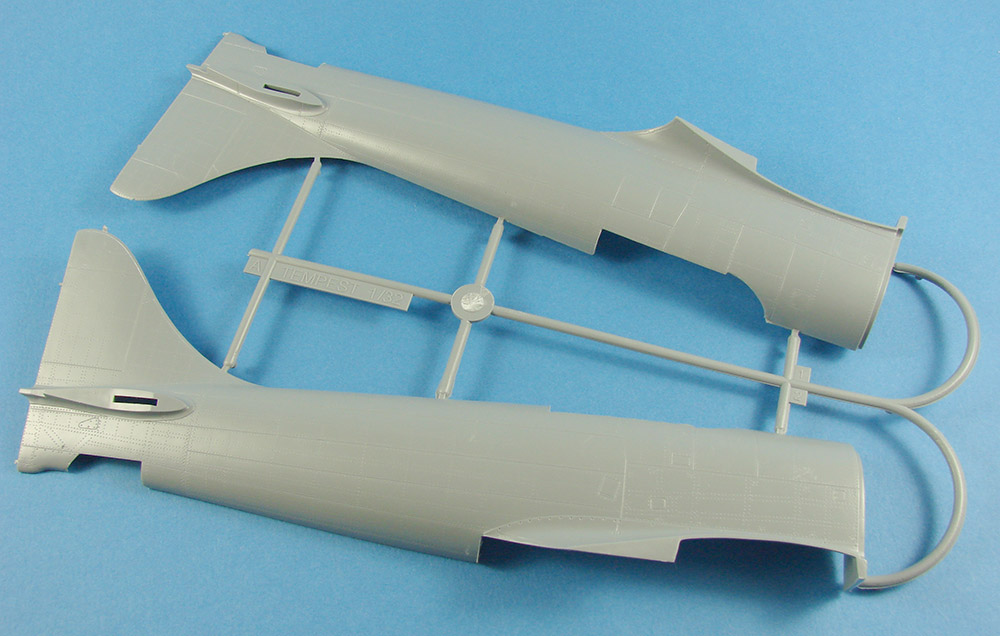
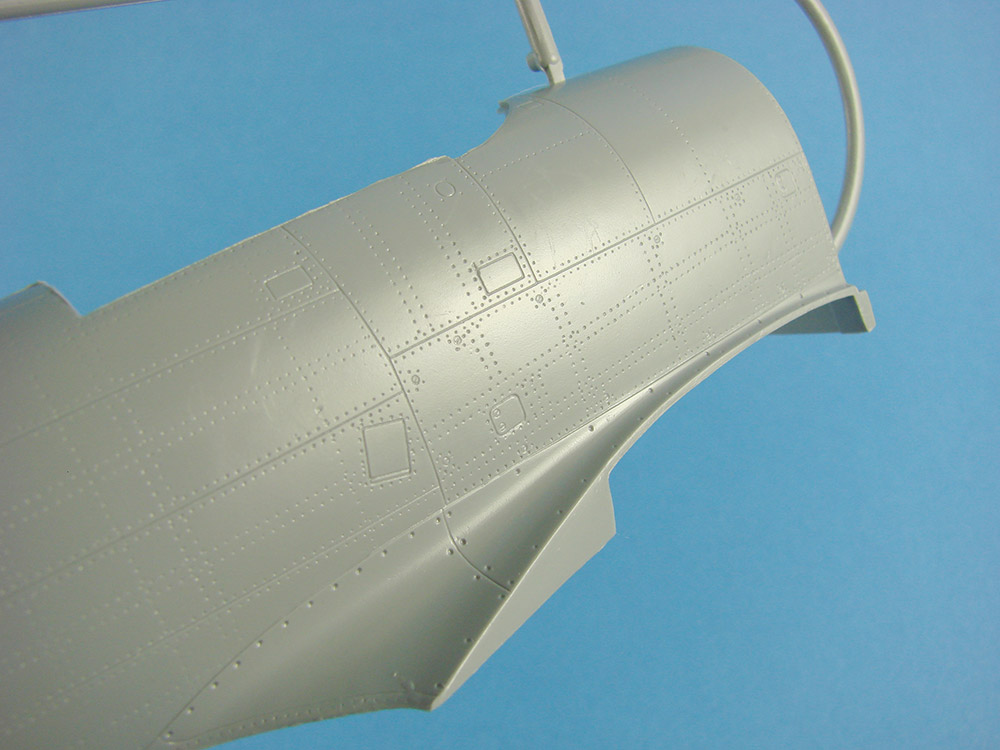
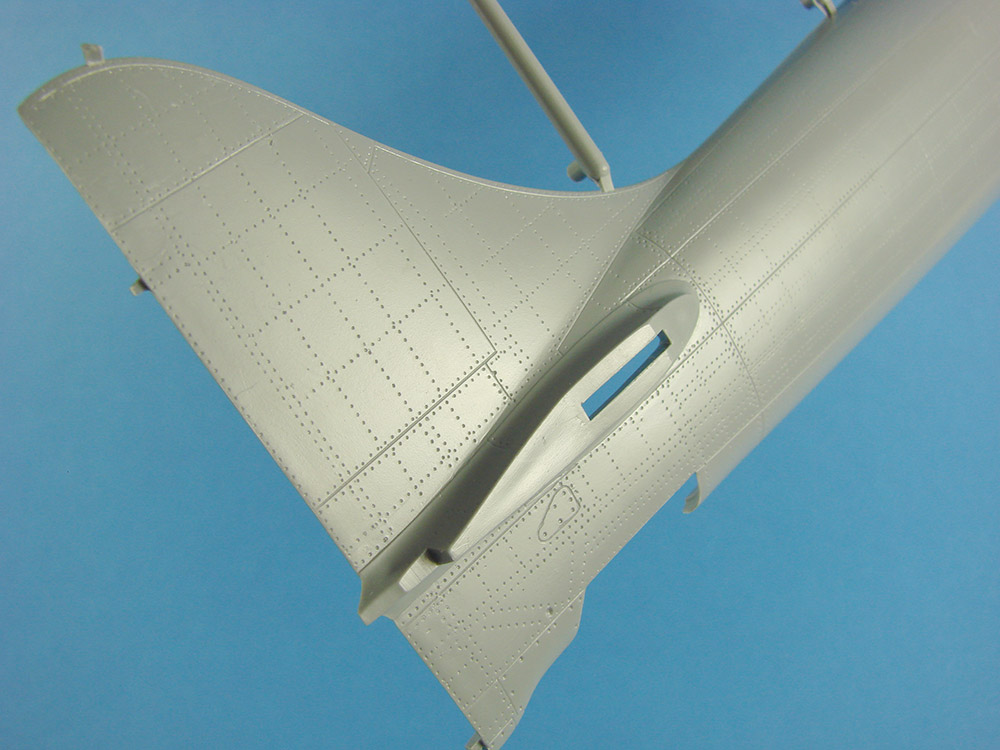
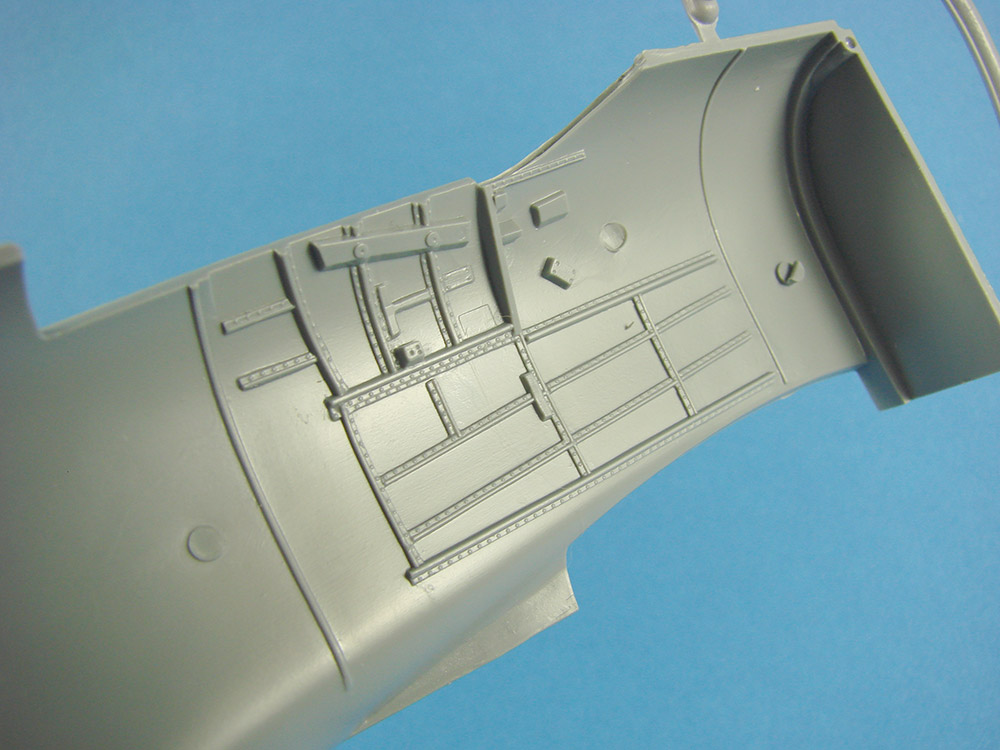
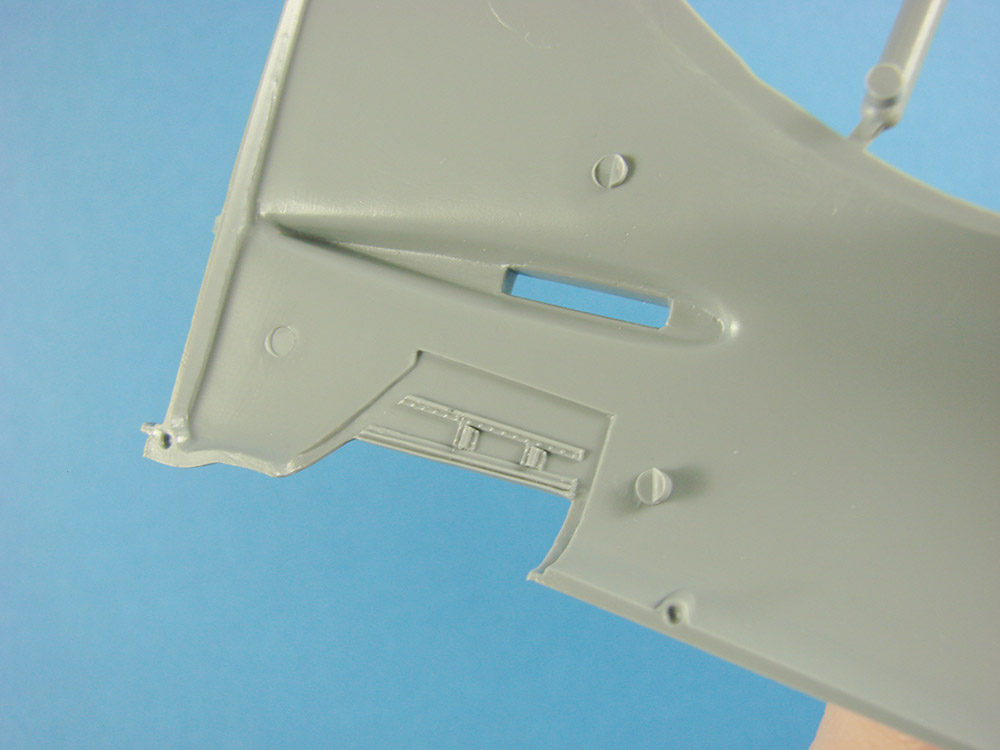
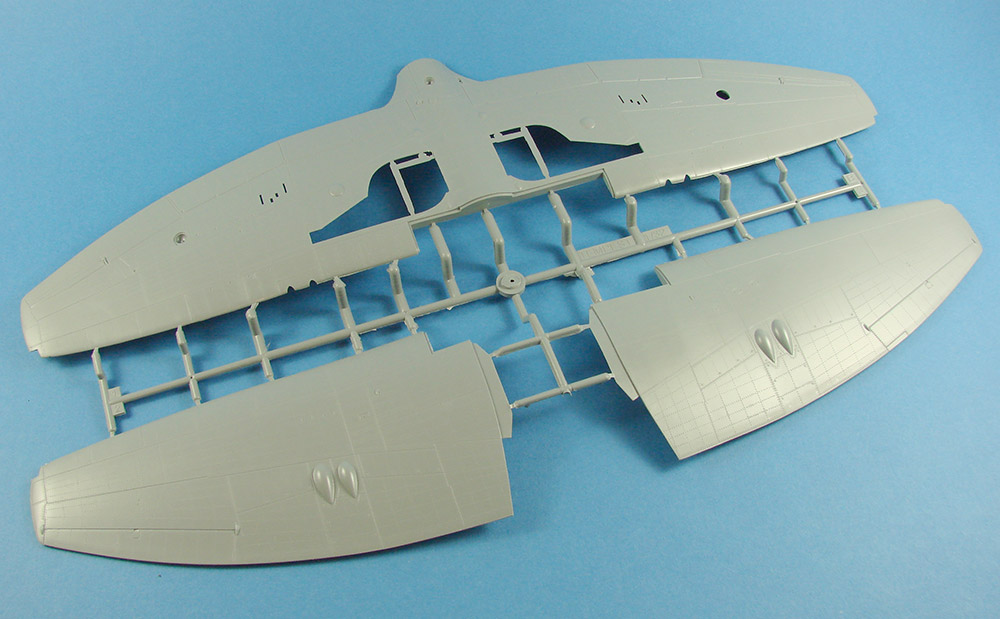
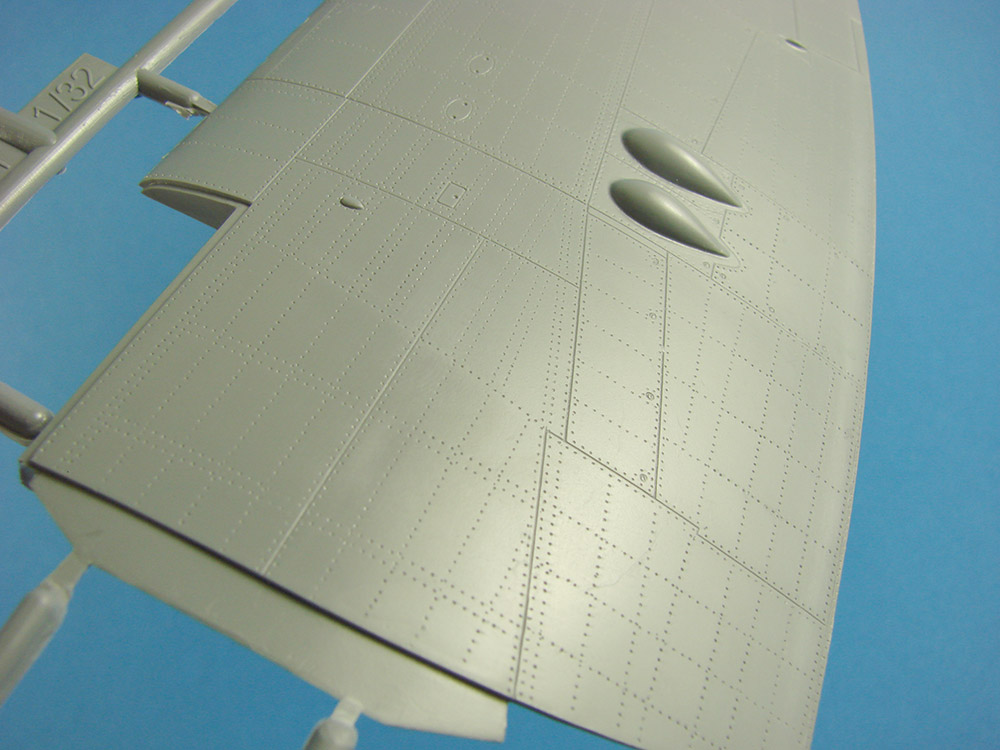
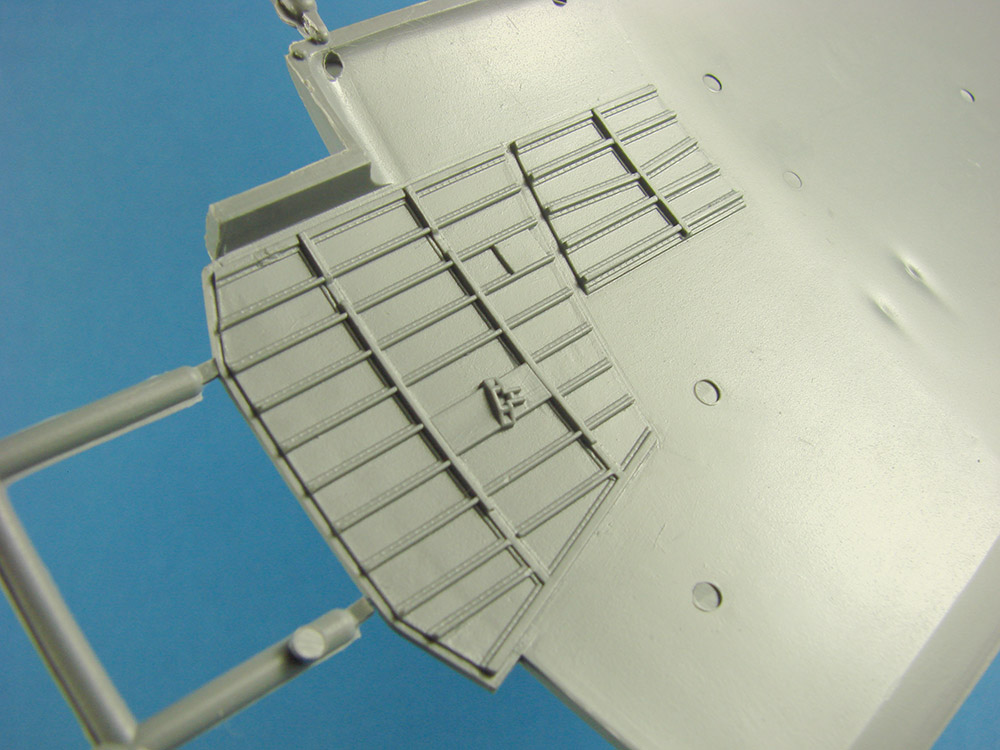
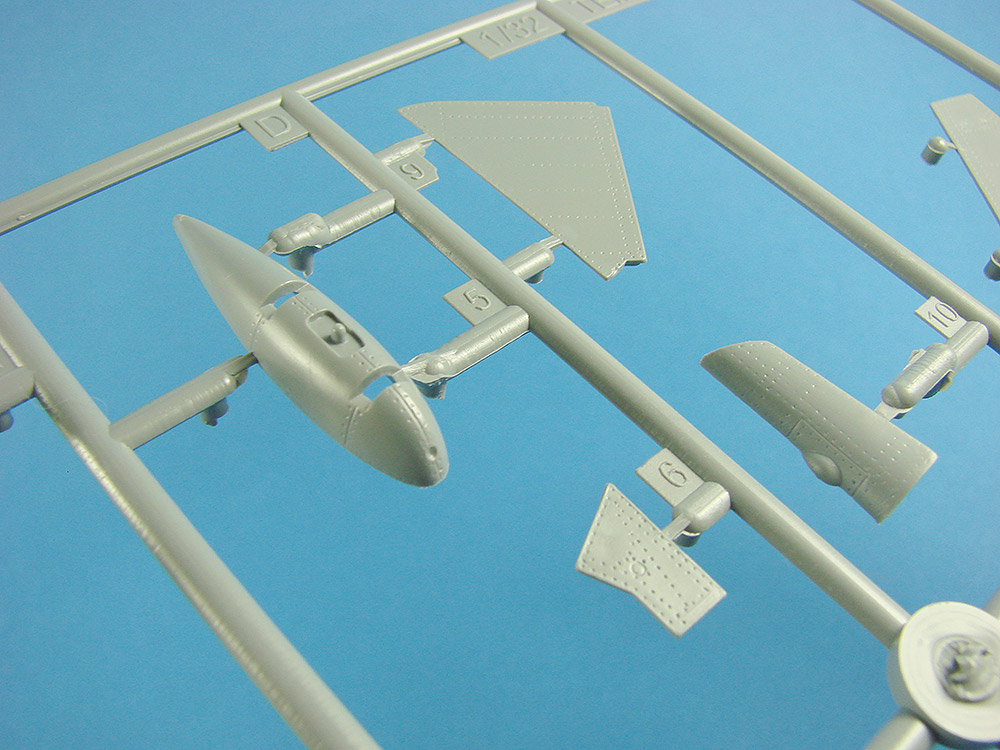
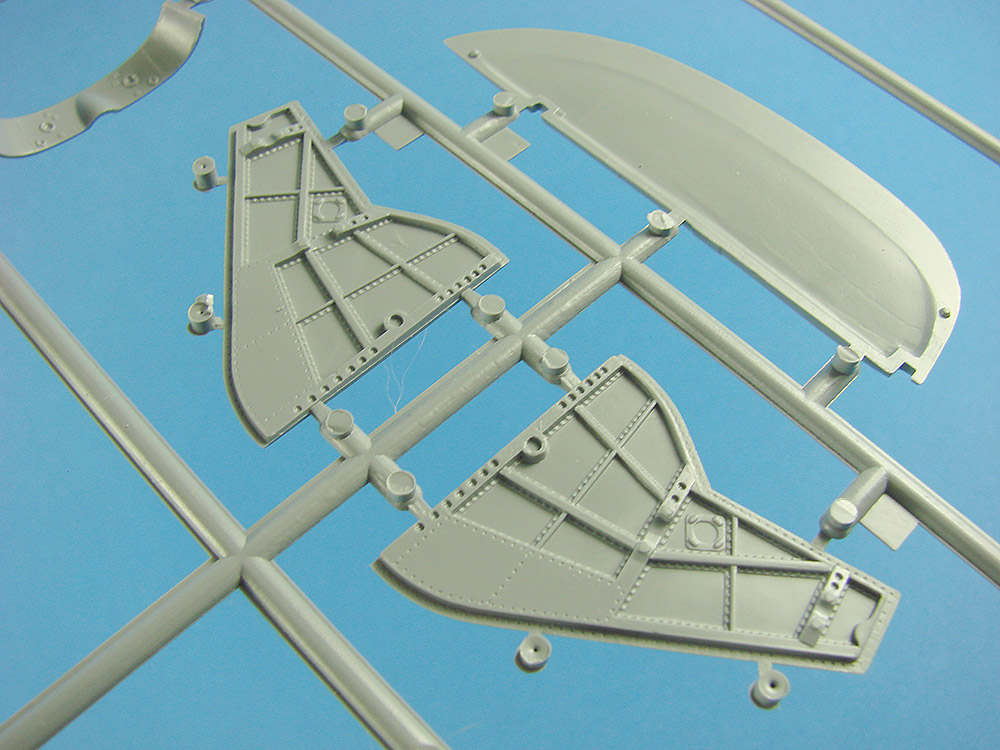
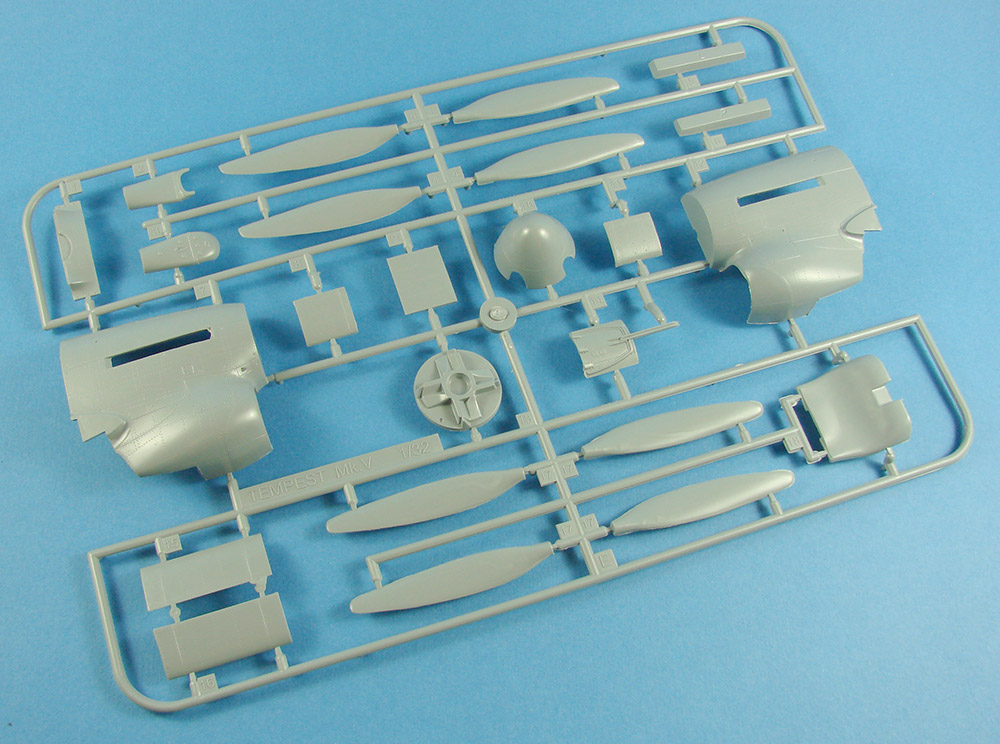
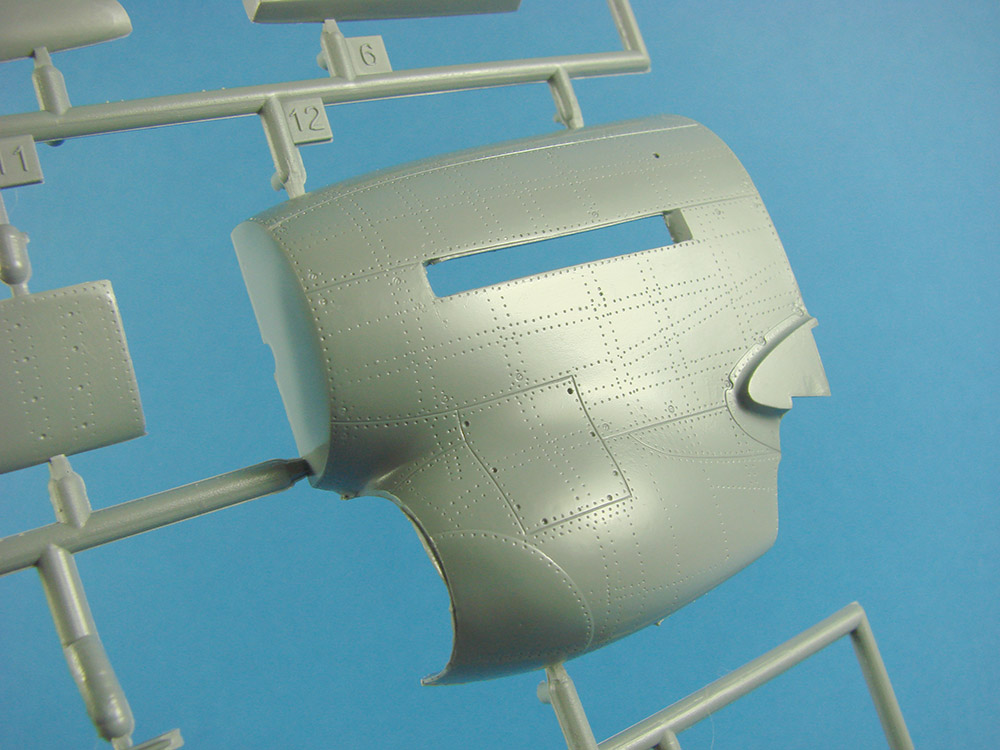
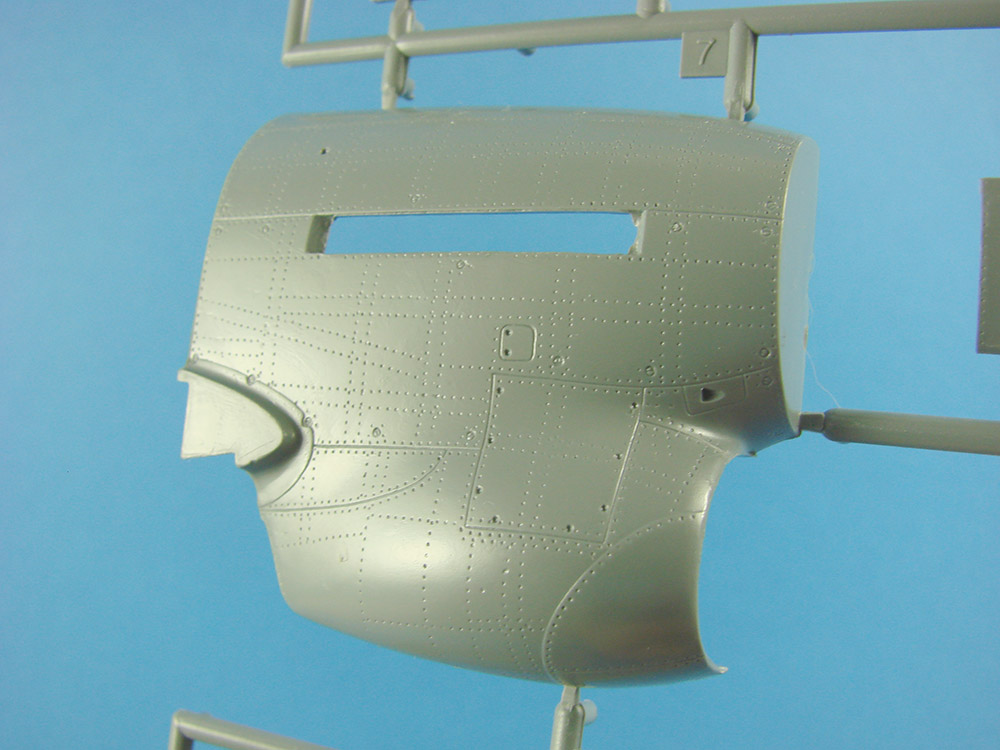
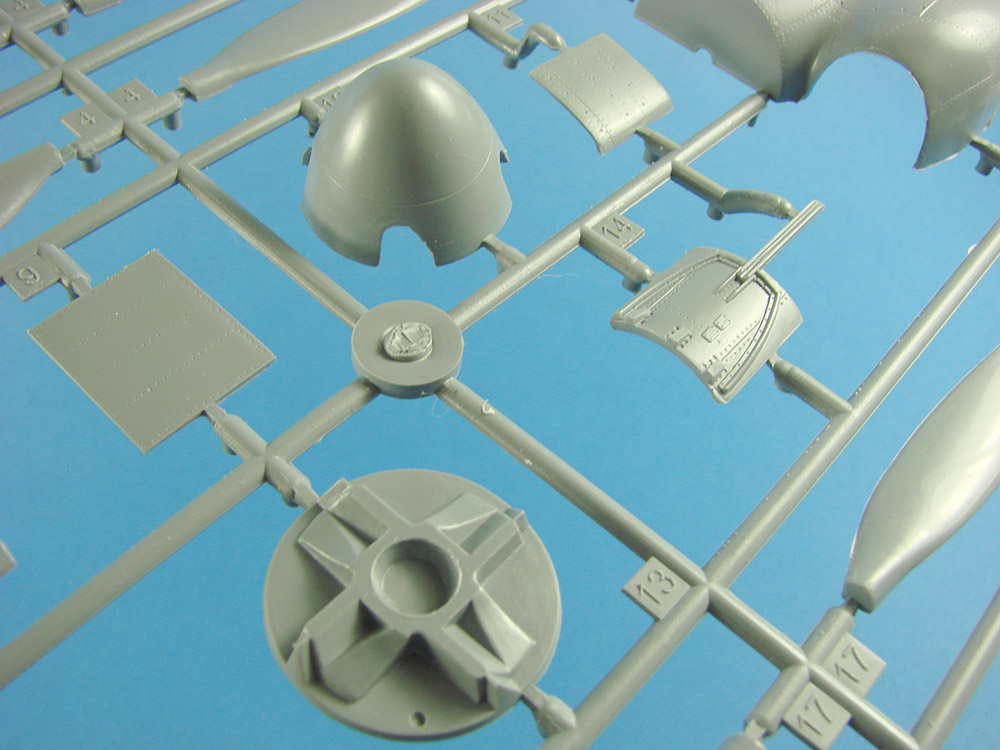
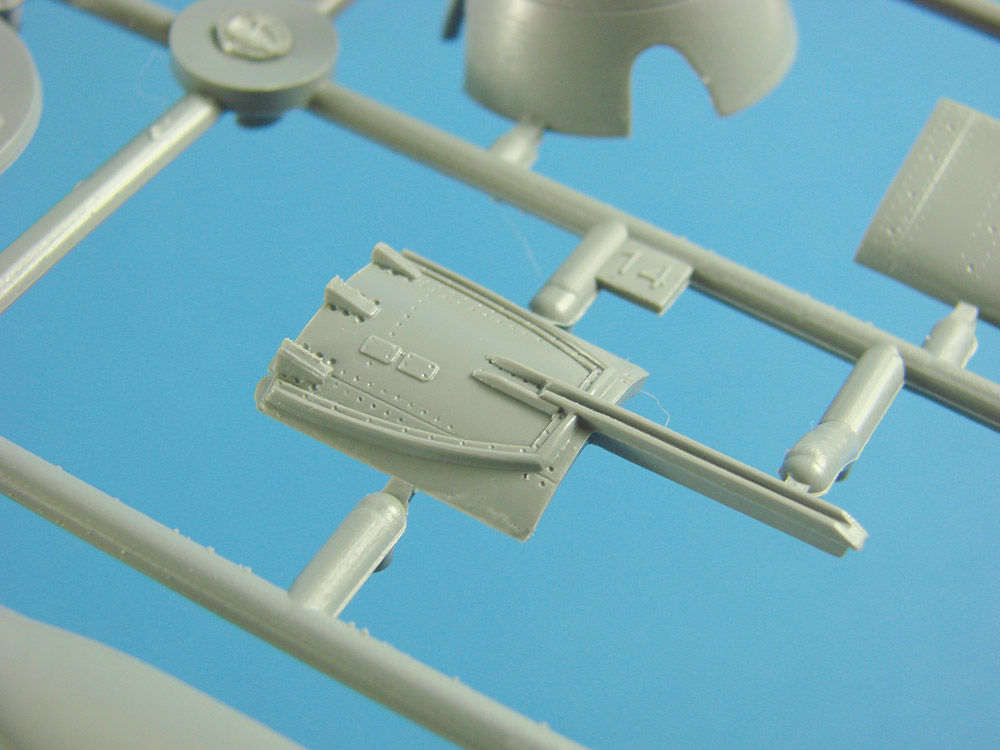
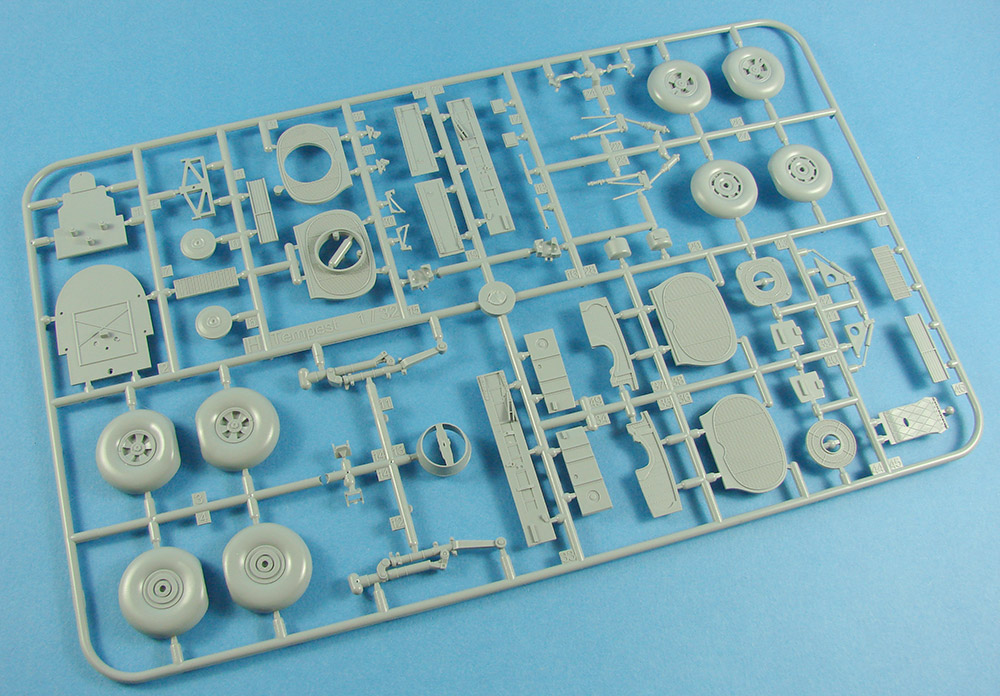
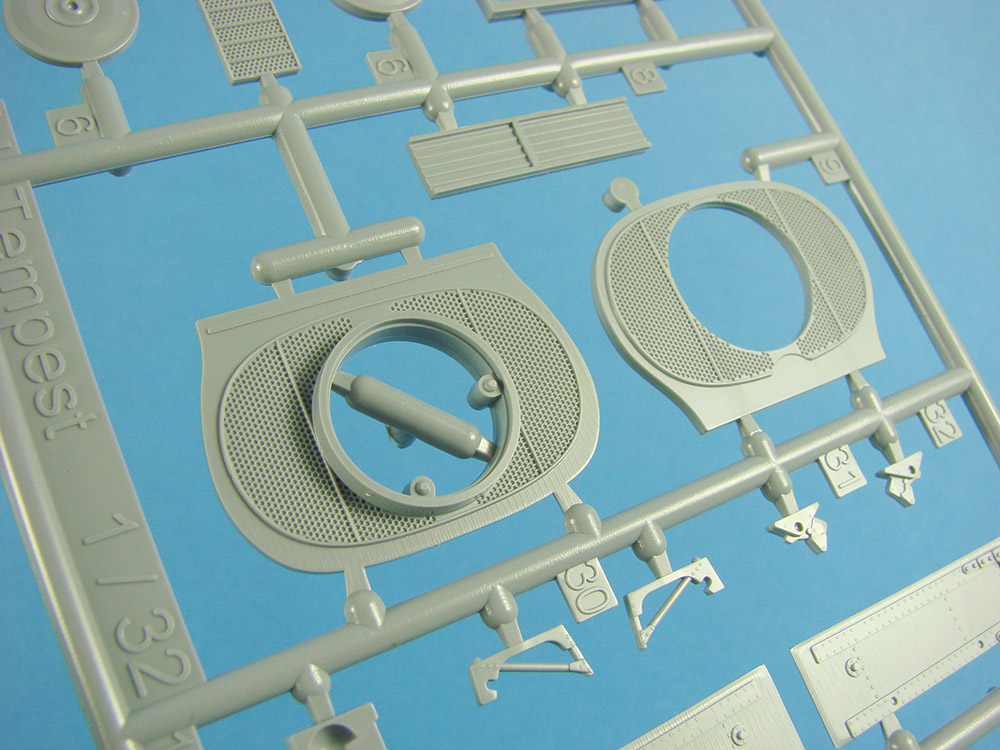
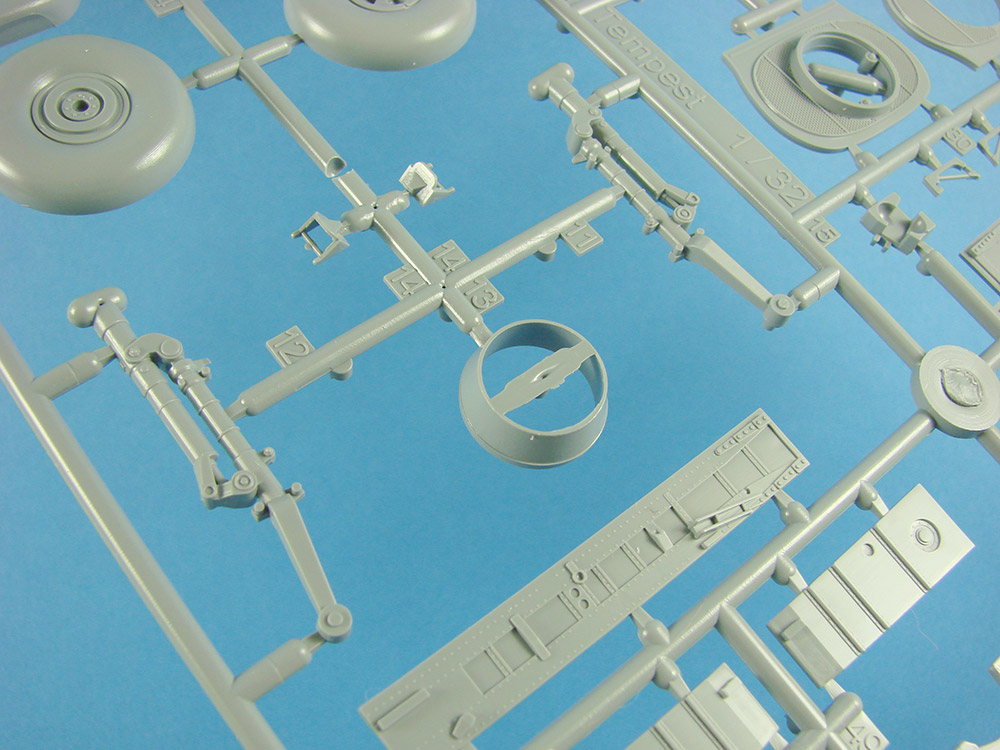
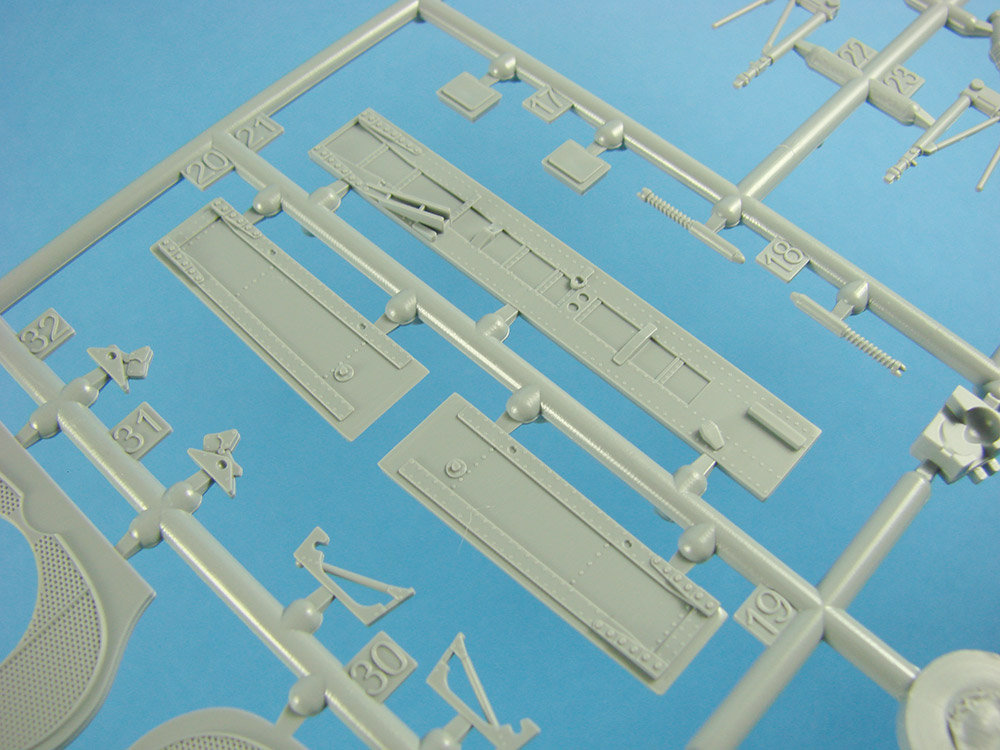
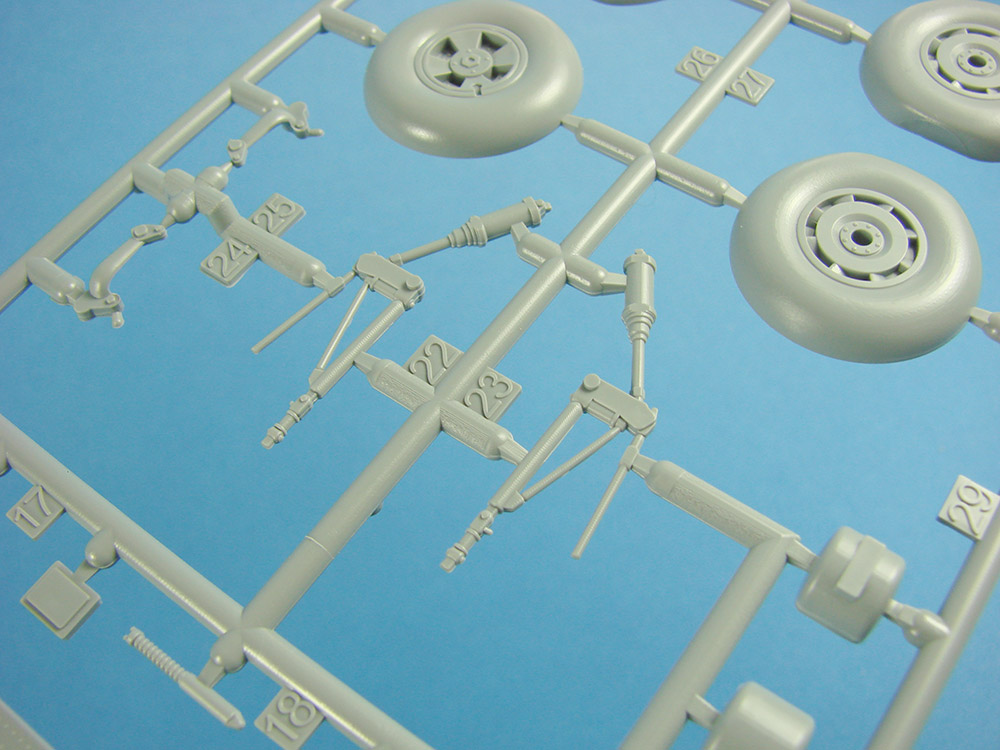
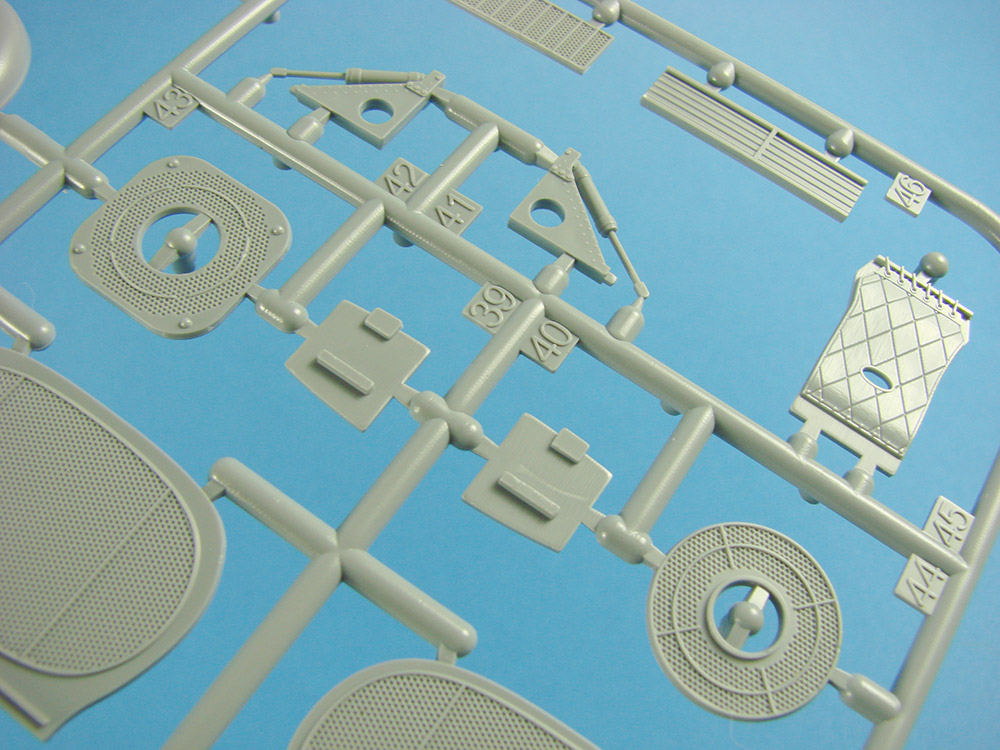
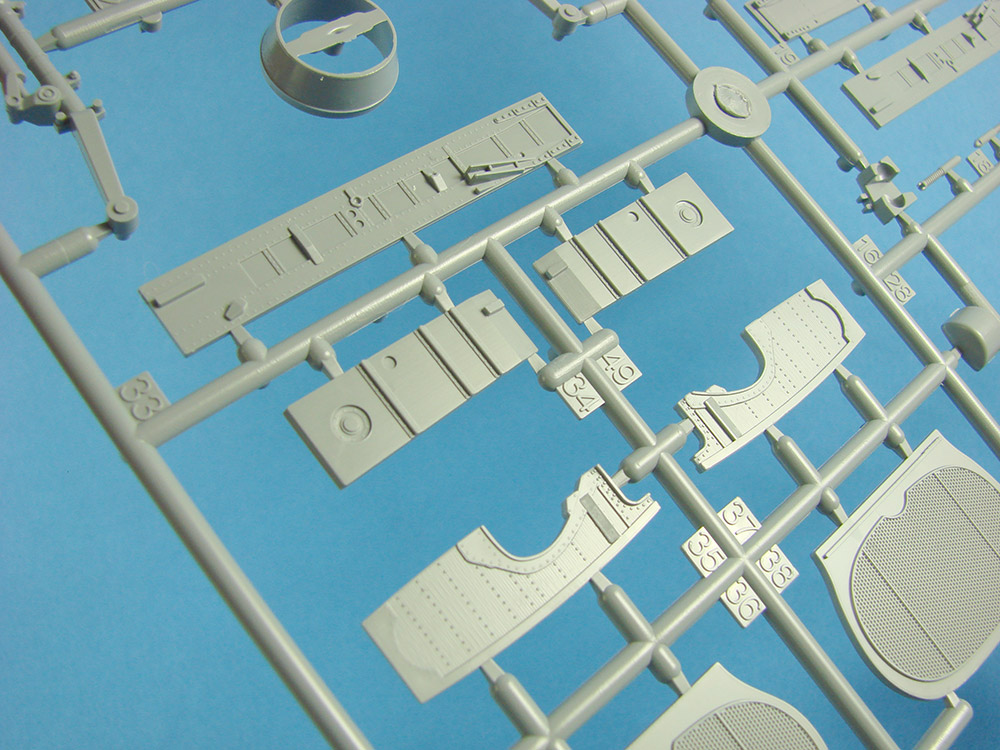
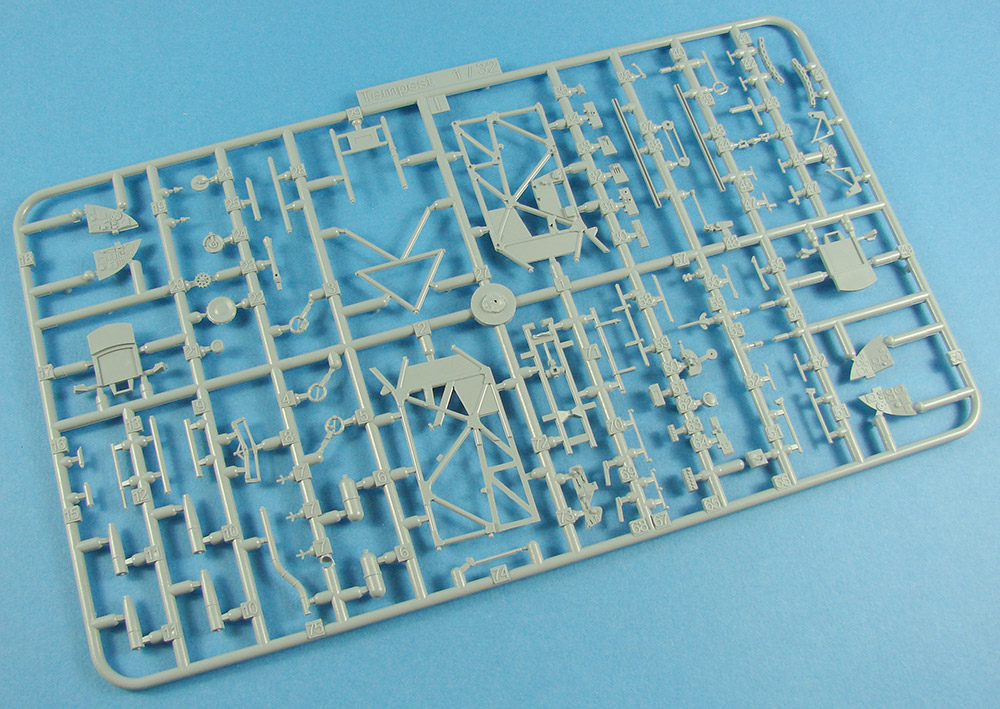
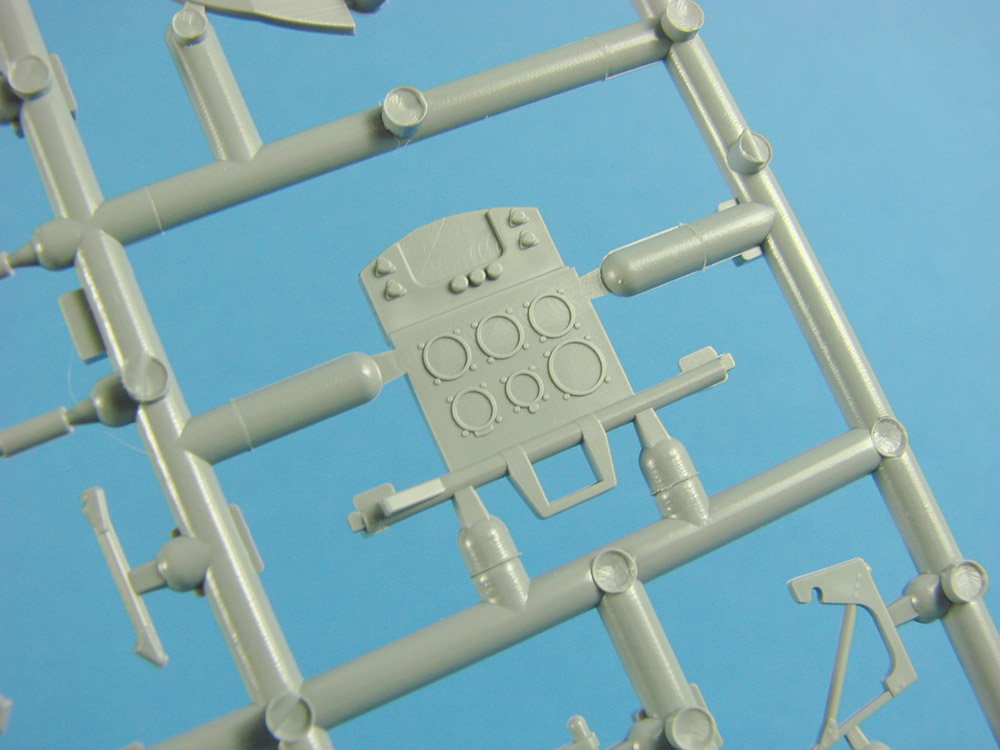
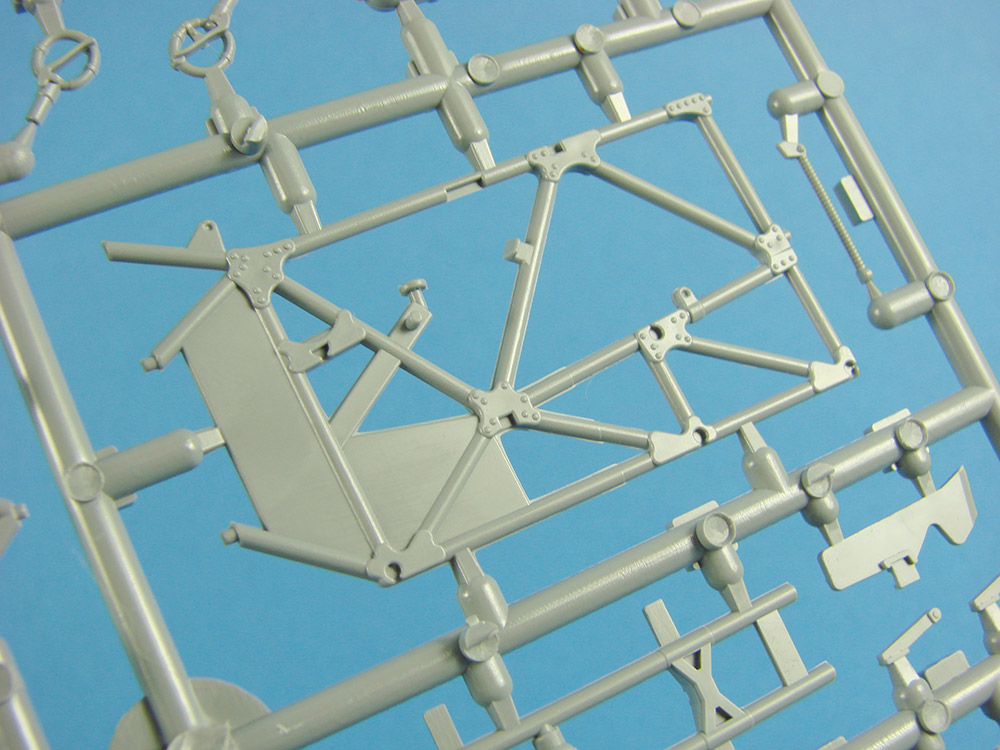
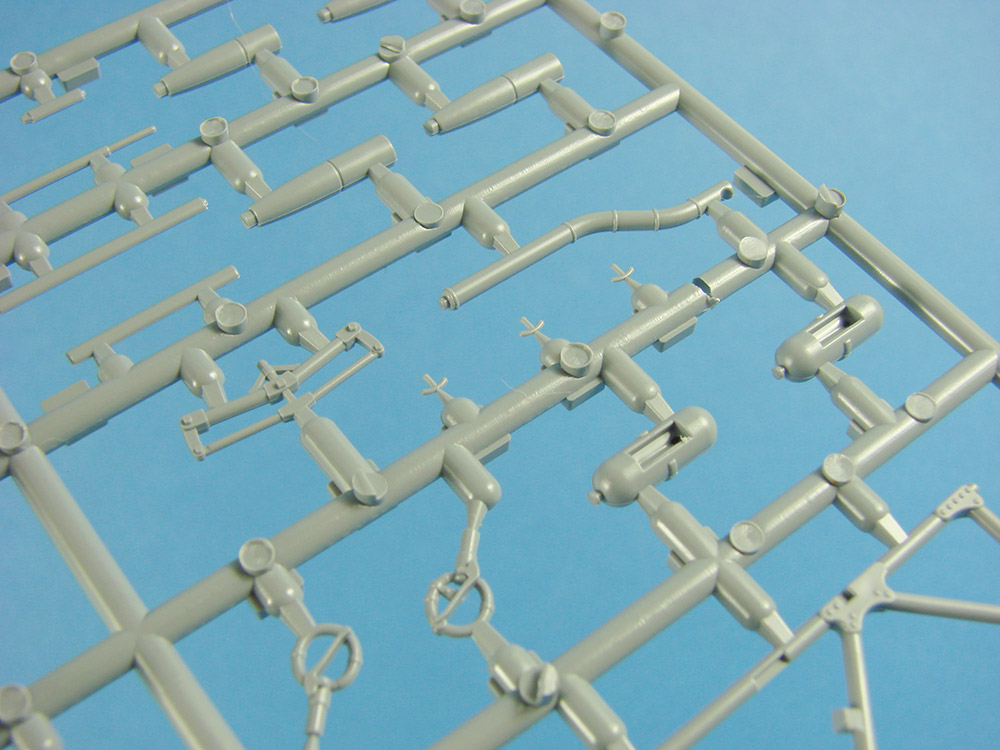
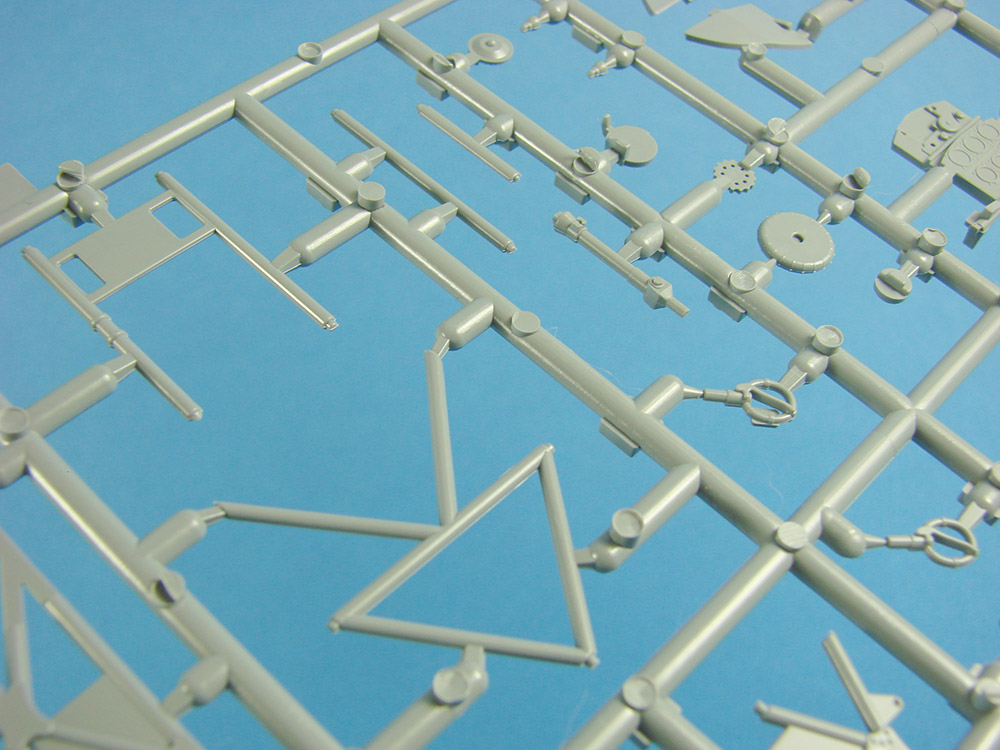
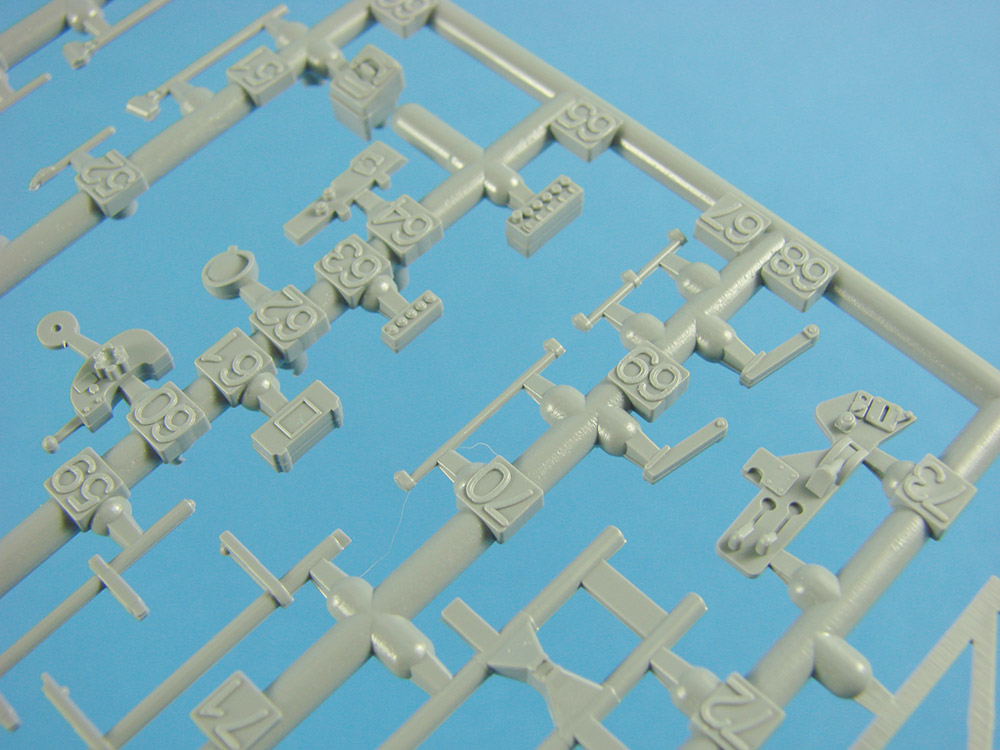
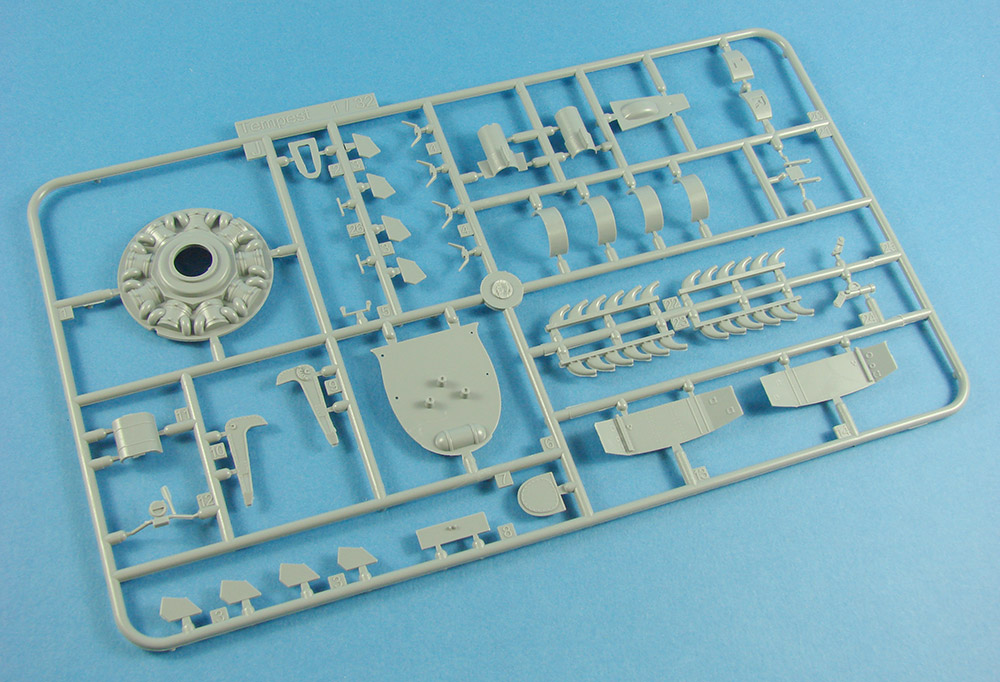
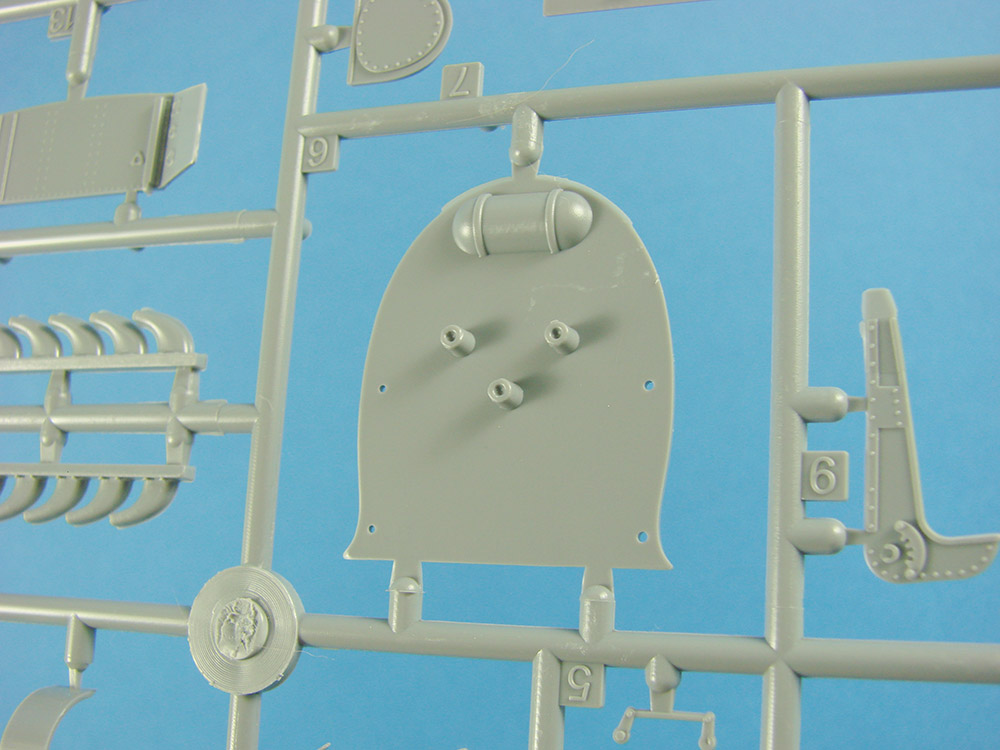
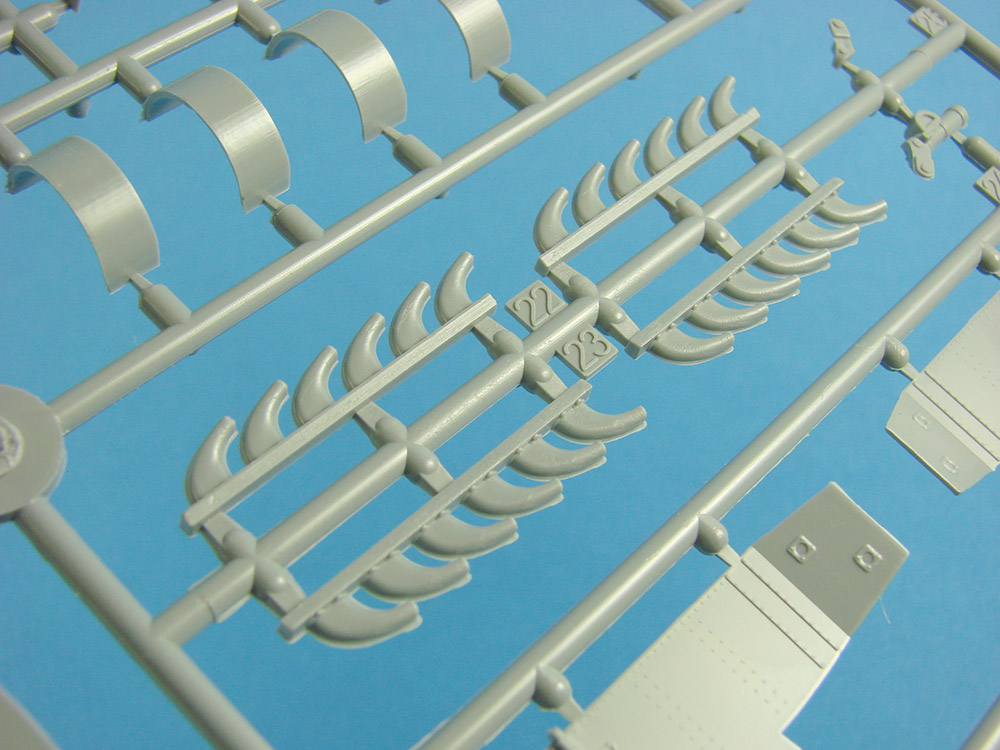
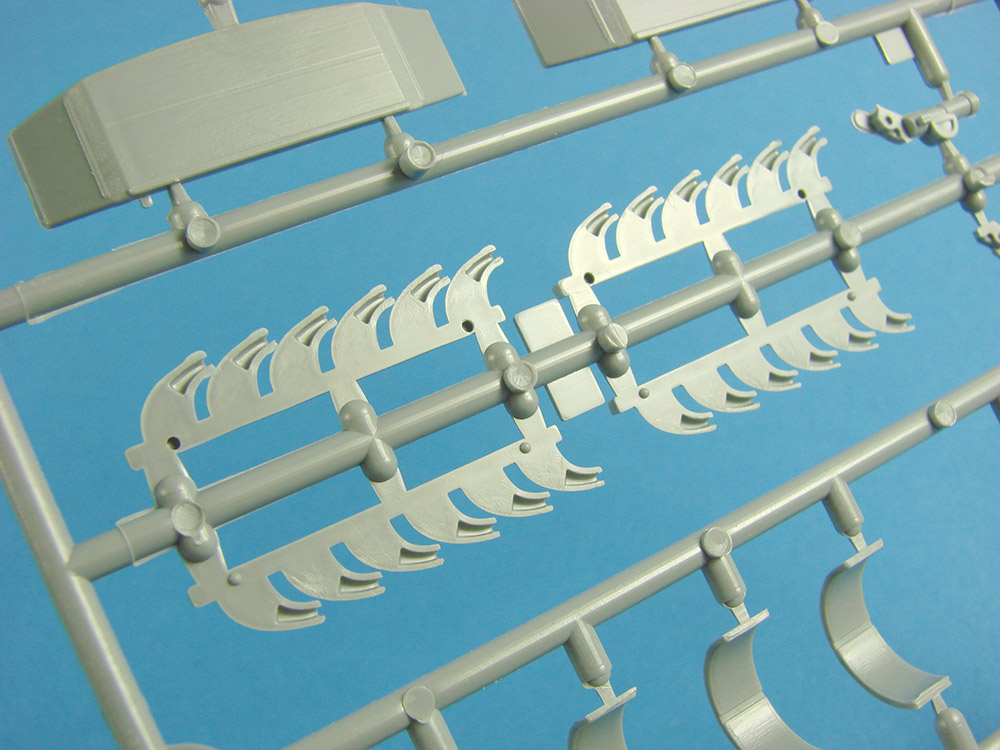
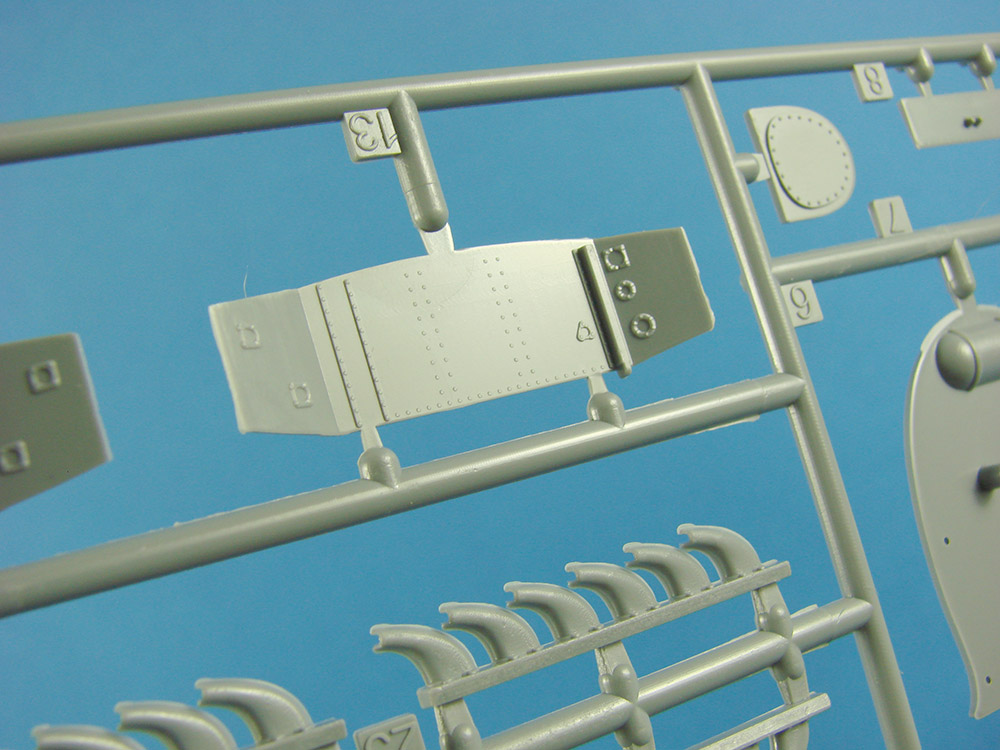
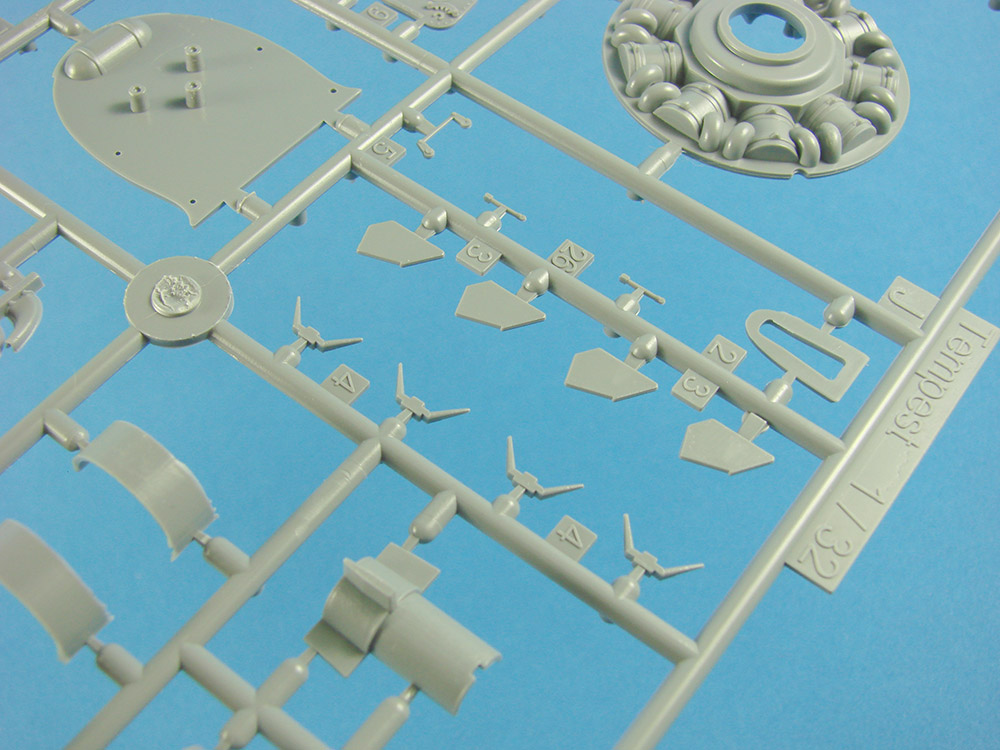
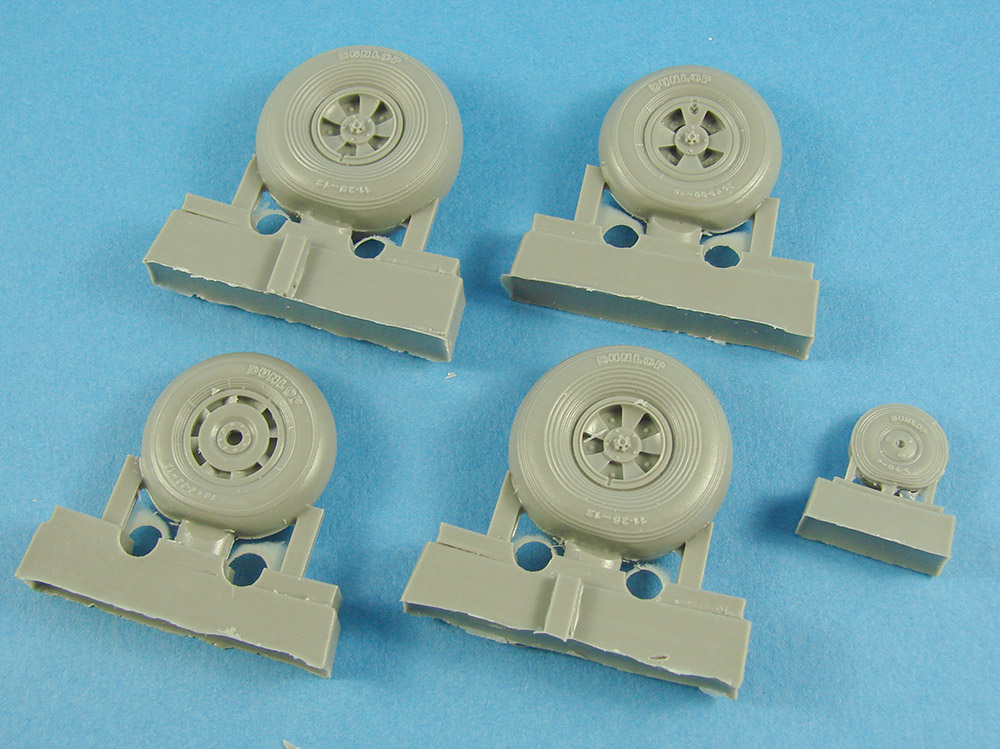
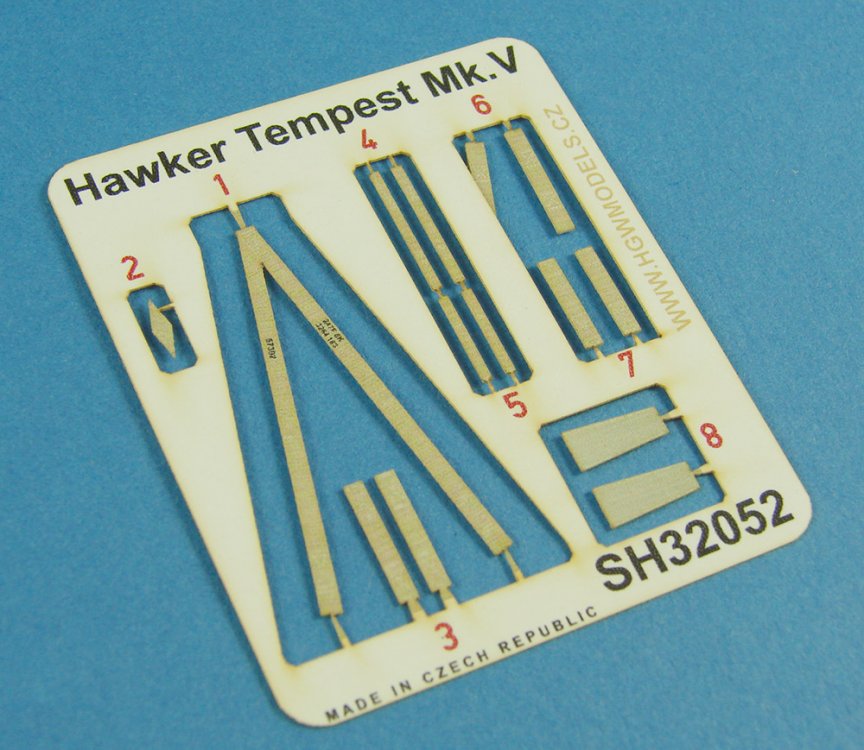
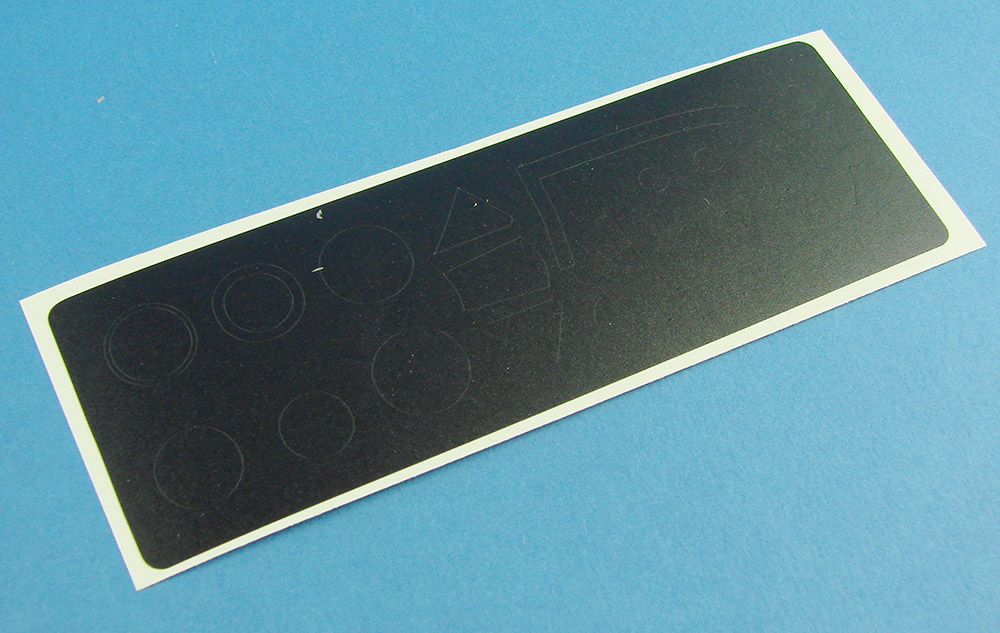
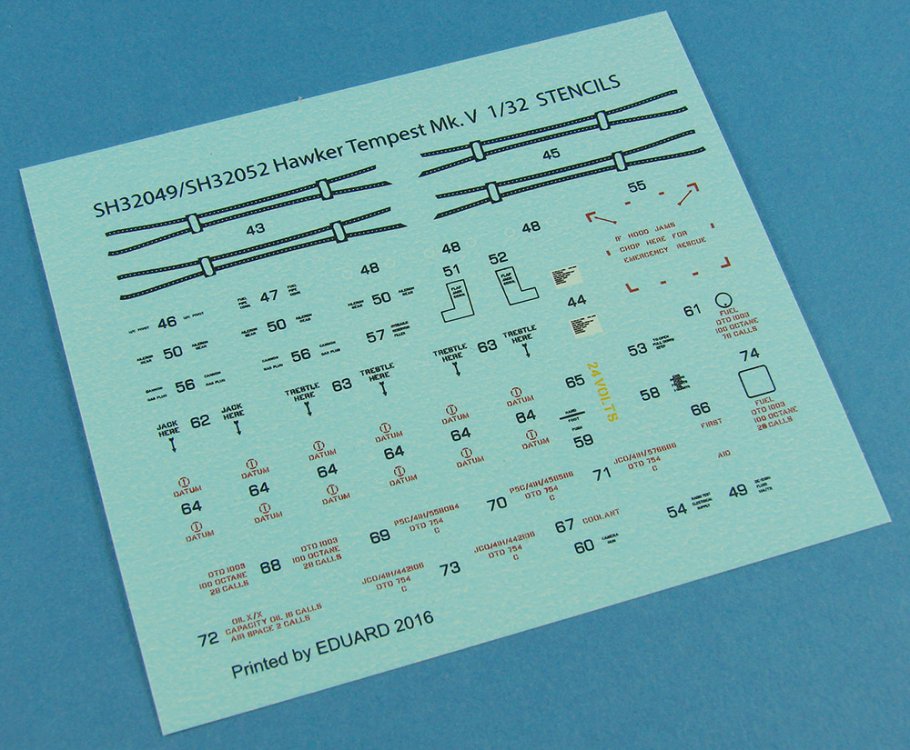
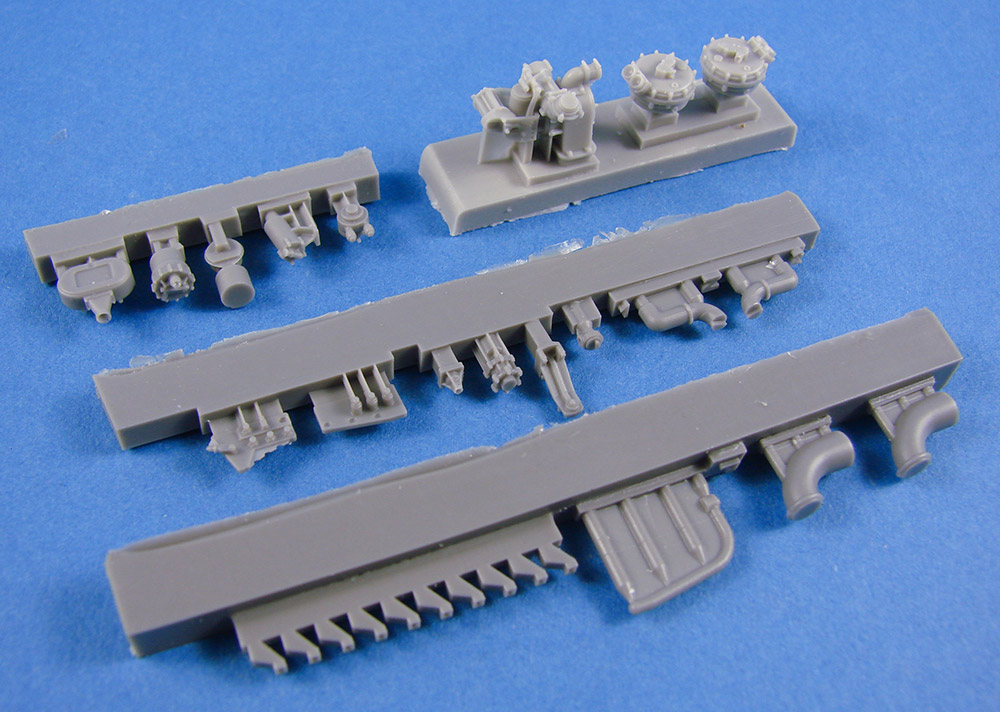
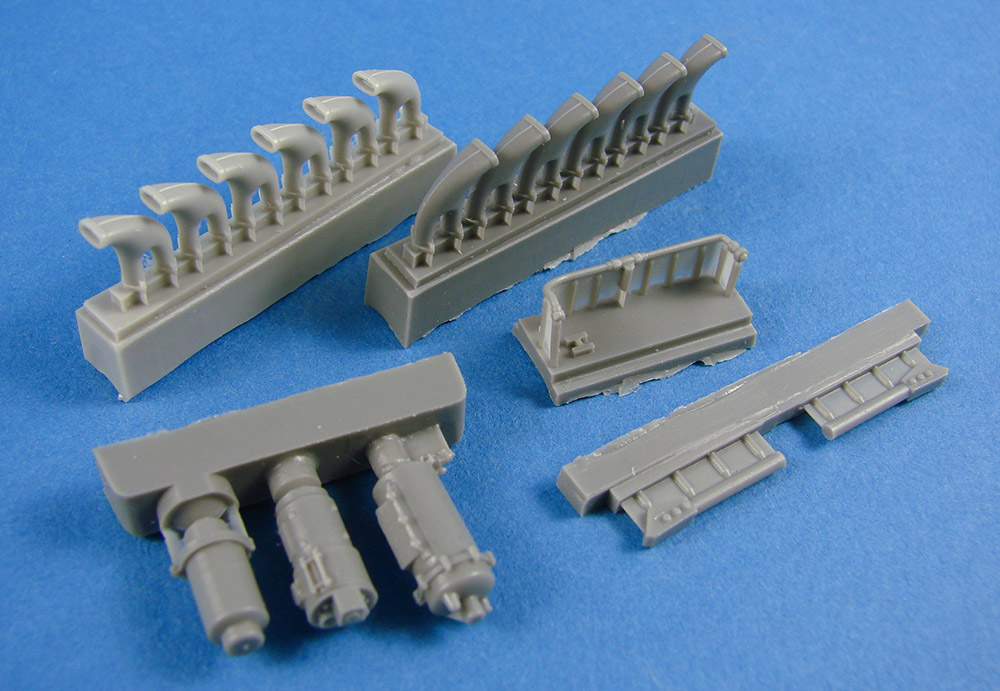
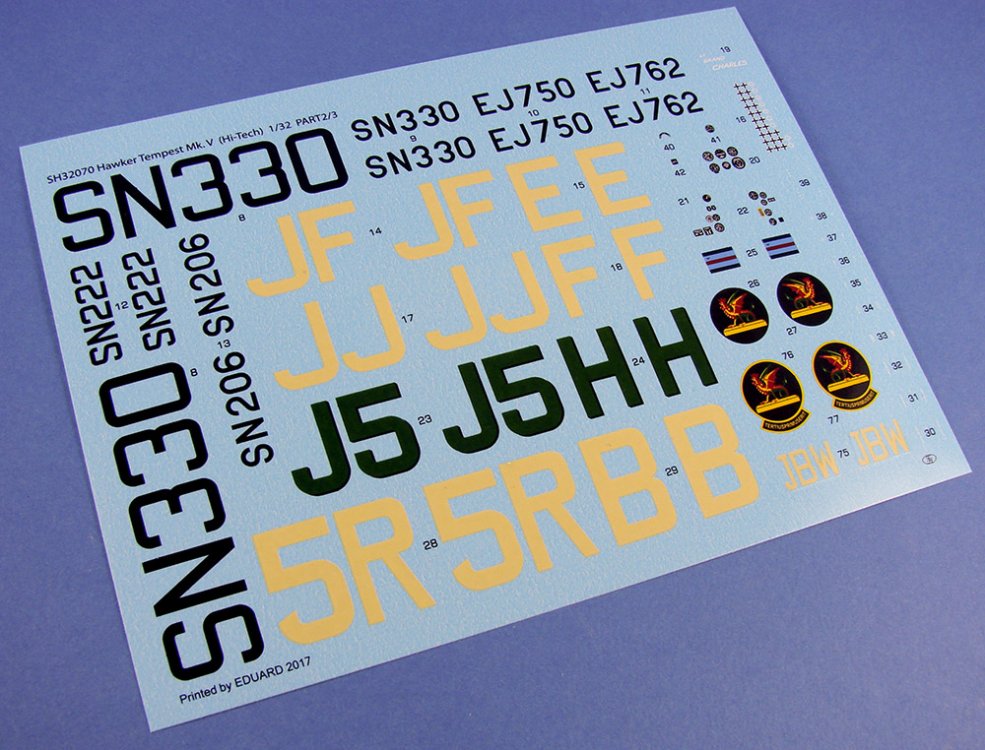
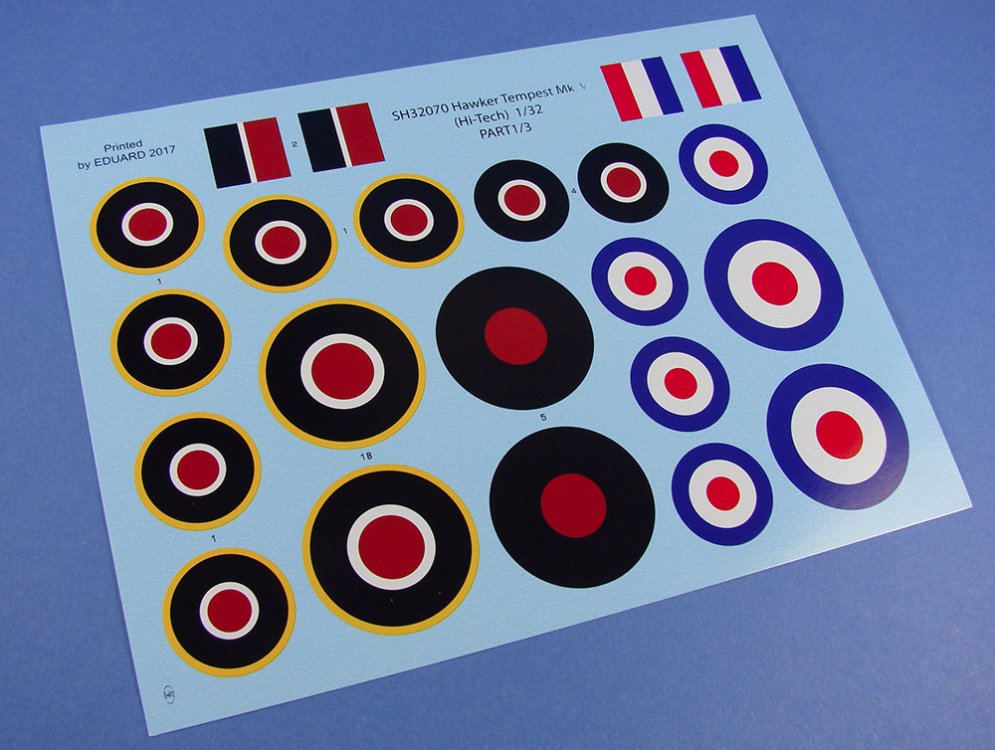
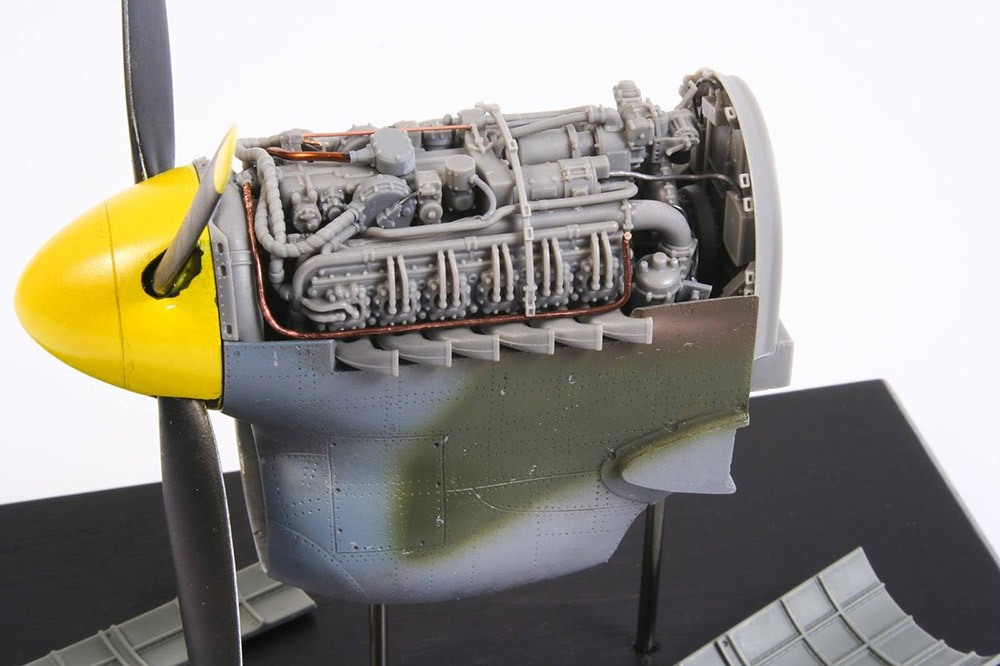
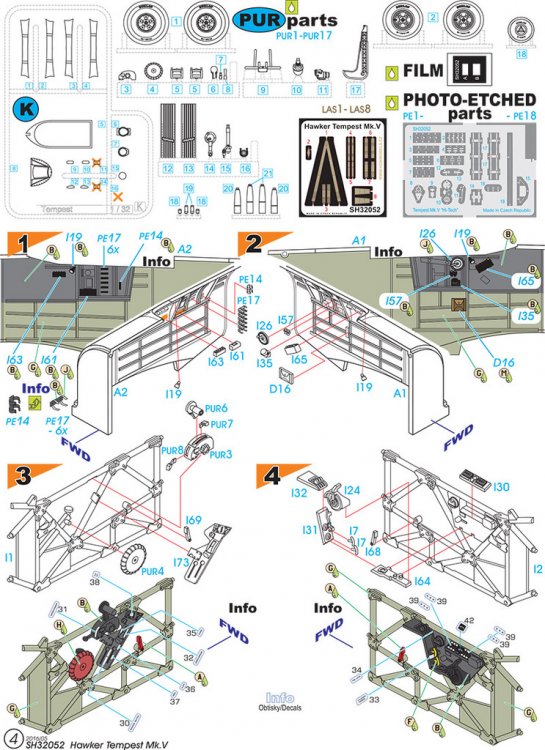
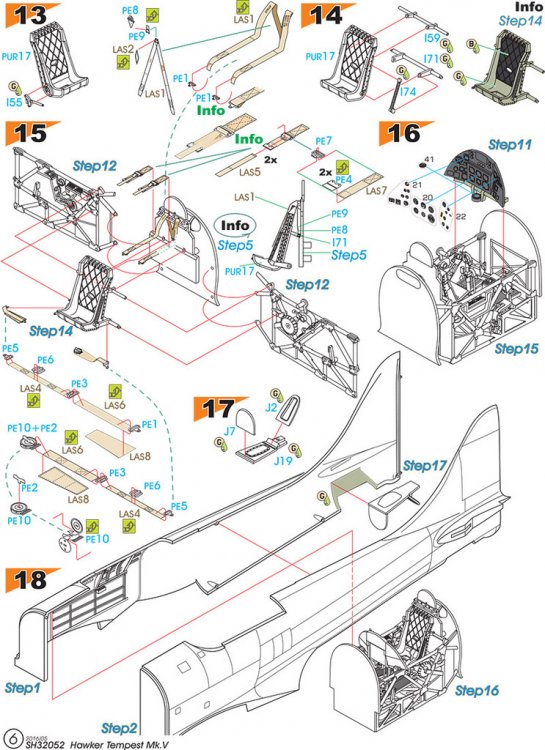
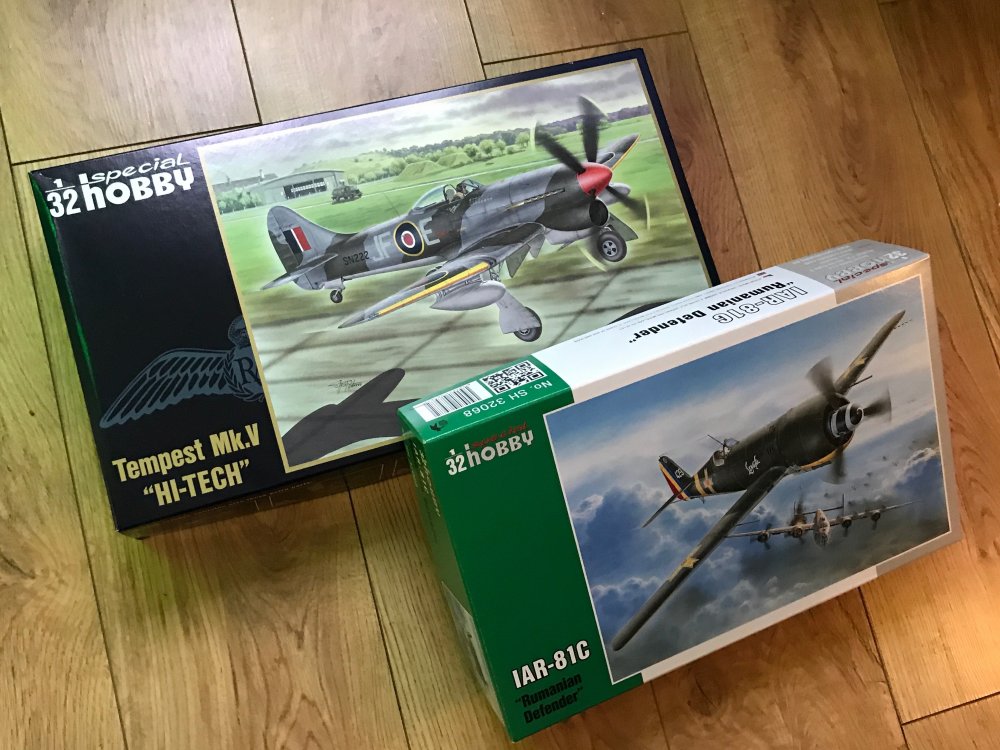
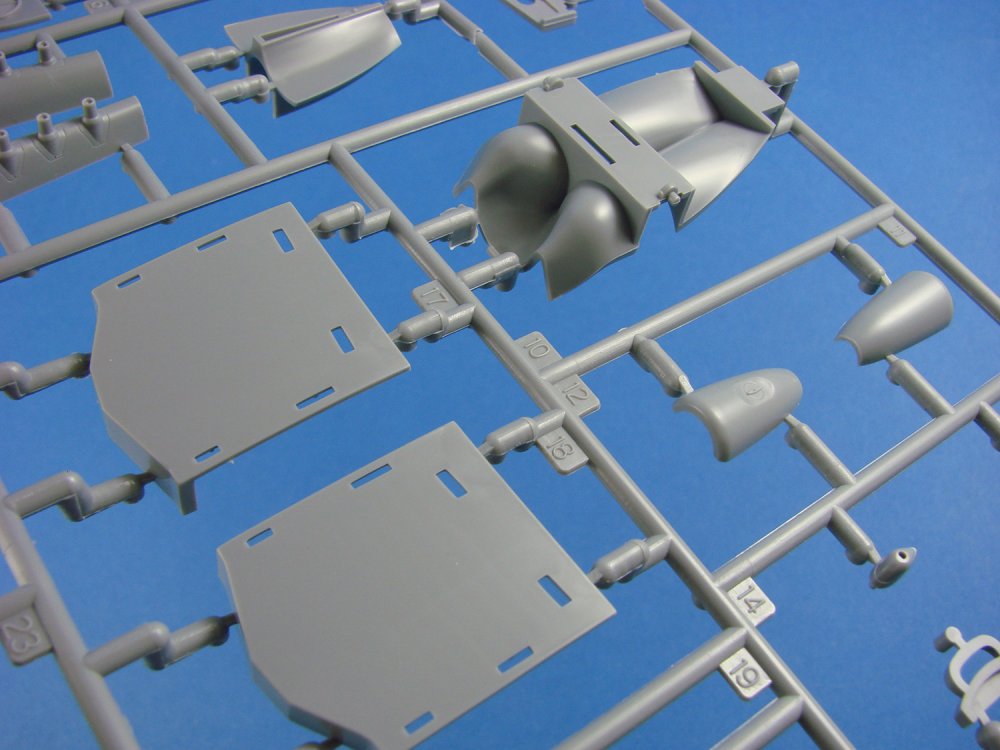
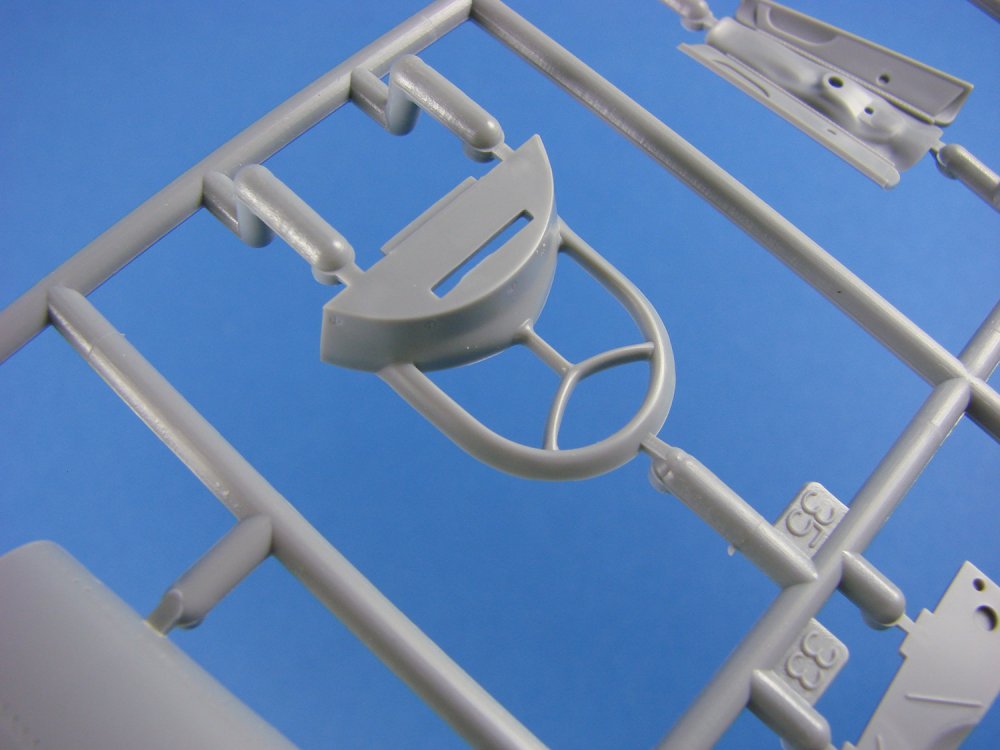
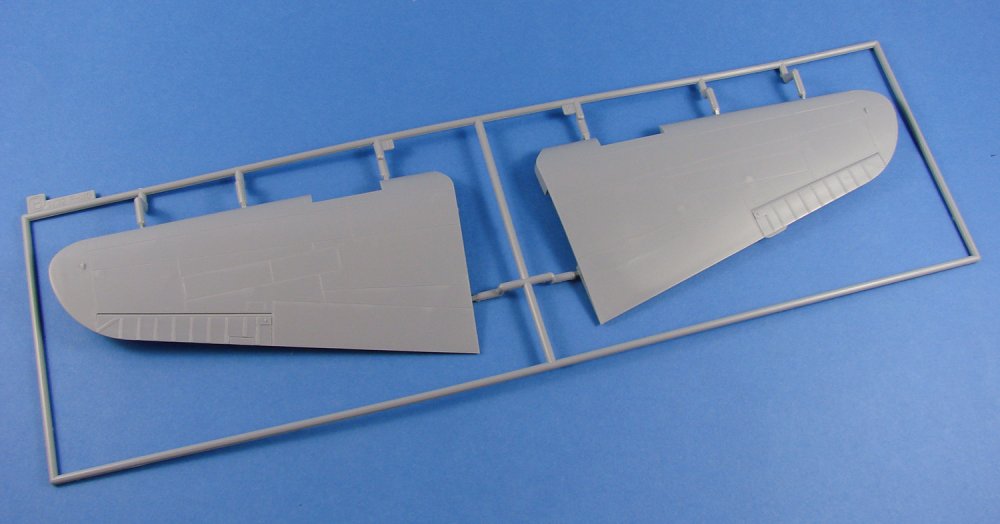
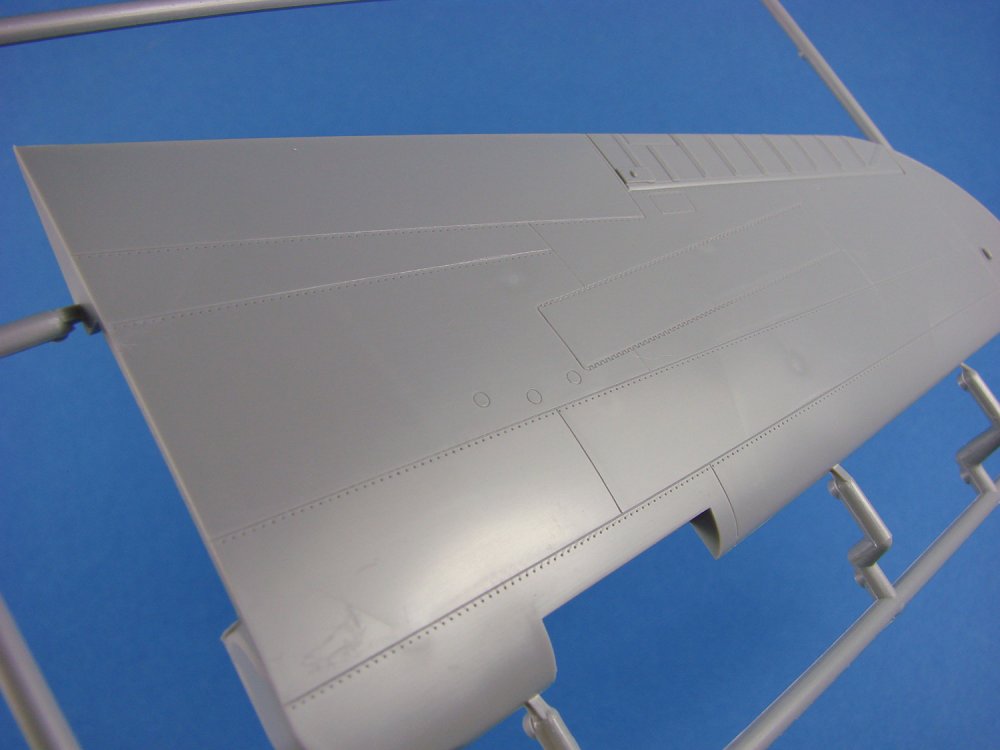
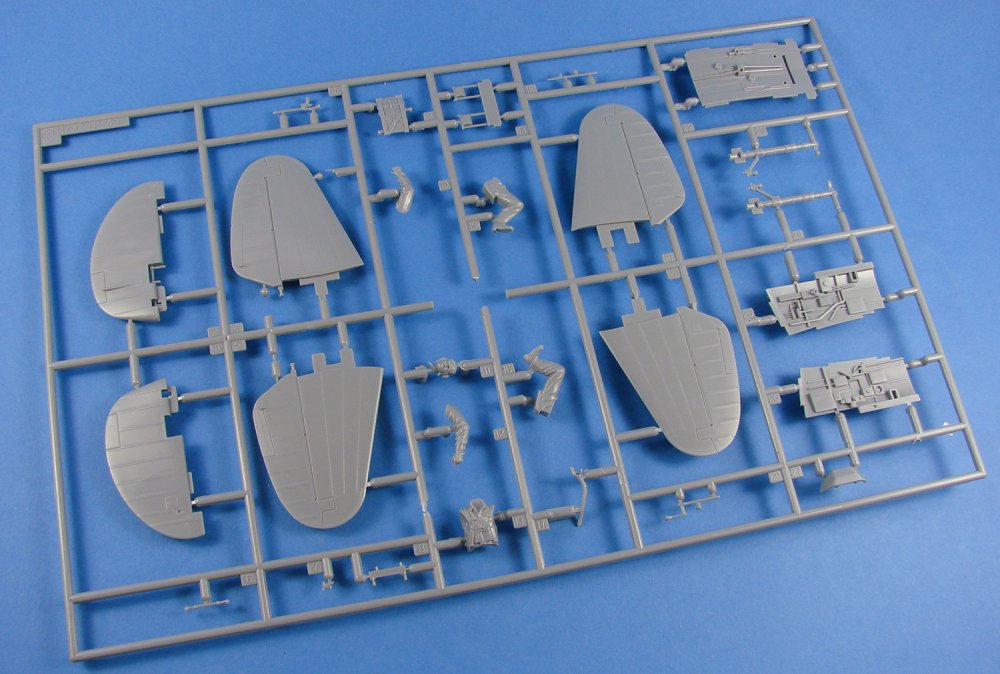
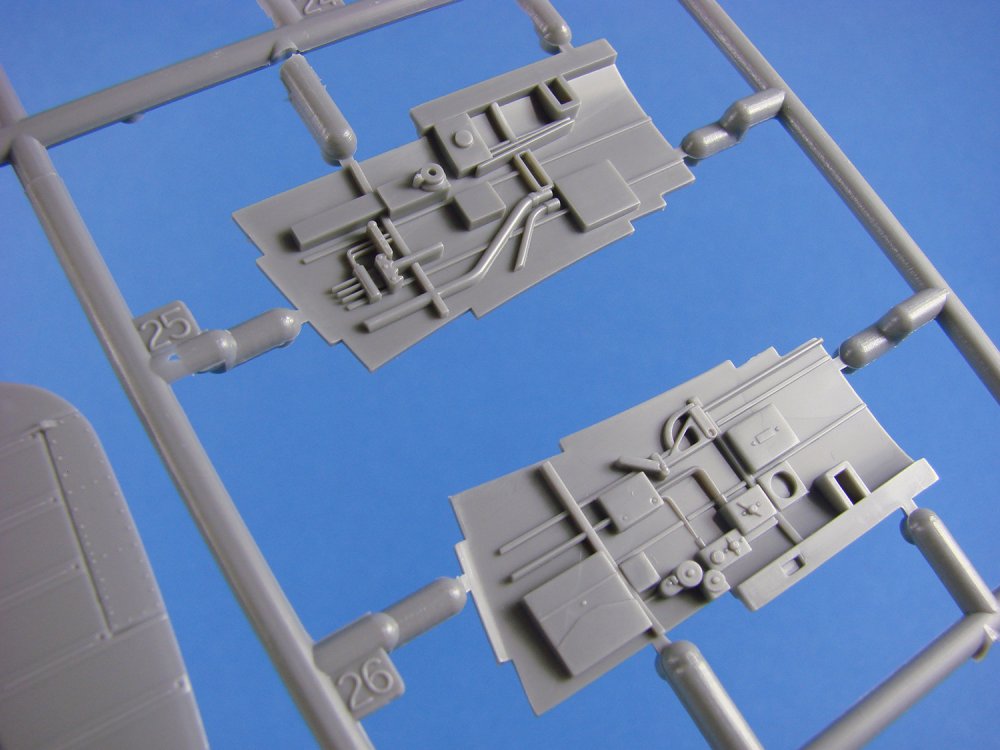
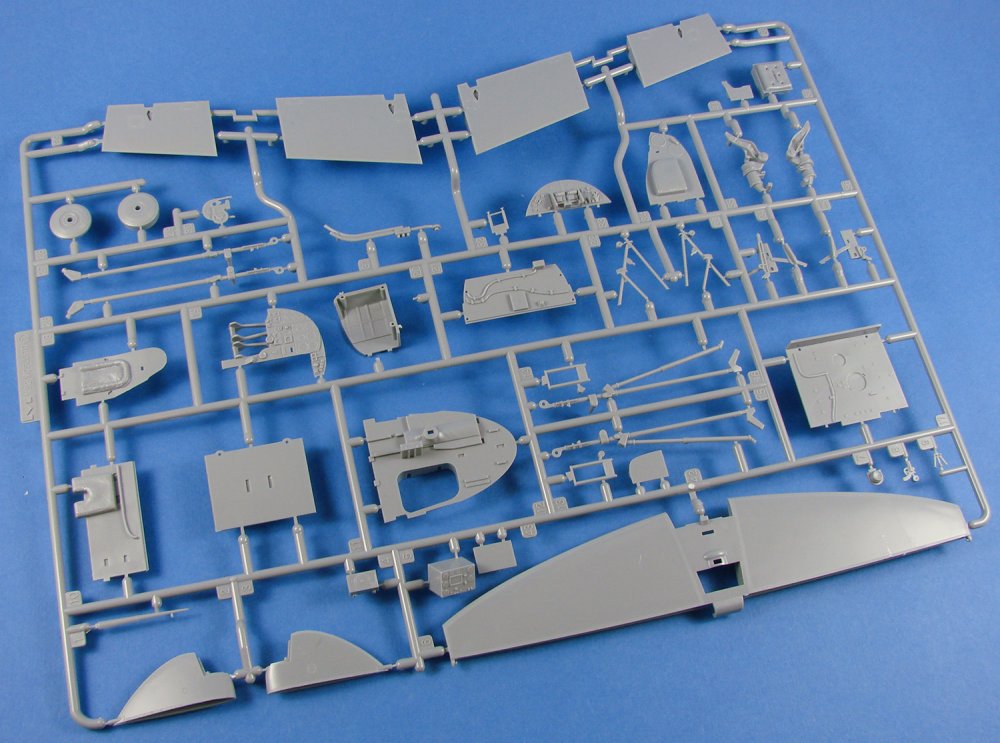
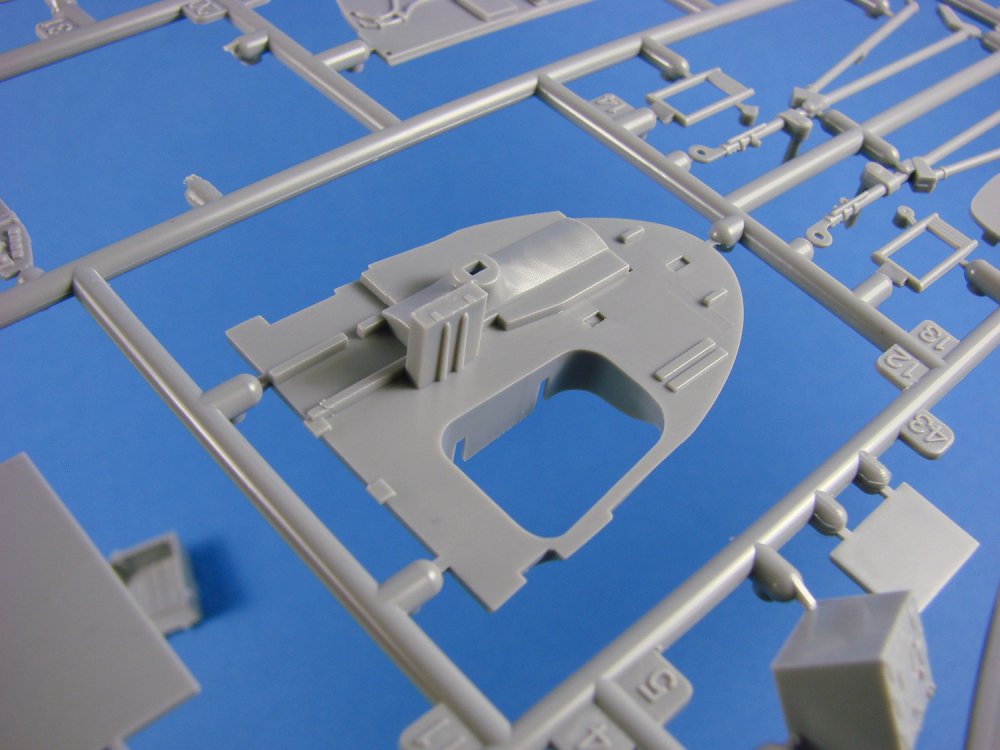
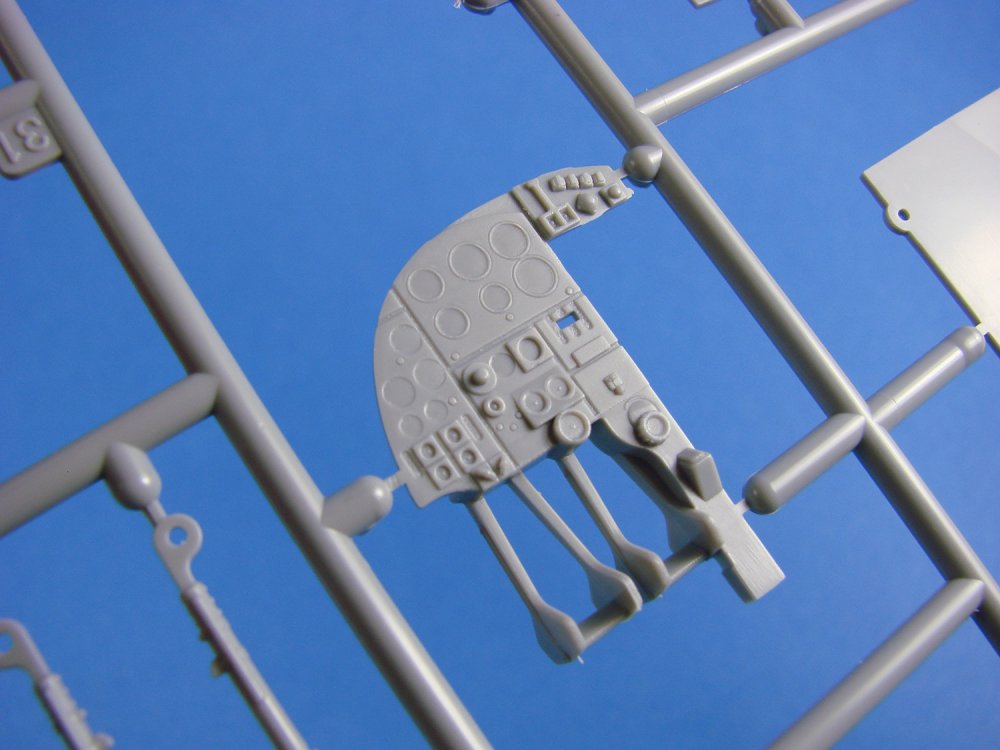
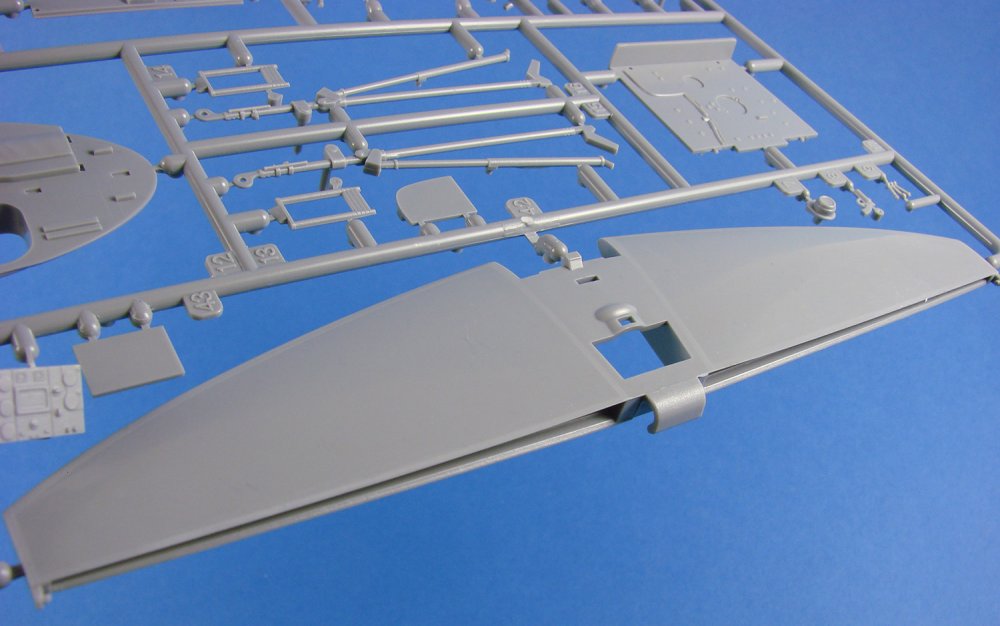
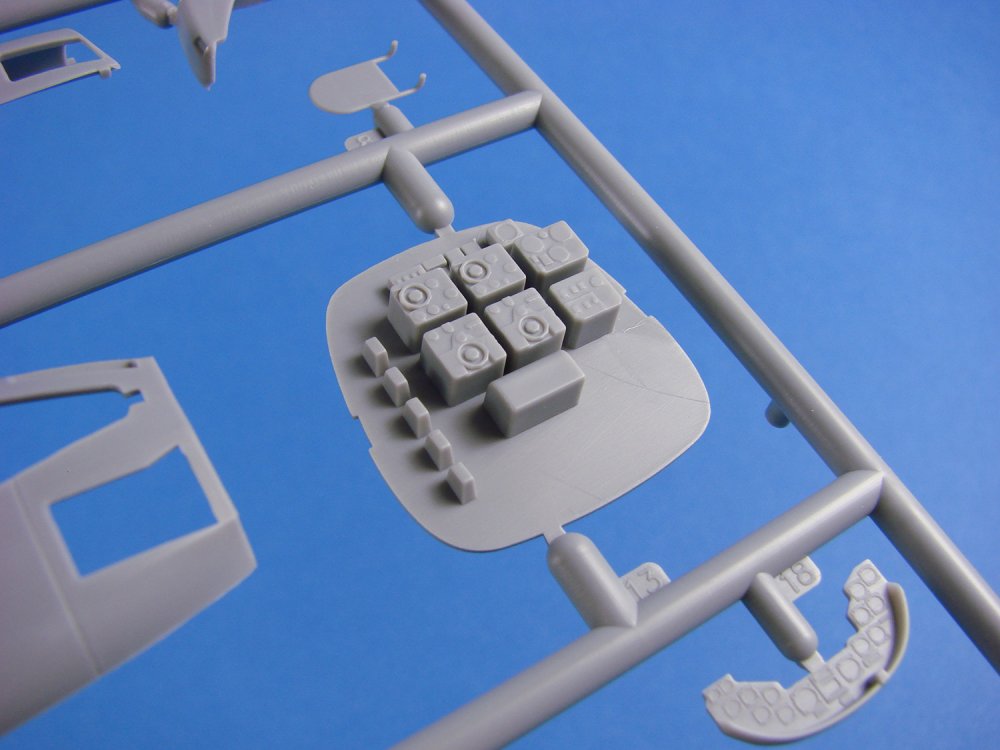
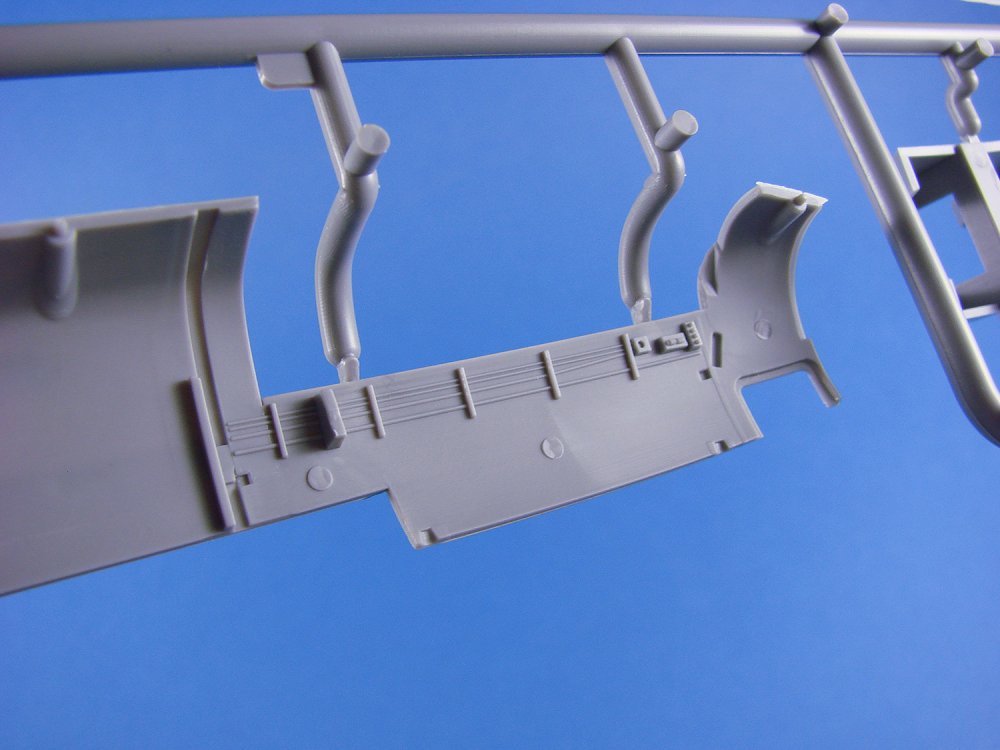
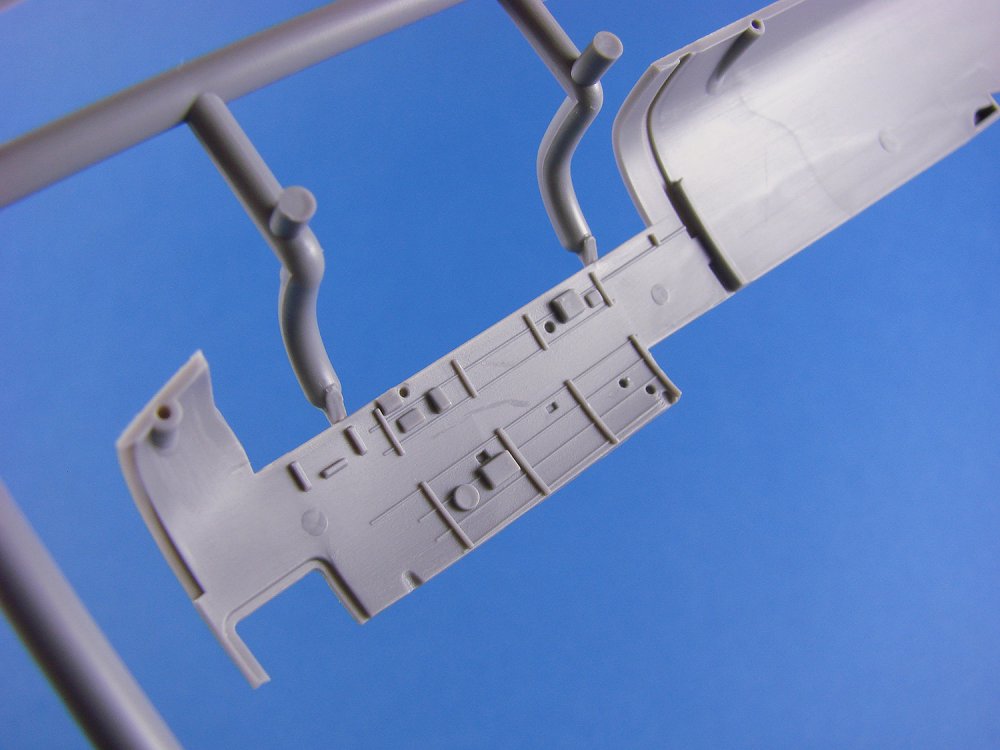
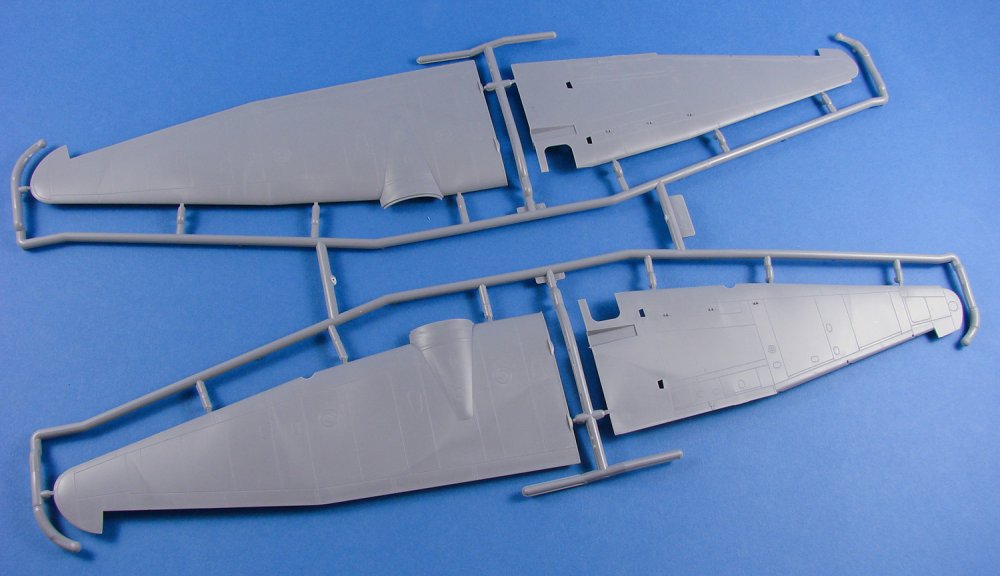
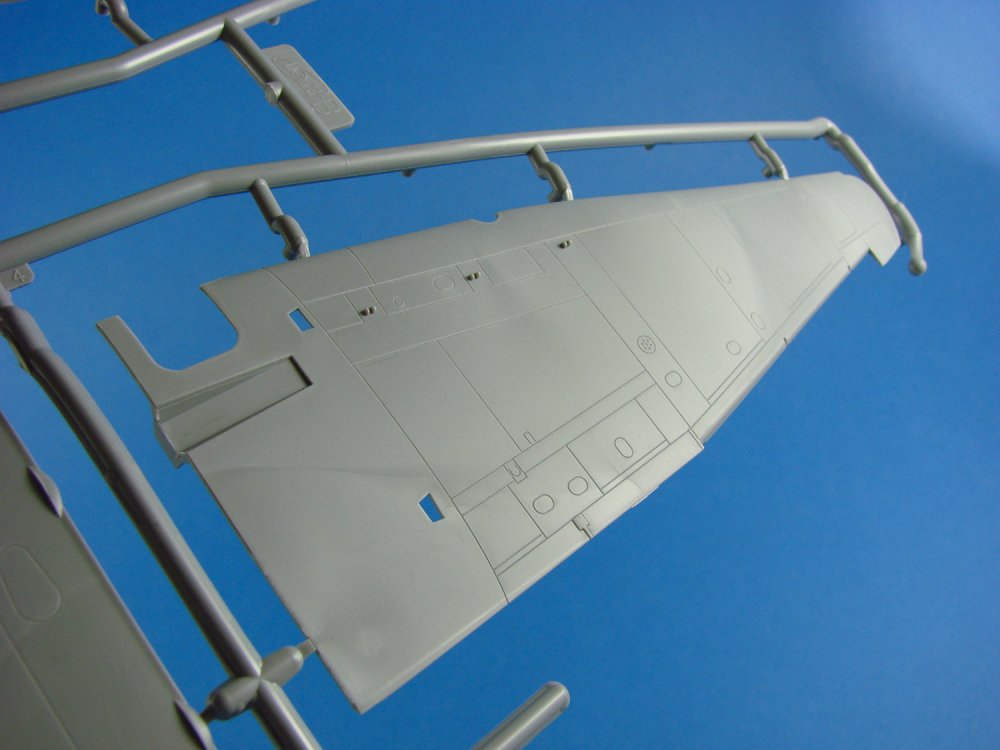
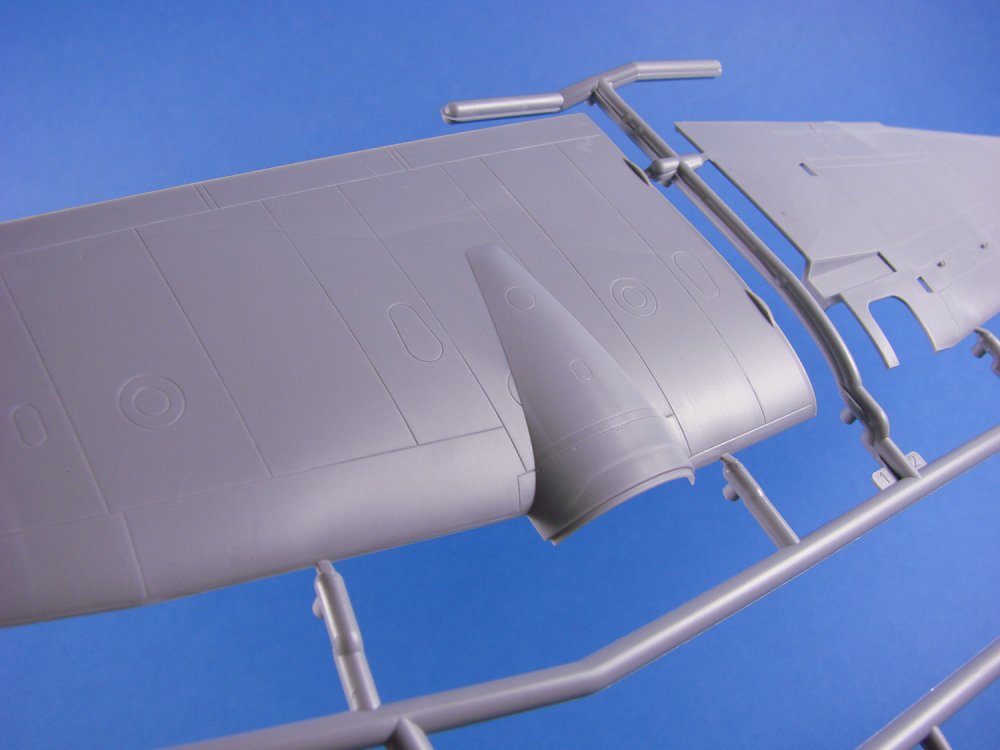
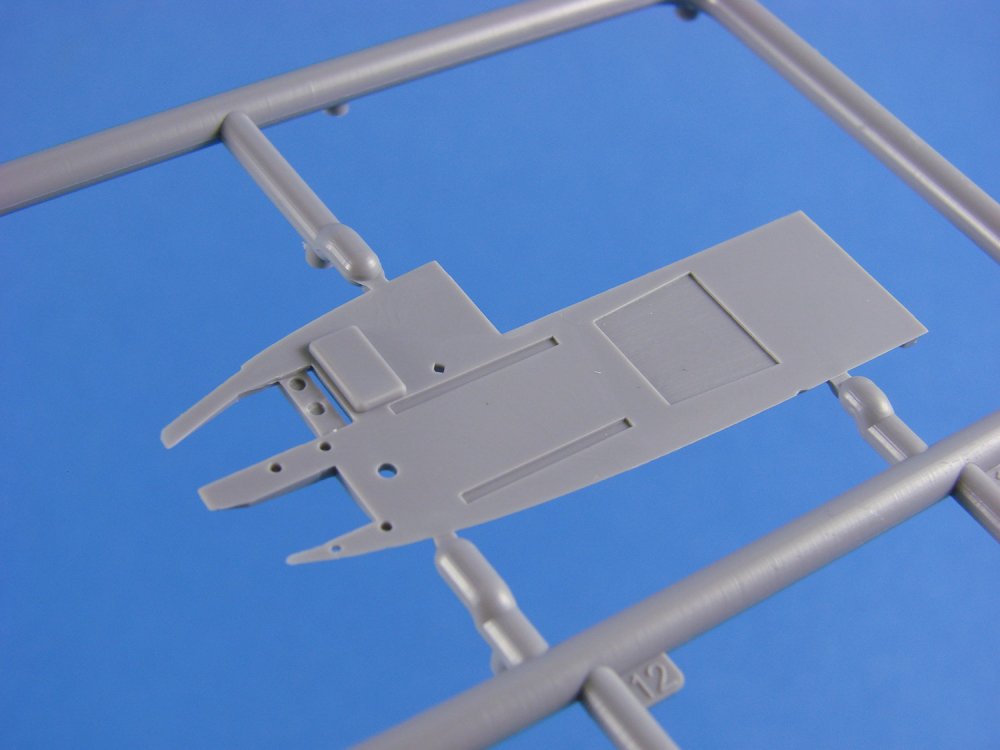
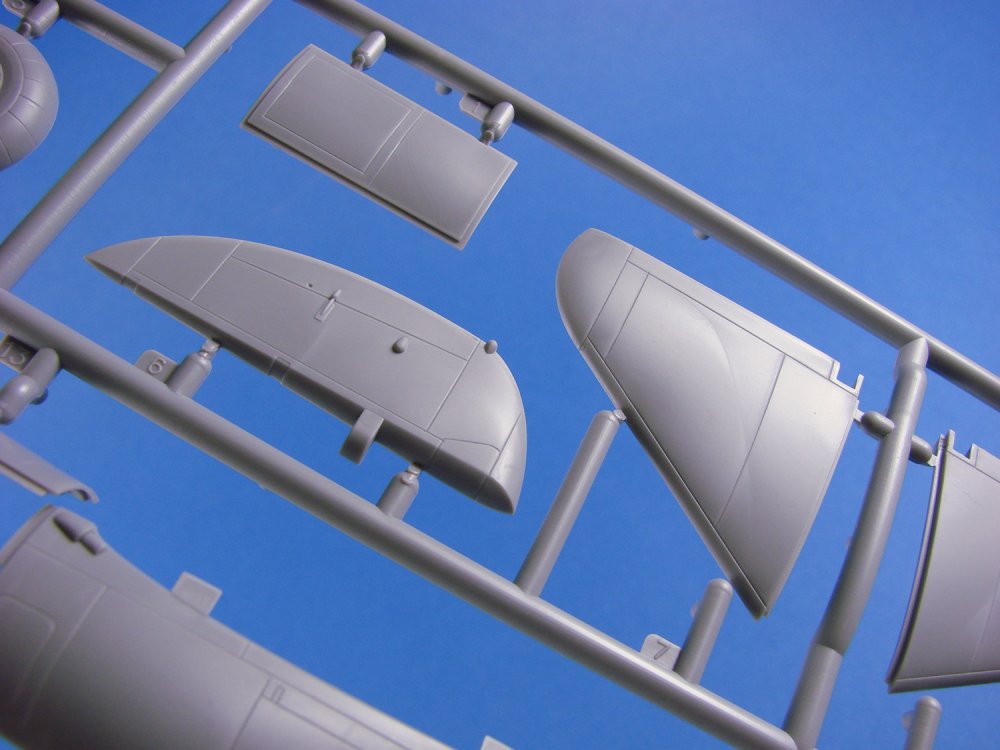
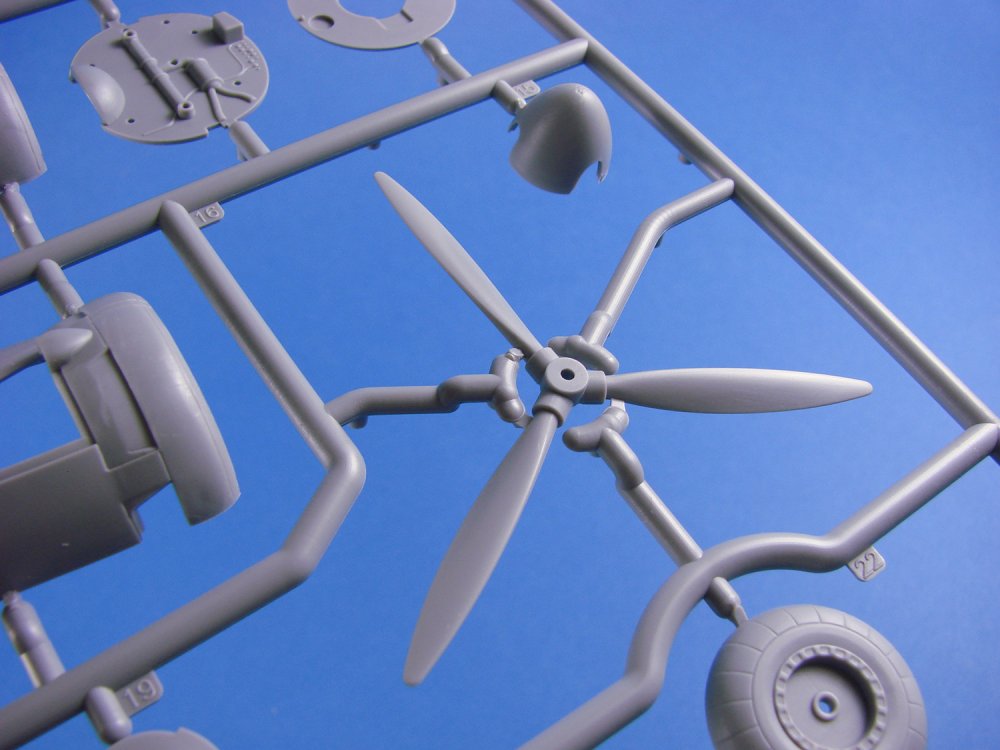
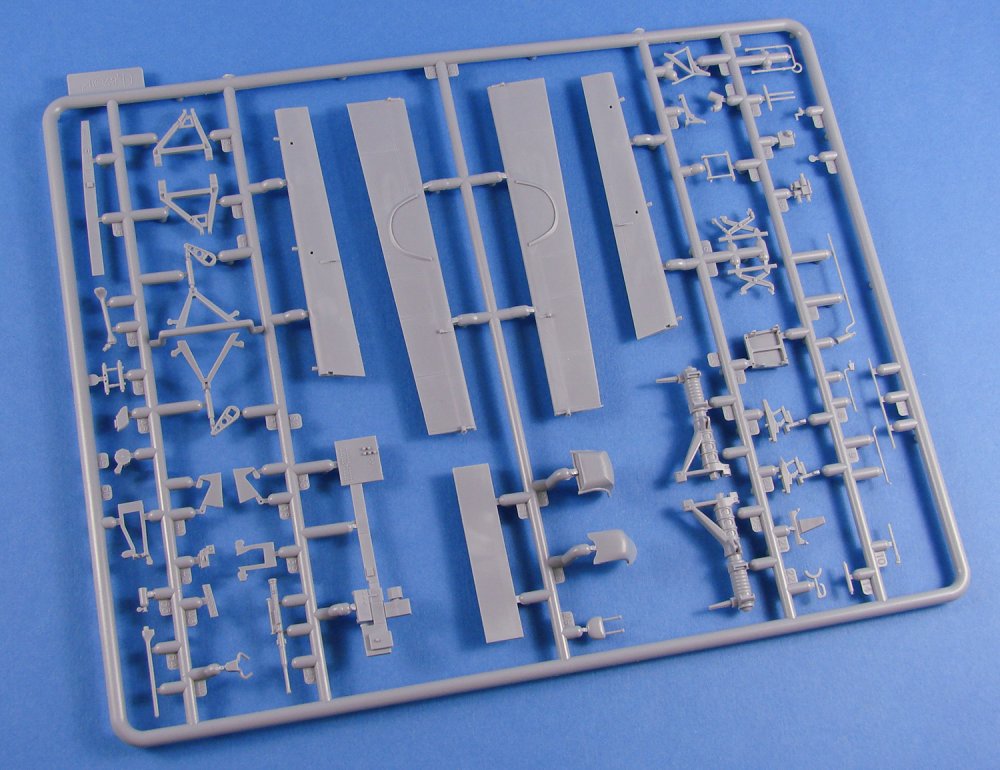
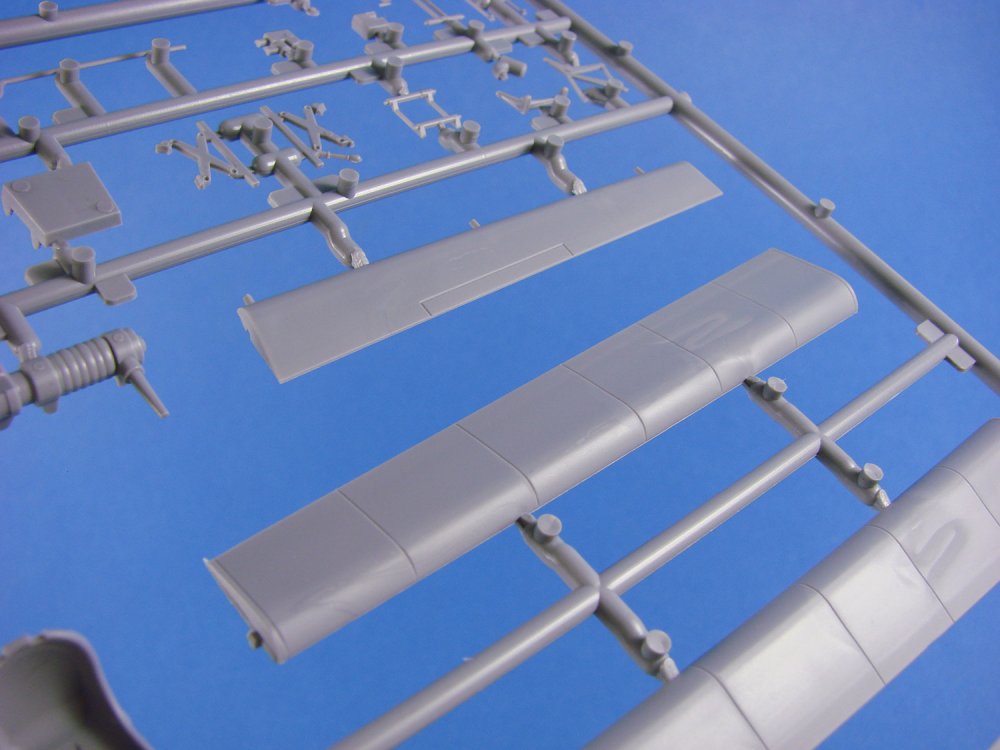
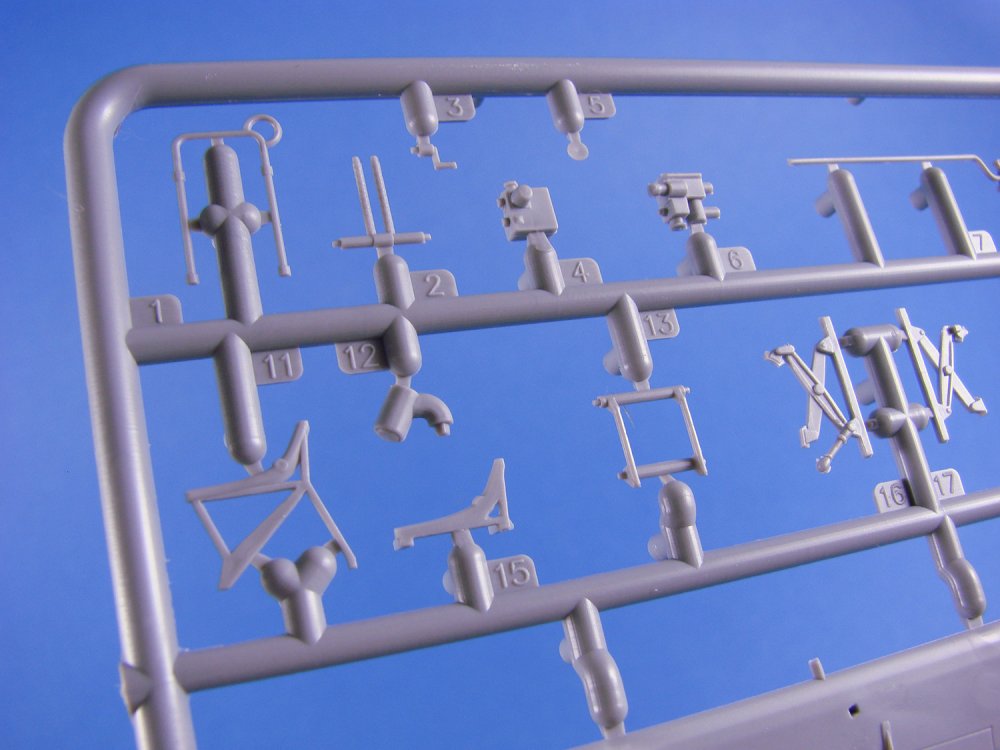
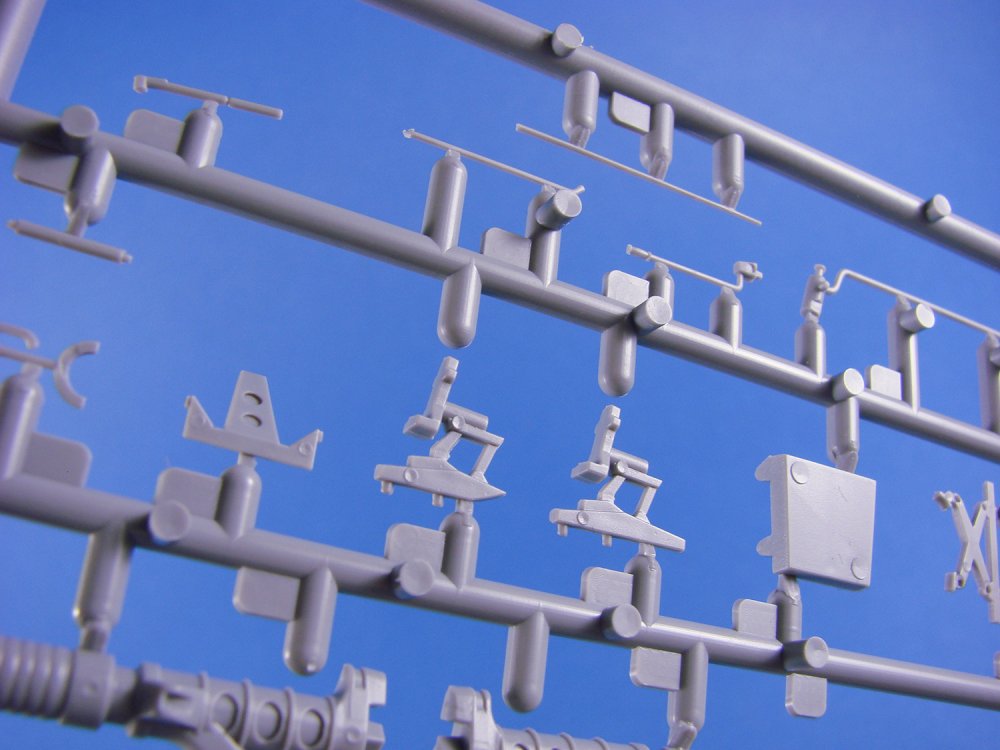
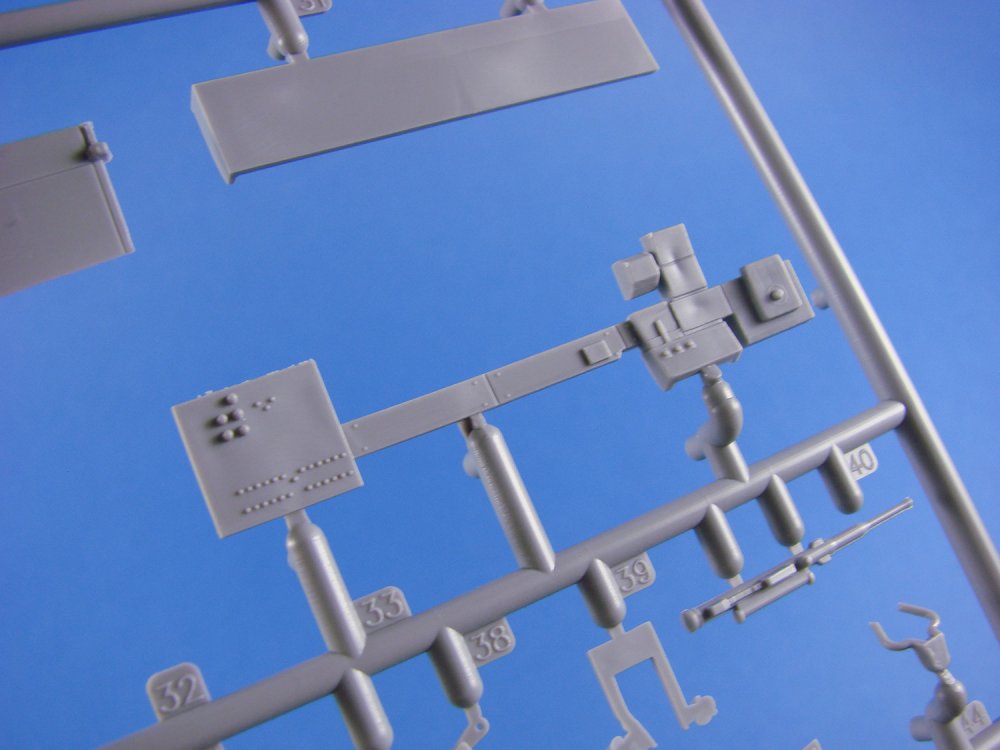
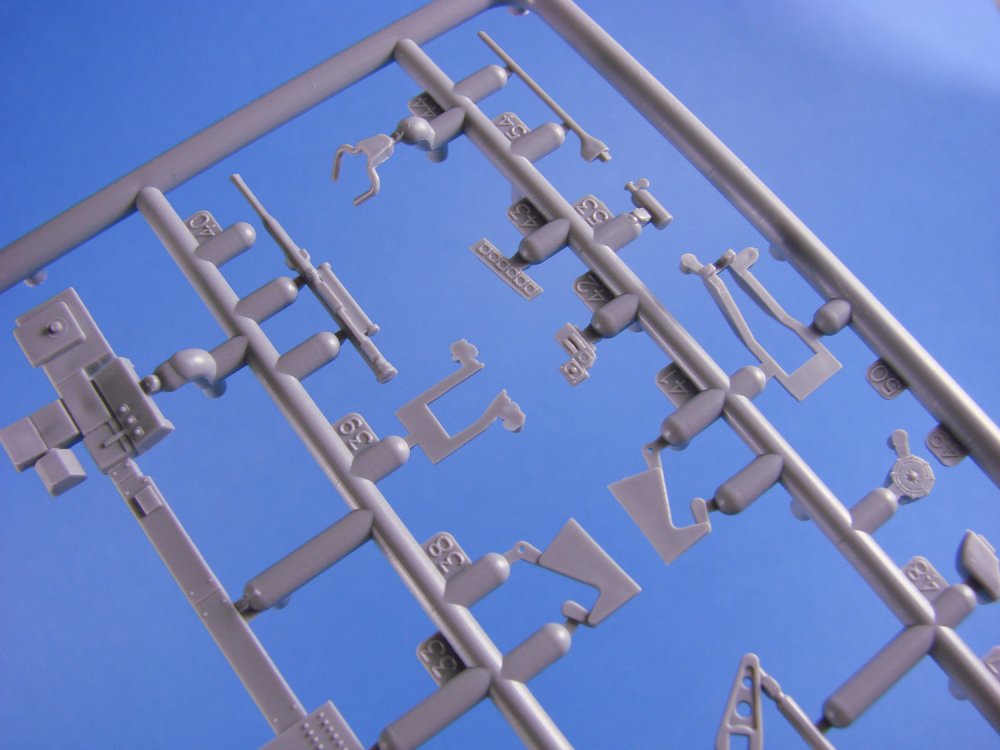
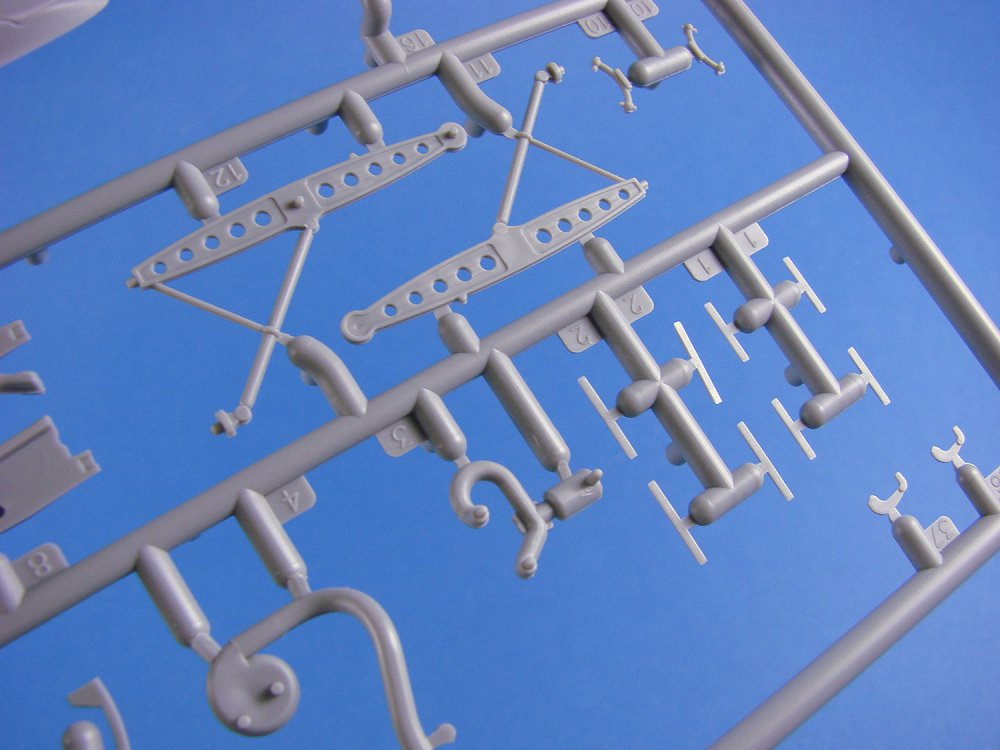
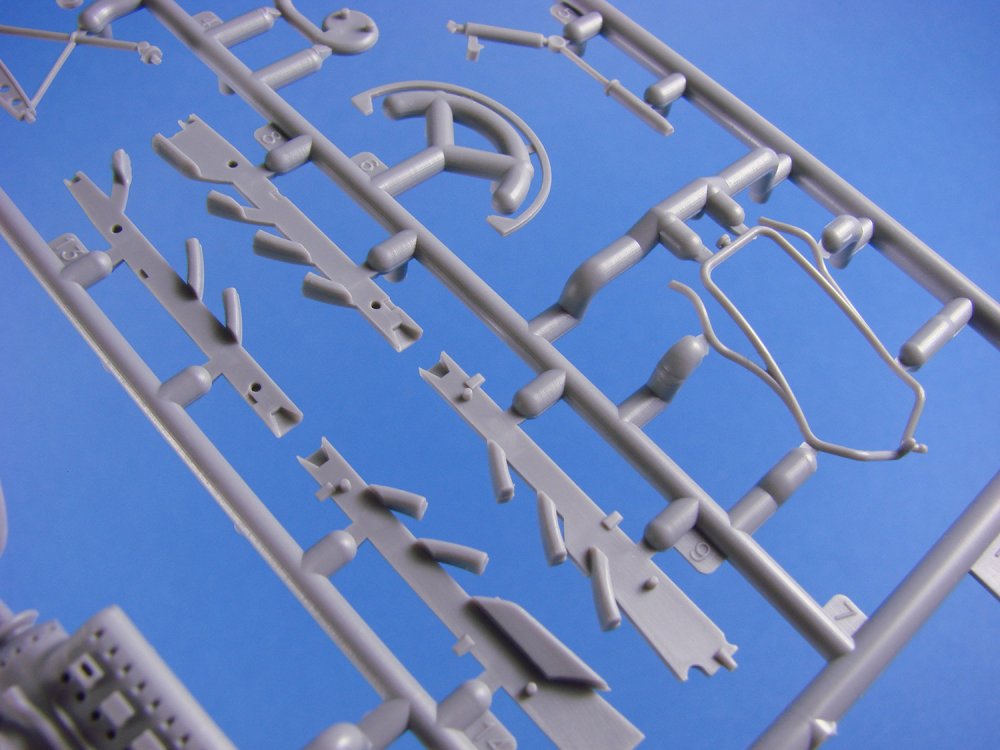
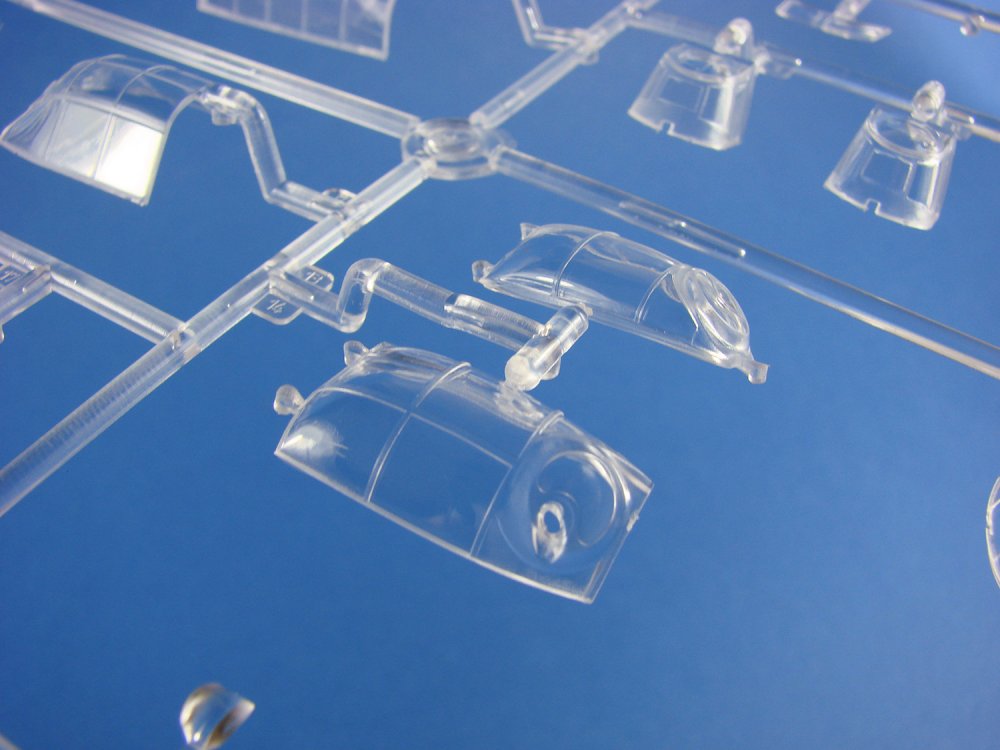
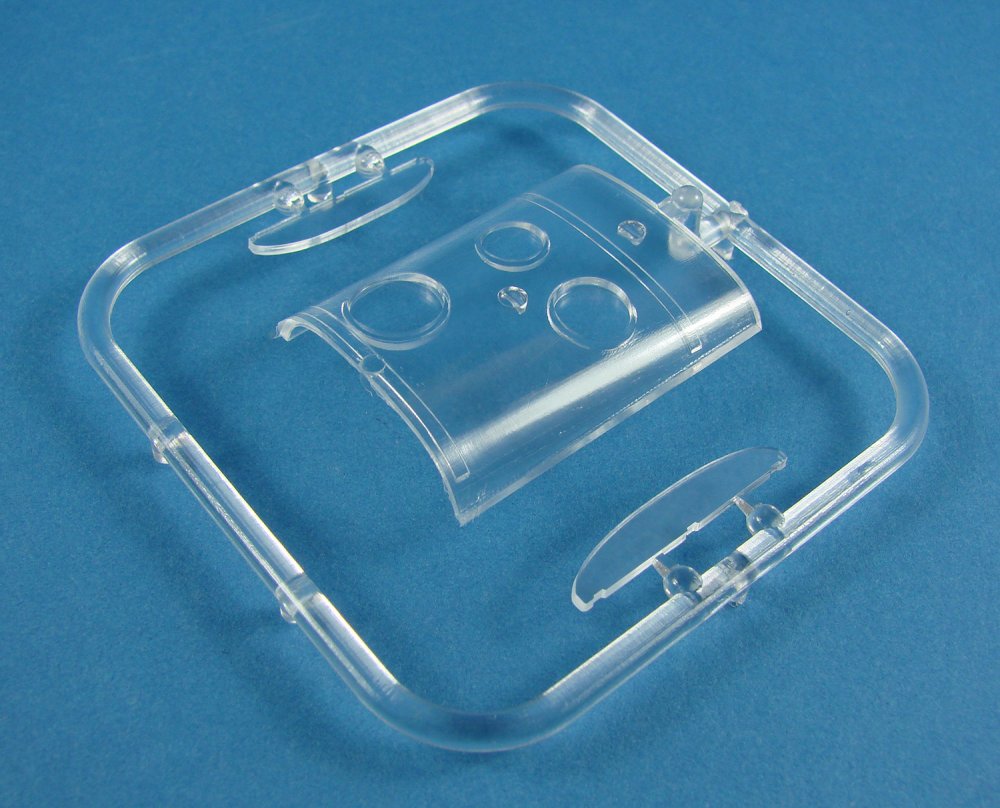
1/32 Tempest Mk.V “HI-TECH 2” Special Hobby Catalogue # SH32070 Available from Special Hobby for approx. 79,00€ Unlike Spitfire development, where even major airframe revisions saw the type keep its original name, Hawker’s Typhoon project was different. The Typhoon wasn’t without its problems, such as a seemingly unstoppable leaking of carbon monoxide gas into the cockpit, and of course that tail unit which had broken away completely on some aircraft, ending with a series of reinforcement straps that were designed as a simple fix for this. Like the Hurricane, the Typhoon also had a thick wing section that provided the machine with enough space for heavy armament, fuel tanks and resulted in a steady gun platform that could be used for low-level operations. Unfortunately, the thick wing was responsible for high levels of drag that slowed the aircraft at certain altitudes, and affected climb rates. To fix these problems needed a number of radical solutions which resulted in Sydney Camm and his team taking the Typhoon literally back to the drawing board. The resulting aircraft was sufficiently different enough to the Typhoon, as to eventually merit a name change, and in keeping with Hawker’s use of severe storm condition names for its range of fighters, ‘Tempest’ was chosen. Originally, the type was to have been called Typhoon II. Six prototypes were built, using different engines, resulting in not just the large-intake Typhoon style machine being built, but also a radial machine and a sleek-cowl Griffon-engine Tempest. Other variables including bubble canopy and car-door style canopy (á la early Typhoon), were included. The small tail fin surface of the prototype machines was eventually enlarged too, and the recognisable filleted fin introduced into production machines, as well as the wider span horizontal tail-plane that was seen on later versions of the Typhoon. A wider track landing gear helped with higher landing speeds. What made the Tempest radically different to the Typhoon was the design of a sleeker, laminar flow wing that was designed by NACA in the USA, and implemented on the new Mustang design. The Tempest Mk.V, which is the subject of this kit release, was fitted with a Napier Sabre IIa/b liquid-cooled H-24 sleeve-valve engine, and had wingspan of 41ft, length of 33ft 8in, and a maximum speed of between 432 and 435mph at 19,000ft. Armament was typically Mk.II/V Hispano cannon (x4), and rockets and bombs could be carried externally, as could droptanks for increased range/operational time. The Tempest went through various incarnations, and the later Sea Fury was a development of this, through the Tempest II family, retaining the later Bristol Centaurus engine. The Kit This isn’t the first time that Special Hobby has released the Tempest Mk.V in its flagship HI-TECH format, with the original kit being released only in 2016. Since then, there has been a standard edition, as well as the Centaurus-powered Mk.II kit that we also reviewed here on LSM. Along with these releases has been a flurry of their own aftermarket sets, such as the weapons bays and strengthened resin struts etc. However, the demand for the first HI-TECH release was so high that Special Hobby decided to reintroduce it, but with some changes that would set this aside from the original. This includes not only FIVE new marking schemes, but also a brand new resin Napier Sabre engine. This is cast as the upper section with the complete cylinder blocks and ancillary equipment. We’ll look at this in a while though. Special Hobby’s Tempest kit is packed into quite a large, standard type box with a removable lid (take note, Revell!), and adorned with an attractive artwork showing a Fassberg-based Tempest II taking off. No other profiles are shown on the box lid, but there are some renders of the included resin parts and other items supplied in this HI-TECH boxing. Lifting the lid is difficult due to the tight fit, but once off, you’ll see EIGHT sprues of medium grey styrene, packed into a single clear sleeve, A cardboard bridge straddles the sprues, and this has the decals and clear parts stapled to it, plus a package with the masks and photo-etch parts. A large colour-printed instruction manual lies at the bottom of the box. Also in this release is a large yellow CMK box that contains THREE bags of resin parts. SPRUE A Only two parts here, but pretty key ones; both fuselage halves. As Special Hobby has utilised some of this tooling for releasing the Tempest II and future Mk.6, the nose is moulded separately, allowing this tooling to be good for all versions. The kit shows just how far this company have come in the last years, with regards to both moulding, tooling and detailing. You would be hard pressed to differentiate the Tempest from a kit made by a whole multitude of more mainstream manufacturers out there, such as Hasegawa, Revell, Airfix etc. Surface detailing is excellent, with restrained, even rows of rivets, and lots of extremely fine panel lining and port/panel access plates. Edges are sharp where the wing will meet the fuselage etc. and the parts have a nicely polished finish to them that wouldn’t look out of place on a Tamiya release. The rudder is separately moulded, and where the nose cowl parts will fit, the forward fuselage has a moulded bulkhead that will provide rigidity to the proceedings. Internally, those high standards of detail are also evident, with stringer and former representation being both refined and sharp, and with associated rivet detail included. Only one ejector pin mark exists in this area, and this is on the area adjacent to the instrument panel. As no other detail is in the vicinity, removing this will be easy. Some detail is also included around the area of the retractable tail wheel, using the same level of refinement seen in the cockpit area. Note also that this model has locating pins too, unlike some of the other less mainstream model kits. I have to say here too that Special Hobby is NOT a Limited-Run company, but fully mainstream. SPRUE B Wings, glorious wings. These are supplied as a single span lower part, and upper port and starboard panels. Note that the inboard leading edge is a separate part, accommodating the future kits that will have intakes in these places. I have to say that each time I take a look at this kit, I like it more and more. Surface detail is commensurate with that of the fuselage, incorporating full rivet detail (plus double rows, where applicable), finely engraved panel lines, fastener detail, access panels and nicely shaped cannon blisters. All control surfaces are integrally moulded, so can’t be posed without taking a saw to the model. Ailerons are moulded along with very fine actuator arms that really do look very good. Cannon shell ejection chutes are also finely moulded. One thing I like here are the tabs that protrude from the upper panels, and provide a support for the wing to fuselage connection. Actually, there is another purpose for those tabs. If you flip the wing parts over, you will see they form the roof of the main gear wells. These areas contain rib and stringer detail, along with rivets, and this will be detailed further with various rods, pistons etc. All of this will be framed by the gear bay walls that are supplied as separate parts that will be fitted into the recessed area in the upper wing panel. Cannon fairings are separate parts too, and the wing has a small bulkhead within that stops them from being inserted too far within. SPRUE C You will be able to pose the elevators dynamically, as these are moulded separately to the stabilisers. All parts here are the traditional upper and lower halves, and external detail is of the same high standard that we have seen so far, including rivet and fastener detail and trim tab actuators/actuator fairings. Other parts included here are for external drop-tanks and bomb bodies. Bomb fins are separately moulded. Bombs and tanks are moulded as halves also, and with the latter, you will of course need to reinstate any panel line detail that may be lost from seam eradication. The fuel filler cap is nicely engraved, but I think the detail to the rear of this is supposed to represent a pipe, and is instead moulded as a fillet. If this is the case, cut away and replace with a little length of bent, rigid wire. SPRUE D This sprue looks very Eduard-ish in design, with its large radius corners. Here we have the fabric covered rudder, complete with its rib tape detail and metal trim tab. This is the only fabric covered area on the Tempest, and I do like the representation here. The multiple undercarriage door parts are just beautiful…both inside and out, with some great detail there, and no pesky ejection pin marks to worry about. Small tags have instead been placed externally to the main doors, and these just require snipping off, followed by a quick swipe of a sanding stick. Et voila! Other parts here include the upper, chin intake wall and the bomb release fairings. SPRUE E For the first time, the instructions show parts here that won’t be used on this build. Here, that is for a second set of propeller blades. Engine cowl halves are moulded here, as are a number of parts that form the flap section and intake outlet to the rear of the main intake. The exhaust attachment boxes can be found here, and these will just glue internally. A two-part spinner is included, with the back-plate including channels that will precisely angle the propeller blades. There is a little flash on the spinner, but nothing to be concerned about. One thing to note is that the fuselage decking to the rear of the pilot, is included here as a separate part. That’s a nice touch as there is a lot of detail in this area, and removing a seam would have been a pain in the arse. Other notable parts here are the upper and lower parts for the wing leading edge inboard areas, where future kits will have the intakes attached. SPRUE H Quite a few parts here are shown as not for use on this release. These include two sets of balloon tyres, several intake parts, leading edge intake parts, and also a seat back etc. What can be used here are the various undercarriage parts, including well detail, walls and the struts, pistons and rods themselves. Looking at how refined much of the detail is here, I’m going to stick my neck out and say it’s Tamiya-esque. Simply gorgeous details that you’ll bury away in those gear bays. Even the sprung-loaded rods look very authentic and filigree. I am particularly impressed with the gear struts and the detail definition here. Please be careful with the removal of parts from this sprue, as so many of the landing gear parts have some very fine detail protrusions. If in doubt, use a razor saw. Note also the forward cockpit bulkhead and the armoured frame onto which pilot’s seat will fit. SPRUE I A small sprue, but one with perhaps more parts on it than any other. One area that features heavily here is the cockpit. For me, a nicely detailed cockpit is the very heart of a satisfying project, and this cockpit it certainly better than most I’ve seen in quite a long time. Two detailed tubular side frames are adorned with various fixing plates and panels and brackets, and there are numerous console parts, throttle, spacers, torsion rods and linkages etc. The main instrument panel is moulded in three parts; central panel and two angled panels that fit to its sides. Be careful here as there are two different sets of side panels. The instructions clearly show what you should not use. Here you will also find the canopy rails and three different types of joystick grip, although none of these are shown as for use, with resin parts favouring these all along the way. Presumably these, like the seat and other parts, will be used in any future, standard boxing that isn’t classed as ‘HI-TECH’ The plastic parts are actually still very nice, as are the cannon fairings that will also be ditched in favour of the resin extras here. Again, watch out for the numerous parts that won’t be used here, and there are a fair few of them. SPRUE J The last grey styrene sprue. Another bulkhead is supplied here, for the rear of the cockpit, and the exhausts are included as halves. It’s a little disappointing that Special Hobby didn’t include the resin ones they now sell, as part of this HI-TECH offering. I would’ve preferred those to the cockpit seat, for instance. It will take some careful seam removal work on these parts. More wheel well parts are found here, as well as the three-part assembly for the tail wheel, again with some very nice structural detail included. More unused seat parts can be found, so some nice parts for the spares box. Several intake parts are moulded here, as are the bomb sway braces and fins and tail wheel strut. The most obvious part though, the radial engine of the Centaurus, is from the Mk.II release, and not for use here. SPRUE K The clear sprue. Of course, you will find the main canopy parts here, with their nicely-defined framing lines which will make things easier for masking. A number of other parts here are drop tank fairings that I think were made from clear acetate or similar. Nice to see these, and they’ll certainly show off that wire modification I mentioned earlier, for the drop tank itself. Finally, note the various wingtip, fuselage, tail and wing-underside lenses for the various lights that were fitted to the Tempest. Clarity is very good, with no flaws at all present. Plastic Summary This kit is almost flash and seam free, with nice tight sprue gate points that are generally well placed so as not to cause problems. I can’t see any sink marks either, except for a couple on the reverse of a part, so they don’t count. Ejector pin marks; there’s only two I can see that need removal, and that will take just a few minutes. Plastic quality is excellent, and the quality of the mouldings are very high quality. Resin parts Unlike the two bags of resin included with the original HI-TECH release, there are now THREE bags, packaged into one of CMK’s yellow resin accessory boxes that they use for the more comprehensive sets. In these bags, you will find: Napier Sabre engine and ancillary equipment and plumbing Detailed engine firewall with fittings Hollow stub exhausts Thin, three part engine cowls with internal details Two sizes of main gear wheels (weighted) Anti-shimmy tail wheel Cockpit components (seat, tread boards, pedals, throttle quadrant/levers, control stick/grip, seat, trim wheel, internal windscreen frame) Cannon fairing stubs These parts are also very high standard, with fine detailing. There are a total of 63 resin parts in this release (with one shown as not for use), cast in a combination of light and medium grey resin. Casting blocks will generally be easy to remove too, and there shouldn’t be any nasty surprises here. The engine is mounted on a resin plinth that sits within the cowl area. No chin radiators are included with this release, but I have seen something on Special Hobby’s Facebook page which shows a complete Napier Sabre with the radiator fitted. Maybe a release we’ll see soon. Photo Etch Only a small fret here that includes parts for the fabric seat belts, control grip trigger, whip aerial and mount plate etc. This small stainless fret also contains a small notch that you need to align on the ailerons, and use as a scribing template for the small trim tabs. Seatbelts These are produced by HGW, from their microfiber material, and should need no introduction. Being laser-cut and pre-printed, all you need to do is to snip and assemble. Just remember to peel the backing paper from them first! Masks A small sheet of vinyl masks is included, for the canopy, lights and wheel hubs. These are sharply cut and exhibit no shrinkage. Decals THREE sheets are supplied here, printed by Eduard. The largest contains roundels and fin flashes. A slightly smaller sheet holds the various serials, codes, emblems, kill markings, and instrument dials for the cockpit. The latter is printed in banks of instruments, and I would be tempted to punch these out to remove their carrier film. Their definition is excellent and they can certainly be used without having to resort to an aftermarket product. The last sheet is mainly stencils, plus the rivet banding for the drop tank acetate covers. Printing is excellent throughout, with minimal carrier film, solid colour and perfect register. The schemes offered are: SN222, JF-E, “Le Grand Charles”, No.3 Squadron, Fassberg (B.152), Fl/Lt. Pierre Clostermann, Late April – Early May 1945 EJ750, JBW, No.122 Wing, Wg/Cmdr. J.B. Wray, Volkel (B.80), late 1944 (this machine shot down an Me 262!) EJ762, JJ-F, No.274 Sqn, F/L D.C. Fairbanks DFC and Two Bars (12.5 victories), Volkel (B.80), October 1944 SN206, 5R-B, No.33 Sqn, F/O G.A. Rens, Quackenbrück (B.109), May 1945 SN330, J5-H, No.3 Sqn, Sqn/Ldr Robert Cole DFC and Bar, Wunstorf, British Occupation Zone, Germany, 1946 Instructions This is printed in a glossy A-4 format, similar to that of Eduard, with a profile on the front page, and a history of the type given in both English and Czech. There are then over two pages dedicated to a parts map, which is useful for knowing the parts not to use, and then we are into the construction. A series of excellent line drawings are annotated with splashes of colour to signify paint and other nomenclature, such as drilling and mask use etc. Illustrations are very clear, and should present no problems. Colour call-outs are supplied throughout construction and refer to both Gunze and Alclad II paints, and the last pages of the manual are given over to the 5 schemes, with each being shown in all 4 planforms. Conclusion I didn’t think the original HI-TECH release could’ve been matched by Special Hobby, but then again, I wasn’t expecting them to release this kit with this superb resin engine. As they saw this as a new release now, and not a reintroduction, this is why they went further and replaced the marking schemes too. A superb kit with nicely moulded plastic and fine details, along with a whole box of resin goodies that will keep you at your bench for more hours than you are probably allowed! Add to this the PE and fabric seatbelts too. The only way I can see this being bettered is if you add the CMK and their ‘Quick & Easy’ edition aftermarket stuff too, such as the weapons bays, struts, leading edge cannon fairings etc. Example of engine from Special Hobby Facebook page Recommended? Without a doubt. Get one whilst you can! My sincere thanks to Special Hobby for the review sample seen here. To purchase direct, click THIS link.


-
THIS! The IAR will soon be with Jeroen.
-
That turned out beautifully!
-
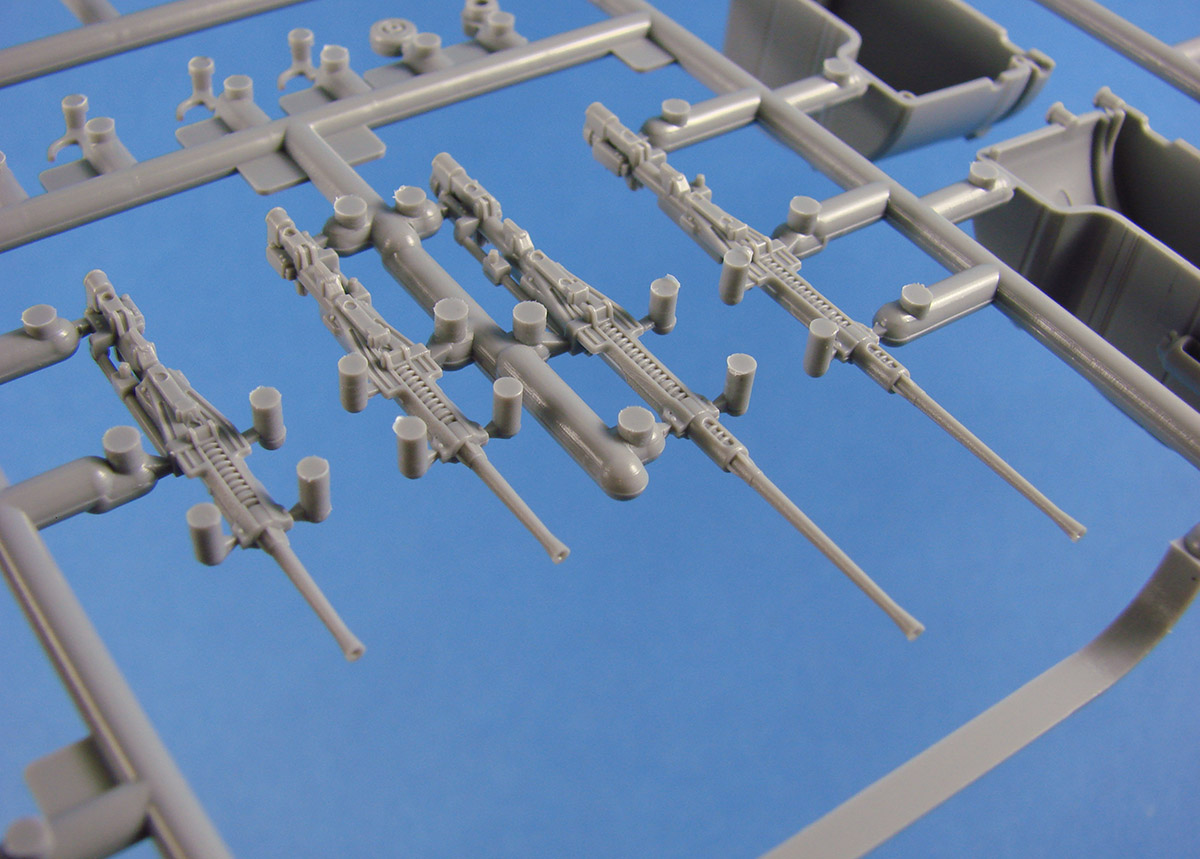
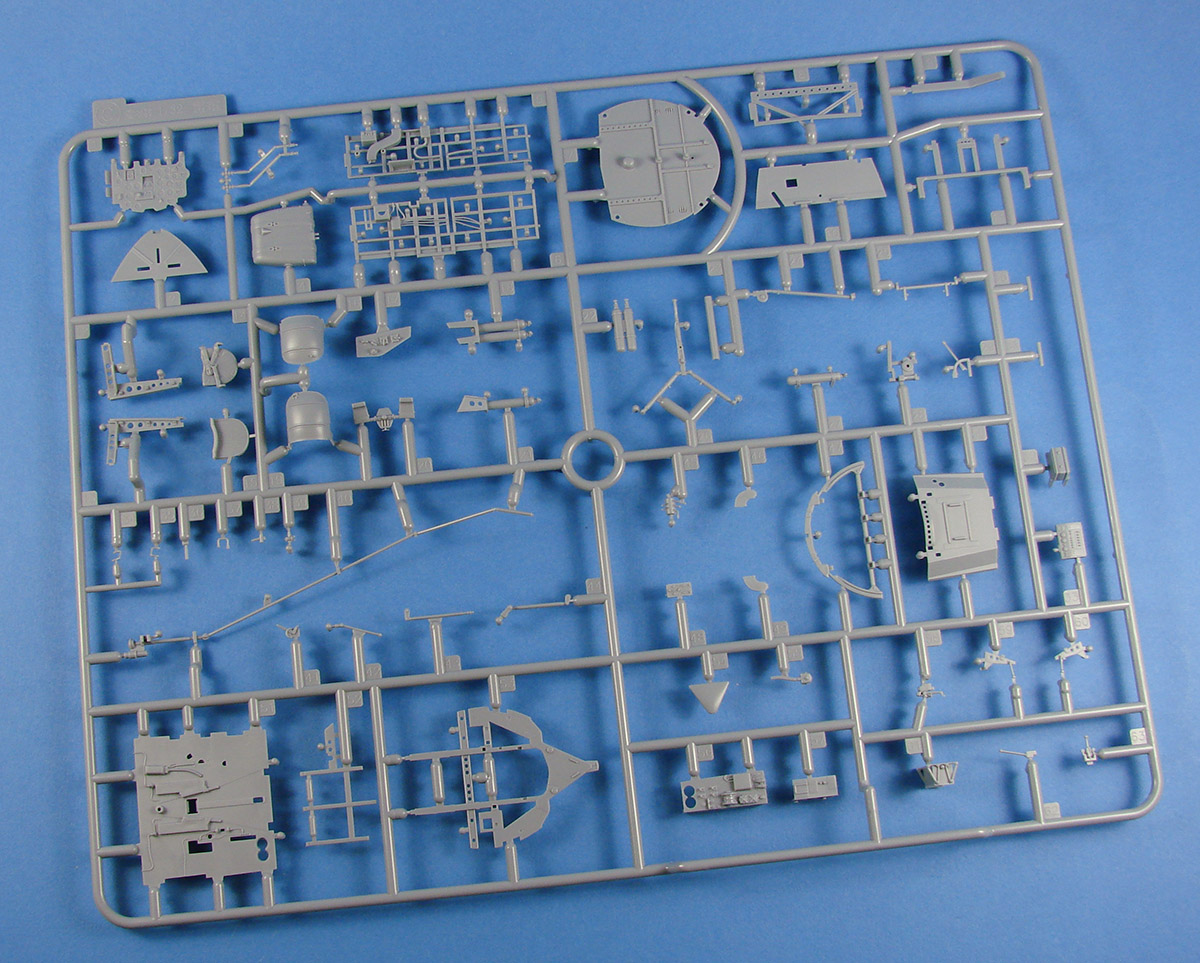
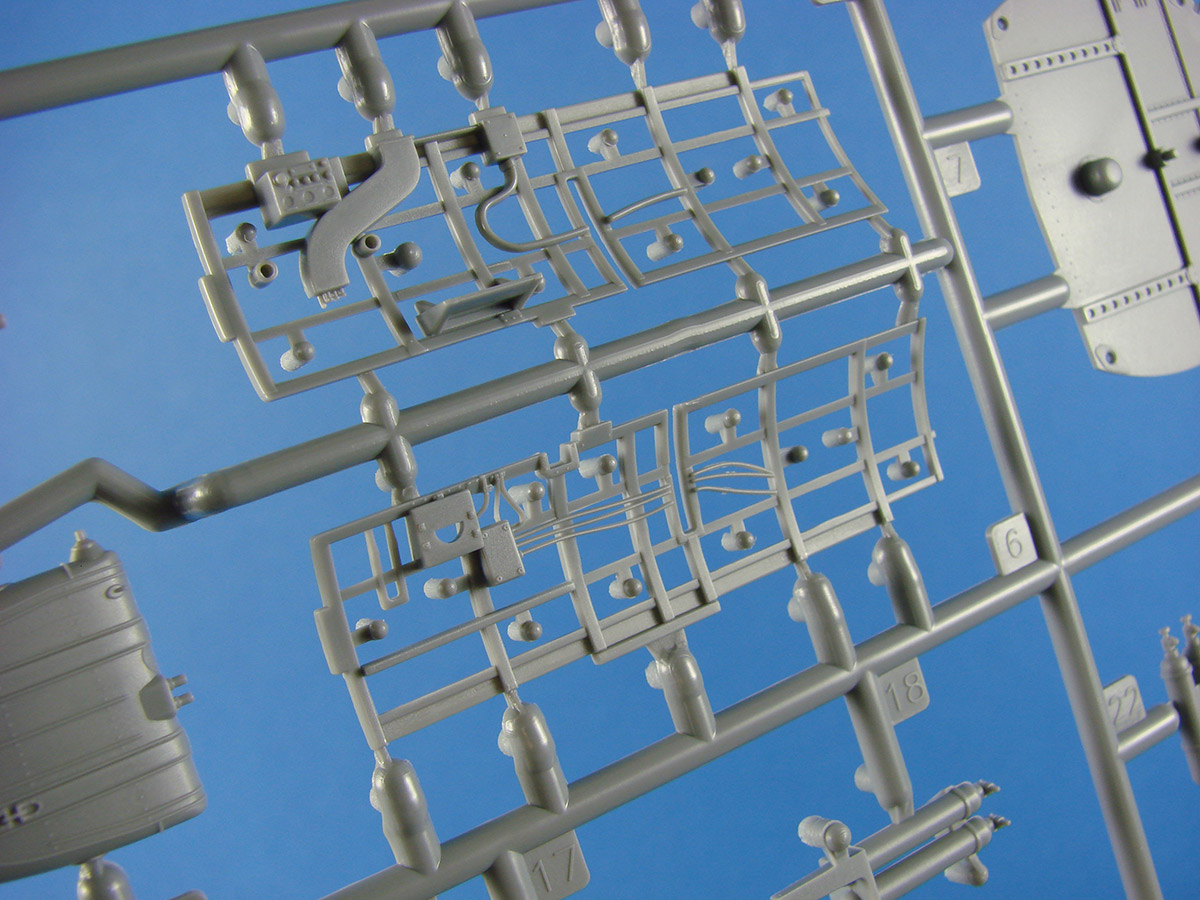
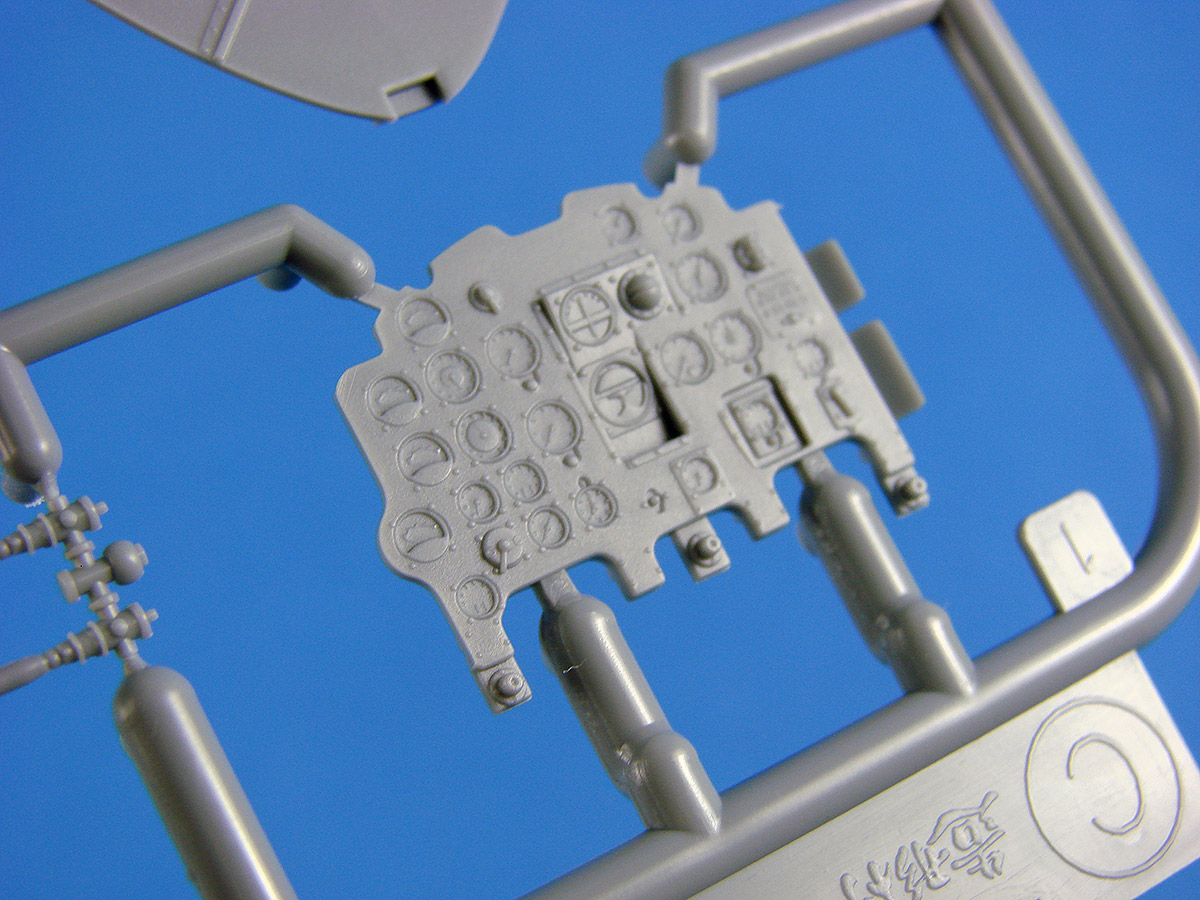
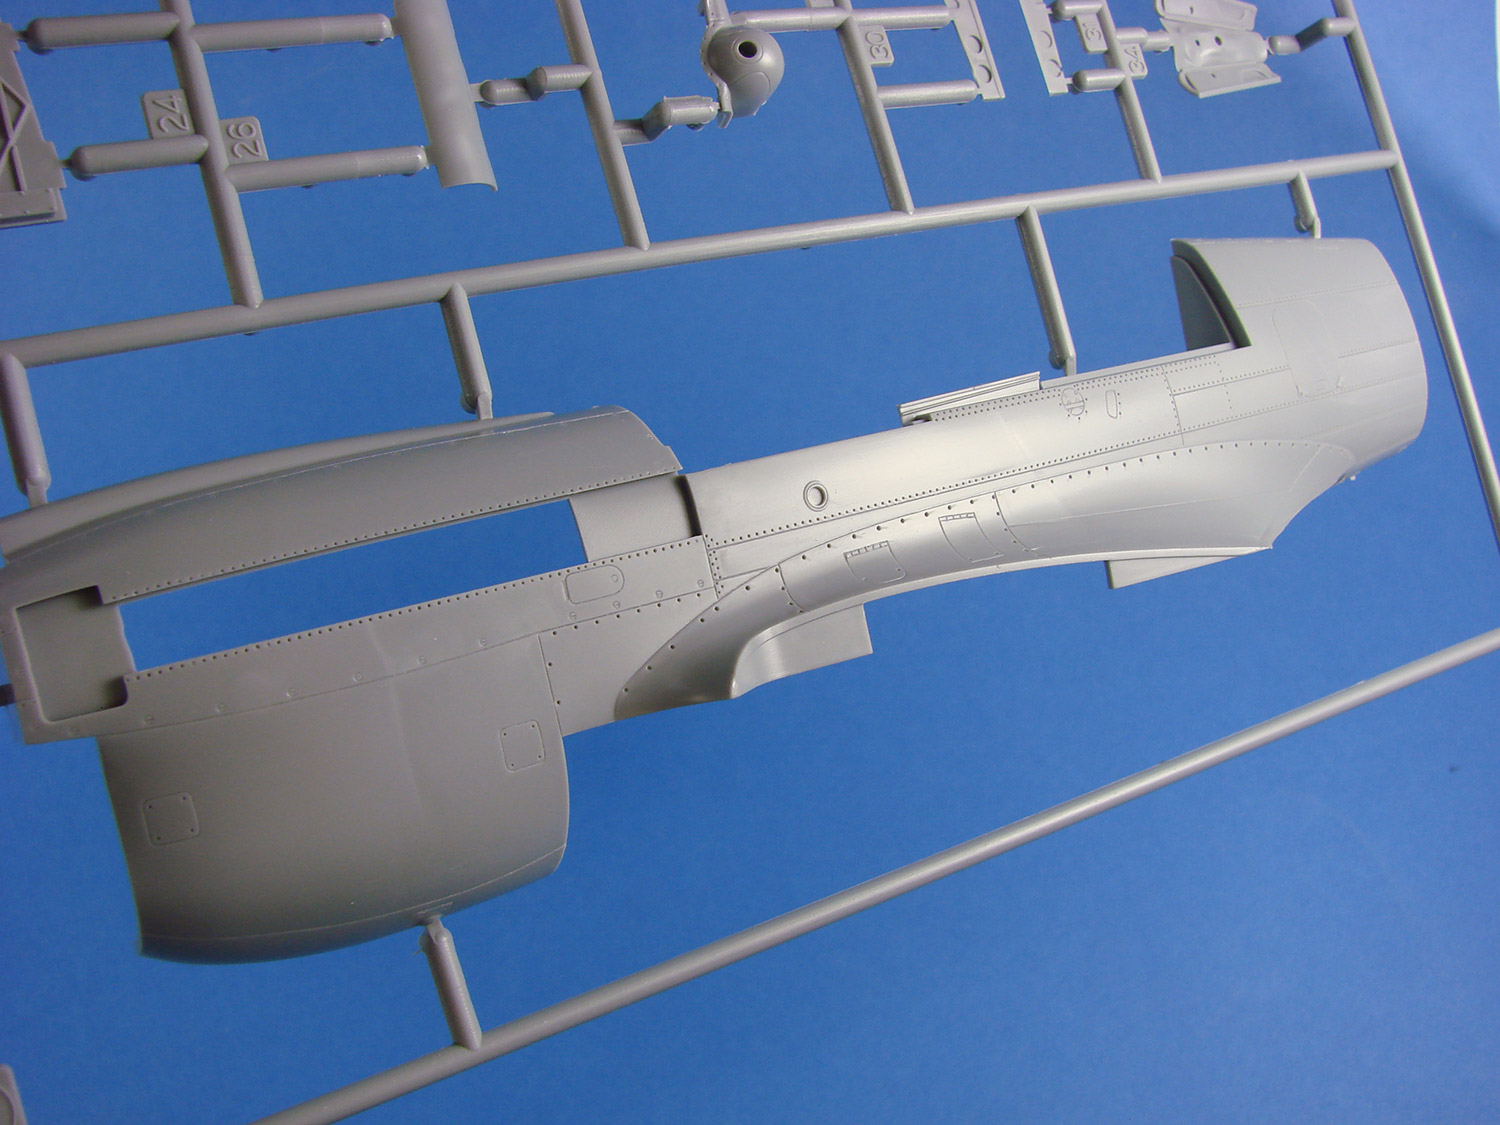
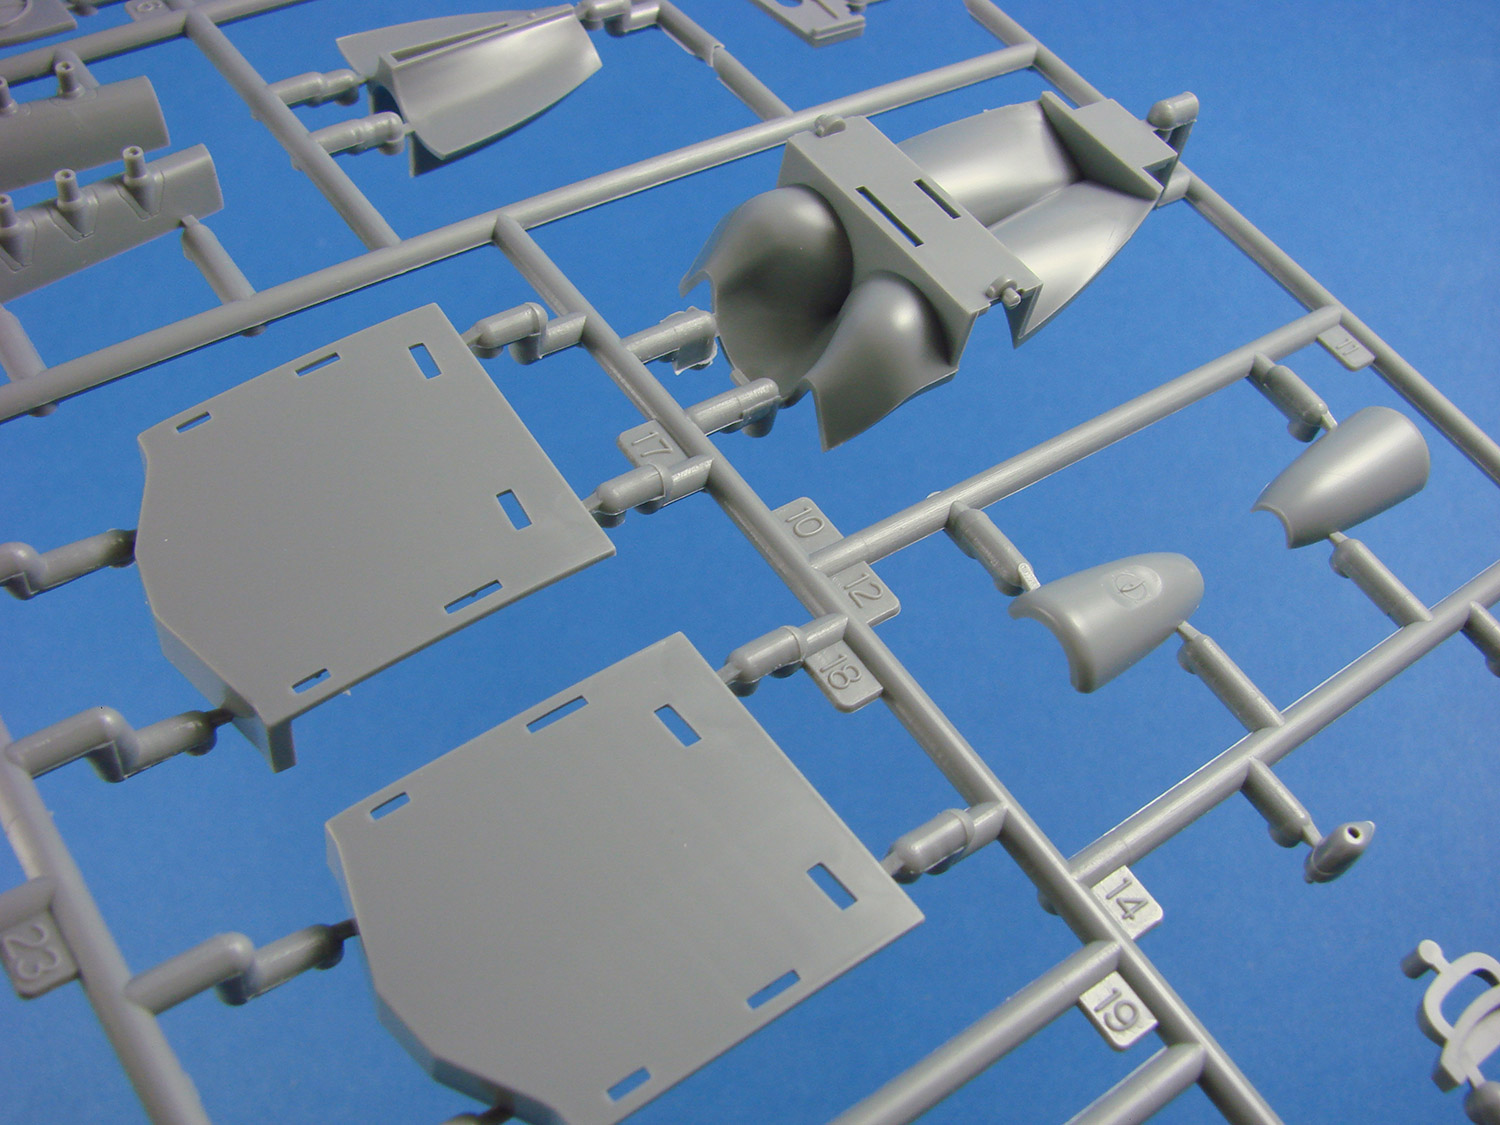
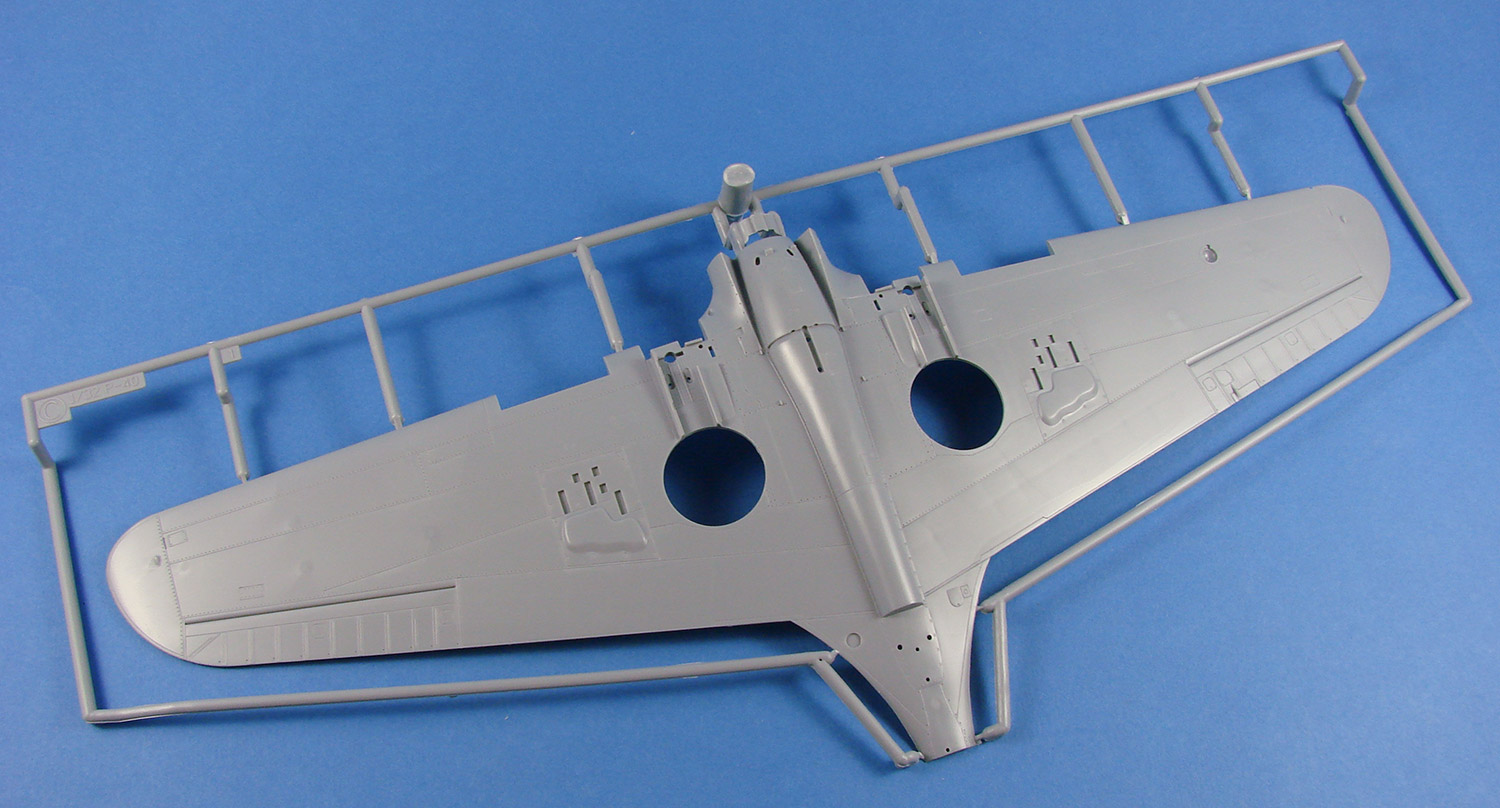
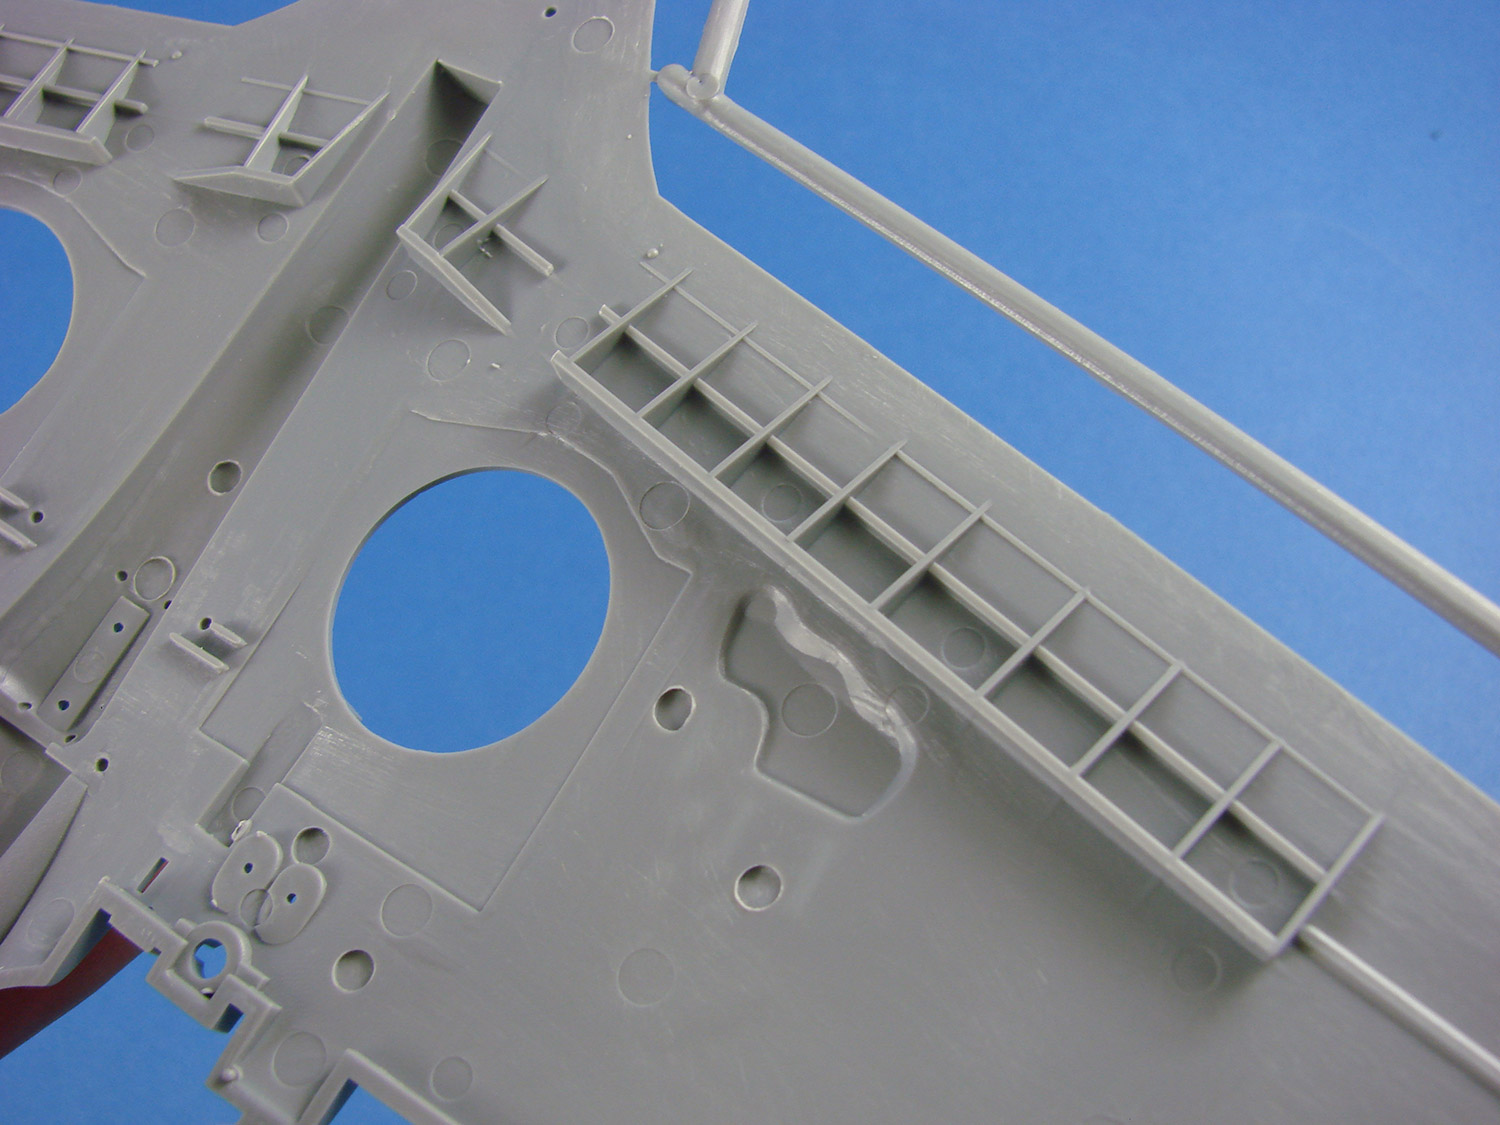
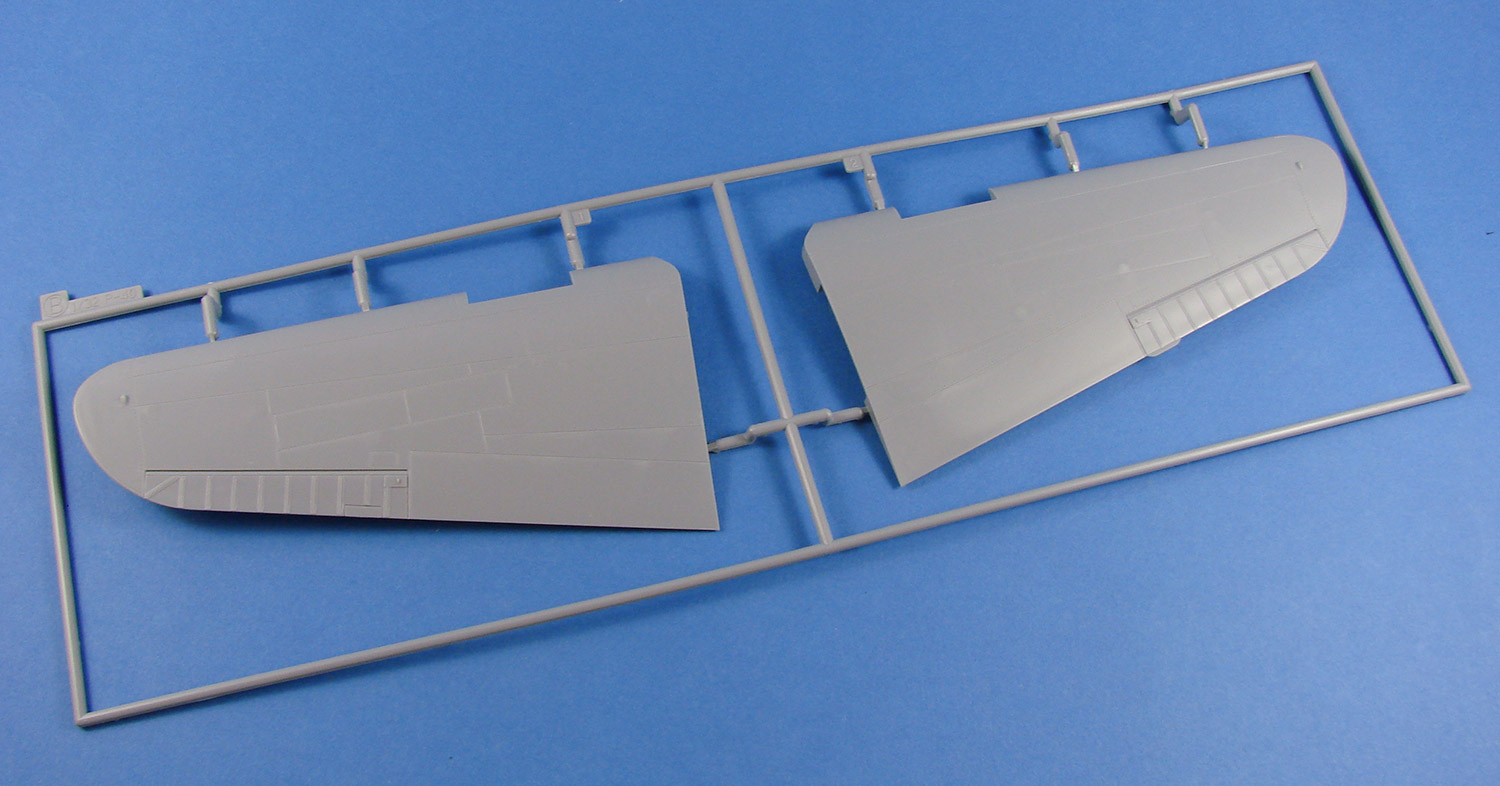
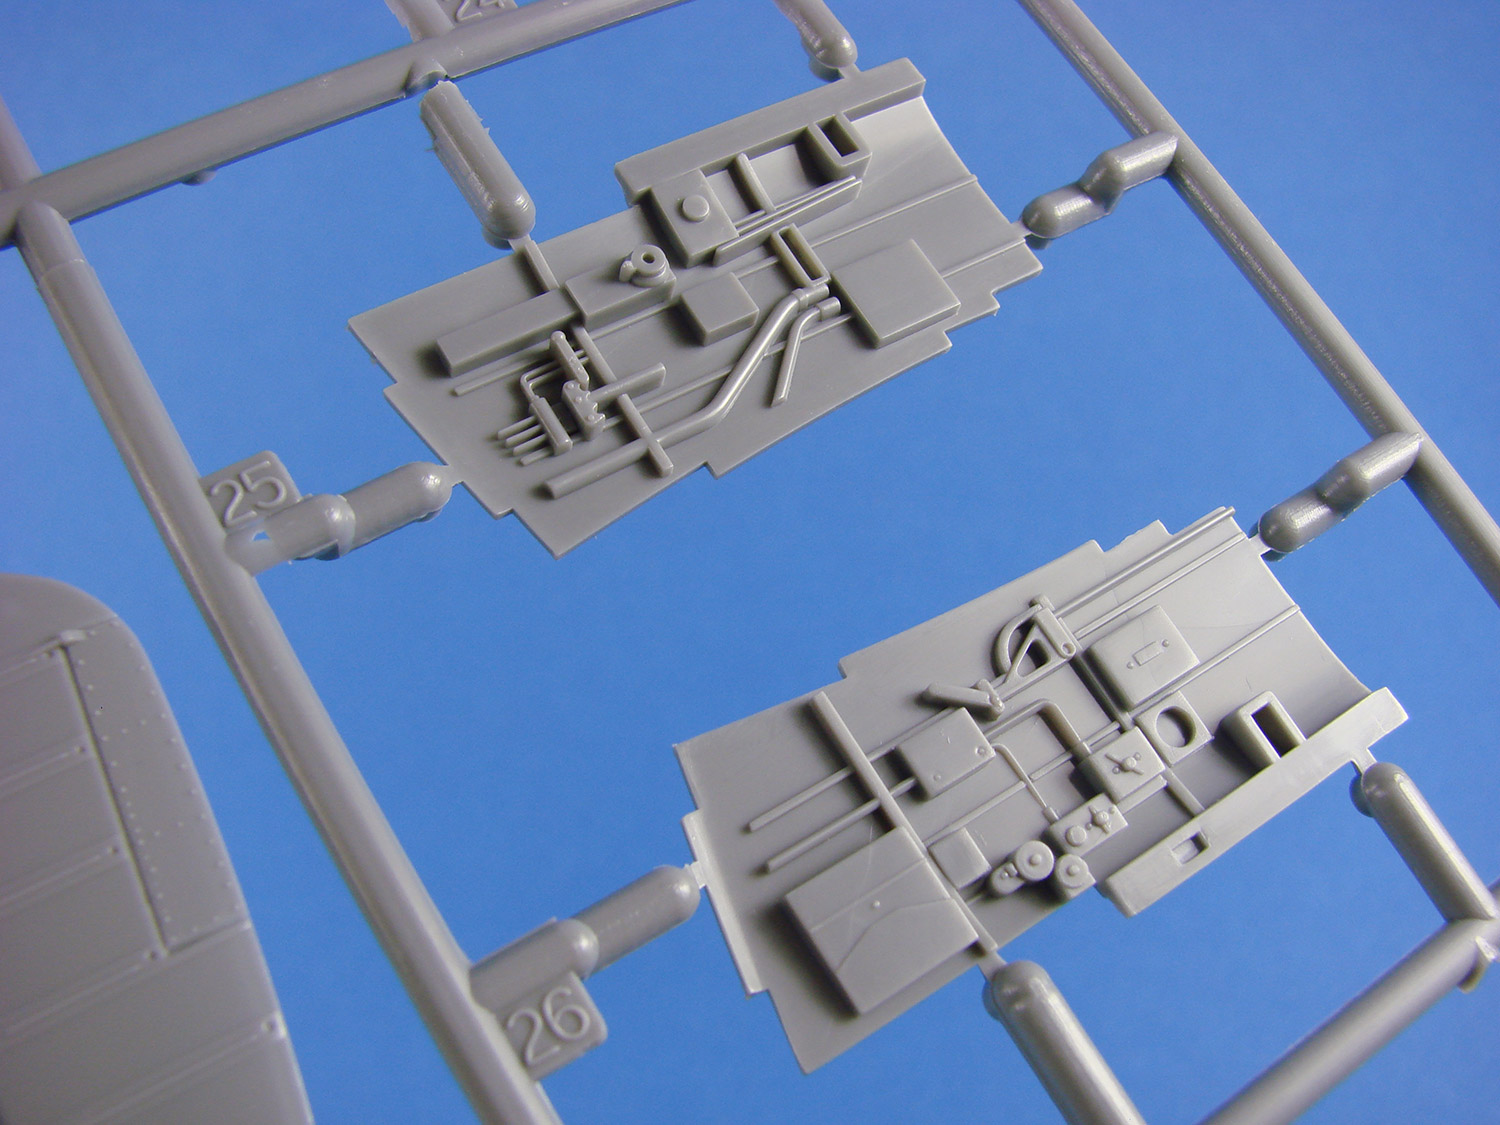
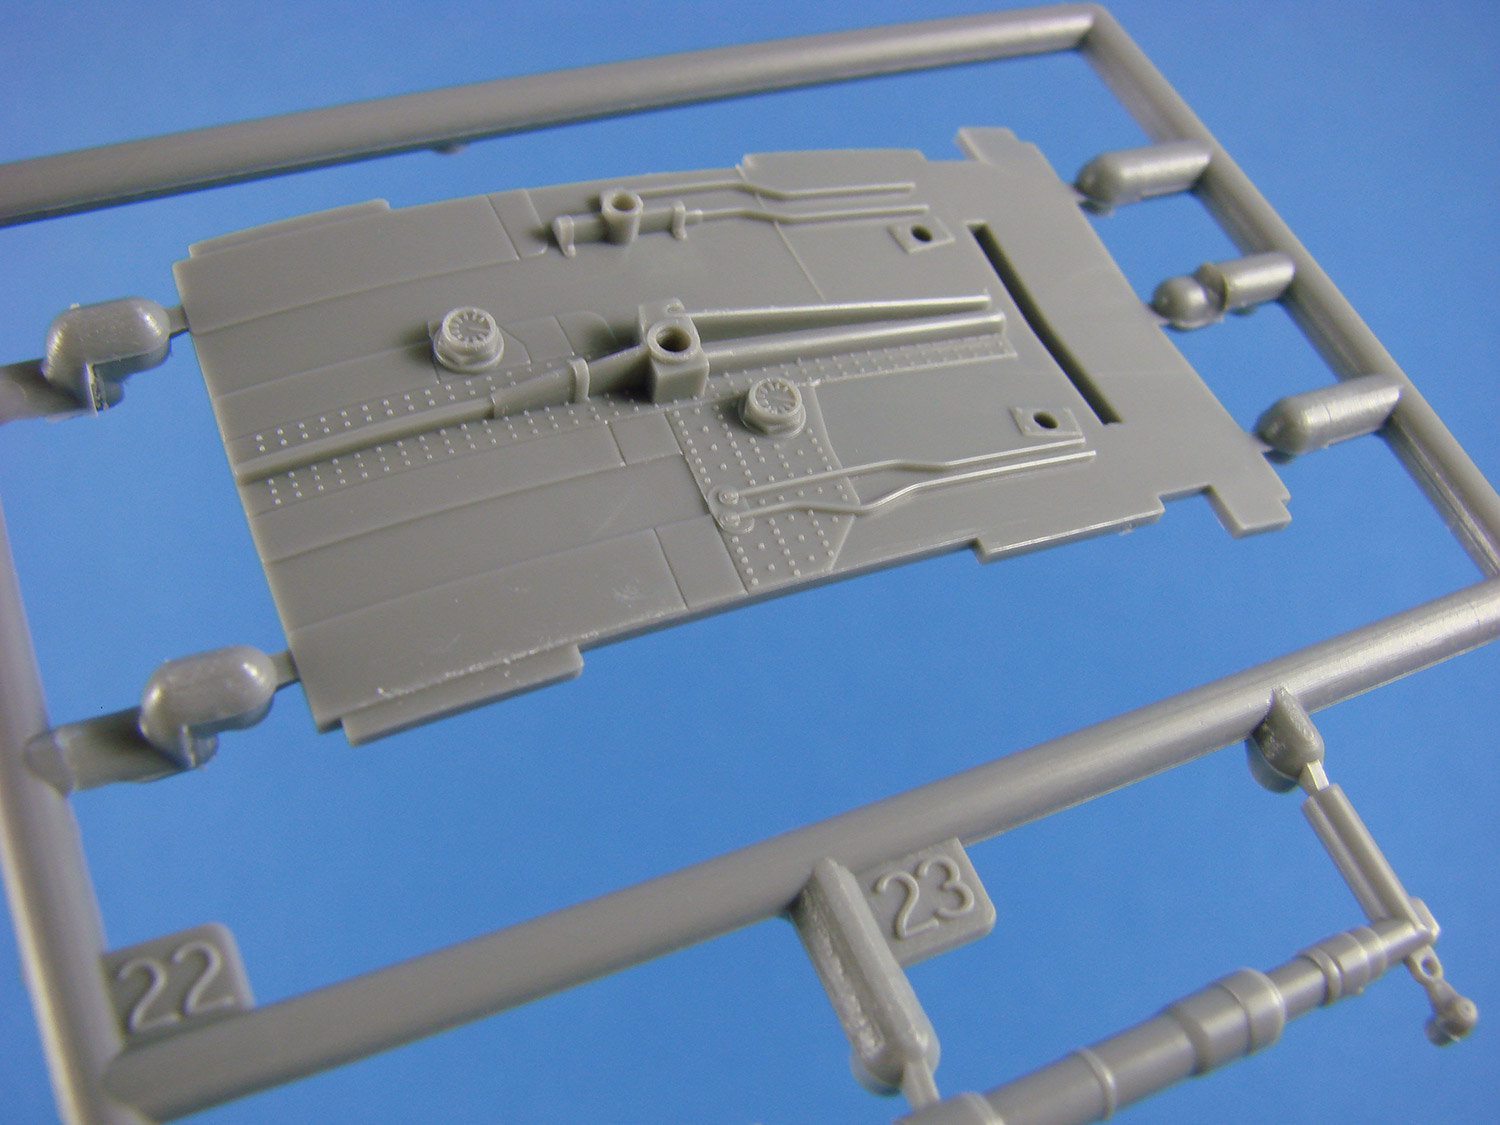
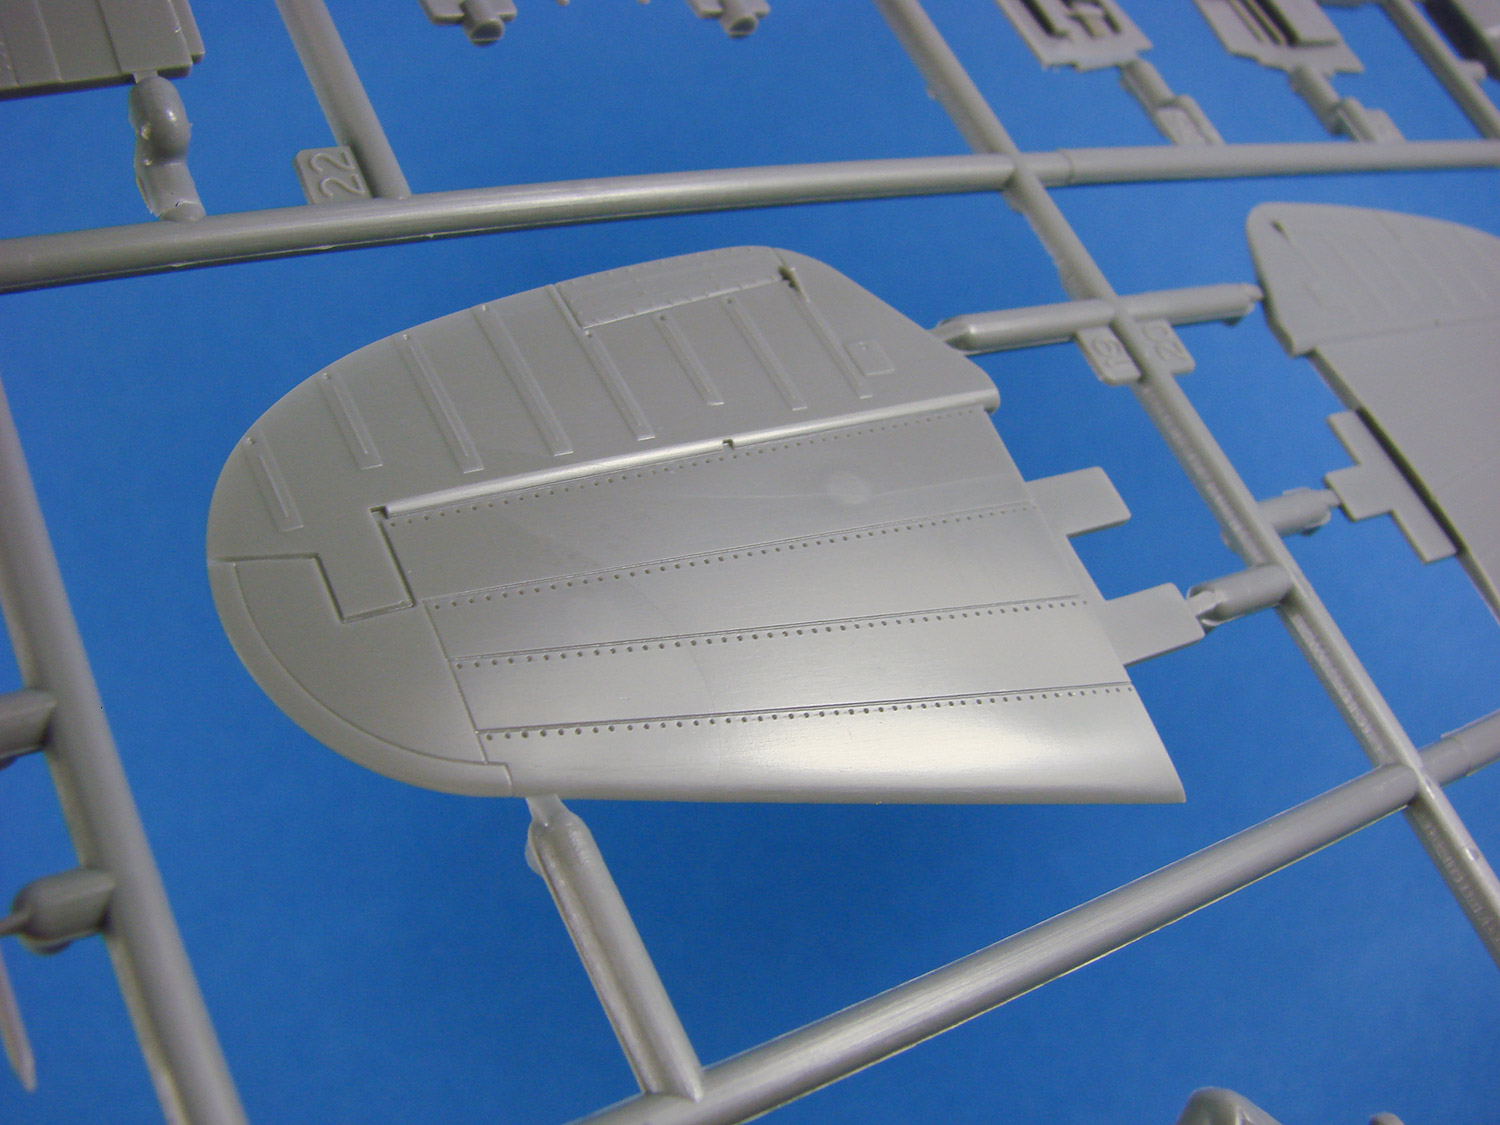
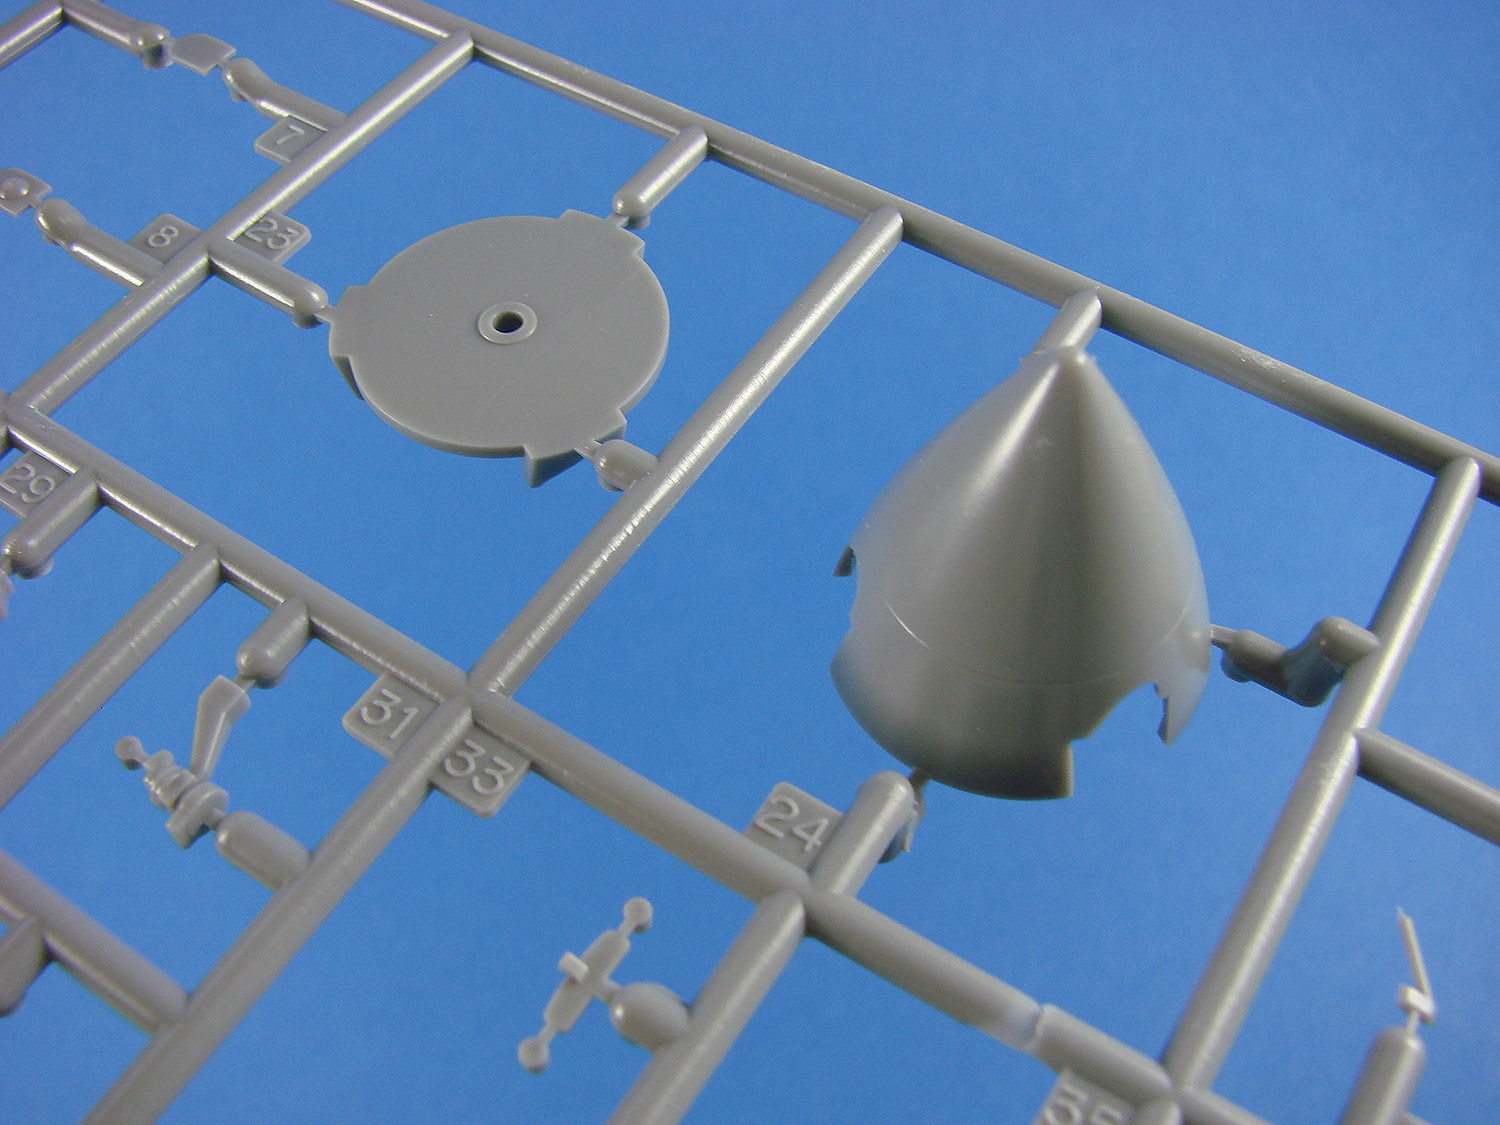
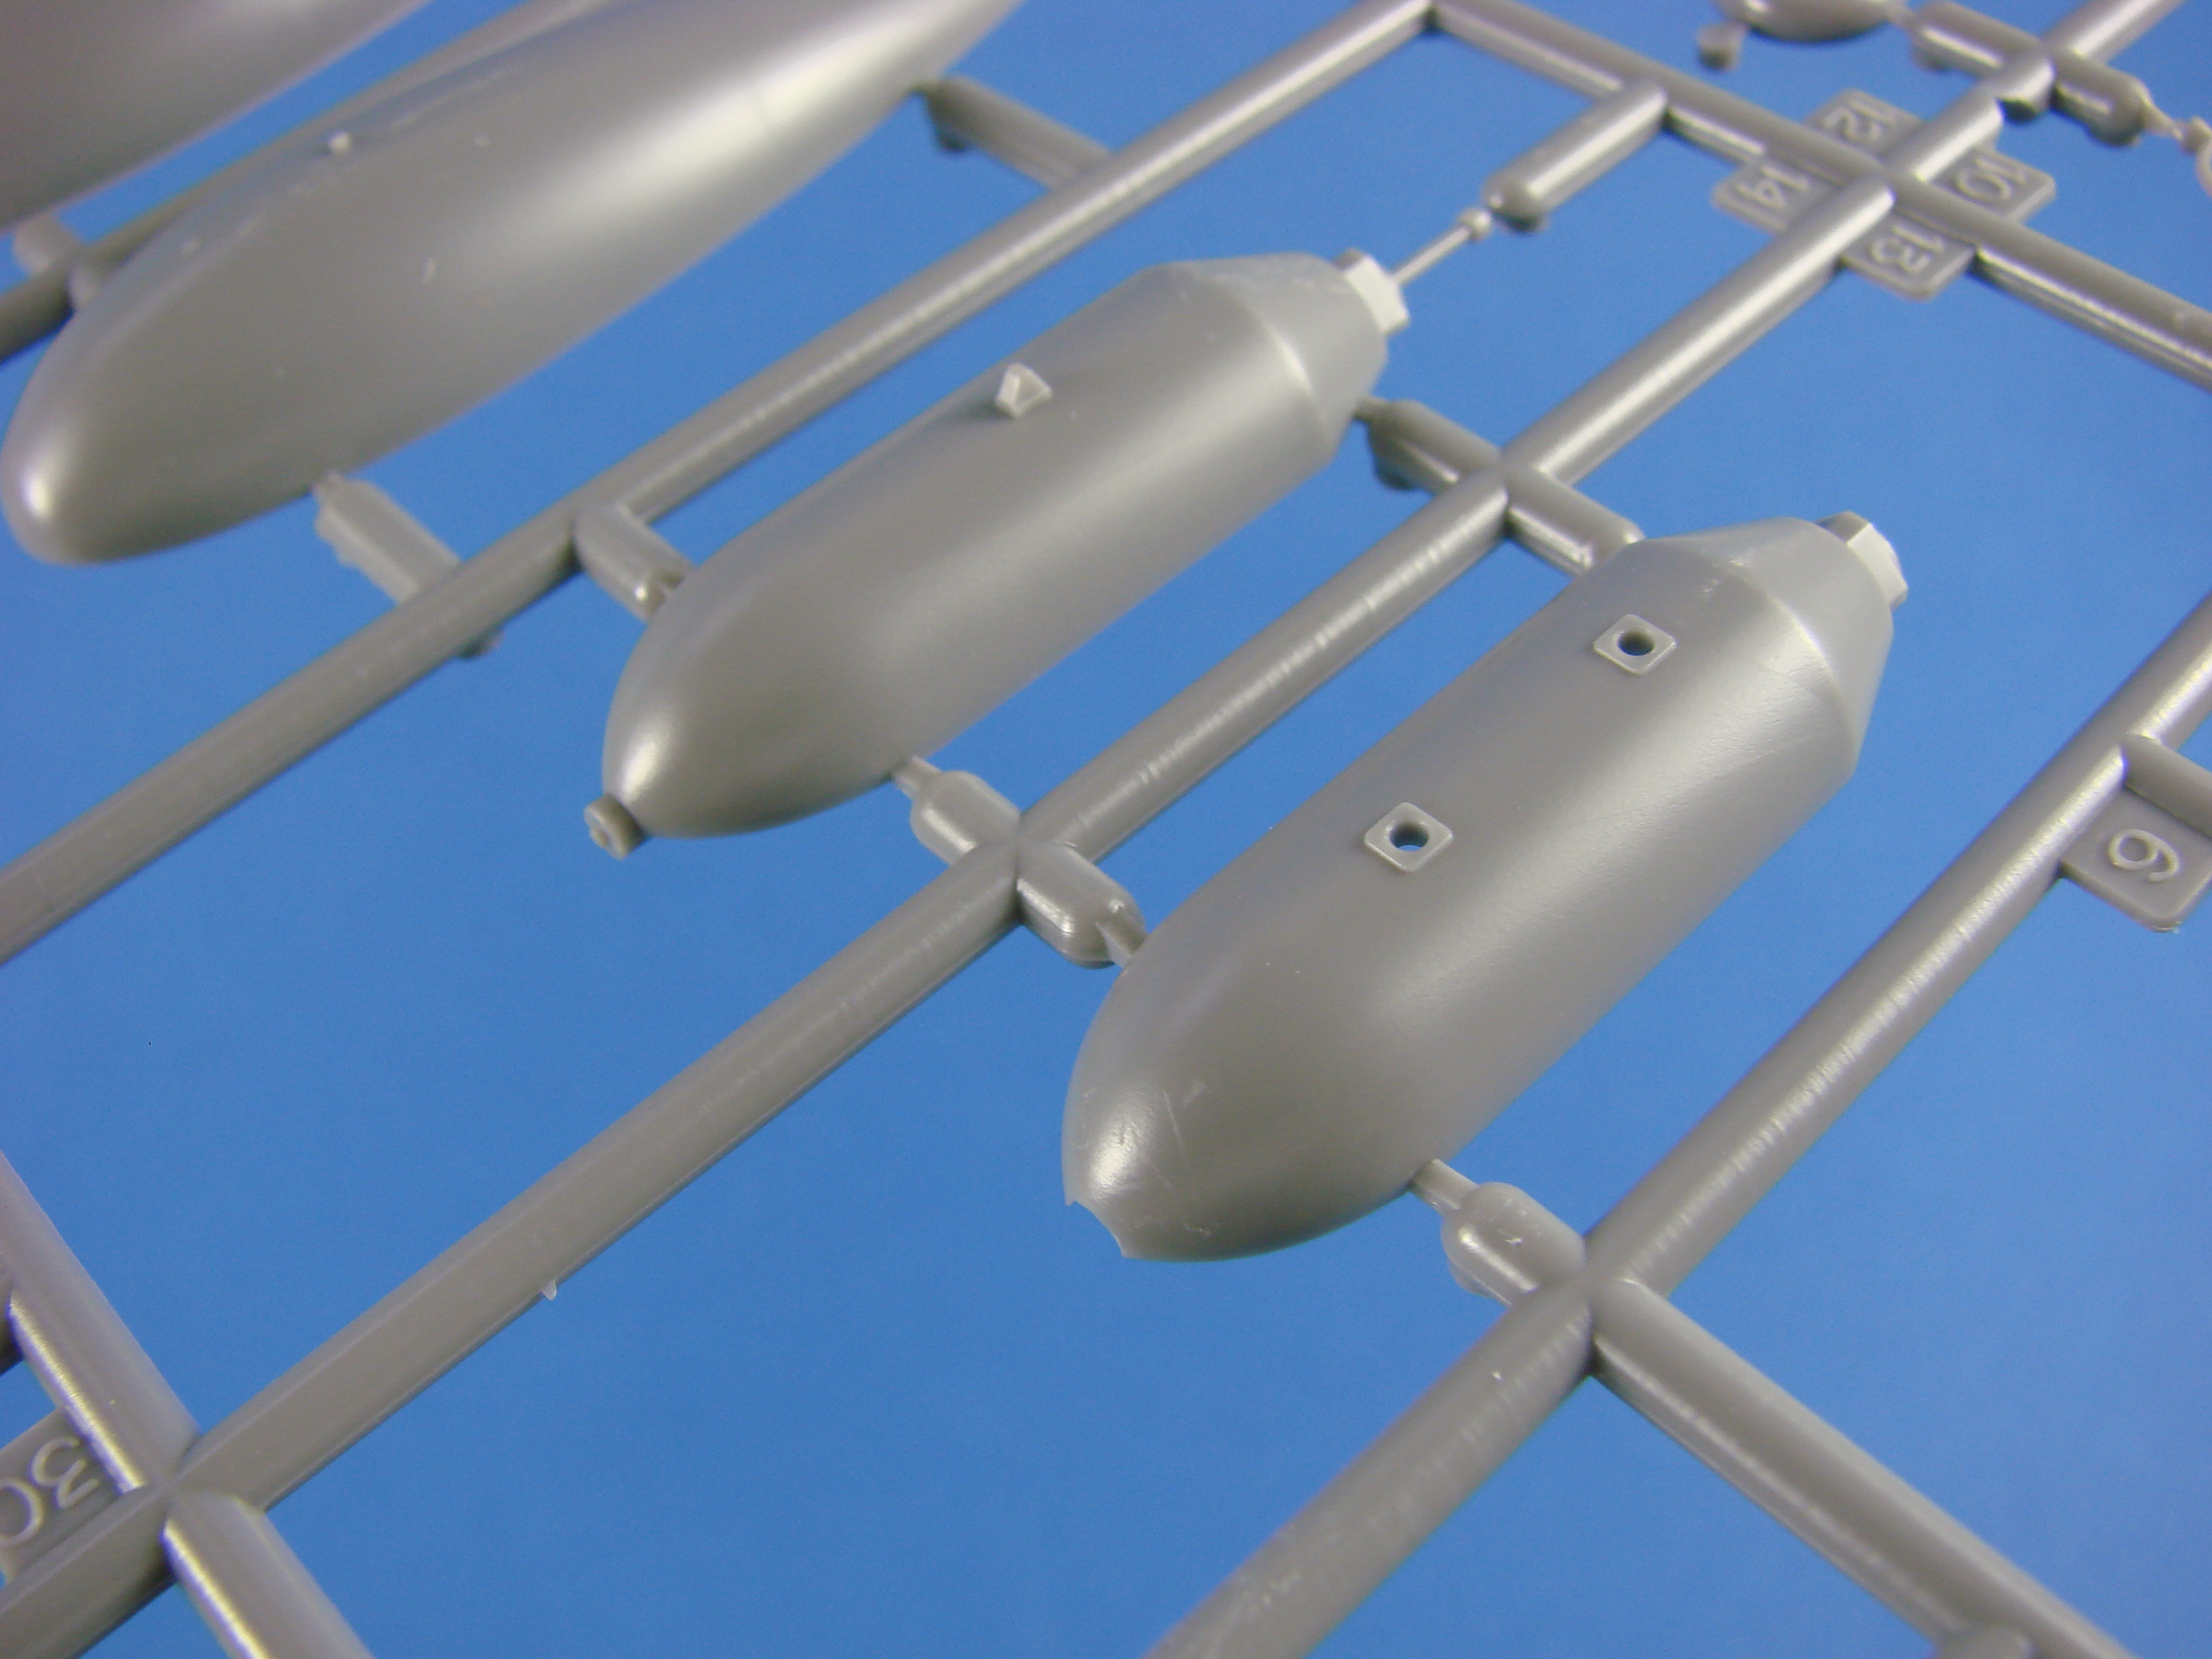
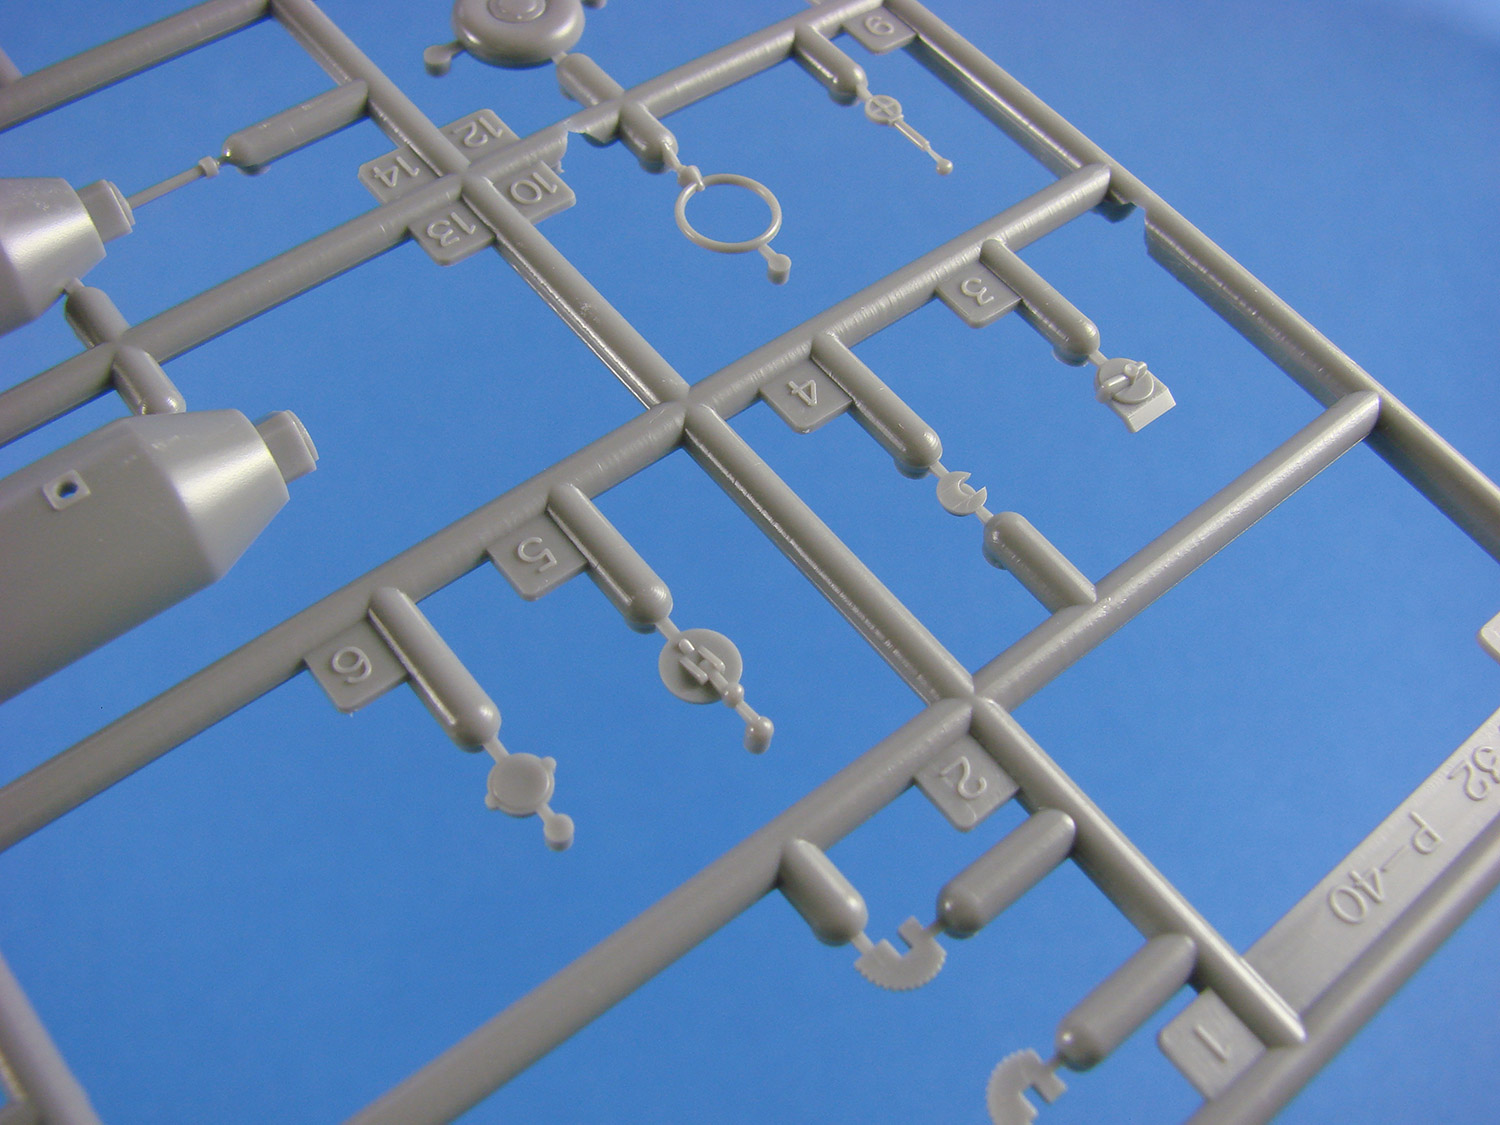
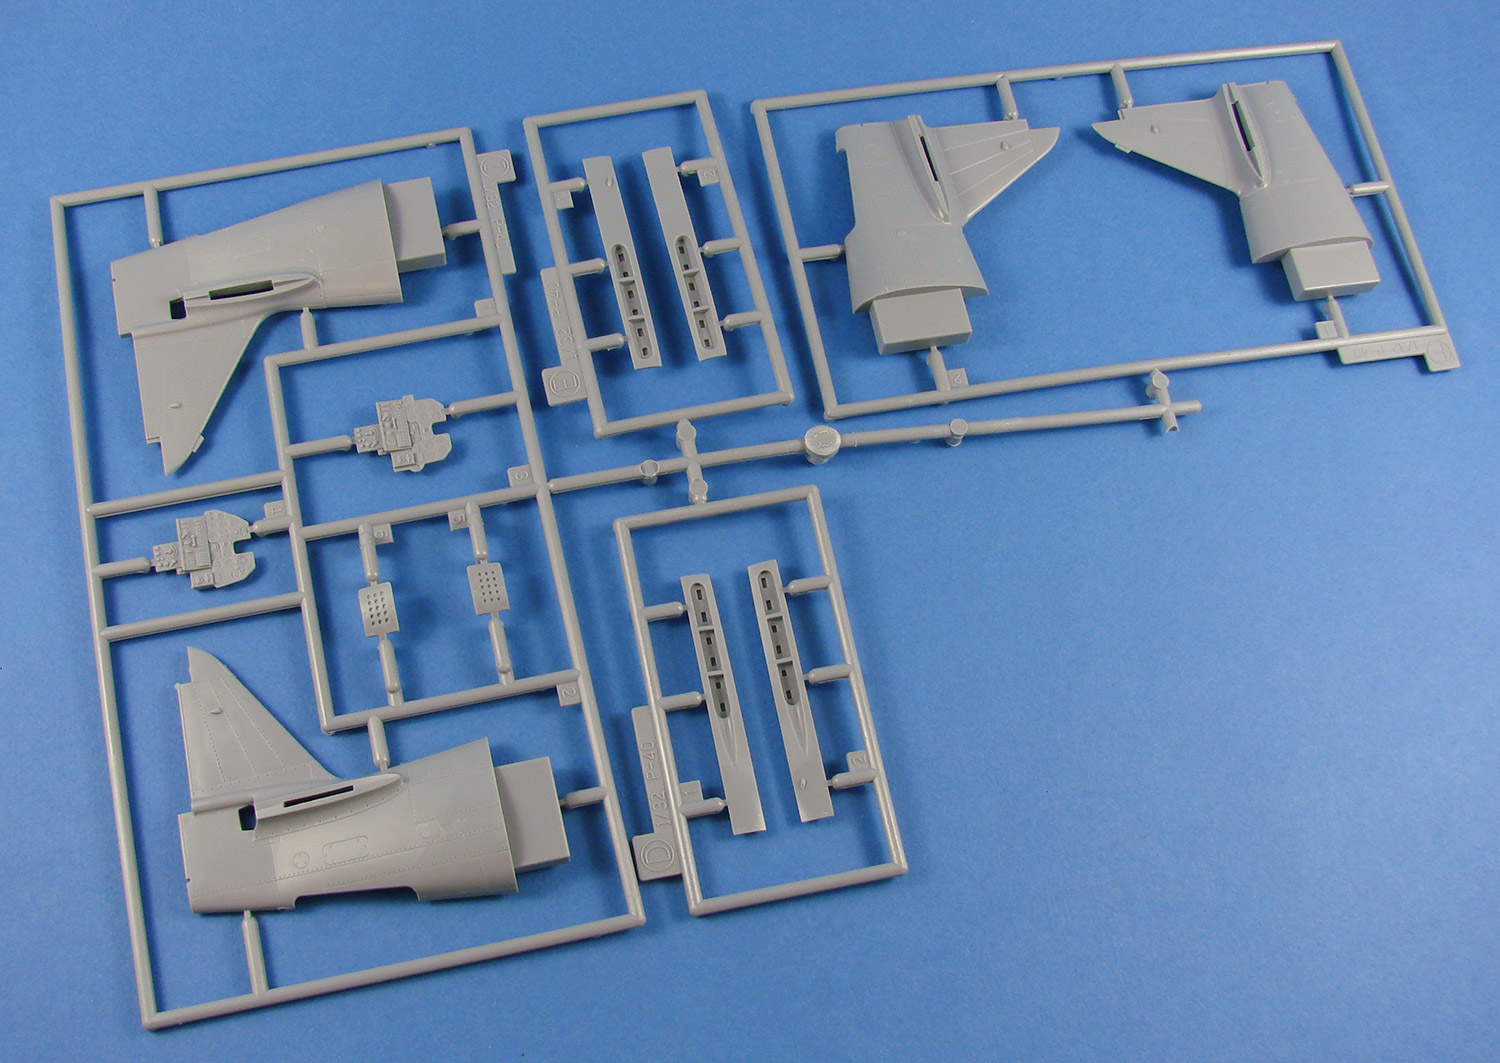
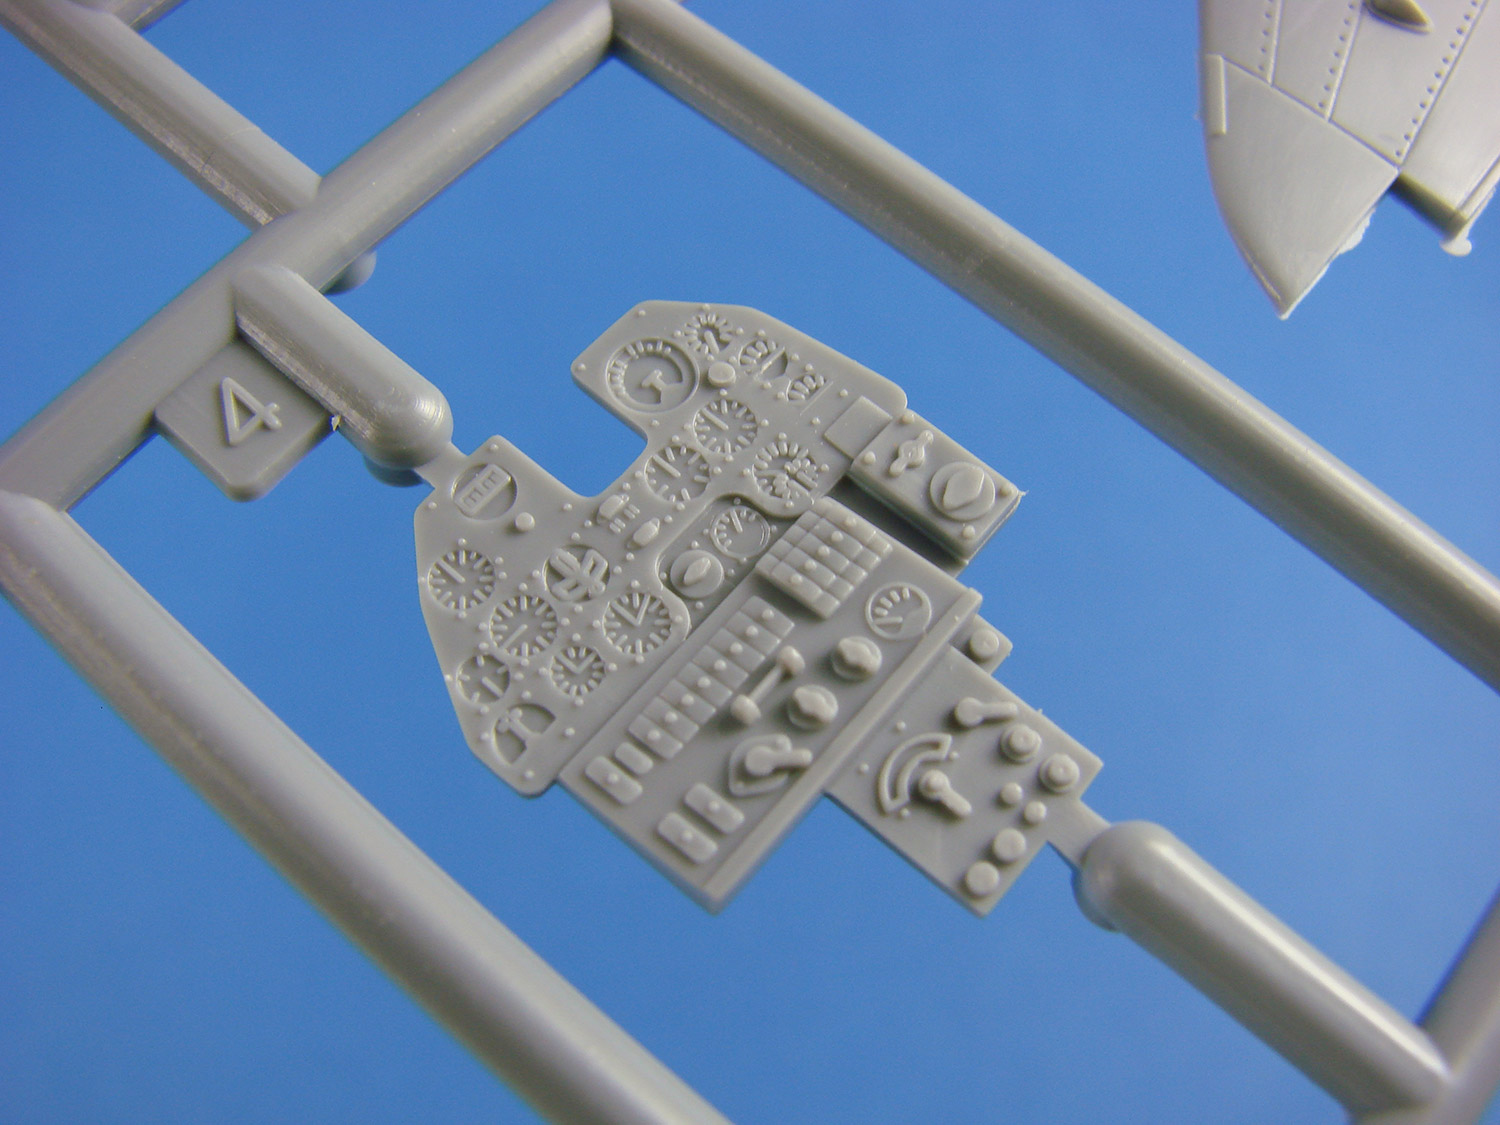
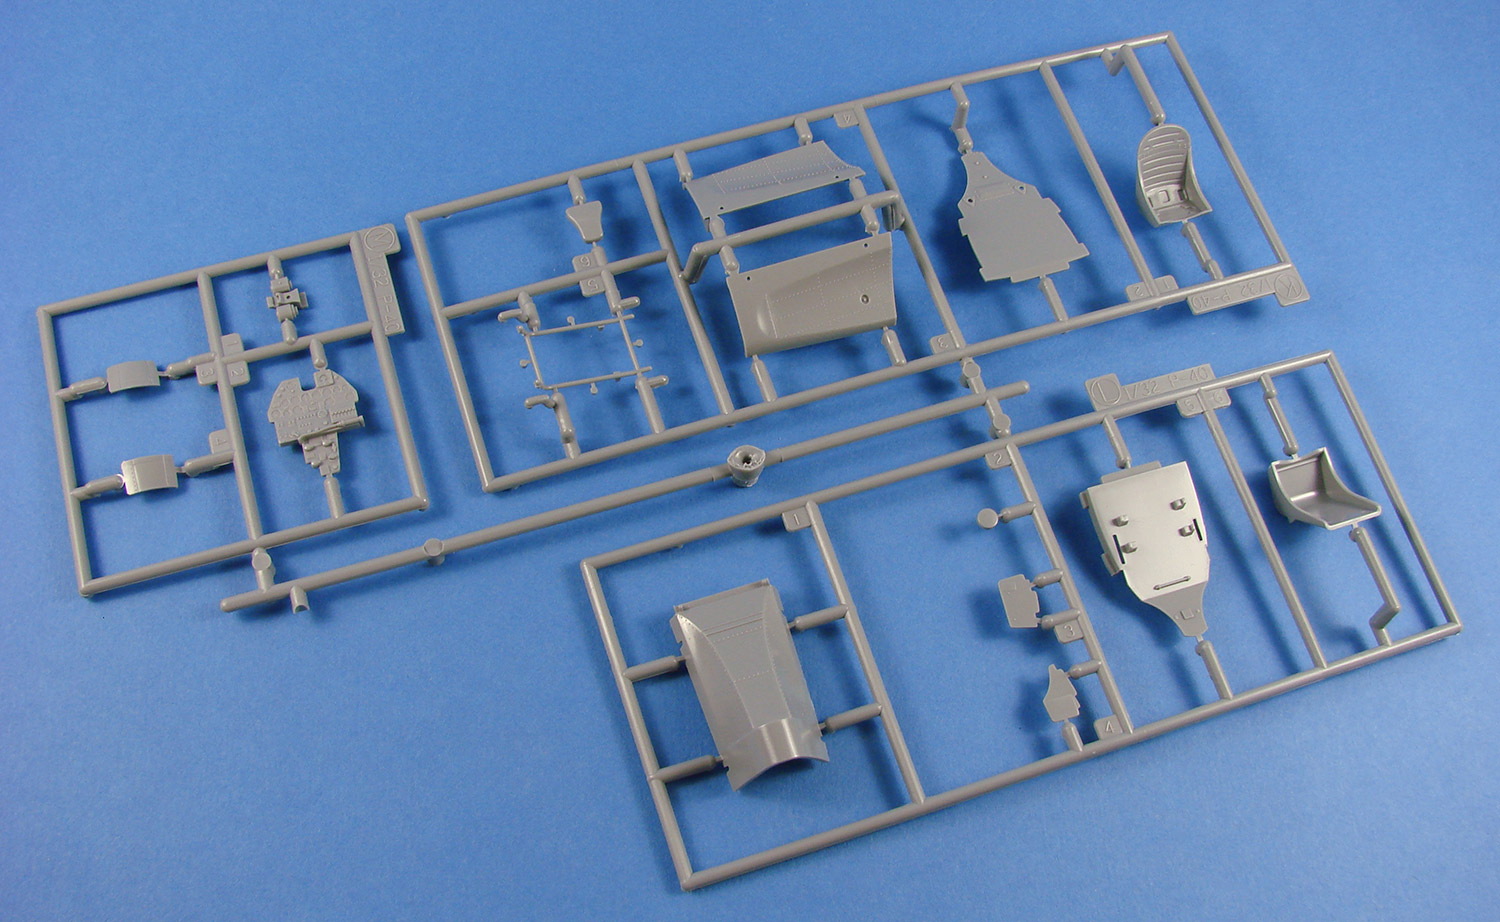
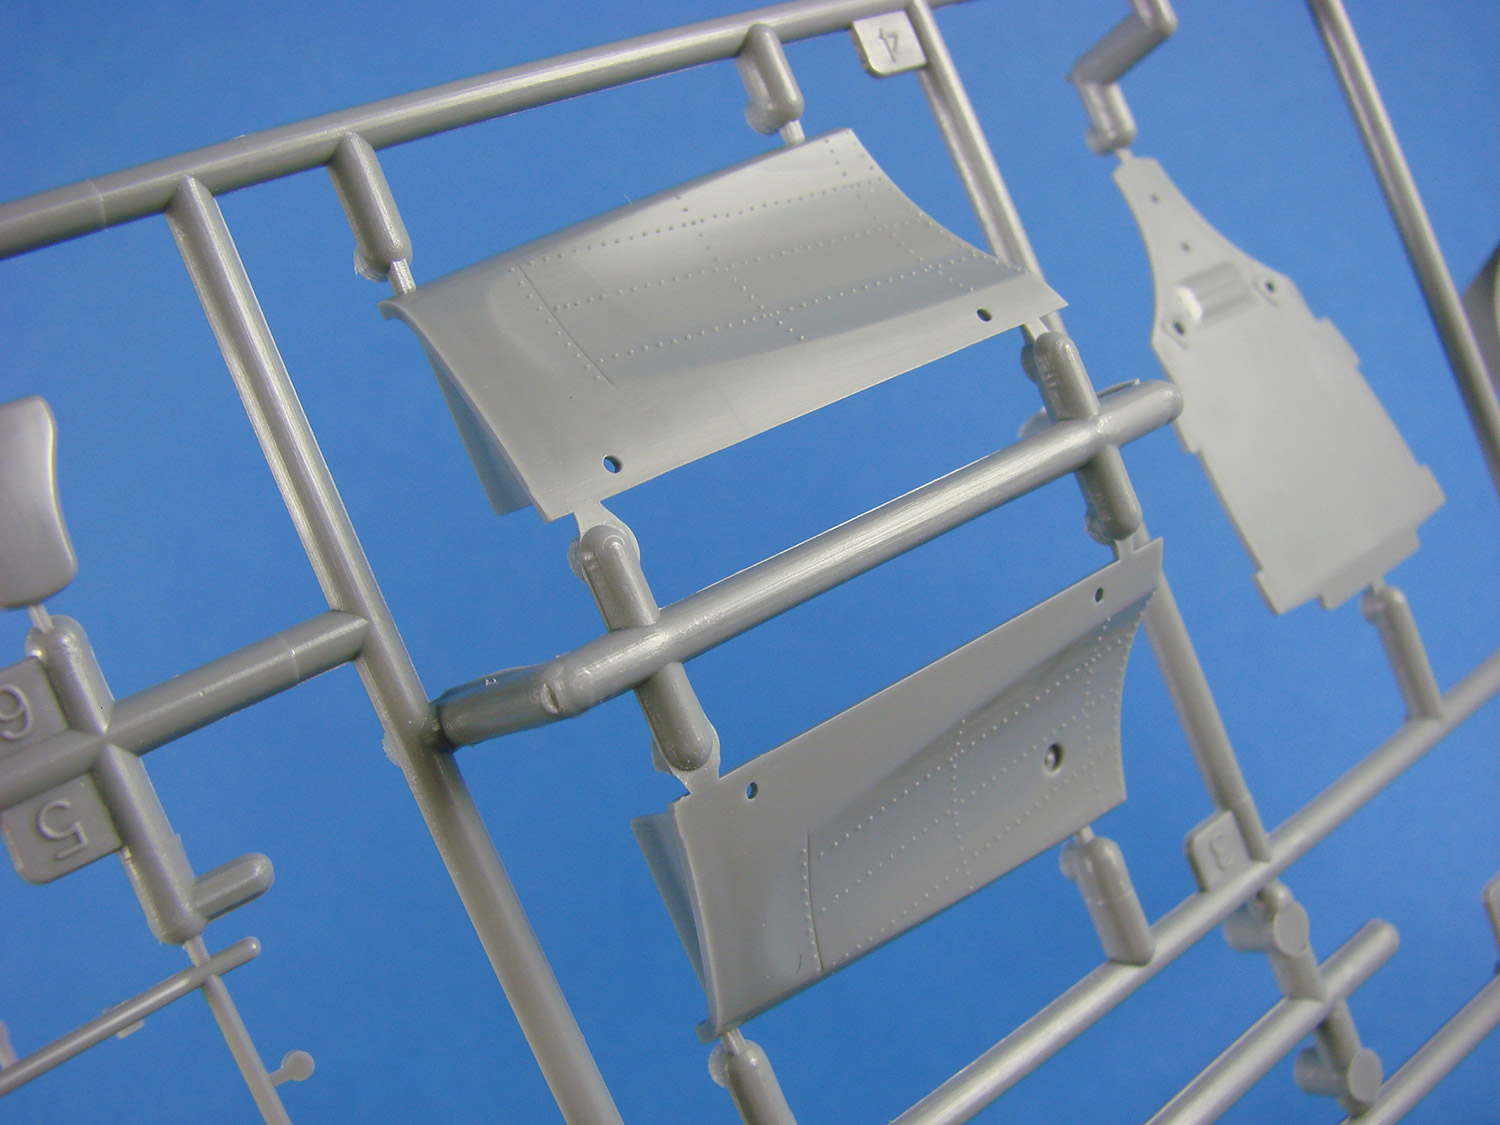
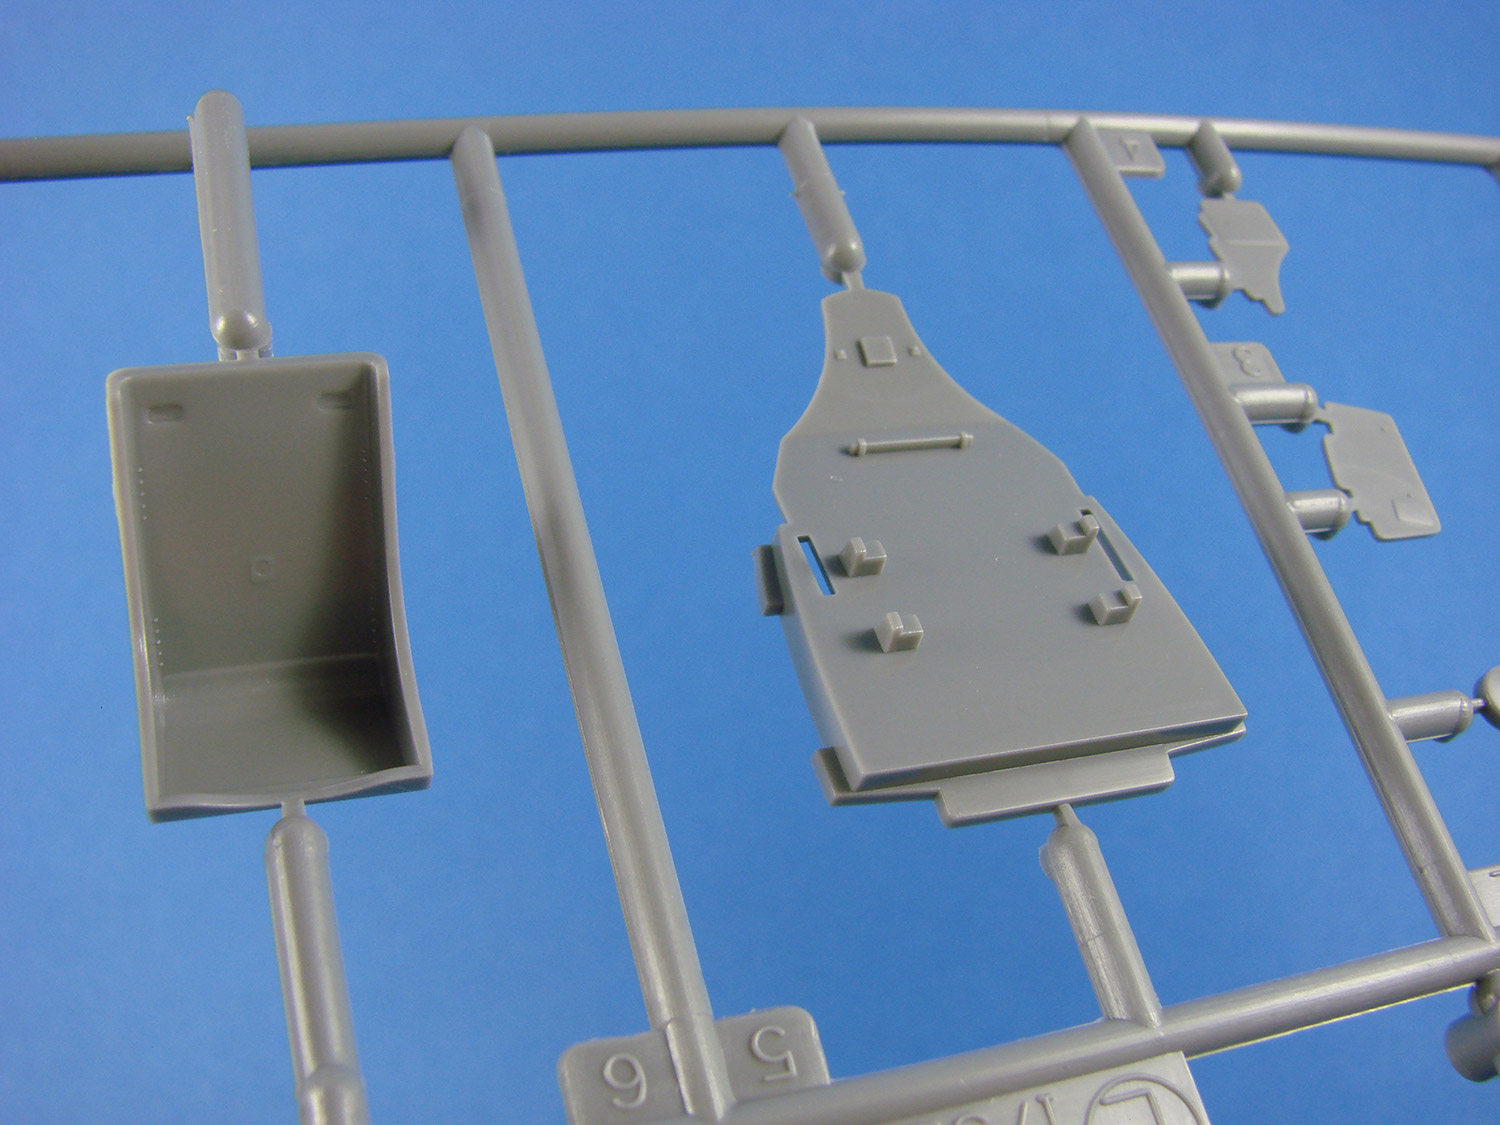
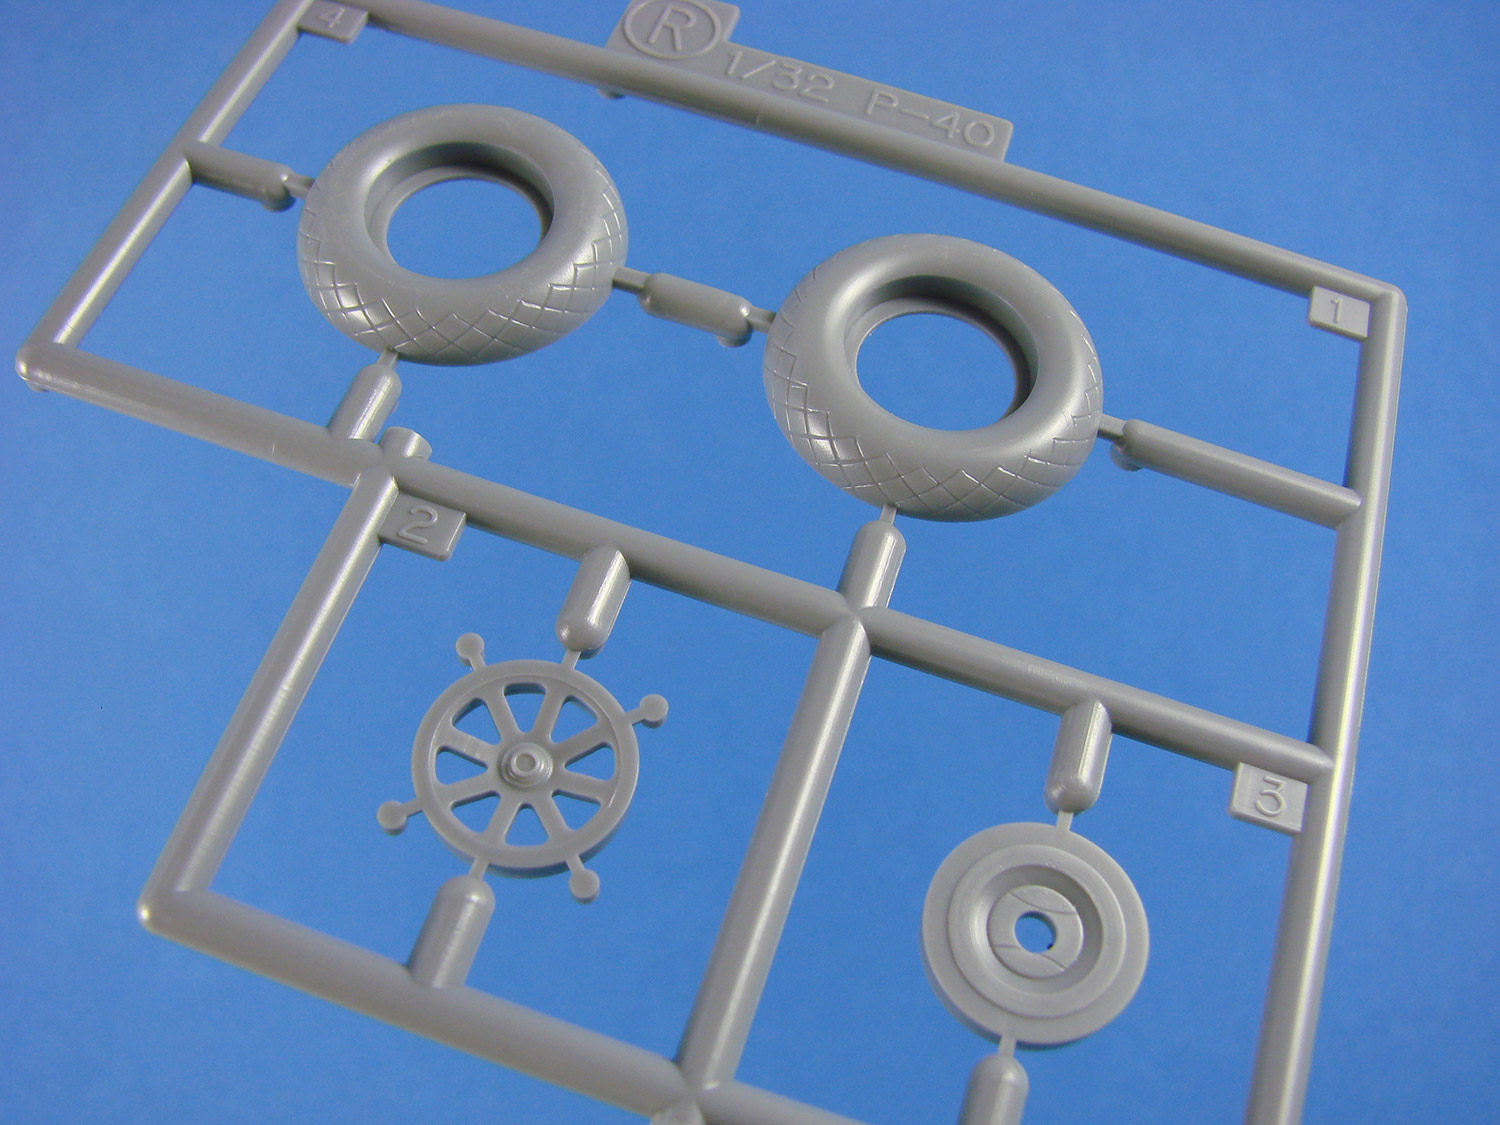
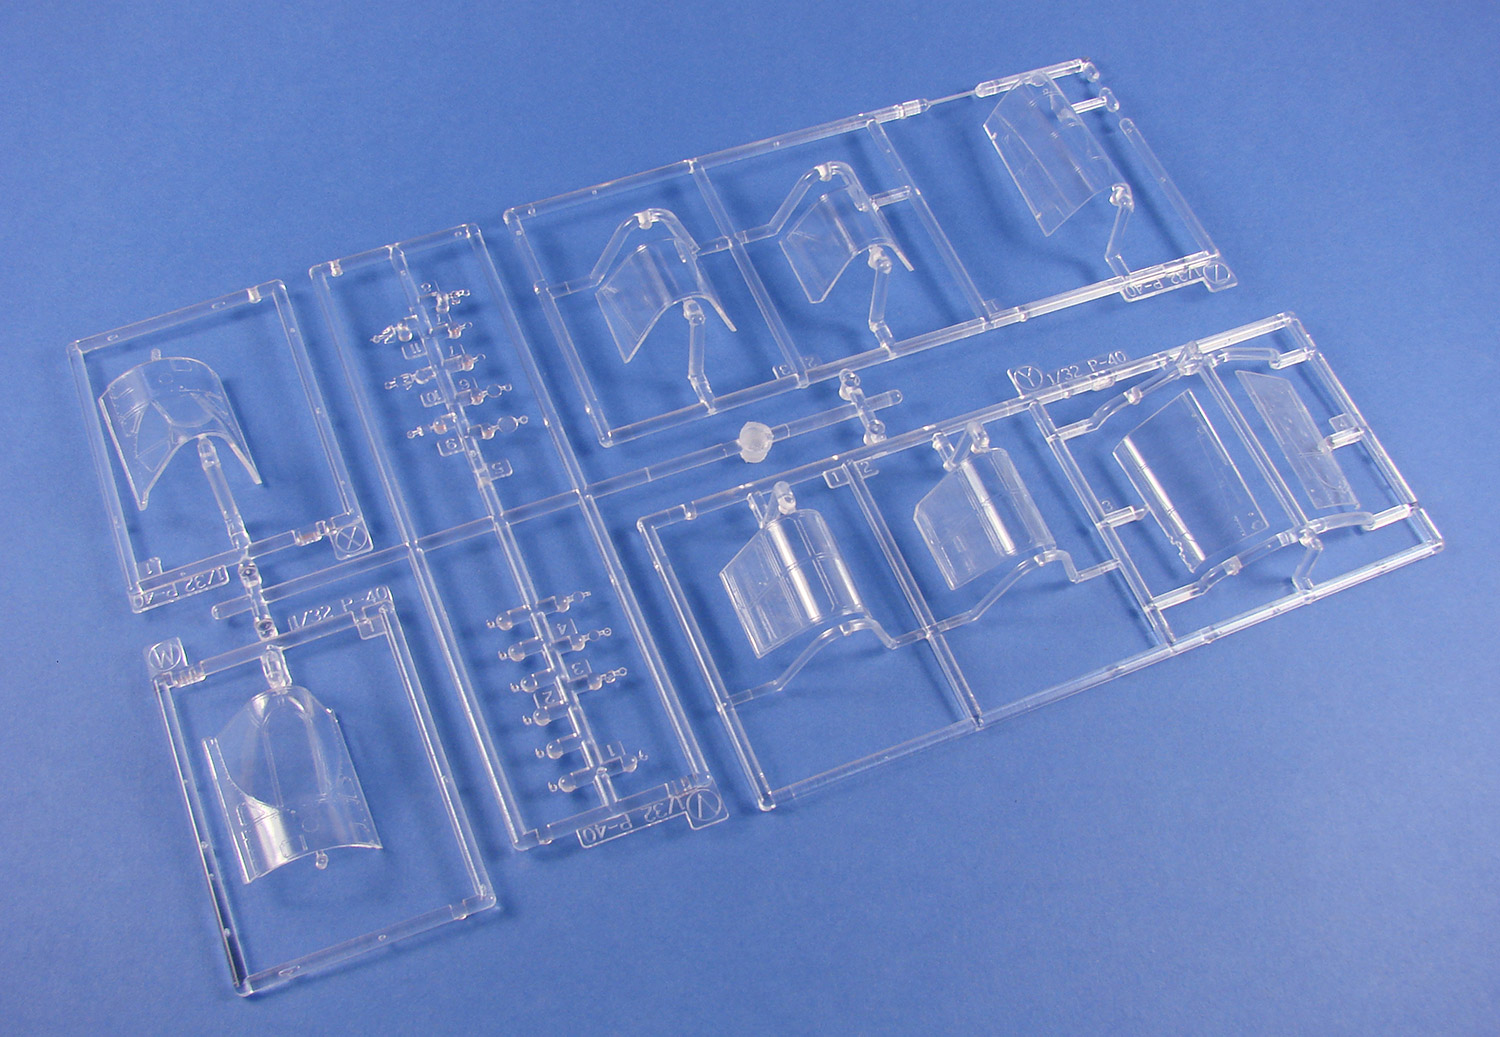
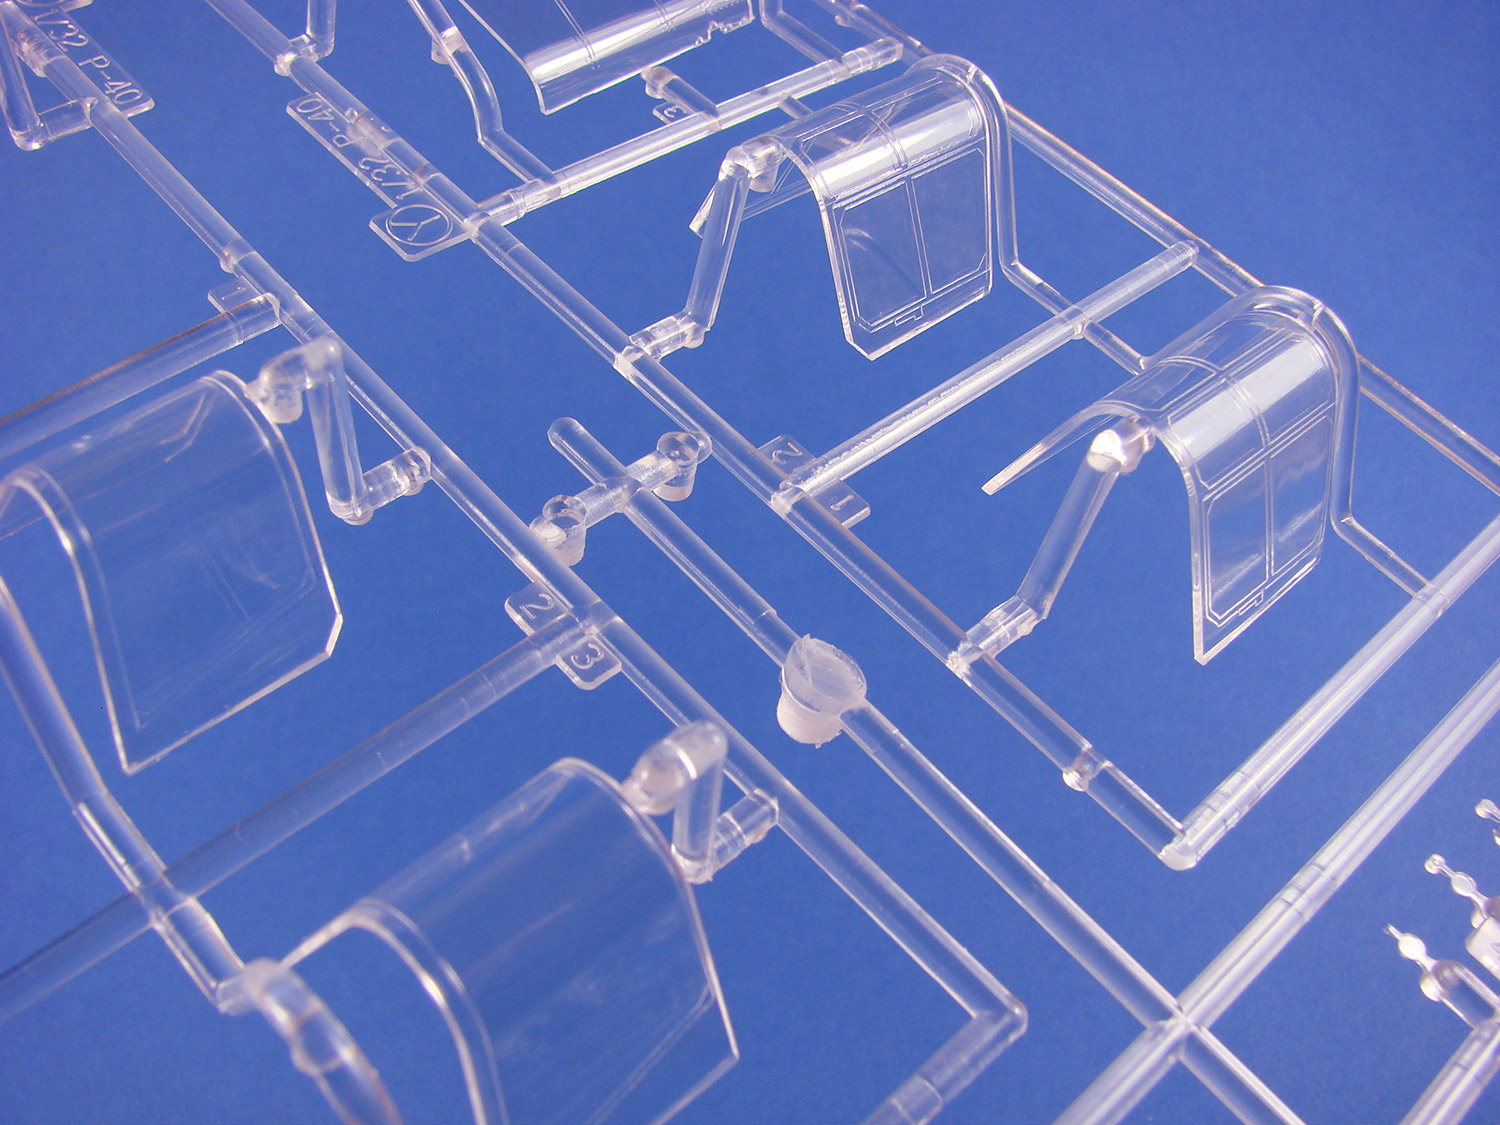
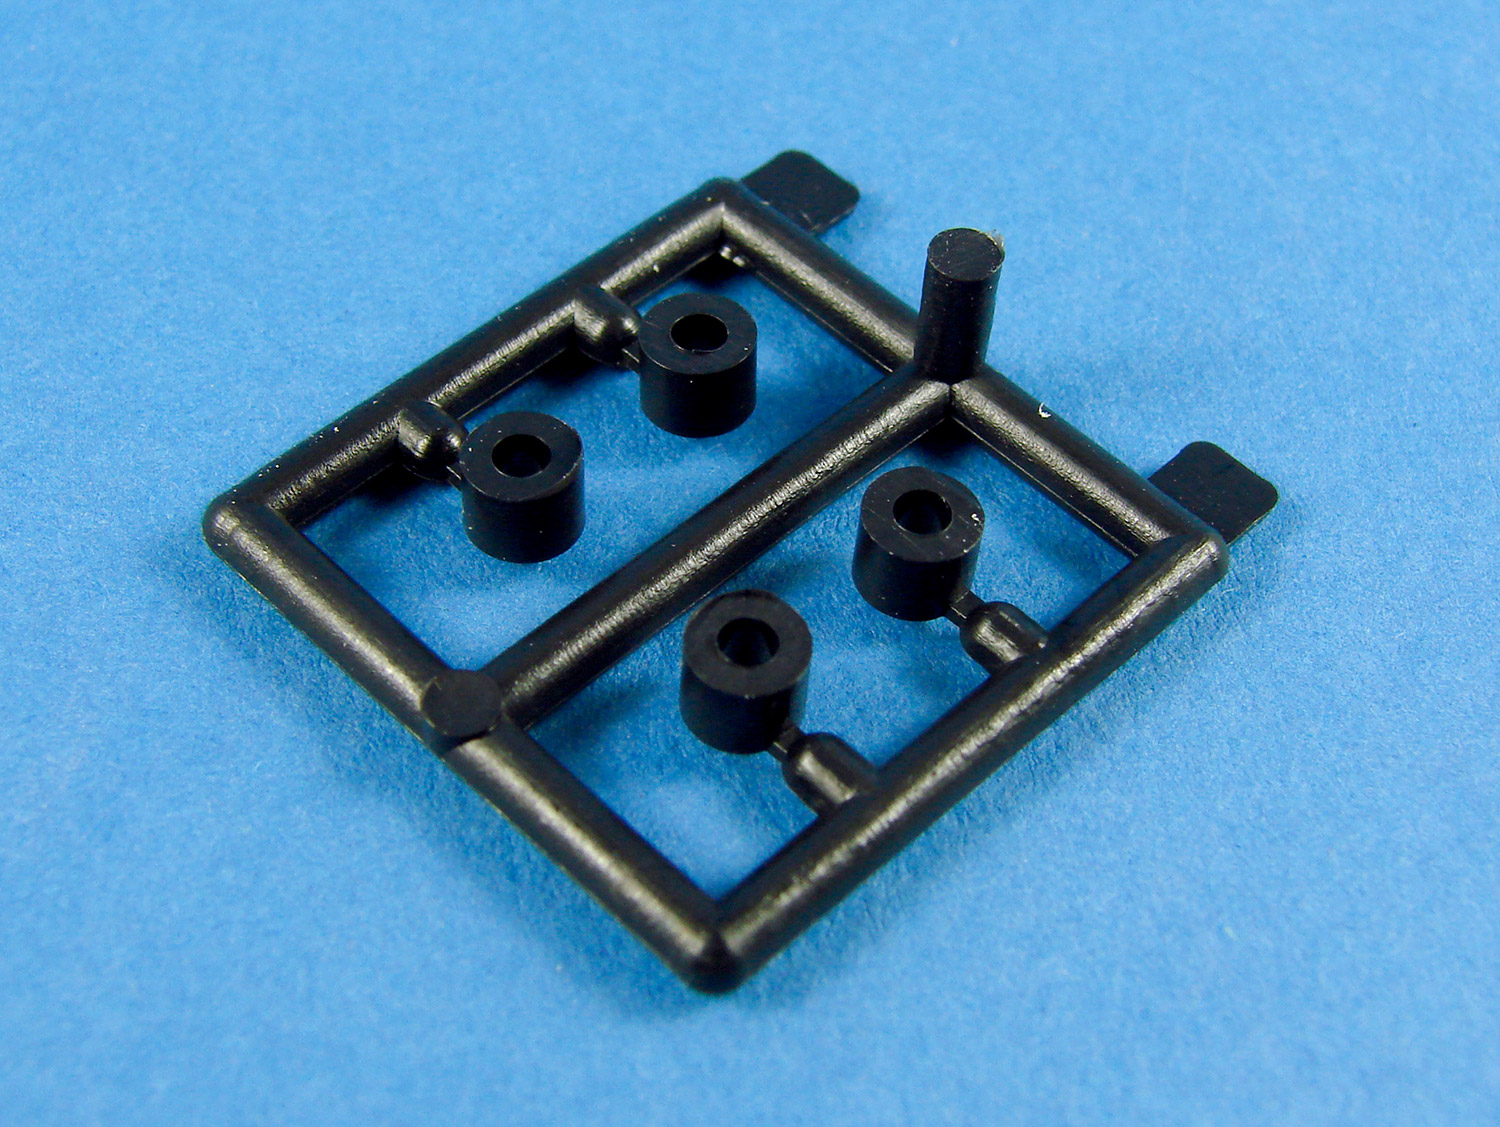
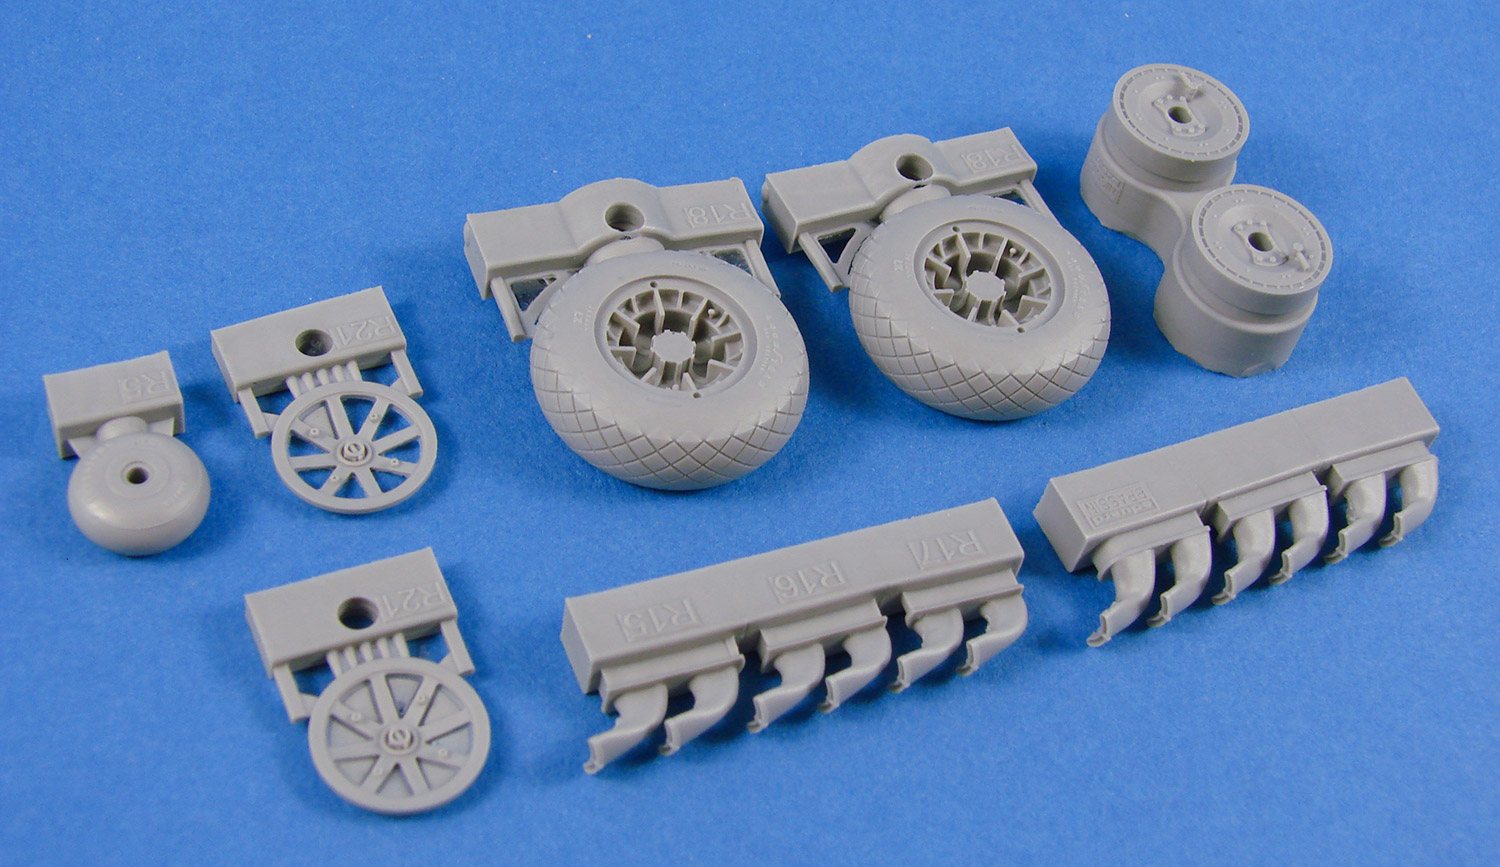
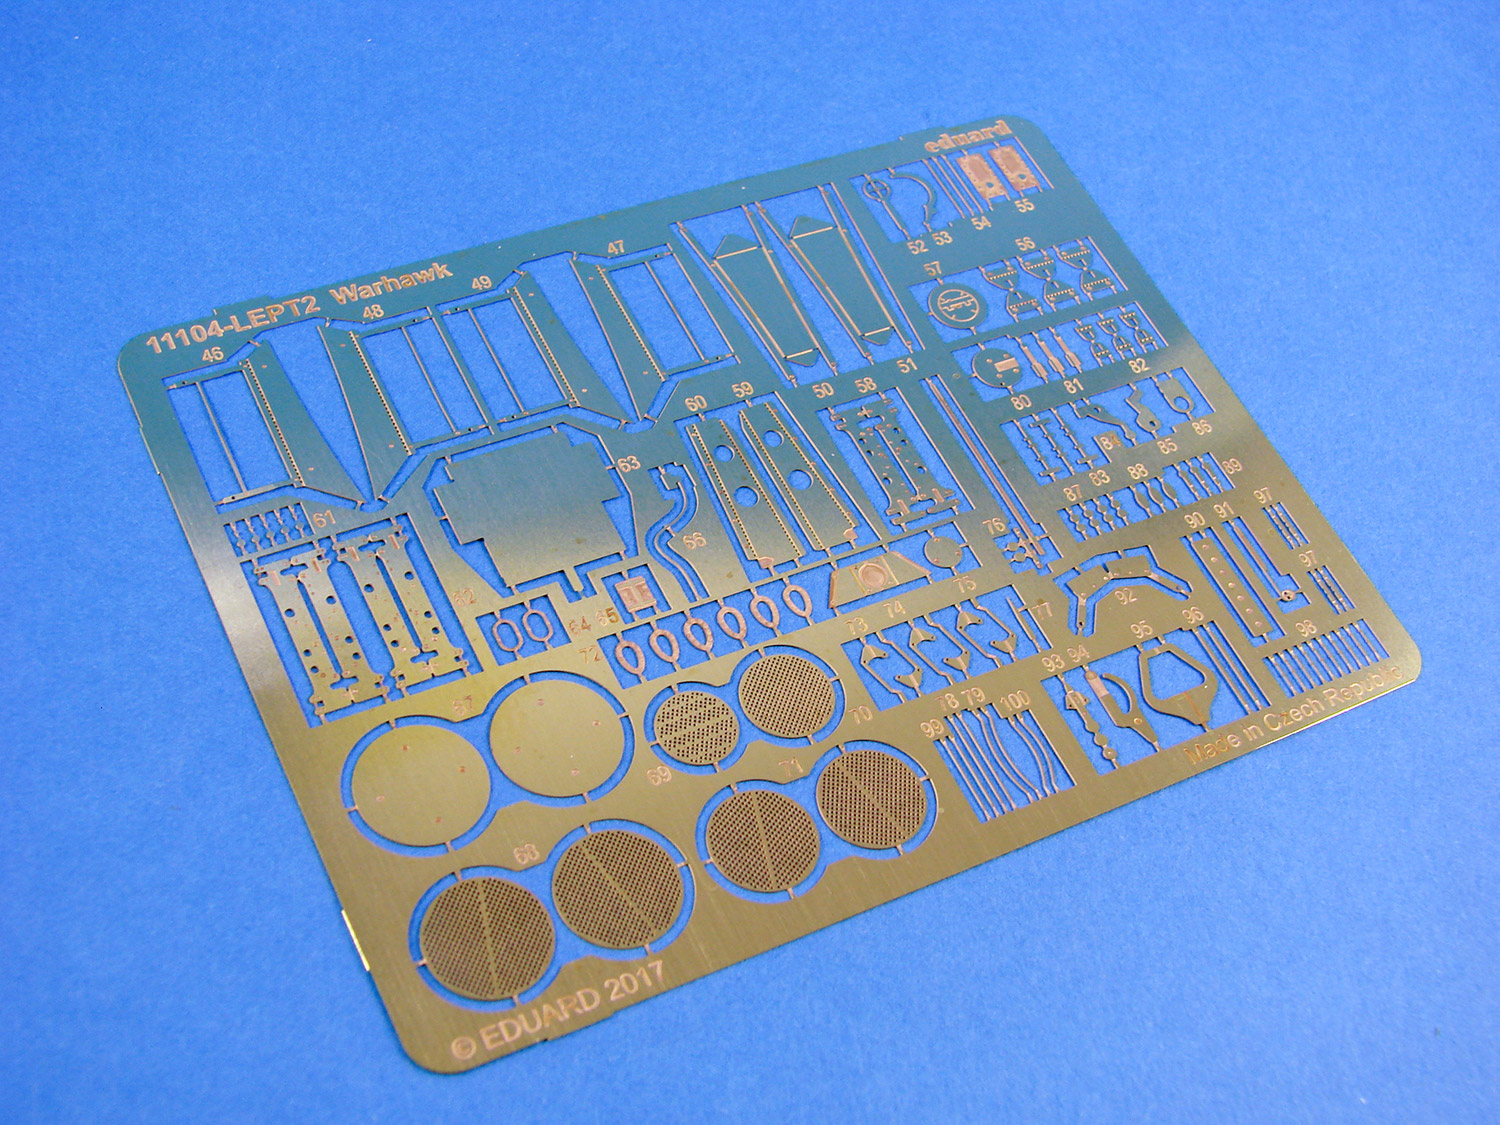
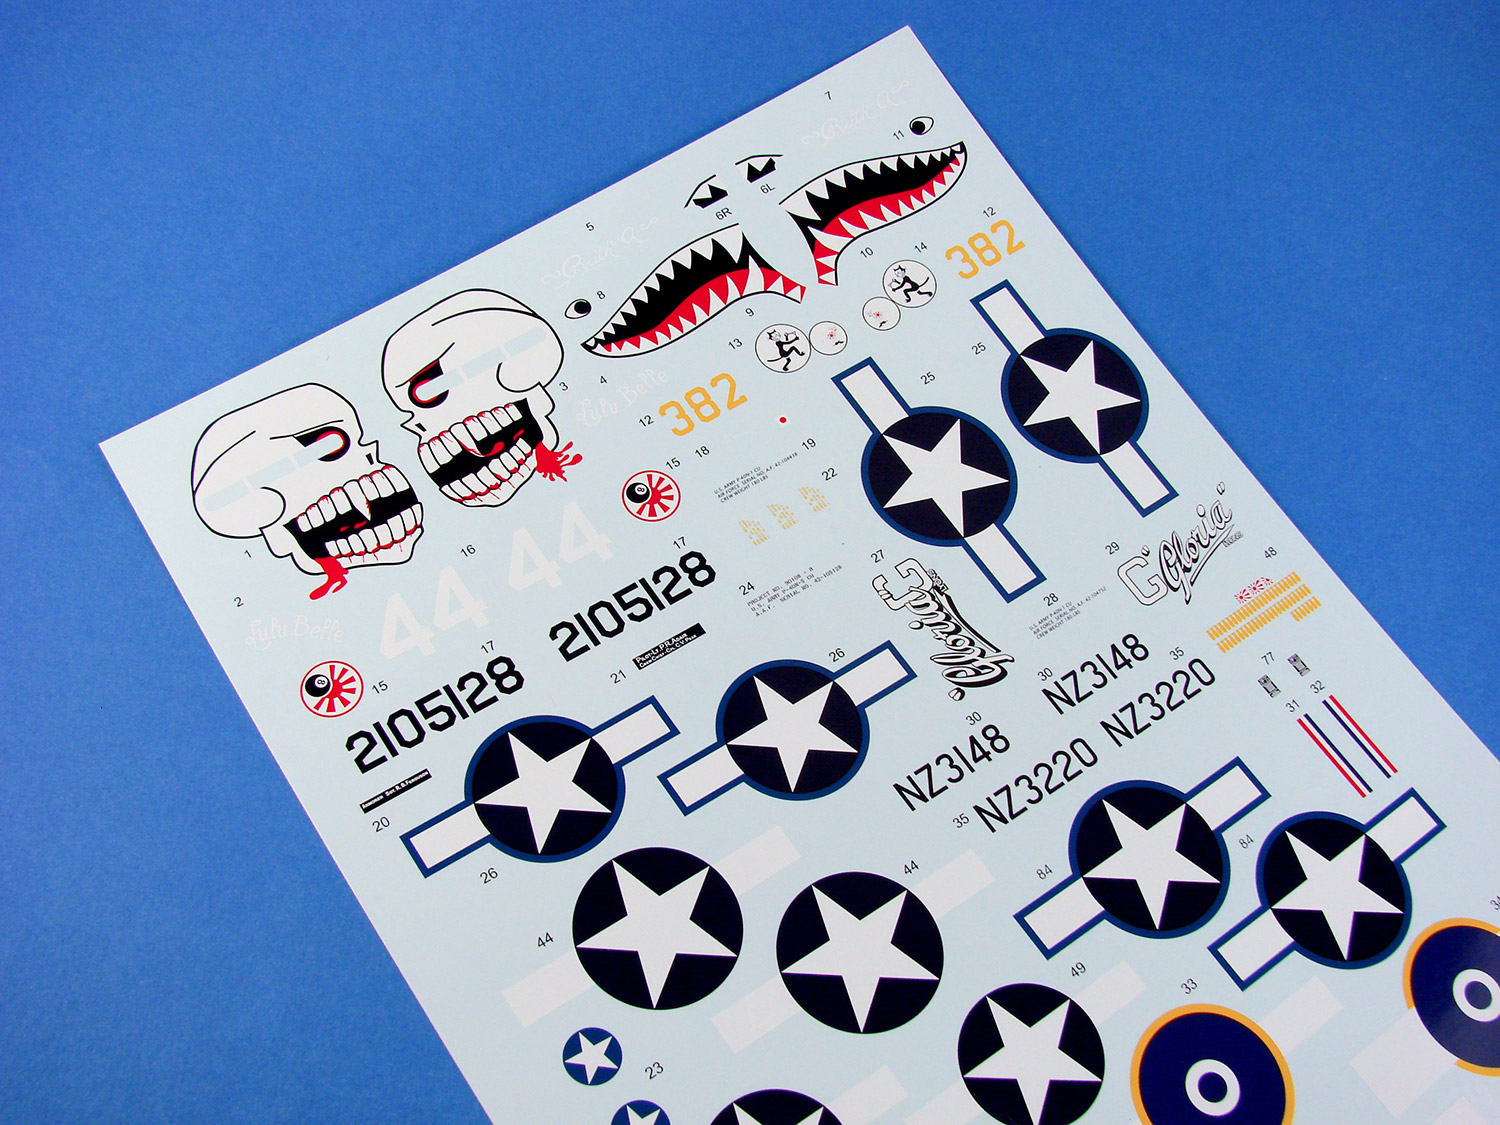
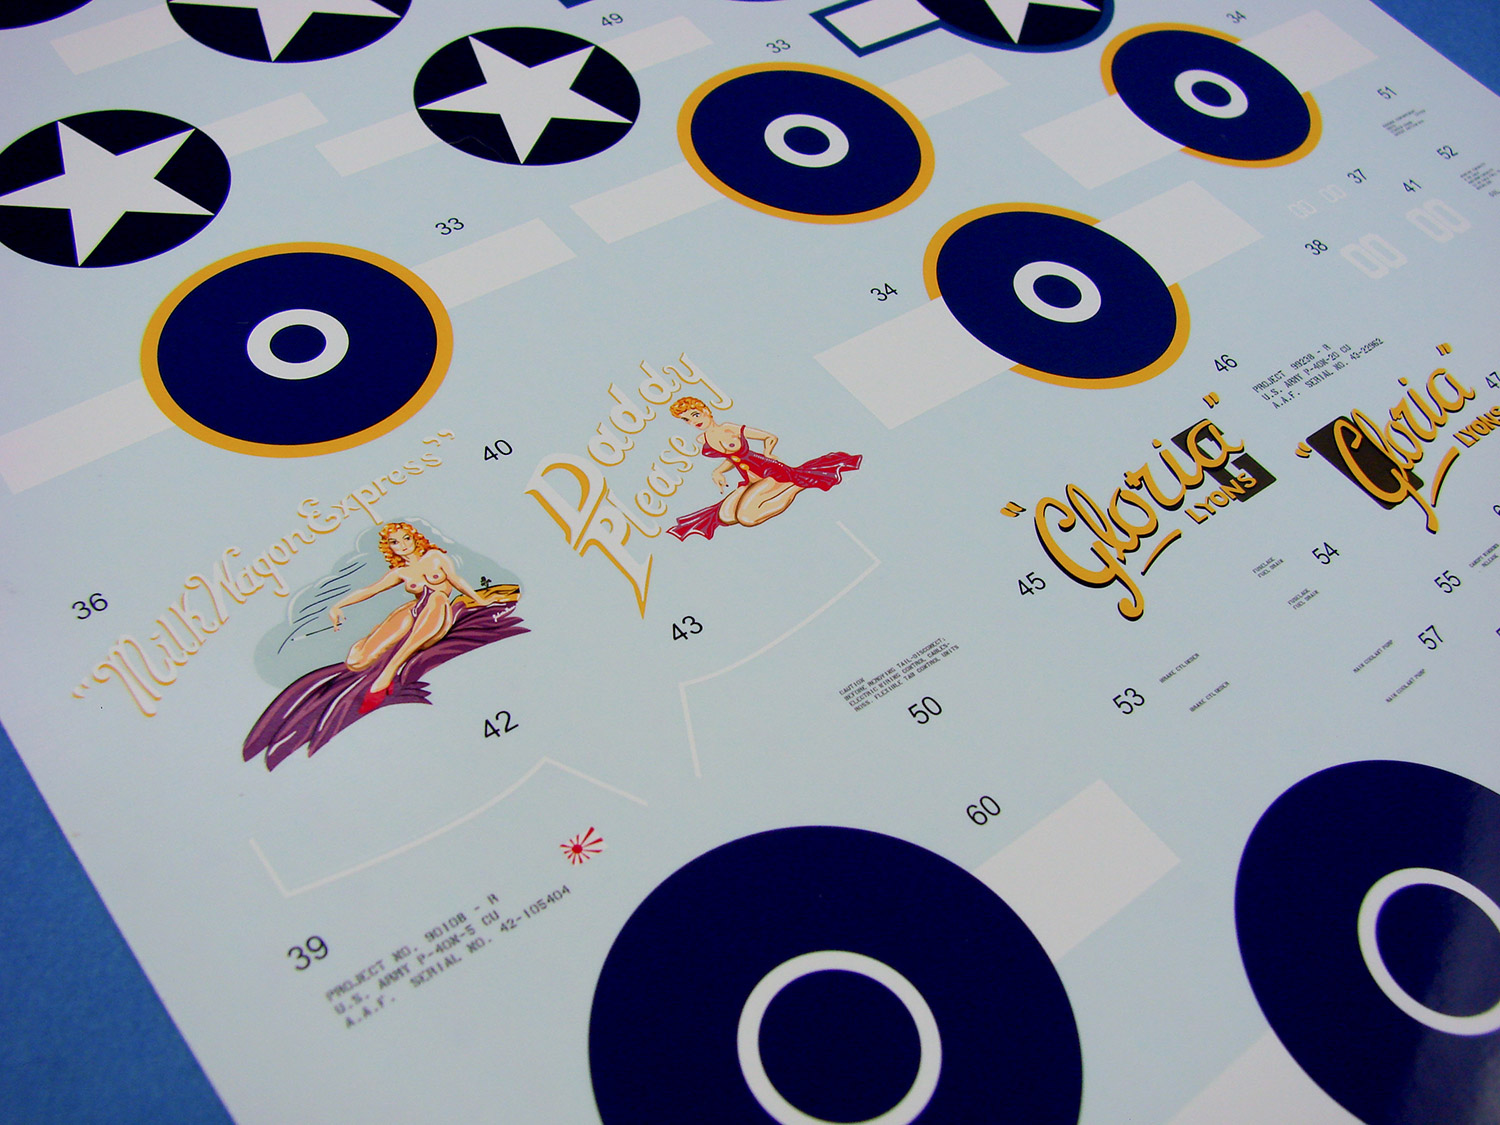
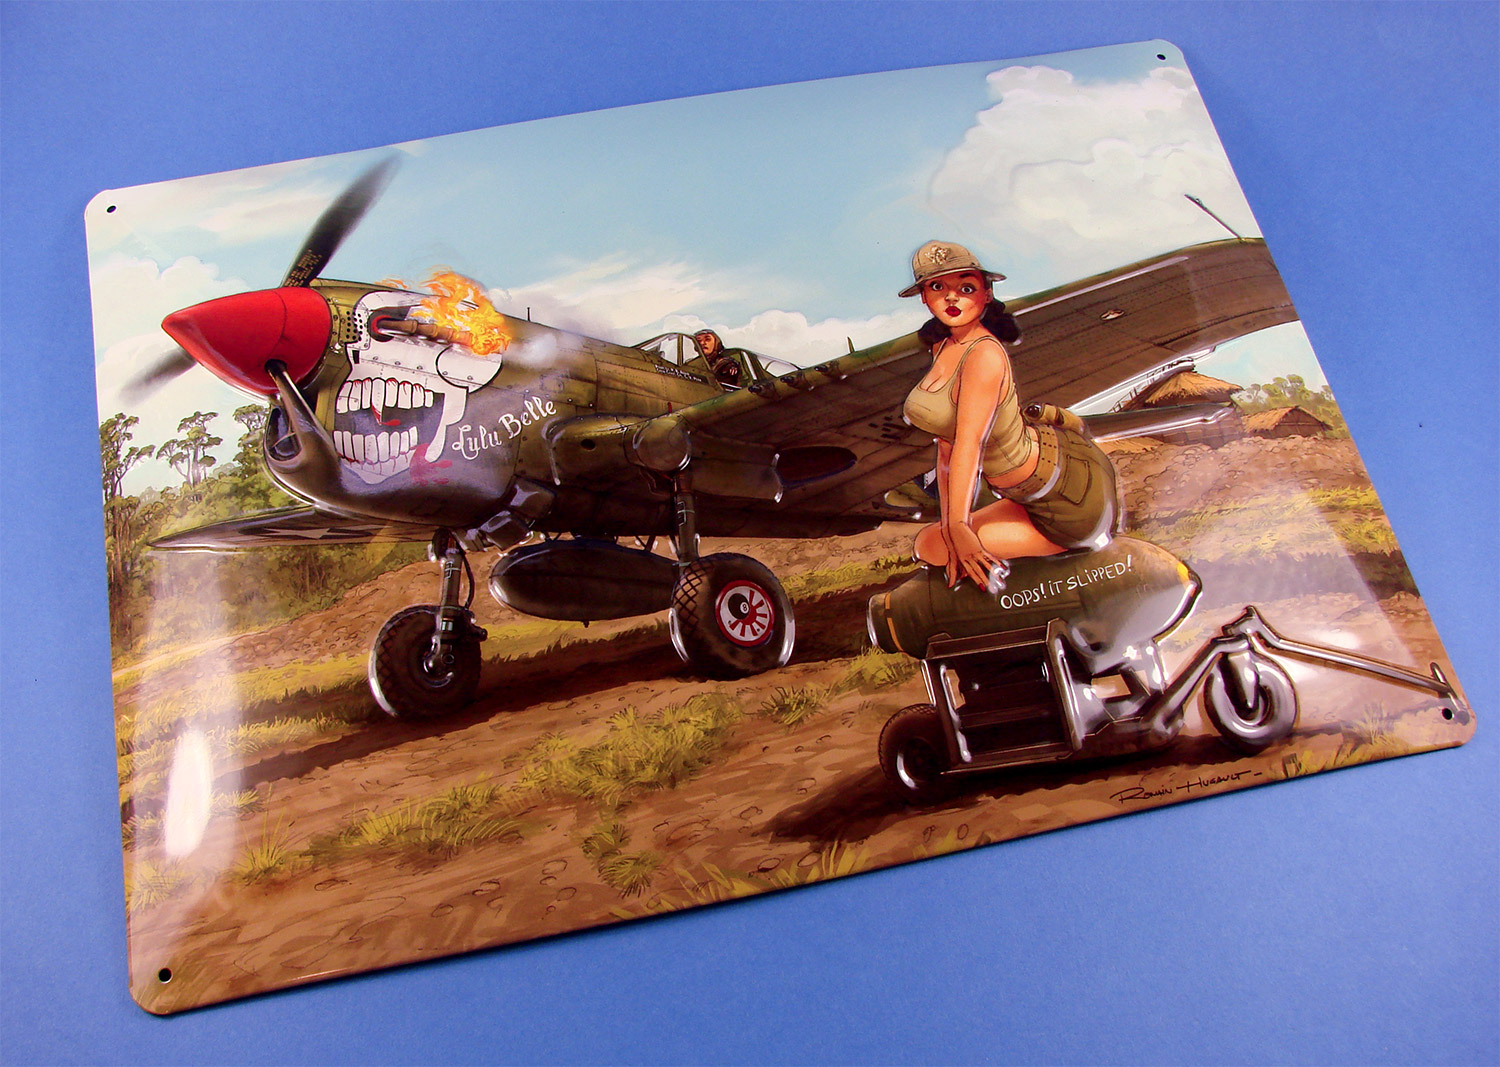
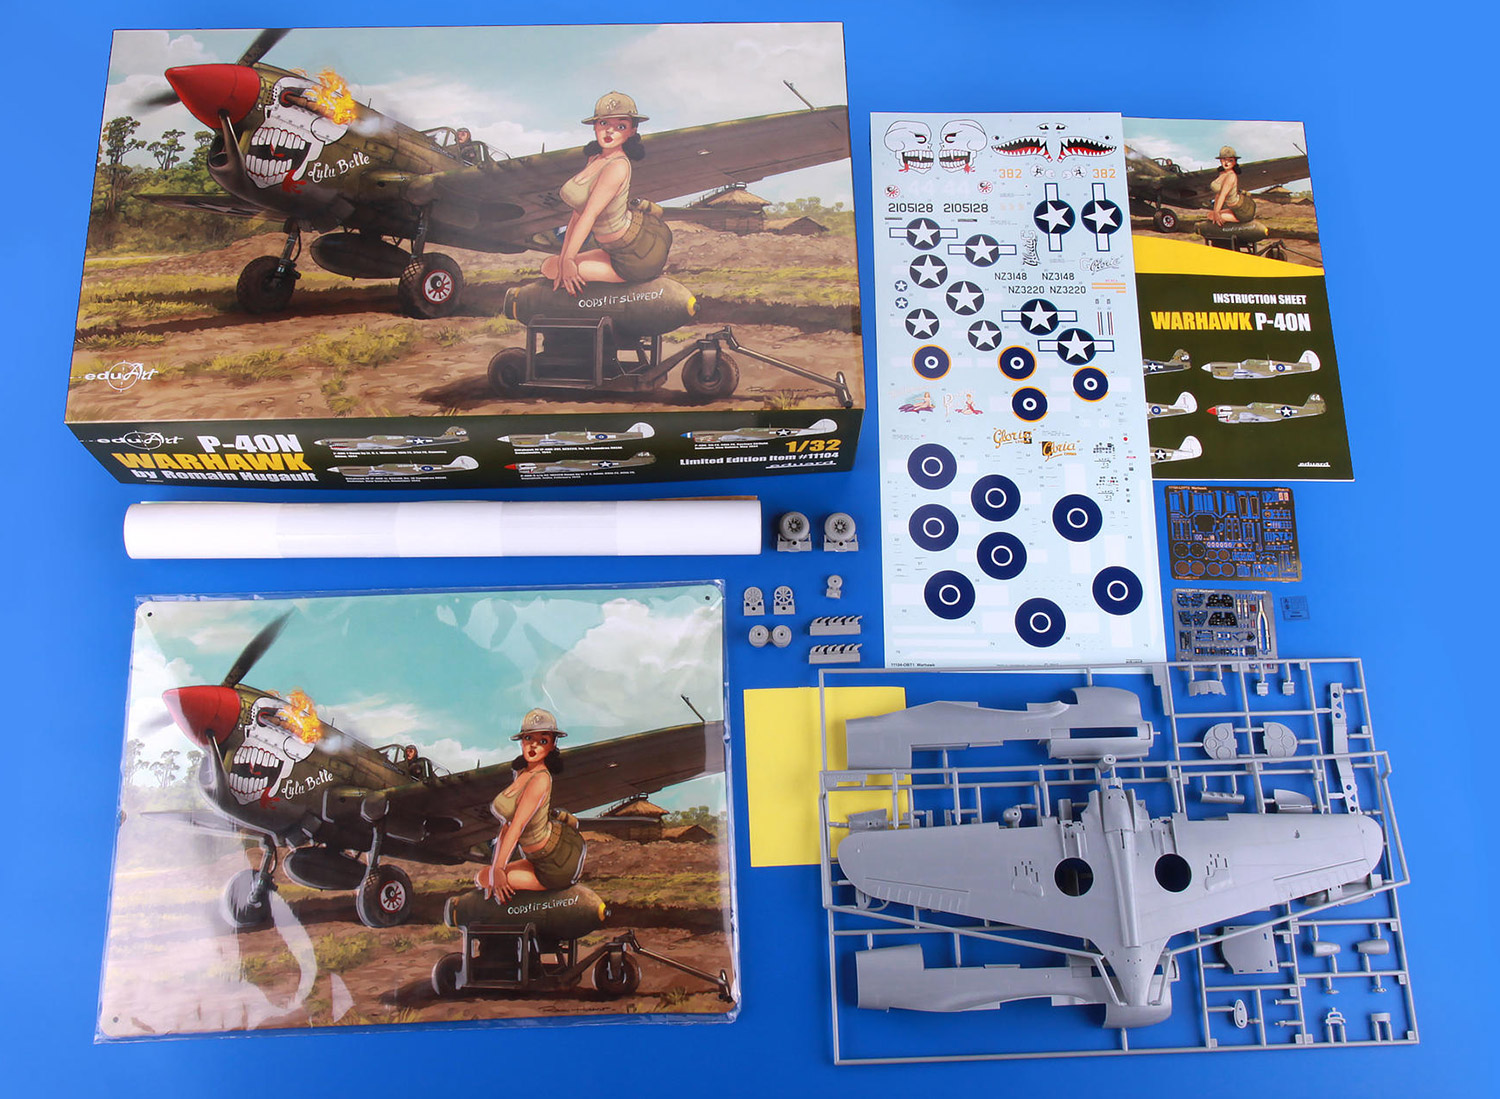
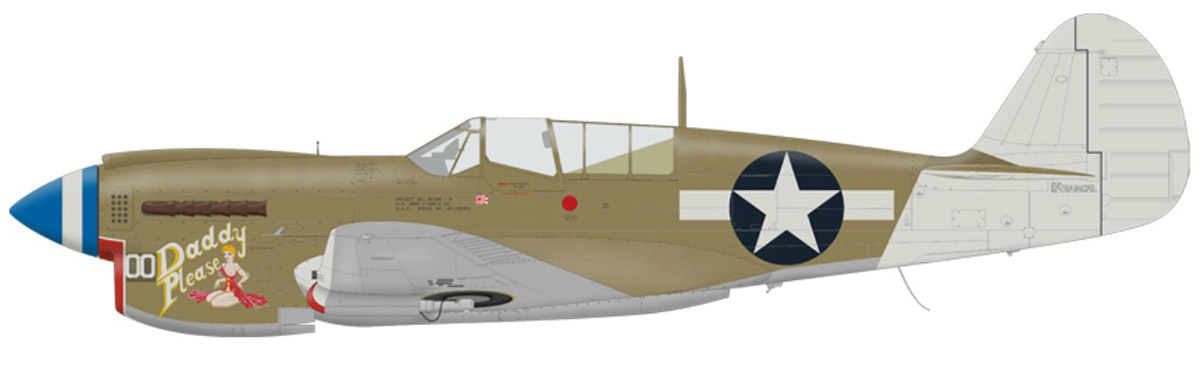
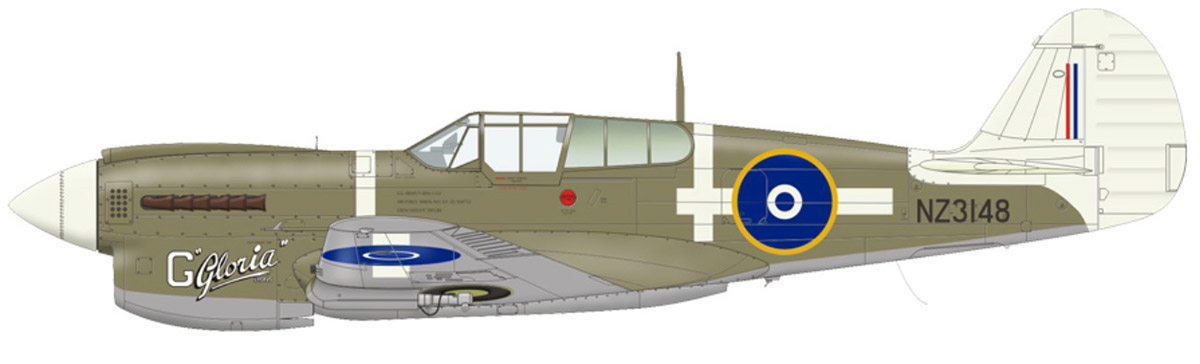
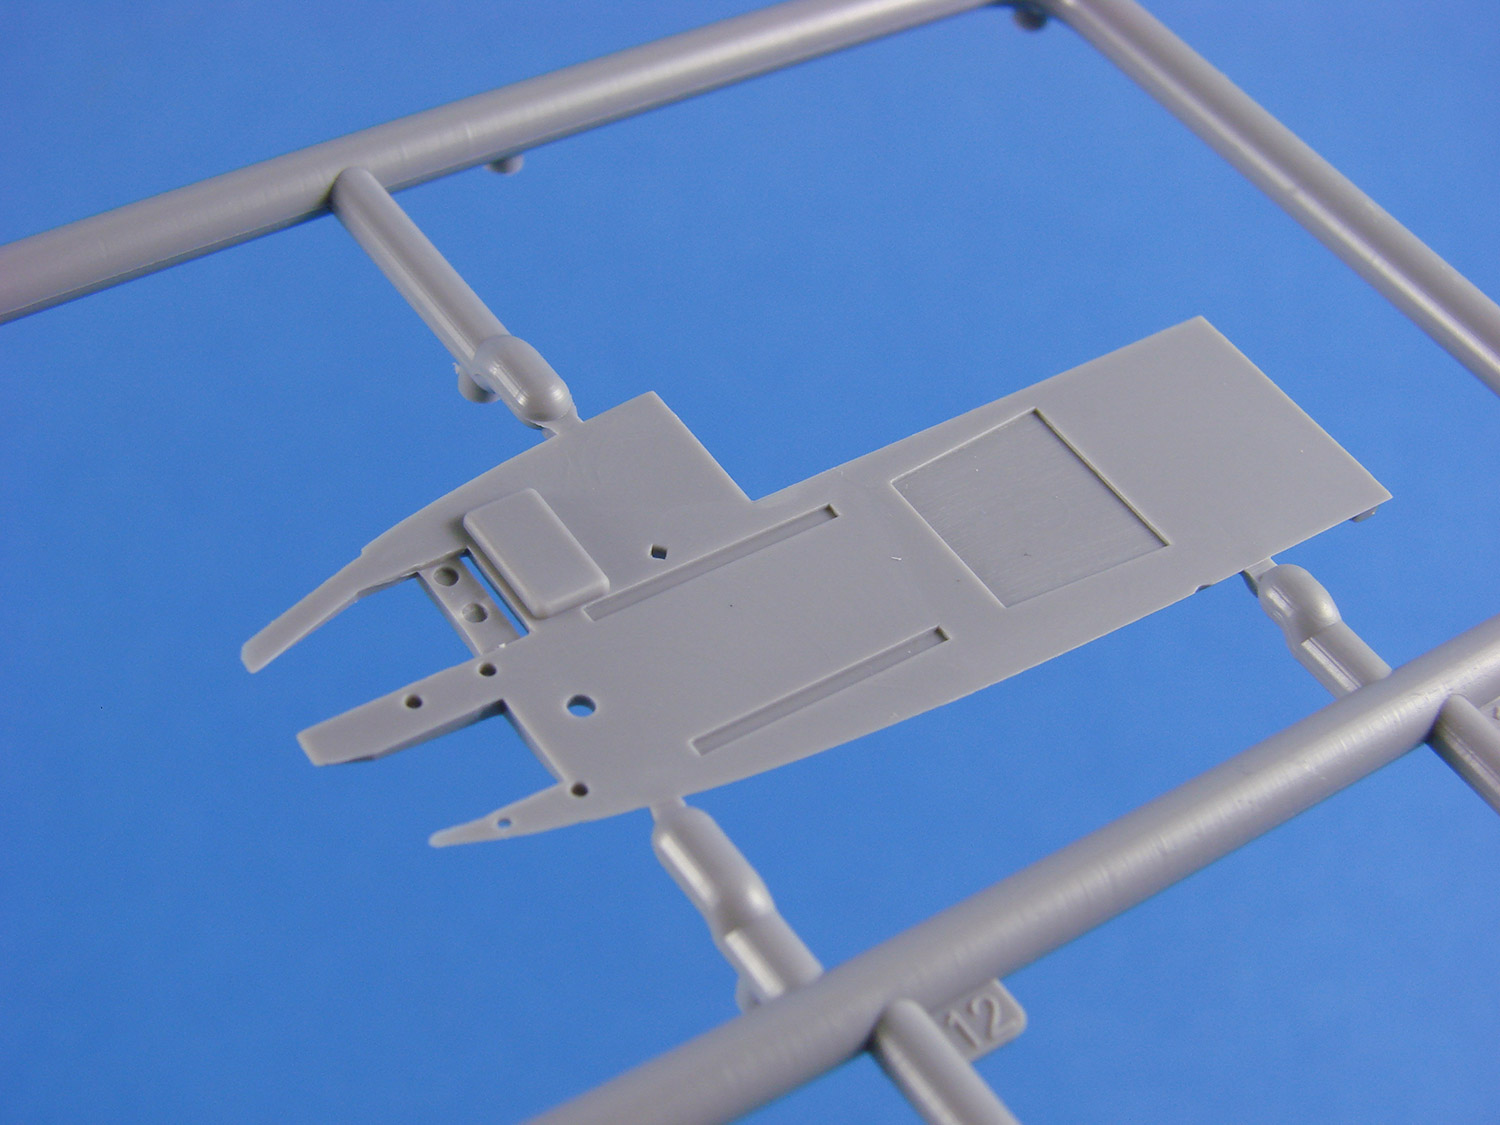
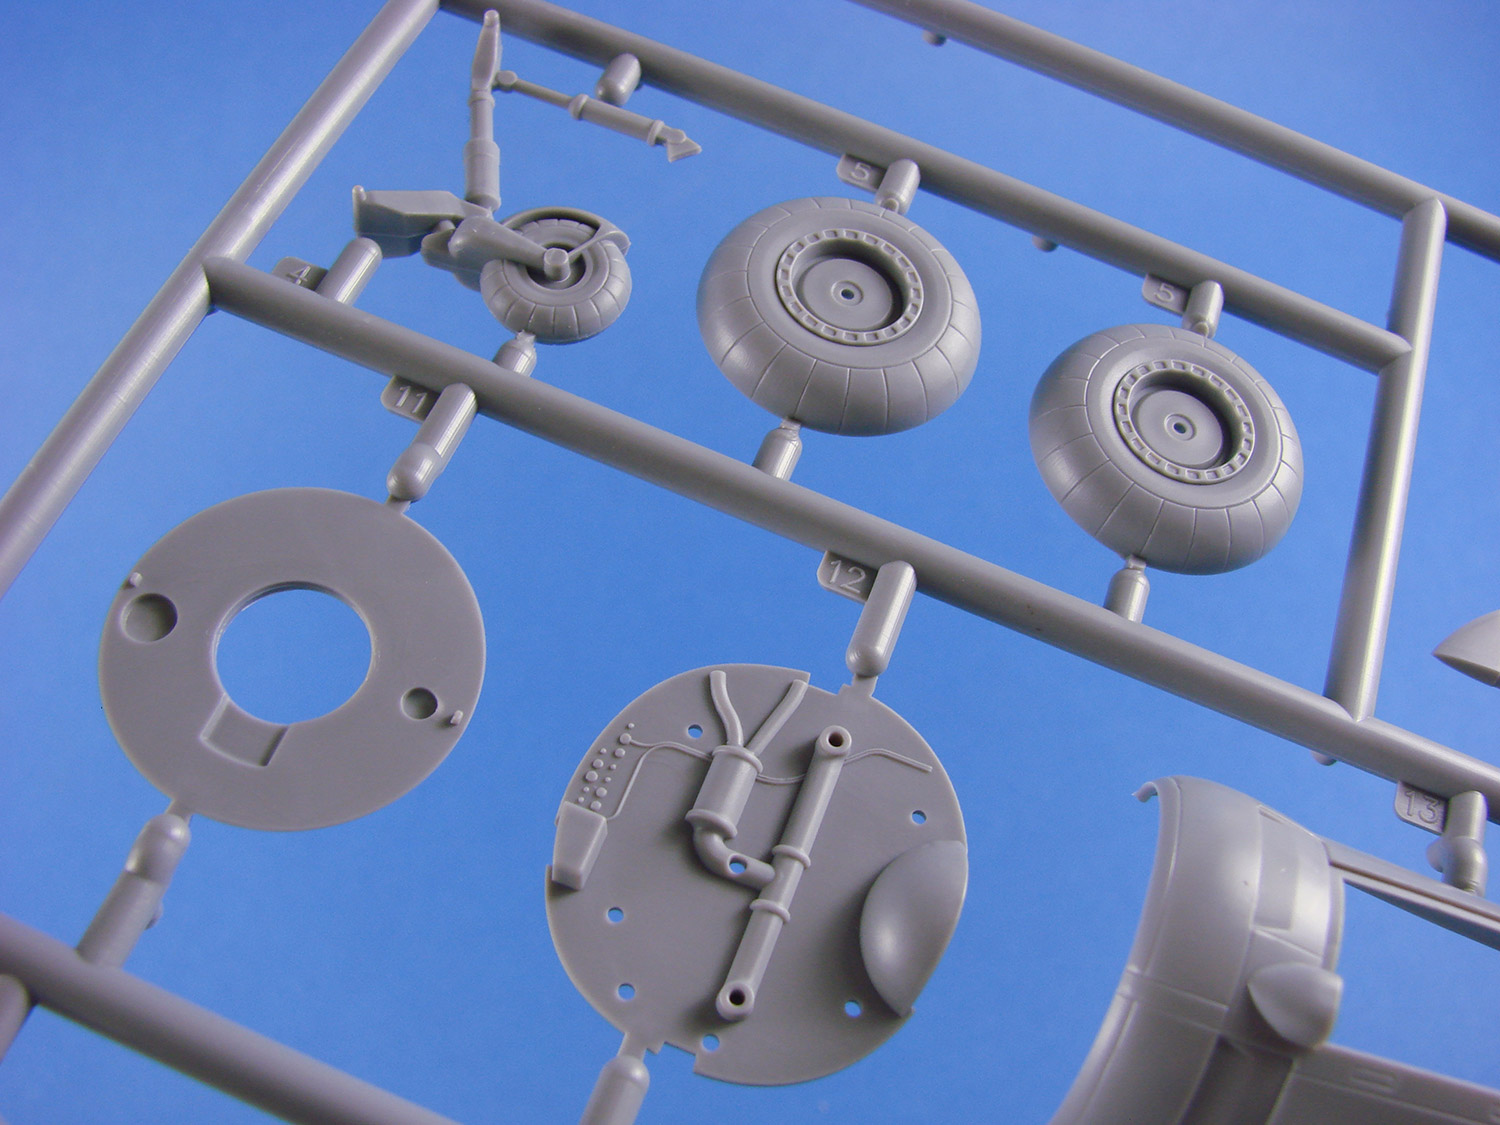
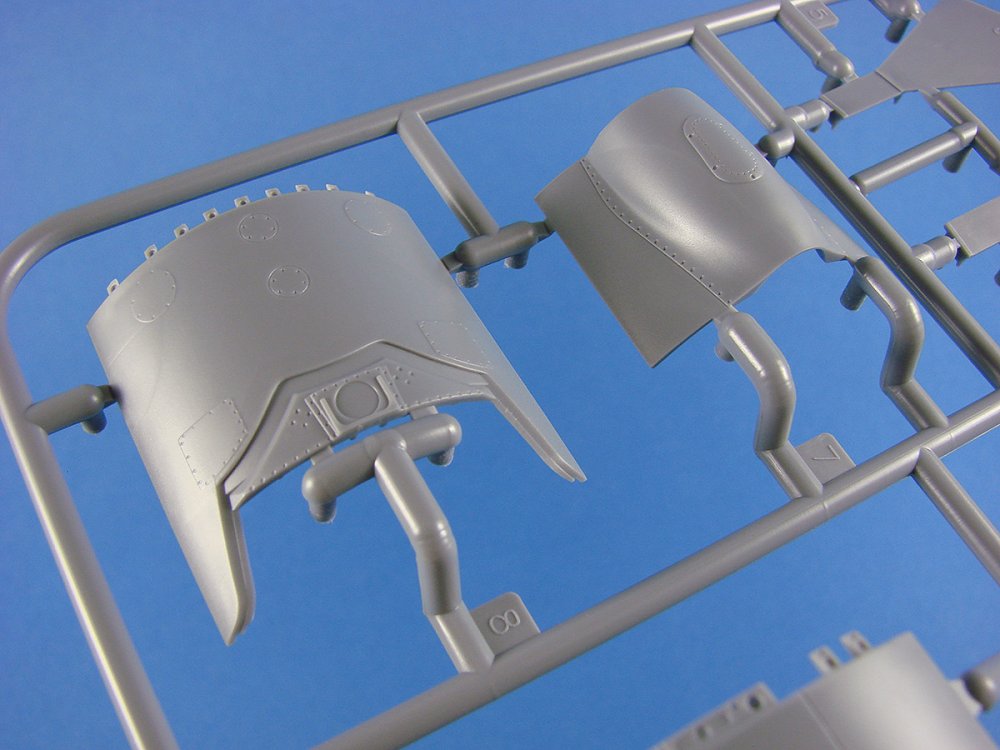
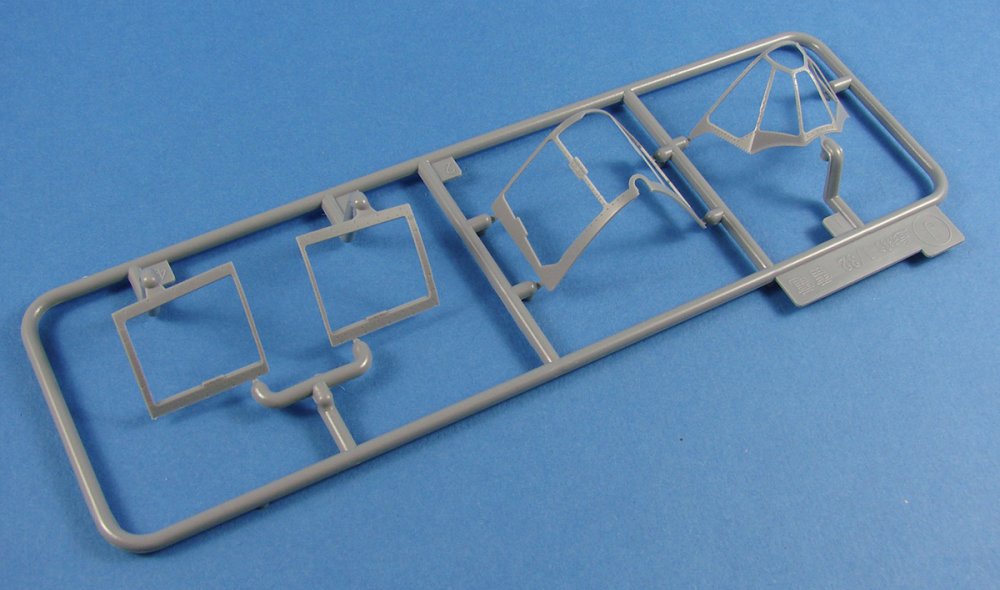
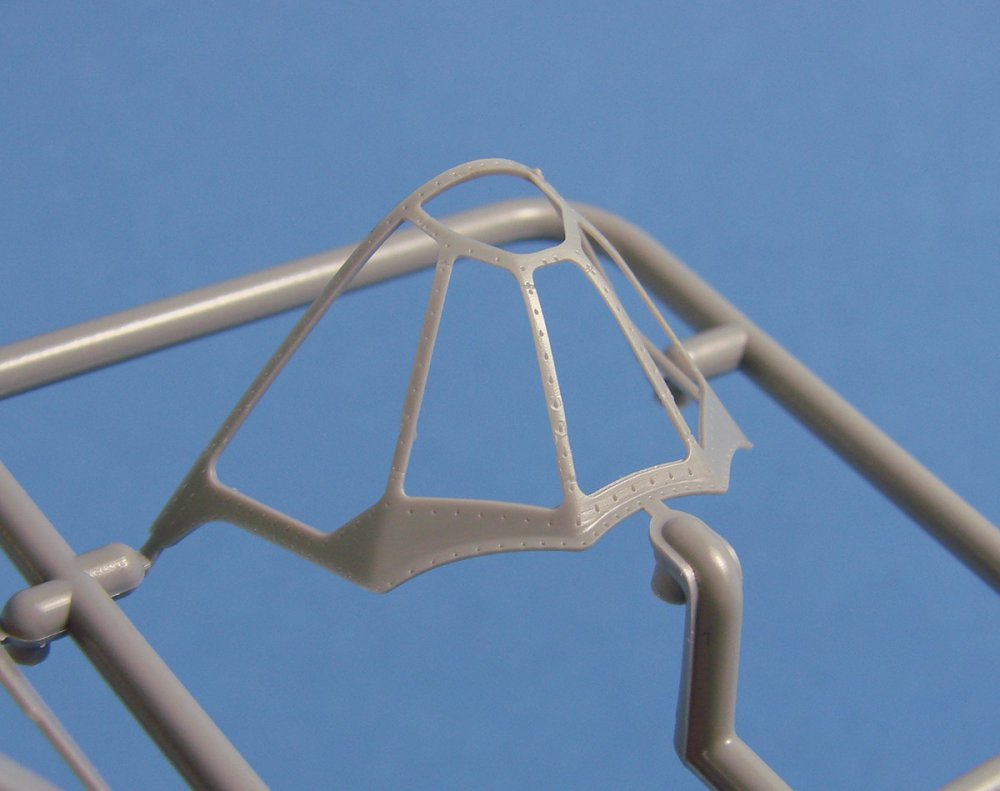
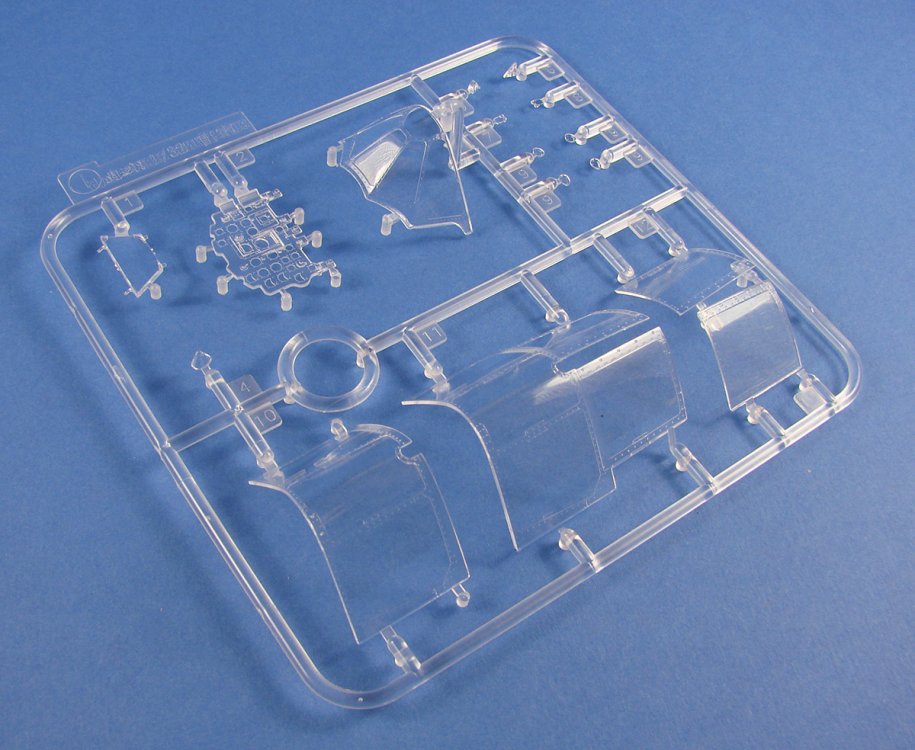
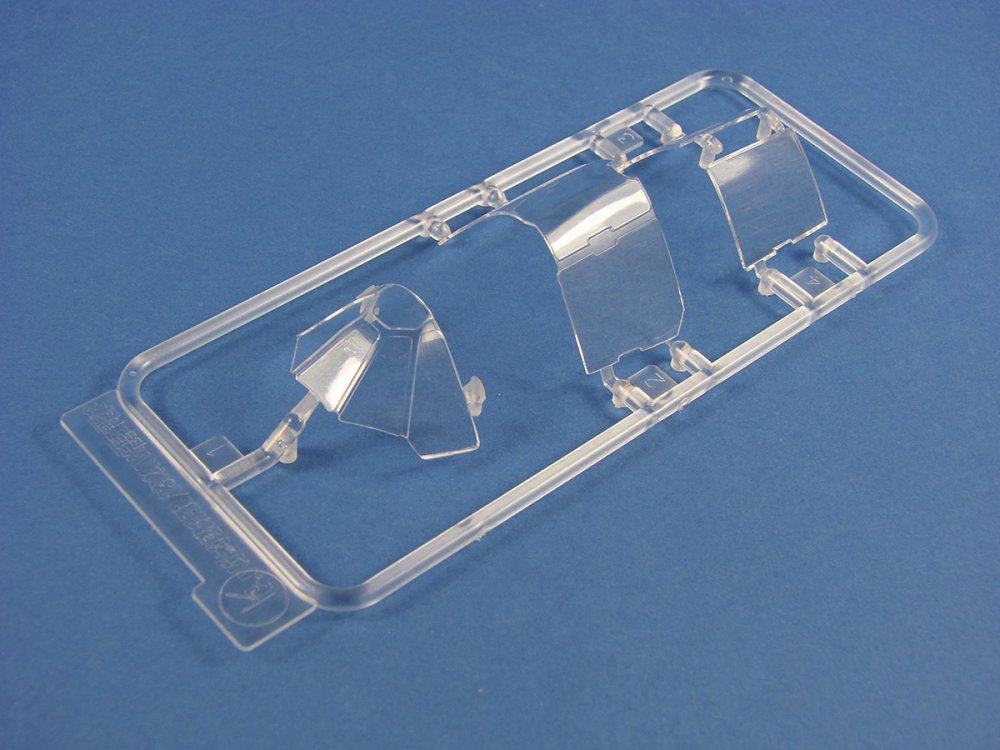
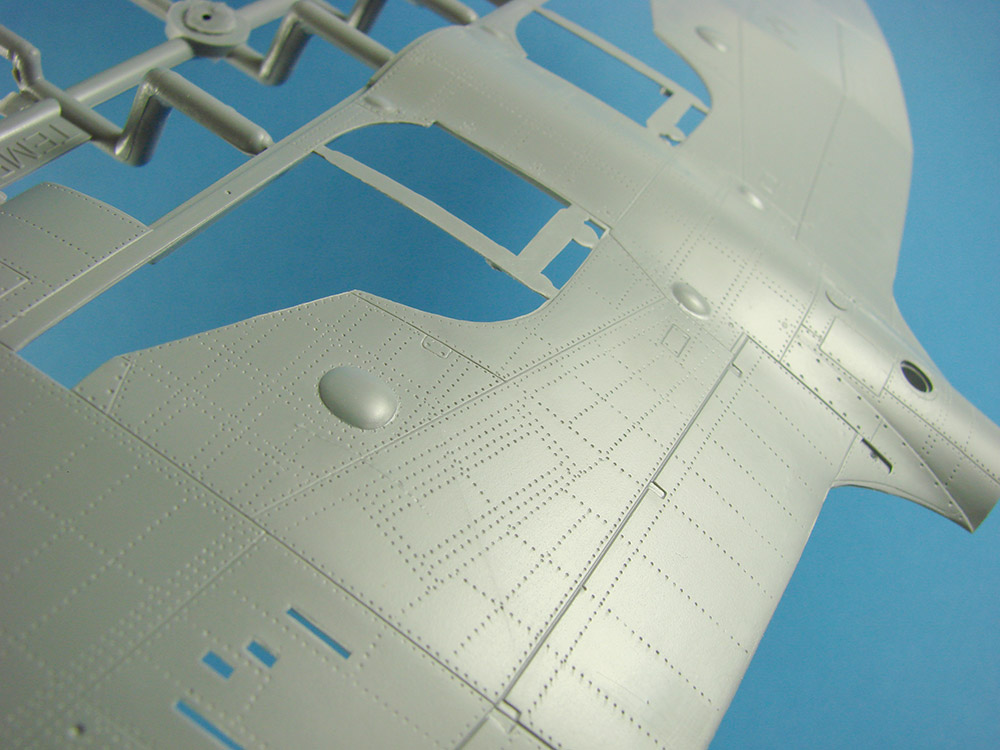
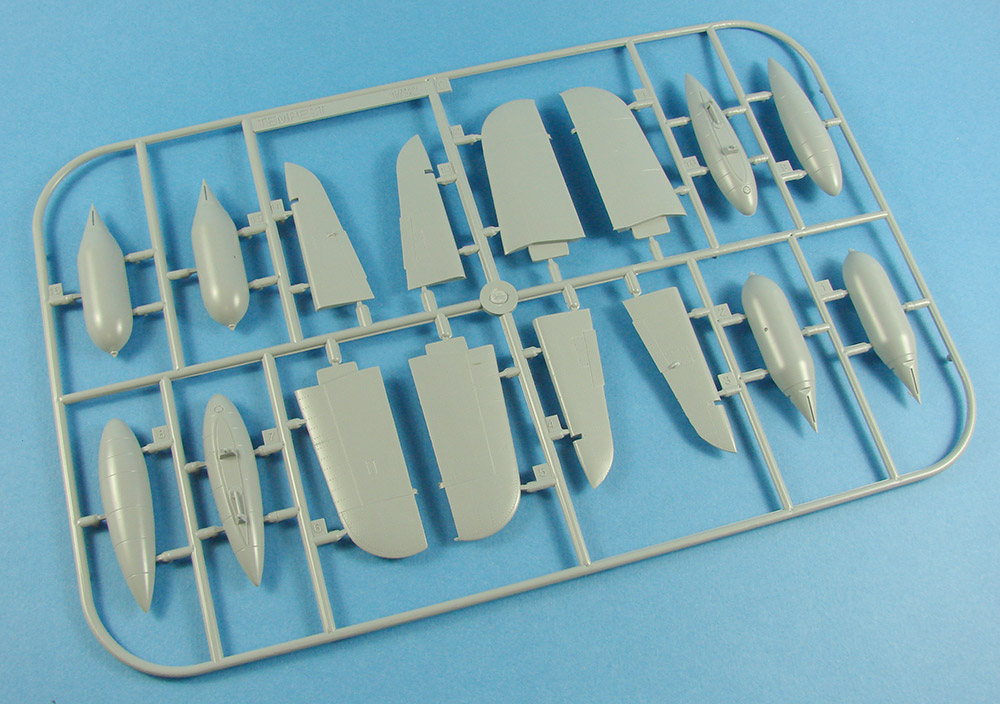
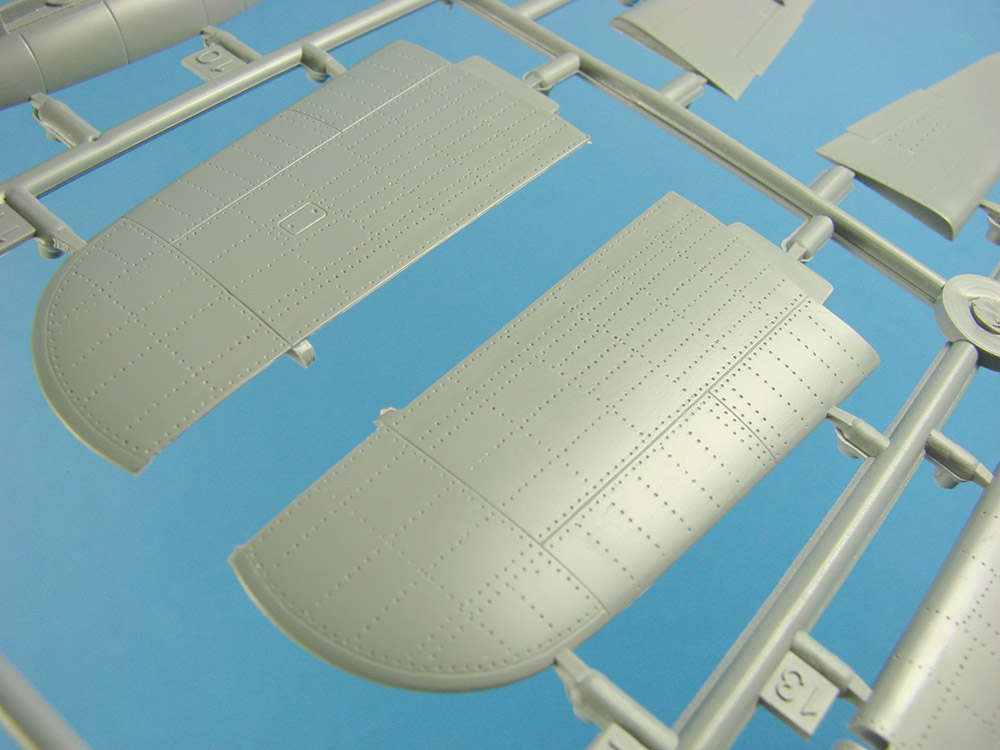
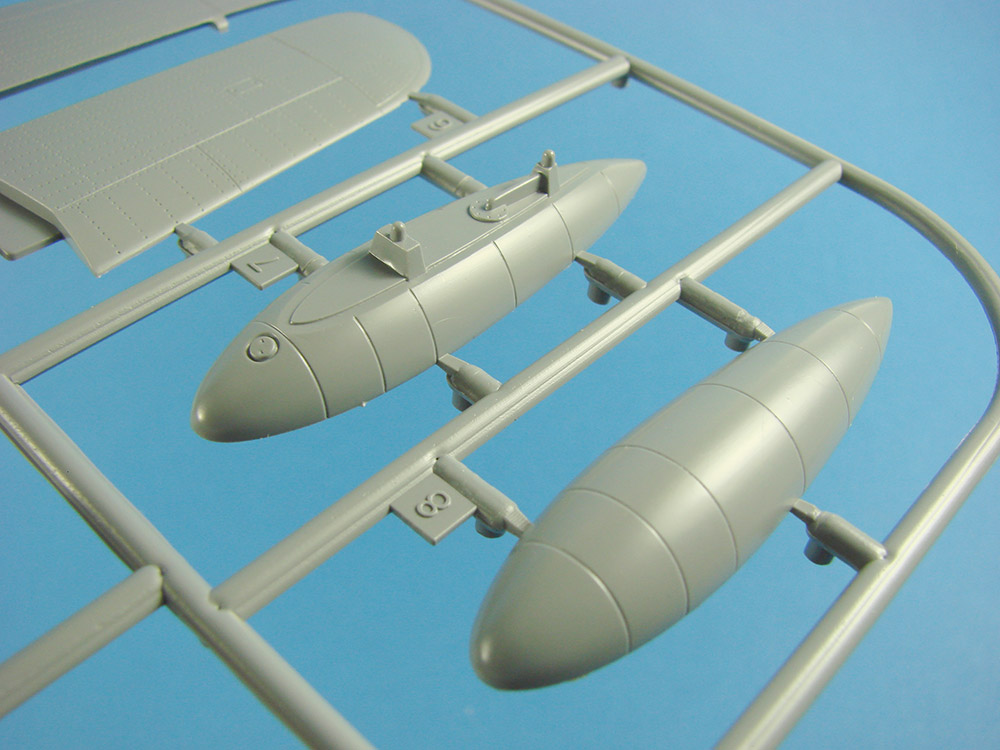
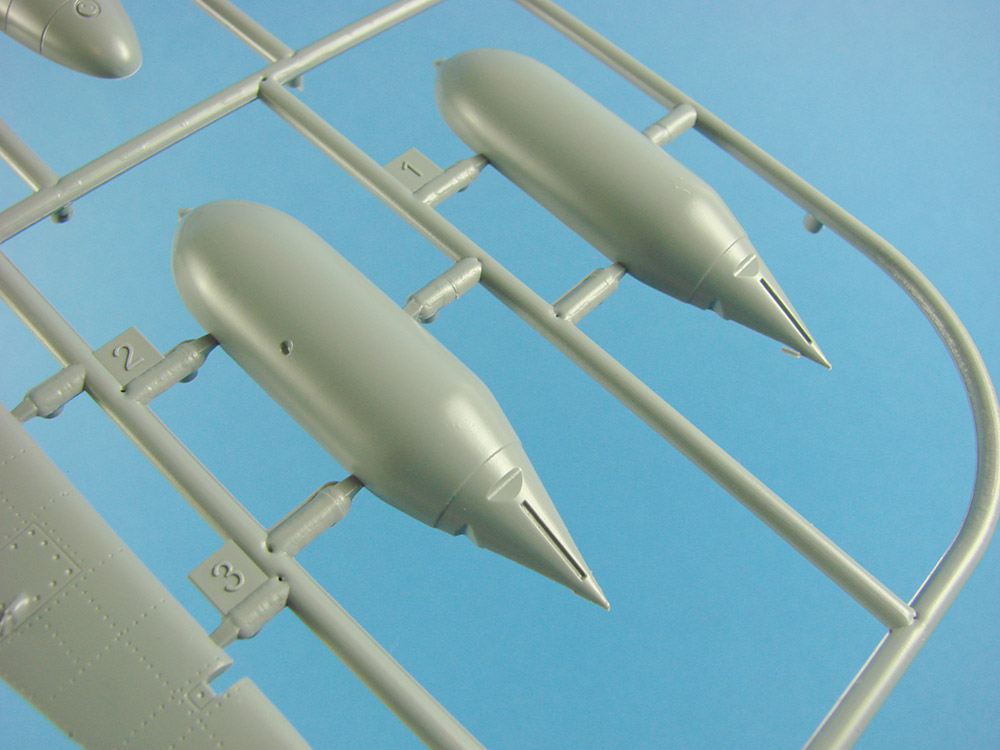
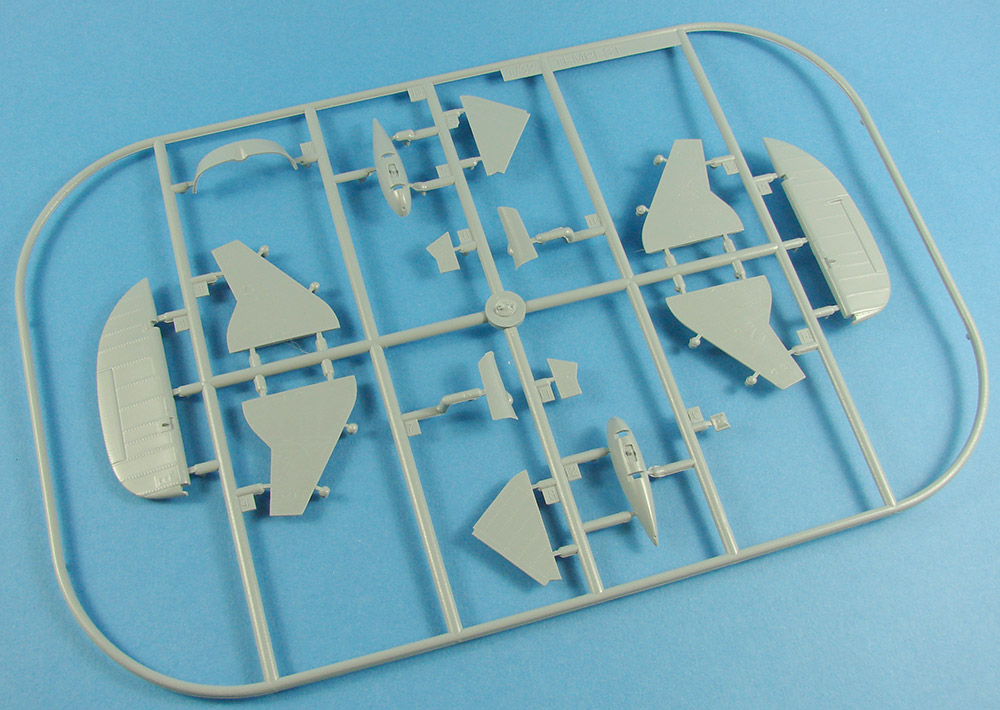
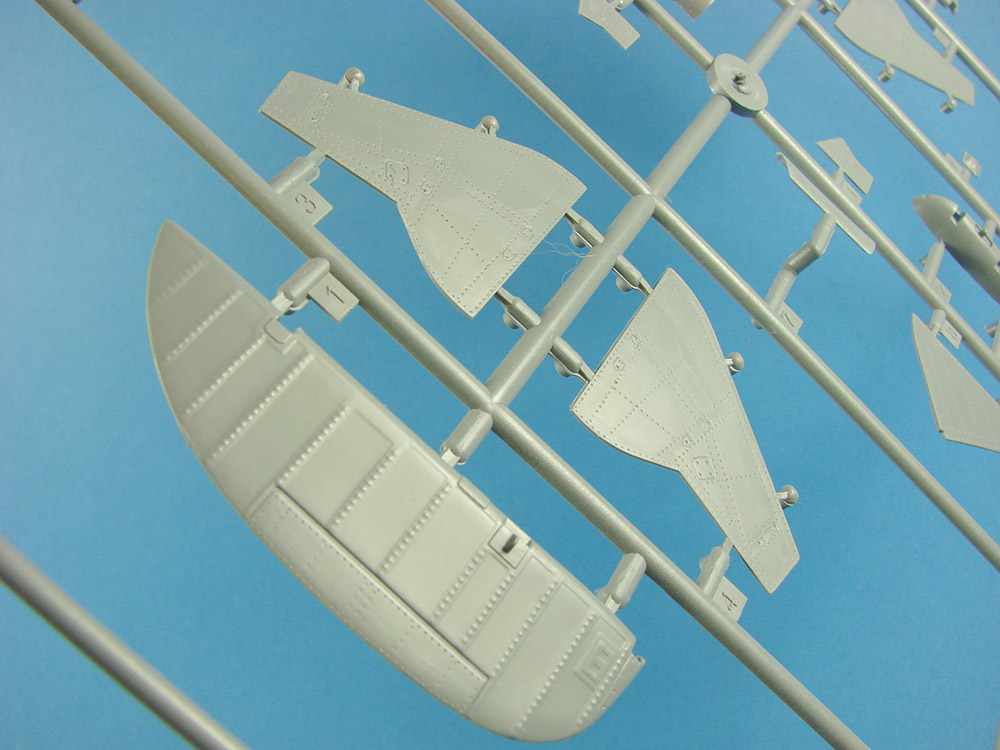
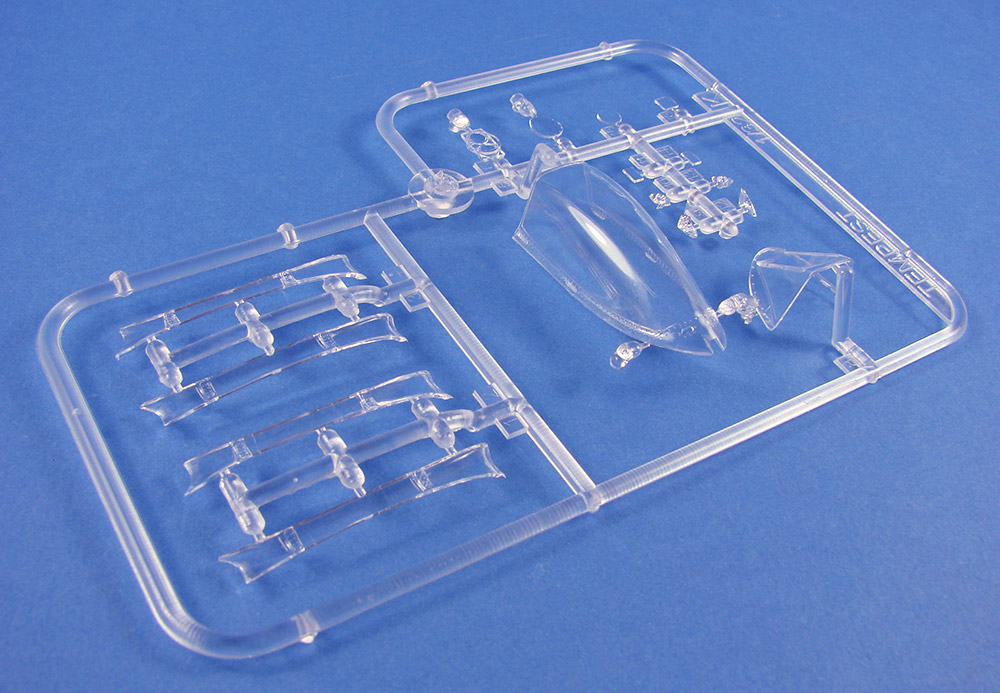
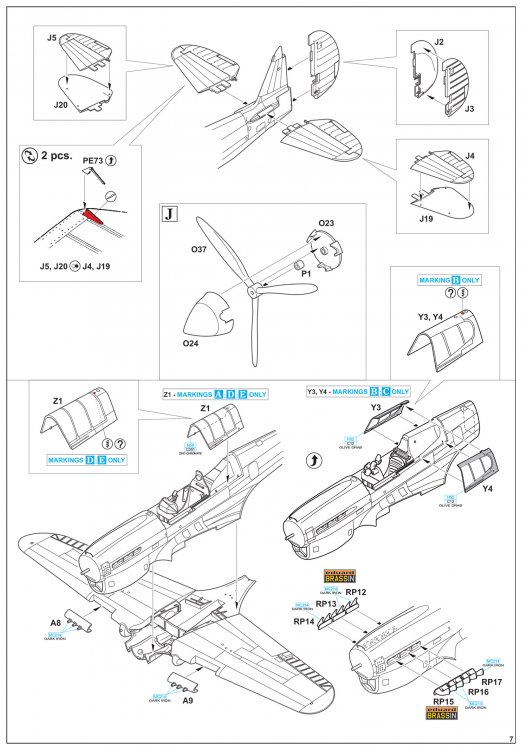
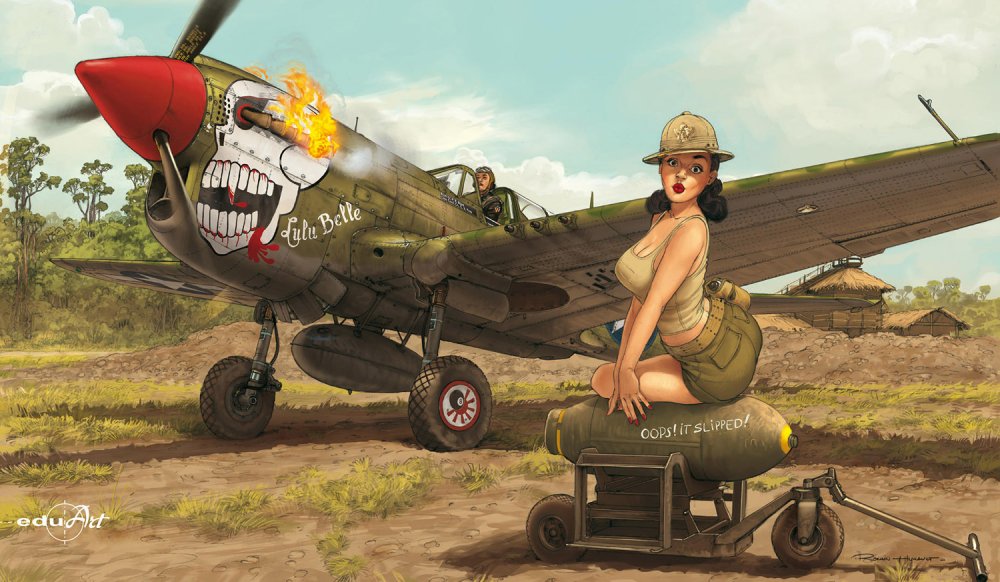
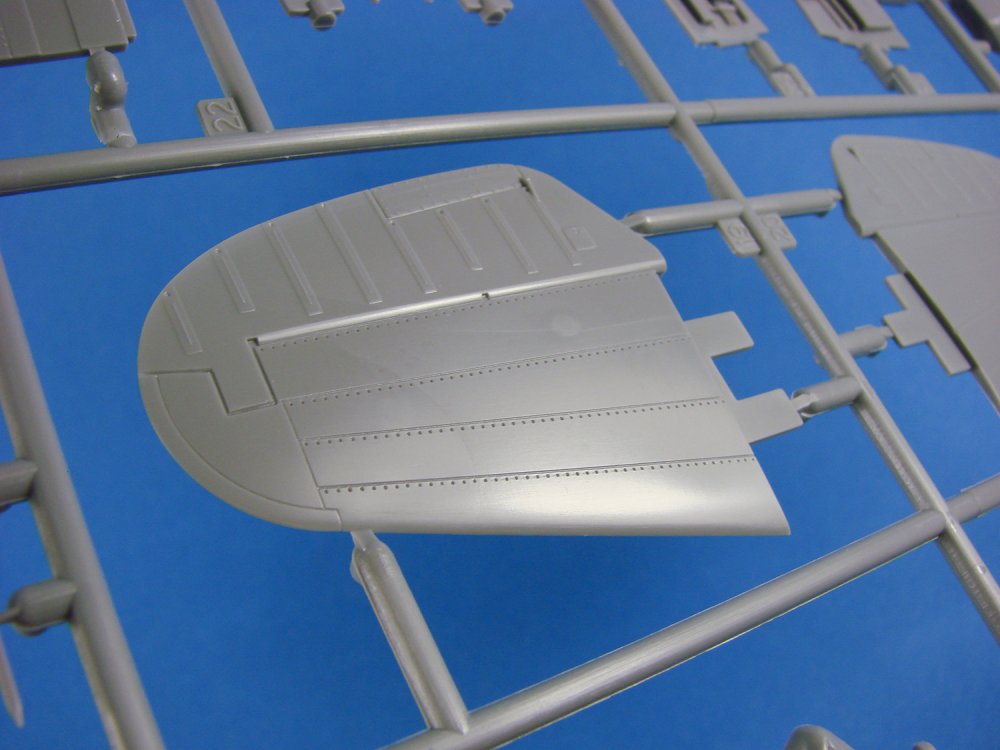
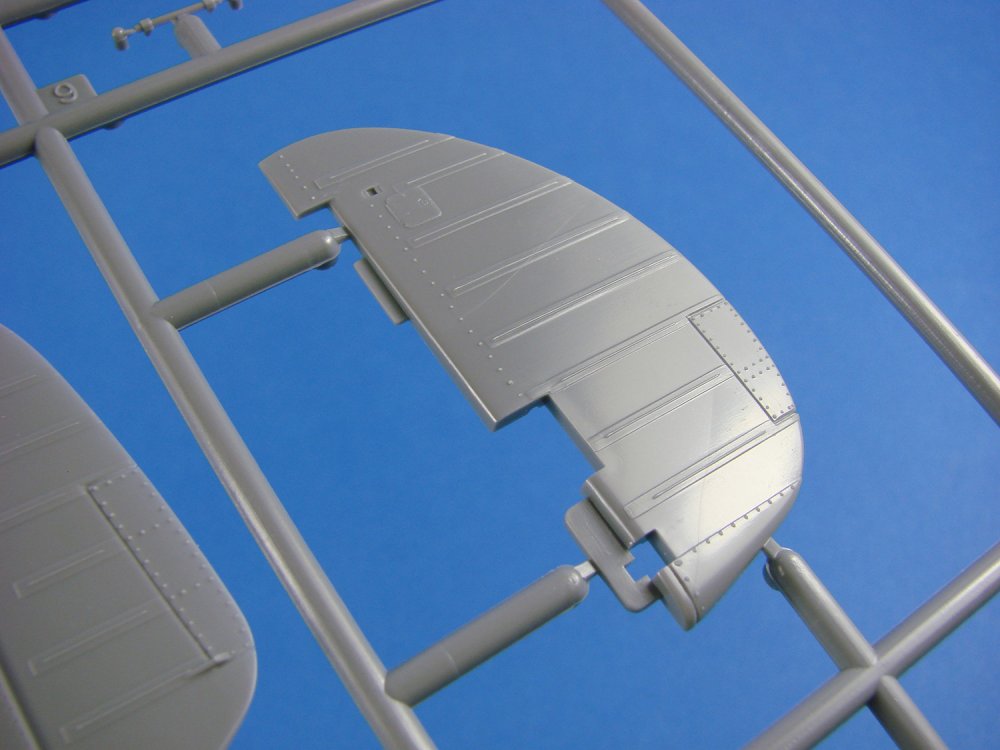
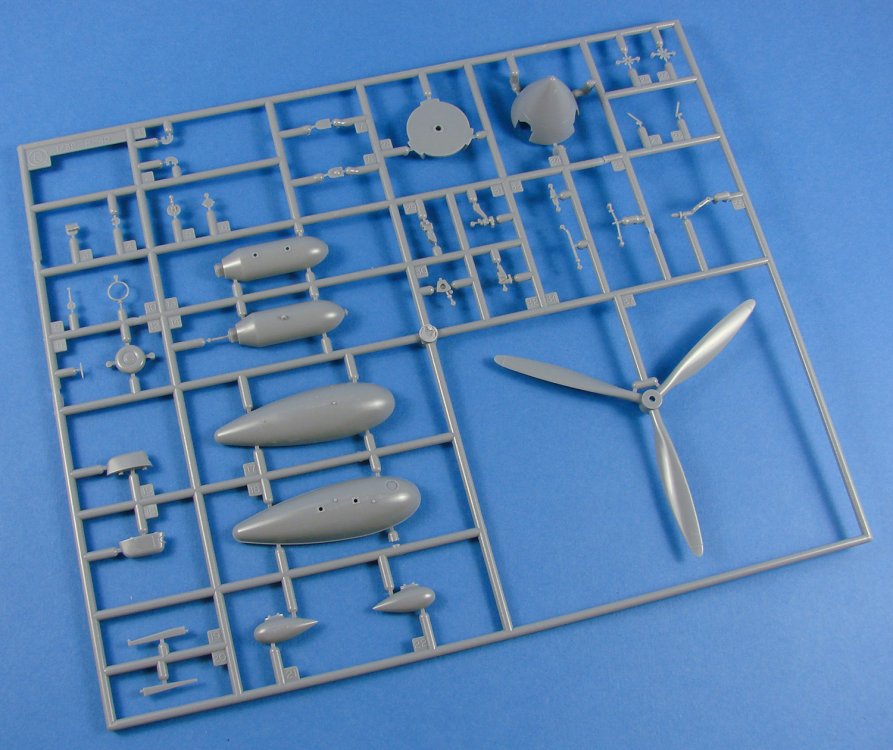
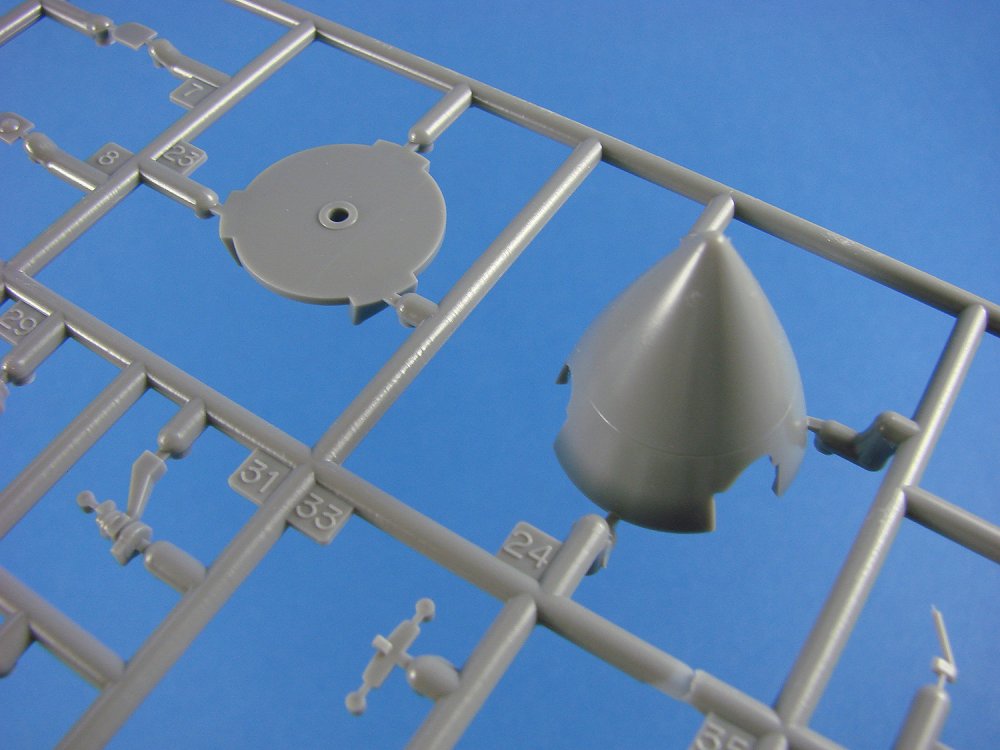
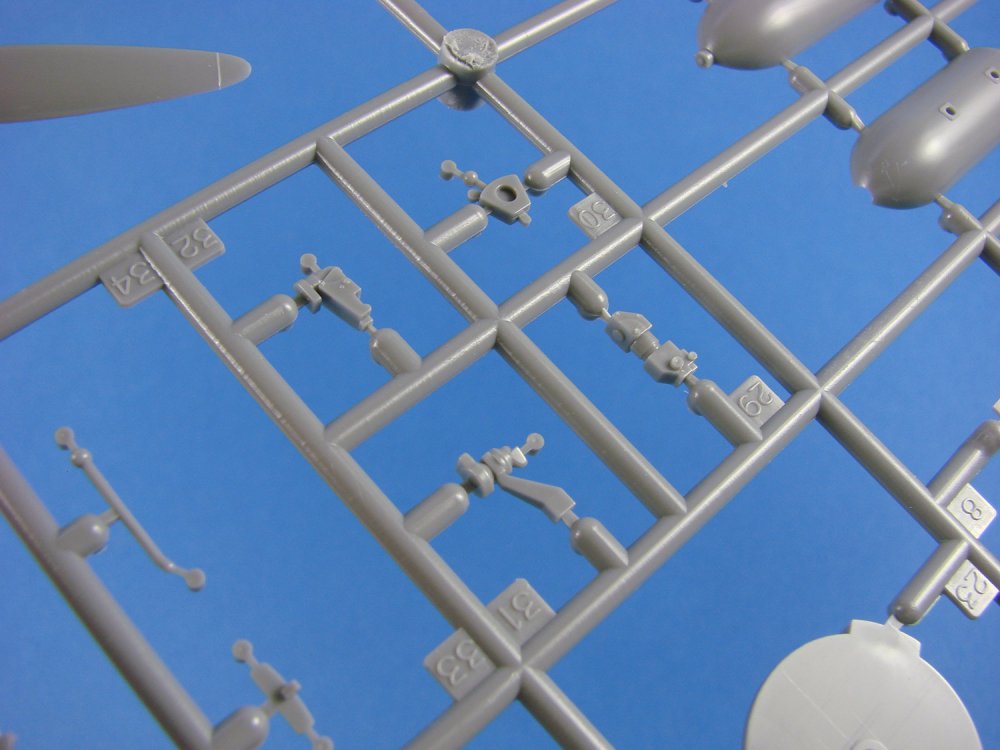
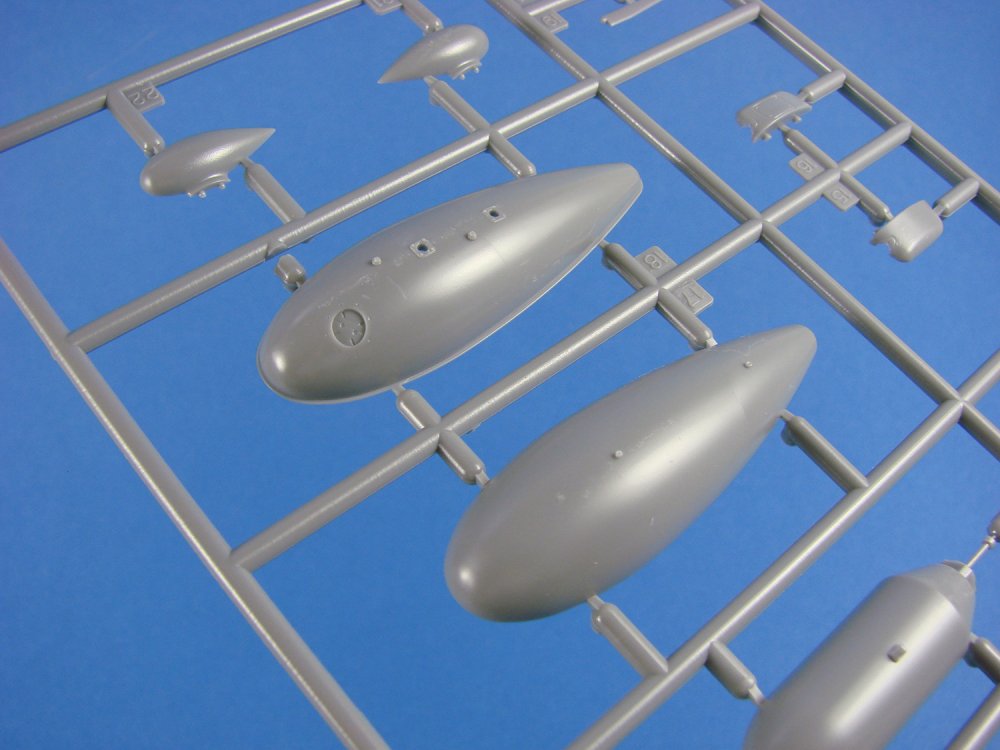
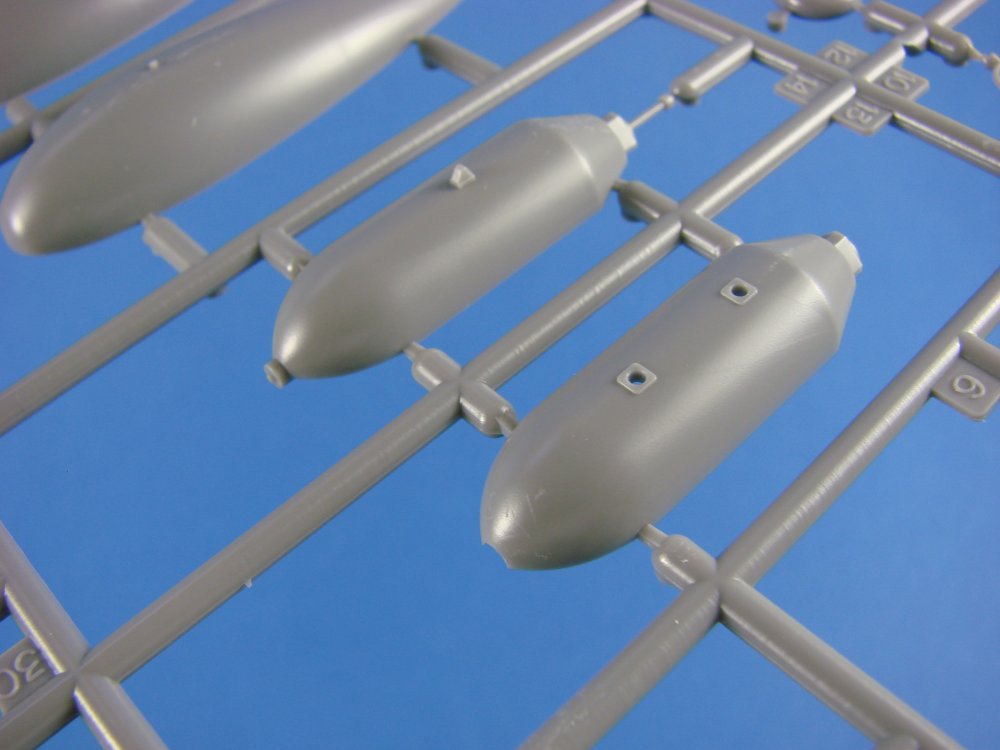
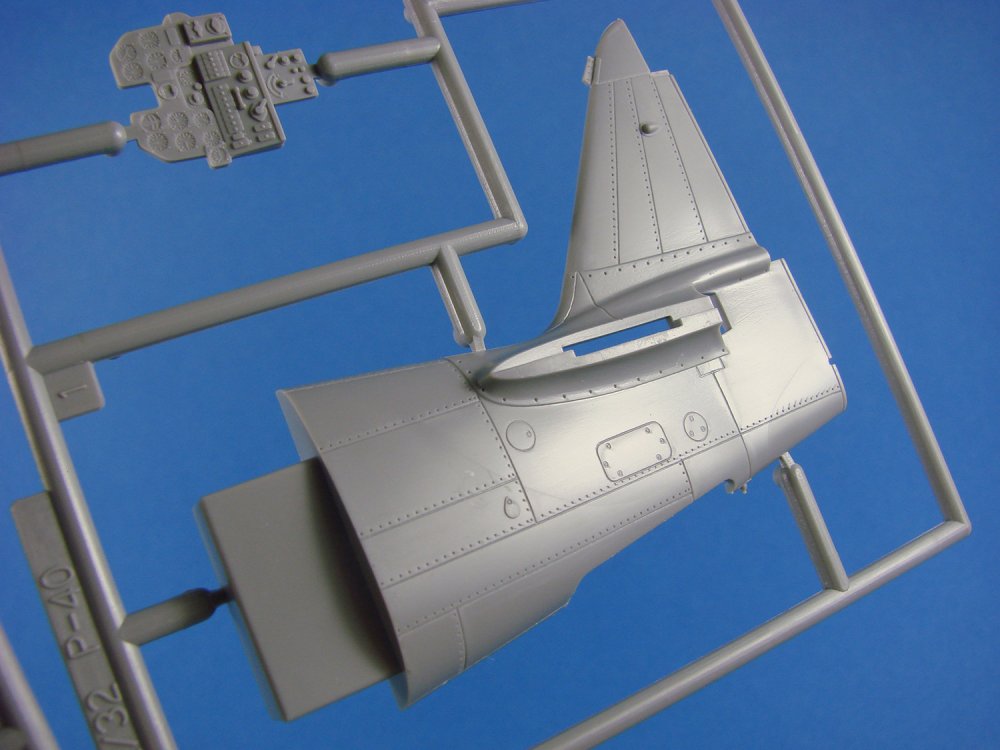
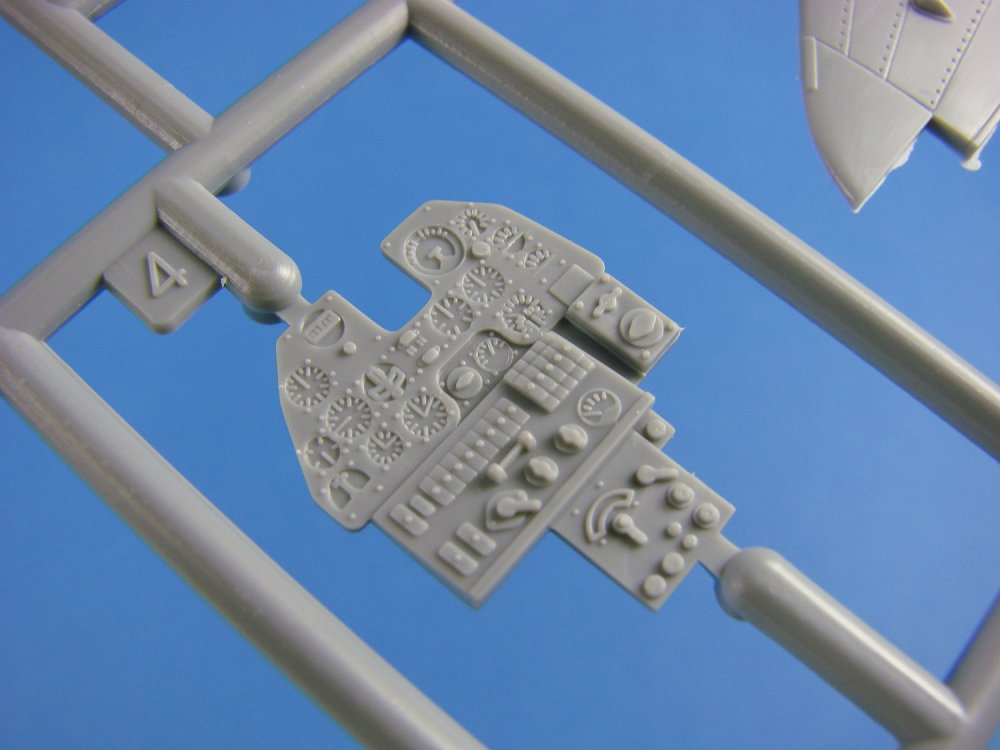
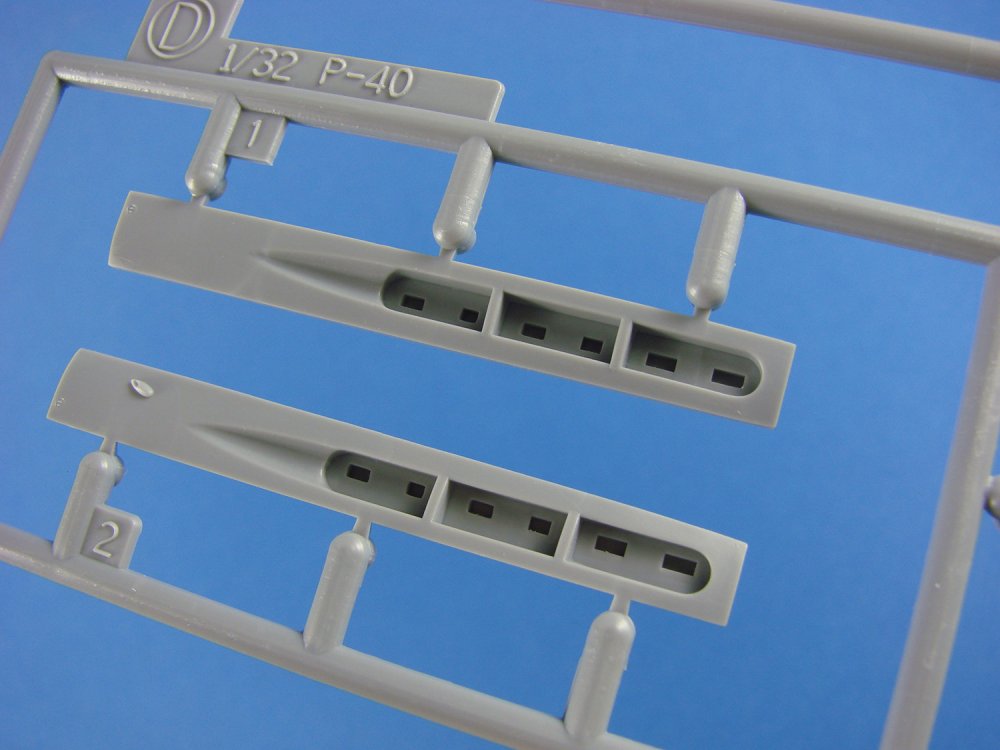
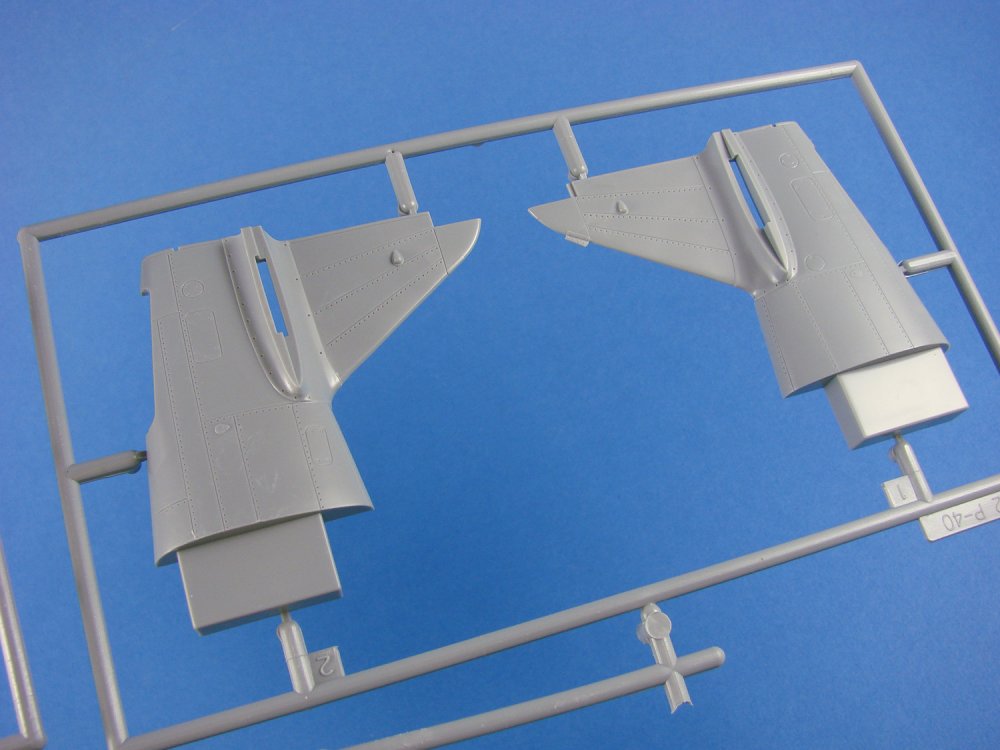
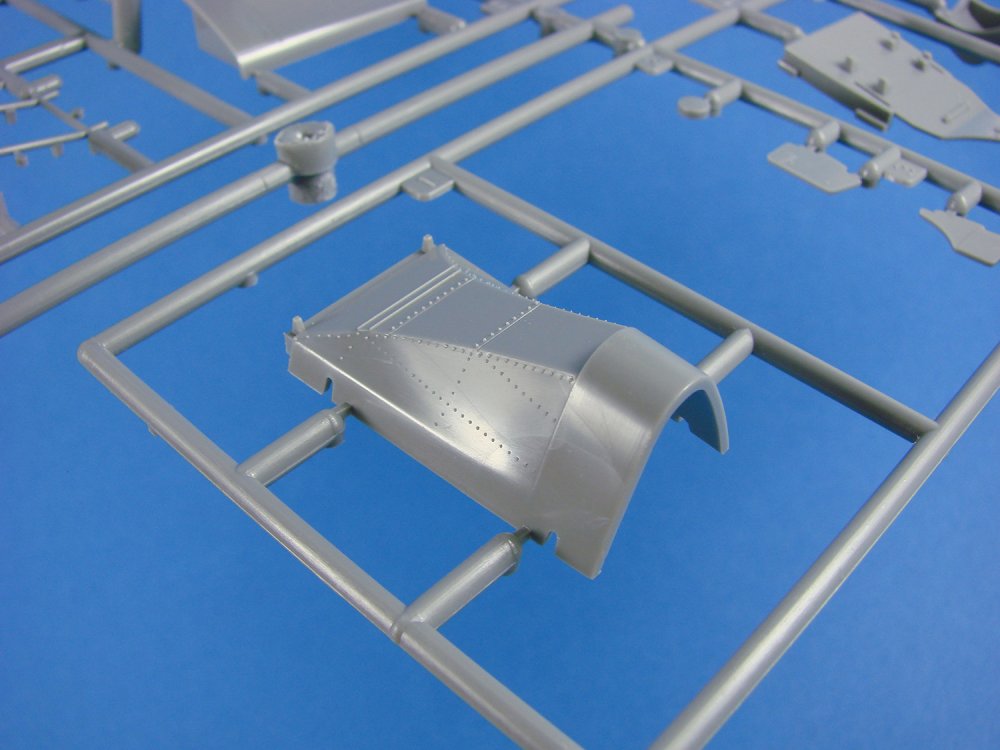
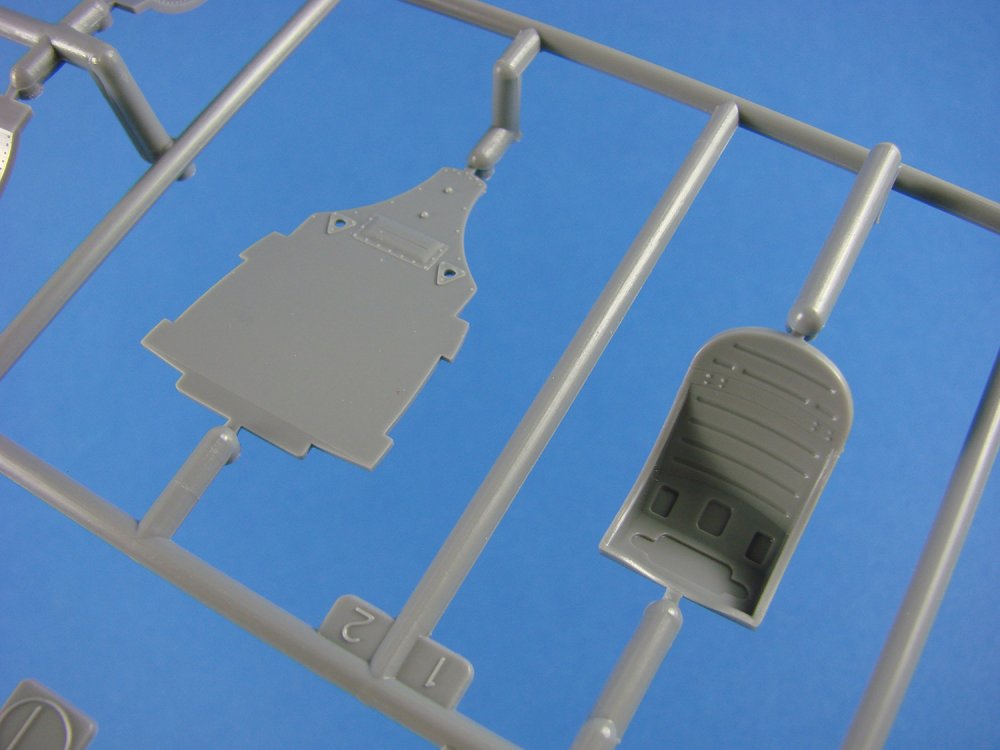
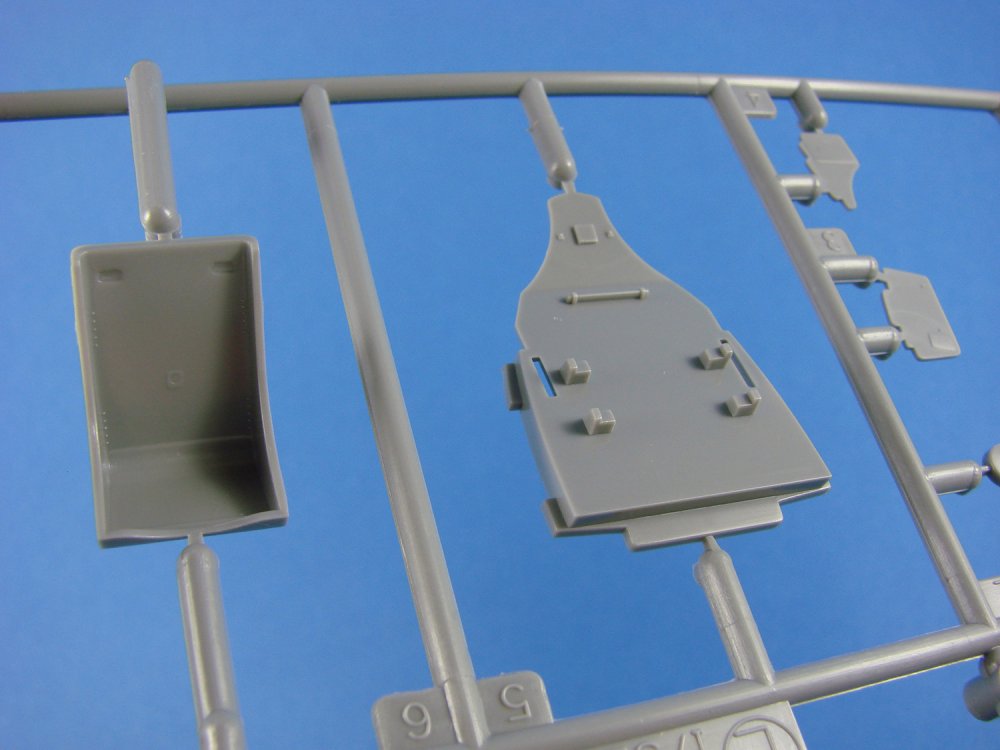
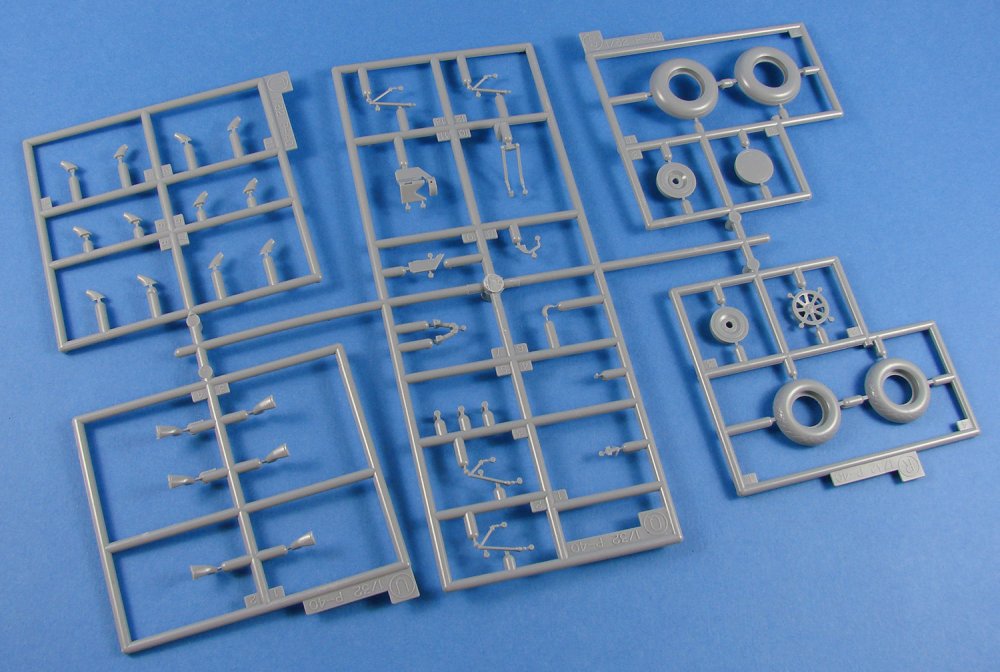
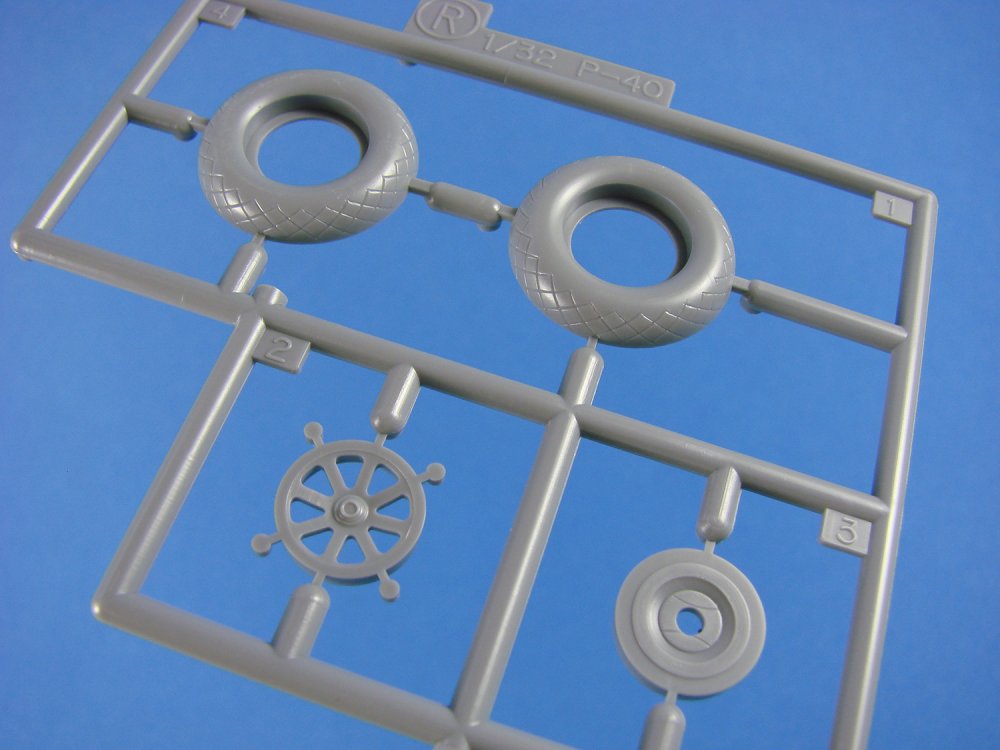
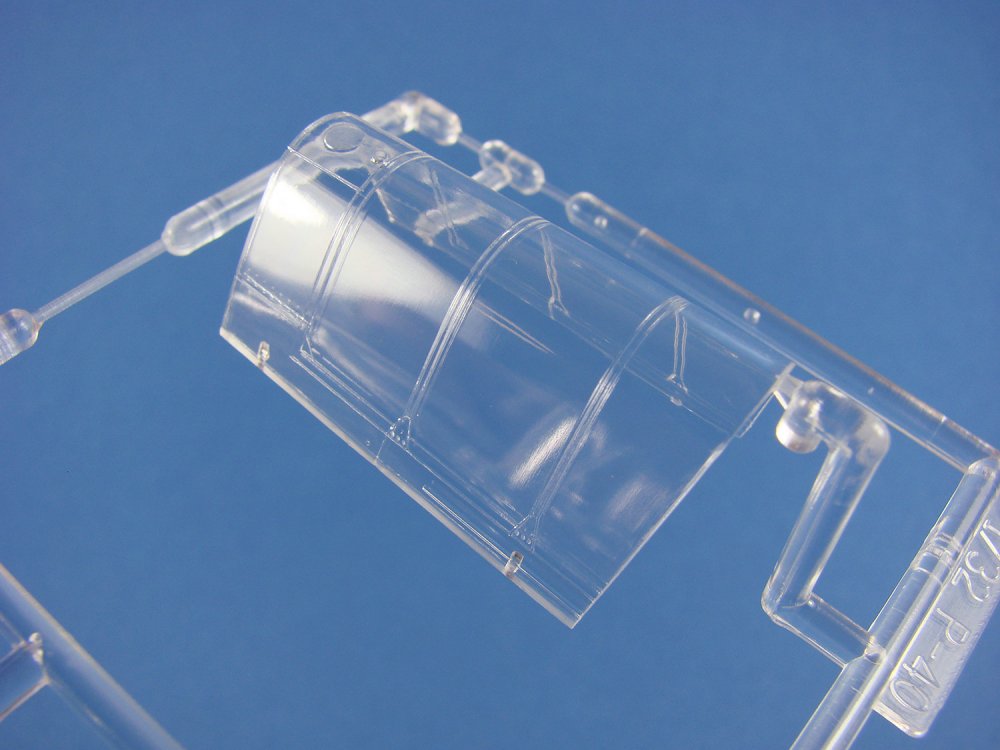
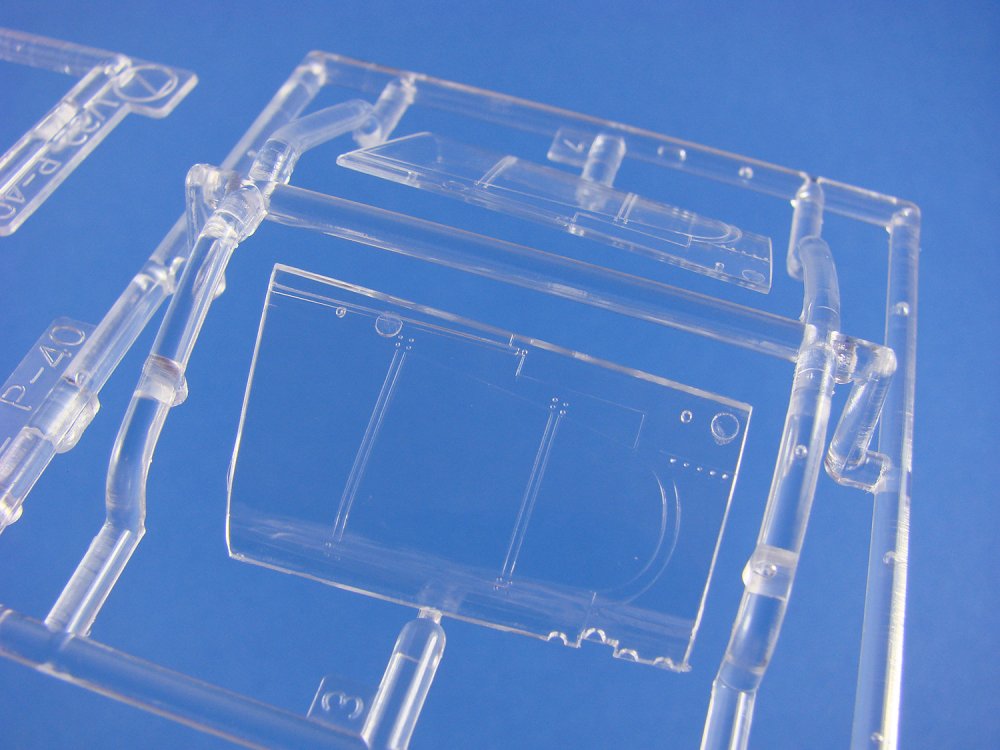
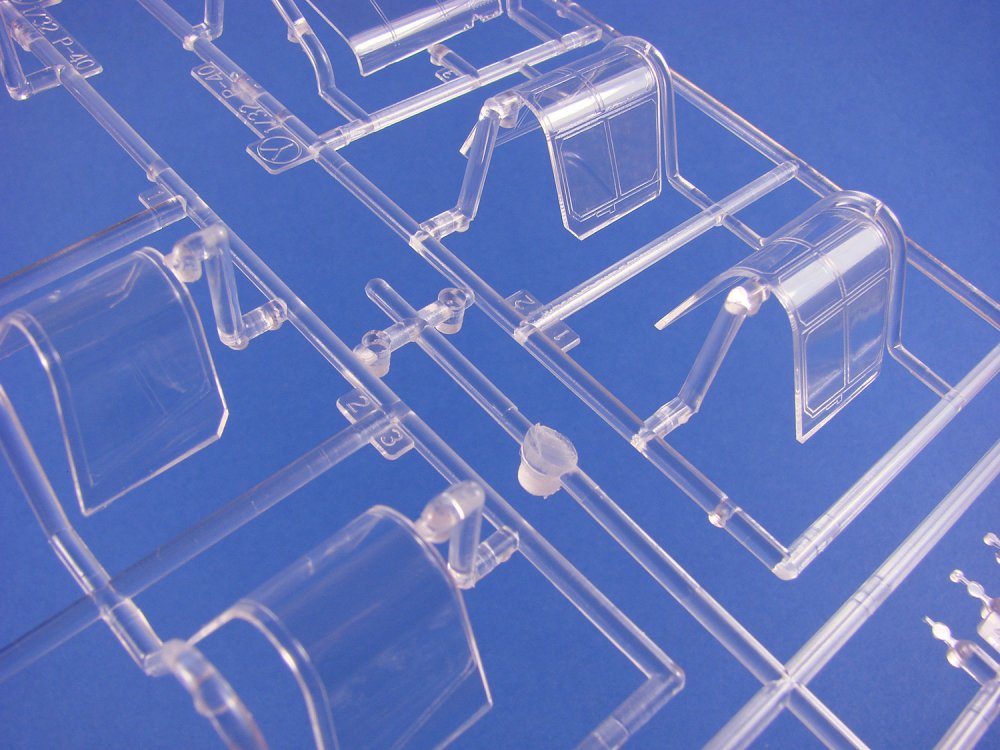
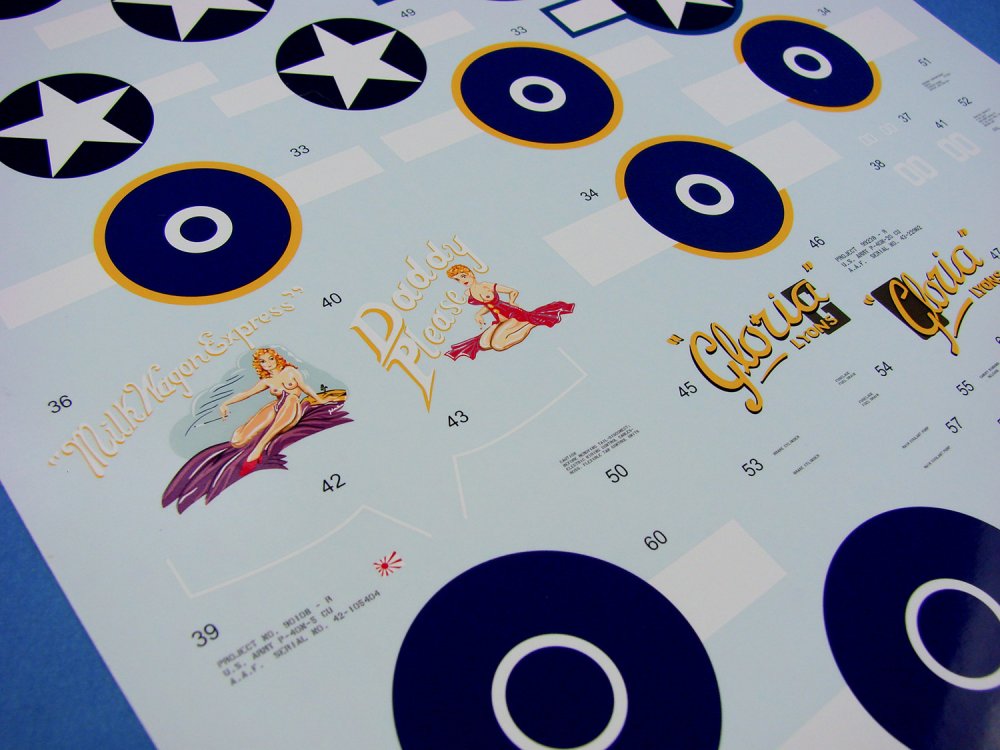
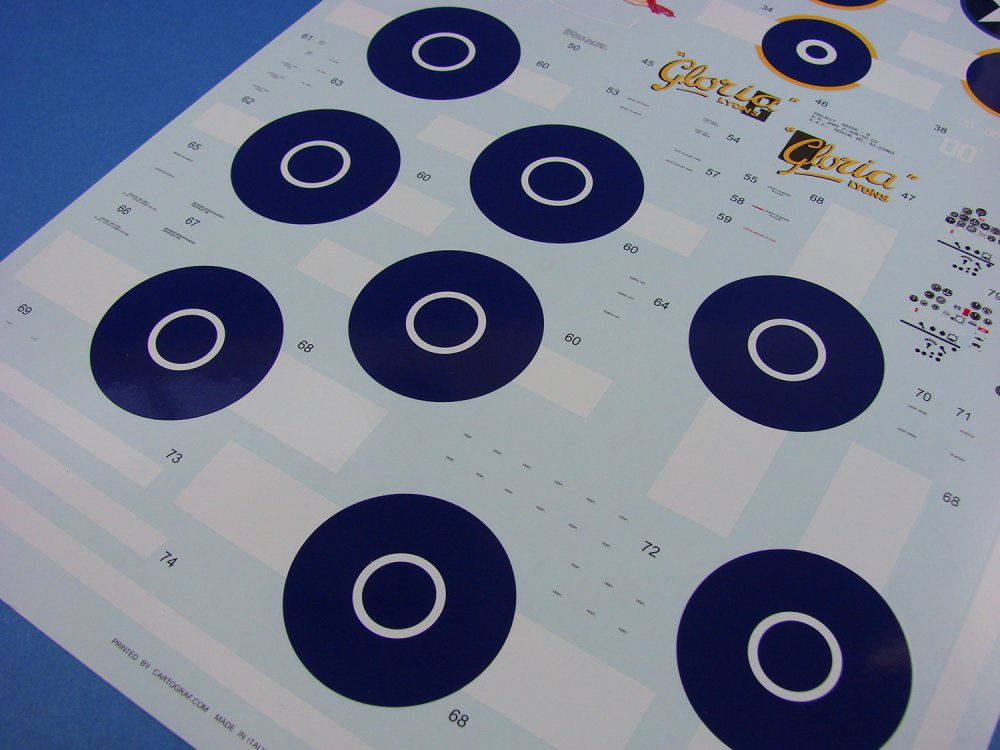
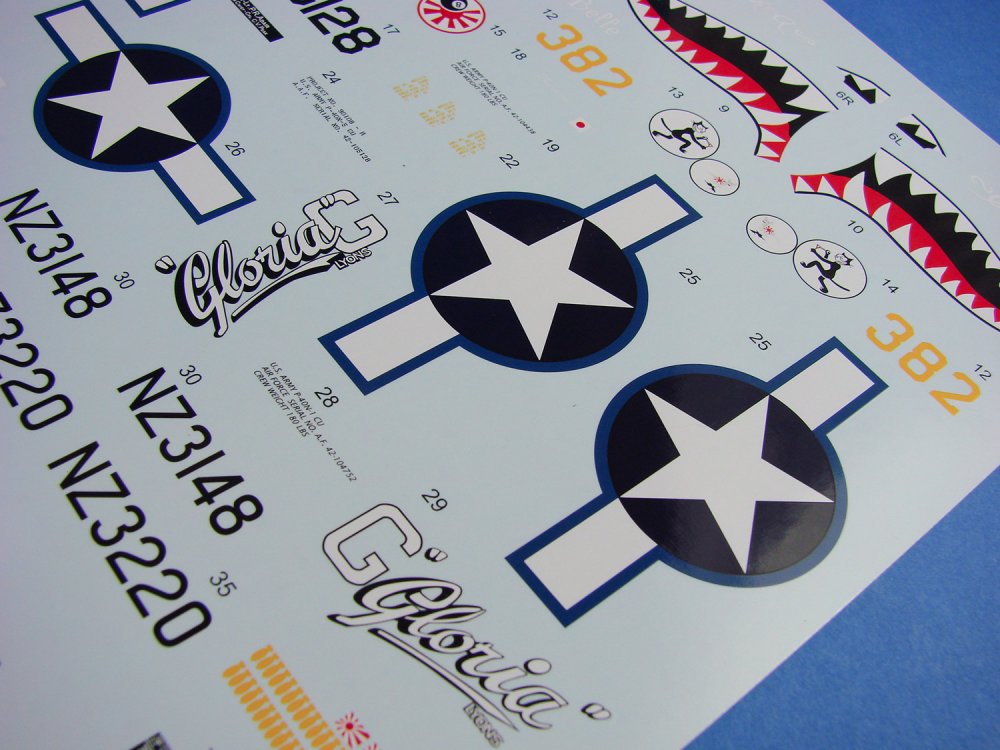
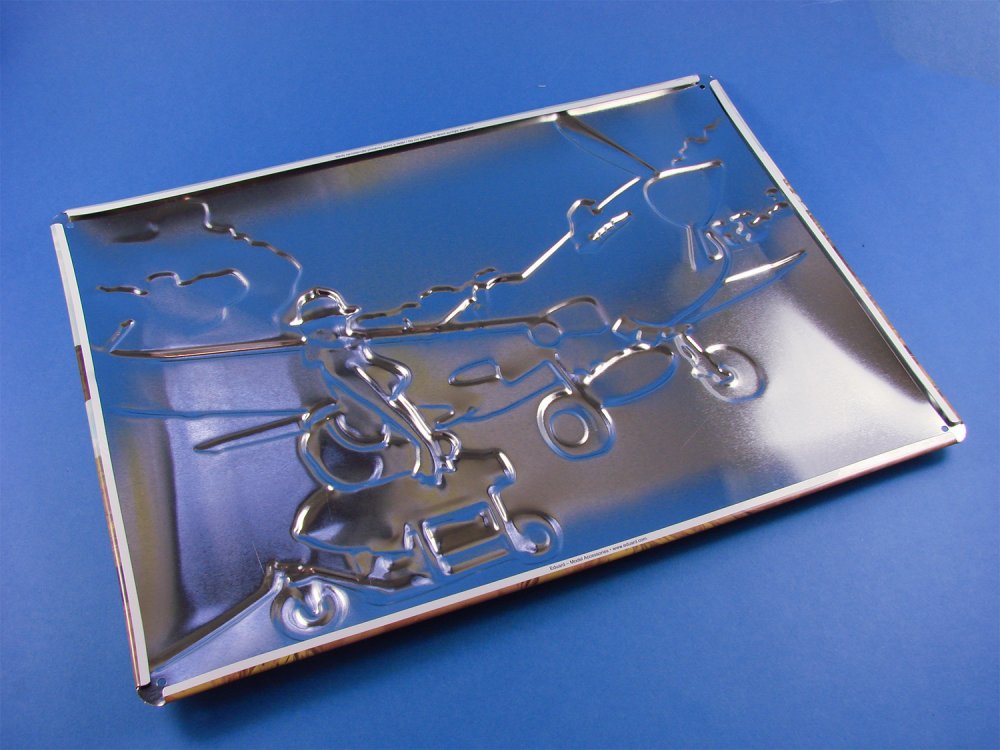
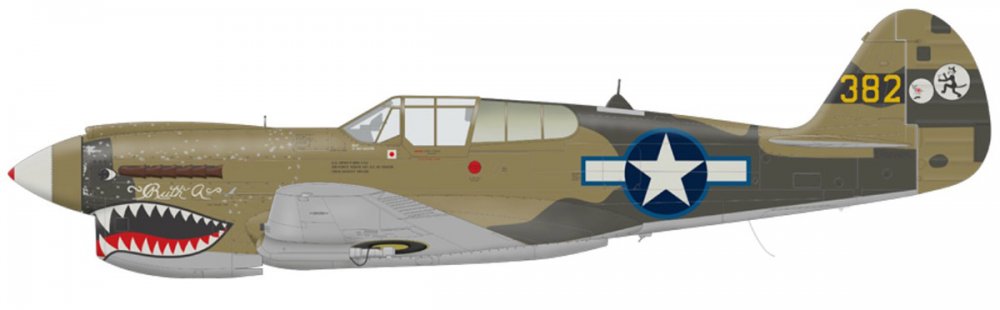
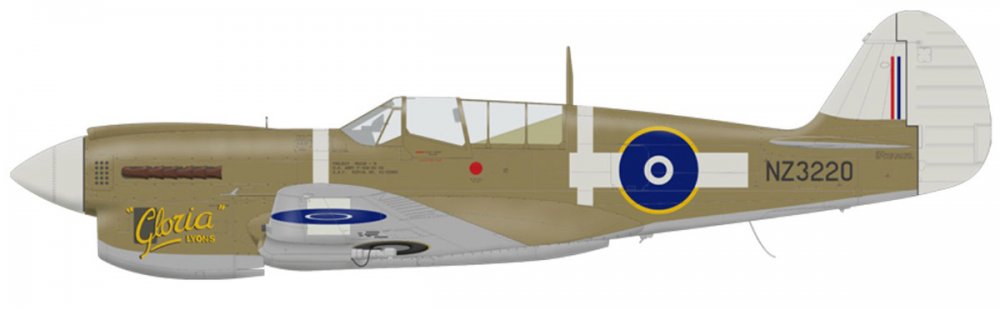
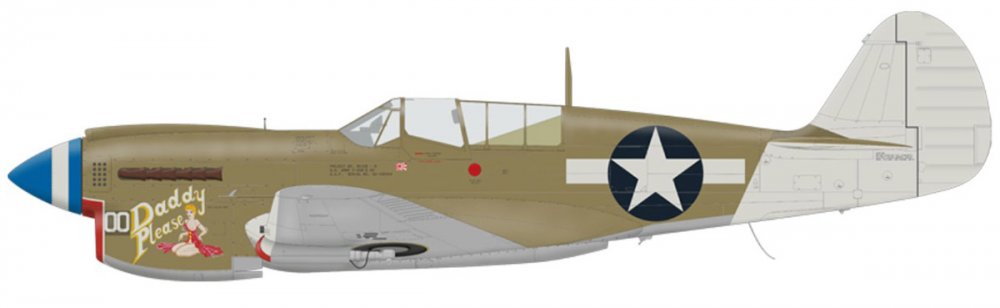
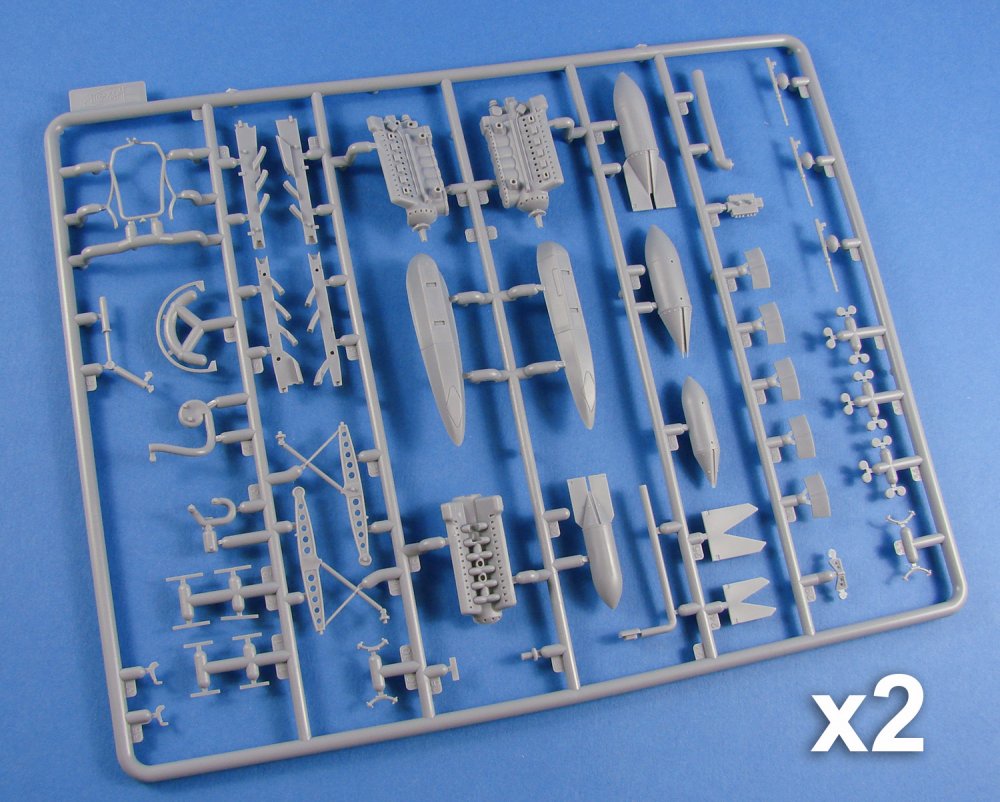
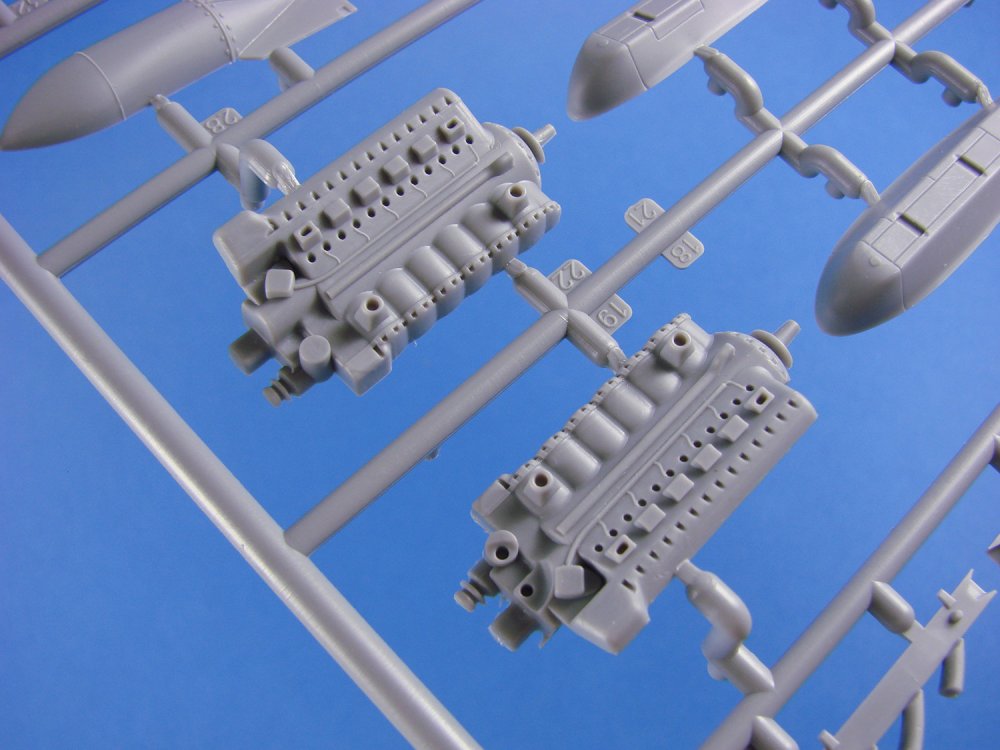
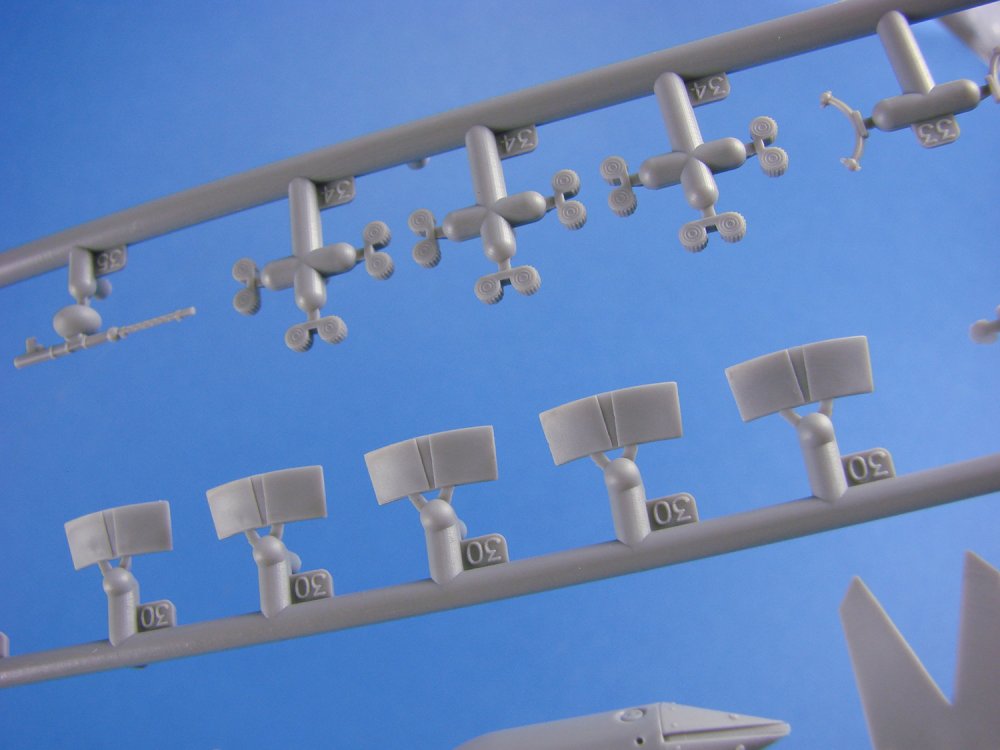
1/32 Warhawk ‘EduArt’ Eduard Catalogue # 11104 Available from Eduard for 123,75 € The Curtiss P-40 Warhawk is an American single-engine, single-seat, all-metal fighter and ground-attack aircraft that first flew in 1938. The P-40 design was a modification of the previous Curtiss P-36 Hawk which reduced development time and enabled a rapid entry into production and operational service. P-40 Warhawk was the name the United States Army Air Corps and after June 1941, USAAF-adopted name for all models, making it the official name in the U.S. for all P-40s. The British Commonwealth and Soviet air forces used the name Tomahawk for models equivalent to the P-40B and P-40C, and the name Kittyhawk for models equivalent to the P-40D and all later variants. P-40s first saw combat with the British Commonwealth squadrons of the Desert Air Force in the Middle East and North African campaigns, during June 1941. No. 112 Squadron Royal Air Force, was among the first to operate Tomahawks in North Africa and the unit was the first Allied military aviation unit to feature the "shark mouth" logo, copying similar markings on some Luftwaffe Messerschmitt Bf 110 twin-engine fighters. The P-40's lack of a two-speed supercharger made it inferior to Luftwaffe fighters such as the Messerschmitt Bf 109 or the Focke-Wulf Fw 190 in high-altitude combat and it was rarely used in operations in Northwest Europe. However, between 1941 and 1944, the P-40 played a critical role with Allied air forces in three major theatres: North Africa, the Southwest Pacific, and China. It also had a significant role in the Middle East, Southeast Asia, Eastern Europe, Alaska and Italy. The P-40's performance at high altitudes was not as important in those theatres, where it served as an air superiority fighter, bomber escort and fighter-bomber. Although it gained a post-war reputation as a mediocre design, suitable only for close air support, recent research including scrutiny of the records of individual Allied squadrons indicates that this was not the case: the P-40 performed surprisingly well as an air superiority fighter, at times suffering severe losses but also taking a very heavy toll of enemy aircraft. The P-40 offered the additional advantage of low cost, which kept it in production as a ground-attack aircraft long after it was obsolete as a fighter. The Warhawk was used by most Allied powers during World War II, and remained in frontline service until the end of the war. It was the third most-produced American fighter, after the P-51 and P-47; by November 1944, when production of the P-40 ceased, 13,738 had been built, all at Curtiss-Wright Corporation's main production facilities at Buffalo, New York. The kit The first thing that surprised me is just how big the box is for this kit, and how heavy it is too. Adorned with one of Romain Hugault’s beautiful lady-inspired artworks that is the raison d'être for this release from Eduard’s new ‘EduArt’ range (following on the heels of the recent P-47 Dottie Mae), we finally see more P-40N plastic on the market. Note the saucy ‘Oops! It Slipped!’ on the bomb that the lady is sitting upon. Can’t beat some nice innuendo in our hobby! Whilst it is still possible to buy other variants of the P-40, the ‘N’ variant hasn’t been available for some time now, and it seems that this is the one that modellers are wanting to see. I suppose from that angle, Eduard’s new Warhawk release is a canny move on their part. Be warned though, only 3000 of these kits are available, and the Overtrees sprues have already sold out. Inside the box, all sprues are bagged into two sleeves, with the three sprues of clear parts being separate to protect them from scuffing. Most of the grey sprues are interconnected. I would’ve liked to have seen all sprues and sprue groups individually packed, but there is no real evidence of scuffing on my parts. Also within the bag is a little packet of polycaps. As this is an Eduard re-pop though, there are of course some of their extras to adorn this model. These take the shape of TWO PE frets (one printed in colour), set of correct resin wheels with appropriate ‘N’ type hubs, fishtail exhausts, clear acetate for the gunsight, and a set of masks for both canopy options. What is this ‘EduArt’, I hear you say. Ok, the rather stunning lid box art is included TWICE inside the box. One of these takes the form of a rolled-up A2 size poster, and the other is a new addition to the range, namely a beautifully printed reproduction of the box art, on an embossed metal plate, so you can feel the various relief, and it should of course catch the light nicely too. More of that later though. A small criticism here as to how this plate is packed. I found mine was sitting directly on top of all the sprues, including the clear one, and although the plate is nicely packed itself, I wasn’t keen on that weight bearing down on my plastic parts in case it deformed them. Top tip….remove from box as soon as you receive it. The majority of this kit has seen action with previous Hasegawa P-40 releases, with the exception of the N version tail parts, cut-down rear cockpit area and the new canopy parts to suit, and the wheels with the specific hubs. This release does include two schemes which will use the high back cockpit and the older style canopy too. As an added, unlisted bonus, the earlier, shorter fuselage tail section is also included amongst the parts. It isn’t even down on the parts plan, and is certainly not slated for use in this specific Warhawk release. This opens up more options for the modeller. Construction typically starts with the cockpit, and even without Eduard’s touch, the office in this release is actually very good, taking into account that this is a kit that was still only tooled in 2008. However, this fully-featured office now has two coloured, multi-layer instrument panel options as well as decals for the standard plastic part, colour-printed seatbelts and numerous other instrument consoles and placards on offer, to supplement the already excellent detail in this area. Also included is a rear mirror (fluffy dice optional!). Two seat options are included. A small number of PE options are provided as decals too. It goes without saying that there will need to be some surgery to perform if you want to implement Eduard’s PE sets, but it is fairly minimal, and includes shaving some sidewall details, and removing the raised detail from the instrument panel. You’ll also have to bend a few metal parts for items such as the map case replacement. Nothing too onerous though. Leaving the cockpit, the PE parts also include the circular intake grilles, aerial mast attachment point, canopy fastening latch, and numerous other external details such as surface panels, trim tab linkages, a small selection of undercarriage bay parts, fuselage fuel tank/bomb rack mounting point, and completely new PE underwing bomb attachment parts. The included Brassin wheels also have photo-etch for the optional external hub disks. One area of contention with modular fuselage design is how you seamlessly fit items such as the separate tail unit. Hasegawa’s instructions called for this to be plugged in after joining the main fuselage. Eduard has recognised the general folly of this and indicated that you need to join the tail halves to the fuselage before you bring the fuselage together finally. That’s pretty sensible and how I approach this in general. The rudder is a separate part, meaning it can be posed dynamically, if you trim back the location tabs. Looking at the fuselage parts shows how nicely refined the external detail is, and makes me wonder why I haven’t built one of these before. Fine panel lines and port access details are the order of the day, with everything looking suitably scale to my eye. Being ex-Hasegawa, there is of course no major riveting to be seen, so if you want a little extra visual interest, you’ll have to dust off Rosie, or even better, use a beading tool. Some key rivet lines exist, but that is all. Ventilation plates, exhaust panels and rear cockpit are separate to the main fuselage halves, in true modular style. The wing is a simple affair to build, with a full-span lower piece, and port/starboard upper panels. Ailerons are integral, as they tend to be with Hasegawa. Surgery will be required if you want otherwise. This also applies to the stabilisers, with integrally moulded elevators. The multipart main gear bay is based around a single spar and is simply sandwiched between the upper and lower wing panels. Separate inserts are included for the Browning machine gun leading edge panels. Detail-wise, there isn’t anything you really need to add here as the plastic parts are very good. Moulding quality is excellent throughout, with no visible defects or badly placed ejector pin marls to suck away the fun. Four clear sprues are included. One of these contains the common windscreen which is moulded along with the external fuselage adjoining panel. This neat idea means you won’t need to worry about gaps being present between the windscreen and fuselage. Another windscreen is supplied, but again, it’s not for use with this release. Main hoods for both the early machine and the cut down fuselage version, are supplied, along with their respective rear canopy sections. Hood parts are included for both open and closed versions of both style of hood. Frame lines are well-defined and the parts are crystal clear. One sprue contains smaller clear parts for landing lights etc. The photo-etch parts are typically superb, as is the norm, with the printing being very good. With some colour PE, I’ve been left disappointed due to ink pixilation, but these are very good, and under a coat of matt varnish, they should look just perfect. Attachment gates are nice and thin and should present no problem. There aren’t too many resin parts in this release, but Eduard has made them count. First up are the replacement wheels with their separate hubs. Not having to remove seams automatically makes these a better option, but the detail is also far nicer and more comprehensive. Secondly, fishtail exhausts are included. Each side is cast in three banks of two manifolds, and they are handed, meaning you will not only need to get them in the correct order, but also on the appropriate side of the cowl. They are easy enough to identify, so there shouldn’t be a problem. Casting quality is flawless. Eduard’s wheel hubs always take a little sawing to free them from their blocks, but the wheels come away from them quite easily and clean-up is quick too. A single sheet of Kabuki masks is included, with parts for both canopy options (obviously!), and also wheel hub masks. Cutting is sharp and you should have no problems. The decals are provided on a single, large, Cartograf-printed sheet. Colour is solid and authentic, with minimal carrier film, thinly laid inks and a nice glossy surface. Registration is also perfect. Those markings which contain the white bars have those printed here too, but I’d probably opt to mask and airbrush these. Still, the option is there. Stencils and cockpit decals are also included. The five schemes available in this release are: P-40N-5 s/n 42-105128 flown by Lt. P. S. Adair, 89th FS, 80th FG, Nagaghuli, India, February 1944 Kittyhawk IV (P-40N-1), NZ3148, No. 18 Squadron RNZAF, Ondonga, New Georgia, November 1943 P-40N-1 flown by Lt. G. L. Walston, 16th FS, 51st FG, Kunming, China, 1944 P-40N, 7th FS, 49th FG, Cyclops Airfield, Hollandia, New Guinea, May 1944 Kittyhawk IV (P-40N-20), NZ3220, No. 18 Squadron RNZAF, Bougainville, 1944 Extras It’s the embossed metal plate that is the real showstopper here. Romain’s box artwork has been transposed to a quite weighty, fairly thick gauge metal plate, and the various relief has been stamped into this, giving a semi-3D sort of feel to the item. The printing is great too! Holes are provided for handing this on your workshop wall, so you won’t need to damage the plate to do this yourself. The same art is provided on a rolled-up A2 size poster too. You can never have too many copies of Romain’s work Conclusion This isn’t a cheap kit, but it’s certainly one I’m pleased to see on the market, especially in this gorgeous EduArt format! There are plenty of options in this release, both official and unofficial, and the schemes themselves are excellent. It’ll still be tempting to do the shark mouth machine, so I must resist. I do feel that Eduard could’ve included the PE with the landing flaps etc. This is now available as an upgrade to this kit. All in all, a very attractive and welcome package that I really can’t wait to get to the bench. Doubtless the most accurate P-40N on the market. Watch out for my build soon in Military Illustrated Modeller. Highly recommended My thanks to Eduard for the review sample shown here. To purchase directly, click THIS link.


-
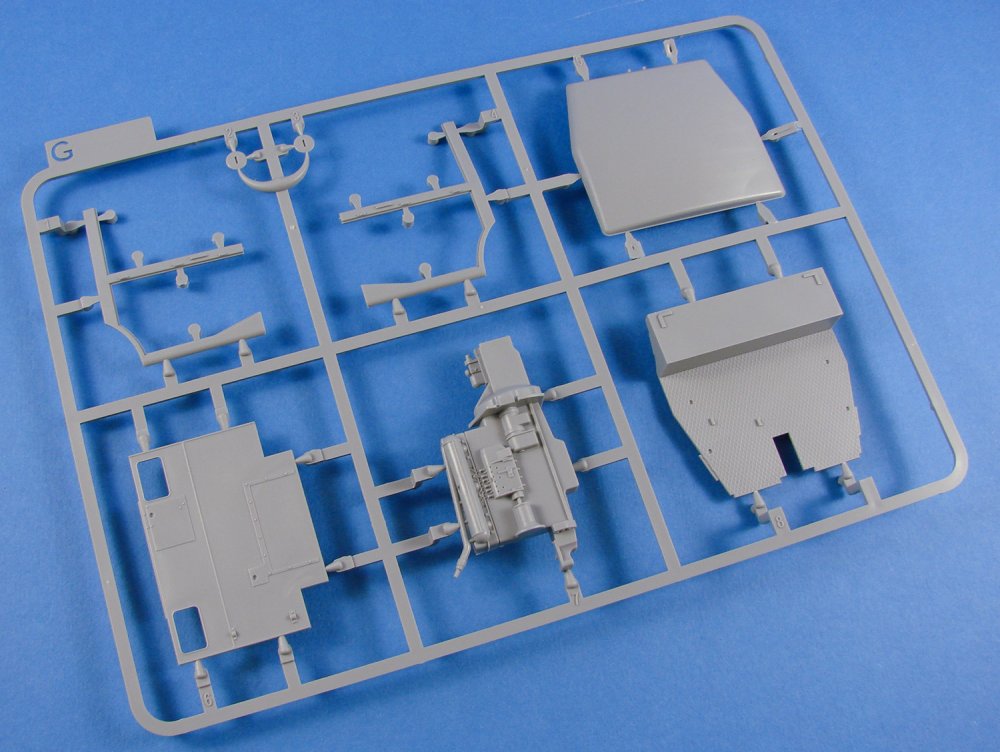
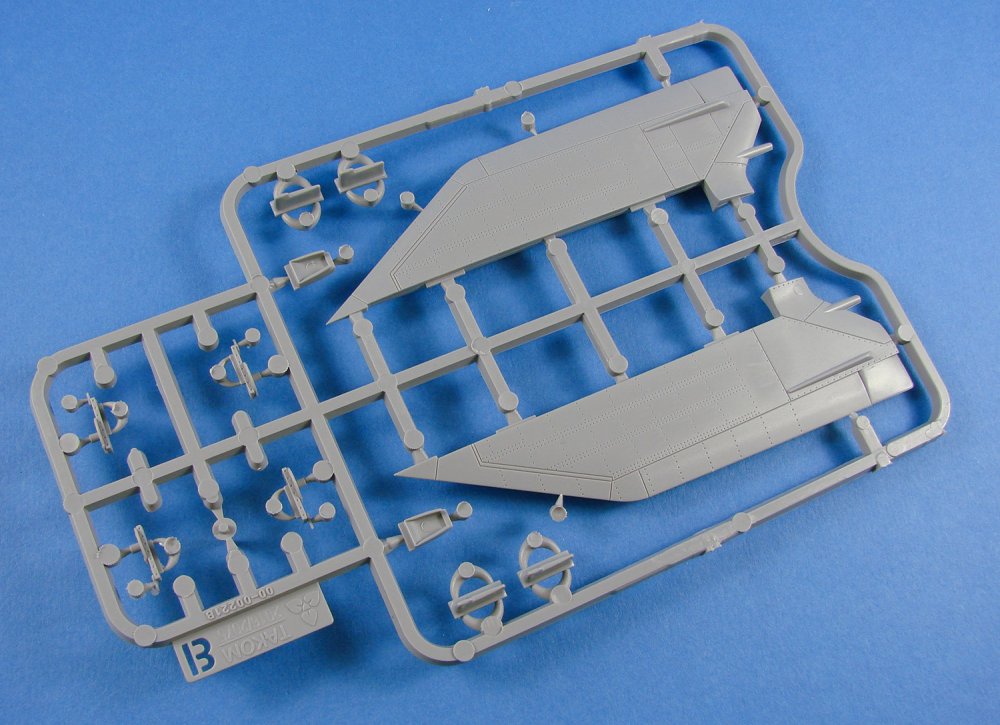
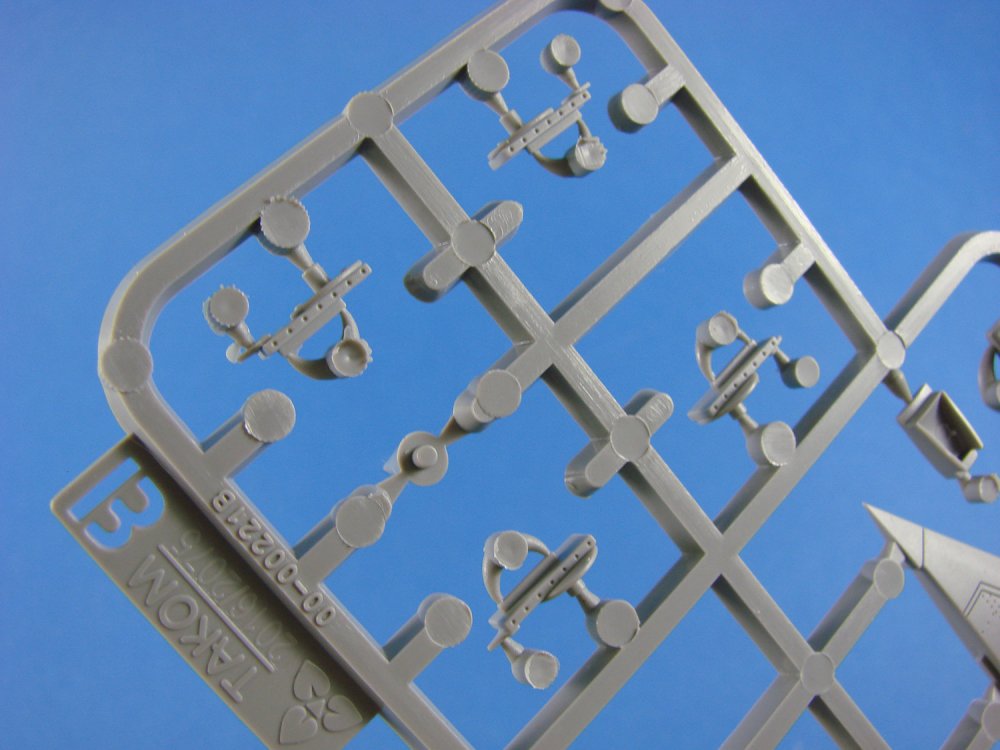
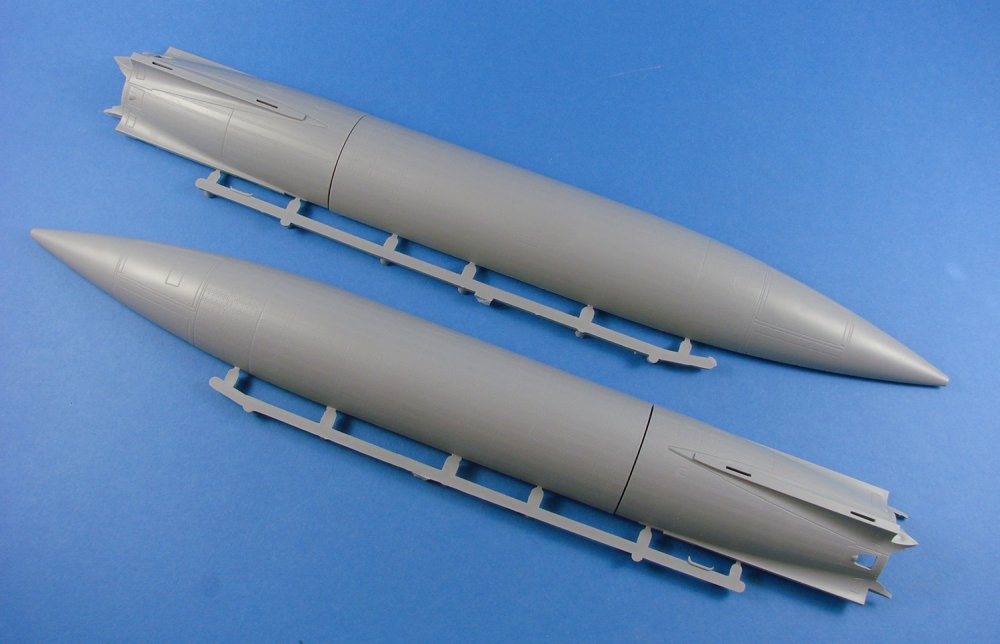
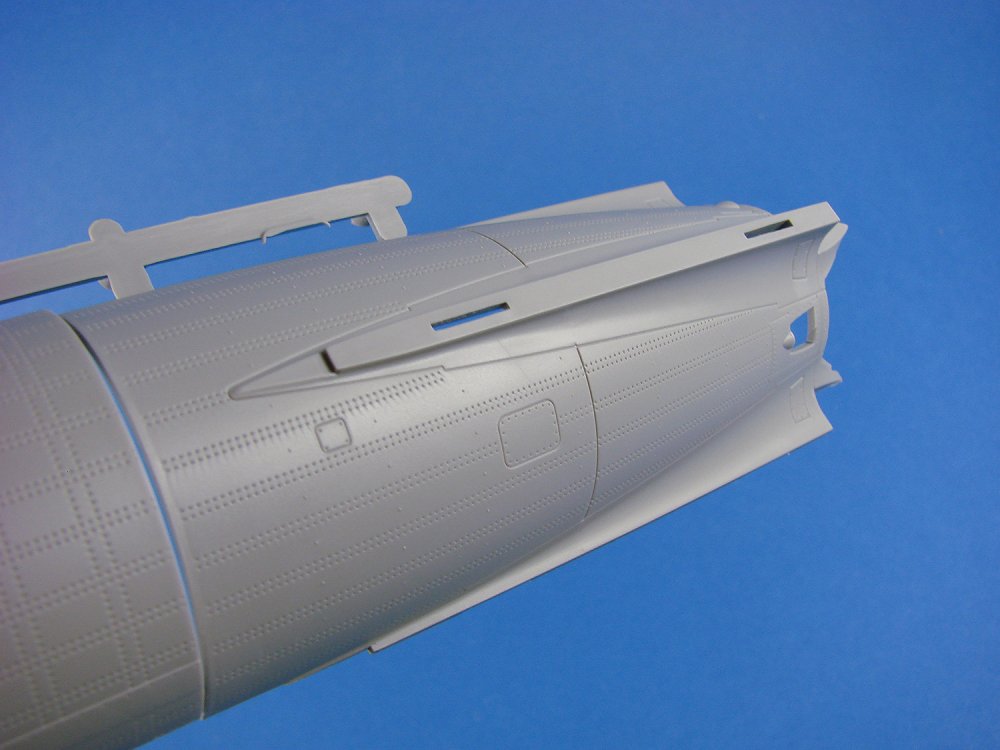
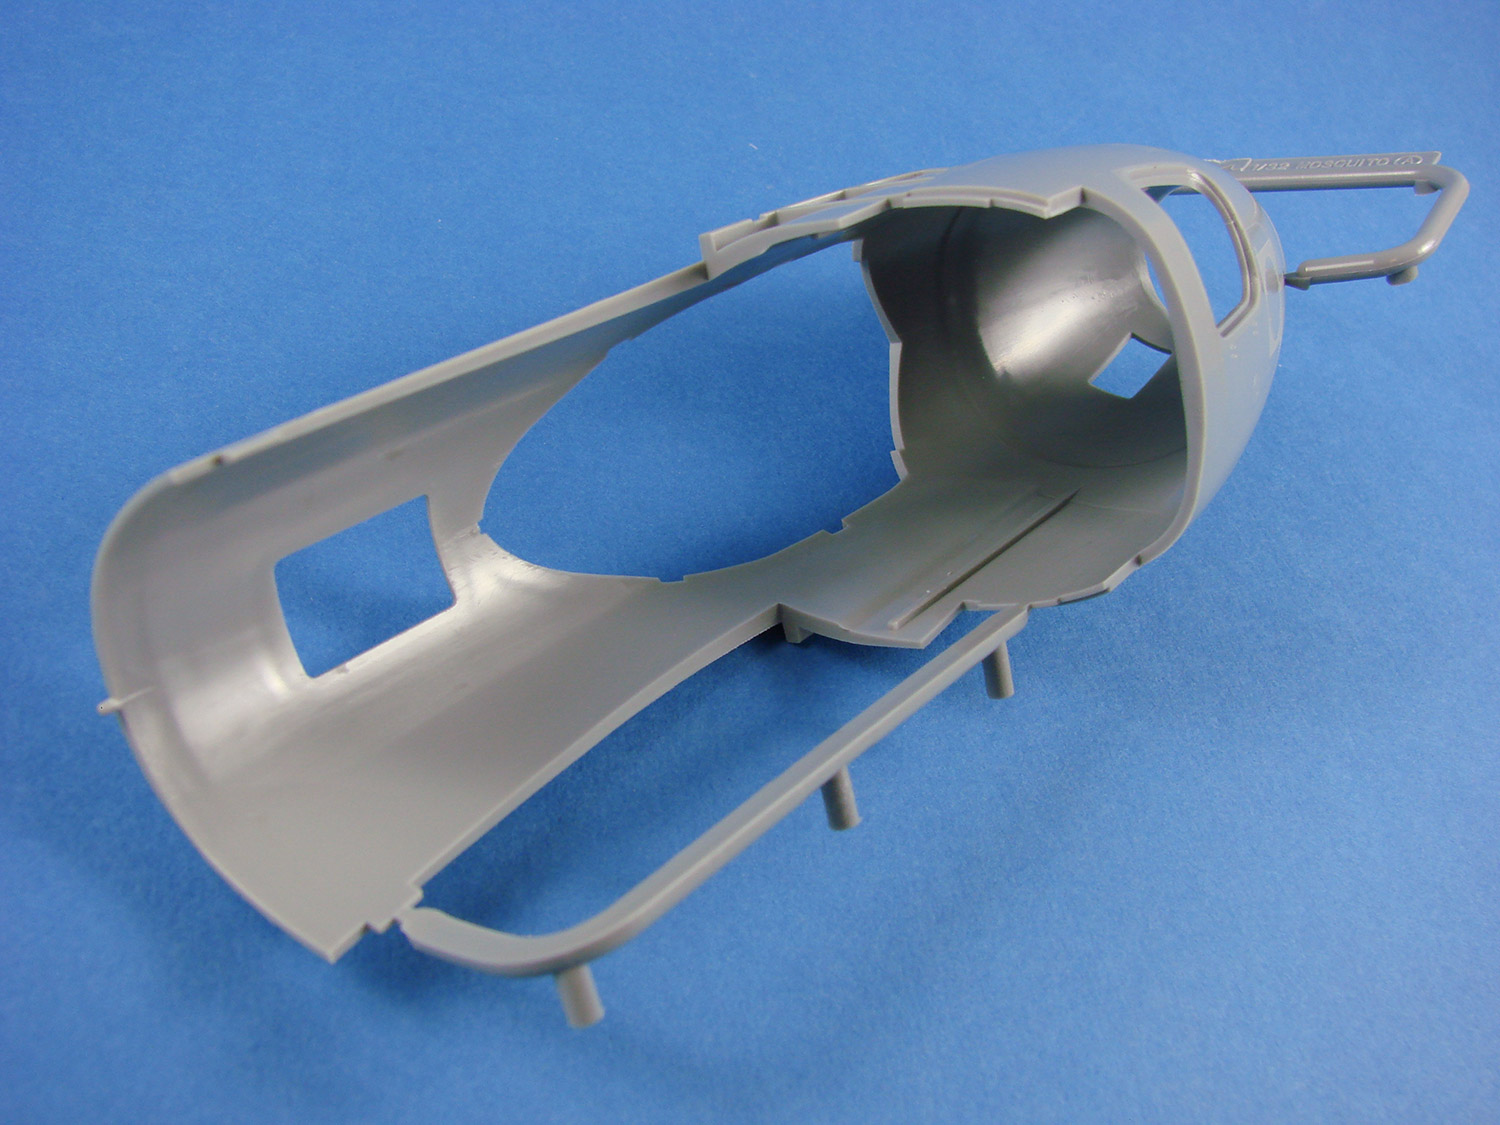
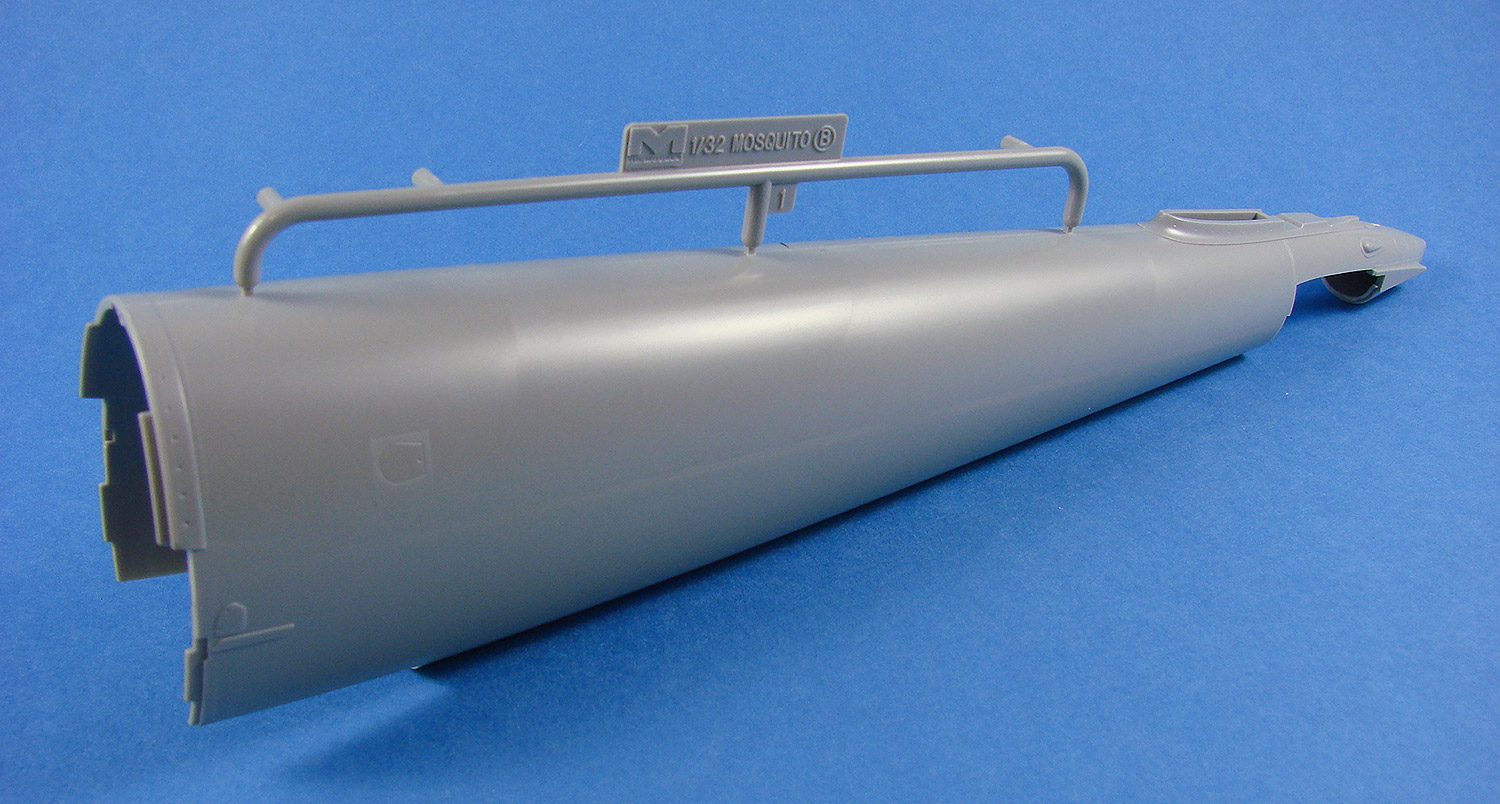
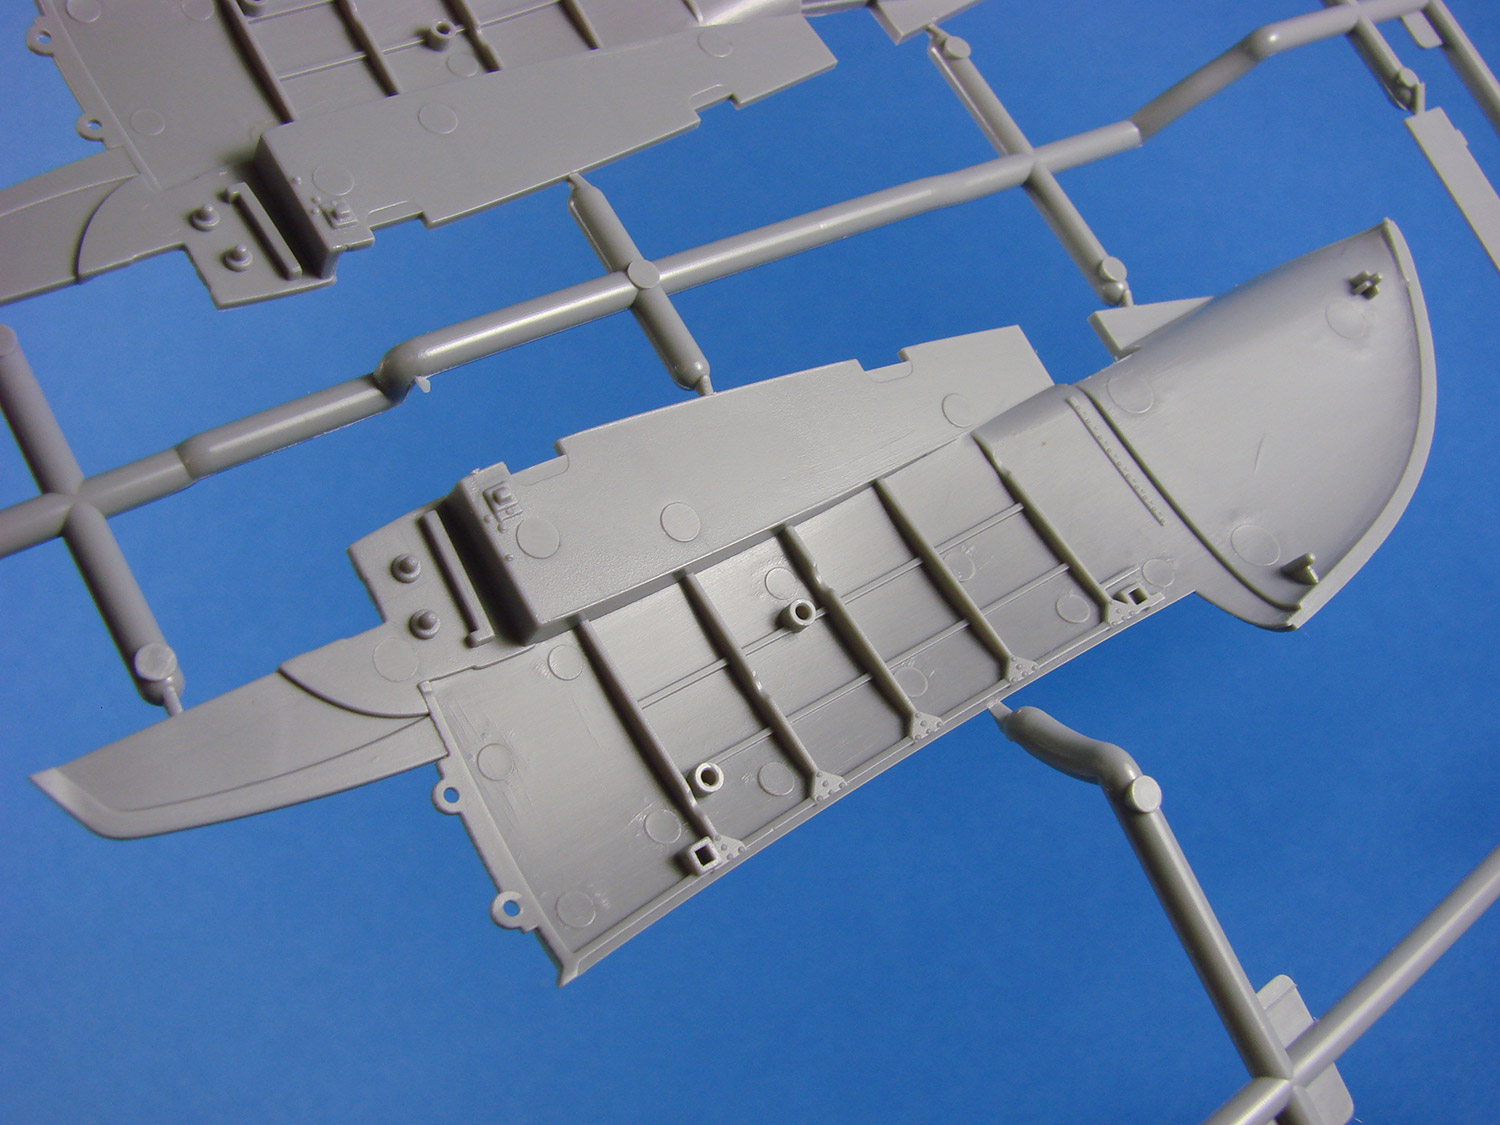
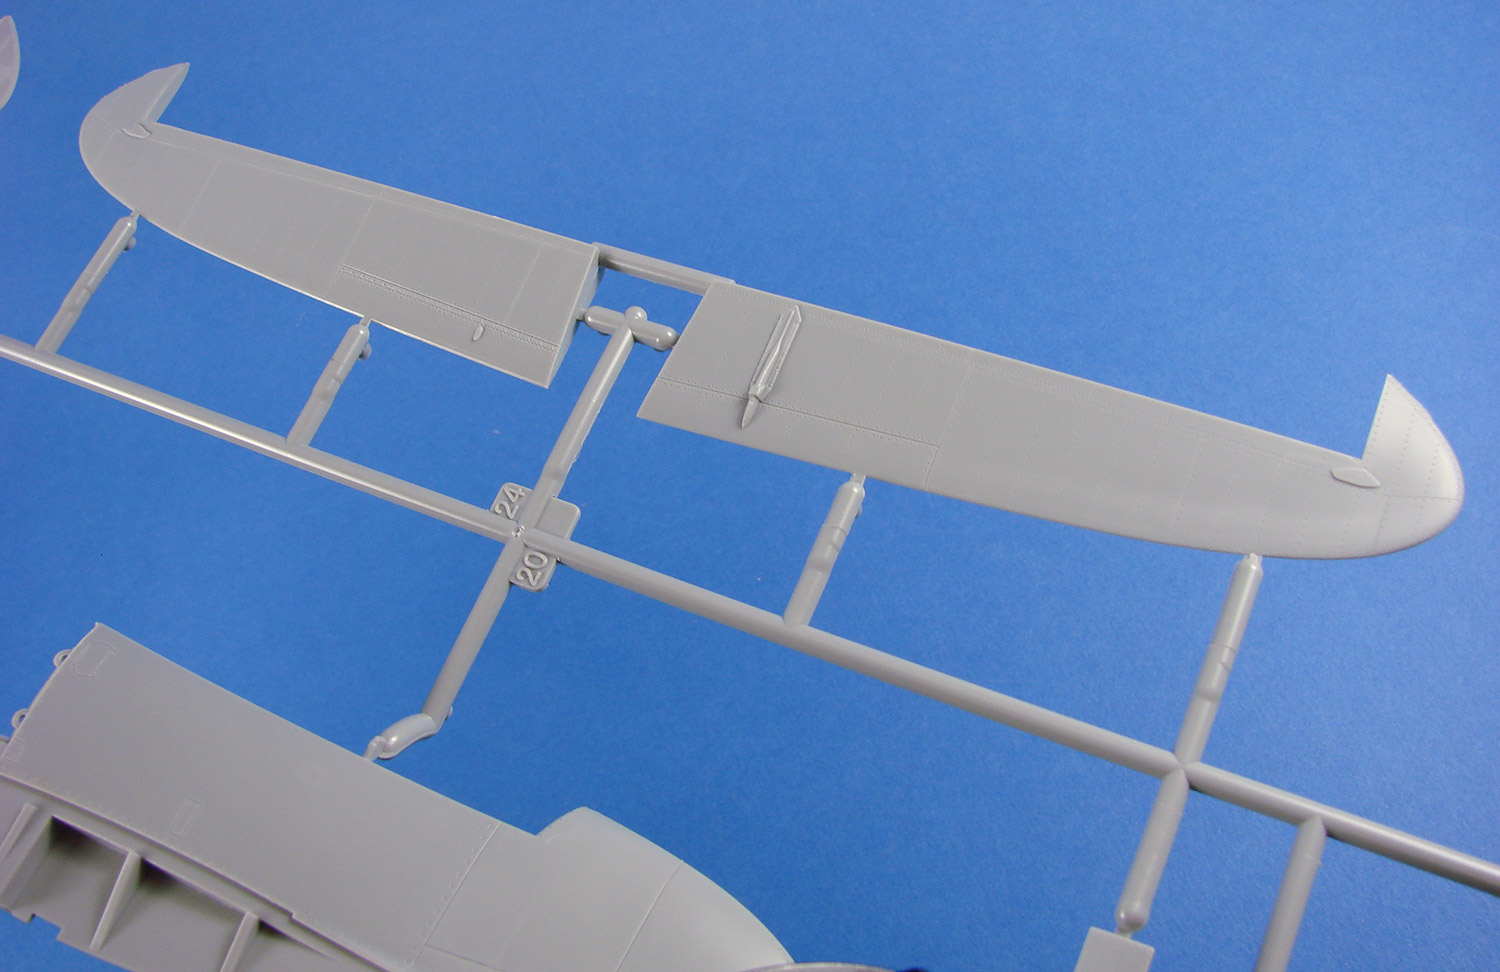
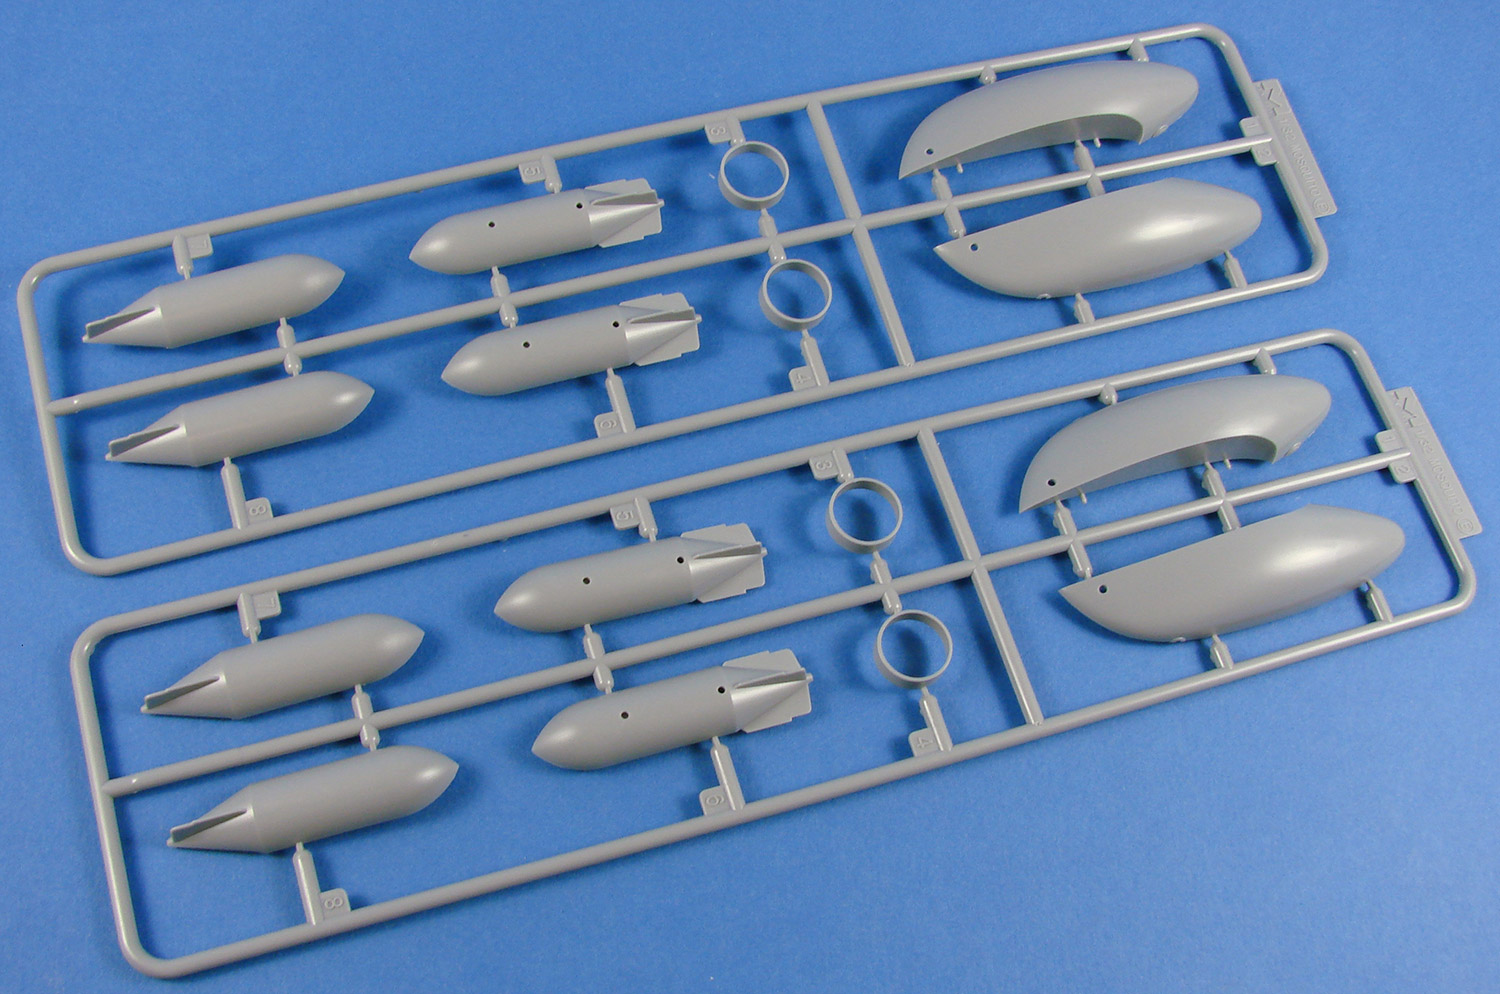
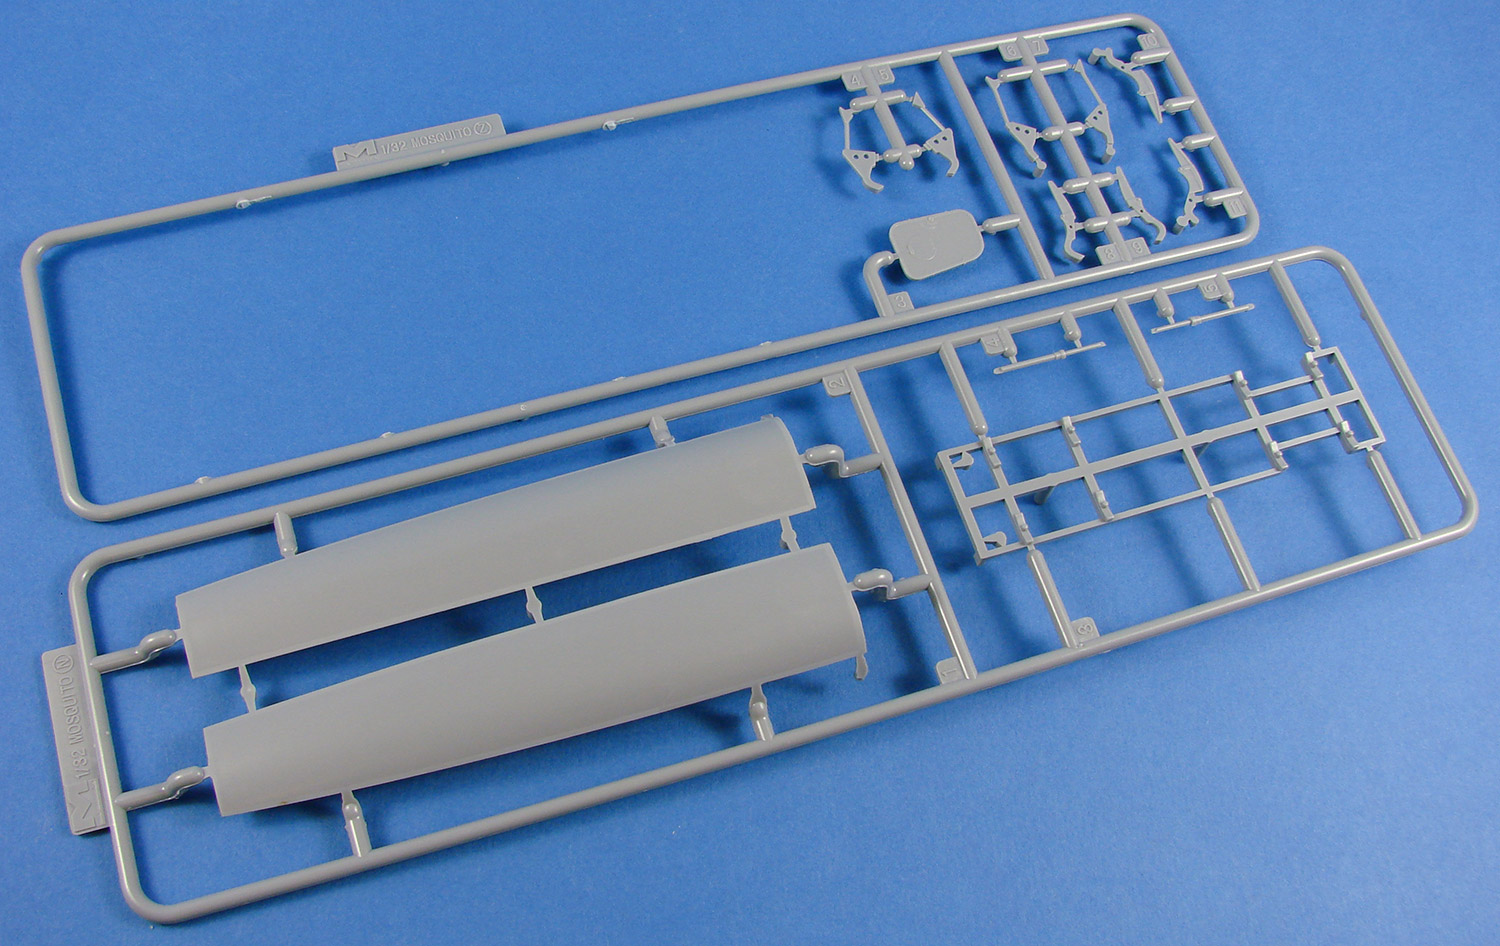
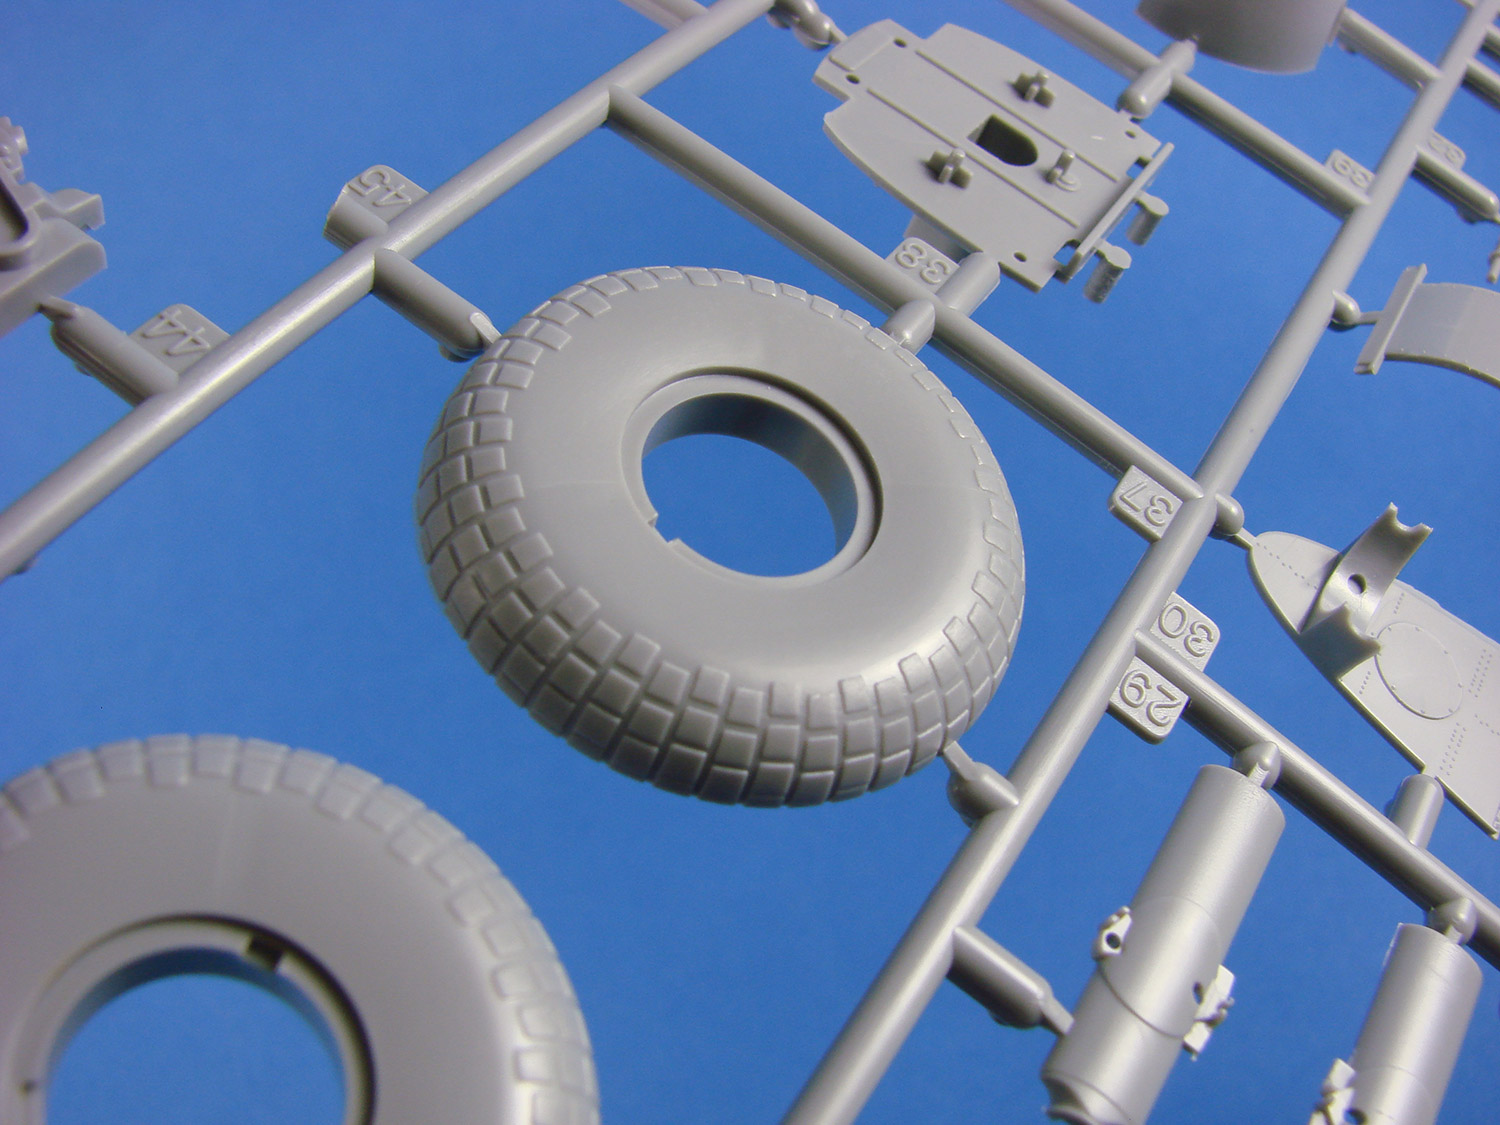
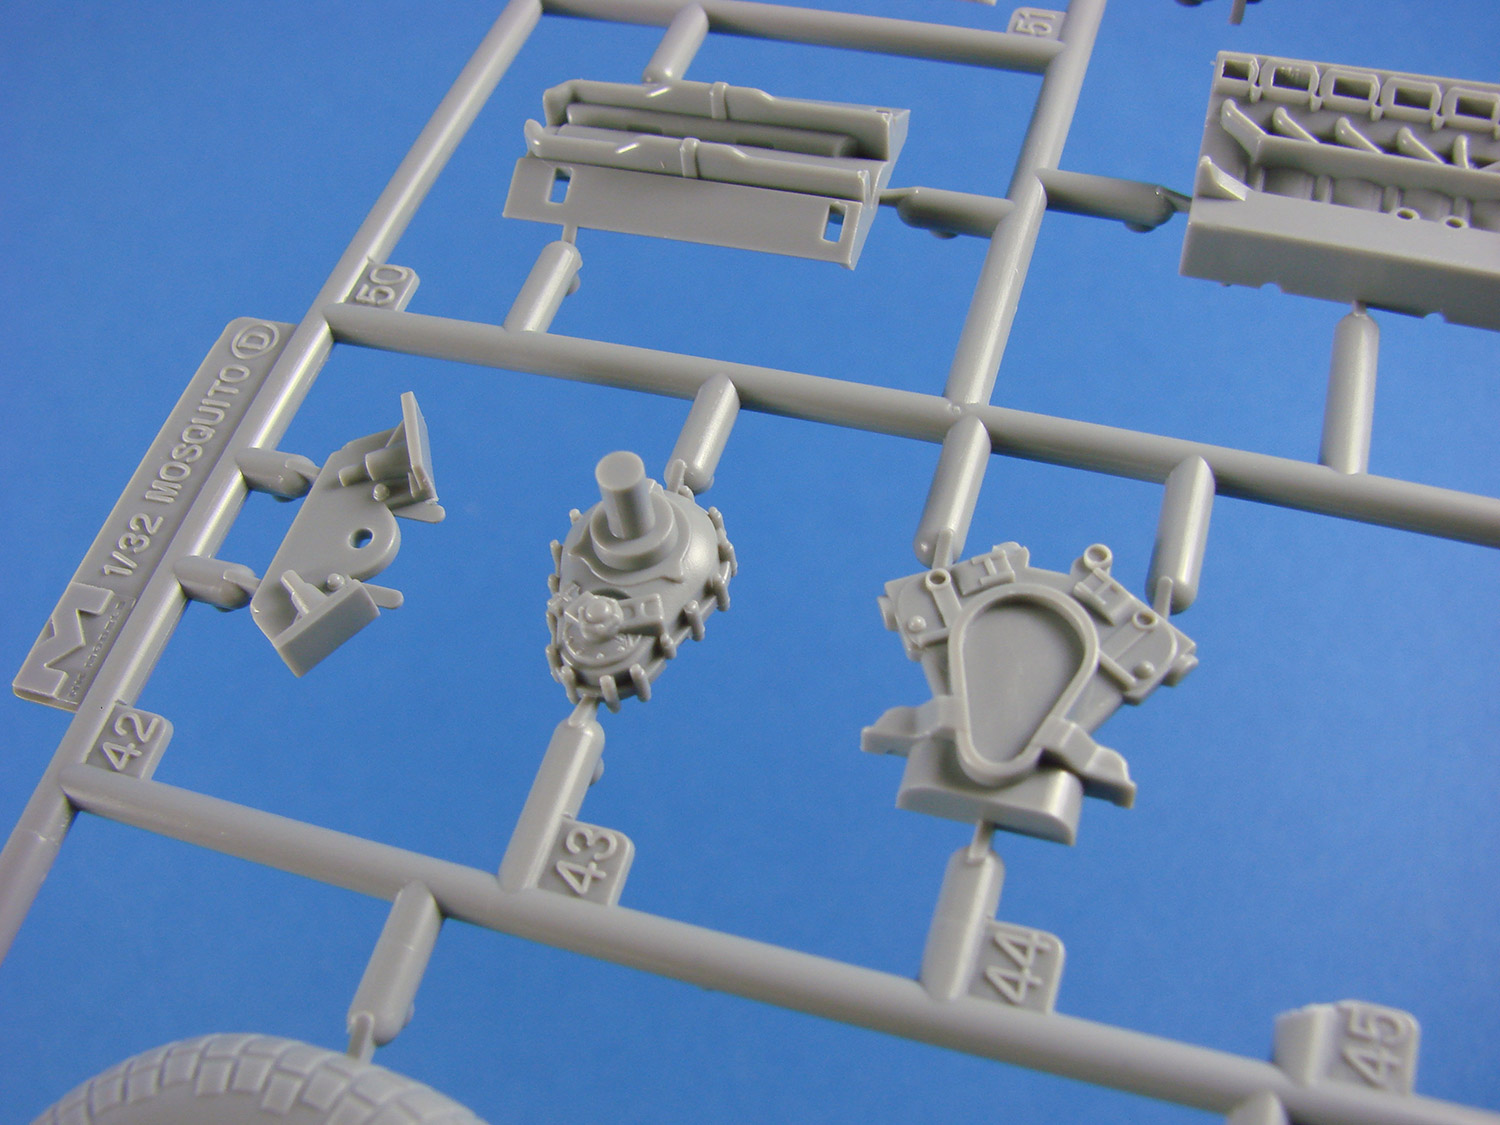
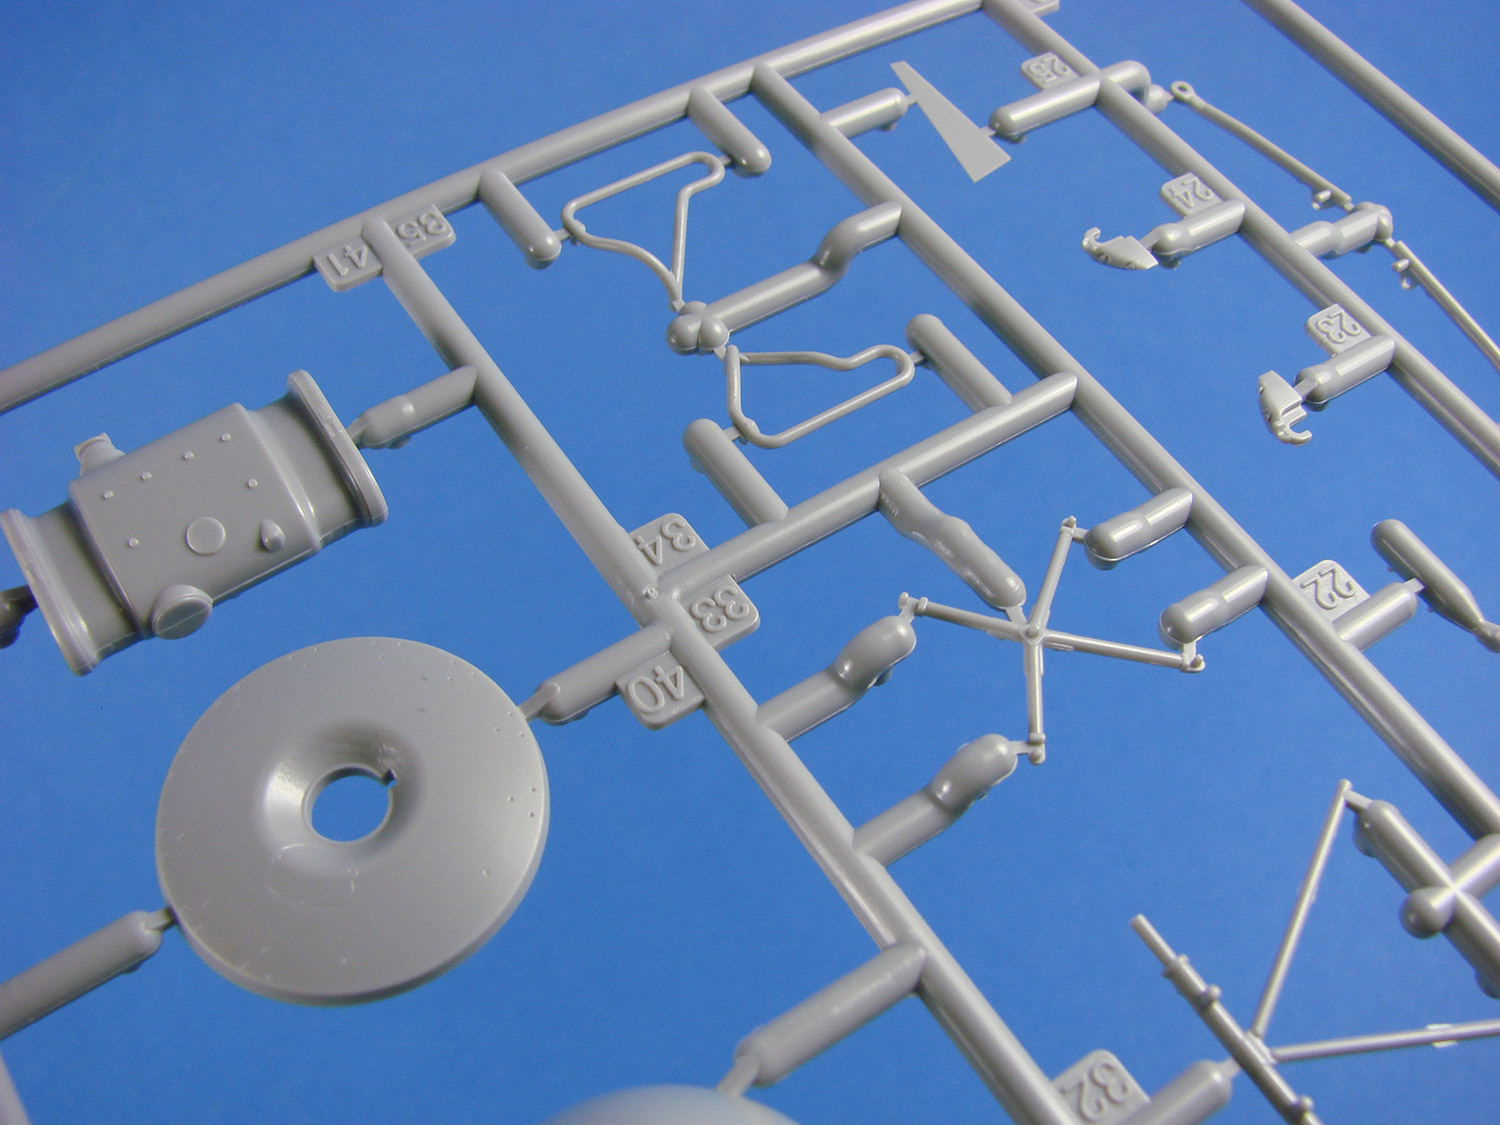
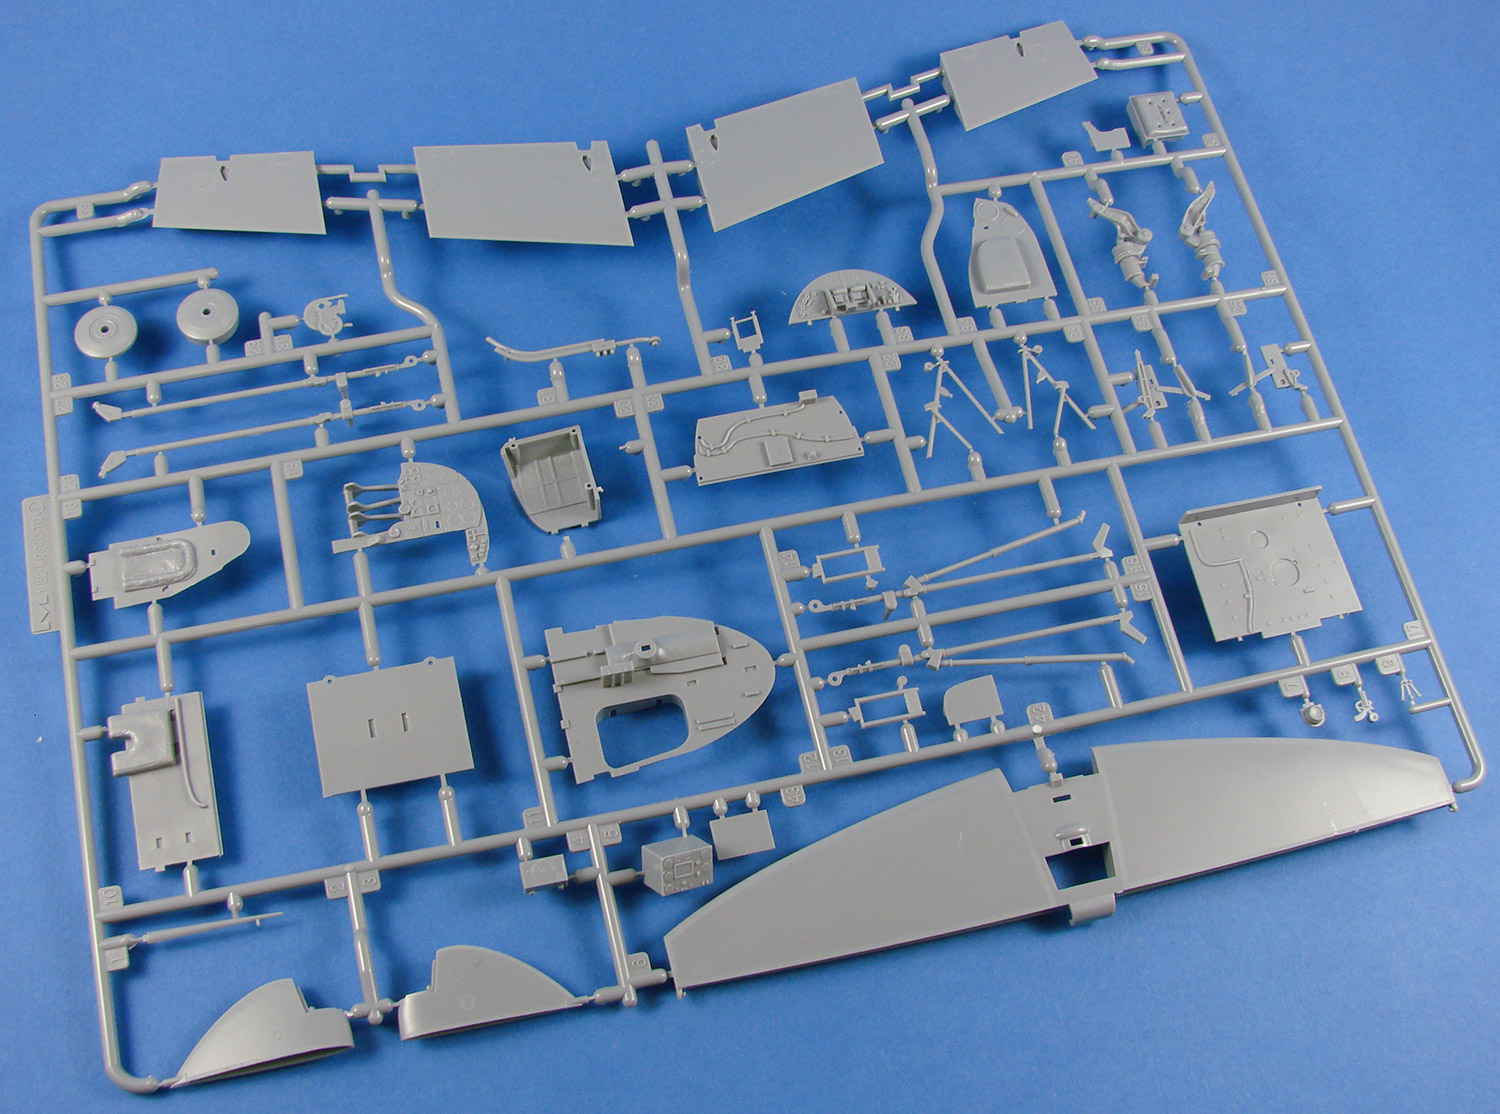
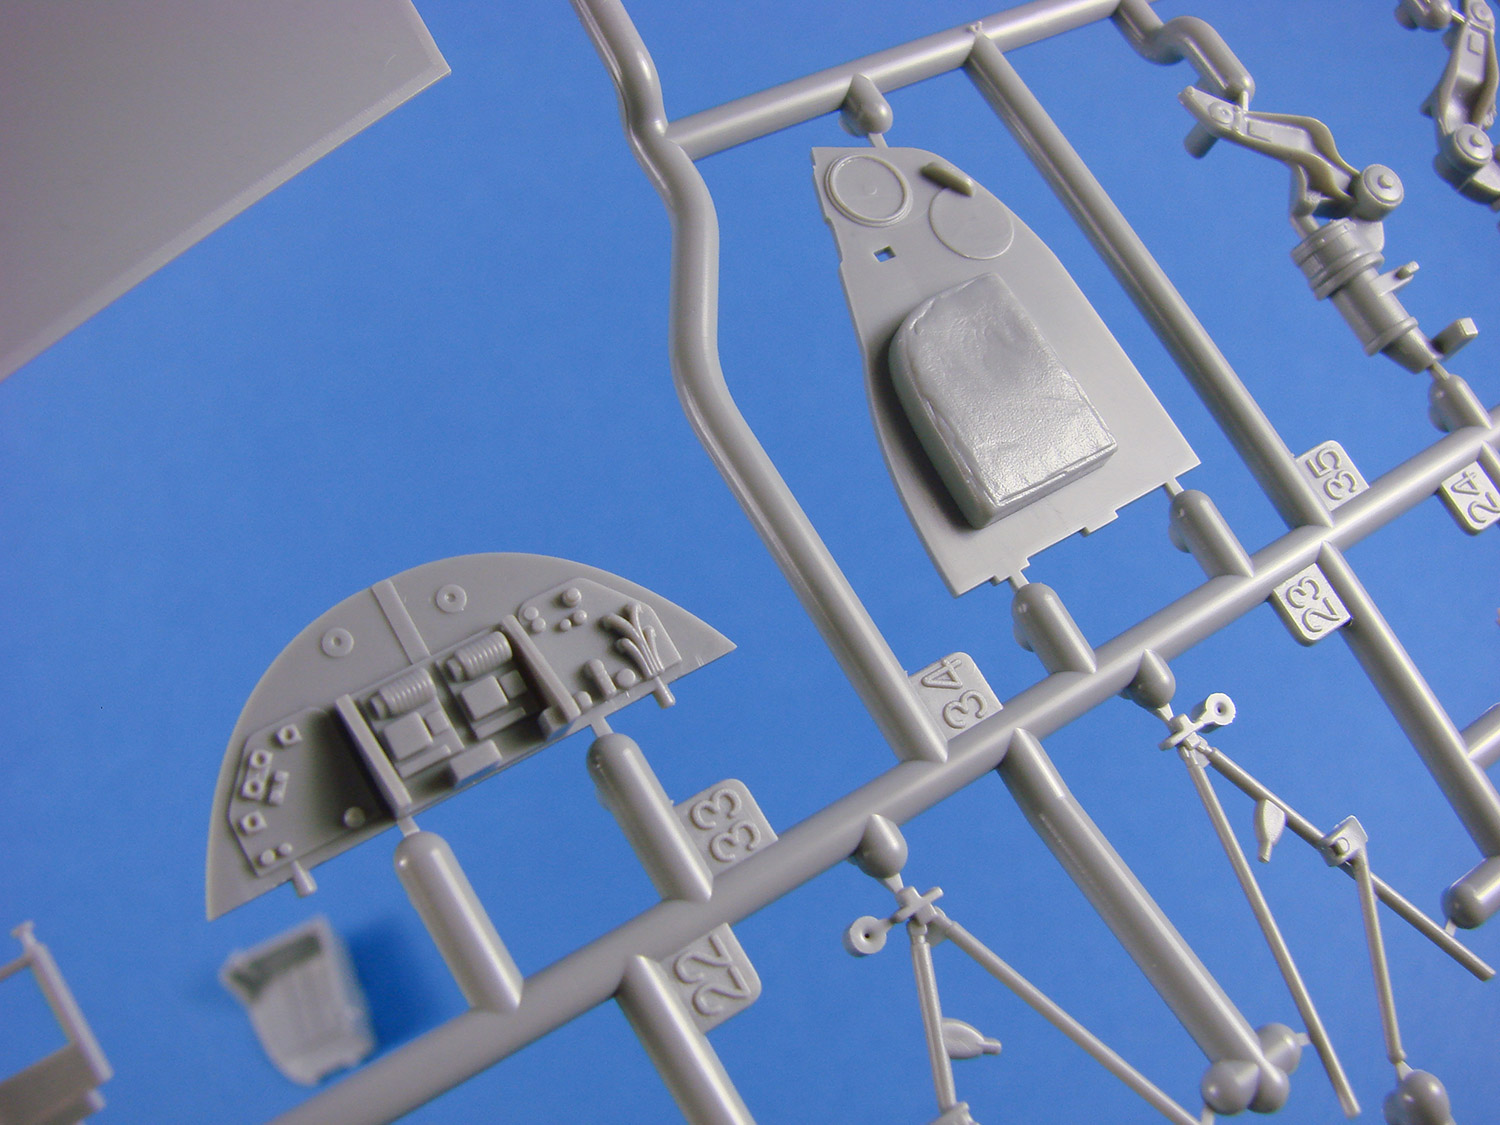
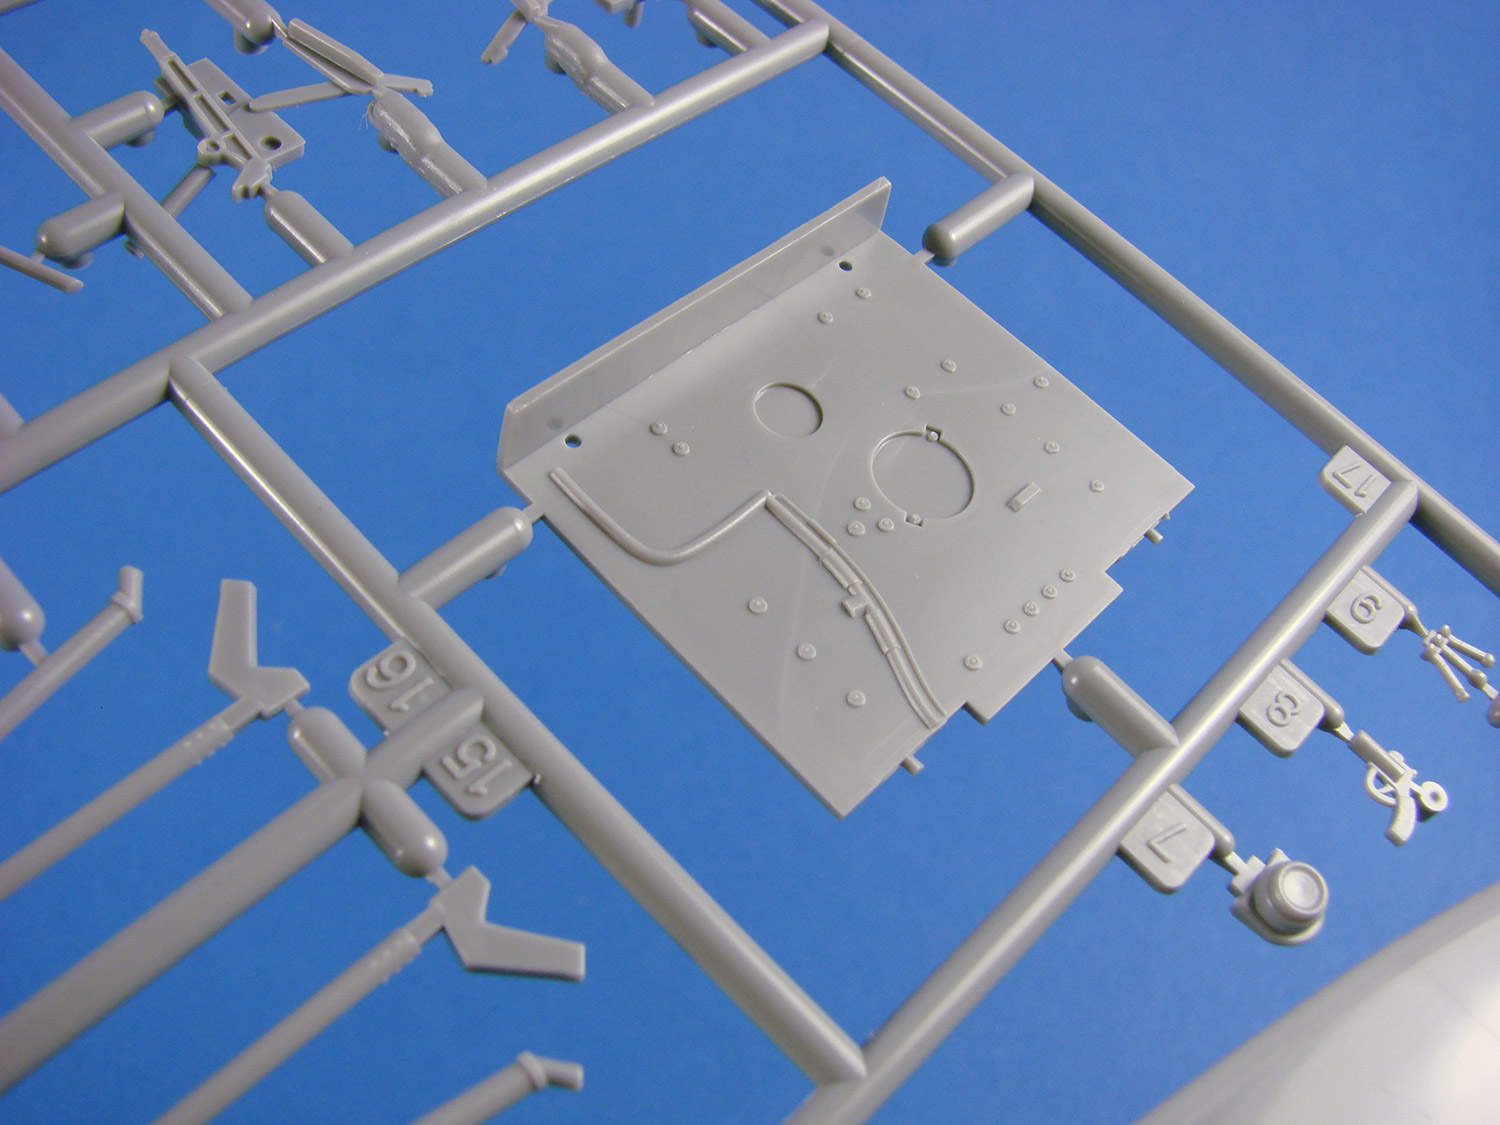
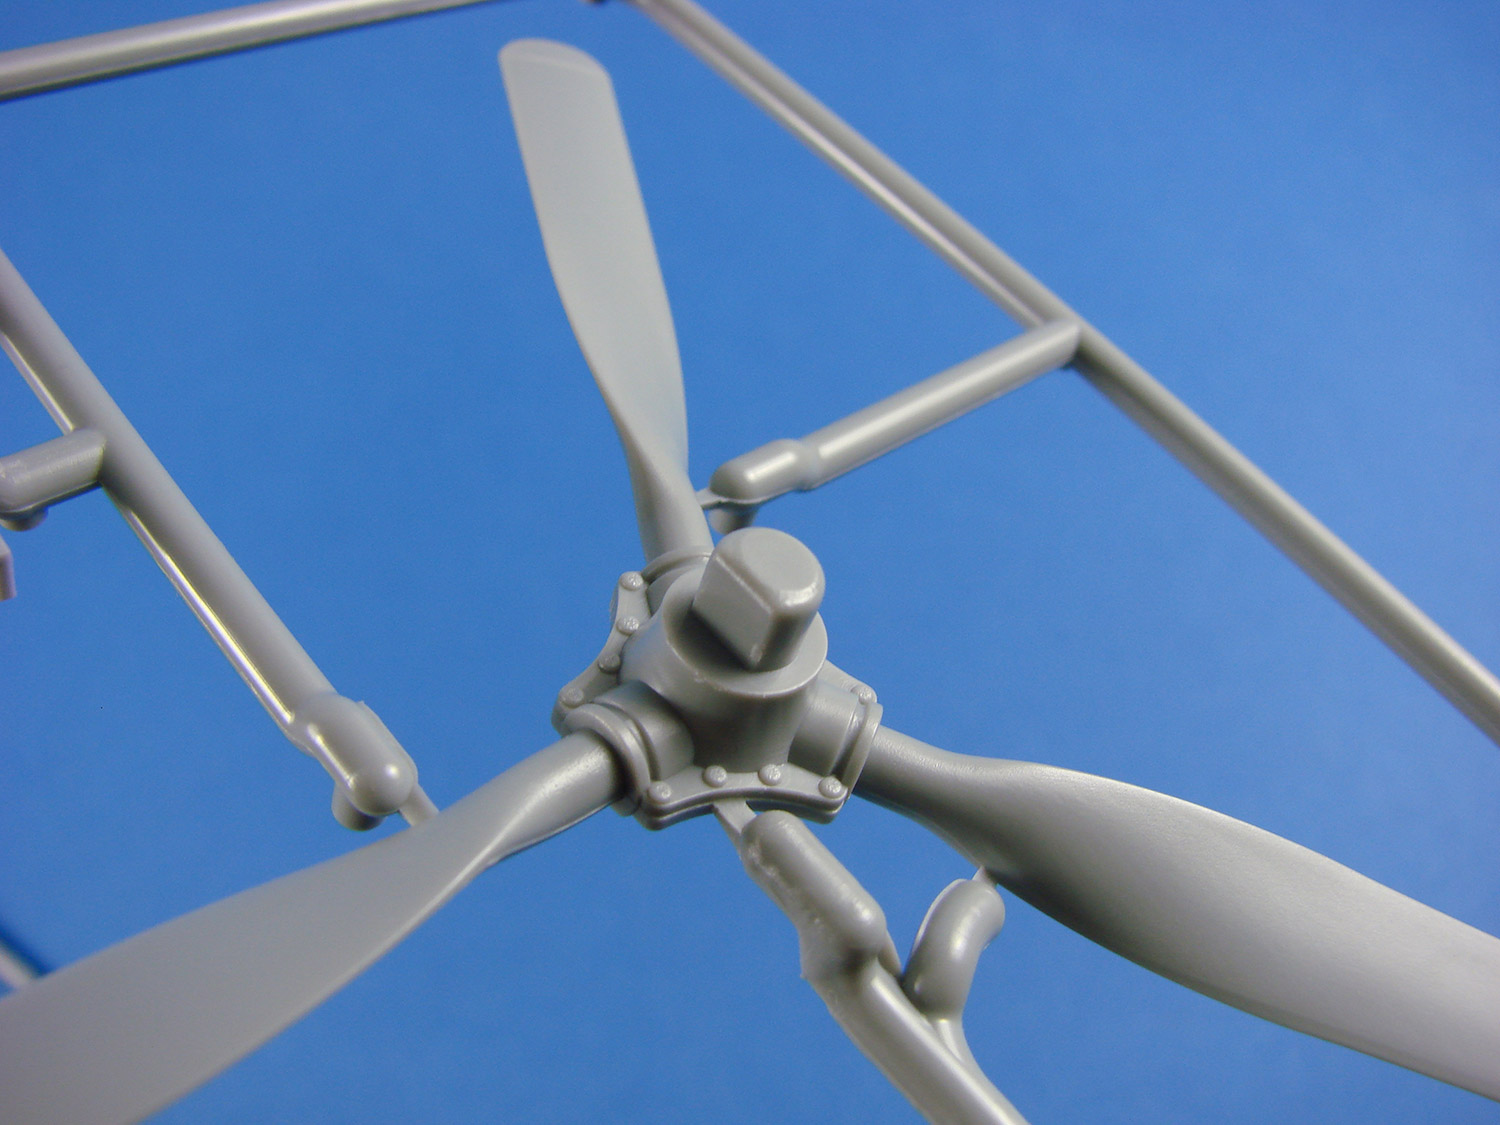
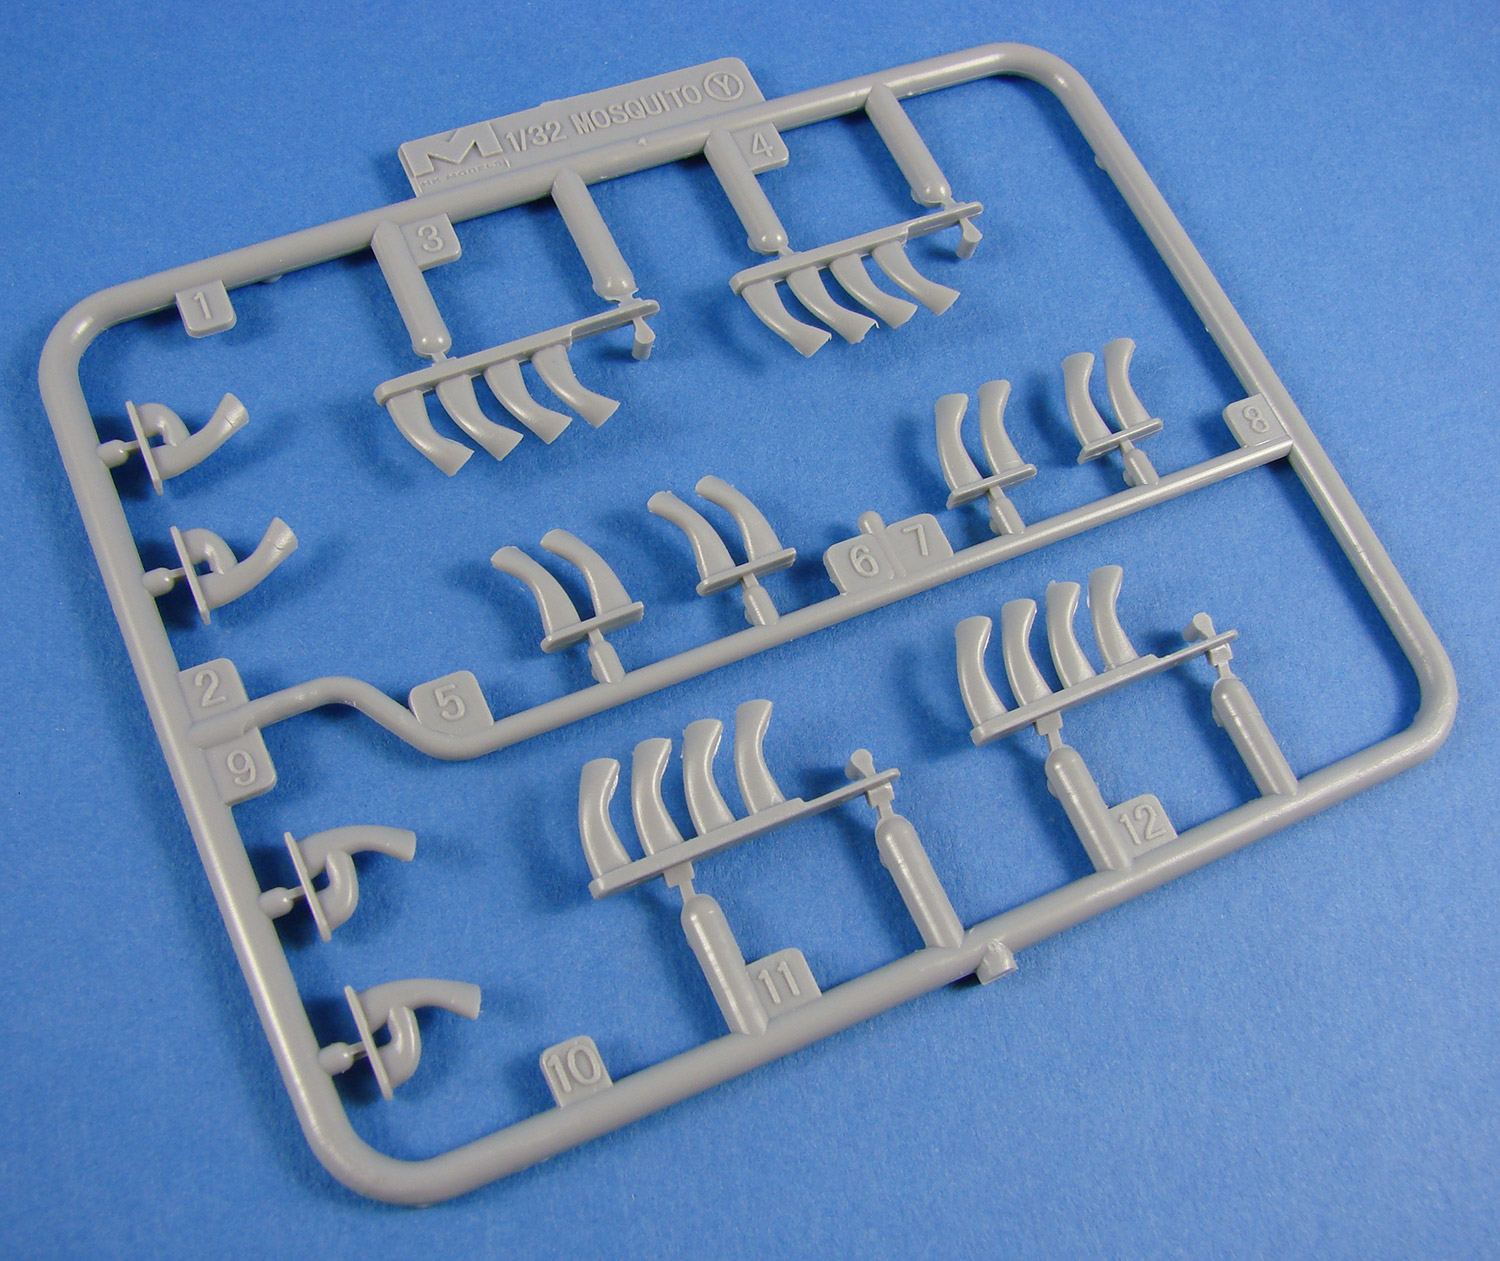
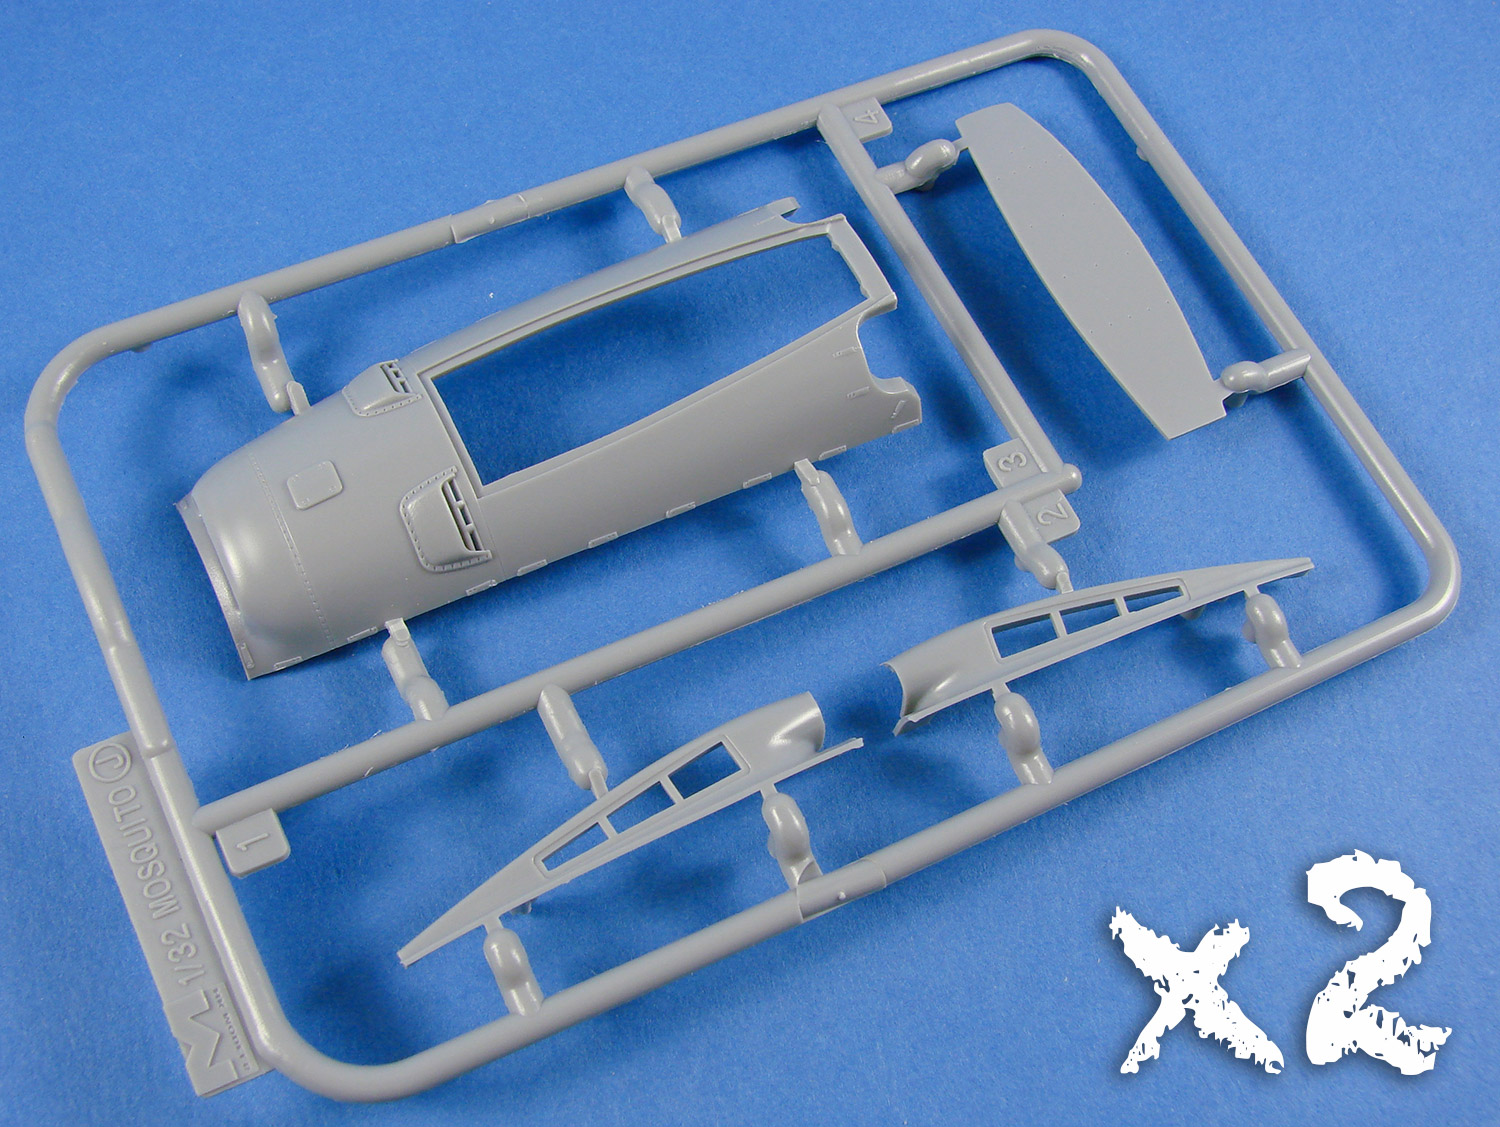
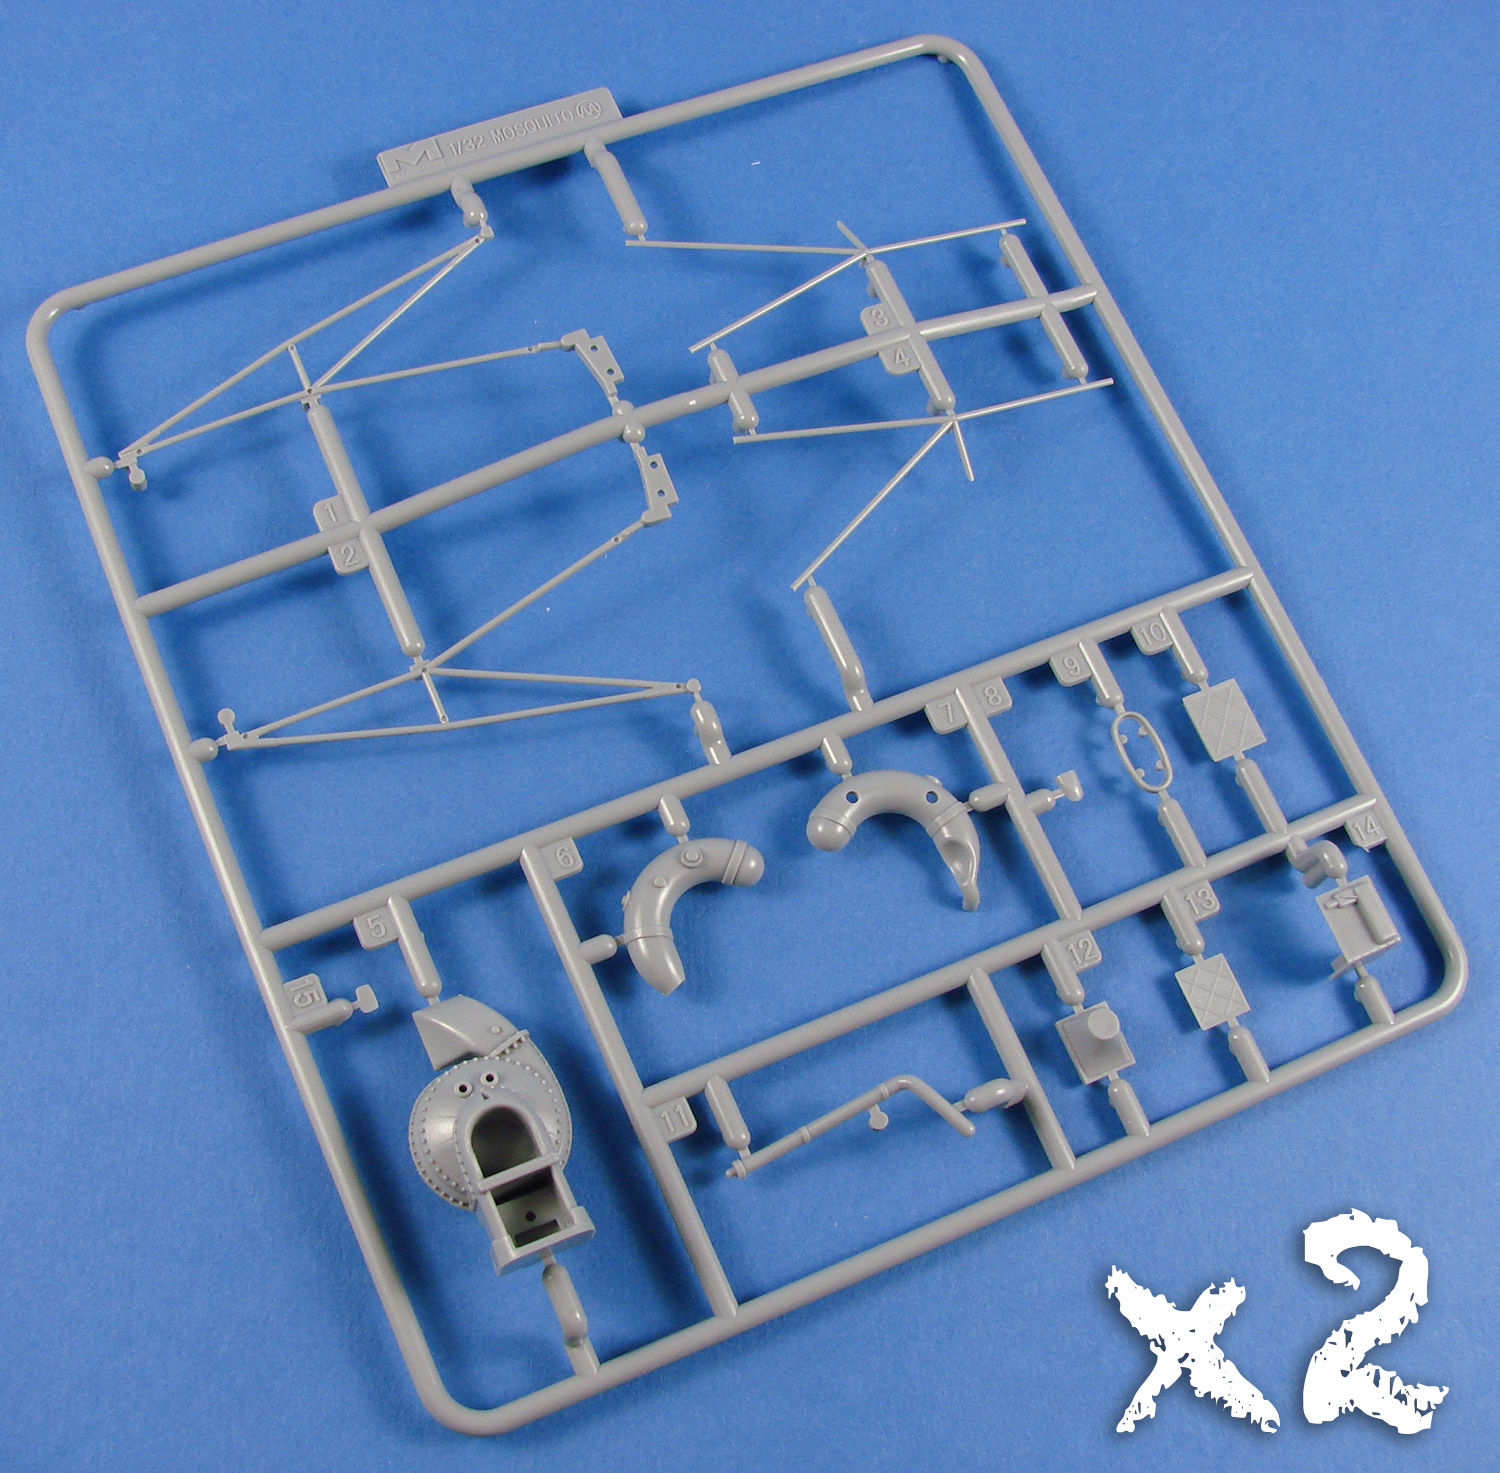
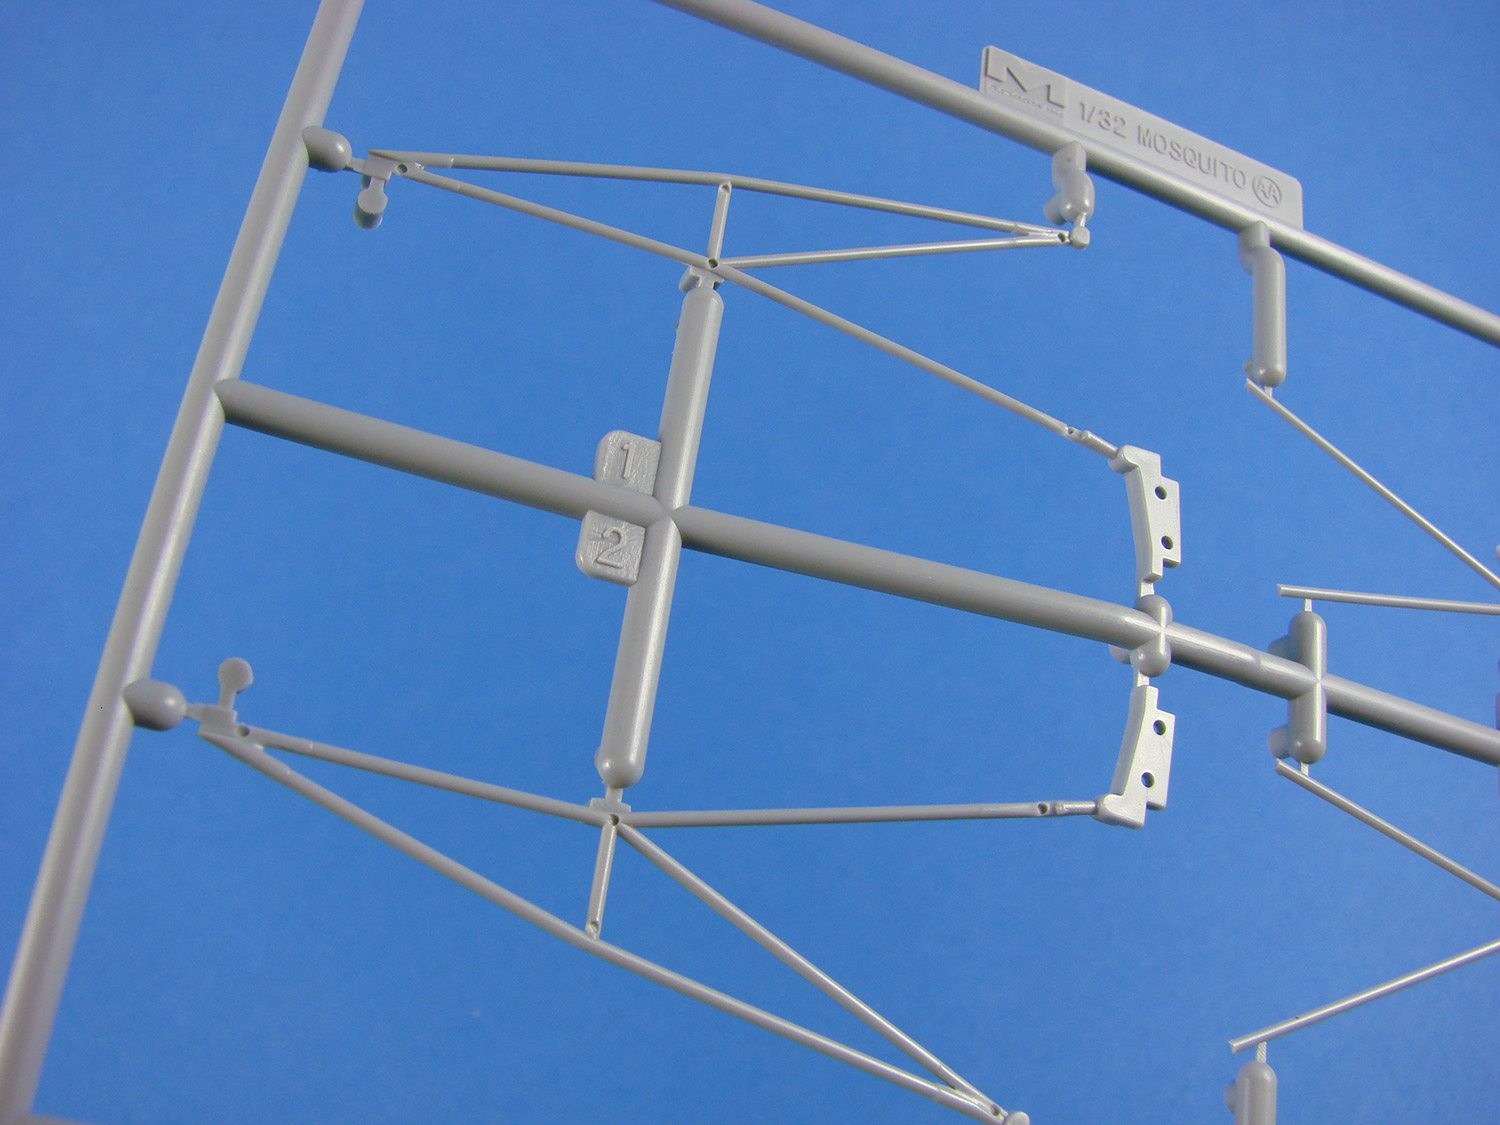
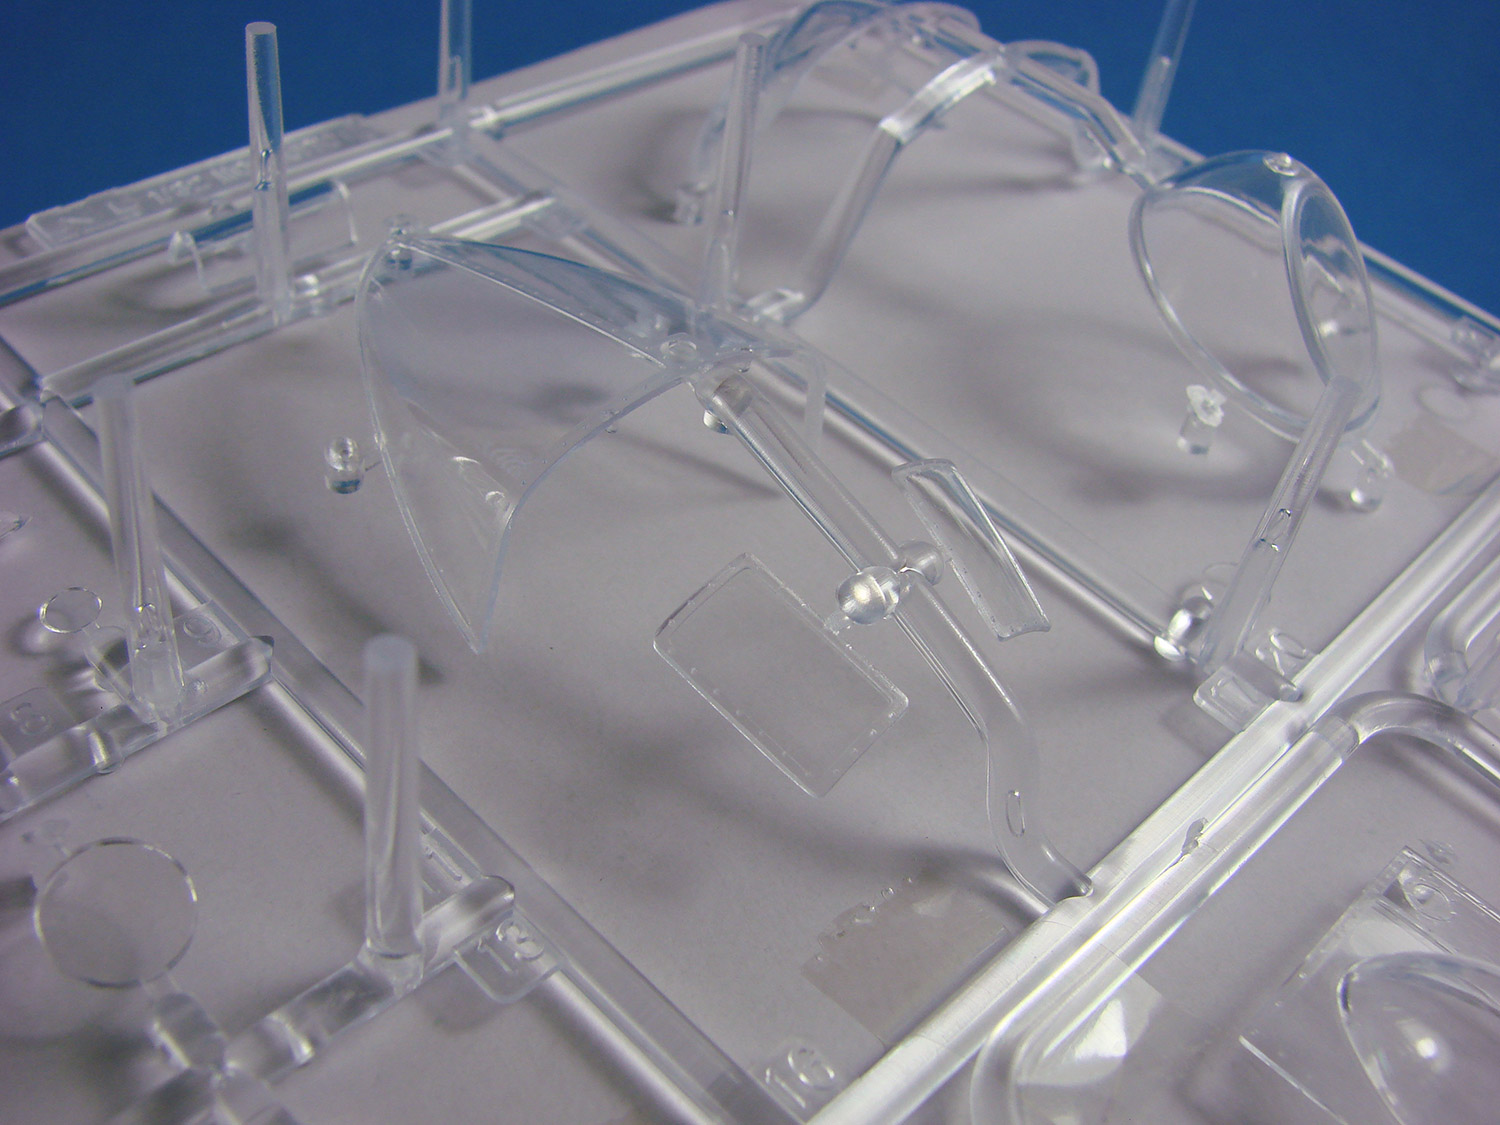
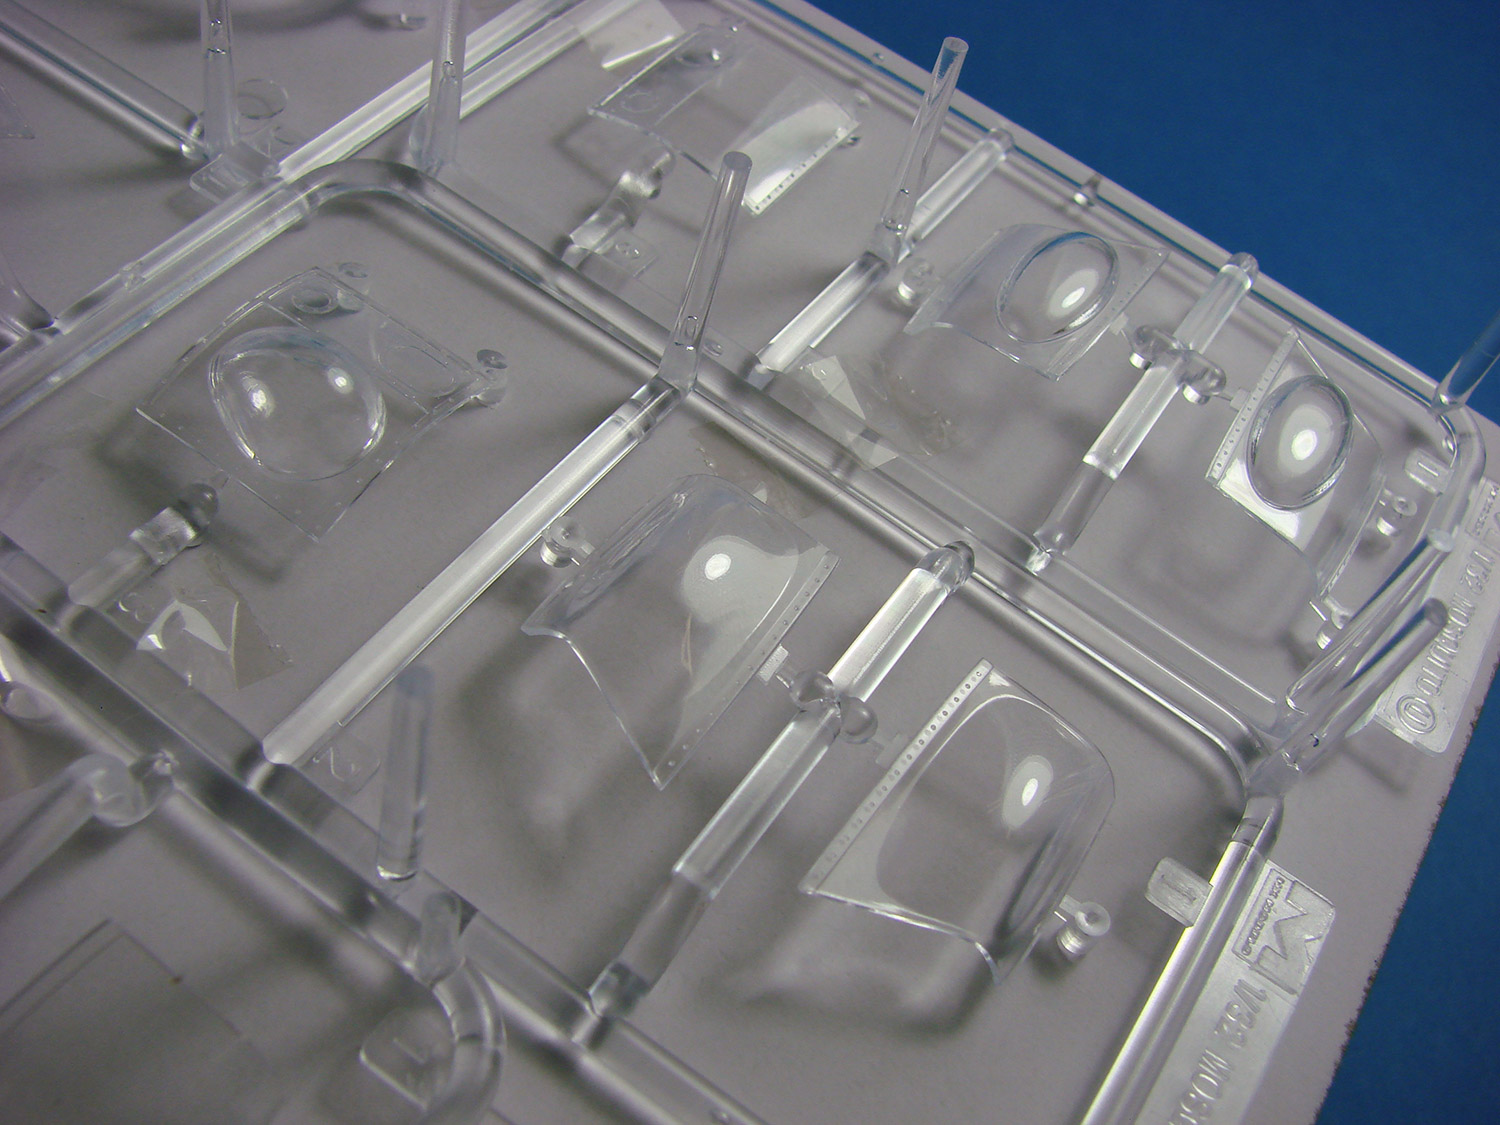
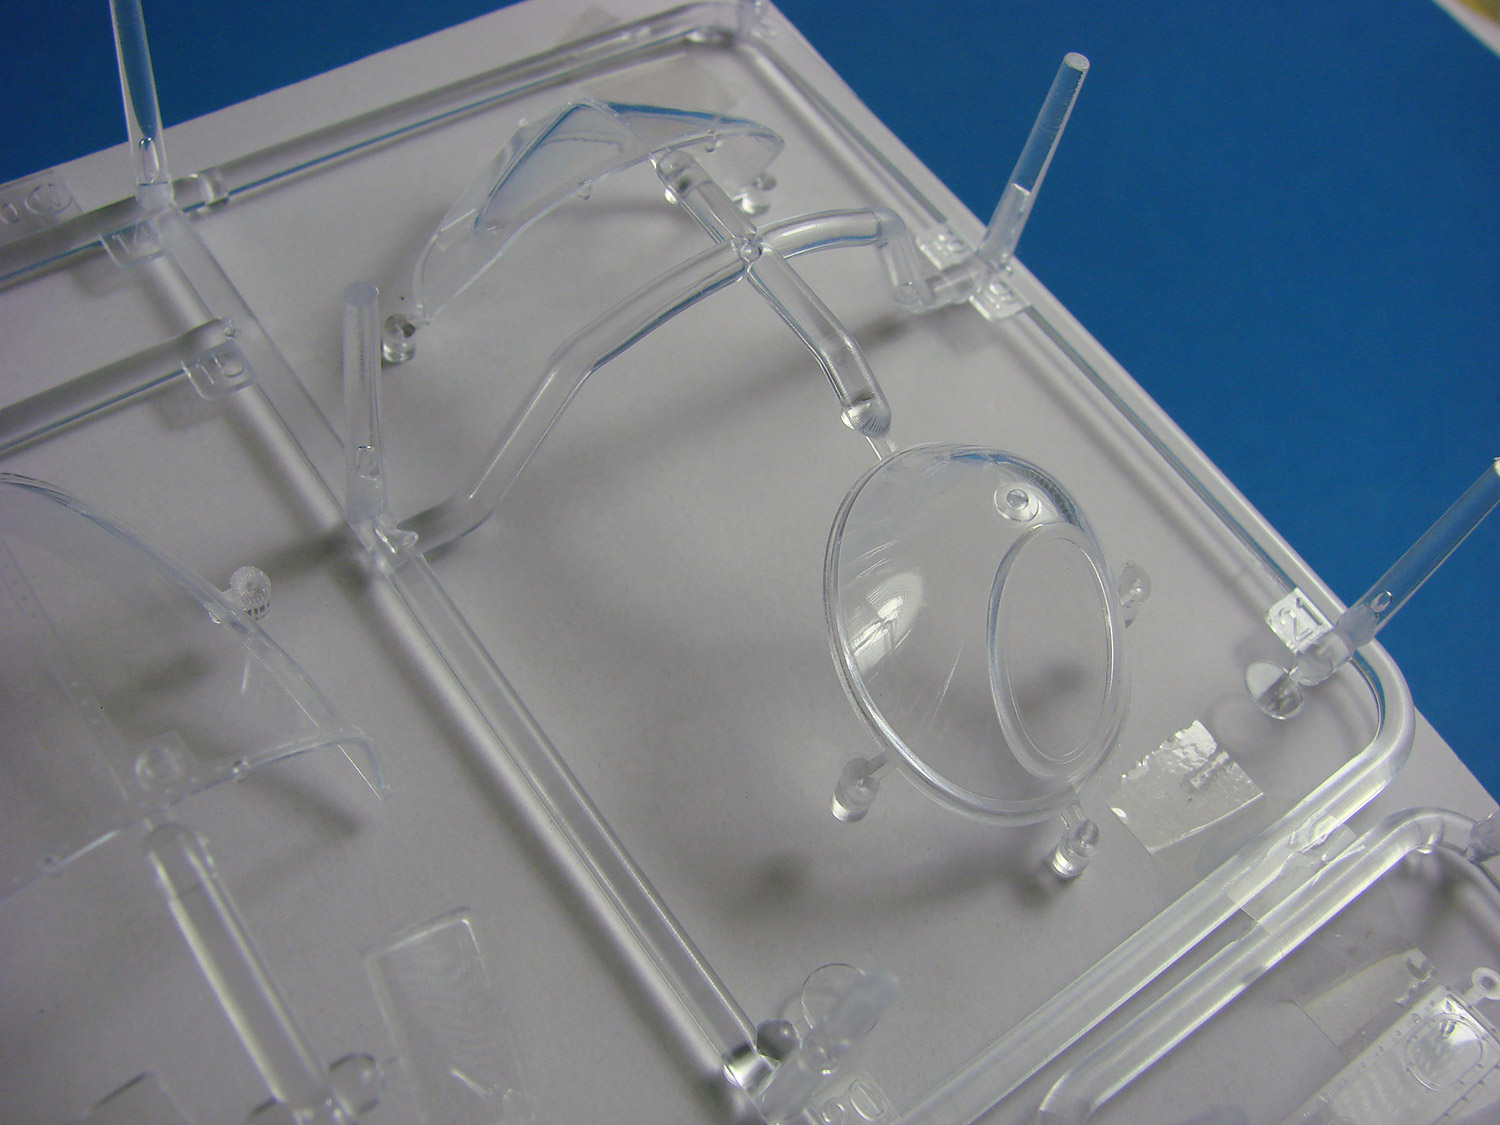
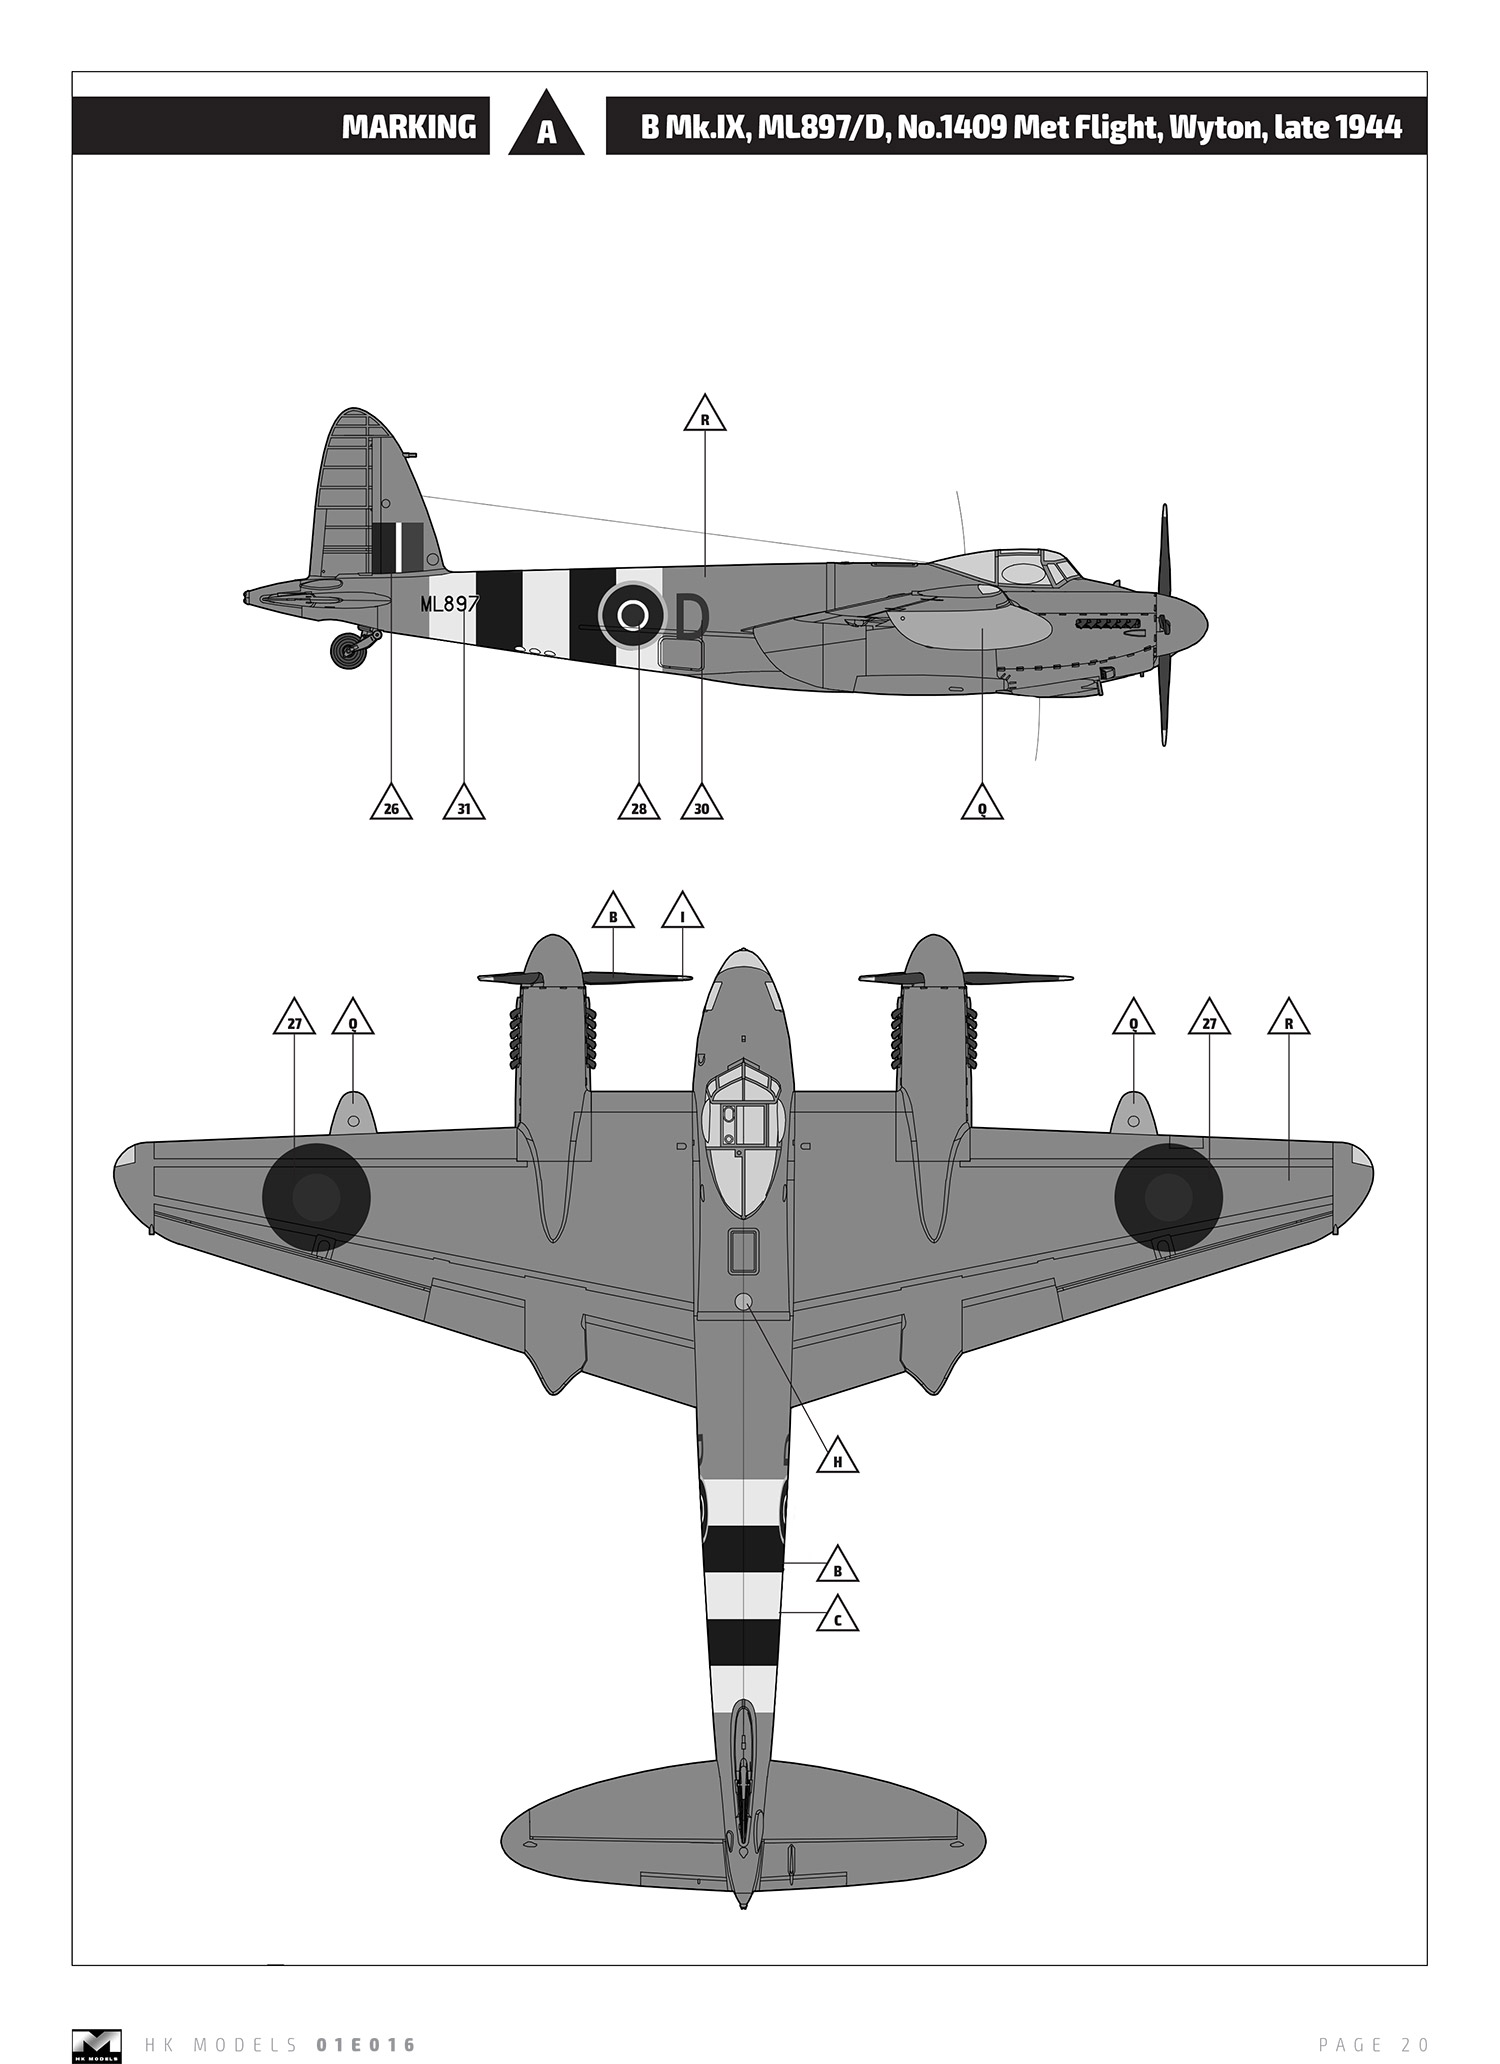
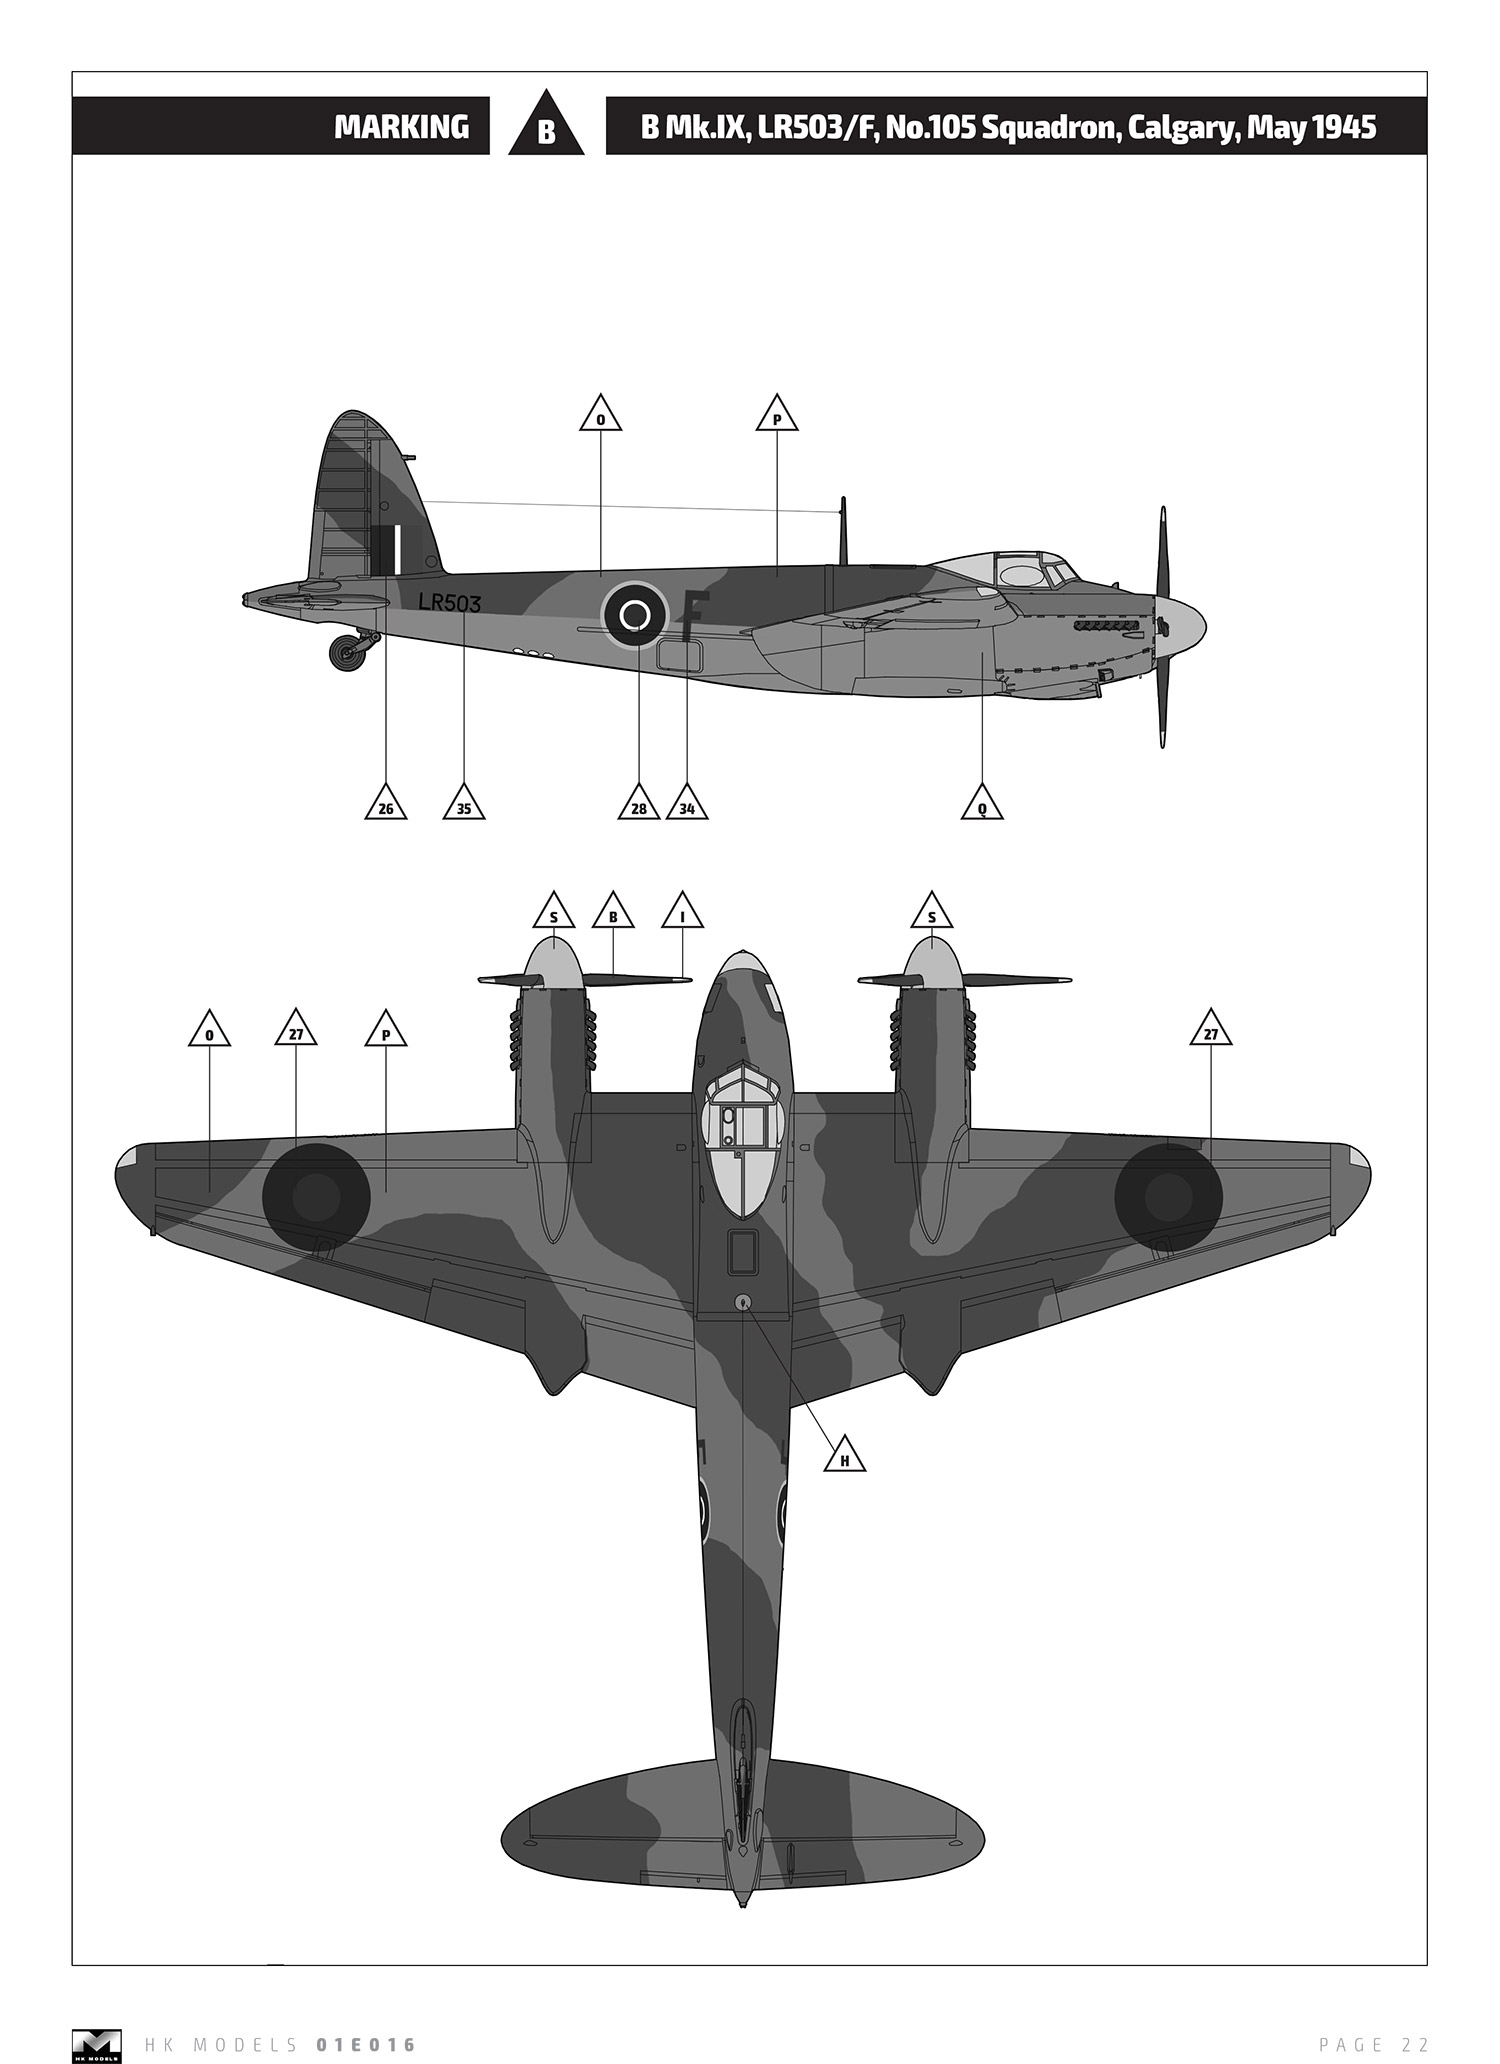
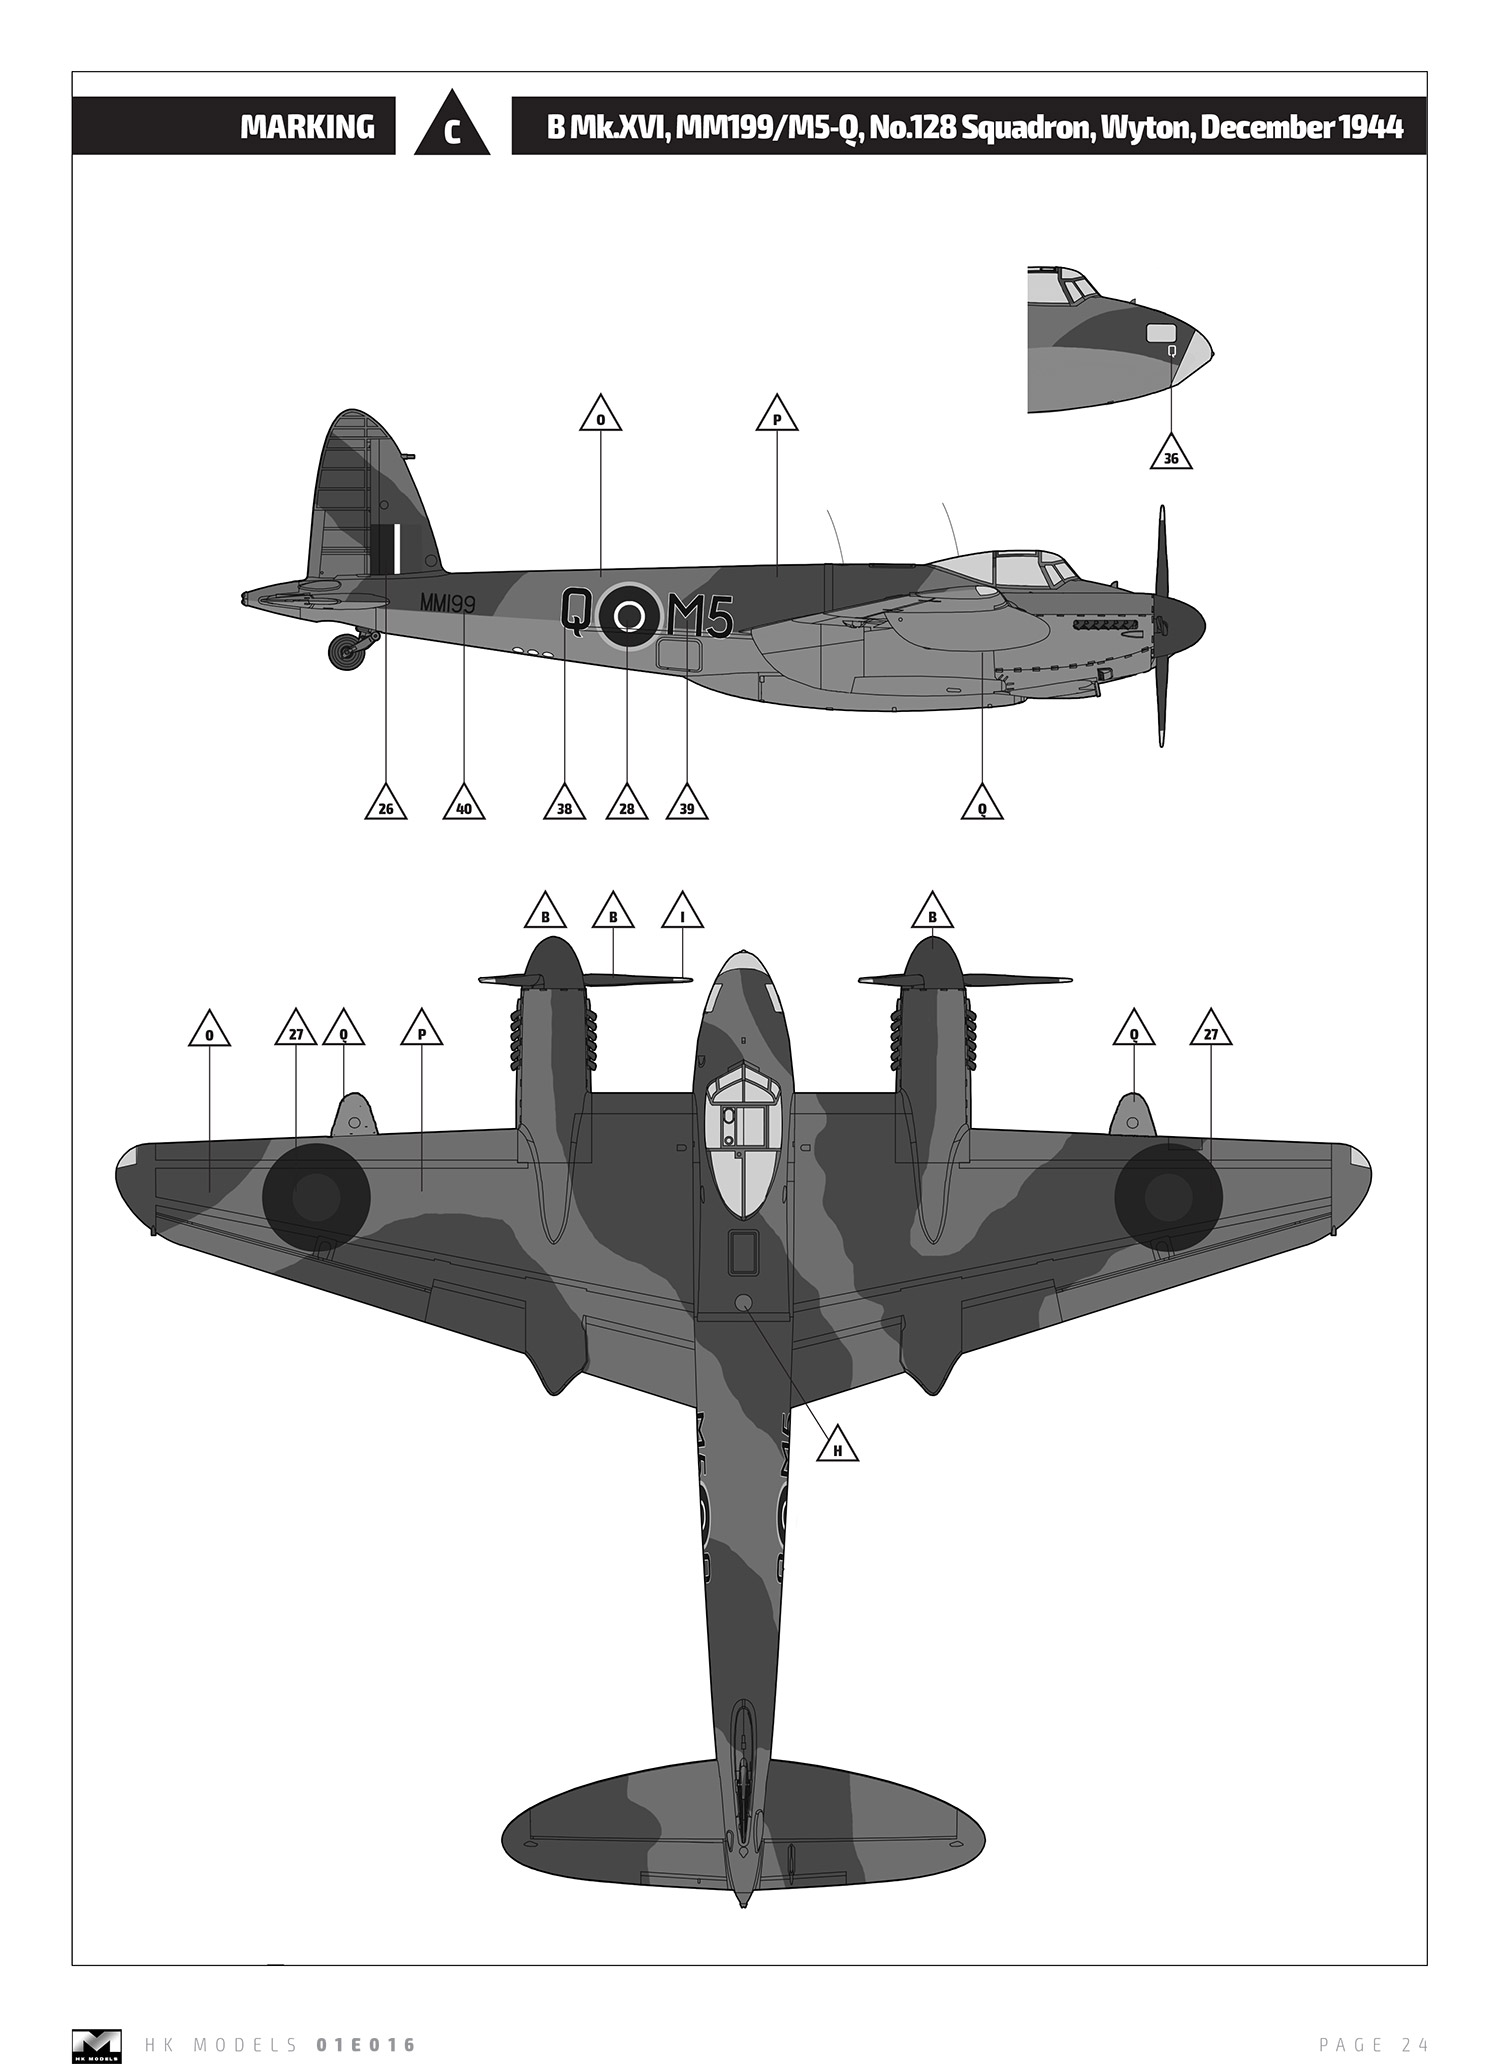
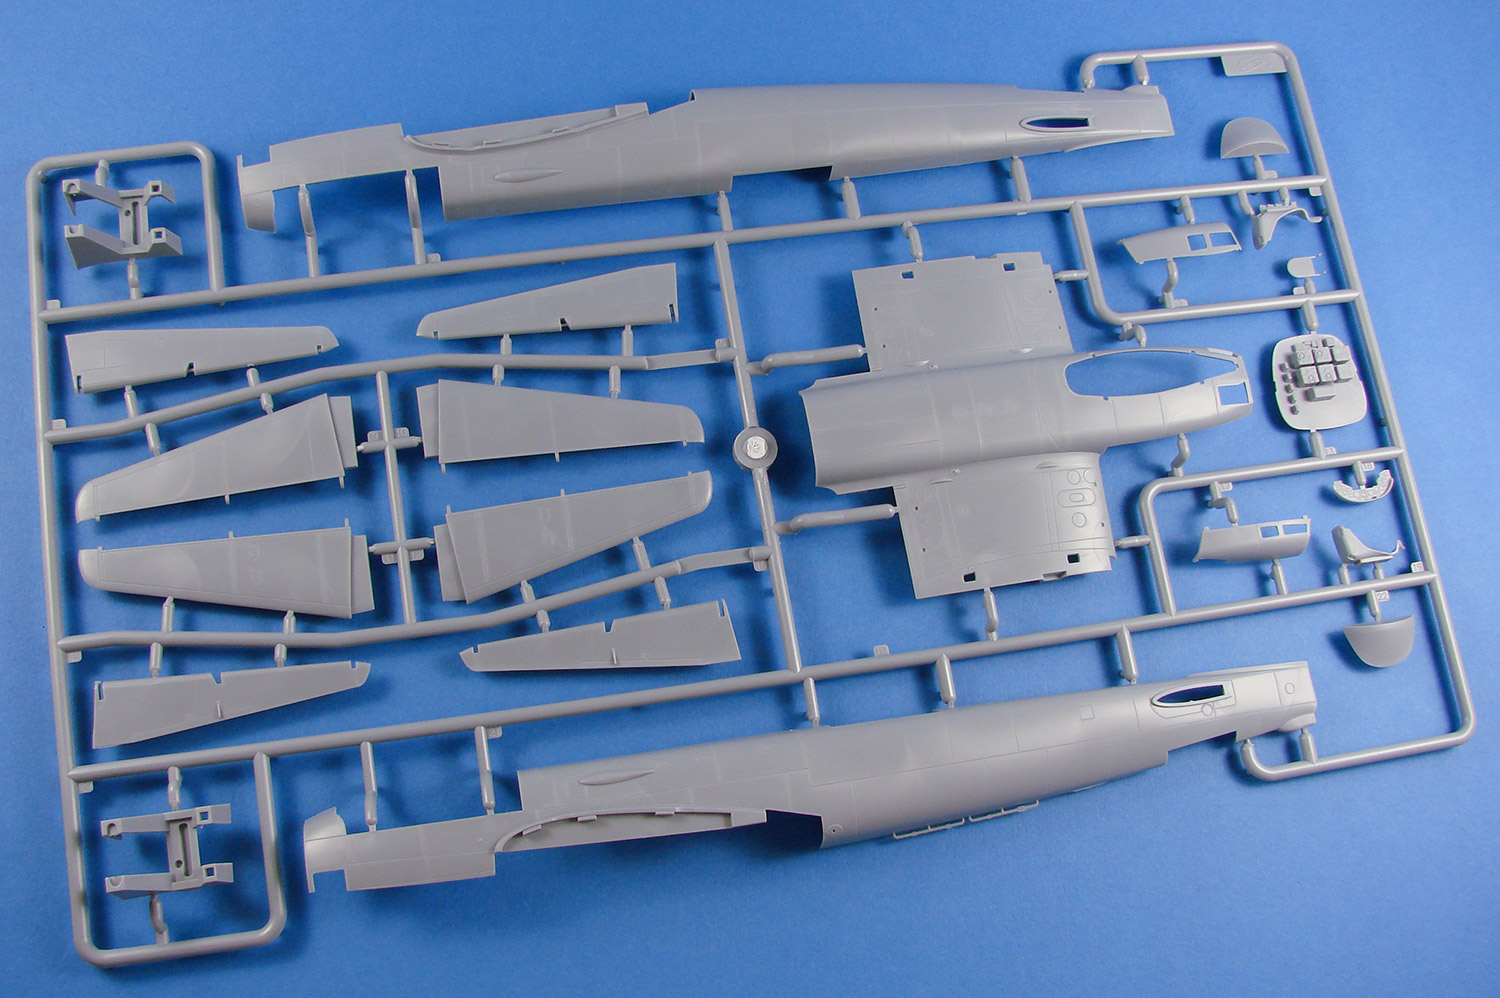
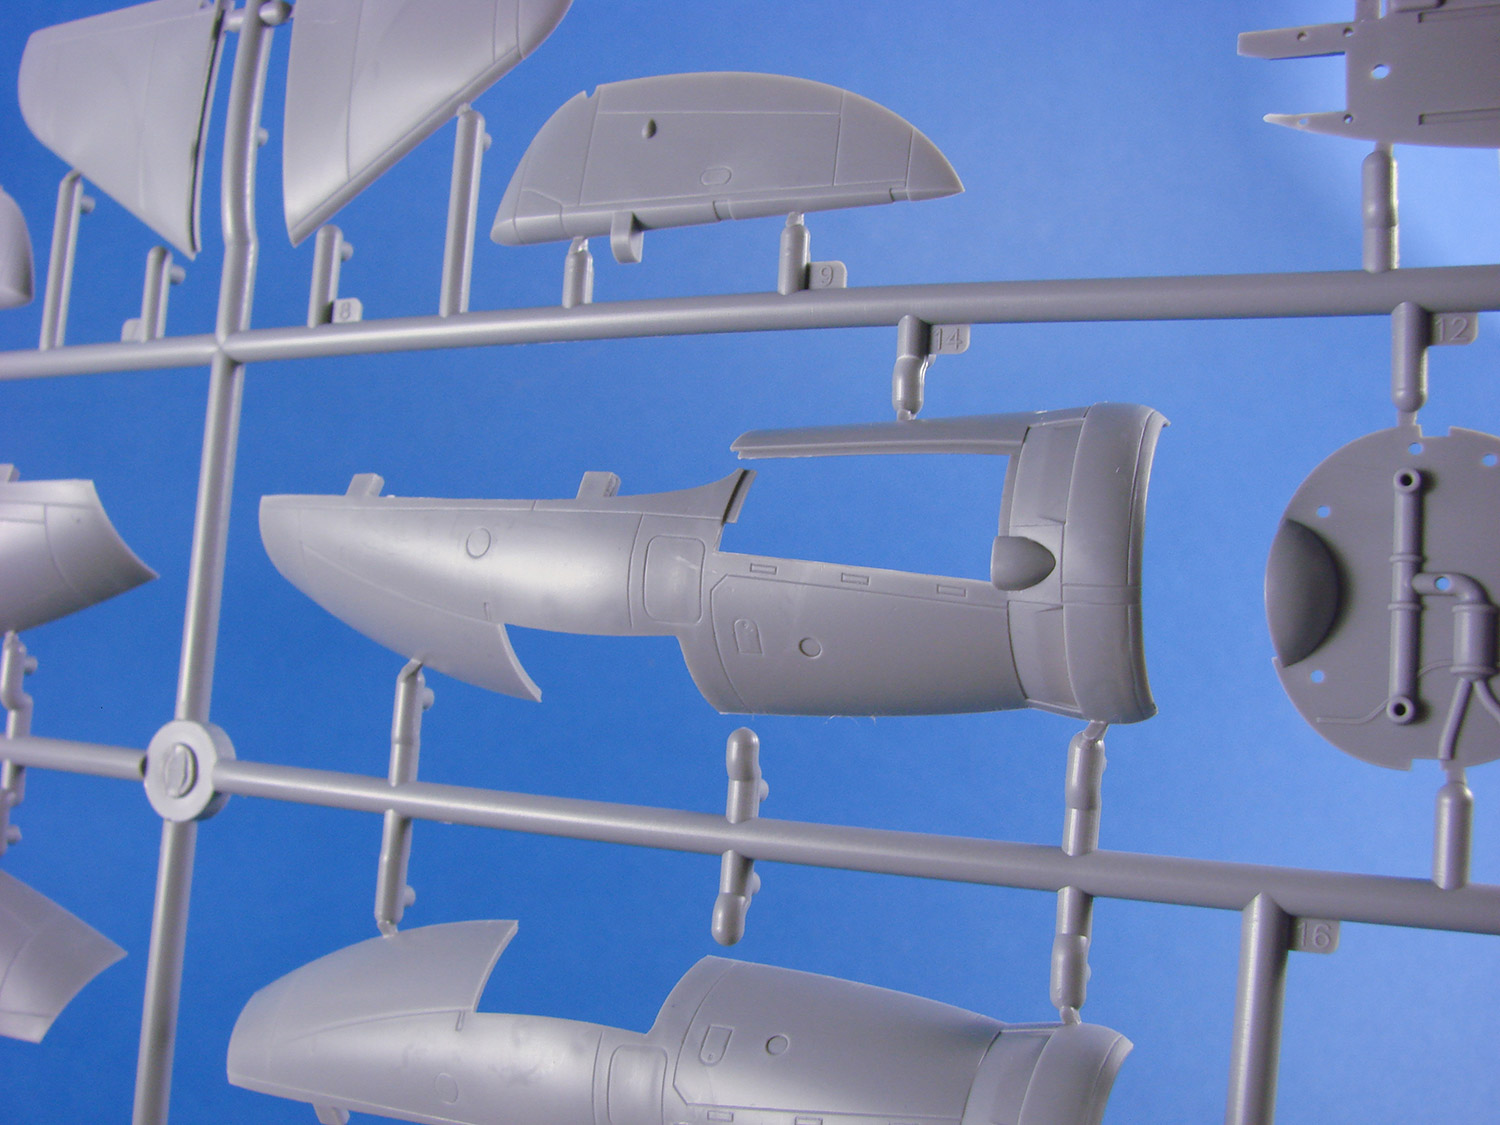
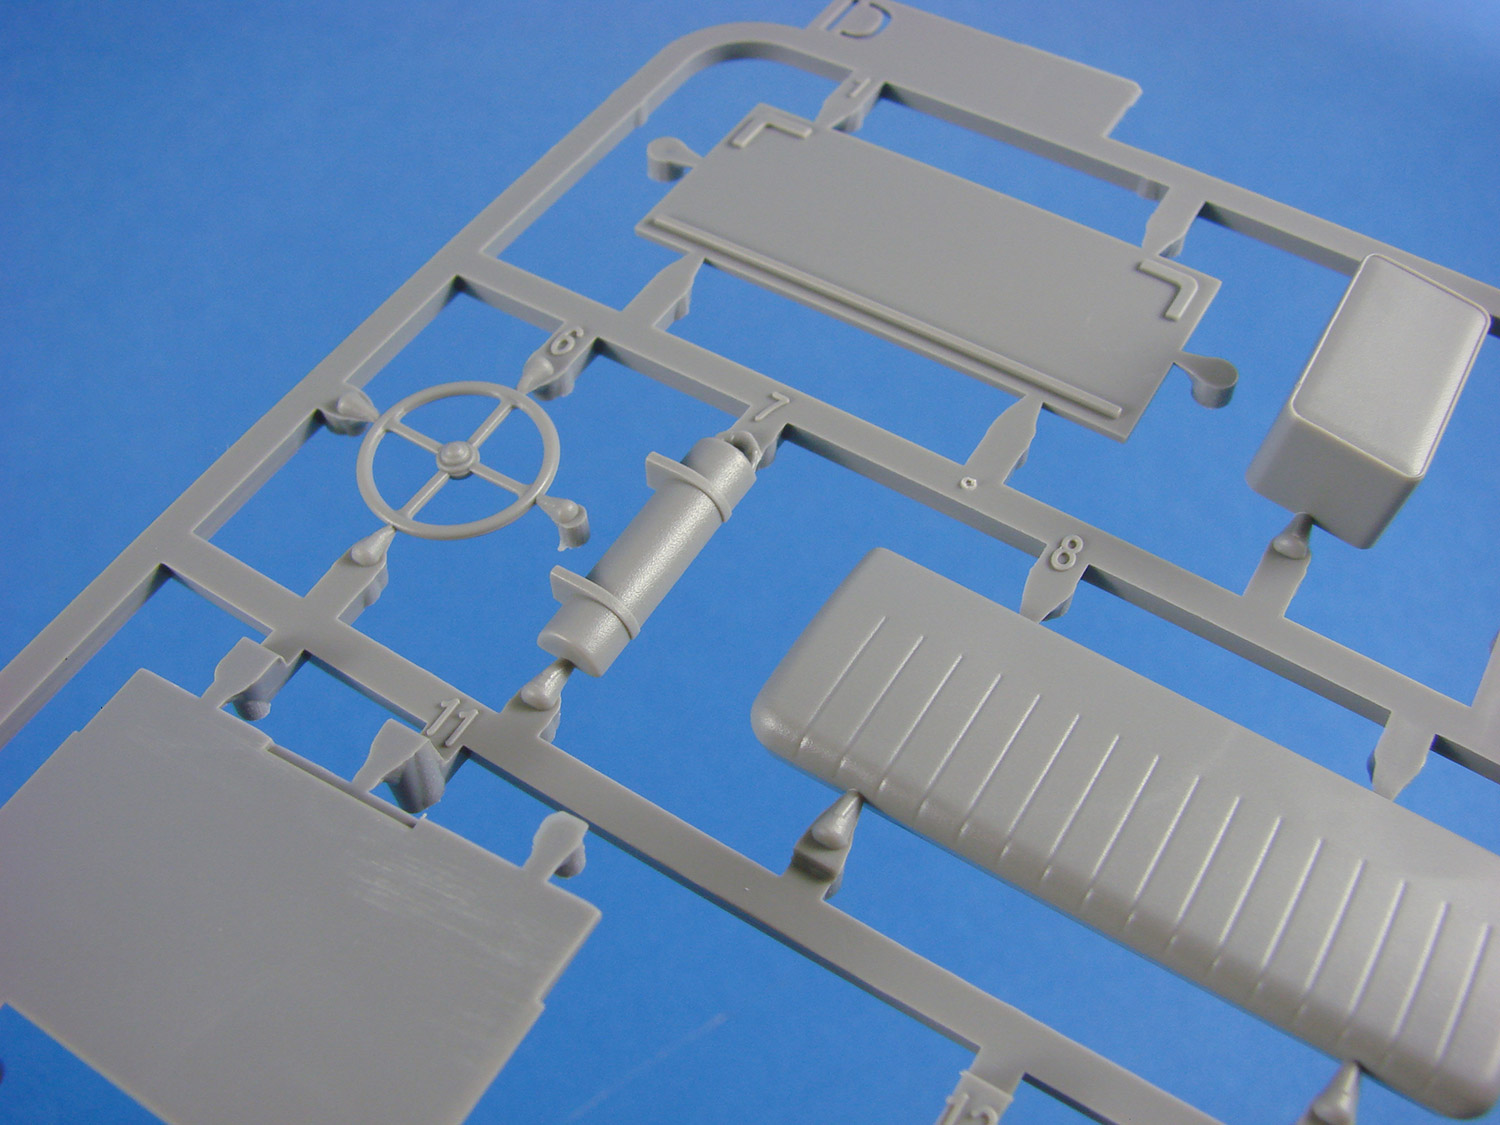
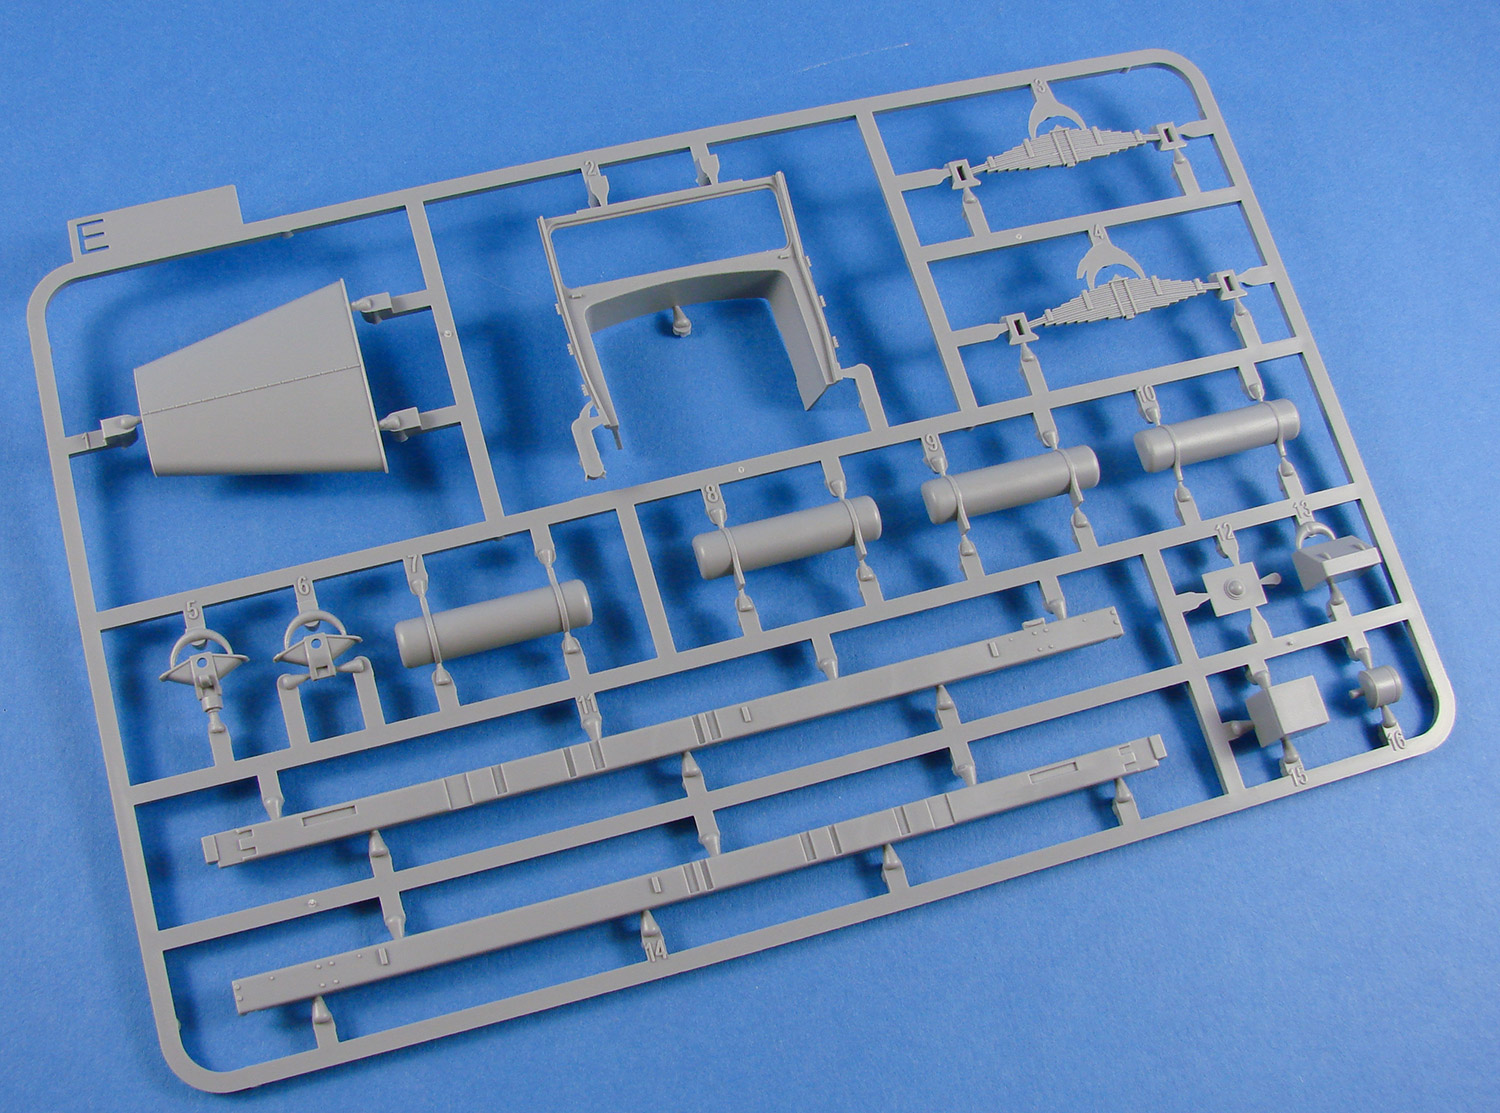
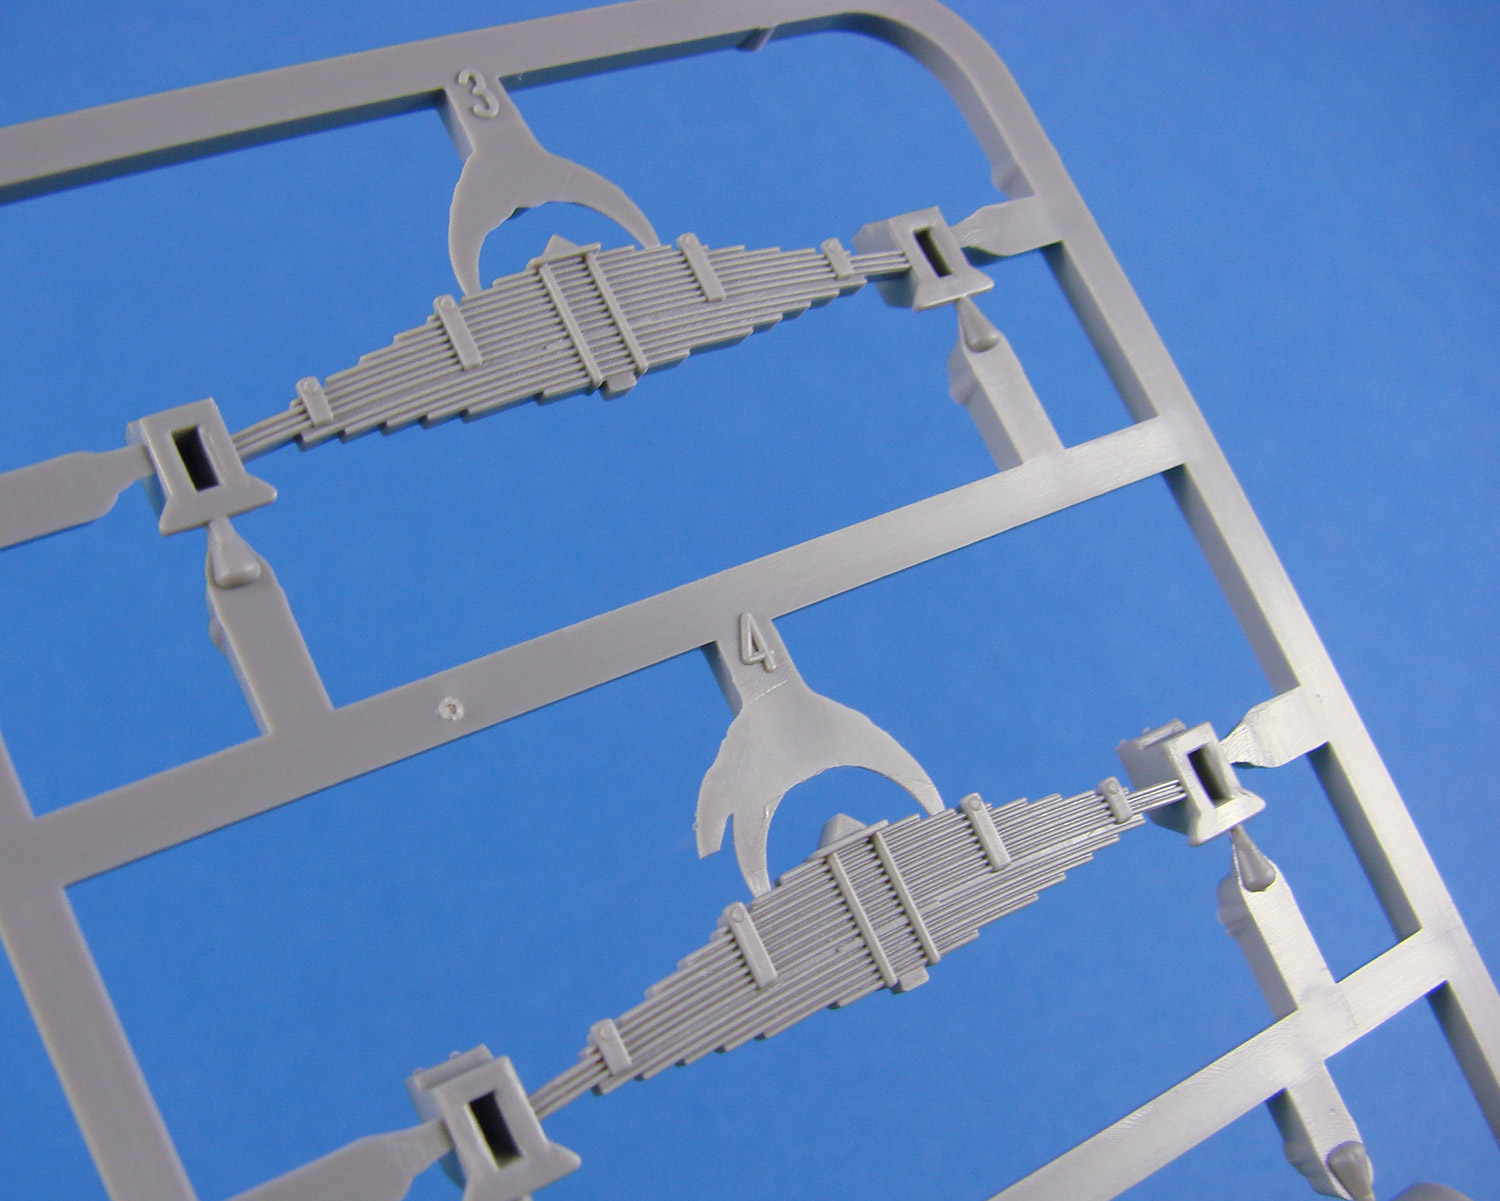
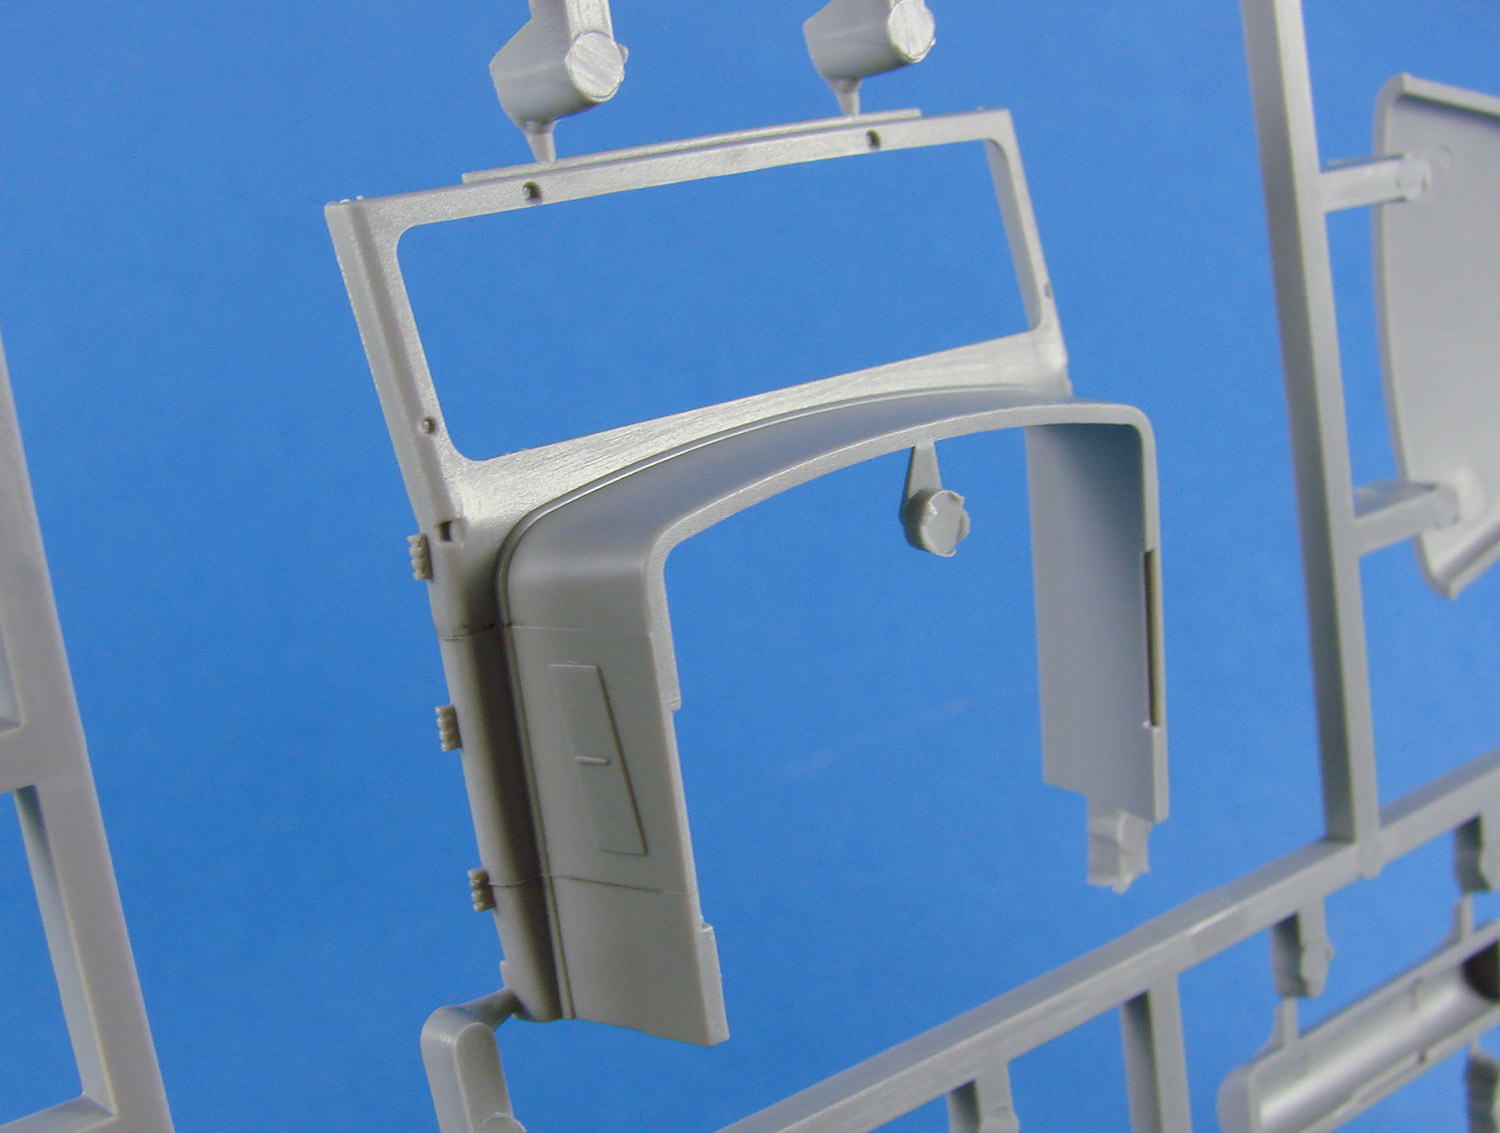
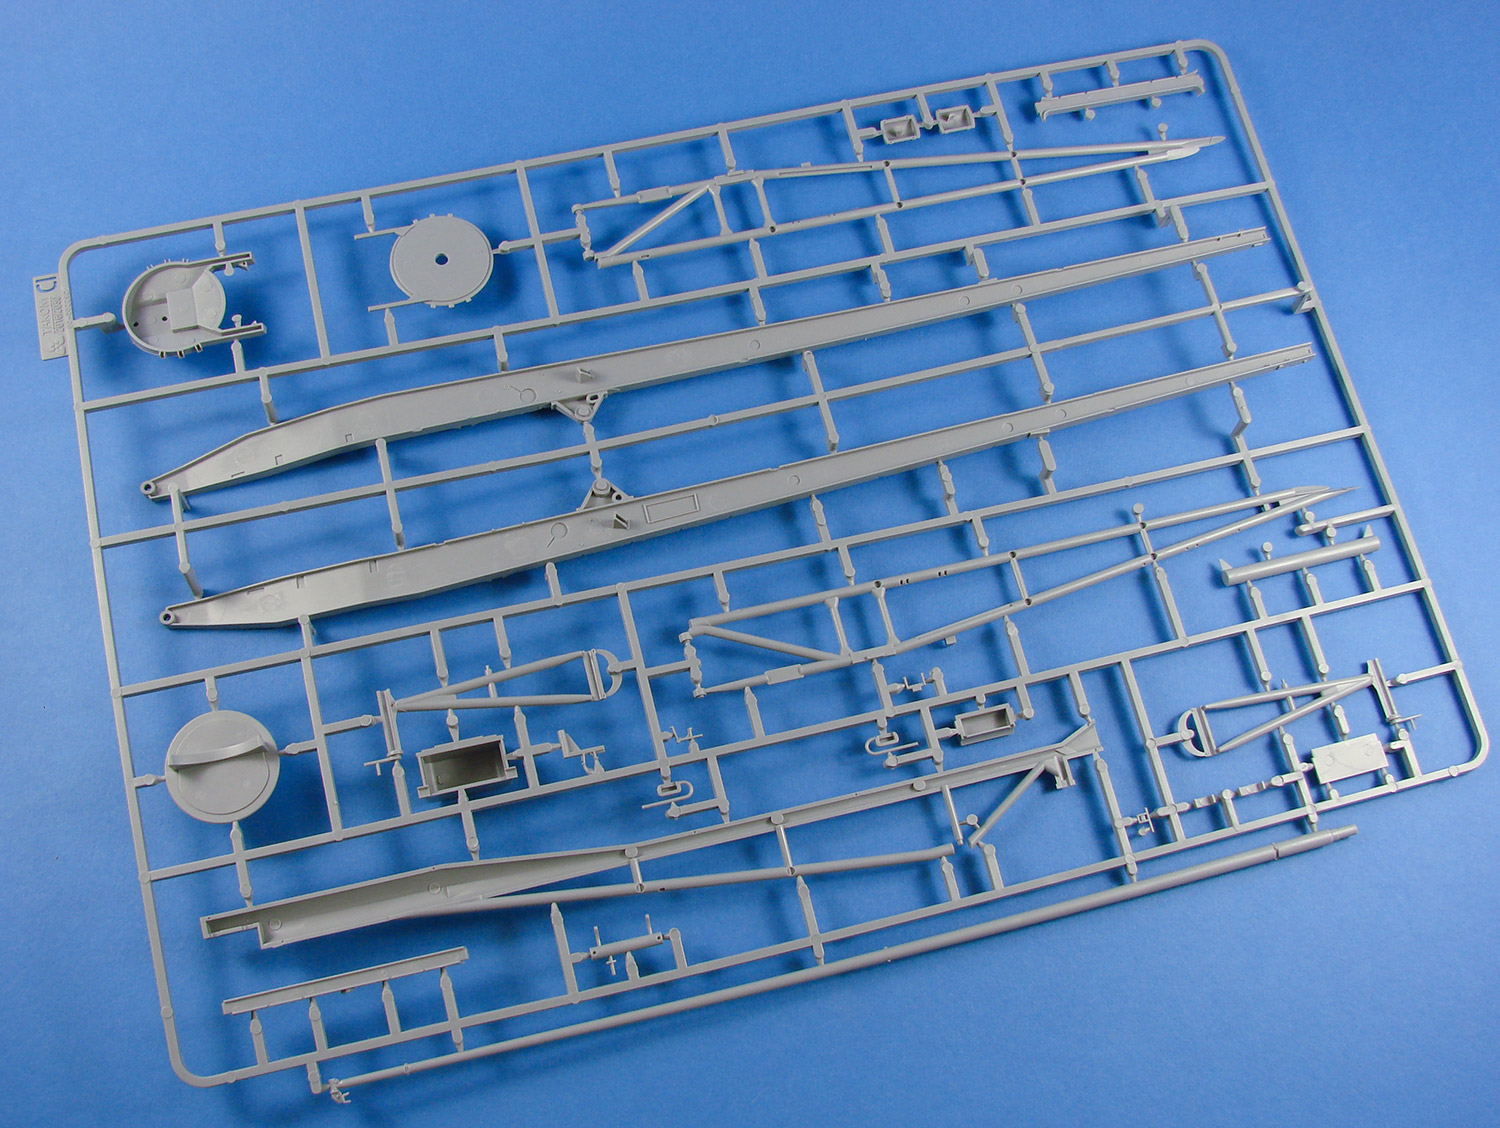
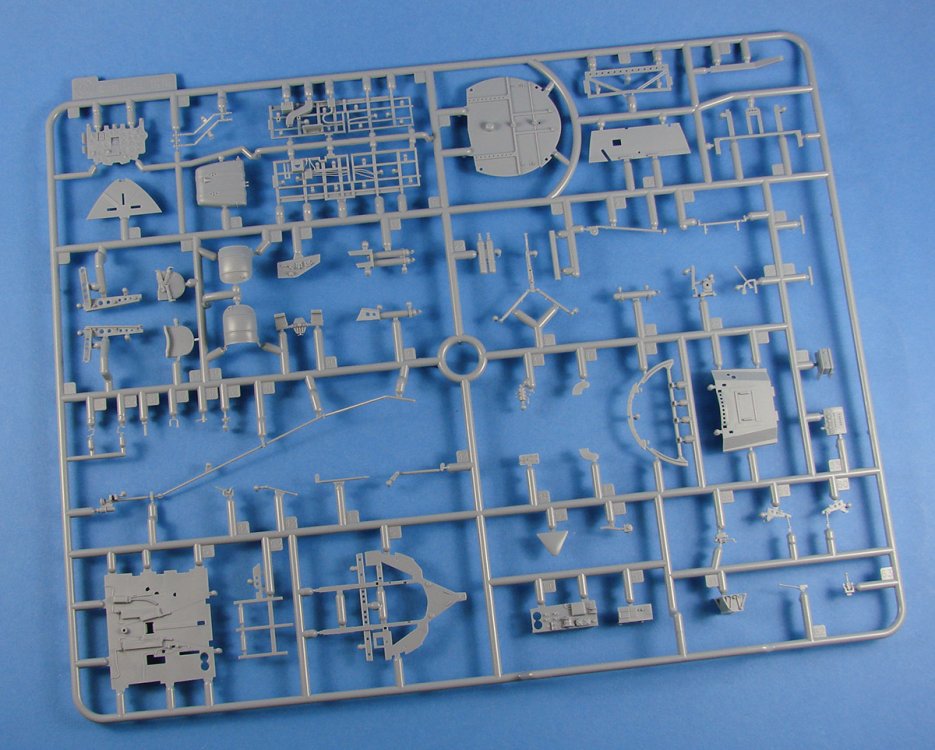
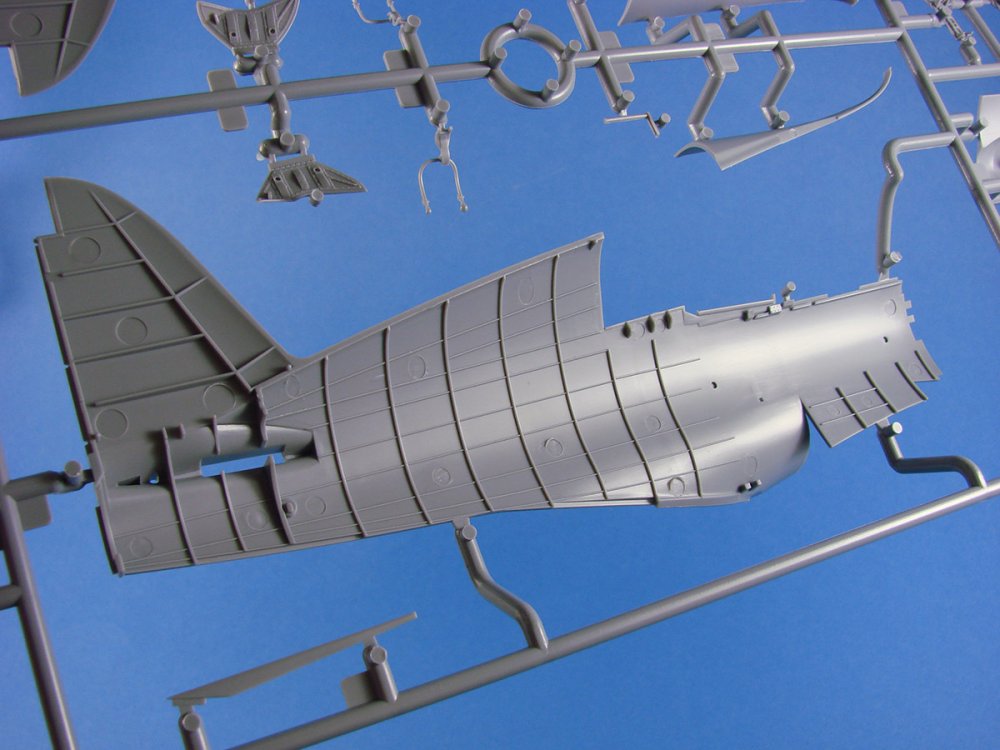
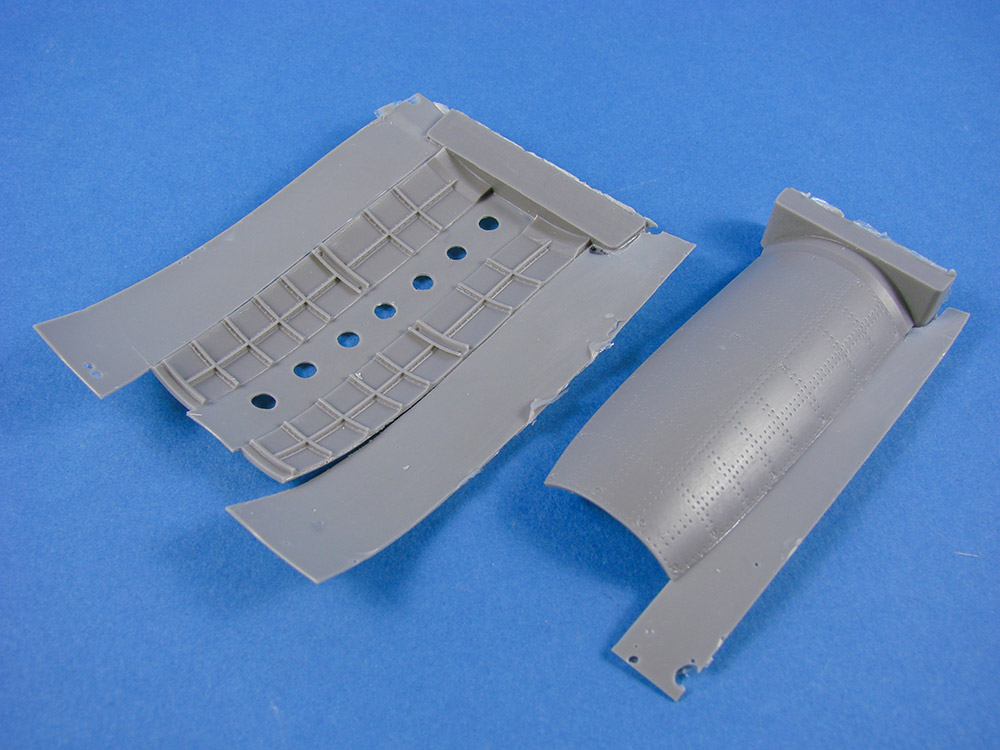
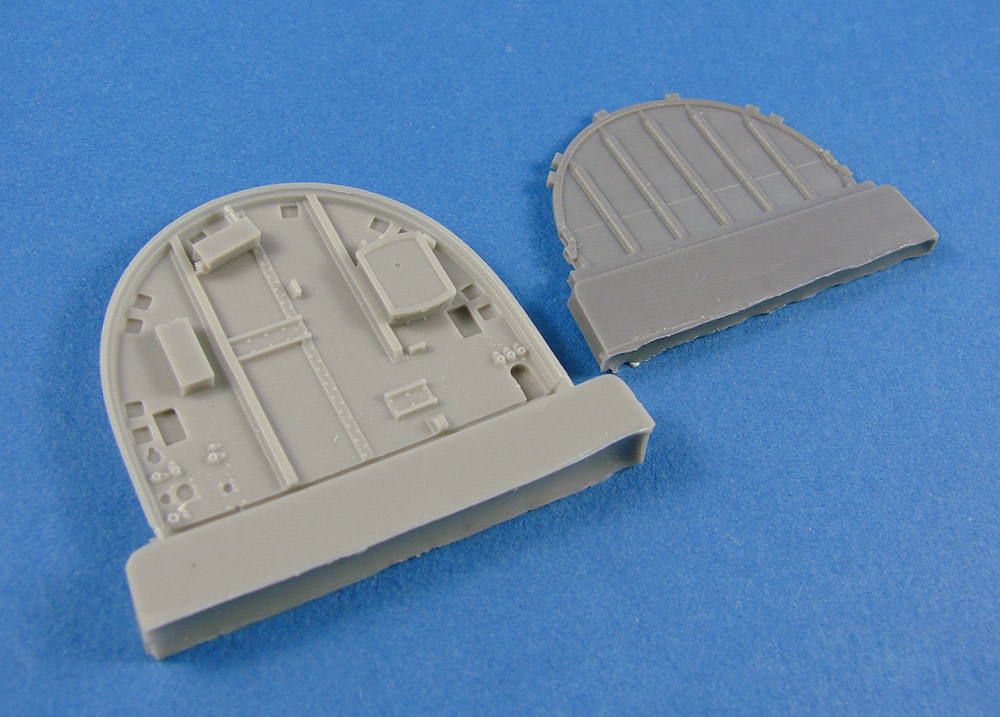
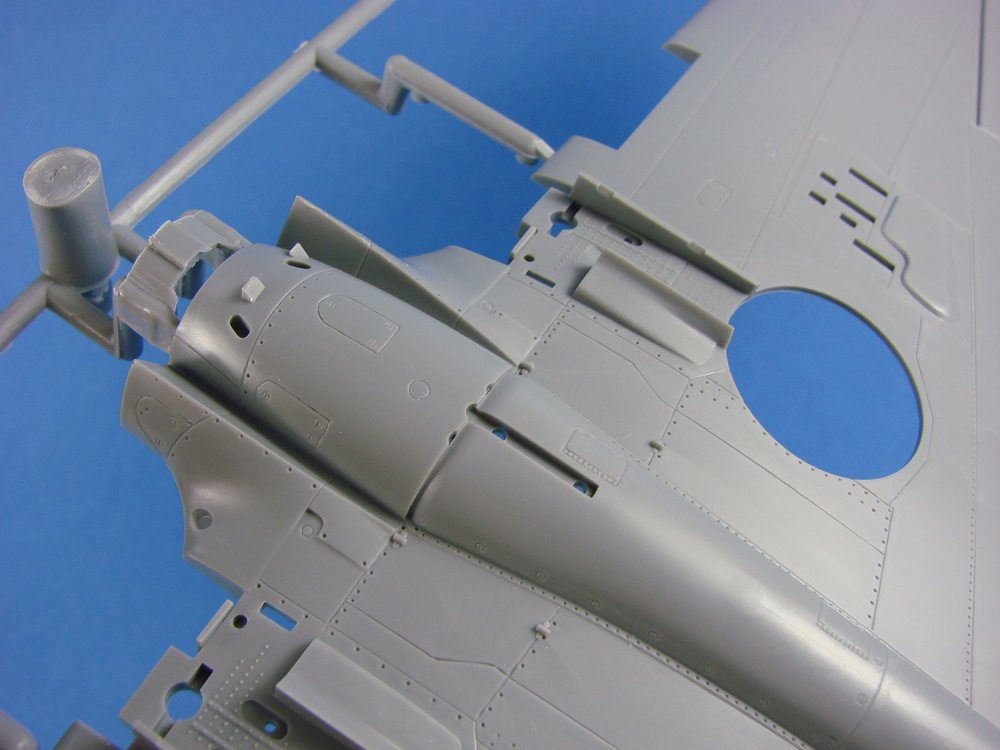
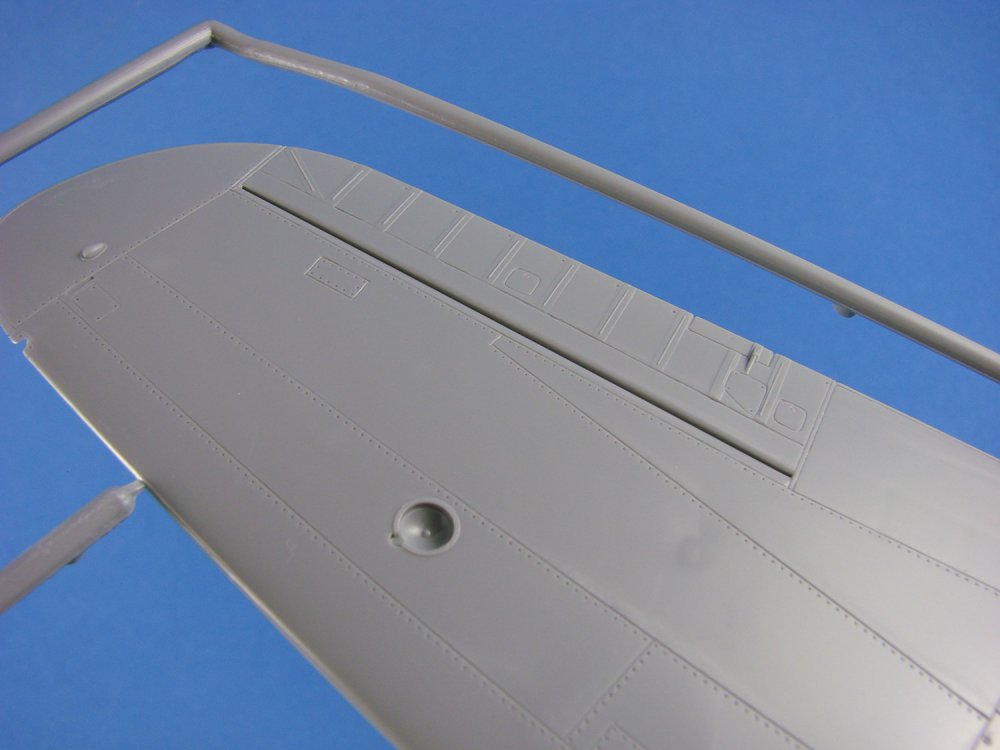
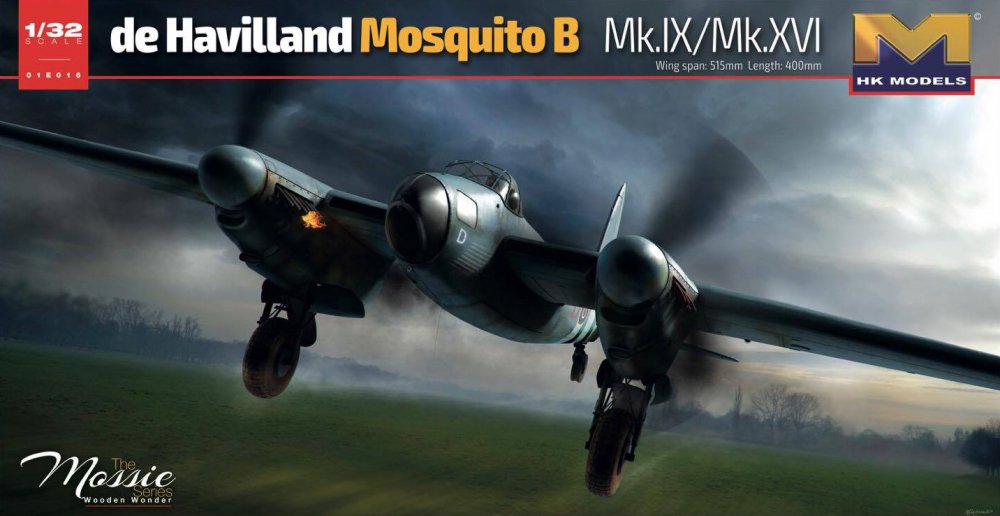
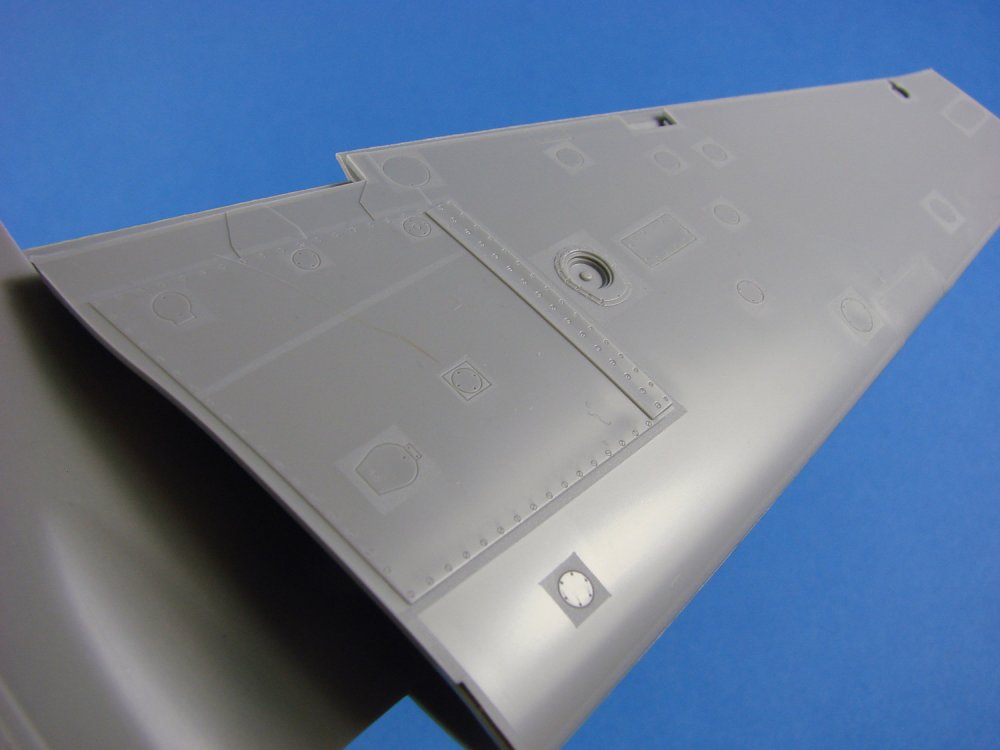
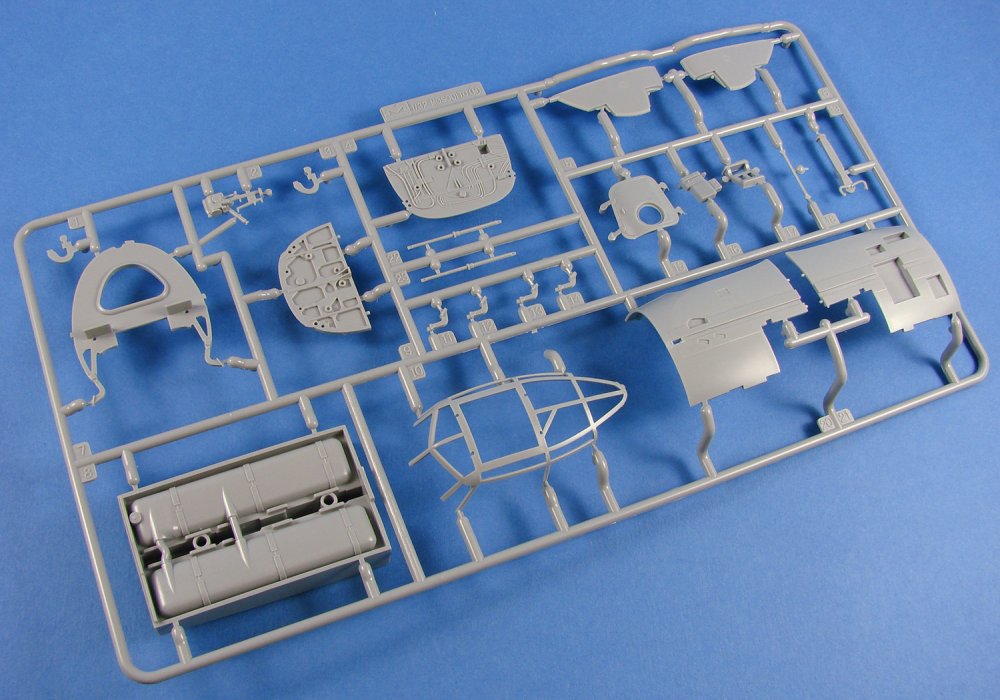
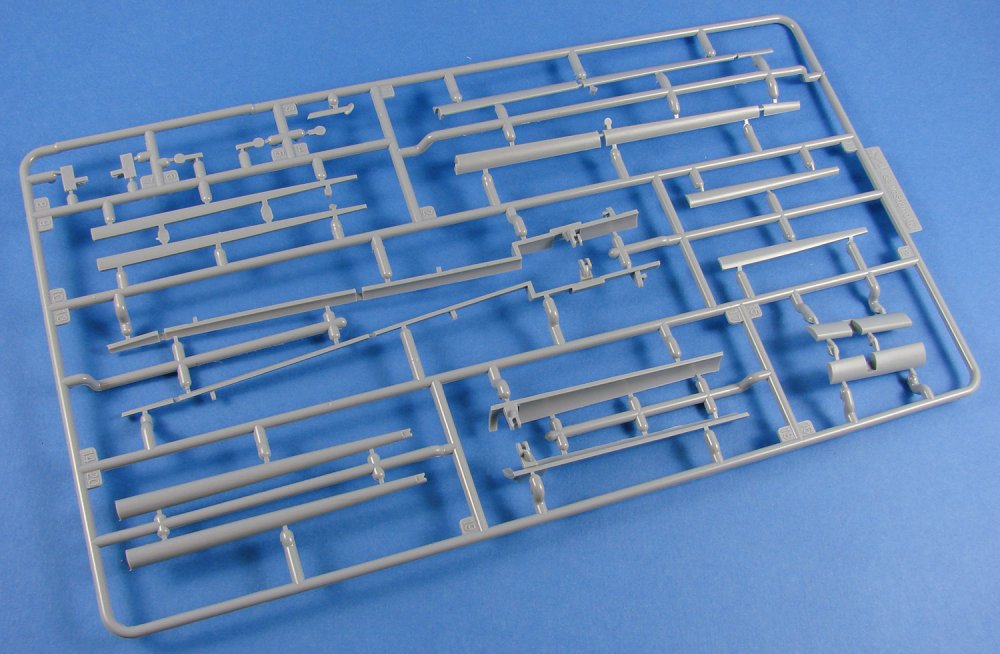
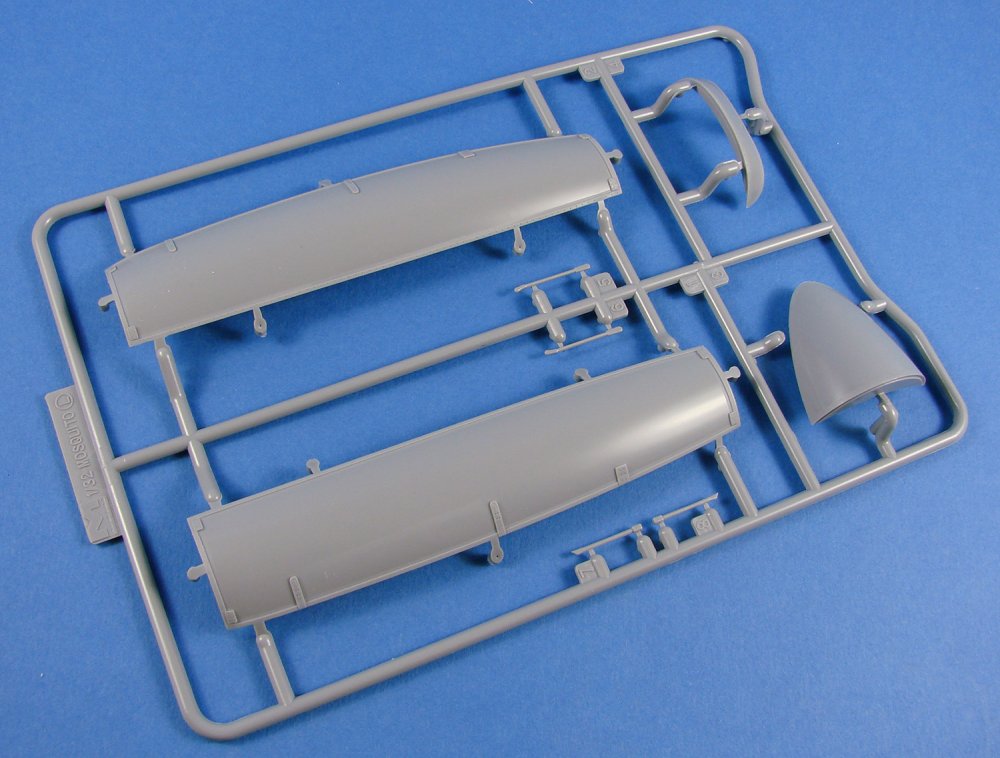
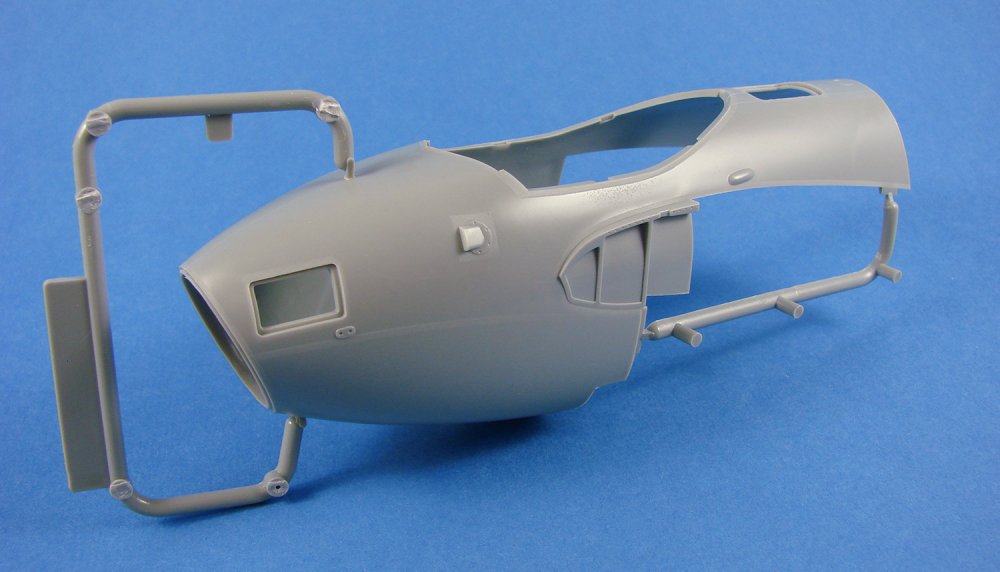
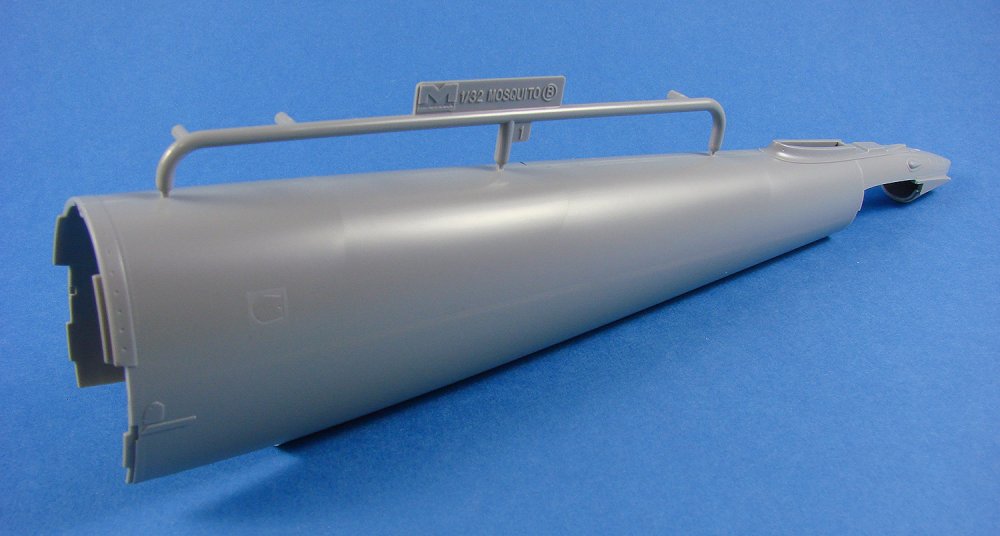
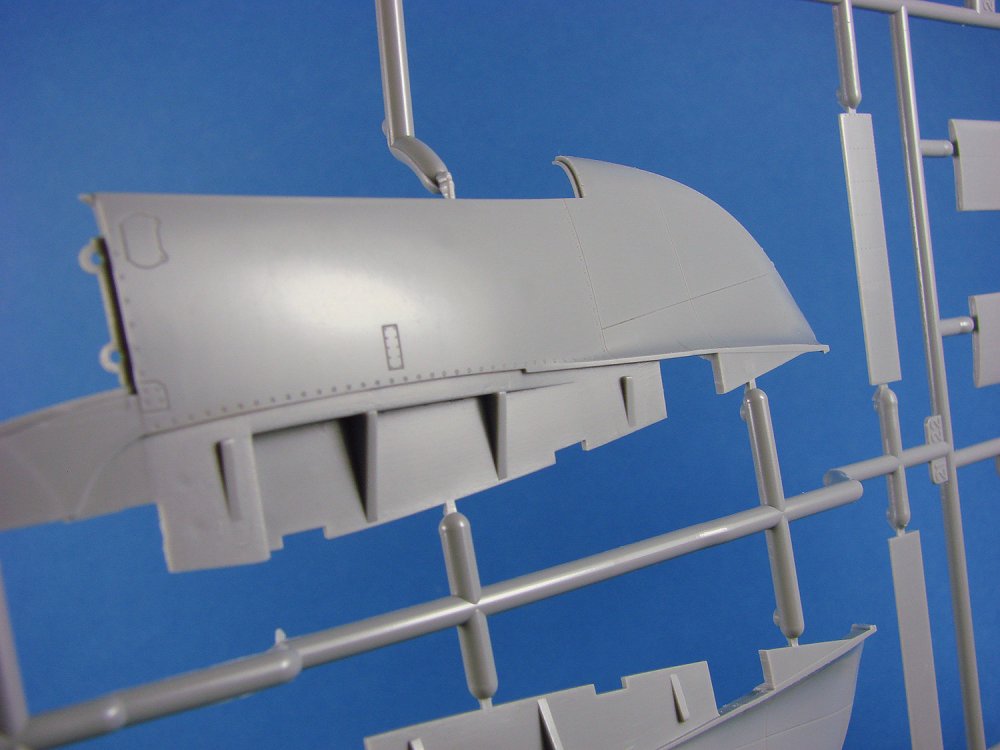
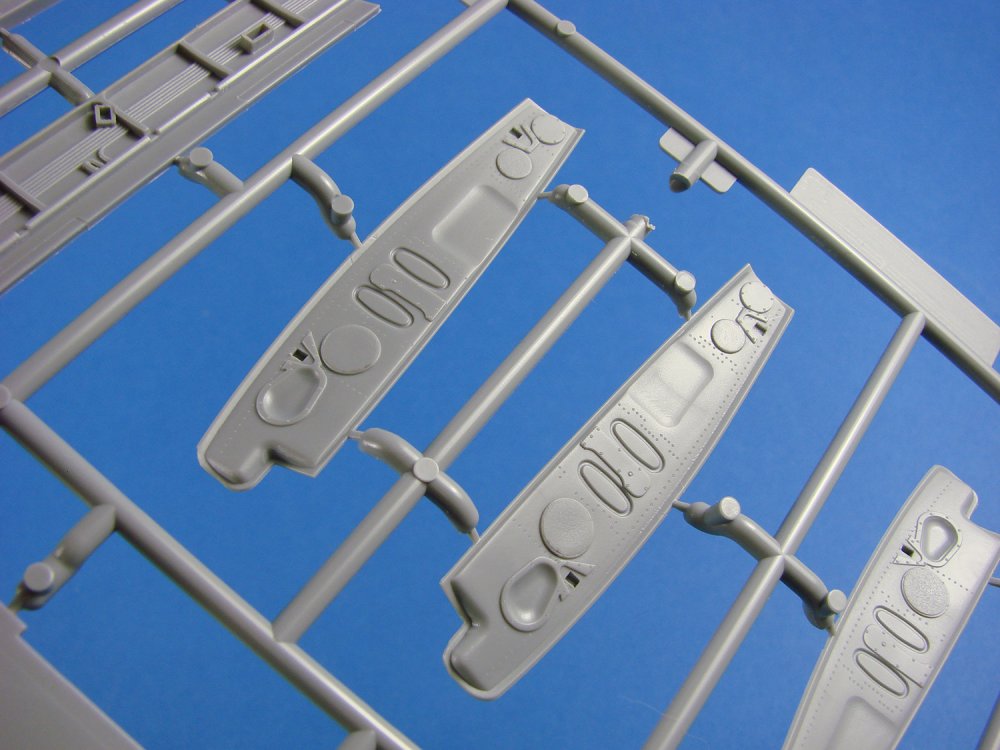
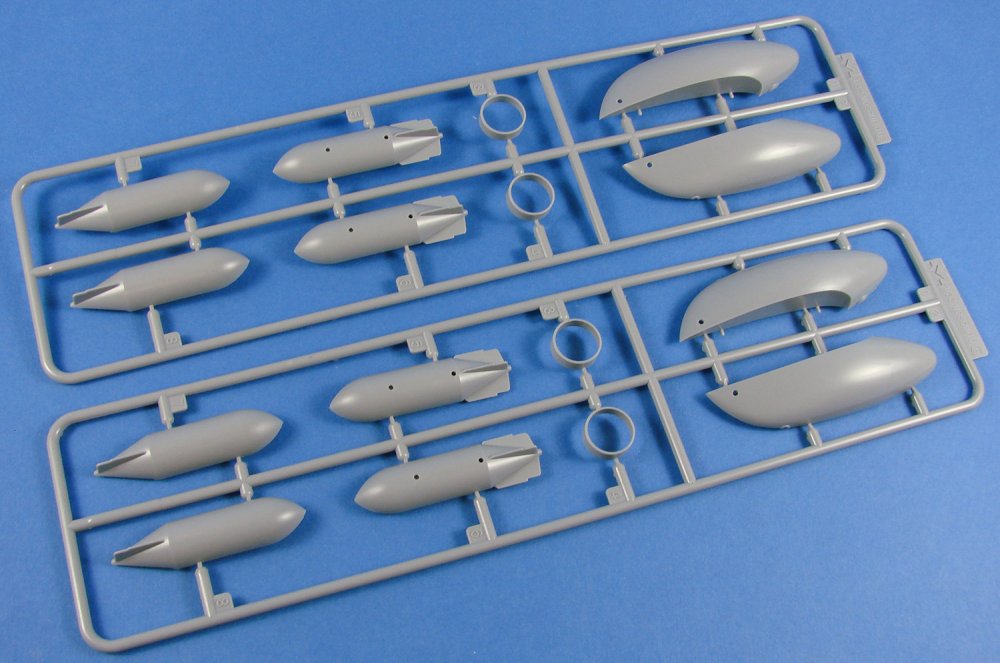
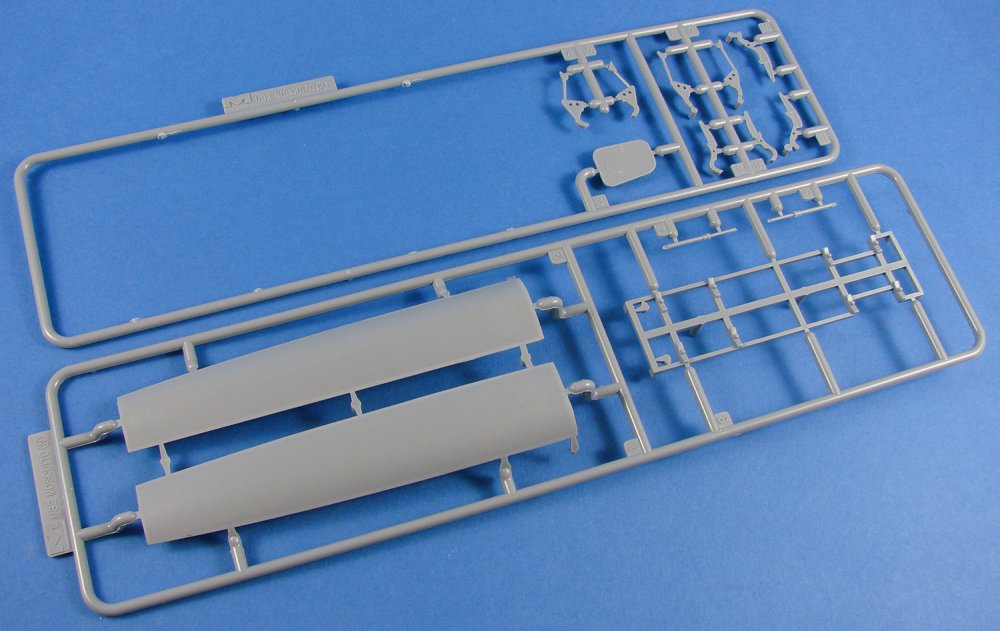
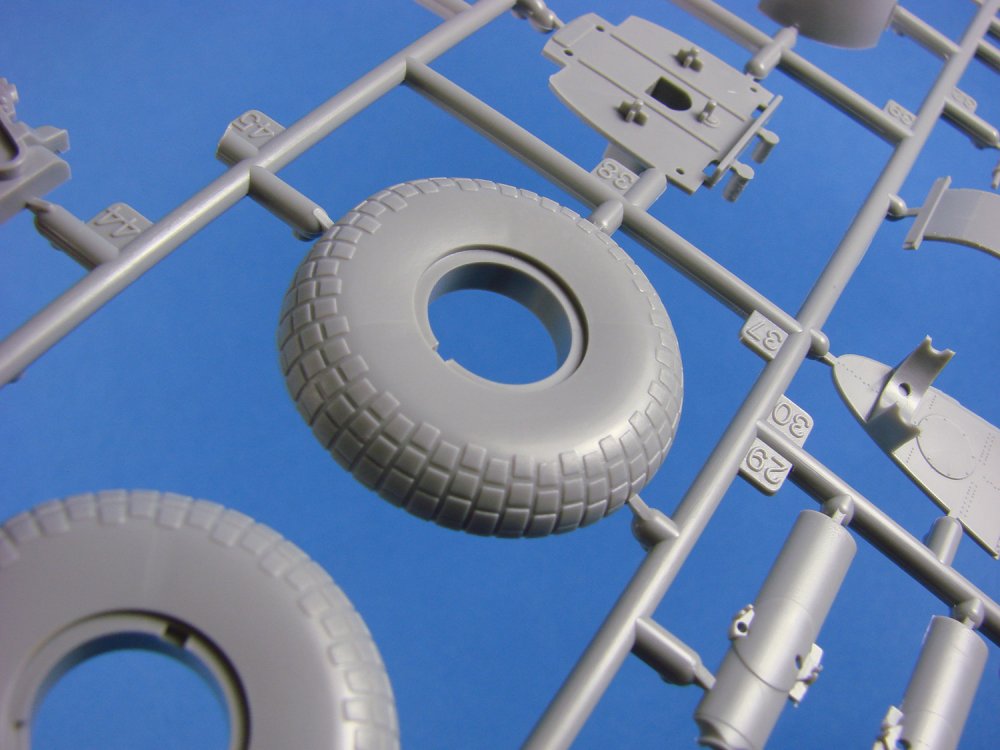
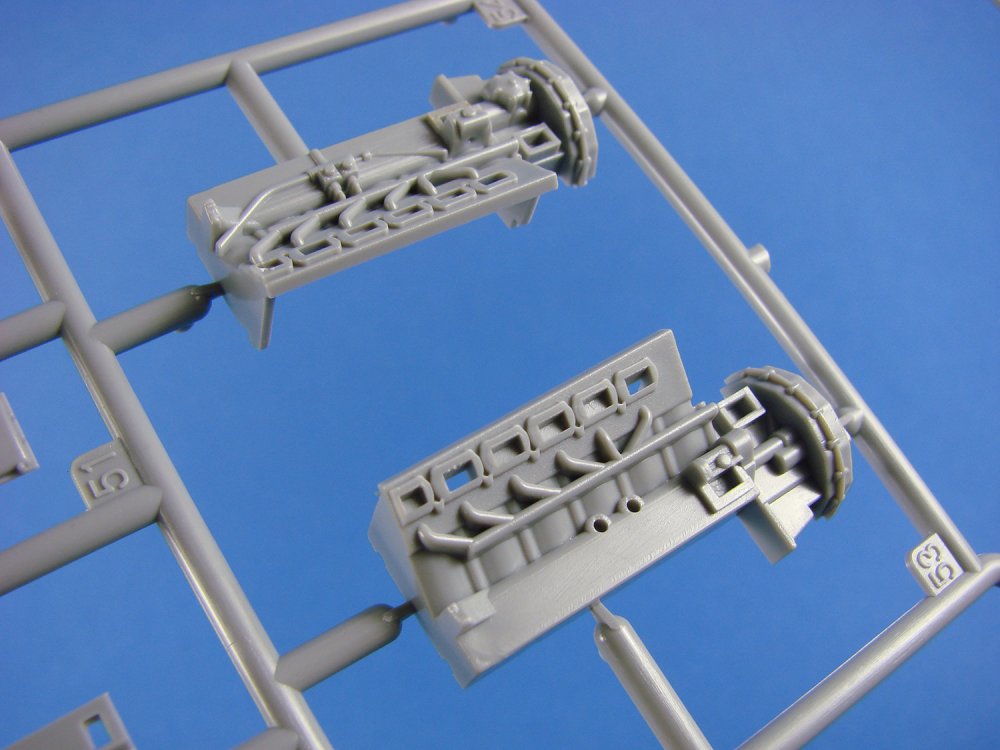
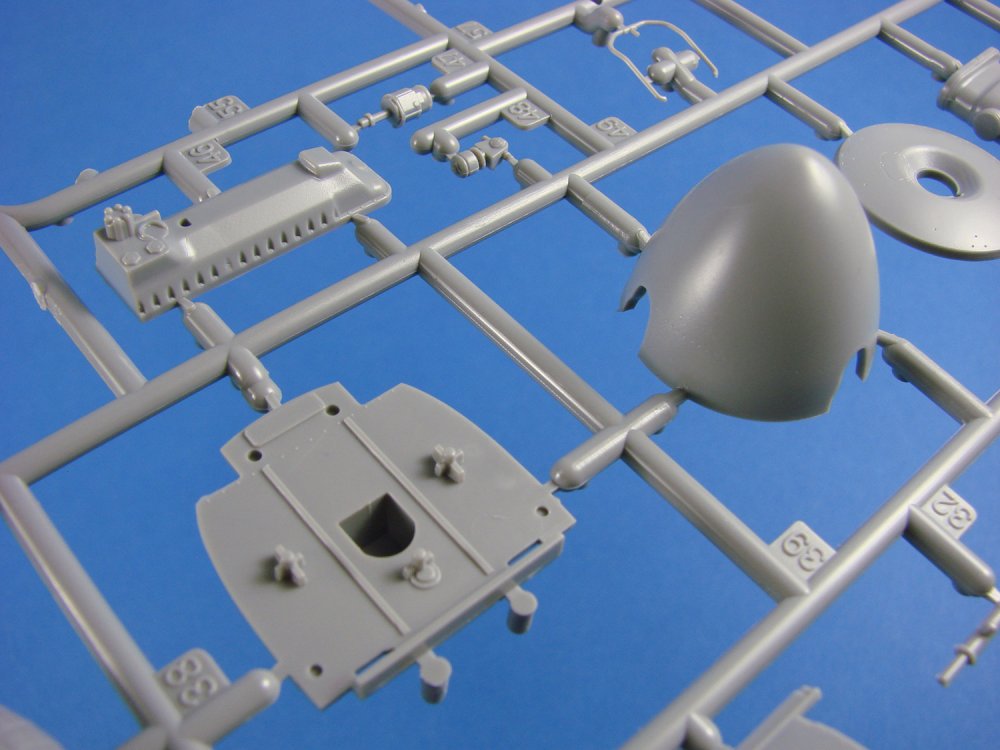
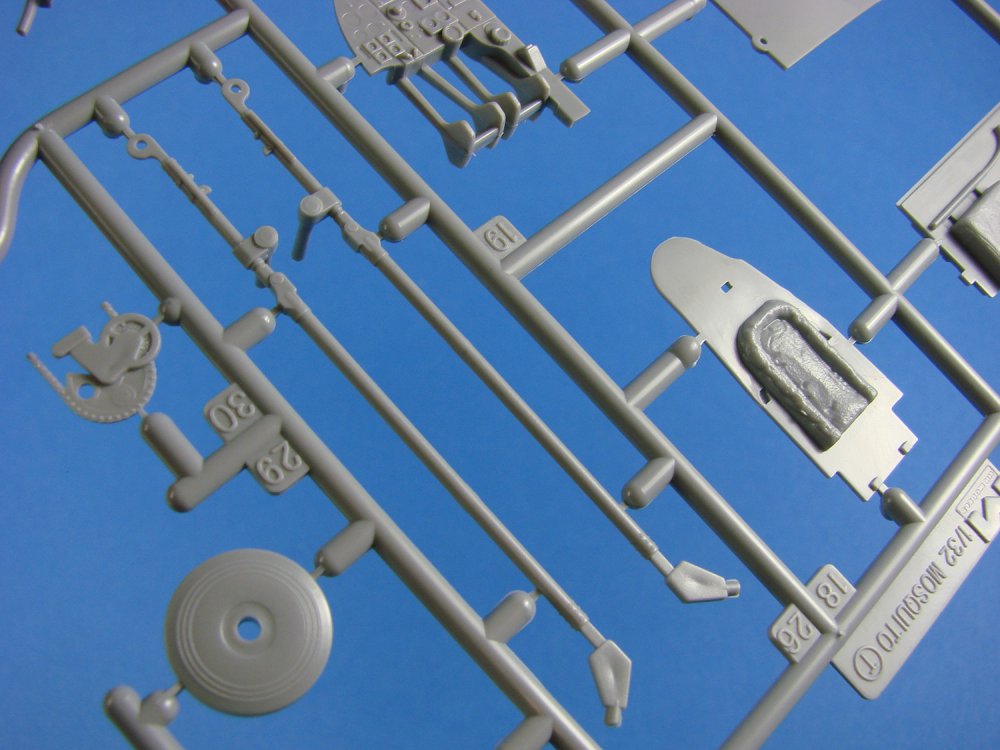
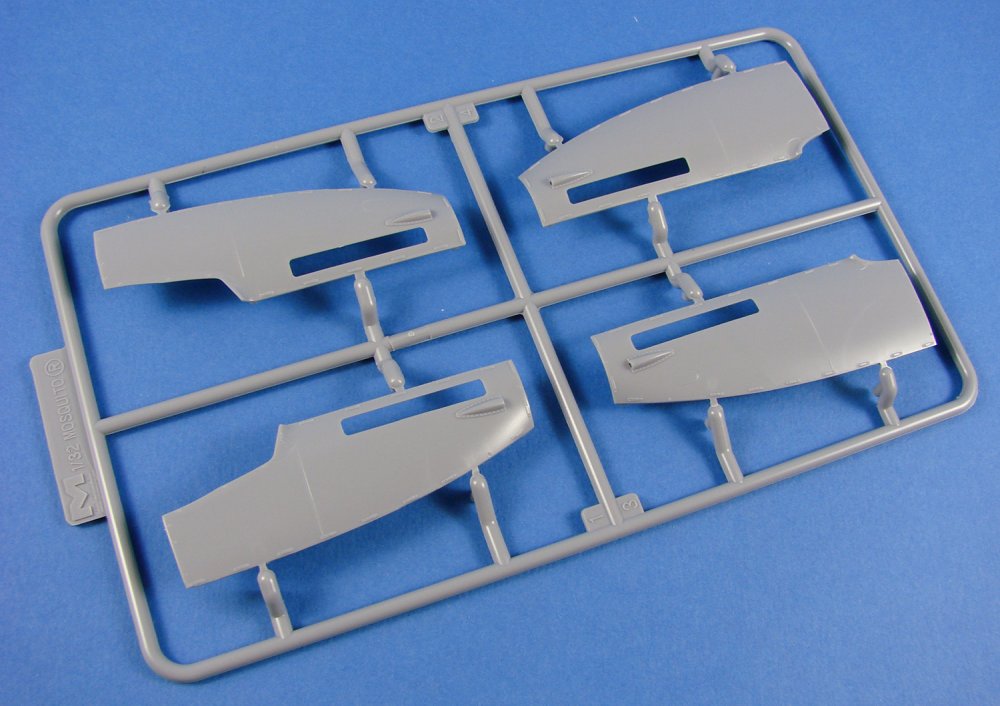
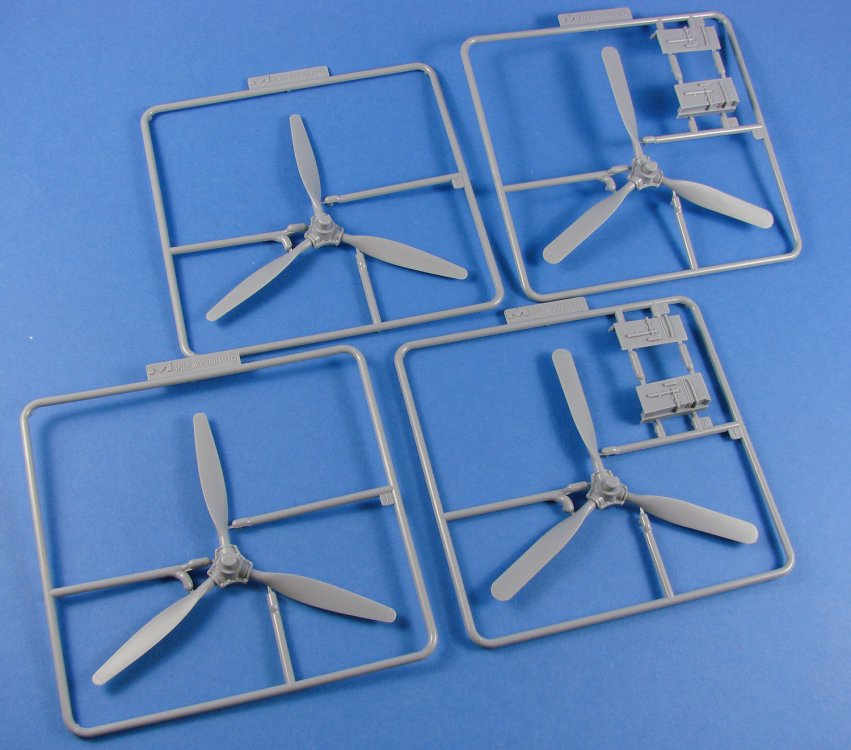
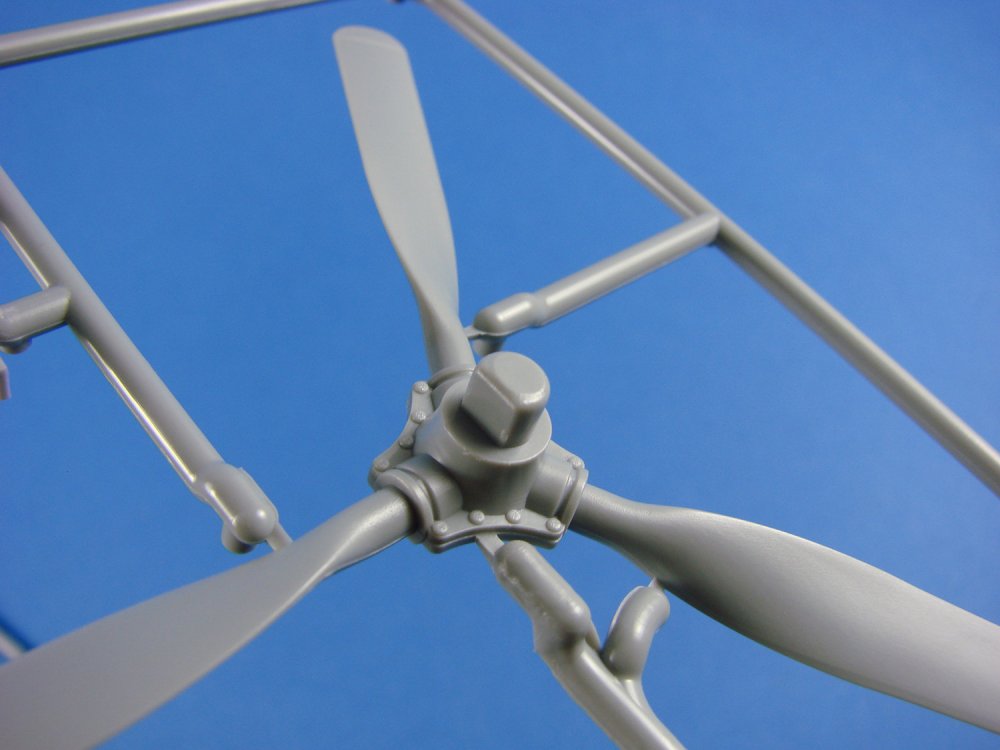
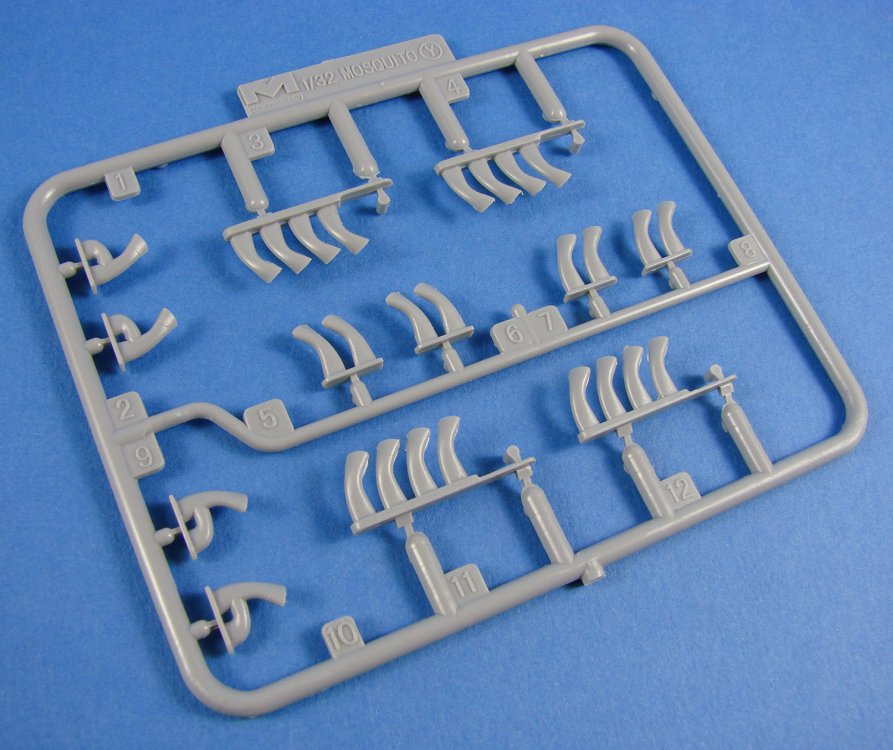
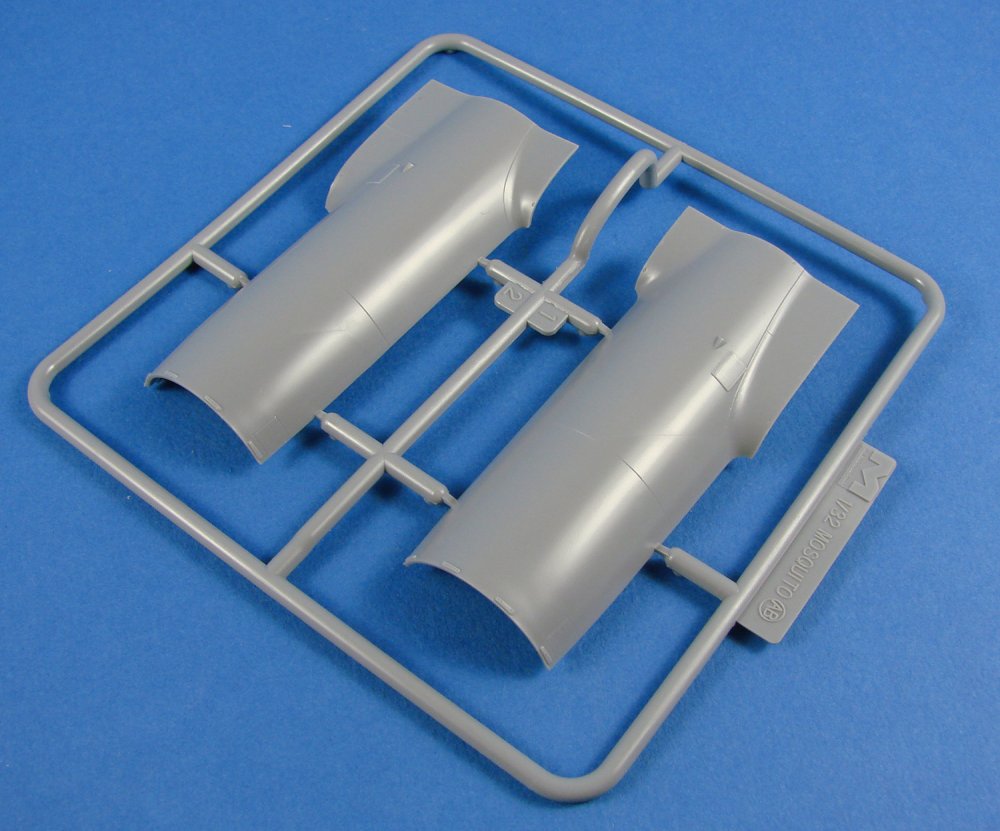
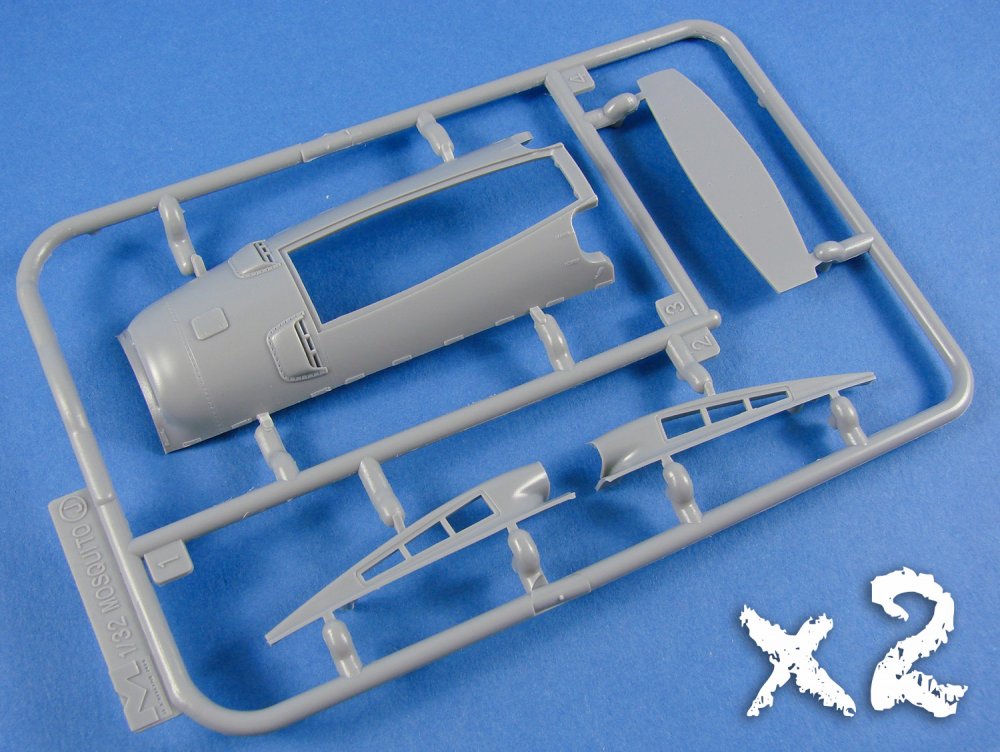
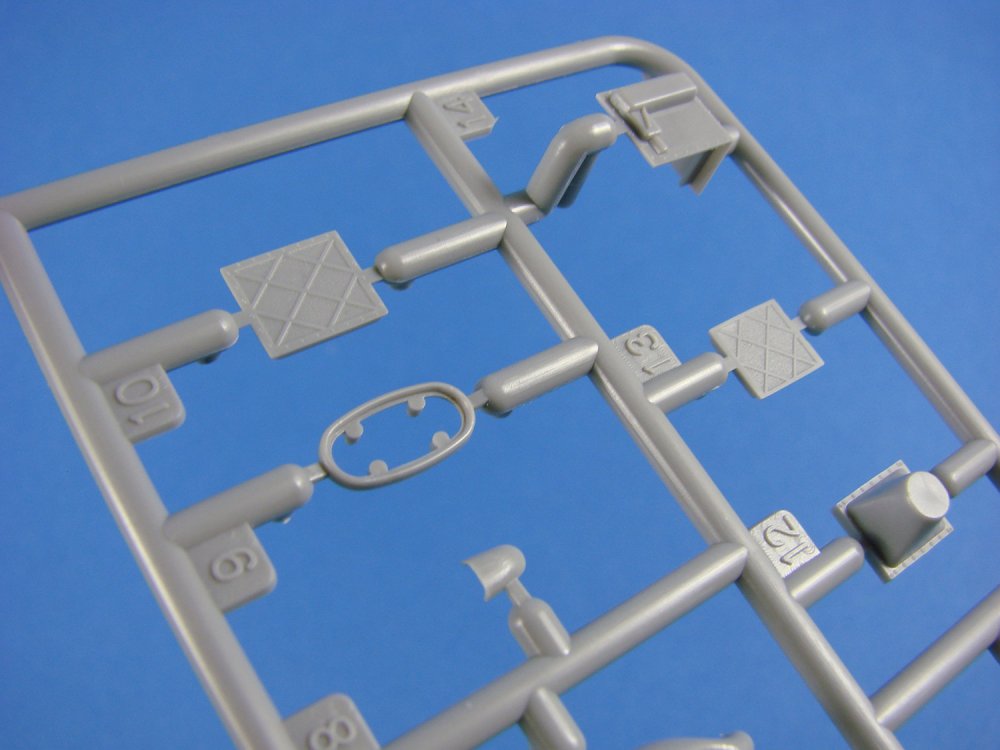
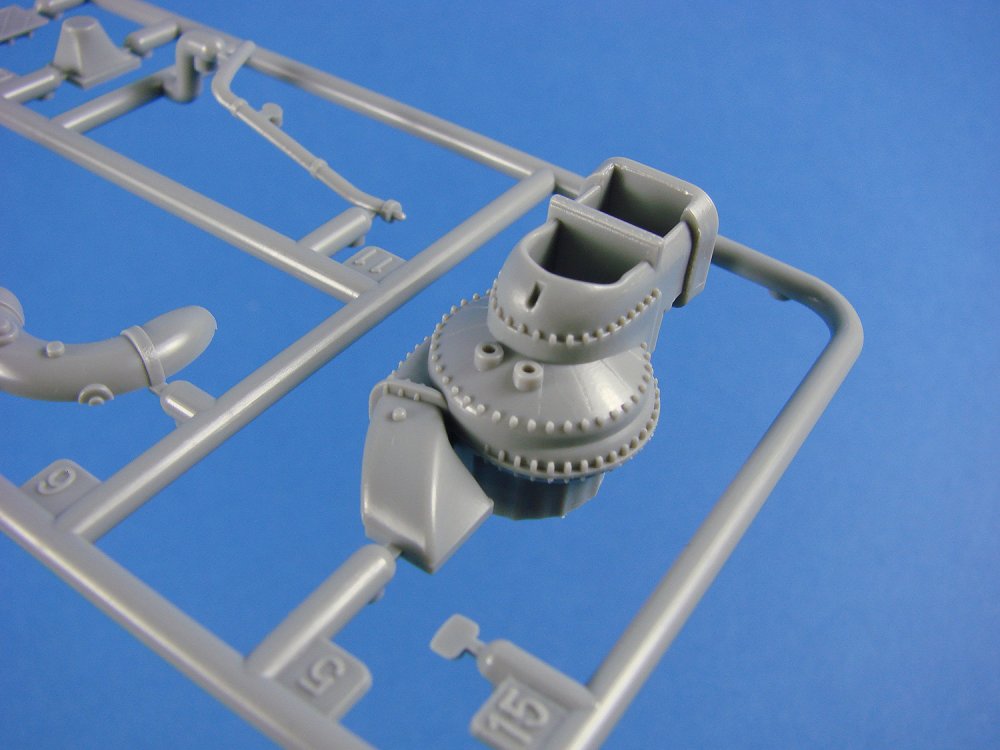
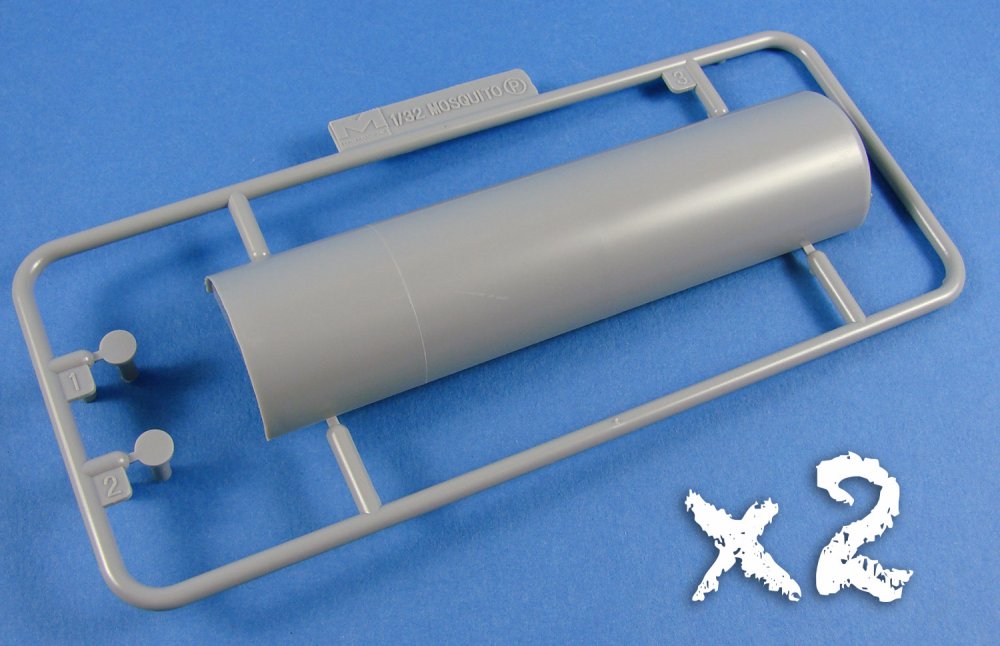
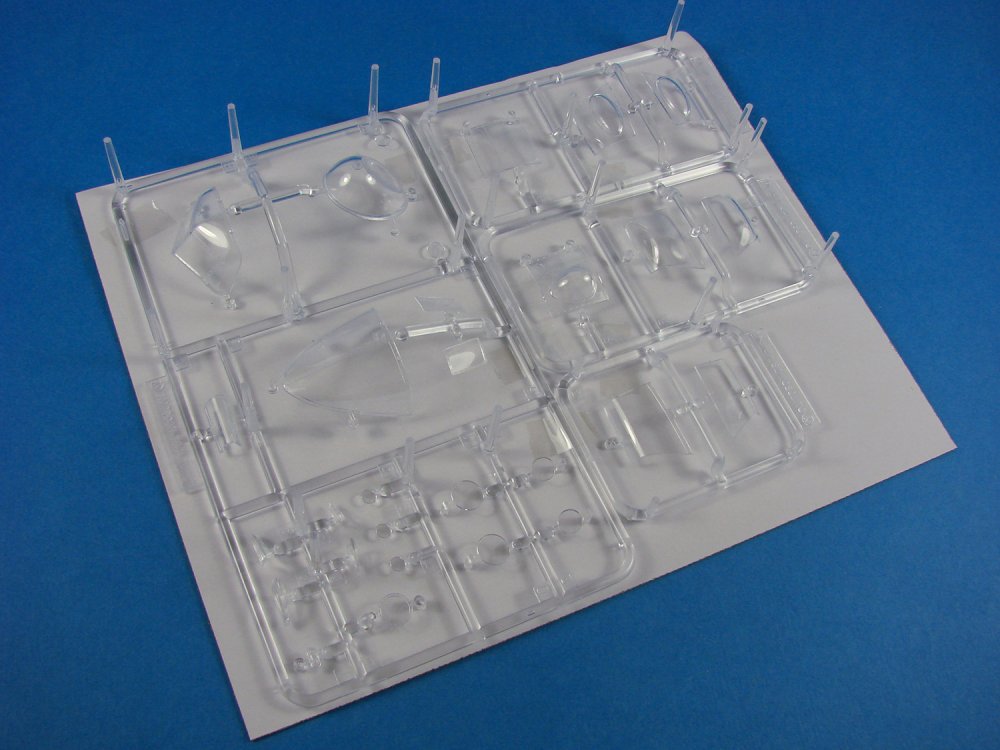
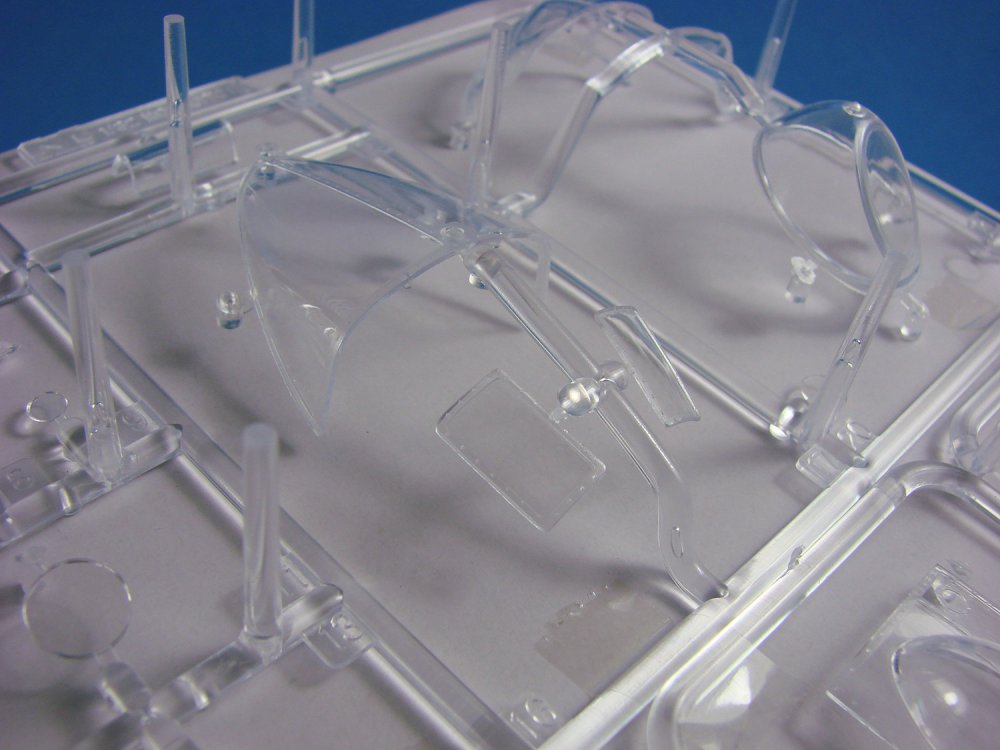
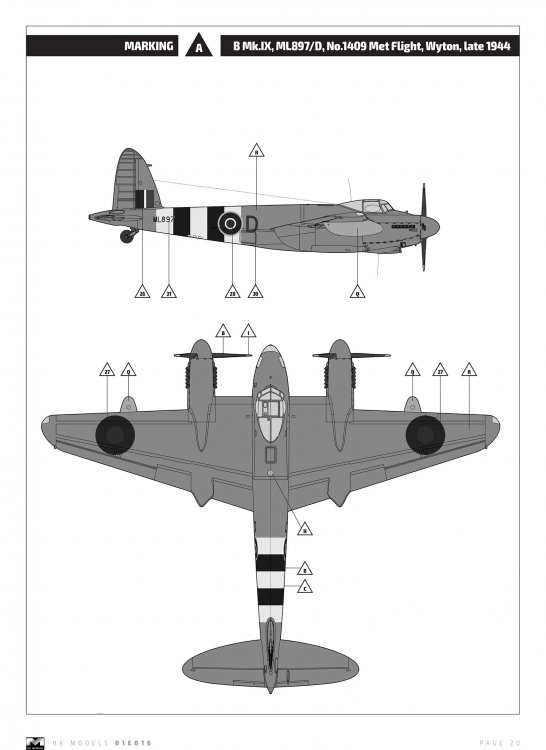
1/32 de Havilland Mosquito B Mk. IX / B Mk.XVI Hong Kong Models Catalogue # HK01E16 Available from MJR Hobbies for £139.50 The Mosquito was probably one of the RAF’s most versatile aircraft designs, and indeed, an aircraft that we may never have had at all if it wasn’t for the perseverance of its designer, Geoffrey de Havilland. It was actually the simplicity of de Havilland’s design that could well have seen the project being stillborn. To meet Air Ministry requirements for a high-speed bomber, de Havilland proposed a new airframe, composed mainly of non-strategic materials, and powered by twin Rolls Royce Merlin engines. Unlike designs which were submitted by other manufacturers, de Havilland envisaged that his machine would be fast enough to be totally unarmed, and with a smooth, aerodynamic exterior. For the Air Ministry, this perhaps seemed a little too much like a flight of fancy, and de Havilland was asked to simply act as a contractor for designs from other manufacturers. Undeterred, Geoffrey de Havilland took on his design under a private venture arrangement, using a small design team led by Eric Bishop, and work began under strict secrecy at Salisbury Hall, Hertfordshire, in October 1939. The aircraft was to be designated ‘DH.98’. Even though de Havilland’s proposal was for an unarmed bomber, his team created a design, which would allow the installation of four, forward firing cannon that would sit in the forward belly of the aircraft, and fire through blast tubes. With the war now in full swing, and changes in Air Ministry requirements, which saw a general acceptance of the DH.98 for a reconnaissance role, a full size mock-up was inspected by the Air Ministry in December 1939; only 2 months after the project began in secrecy. The foot was now firmly in the doors, and from this point, the Air Ministry made demands of the DH.98 which saw it being developed for a high-speed bomber and also fighter role. The Mosquito, as it soon came to be known, was one of the most versatile airframes in frontline service, with it eventually being used for roles such as night-fighter, long-range fighter, photo-recon, fast bomber, and maritime strike aircraft. No potted history of the Mosquito can be complete without a few words about its construction. The main airframe itself was composed of wood, with the fuselage being formed over a concrete buck, as halves, using a sandwich of balsa in between birch layers. These rigid shells required no internal framework, and once fitted out, were glued together and strengthened by simple bulkheads. The wings were also all-wood, being constructed from spruce and plywood, mainly. This highly successful design was also operated by the US, as well as Canada, Australia, China, France and New Zealand etc. and nearly 8000 had been built by the time production ceased in 1950. The kit This is of course HKM’s second incarnation of the Mosquito, with this particular kit version, the Mk.IX and Mk.XVI differing from the original release, mainly due to being fitted with the two-stage Merlin engine. This B Mk.IX was derived from the PR Mk.IX machine, and there are parts in this kit, albeit unused, for such a machine. I’m pretty sure that type could be cobbled together with relative ease. There are TWENTY-FOUR sprues of light grey styrene, all individually wrapped, a further THREE slide moulded main parts (wing, forward fuse, rear fuse), and THREE sprues of clear styrene. If you like a nice part’s count, despite some of the single piece parts included, then you won’t be disappointed. A total of 375 plastic parts are included, with options for both standard and bulged (cookie/blockbuster) bomb bay. These are supplemented by TWO frets of PE parts, and a single decal sheet from Cartograf. Tomek Wajnkaim’s atmospheric box art is superb and would certainly catch my eye if I was in the local hobby store. At this point, I do have to state that I have had an input on this kit, as with the previous Mosquito release, and this extends to a few design touches and also work on the manual. My extended team at LSM has also contributed with the box art and box design, instruction illustration and decals. The box carries the LSM logo too, stating our input. I don’t want anyone to be of the impression that I will write my article based on something I hadn’t declared. This kit, as with any other, isn’t perfect. No doubt about that. I will also state from the outset that there has been no re-tooling of either the wing (intake shape), or the nose section. These remain the same as the original release, along with any respective clear parts. For an review of the previous release, take a look at Jason Gill’s article HERE. Ok, onto business. Many a paragraph has been written about the previous release, both in modelling communities and on social media. Instead of doing an entire review for this new kit, I’ll do an overview, and describe the differences that are to be found with the B Mk.IX and B Mk.XVI. This is perhaps the first kit where I have seen slide moulding being used so widely, and for main parts. A full span wing is included again, and this incorporates both the upper and lower panels as a single piece. That’s certainly a very advanced way of using slide moulding, and definitely the most impressive. All there is to do to complete the basic wing structure is to add the trailing edge spars and wingtips. As far as clean-up goes, a faint moulding line exists around the leading edge, and that’s it. A few swipes with a sanding sponge, and its history. Wing detail is excellent, with not only the various filler and access panel details on the underside (remember that this was a wooden-skinned wing), but also the extremely fine laser-etched wing panel tapes. You’ll need to tread carefully with paint, or these will disappear. HK has also moulded the stabiliser as a full span part, with the same sort of trailing edge spar insert. In fact, all of the control surfaces and fin are also hollow and have a simple mould seam to remove only. I did say that slide-moulding was extensive. Surface detail on these parts is limited, by very nature, but what there is, is beautifully rendered. With the wing being a single part, if you wish to fit the underwing tanks, you will need to actually mark the locations yourself, and then drill holes. A plan is included to show you exactly how to do this. When you open the box, it’s hard to ignore the two fuselage sections, moulded as front and rear, and connected along the fuselage stiffening joint that runs circumferentially around this area. This perfectly hides any connection you will make. As with the wing, very faint moulding seams exist, and these will just need a few seconds to eradicate them with a sanding sponge. These parts are very impressive in their execution, with the minimal external details being nicely applied. The cockpit entry door and the equipment port in the lower rear fuse, are separate parts, and the side walls that sit underneath the wing, are also separate. This is to facilitate the fit of the wing to the fuselage, as per the real aircraft. Assembly at this point is not too dissimilar from that in the de Havilland factory! A detailed bomb bay is included, and two different styles of bomb door are available. These are the standard, straight doors, and the bulged doors for the cookie-carrying machine. Front and rear fairings are included for these, and these fit beautifully (speaking from previous experience). Of course, there is a major change in this kit, and that is inclusion of the two-stage Merlin engines. To accommodate these, longer nacelle panels have been included, as well as newly-tooled parts for the upper cowl, that plug into the upper wing. The new engine parts are moulded onto two identical sprues that also hold the longer engine bearers, glycol tank and supercharger etc. Detailed engines are supplied for both nacelles, as are two versions of the propeller. The exhaust sprue is the same as in the previous release, but this time, we build it as a 6 stub version, and not the 5 stub. All new sprues for this release concern the engine area. A total of six newly-tooled sprues account for this part of the build, and help to produce that recognisable nacelle profile. Photo-etch louvres are supplied for the side of the lower intake cowl. As far as I can tell, there are no cockpit changes in this release. Having built this one for the box art model on the previous release, I can say that the cockpit it very nice out of box, but would benefit from Eduard’s detail set, or the Profimodeller PE release. Some lead wire for wiring also wouldn’t go amiss. PE seatbelts are included too, but you might hanker after the textile ones from HGW. You’d have to go a long way to beat those for realism. Looking at the instructions, you are advised to install the bomb bay door actuators around the time you build the cockpit. My advice is NOT to do this, but to wait until the model is more or less complete, otherwise you will bend or snap them whilst handling the Mosquito. In fact, I would attach them after painting, at the same time you fit the bomb bay doors. If you want to see what can be done with the HKM kit, take a look at this link on The Modelling News. Probably one of the finest cockpits I’ve seen, albeit with a lot of dedication from the builder. I quite like the undercarriage on this kit. Looking at the real thing, HK has produced a superb replica, and it does actually articulate when built…..right up until the point where you have to install it to the model. Removing the seams on the wheels is a little tedious, but isn’t it always, unless you fit a nice resin replacement, such as Eduard’s Brassin parts. The undercarriage bays are highly detailed, with nice constructional detail and some wiring/plumping. A little extra wiring would be good to add, but the bays are quite narrow, and vision will be limited. Gear bay doors have the correct internal detail representation. The last newly-tooled sprue in this release concerns the canopy. This sprue holds just two parts which are for the side panels. All clear parts fit around an internal framework, and they do fit just great. Clarity is superb, and the frame lines are nicely defined. I would use Eduard’s masks for this canopy though. When I originally built the prototype, I had no such luxury, and it took hours. There will be a small change in the masks to represent this kit, but nothing too different. Two PE frets are included, with parts for the louvres, intake grilles and seatbelts. There isn’t anything to tax you too much here, and PE quality is very good. If you, like me, want to add some extra detail, then of course it would make sense to change the belts, as previously mentioned. There are three schemes for this release. These are: B Mk.IX, ML897/D, No.1409 Met Flight, Wyton, late 1944 B Mk.IX, LR503/F, No.105 Squadron, Calgary, May 1945 B Mk.XVI, MM199/M5-Q, No.128 Squadron, Wyton, December 1944 A single, large Cartograf-printed decal sheet is included. Printing is superb, with decals being nice and thin, with minimal carrier film, authentic colour, and perfect register. They are also glossy, which is preferable to matt, as I find they conform far more easily. The glossy A4 instruction manual is printed in greyscale, but it easier to follow that the early HK manuals, with shading being used on solid areas. Construction takes place over 44 easy to follow stages, with some sub-stages included. Parts options are clearly shown and paint call-outs are supplied in Gunze, Tamiya and AK codes. This kit is a partnership between AK, LSM and HKM. The latter pages of the manual have profiles for all three schemes, from multiple angles. These are printed greyscale too, and I admit that I would have liked to have seen these in colour. A profile is included for stencil placement too. Conclusion Whilst not a perfect kit (is there one?), I do profess a love for this one, ever since I saw it on the Pocketbond stall at Telford in 2014. That was when I was working with HKM, along with the other LSM team, and I took the prototype home to build for a magazine, and the box art. There is a respectable parts count, some nice engineering, and a finely detailed kit to be had with this release, and no doubt we’ll see more sets released to coincide with this hitting the shelves. Being the B Mk. IX / B Mk.XVI variant, this of course opens up more neat options schemes. I wonder when we’ll see the PR version… My thanks to Hong Kong Models for the sample seen here. To purchase directly, check out your preferred hobby store. In the UK, MJR Hobbies will sell this for £139.50. Click here to hit their page. Completed model of previous HKM Mosquito kit, built by author


-
- 4
-
-
Such a great kit. French one for you by any chance?
- 1 reply
-
- 1
-
-
- special hobby
- 1:32
- (and 1 more)
-
Nice to see you here Ian. Crack out a build a pour a beer
-
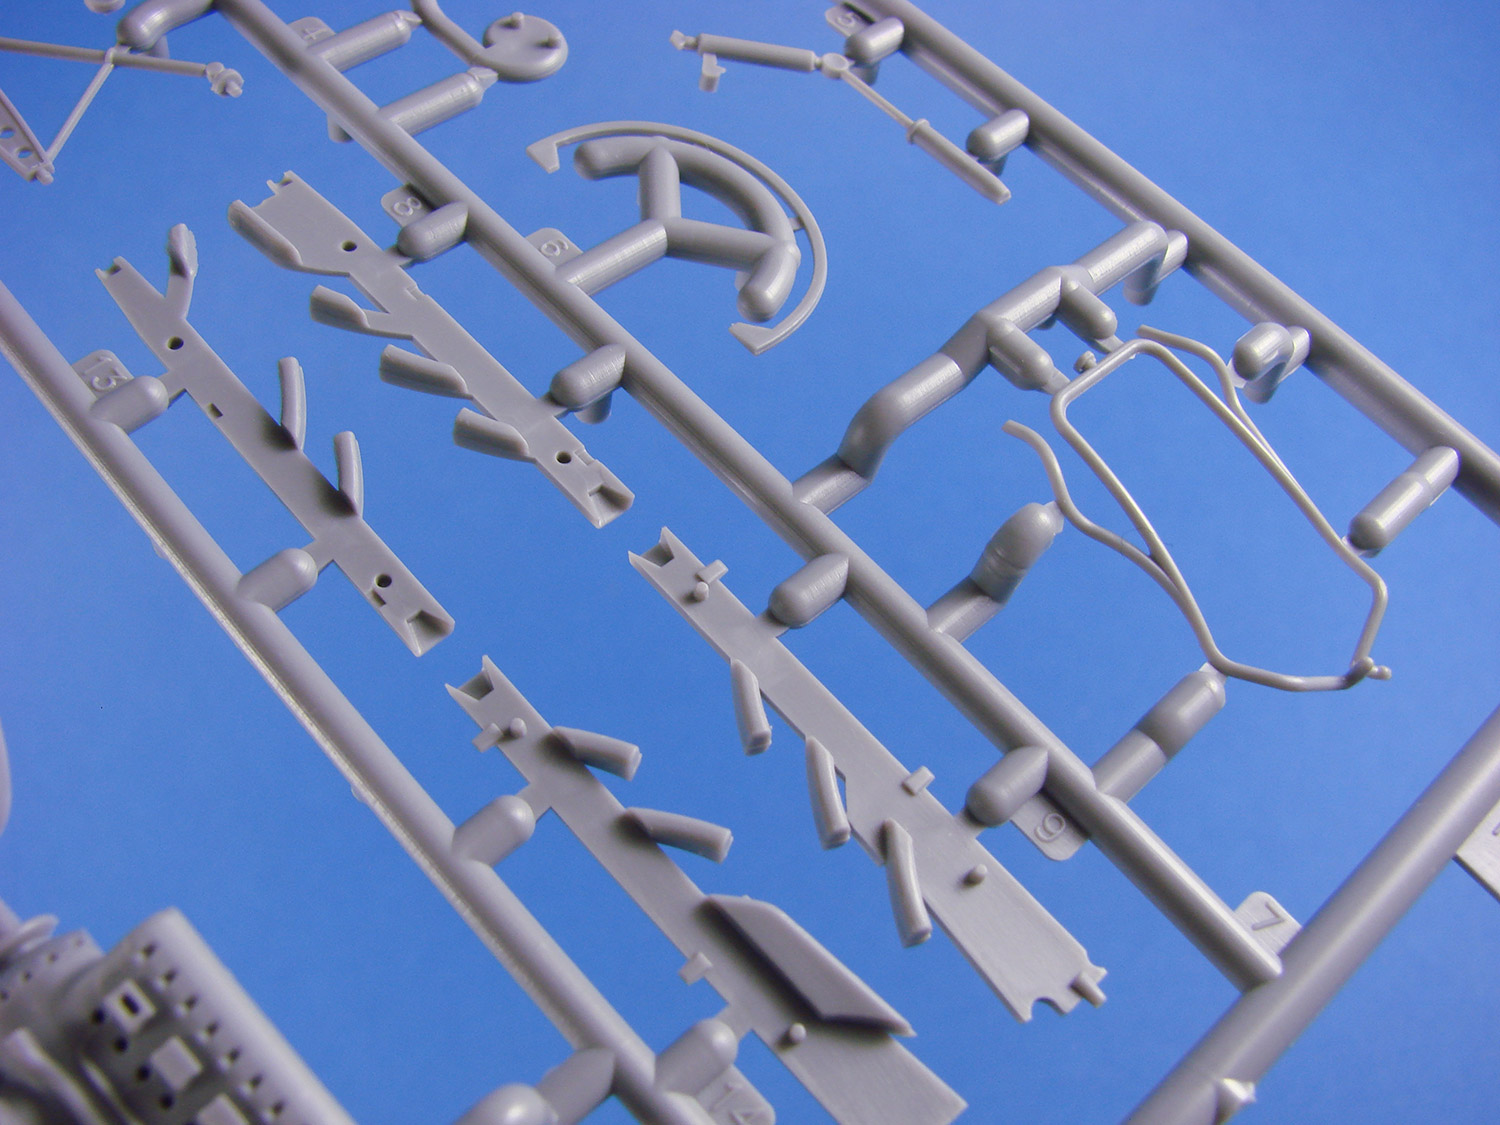
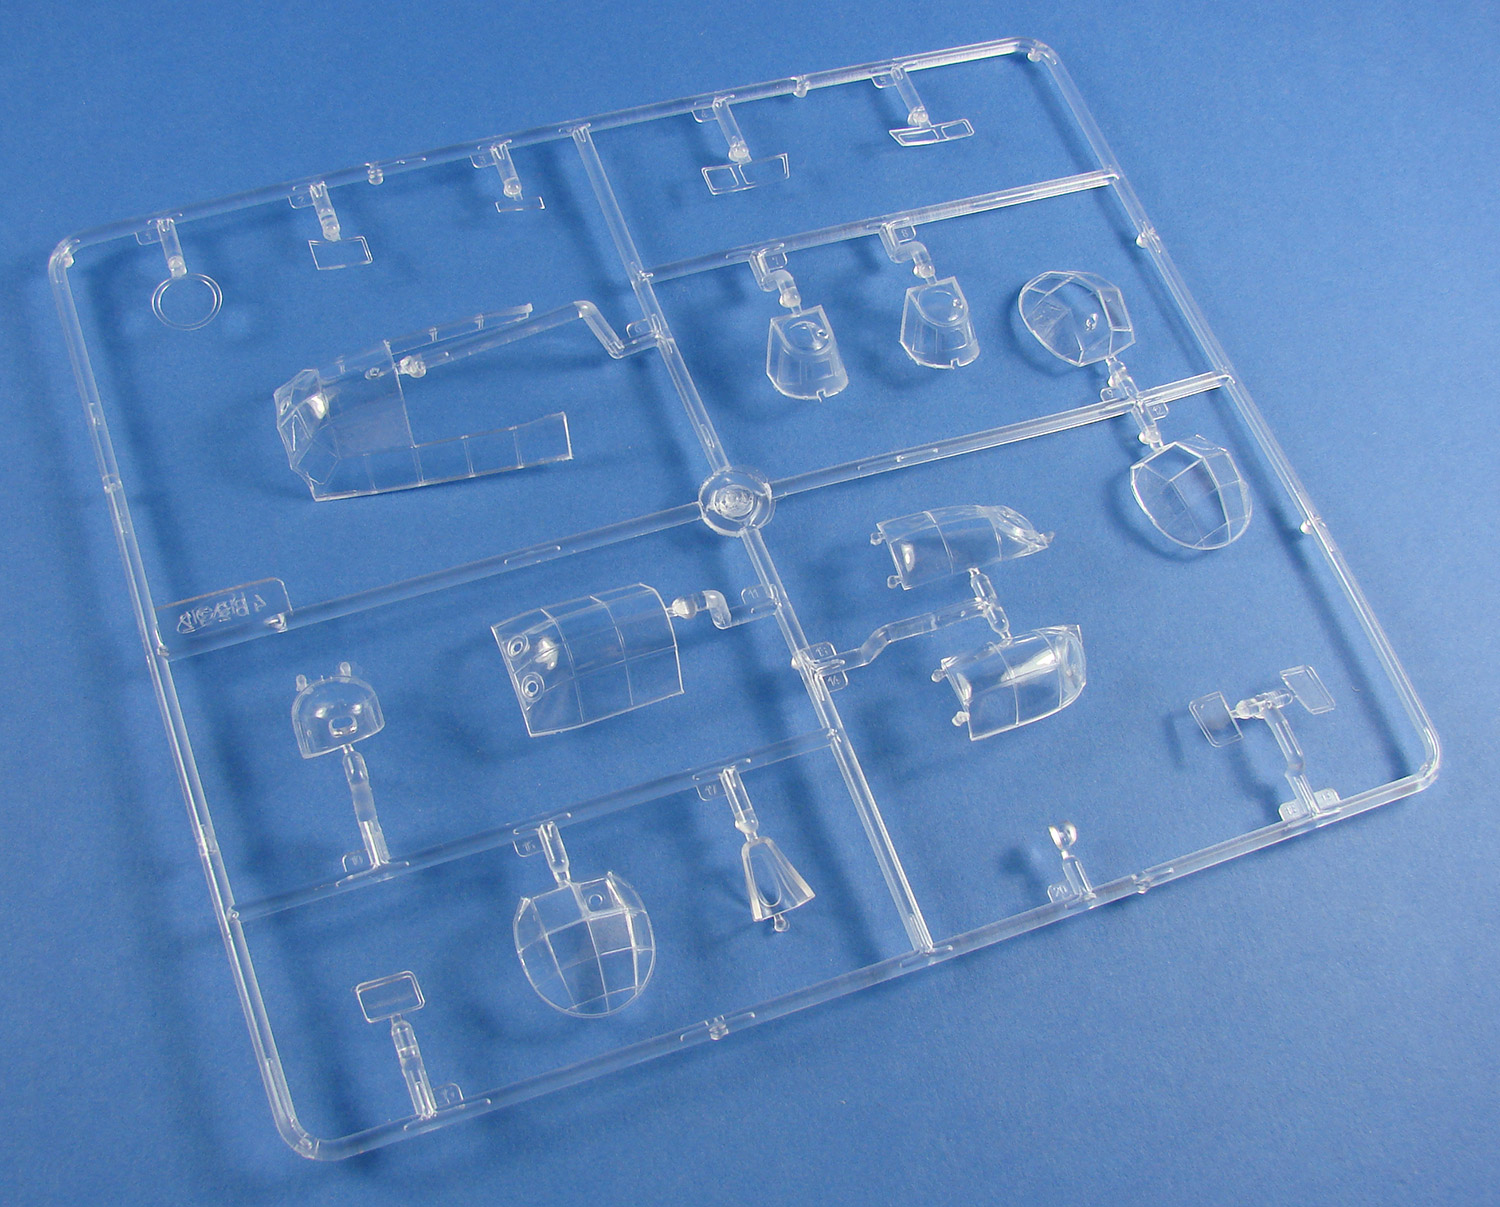
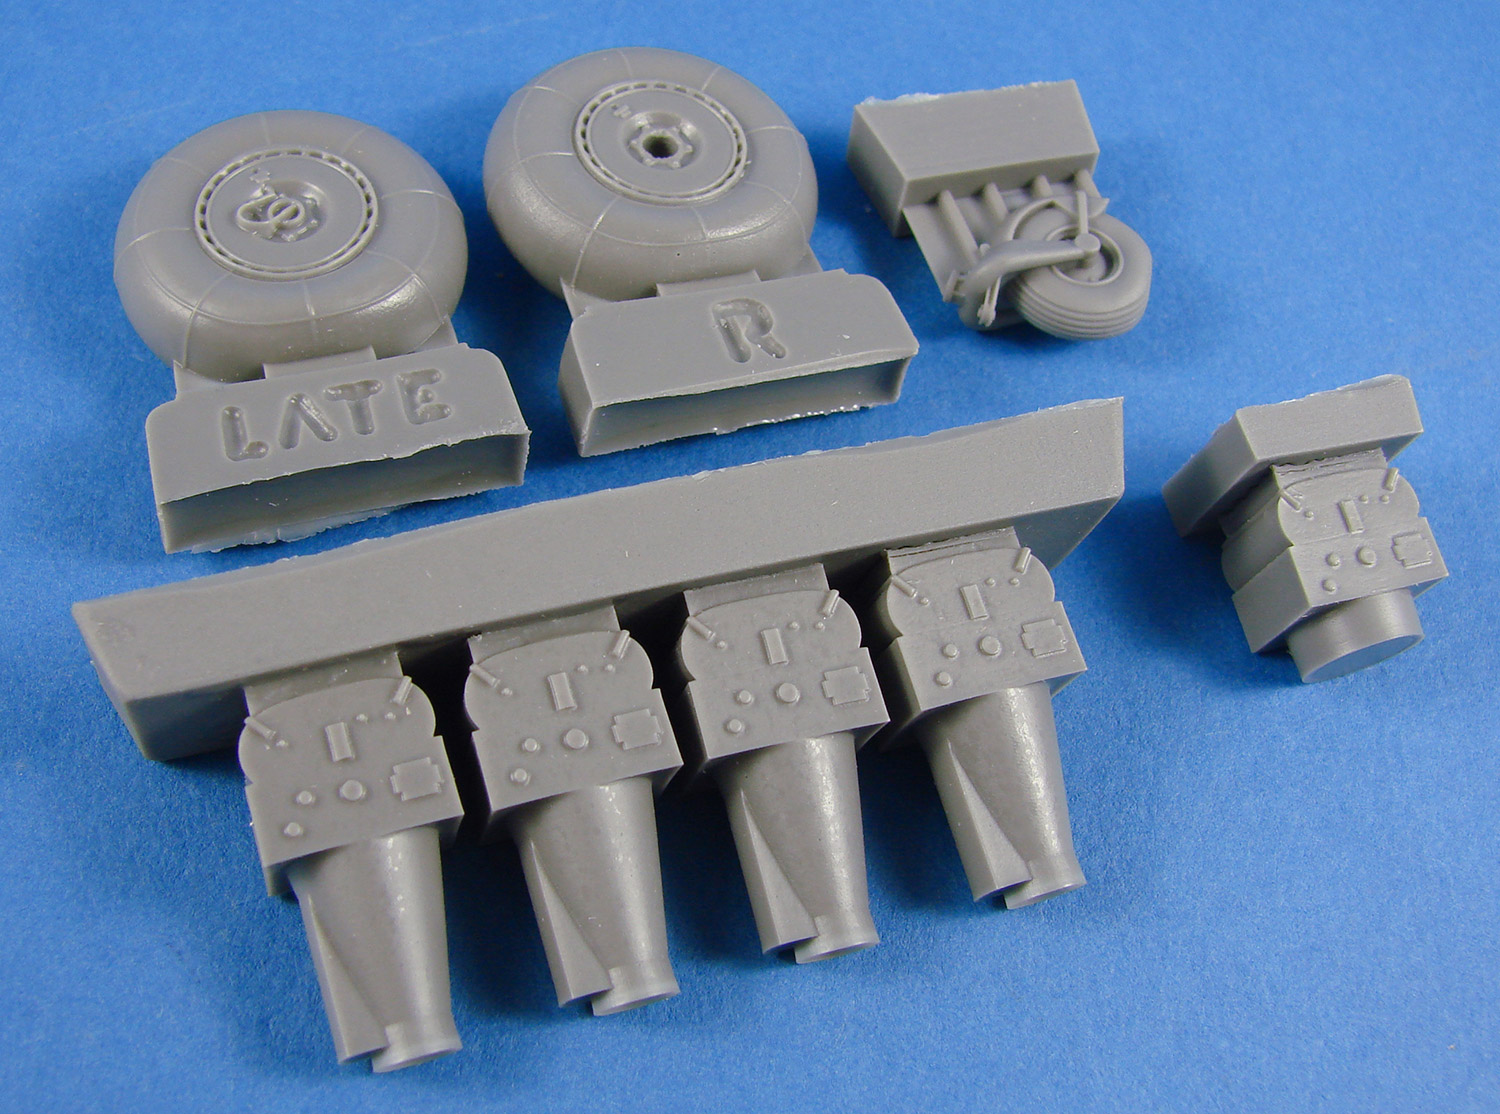
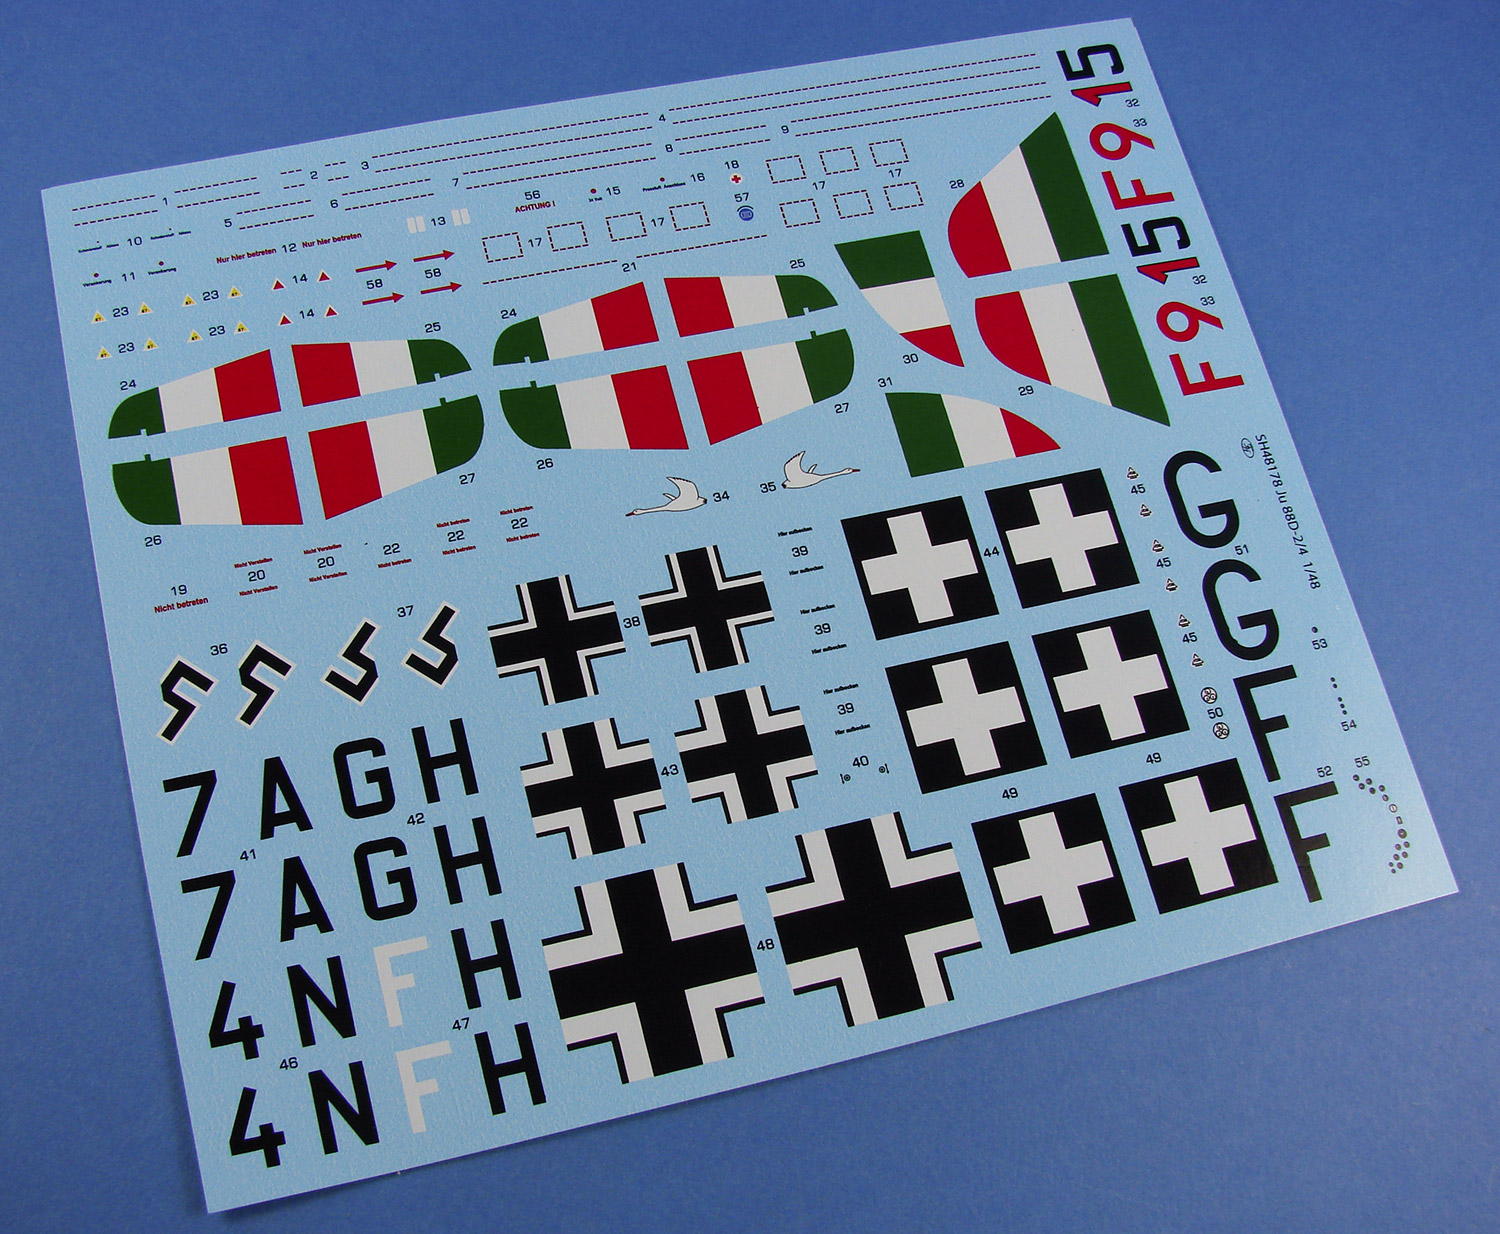
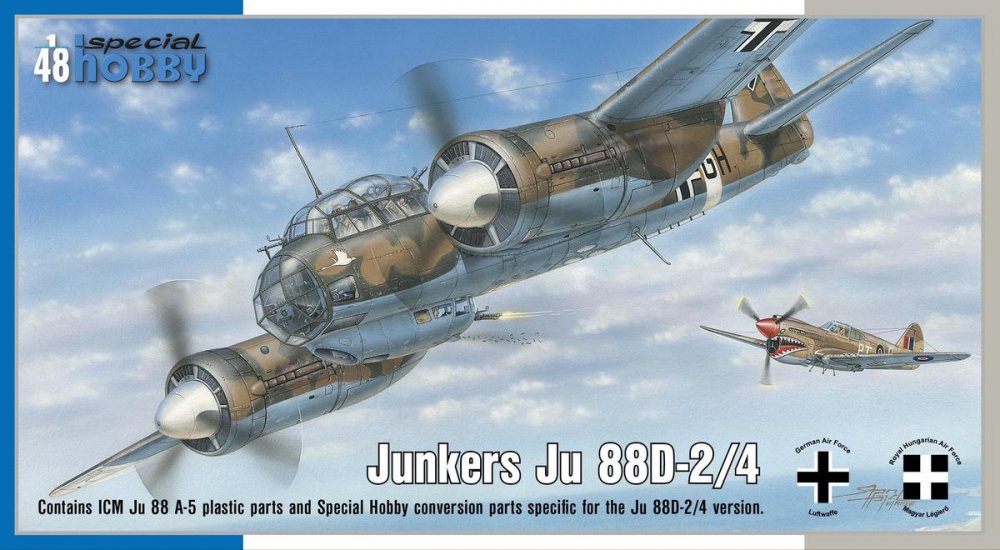
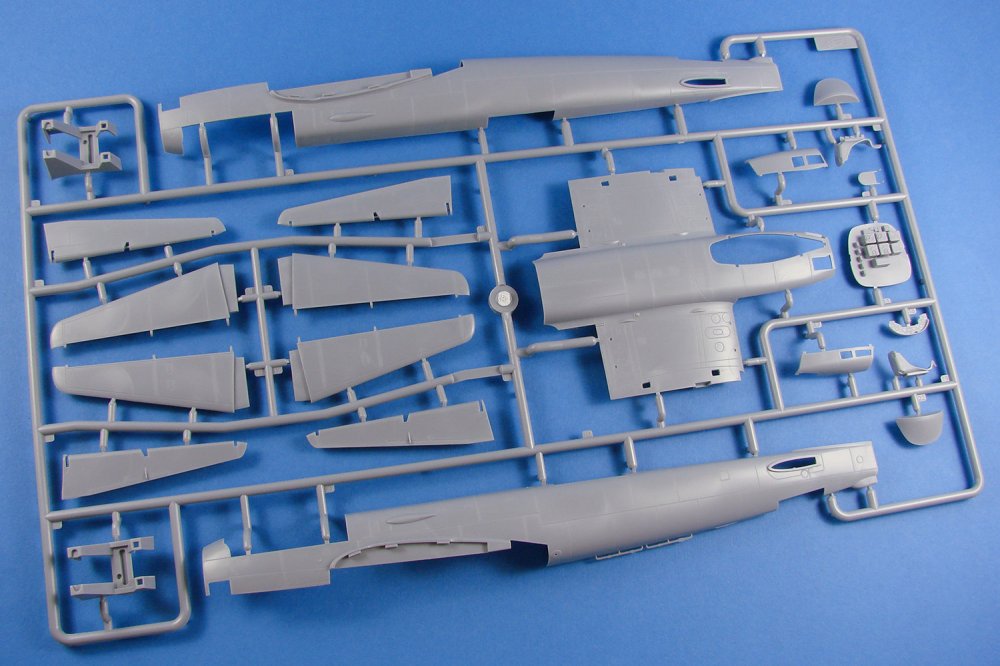
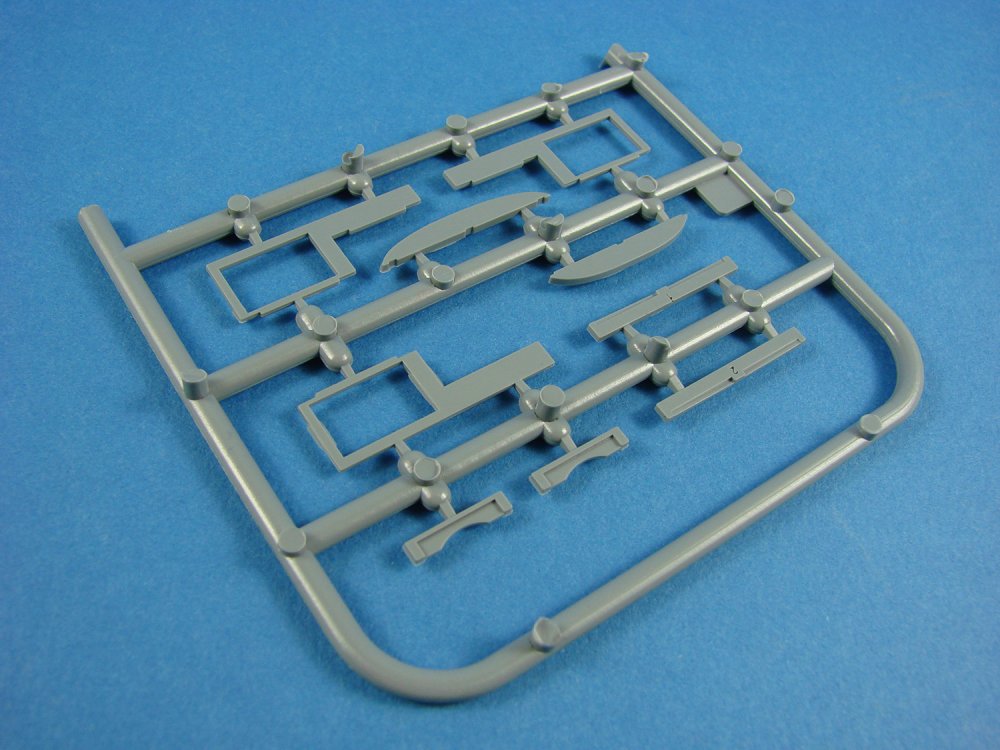
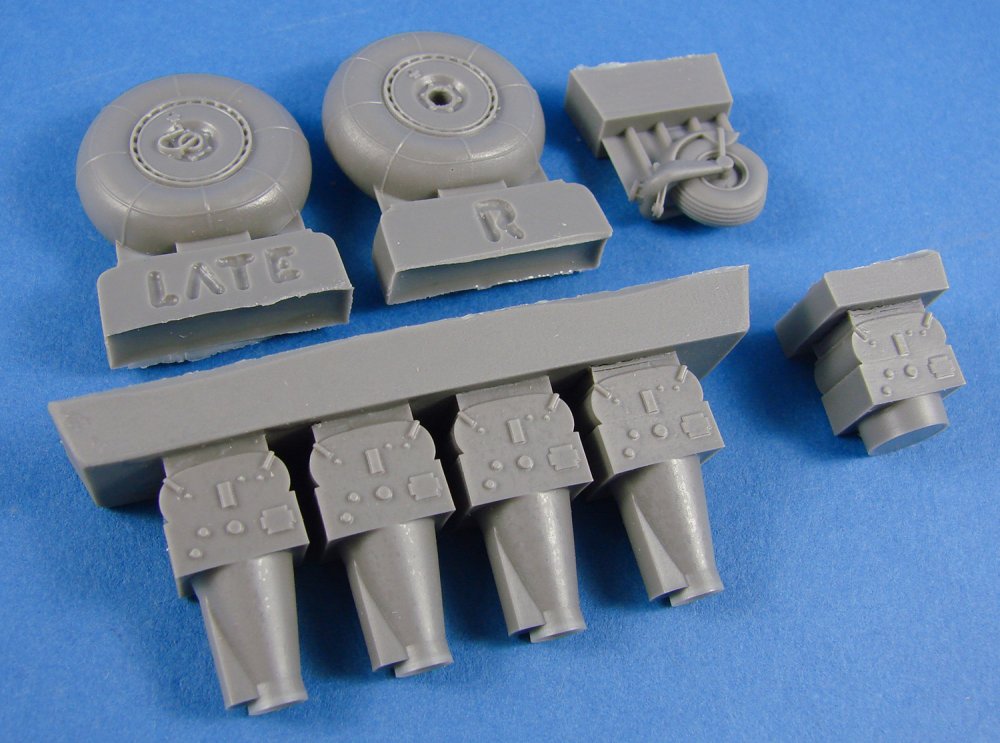
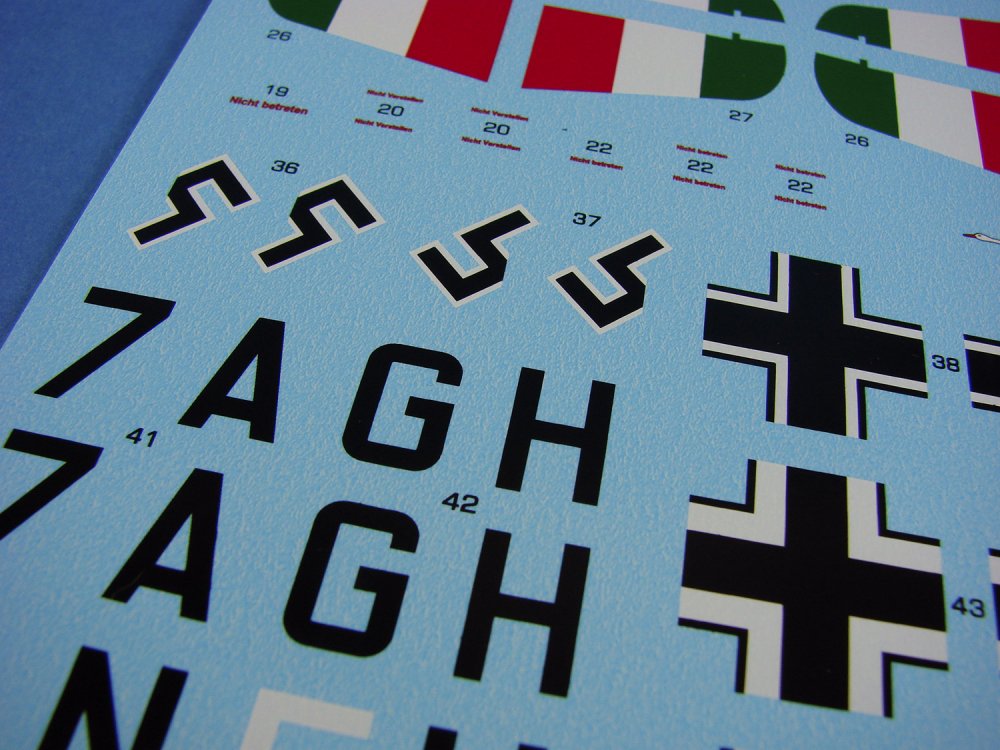
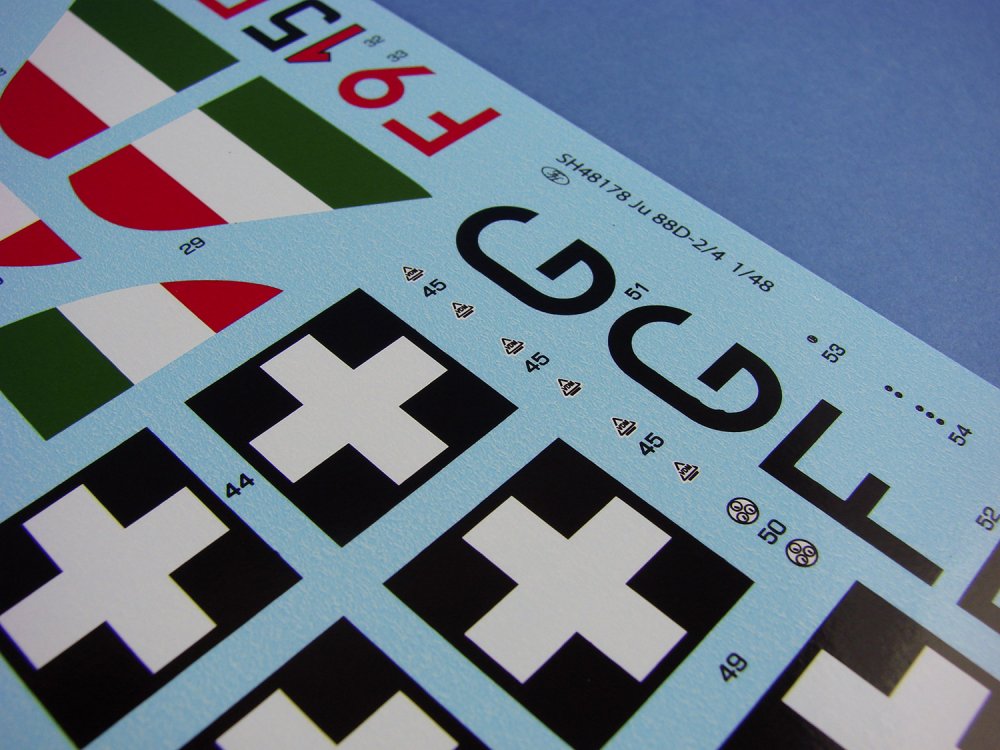
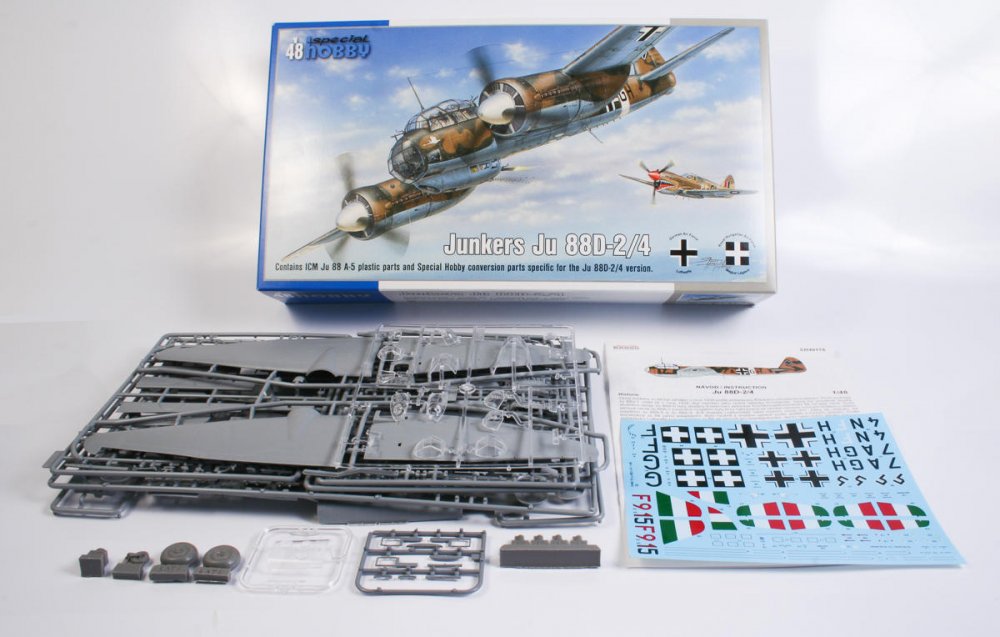
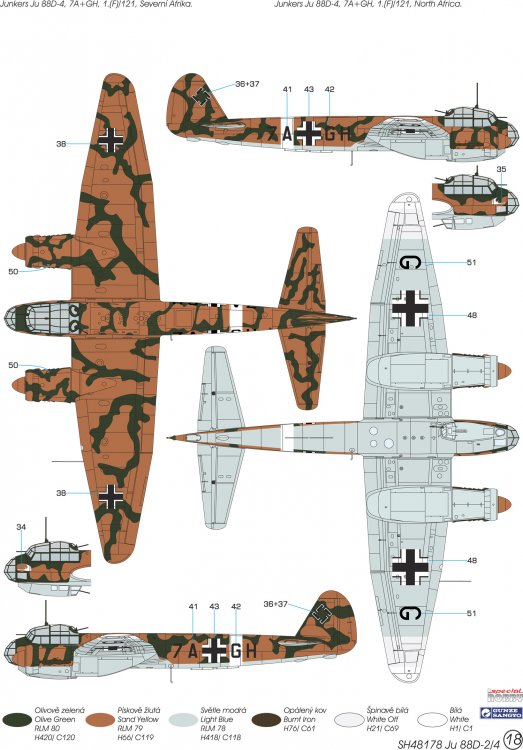
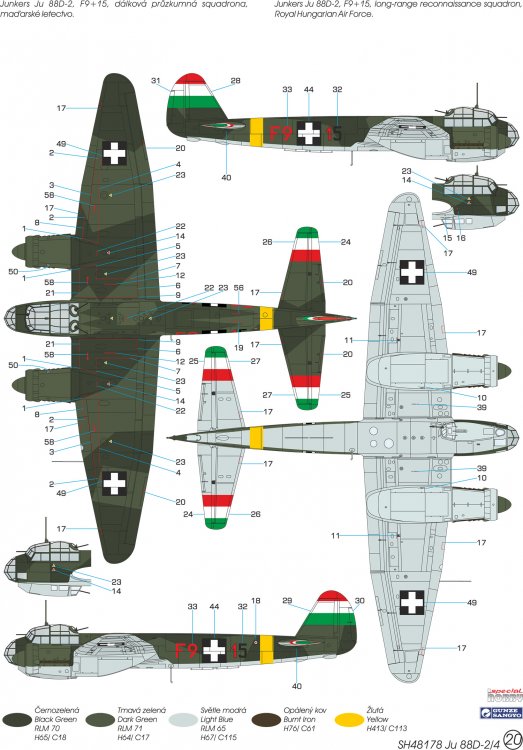
1/48 Junkers Ju 88D-2/D-4 Special Hobby Kit # SH48178 Available from Special Hobby for around €44,73 Without a doubt, the Junkers Ju 88 was one of the most versatile and adaptable aircraft to have been used during WW2. Entering service as the war was literally starting (on the day of the Polish attack), the Ju 88 became successful for its numerous famous and infamous roles, starting out as a light bomber/dive bomber, and when losses started to mount around the time of the Battle of Britain, it was moved into other theatres of war, such as North Africa, and against shipping in the Mediterranean with a torpedo-carrying variant. Where it is perhaps best known are for its roles as both a heavy fighter and night-fighter, in which it excelled. The C version, which is the subject of this kit, saw the glass nose replaced with a sheet metal unit, carrying a lethal punch of four fixed guns (1 x MG FF cannon, and 3 x MG17). This was the version which eventually morphed into the deadly Ju 88G, with its revised fin and night-fighting equipment, including spine mounted, upward firing guns and lack of the bola. Many of the C version machines were built from converted A-1 and A-4 airframes, and still retained the ability to also carry bombs. To deceive enemy fighters, a number of these heavy fighters had their noses painted to represent the glazed nose A variants. The kit ICM seem to be favourites for other companies to re-box at the moment, with this latest Special Hobby kit, along with their recent Ju 88C-4 release, being of Ukrainian origin. ICM’s base kit was first released in 2015, as the A-5, with further subsequent ICM and Hasegawa boxings. However, this is the first time that we’ve seen a ‘D’ version of this kit. This quirk is due to the majority of the kit being ICM, coupled with new injection-moulded and resin parts from Special Hobby themselves. So, if you want a recently new-tooled Ju 88 that is marketed as the Photo Recon/Tropical version, then this is one you may well opt to buy. This kit itself is packaged into a fairly large box with a nice painting of a Ju 88 being pursued by a P-40. The lid is quite a tight fit, but when you get this off, the parts within are packaged into a single clear sleeve, with the clear sprue being separately packed. A cardboard shelf sits over one side of the inner box, with the decal sheet and resin parts securely fastened to it, as well as the brand new Special Hobby clear sprue. An A4 colour-printed instruction manual resides in the bottom of the box. As for the plastic itself, there are SEVEN sprues of light grey ICM plastic and one sprue of ICM clear plastic. This is alongside a single sprue of light grey Special Hobby plastic and one extra clear sprue from this company. There are also 8 extra parts, cast in dark grey resin. I know that some modellers can be driven to frustration by the engineering choices that some companies make, but with this kit, ICM has boxed clever. It is designed to accommodate other versions so as to maximise the tooling, but none of this is done to the disadvantage of the modeller. Some very intelligent design work can be seen here, such as the fuselage halves being full length, so no need to graft on different nose versions. The fin is also separate, indicating something from the 88G family, maybe. Wing root fairings are moulded to the fuselage and are tabbed, meaning that the upper wing panels can easily sit on these and provide a positive location point. Another touch of genius is a single piece lower fuse and inboard wing panel section. When this is fitted to the fuselage, and then the wing panels added, the lower seam will be totally hidden under the broad nacelle structure. The nacelles themselves will then locate into the undersides via tabs. If you’ve ever seen the Revell 1/32 kit, you’ll know that there is a sturdy structure within the nacelle that the undercarriage is mounted to. Looking at this model, I think that whilst you may need to fit that mounting structure prior to the nacelle, it appears that you can probably fit the landing gear later, after painting. All control surfaces on this model can be posed, with the rear of the nacelles being separate for this purpose. You may need to fiddle things with this, and I can’t comment further without test fitting this one. Two detailed Jumo211 engines are included in this kit, with the provision to display one/either of them. These really do look very good, with each unit containing around 15 parts per engine, including the firewall and associated plumbing. One scheme that has standard day splinter camo, will use the plastic kit parts for exhausts. For the other two night schemes, a set of resin exhaust flame dampers are included. It does appear that the rear of the resin flame dampers contains a block that represents the visible connection between the damper and the engine. So, all should be good in opening the cowls with these installed. Check your references. The engines must be installed within the nacelle before the whole assembly is offered to the wing. You’ll need to make sure your painting and masking regime is good here. Cowl radiator flaps are presented as open only, so to pose these in the more aesthetically pleasing closed position, you will need to do a little surgery. Propellers are supplied as single piece units, and the spinner comprises of the typical back-plate and front section. If you expect a lot from the cockpit area, in terms of detail, then this won’t disappoint. Whilst there are no specific Eduard sets for this release at the time of writing, some areas could still use some of the sets designed for the ICM release. I would at least recommend some seatbelts, at least. The office area is very well-appointed, with nicely moulded fuselage sidewall details, accompanied by a superbly equipped radio rear bulkhead. Unlike the previous C-4 nightfighter release, there are no resin ammunition racks and drums, resin instrument panel with this release. However, the model already comes with nicely detailed side consoles with delicately rendered instruments, two-piece control column, rudder pedal assemblies, seats with intricate mounting points etc. When assembled the cockpit will most certainly be a very busy and visual area. The bola is moulded separately to the underside fuselage, and can be fitted later in assembly. Surface detail is everything you would expect from a modern-tooled model, with finely engraved panel lines and port details. There are also no rivets at all, so if you do want them, then you’ll have to get out Rosie. Plastic quality here is excellent with no flaws or obtrusive ejector pin marks. Clear plastic parts, both ICM and Special Hobby, are superb, with excellent clarity and nicely defined frame details. Three options are provided for the rear canopy, with weapon’s placements, and you’ll need to make sure you use the new main canopy provided on the Special Hobby sprue, and not the original ICM part. To convert this model to the D-2/D-4 standard, some surgery will be required. This involved cutting away the plastic at the rear fuselage area of the wing centre section, and grafting into it a new fuselage section that is moulded in clear plastic, incorporating the clear windows for the downward-facing cameras. This unit is built up as a tray, with stanchions and brackets inside onto which are mounted the camera units. The difference between the D-2 and D-4 versions are nil. On the real aircraft, there was a tropicalisation within the engine units, with no external signs of variant change. I suppose the only real way of telling was if the aircraft was in desert camouflage! The resin parts in this kit do more than simply provide the aforementioned conversion parts for the D-2/D--4. They also provide enhancements over general kit detail, such as nicely weighted wheels and new tailwheel and mudguard. Unlike the previous C-4 version, this kit doesn’t supply the replacement main gear doors with internal detail missing on the kit parts. That is a shame, but I’m sure those can be purchased separately. All parts are nicely cast in dark grey resin, with no flaws. Of course, you will need to remove casting blocks, but looking at these pieces, that won’t be too difficult a task for the average modeller. A Cartograf-printed decal sheet contains markings for THREE markings, with all printing being in solid, authentic colour, with minimal carrier film and also being both nice and thin. Registration is perfect too. As well as markings, a full suite of stencils are included as are instrument decals. The three schemes are: Ju 88D-4, 7A+GH, 1.(F)/121, North Africa Ju 88D-2, 4N+FH, 1.(F)/22, Norway Ju 88D-2, F9+15, long-range reconnaissance squadron, Royal Hungarian Air Force Conclusion It’s great to have a modern tool Ju 88D-2/D-4, and one whose base plastic can now put the maligned Dragon versions out to pasture, plus the poorly-executed Hobbycraft release. This kit has everything; a great cockpit, two detailed engines and the excellent camera conversion set. I can’t see anything here that would challenge your average modeller, and the price-point is also very attractive, with this kit retailing for around £38 in the UK (as of time of writing). If you have ever hankered to build a tropicalized version of the Ju 88, then this blend of both ICM and Special Hobby parts should be high on your purchase list. Highly recommended My thanks to Special Hobby for this review sample. To purchase directly, click HERE


-
Definitely!
-
1/48 Henschel Hs 123B-1 Gaspatch Models Catalogue # 48096 Available from Gaspatch Models for €45,00 The Henschel Hs 123 was a single-seat biplane dive bomber and close-support attack aircraft flown by the German Luftwaffe during the Spanish Civil War and the early to midpoint of World War II. It proved to be robust, durable and effective especially in severe conditions. It continued to see front-line service until 1944, only to be withdrawn due to a lack of serviceable airframes and spare parts. Henschel was a German locomotive manufacturer. Soon after Hitler's rise to power, Henschel decided to start designing aircraft, one of the first being the Hs 123. The aircraft was designed to meet the 1933 dive bomber requirements for the reborn Luftwaffe. Both Henschel and rival Fieseler (with the Fi 98) competed for the production contract requirement, which specified a single-seat biplane dive bomber. The first prototype Hs 123, the Hs 123V1 was cleared for its maiden flight on 1 April 1935, and General Ernst Udet, a World War I ace, flew the first prototype on its first public demonstration flight on 8 May 1935. The Hs 123 was intended to replace the Heinkel He 50 biplane reconnaissance and dive bomber as well as acting as a "stop-gap" measure until the Junkers Ju 87 became available. As such, production was limited and no upgrades were considered, although an improved version, the Hs 123B was developed by Henschel in 1938. A proposal to fit the aircraft with a more powerful 716 kW (960 hp) "K"-variant of its BMW 132 engine did not proceed beyond the prototype stage. The Henschel Hs 123 saw service in the Spanish Civil War, as part of the Condor Legion, and despite being generally superseded by types such as the Ju 87, the Hs 123 limped on into the invasion of Poland, followed by the advance of the Low Countries, although operational numbers were by now quite low. Despite this, the Hs 123 took part in operations over the Eastern Front, and served with distinction. The year was 1944, and when the advantages of the type over other front line aircraft was pointed out, a suggestion to restart production was made. It was too late, as all tooling was dismantled in 1940, and by now, even the successor to the Hs 123, the Stuka, was pretty much long in the tooth. The Hs 123 was operated by Germany, China, and Spain, with the latter finally retiring the type in 1953. The kit This kit has been in gestation period for quite a while now, with Gaspatch’s stall at Telford Scale Model World advertising the forthcoming kit in 2015. Getting the information together to produce an accurate kit of the Hs 123 was not an easy task, as this isn’t a well-documented aircraft in terms of drawings, and the existing ones are inaccurate for various reasons. Nonetheless, Gaspatch has produced what they claim to be a precise model of this important aircraft, with a caveat relating to small differences between batches and manufacturer. The kit itself comes in a very attractive and extremely robust, single-piece corrugated box, with a beautiful satin finish. The box lid has lid tabs to lock it into the main body. The kit I have here is the B-1 variant, suffixed ‘Adolf Galland’ on the lid. Gaspatch also released the A-0 kit at the same time. The Galland scheme is actually one of FIVE schemes available in this B-1 kit. A history of the type is printed on the reverse of the box, leaving the manual solely for construction and painting detail. Inside the box, there are a total of SIX individually wrapped dark grey styrene sprues, and a single, small clear sprue. These are accompanied by a small photo-etch fret, a tiny vinyl masking sheet, cardboard jig, and a single Cartograf-printed decal sheet. Lastly, a very attractive A5 manual is included, printed in full colour, adorned with a copy of the box artwork on the front page. Gaspatch sent us the B-1 version of this kit, but have just released two versions of it, with the other being the earlier A-1 variant with a metal and fabric upper wing as opposed to the all-metal wing of the B-1. All other sprues are the same, but as the different wing sprues have different nomenclature with A-1 wing sprue being Sprue A, our review of this particular release starts at Sprue B. Apart from the wing and decal sheet, of course, everything else in the two kits is identical. This is a release that I feel needs me to abandon the usual sprue by sprue blow of events, in favour of looking at the detail and what is offered in terms of options etc. This is what will really sell these particular releases. If you ever got the opportunity to see the first injection moulded Gaspatch kit, the Salmson, then you were in for a foretaste of what you’d see with these new releases. Construction typically starts with the cockpit, and the level of detail here sets the pace for the rest of kit. Whilst this mostly a plastic affair, numerous photo-etch parts complete the scene, such as throttle quadrant linkages, levers, seatbelts, rudder pedal straps and respirator container. Next to Eduard’s beautiful Bf 109G series, this possibly has one of the nicest cockpits I’ve seen in 1/48. Remember, I’m a large scale builder normally, so 1/48 usually has to be pretty good to enthuse me, and this does. The two part instrument panel really is superbly detailed, as is the port side console with its various equipment details. Instrument gauge faces are moulded blank, to facilitate the decals that are supplied for this. Panel detail is of course supplemented by some fine internal fuselage wall mouldings, forward instrument panel bulkhead, pilot seat bulkhead, separate floor section for the rudder pedal assemblies (the cockpit itself doesn’t have a main floor as the bottom of the fuse forms this). Again, the various internal details are excellent, with the control stick fitted with its linkage, and tank on the forward bulkhead, finely detailed seat with multipart mounting brackets, oxygen tank and regulator etc. There is also a parcel shelf to the rear of the pilot, with the fuselage being supplied with a separate door for access to this area, creating some nice display possibilities. Also moulded separately to the main fuselage halves are the upper cowl and the section to the front of the cockpit. This is quite a neat design as the upper instrument panel is fitted directly to this before assembly to the airframe, avoiding having this part sandwiched in between the fuse halves, and the aggravation that could cause. Note that the headrest and fuselage fairing are separate. This is due to the A-1 version having marking options where this isn’t fitted. All schemes in this release will use those parts. Cockpit doors on both sides are separate parts, and can of course be posed either open or closed. The upper wing is composed of two, full span parts, along with separate ailerons. Detail as per the fuselage, is extremely fine, with excellent panel line detail etc. The lower wings have fabric details too, which I personally think has been beautifully rendered. This fabric and rib detail of course carries over onto the elevators, and rudder. The latter is fitted with a separate trim tab that can be posed, although you will need to alter the photo-etch linkage if you decide to fit it any way other than in line. As this model can be built with or without the undercarriage spats, Gaspatch saw fit to provide two lower wing options to suit. Holes are cut into the upper and lower wings so that the stout main struts can plug straight into them. There’s certainly nothing flimsy about this part of construction. Of course, as this was a dive bomber too, it was fitted with dive brakes. These are separately moulded and can be posed either up or down. They also have the visual indicator tab which sticks up through the upper wing skin when the brakes are deployed. Another very nice touch. As previously mentioned, the undercarriage can be built with or without spats, and the construction for both is very different. Thankfully, Gaspatch haven’t tried to create a set of struts that can be hidden in the spats. Both use entirely different components to illustrate these options. You can use full spats or just use the upper spat part, or build without any spats at all. Wheels are also supplied weighted too, so no need to fix that yourself. Two different types of wheel are included. To help you with the addition of the undercarriage to the lower wing, a laser-cut cardboard jig is included. I don’t know how necessary this is, but its addition certainly can’t do any harm to proceedings. The BMW 132Dc engine comprises of around a dozen parts, not including the exhaust arrangement, which adds another six parts to the assembly. Engine detail is very fine, with nicely represented cooling fins and central hub. The induction piping is a separate piece. This engine is to be shrouded by the characteristic cowl with its cylinder head bulges. Gaspatch have done a beautiful job of the moulding here, but the cowl comes in NINE parts! I’m confident that it will fit perfectly, having seen test shot builds online, but it could be a little fiddly. Munitions are supplied of course, and these include bombs for the undersides of the lower wings, and a fuel tank which sits centrally under the fuselage. The bombs may be left off the model and the mounting racks fitted separately. Clear parts are supplied for the windscreen and wingtip lights. A vinyl mask set is included which has parts for both the inside and outside of the windscreen. It’s not often you see that in a kit. Moulding quality here, and across the rest of the kit, is exceptional and flaw-free. Ejection pin marks won’t hinder you either as they’ve been placed with some thought. Photo Etch There are over forty PE parts on the single brass fret that comes with this kit. As well as the cockpit parts (levers, linkages, respirator case, rudder pedal straps, seatbelts), there are also included the trim tab links, lifting point strengthening rings, gun sight reticule and point, external fuel tank valve etc. Production quality is excellent, with small, thin tabs holding the parts in place. Decals A single decal sheet is included, printed by Cartograf. This includes the markings for all FIVE of the supplied schemes, and also includes swastikas, albeit as halves. Stencil and instrument decals are also to be found here. Printing is first class, being nice and thin and with solid and authentic colour. Carrier film is minimal and everything is in perfect register. The schemes included are: 10(Sch)/LG2, Balkans, April 1941, Operation Marita 10(Sch)/LG2, Balkans, April 1941, Operation Barbarossa Blue 4 of Erg.St/LG2, Russia, Winter 1941-42, Operation Barbarossa 4 (Sch)/LG2, flown by Adolf Galland, Septamber 1939, Poland 7 (Sch)/G1, Eastern Front, August 1942 Instructions These are among some of the best that I’ve seen, being printed in full colour, with specific inks denoting PE and new part application etc. Printed in an A5 format, with a satin finish, construction is shown over 19 building stages, including rigging, and includes images of the painted interior to show you how to finish the various assemblies. No manufacturer codes are given, with a simple RLM chart supplied instead. The last pages show the various schemes and their decal placement etc. Conclusion What a great little kit! I think I’ve been waiting to see this since 2014, and the wait has been well and truly worth it. Along with Eduard, the Gaspatch releases are really setting new standards for 1/48 scale modelling, with details that wouldn’t be amiss in a model of a larger scale. There are some great options here too, including the spats, and the schemes are varied. The price is also very attractive too, with this being around 35E or cheaper. I’m so glad that it was Gaspatch who decided to release this one, as it’s perhaps one of the most iconic Luftwaffe types that operated in the early stages of the war, and these guys have done it proud! Highly recommended. My thanks to Gaspatch Models for the sample seen here. To purchase directly, click THIS link.
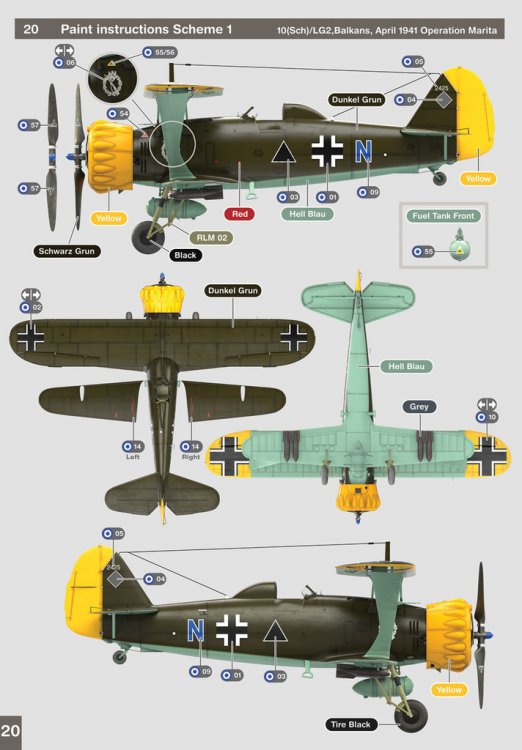
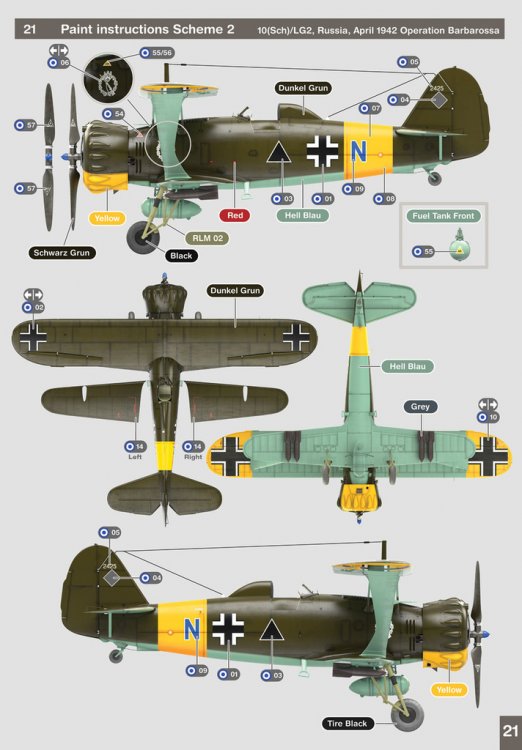

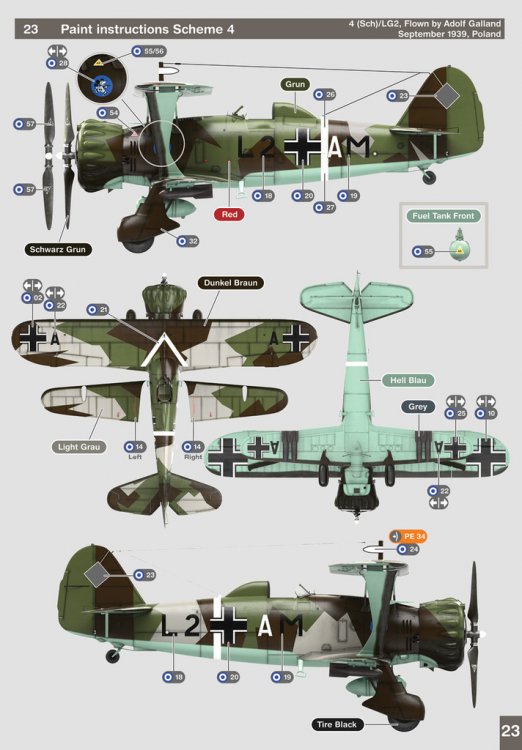

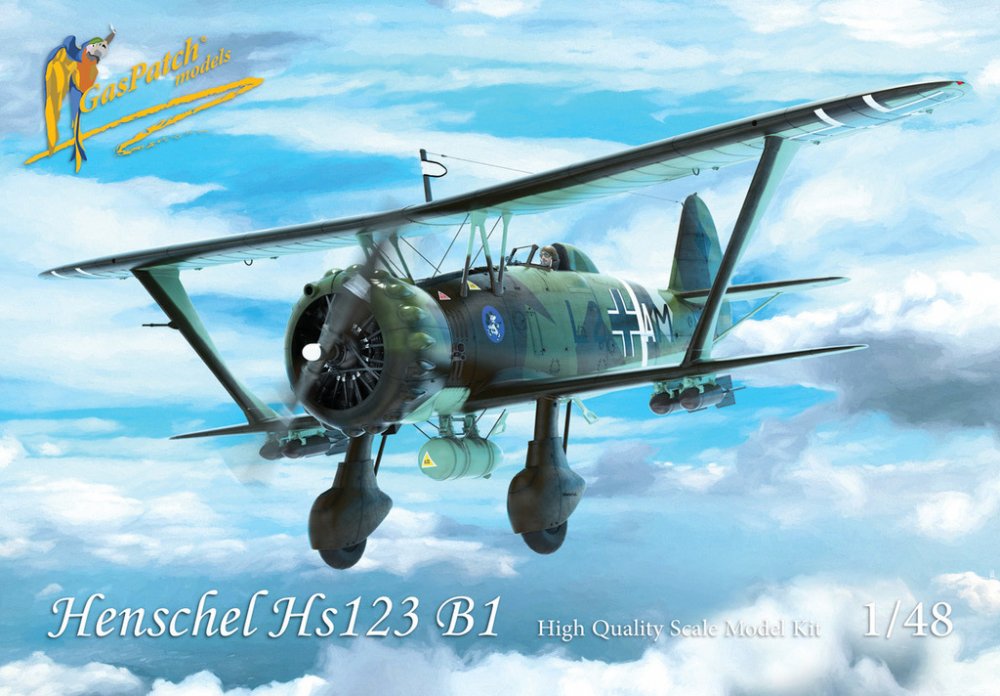
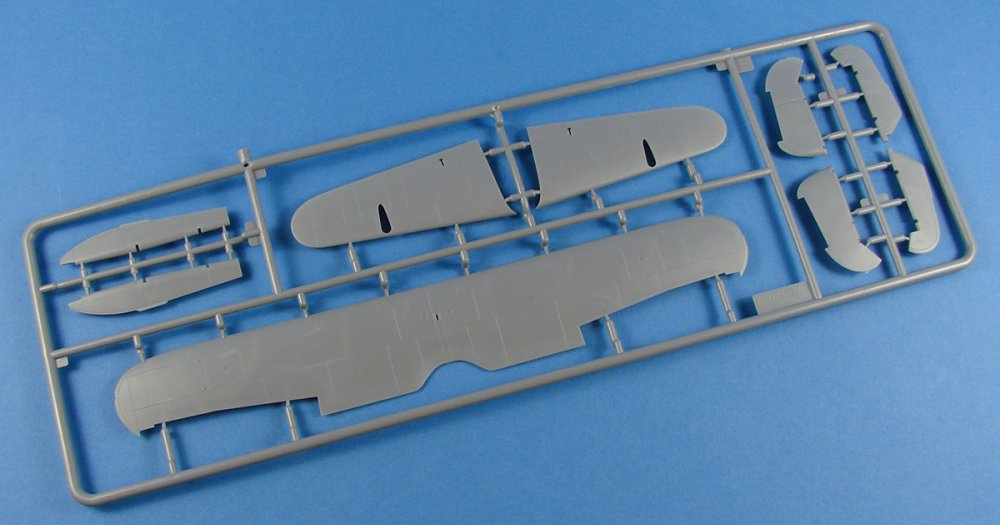
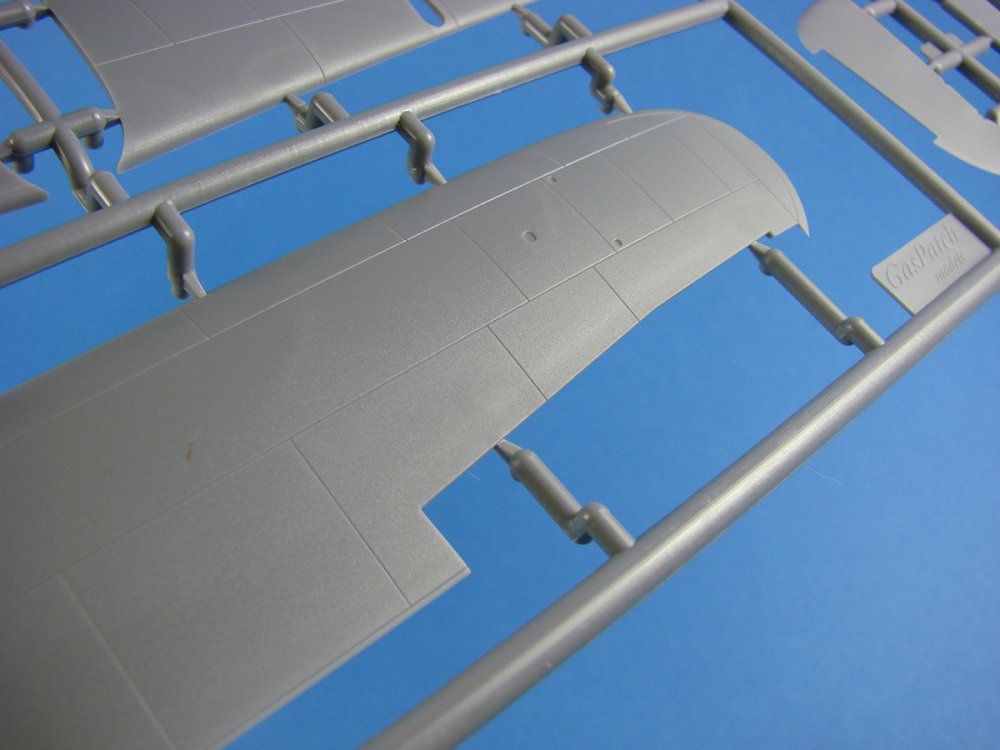
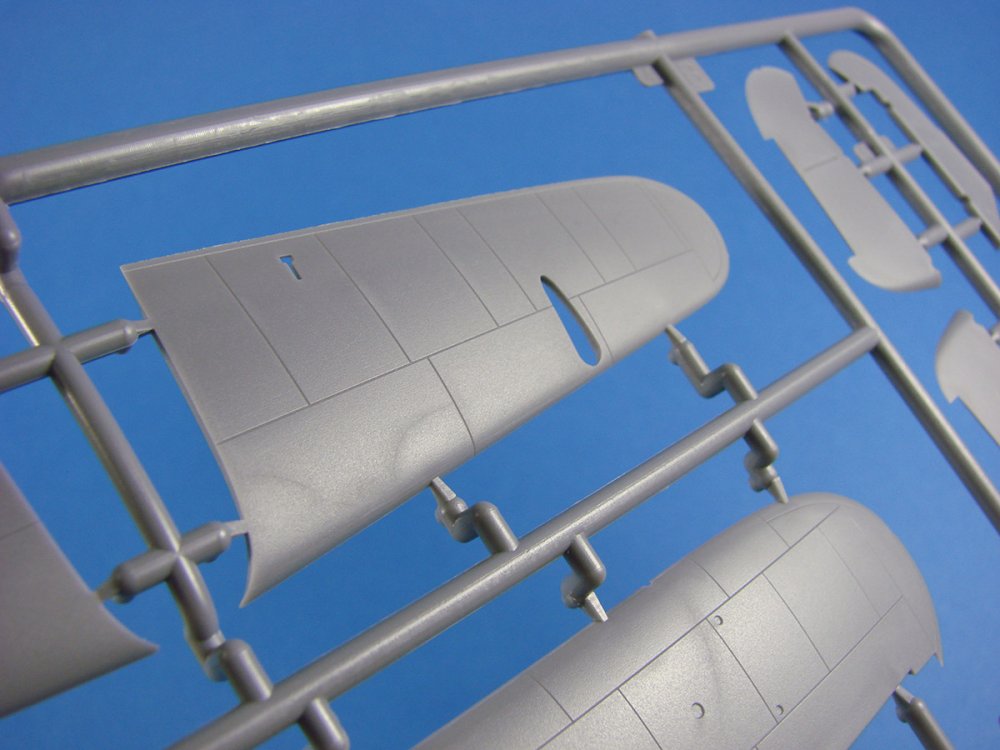

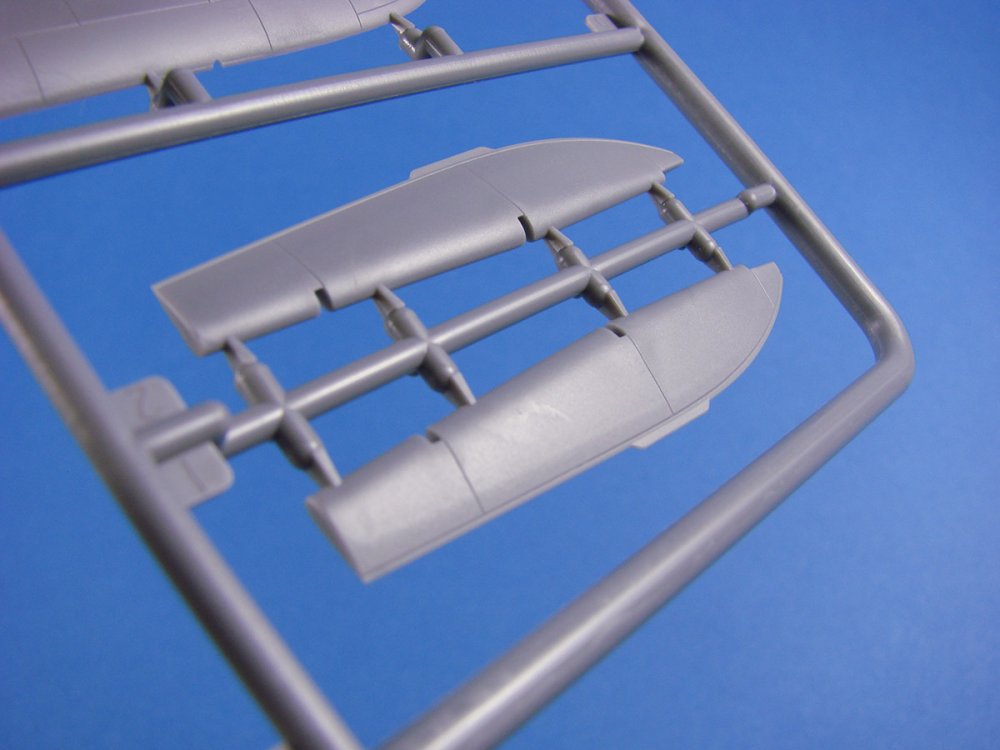
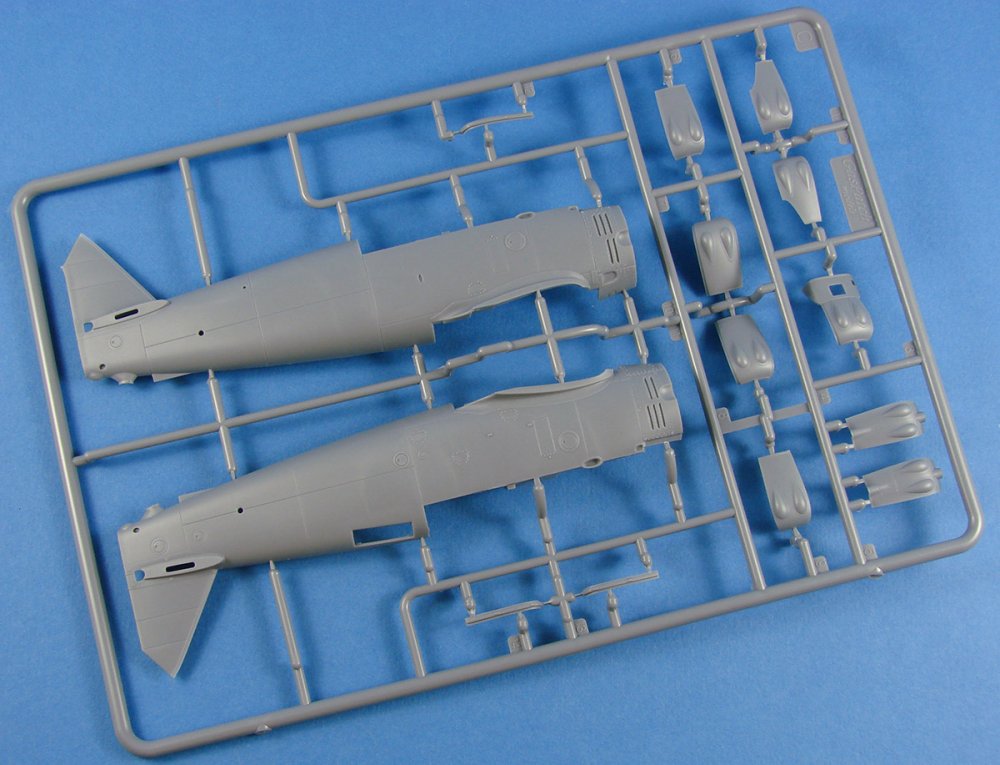
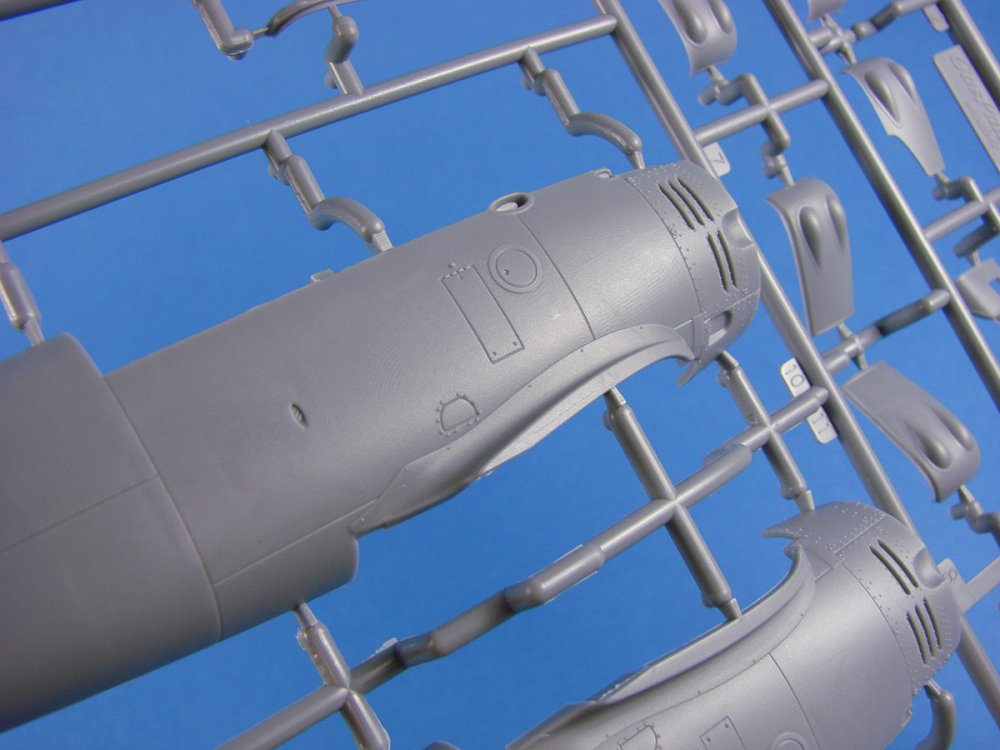
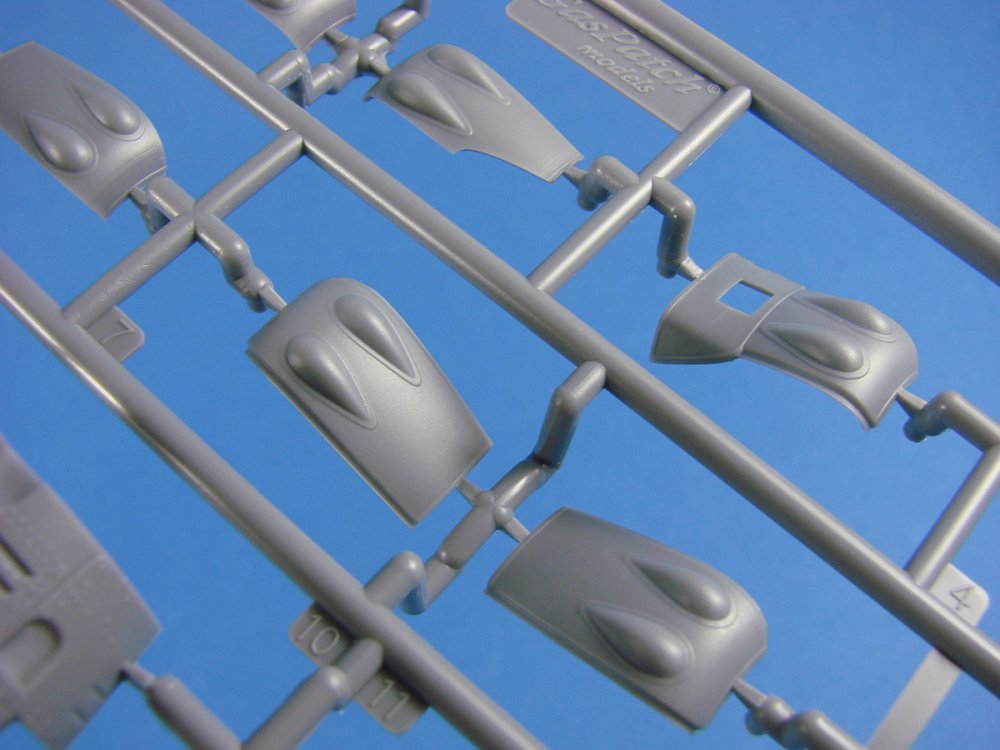
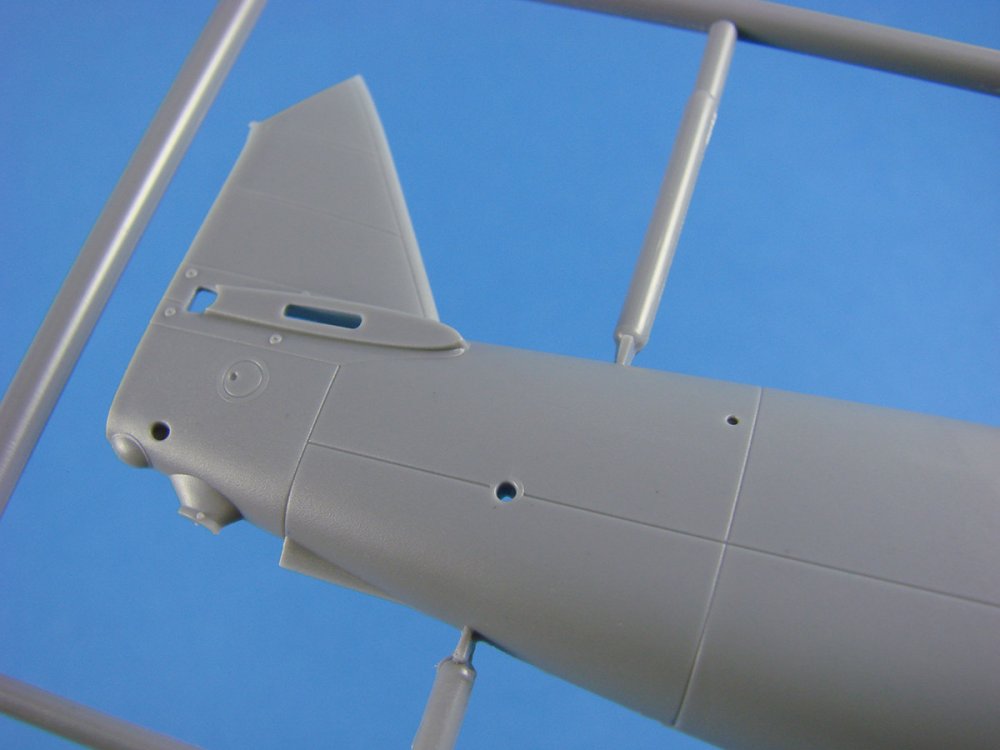


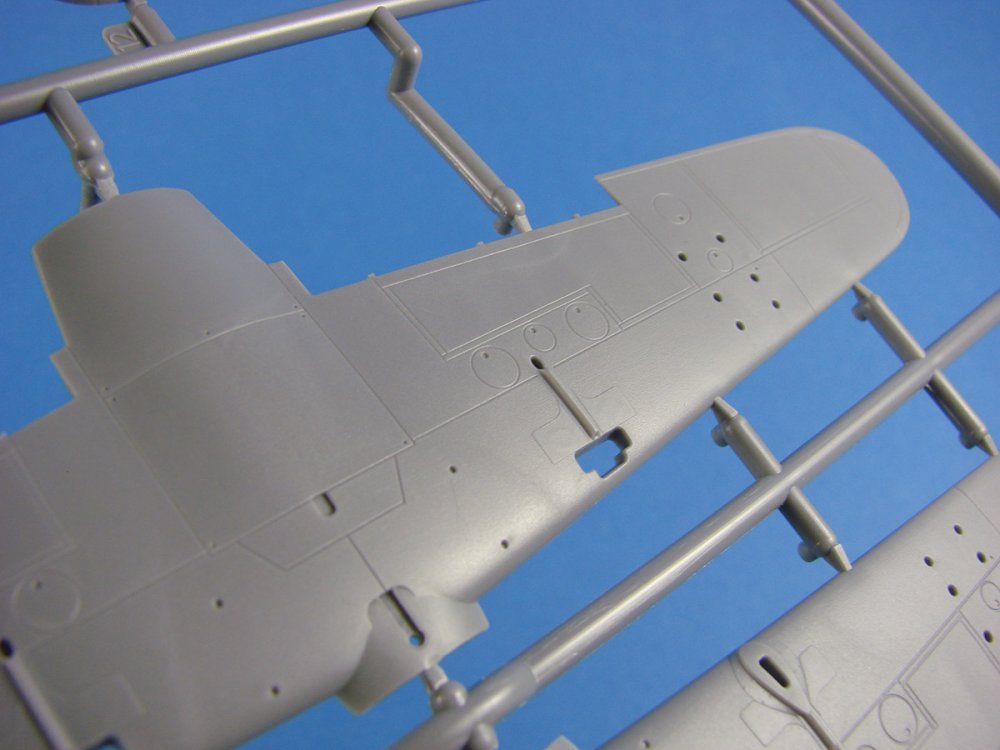
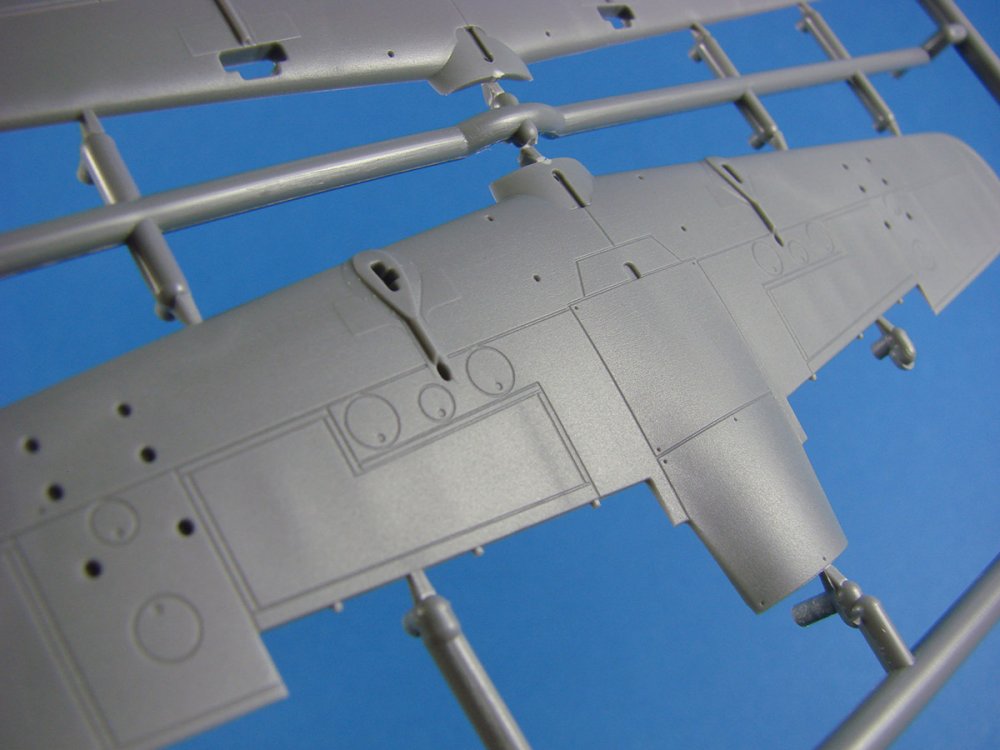


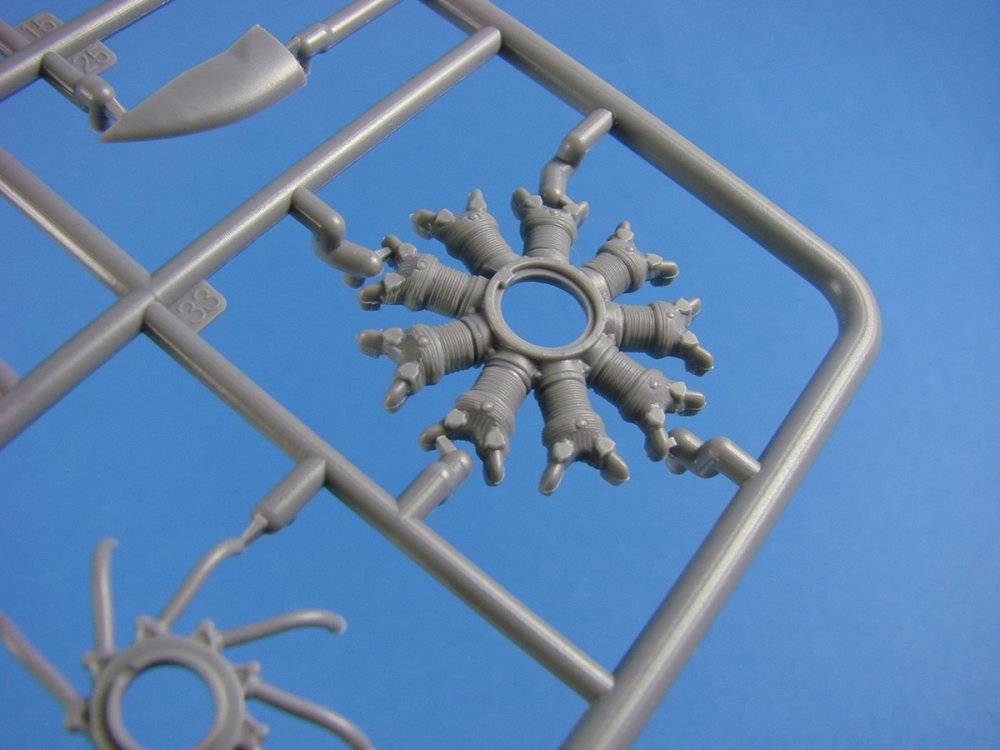
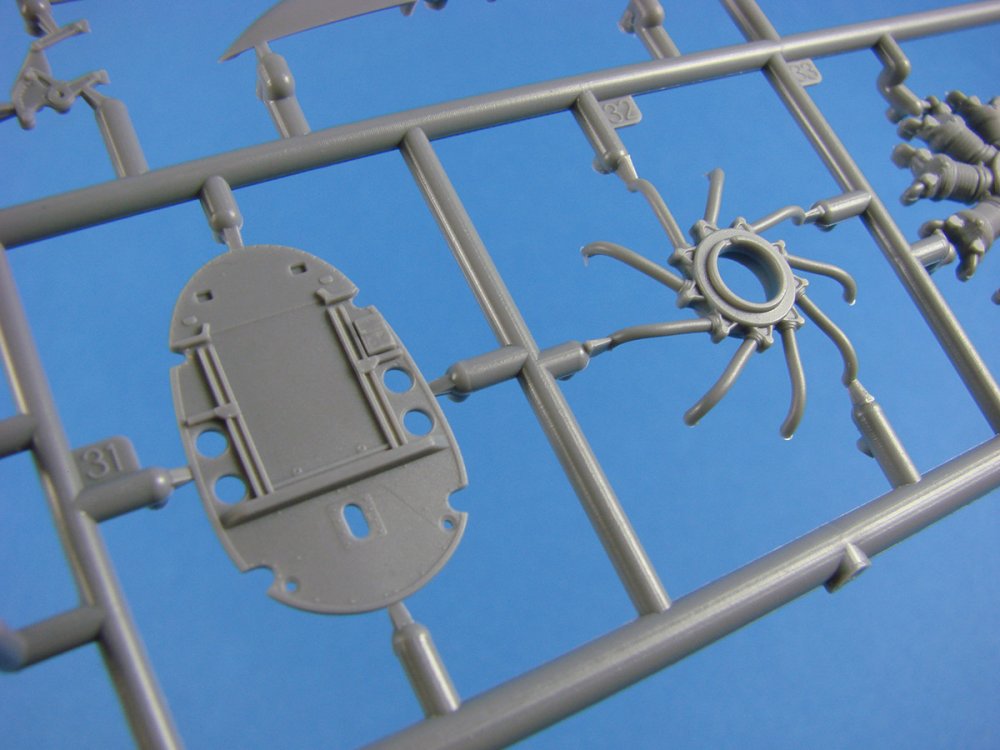
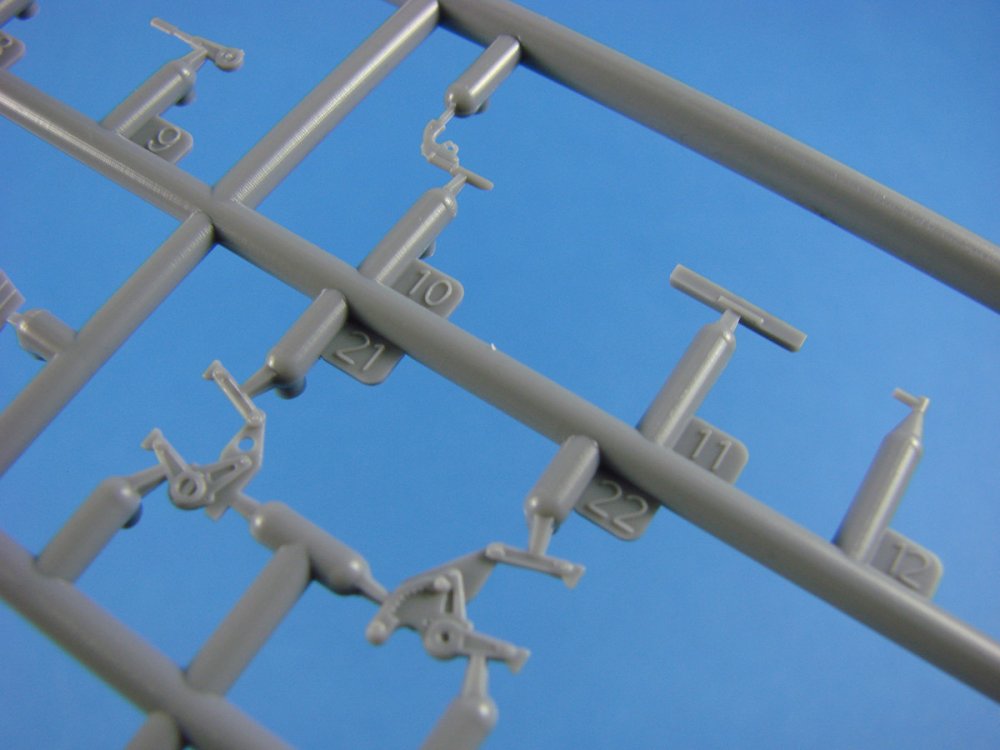
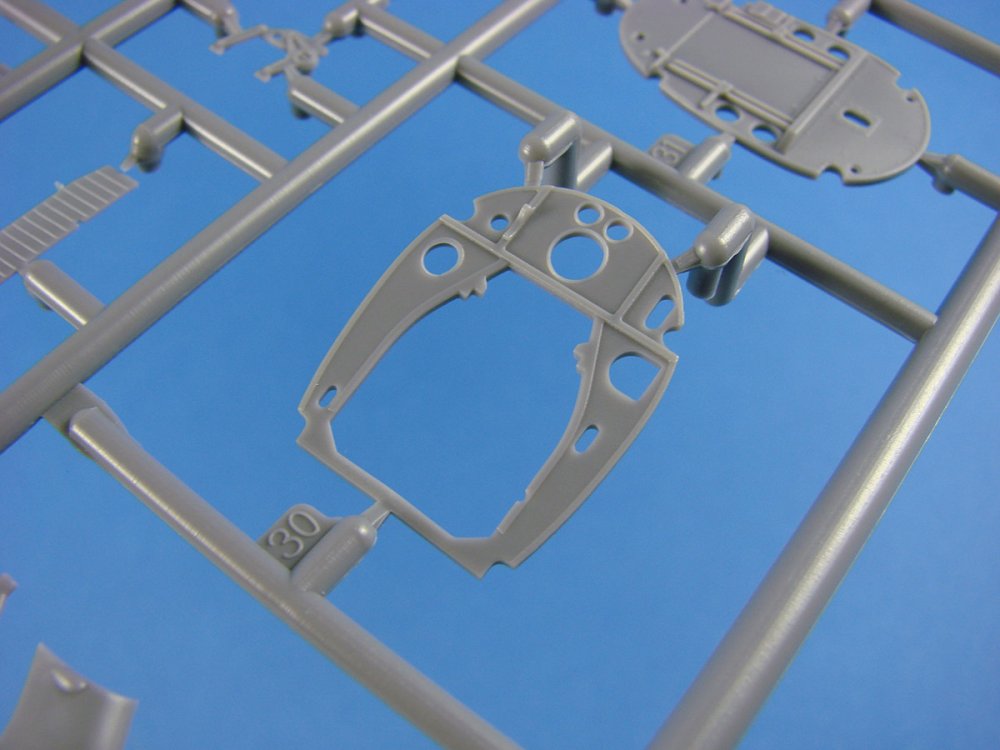

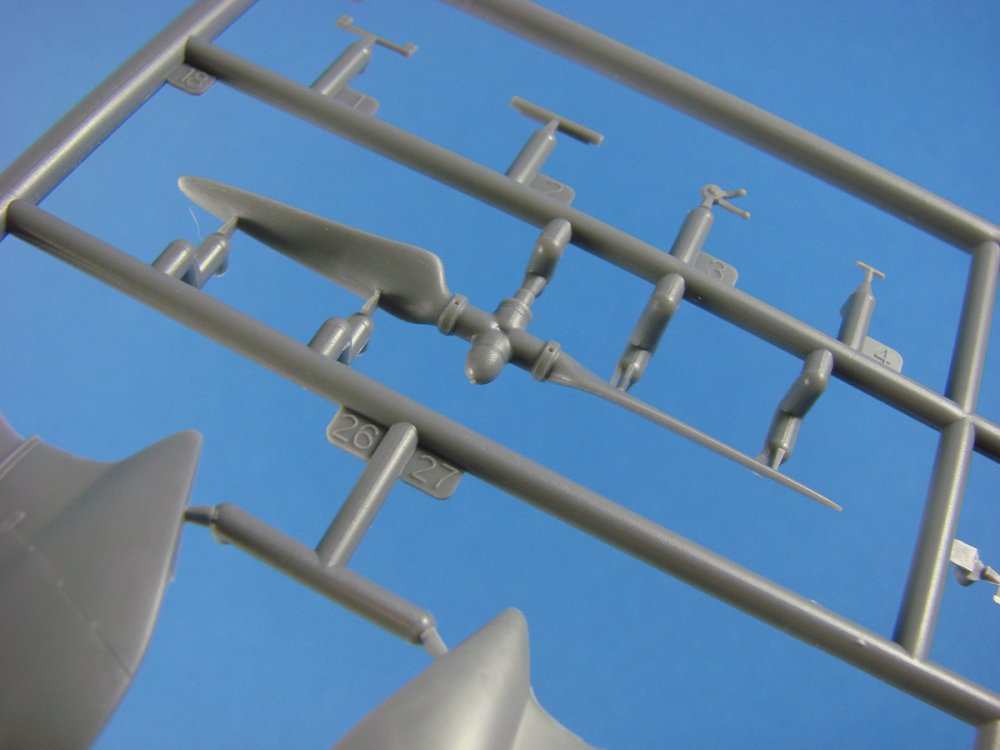
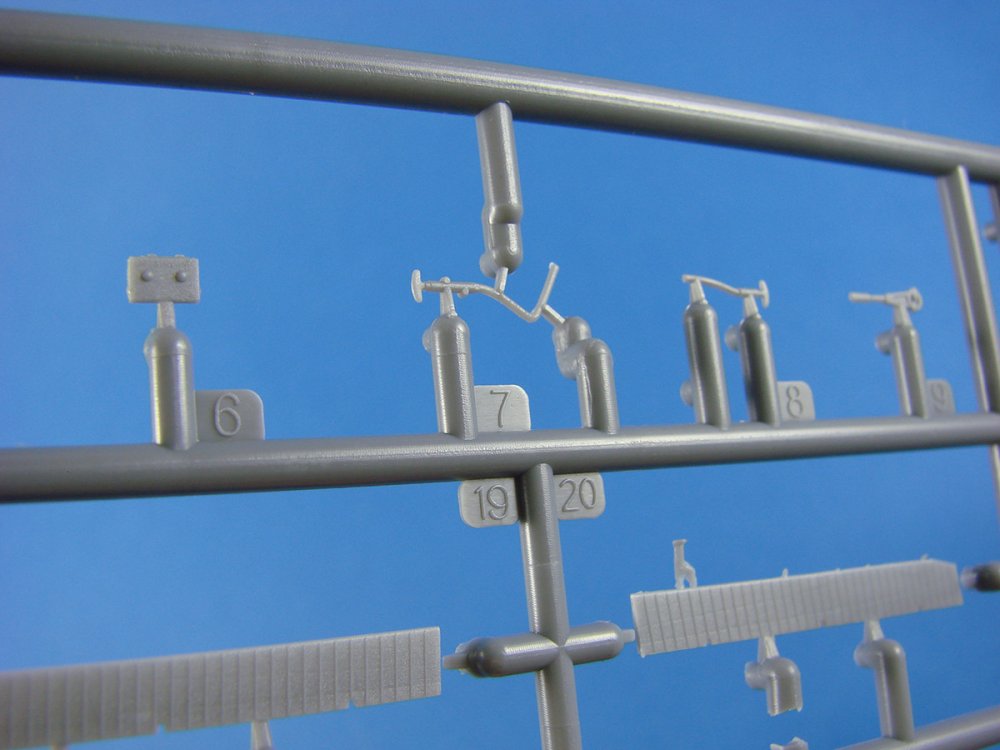
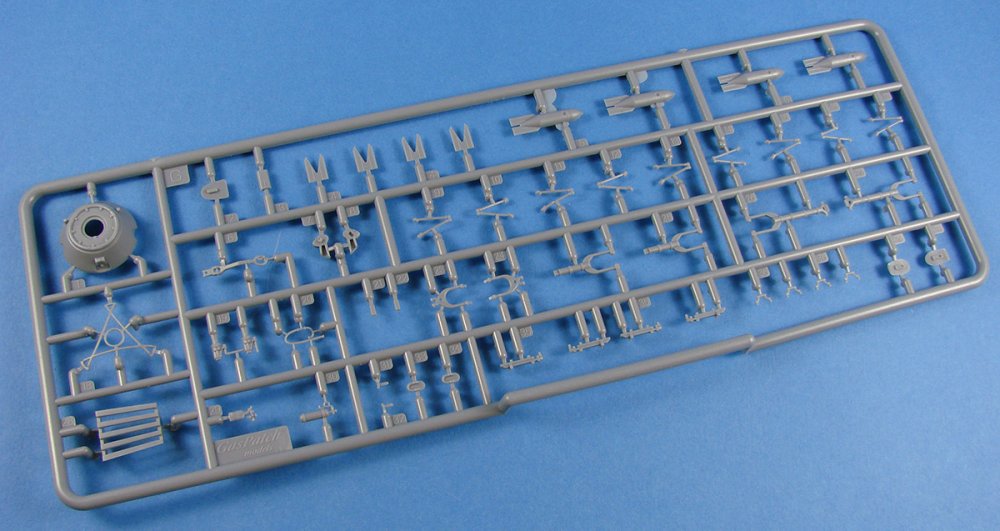


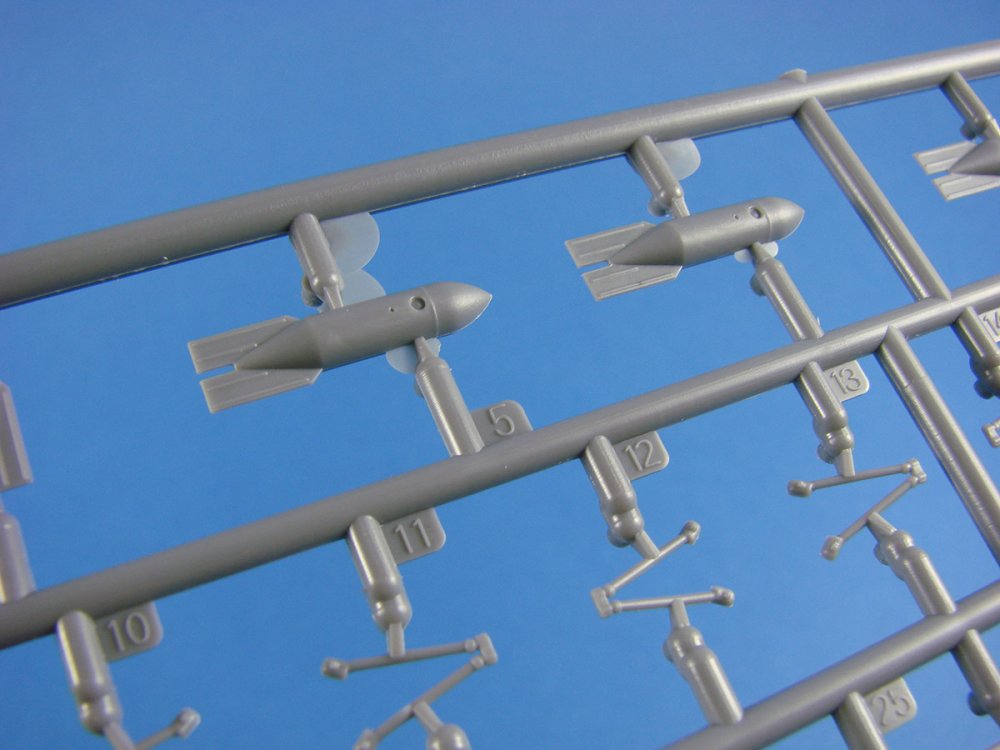

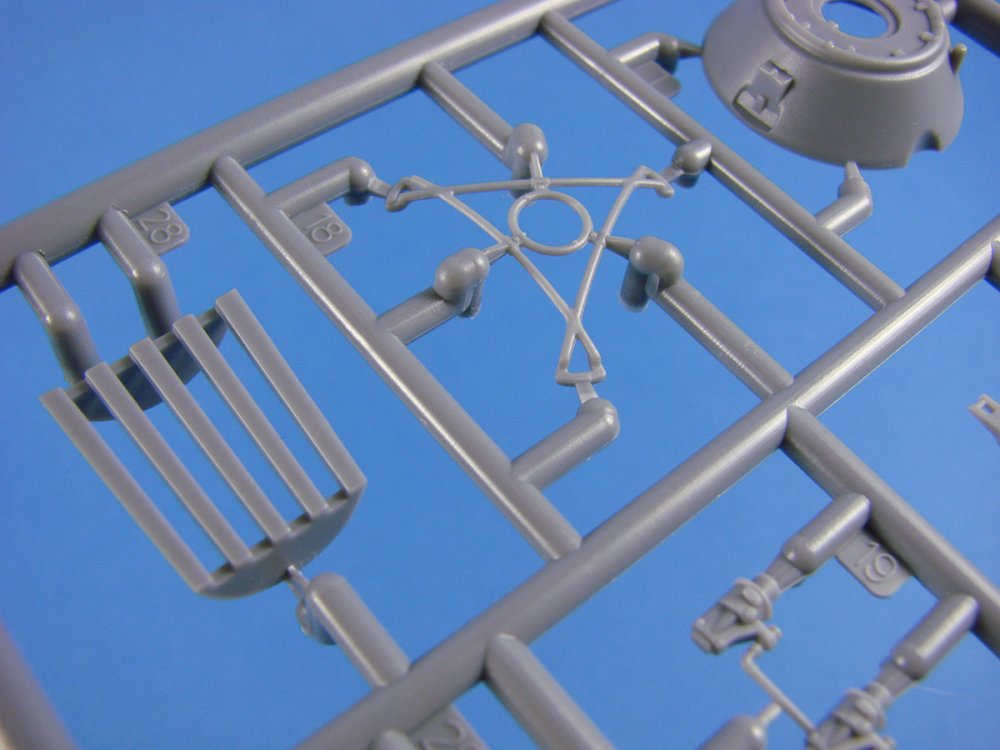
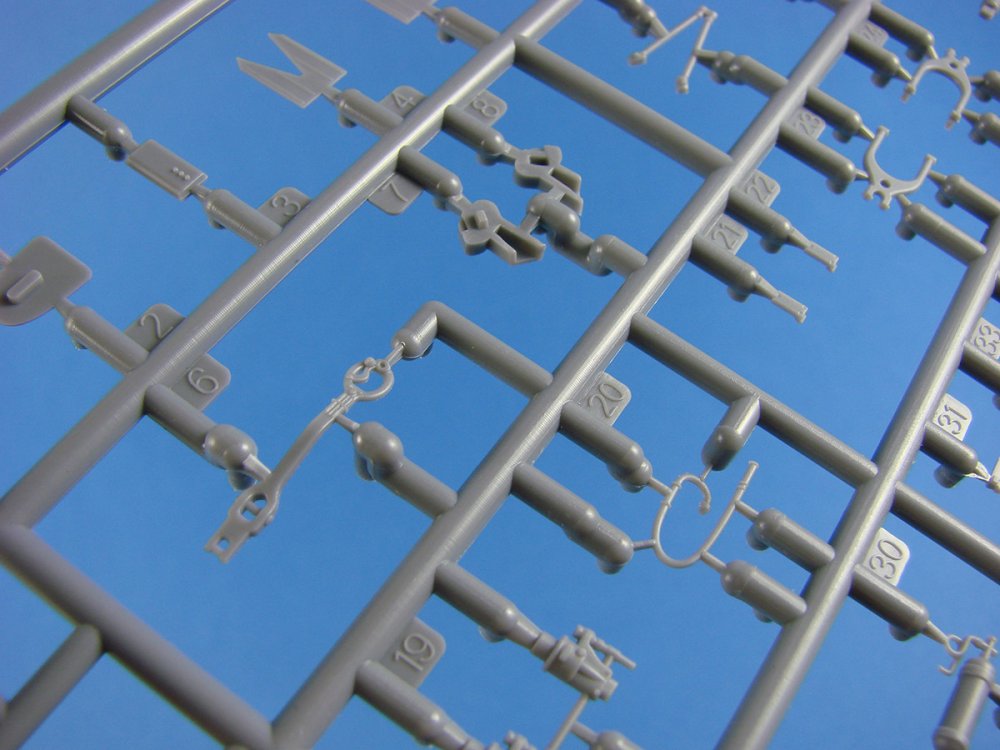
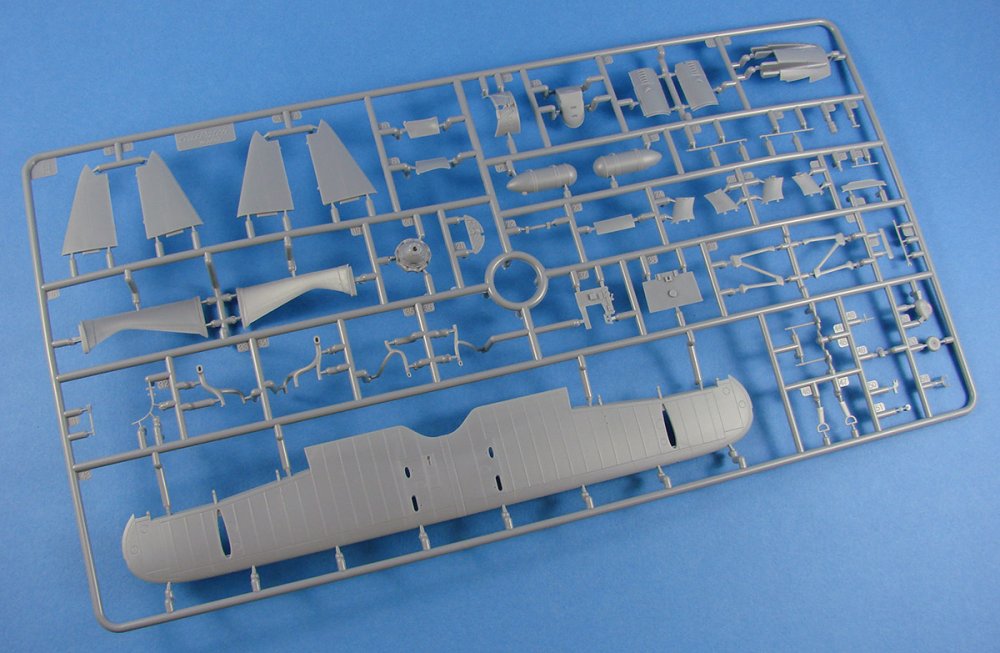
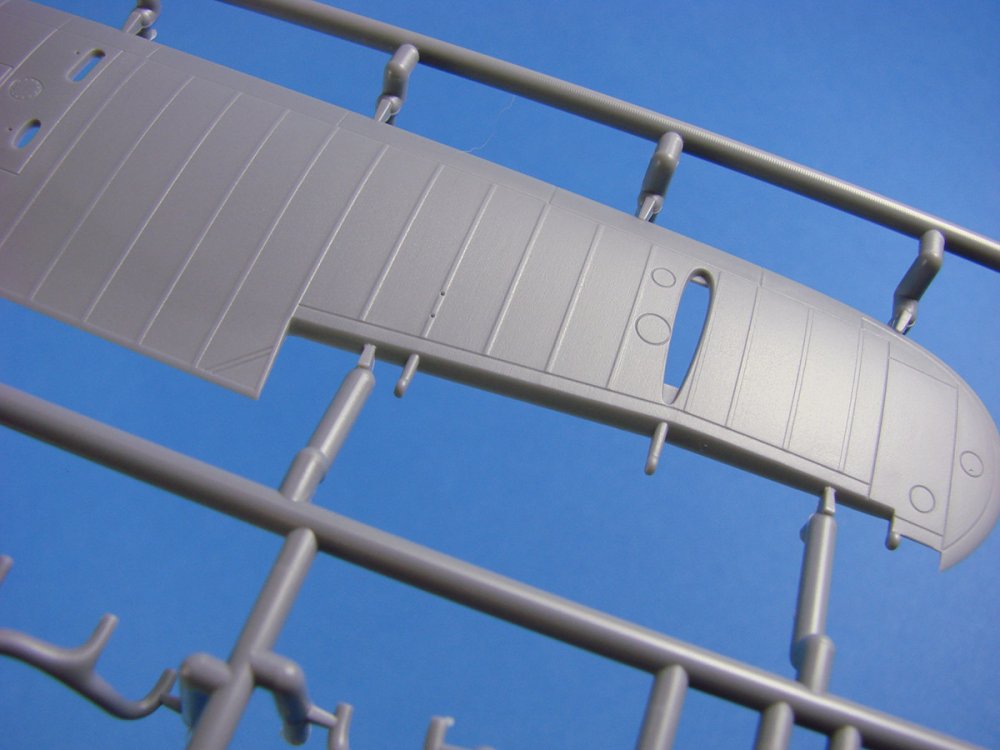
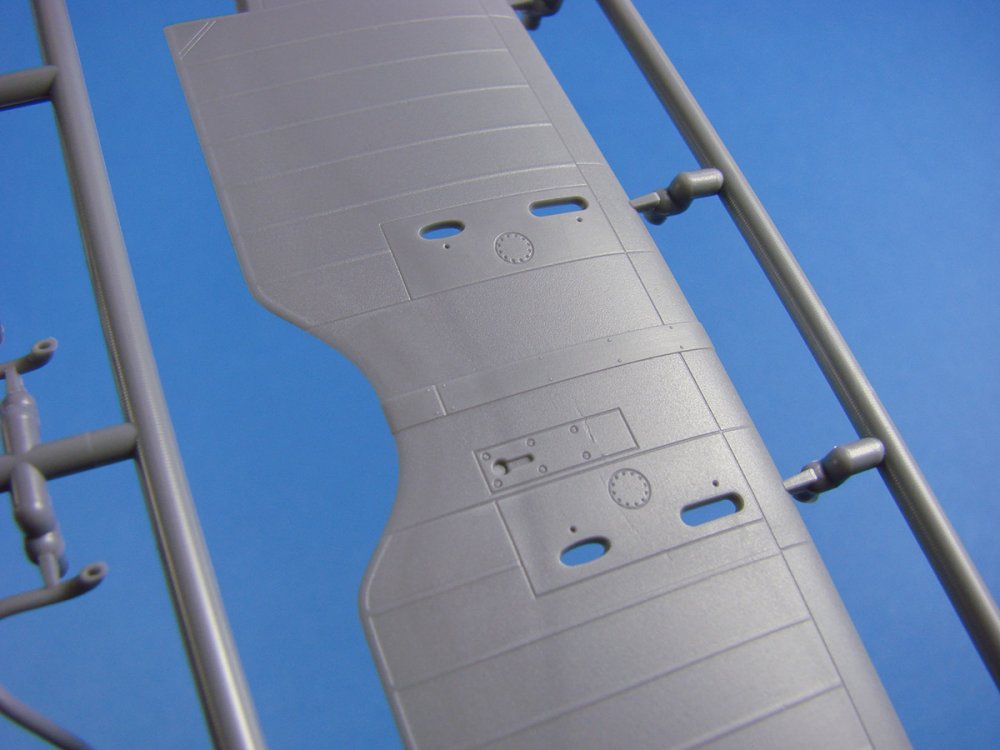
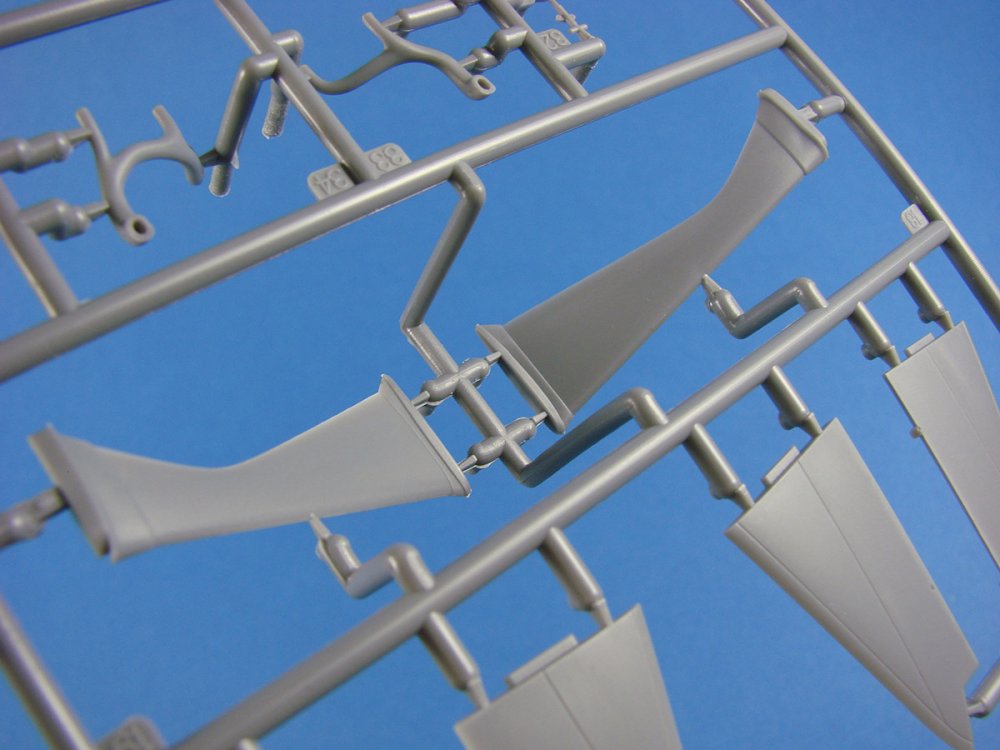
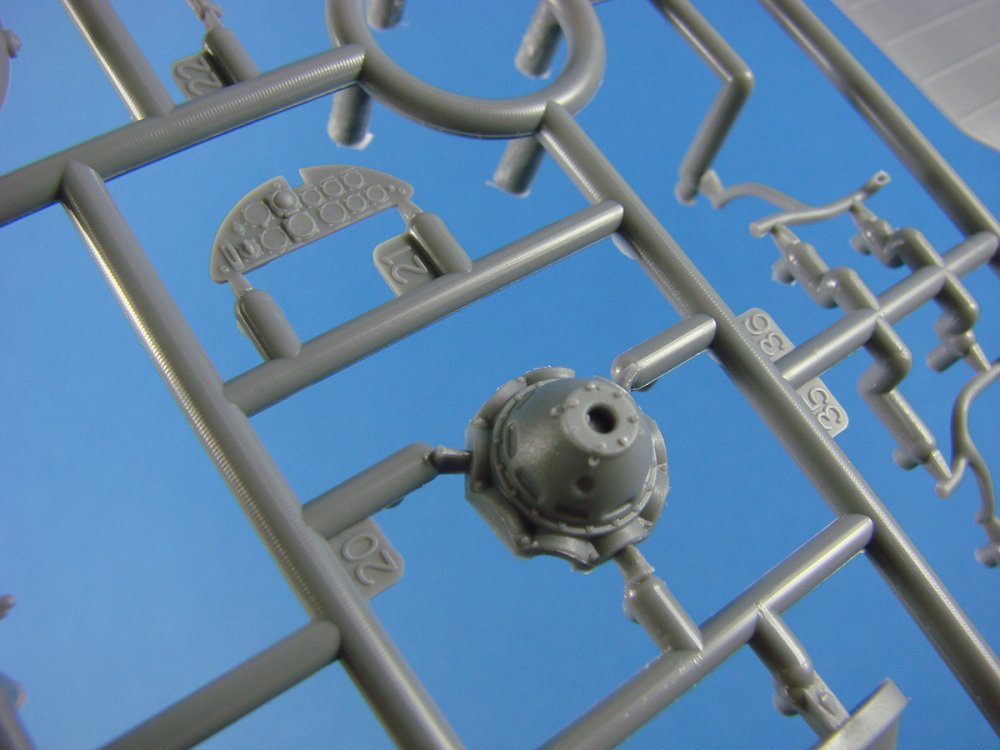
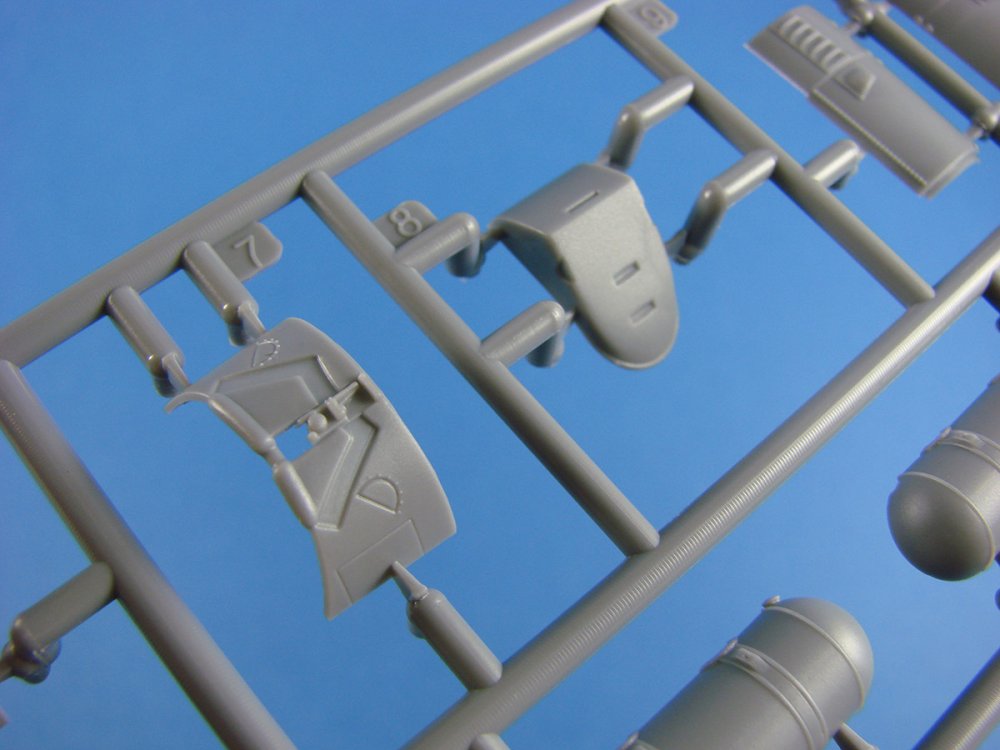
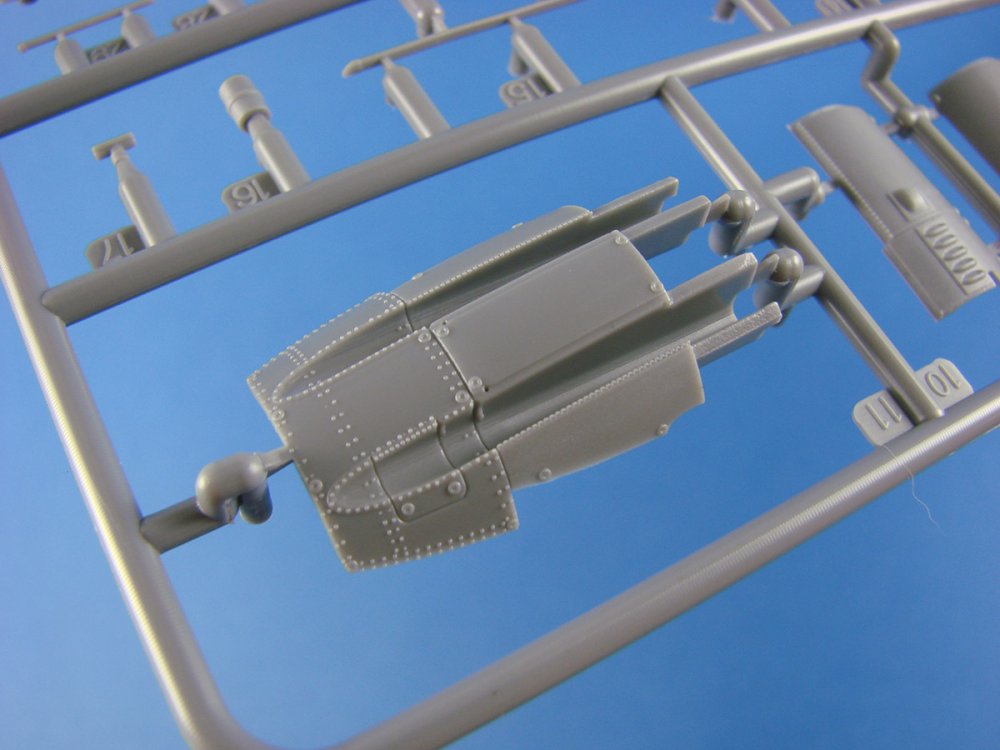
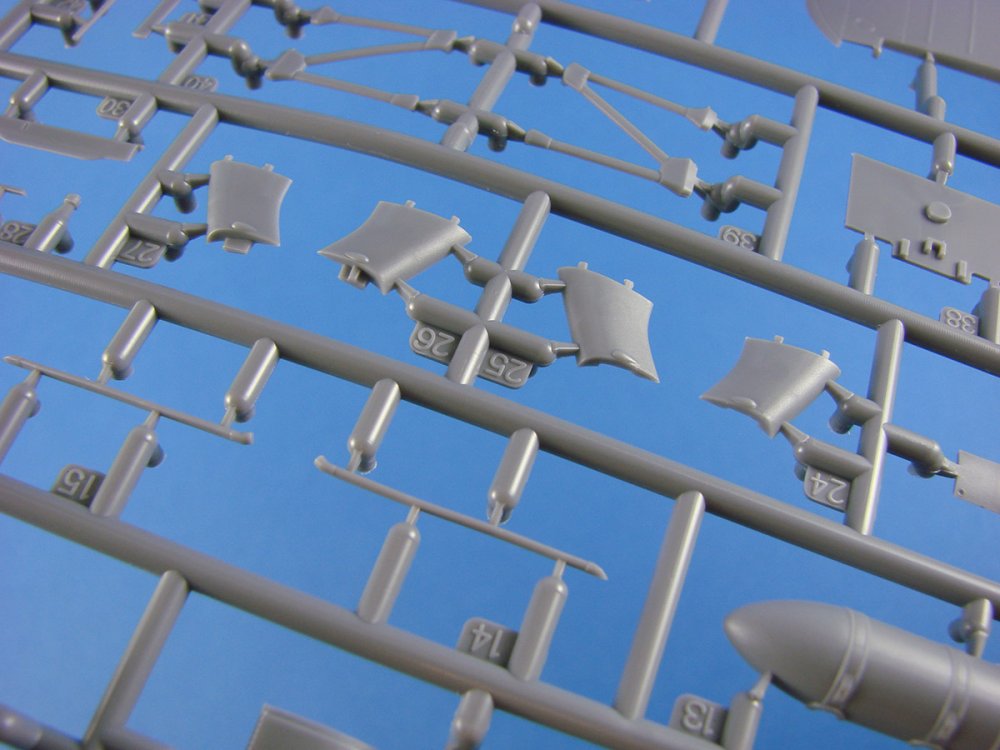
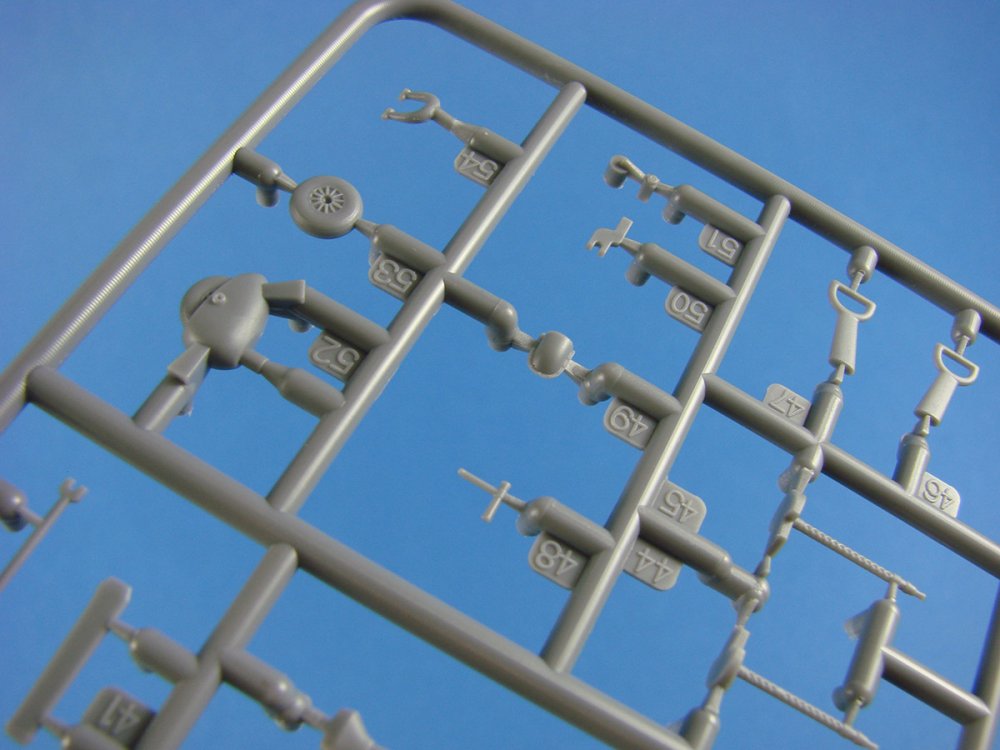
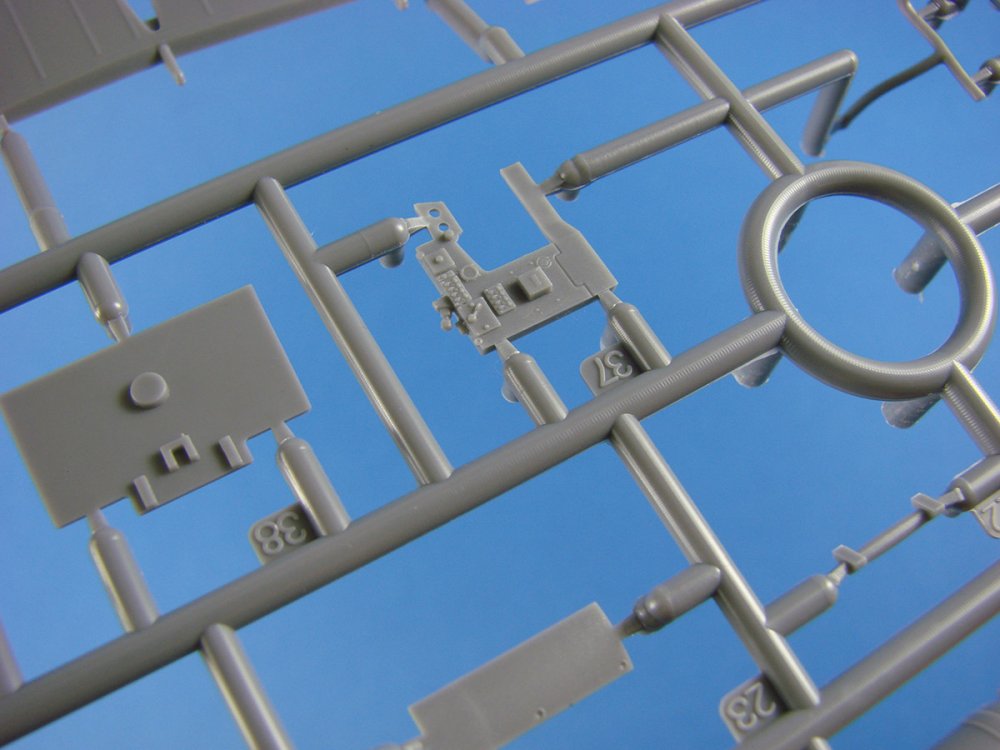

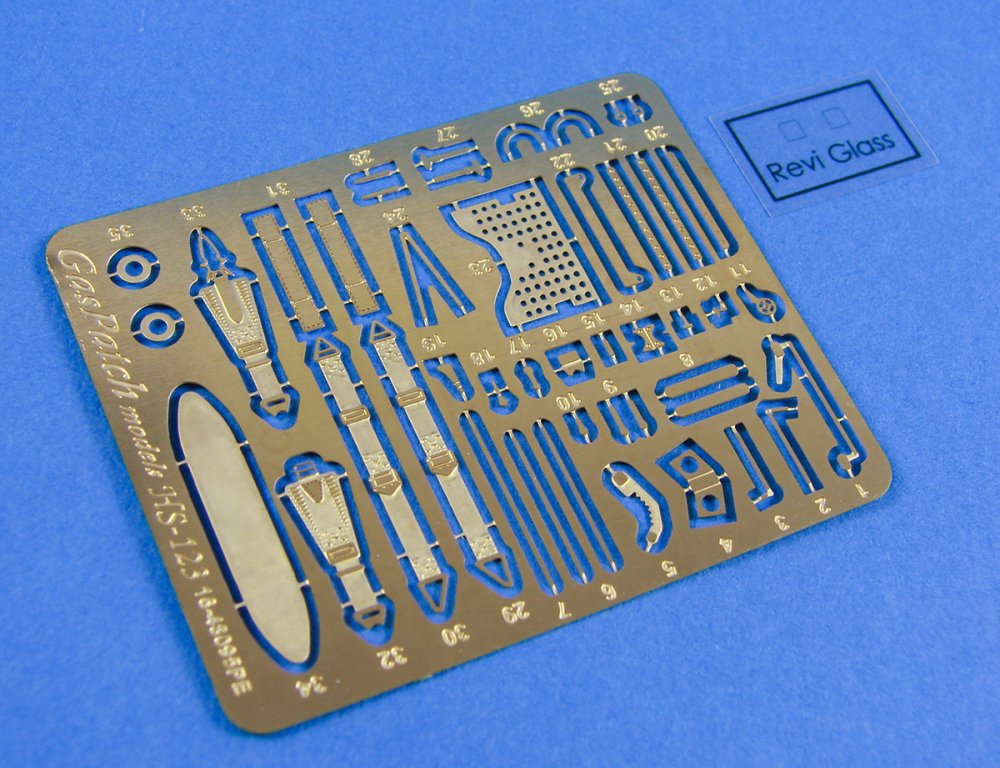


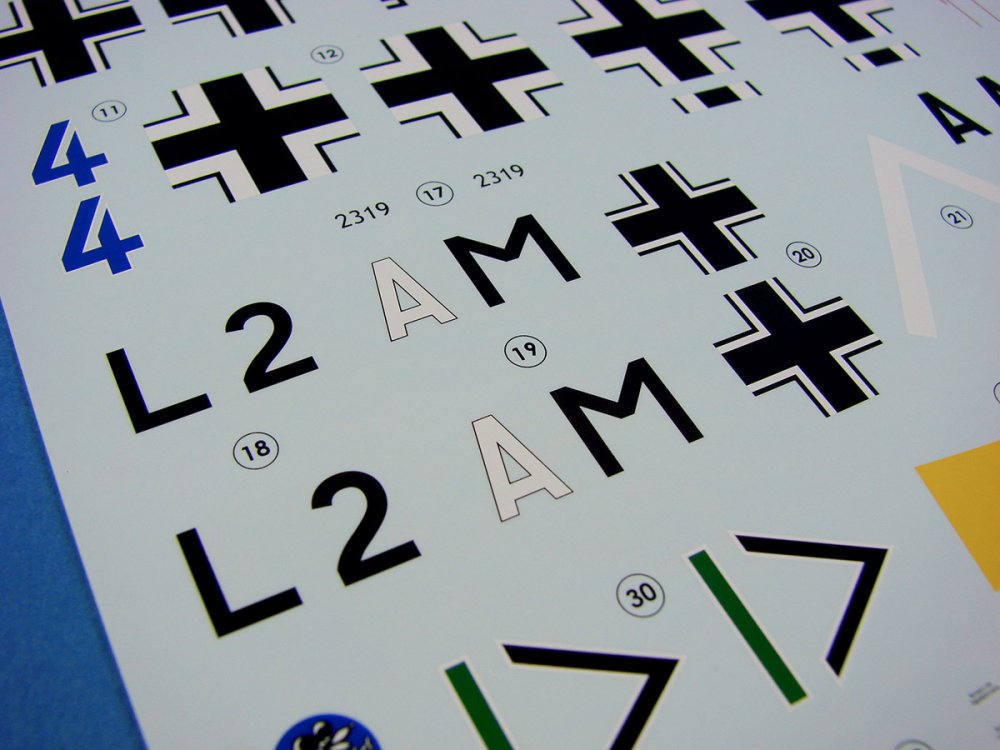
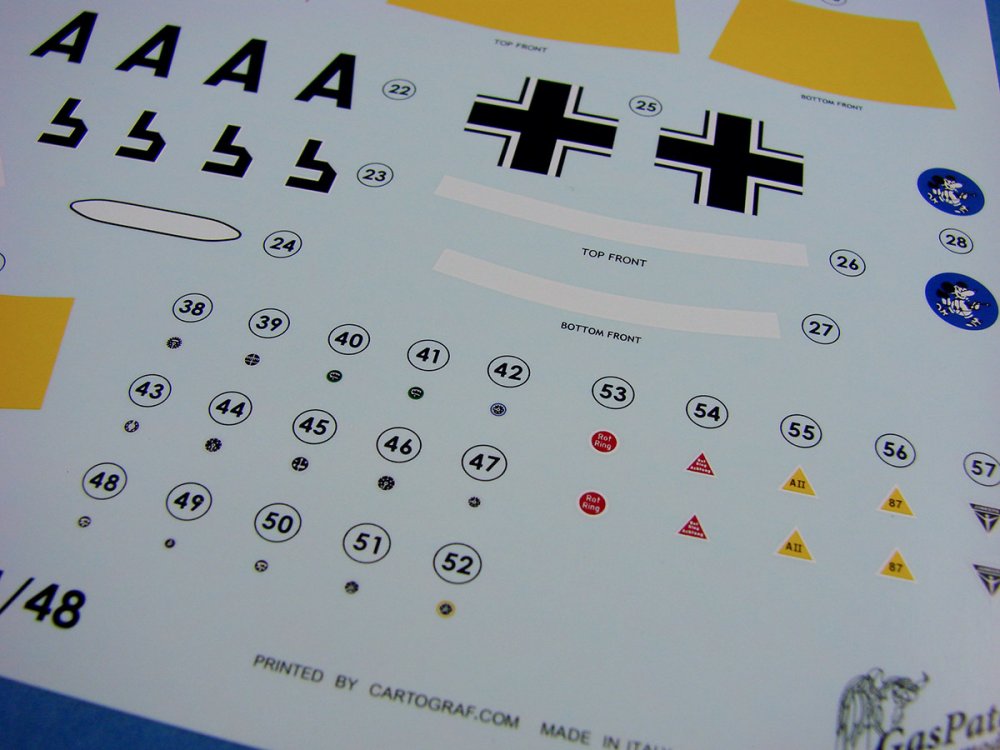
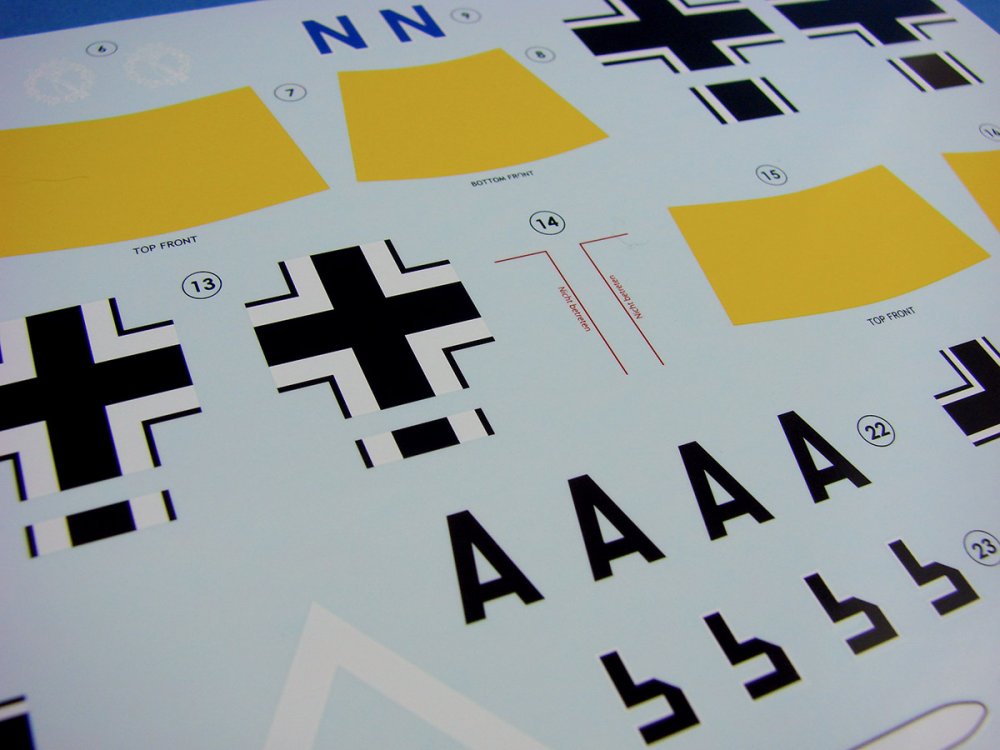

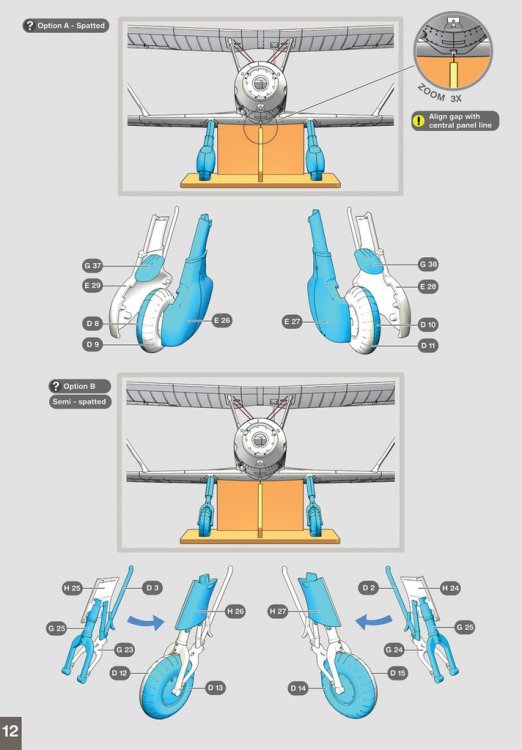
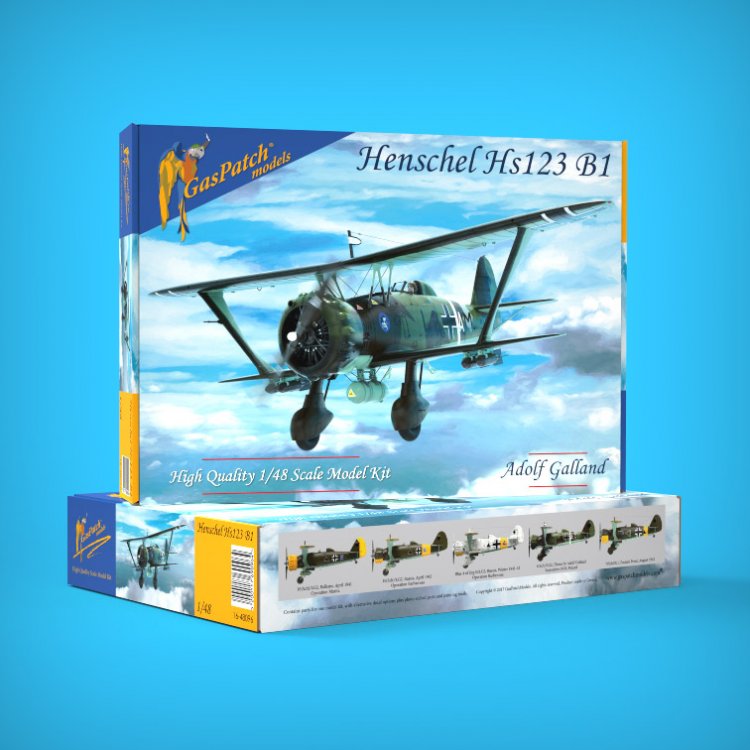
-
- 2
-
-
Got to say I wasn't too bothered about this one.....until I saw this! What a great kit. Very tempting.
-
1/48 SE.5a ‘Royal Class’ Eduard Catalogue # R0015 Available from Eduard for €74,95 The Royal Aircraft Factory S.E.5 (Scout Experimental 5) was a British biplane fighter aircraft of the First World War. It was developed by the Royal Aircraft Factory by a team consisting of Henry Folland, John Kenworthy and Major Frank Goodden. It was one of the fastest aircraft of the war, while being both stable and relatively manoeuvrable. According to aviation author Robert Jackson, the S.E.5 was: "the nimble fighter that has since been described as the 'Spitfire of World War One'" The S.E.5 was capable of superior overall performance compared with the rival Sopwith Camel, both aircraft being capable dogfighters of the era; however, problems with its Hispano-Suiza engine, particularly the geared-output H-S 8B-powered early versions, meant that there was a chronic shortage of S.E.5s until well into 1918. Thus, while the first examples had reached the Western Front before the Camel, there were fewer squadrons equipped with the S.E.5 than with the Sopwith fighter. Together with the Camel, the S.E.5 was instrumental in regaining allied air superiority in mid-1917 and maintaining it for the rest of the war, ensuring there was no repetition of "Bloody April" 1917 when losses in the Royal Flying Corps were much heavier than in the Luftstreitkräfte. The S.E.5s remained in RAF service for some time following the Armistice that ended the conflict; some were transferred to various overseas military operators, while a number were also adopted by civilian operators. In spite of possessing a square-and-boxy appearance, the SE.5a was an advanced aircraft for the era; amongst its features, the S.E.5 was the first aircraft to be equipped with a pilot-adjustable tail-plane and a steerable tailskid. The S.E.5 was composed of a wire-braced box girder structure while the wings were furnished with wooden spars and internal ribs. The fuselage was narrower than many contemporary aircraft, which provided the pilot with good all-round visibility. The aircraft had considerable structural strength, which was credited with improving the type's crashworthiness and survivability. It could also withstand high-g manoeuvres and was relatively resistant to battle-damage. Unlike many of its peers, which were unforgiving and highly agile, the S.E.5 was comparatively stable, easy to fly and forgiving; its stability enabling pilots to more readily fire upon enemies from further away with a greater degree of accuracy. It had a noticeably lower accident rate than comparable aircraft. The cockpit was set amidships, making it difficult to see over the long front fuselage, but otherwise visibility was good. One of its greatest advantages over the Camel was its superior performance at altitude, making it a much better match for the Fokker D.VII when that fighter arrived at the front.[citation needed] Aviation authors Donald Nijboer and Dan Patterson attribute the S.E.5 as being "arguably the best British-built fighter of World War I". Courtesy of Wikipedia The kit It’s not actually been too long since Eduard first released their new SE.5a Profipack kit, along with a plethora of their own aftermarket items and their useful Overtrees sprues and PE parts. As with their range of Spitfire kits, the SE.5a is becoming known for its general accuracy, excellent engineering, and trouble-free assembly. I really don’t suppose we can blame them for maximising the joy with this kit, and releasing it in their popular Royal Class series. As with a number of the recent kits in this format, this one has the familiar crimson box lid, with a simple outline drawing of the aircraft. There is of course more than one kit here too, with sprues being supplied for building TWO of these super little models, as well as additional PE and resin parts. Royal Class kits also include a little extra item within. In the past, we have had metal aircraft fragments and beer glasses etc. In this release, Eduard has supplied a rather nice and sizeable hip-flask, made from stainless steel, and carrying the RFC emblem etched onto the front, with Eduard’s logo on the reverse. I’ll look at this more closely later in this article. This Royal Class release contains the following items: Four sprues of medium grey styrene Two sprues of clear styrene Two frets of colour-printed photo-etch Three frets of brass photo-etch Twenty-eight resin parts (guns, ammo drums and flame dampers) One masking sheet One decal sheet for THIRTEEN marking options One etched, stainless steel hip-flask Now, I’ll take a look at the sprues and parts in turn, and see what they offer in terms of options and detail etc. Sprue A (x2) The real beauty of Eduard’s tooling and moulding can be seen on the wing panels. Each of these is moulded as a single, full-span piece, and the surface detail really is the 1/48 equivalent of a Wingnut Wings kit. Rib and rib tape/stitch detail is restrained and there are hints of the underlying pair of leading edge ribs that sit between the main ribs. Strengthening and stiffening plate detail is present and looks perfect. Ailerons are separately moulded so that you may pose them dynamically, and the detail on this is as refined and delicate as that of the wings. Upper and lower wing panels also have a pulley access port for the control surfaces, with the pulley moulded within. Clear parts are supplied for the panels themselves, as are PE parts for the fastening strips. As the lower panel is full span, it includes an integral lower fuselage centre-section and forward lower engine cowl section. It’s onto this that the fuselage cockpit tub will sit before the fuselage is closed up around it. Wing strut location points are nice and clean and should provide a plug-fit for those parts. Eduard has designed this model so that the elevators may be posed too, with separate, individual elevators. As with the wings, the stabiliser is also full span and incorporates the elevator pulley ports that will again be glazed over. Two different sets of elevators are moulded here, but only one set is to be used. All undercarriage parts are to be found here, including the delicate wheels with their spoke and fabric detail, spreader bar/axle, and two options for the V-struts. One of these will need to be supplemented by the use of some thin plastic rod, although I can’t see why Eduard didn’t just mould the parts on this sprue. The SE.5a’s steerable tail wheel and fairing are also included here. Remaining sprue parts include ammunition bin, cabane struts and inter-plane struts, optional head rest fairing and upper, forward fuselage bulkhead. Sprue B (x2) I really like the fuselage depiction with its slab sides. Externally, detail includes some beautiful longitudinal lacing and also around the wing root area. Of course, this was present so the fabric could be removed for maintenance. It was quite common to see the forward fabric to be rippled, but that isn’t depicted here as it was in the Wingnut Wings kit. However, what Eduard has done is created a seriously realistic surface representation with raised metal panel, raised rivet and foot stirrup details. Whilst the fin is integral, the rudder is moulded separately. Internally, the cockpit wall area is more or less bare due to the detail being within the frame/tub. The engine area though is a different matter, with engine bearer and tensioning cable details. Ejection pin marks have been hidden in the lower echelons of this area and within the area to the front of this, which will be totally hidden once assembled. If you like cockpits, then this kit doesn’t disappoint at all, with a beautifully detailed pilot’s office that is centred around a framework tub. This tub consists of port and starboard side frames, and a number of stanchions that connect them. Within this, a nicely detailed instrument panel and console are included, as are the trim wheel, control stick components, fuel tank fuel priming pump, and rudder bar, to name a few. Eduard’s tooling really is excellent, with small details being nicely represented. For the instrument panel itself, there is a colour PE alternative to use, and the interior is also supplemented by both resin and PE parts for such details as the ammunition drum and carrier, seatbelts etc. For the instruments, more PE is included, as are decal options. Two engine options are available in this kit. These are the Wolseley Viper and Hispano Suiza engines. In 1/48, these are quite small, but the detail is very nicely captured. The cylinder blocks are moulded as halves, with the crankcase composed of two parts. Plumbing and magnetos are also separate. Depending on which engine the SE.5a was fitted with, the radiator cowls were quite different, and these have been nicely recreated here. For further details, Eduard offer a Brassin alternative, but these aren’t included in this release. Other parts on this sprue are the propellers (one x 4-blade and two x two blade, exhausts, cowls, engine bulkheads, upper wing gun and integral track, and numerous small pieces for the cockpit and numerous external airframe details. Sprue C (x2) These are the clear parts, and arranged within a circular sprue. Here you will find the windscreen options, and the various access panel clear plates. Detail, where appropriate, it excellent, and the parts have perfect visual clarity. No problems whatsoever. Photo-etch parts Firstly, the colour frets. Two identical pieces are supplied in this release; one for each model. These include a full colour instrument panel and separate instrument gauges and other cockpit parts, seatbelts, inspection port frames, ammo drum container, wire bracing, gunsight mount, aileron control cables etc. Colour printing is excellent. Two more identical frets contain the parts for the Brassin guns, and the last fret holds parts for the various streamers and flame damper brackets etc. Resin parts No less than 28 resin parts are supplied in this release, focusing solely on the guns, ammo and flame dampers. These are cast in a combination of both light and dark grey resin. I feel that the dark grey material is used for items that need a little extra strength, but I could be wrong. Of course, the parts in this release are available as separate Brassin releases too, if you’d opted for the ProfiPACK version, but it’s good to see their inclusion here. Essentially, what we have are two sets of parts from the SE.5a Guns Brassin pack, and the dampers which appear to have their first outing in this release. Again, there are two sets of these; one for each of the included kits. Despite Eduard’s plastic equivalents being more than good enough to come up to the mark, their Brassin parts take things in a totally different direction, with some of the most subtle detail you will see in resin. The fuselage mounted guns themselves are built up from a rear breech and separate barrel/cooling jacket, plus a PE reticule and cocking lever. The wing-mounted gun is a single piece, with a separate barrel, supplemented by a choice of two different ammo drums, handle, and cockpit lever. The latter is very small, so be careful handling it. This gun is mounted to an adjustable rail, and this is also supplied in resin. PE parts are also included. To fit the flame dampers, you will need to remove the rear of the plastic exhaust pipe, and graft it into place. Only one scheme option (A) requires this modification. All resin is superbly cast and their connection to the casting blocks are easy to saw through and quite thin. For me, the only omissions in this release are one of the resin/PE radiators, and one of the superb propellers that are also available separately. Numerous options exist for these however, but the inclusion of one of each would have made this the ultimate SE.5a release, ever! Masks A single sheet of paper kabuki masking material is supplied, with enough parts for both models. Included are masks for the wheels, windscreens, and the small, clear access panels on the wings and tailplane. All masks are sharply cut and the instructions are clear as to their placement. Decals A single decal sheet, printed by Cartograf, contains the markings for all THIRTEEN schemes. The appearance of the SE.5a was fairly generic for the larger part, but Eduard has chosen some interesting and attractive options for this release. As well as national markings, serials and insignia, stencils are also included. Printing is nice and thin, as well as having minimal carrier film, and solid and authentic colour. Registration is perfect. The schemes available are: C1803, flown by Capt. C. J. Truran, No. 143 Squadron, Detling, Great Britain, May 1918 C1904, flown by Maj. W. A. Bishop, No. 85 Squadron, Petit Synthe, France, June 1918 D278, flown by Capt. E. Mannock, No. 74 Squadron, Clairmarais North, France, April 1918 F5687, flown by Lt. J. A. Roth, No. 60 Squadron, Quiévy, France, November 1918 B189, flown by Capt. J. H. Tudhope, No. 40 Squadron, Bruay, France, April 1918 B4863, flown by Capt. J. T. B. McCudden, No. 56 Squadron, Estrée Blanche, France, September 1917 B603, Training Unit, Great Britain, 1918 B525, flown by Lt. A. P. F. Rhys - Davids, No. 56 Squadron, Estrée Blanche, France, October 1917 B507, flown by 2/Lt J. J. Fitzgerald, No. 60 Squadron, Sainte-Marie-Cappel, beginning of October 1917 F9029, No. 1 Squadron Canadian Air Force, Shoreham, Great Britain, 1919 D362, 5th and 6th Training Squadron, Australian Flying Force, Minchinhampton, Great Britain, 1918/1919 A2-24, flown by F/O F. C. Even, No. 3 Squadron Australian Air Force, Canberra, Australia, beginning of May 1927 F8005, flown by Capt. R. G. Landis, CO of 25th Aero Squadron, Collombey-les-Belles, France, November 1918 Instruction manual Eduard’s typically lush style continues with this 24-page, glossy A4 publication that covers both construction and the scheme artworks. A full parts map is supplied at the beginning, with the not-for-use parts being clearly identified. Colour codes are also supplied for Gunze/Mr Metal paints. Construction illustration is easy on the eye, with this mostly being in line drawing format with coloured ink to denote part modification or PE/resin addition. The various parts options are clearly shown, with their marking scheme letter denoted. Rigging illustration is also given, with all lines in blue ink. This could’ve been easier to follow if the various lines were printed in different colours. Paint call-outs are given throughout. Scheme illustrations are excellent, with easy to follow colour and decal images. Hip-flask This is a little beauty. I’ve owned a few flasks over the years, and this is as good as some of those. It’s also quite a decent size too, and the RFC engraving really does look good. What I like about this flask is the captive lid that swings out on a bracket once you’ve unscrewed the lid. It certainly stops you dropping it on the floor in a crowded bar and shuffling around on your knees, looking for it. Just remember that as with any flask, you should give it a good wash out or sterilise before use. Conclusion This is one hell of a kit, made even better with the fact that two full sets of sprues are included, plus the resin and PE parts that elevate the already excellent kit parts to something that should look quite spectacular if you take your time and effort. I do feel that at least one of the Brassin radiator sets would have been a nice addition, and maybe one of the propellers too. Having said that, the price that you should be able to get this for, proves that this is very good value for money, in relation to the ProfiPACK release, and of course, you get that rather attractive hipflask that I assure you will see some action in the near future. A gorgeous kit, and remember, this is a limited edition. Get it now whilst you can! Highly recommended. My sincere thanks to Eduard for this review sample. To purchase directly, click HERE
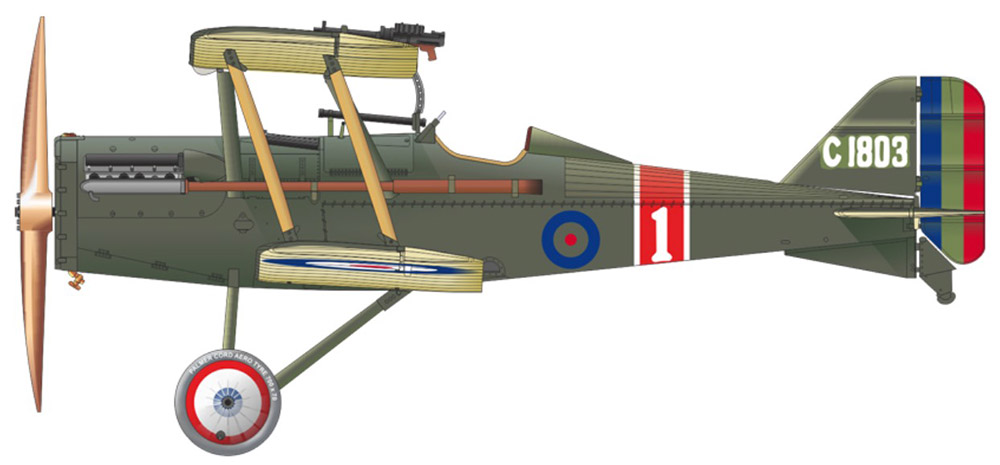
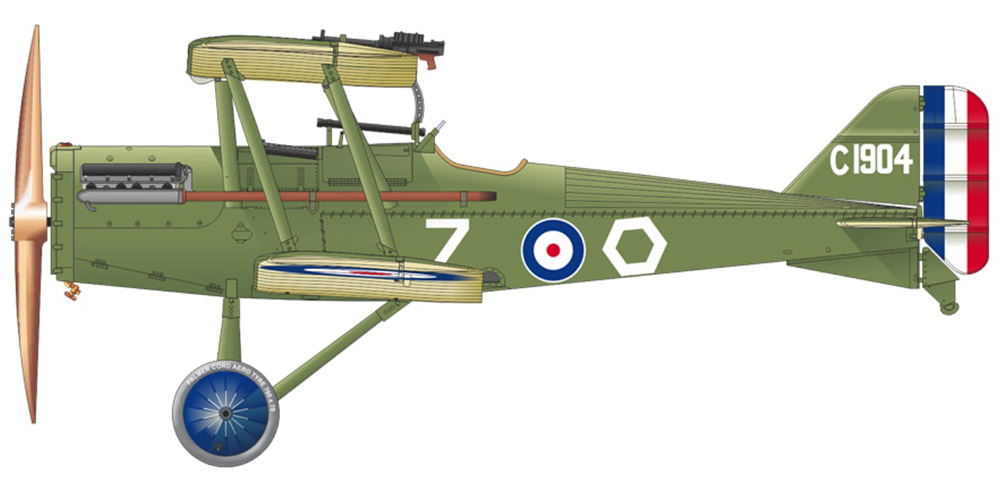

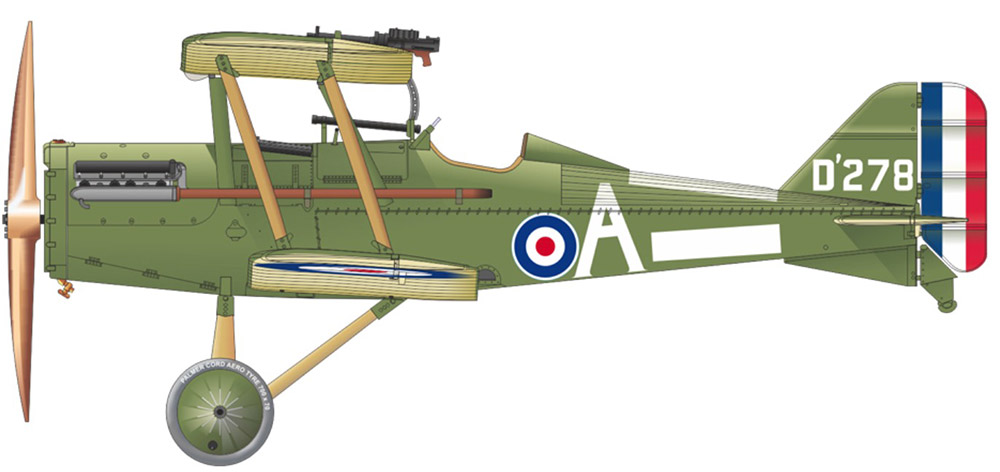
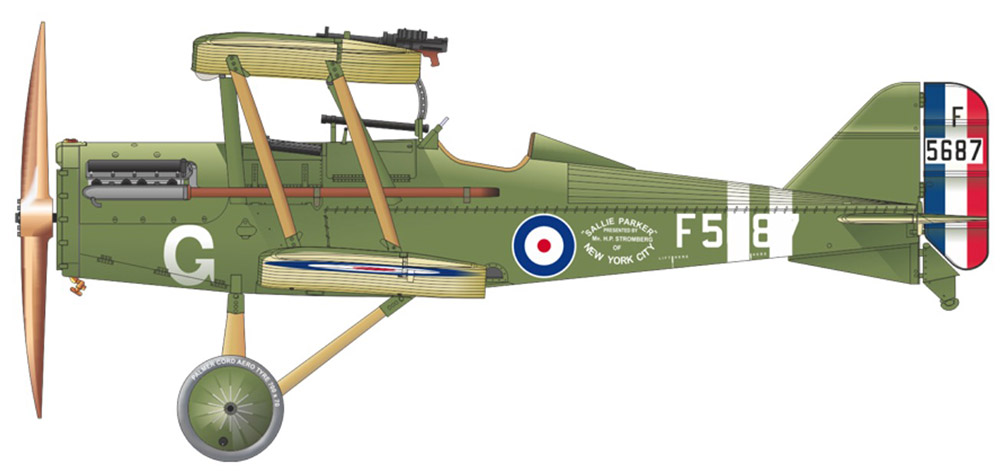

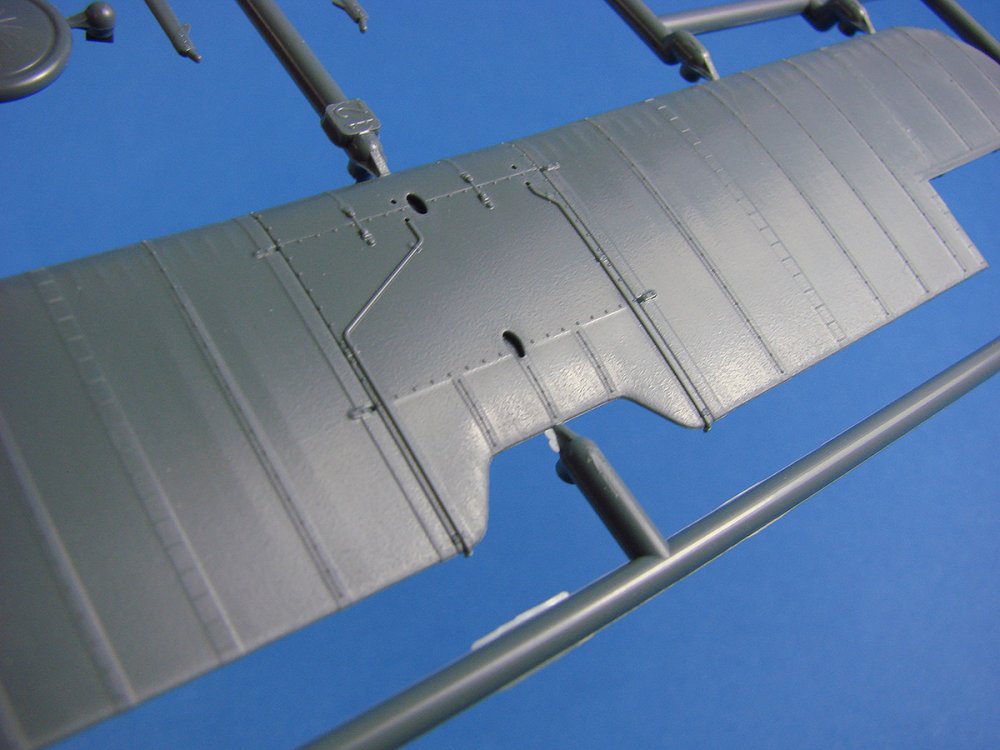
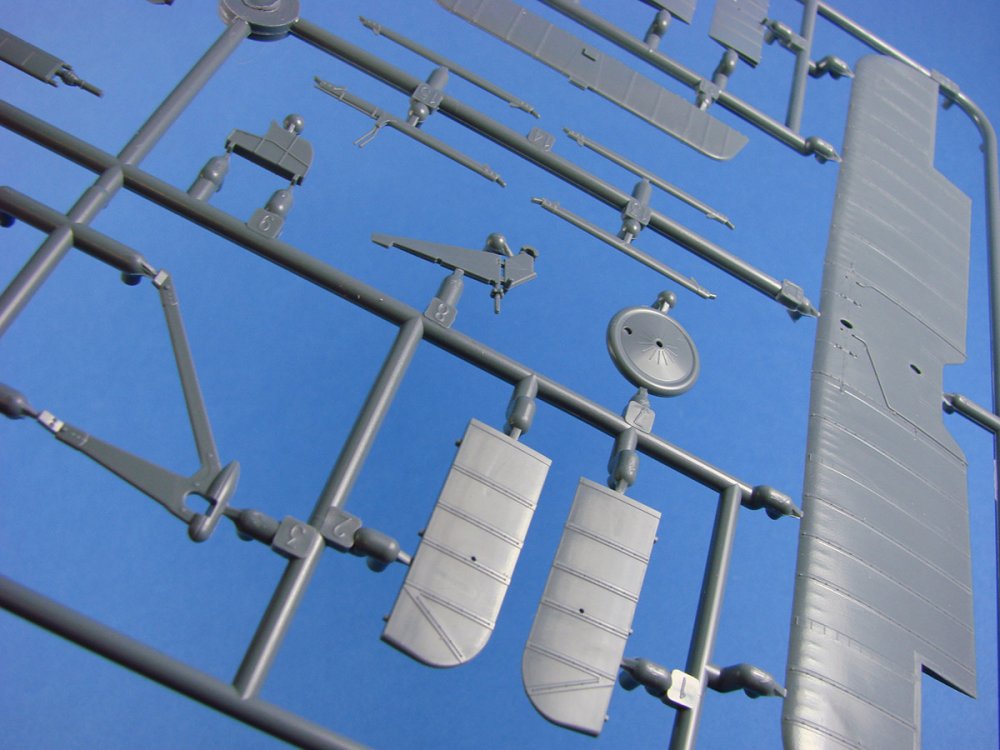
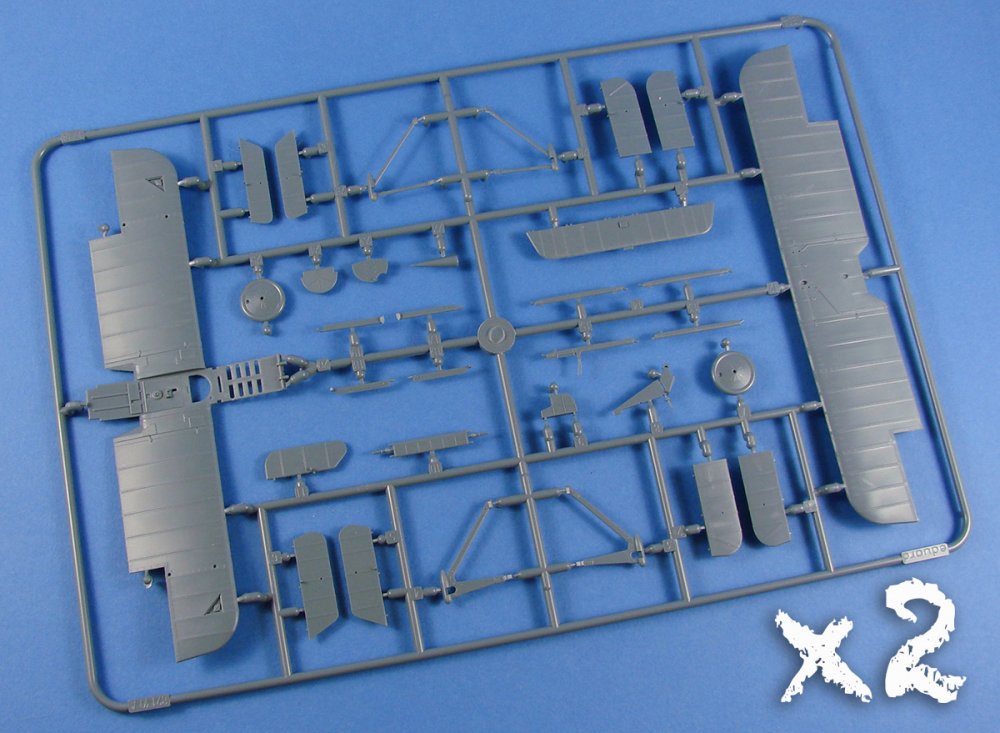

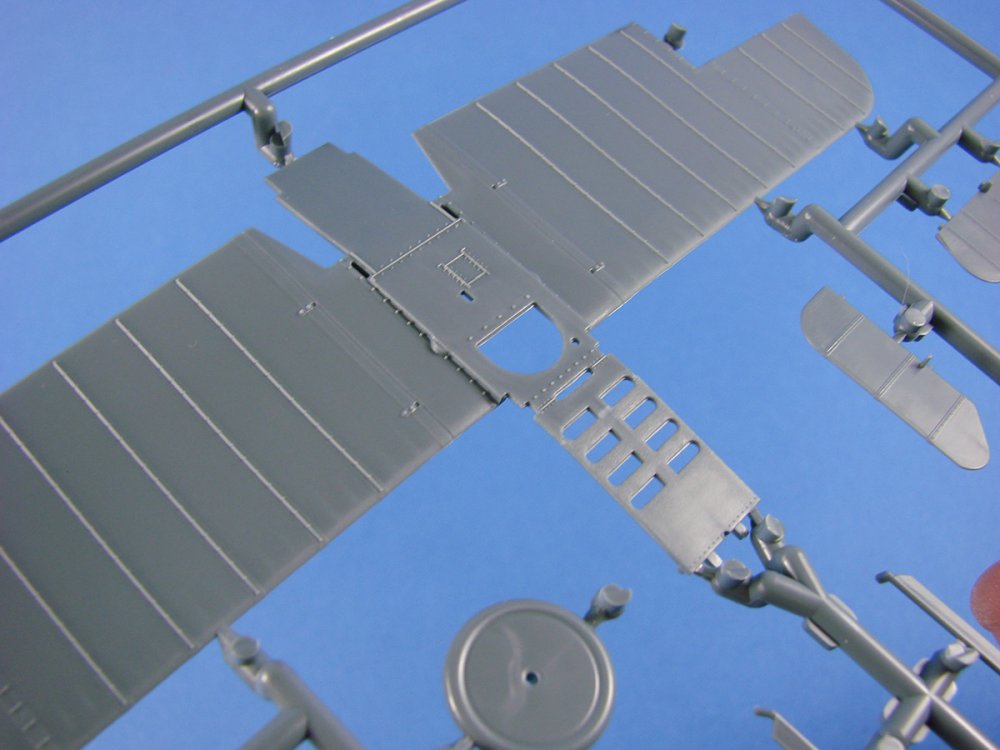
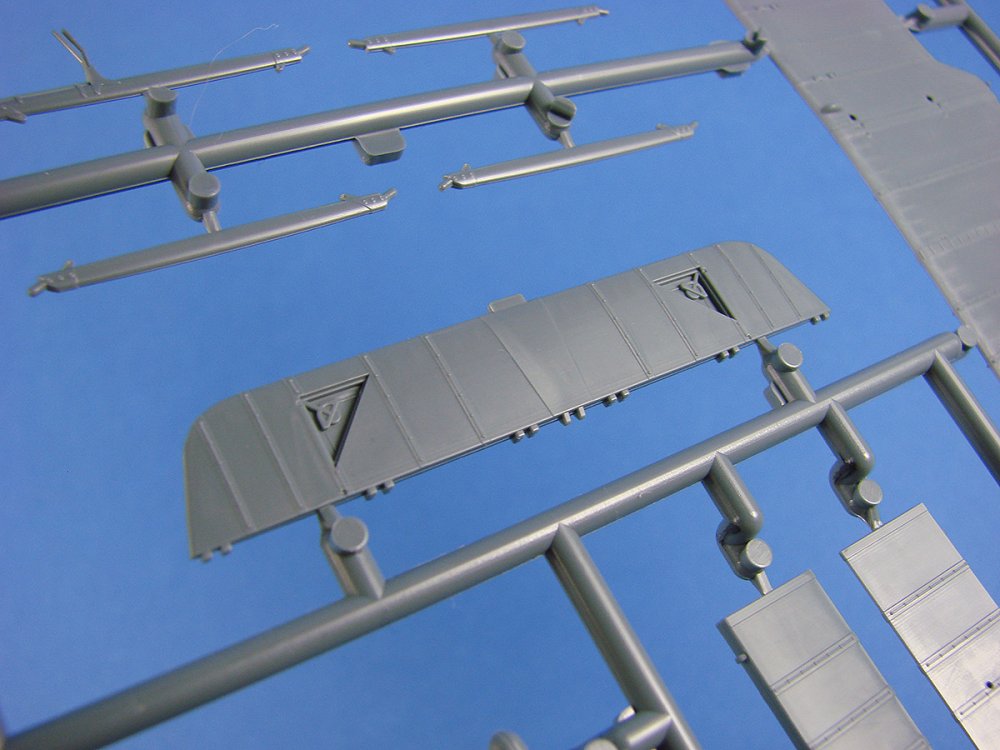
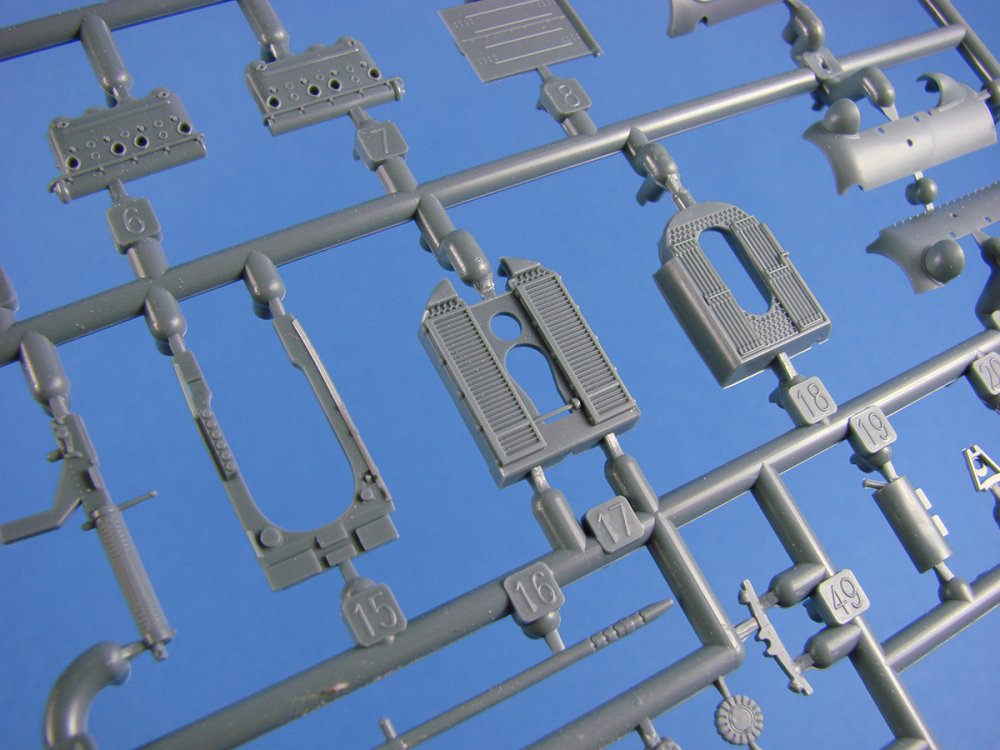

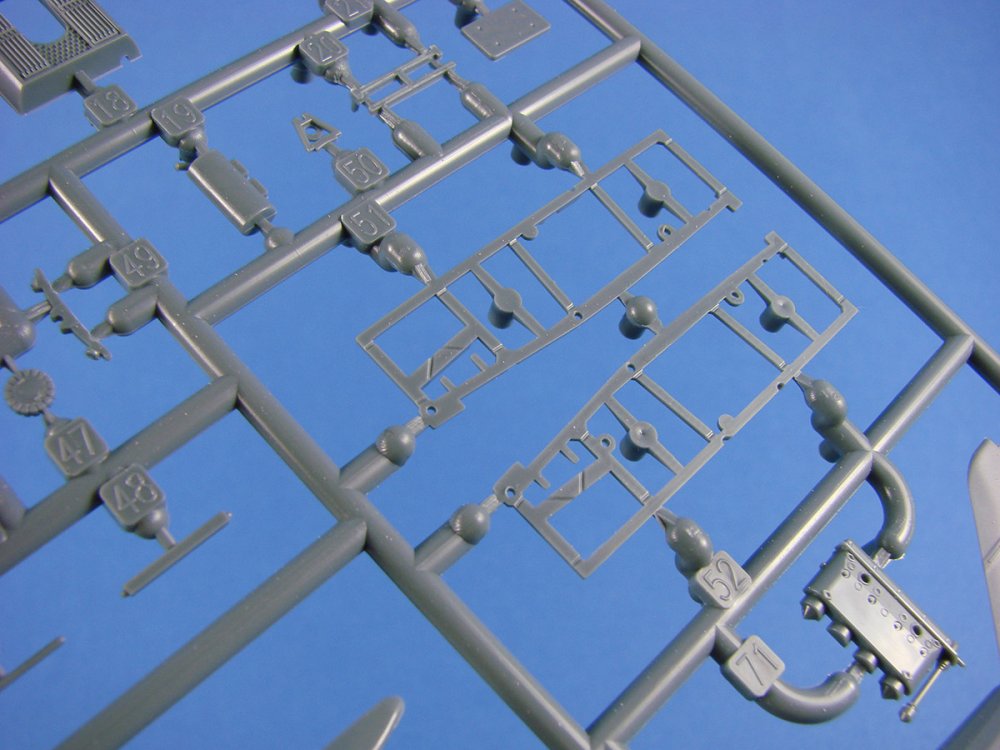
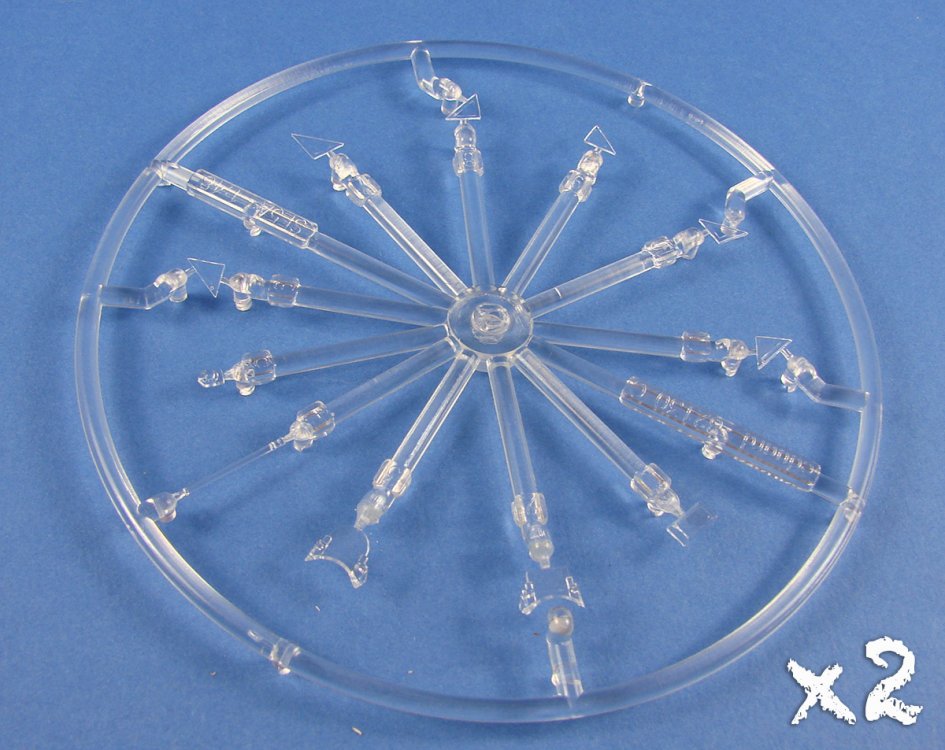
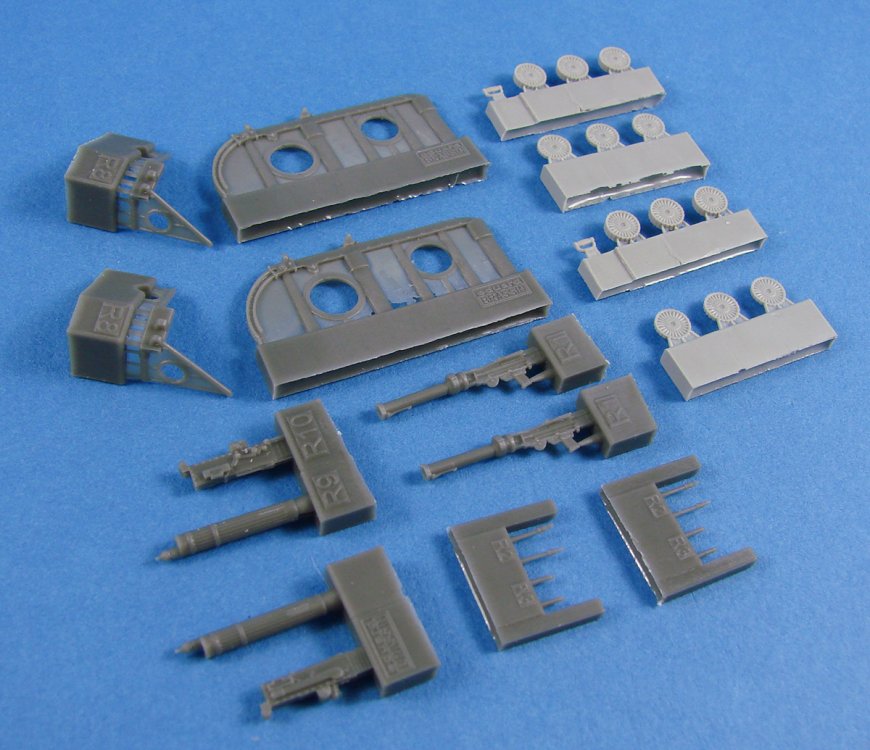
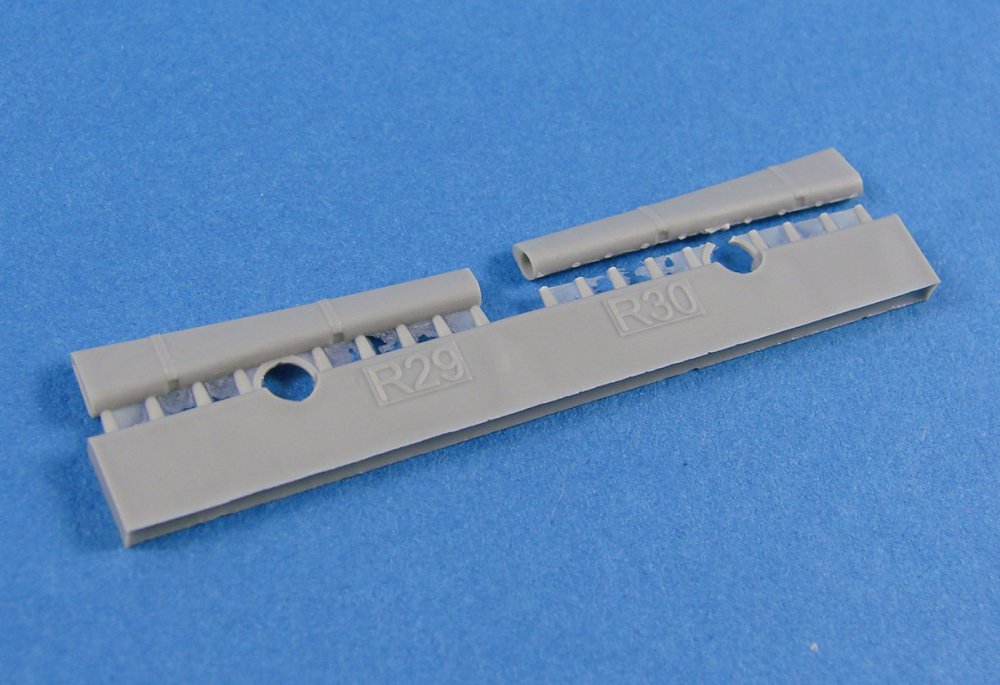

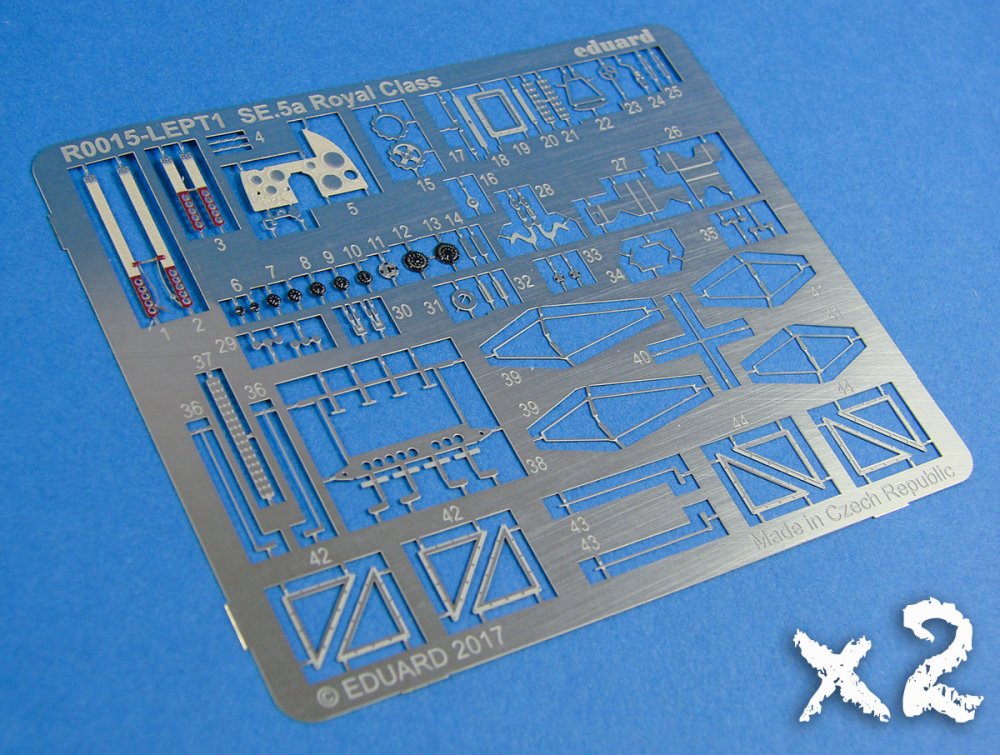
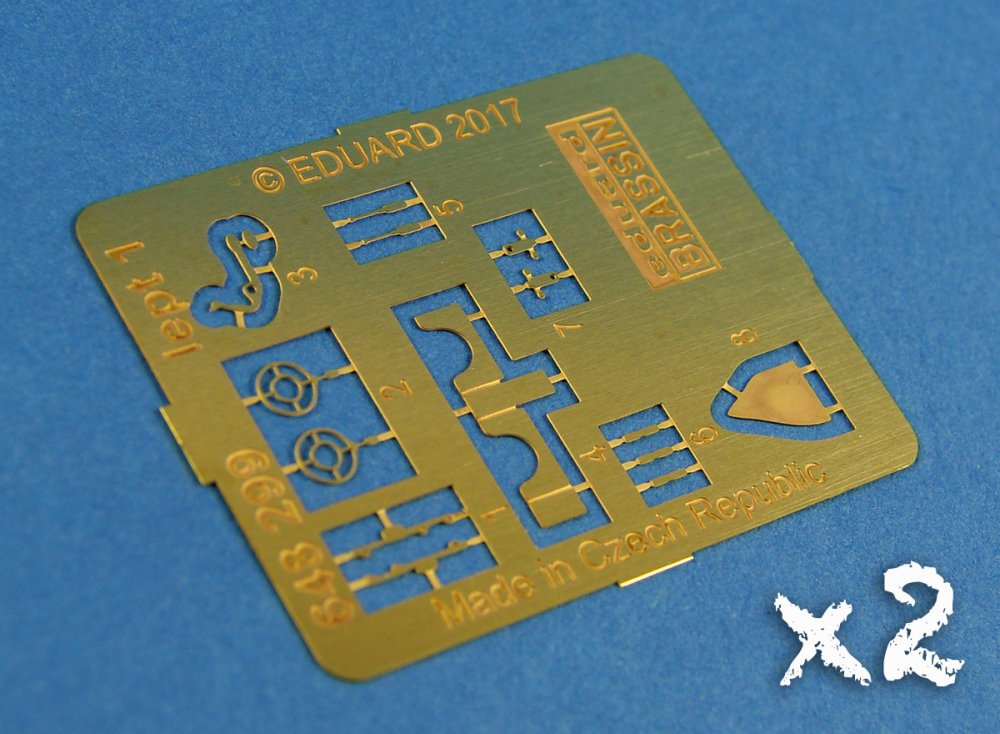

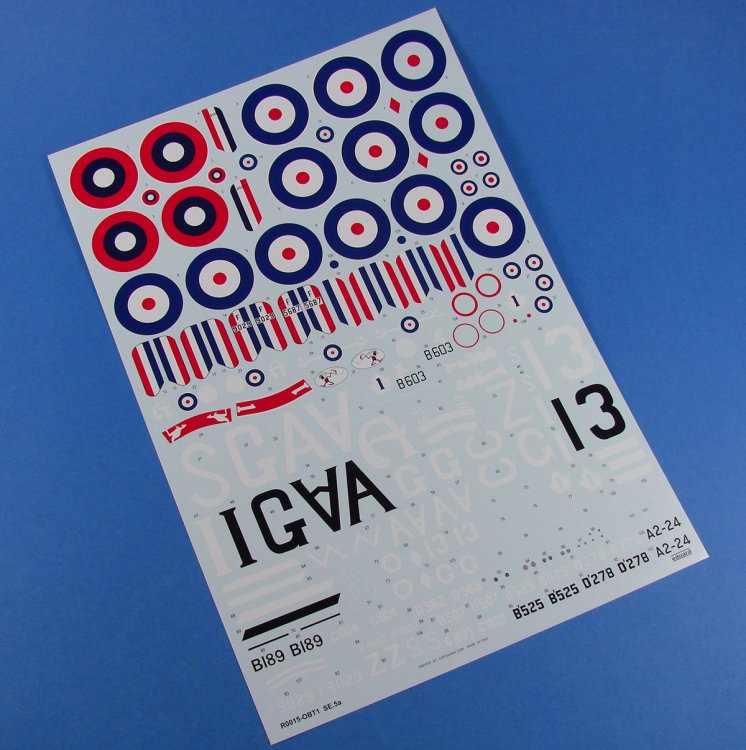
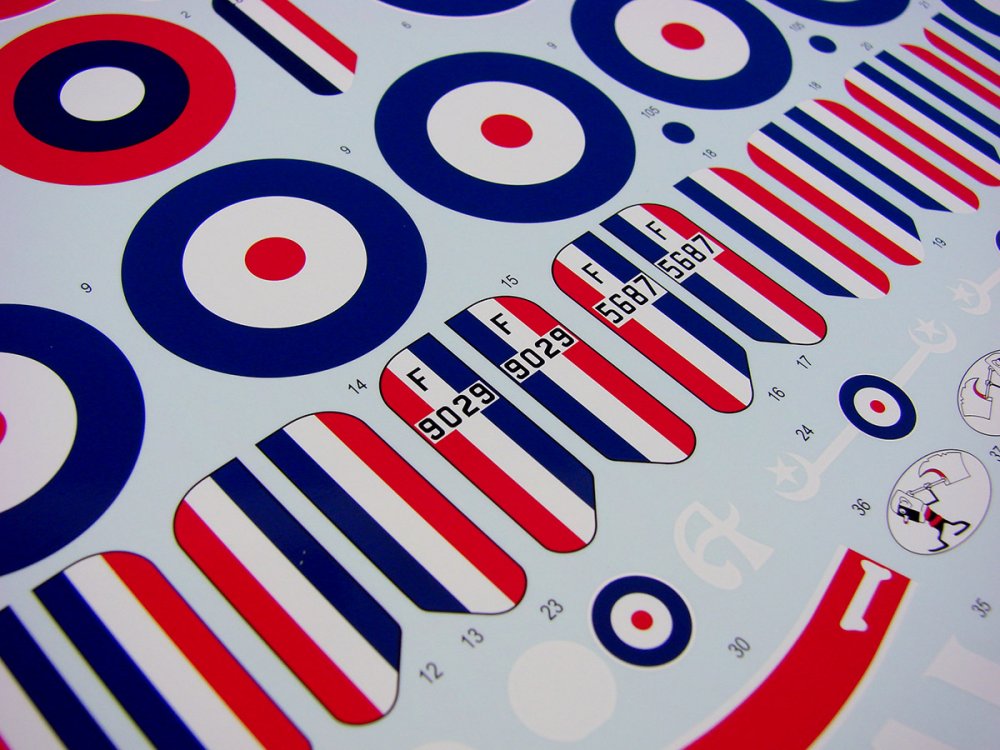

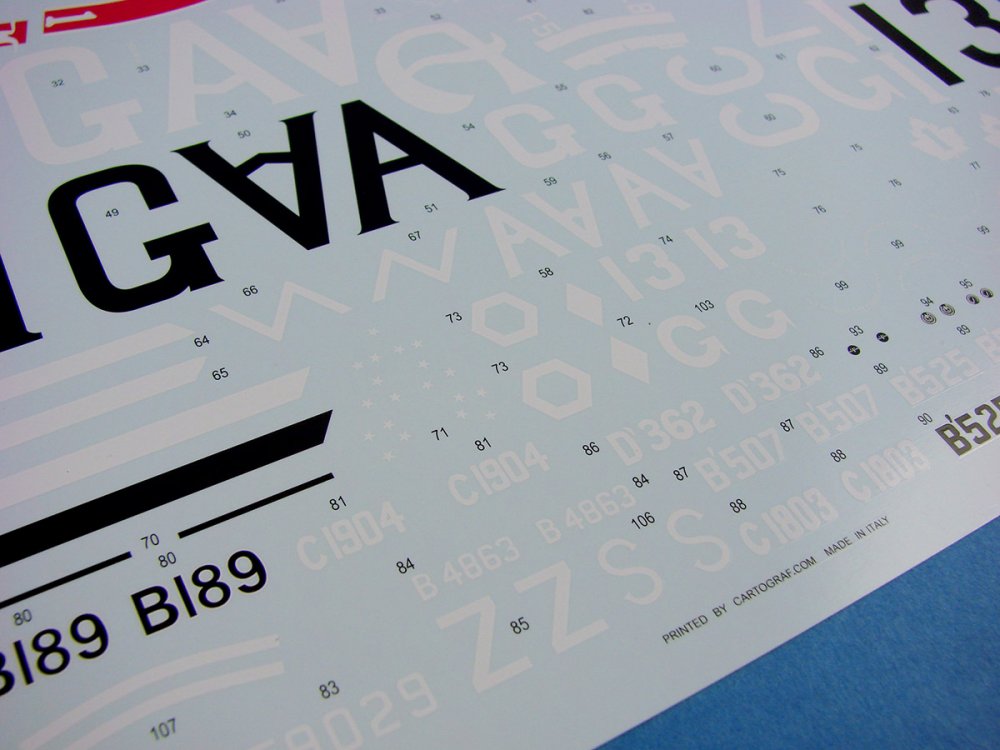


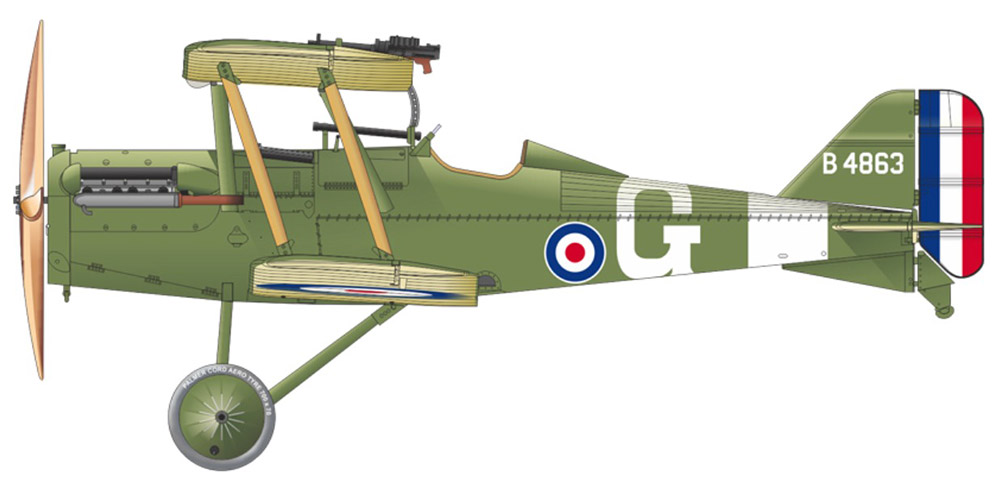
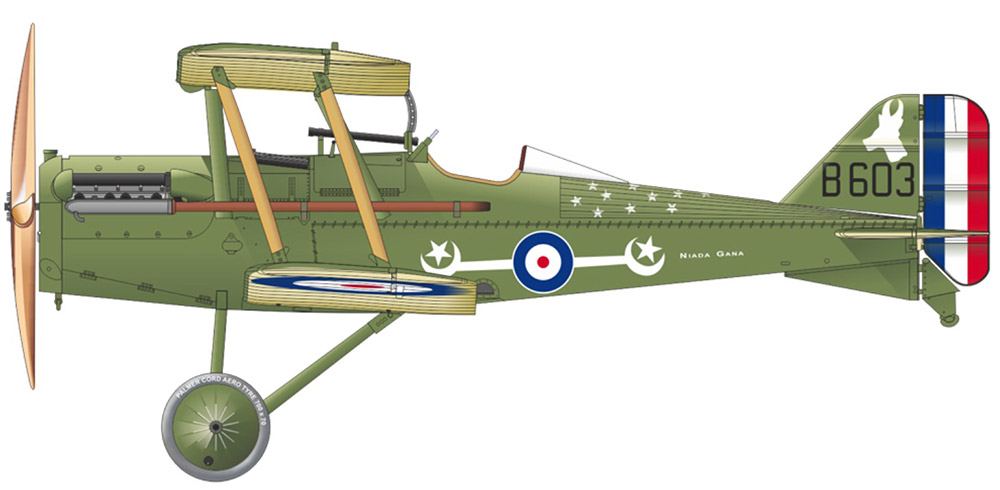
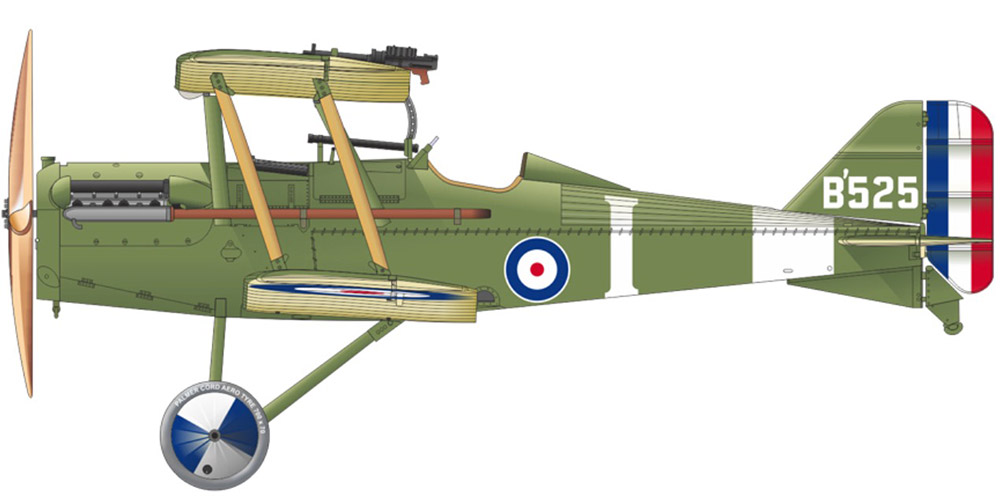
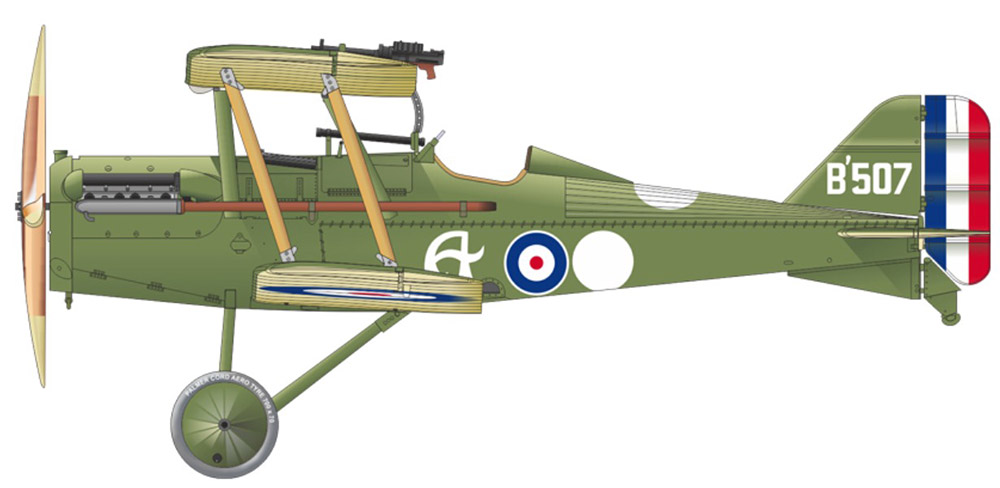
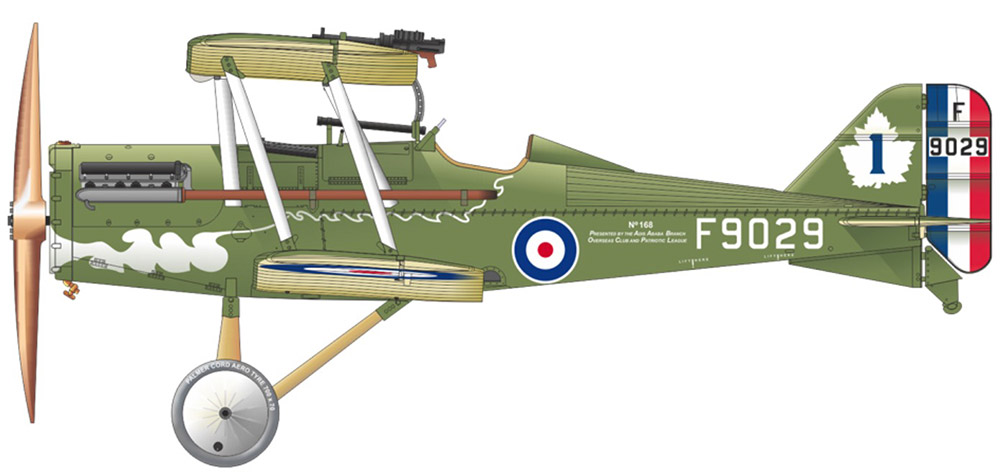
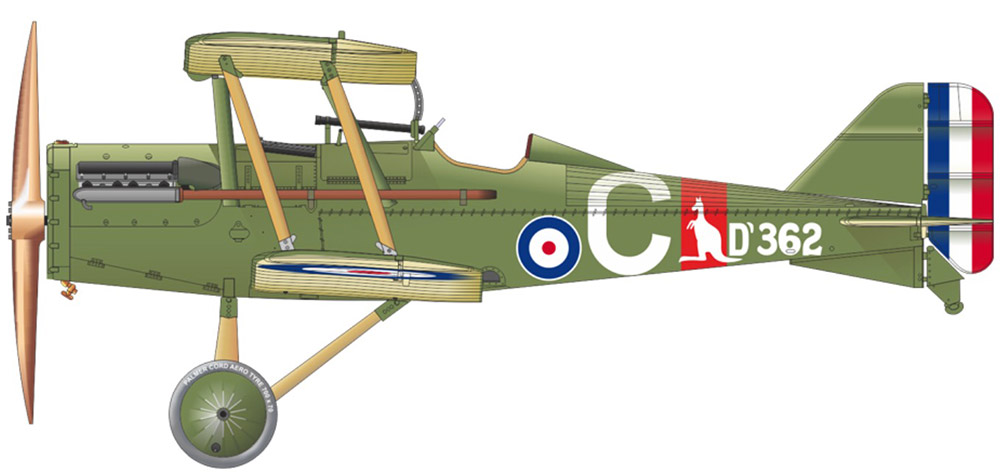
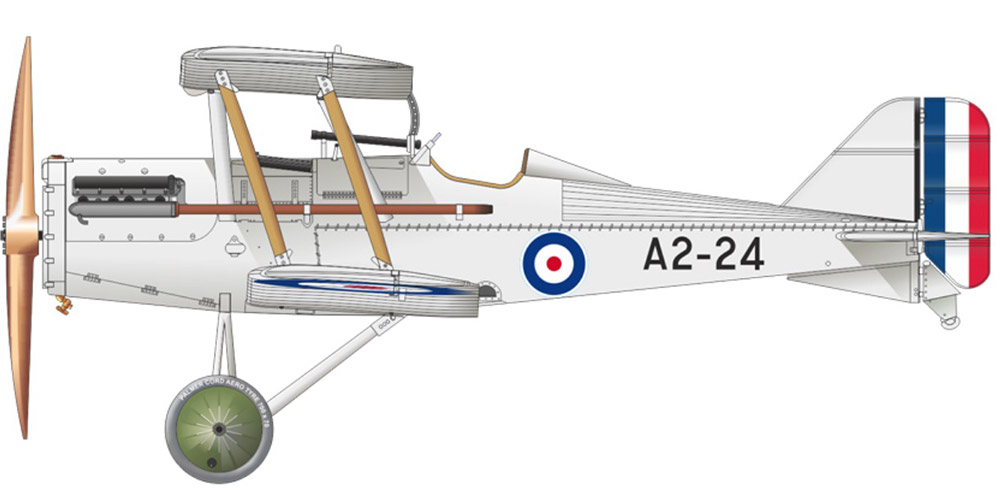
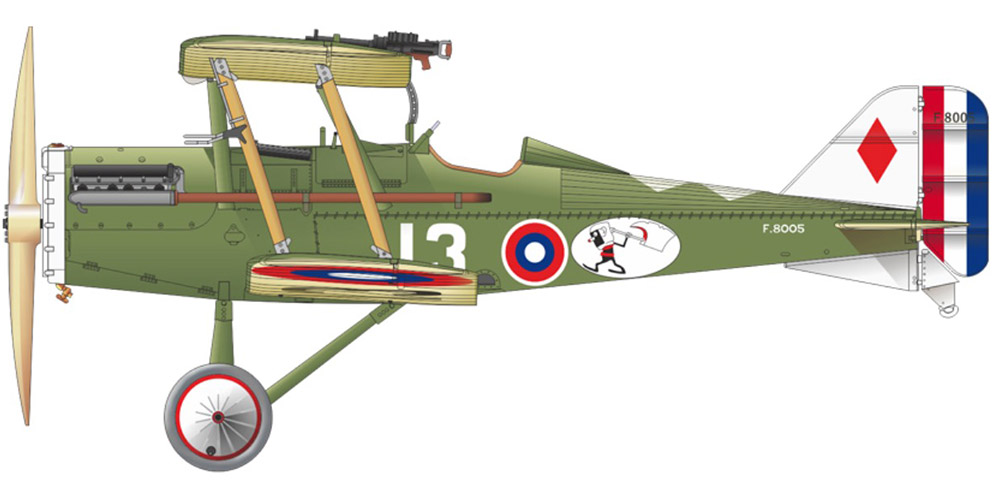
-
profimodeller Profimodeller 1/35 Steyr K2670
James H replied to JeroenPeters's topic in Armour/AFV Reviews
That looks real nice, and a surprising amount of PE for something so simplistic-looking. You gonna build it up? -
Iconicair Supermarine Spiteful
James H replied to JeroenPeters's topic in LSM 1/35 and Larger Work In Progress
What a strange looking pit with that recessed control stick. Looking pretty neat. How is the rest of the cockpit detail? -
1/32 Fokker D.II WW1 biplane fighter kit
James H replied to petr@specialhobby's topic in Special Hobby
I am SO impressed! -
wingnut wings Wingnut Wings Sopwith F.1 Camel 'Le Rhône'
James H replied to JeroenPeters's topic in Aircraft Reviews
Really like this one, especially that blue scheme. Nice to see what the differences actually are with this. A must for my stash sometime! -
1/35 V-2 Rocket, Meillerwagen, Hanomag SS100 Takom Catalogue # 2030 Available from Modellbau-Koenig for €79,50 The V-2 (German: Vergeltungswaffe 2, "Retribution Weapon 2"), technical name Aggregat 4 (A4), was the world's first long-range guided ballistic missile. The missile with a liquid-propellant rocket engine was developed during the Second World War in Germany as a "vengeance weapon", assigned to attack Allied cities as retaliation for the Allied bombings against German cities. The V-2 rocket also became the first artificial object to cross the boundary of space with the vertical launch of MW 18014 on 20 June 1944. Research into military use of long range rockets began when the studies of graduate student Wernher von Braun attracted the attention of the German Army. A series of prototypes culminated in the A-4, which went to war as the V-2. Beginning in September 1944, over 3,000 V-2s were launched by the German Wehrmacht against Allied targets during the war, first London and later Antwerp and Liège. According to a 2011 BBC documentary, the attacks from V2s resulted in the deaths of an estimated 9,000 civilians and military personnel, and a further 12,000 forced labourers and concentration camp prisoners died as a result of their forced participation in the production of the weapons. The A-4 used a 74% ethanol/water mixture (B-Stoff) for fuel and liquid oxygen (LOX) (A-Stoff) for oxidizer. At launch the A-4 propelled itself for up to 65 seconds on its own power, and a program motor controlled the pitch to the specified angle at engine shutdown, after which the rocket continued on a ballistic free-fall trajectory. The rocket reached a height of 80 km (50 mi) after shutting off the engine. The V-2 was guided by four external rudders on the tail fins, and four internal graphite vanes in the jet stream at the exit of the motor. The LEV-3 guidance system consisted of two free gyroscopes (a horizontal and a vertical) for lateral stabilization, and a PIGA accelerometer to control engine cut-off at a specified velocity. The V-2 was launched from a pre-surveyed location, so the distance and azimuth to the target were known. Fin 1 of the missile was aligned to the target azimuth. V-2 rocket on a surviving Meillerwagen (photo, author) As Germany collapsed, teams from the Allied forces—the United States, the United Kingdom, and the Soviet Union—raced to capture key German manufacturing sites and technology. Wernher von Braun and over 100 key V-2 personnel surrendered to the Americans. Eventually, many of the original V-2 team ended up working at the Redstone Arsenal. The US also captured enough V-2 hardware to build approximately 80 of the missiles. The Soviets gained possession of the V-2 manufacturing facilities after the war, re-established V-2 production, and moved it to the Soviet Union. (Courtesy of Wikipedia) The kit This is actually the second Takom release of the V-2, with the initial kit containing just the rocket itself. This more comprehensive boxing contains not only the V-2 Meillerwagen that was designed to carry and cradle the rocket, but also the Hanomag SS100 heavy road tractor. Lastly, if you wish to display the V-2 in its deployed position, then parts are also included for the launching platform. In fact, the only thing this set really misses is the liquid oxygen and other fuelling tanks. I’d like to think we’d eventually see those. For the moment though, let’s look at the main event. This is a large box, and it is absolutely crammed full of plastic and other goodies, which isn’t surprising when you consider it contains three kits (four if you include the small launch platform). As with much Takom artwork, this one certainly pleases. A Meillerwagen is shown raising the rocket into position onto the launching platform whilst a previously launched weapon is seen rising into the air in the distance. One side of the box shows the Hanomag and trailer, with the V-2 in lowered position. The other has a sprue and contents map, showing that this project is no weekender. Inside the box there are a total of SEVENTEEN light grey sprues that are all bagged individually (except for the main rocket parts), one clear sprue, one small PE fret, two packets containing a total of 15 vinyl tyres, two brass chains, and two small decal sheets. Yup, a real package! Two instruction booklets are included. One of these concerns the Hanomag alone (as this was a separate release), and the other deals with the Meillerwagen, V-2, and the launching platform. Several painting options are included for all individual components. Hanomag Having already seen a release of this as a standalone kit in 2016, it made total sense to include it as part of the V-2 Meillerwagen release we see here. A total of SEVEN sprues and ONE clear sprue go into the construction of this robust-looking vehicle, as well as 7 of the 15 vinyl tyres included in this release. Reading a small number of online accounts regarding the specific Hanomag release, construction appears to be a trouble-free process, and this would look to be the case when you look at the kit engineering. Despite that fact, the Hanomag SS100 is packed full of detail. Construction takes place over 26 stages within the manual, with all of these being depicted in greyscale renders that reference any RLM colours used, as well as codes for Mig Ammo paints. Mig have partnered with Takom to bring you their own colour call-outs and profiles for their releases. Four schemes are supplied for the Hanomag, all with starkly different appearances. These are for vehicles that were used at Peenemunde, Tempelhof, Mittelwerk (Nordhausen), and Belgium. I’m not really sure that all of these schemes were for use in V-2 deployment, for example, the Telmpelhof vehicle. Unless my history serves me incorrectly, no V-2 was fired from Berlin!! \ The model includes detailed chassis, with engine, transmission, exhaust system, fuel tanks, and suspension. It’s quite deceptive when you look at the sprues, as the chassis itself is constructed from a number of innocuous looking beams etc. that don’t really make any sense until you look at the in constructional context. This approach certainly adds to the parts and sprue count, and should be real fun to build. I’ll certainly be expecting this when I begin this soon for Military Illustrated Modeller. Like them or not, you get vinyl tyres in this release. These are all supplied off-sprue, so there is no clean-up to do with them. The seam is almost invisible, and moulding detail includes the manufacturer identifying lettering on the side of them. Kit design allows the front wheels to be positioned together via a working linkage. Cab detailing is very good, and also quite simplistic, as is commensurate with the real thing. It appears that the doors can be posed in the open position, but there are internal door panels that are fitted when the external doors are secured within the frame. Manual illustration doesn’t show an optional position for the doors, other than closed. Meillerwagen At first glance, this looks to be a daunting-looking project, but having seen one of these being built on YouTube, and thanks to some nice engineering and quirky construction, it appears that you end up with something quite complex in appearance, but relatively easy to build. There are six sprues associated with this vehicle, although not exclusively. There are some parts on them associated with the launch platform too, which appeared to have been cut down for the release of the separate V-2 rocket in 2016. Here, those sprues are included in their un-butchered format. Another twenty-four steps are given over to the construction of this behemoth, with that figure doubling or trebling if you look at the various sub-assemblies contained therein. These stages are shown in a separate manual to the Hanomag, and also containing illustration for building the V-2 and launching platform. As with the Hanomag, multiple colour options are provided for the Meillerwagen. These are for two machines that operated in Holland in 1944, with one being overall grey, and the more attractive unit carrying the Dunkelgelb, Olivgrun and Shokobraun (Schokoladenbraun?) colours. I don’t know if you’d need to pair the Meillerwagen colour with the Hanomag. It would be quite attractive if you could use odd colours and certainly some visual stimuli. The Meillerwagen can be built with the lift frame either raised or lowered, and the upper collar can be posed in an open or closed position. The frame contains operating platforms that can be suitably posed, and with these are included two lengths of brass chain for the crew safety barrier. Eight further vinyl tyres are included for the construction of the Meillerwagen. A series of Hydrogen Peroxide tanks are included within the frame. A single PE fret provides a small number of parts for the Meillerwagen, and shares itself with a few small details designated for the rocket. V-2 and launching platform I suppose it’s ironic that the real star of the show is the one with the least number of parts, but that really doesn’t matter, as detail is every bit as good as that of the Hanomag and Meillerwagen. The rocket comprises of separate front and rear sections, supplied as halves, with the connection ring that fits between them, as per the real thing. Into the lower halves fit the exhaust nozzle and the graphite steering paddles that sat in the rocket’s thrust gases, guiding the V-2 onto its path of destruction. The rocket fins are separate parts, to be plugged into the lower half. Without a doubt, even in 1/35 scale, this is an imposing creation. Externally, detail is given as fine panel lines and rows of recessed rivets. Cleaning up the seams will mean that some of this may be lost, so make sure that Rosie is available to put back what might disappear under a sanding stick. The rocket is supplied on two sprues, with the main body parts being separate and in their own clear sleeves. PE is supplied for hatch latches and the strap which holds the rocket onto the Meillerwagen whilst in transit and being erected. There are six colour schemes for the rockets, ranging from those built for deployment and test. Whilst there are camouflage options, I still prefer the black/white quartered unit whose colours were apparently to gauge telemetry when launched. Lastly, the launching platform. As the Meillerwagen is raised, the rocket base is located to the launching platform before the vehicle moves away and the rocket is ready to fire. This little kit comprises the thrust table with its scalloped sides to equally deflect the thrust outwards, manually-operated jacks, and a geared table onto which the rocket sits. A total of around 40 parts comprise this unit. Decals Two small sheets are included for the Hanomag and rocket. These simply contain things such as serials and stencilling for the rocket, and military registration plates and instruments for the Hanomag. These are nicely printed by Cartograf and in perfect register. Conclusion The only things missing here are the fuelling tanker and the firing cabin. Maybe we’ll see those eventually. Having said that, this is a superb representation of the rocket and her delivery/deployment train, in the most intricate of detail. Once you get all the sprues out of the box, you’ll be hard-pushed to get them to fit back in there, there really is so much plastic to work with. This brings me onto the price. MBK is selling this kit for €79,50, and I think that represents excellent value for money for what is really quite an amazing kit of what was ground-breaking technology at the time, leading onto what eventually became a part of America’s space programme and the moon landings. This is no weekend project (except maybe for the rocket itself), and I think you’ll need a little patience for the Meillerwagen, but the payoff will be a stunning model that will be very different to others on the shelf. My sincere thanks to Modellbau-Koenig and Uschi van der Rosten for the sample reviewed here.