JayDee
-
Posts
3,272 -
Joined
-
Last visited
Content Type
Profiles
Forums
Events
Gallery
Everything posted by JayDee
-
 Loving it! Such a great kit. You'll love this one.
 -
Profimodeller Fi103 V1
JayDee replied to JeroenPeters's topic in LSM 1/35 and Larger Work In Progress
That looks like a proper engineering project. I'm sort of getting memories of the one I reviewed now. Good to see it being built. -
Thanks for posting, Malcolm. If anyone can donate even one kit, and maybe an extra tool or glue you have, then this will help. Remember....kits must be un-started, and not of modern/current military types as the latter could have an adverse effect on rehabilitation.
-
profimodeller Profimodeller 1/32 Dobbas Container (for Ju-88)
JayDee replied to JeroenPeters's topic in Aircraft Reviews
What a great little kit! Nice photos too. I bet that did wonders for the streamlining effect. -
Profimodeller Fi103 V1
JayDee replied to JeroenPeters's topic in LSM 1/35 and Larger Work In Progress
Way too cool. -
I got this in York today.
-
Looks like it needs a little TLC. Great shots!
-
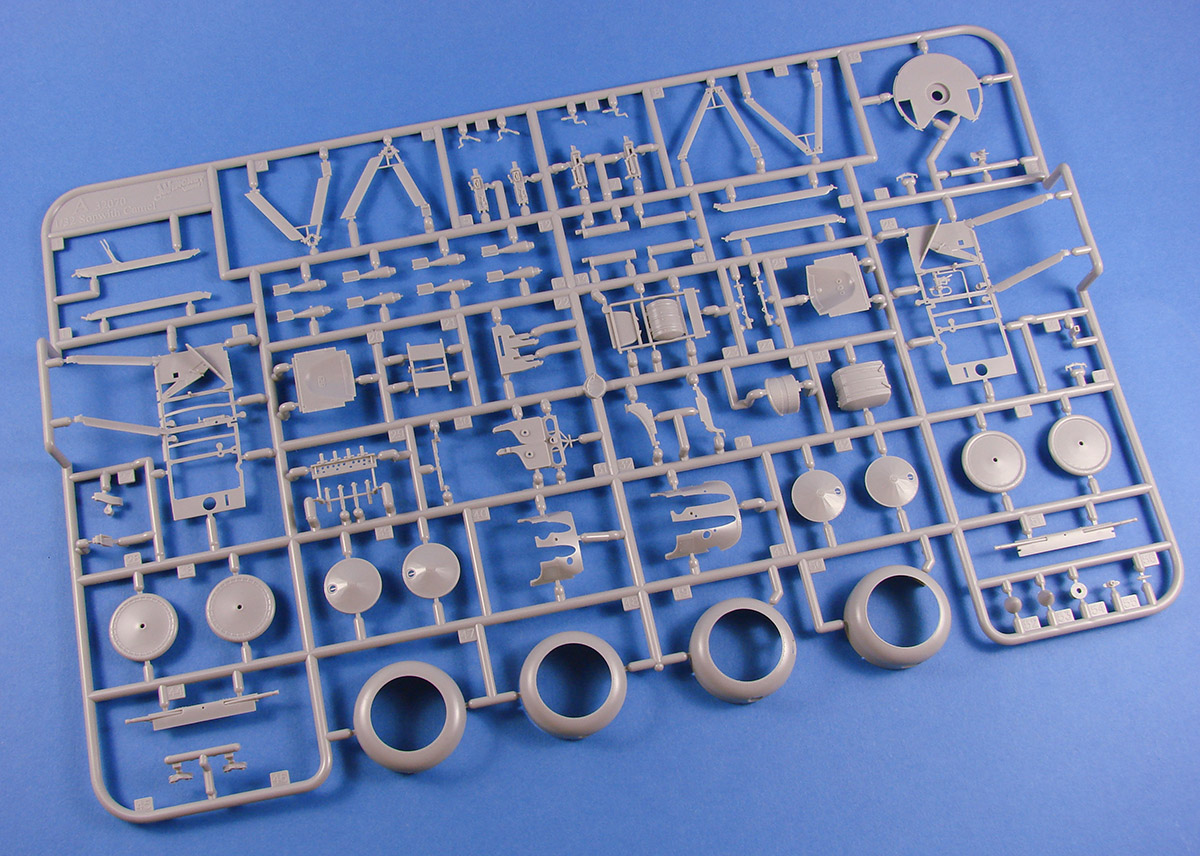
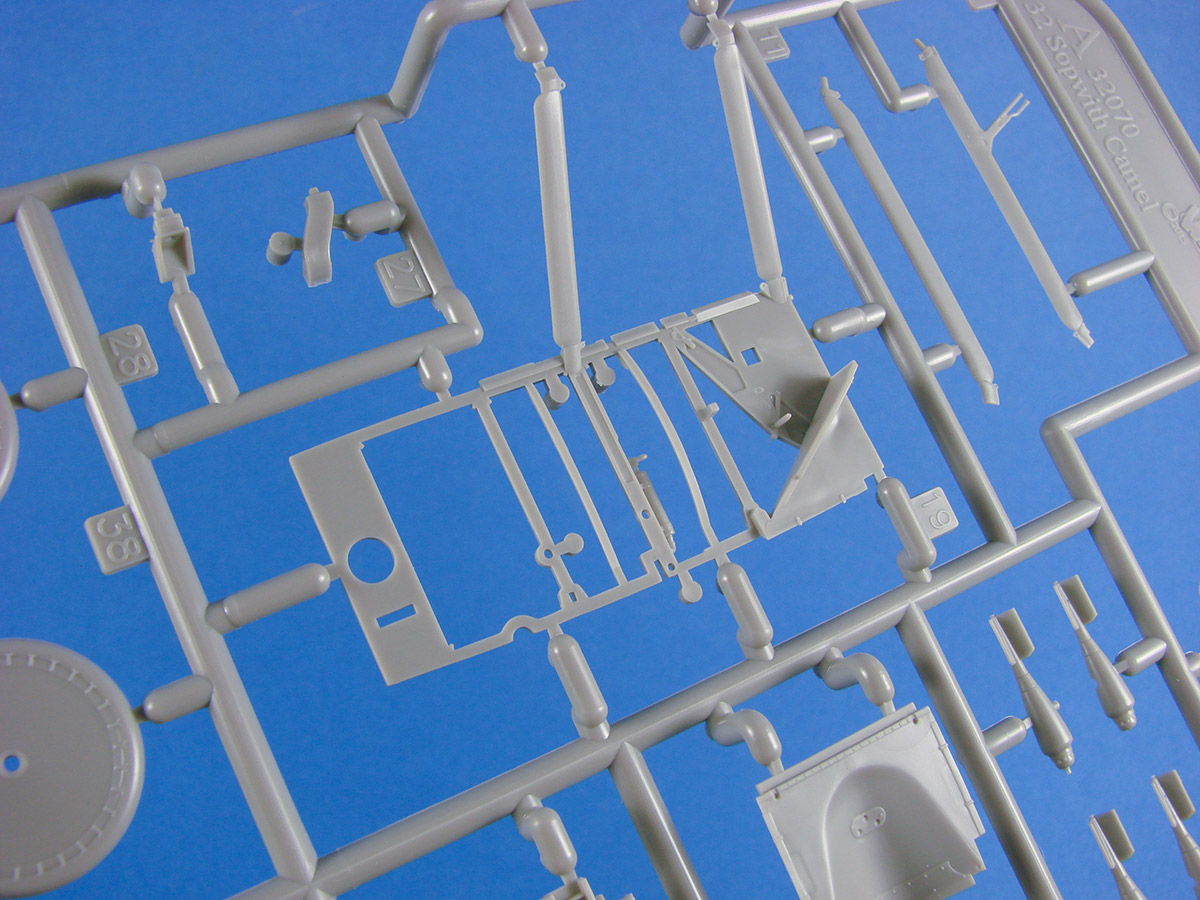
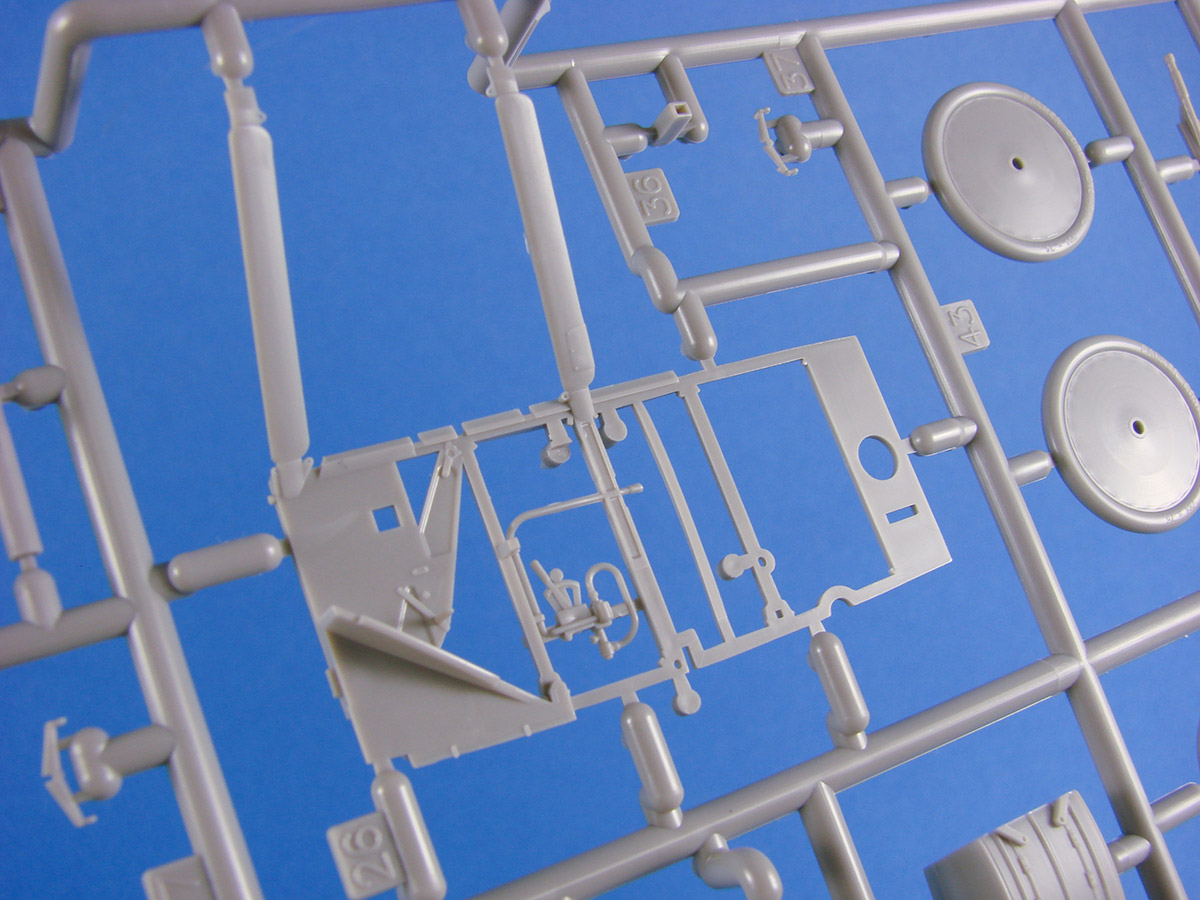
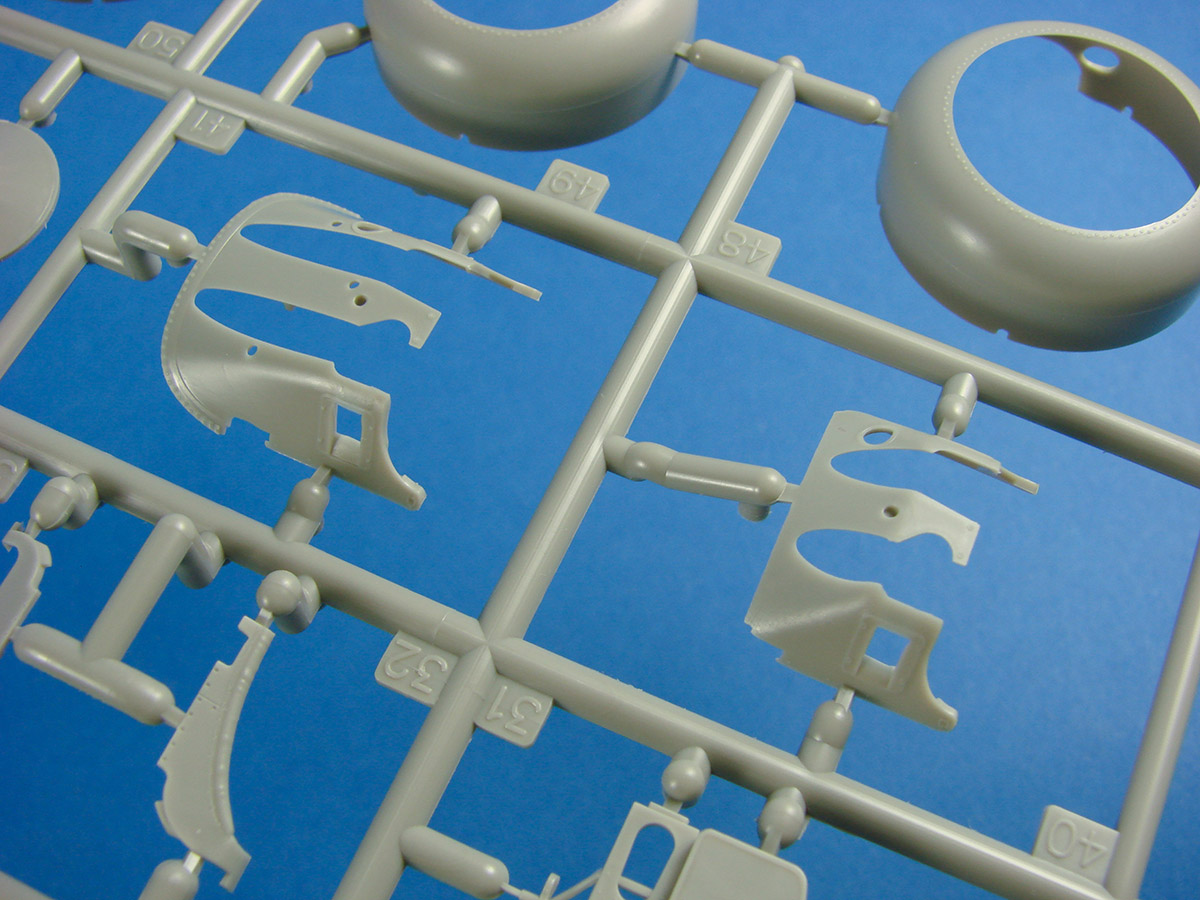
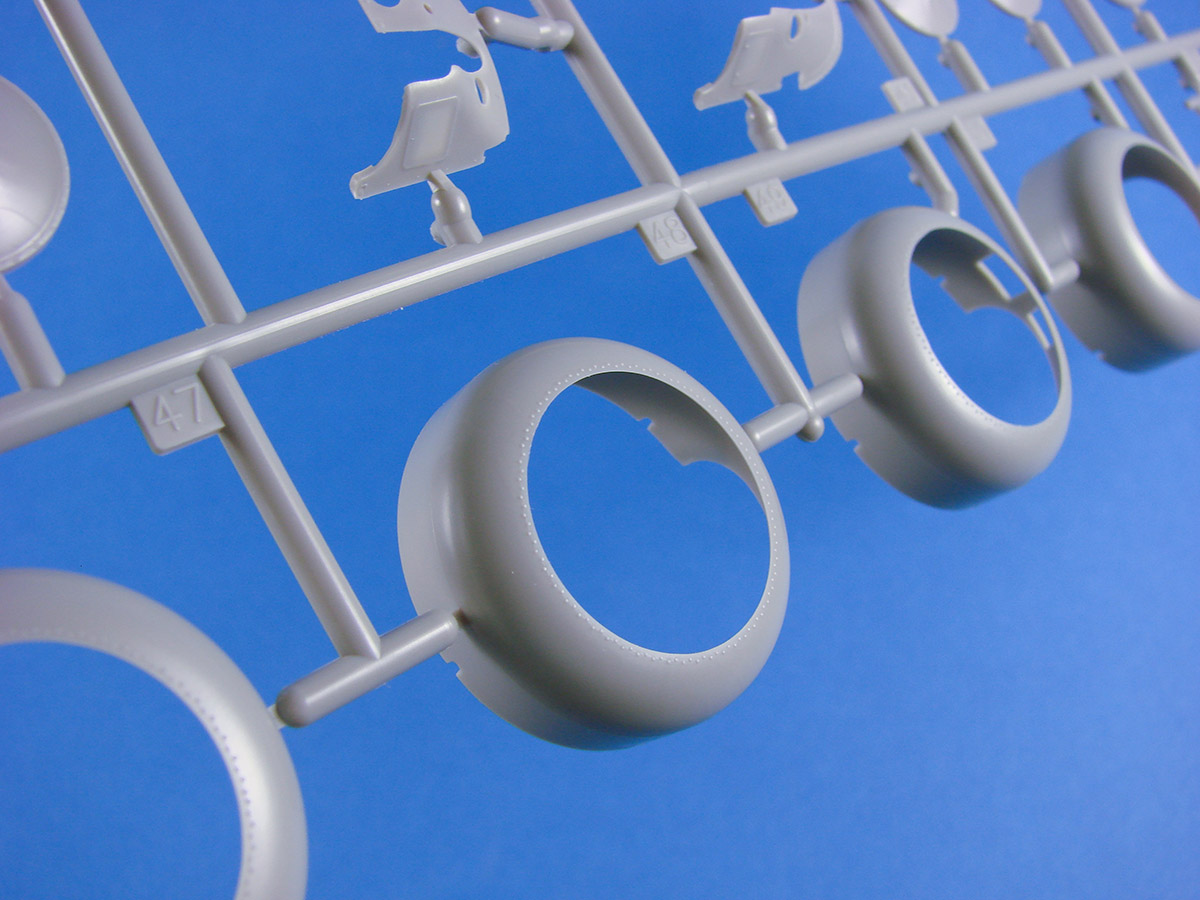
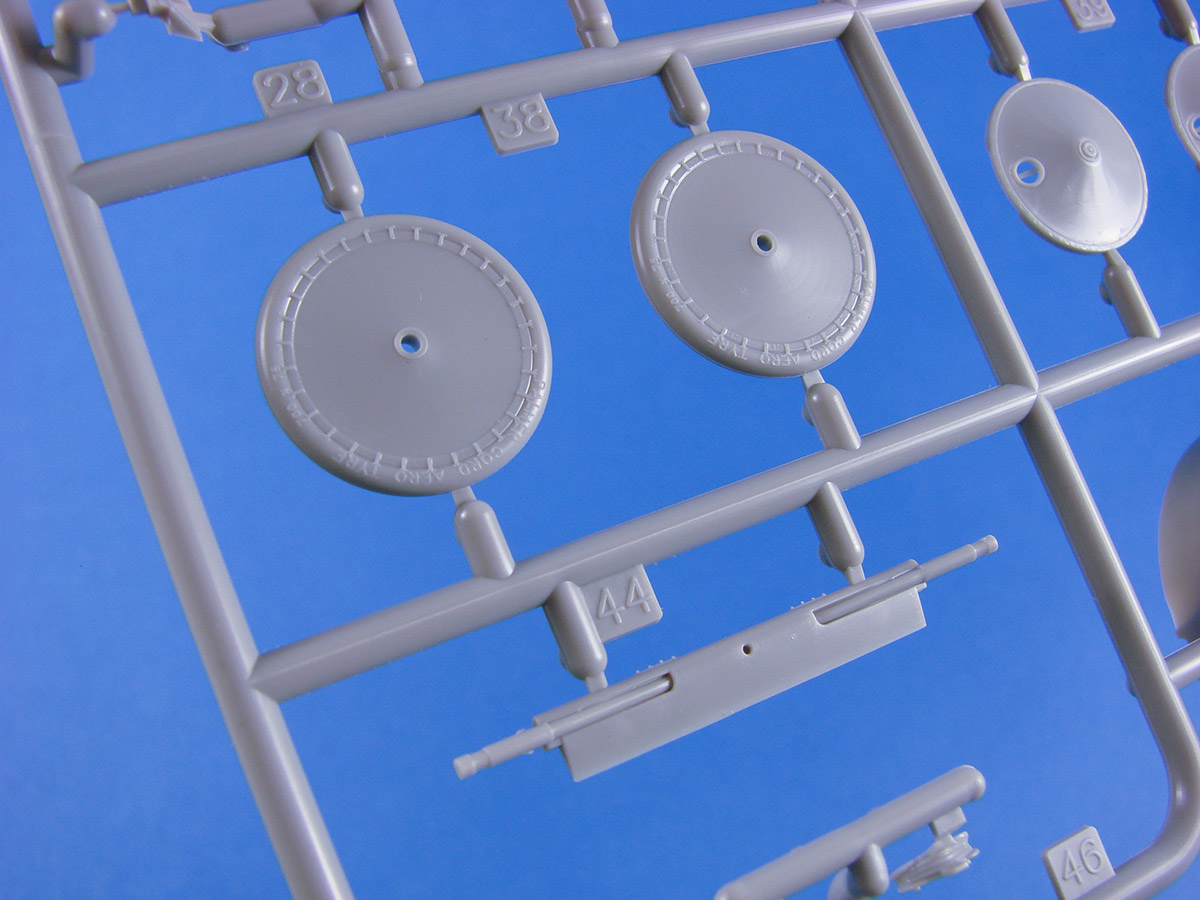
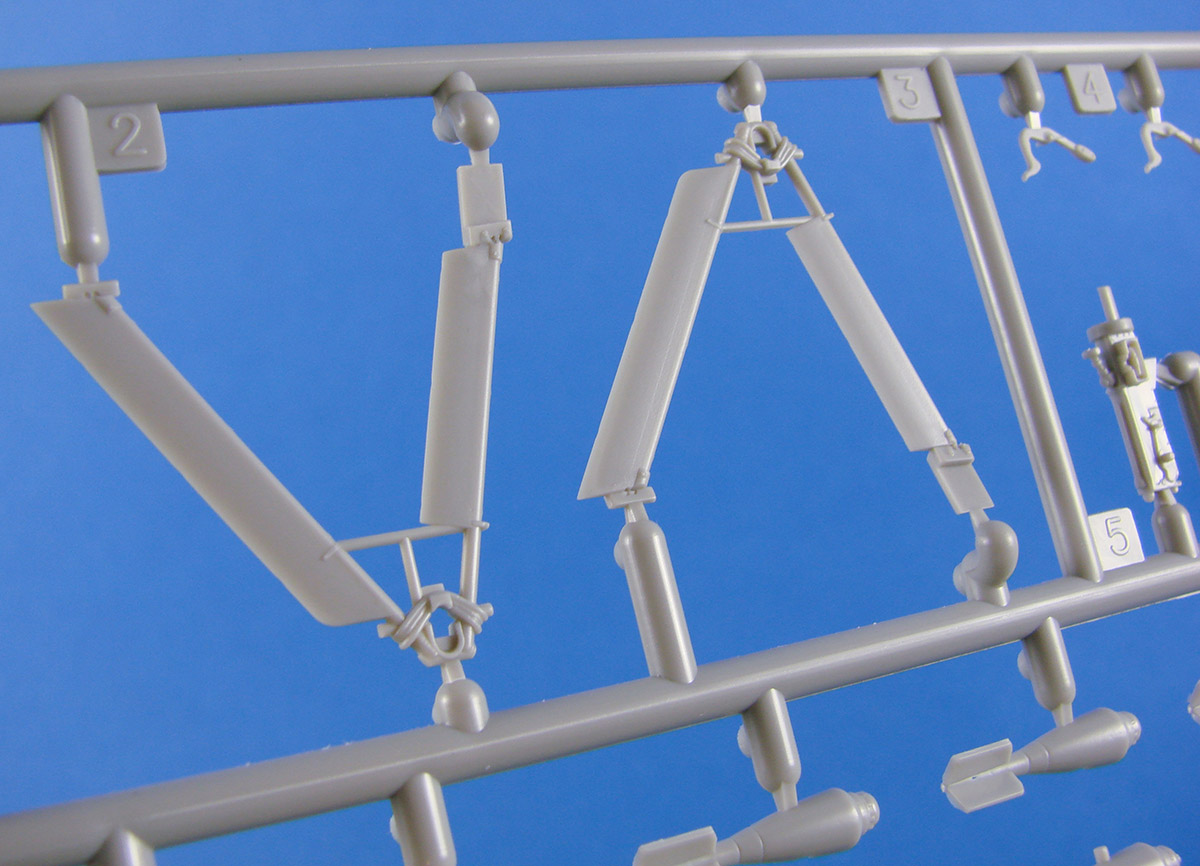
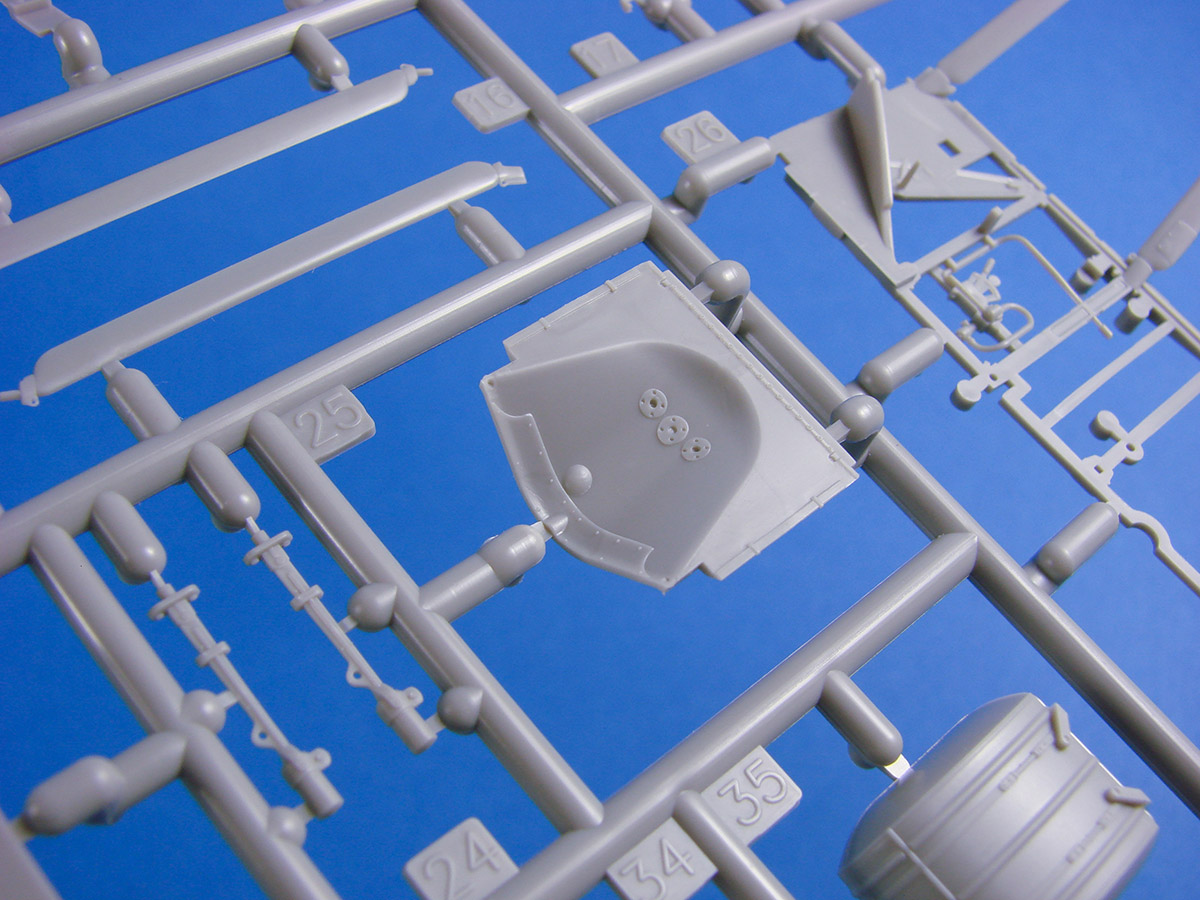
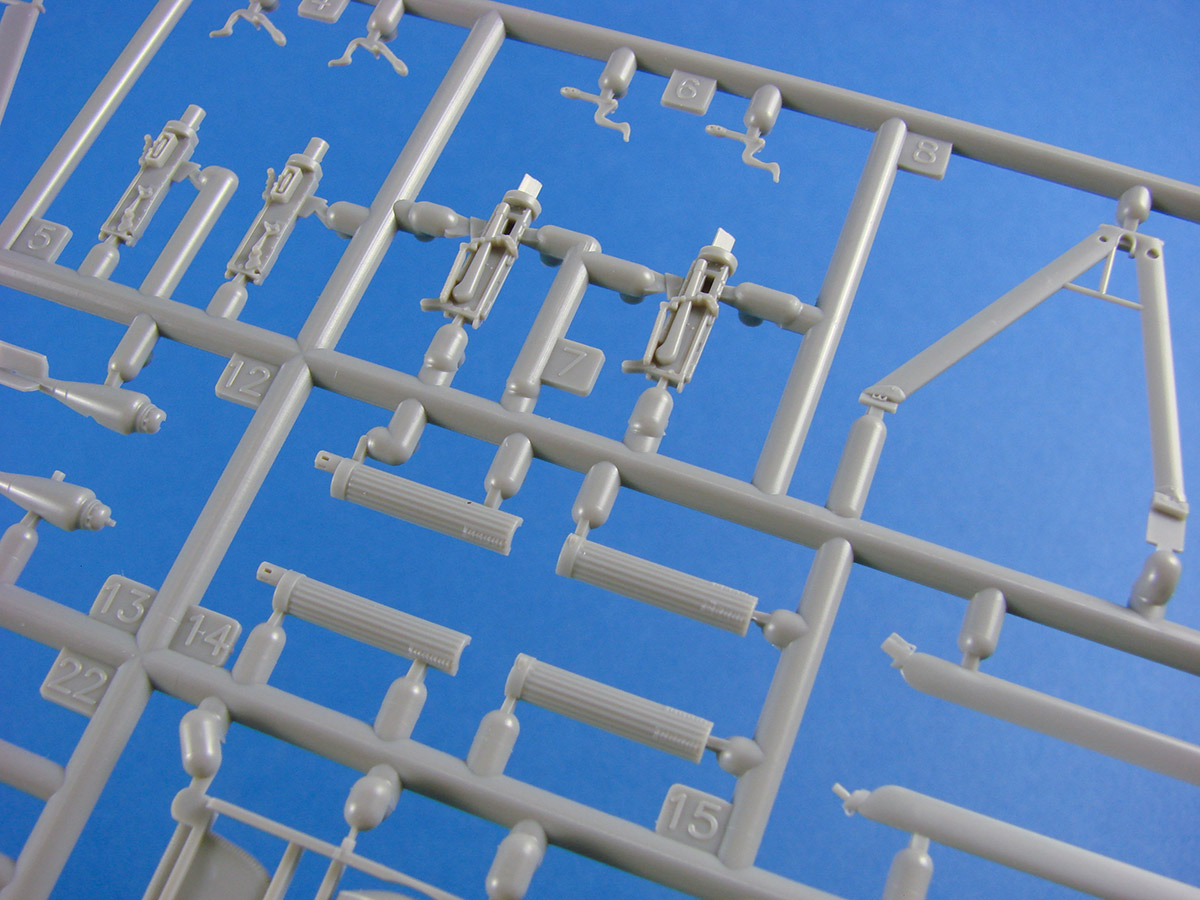
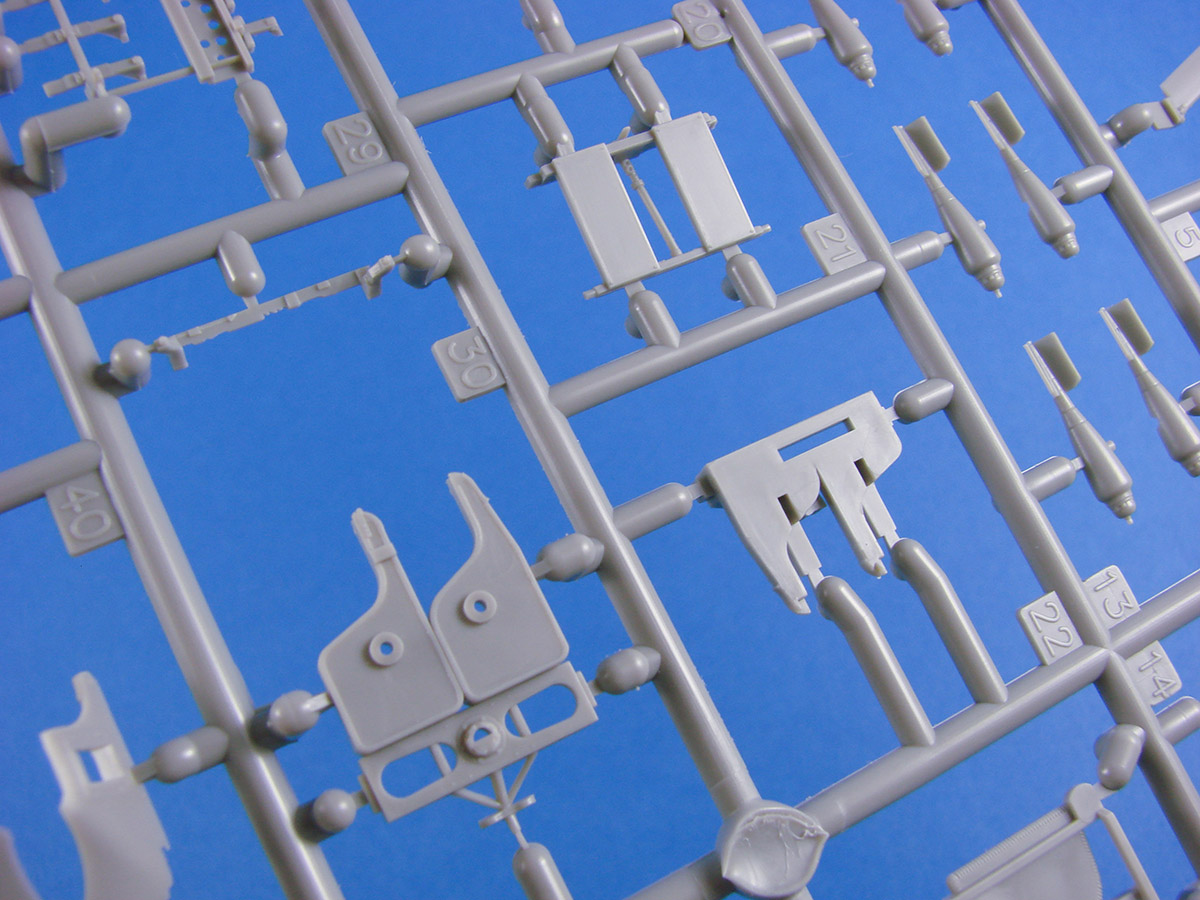
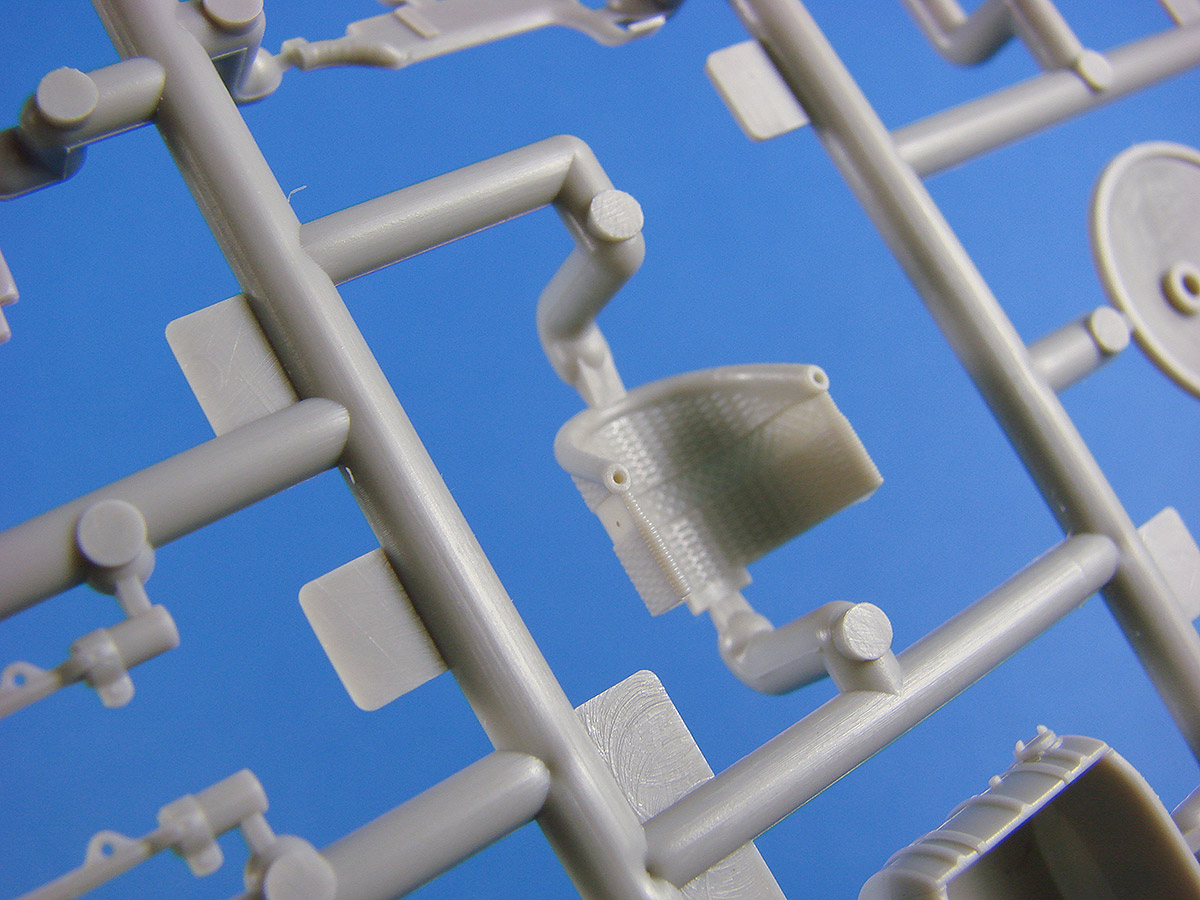
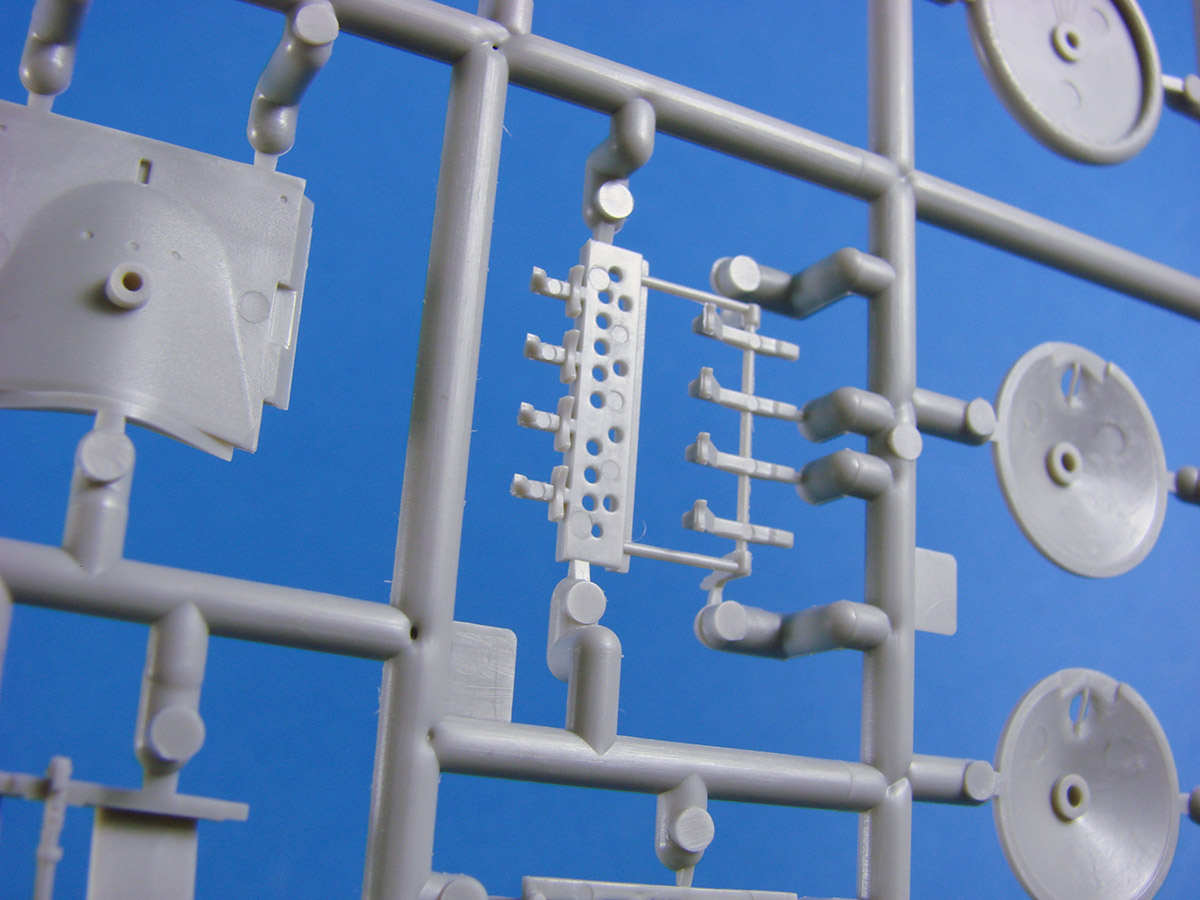
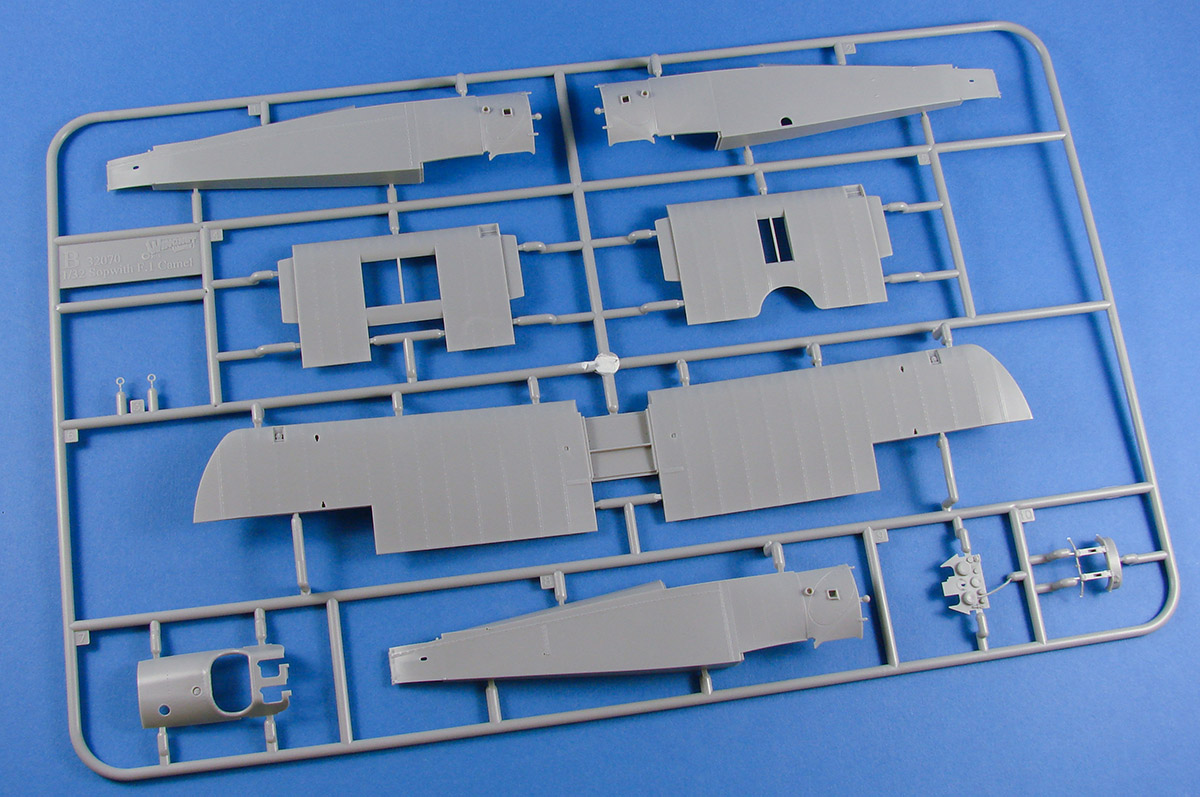
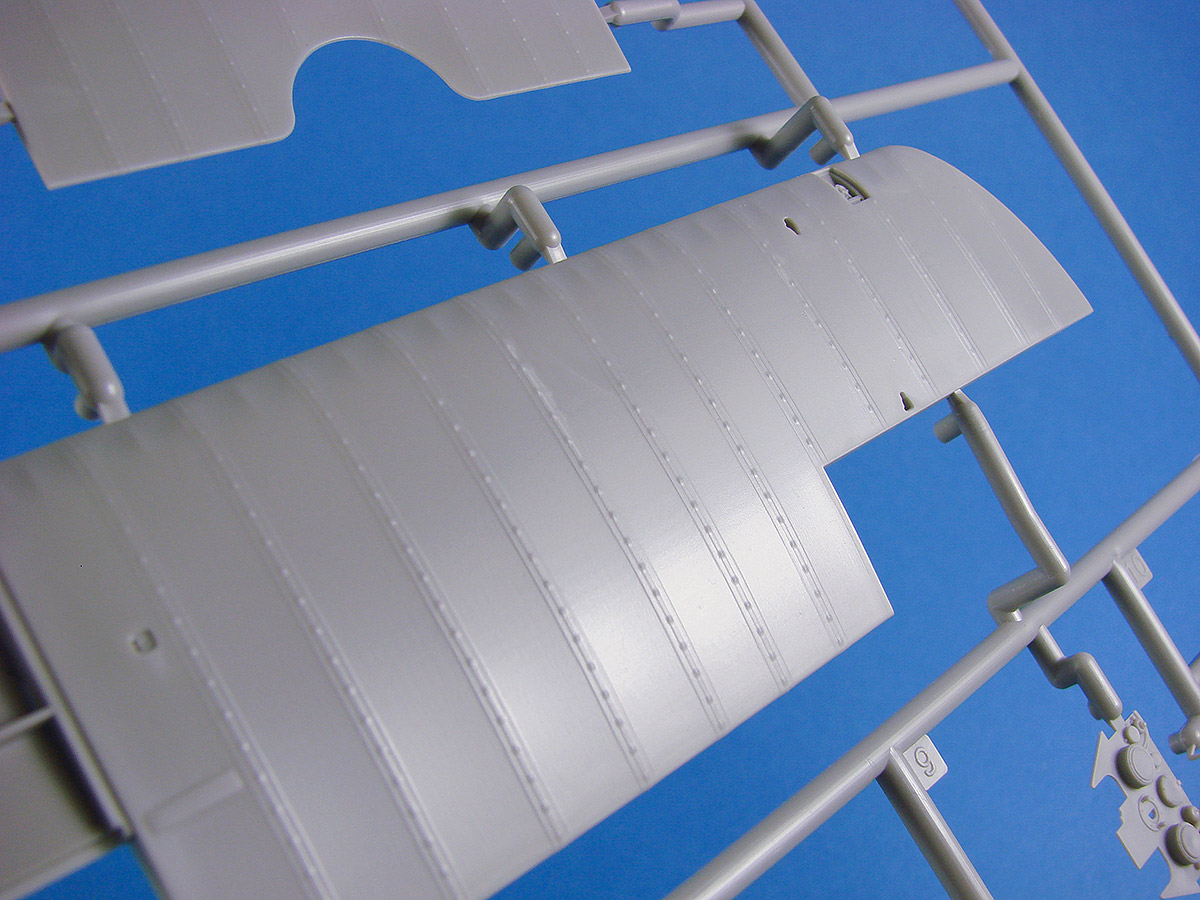
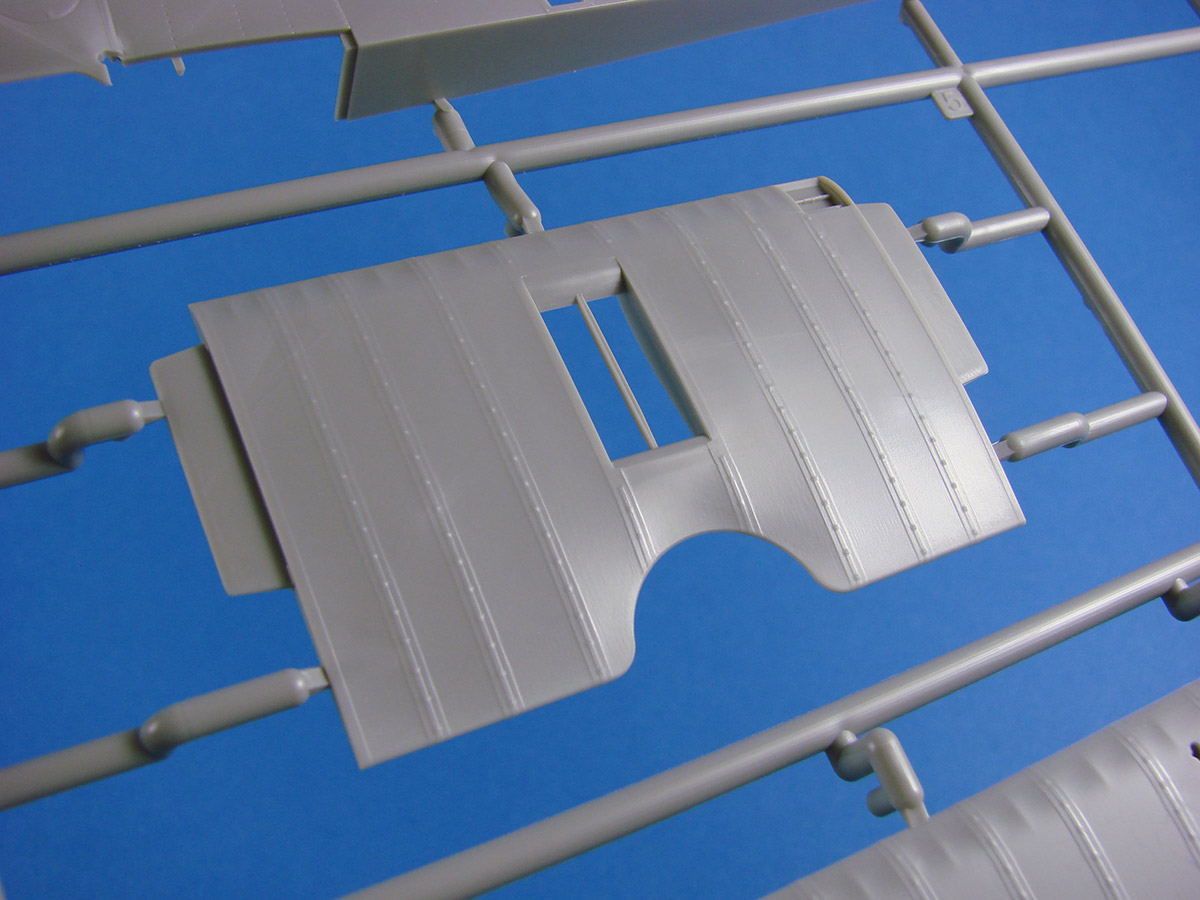
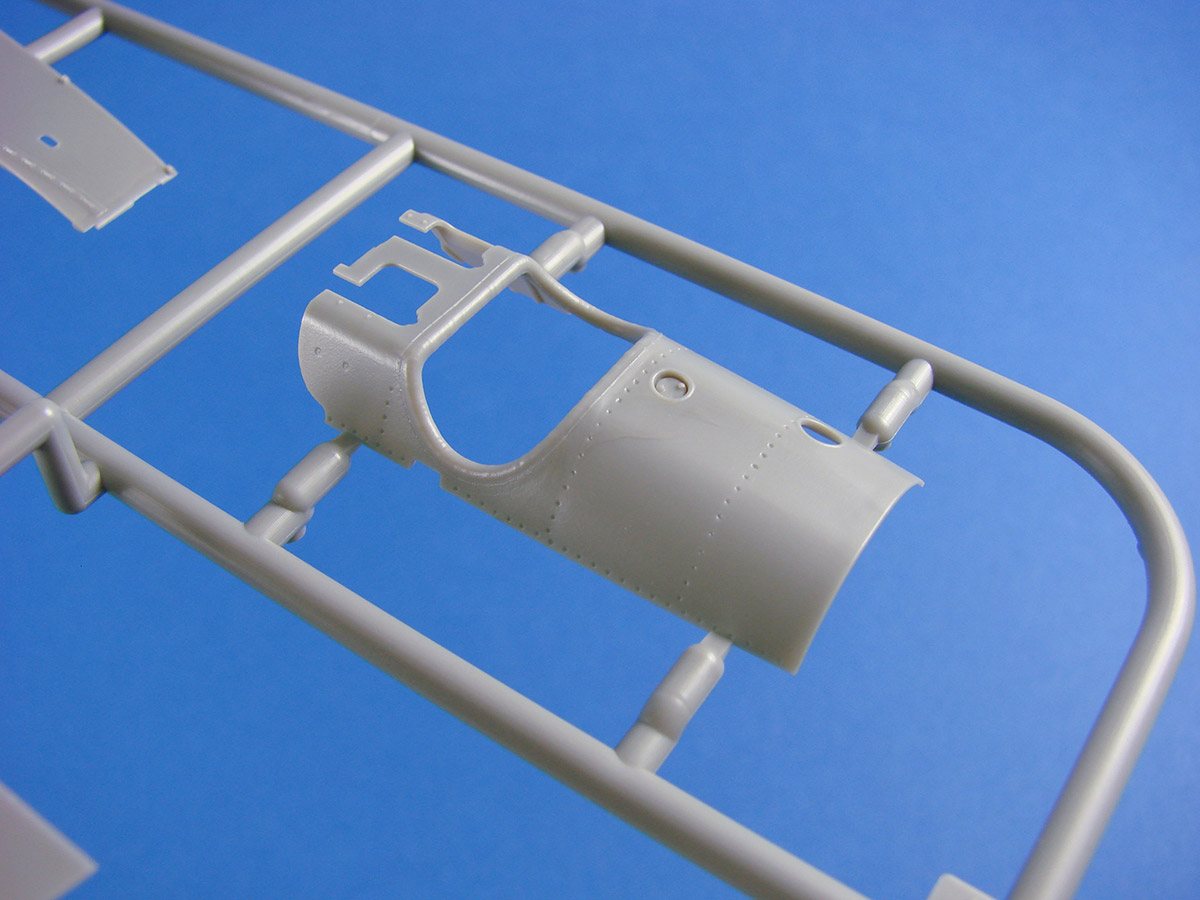
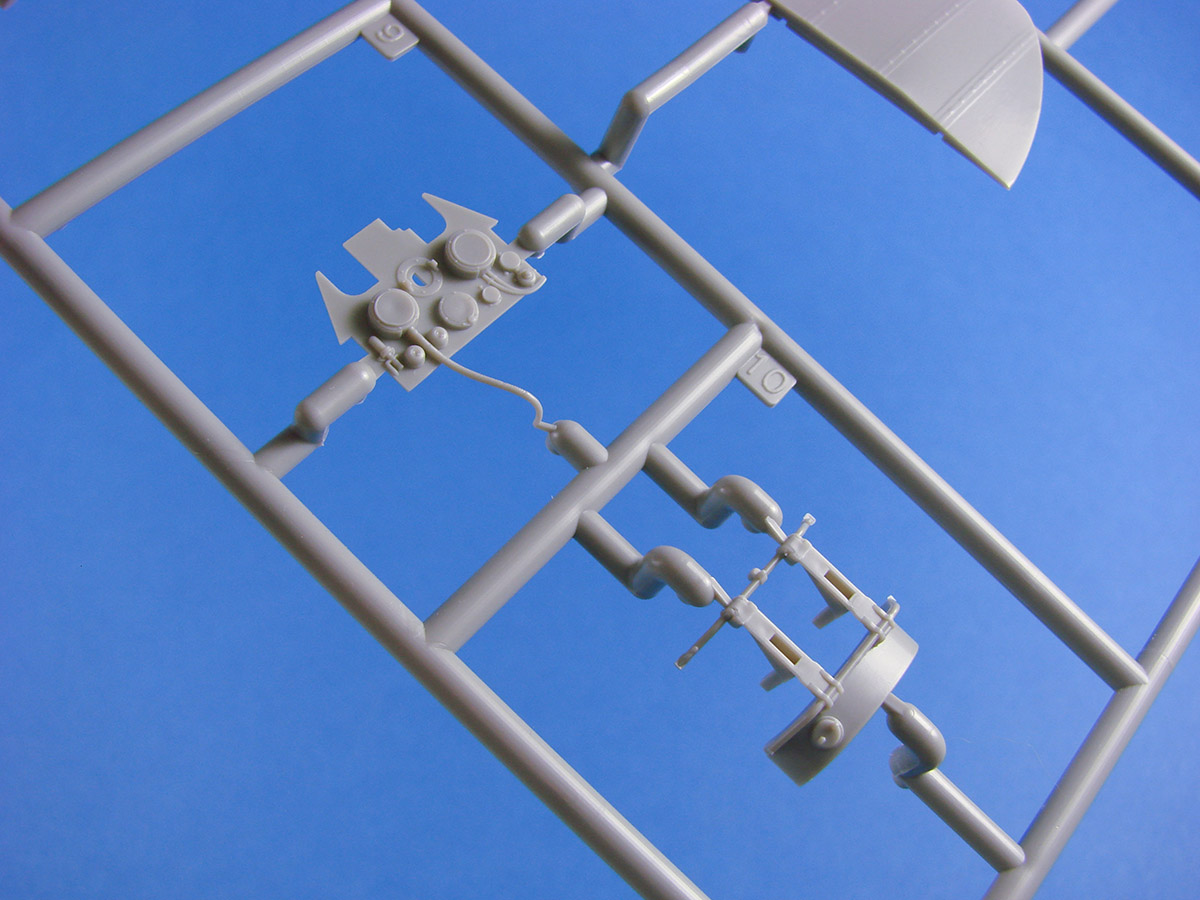
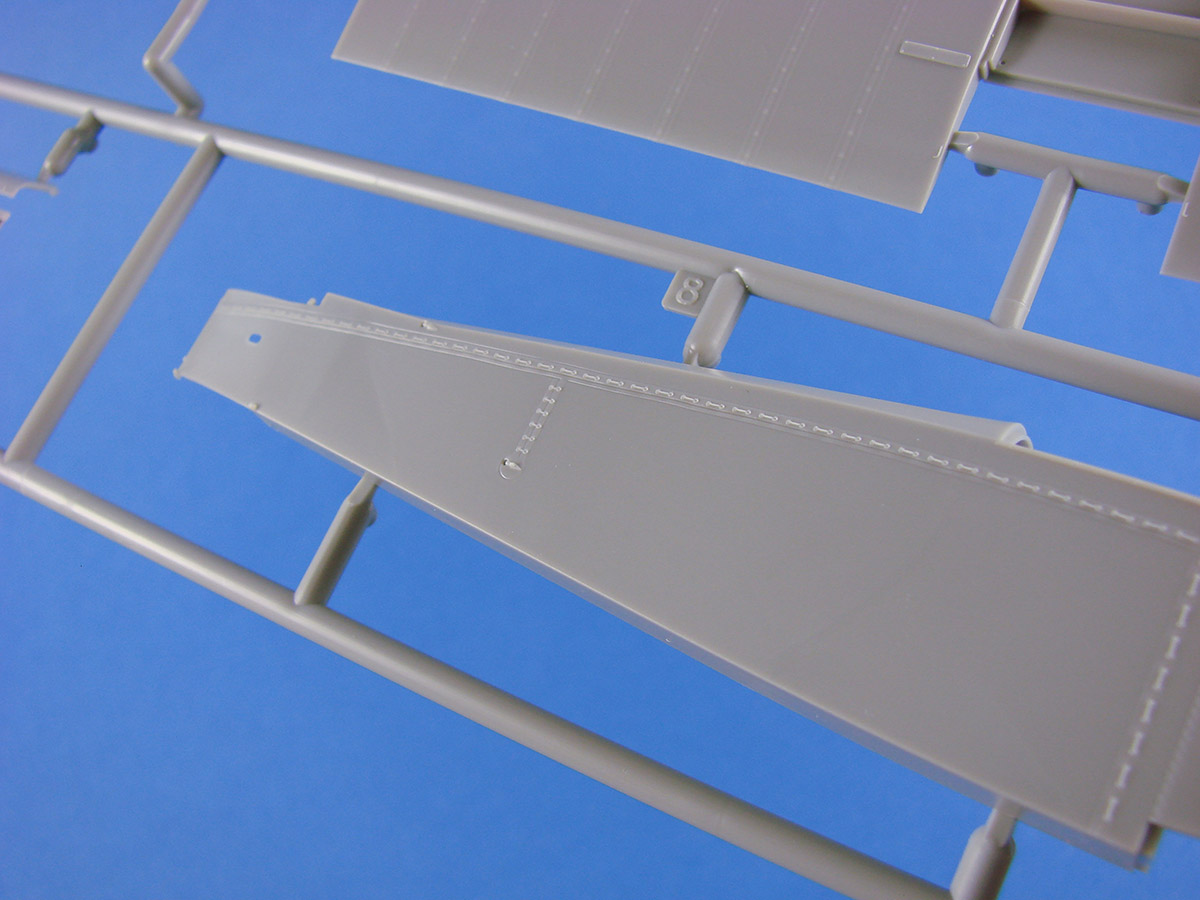
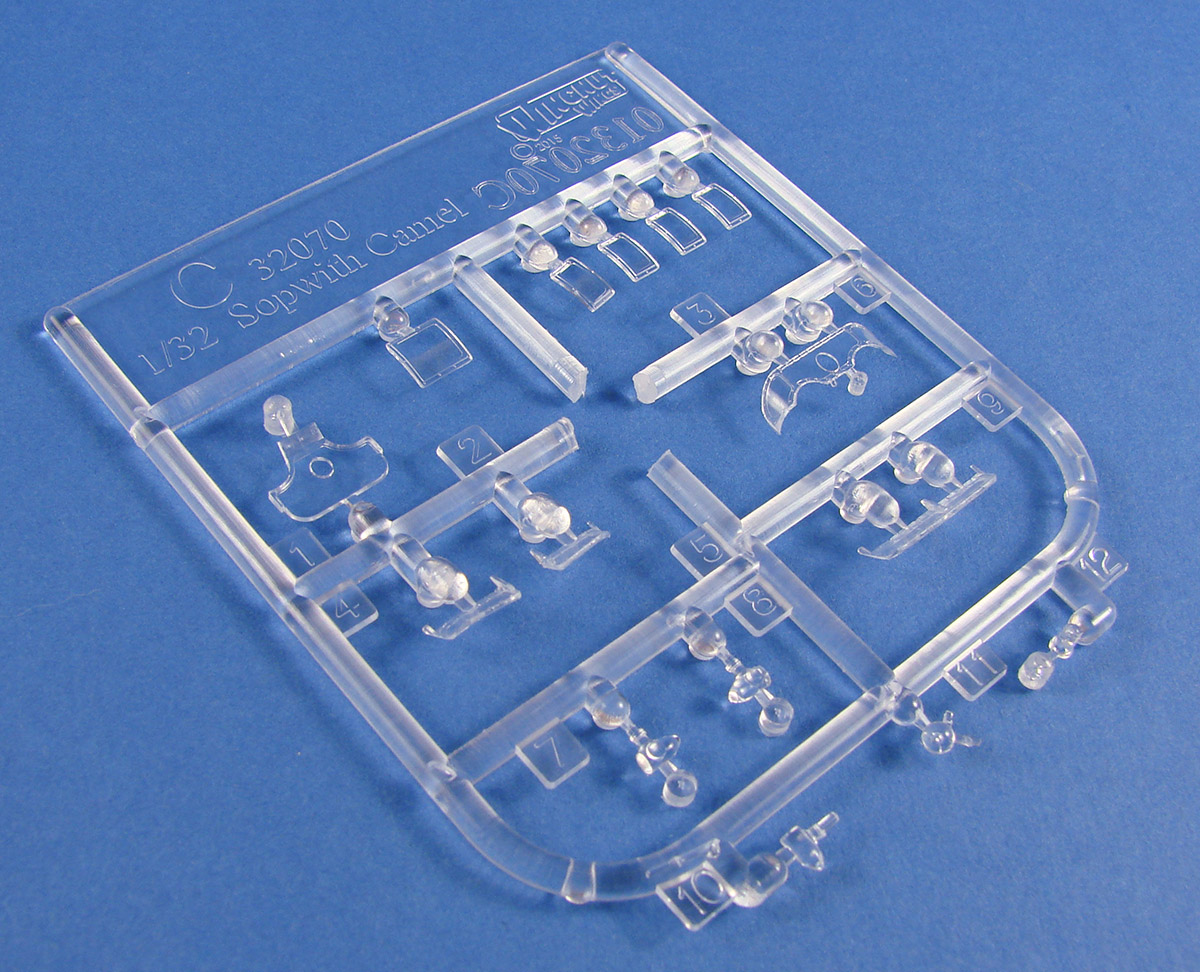
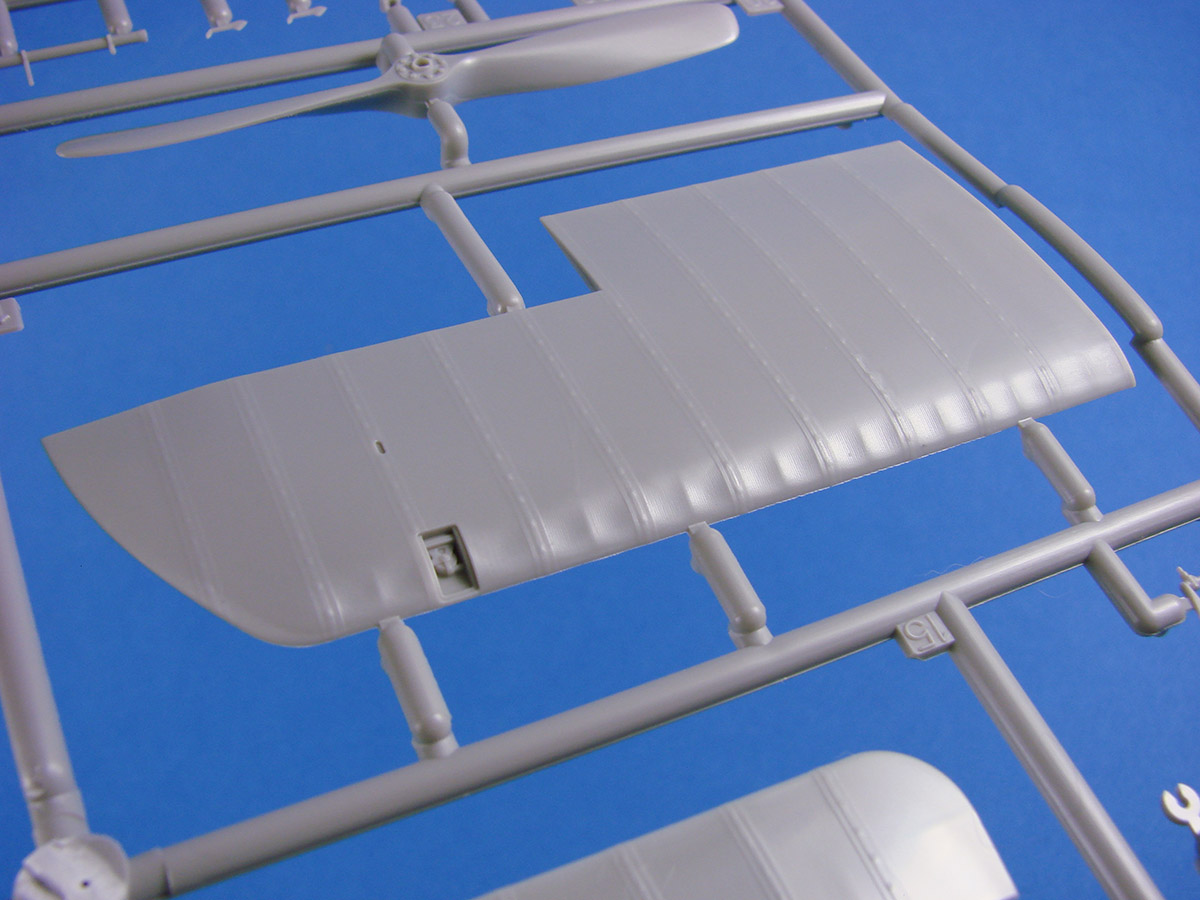
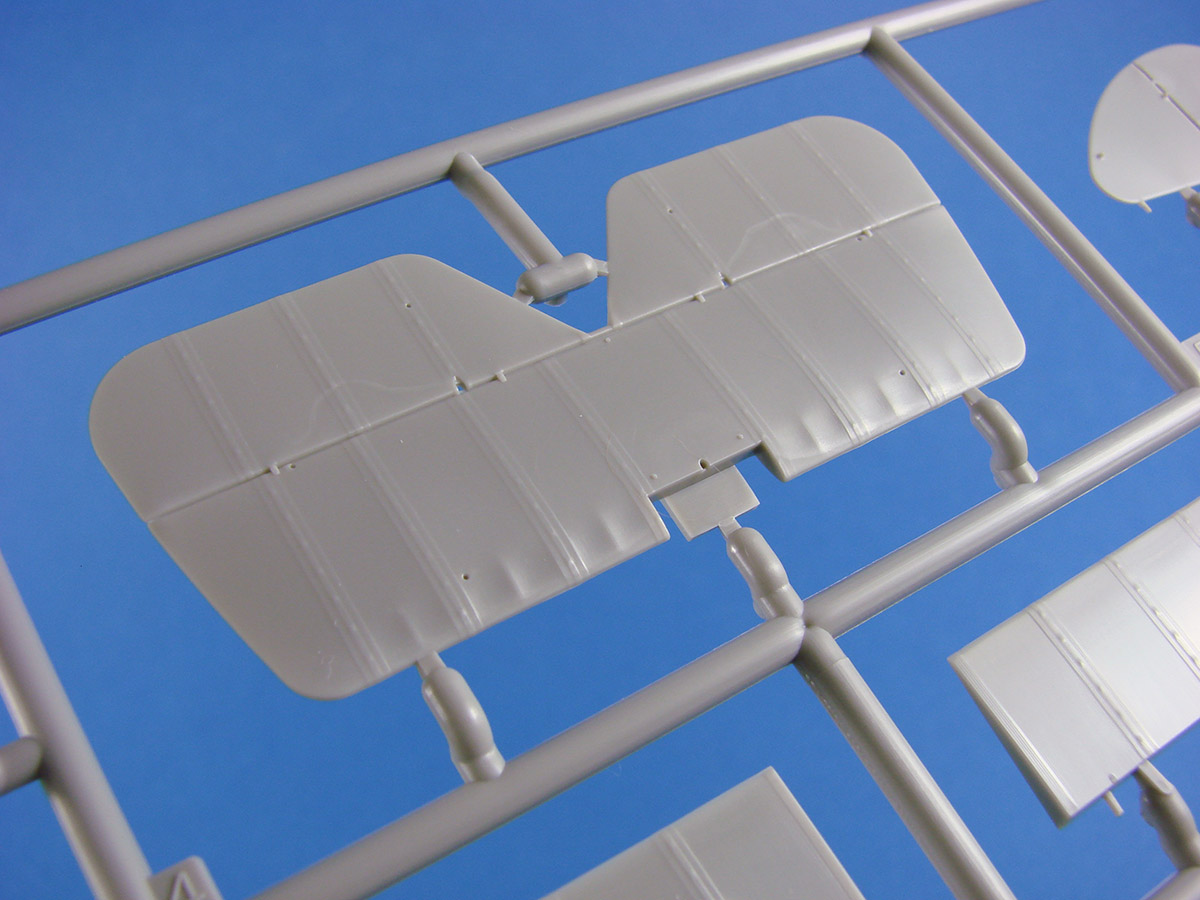
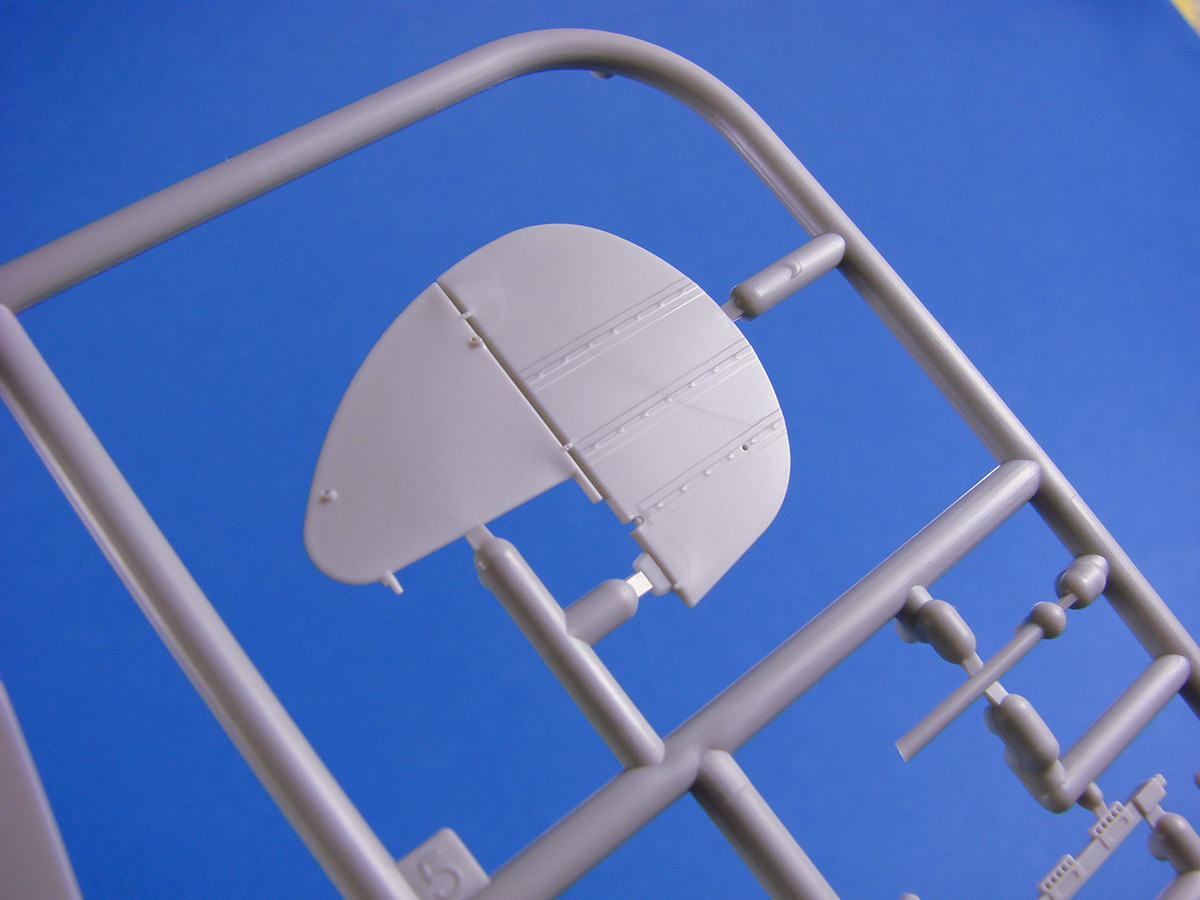
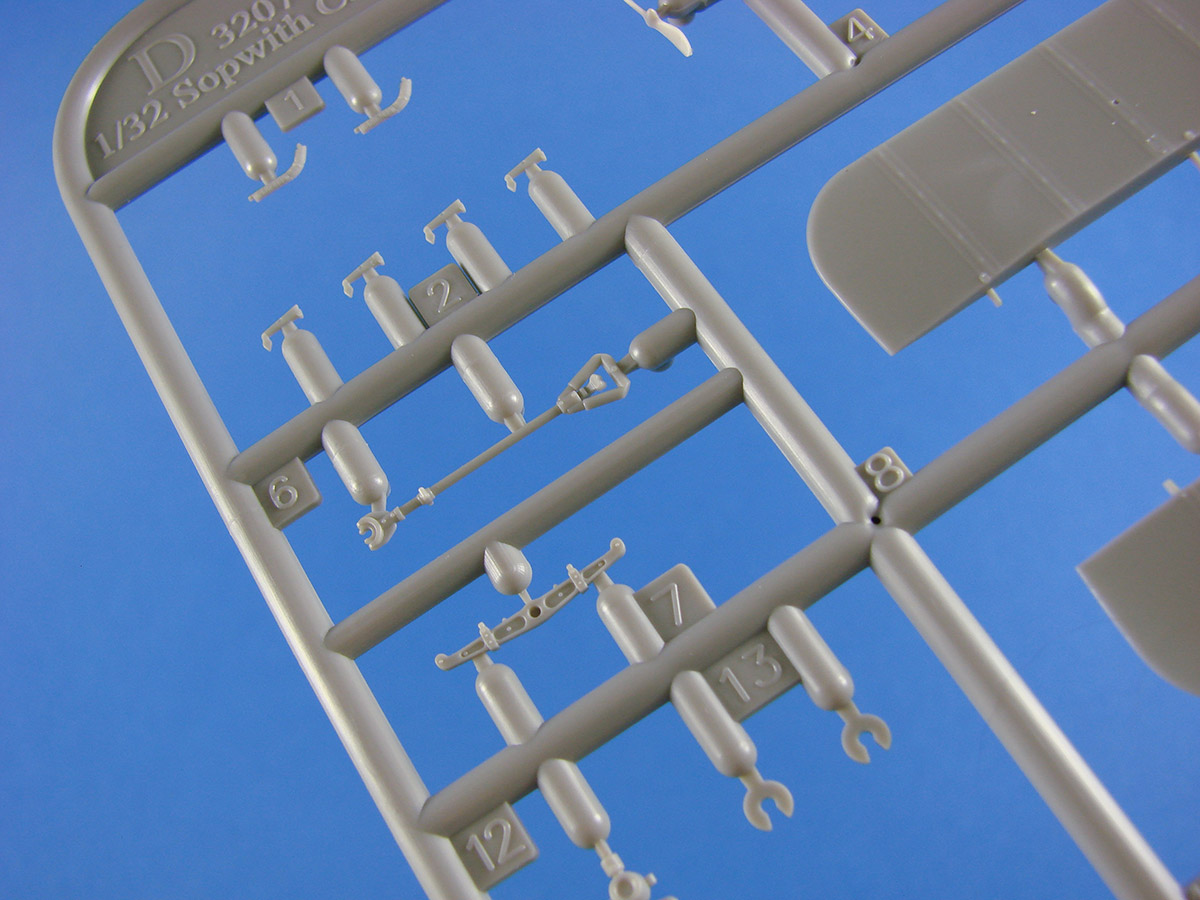
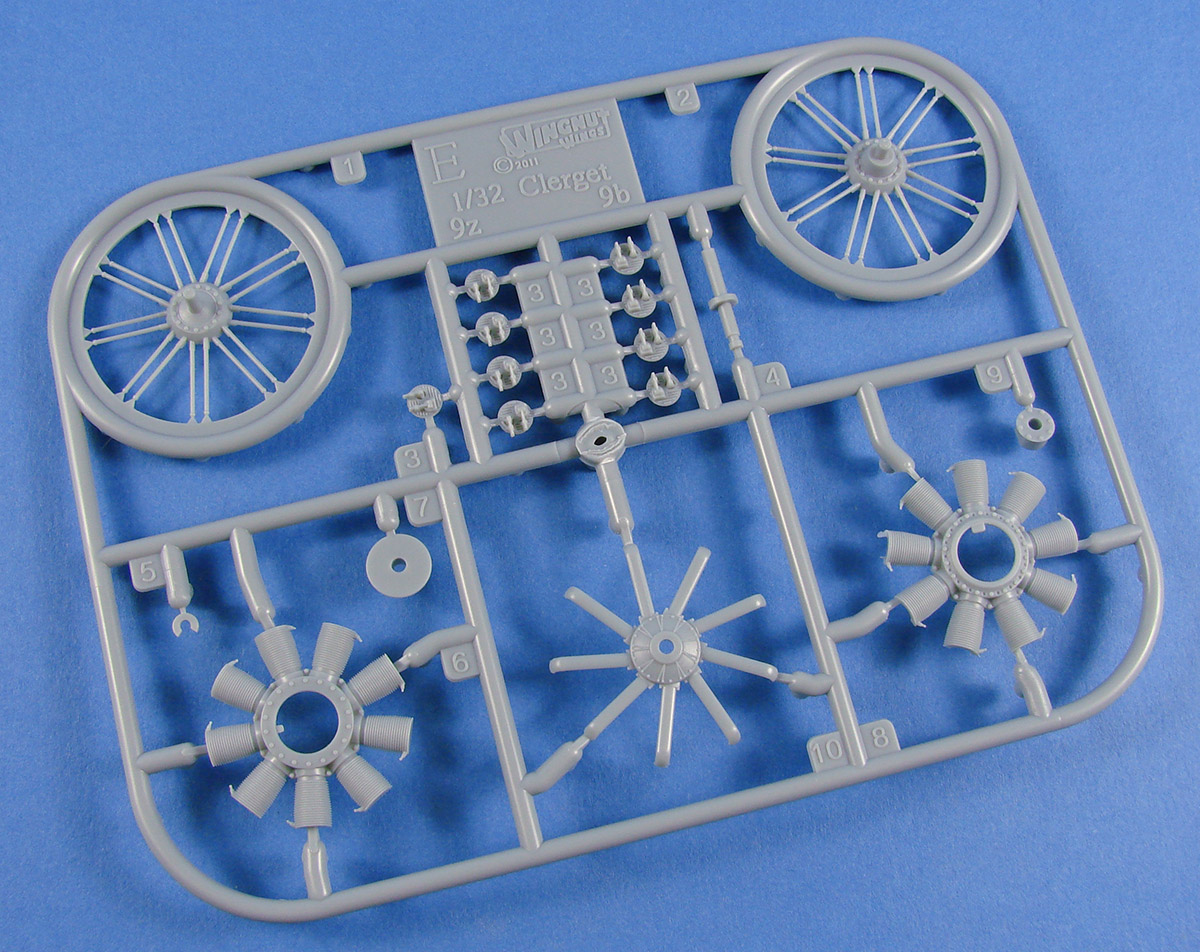
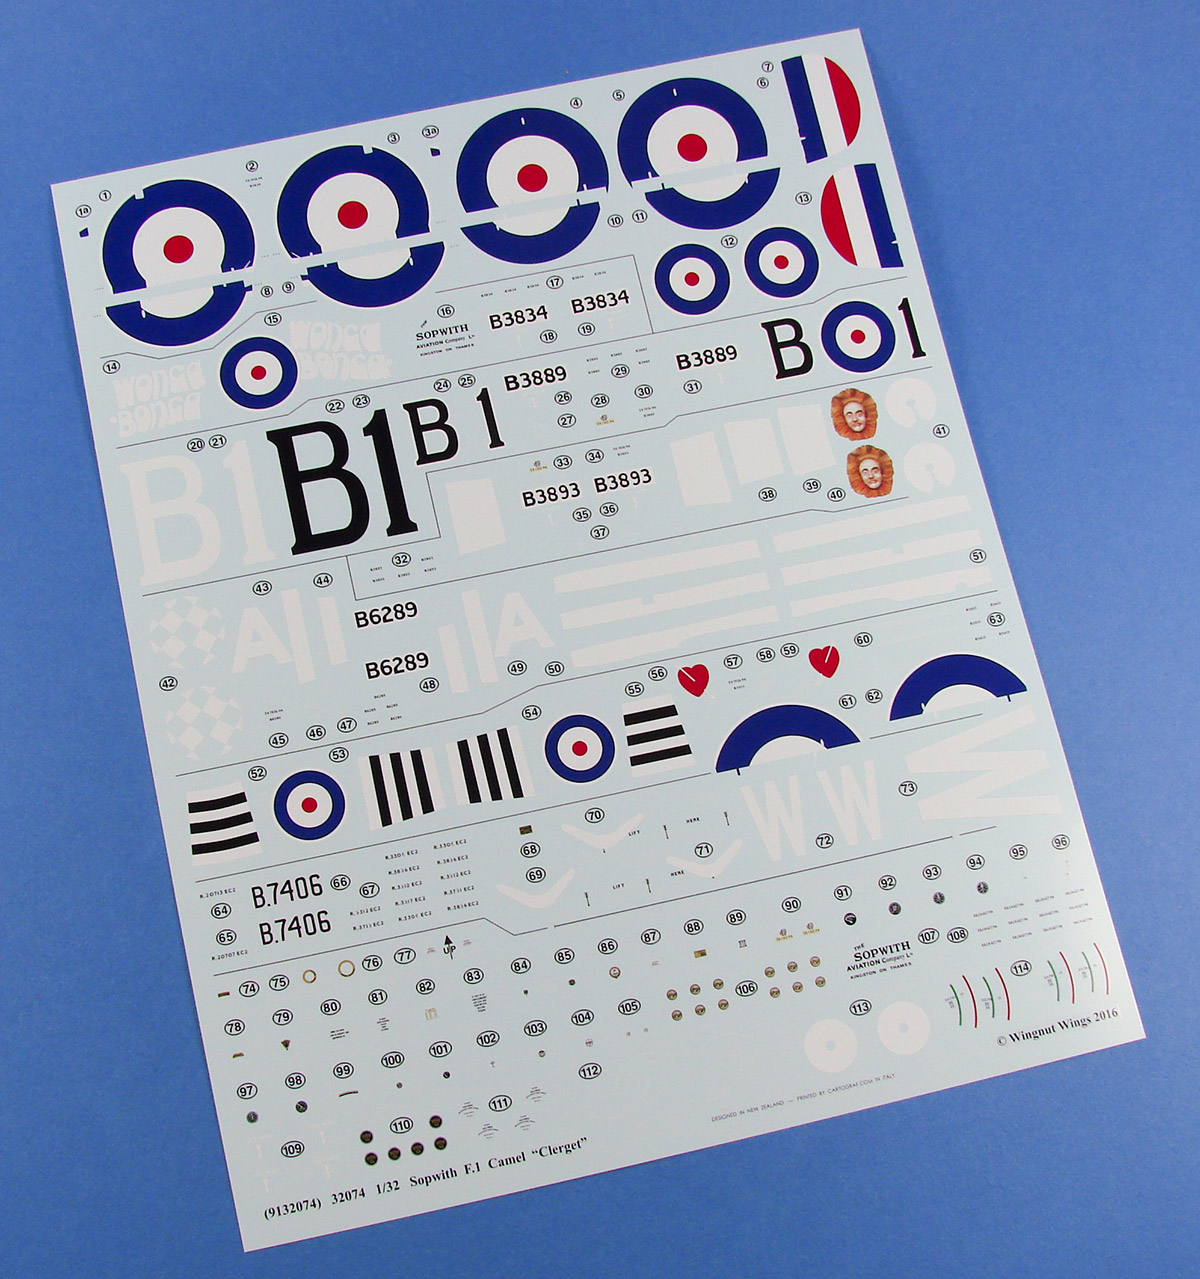
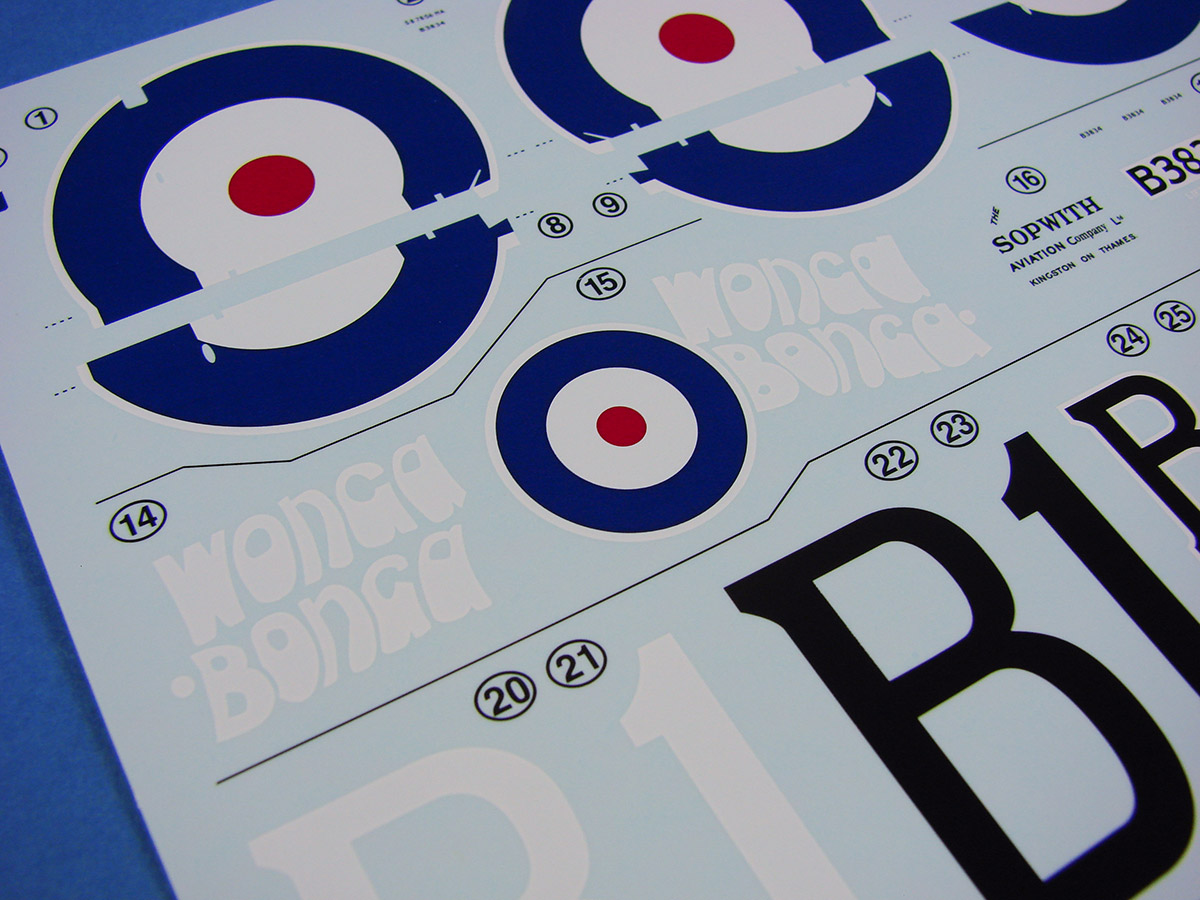
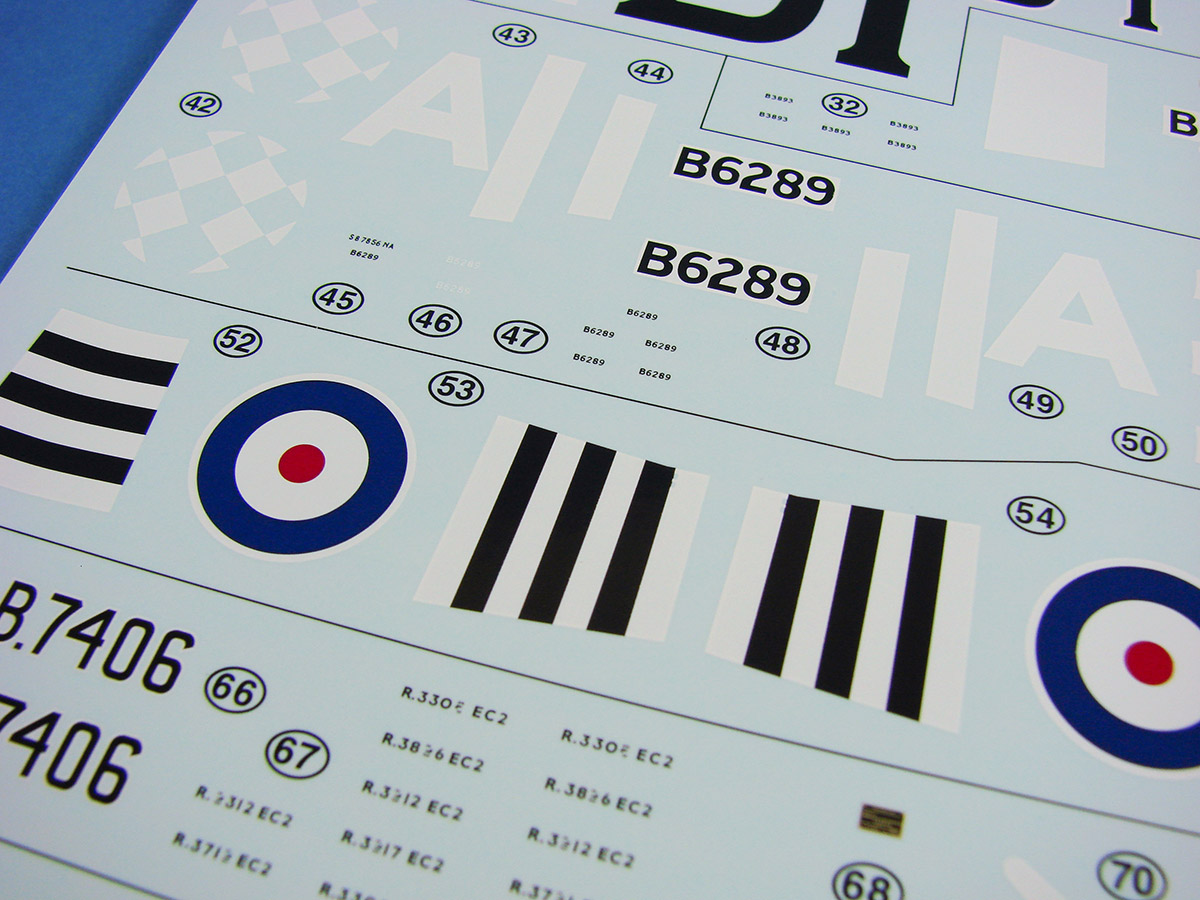
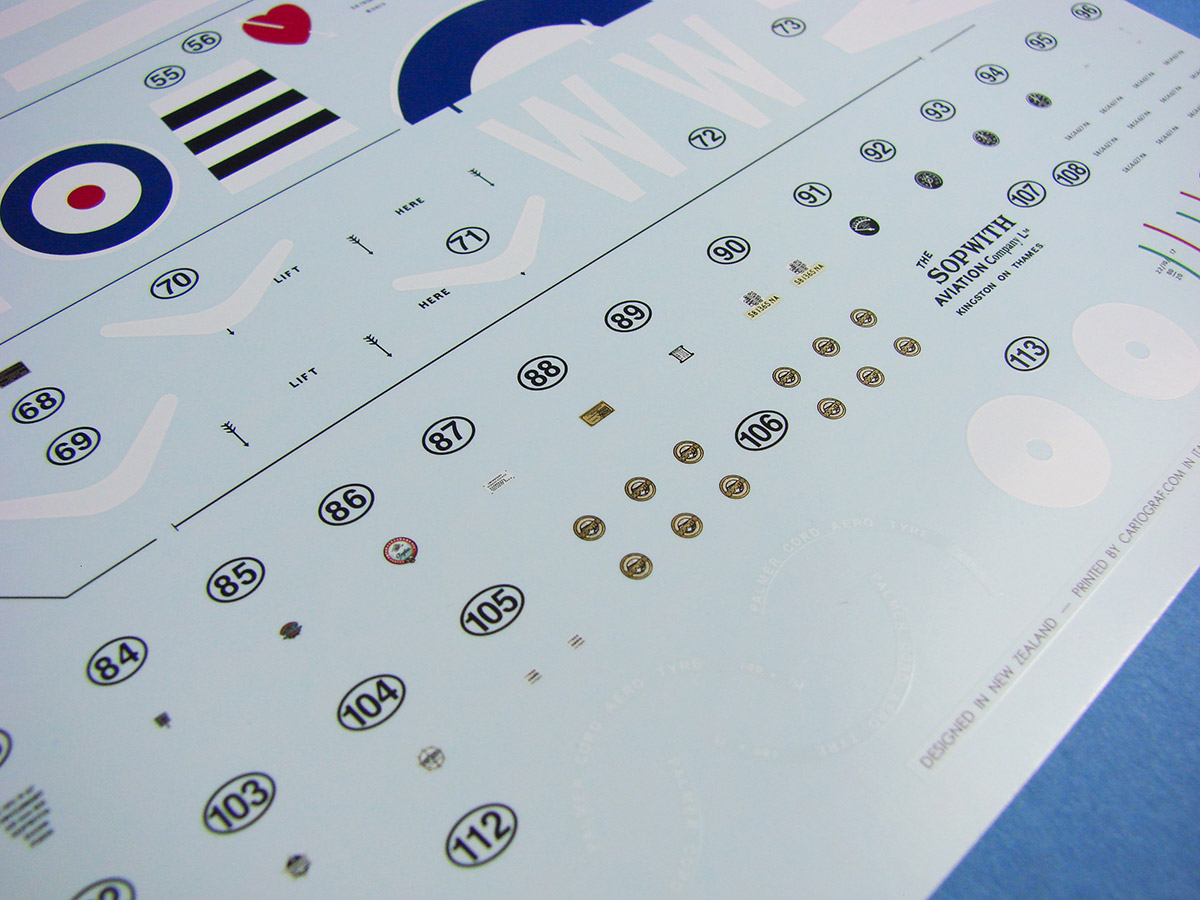
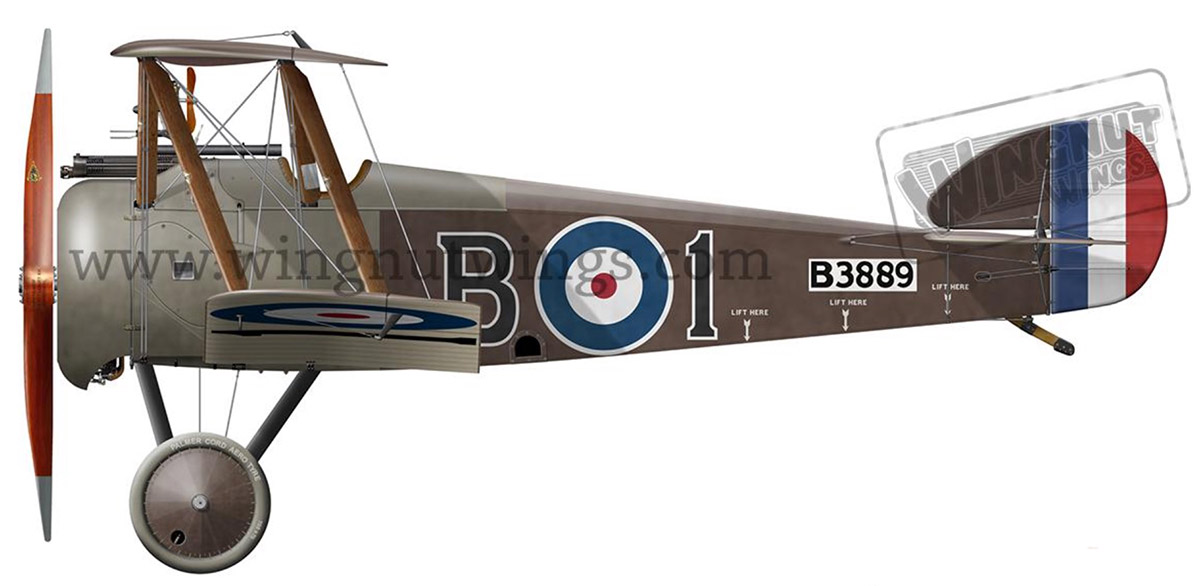
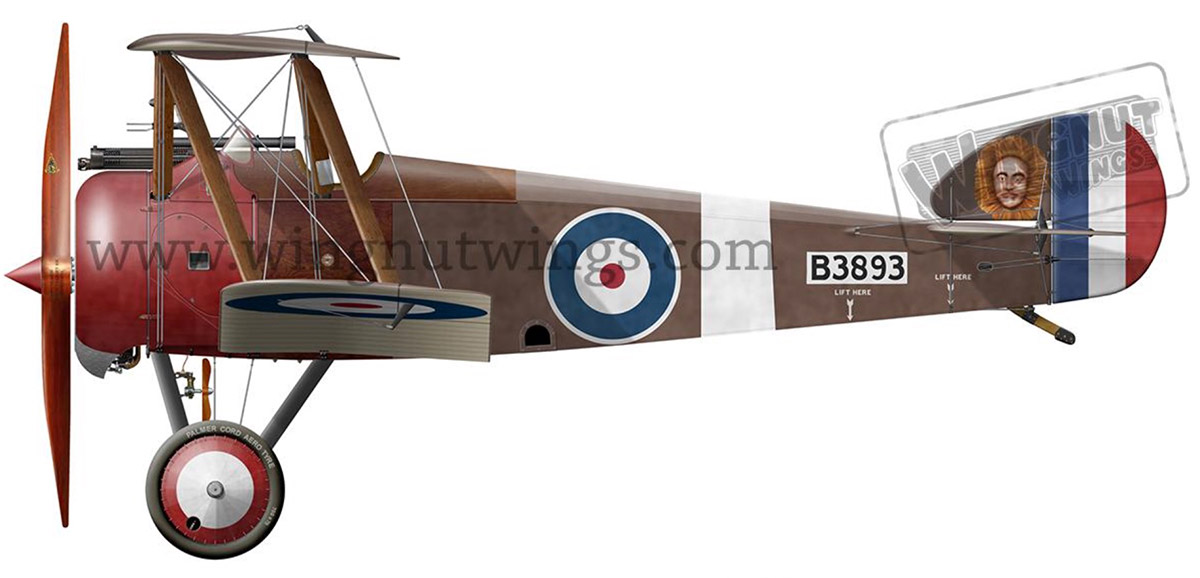
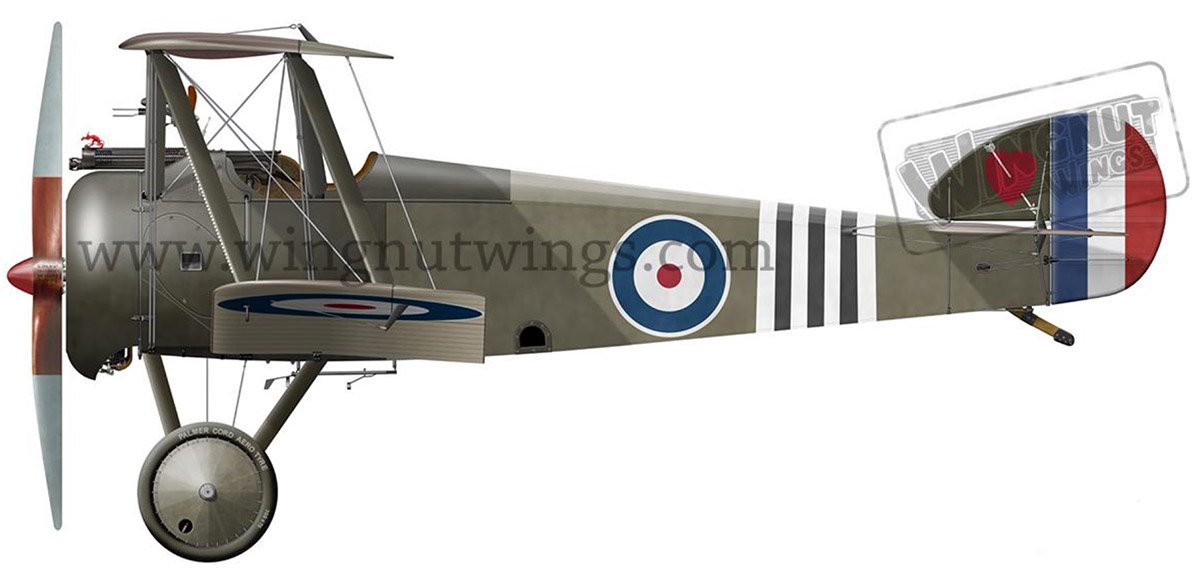
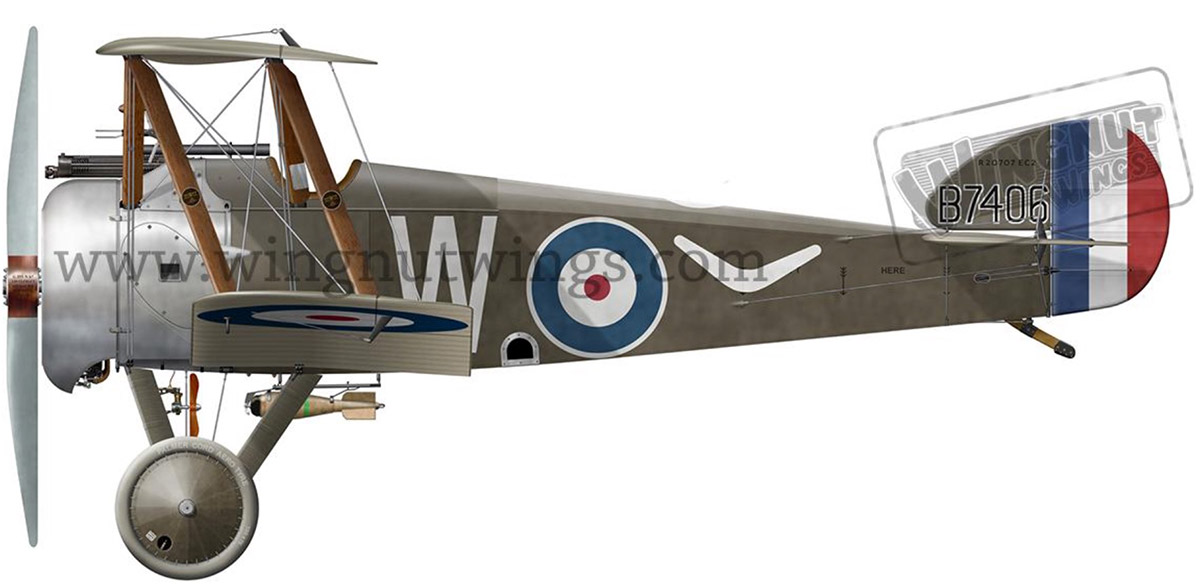
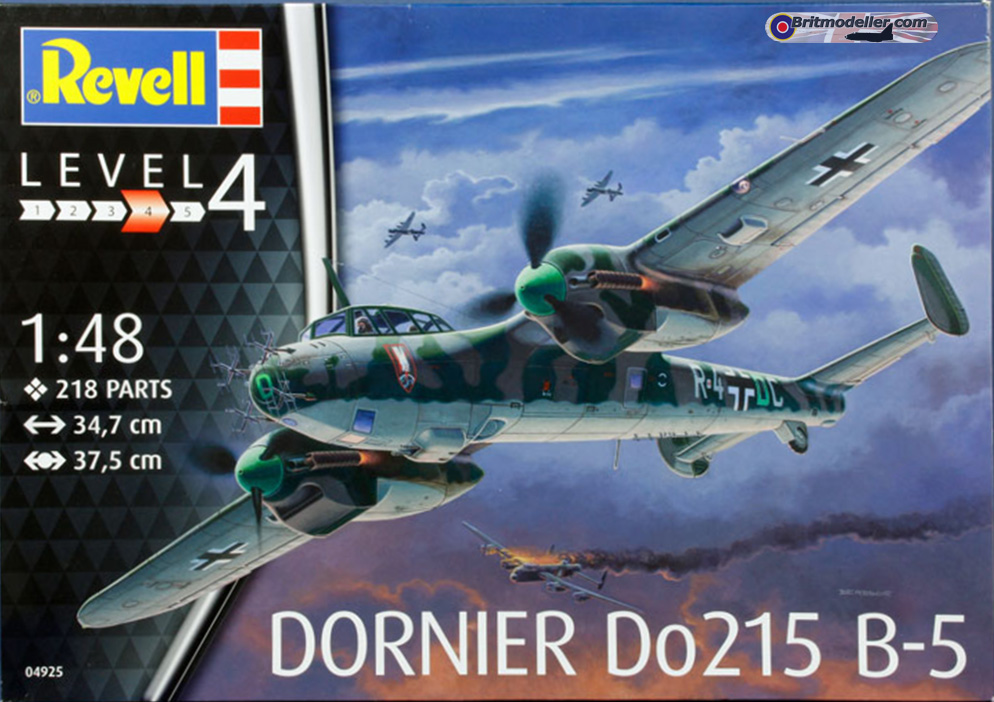
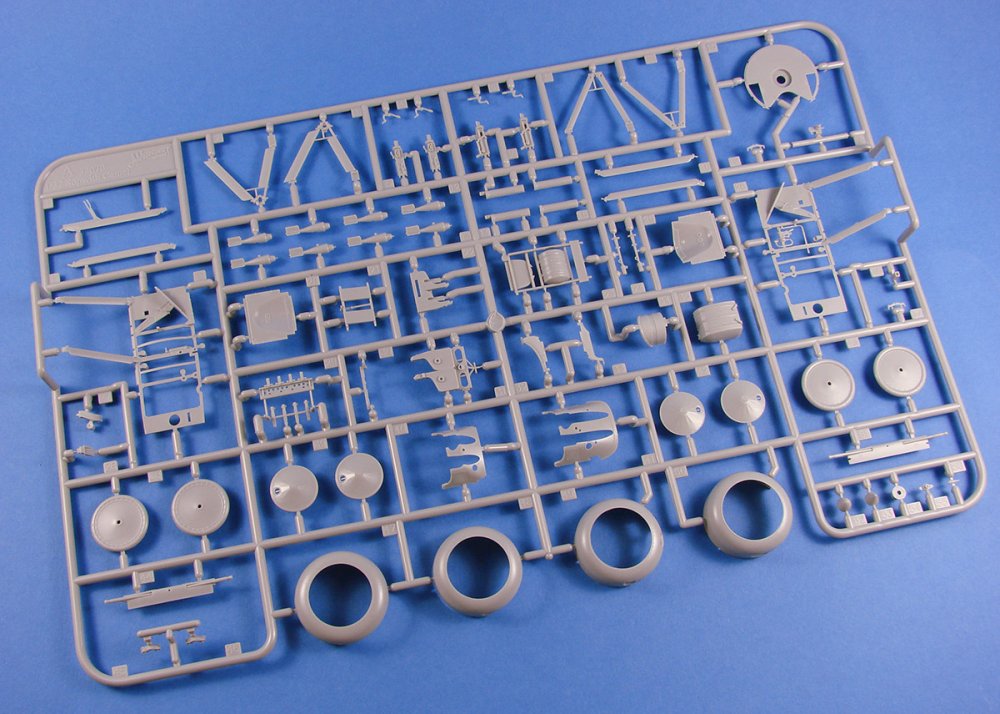
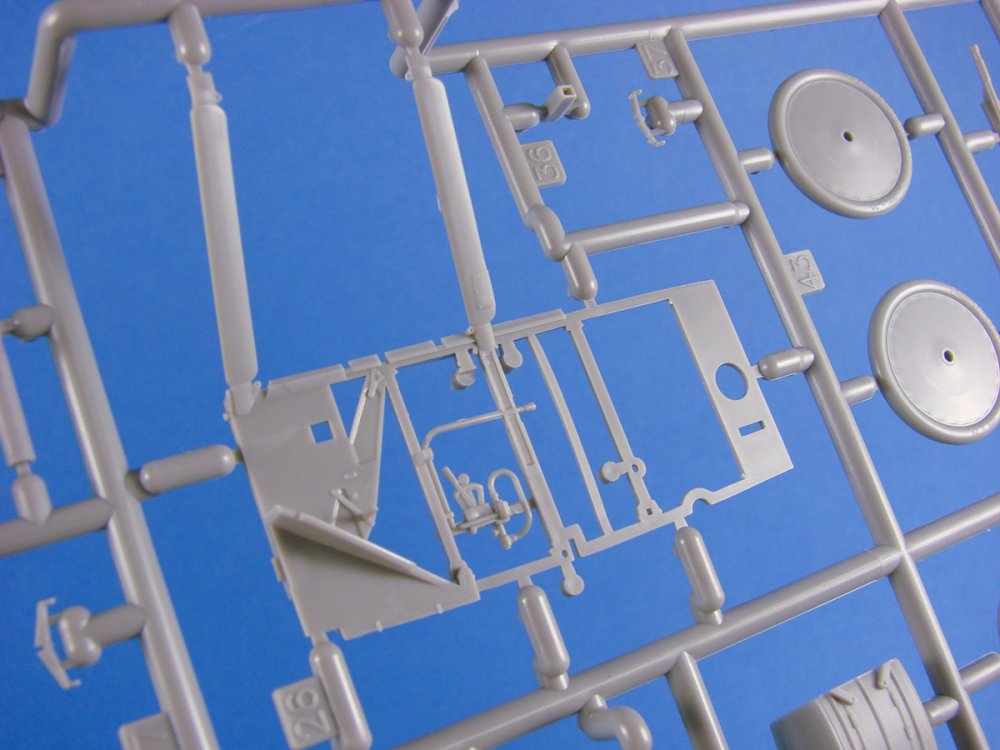
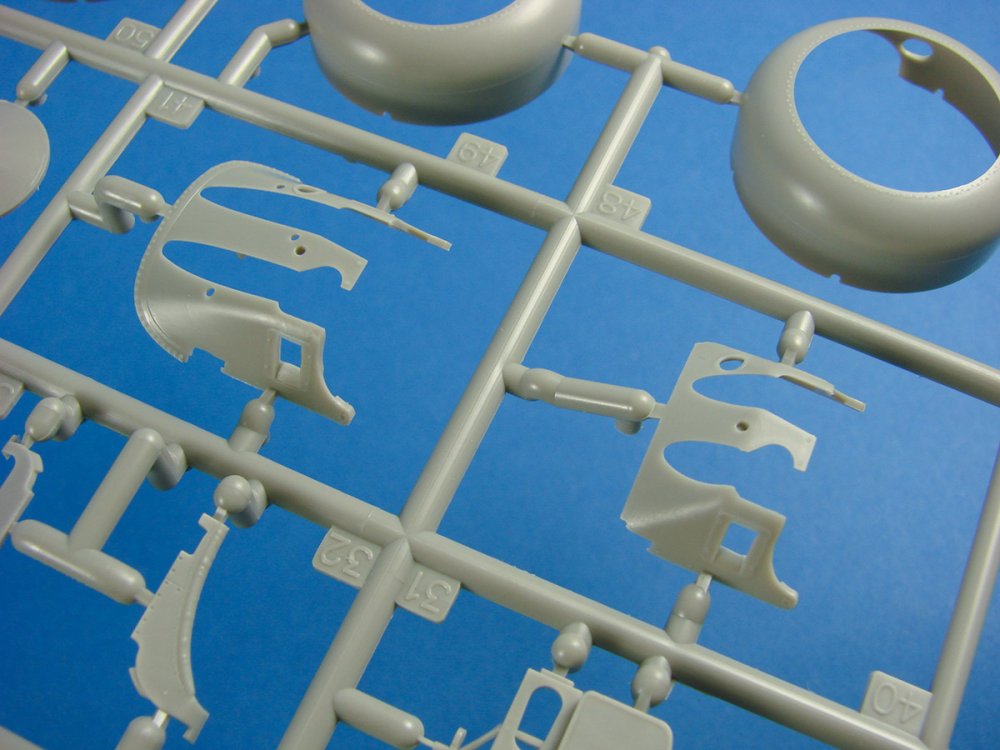
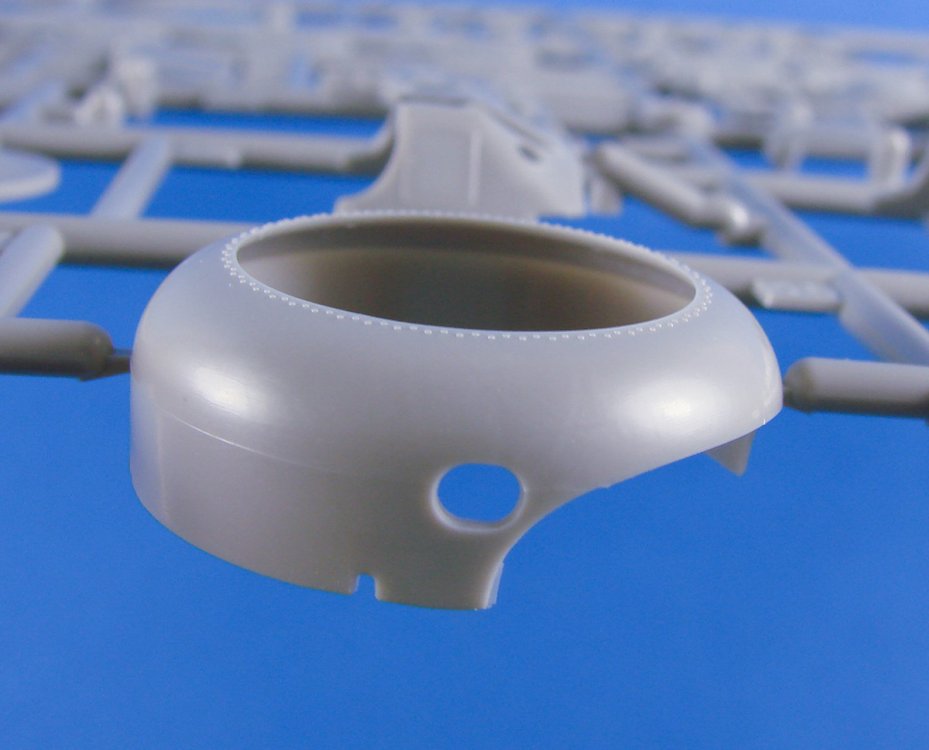
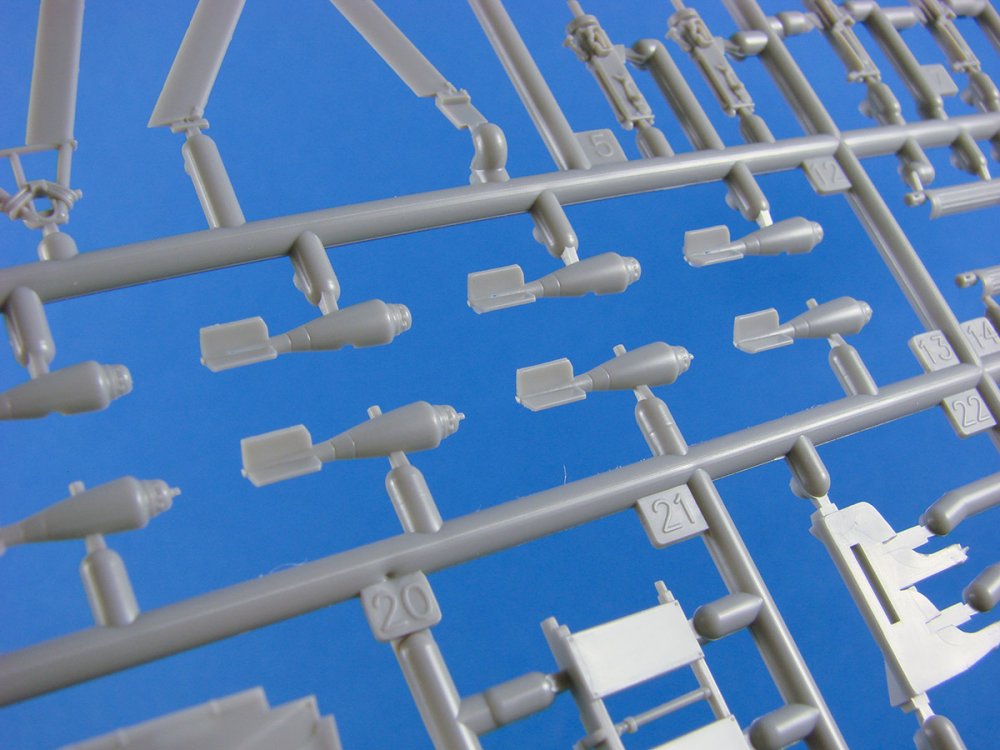
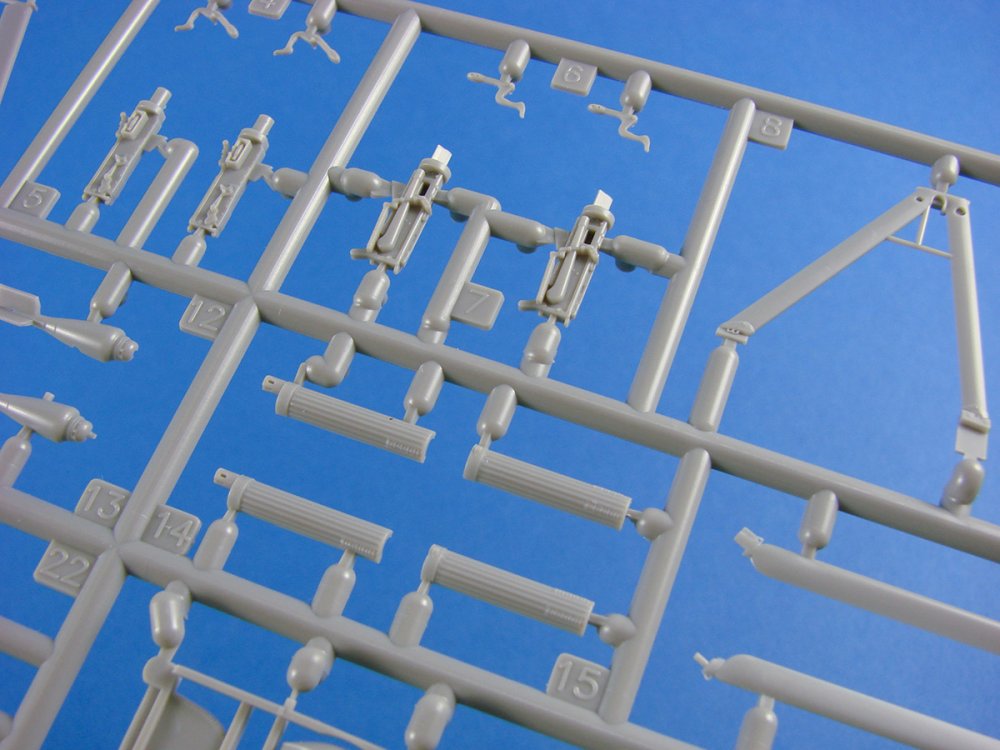
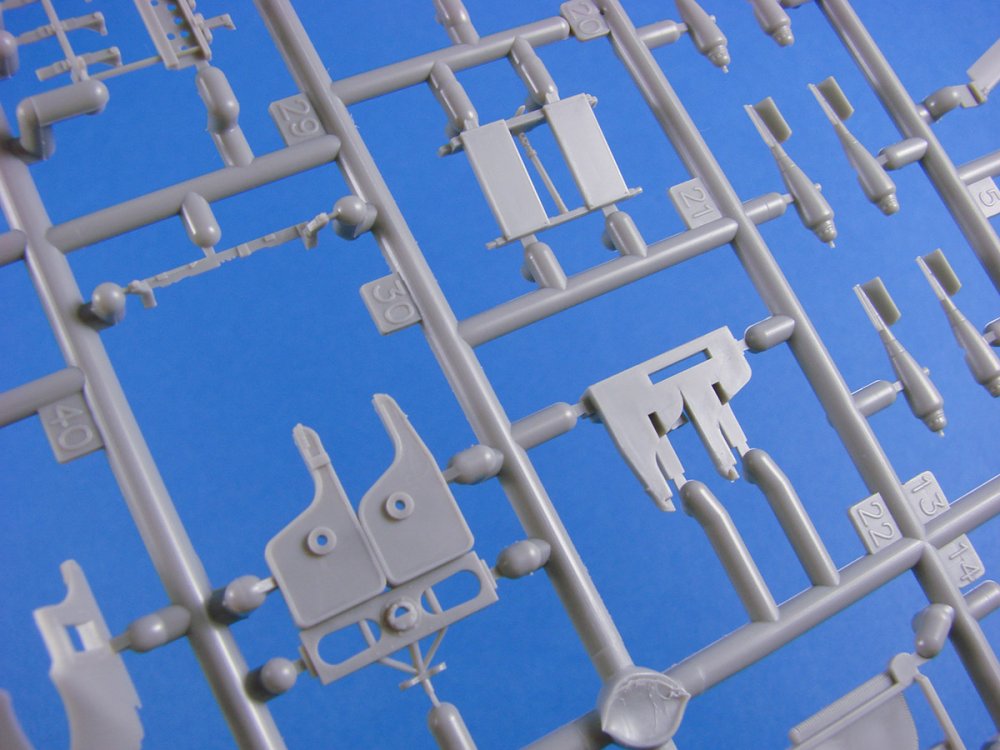
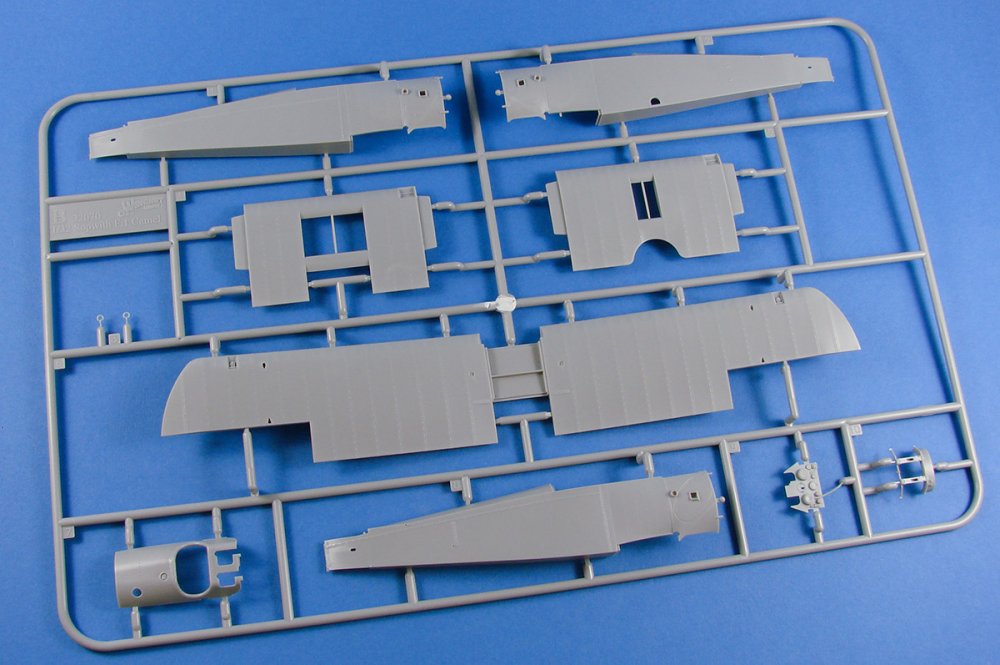
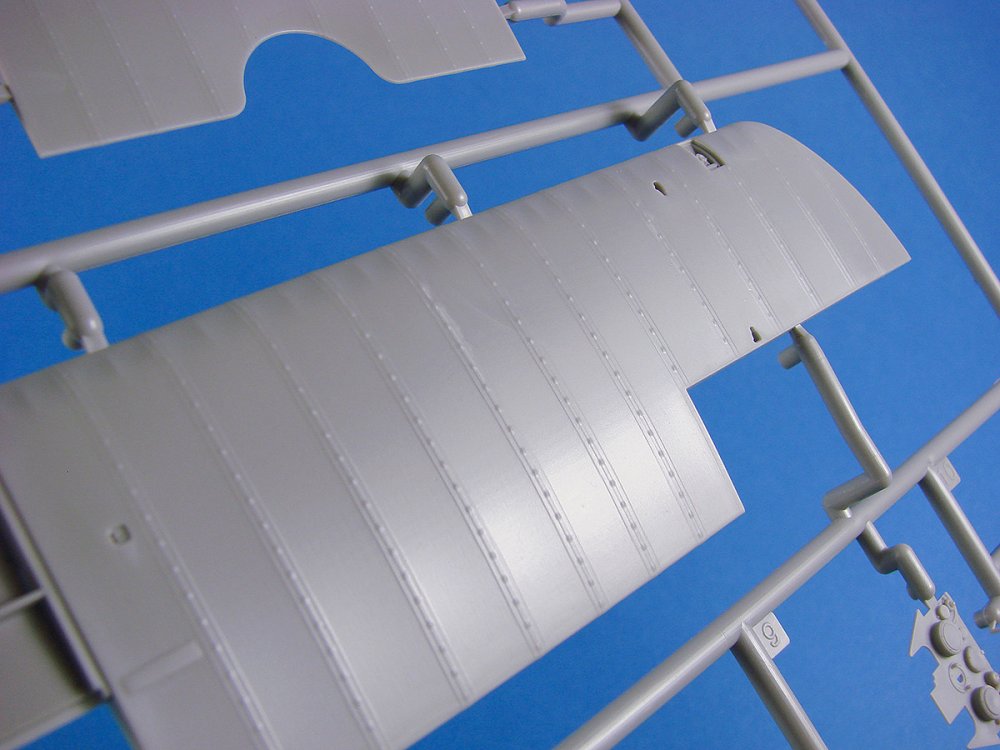
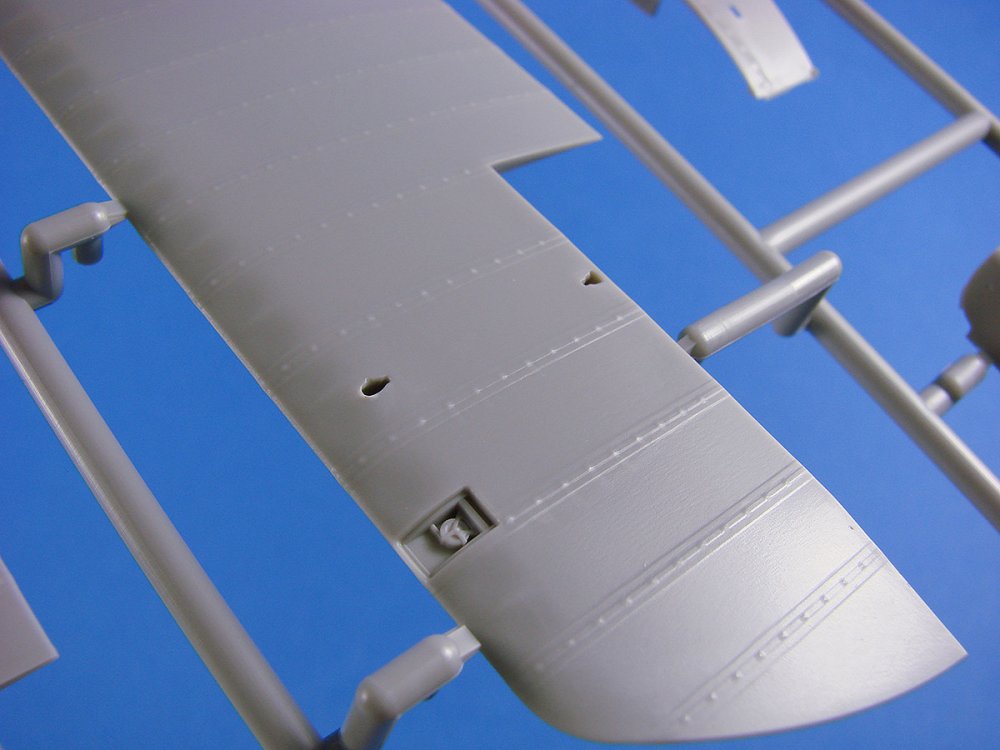
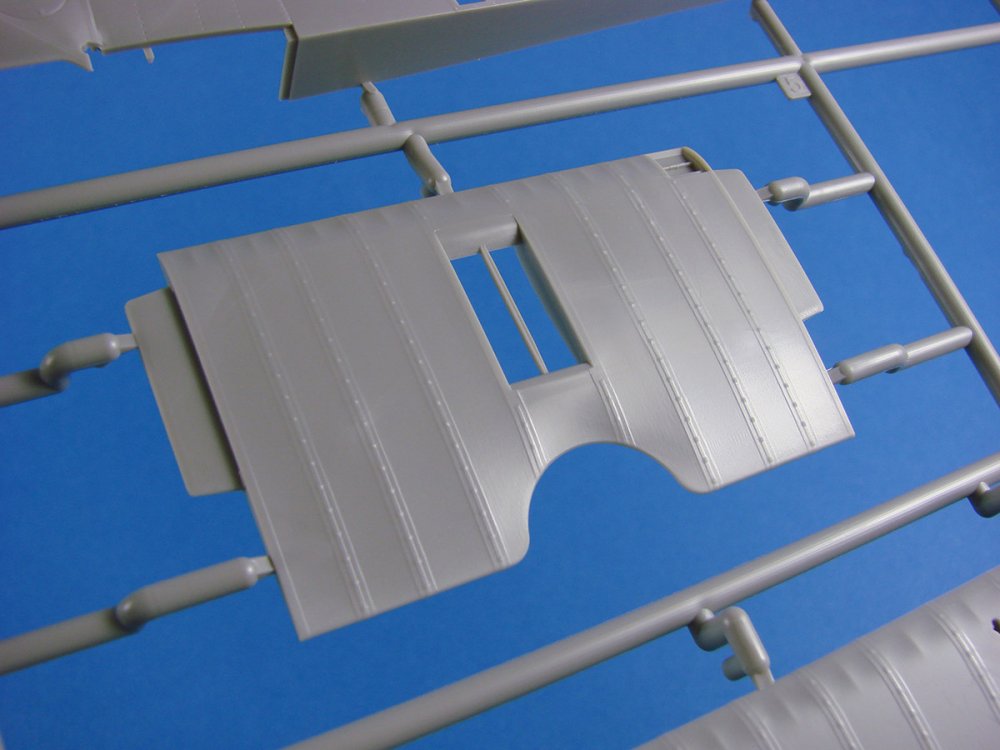
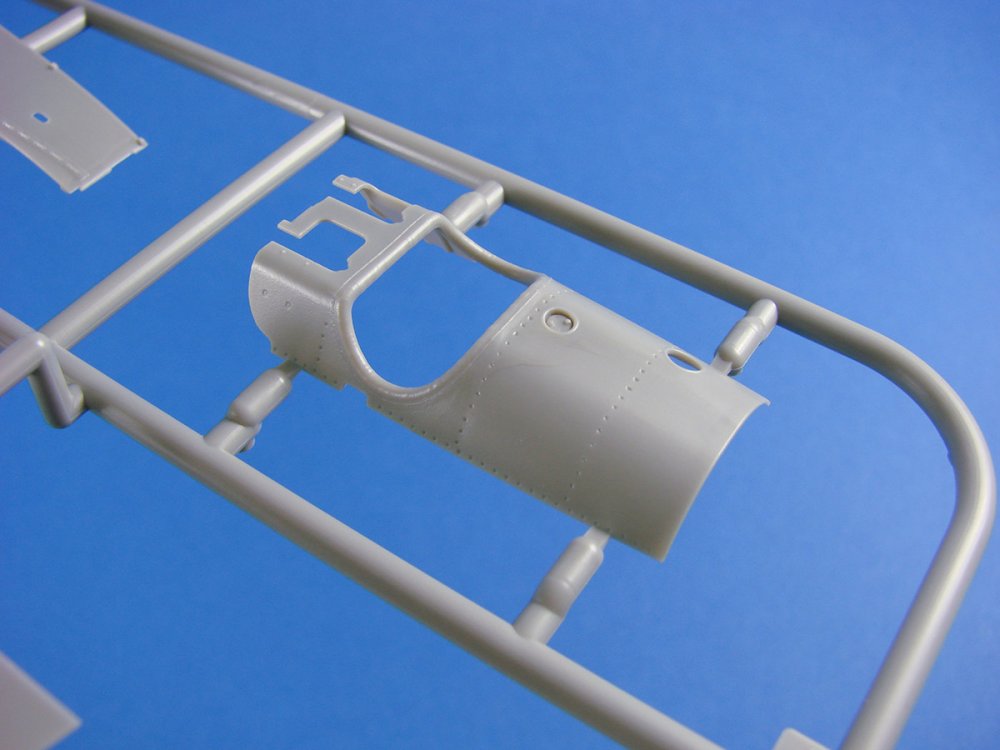
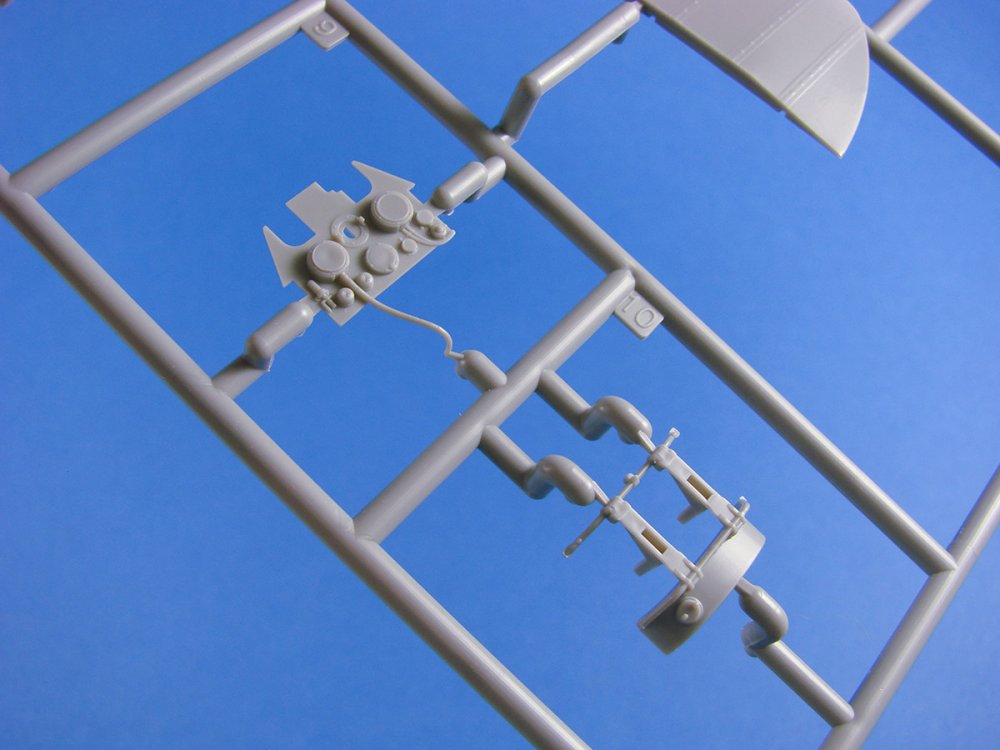
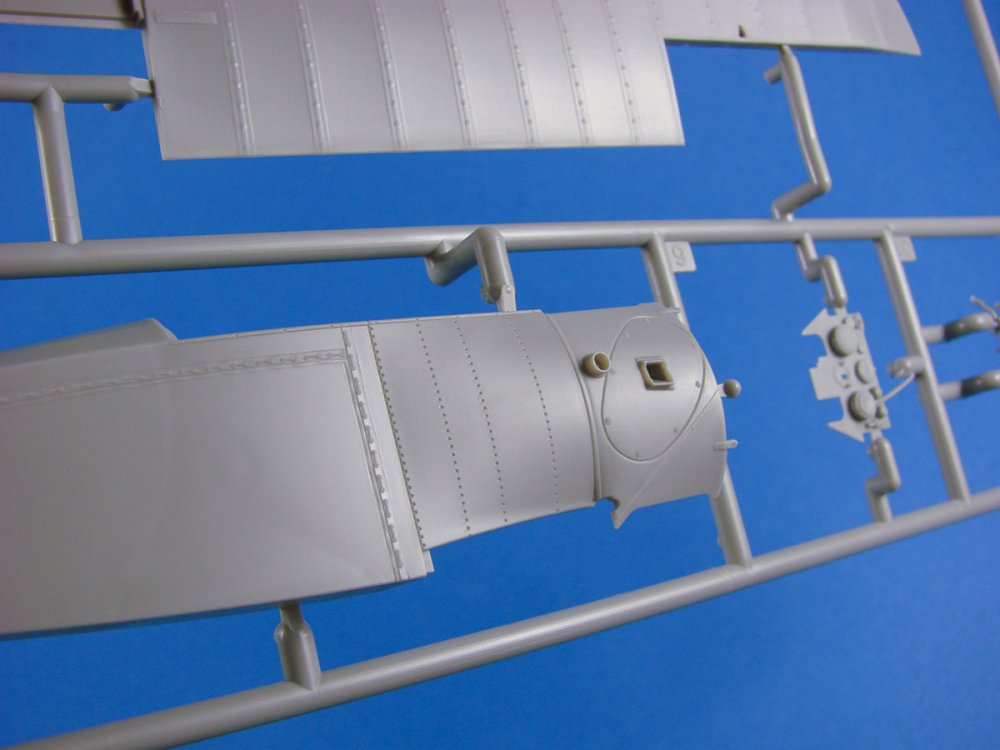
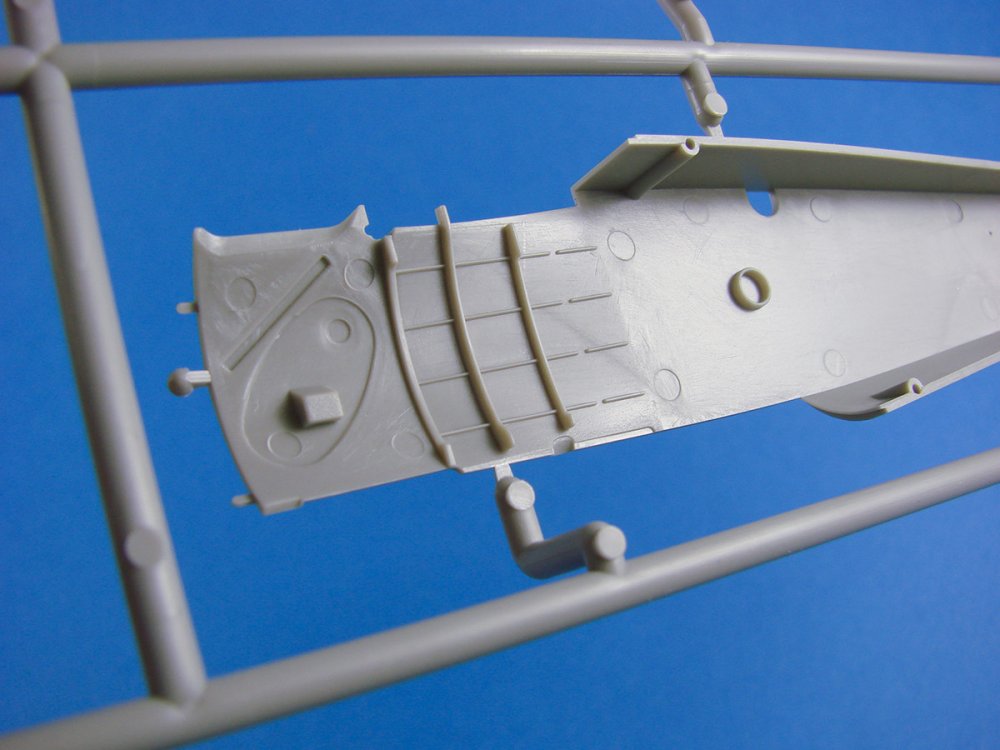
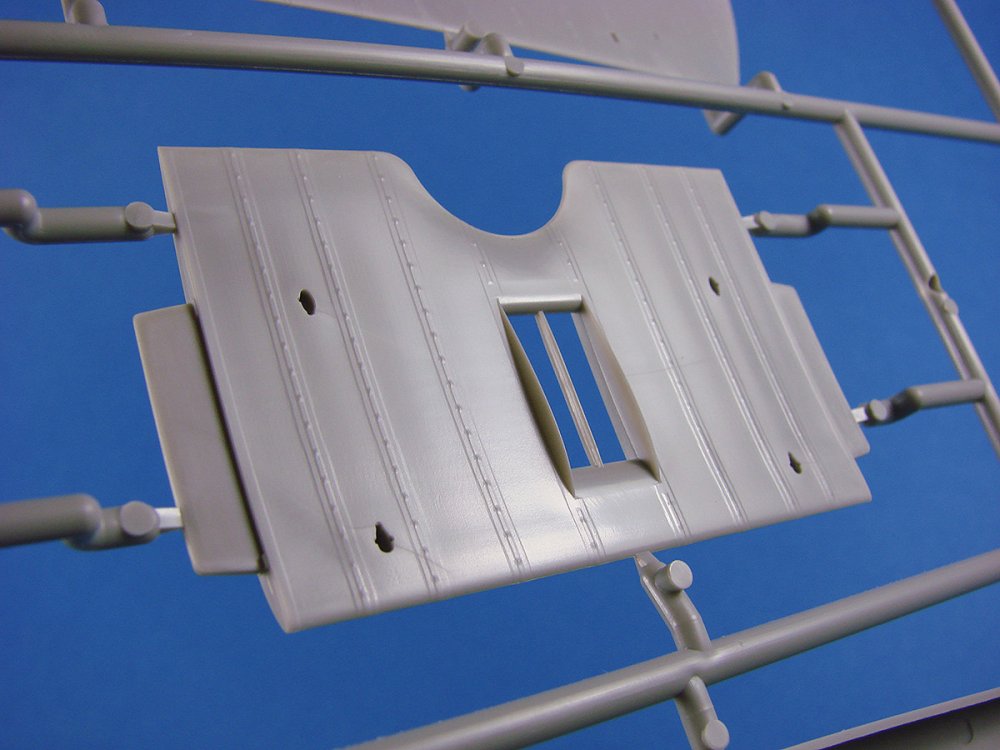
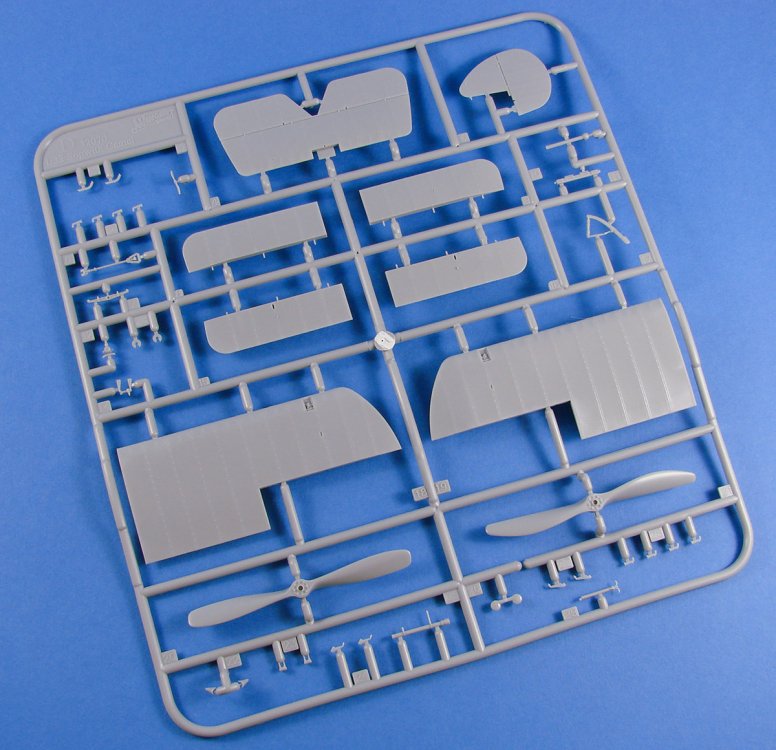
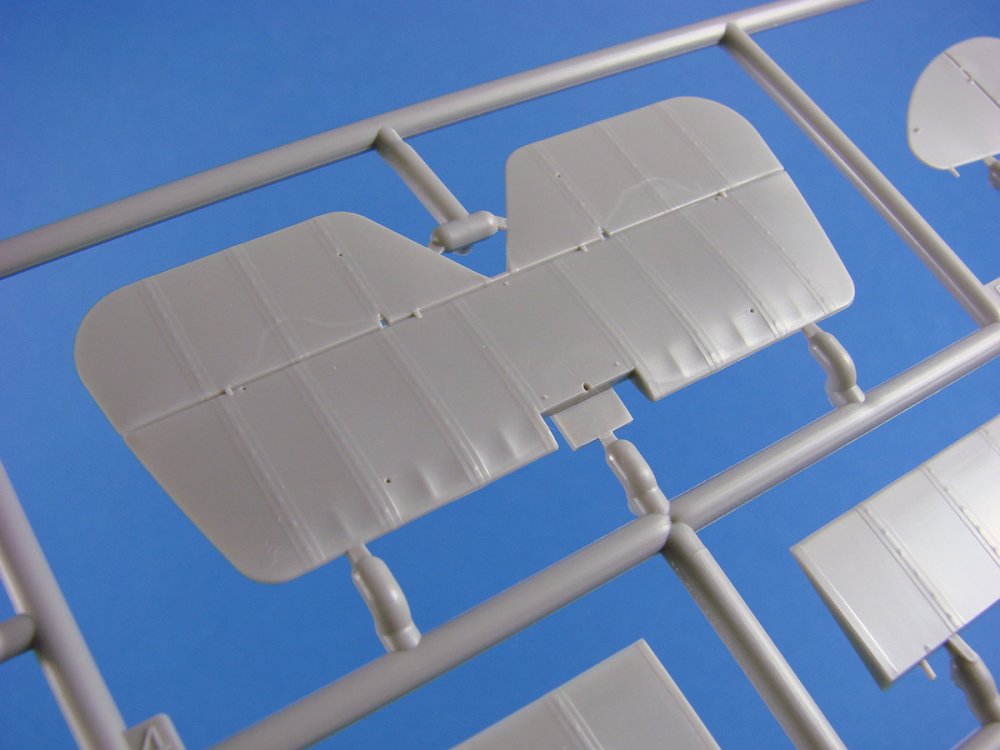
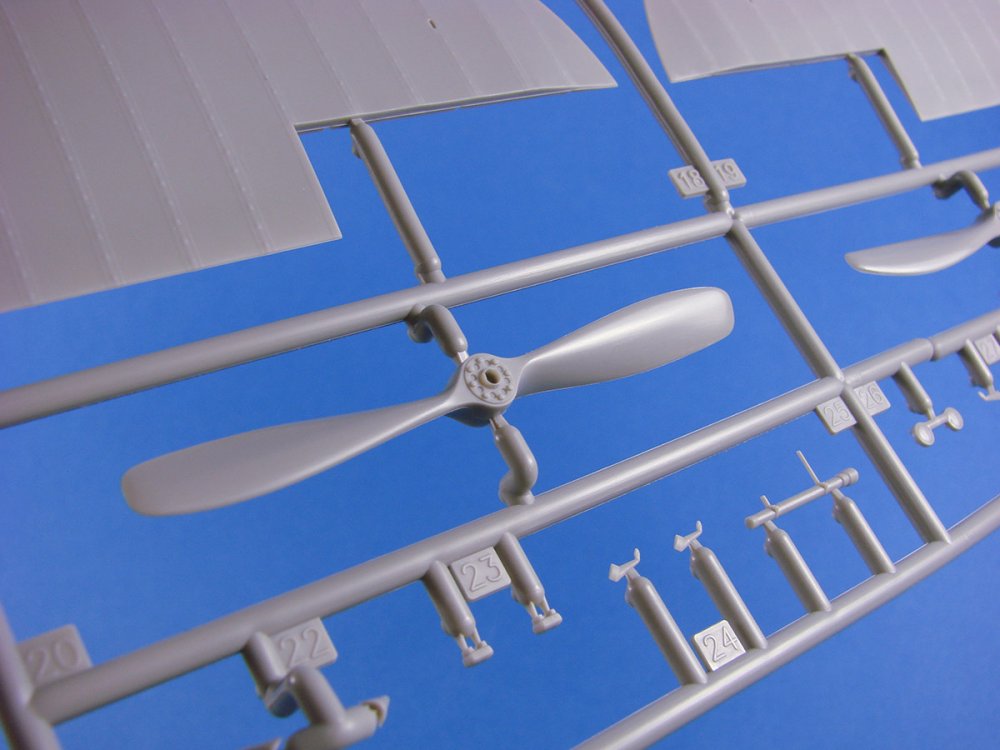
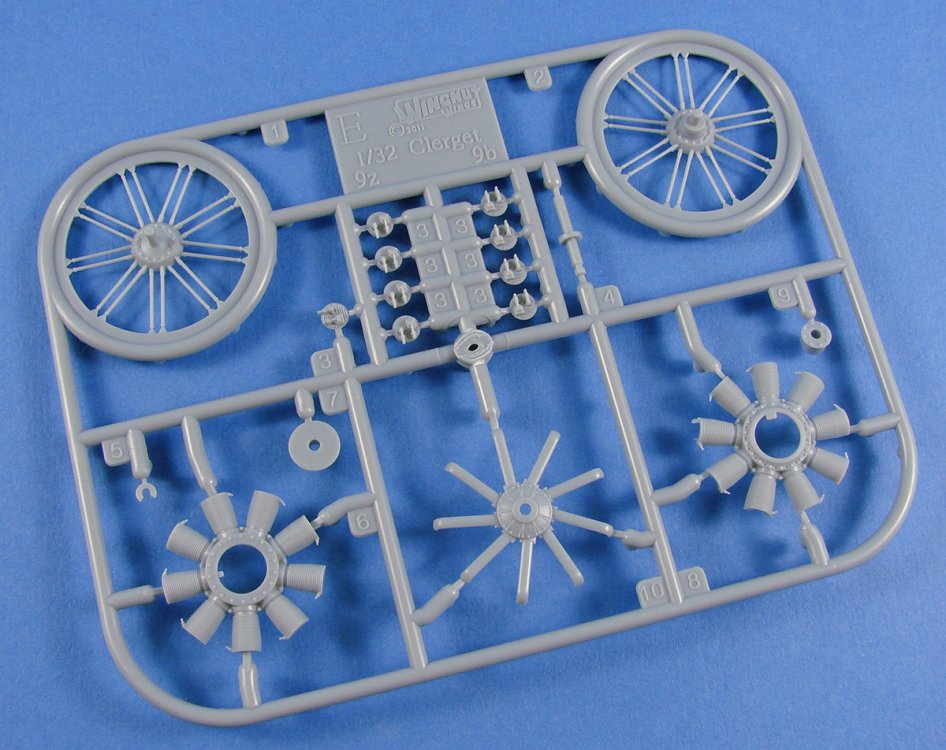
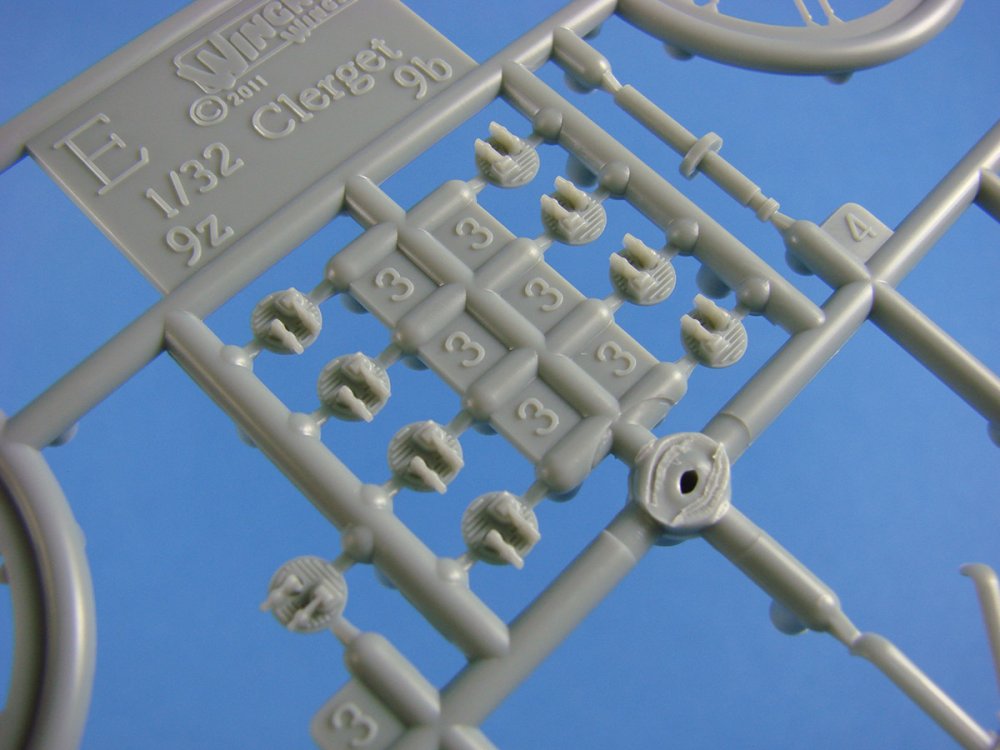
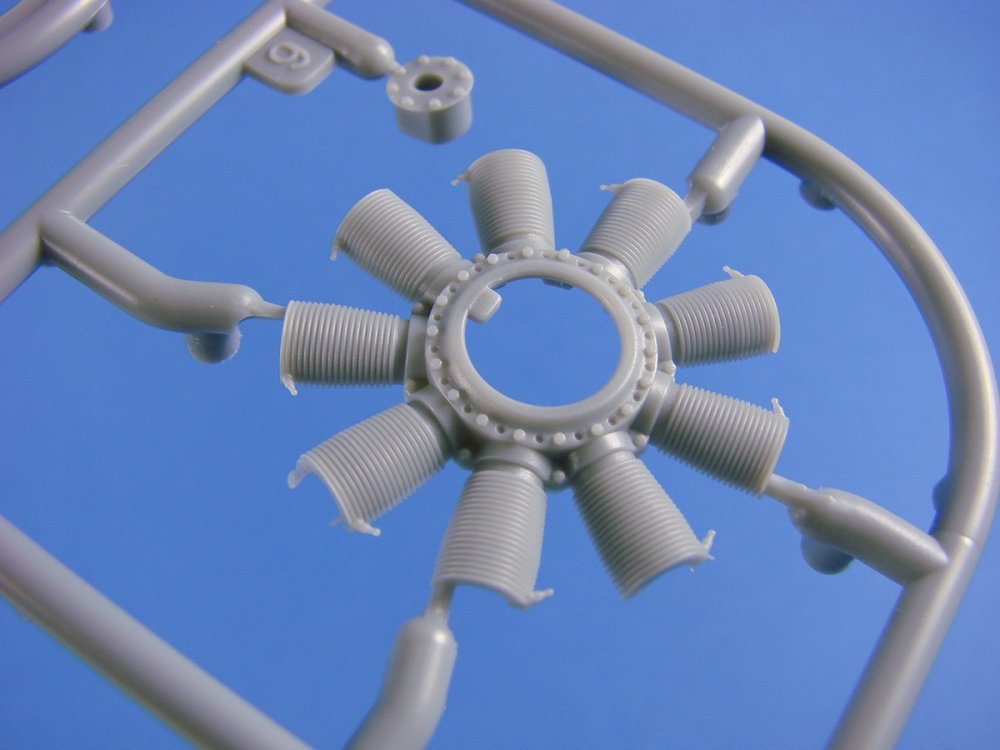
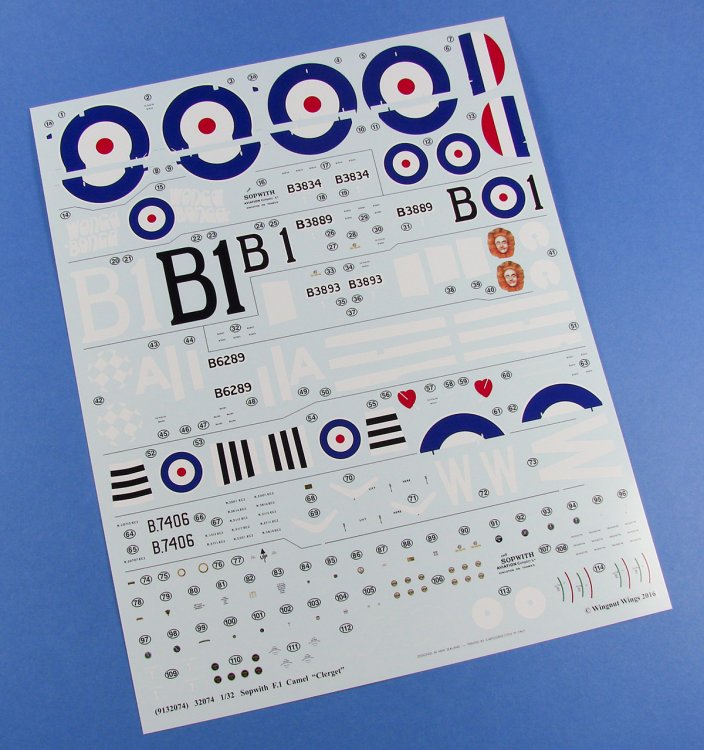
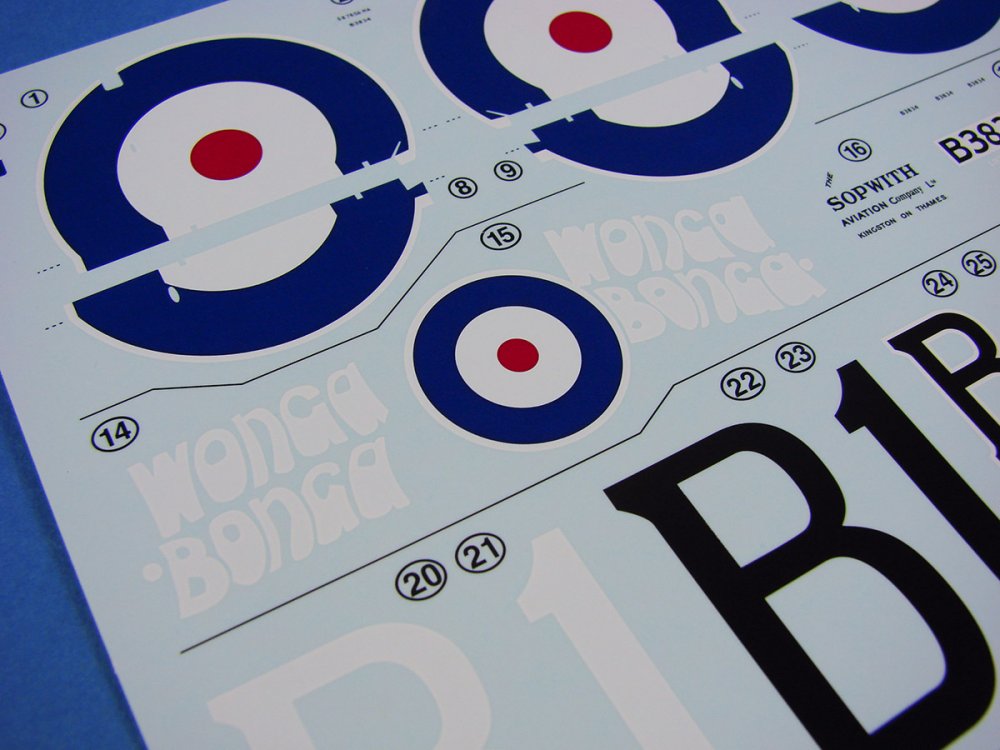
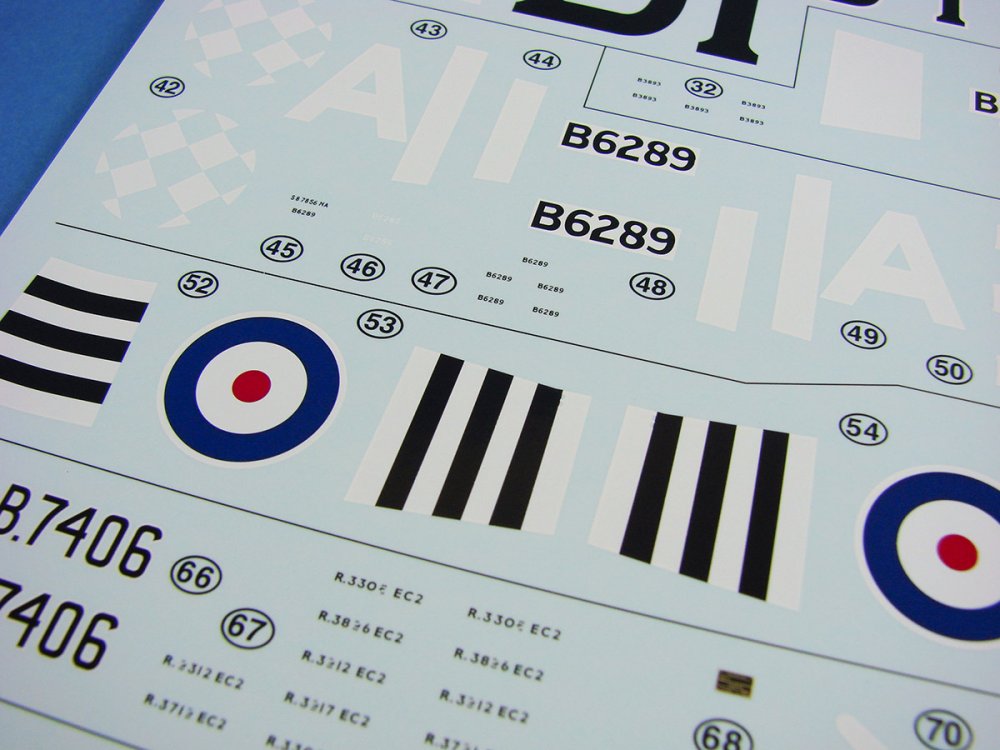
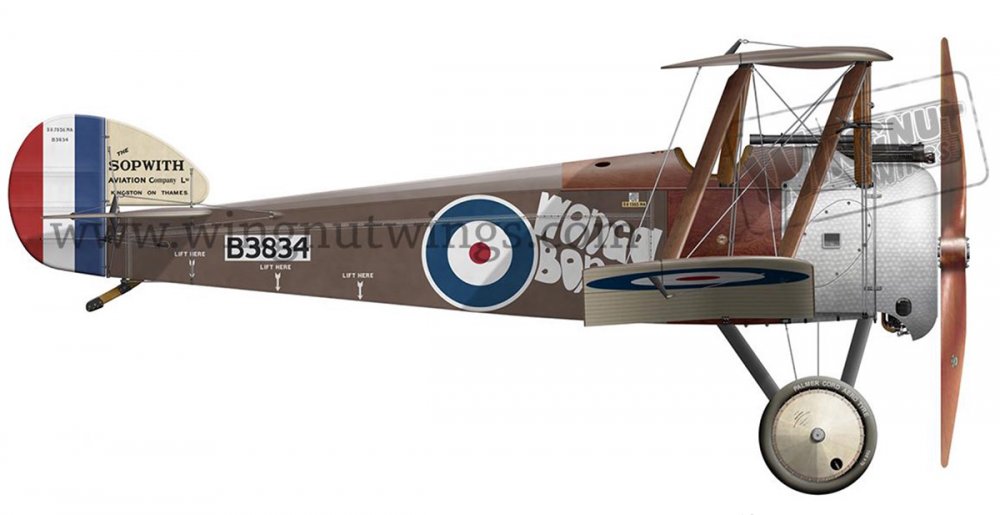
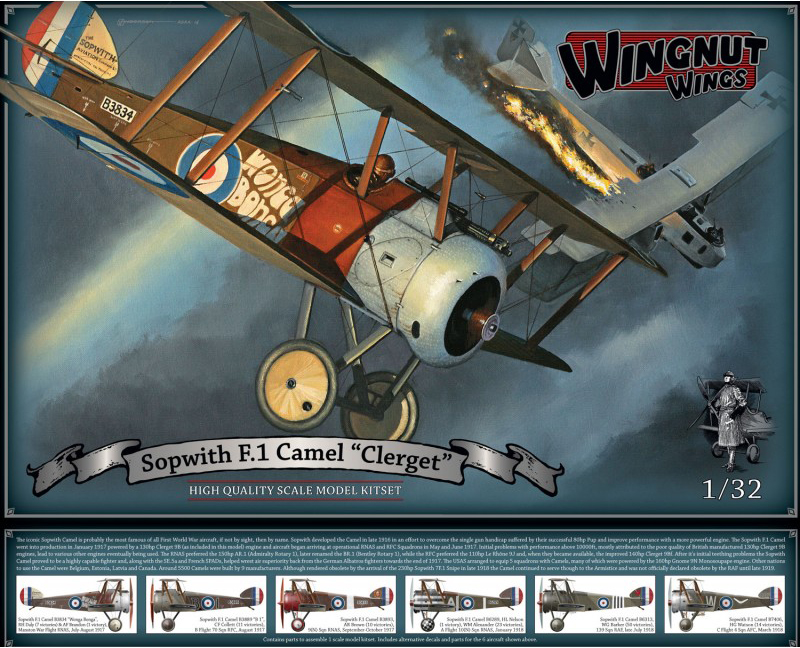
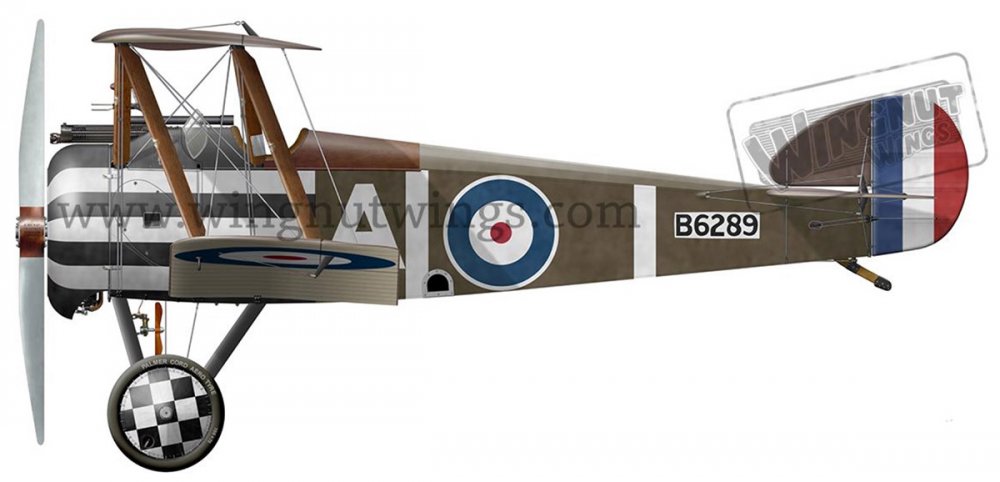
1/32 Sopwith F.1 Camel “Clerget” Wingnut Wings Kit # 32074 Available from Wingnut Wings for $79, plus shipping The Sopwith Camel was a British First World War single-seat biplane fighter aircraft introduced on the Western Front in 1917. It had been developed by the Sopwith Aviation Company as a successor to the earlier Sopwith Pup and would become one of the most iconic fighter aircraft of the First World War. The Camel was typically powered by a single Clerget 9B rotary engine and was armed with twin synchronized .303 Vickers machine guns. Though proving difficult to handle, it provided for a high level of manoeuvrability to an experienced pilot, an attribute which was highly valued in the type's principal use as a fighter aircraft. In total, Camel pilots have been credited with the shooting down of 1,294 enemy aircraft, more than any other Allied fighter of the conflict. Towards the end of the Great War, the type had also seen use as a ground-attack aircraft, partially due to it having become increasingly outclassed as the capabilities of fighter aircraft on both sides was rapidly advancing at that time. The main variant of the Camel was designated as the F.1; several dedicated variants were built for a variety of roles, including the 2F.1 Ship's Camel, which was used for operating from the flight decks of aircraft carriers, the Comic night fighter variant, and the T.F.1, a dedicated 'trench fighter' that had been armoured for the purpose of conducting ground attacks upon heavily defended enemy lines. The Camel also saw use as a two-seat trainer aircraft. In January 1920, the last aircraft of the type were withdrawn from RAF service. (Courtesy of Wikipedia) The kit Wingnut Wings always said they wouldn’t release certain subjects as they had been adequately covered by other manufacturers, such as Roden. This was very disappointing for a lot of WNW fans as they wanted to see the magic Kiwi touch applied to these key aircraft. One of these Holy Grail subjects was of course the Sopwith Camel, and after much friendly pressure from fans, worldwide, we now see not one, but FIVE new Camel releases, as well as another in the Duellist series. These kits cover all the various incarnations of the famous little fighter, with their various engine types, and those in unusual service. This review covers the more familiar Clerget-engine type. The kit spec is as follows: Dimensions 26cm x 18cm High quality Cartograf decals for 6 aircraft 166 high quality injection moulded plastic parts Optional fuselage halves with alternative lacing details, windscreens, cut down cockpit decking, early and late undercarriage, propellers, 20lb Cooper bombs & carrier Highly detailed 18 part 130-140hp Clerget 9B/9Bf engine 10 photo-etched metal detail parts Fine in-scale rib tape detail Full rigging diagram Steve Anderson’s lovely artwork adorns the lid again, with Ronny Bar’s scheme profiles along the edge. All new Camel releases have many common parts which are supplied across THREE light grey sprues and one clear sprue. Sprues A, C, and D are labelled as ‘Sopwith Camel’, whilst Sprue B is the only one to carry the ‘Sopwith F.1 Camel’ nomenclature. Specific to this kit is the Clerget 9B engine which resides on Sprue E, with ‘E’ typically equated for ‘engine’ on WNW releases. This release also contains a single fret of brass PE, as well as a single, large decal sheet covering all SIX schemes. All sprues are separately bagged and these numerous bags are sealed in a large outer one that has an identifying slip which states which kit engine is included. In this case, Clerget. Sprue A The first thing you’ll notice here are sheer number of parts. Firstly though, a quick look at what the cockpit offers. Everything I like about WNW engineering can be seen on two of the main cockpit parts, namely the port and starboard sidewalls. These delicate parts have been moulded with integral cabane struts, so of course there’s no need to wonder about the angle of these when you later add the wings. The walls themselves are superbly detailed, with the only ejector pin marks in areas that will be covered with subsequent assemblies. A small number of ejector pin nodes will need to be clipped off certain areas too. This feature minimises the need to place them on parts themselves. The cockpit floor is very unusual in this case because it has the pilot seat base and lower fuel tank integrally moulded. A separate seat back has some nicely moulded wicker effect. Other cockpit parts included here are engine back plate, magazines, carburettor air induction pipe, Vickers machine guns with Hyland cocking levers (water cooling jacket being separate to the main breech), empty ammo chutes etc. On this sprue, you will notice a central lower fuse bomb rack and accompanying 20lb bombs, the latter being comprised of two parts each, wheels with separate external hubs, various engine cowls, undercarriage V forks (two types, early and late) and spreader bar, upper fuselage gun cowls, and wing struts etc. As this is a common sprue, it’s important that you check this against the parts map as there are a good number of parts that must not be used with this release. Among those are three of the four engine cowls, two machine gun breeches, one of the two undershields, and one set of wheels/hubs. Two spinner options are supplied in this release. Sprue B A nice feature here is the full span lower wing with its excellent rib tape rendition and subtle leading edge rib-lets that you can just about see in the correct light. The fabric and rib representation has been very nicely captured. Strut mounting positions are moulded as key slots so as to make their attachment much less ambiguous. Ailerons are separate. Control cable openings with the moulded pulleys are included. These will be fitted over with a clear cover which you may be best giving a light misting of clear yellow or orange to simulate how these ended up in exposure to UV light. Instructions do say that these were generally overpainted in the wing colour. Two upper centre wing sections are included, with the same level of detail, but only one will be used in this release. Note the tabs onto which the outer panels will slot. There are actually THREE fuselage halves in this release, with the extra being an alternative starboard option that has different lacing. External detail is extremely refined with that neat stitching pattern, wooden panels at the cockpit area, with nail lines, and the forward access panels moulded in situ complete with fastener detail. Of course, the upper MG deck is separate, as is the cockpit coaming. Internally, the cockpit has rib and stringer detail. The rest of this will come from the cockpit tub. As for the coaming, there are a number of elements of surgery you may need to employ here, depending on the scheme you choose. This could range from the removal of the rim of the fuel filler port, to cutting back the coaming almost totally at the front end. Illustration is clear as to what needs doing and for what scheme. Lastly, an instrument panel is included here. Decals are supplied for the instruments, and you will also need to remove a small amount of plastic to accommodate the interrupter gear that was used on this version. Sprue C This clear sprue contains the various permutations of windscreen, and the numerous pulley access ports for the wings. Being a common sprue, there are several other parts which should not be used. Clarity is excellent. Sprue D Despite the Camel’s wings being very thin, Wingnut Wings has used slide moulding technology to incorporate a slot into the single part upper wing panels, into which the centre section tabs will locate. This is very impressive. Those wings exhibit the same finesse of detail as the lower wing, and this continues to the other flying and control surfaces that are moulded here, such as the fin/rudder, ailerons and tail-plane. The tail-plane and fin/rudder are moulded as single pieces. I think these can be scored so as to droop the elevators and angle the rudder, but be careful if you choose to do that. Two propeller options are supplied. Other sprue parts include the compass/inclinometer, rudder bar, control column, control horns, Rotherham petrol pump, Aldis sight, etc. Sprue E In any sprue indicates a reason to use a razor saw to remove parts, it is this one. E is of course for ‘engine’ and here we have the Clerget, comprising of 17 parts. Yes, the spec says ‘18’ but one of these isn’t for use on this particular release. The detail here really is excellent, with fine cooling fins on the cylinders, and some very fine detail on the cylinder head rocker arms. More filigree detail can be seen on the induction pipe hub, and of course, those frighteningly fragile-looking pushrods need to be handled with care. Note that there are two options for the pushrods. Photo Etch There are 10 parts on the PE fret. Two of these are for the lap-belts, and the others for the machine gun jacket ends and reticules, Rotherham petrol pump brackets and two as of yet unidentified parts (No.4). Production quality is excellent, with nice definition and small tags to remove these from the fret. Decals There are SIX marking schemes included in this release, with some nicely diverse markings, all typically on PC10 or PC12 backgrounds. The sheet itself is split into sections so as to making identifying your specific decals far easier. Stencil data and instruments are also included. It comes as no surprise to find out that the sheet is printed by Cartograf, and the glossy finish sheet contains beautifully thin decals with solid and authentic colour, and minimal carrier film which is always good to see. The schemes included are: Sopwith F.1 Camel B3834 “Wonga Bonga”, RH Daly (7 victories) & AF Brandon (1 victory), Manston War Flight RNAS, July-August 1917. Sopwith F.1 Camel B3889 “B 1”, CF Collett (11 victories), B Flight 70 Sqn RFC, August 1917. Sopwith F.1 Camel B3893, AR Brown (10 victories), 9(N) Sqn RNAS, September-October 1917. Sopwith F.1 Camel B6289, HL Nelson (1 victory), WM Alexander (23 victories), A Flight 10(N) Sqn RNAS, January 1918. Sopwith F.1 Camel B6313, WG Barker (50 victories), 139 Sqn RAF, late July 1918. Sopwith F.1 Camel B7406, HG Watson (14 victories), C Flight 4 Sqn AFC, March 1918. Instruction Manual These are always something very special in their production, and this glossy, 24-page production is no different. Starting with a concise history of the Camel, and then a detailed parts map and colour reference chart, the model itself is broken down into 10 constructional sequences. That doesn’t sound a lot, right? Well, that’s true, but each step contains several sequences, such as No.6. This, for example, illustrates everything from tail surface addition through guns and windscreen. There is certainly a good amount of building to be had with this kit, and the levels of detail could never possibly disappoint. Whilst the construction illustrations are in a drawn, grey style with blue to illustrate new parts additions (and red for modification), several colour illustrations annotate the manual, showing what assemblies should look like under a coat of paint. Of extra use are the numerous period images that are dotted throughout the manual, illustrating specific points of construction/detail. A full rigging chart is included, with two colours used to define the differences in cord type. A small rigging change is included for one scheme too, with this being made clear in the constructional sequences too. It is crucial with these kits that you decide exactly which machine that you will build from the outset, due to the numerous differences that can pertain to one or more scheme. The last pages contain the scheme illustrations, ably presented by the amazing Ronny Bar. Technical and historical notes are supplied with the schemes, as is a little period imagery. Conclusion Well, we all waited for it (and some still are!), but was it worth it? Without a doubt. This highly detailed kit captures the very essence of one of the most iconic aircraft of the Great War, and it’s fitting that we should see this now, in its centenary year. I remember as a kid that I was loaned a pilot’s logbook, leather flying helmet and angular flying goggles from a lady whose father flew the Camel, and that sort of transfixed me with this specific type. Here I am now, 35yrs later, and I have the ultimate in injection moulded kits of this very pretty aircraft. Intelligent design seems to be the key to WNW kits, and this model should be buildable by most people with a modicum of building experience. Rigging is a different matter of course! What else can I say? Perfect subject, superbly engineered and moulded, and with some very attractive schemes. This is the Camel to build. Very highly recommended Our thanks to Wingnut Wings for this review sample. To buy directly, click THIS link.


-
Profimodeller Fi103 V1
JayDee replied to JeroenPeters's topic in LSM 1/35 and Larger Work In Progress
That ridge is off centre? -
Underwhelmed.
-
Profimodeller Fi103 V1
JayDee replied to JeroenPeters's topic in LSM 1/35 and Larger Work In Progress
Phallic -
Dammit, I need to spend more money!
-
Can you show me how you'll go with the cockpit and stuff? I want to use the Paragrafix console but interested in how the rest of this will work. How can this be used with fibre?
-
Sorry for the lack of updates on this. This model has taken over my workshop (quite literally) and my life (in between my Fw 189). At this stage I have both upper and lower hull plates complete and plated. Some slackening of the framing was needed to allow the hull plates to sit flush to each other. Once complete, the screws were secured with thread-lock to stop them coming loose inside this behemoth of a model. Here you see the frame assembly, ramp installation and the section that sits between the mandibles. I'll try to get a photo of the complete hull dishes real soon. I tell you, this model is seriously amazing. So pleased I decided to fork out the cash for it.
- 25 replies
-
- 2
-

-
- millennium
- falcon
- (and 1 more)
-
Dammit. I want one.
-
NASM's unrestored Ta-152H-0
JayDee replied to JeroenPeters's topic in LSM 1/32 and Larger Aircraft Ready for Inspection
Holy damn.....he nailed it You should send some photos to ZM. Taking your time paid off, even though I took the pi$$ -
Ta-152H-0 awaiting restoration at the NASM
JayDee replied to JeroenPeters's topic in LSM 1/35 and Larger Work In Progress
Damn that's so nice, and that canopy weathering makes all the rest of it come together and make sense. -
Hasegawa P-40E bringing back that mojo!
JayDee replied to Wingco57's topic in LSM 1/35 and Larger Work In Progress
You are a machine! Really like this one, and such a nice kit too. -
Been a hard day for my postie. Millennium Falcon stuff including pulsating animated Hyperdrive lights (Neopixel), Paragrafix PE, underside lights and gear bay doors. Bandai AT-ST Fisher Models Meteor T.7 conversion for HK Models kit Tirydium lighting set for Moebius 1/32 Cylon Raider (Original series)
-
WOW!!
-
Ta-152H-0 awaiting restoration at the NASM
JayDee replied to JeroenPeters's topic in LSM 1/35 and Larger Work In Progress
Beautiful! More fading yet though? -
Definitely rivet. It adds some visual interest to a quite bland surface. Should look real good!
-
Airfix 1:24 Hawker Typhoon Mk.Ib car-door
JayDee replied to JayDee's topic in LSM 1/32 and Larger Aircraft Ready for Inspection
The endless hours, days scraping the seams on the cockpit parts due to tooling misalignment, and the cowls. Fitting those is enough to make a saint swear. Two of these, and the second was no easier. Still, it's a kit I love, and I'd easily build another. If this was tooled by another factory instead of those clowns in India, this kit would be perfect. -
Ta-152H-0 awaiting restoration at the NASM
JayDee replied to JeroenPeters's topic in LSM 1/35 and Larger Work In Progress
Dammit -
Ta-152H-0 awaiting restoration at the NASM
JayDee replied to JeroenPeters's topic in LSM 1/35 and Larger Work In Progress
I love that tail. Looks perfect! How will you cloud/age the canopy?