JayDee
-
Posts
3,272 -
Joined
-
Last visited
Content Type
Profiles
Forums
Events
Gallery
Everything posted by JayDee
-
That looks gorgeous in white primer. Construction looks excellent all round. I know this has been a trial, but you did that kit proud
-
Great review, and nice to see the differences between versions instead of the usual run of the mill article. I never expected to see such cool schemes either. Great job!
- 7 replies
-
- 1
-

-
- Windnut Wings
- Ninak
- (and 1 more)
-

Ju-88C-2 "4D+FH" in pieces
JayDee replied to JeroenPeters's topic in LSM 1/35 and Larger Work In Progress
Damn sexy Wooden crate looks real. This is the best Wessex I've seen. -
Coming! Schatton "Würzburg-Riese" Radar
JayDee replied to JeroenPeters's topic in Modelling Discussion
Hihihihihihihi -
I'd say so. I knew about this project over 2yrs ago.
-
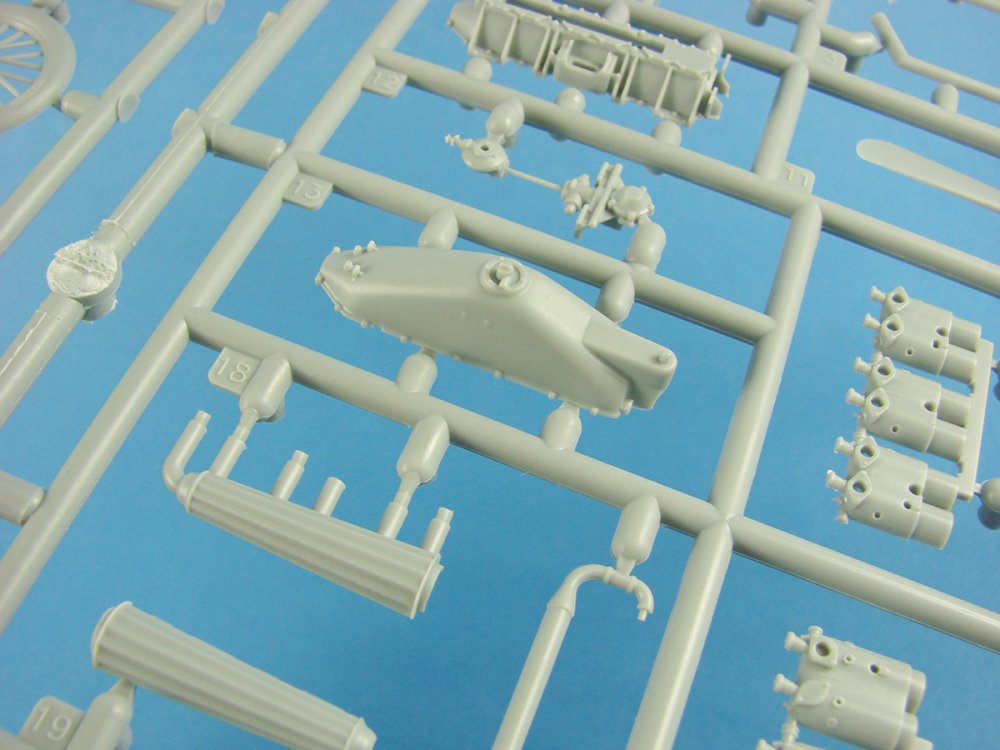
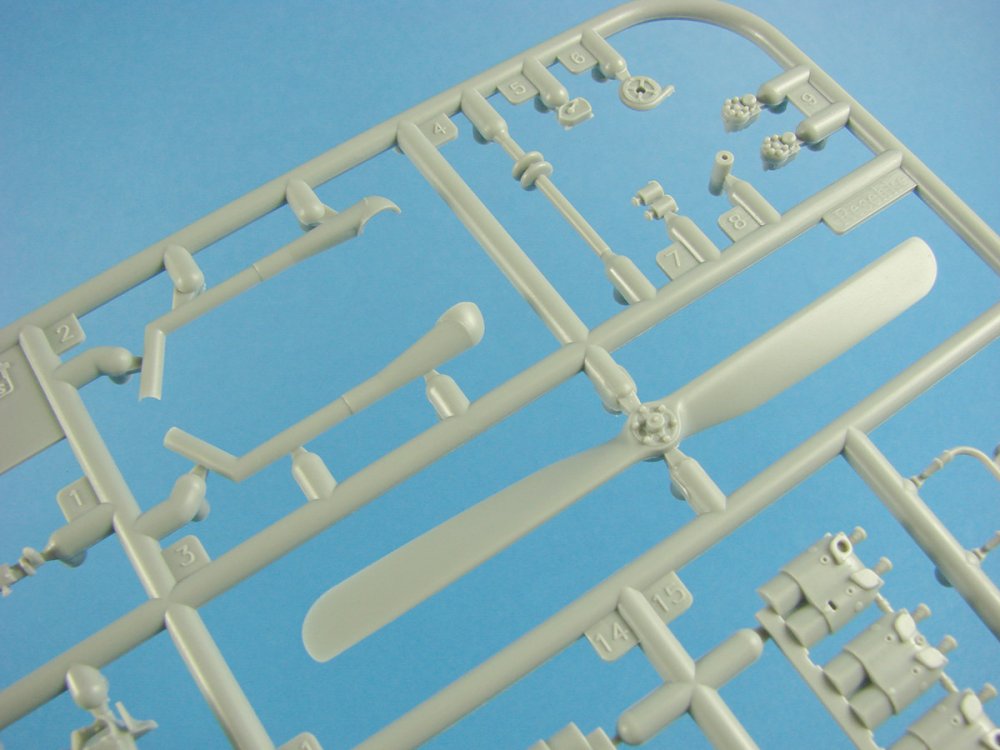
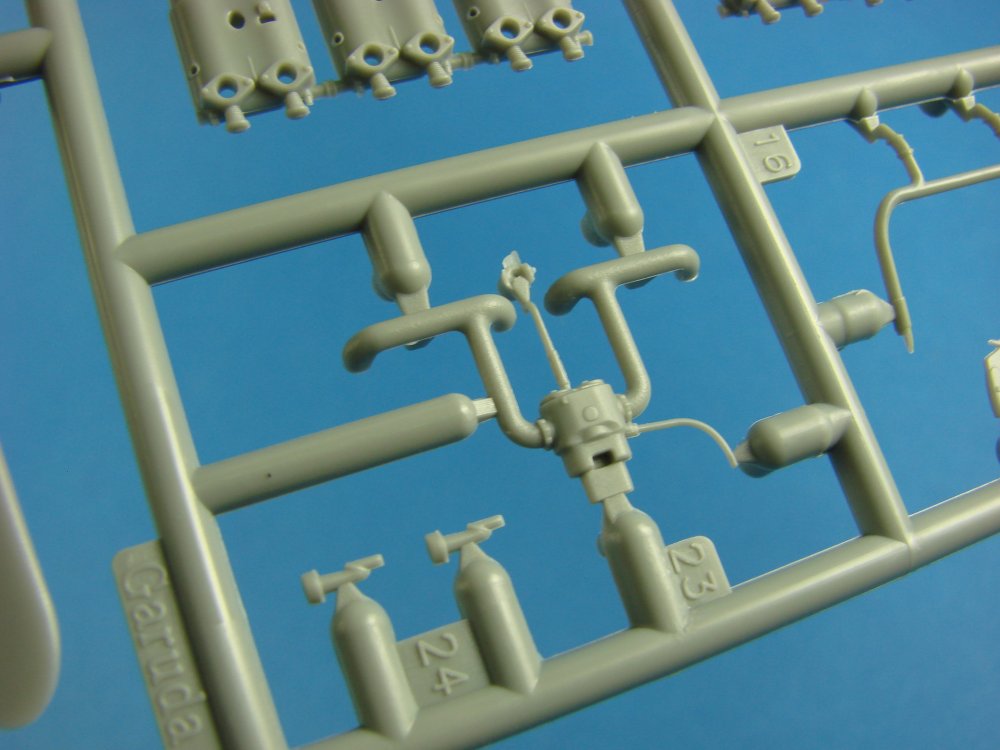
1:48 F6F-5 Hellcat Jasmine Model Catalogue # 202006 Available from Jasmine Model for $169.00 With a more or less full PE model, one thing that will instantly hit you is how it can be packed into quite a small box, compared with an injection styrene model. Compare this with an Eduard kit release, and this will fit in there 3 to 4 times, with space left over. However, what you have here is a model that is infinitely more detailed, simply because of the skeletal nature of the kit. This really panders to the technical voyeur amongst us, with a morbid fascination for internal structures and guts of one of WW2’s most respected and lauded US fighters, and hero of the war in the Pacific. This quite slender little box is around the same size as the 1:72 Valkyrie that I reviewed on Scale Plastic & Rail (R.I.P.), back in May 2014, and contains THREE sheets of stainless steel photo etch that has 321 parts. That’s right…..321 parts! Not exactly a weekend project. The box art shows the Hellcat with wings in flying position, but as you can see here, these can also be folded, which looks extremely cool. Opening the lid, the first thing you see is the manual. Remove this and there are the three stainless PE frets that are covered each side in a protective, self-adhesive film. All of these are packed into a re-sealable cellophane sleeve. Remove these too, and there is a cardboard shelf that also needs to be lifted out. Underneath lies a section of black foam with two cut-outs. These hold four bags that contain the various cast parts. These are made from resin that has been cut with an excellent metallic pigment. For all intents, they look like metal, but the lack of weight tells you these are not made from that material. If you see elsewhere that these are white metal, then they have either never seen that material, or they are ill-informed. As with the Valkyrie, reviewing a PE kit is not an easy job. We can’t talk about specific, beautifully moulded detail and how things might just need some lead wire to complete. This model, apart from those resin parts, is entirely a flat-pack affair, and it will be your keen eye, judicious folding skills and patience that will create the final look of this model. Rushing it, or using sloppy skills, will be noticeable as you can’t rely on moulded detail to hide any slackness on behalf of the builder. Looking at those three metal frets, everything does look all rather two-dimensional, but that's quite deceptive. This model is very much a three-dimensional affair, and it'll come as no surprise that you'll need to do a fair bit of bending of metal, as with the previous Valkyrie and Ho 229 kits. These could generally be built with nothing more than a pair of tweezers to bend the various parts, but I highly recommend a quality photo-etch bending tool. I regularly use a Hold 'n Fold 5.5, as this creates a consistently sharp fold over the numerous long lengths of PE. The quality of the photo-etched parts is of the highest. The tiniest of tags hold each part in place, and these will be easy to sever, despite being made from stainless steel. I would also suggest you avail yourself of some small jeweller’s files to remove any remnant that could detract from the finished result. You can pick up a cheap set of files for around £3, so in relation to the kit cost, it’s a worthwhile purchase. All parts are clearly numbered, but there isn’t much in the way of rhyme nor reason as to their location, so I guarantee you will spend a lot of time actually searching them out before you can use them. Some parts are easy to locate due to both their size and shape, but many are far less so, and look unrecognisable in their unfolded state. All I can suggest is that you spend a little time studying the frets and acquainting yourself with the location of the parts, and their relationship to construction. Jasmine has tackled construction in a way that many of us would recognise. With this kit, it starts with the cockpit, and contains 18 stages of folding and slotting work. All parts within the cockpit are from flat PE, including the seat and seatbelts. Next up is the fuselage, and this is of course using the cockpit as its reference part for adding the various ribs, formers and stringers. As nothing here is quite as straightforward as simply moving to the next area of construction, you will add various other assemblies, such as the tail wheel bay and arrestor hook, and then proceed with the fuselage again, and even back to the cockpit in order to enclose it within fuselage formers etc. You will note that the tailplanes are built from flat sections and you will twist the ribs through 90 degrees to the vertical, thus creating a 3D item. The wings, however, are composed of individual ribs that slot into the various spars and other constructional elements. Care needs to be exercised on the wings, fin and tailplane, as the control surfaces are moveable and therefore may be posed however you wish them, providing their weight doesn’t droop them naturally. Surface detail on the metal is very good, with nice relief etching and rivet/fastener detail. Many parts are very fragile until they form a more solid overall part of the model construction, so please treat them with a little reverence and respect. It’s true that a number of parts can’t be made from flat pieces of photo-etch metal, and where that is the case, Jasmine has included those parts as a resin material with the metallic pigment I mentioned earlier. These are so amazing in appearance, as to have a high metallic sheen and look like some expensive cast metal. For this model, these parts include the engine and its various ancillary fittings, plus the propeller, forward cowl ring, machine guns, tanks, undercarriage struts, and of course, the wheels. There are around 50 parts spread over 4 bags, and all with some great detail. The engine itself will take a little while to assemble as it has separate cylinders and exhaust piping. A glossy 16 page manual is included, with both photographic assembly images and drawings to help you on your way. Coloured ink is added to show you specific details on the photographic steps, Whilst I find the images pretty good, I think some larger photos would have been useful for some areas. You will also find the manual on the Jasmine website, and if you print these, or merely display on your screen, you might see them as larger images that will help further. Conclusion Firstly, I think the thing you really have to say is that if you aren’t a fan of photo-etch, but like the appearance of this, you aren’t going to have an easy time. This encompasses most of the skills required for this particular discipline, including various folding techniques, slotting, manipulating complex frames and structures. Thankfully though, there is no need to solder anything here, and if you take things step by step, and methodically, then the model is actually simpler to build than its appearance might betray. That’s quite a statement for a model whose control surfaces are all working, but I hope to prove that before too long with a build of this. You might read of some other forums and websites/Facebook, that the cast parts are white metal. That, as I have already said, is wrong. They are resin that is mixed with metallic pigment, and are lighter and easier to work with. All you will need to accompany this miniature masterpiece is a bottle of thin/medium CA, a sharp scalpel, folding tool, and a small set of files to remove any tag remnants. This isn’t a cheap model, but that’s because of being a niche product with a long development time. It is, however, a stunning kit, and very worthy of consideration if you have a penchant for the engineering side of an aircraft. This particular model fulfils that particular interest perfectly. Go on, it’s new year, so treat yourself! Highly recommended My sincere thanks to Jasmine Models for this review sample. To purchase directly, click THIS link.
-
Nice work! I quite like the C version with shorter wings. Great looking model
-
I heard Revell were releasing a 1:32 Arado Ar 234 at some stage, but I first heard this about 2 years ago.
-
Definitely a day of great plastic here (and resin, turned brass and decals!) These came on a trade from Johan, LSM member. Plus some great stuff like a full set of Barracuda sets for the Spit, plus barrels. There are decals for the P-51D, and Aires cockpit and wheel well set for the Zeke! Bootiful!
-
Such a great kit. Coming along real nice. What scheme you going with? This is my bullshit Bavarian scheme:
-
1/32 Matchbox/Revell Westland P.12 Wendover
JayDee replied to Rob1970's topic in LSM 1/35 and Larger Work In Progress
Real bizzarre aircraft, and based on one of my favourites too -
What an amazing project. There's a Shack in the museum in the next town to me. Going to be a great build
-
Ju-88C-2 "4D+FH" in pieces
JayDee replied to JeroenPeters's topic in LSM 1/35 and Larger Work In Progress
Very classy. Some great touches with this, even though you copped out with the wings. The battle for modelling is not over! -
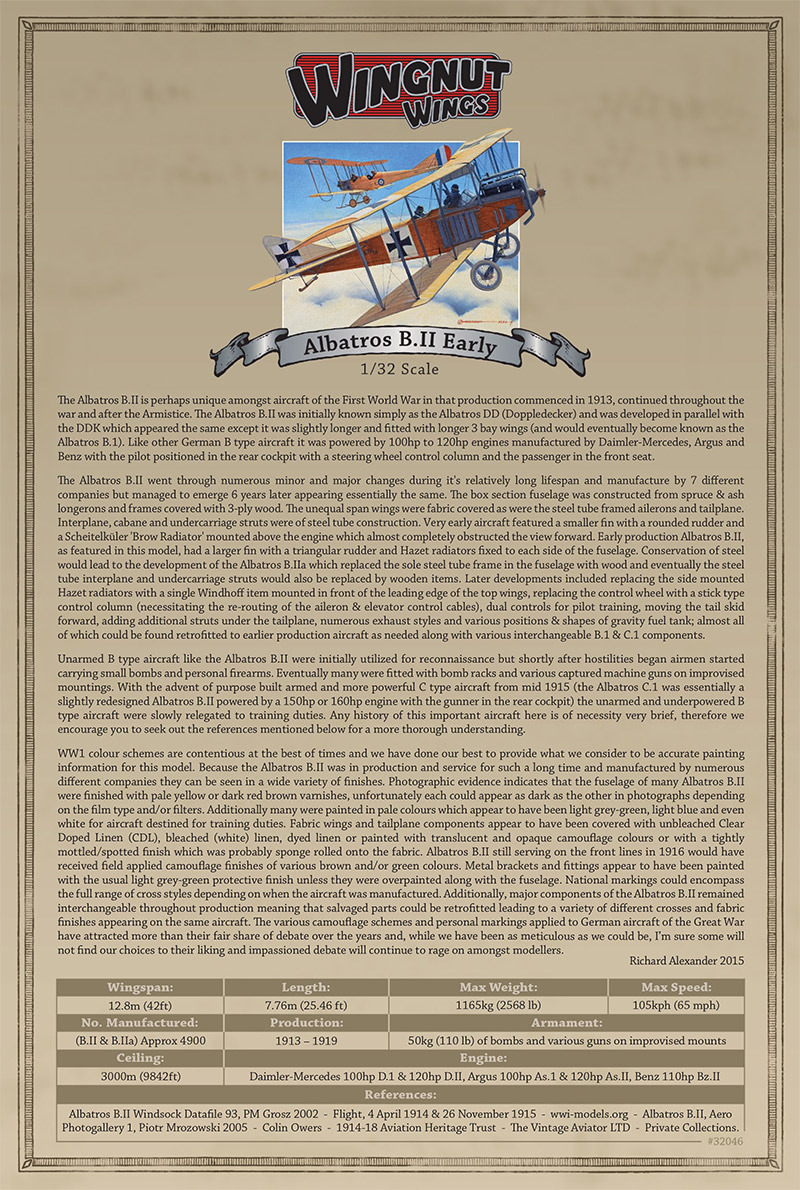
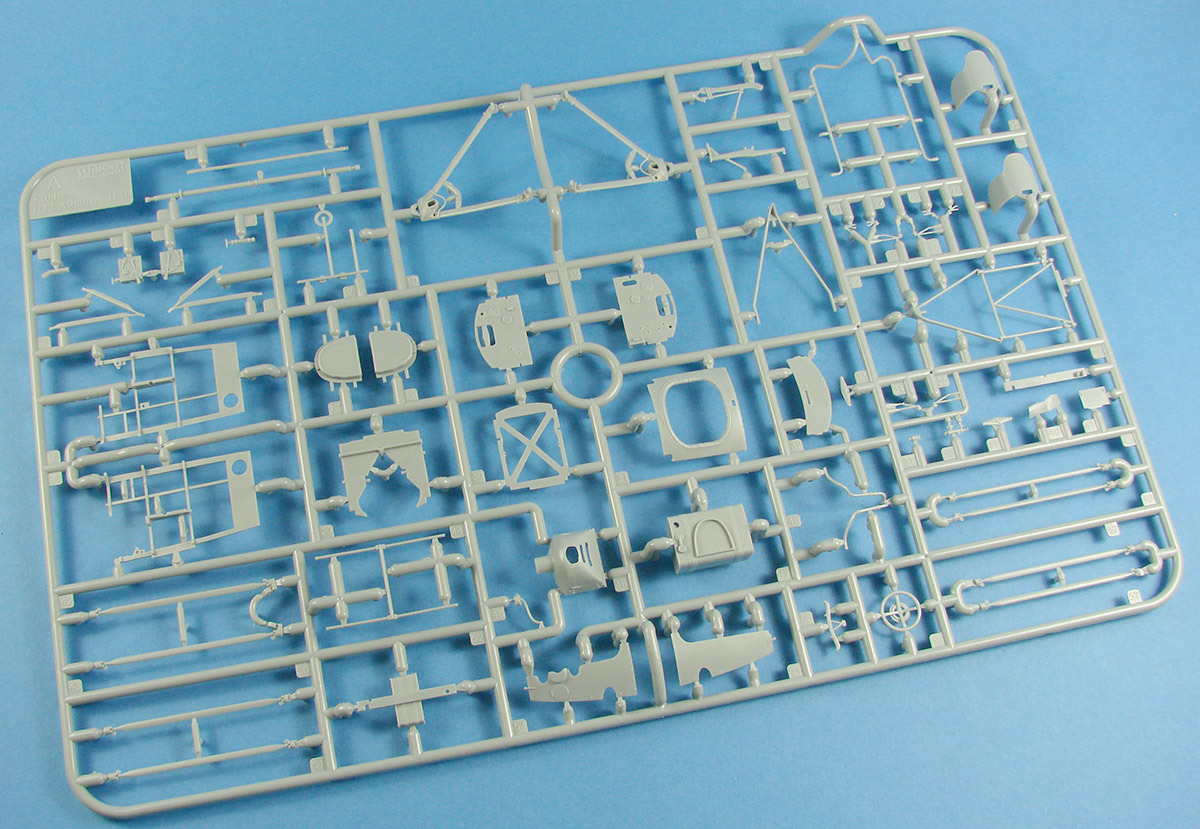
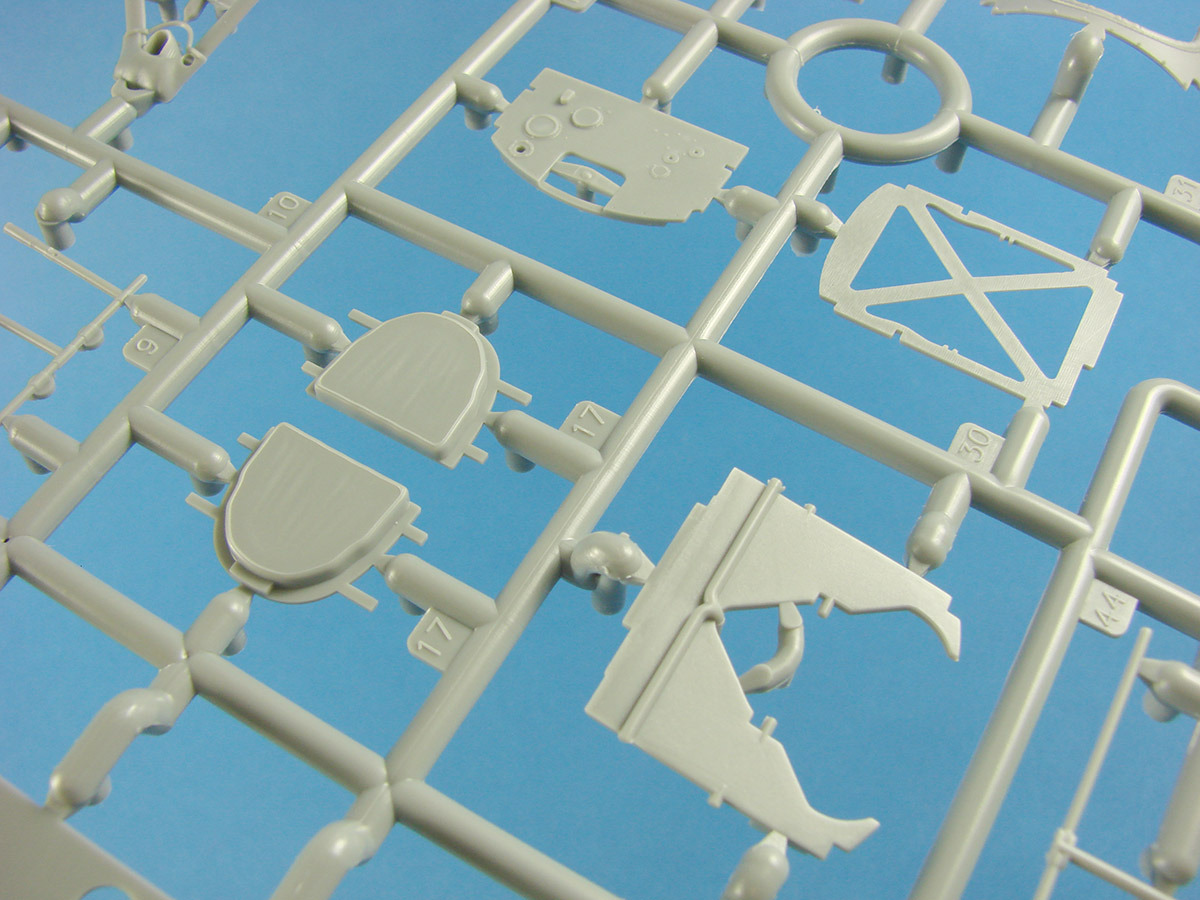
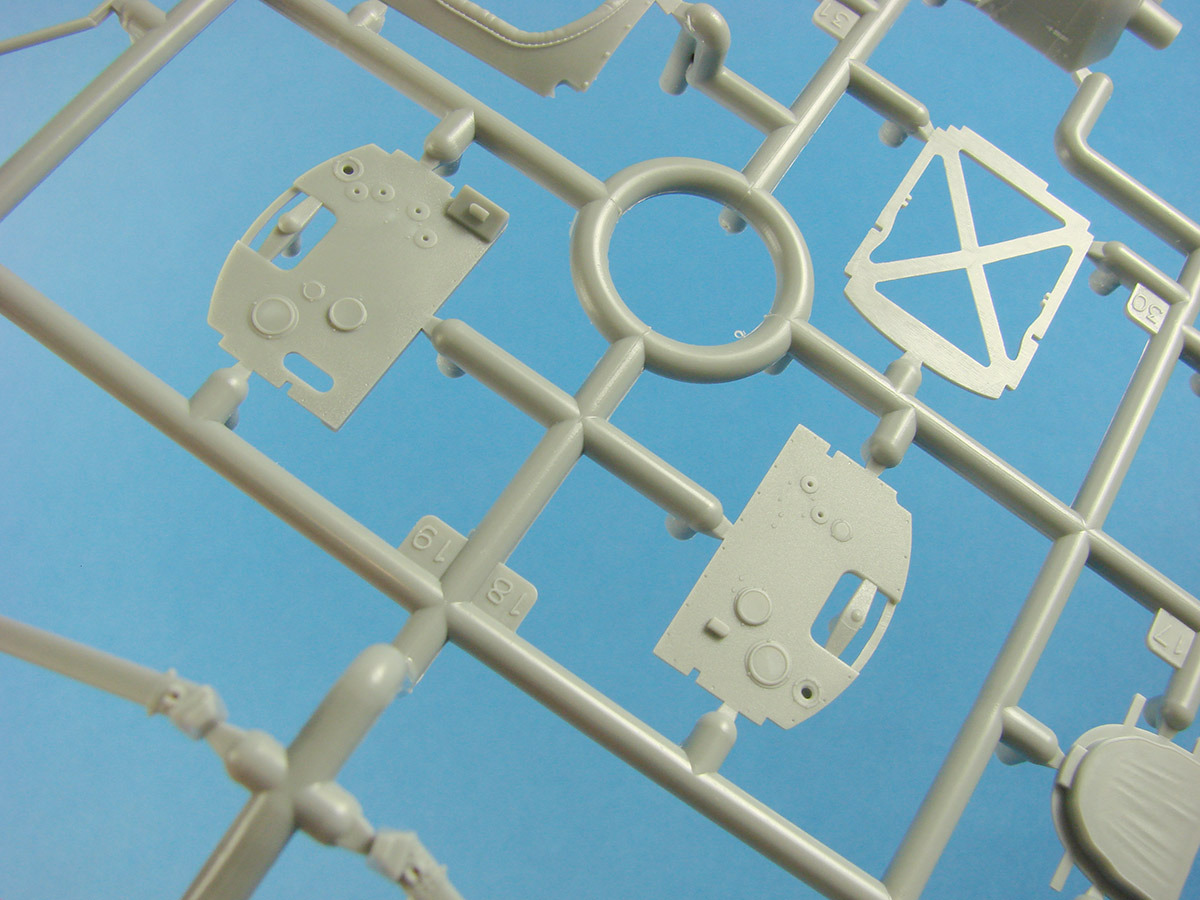
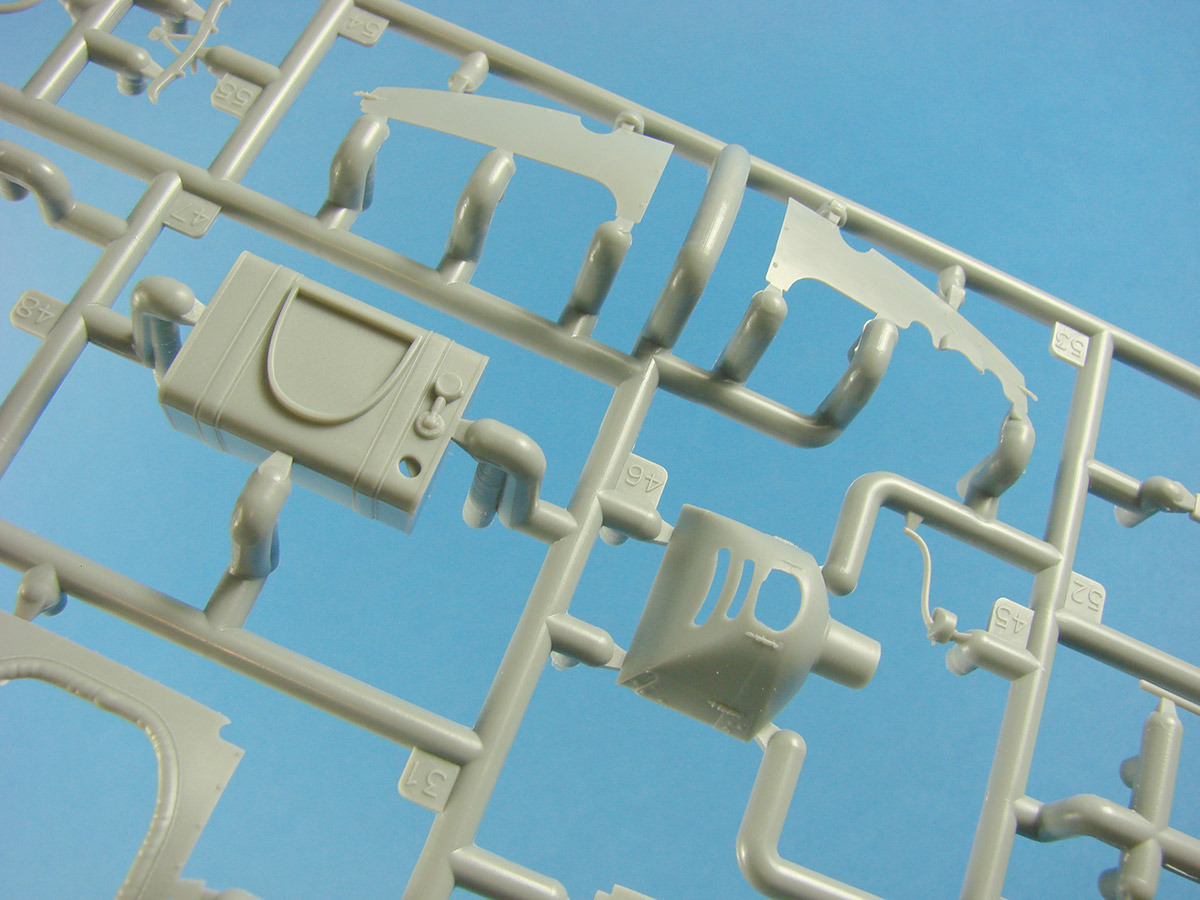
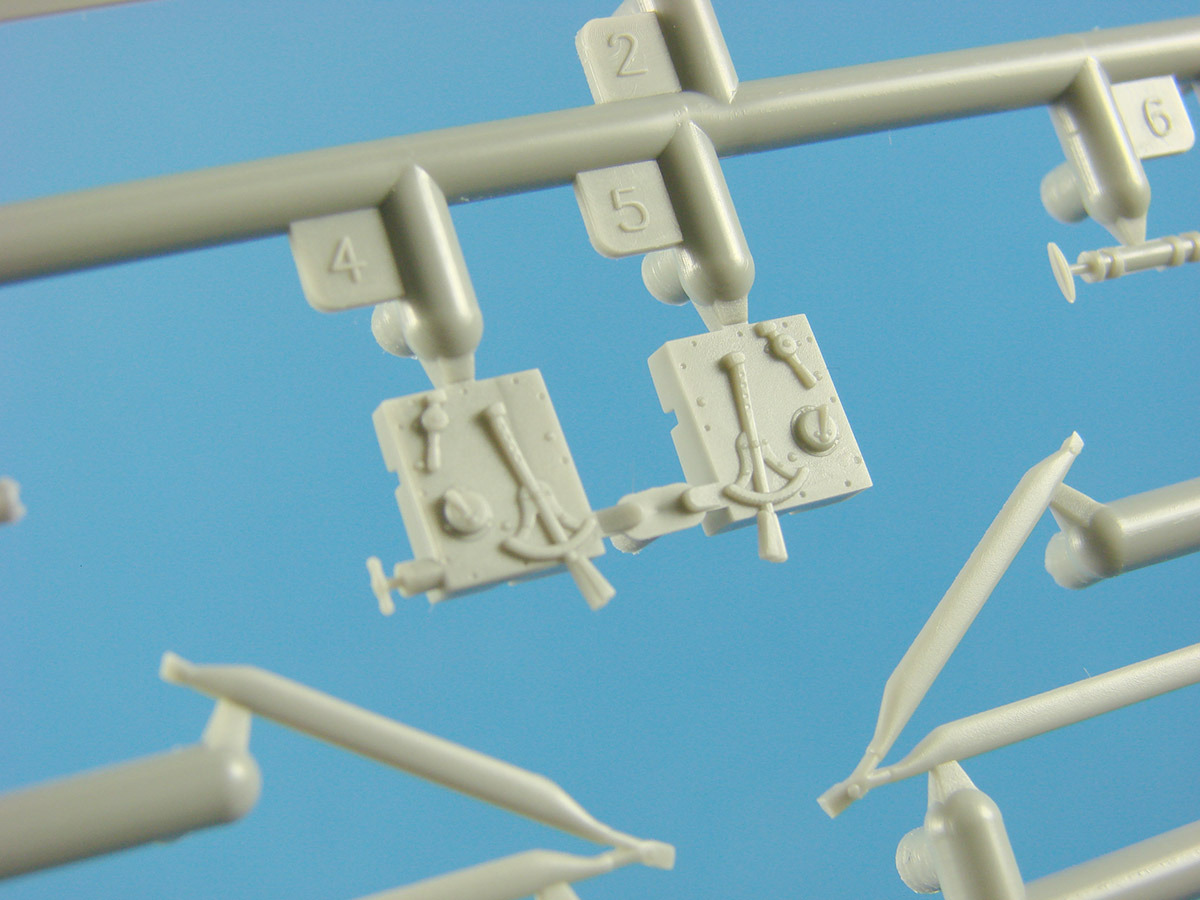
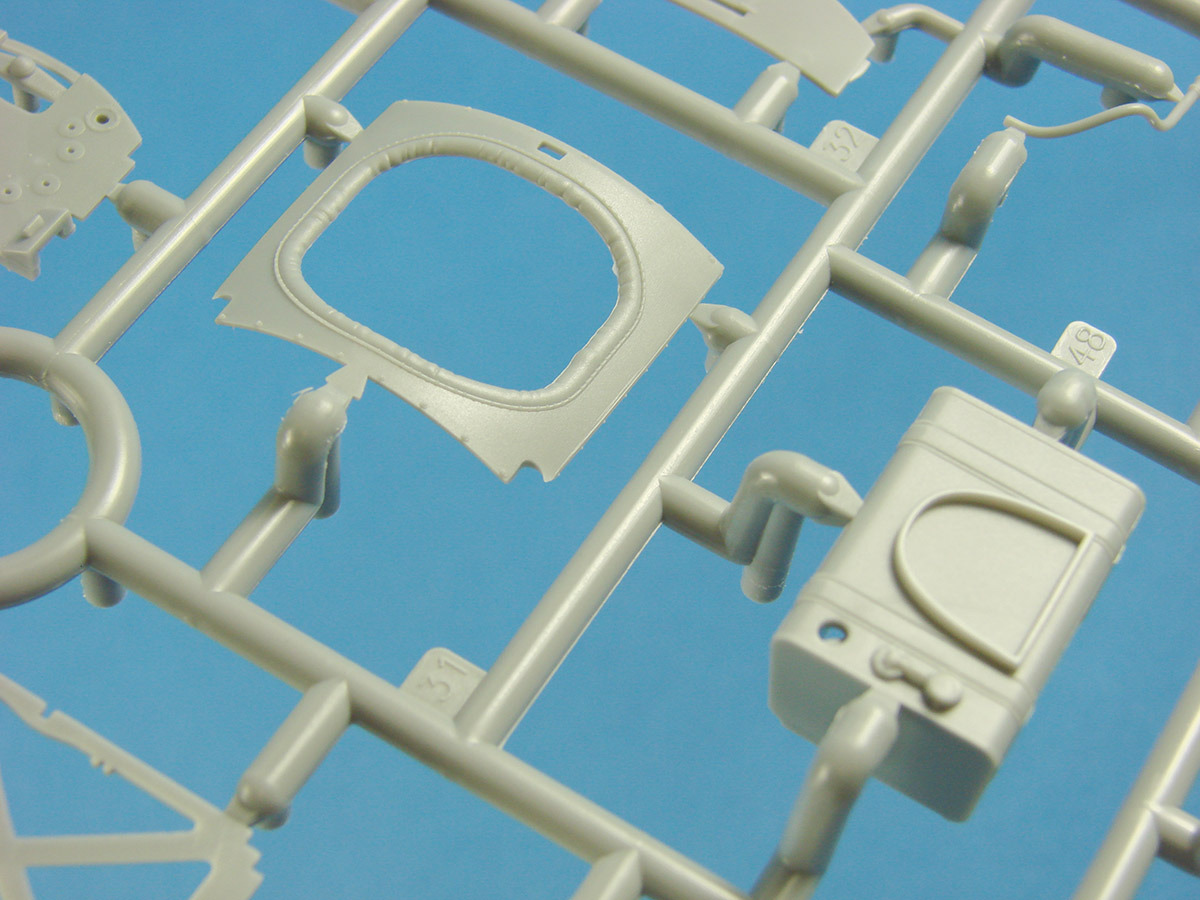
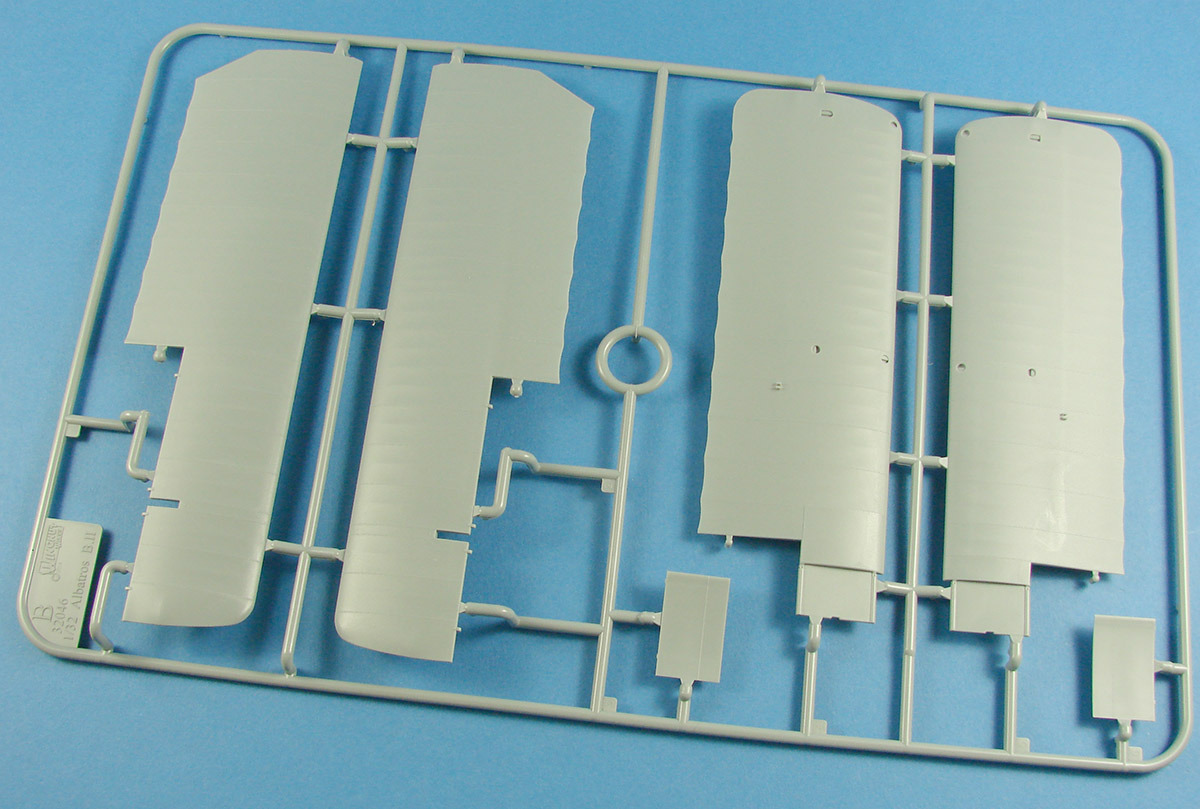
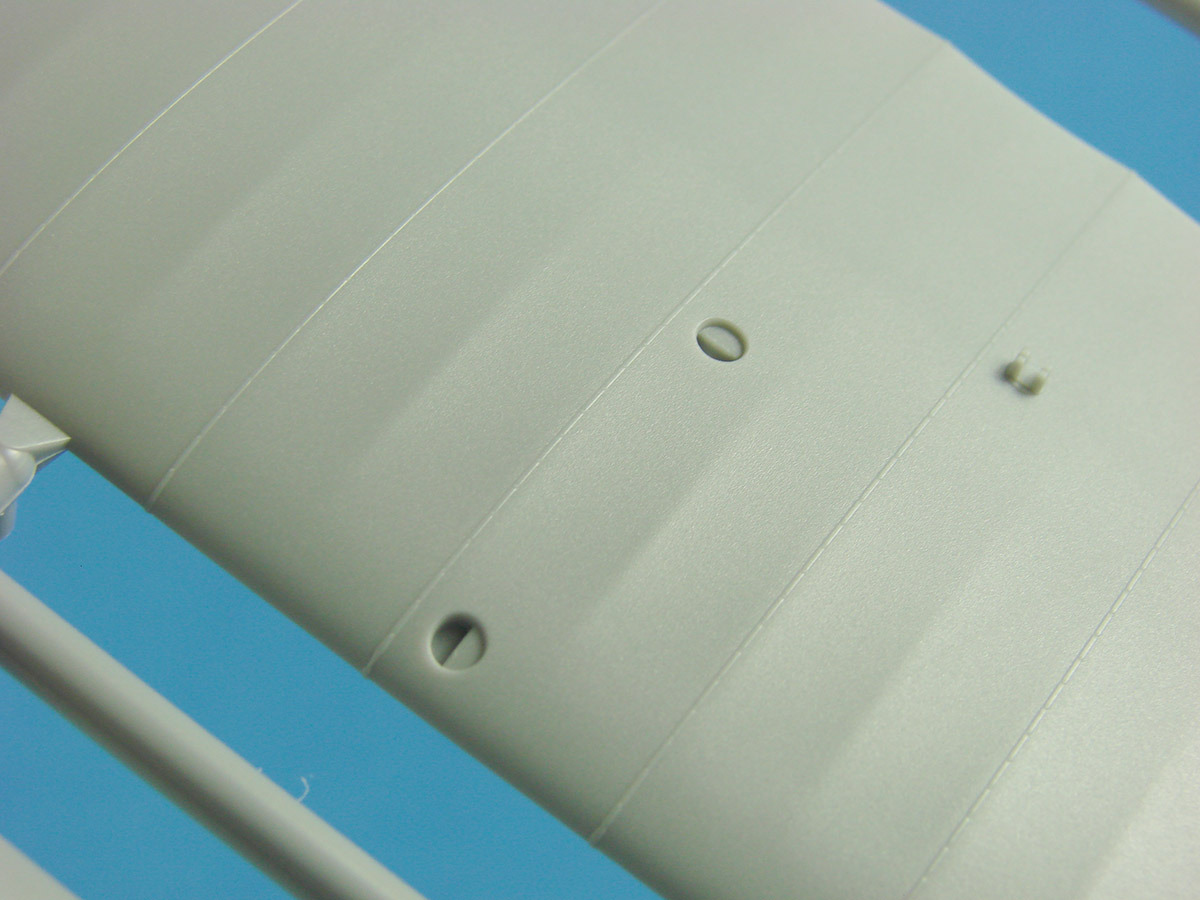
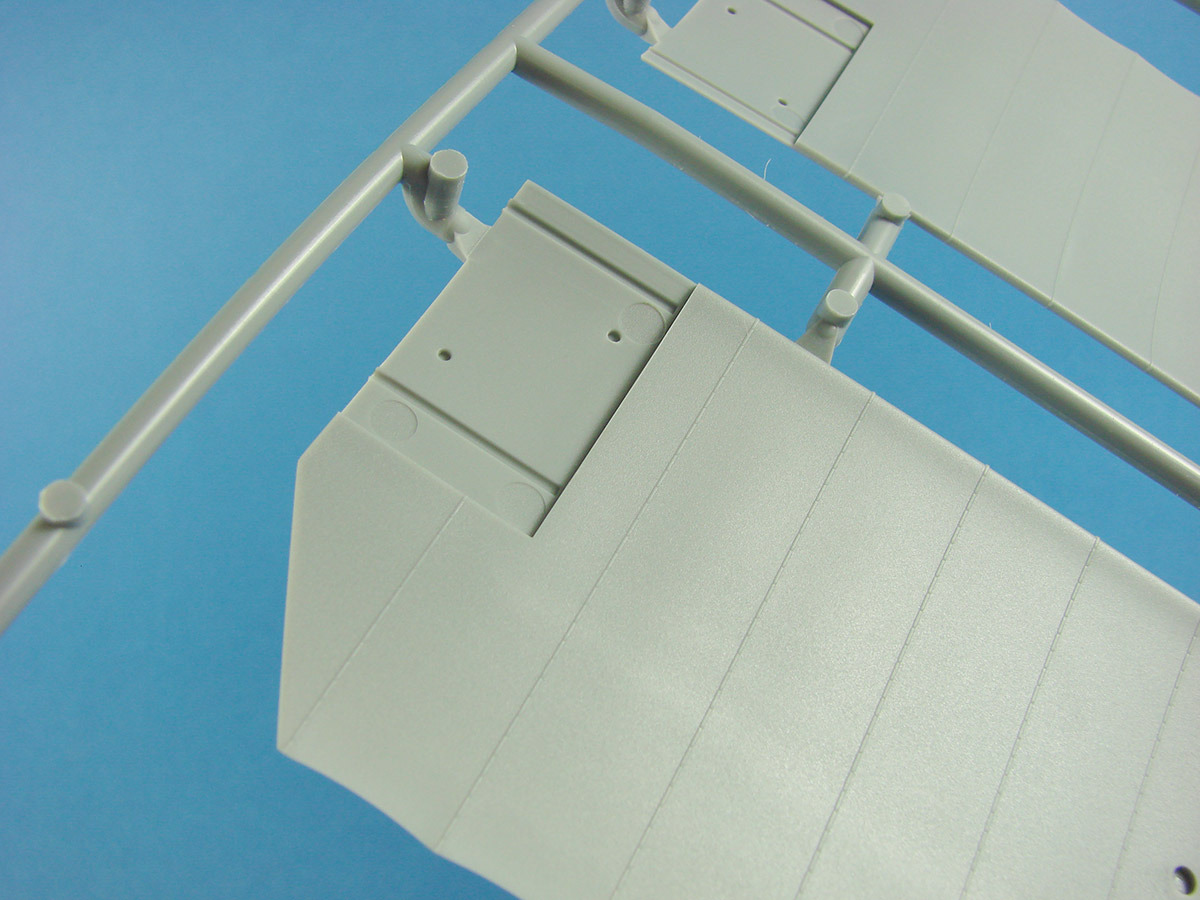
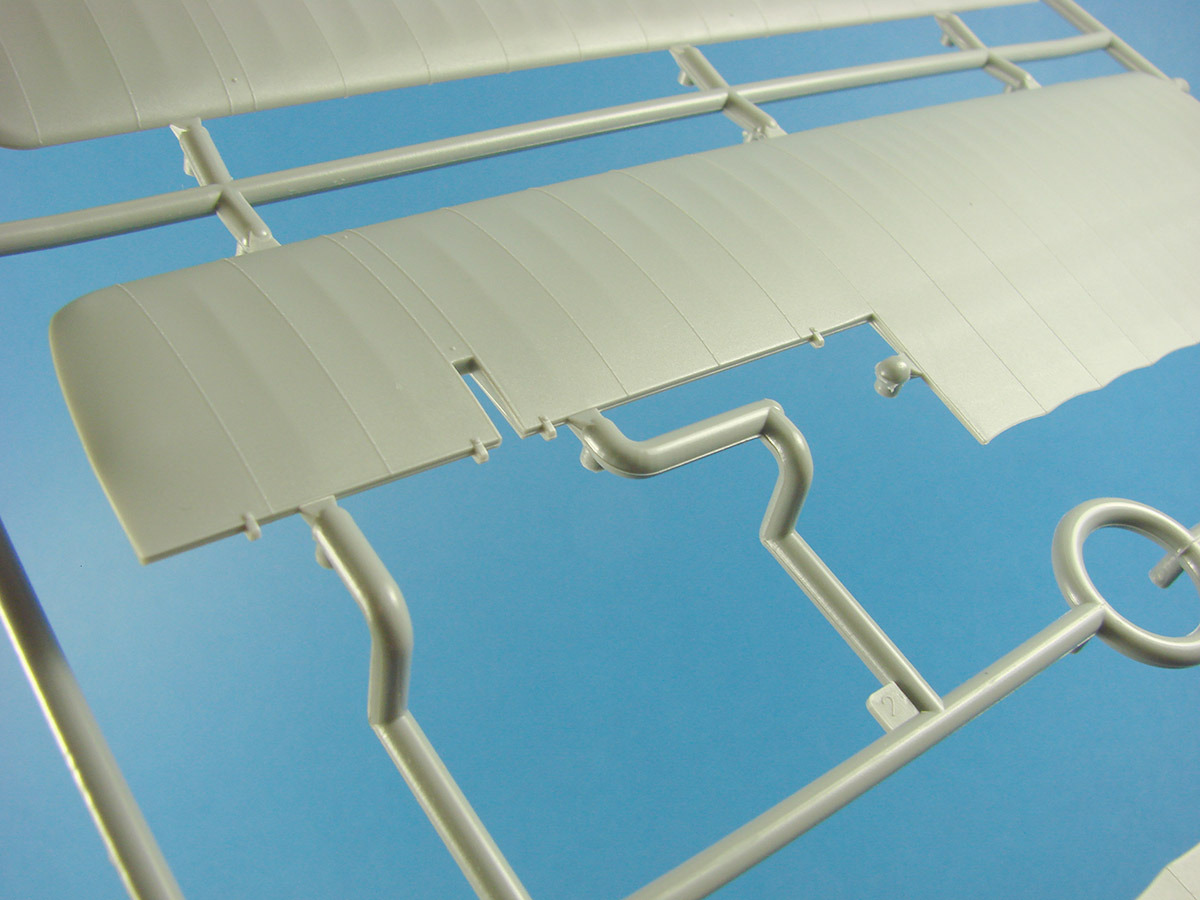
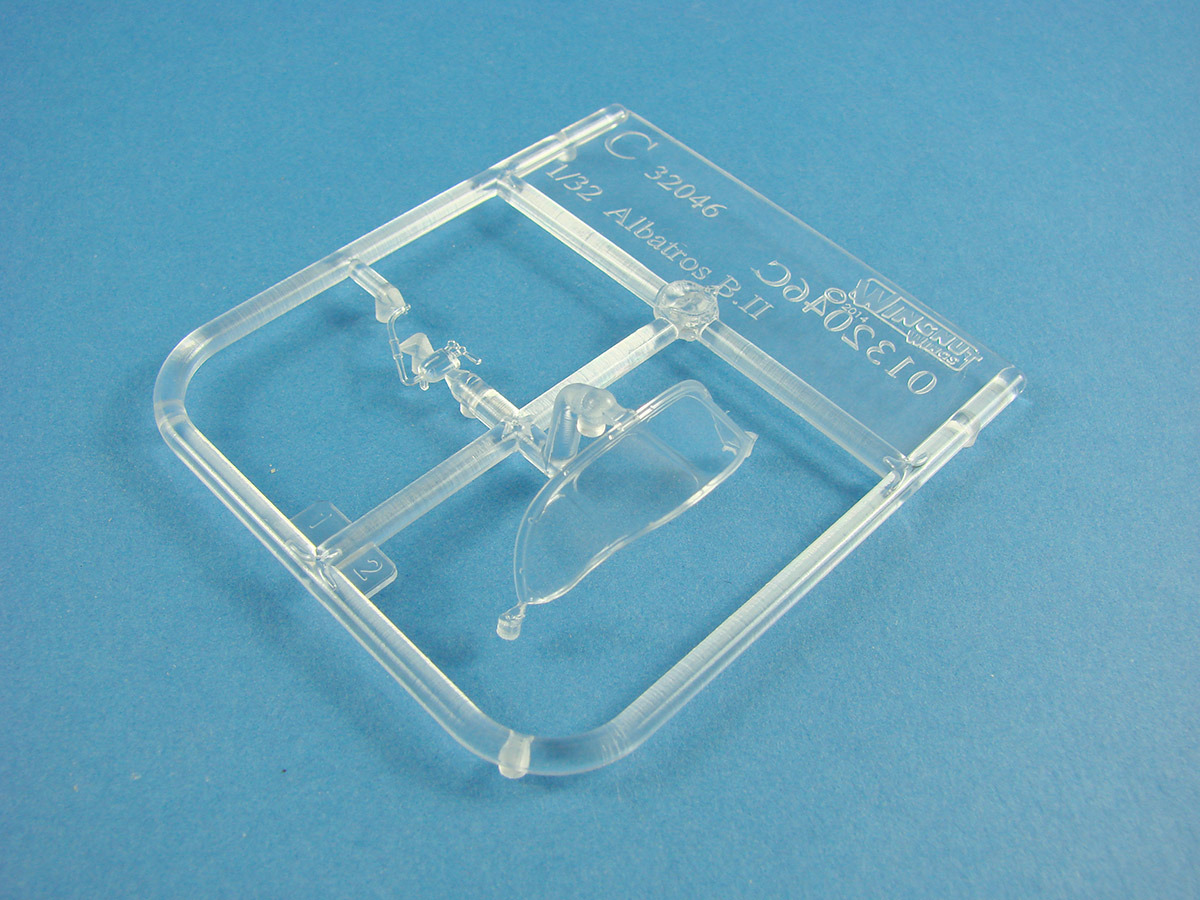
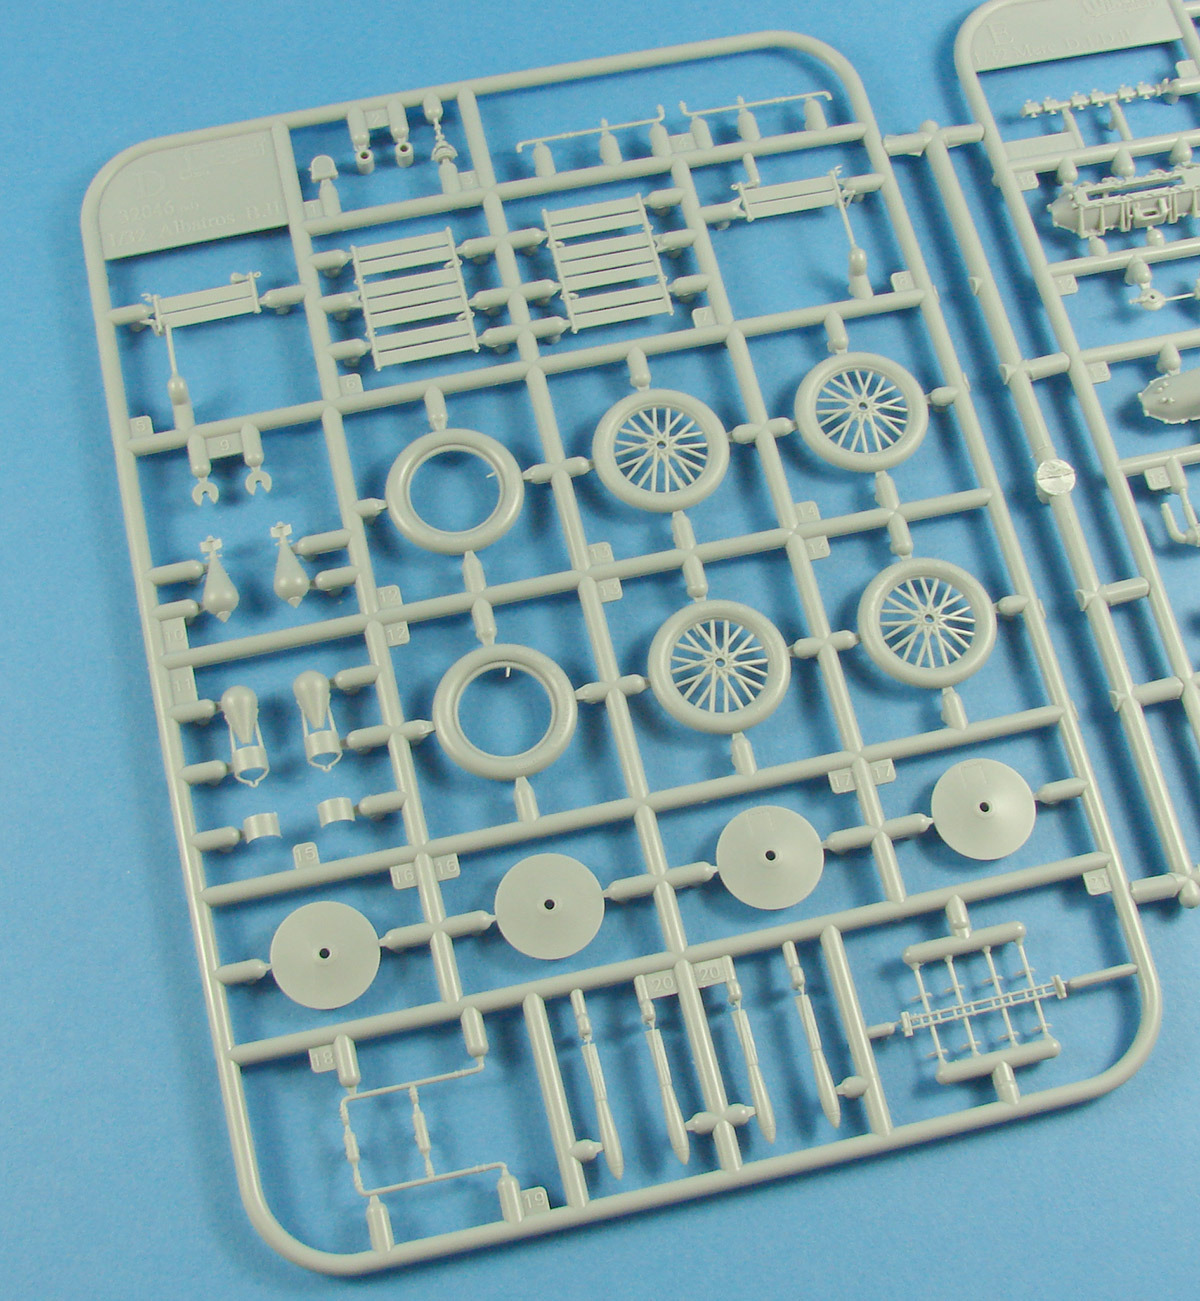
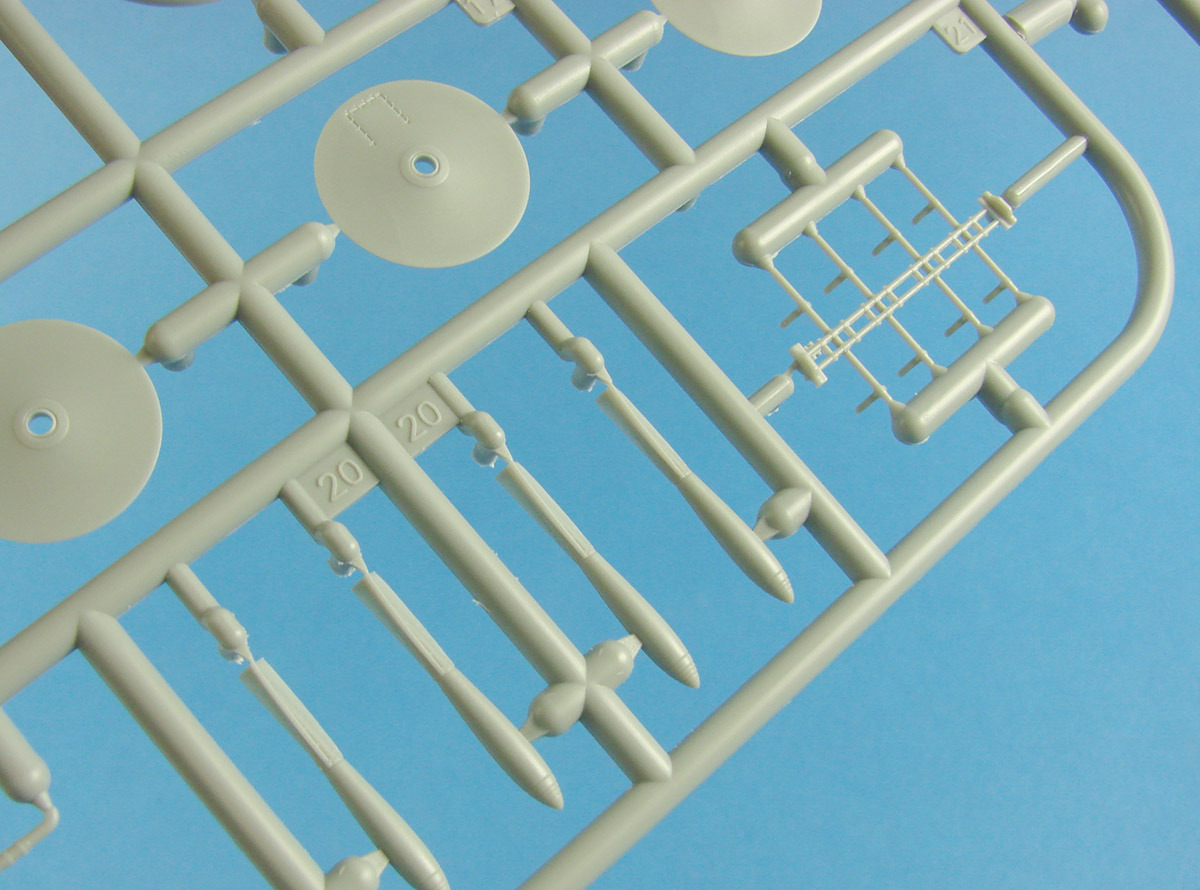
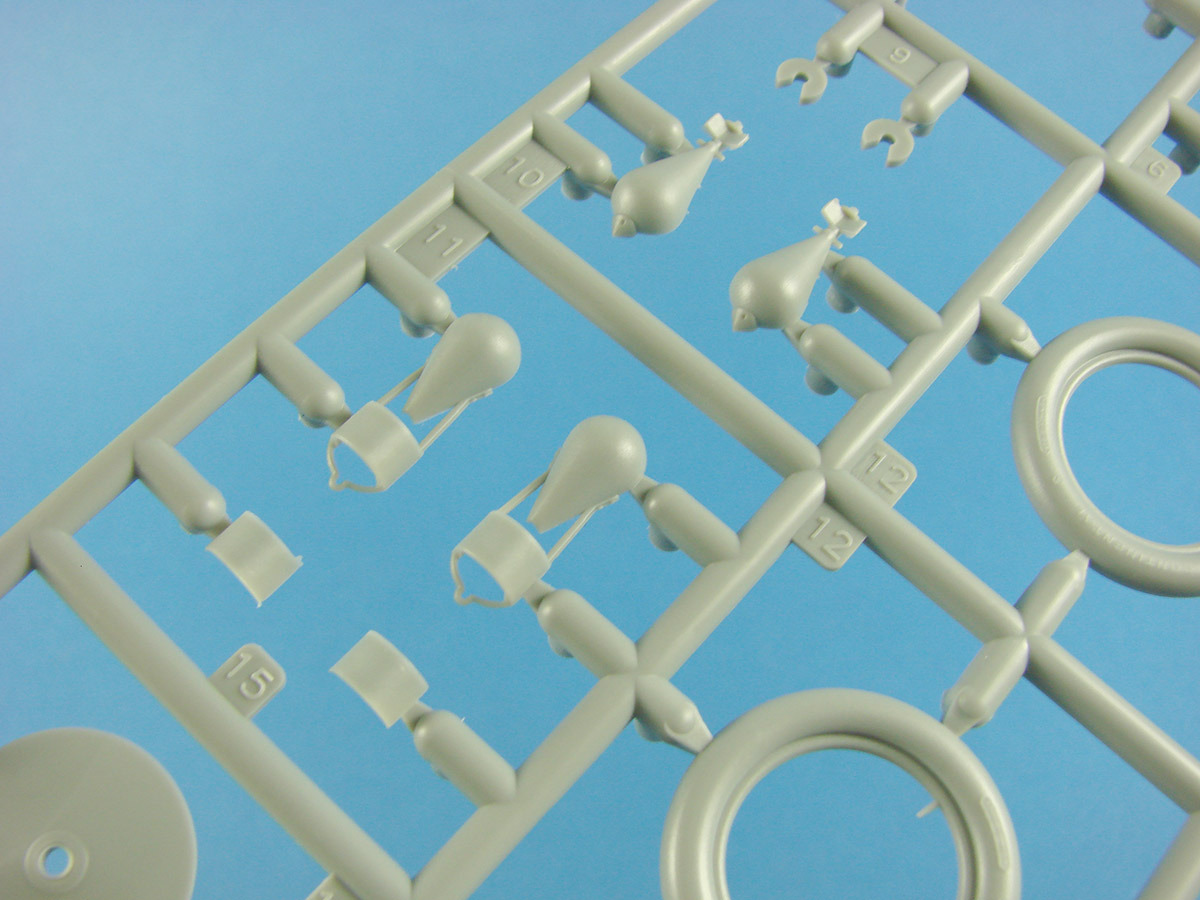
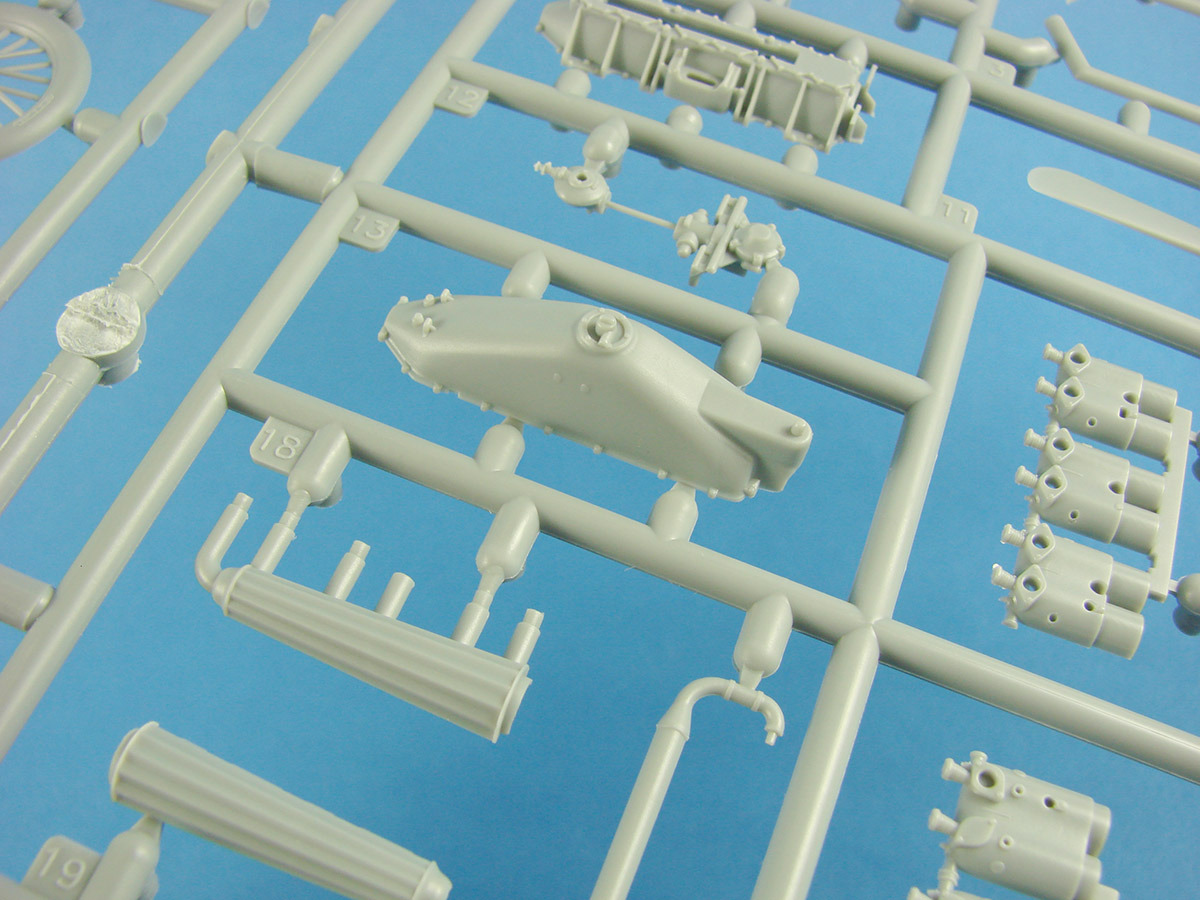
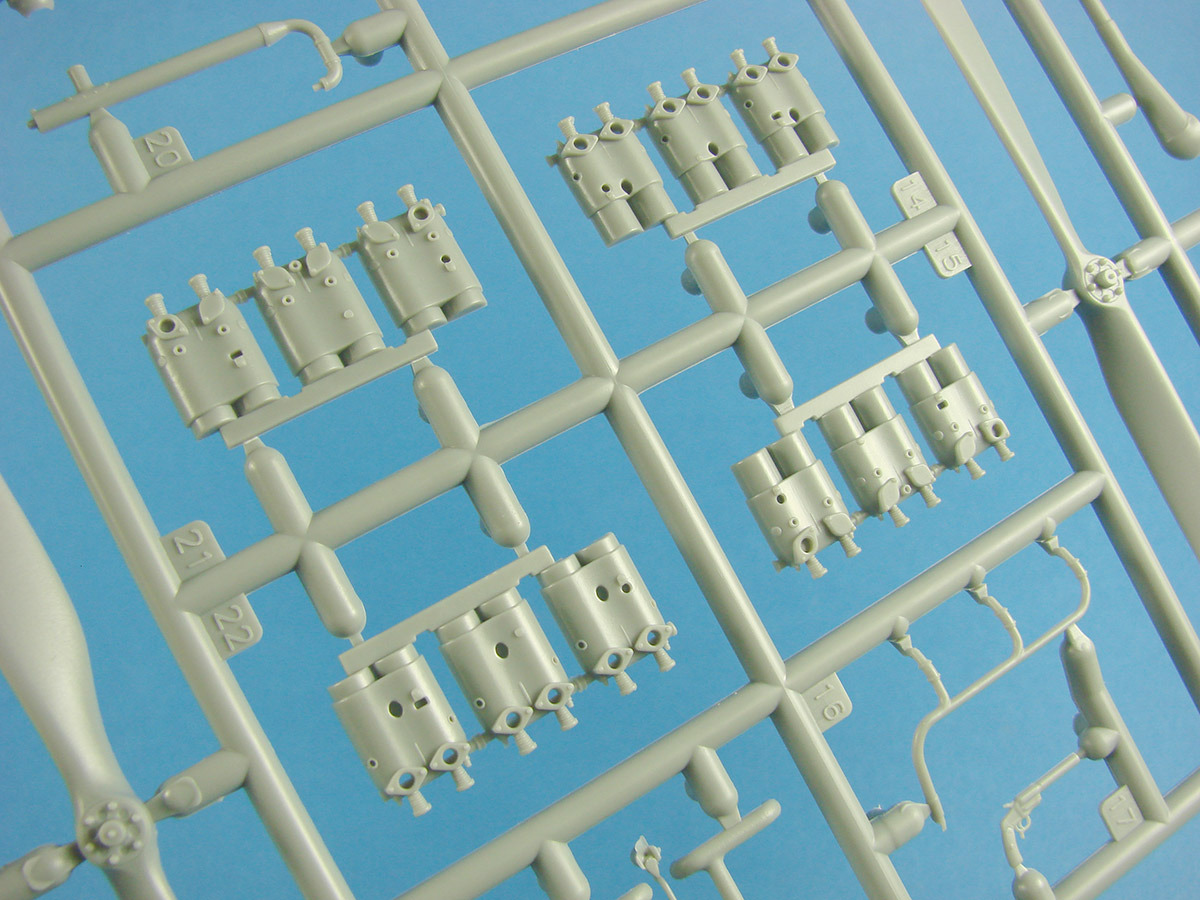
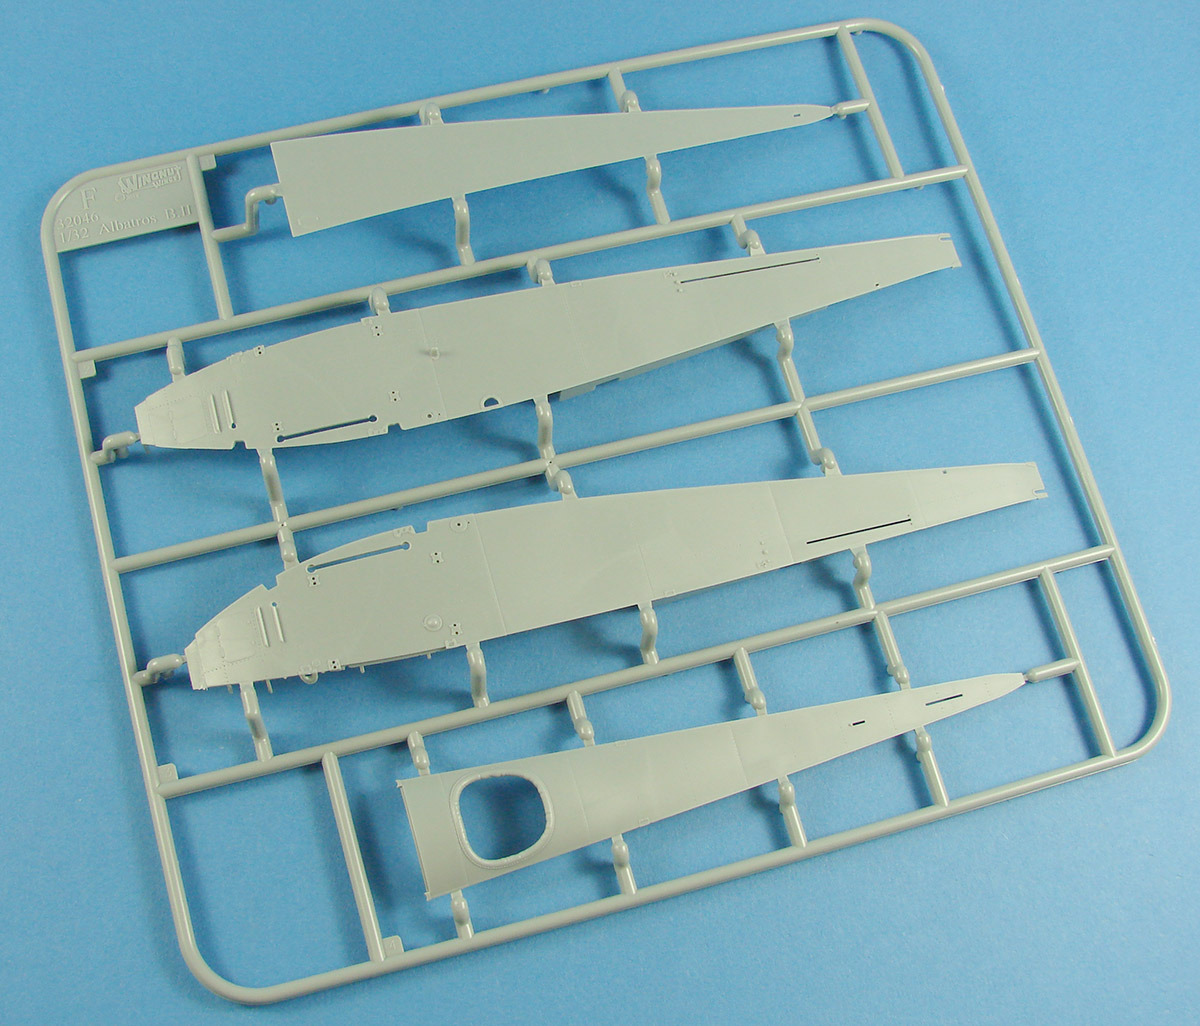
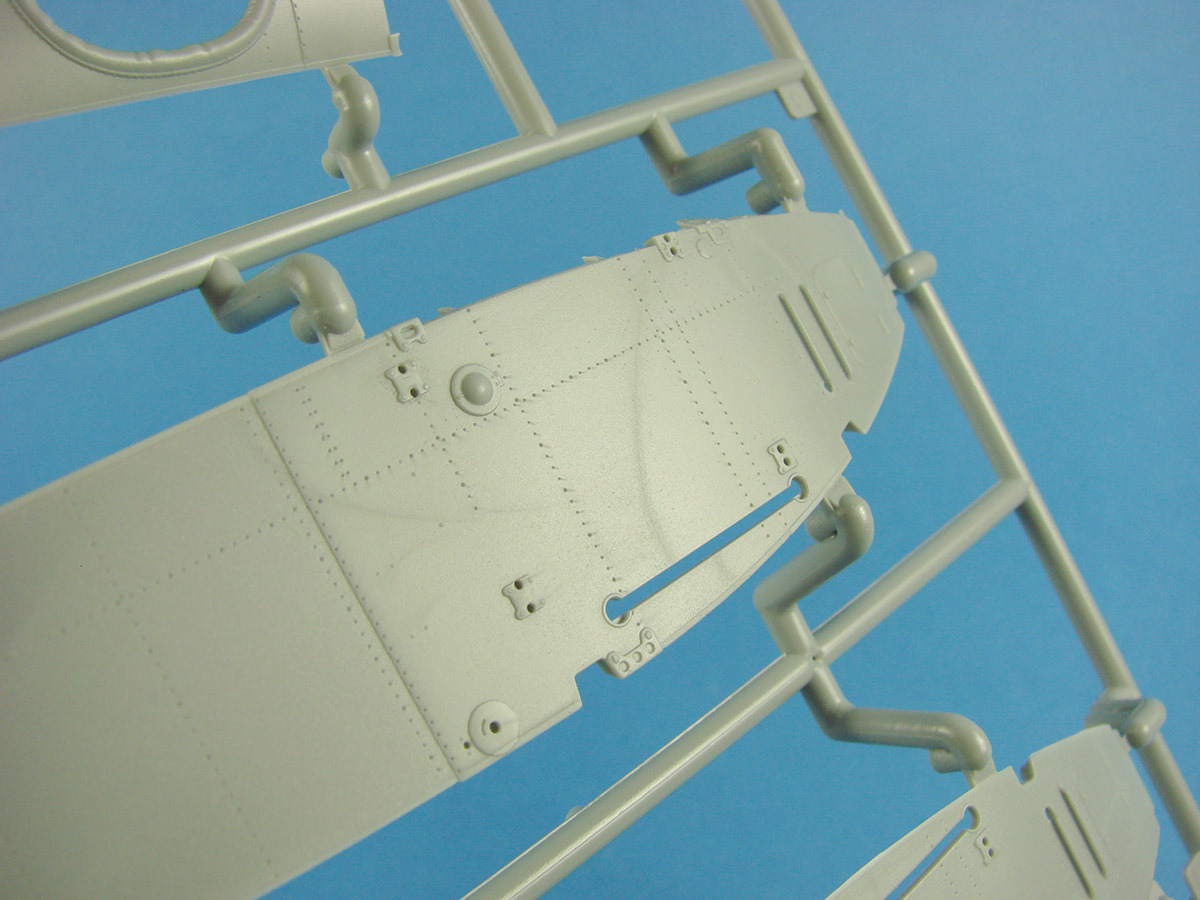
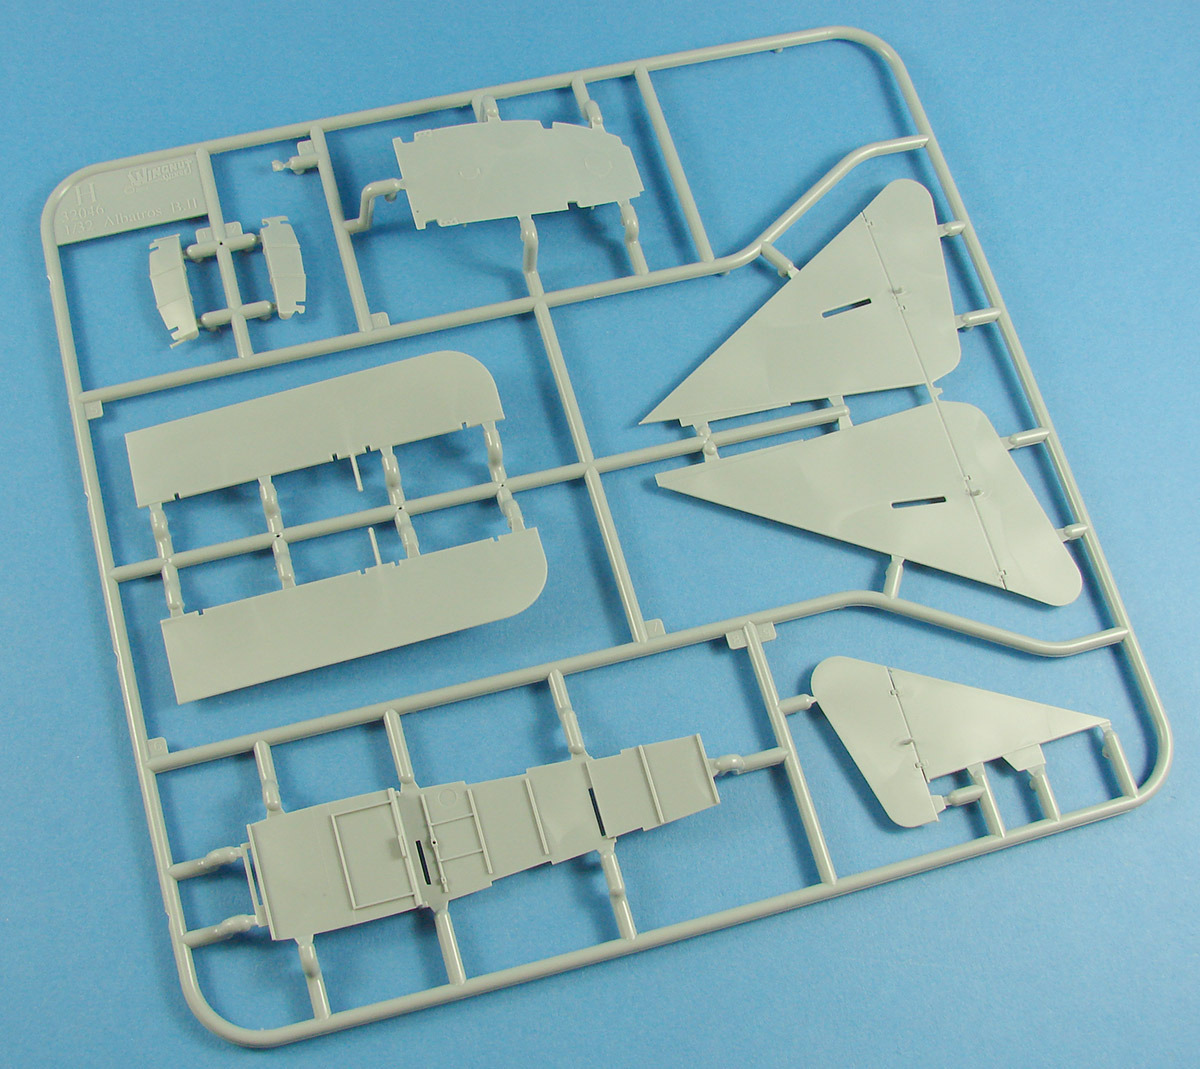
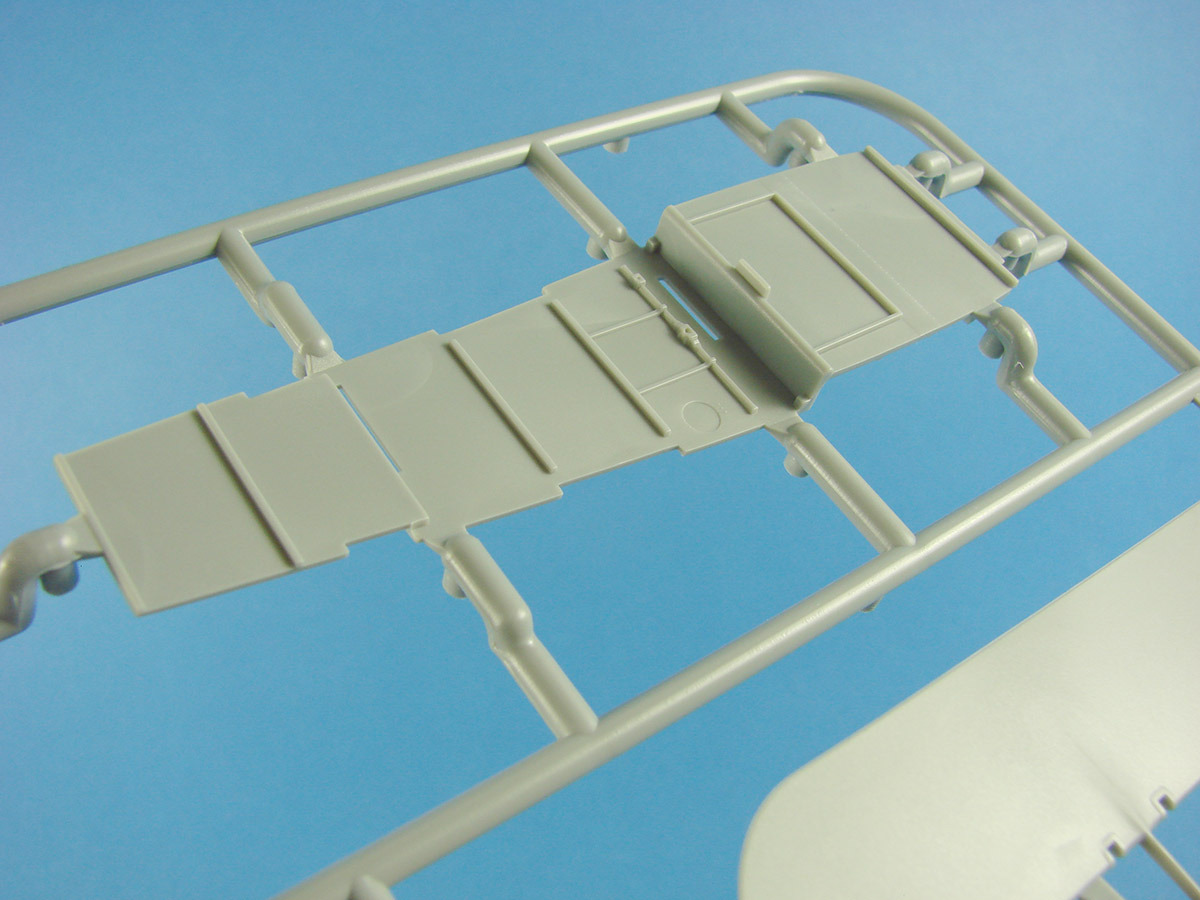
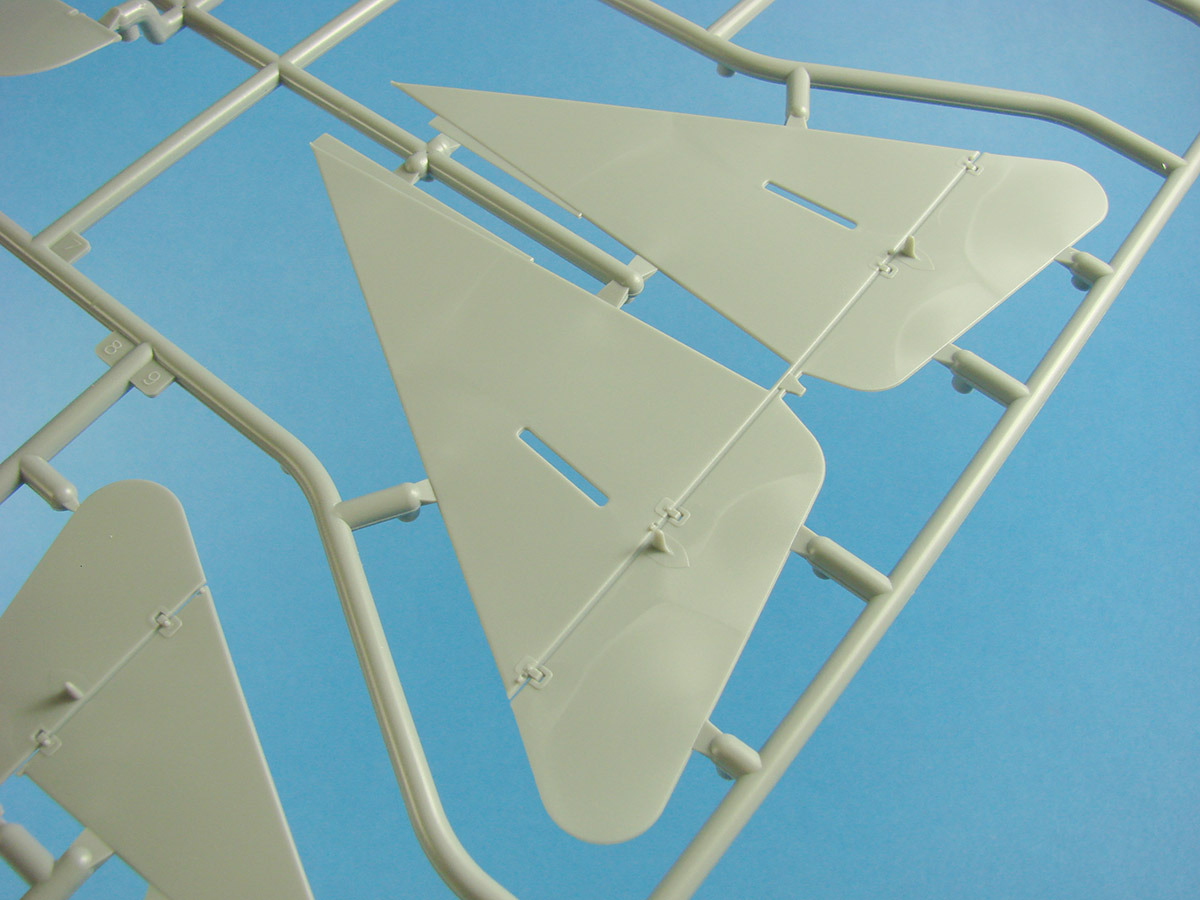
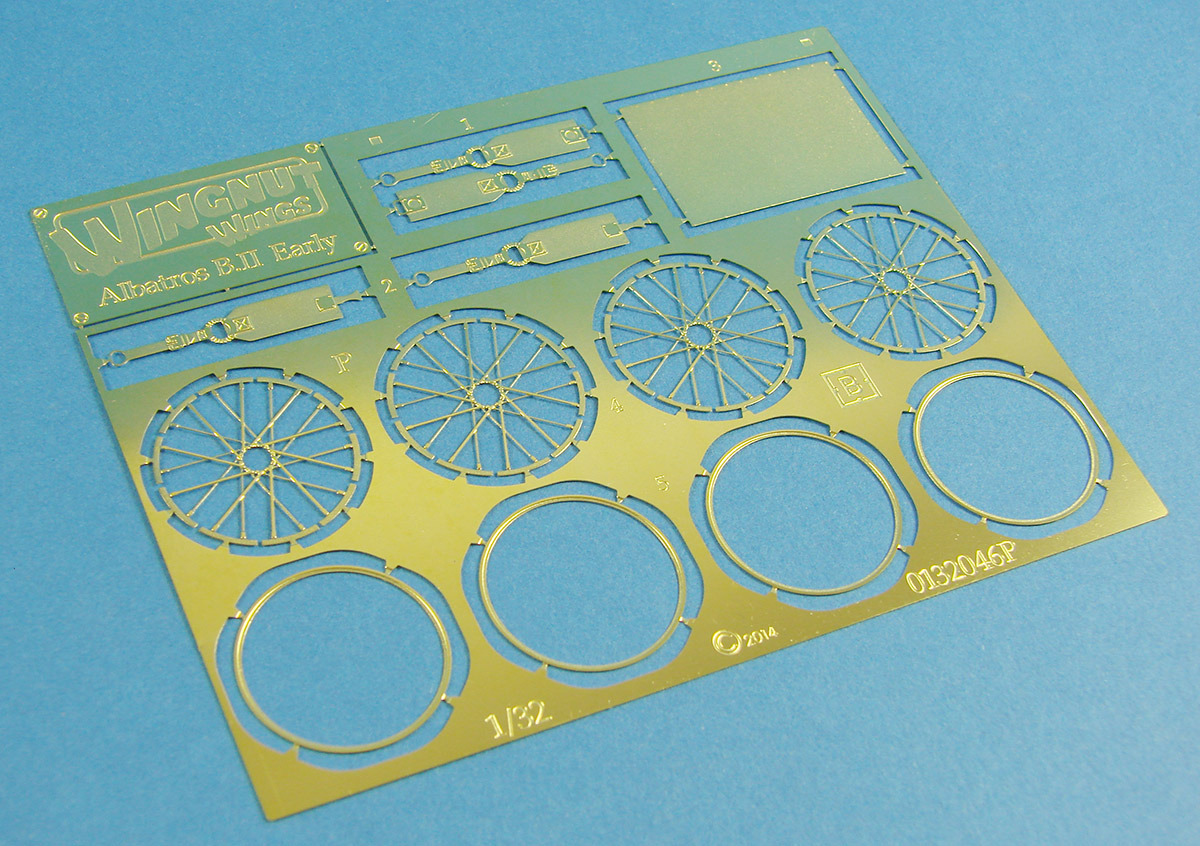
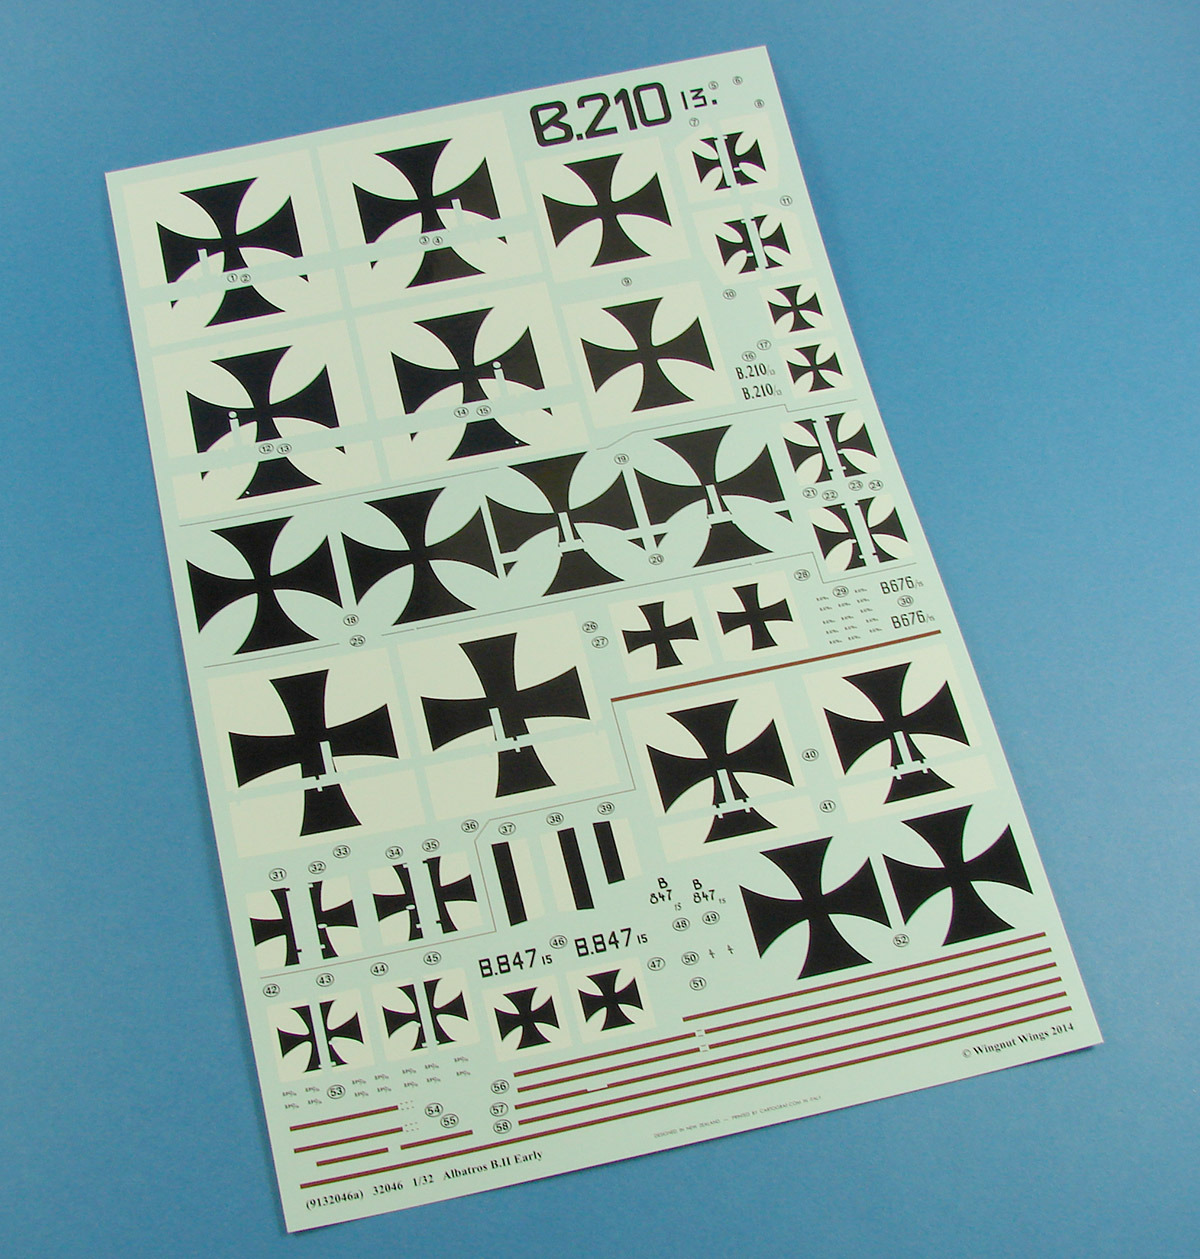
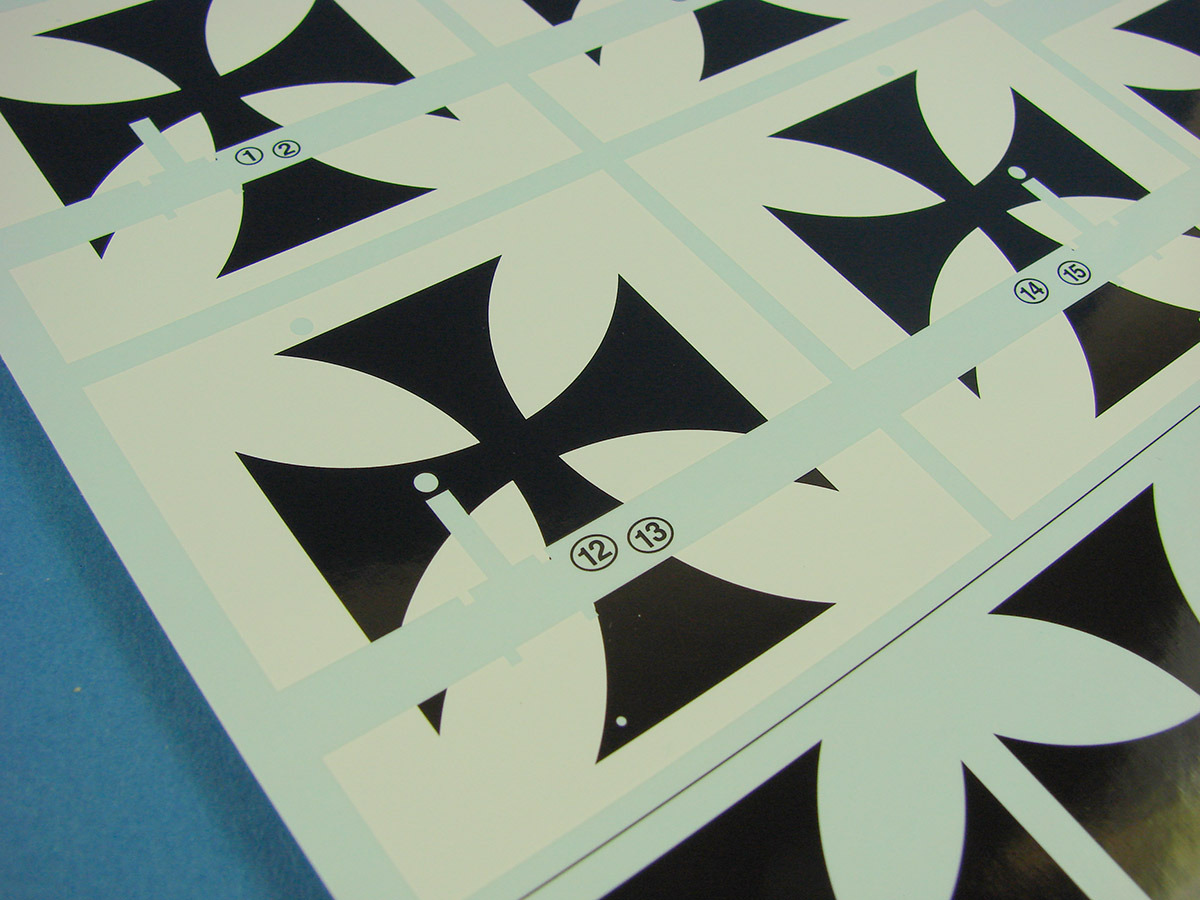
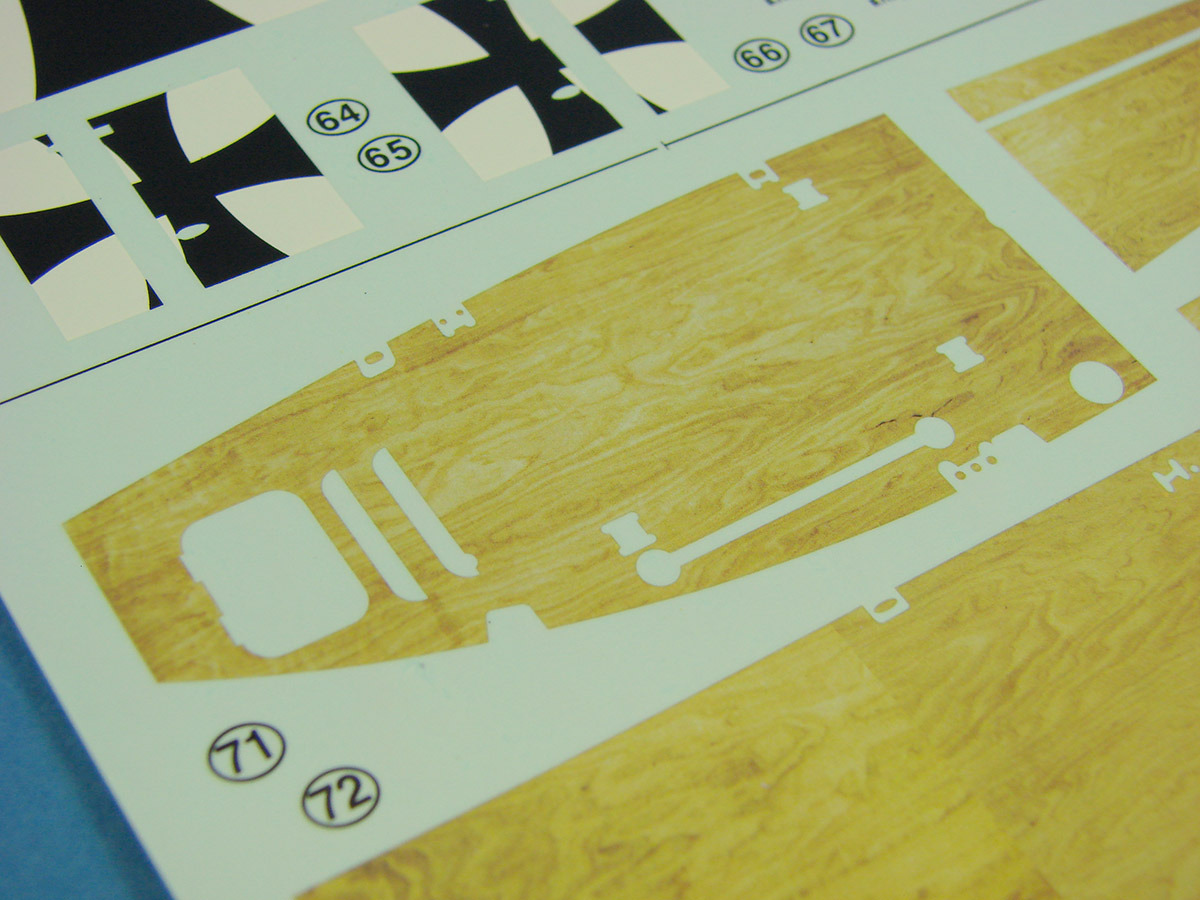
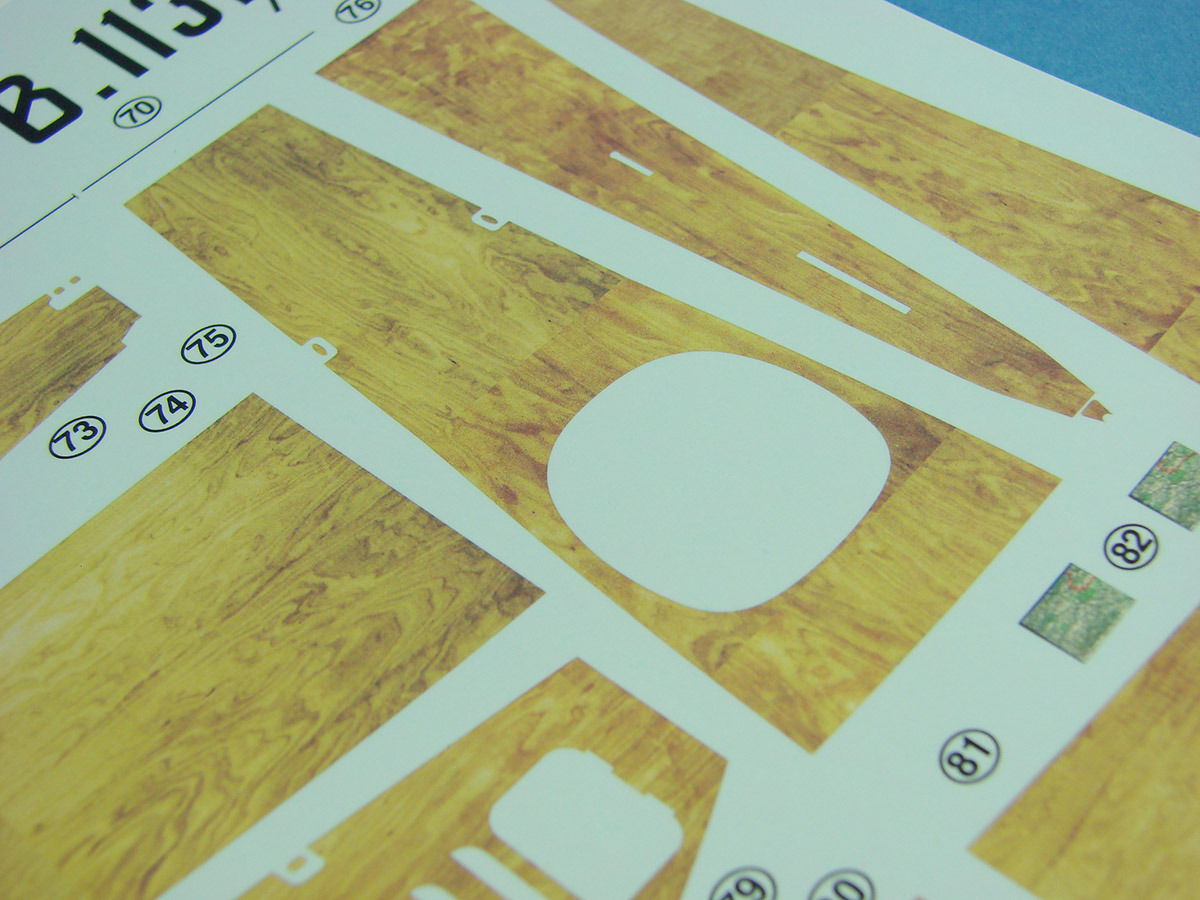
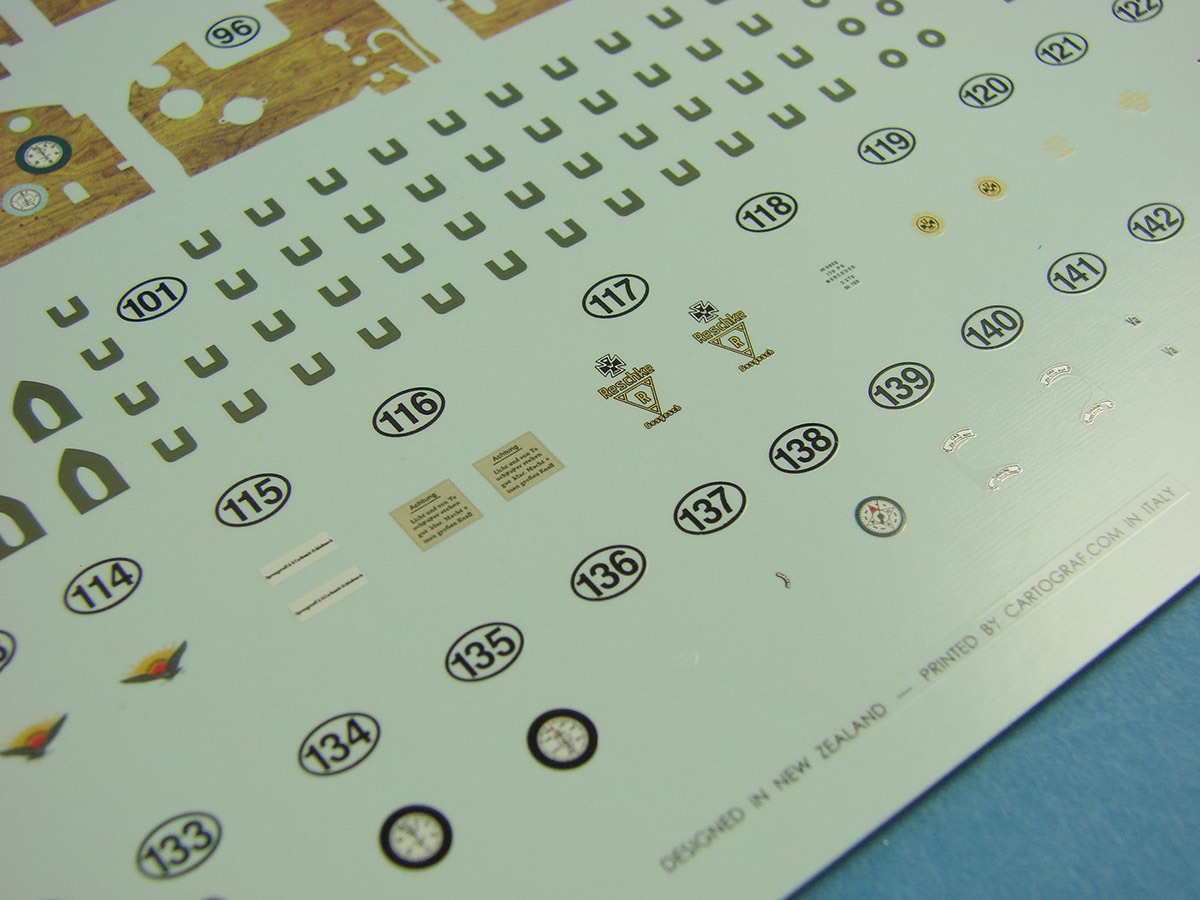
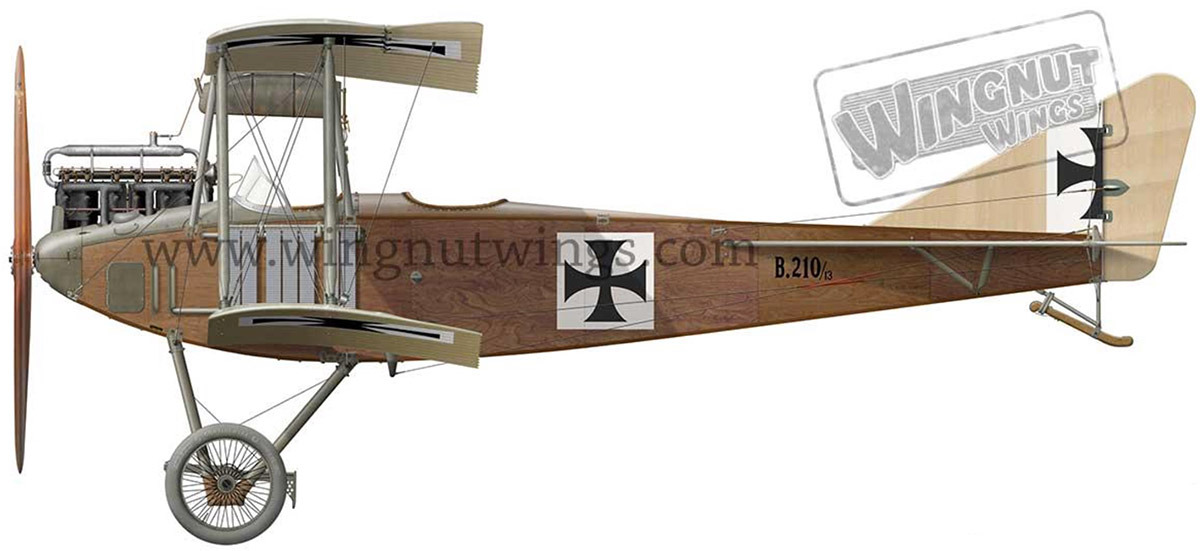
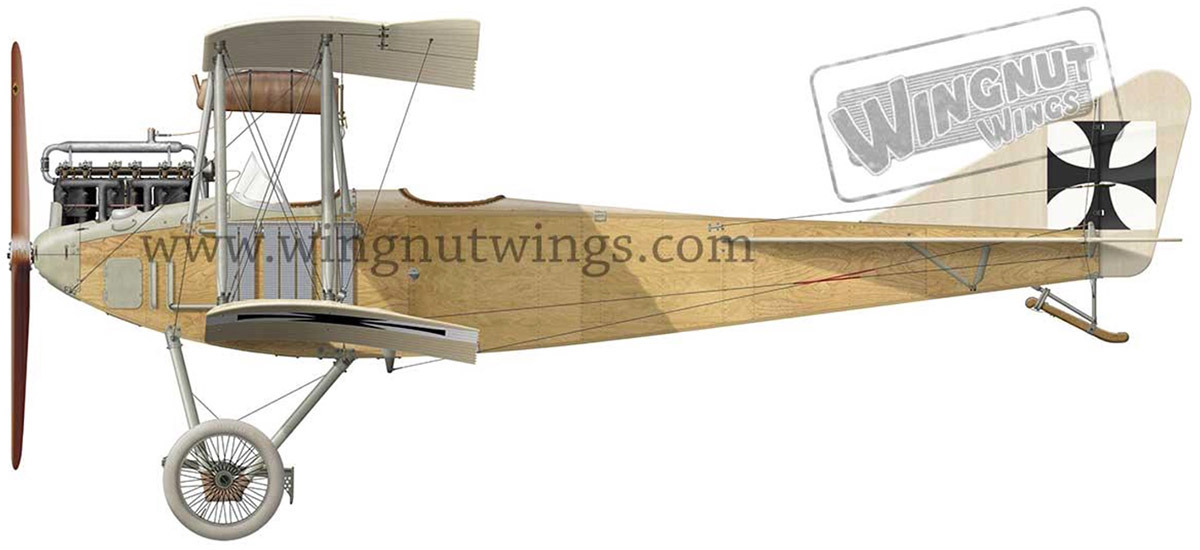
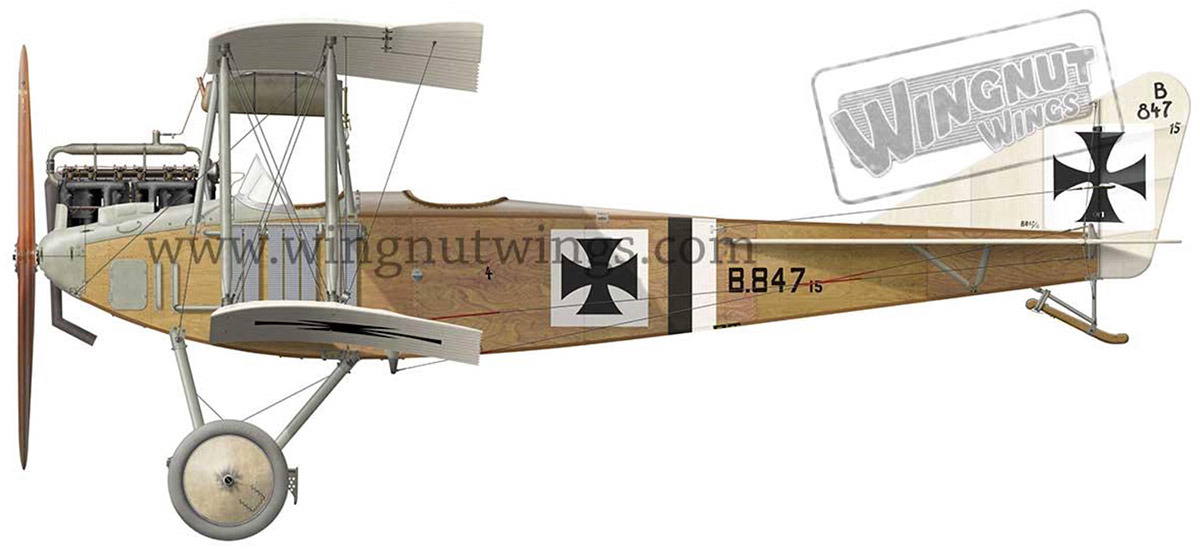
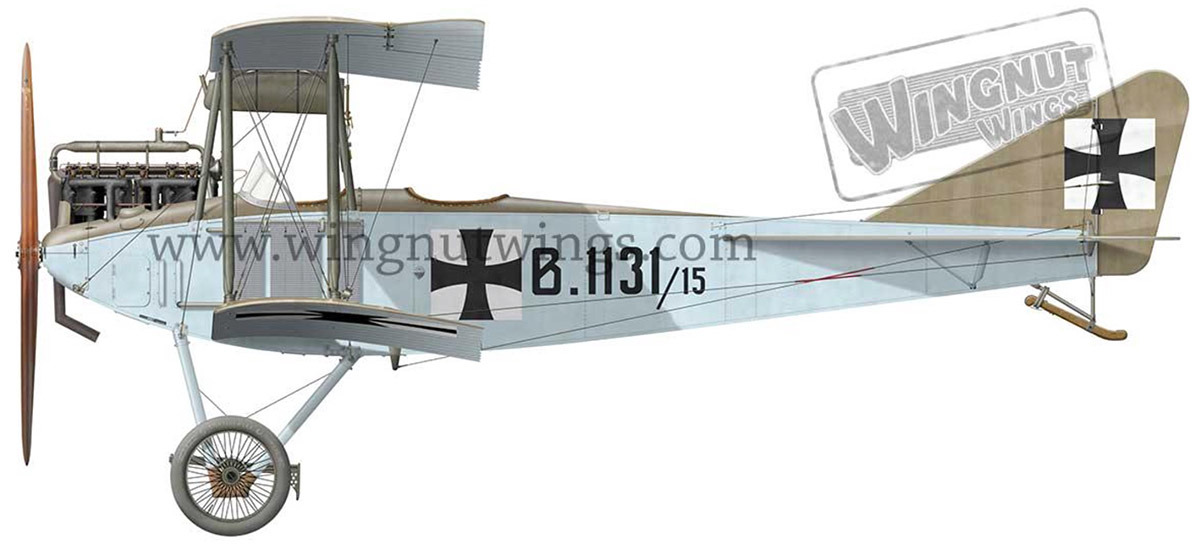
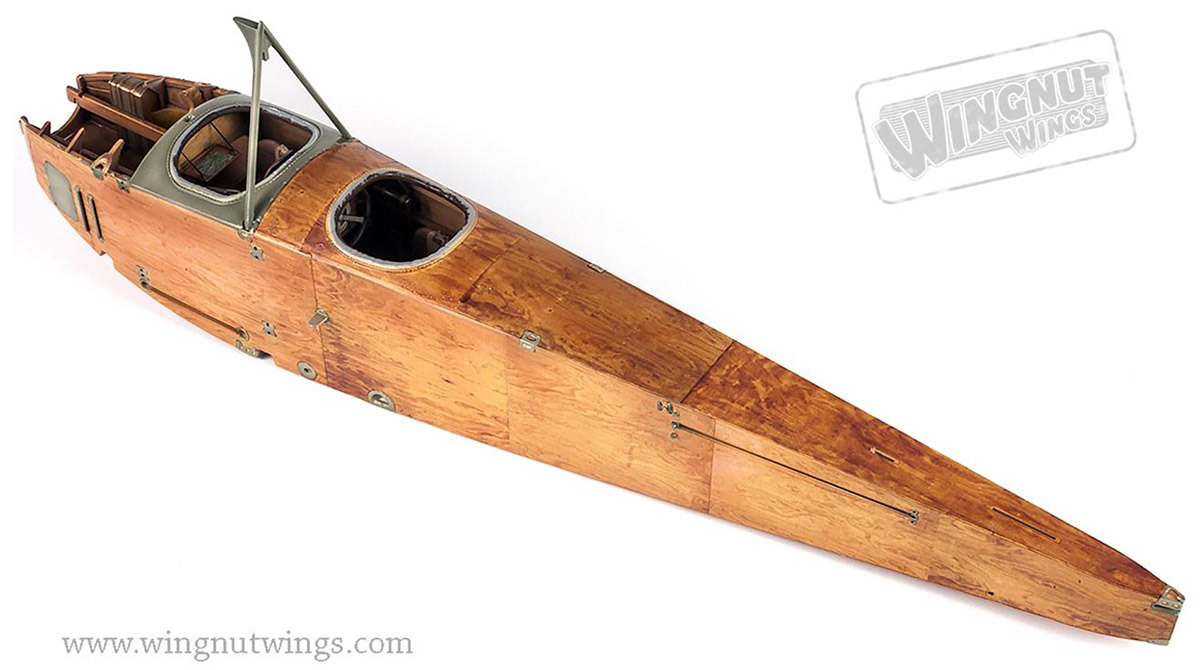
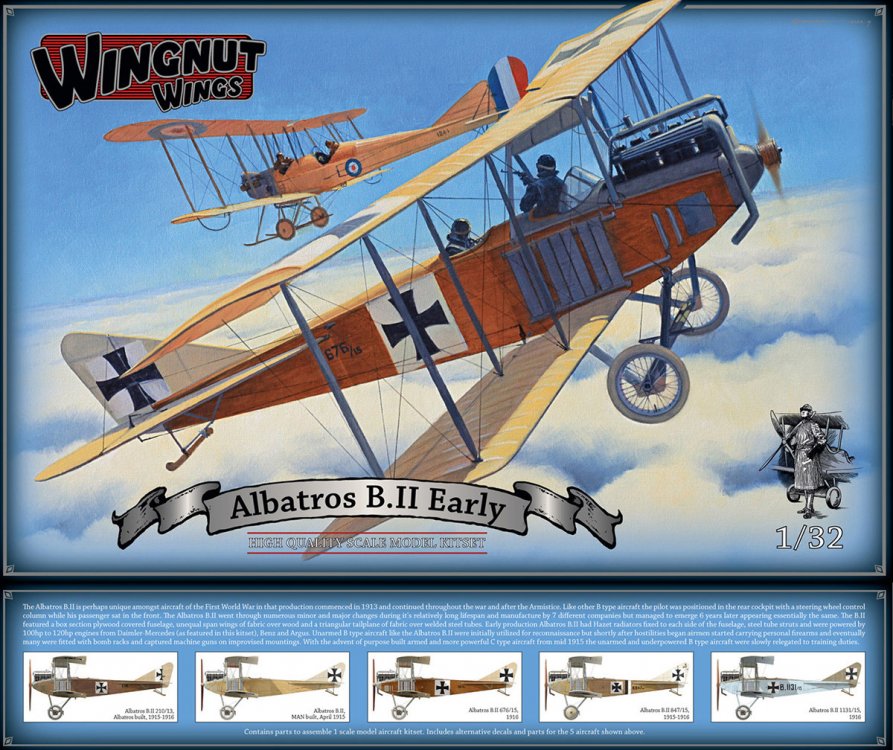
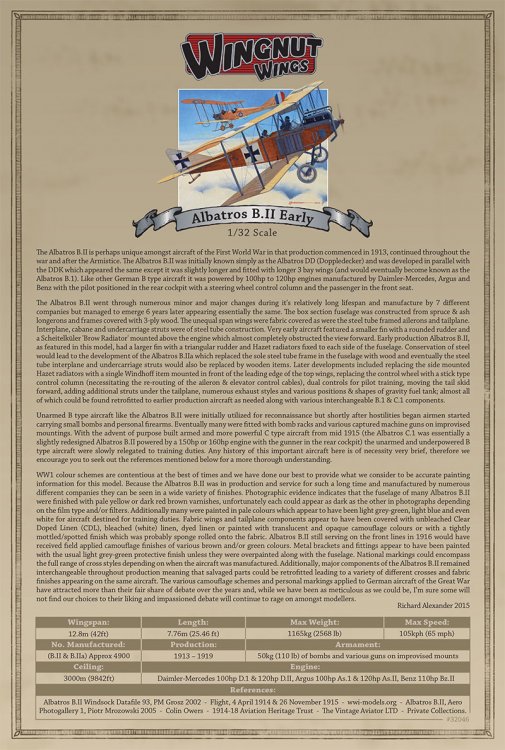
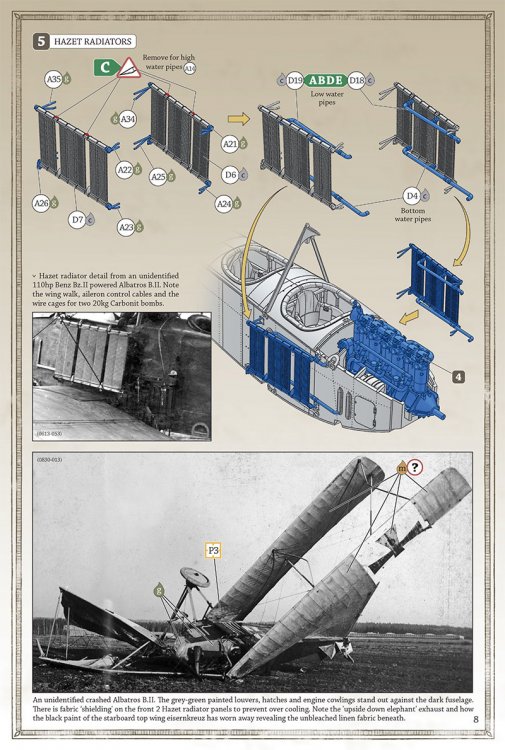
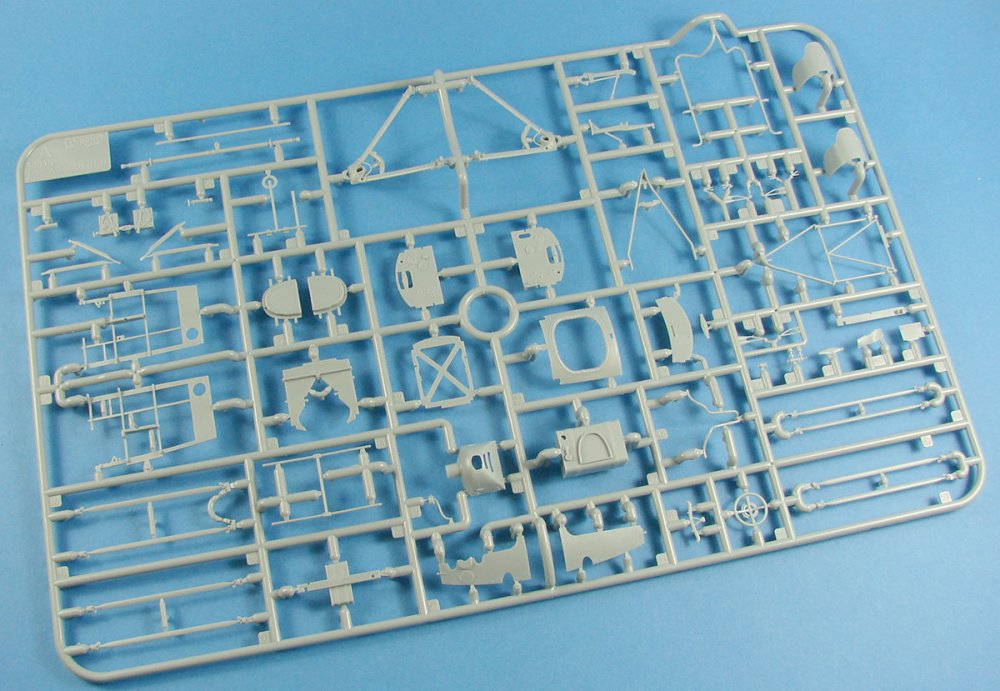
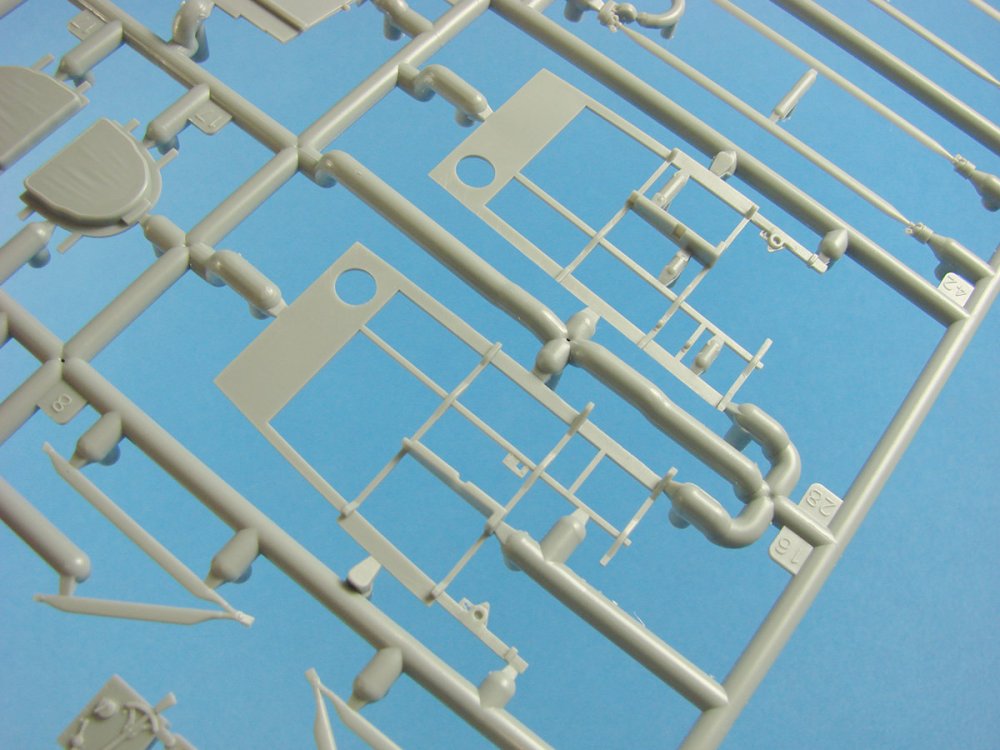
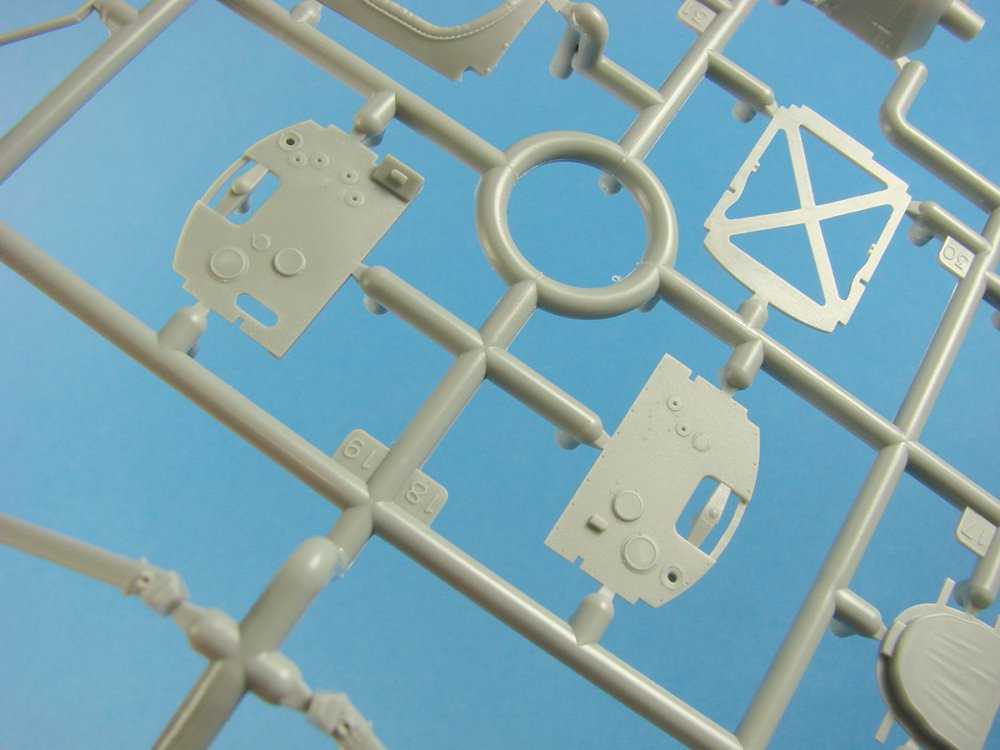
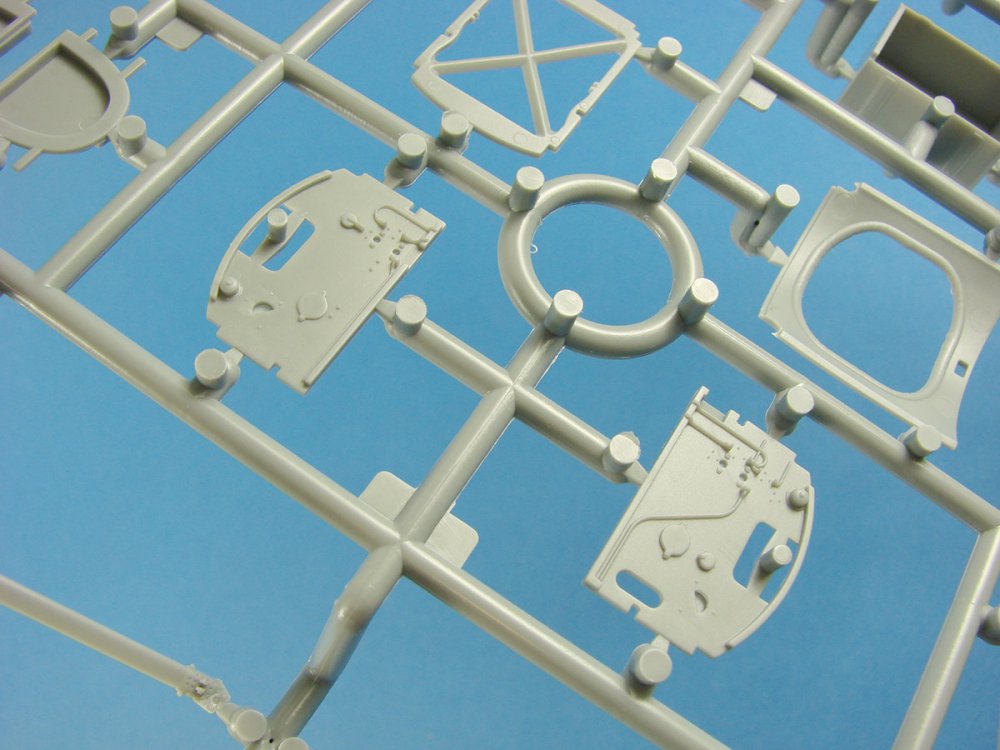
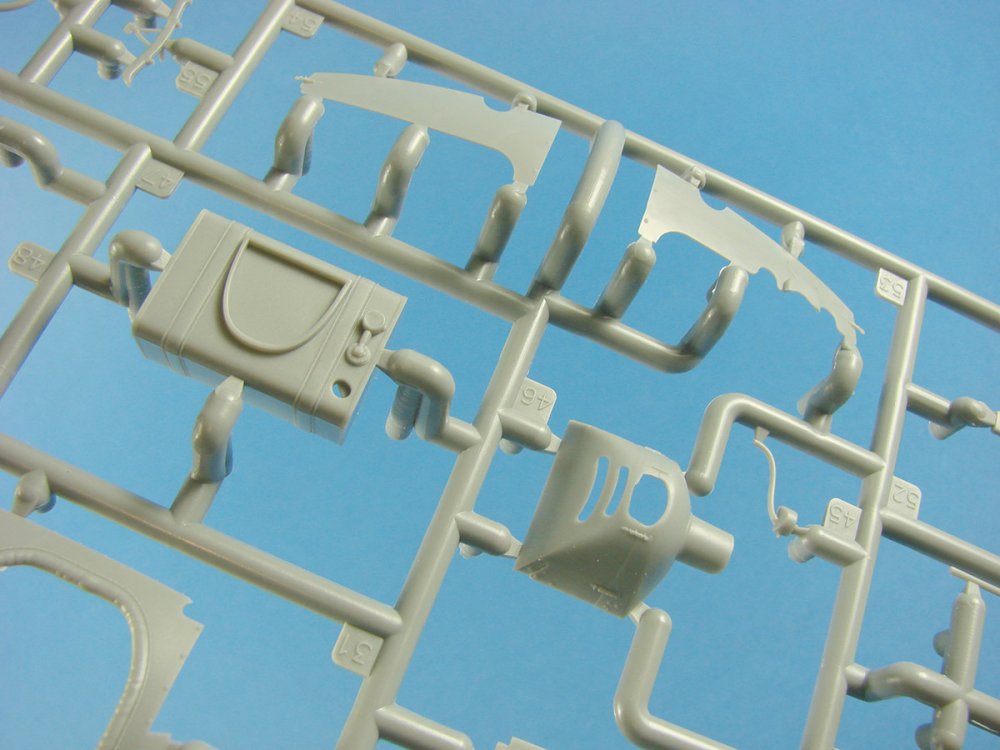
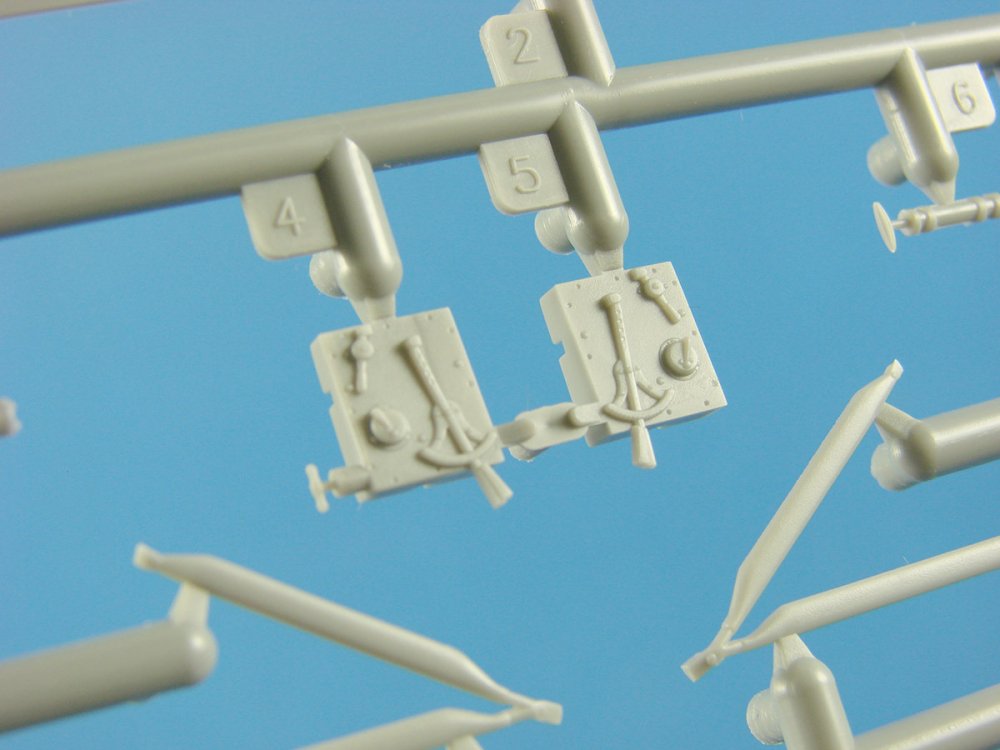
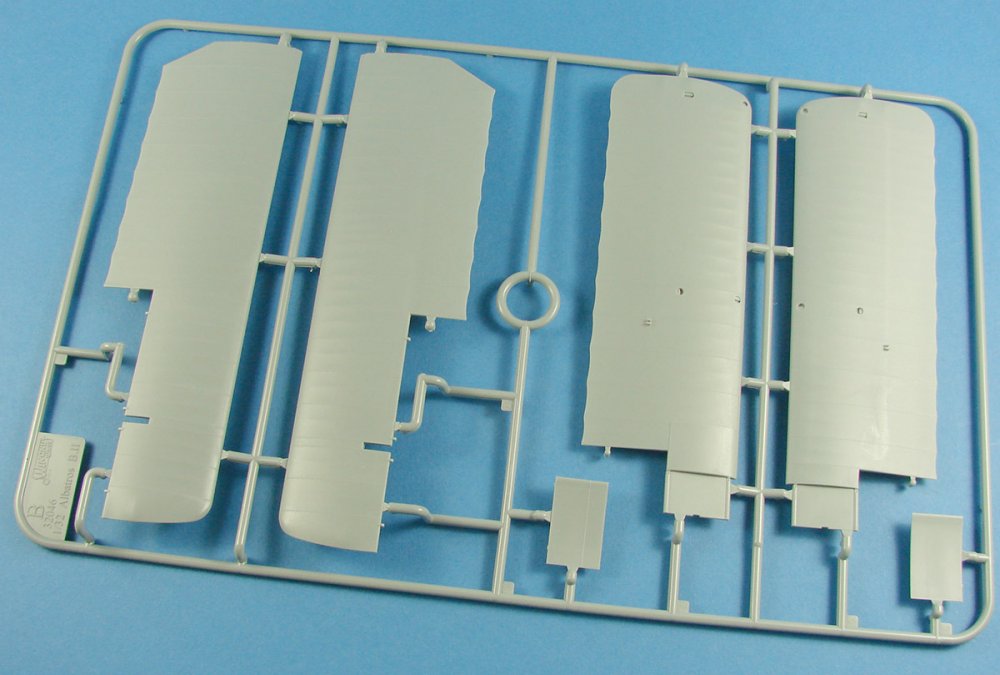
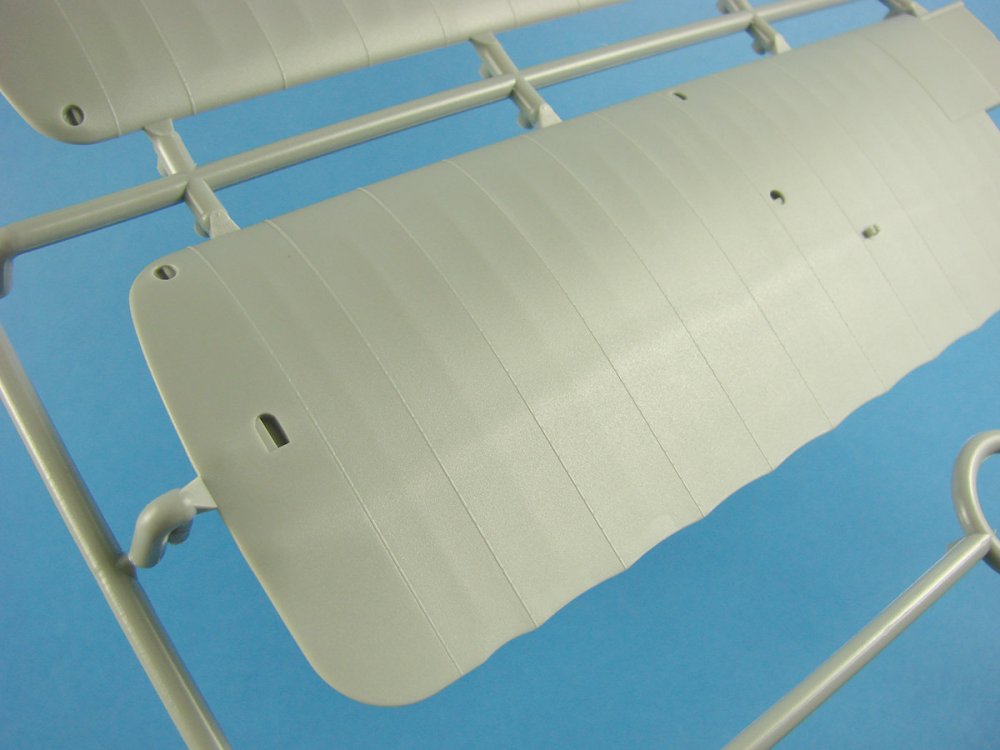
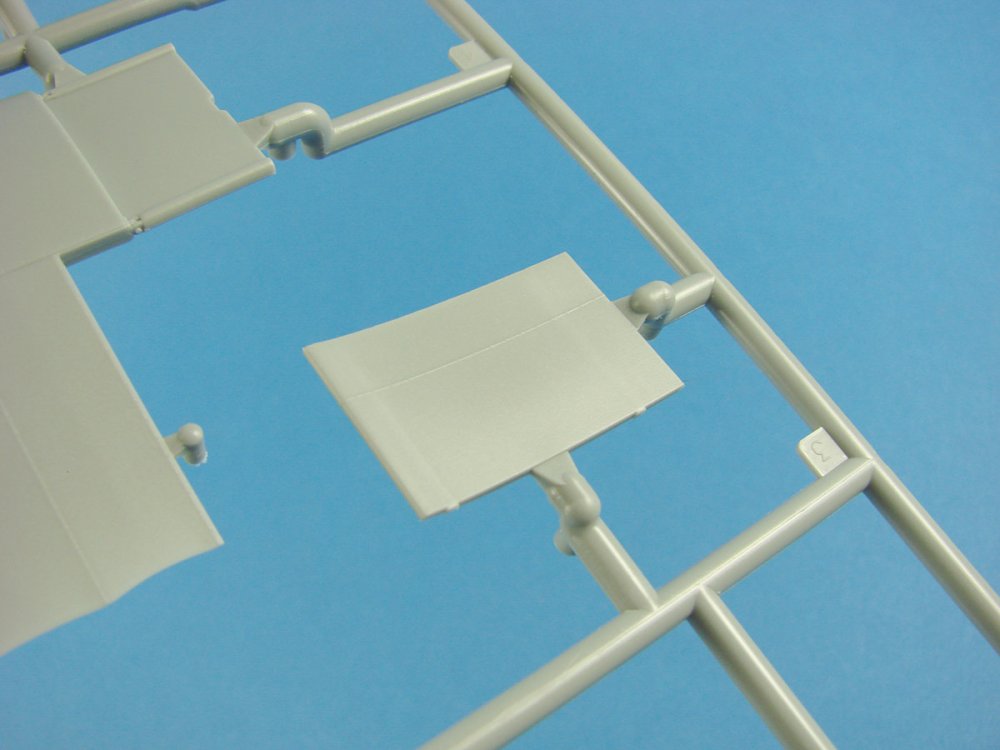
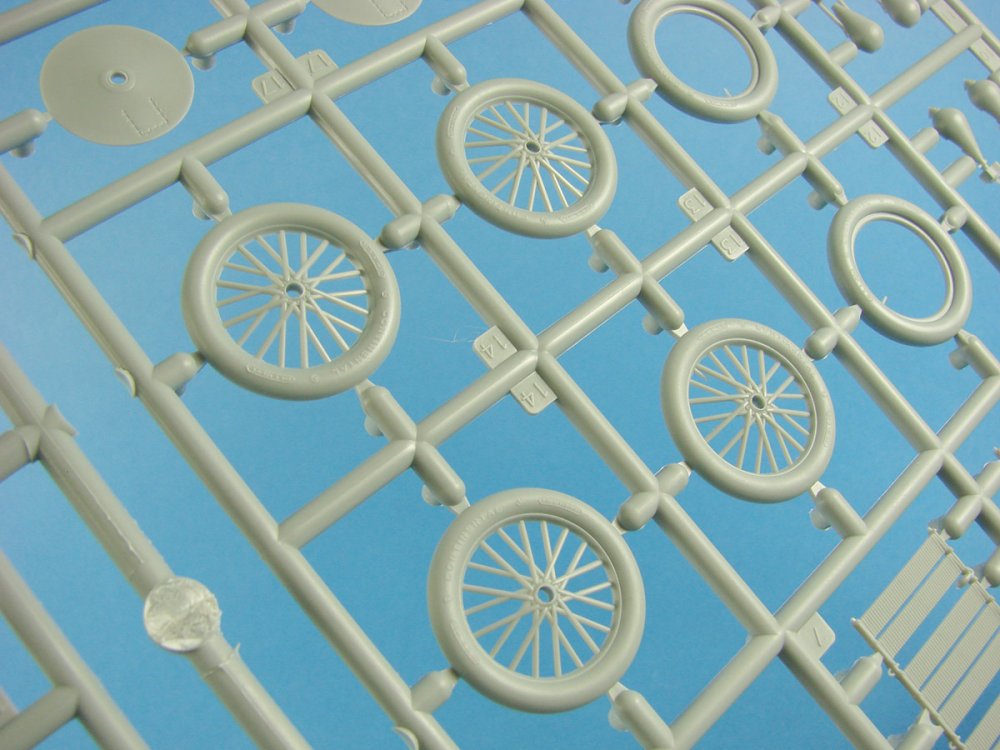
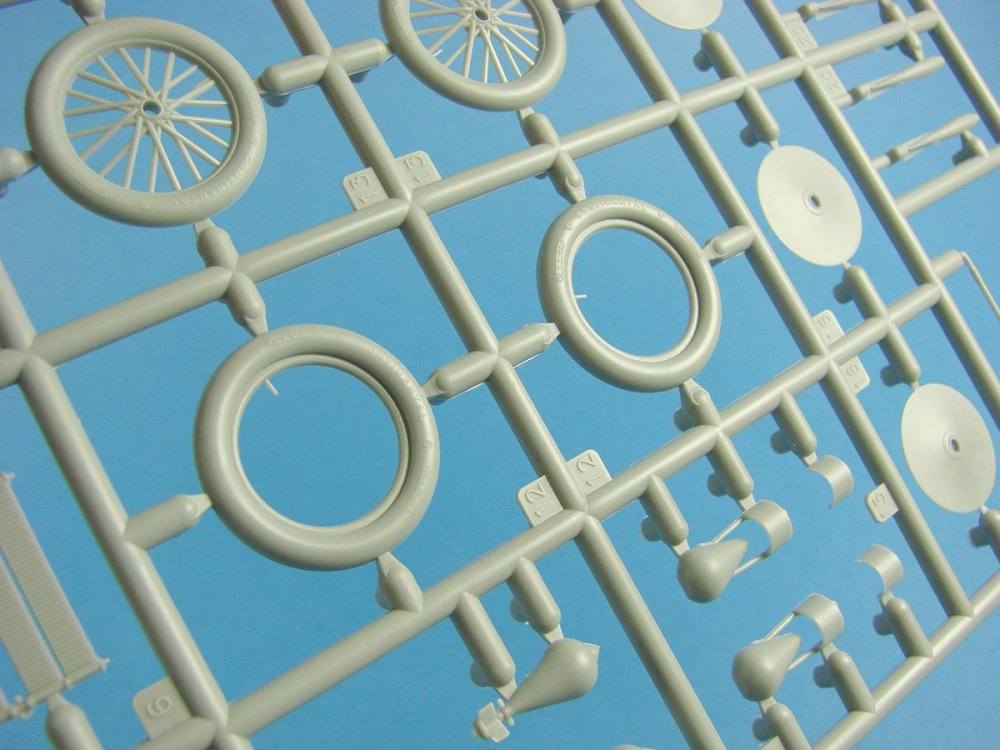
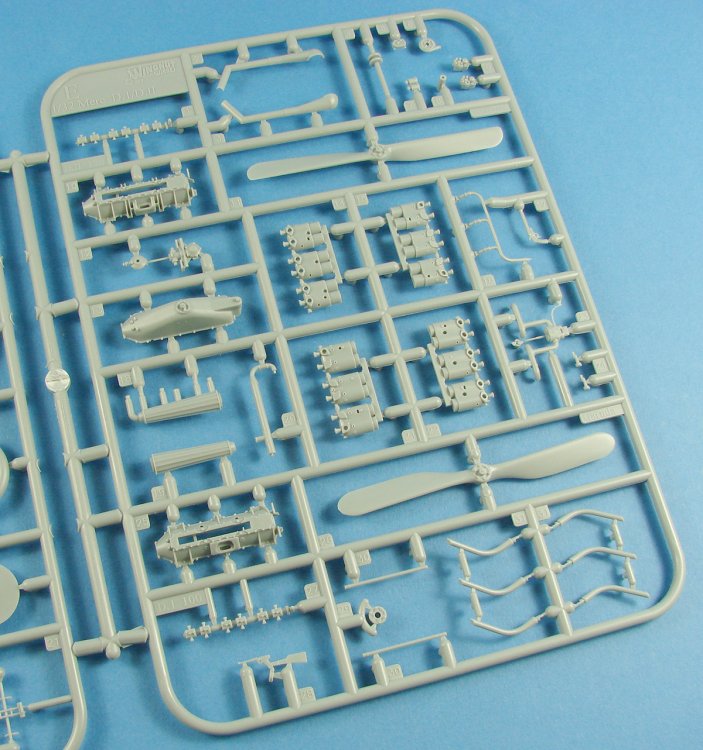
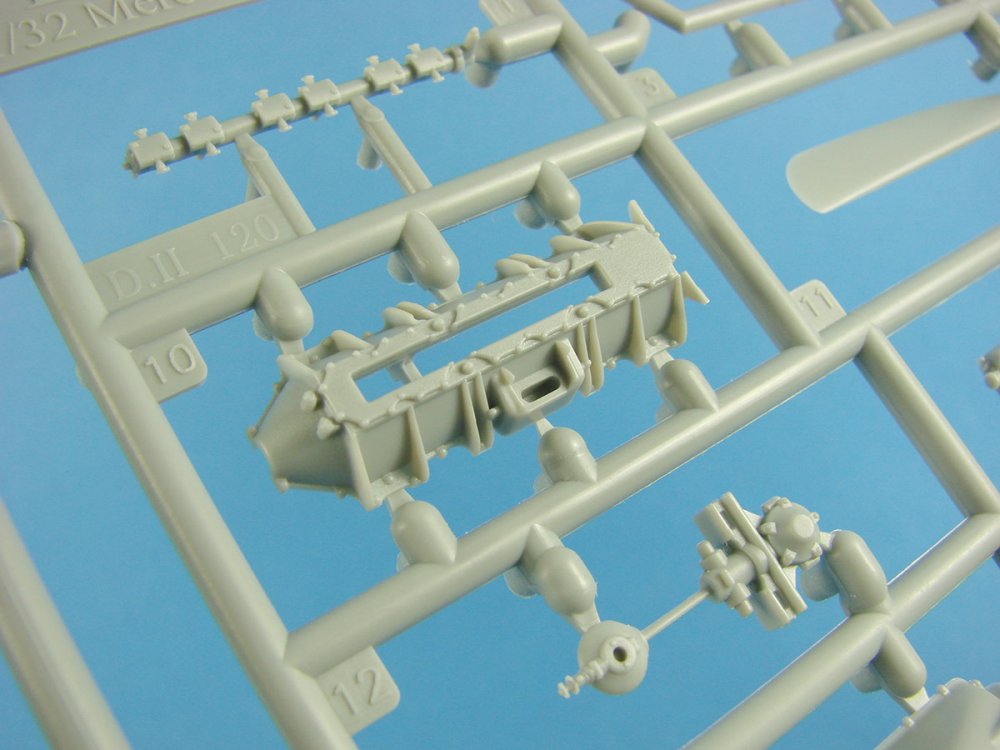
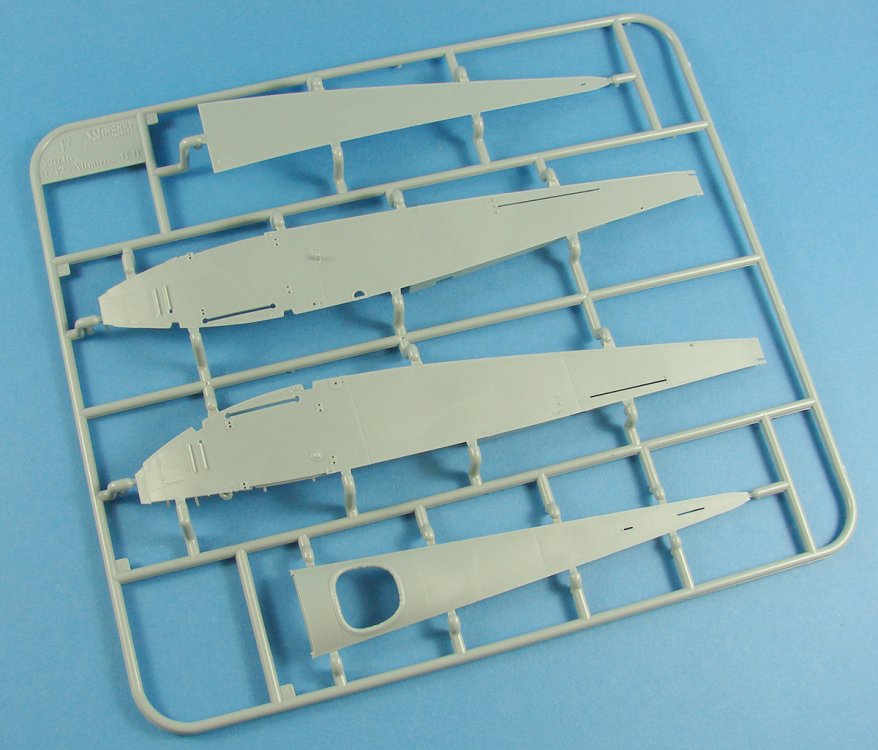
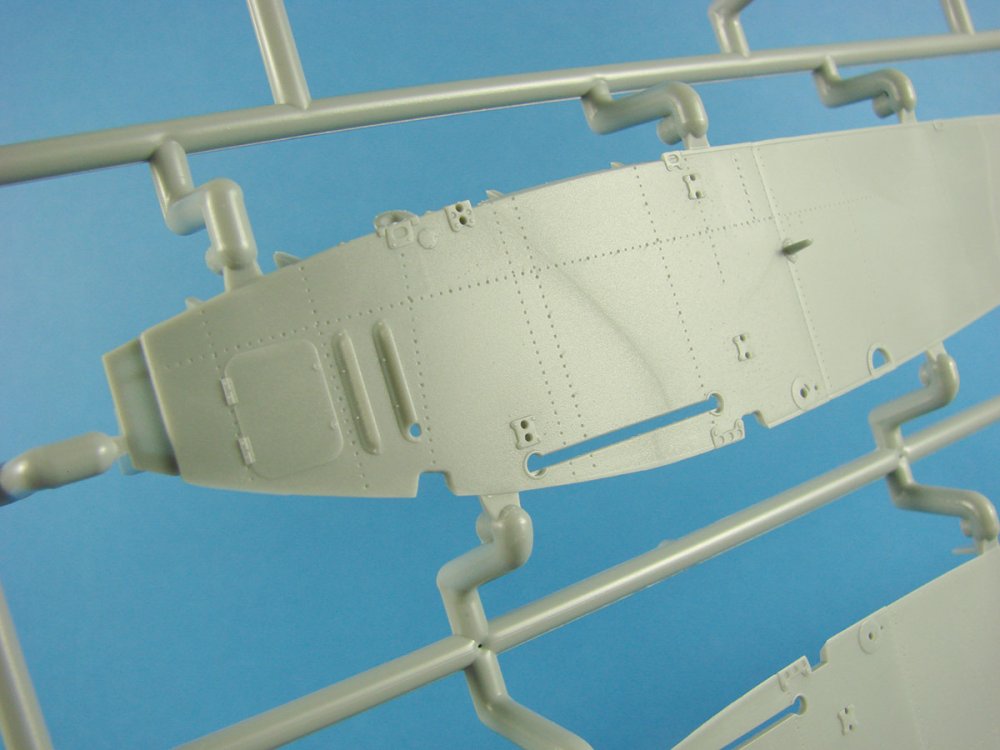
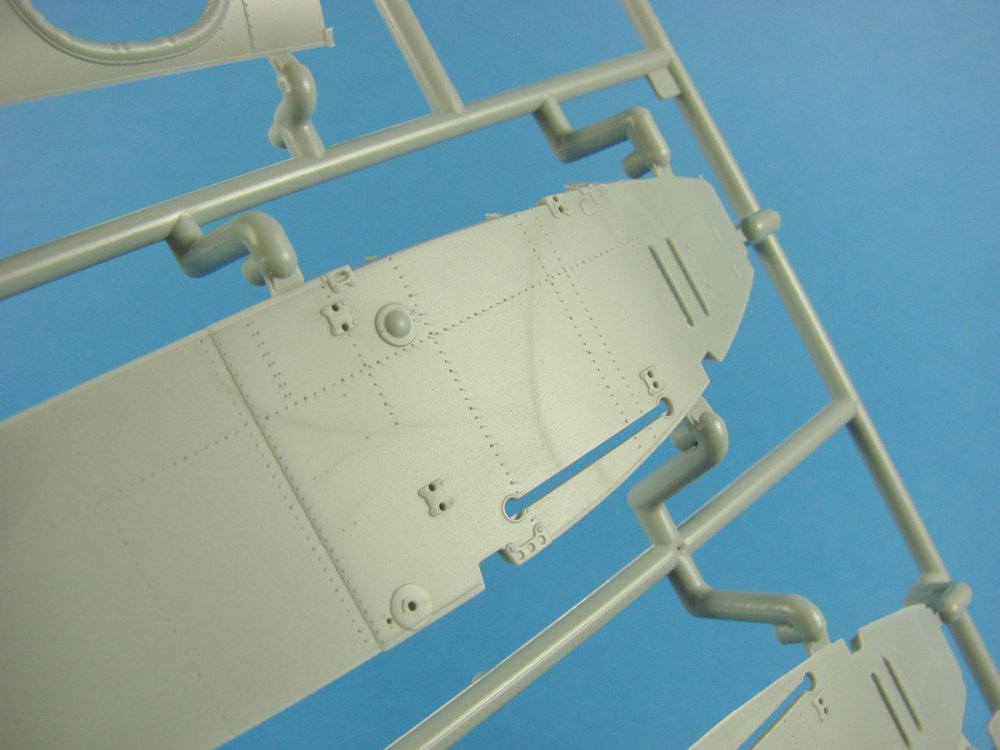
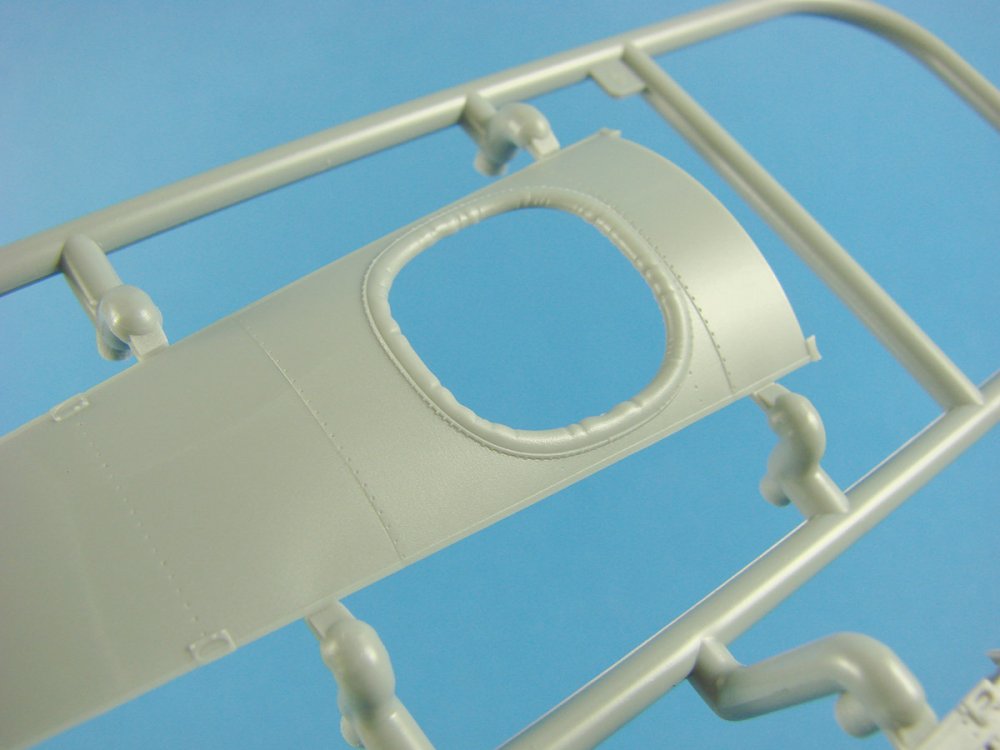
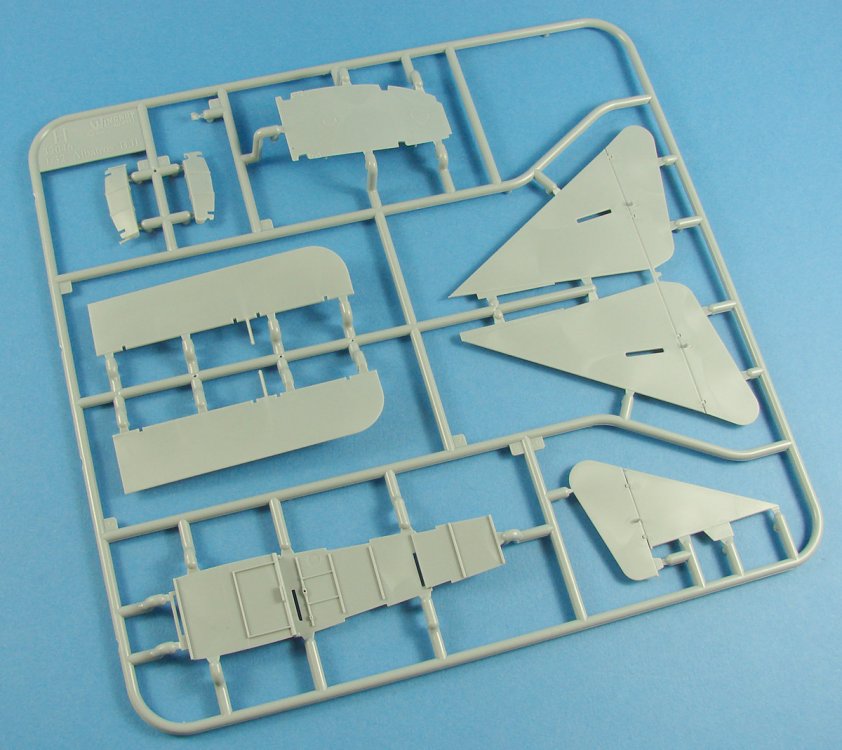
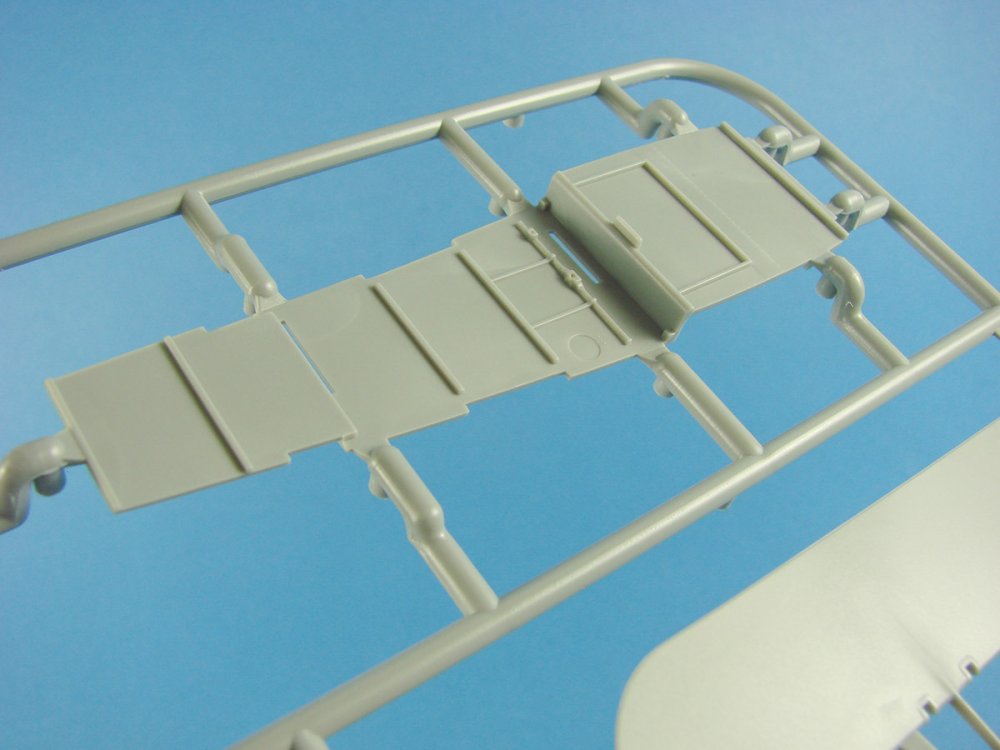
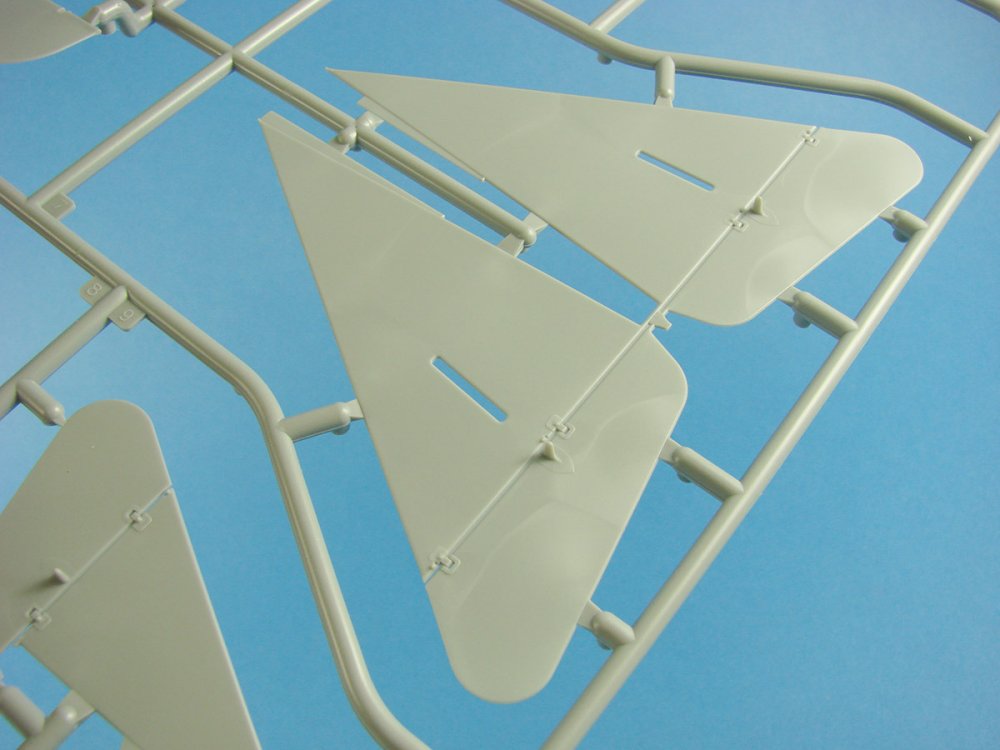
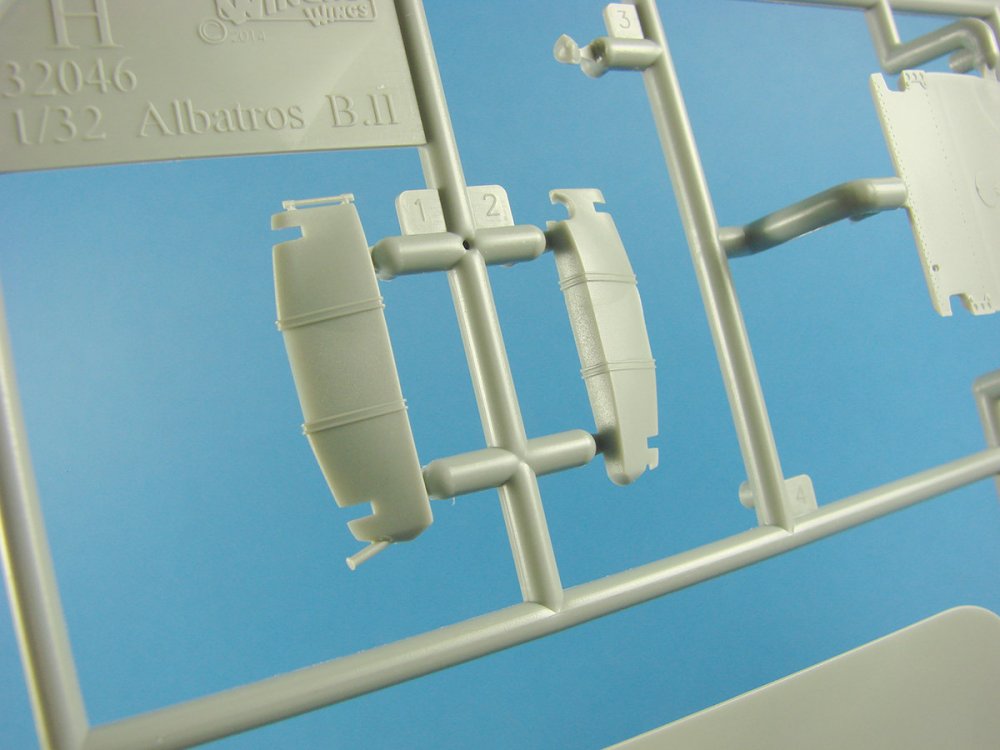
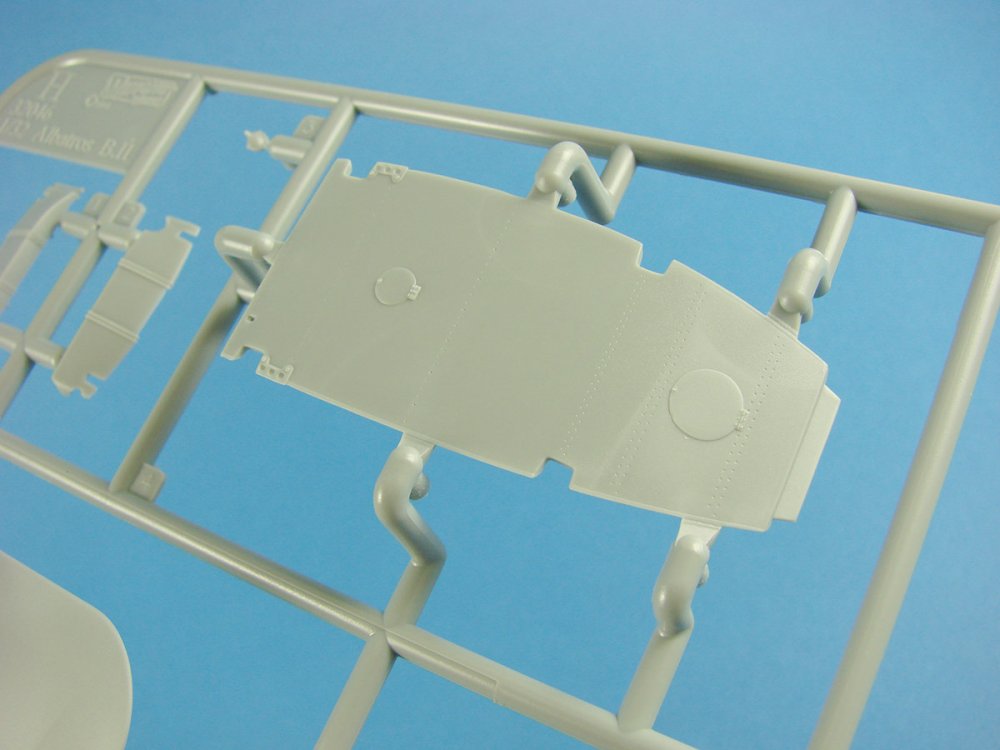
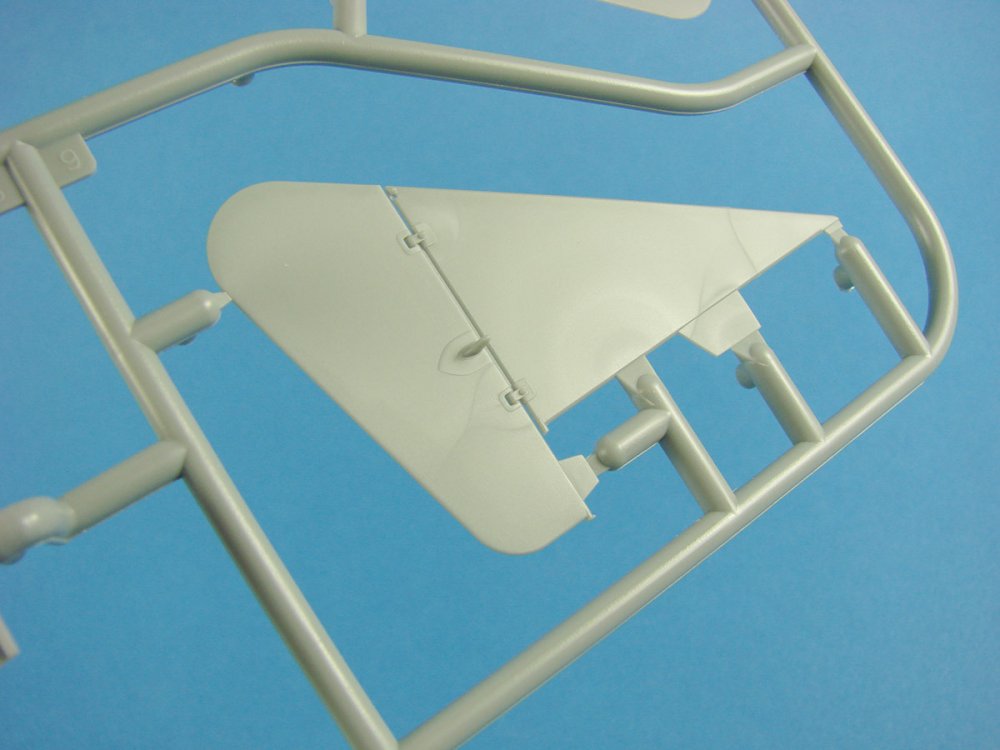
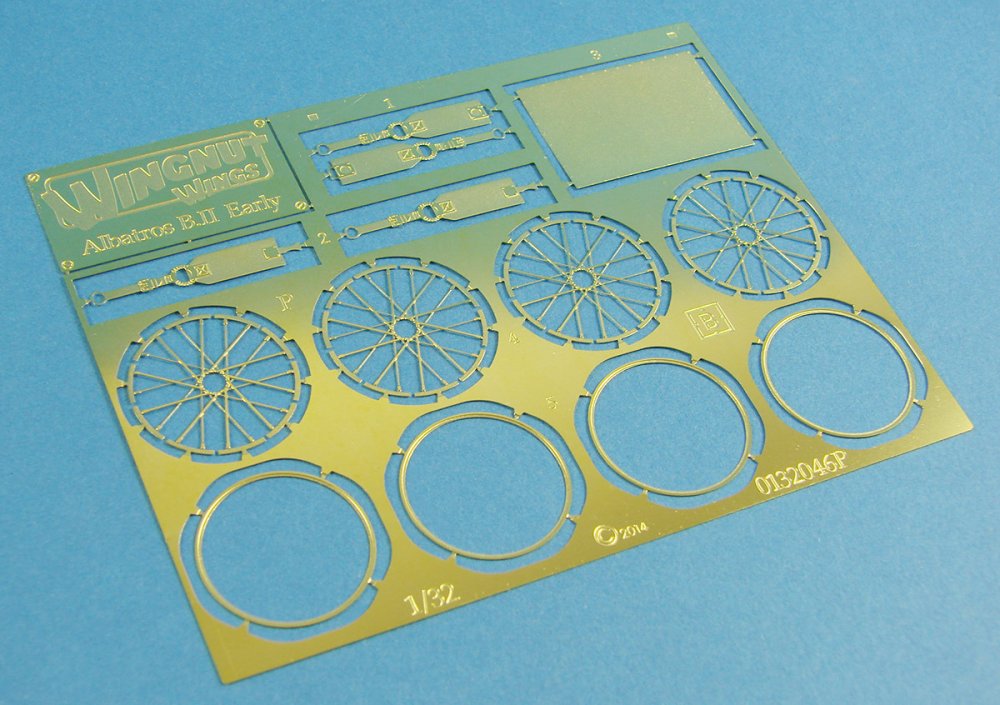
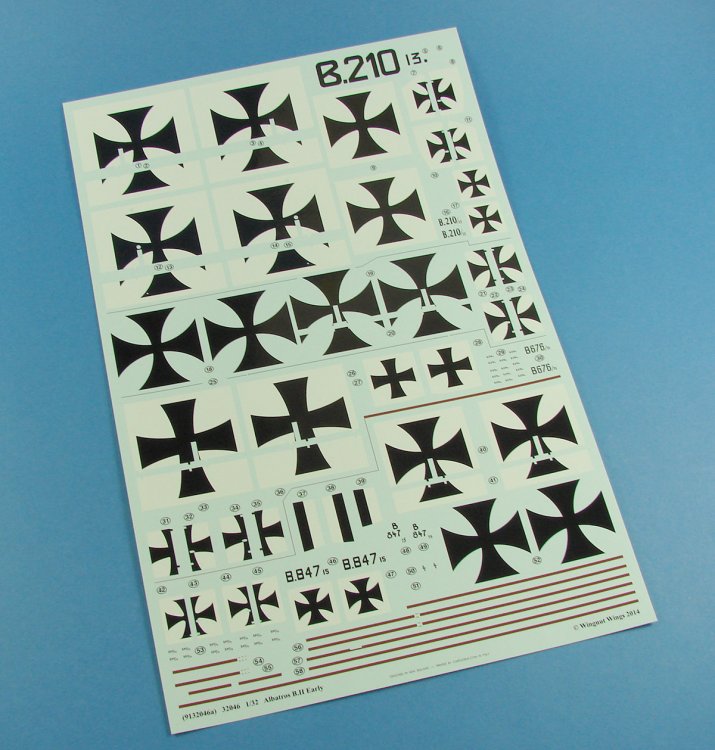
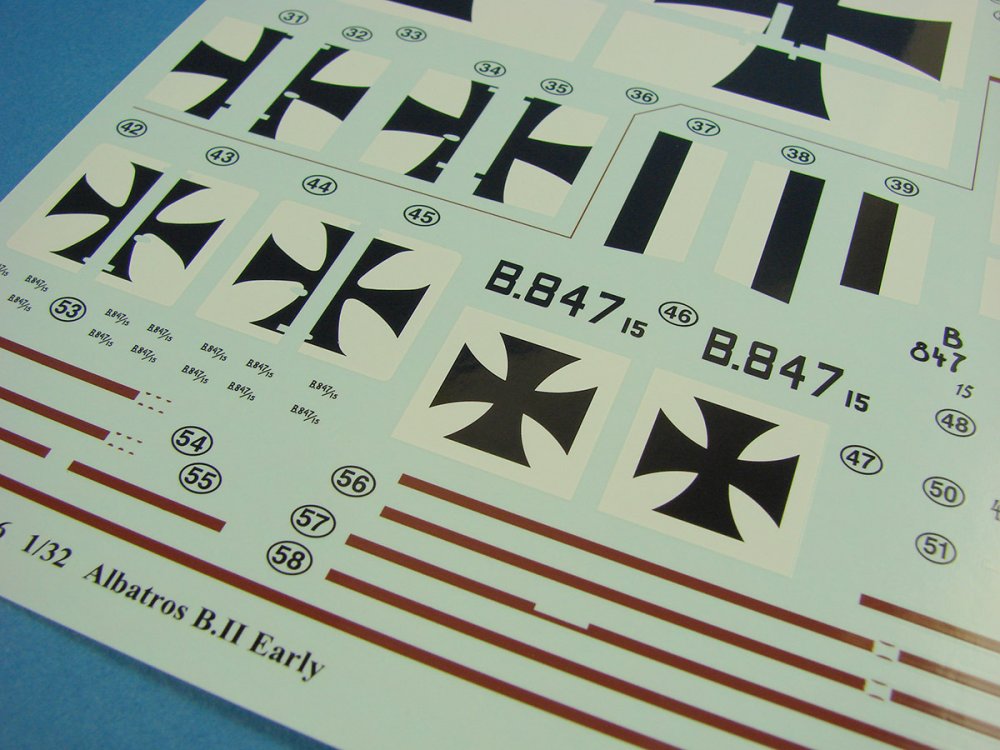
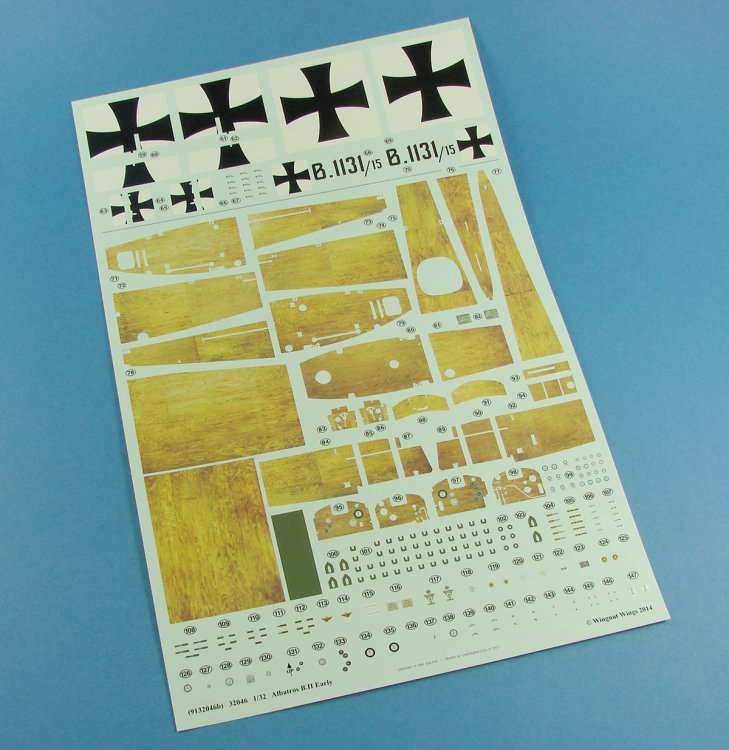
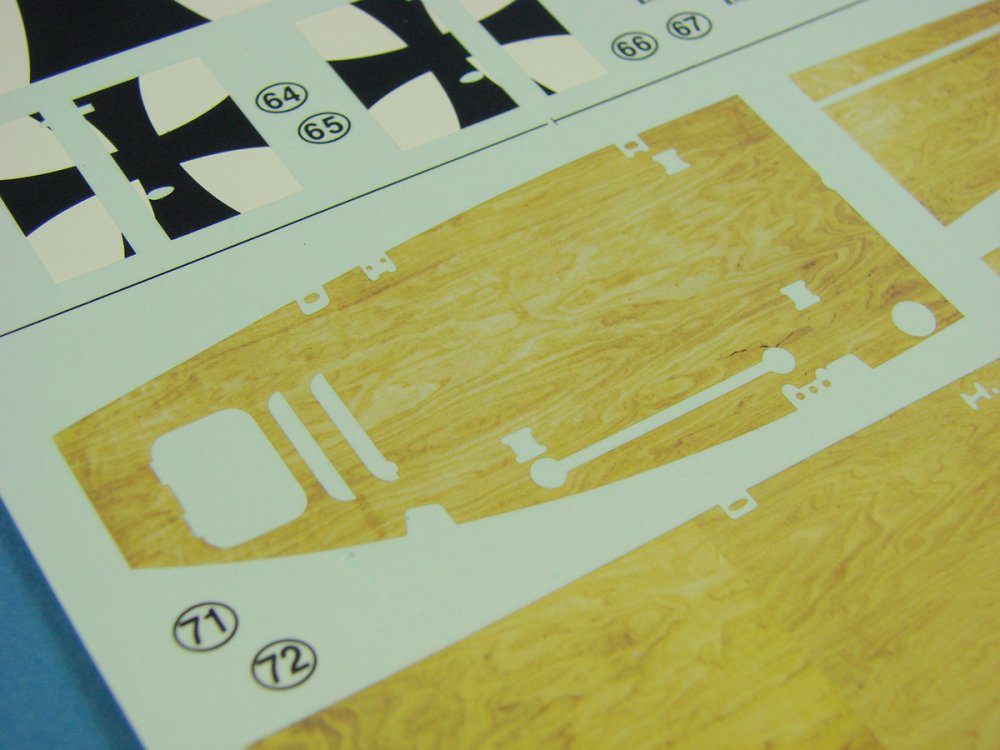
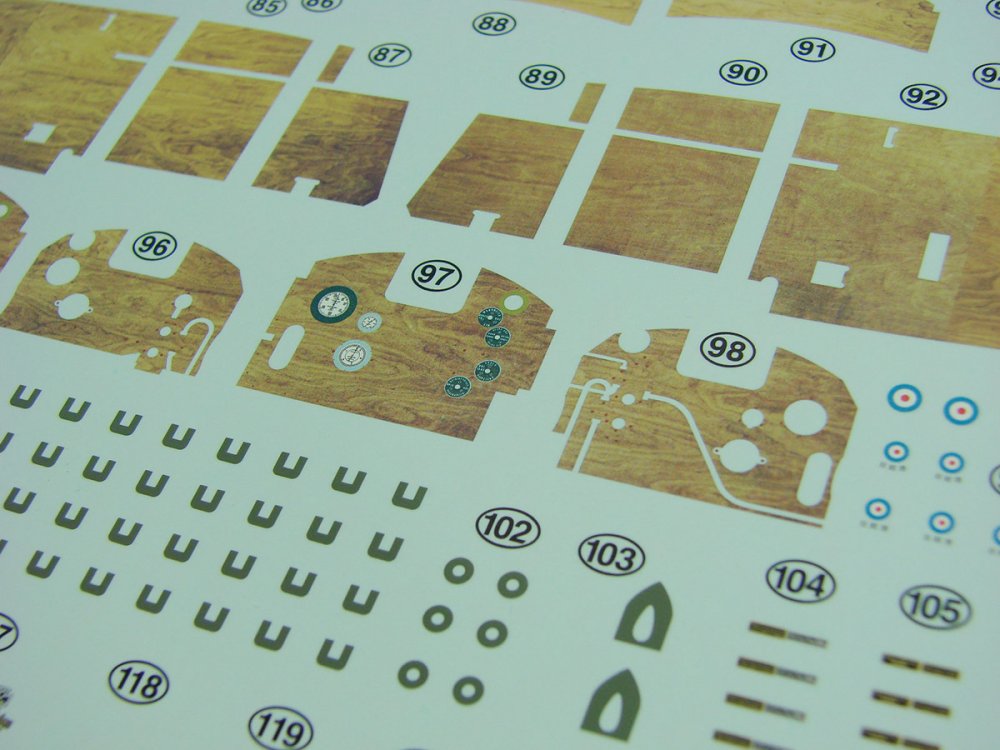
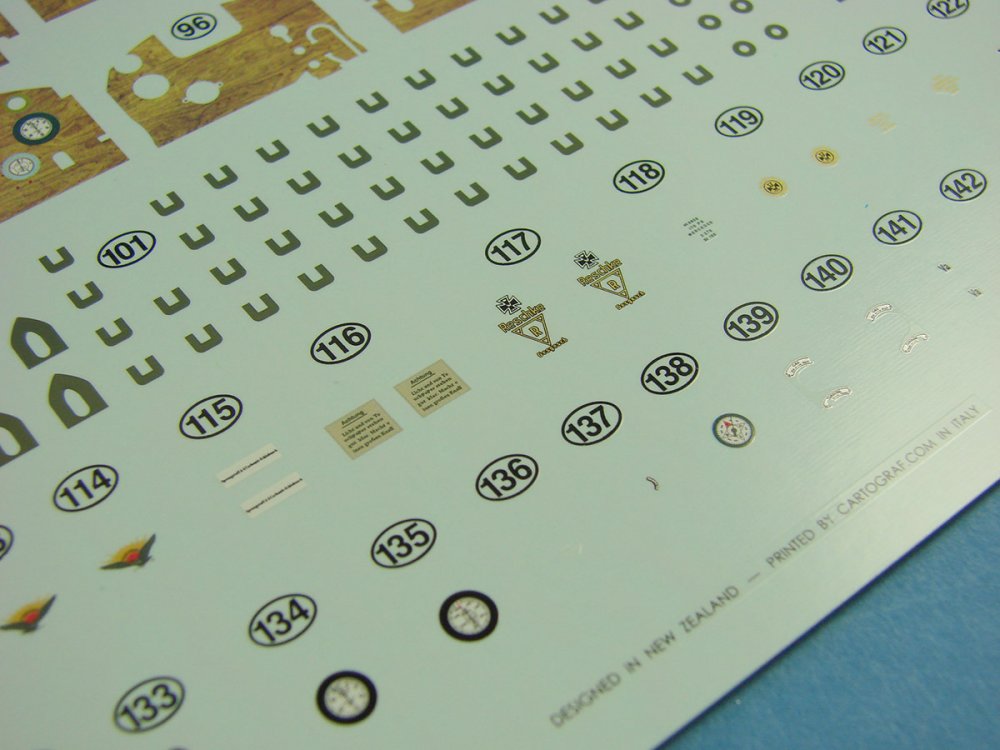
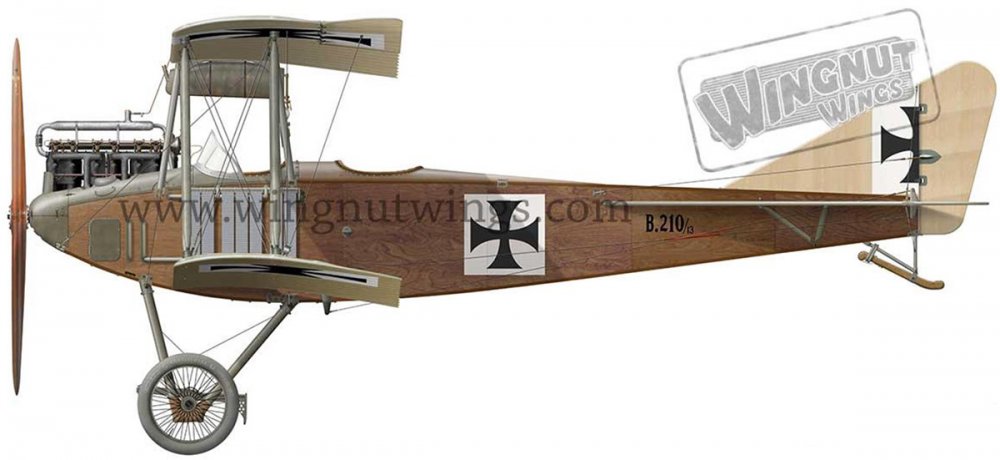
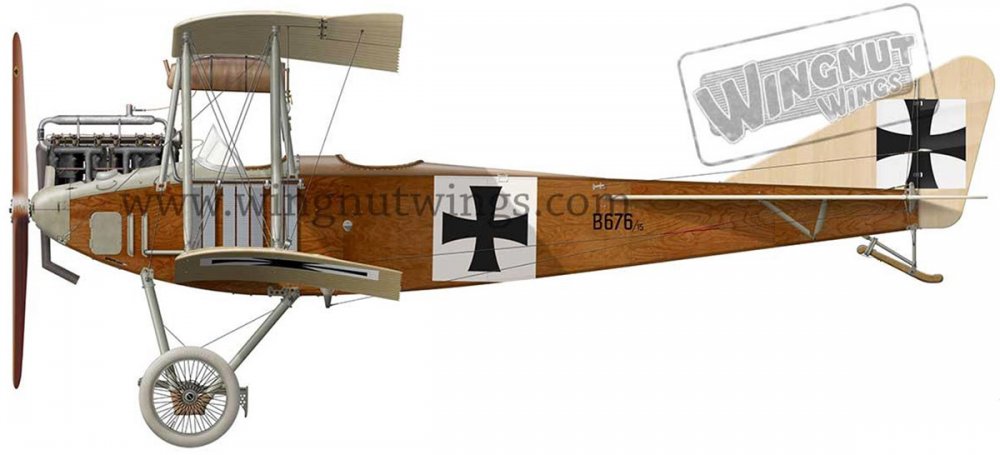
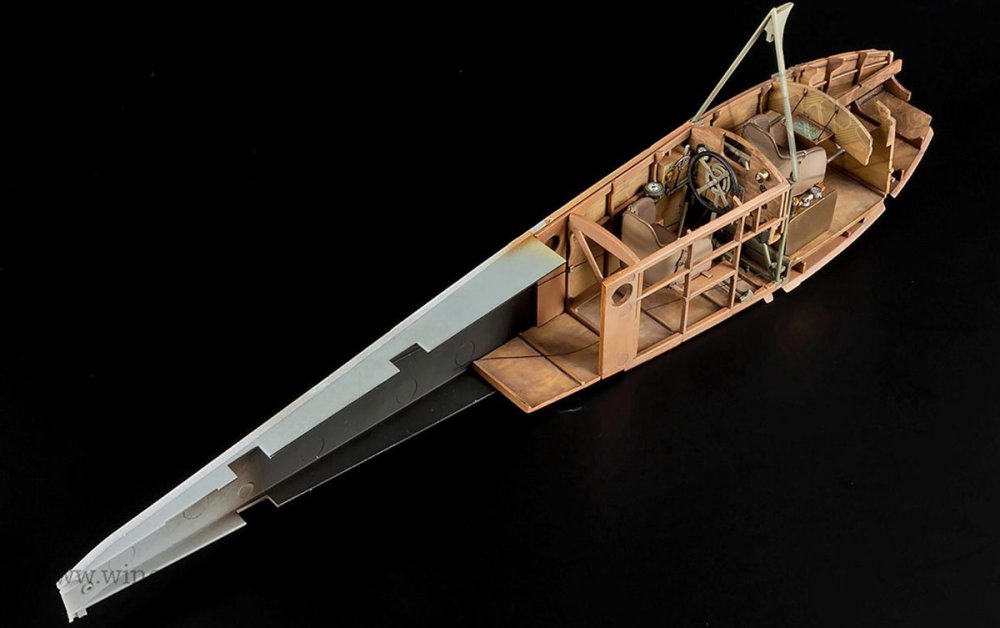
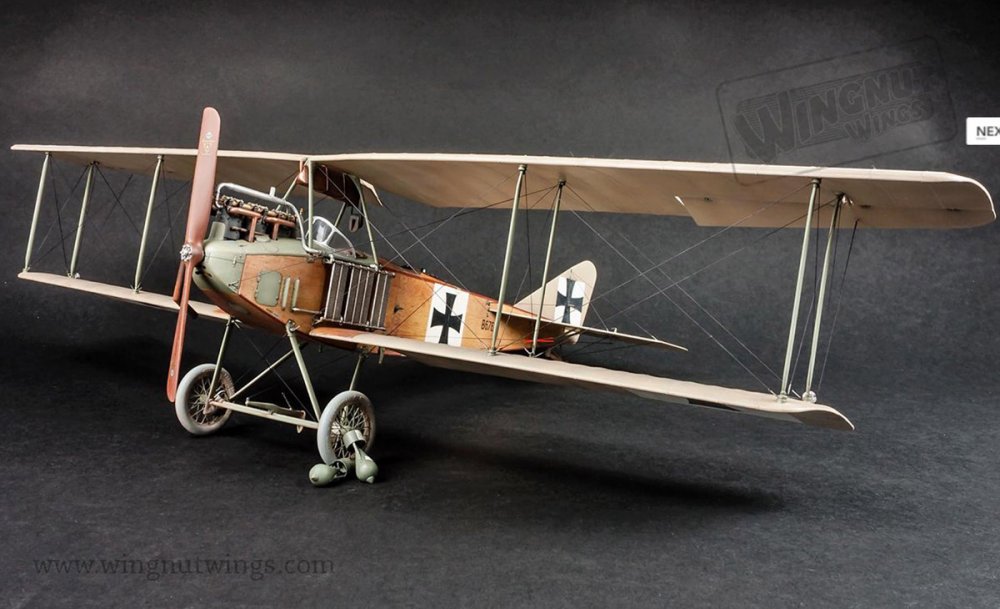
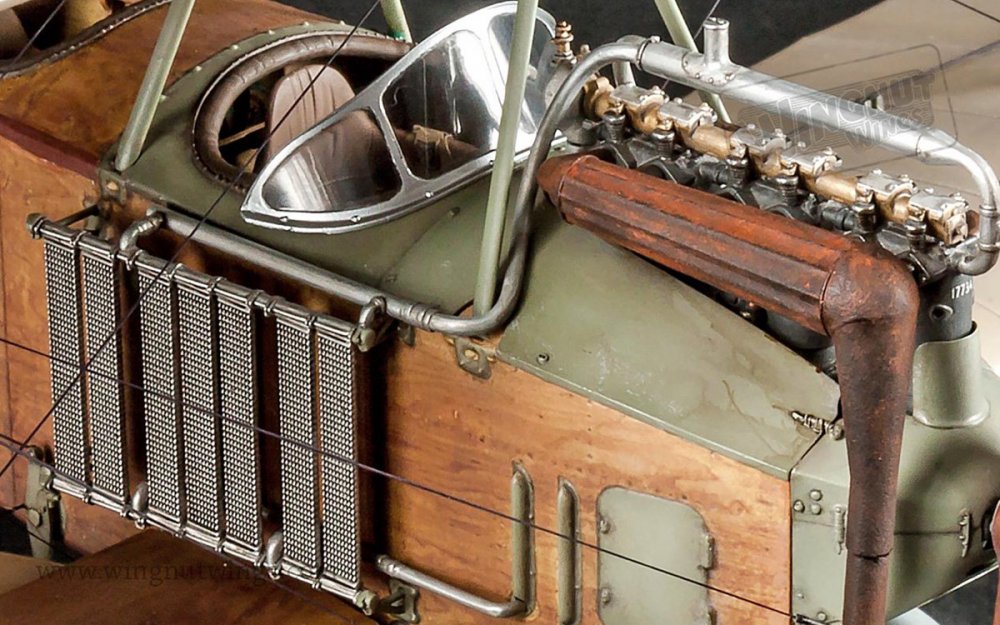
1:32 Albatros B.II Wingnut Wings Catalogue # 32046 Available from Wingnut Wings for $119.00 with FREE worldwide delivery In the years before Ernst Heinkel became known for some of his more notorious products that his own company built for the Nazis, such as the He 115 and He 111, he worked for Albatros Fluzeugwerke in Berlin. The B.II was one of his very first own-designs, and first saw service in 1913, and despite various in-service changes, both minor and major, continued to see service until after the Armistice. Designed as a reconnaissance aircraft, the type was unusually in that the pilot sat in the rearmost crew position, seriously restricting his field of view. A second crew member sat up front, in his role as observer, and whilst the type was generally unarmed, a number of machines were fitted with field-modifications such as gun mounting ring. Under standard operational service, defence was by means of the crew’s own service revolvers. It has to be remembered that the B.II first saw service in a time when fighter aircraft didn’t exist, and it was common to either throw grenades at each other or take pot shots with personal a sidearm. With the advent of the fighter aircraft, the B.II was gradually removed from absolute frontline service in 1915 and was used as a trainer aircraft. Construction of the B.II was conventional, with timber being used almost in entirety, with the exception of the steel tube control surfaces and fin. The fuselage longerons were made from spruce, and the whole fuselage was sheathed in plywood, and the machine was powered by varying types of engine, namely a 100hp/120hp Daimler-Mercedes D.1/D.II, a 100hp Argus As.1 or 120hp As.II, and also a 110hp Benz Bz.II. This particular model is supplied with the Daimler-Mercedes option. Depending on factory or chronology, the B.II was fitted with either a fuselage or wing mounted radiator, various size/shape fins and rudders. As the war progressed and metals were becoming increasingly valued as crucial for the war effort, the internal tubular fuselage frame was replaced with wood, and the aircraft designated as B.IIa. Another variant of the B.II saw it fitted with floats and designated B.II-W (Wasser). The B.II also claimed its place in history as the first enemy aircraft to drop bombs on England. These were carried internally and manually dropped by the crew member. Sittingbourne and Faversham were the victims of this incursion, but no real damage or casualties were reported. The kit This particular kit was one of the traditional Christmas releases from WNW, and one where no one outside WNW had any idea existed. These are the best sort of Christmas surprises, and especially when they take the form of such a well known and familiar machine, to fans of WW1 aviation. Resplendent with an artwork showing a B.II taking a pot-shot at a passing B.E.2C. Steve Anderson’s depiction of early aviation combat is assured in this image, showing the elegance of both protagonists. I sure hope to see the B.E.2C following this at some stage. Again, the side of the box depicts the supplied schemes, with there being FIVE to choose from here. This kit has something a little special that we’ll look at later in the decals section. There are SIX individually bagged light grey sprues included in this release, as well as a single clear one. Decals are provided on TWO sheets, and a single PE fret is included. From Wingnut Wings: 156 high quality injection moulded plastic parts. Features early production side mounted Hazet radiators and steering wheel control column as well as optional 100hp or 120hp Daimler-Mercedes engines, propellers, exhaust manifolds and covered or uncovered wire wheels. Flugzeugpistole Luger Automatik armament and 12.5kg PuW or 20kg Carbonit bombs. 39 part highly detailed Daimler-Mercedes 100hp D.1 or 120hp D.II engine. 13 photo-etched metal detail parts including uncovered wire spoke wheels. 28 page fully illustrated instruction manual. 2 high quality Cartograf decal sheets including photo realistic 1/32 scale plywood fuselage panels and markings for 5 aircraft SPRUE A This is the main detail sprue for the B.II, and contains parts for many areas of the airframe, and noticeably the cockpit area. Whilst the cockpit module is actually built upon a floor that is to be found on Sprue H, it appears that the rest of the components for this highly detailed area, are to be found here. These consist of bulkheads, including one with integral cabane struts, plus cockpit sidewall frames, fuel tank, throttle/engine ignition panel, map board, TWO instrument board options, control wheel and column with torsion bar, fuel pressurising pump, rudder pedals, multipart pilot and observer seats (identical), and tachometer etc. A few minor parts are moulded on other sprues. In some respects, the cockpit on the B.II seams a simpler affair than a number of other WW1 types, but that is quite deceptive. Seatbelts (lap belts) are supplied as photo-etch parts. Notice that the observer upper deck/coaming is moulded here as a separate part, with some beautiful leather effect crumpling around the edges. You might be forgiven for thinking that this is simply a cockpit sprue, but please note the separate forward cabane strut too, tail skid, main gear claw brake, engine cowls with delicate fastener detail, wing struts with tiny moulded holes for rigging points, undercarriage V-struts and separate spreader bars, and also the locating points for the Hazet radiators. SPRUE B Here be wings. Both upper and lower panels for port and starboard. These are moulded with superb rib and fabric detail, with delicate cap strips and a very fine, scalloped trailing edge that represents the tension on the wire from the doping of the fabric. Please note that the strut locating points are shaped, so that it’s impossible to insert the incorrect strut. Little design details like this, mean a lot. It also has to be noted that there is an external insert to add to the connection point on both upper wings. This is because there is a deep channel moulded here that will accept the connecting rods that sit atop the gravity fuel tank between the cabane struts. It would have been difficult to mould those holes at that depth without resorting to slide moulding. SPRUE C Just two parts exist on the clear sprue. These are the curved forward windscreen and the internal cockpit fuel sight glass. Both parts are crystal clear, and the windscreen framing definition is excellent. SPRUE D For the first time, we can see spoked wheels included in a WNW release! These have had to be tackled in a different way than we are used to seeing with wheels, as they are moulded as halves. This is to accommodate the set of spokes that fit to each side of the hub. Purists will say that these are maybe not fine enough, but they still look exceptional to me. Remember that these have to support the weight of the model, but still retain a scale-like appearance. I think WNW managed to succeed with this. Note that you can even see the tire inflation nipple included! A set of wheels exist without spokes. These can be fitted with the optional fabric cover parts, or you can use the photo-etch spokes included in this release! Another first. The Hazet radiators are included here, plus associated water pipe plumbing. Note that a couple of radiator parts are not for use, and are presumably for a different method of mounting that we’ll see in a future release. Other parts here are the external bomb rack and their 12.5kg PuW bombs. As the manual indicates, these were only fitted from 1916 onwards. For a really agricultural experience, some 20kg Carbonit bombs are included. These are the type that were dropped by hand whilst over target! Date on these is 1914-16. SPRUE E As usual, E is for engine, and from this sprue, you can make either the 100 or 100hp Daimler-Mercedes variants. A project in itself, this contains a multipart sump/crank case with breather pipes and a two part cylinder row onto which water piping is supplied for the jacket cooling, and also TWO types of camshaft and rocker boxes, dependent on whether you will build the 100hp or 120hp version. There are TWO options for the cylinders themselves, again depending on which version of the engine that your model will use. Magneto detail, plus water pump, ignition conduits. All you really need to add are ignition wiring and maybe some Taurus sparkplugs for extra realism. SPRUE F With this, F, is for fuselage, and this is broken down into four separate parts. The external plywood skinning is superbly recreated, with fine panel lines, and what also appear to be rivets. These are actually the wood nail positions, which I imagine will have been driven just below the surface of the plywood. In that case, this would be a good representation of this feature. The forward engine area has beautifully recreated open louvre detail and access port/hinge detail. Wing and tail location slots are clean, and the metal fixing plates for the radiators are also moulded. The upper-rear fuselage section contains the coaming for the pilot position, in the same level of detail excellence as seen on the part on Sprue A. Note that the long edges of the parts also have a beading that protrudes slightly. This represents the spruce longerons in between which the ply sheets fit. You will need to remove a little detail around the engine, if you utilise the high water pipe installation. Internally, there isn’t too much detail, but there are a number of moulded frame elements within the engine bay. It appears that ejector pin marks are kept away from all visible areas too. SPRUE H This last sprue contains the cockpit floor, ailerons, forward lower engine/fuselage cowl, gravity fuel tank, fin and rudder part and stabiliser and elevator parts. Note that the rudder and elevators are integrally moulded and if you wish to pose these dynamically, you would need to lightly score the joint and bend the surface gently. Surface detail on the control surfaces is stark and would not display internal elements through them, so WNW is correct in this depiction. Plastic summary I’ve never yet encountered any issue with WNW quality, with the exception of a couple of ejector pin marks on the odd previous release. This model has no such issues that I can see, with design being both intuitive and intelligent. Engineering isn’t overdone, and the moulding is of the highest quality, with no flaw to be seen. I can’t see any flash either, and seams are so negligible as not to be an issue. Photo Etch This includes a starboard wing walk panel, lap belts, and the spokes for the wheels. As these need to be formed into a dome shape, the circumference is split to allow that to happen. Separate rims are included to hide the split appearance of the spoke part. Etch quality is extremely high and connecting tabs are minimal. Decals TWO Cartograf printed sheets are included here. The first one has the various national marking versions, on both white backgrounds and printed separately. Where the marking overlies a control surface, separate decal parts are supplied, and these also include rigging point holes etc. This is a great way of aligning your decal precisely. A small number of stencils are printed on the first sheet, and also some curious looking dark brown strips. These are actually for the spruce longerons that run down the fuselage length. Sheet two shows some nice innovation by WNW. As well as a few further national markings, a complete set of wood grain decals! These are for both internal and external surfaces. As the B.II was mostly seen in a wooden finish, and because the shape of the subject allows it, WNW have included these photo-realistic decals. The carrier film on them is also barely existing beyond the border of these parts, meaning that fitting them should be easy. Note that decals are also included for the instrument board – both front and rear faces. The resulting finish should be quite extraordinary. I’m sure you’ll agree that these decals look quite amazing. If you want to make these look a little richer, as seen on some schemes, you can of course mist over a transparent colour, such as Tamiya Clear Orange. Also printed here are more stencils, instruments, data plates, and various hinge and cable point grommets/ferrules etc. Printing is first rate, with everything being nice and thin, and in perfect register. The schemes available are: Albatros B.II 210/13, Albatros built, 1915-1916. Albatros B.II, MAN built, April 1915. Albatros B.II 676/15, 1916. Albatros B.II 847/15, 1915-1916. Albatros B.II 1131/15, 1916. Instructions This is a beautiful, 28 page glossy affair with a history on the front, parts plan with colour codes supplied for Tamiya and Humbrol colours, and constructional sequences that are a joy to follow. These are drawn in greyscale, with blue ink used to denote new part additions. Colour references are supplied throughout, and these are interspersed with full colour illustrations what depict completed assemblies. Contemporary reference is supplied for the engine, and period photos are used throughout as reference. These extend to the scheme illustration areas in the rear of the manual. As is usual, Ronny Bar has done the profiles themselves, and they, as always, are excellent. A rigging diagram is also included. Conclusion A fantastic kit of a very beautiful aircraft, carried off with the sort of aplomb that only WNW can create with their releases. The inclusion of the wood decals is also a wonderful bonus, putting the ability to recreate this effect at the fingers of all modellers, and not just the more experienced. Detail is everything that we have come to expect from these releases, from the well-appointed crew positions and the engine, to the realistic fabric and rib detail, coupled with the spoke wheel options. Whilst the Hannover Cl.II and Roland C.II are probably my all-time favourites, I’m feeling they are starting to be usurped by this release. Top marks to WNW. You really need to treat yourself to one of these, right now! Very highly recommended My sincere thanks to Wingnut Wings for this review sample. To purchase directly, click THIS link.


-
Ju-88C-2 "4D+FH" in pieces
JayDee replied to JeroenPeters's topic in LSM 1/35 and Larger Work In Progress
Looking amazing. Still a cop out not fitting those wings -
That's certainly something to aim for. Probably the best of of these that I've seen done. It's a shame that Bandai didn't pay much attention to the design of the stand, so I can understand why you didn't show its base!
-
1/32 Tamiya Spitfire MkXVIe Cooper race 1949
JayDee replied to Mauricio_1971's topic in LSM 1/35 and Larger Work In Progress
Frickin' gorgeous! Just when I thought I'd weaned myself off wanting one of these kits too..... -
You're a sick man, Mikey. Another 109 that is at a place that I only dream of getting to. Great scheme too
-
Revell 1/32 ju-88 a1j
JayDee replied to Brundledonk's topic in LSM 1/32 and Larger Aircraft Ready for Inspection
Corking result. A sizeable bird too. If you've any construction photos, please share! -
Ju-88C-2 "4D+FH" in pieces
JayDee replied to JeroenPeters's topic in LSM 1/35 and Larger Work In Progress
Got to love a flange to sort the problem! Looking good. Can't wait to see under some primer. -
...and the real crux here is that if he screws it, he can't go to the shop or HK for new parts!
-
Yes, I felt I had to reply to Andreas on LSP.
-
The Trumpeter 262 kits are superb, I agree. The only real 'issue' with the 2-seat is the slight difference in rendering of panel lines between the wings and the new-tool fuse. But, it's a shit hot kit!
-
I would kill for space like that. Even an en-suite crapper!
-
1:32 Revell Spitfire
JayDee replied to Mish's topic in LSM 1/32 and Larger Aircraft Ready for Inspection
VERY nice! A much maligned kit (in some quarters), but looks great when done