


BevanBrooks
-
Posts
432 -
Joined
-
Last visited
Content Type
Profiles
Forums
Events
Gallery
Everything posted by BevanBrooks
-
zoukei-mura FockeWulf Ta152H-1
BevanBrooks replied to TeWika's topic in LSM 1/35 and Larger Work In Progress
Your killing me Ted I want to see how this turned out. If the fuzzy pics are anything to go by pretty damn nice Cheers Bev -
1:32 Hasegawa Ki44-II (item 08220)
BevanBrooks replied to rieser's topic in LSM 1/35 and Larger Work In Progress
How many rounds of masking did you say that was again lol! Neat and tidy, on to the markings great stuff mate. Bevo -
1:32 Hasegawa Ki44-II (item 08220)
BevanBrooks replied to rieser's topic in LSM 1/35 and Larger Work In Progress
Pulling up a seat Ralph. Dont reckon you can jinx this build mate, airframe looks like it's gone together very nicely. Cheers! -
zoukei-mura FockeWulf Ta152H-1
BevanBrooks replied to TeWika's topic in LSM 1/35 and Larger Work In Progress
Great attention to detail, I wish I had your patience!! Bevan -
Yep nice and dirty, just the way I like'em! Nice work. Cheers Bevan
-
1/32 Hasegawa N1K2 Shiden
BevanBrooks replied to CruZz's topic in LSM 1/35 and Larger Work In Progress
Love the effects on the control surfaces, great stuff. Bevan -
1/32 Hasegawa N1K2 Shiden
BevanBrooks replied to CruZz's topic in LSM 1/35 and Larger Work In Progress
That's looking the business. Great stuff. Did you spray the worn effects over the whole model or just where you wanted to chip? Cheers Bevan -
Nice work Pete!! And you're welcome. Cheers Bevan
-
Hi Pete, you could try cutting the head armour off, cutting the cross brace and point of the "v" so you have two halves. Make a spacer piece to get the correct width. At least you'll keep the frame work in scale and hopfully minimal paint work............ just my 2cents worth. Cheers Bevan. Ps hows the 109E coming along?
-
zoukei-mura FockeWulf Ta152H-1
BevanBrooks replied to TeWika's topic in LSM 1/35 and Larger Work In Progress
Looking sharp Ted. I usually use a rivet wheel but would love to do just one kit with a beading tool, it looks a lot more realistic. Keep us posted. Cheers Bevan -
Inspiring stuff Johan, I like your style of paint work. Cheers Bevan
-
Mig 3 - In the Buff
BevanBrooks replied to wackyracer's topic in LSM 1/35 and Larger Work In Progress
This is looking very cool so far!! -
Hasegawa 1/32 Fw 190 D9
BevanBrooks replied to BevanBrooks's topic in LSM 1/35 and Larger Work In Progress
Hi Ted, thanks. Nothing fancy about the setup just a fugifilm finepix j20 set on auto with the macro function on, flurecent light and a black background. A little editing as well!! Cheers Bevan. -
Hi Pete awesome work. I really like the Ta 152 pit, pretty realistic. Hopefuly you can update us sooner rather than later on your builds...........as well as the Corsair. Cheers Bevan
-
Hasegawa 1/32 Fw 190 D9
BevanBrooks replied to BevanBrooks's topic in LSM 1/35 and Larger Work In Progress
Hi guy's, been a while in between drinks. The exhausts were painted h76 burnt iron with xf2 flat white added then matte coated. Burnt umber pastel dust was rubbed in and affixed with an xf85 rubber black enamel wash. Then matte coated again. A thicker application of the xf 85 wash was applied around the base of the stubs. 2b grey lead was touched along the edges of the openings and finally the openings themselves were blacked out. Hope everyone had a great Christmas. Cheers Bevan -
Loving your work! Cheers Bevan
-
Your attention to detail is fantastic. Your weathering is very realistic and a joy to look at. Cheers Bevan
-
KI-61 Hien Haségawa 1/32
BevanBrooks replied to AdrienD's topic in LSM 1/35 and Larger Work In Progress
Very nice Cheers Bevan -
Pretty awesome! Love the colour variation in the paint work. What paints and final varnish did you use? Cheers Bevan
-
1/32 Revell Heinkel 219 wip
BevanBrooks replied to BevanBrooks's topic in LSM 1/35 and Larger Work In Progress
Hi, have a look on page 3 of finished work, it was finished some time ago. Cheers Bevan -
1/32 Revell Heinkel 219 wip
BevanBrooks replied to BevanBrooks's topic in LSM 1/35 and Larger Work In Progress
Photobucket didnt screw up I did. I deleted the photos from my album to make more room not realising that they would be deleted from here as well, a rookie mistake!! I've still got all the photos in a file on the computer though. Sorry for the inconveniance, there are however pics of the finished model in the finished projects section. Cheers Bevan -
Hasegawa 1/32 Fw 190 D9
BevanBrooks replied to BevanBrooks's topic in LSM 1/35 and Larger Work In Progress
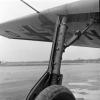
Cheers guy's. The wheel hubs were painted with xf1 flat black and the tires with a mix of xf85 rubber black and xf2 flat white. I then sealed them with a coat of acrylic clear. Next I gave them a pin wash of Tamiya enamel xf 10 flat brown, sealed with clear. I sprayed a thin mix of black around where the tire meets the hub. I then thinned some xf24 dark grey with a drop of flat white and lightly tried to highlight the bulged part of the tire, again sealed with clear. With the xf10 flat brown and xf57 buff enamel I touched here and there for a bit of grubbiness followed by some white oil paint over the whole lot. 2b grey lead pencil was used on the edges for a bit off chipping. This was all coated with Testors model master flat acrylic clear. The prop blades were painted with Gunze RLM 70 black green and given a wash of white oil paint. Sealed with testors flat, the pencils came out for some scratches. .............and I gotta say, pretty average shots of the props! Cheers Bevan -
1:24 Grumman F7F Tigercat N7654C
BevanBrooks replied to airscale's topic in LSM 1/35 and Larger Work In Progress
Epic build! Kudos to you. Bevan -
Hasegawa 1/32 Fw 190 D9
BevanBrooks replied to BevanBrooks's topic in LSM 1/35 and Larger Work In Progress
Hi, yes the RLM 81 is a custom mix Gunze H421 RLM 81 1ml Tamiya xf9 Hull Red 4 drops RLM 76 Tamiya xf23 1 ml Tamiya xf 2 flat white 20 drops This mix was used on the ailerons wing and tail plane tops. Bottom engine cowling was Gunze RLM76 out of the jar Hope this helps -
MIG 23 MLD Flogger K - Trumpeter 1/32
BevanBrooks replied to Paulo Lopes's topic in LSM 1/35 and Larger Work In Progress
Great work so far, can't wait to see the paint start flying Cheers Bevan