DocRob
-
Posts
7,127 -
Joined
-
Last visited
Content Type
Profiles
Forums
Events
Gallery
Everything posted by DocRob
-

Special Hobby Whirlwind
DocRob replied to Peterpools's topic in LSM 1/35 and Larger Work In Progress
Wow Peter, only some days away and disaster struck. You put so much effort into the beautiful Whirlwind, it's a shame to see it has been binned. I can understand your reaction, as some kits just push you over the line. I binned kits too, but I always try to calm down, before doing so and try to find a solution, like showing the bird with retracted LG in flight,... There are kits, which are bad / delicate in some ways and some of them trigger my appetite to finish them, like in my case the MikroMir Fokker D.VIII or the Fly Arado 234, which is an on and off shelf queen, but I desire to finish it and then there are kits, which are utterly frustrating Time is too precious to deal with these, maybe there will be something useful recycled from your Whirlwind. This said, I have several Special Hobby kits in my stash and I hope the best, as SH has some really interesting subjects in their portfolio. Cheers Rob -
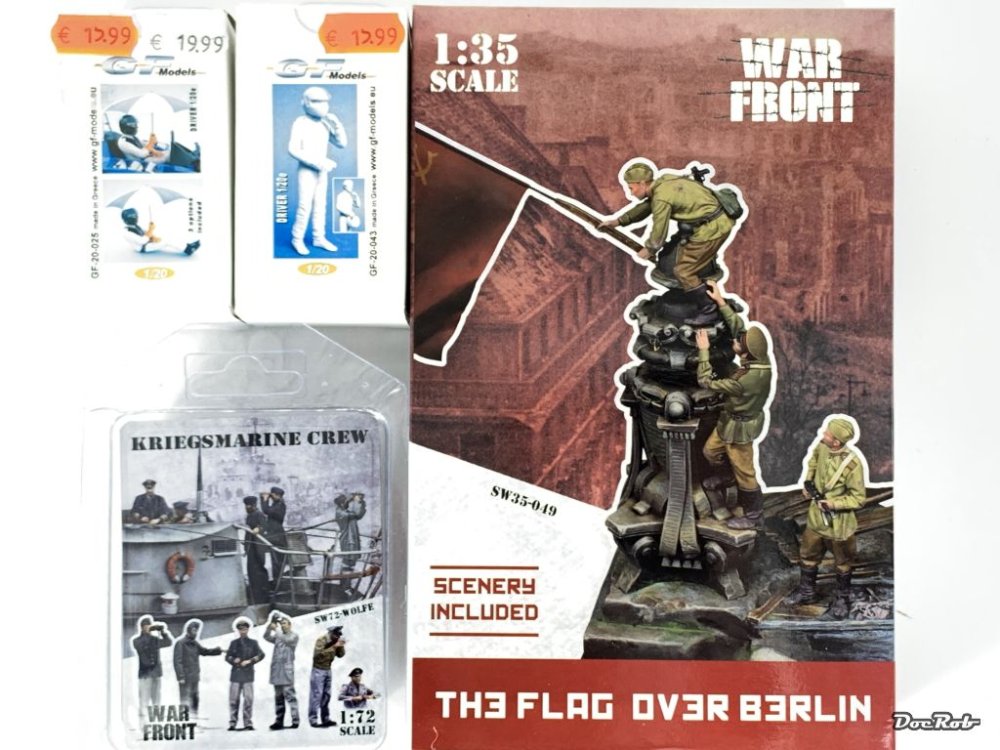
I'm back from my Berlin trip and need some rest from my trip, phew, so many things to do, not a lot of sleep and lots of goods to buy. Model wise, there was only little, as we already had 80kg's of luggage, but it was great to visit some of the still existing hobby shops. I bought a Berlin related figure set in 35 scale from Scale 75 and a 1/72 set of resin figures for my possible Schnellboot S-38 entry for the 'wet' group build. The 1/20 resin driver figures are for my McLaren MP4/2 (Alain Prost) and the second for a Lotus. Unfortunately the umbrella of the Lotus driver wasn't in the package. Another thing, I imported unluckily was the plague. Yesterday a test confirmed, I got the big C and have symptoms of a mediocre flu, f***. Cheers Rob
-
I had to do it, these Tamiya kits have their own attraction in their near perfectness. I added Brassin wheels, Quinta interior details and Ammo belts from KitsWorld. I will do a NMF P-51 with this and I really like Blondy from the box or Petie 2nd also provided. How does the provided decals perform, has anybody used them? Cheers Rob

-
How many Gary, there is no way to chicken out 🤣. Cheers Rob
-
Trumpeter F4F-3 Late - 1/32nd
DocRob replied to Bomber_County's topic in LSM 1/35 and Larger Work In Progress
Sorry to hear about your decal probs Phil. Weathering might enhance the issue, setteling in the cracks. I believe, 1ManArmy has a set of masks for markings AND stencils in their portfolio. Cheers Rob -
GWH Curtiss P-40B; The Flying Tigers
DocRob replied to Peterpools's topic in LSM 1/35 and Larger Work In Progress
And I thought these early P-40's had only the ring and bead gunsight, but what do I know . Cheers Rob -
Muchas gracias amigos, it will be the first time back to my old hometown of Berlin since four years. I will feel like a tourist there, I guess. It will not be only fun though, some family business and other demanding things to do, but I will visit one or two LHS's, something, I have not on my island. Cheers Rob
-
Great build and setting Martin. To many Z's for my liking, but you explained the chosen scheme. Cheers Rob
-
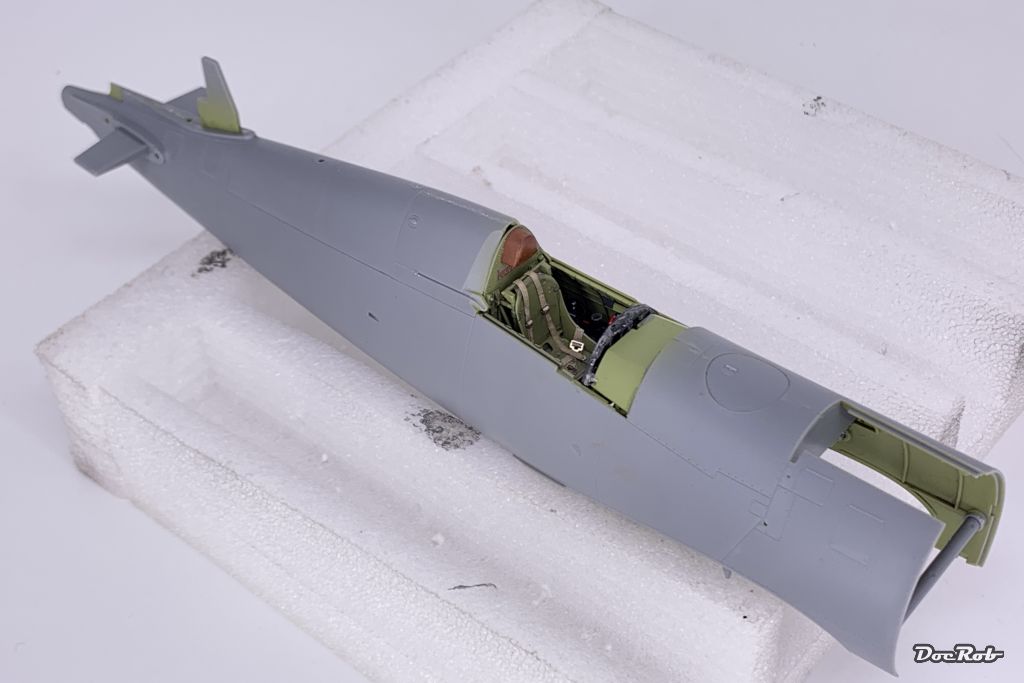
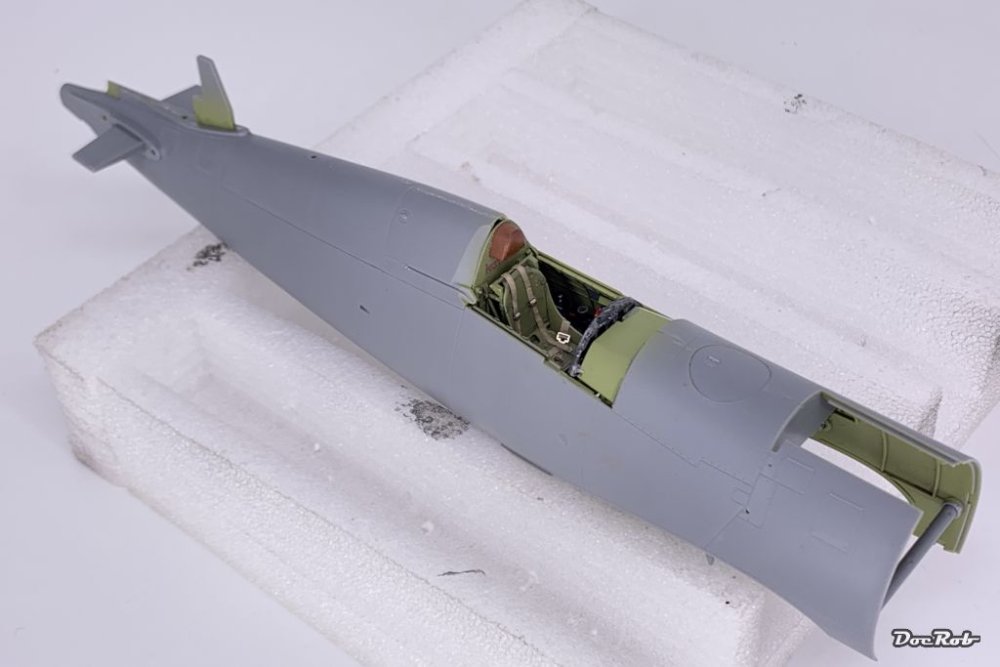
I closed the fuselage, after inserting the finalized cockpit and rear framing. For better alignment of the front structural parts, I glued them to one side of the fuselage and dry fitted the other half and let the glue cure over night, perfect alignment. I know, the headrest should be black, but I preferred brown, at least for the moment. That's it for the next two weeks from my side, I'm going on vacation and take only the phone with me. So don't wonder if there may be some occasional likes, but no comments. Cheers Rob
-
GWH Curtiss P-40B; The Flying Tigers
DocRob replied to Peterpools's topic in LSM 1/35 and Larger Work In Progress
Oh, I already posted the pics here some years ago. Cheers Rob -
1:64 HMS Indefatigable (1794) - prototype for Vanguard Models
DocRob replied to JayDee's topic in Non LSM 'WIP
Another stellar kit from Chris of Vanguard Models. It was about time to present this one to our landlubber forum, as I followed your prototype build on MSW eagerly. Having built Vanguards Duchess of Kingston sans rigging until now (winter business), I can only state these kits are among the best you can get as wooden ship models. I have HMS Sphinx in my stash, so it will be a while to consider Indy as a new project, but she is so tempting. Hey Ho, Hornblower, let's go -
Fisher F9F finished
DocRob replied to JohnB's topic in LSM 1/32 and Larger Aircraft Ready for Inspection
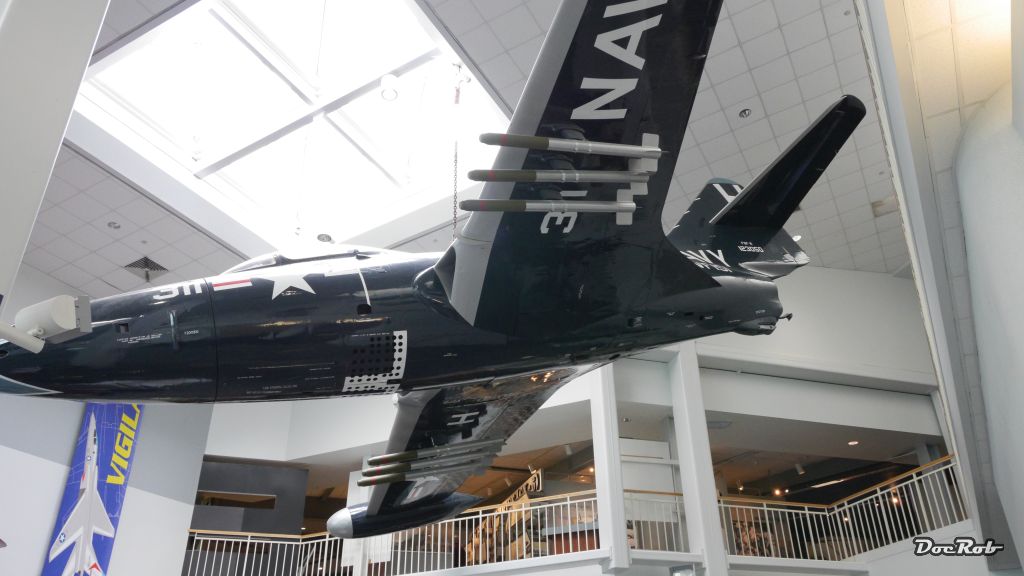
That's a nice coupe there with the Corsair. Splendid work as always and the GSB came out perfect, like on the pic I found from some years back in Pensacola. Cheers Rob
-
@belugawhaleman, Paul, you can build the larger Char B1 bis. The Tamiya kit is wonderful, and it's easier to paint, being larger and a bit boxy. You can also try markers for the outlines. It worked on my Lancia recently, but yours has to be thinner. Cheers Rob
-
GWH Curtiss P-40B; The Flying Tigers
DocRob replied to Peterpools's topic in LSM 1/35 and Larger Work In Progress
Interesting Peter, I'm along with the guys, great choice and a kit, I have thought about buying sometimes. If you are interested I can post some mediocre pics of the real thing, I took in Pensacola some years ago. Cheers Rob -
Nice work on the IP Carl. I really like the idea of using the outside ring masks for coloring the bezels. I used these often for other jobs, but never thought of them for bezels. Am I alone in thinking te ZM IP looks very soft in detail and a bit toyish? It was the same with the TA-152, where I used PE. I don't know what it is with ZM, The Phantom IP's look absolutely crisp, means, they are able to deliver. Cheers Rob
- 90 replies
-
- 3
-

-

-
- zoukei-mura
- 109
- (and 1 more)
-
Revell Me262 B-1a/U-1 Nachtjäger "Red 12"
DocRob replied to CANicoll's topic in LSM 1/35 and Larger Work In Progress
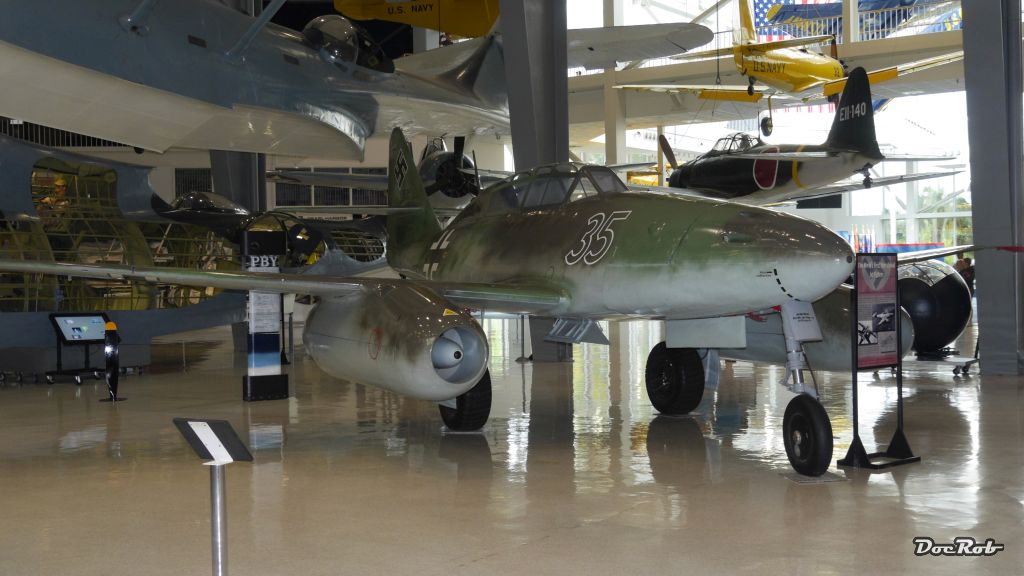
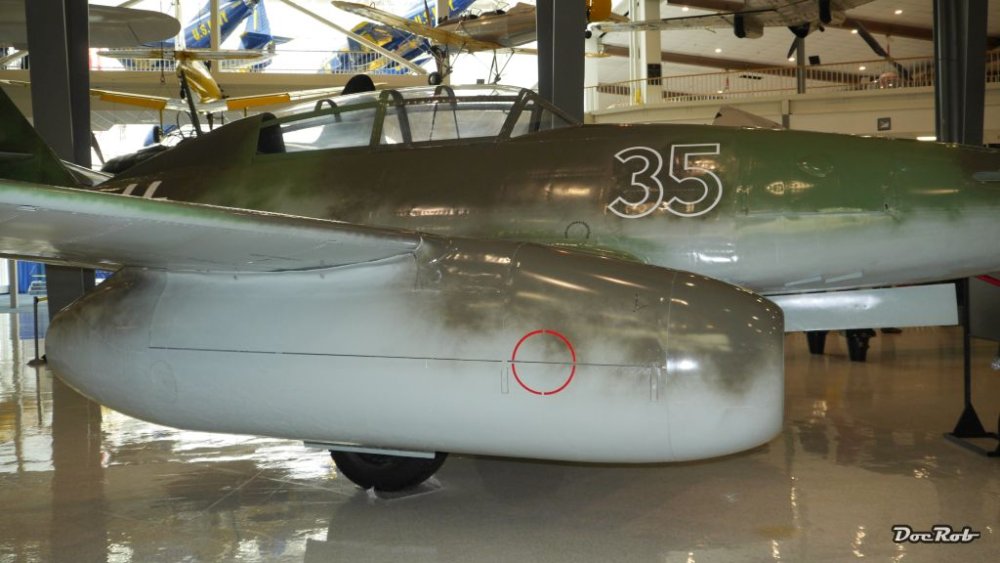
Great result. Like Gary said, not easy to weather. I remembered, that I took some pics years ago in Pensacola from the real thing. Not the best photos, the lighting was very bad. Cheers Rob
-
Never liked Bikini Tops, .... on Jeep's I mean. Cheers Rob
- 2,036 replies
-
- 6
-

-
- car related stuff
- anything about cars
- (and 6 more)
-
AK Interactive Real Colors (Acrylic paints)
DocRob replied to JeroenPeters's topic in Tools, Books & Misc.
I used AK's Real colors some time now and I really like them. They spray very fine, thinned with Mr. Leveling Thinner and cover very well with only light coats. Until now, I only painted interiors with only a bit of masking, using Kabuki tape and Mr. Neo liquid mask without any lifts. I only primed the PE parts here. I will use AK's RC for the exterior on my actual Corsair build, but I will apply primer (Mr. Surfacer) for that task. I will mask insignia and stencils with Kabuki and I can't foresee, what kind of physical abuse will be used during weathering (hairspray, chipping, sanding, ...) and which kind of medium I use (acrylic, lacquer, ...). Like you, I want to skip unnecessary steps, but for a paintjob, I will opt for a durable base, instead of having paint lifts or other effects at times, I'm thinking of completing the build. My experiences (many) with Vallejo Air were mixed to subpar in every aspect. They lifted easier, spray more delicate. I trust RC colors way more, but like I said, when it comes to ruining a near finished kit, I will go the safe way. I'm not a re-doer, I will never strip a paintjob, the first application has to be the last, with corrections naturally. A completely ruined paintjob would de-mojo me and I probably would bin the kit. Cheers Rob -
The gap in front of the windscreen, how wide is that? I guess far less than half a millimeter. Maybe sanding the hull parts a tiny little bit would you spare the filler, if the main canopy part fits afterwards. Cheers Rob
-
Special Hobby Whirlwind
DocRob replied to Peterpools's topic in LSM 1/35 and Larger Work In Progress
The camo came out great Peter. Good to hear, that you are recovering and your hands got steadier with time. I am always afraid of freehanded spraying, even with my normally steady hands. Cheers Rob -
Great looking paintjob on the Panther, John. I never built a GSB bird, but it seems to flow naturally from your hands. Cheers Rob
-
What is on your bench right now ? Share a picture :)
DocRob replied to Martinnfb's topic in Modelling Discussion
Great job Martin the tiny BTR looks amazing. Let us now about the results of the competition. Cheers Rob -
Muchas gracias hombres. I want to have a worn, but not overused look with the Corsair. Painting the interior green was done with three different shades of the color along with some brown panel liner. After flat coating all, I applied some Uschi van der Rosten iron pigments, which are among the finest you can get and gave everything a slight metallic sheen, which I really like simulating painted metal. Then some scratches and tearing with AK's True Metal Wax dark aluminum applied with a toothpick finely and then rubbed into the surface with fingers and cotton swabs. The seat belts were pre crumpled, rolling the paper parts through my fingers and after assembly the received a brown wash, rubbed in with my fingers. Cheers Rob
-
Valentine MK.II/IV Tamiya 1/35
DocRob replied to belugawhaleman's topic in LSM 1/35 and Larger Work In Progress
Good to hear, you are better now. The Valentine looks nice and I do like your method of building length and link tracks too. Cheers Rob -
IJN Shimakaze - Hasegawa + Infini upgrades and other AM - FINISHED
DocRob replied to Landlubber Mike's topic in Non LSM 'WIP
Wow Mike, that's a stunner. Detail and painting / weathering is looking so real, as does the water. One of the few occasions, where everything blends into a perfect result. Cheers Rob