DocRob
-
Posts
7,118 -
Joined
-
Last visited
Content Type
Profiles
Forums
Events
Gallery
Everything posted by DocRob
-
Nice work on the 104 Carl. Your template seems to have worked fine. Sometimes there are simple and effective solutions, but it's hard to find them, that's where LSM comes into play, idea stored . Cheers Rob
-
 Phew, this tail fit looks downright ugly. It seems ZM has nearly always some areas, where a toy designer was at work (with exception of their Kai Phantom). I hope your surgery will succeed. Cheers Rob
 -
Revell Me262 B-1a/U-1 Nachtjäger "Red 12"
DocRob replied to CANicoll's topic in LSM 1/35 and Larger Work In Progress
Sorry for being late to the party, but your 262 looks terrific with the mottled camo. I have the same kit along with some goodies in stash and will give the mottling a try, when it comes to that. I normally use a H&S Infinity with a 0,2 nozzle, but will dig out my old and trusty Rotring airbrushes again, which have the advantage only being one and a half action, not double action. It's easier to control the color dispersion with these. Like some of the others, I'm eager to see the results of your slight sanding, which I never tried before. Cheers Rob -
Trumpeter/Revell P-51B done
DocRob replied to JohnB's topic in LSM 1/32 and Larger Aircraft Ready for Inspection
I like her a lot. There is no decent -B out there, but your transformation produced one, great. Like Hubert said, you nailed painting and decaling, what's not to like there. Ah, the canopy, wasn't it frosted over during the flight, slowly melting now ? Cheers Rob -
What is on your bench right now ? Share a picture :)
DocRob replied to Martinnfb's topic in Modelling Discussion
Thank you Paul, I'm blushing. I don't know about Silly putty, but Panzer Putty tends to flow a lot with time and gravity. It helps to apply it thin and to work fast. Blue Tack might be better in that way, but it is also a bit harder to give it the right shape. Panzer Putty flows easily into small crevices and sharp angled parts, that's why I used it here. The work area shouldn't be too warm, which enhances the flow and you shouldn't squeeze the stuff for too long, which has a similar effect. If you use either stuff for masking, make sure that you airbrush from different directions with thin layers to avoid differently sharp contours around the blobs. Cheers Rob -
What is on your bench right now ? Share a picture :)
DocRob replied to Martinnfb's topic in Modelling Discussion
Oh my, Hubert, why can't Porschistas not differentiate between a Lancia and a Beetle . Batman in a Beetle, cool thought. But you're absolutely right, there are some undeniable similarities between the Lancia and the Insect in your pic. The Italians were well known for their weird camos, but this seems even a little razzle dazzle. Cheers Rob -
What is on your bench right now ? Share a picture :)
DocRob replied to Martinnfb's topic in Modelling Discussion
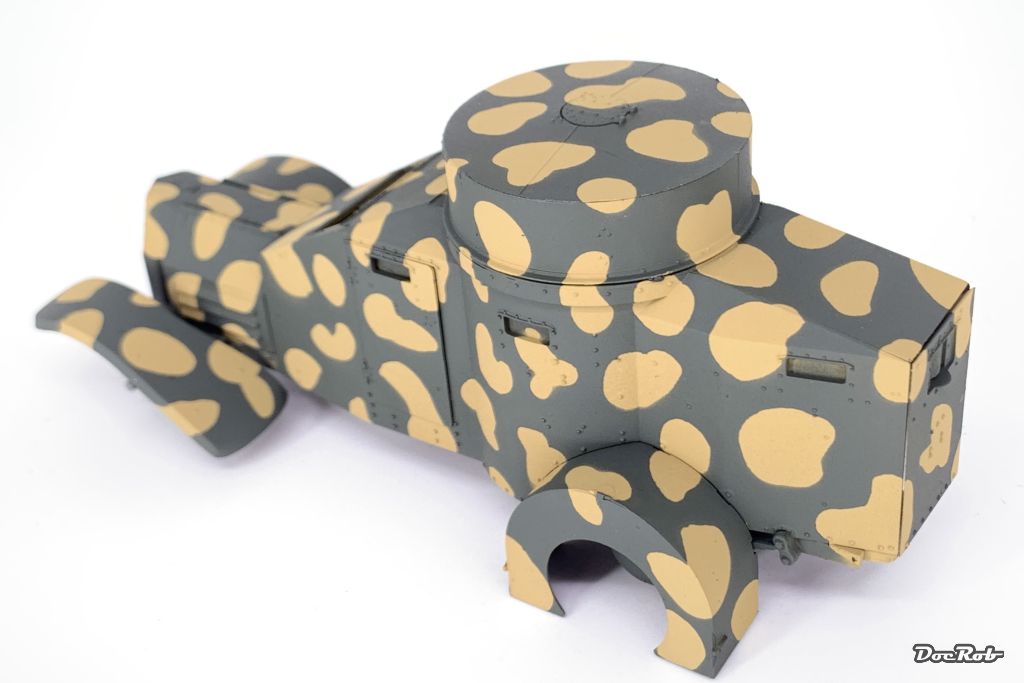
Muchas gracias amigos, but the Lancia got a desease . It's only Panzer Putty, which adheres well, but tends to flow over night and I had to redo the first dots, because of this. You have to work fast with that stuff. Then I applied a coat of field gray over the dark yellow, carefully from all sides, to keep the sharp contours. I removed the PP-blobs carefully with a ball of the stuff, which is sticky enough to lift them after only half an hour of drying time. Cheers Rob


-
Beautiful paintjob on that Canary Scott. In fact the Canaries on my island only have yellow bellies. The color can be a pain, but you mastered it perfectly it seems. Cheers Rob
-
Chikuma - Tamiya - 1/350 - IJN Heavy Cruiser-Finished
DocRob replied to KevinM's topic in Non LSM 'WIP
Fantastic progress with the rigging. I never imagined, that there is so many of it, but you managed that beautifully. The cruiser is a looker for sure. Cheers Rob -
Nice progress Gary. The cockpit looks nice and busy and the seat belts are eye catching. Good to hear about the good fitting and these small sink marks are no deal breaker. Is there the perfect kit out there, hmm, just started my new Tamiya Corsair... Cheers Rob
-
What is on your bench right now ? Share a picture :)
DocRob replied to Martinnfb's topic in Modelling Discussion
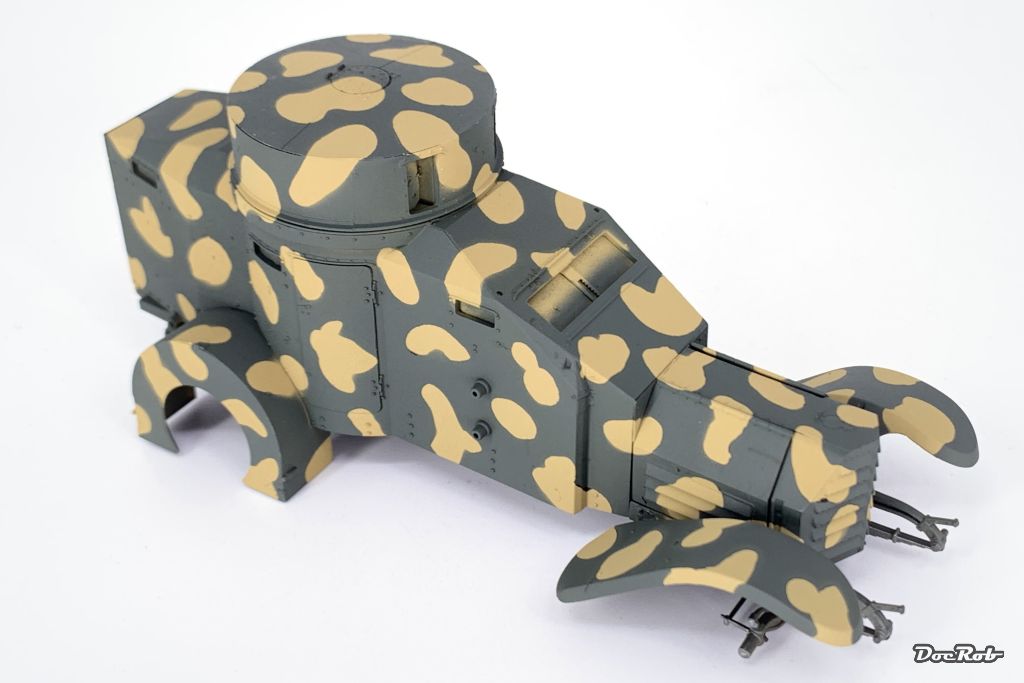
Lancia 2.0, this one is a shapeshifter. I gave it a coat of dark yellow, which will be the lighter camo color. Next, I will put on small blobs of Panzer Putty or Blue Tak, depends on which works better for the yellow dots. Then I will spray olive green and then paint the borderlines with a brush or marker in flat black. Cheers Rob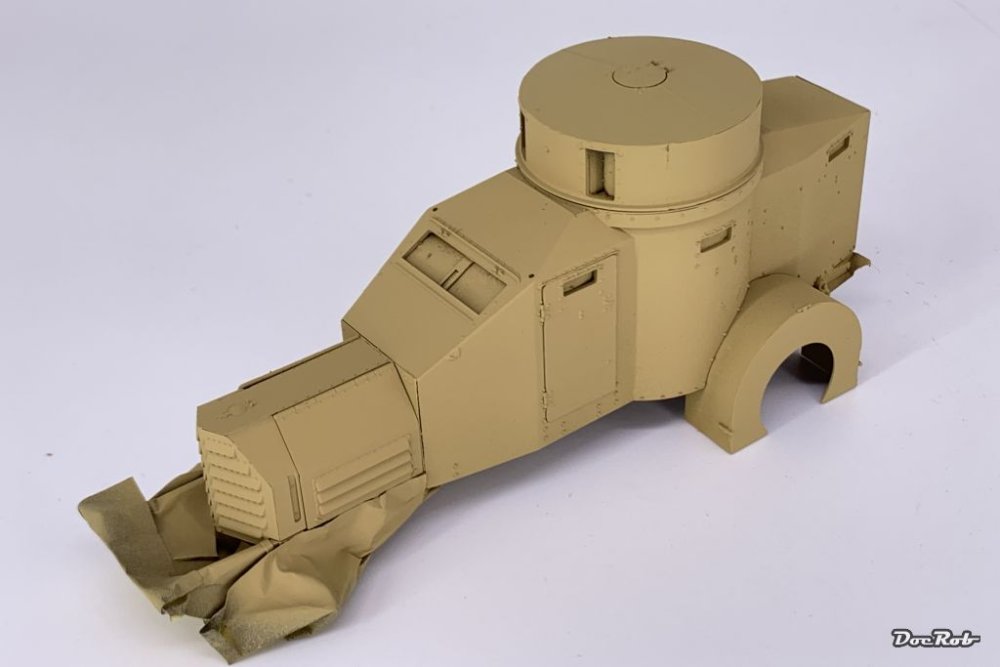
-
Great detail and detail painting on the interior and equipment clutter Phil. Can't wait to see the Halbkette 'closed'. What type of camo will you apply? Cheers Rob
-
Trumpeter F4F-3 Late - 1/32nd
DocRob replied to Bomber_County's topic in LSM 1/35 and Larger Work In Progress
Very nice Phil, she will be a beauty in your hands. The engine looks sharply detailed too. Cheers Rob -
What is on your bench right now ? Share a picture :)
DocRob replied to Martinnfb's topic in Modelling Discussion
And then, what... ? Cheers Rob
-
A Ukrainian beauty Martin with a great 'blended in' appearance. The Mig looks very close to the first pic, what more can be said. BTW: Harsh sunlight and heavily cast shadows ruin every photo session Cheers Rob
-
Great progress with the office and engine Gary. It seems like ZM has some 'soft' spots in every kit for some reason only known to themselves. I hope the six point attachment of the engine struts is better designed than with their TA-152, where it couldn't work like described in the manual. Good choice to go for light gray as highlighting color, I do the same and never use silver shades for that purpose, just looks better scale wise. Cheers Rob
-
Tamiya F-14 VF-2 Bounty Hunters
DocRob replied to Bill_S's topic in LSM 1/35 and Larger Work In Progress
Great build and paintjob on that beautiful beast Bill. I love the high-viz schemes on the F14, they emphasize the elegance in the brute. The Tomcat is by my favorite western jet ever, maybe not as iconic as a F-104 or F-4, but design and that it was makeable at the time, makes it a standout. Cheers Rob -
What is on your bench right now ? Share a picture :)
DocRob replied to Martinnfb's topic in Modelling Discussion
Great Carl, but without any AM and delicate PE, pah . Cheers Rob -
Great paintjob with the fading colors Bill, what a beauty. Cheers Rob
-
What is on your bench right now ? Share a picture :)
DocRob replied to Martinnfb's topic in Modelling Discussion
I was contemplating about that from the beginning, but wanted to try the camo the other way around. In fact, I had the idea for a French WWI tank some time ago and wanted to give it a try. When I saw the scheme of the Lancia, I had to try it. Even with the marker, the camo will be very difficult to apply, especially in tight spaces around the wheel housings and front fenders. I have to let that sink in for a bit and then I will decide how to progress. Cheers Rob -
What is on your bench right now ? Share a picture :)
DocRob replied to Martinnfb's topic in Modelling Discussion
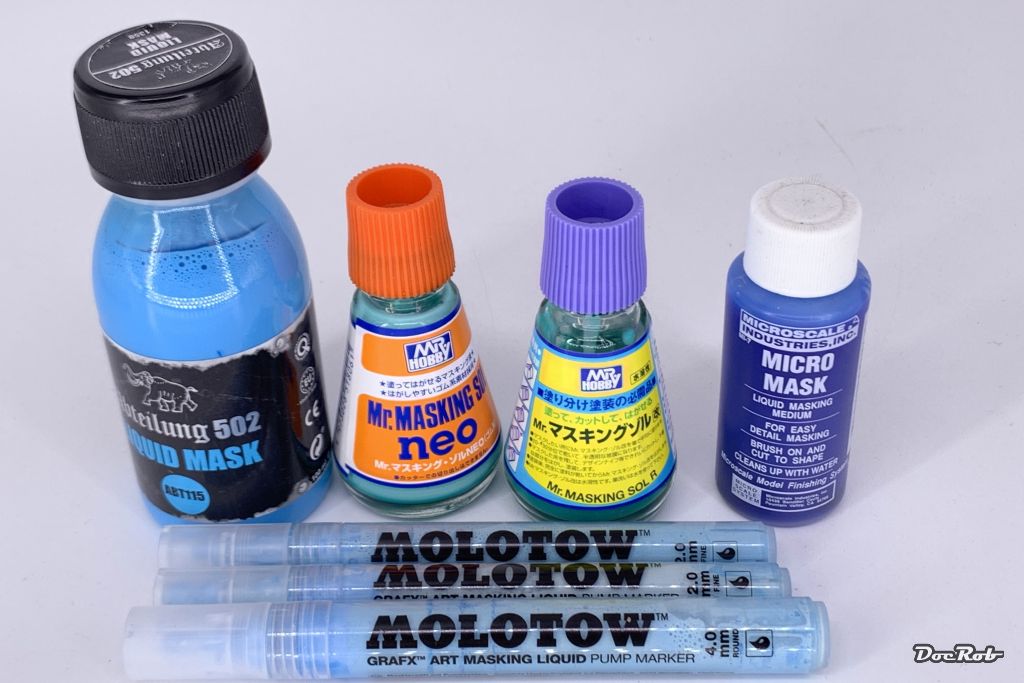
So far so bad, it seems, I have to settle with a different paint scheme or a different approach with the Lancia. I tried all my masking fluids and had nothing positive to show for, but lots of problems applying them. This is how the Molotow masking pens showed, unusable. The ragged outline is no splatter or sputter, it's adhesion, which shows some seconds after application That's what I tried. A little better than the Molotow's was only the Abteilung 502 masking fluid applied with a brush. Very tedious and not satisfactory in the end. Besides, the blue fluid dries near transparent onto the black background, which makes it hard to see later. Worst was like every time I tried the Micro Mask liquid, which left marks on the base layer . This bottle is history. Cheers Rob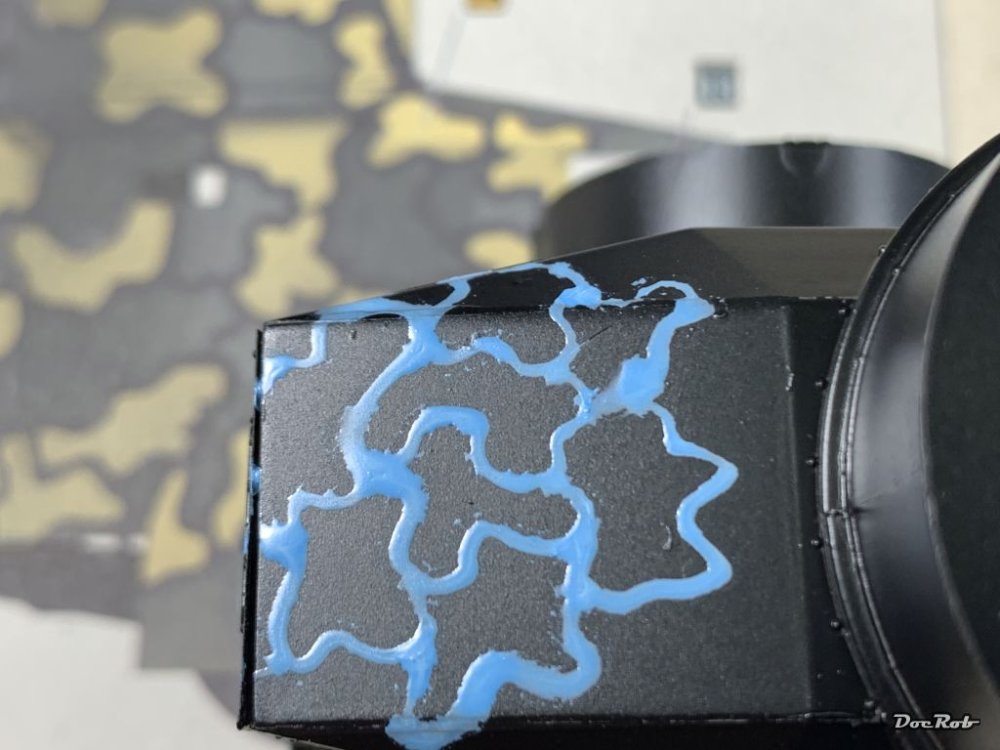

-
What is on your bench right now ? Share a picture :)
DocRob replied to Martinnfb's topic in Modelling Discussion
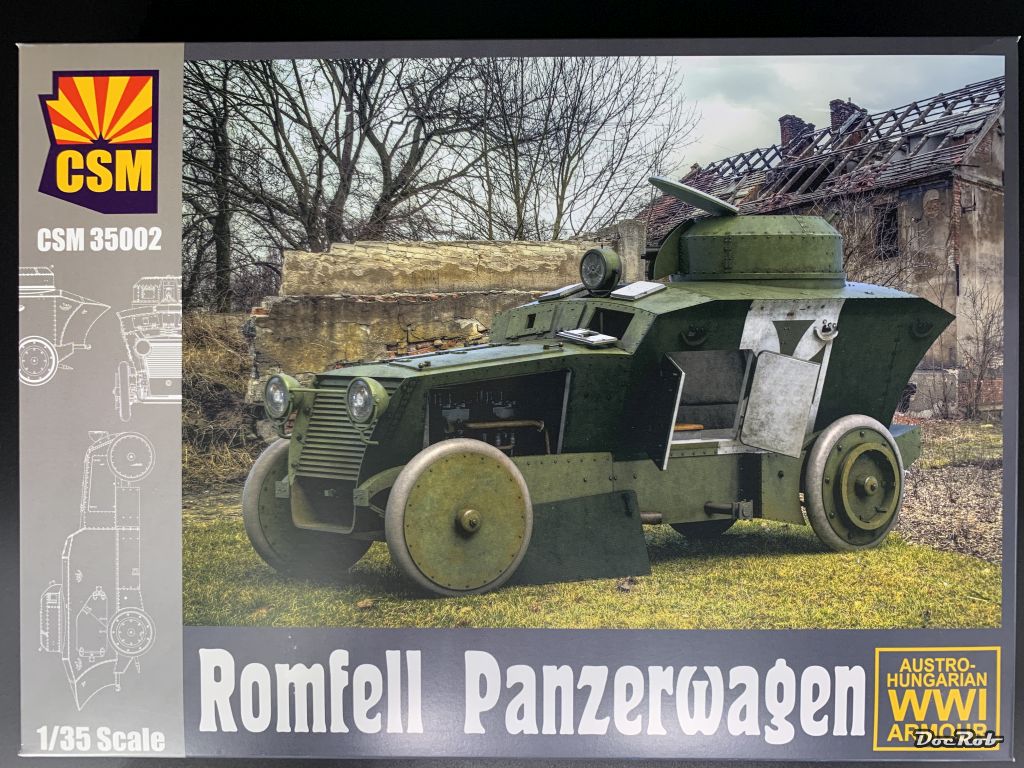
Indeed Hubert, but my favorite Batmobile space is occupied by this cool fellow. Every time, I see the Romfell in my stash, I have steam punk in my mind and maybe I do some scratchwork with this and make something batish out of it. Cheers Rob
-
Have you checked the Yahu IP's Peter? Way ahead of Eduard they look extremely good. I like them better than what I have seen from Quinta or Kits World. 3D printing looks great mostly and you have all the consoles included with Quinta, Red Fox,... but for IP's, Yahu is the best choice for me. Cheers Rob
-
I have the same one in stash. An odd vehicle for sure, optimized for hit and run . Cheers Rob
-
What is on your bench right now ? Share a picture :)
DocRob replied to Martinnfb's topic in Modelling Discussion
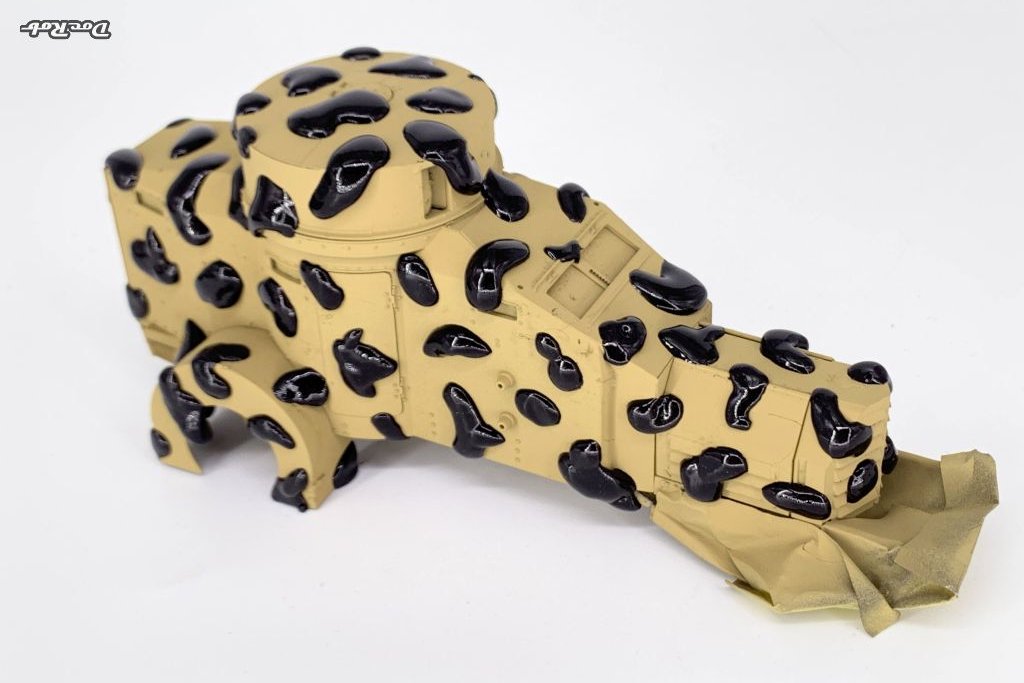
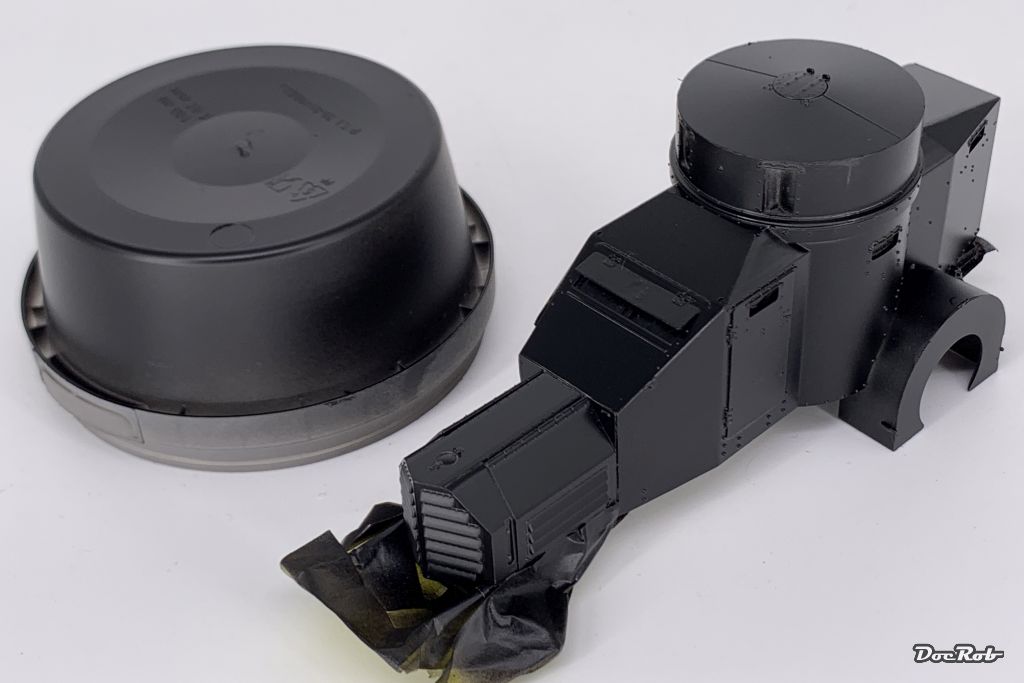
What happened here? Has Lancia build the new Batmobile? Sorry but nope, I primed the car with Mr. Surfacer and airbrushed Tamiya's semi-gloss black lacquer paint for my camo experiment. As a testbed, I also sprayed the quark pot the same way. I will try to apply the thin curved lines with a Molotow masking pen, then spraying the first camo color (green) and last the second (sand) after masking again with liquid masks. So far the approach, let's see how it works. Cheers Rob