DocRob
-
Posts
7,122 -
Joined
-
Last visited
Content Type
Profiles
Forums
Events
Gallery
Everything posted by DocRob
-

Duchess of Kingston - Beauty of the Seas - Wooden Sailing Ship 1/64
DocRob replied to DocRob's topic in Non LSM 'WIP
Thank you Peter, there are lots of subassemblies and test fitting to do and I will prepare everything and then drop it in the right place in a comfortable order. In the manual, the guns are last mounted, but I'm not so sure, if rigging them wouldn't be difficult with all the other parts in the way. In the prototype build the guns where not rigged, but I plan to do so, at least simplified. Thank you Phil, there are new challenges lurking at every corner, but generally nothing proved too hard to overcome. In fact part of the fun of the build is to find solutions. Cheers Rob -
Nice problem solving Bill, have you used any guide or did you scribe free handed? Cheers Rob
-
Duchess of Kingston - Beauty of the Seas - Wooden Sailing Ship 1/64
DocRob replied to DocRob's topic in Non LSM 'WIP
It looks like nothing has happened lately, but as I'm preparing all the deck clutter, there is only not much to show. There are multiple sub assemblies like the anchor winch, the bell stock, , the binnacle, the belaying rails, pumps, ..., accompanied by adding numerous eyebolts. Speaking of, the PE eyebolts were primed and airbrushed satin black, but I should have burnished them, as through rough handling with tweezers, the color chipped often and a lot of touch up was needed. The wooden parts are mostly laser cut and the cleanup of the char takes a lot of time, if made thoroughly. I may assemble the cannons, before I add everything to the decks. I will make it as easy for me as possible, due to a well thought order of mounting the parts. So for now, there is only an ugly pic with some of the prepared parts, cleaned and varnished. Cheers Rob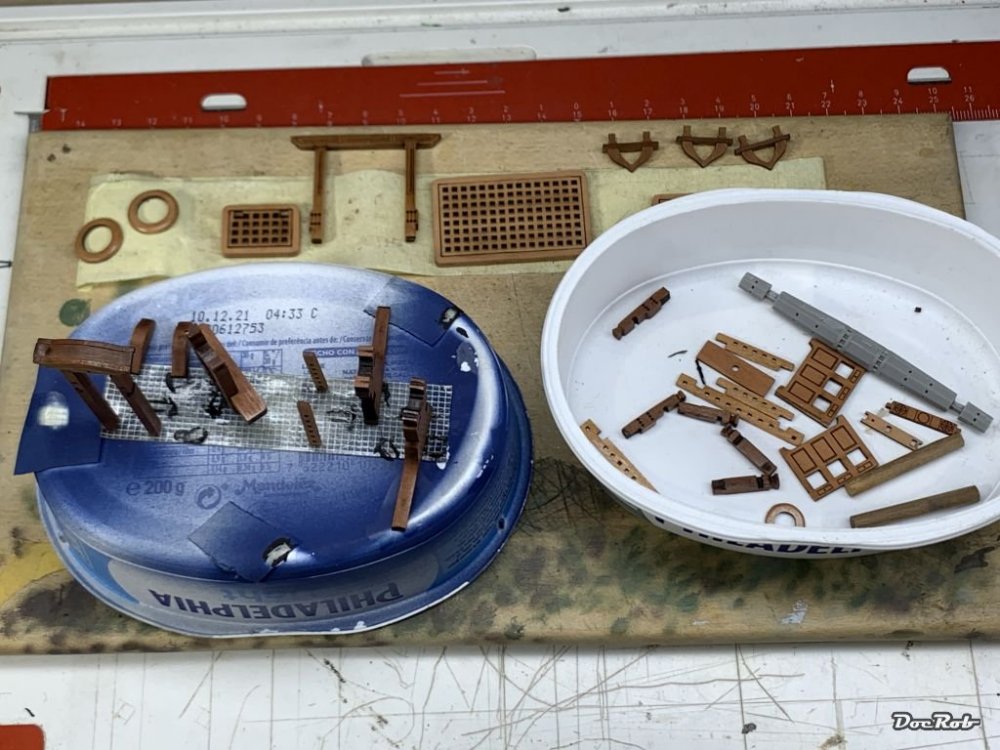
-
Aussie Mirage III D
DocRob replied to Mirage's topic in LSM 1/32 and Larger Aircraft Ready for Inspection
These sleek lines of a Mirage, what's not to like there. Yours look wonderful Alain and has a great finish and great detailing especially around the cockpit. Welcome to LSM, where there were some Mirage derivate builds in the last time, all interesting to watch. Cheers Rob -
Just have re-seen the movie Diva, which sports a snow white Citroen Traction Avant. One of my favorite cars along with the Goddess 'DS' of the same maker. I doubt yours will be white, but it will be a looker, I'm sure Jeroen. Cheers Rob
-
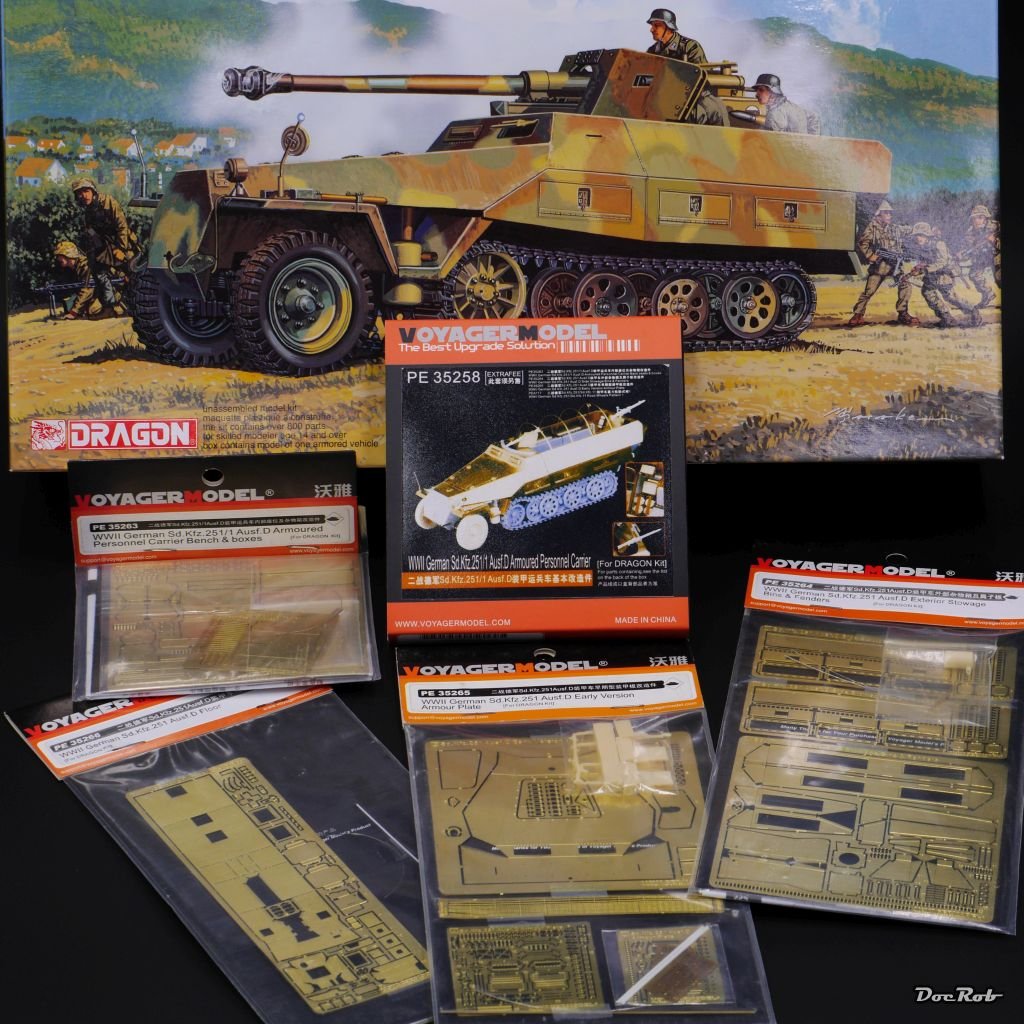
Just when I looked at my PE sets for the Halbkette, I decided, not so soon . Cheers Rob
-
All these struggles are luckily not visible in the fine result Peter. Bad decals are a pain to work with, but sometimes, it helps to apply a little bit of heat with a hairdryer. Anyway, masking and painting is mostly the better way, specially when you have to do the same cutting for the decals as well. Well she starts to look fast Peter, can't wait for the finish. Cheers Rob
-
Duchess of Kingston - Beauty of the Seas - Wooden Sailing Ship 1/64
DocRob replied to DocRob's topic in Non LSM 'WIP
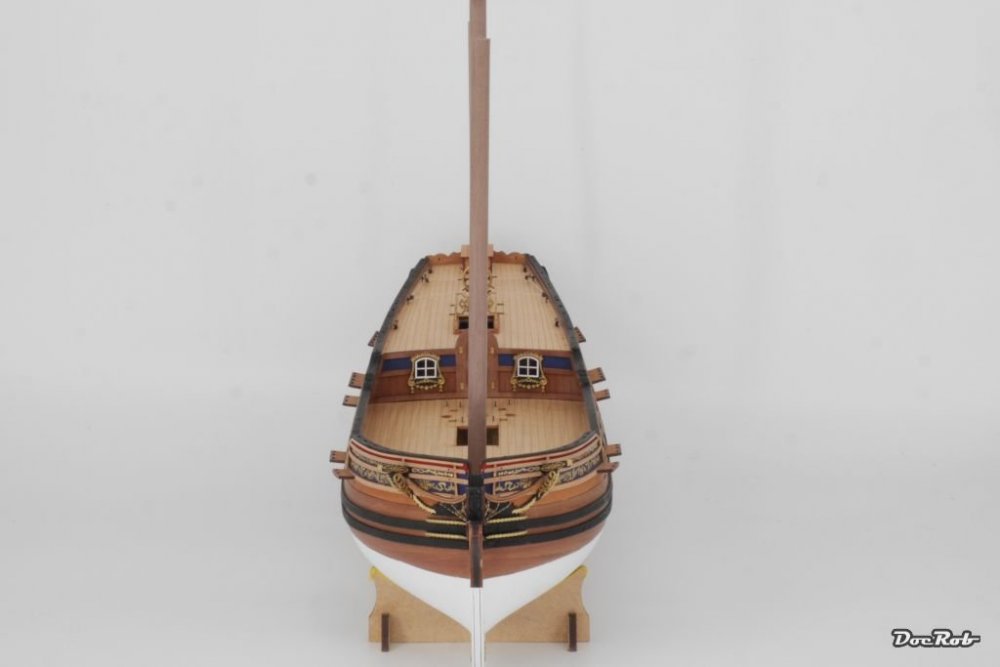
Hold your horses Gary, this is a yacht and not a ship of the line. The armament consists of six four pounders, good enough to keep some rowing boats at distance. Four of the gun ports are only fake or were maybe used to feed the fishes by green faced blue blooded passengers. Cheers Rob -
Duchess of Kingston - Beauty of the Seas - Wooden Sailing Ship 1/64
DocRob replied to DocRob's topic in Non LSM 'WIP
Thanks Martin, in this case it's the kit not me . Cheers Rob -
You have bigger teeth then Peter, right? Cheers Rob
-
Great show Cheers Rob
-
Typical Dragon, I would say Phil. Countless part, tons of detail and very poor instructions. Normally they go together well, though. Your 1,5 steps look like half of the halftrack (or one quarter track ) is done. However, the result looks promising great. When I remember right, the tracks are made from single track links of two parts each, am I right? Cheers Rob
-
Duchess of Kingston - Beauty of the Seas - Wooden Sailing Ship 1/64
DocRob replied to DocRob's topic in Non LSM 'WIP
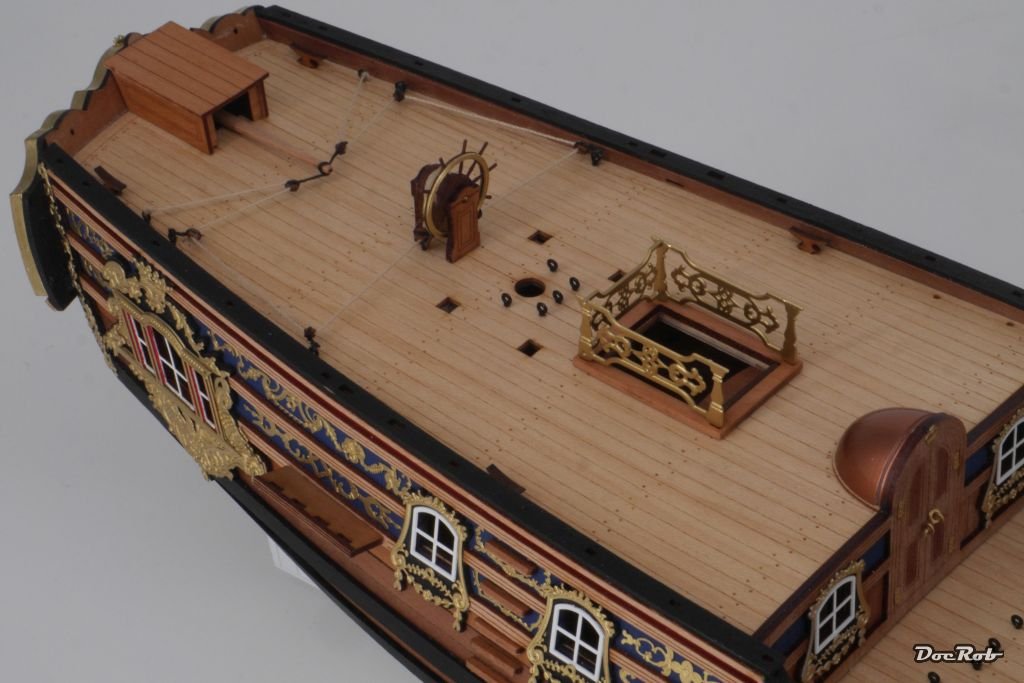
Today, I prepared the belaying rails around the masts. This included a lot of sanding, to get rid of the char and give the parts a better three dimensional appearance. Than they were varnished and left to dry. While working on these, a thought struck me, as there will be more and more delicate details added to the decks. Do the masts fit and do they have the right angles. I cut the lower parts of the masts to size and inserted them into their slots. The opening for the foremast needed some filing, the others fitted perfectly. Again, nice design by Chris as the masts sit very tight and barely movable into the slots. The angles seem to be good according to the plans. The fore and main mast look really thick with their 8 mm diameter, but this is supposed to be so. Cheers Rob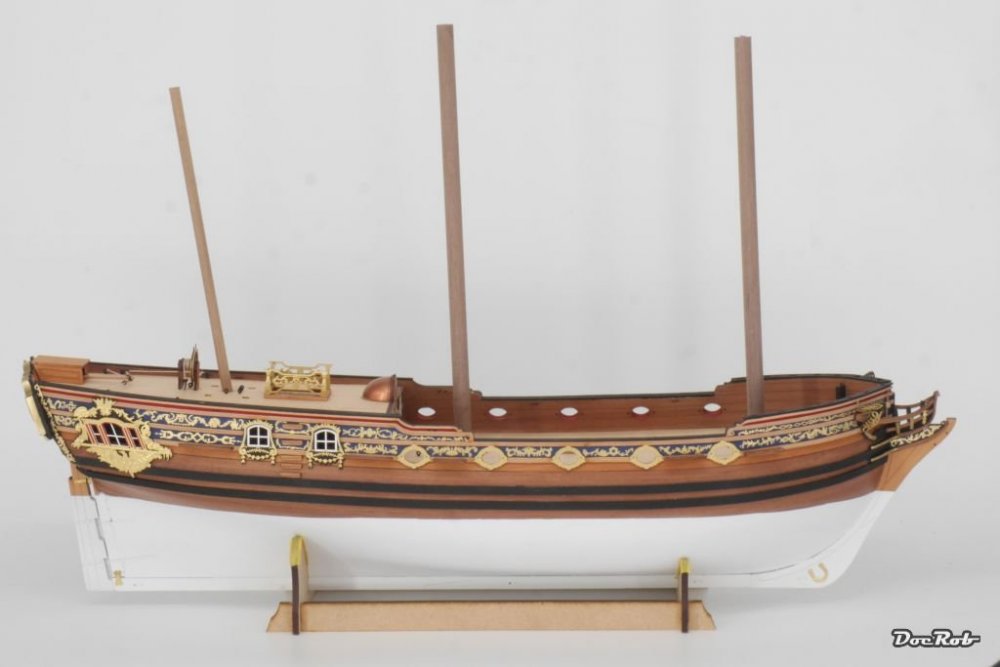
-
Duchess of Kingston - Beauty of the Seas - Wooden Sailing Ship 1/64
DocRob replied to DocRob's topic in Non LSM 'WIP
Thank you Peter, for now the rigging is finished and will haunt me at a later stage again. Concerning the macro photos, I have to admit, that I really like them, even if they are emphasizing on details, which never would be visible in such brutal clarity with the real eye. When I do a WIP, I like to be criticized, and this is helped by a little overemphasizing through a macro lens. A WIP is a build log for others and me, which could be used ass reference. I'm sure, I have forgotten half of my solutions during the build in two years and can reference to my WIP. Therefore it's helpful to show all the details, nice or not. Cheers Rob -
Only the toothpick showed the scale Peter. Nice work on the fuselage and wings. She will be beautiful in yellow and blue. Cheers Rob
-
Makes all the sense in the world Martin. You must have caught one of the better days for taking the pics in your weather tormented home area . On my island the weather changes rapidly sometimes, so for me the soft top is perfect as it is opened or closed in two minutes and I often have to do it on my way, because of changing conditions. The main reason for closing up though is wind, as we have no freezing temperatures except on the highest summits in winter time. Driving open through light drizzle normally is no problem as astonishingly few rain enters the car. We have that very often, when passing the clouds. You seem perfectly prepared for winter conditions with only the exception of an ice bear frontguard with your Jeep. Love the color of yours, which would have been my second choice, if available for my model. Cheers Rob
- 2,036 replies
-
- 5
-

-
- car related stuff
- anything about cars
- (and 6 more)
-
You should widen your debt and invest in a soft top Martin. You seem to have fine weather now and it's pure joy to drive open topped. I have both tops, but the hard top is rotting in the garage, as I never liked handling the heavy and sensitive (mine are painted) targa parts. The canvas top is very robust and even stormy conditions are no problem with it. Your ride looks great now and I am a little jealous at your zillion gear automatic, where my JK has only five. In the flat country it should be sufficient, but with our steep mountains here it's often hit and miss. Generally I like the rough appearance of the JK a bit more, so I have to live with that . Cheers Rob
- 2,036 replies
-
- 5
-
-
- car related stuff
- anything about cars
- (and 6 more)
-
Yes Phil, I would definitely solder the bigger parts. It needs to be well processed, as there should be no plastic near the to solder parts. Cheers Rob
-
Duchess of Kingston - Beauty of the Seas - Wooden Sailing Ship 1/64
DocRob replied to DocRob's topic in Non LSM 'WIP
Thank you Gary, I guess in the case of DoK, the rudder arrangement was adapted to the deck, to have more room to party in the cabin. There was even a mirror clad organ on board along other clutter. Not a good idea of dancing some elaborated minuets, while stumbling over the ropes of the steering mechanism. I'm completely new to rigging with yarn. I only used what is supplied with the kit until now and I think it's high quality yarn, made by Güttermann. I do like the rope like appearance of the material and it was easy to get good tight knots into it, with a drop of CA for securing. I just had a quick look for silk thread and it seems to be really expensive, two meters for 6 Euros, was the first I found with a diameter of 0,45 mm . I considered using a flame to get rid of some fuzzy residues, but wouldn't like my work destroyed by fire and chickened out. Cheers Rob -
I'm all eyes Phil, I like the half tracks a lot, but never build one myself. Can't wait to see yours progressing. Part count is not overly important, it's how the kit is designed what counts. There is the clean up of course. I have this incarnation in my stash, but frightened myself with adding all the PE madness, which substitutes practically most of the body parts, as I planned mine bruised and dented. Without the PE, I may had build it already. Cheers Rob

-
Duchess of Kingston - Beauty of the Seas - Wooden Sailing Ship 1/64
DocRob replied to DocRob's topic in Non LSM 'WIP
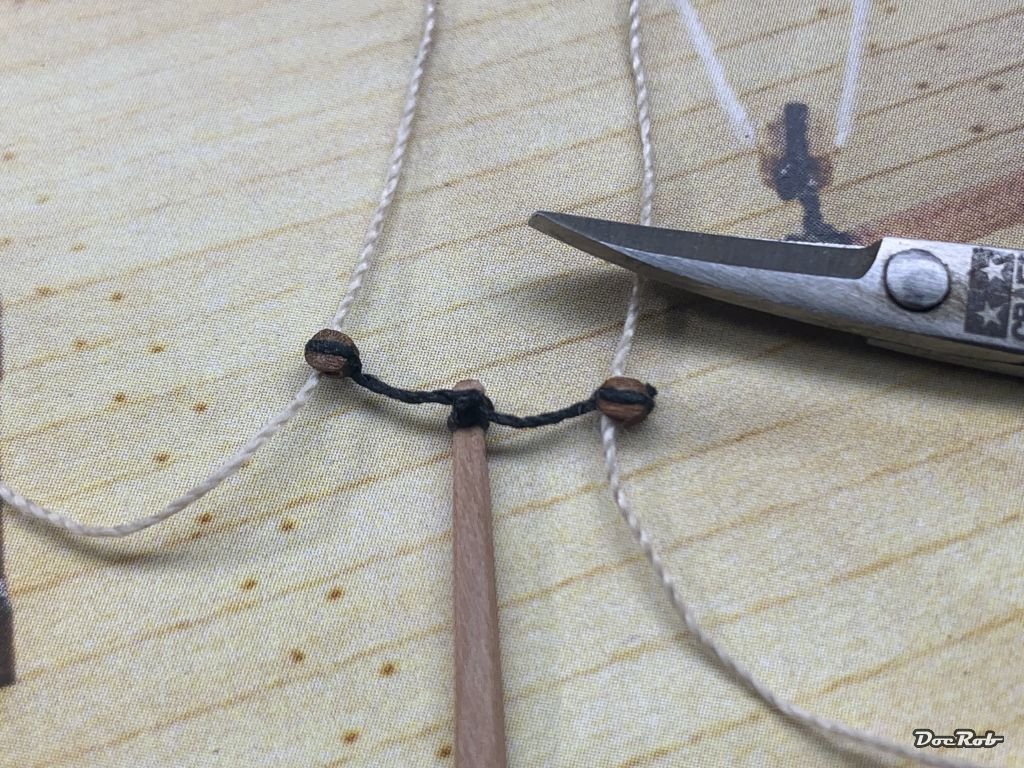
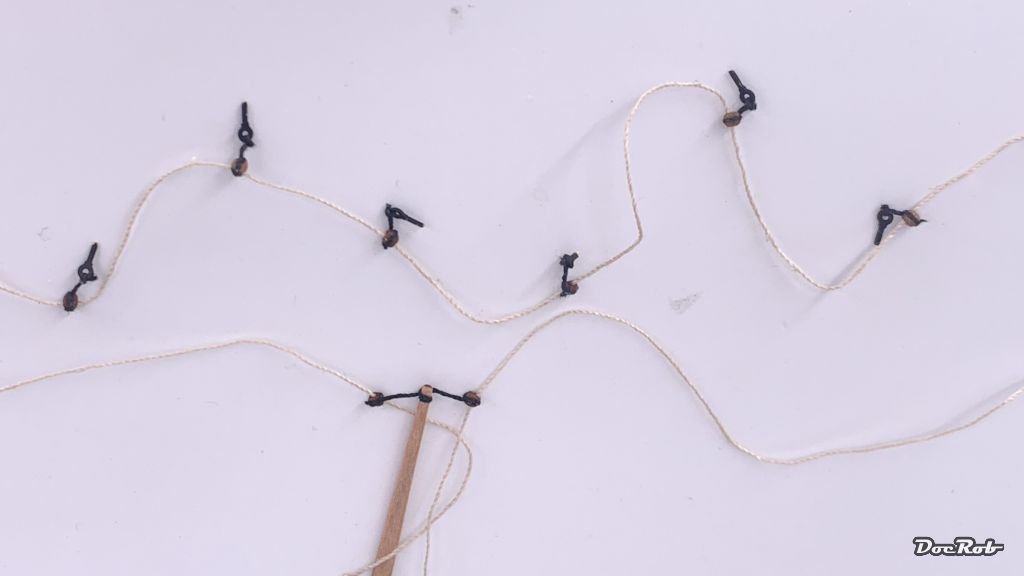
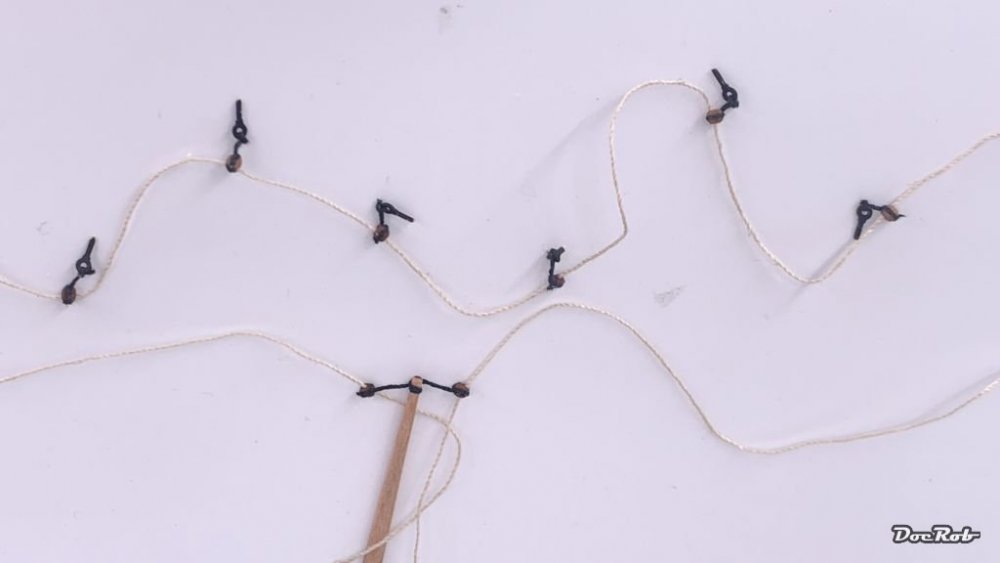
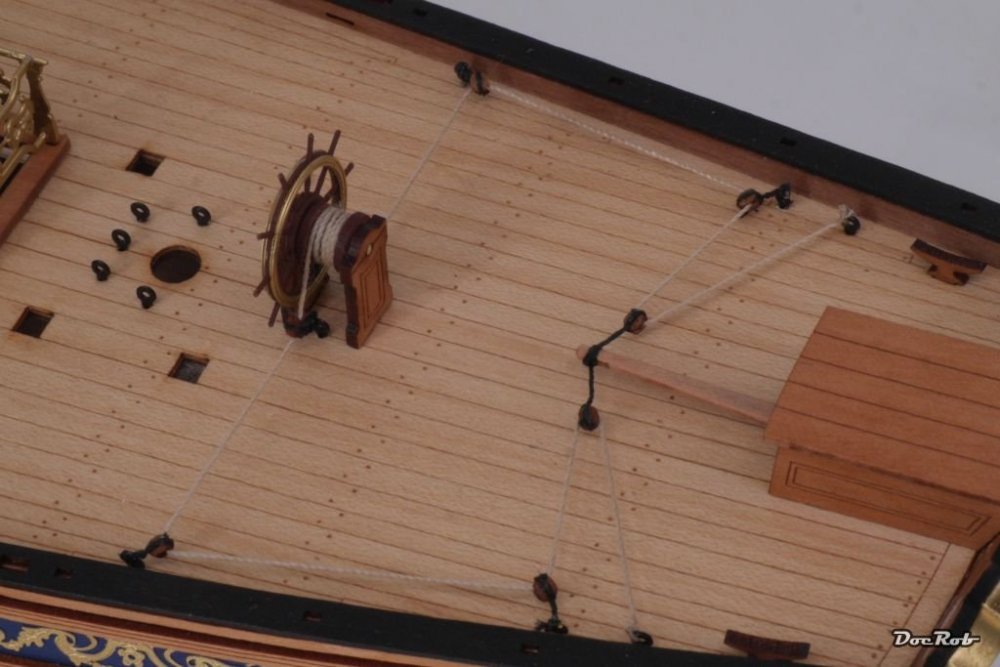
After a lot of trying, testing and preparing, I finally got the rudder drive assembled. First I sprayed all the PE eyebolts and other PE parts for rigging in semi matte black, after priming of course. I had the parts primed together with the gold painted PE for decorations, otherwise, I would have burnished the black parts. I decided, to fiddle all eight blocks onto the natural colored thread, which was not easy to do, even after I drilled the holes in the blocks out. Then I added small length of black thread around the blocks and the last two were attached to the rudder tiller arm and secured with a tiny drop of CA. Next, I attached eyebolts to the remaining six blocks, the same way. In some build logs, I saw that the short ends of black thread were seized (thickened with knotted thread). After seeing how delicate the whole affair is, I skipped that. It's 1/64 and the pics are heavily macroed. The rudder assembly got mounted, starting with the steering wheel and then working towards the tiller arm, gluing the PE eyebolts into the 0,8 mm pre drilled holes. As the natural colored thread is still movable, like the real thing, it was easy to tauten the assembly and sling a knot around the last eyebolt. I'm really happy that this is beyond me and the result is not perfect, but sufficient. I even swore sometimes, a thing I can't remember to have done before while building the DoK. Finally I added some railings for the staircase, made from PE on a wooden frame. It's interesting, that the PE is supplied in three different thicknesses, 0,2 mm, 0,4 mm and like the railings 0,6 mm, which allows for a little relief detail. I first considered to cut the posts of the railings and substitute them with self made ones, produced from pear wood rests on my mini lathe, but I was only not able to make two posts looking the same, let alone four. Cheers Rob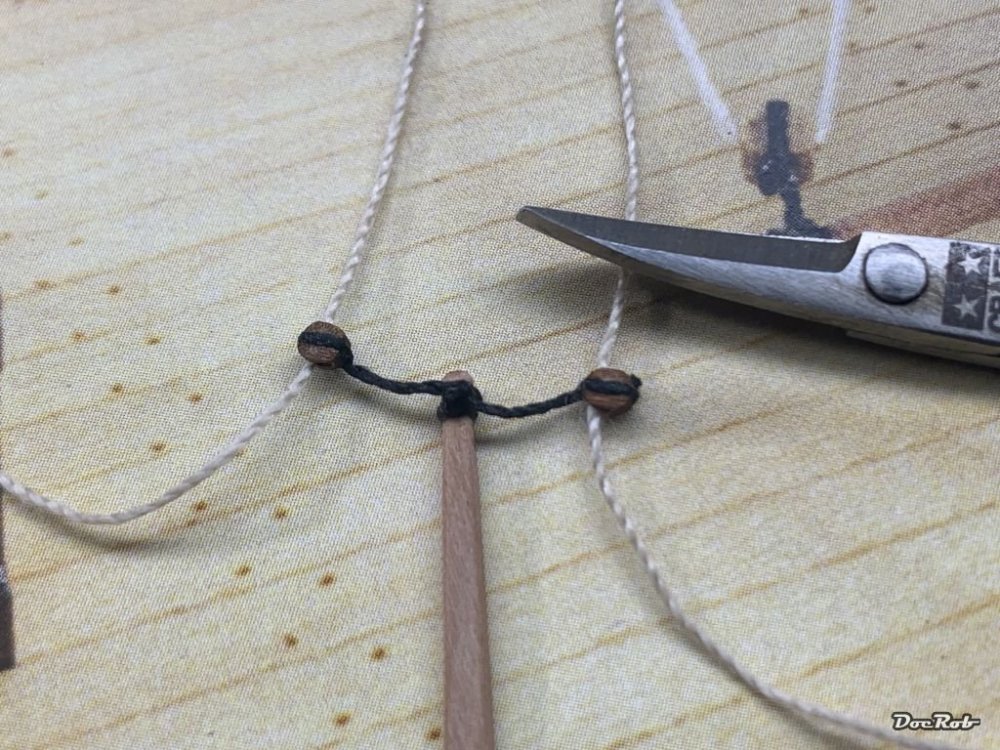

-
Wow, my eyes are hurting from looking at your Mig Ernie, but that's a good sign, as the camo came out great. Cheers Rob
-
Duchess of Kingston - Beauty of the Seas - Wooden Sailing Ship 1/64
DocRob replied to DocRob's topic in Non LSM 'WIP
I hope with the shrouds and other rigging it will be a bit easier. These are by far the tiniest blocks and I'm lucky, I opted for the better pearwood blocks, when buying the kit. I bought two books about rigging and hope that will help. There's a whole array of new obstacles to master, well, I will take my time and hope to get into a flow. Cheers Rob -
Duchess of Kingston - Beauty of the Seas - Wooden Sailing Ship 1/64
DocRob replied to DocRob's topic in Non LSM 'WIP
I had the same feeling Gus. I managed rigging of WNW kits, but that's metal tube and fishing line. Wood and thread, is a different pair of shoes though. I hope, Im able to tackle this somehow. Cheers Rob -
Dragon Jagdpanzer IV 70 (A) Kit 6015 COMPLETE
DocRob replied to GazzaS's topic in LSM 1/35 and Larger Work In Progress
The slightly sunken in soles look good, better to do this with the clay not dried up. The footsteps left of the Tellerminenmann look a bit unnatural though. Cheers Rob