DocRob
-
Posts
7,122 -
Joined
-
Last visited
Content Type
Profiles
Forums
Events
Gallery
Everything posted by DocRob
-
Impressive 'Tamiya' stash Carl, as I couldn't bring myself to so much repetitive builds, my favorite on your pic is a single kit from Ukraine, which I have built recently and enjoyed it mucho. Cheers Rob
-

Duchess of Kingston - Beauty of the Seas - Wooden Sailing Ship 1/64
DocRob replied to DocRob's topic in Non LSM 'WIP
Thanks Phil, I helped myself to a cocktail to relax. A combo of rye whiskey, Aquavit, a bit of rich sugar and some drops of Angostura. It's funny somehow, every step before and after planking is shown in the manual to greatest detail, but the planking is just some pics and description. That's no critique, as it's enough to get it done, but shows exactly that, it has to be done, somehow. There are many possibilities and techniques to realize the planking, but in the end, you have to go through it. Today, I managed only some planks on the other side, due to my sore fingers and delicate area around bow an stern, where the preparation, mental and physical is a challenge. Cheers Rob Muchas gracias señhor. Cheers Rob -
Duchess of Kingston - Beauty of the Seas - Wooden Sailing Ship 1/64
DocRob replied to DocRob's topic in Non LSM 'WIP
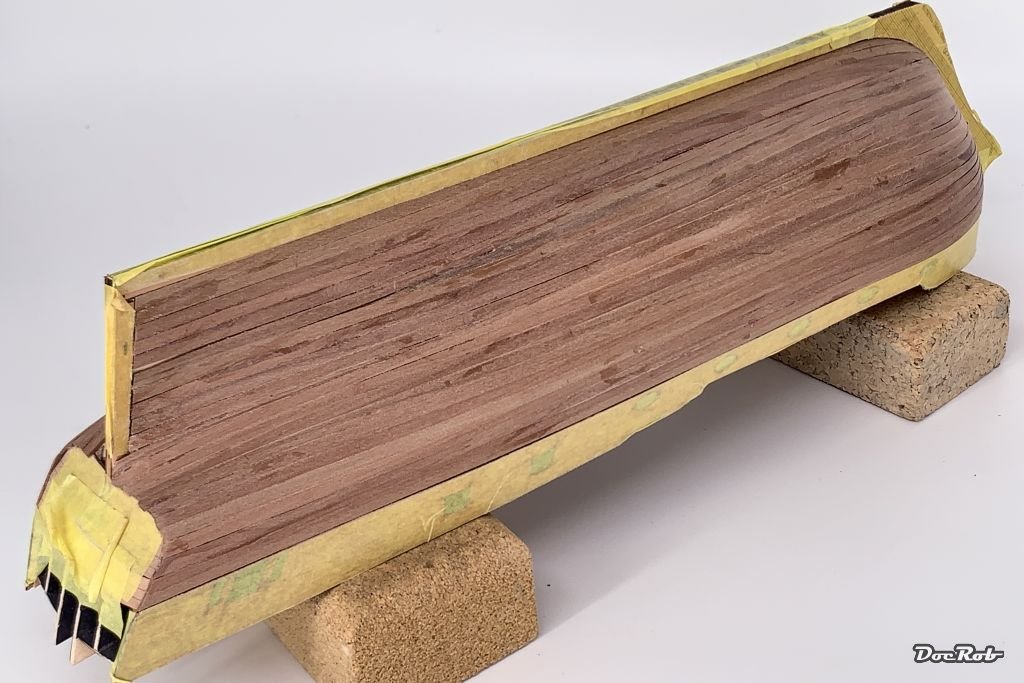
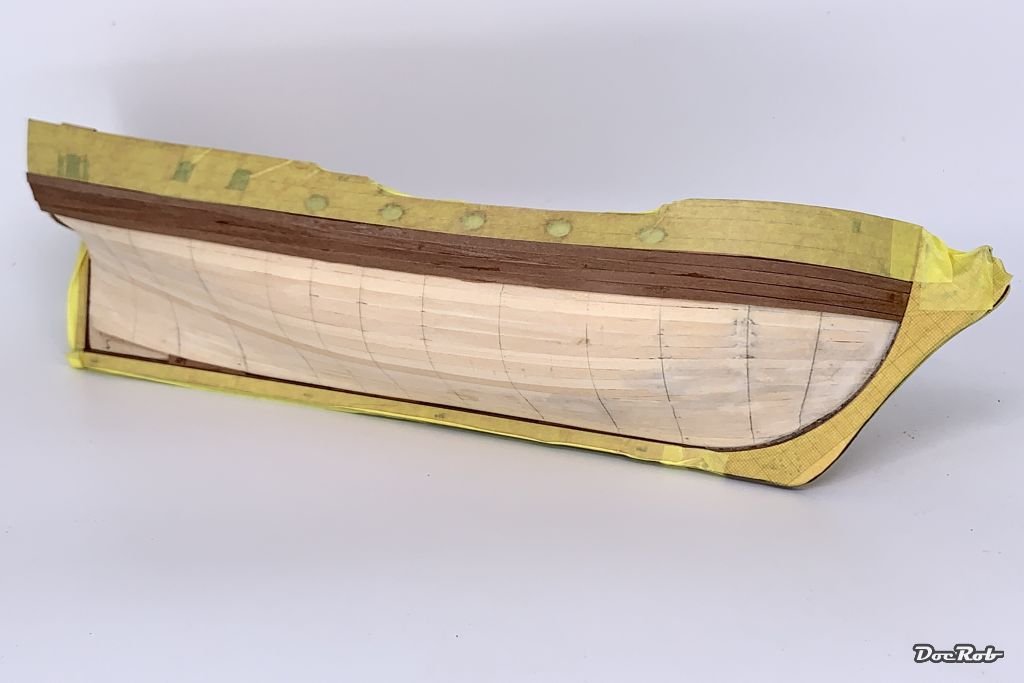
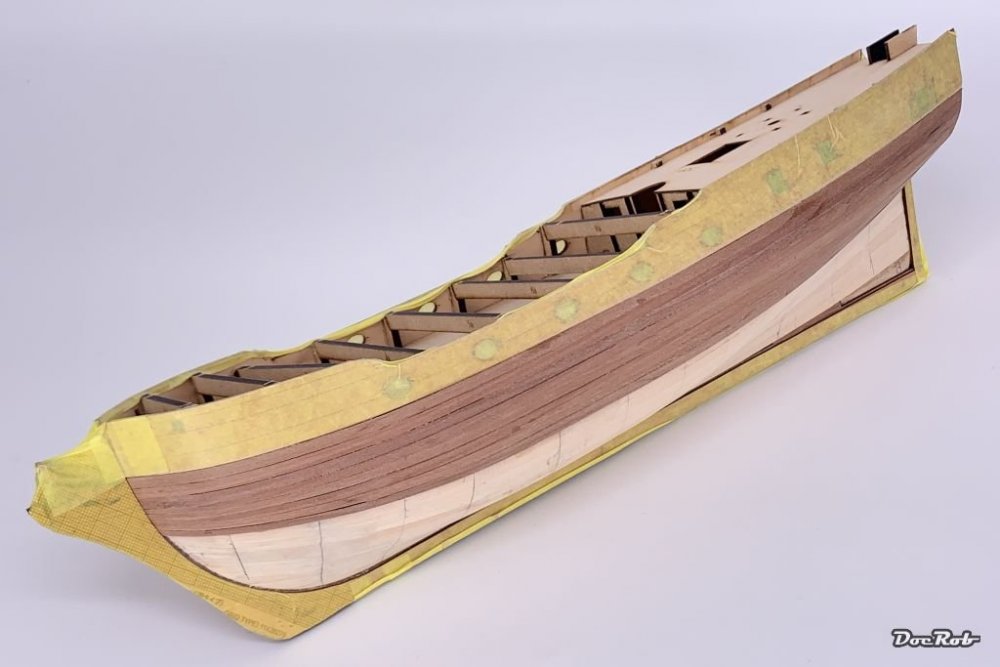
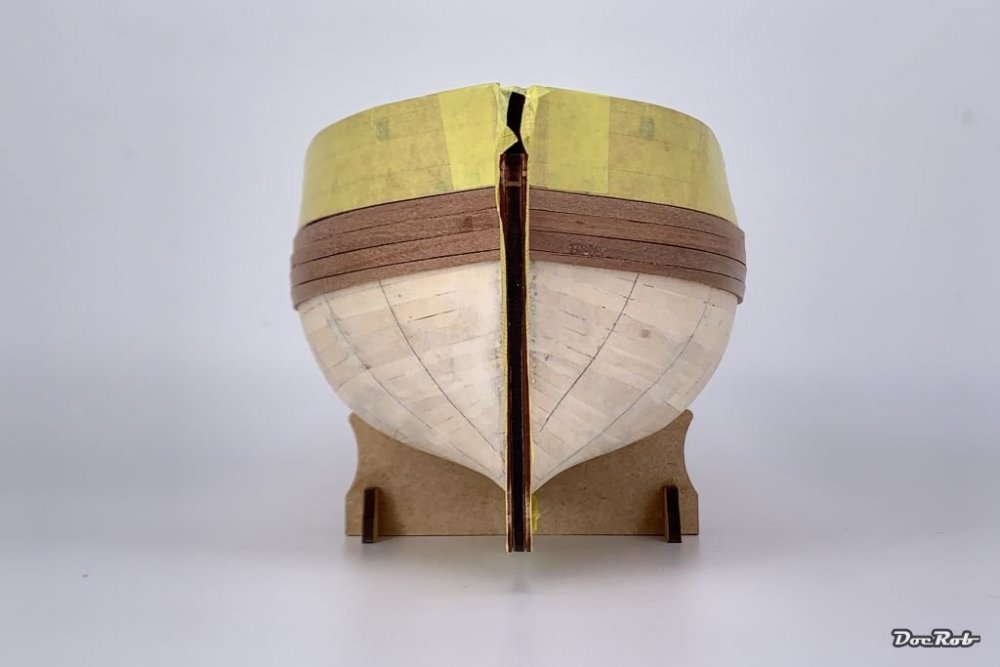
Phew, one side is almost ready with second planking. The geometry wasn't so simple and I had to use some filler planks, to let the full length planks 'flow' better. There are some places, where I will insert some tiny parts of planking material, to have a smooth base. I don't know why the result of my work looks always more stained than to the real eye, maybe my camera likes landscapes better, or I have to incorporate a softener, a la David Hamilton, tempting curves in the fog . Anyway, I'm sure, after a proper sanding all will look fine and above the waterline, there are no filler planks used. Cheers Rob
-
Duchess of Kingston - Beauty of the Seas - Wooden Sailing Ship 1/64
DocRob replied to DocRob's topic in Non LSM 'WIP
Thanks Gary, planking can be tedious and working with CA is demanding to my hands, as these are the clamps, nails, rubber bands. My fingertips are sore, but I progress poco a poco. Thank you Mike, yesterday, I continued and formed the next rounding on the stern. Definitely not the easiest part to plank. While working with CA for attaching the planks, I have to follow some eternal physical rules, like letting the gravity work for you. Yesterday I made the mistake to set the firs plank with CA onto the hull with the keel showing upwards, not a good idea, as the CA easily stains the above planking. Lessons learned, you can't beat physics. Thank you Phil, but I have to say, no nails involved with second planking . Cheers Rob -
Nice kite, Bill, congrats. The only WNW kit I'm really missing is a wood clad two seater, either the LVG or better, the Albatros B.II. On the other hand, my stashed WNW kits will give me enough exciting bench time, but the 'want to have-pang' is there . Have fun with the kit. Cheers Rob
-
Are we so much different? A bit of physical exercise is not the worst for us bench hunched individuals . Earnestly, it's about exchanging words and not blows about such an unimportant important thing, like modelling. Cheers Rob
-
Dragon Panther A with Zimmerit
DocRob replied to GazzaS's topic in LSM 1/35 and Larger Work In Progress
That's what I meant, plaster of Paris will work or these ready mixed pastes from AK or Mig. Real mud will be to coarse grained, except maybe clay. Cheers Rob -
Silky smooth Phil, that's a nice base layer. Cheers Rob
-
Duchess of Kingston - Beauty of the Seas - Wooden Sailing Ship 1/64
DocRob replied to DocRob's topic in Non LSM 'WIP
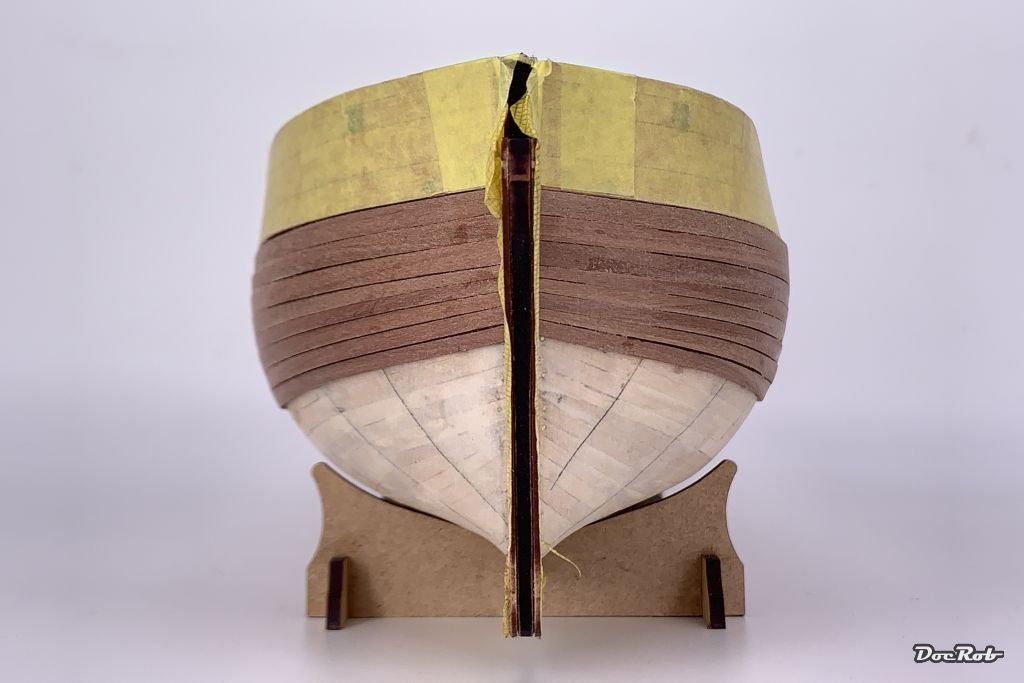
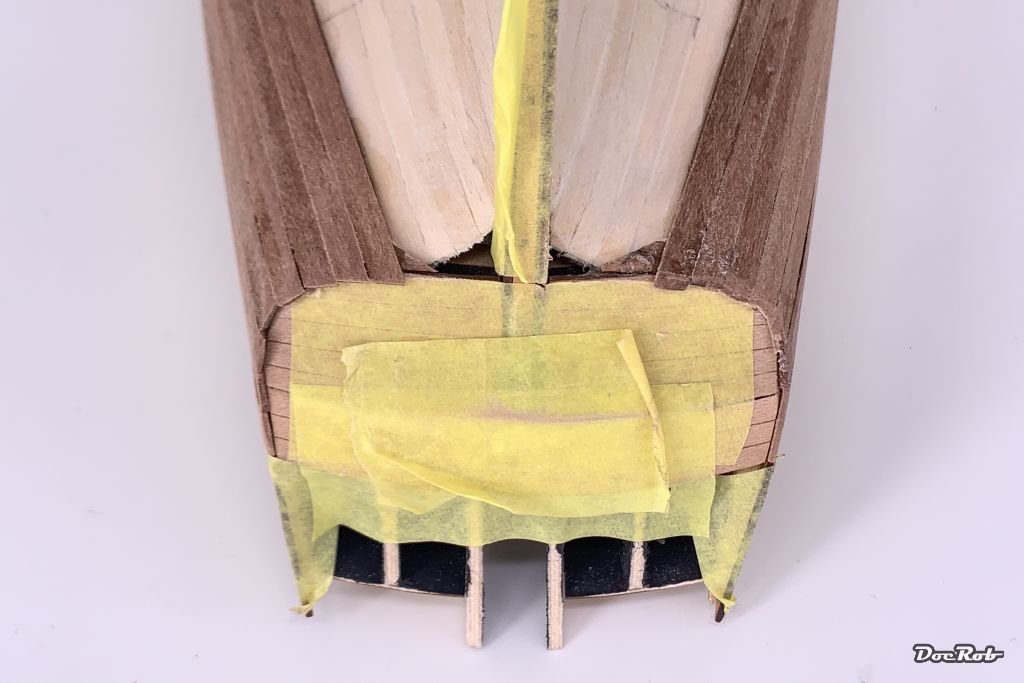
Today I managed eight planks, not too shabby. With each plank it's checking the woods surface, angle cut the bow end, taper the bow section with a ruler and a blade to fit bevel the bow section with a sanding stick, dry fit the plank into place, mark the to bevel areas in the mid and stern section, bevel here, cut to length and after a second dry fit, glue it on with Colle 21 CA. I started with three gluing areas for each plank, bow, mid ship, stern and went to four now, as the bow geometry becomes more delicate. I really like the CA method with the fast bonding glue. It makes positioning of the planks easy, but on the downside, you have to be fully concentrated, there is no margin for error and it's a bit messy if you are not absolutely careful. The hull planking is still symmetrical enough and will look good after sanding. When ready, I will use my new small accumulator driven sander and, like of course read in another WIP, will collect the dust, to mix it with diluted PVA as filler where needed. In all, I'm satisfied with the result and the problematical stern area seems to work out good too, after a little sanding and inserting of tiny filling blocks for support. Cheers Rob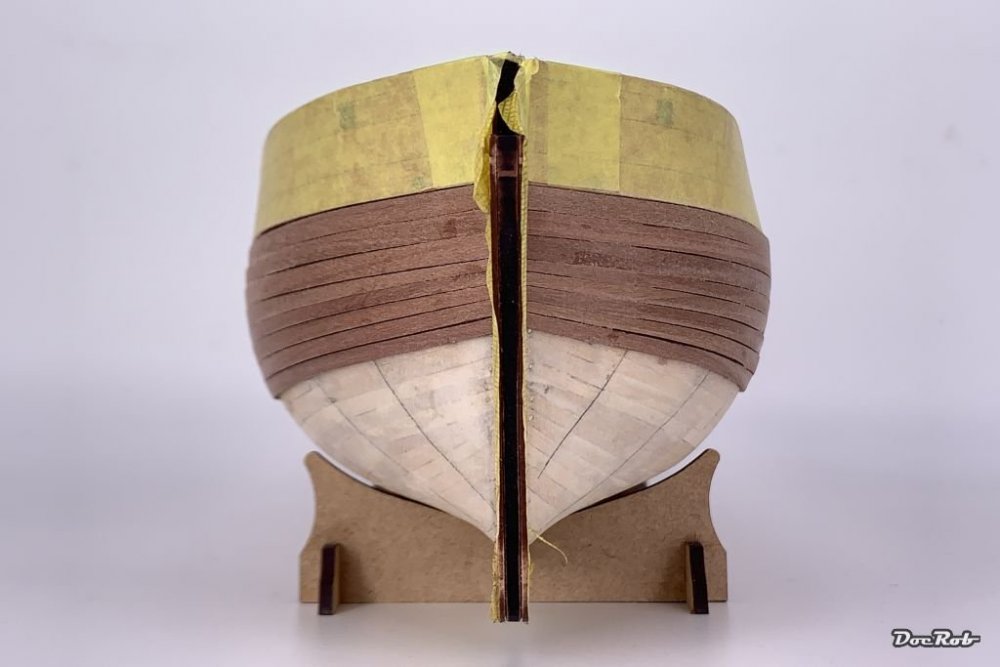

-
Thank you Carl, it seemed to have worked perfectly, gluing the canopy without smears and fogging. I dip clear parts in Future to enhance the transparency and minimize the risk of fogging, specially with CA involved. Once I had a reaction between Future and liquid mask after some weeks, since then it's only Kabuki on futurized canopies. Nice save with the shims, the canopy fit now looks great. Cheers Rob
-
Duchess of Kingston - Beauty of the Seas - Wooden Sailing Ship 1/64
DocRob replied to DocRob's topic in Non LSM 'WIP
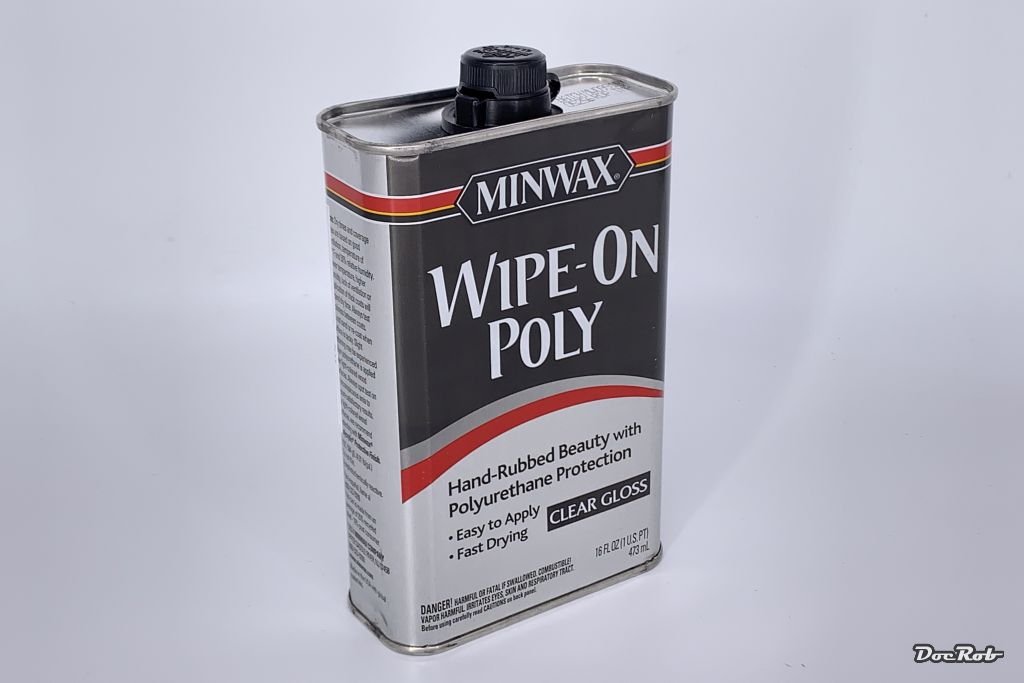
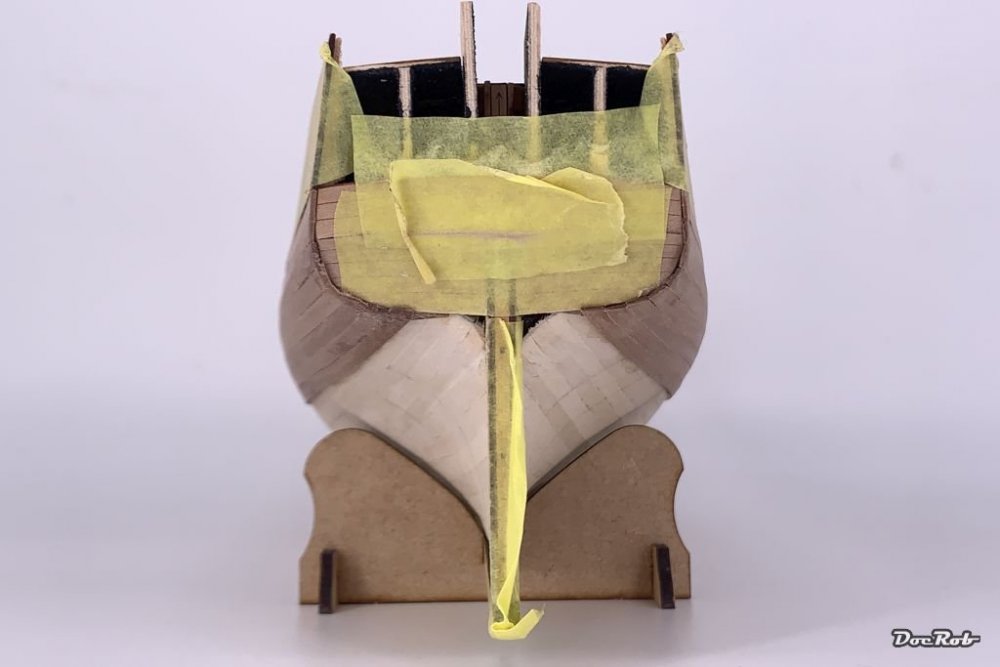
Over time there arose a lot of obstacles, purchasing modelling goods on my tiny island, specially where hot liquids come into play. All modelling goods are brought here by tiny passenger planes with small freight compartments. The rules about what is allowed to deliver have changed dramatically. No rattle cans, no hot colors, like Tamiya LP containing more than 30 ml per unit, ... Some online shops generally do not deliver 'hot' colors here, creating their own rules. And there are products like WOP, which seems not to be sold in Europe, except for Poland. There are clear benefits, living on an island, purchasing goods, clearly is not one of them . Cheers Rob -
Duchess of Kingston - Beauty of the Seas - Wooden Sailing Ship 1/64
DocRob replied to DocRob's topic in Non LSM 'WIP
Thanks Peter, the good thing about being a novice is, you can learn a lot . Between building steps, I read a lot and try to form a picture about what lays ahead of me based on the experiences of Mike, other WIP's and my own sparse experiences with wooden ships and a bit less sparse experience in wood working in general. Steps like second planking make my head swirl in advance, trying to abstractly develop the right approach and trying to adopt it to my situation. This is a tedious and often frustrating phase, as there are a lot of unsuccessful attempts involved. Knowing myself, that doesn't take me down, as I know the fog will clear and I normally find a makeable solution. In a way, I enjoy this process, having to suffer a bit, to achieve some satisfaction. Cheers Rob -
Dragon Panther A with Zimmerit
DocRob replied to GazzaS's topic in LSM 1/35 and Larger Work In Progress
Coming along nicely Gaz, Panther and base look great. Concerning the squeezed mud, why not doing the real thing, well at least scale reduced with the Panthers tracks pushed into freshly applied and pre colored plaster-mud or one of those AK or Mig pastes? Cheers Rob -
The canopy came together nicely Carl. Which type of glue did you use for the clear parts? Have you prepared the clears with Future? You see easily, my questions manifest, that I also found the canopy will be the hardest part of the build. Cheers Rob
-
Just started this, because it's about the live of the Duchess of Kingston, the very same woman, who owned the wooden ship, I'm actually building. She seemed to have been an illustrious person. Cheers Rob
-
Duchess of Kingston - Beauty of the Seas - Wooden Sailing Ship 1/64
DocRob replied to DocRob's topic in Non LSM 'WIP
Thank you Mike, I like the color of the supplied pear wood too and I will not stain it. I try the wipe-on-poly, to seal, along with shellac. I think the wood will look really rich with only a clear coat on and there will be less risk of color bleeding for the painted parts of the ship. On the siede view pic, it looks like there are a lot of stains, which must be a result of the lighting or camera setting. Luckily to the real eye, it looks much better with only very few superficial marks. I considered working with short plank pieces and prepared one for testing. I found, that a full length plank lays smoother to the plank above, somehow. Like you mentioned, I also feared that the plank ends will be to visible, where they meet. Cheers Rob -
Quite a difference in calibre and mobility, but a nice result for sure. Cheers Rob
-
I use LP colors and gloss, semi gloss and flat coats thinned with leveling thinner. A ratio of 2,5-3/1 thinner/paint works perfect. As I have no access to spray cans anymore, I have to work this way, but I found the results to be very good with the LP colors. If you haven't used LP colors, you should be warned. With their thinner they are relatively hot and melt some kinds of plastic and sometimes decals. It's always a good idea to test before. I tend to spray a very thin coat first and dry it with the AB, before I spray on the real deal. Cheers Rob
-
I fell victim to Ernies review too and built one last year. It is a great and flawless kit, easy to build, but spares no detail. As an experiment, I brush painted mine with oil colors. In all a very pleasant build. If you start yours, please do a WIP here and by the way, welcome to LSM. Cheers Rob
-
Ferrari 330P4 Open top 24Hrs Daytona 1967
DocRob replied to mark31's topic in LSM 1/35 and Larger Work In Progress
Your engine looks almost real, great work, Mark. The paintjob is smoot and shiny, with a gloss coat it will be super. I guess, the slightly orange tint is due to lighting conditions. Cheers Rob -
Tamiya also has a semi gloss lacquer in jars in their range. It's LP-24, no need for decant. Are you sure, you could mix flat base with lacquer paint? I would test it in a jar, before I have a lump in the airbrush. Future can be used directly from the bottle, no need for thinning even with a 0,2 mm nozzle. For cleaning the AB, I use ethyl alcohol. Cheers Rob
-
Duchess of Kingston - Beauty of the Seas - Wooden Sailing Ship 1/64
DocRob replied to DocRob's topic in Non LSM 'WIP
Today, after a delivery time of over a month, this 'wipe on poly' showed at my doorstep. It came from Poland and I'm very happy to have it received now. You might say, c'mon wop, what's so special about it. Here in Europe, it seems to be very hard to find the stuff. I ordered it three times before, but it was never delivered to me. I was refunded, but never got in possession of the precious liquid. Cheers Rob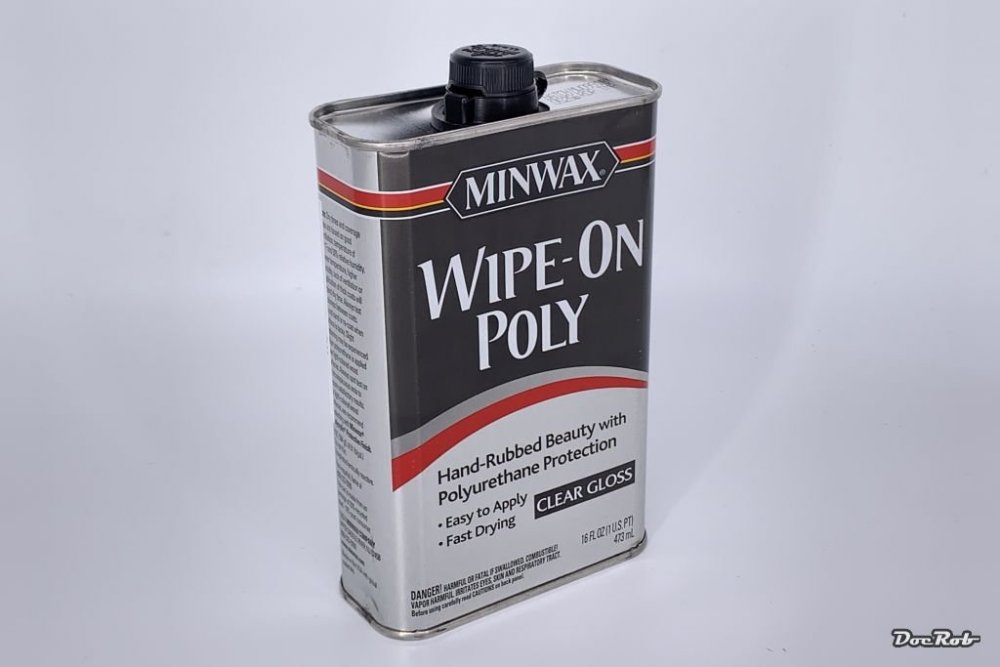
-
Duchess of Kingston - Beauty of the Seas - Wooden Sailing Ship 1/64
DocRob replied to DocRob's topic in Non LSM 'WIP
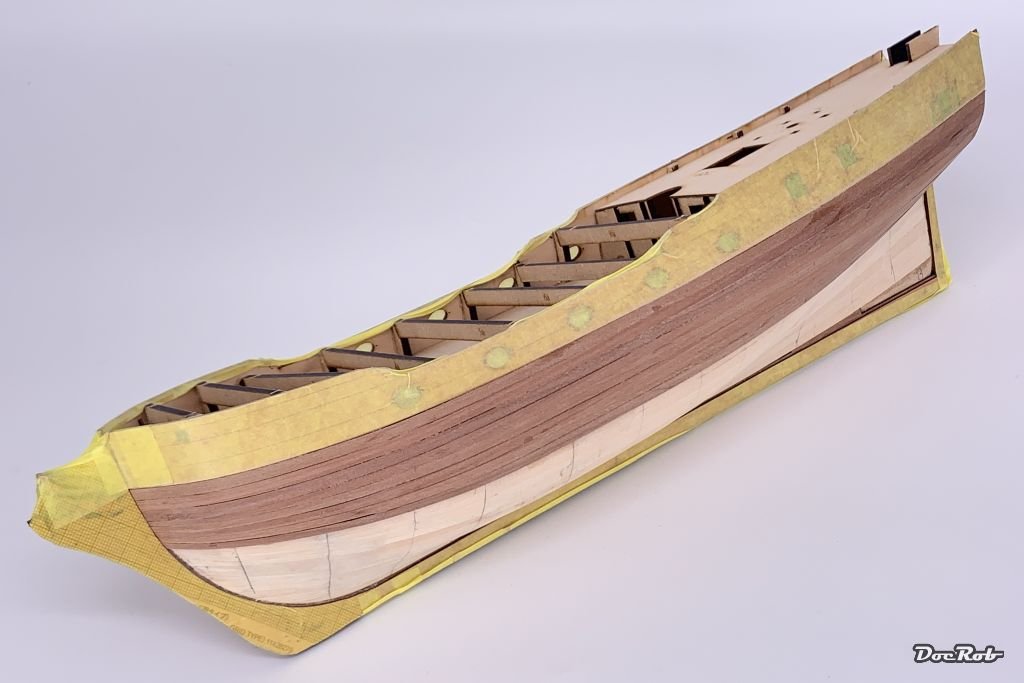
Thank you Mike for sharing your thoughts about second planking. Yesterday I tried a lot of different things to get a feel for the pear wood planking and had no success at all, which was a bit frustrating, but as it often turns out, it was necessary to find the way which works best for me. I tried pinning, but when using PVA, the planks in the bow area moved a bit because of their relatively strong bendings in two dimensions. Soaking them would have been the way to do, but I was eager to find a method without soaking, at least for parts of the planking. Today, I tried my relatively fast curing CA, from Colle 21 today, and it worked relatively good. This glue can be applied relatively relaxed, but glues immediately, when pressed onto the first planking. Therefore, I glued each plank in three steps. There are some stains from the glue, but nothing, which cannot be removed with a bit of sanding. I can understand your dislike of CA for wood, it just does not feel natural, but it works and I don't need any clamping, pinning, ... At least, I managed to add seven planks today. The first three were full width planks, as I found, that this way, the following planks will lay better and for aesthetical reasons, but everywhere, where the radii of the hull are tighter, I beveled the planks, to have a equally small gap to the next plank. The fourth plank was the first one which got tapered around the bow and until now, I managed to achieve a symmetrical plank picture on both sides. I thought, I'm a tool nerd, but seeing your collection of plank bending devices, I'm envious . As I'm not sur, how my future as a wooden ship modeler will turn out, I'm a bit cautious adding all the tools now. I hope, I will never have two deal with 2mm thick planking and for the moment my bending pliers will have to do for mine. Cheers Rob
-
Duchess of Kingston - Beauty of the Seas - Wooden Sailing Ship 1/64
DocRob replied to DocRob's topic in Non LSM 'WIP
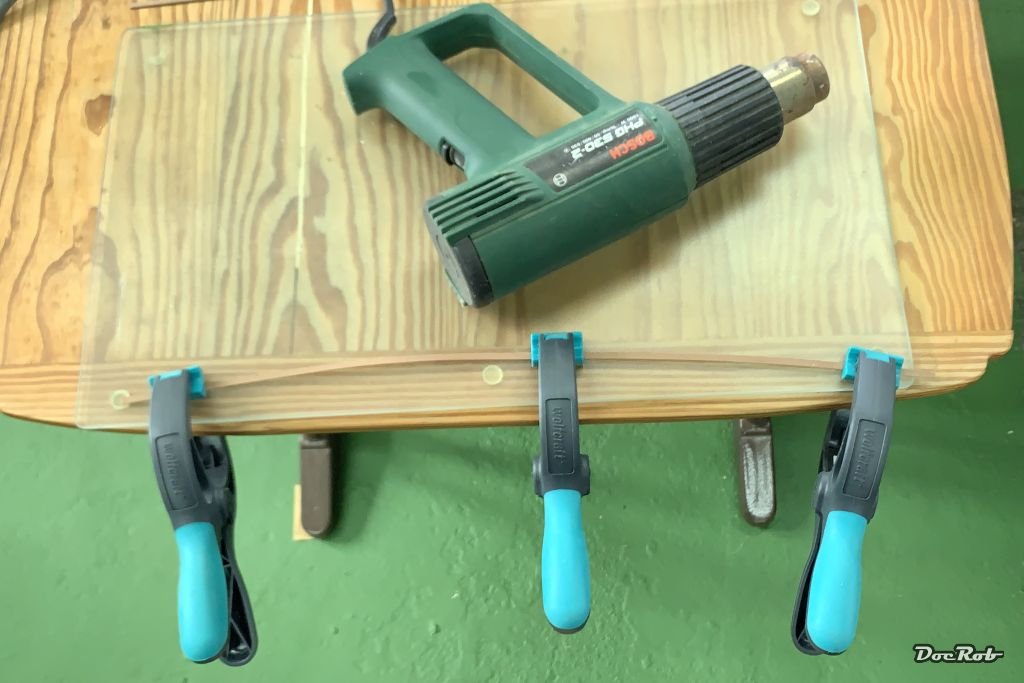
Thank you Peter, this thread is the essence of lots of other build logs, I read and the input of kind members here, where I use the Dok build as the focal point to it report the way, I did it after sorting all the information for me and my situation. In other words, it's great to have all of you around At the moment I'm a bit stuck with the beginning of second planking. The pear wood is a bit harder to work with, than the soft and bendable lime wood. The other difficulty is, to hold the planks in place without the possibility to nail them down corresponding with the use of different type of glues, PVA or CA. I tried different techniques yesterday, but haven't found the right way to go. I have two types of CA, one cures very fast, the other too slow. Wood glue is curing slowly too, which give you the benefit of easy adjusting, but to hold a plank down and up against the last one over a long curing period, is not easy, given the springy flex of the material. To hold a plank in place, I used thumb tacks, pin nails, which were forced through plank rests, rubber bands, but none was completely satisfactory. The wood needs to bend multi dimensional and I experimented with clamping soaked planks down on a glass plate and dry them with a hairdryer, to at least have the longitudinal bending ready. All in all, I tried a lot of things and am a bit concerned about the outcome. But I know, like I described my iterative process in your Ferrari thread, I will find a way. Next, I will protect all the keel, bulwark and stern fairings with kabuki tape, to protect them from glue residues and will try the fast drying CA step by step from the bow to the hull. Cheers Rob
-
Very often, I use Future / Pledge as a clear coat, at least, when I do not work with hot chemicals later onto it. It can be mixed with Tamiya flat to the desired matteness. If you use more than 30% Tamiya flat in the mix, the results will look frosted. There is a good description of the mixing ratios on the homepage of talented modeler fichtenfoo. Clear Coats with Future Floor Acrylic – FichtenFoo Cheers Rob