DocRob
-
Posts
7,045 -
Joined
-
Last visited
Content Type
Profiles
Forums
Events
Gallery
Everything posted by DocRob
-

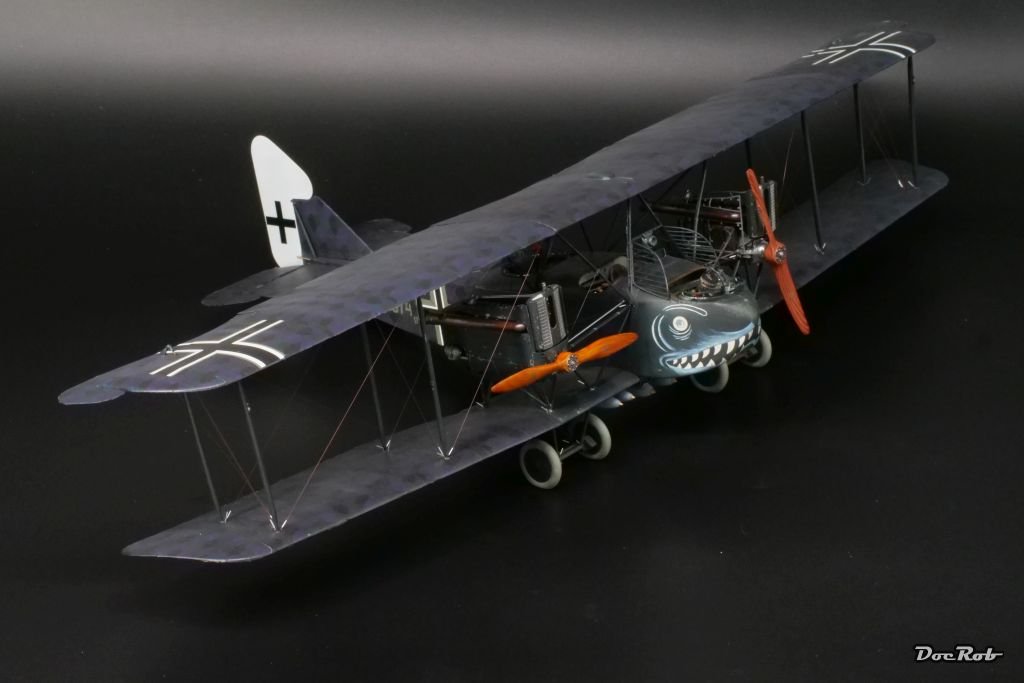
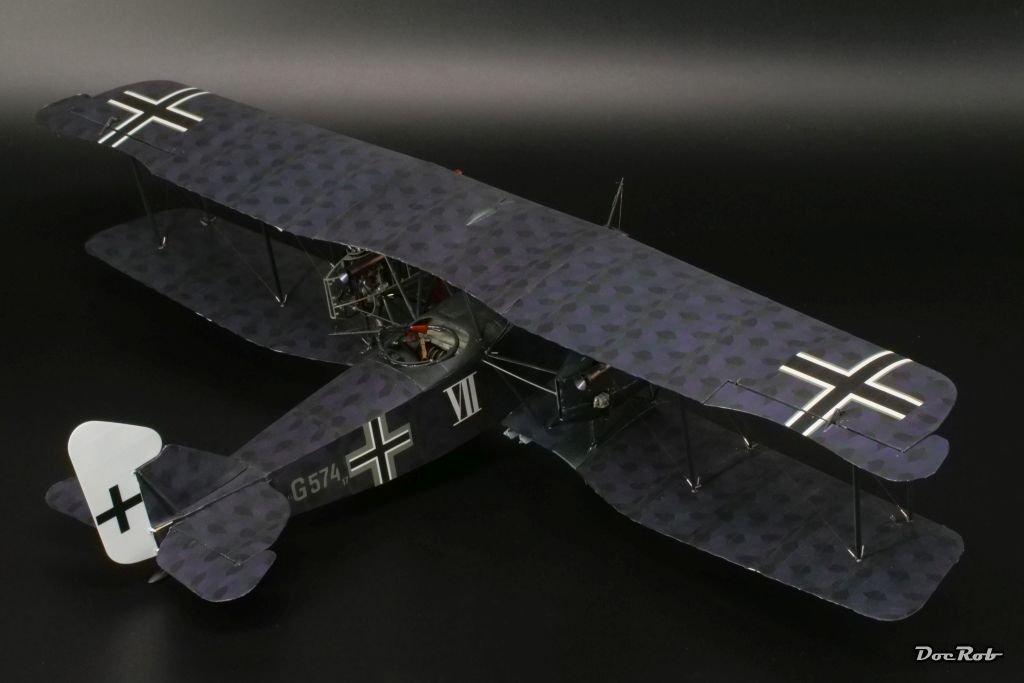
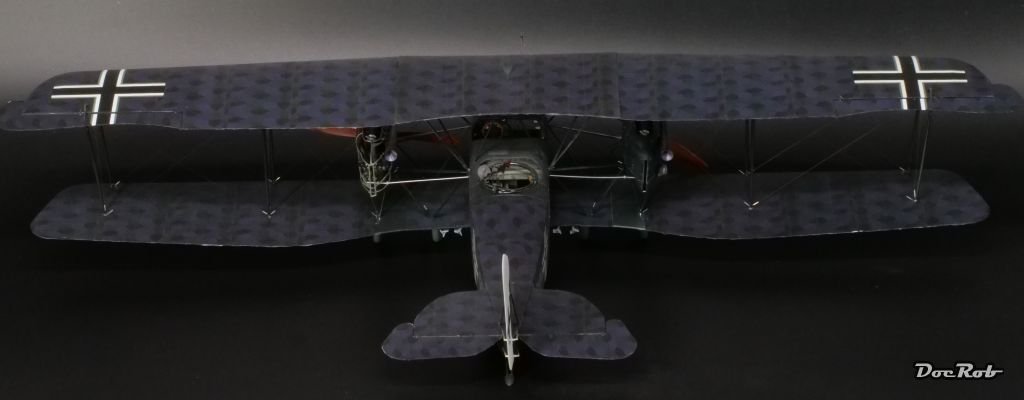
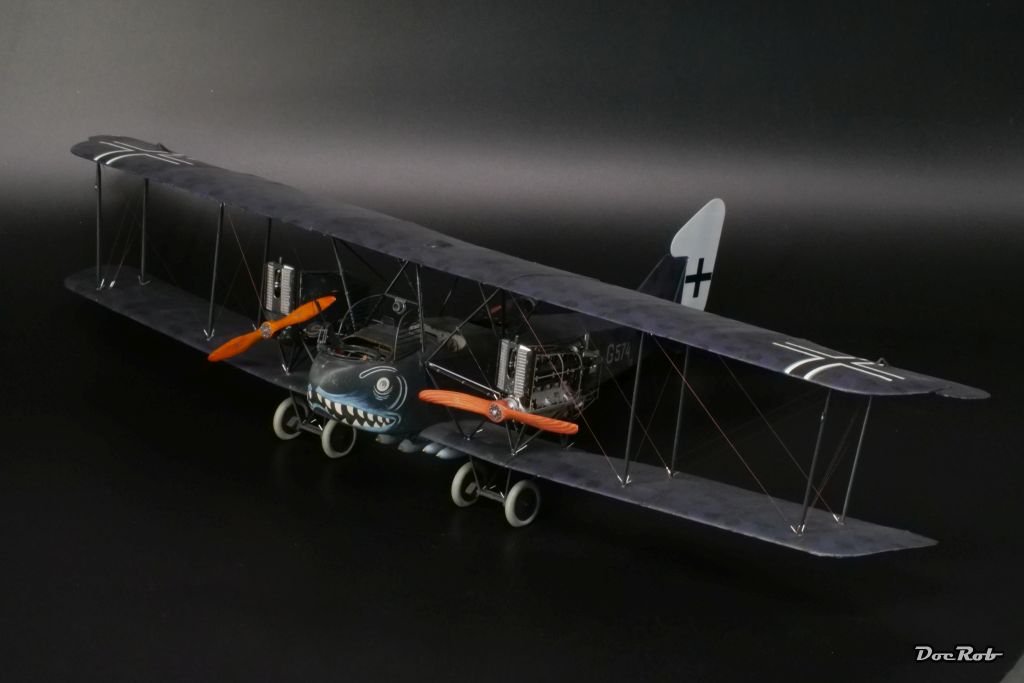
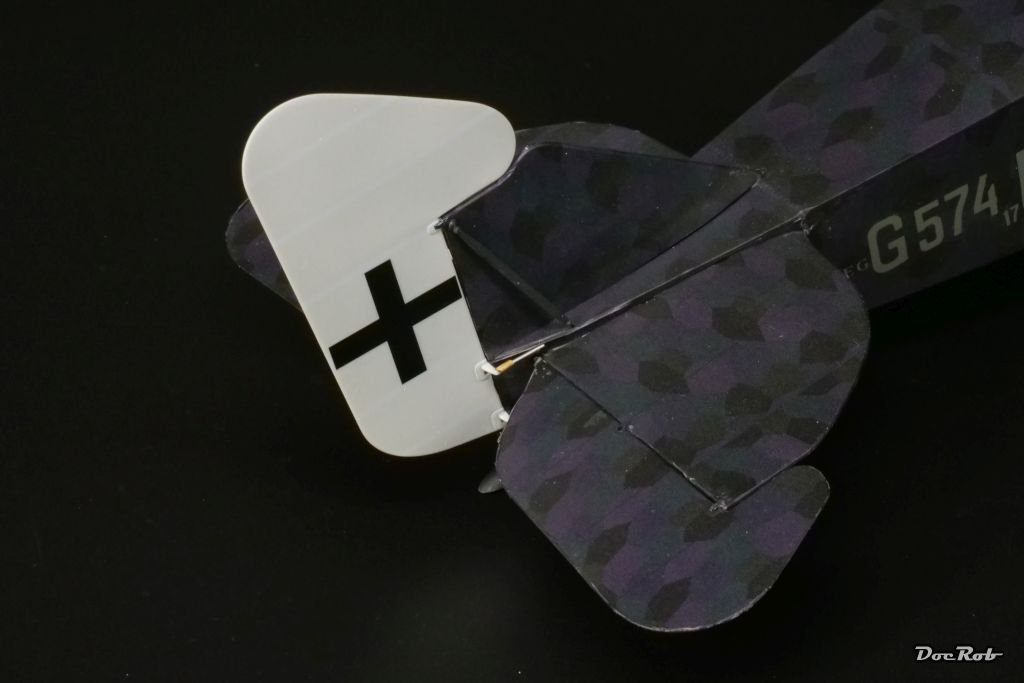
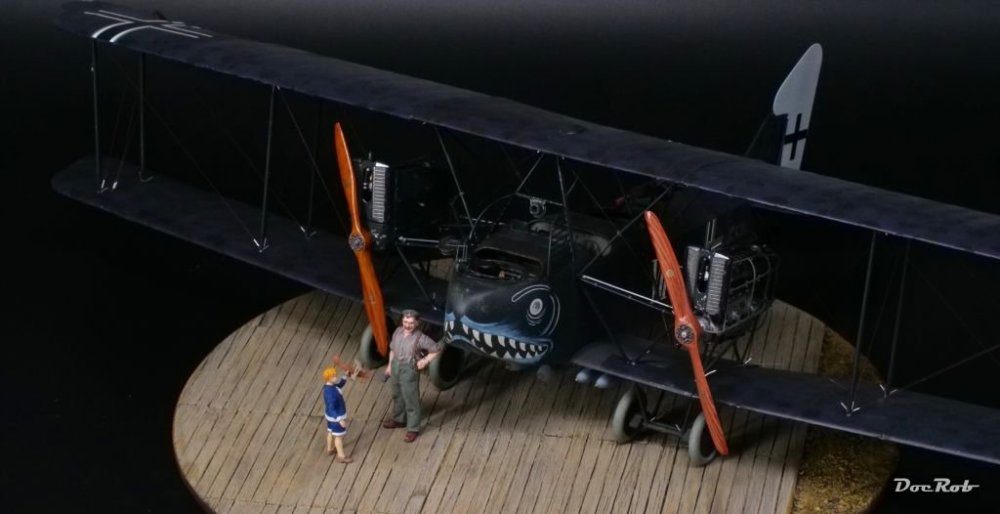
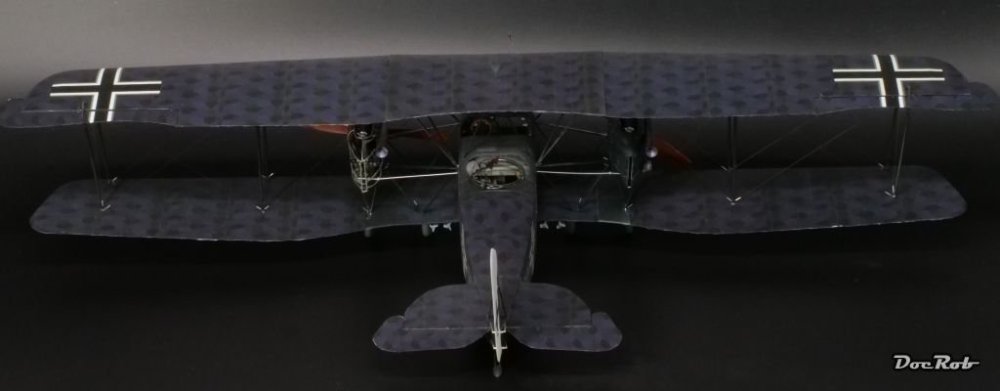
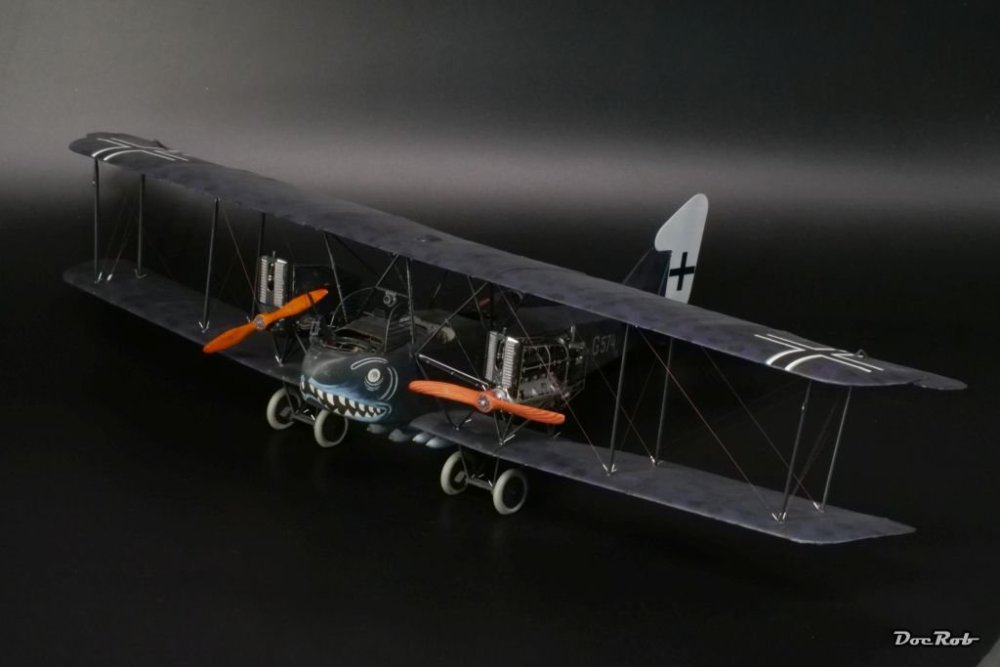
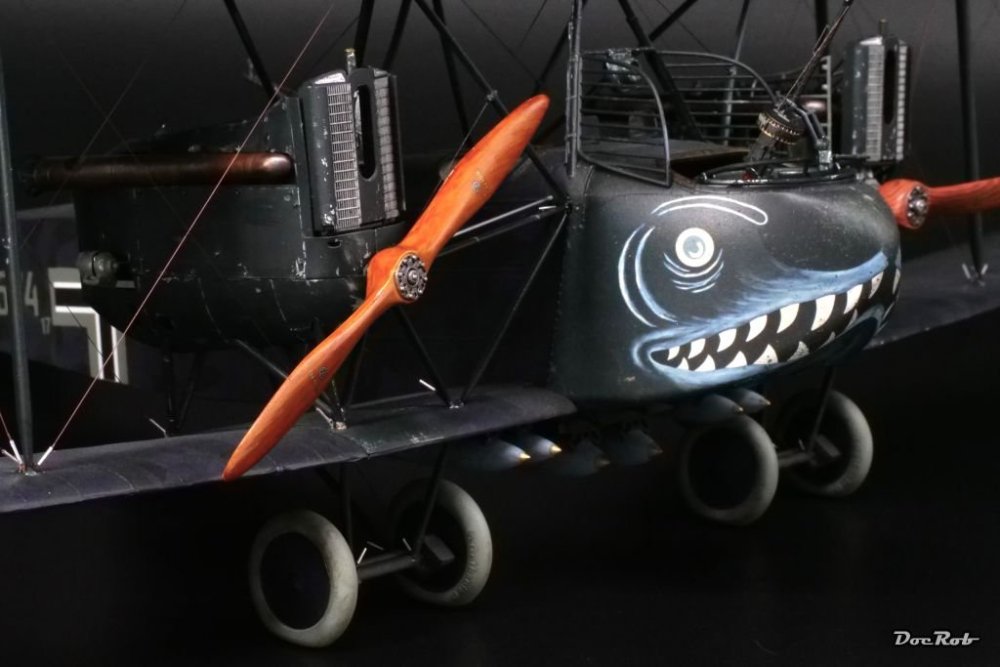
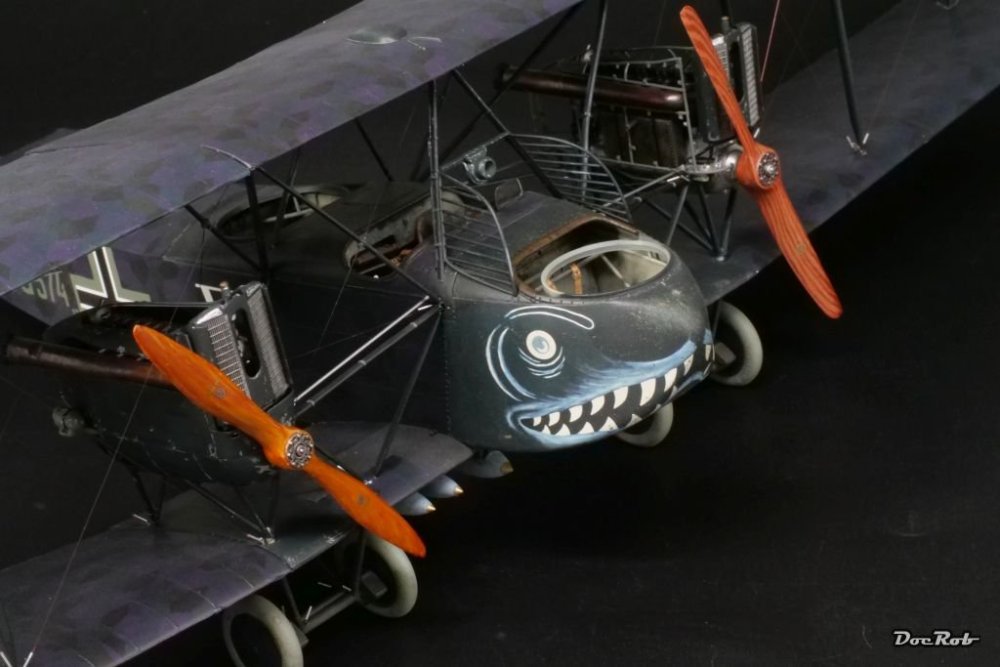
AEG G.IV - Creature of the Night - WNW 1/32
DocRob replied to DocRob's topic in The Great Twins Broup Bluild
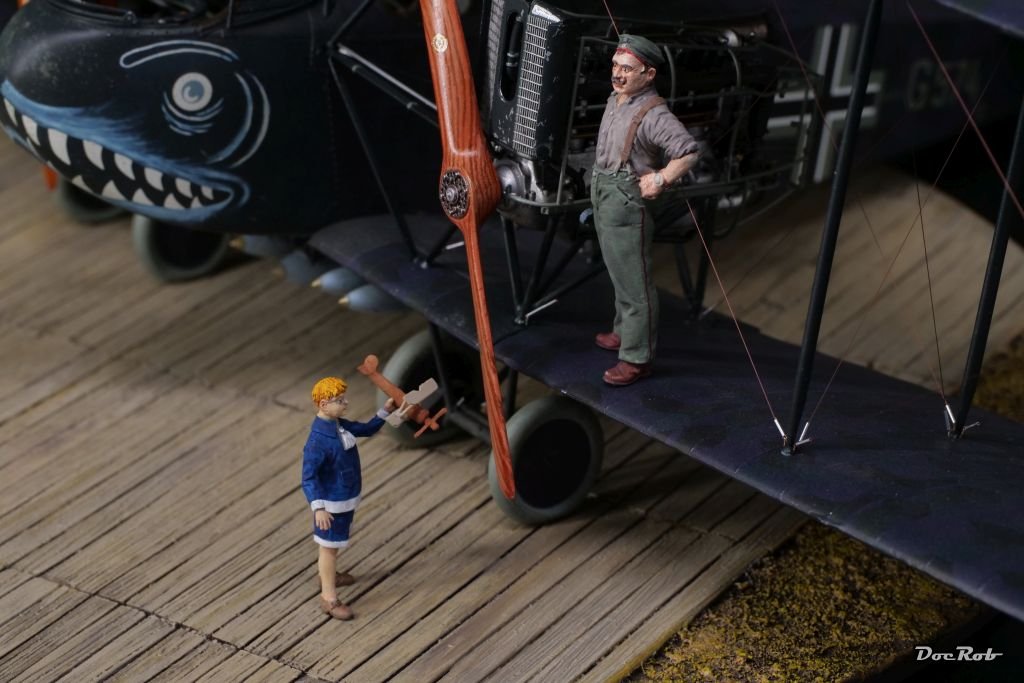
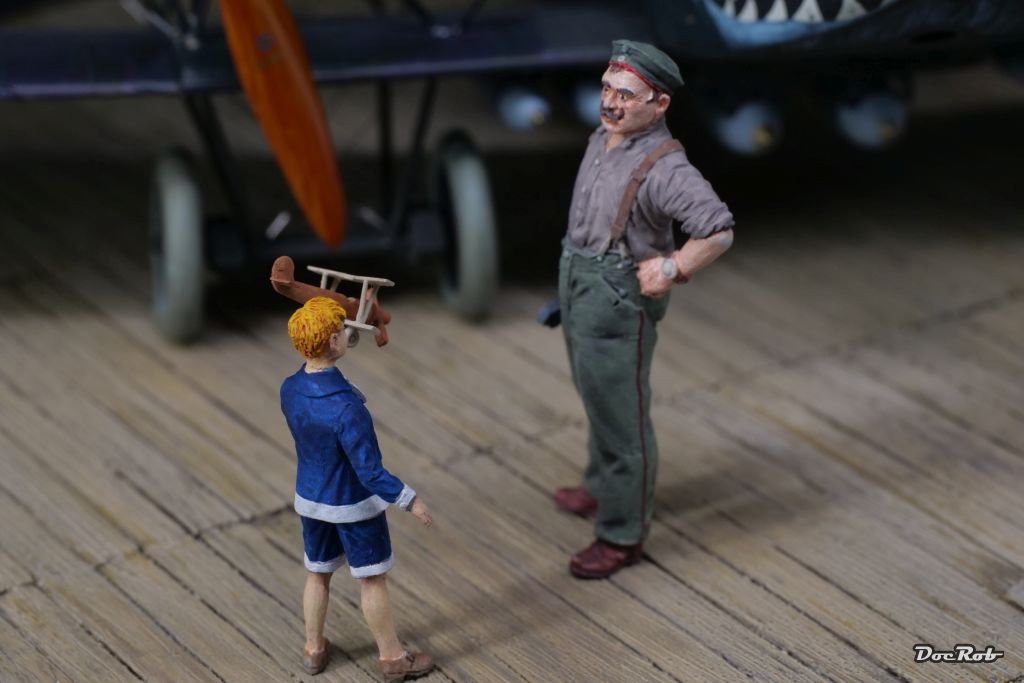
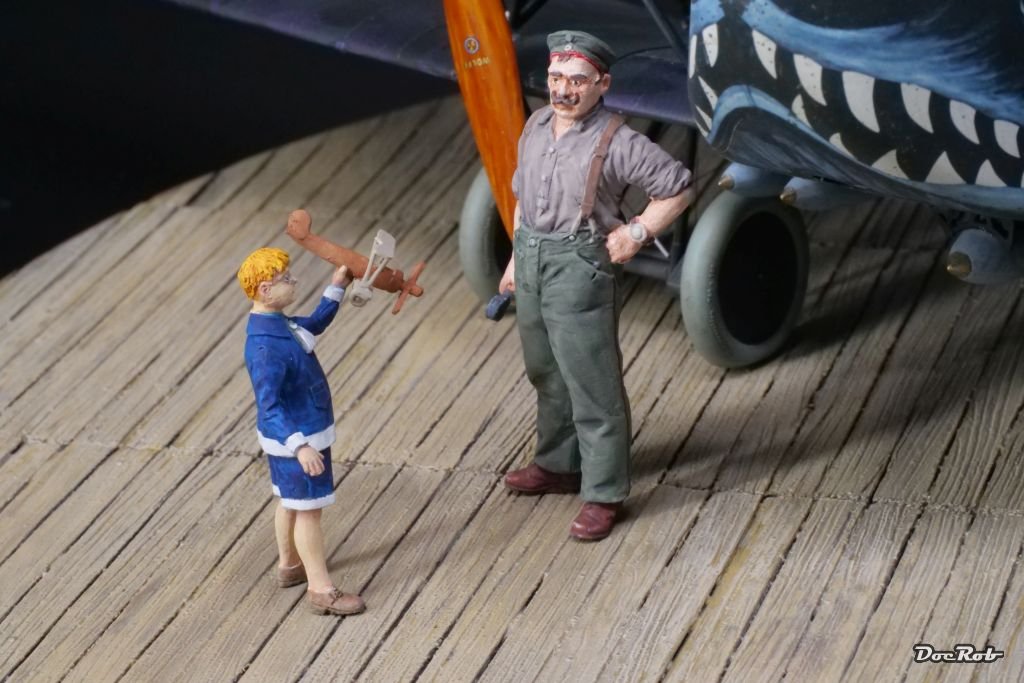
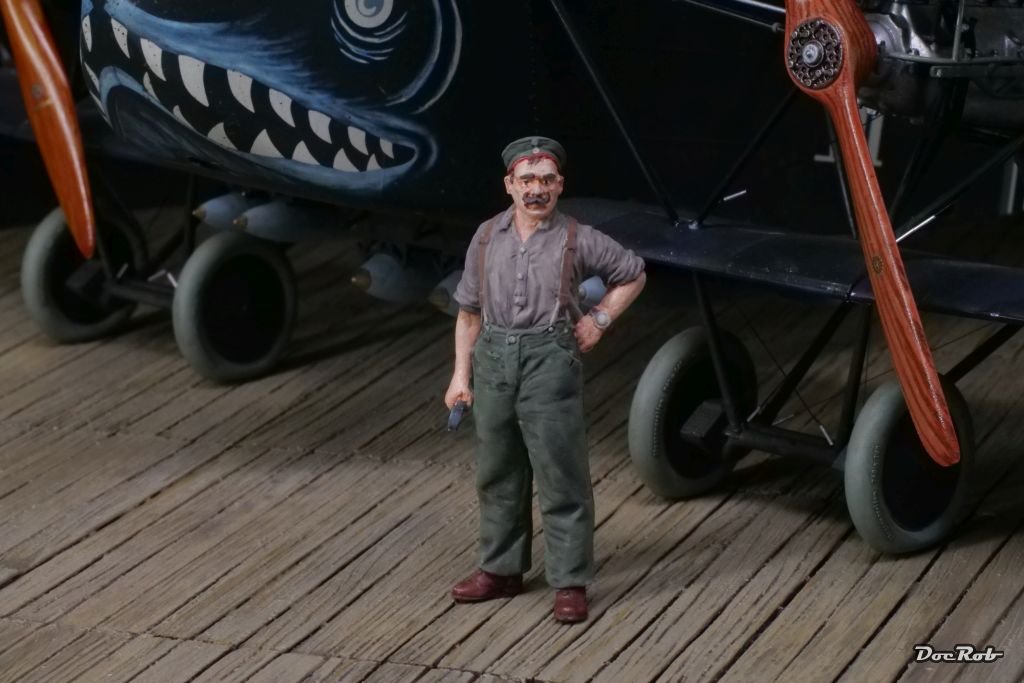
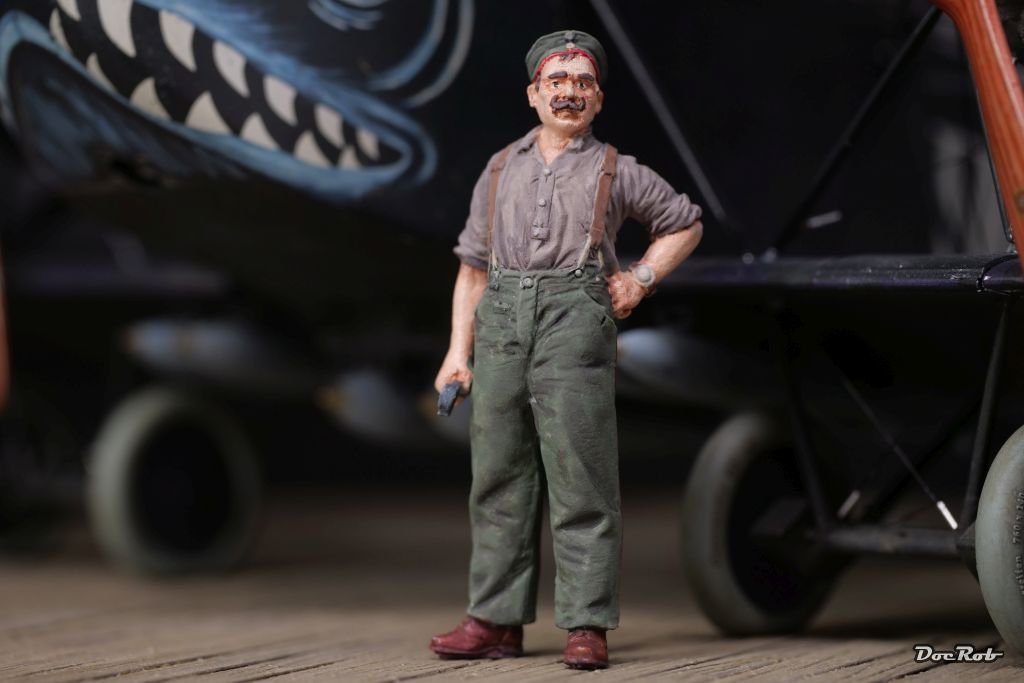
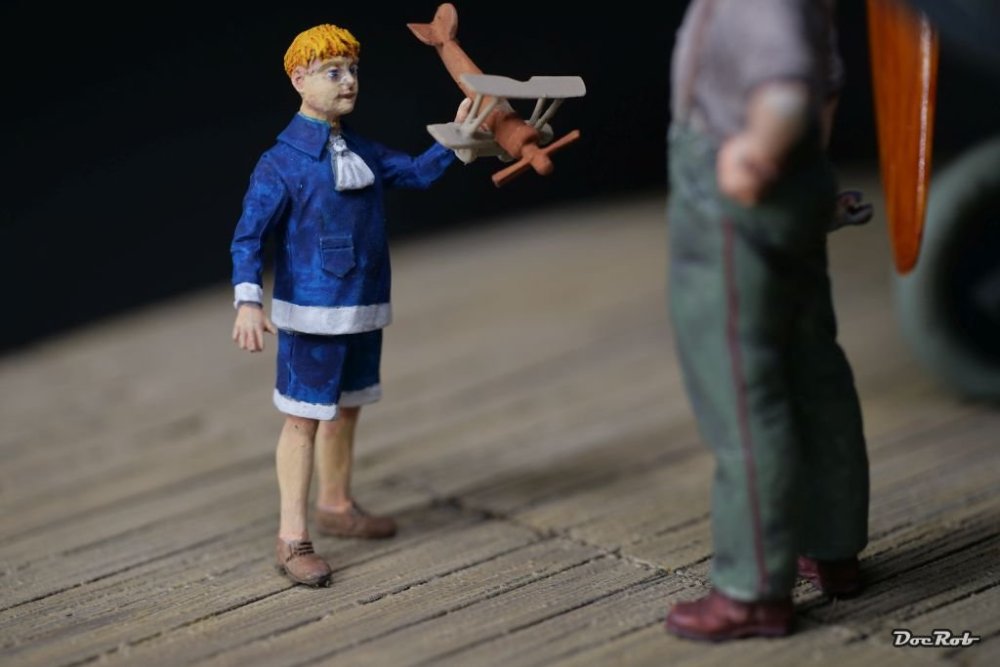
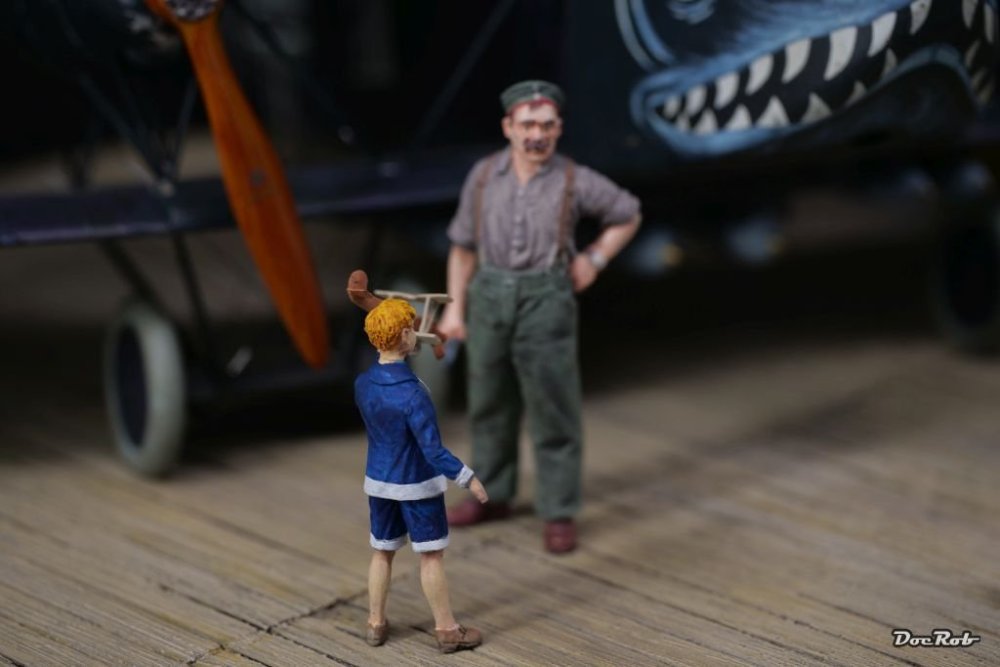
Thank you Peter and Hubert. I know a lot about figure painting theoretically, but am not able to convert it onto my figures. I know about the eyes. My mechanic looks like he´d seen a bunch of Camels approaching with his bug eyes. I always fight with color consistency with figures. too dense and you have a blob, too thin and it doesn´t cover. What really helps are good brushes and I´m not only using the smallest, as color soaking capacity is also important. Anyway, I added the second figure to my build and call the mighty bat FINISHED .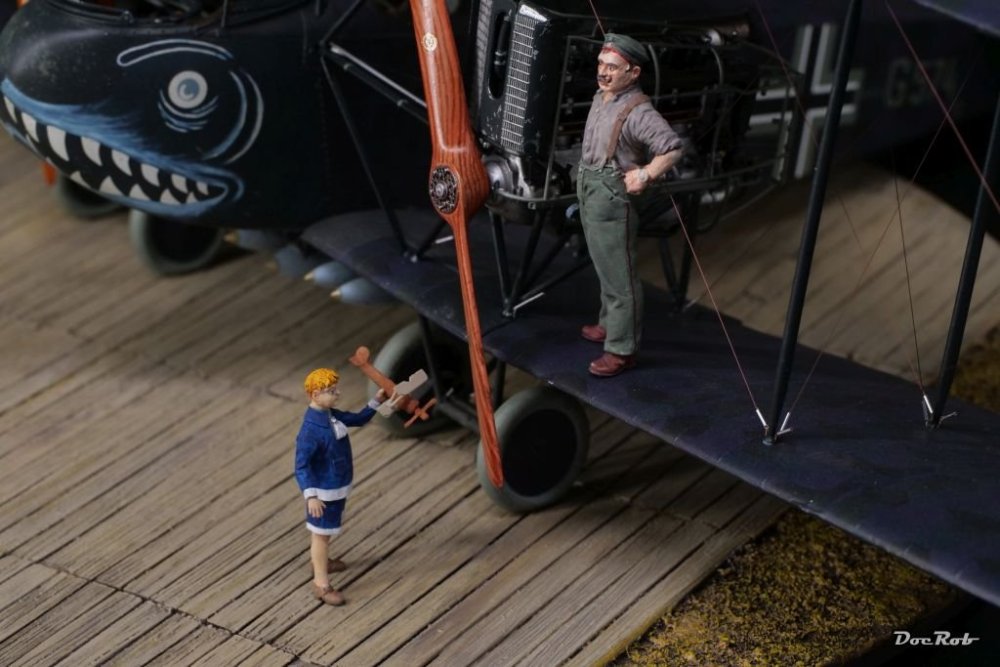
-
AEG G.IV - Creature of the Night - WNW 1/32 - Finished
DocRob replied to DocRob's topic in The Great Twins Broup Bluild
Thank you FA and Martin, the build was challenging at times, but somehow ever rewarding. Fortunately the Twins GB was enough of a kick a$$ to start this extensive project. Cheers Rob -
AEG G.IV - Creature of the Night - WNW 1/32
DocRob replied to DocRob's topic in The Great Twins Broup Bluild
Wise decision, Carl. I like to choose figures fitting for a build, which actually form a picture or tell a story, but I often shy away, when time comes for painting these. The eyes are terribly different and many of my attempts end cross eyed. Cheers Rob -
F-15DJ Kai or Eagle Plus- Finished!
DocRob replied to BlrwestSiR's topic in The Great Twins Broup Bluild
Lots of fitting design elements there, Carl. The Super F-15 is coming together nicely. Cheers Rob -
Nice haul, Paul. I have the grinder as well and had hoped for a more universal collet for slow revolution drilling duties. It´s a nice tool, but a bit limited due to the 3mm shaft diameter. Cheers Rob
-
Stunning looking Jug, Peter. You chose a very attractive scheme and the decals let it pop. Bummer with the description. My decal sheet for the Burma Banshees seems to have a very decent documentation with measurements even for the painted bars. Cheers Rob
-
AEG G.IV - Creature of the Night - WNW 1/32
DocRob replied to DocRob's topic in The Great Twins Broup Bluild
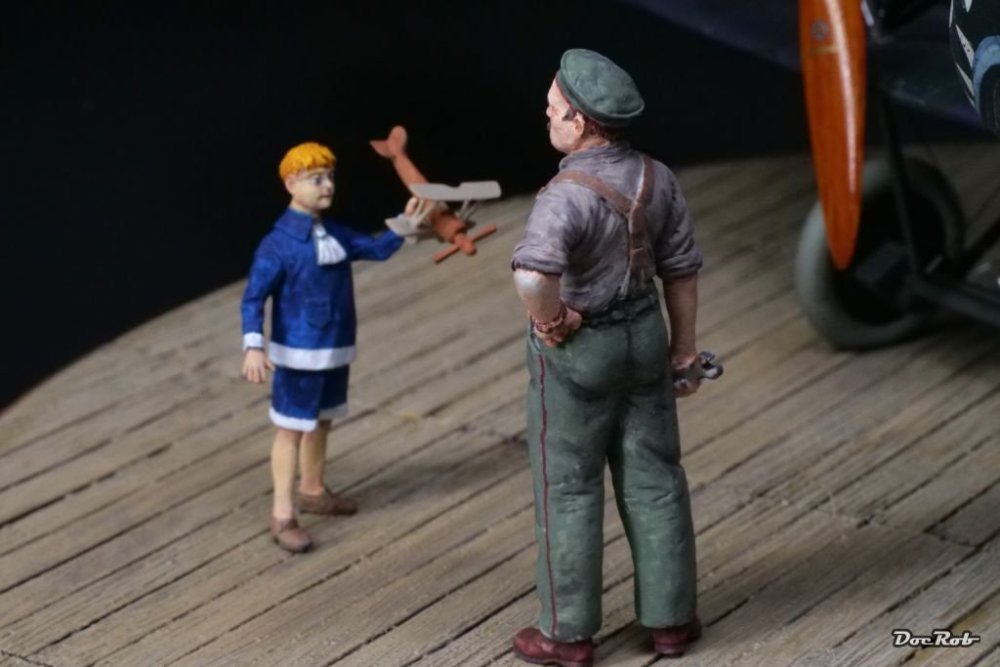
Thank you Martin, I loved the figure, when I saw it first and in the GB-Finished section, you can see the other figure and that it is not a hammer, but a wrench, we are talking German engineering here . Cheers Rob -
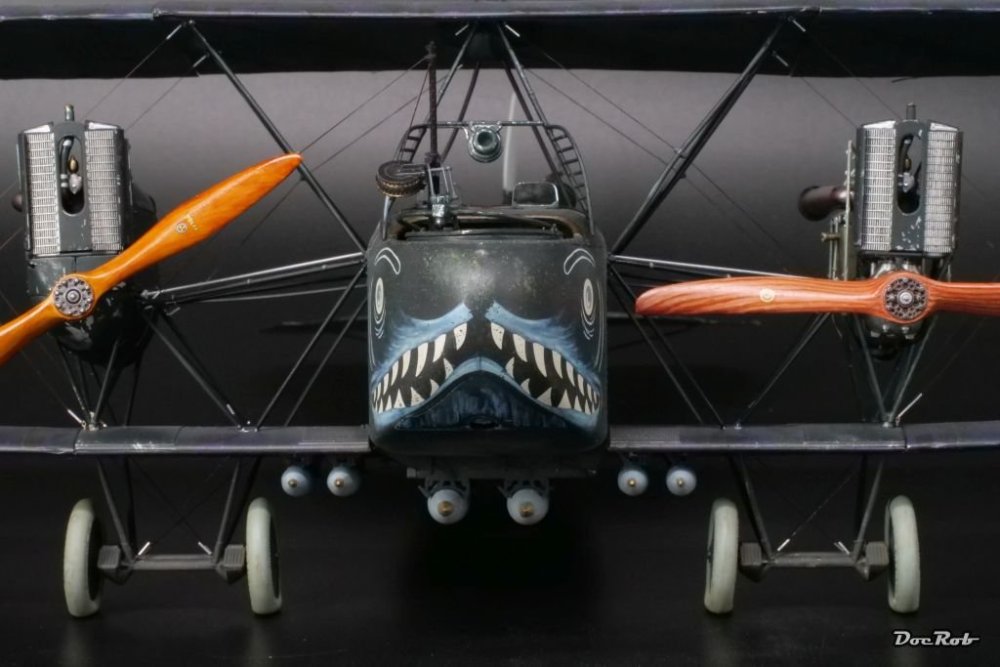
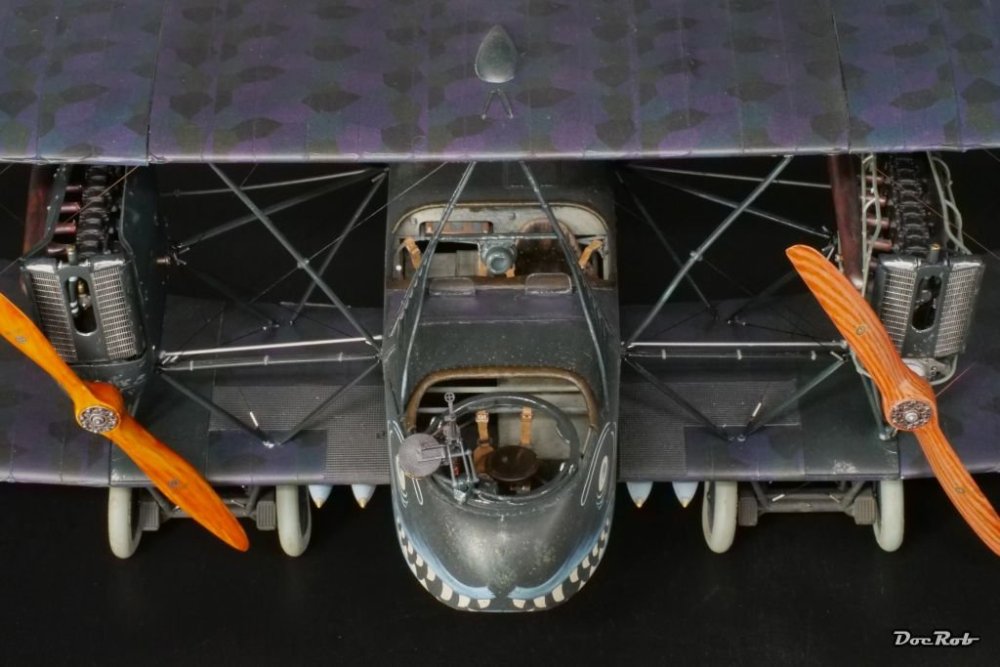
The big bat is finished now, that I found the courage to paint the figures. Cheers Rob


- 15 replies
-
- 11
-

-

-
AEG G.IV - Creature of the Night - WNW 1/32
DocRob replied to DocRob's topic in The Great Twins Broup Bluild
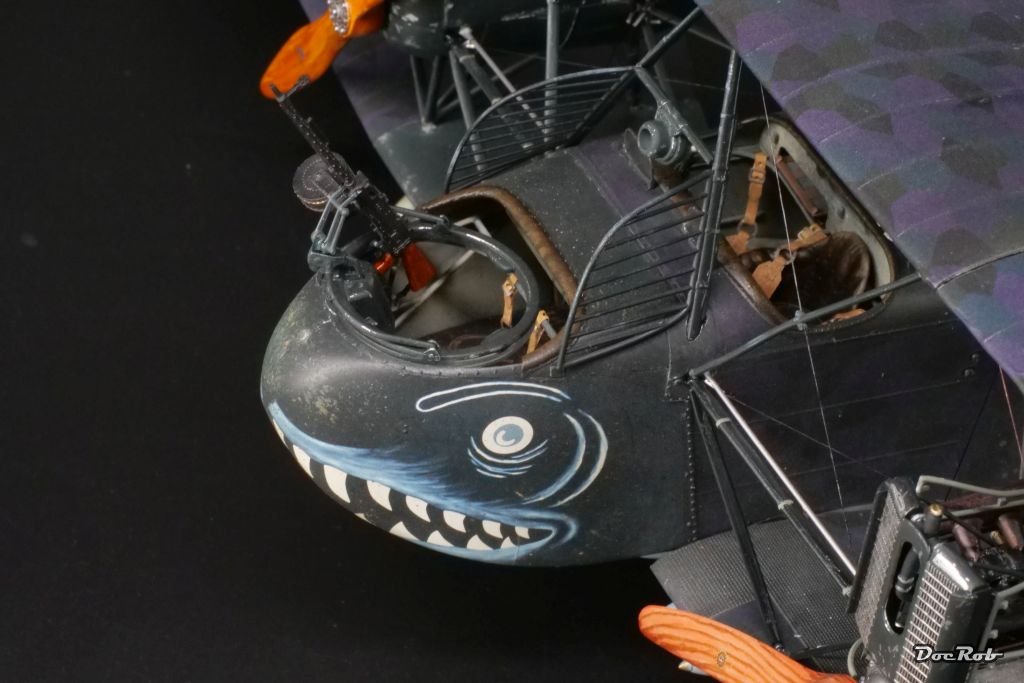
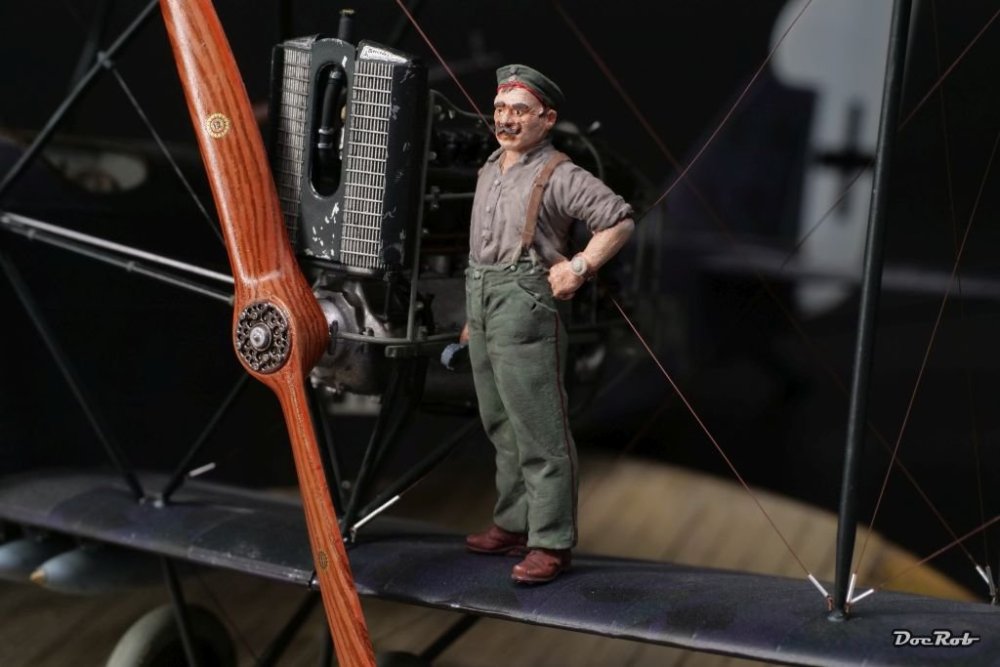
Well, here are my feeble attempts in figure painting. I try to do one or two figures per build, but often shy away, because painting these is always like a burde for me. Nonetheless, i try to improve my skills and sometimes force myself to finish the figures. The mechanic is painted with acrylic colors from Scale75, except for the skin, which was painted with oil colors. Cheers Rob

-
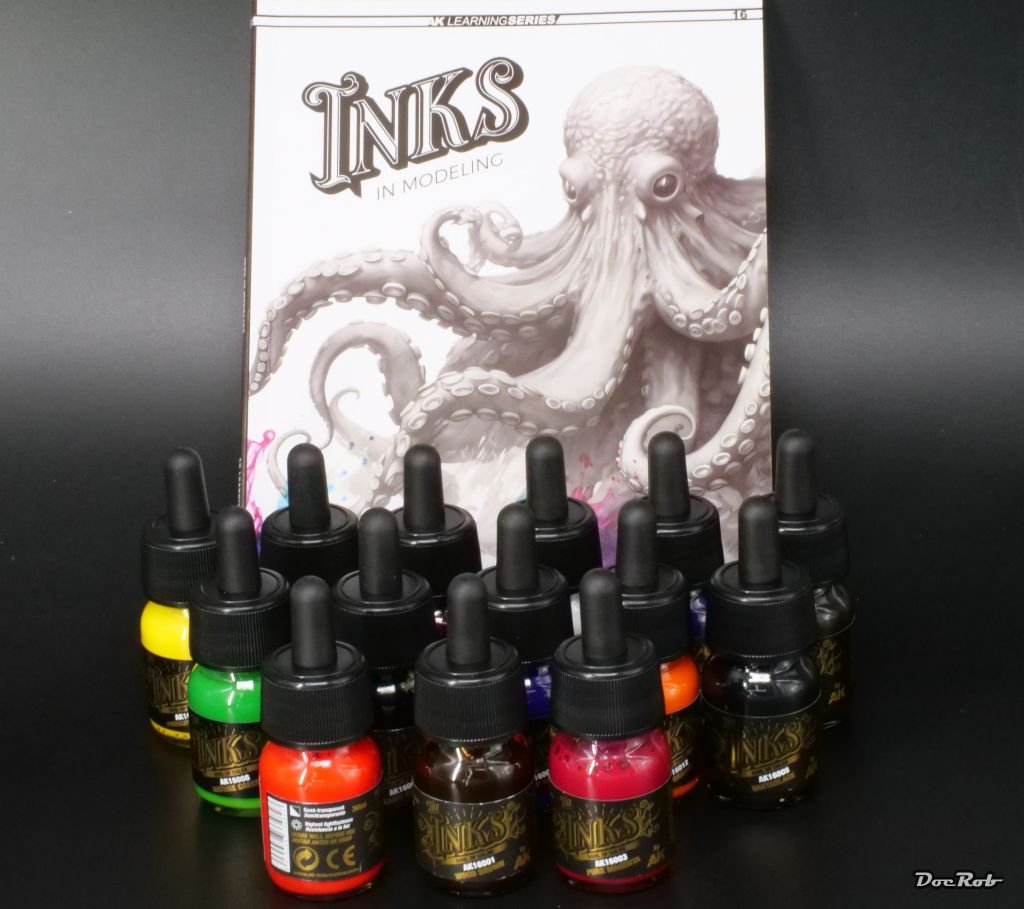
Inks are definitely worth a look, Peter. For testing the effect you can dilute every high pigmented color, where after thinning no pigments show and ´varnish´ over painted areas. It´s like a wash, but with a lot more density, pigment wise. The steel pins are included with some tumblers, with others not. I had to take what´s available and had to order extra pins, but that´s no problem, as I could order different sizes for experimenting. I have some time until first testing, as I start a little week trip to Galicia in Northern Spain for having the finest seafood among other goodies. Cheers Rob
-
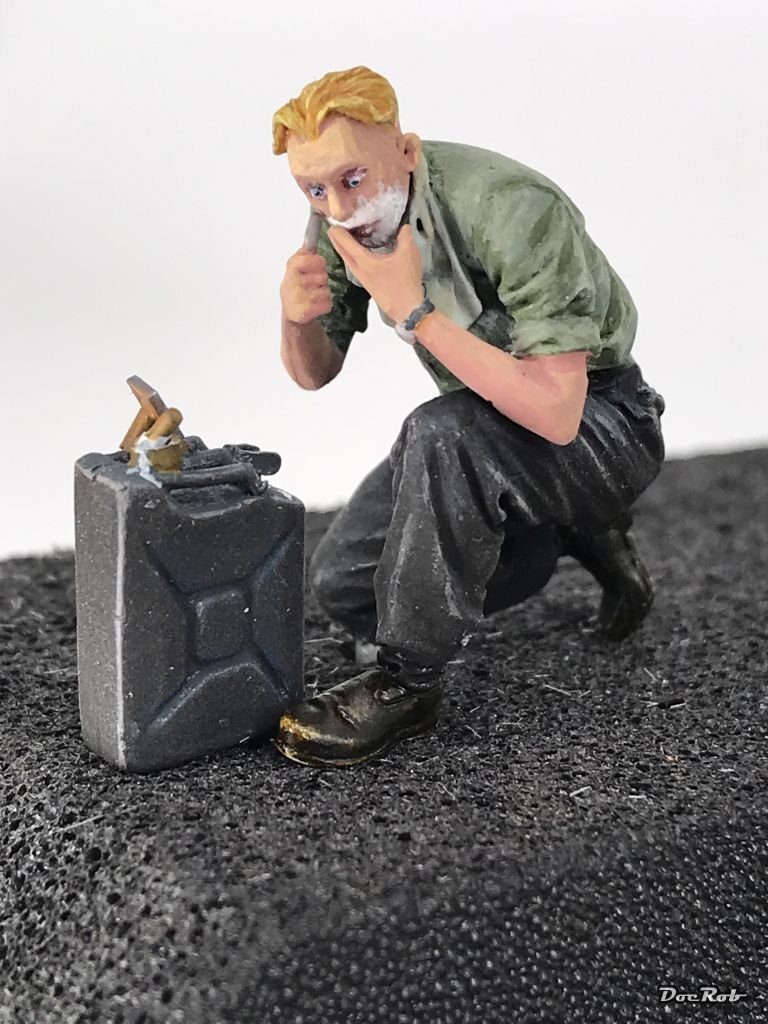
That´s where the bock in the background comes into play, Martin. Earnestly, I used inks over acrylic paints for figure painting, but there are many other possibilities. The inks are very thin in consistence, but have a lot of pigment and can be used brushed or sprayed. One little example, I could remember were the boots of this shaving gent, where I used yellow and brown inks on his boots for color richness and depth. Cheers Rob

-
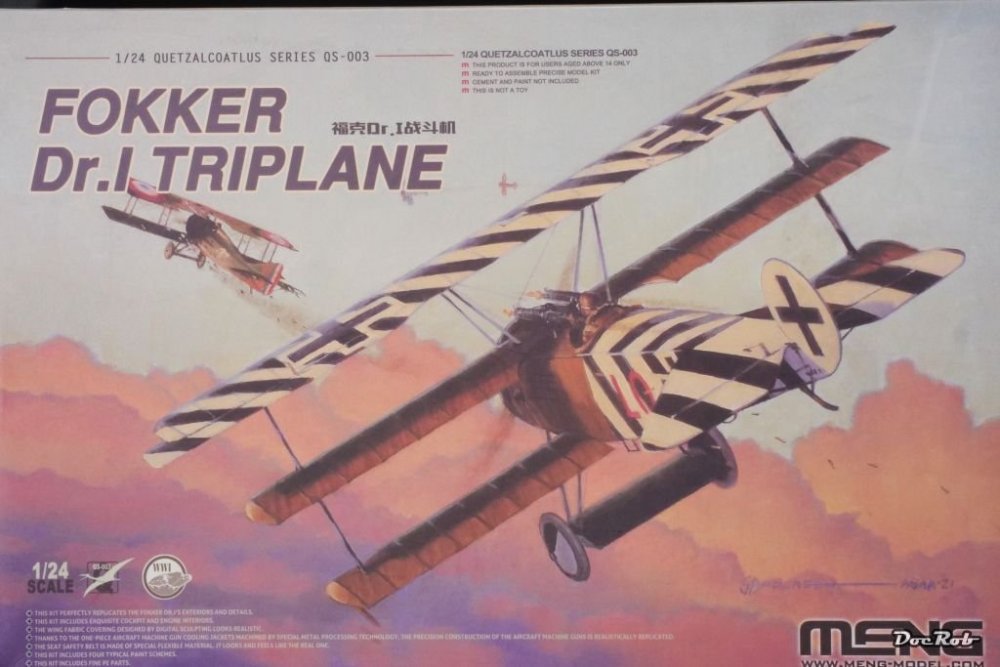
Yesterday arrived the big Fokker DR.I in 1/24 from Meng (WNW?). It seems to be a simple build, but includes fabric seat belts and brass gun jackets. My only AM will be an Aviattic decal set for Josef Jacobs all black DR.I. The set plasters the whole plane with fabric decal (nothing new to me ) and includes also wood decals and others for the interior. I have a sparse ink set, which I really liked to use for figure painting, as a kind of wash or airbrushed for tonal accentuation. I bought the complete 14 color set from AK, as I want to dig deeper into the ink thing. Lastly, my long awaited magnetic tumbler polisher arrived. It took a lot of effort, to get it sent to my remote part of the world, but now it worked. This will be used, to clean white metal parts from my recent Model Factory Hiro kits (One more is due to arrive soon). You put the parts into the jar add water and some tiny polishing steel pins (which still need to a arrive) and the tumbler swirls the needles around the white metal parts due to a rotating magnet in the base. This cleans and betters the surface quality of the parts. Cheers Rob


-
Fantastic model and ultra dynamic display, Congratulations Mark, you show jets, where they look best, in action. Cheers Rob
-
The V1 looks great Martin, love the camo and the trailer. I see you have a ZM Marsden base as well. I have three different, great for a quick presentation. Cheers Rob
-
While waiting for my decals to arrive, your Jug is half finished Peter . Your paintjob came out fantastic, love the contrast between yellow and OD. Like Mike said, can´t wait for the decals. Cheers Rob
-
AEG G.IV - Creature of the Night - WNW 1/32
DocRob replied to DocRob's topic in The Great Twins Broup Bluild
Don´t sell yourself short, Peter, with your skillset, the DR.I will be an easy build. If you want to get around wood painting, you could use either a Quinta set or Aviattic decals for the exterior, which include interior woodgrain decals as well. Rigging is only six lines, which are not very visible. Done with elastic rigging line, there should be no problems. The scale, well, I guess the 1/24 Fokker is smaller than a 1/32 Spitfire. I stand to be corrected, but I see the big Meng DR.I as an easy in between build kit. Reflecting my WWI plane builds, all have been easier than thought before and more rewarding then most of my other plane builds, but that is of course a very personal view. Cheers Rob -
AEG G.IV - Creature of the Night - WNW 1/32
DocRob replied to DocRob's topic in The Great Twins Broup Bluild
He he, thank you for the praise, Mike. For such a huge and demanding kit, there are astonishingly many builds to find, with great results. WNW could have chosen from a lot. That said, I´m thinking about getting another AEG, this time the earlier day bomber version, they can still be found for relatively fair prices. Cheers Rob -
AEG G.IV - Creature of the Night - WNW 1/32
DocRob replied to DocRob's topic in The Great Twins Broup Bluild
Thank you Peter, I´m blushing. You should try a WNW kit, possibly a German fighter, these are easy to rig and great to learn the needed techniques. Besides there are so many colorful choices. Only yesterday, I found a 40% off deal on the Meng (WNW?) 1/24 Fokker DR.I and couldn´t resist. By the way, an ideal beginner kit, when it comes to WWI planes. I opted for Aviattic decals to plaster the whole crate to depict the all black DR.I of Josef Jacobs. This will be a nice in between build. Documenting my work is not only altruism, it helps me to remember used techniques and develop them further to my liking over the years. Cheers Rob -
AEG G.IV - Creature of the Night - WNW 1/32
DocRob replied to DocRob's topic in The Great Twins Broup Bluild
Done so far, phew. I have to continue to paint the figures and to clean up my bench, which I guess will take longer than the build itself . Cheers Rob


-
AEG G.IV - Creature of the Night - WNW 1/32
DocRob replied to DocRob's topic in The Great Twins Broup Bluild
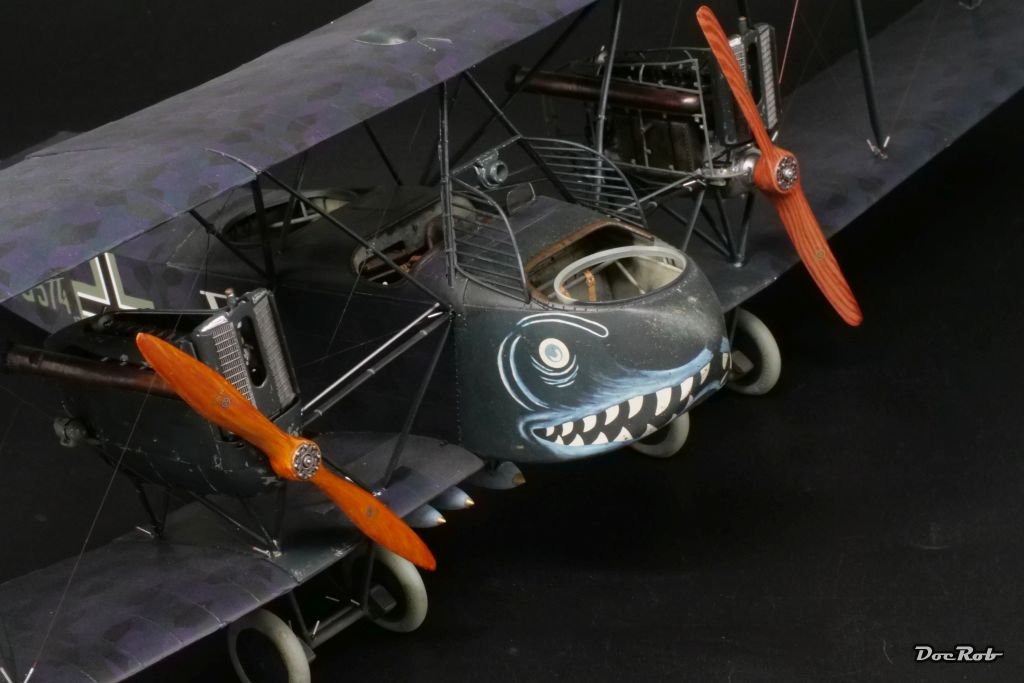
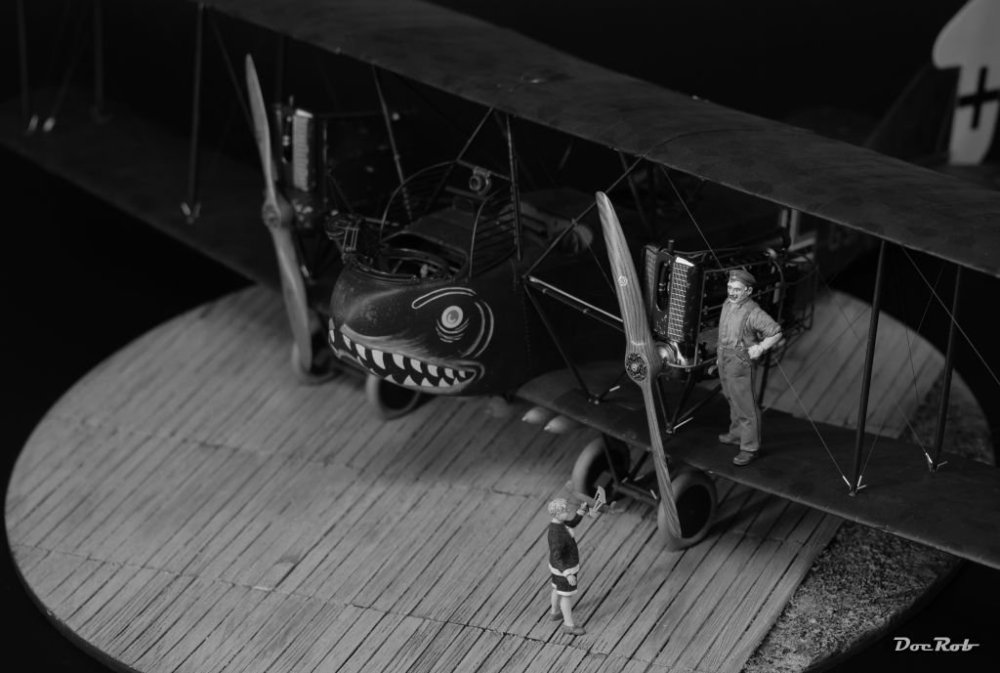
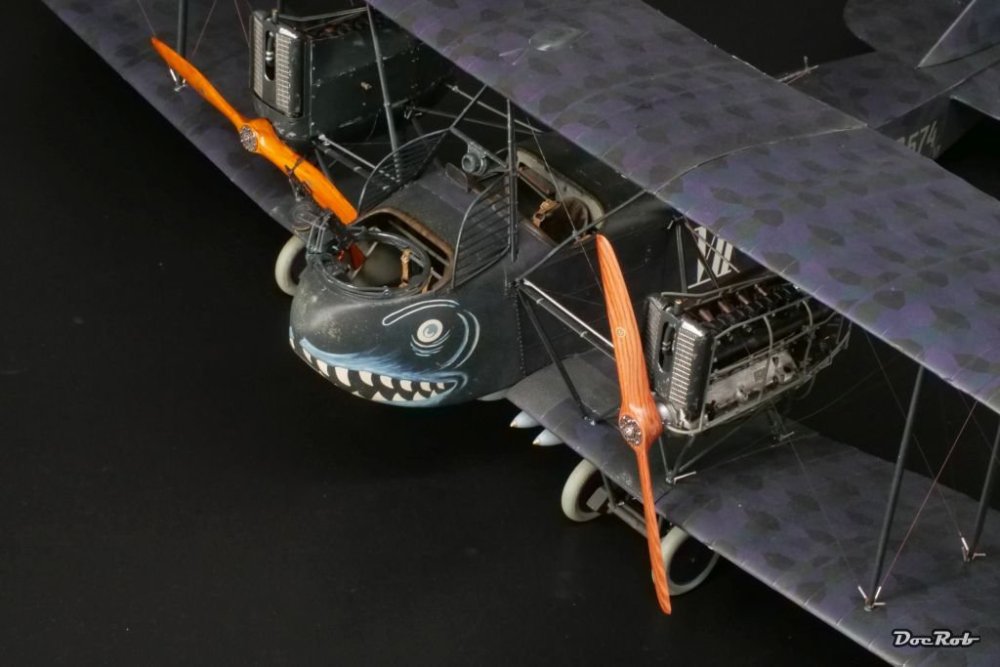
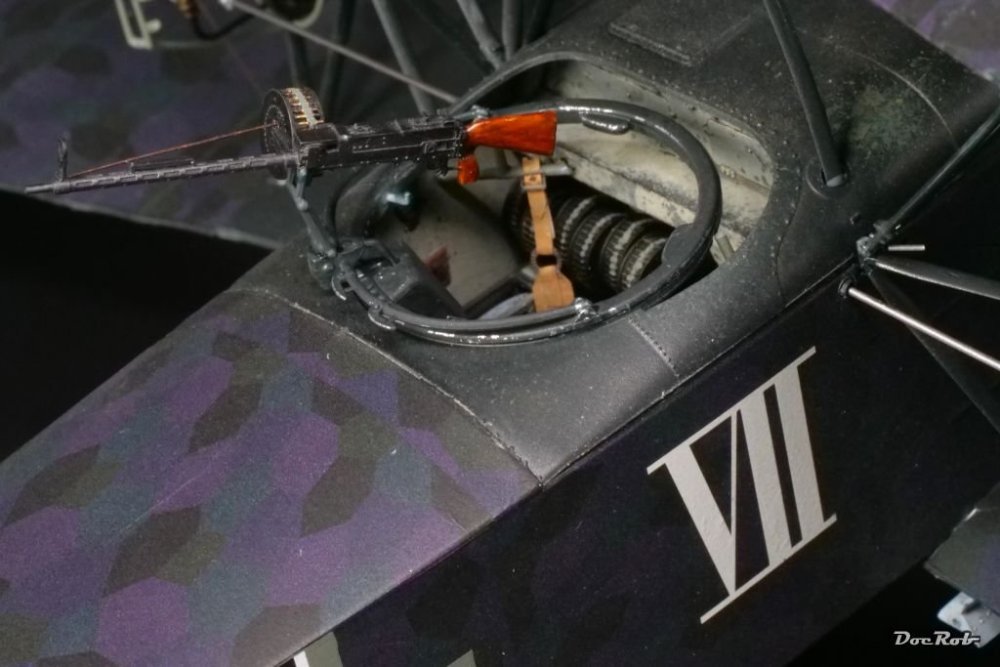
Final steps ahead, luckily. The huge airframe and the delicate details make working on the big bat more and more difficult. The issues fixed to parts torn loose ratio turns worse . I assembled the elevators and the rudder and added steering cables for the rudder. the fittings were made from split brass rod to add some more detail. Finally, I reassembled the guns, the worst part of the build and installed them into the gun mounts onto the gun rings. There will be a lot of final touch ups and then the big bat is finished. Cheers Rob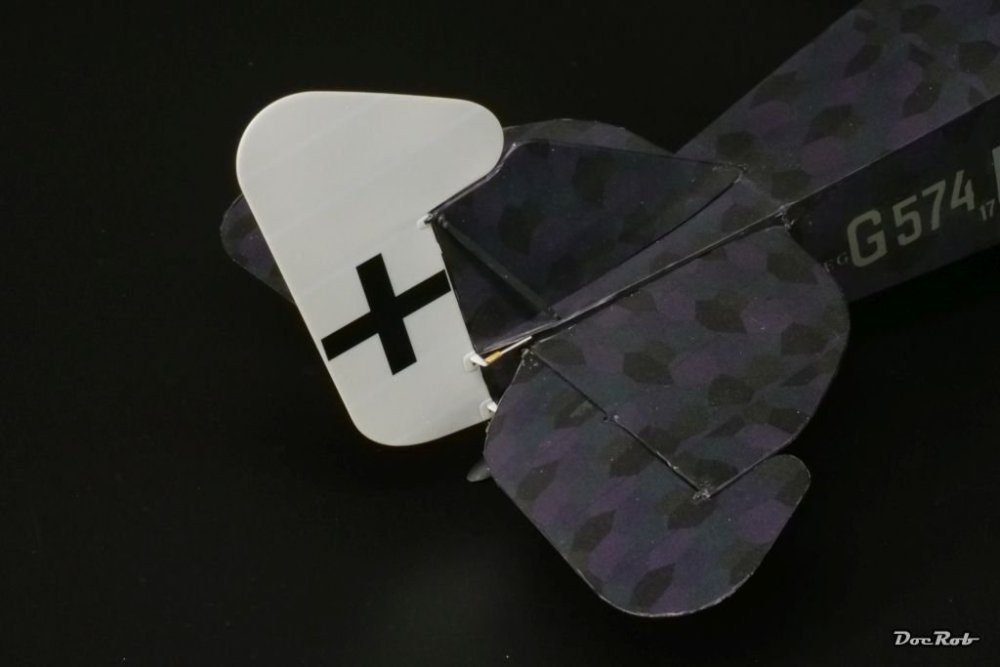

-
AEG G.IV - Creature of the Night - WNW 1/32
DocRob replied to DocRob's topic in The Great Twins Broup Bluild
Muchas gracias amigos and thanks for the being well wishes for my back. The pain is almost gone and tomorrow I may will be body surfing if the waves permit. The most frustrating part of the build were indeed the Parabellum MG´s. The one which fell out of the fuselage was a pain to reinstall and it took me a lot of time and cursing to get the magazines to glue in position. Sounds easy, but wasn´t, I don´t know why. If you´re not sure, how to align the guns, this calls for trouble. The gun rings sport a gun holding bow, movable of course, which holds the also movable gun posts . Today, I fixed all these issues, but as you say Mike, with a large delicate build like this, I felt more and more clumsy and thought twice about every movement. Luckily the airframe itself is sturdy due to great WNW engineering. I masked and airbrushed lamination on earlier builds and the pencil method proved much easier and more flexible. Cheers Rob -
Nice choice Peter and glad to hear the decals seem to be of good quality. Mine are on the way too, but like always, it takes a while. Cheers Rob
-
AEG G.IV - Creature of the Night - WNW 1/32
DocRob replied to DocRob's topic in The Great Twins Broup Bluild
Meanwhile, I finished the propellers, painting the hubs with gun metal, later pointing out the screws in silver and last adding black panel line wash for accentuation. When dried, I added the propeller brand logos and on they went. This was followed by two very frustrating hours, where all the guns fell apart, which were only temporarily fitted. The two in the gun rings while adjusting and worse ,the one in the fuselage fell out. After said two hours, I somehow managed to get the one in the fuselage back in place, using different tweezers and a torch, to reach into that now hard to access area. The other guns fixing is for tomorrow, but I used the chance and varnished their stock and grip with transparent orange. Cheers Rob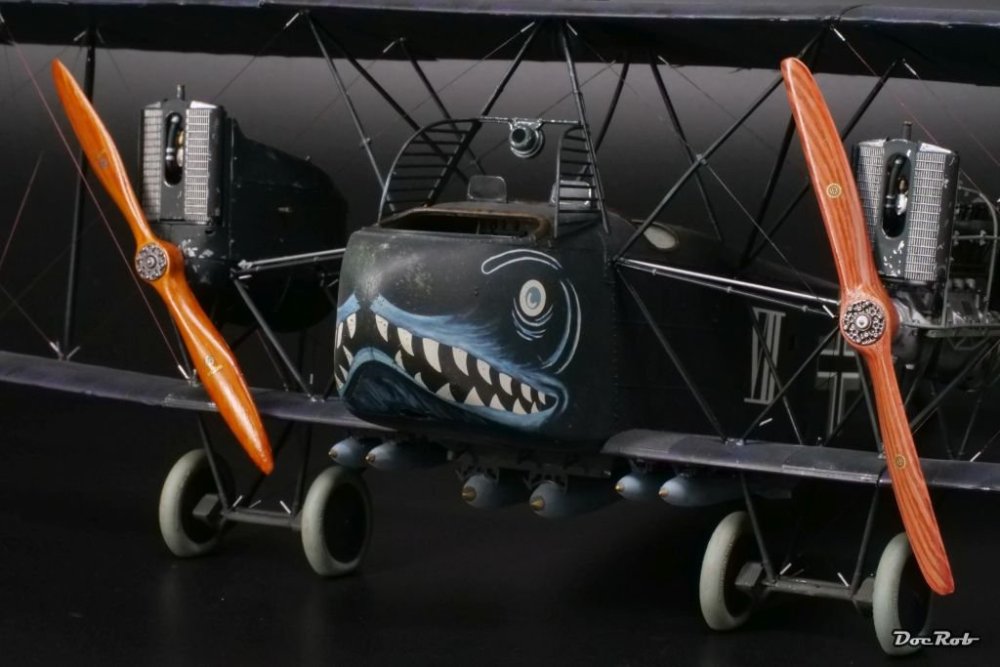
-
AEG G.IV - Creature of the Night - WNW 1/32
DocRob replied to DocRob's topic in The Great Twins Broup Bluild
Muchas gracias Amigos, my back is starting to get better slowly and I can move almost normal again, not that geriatric type of slo-mo break dance anymore . Cheers Rob -
Looking already good Peter, even without paint or primer. I guess, you use AM barrels, right? Cheers Rob