DocRob
-
Posts
7,045 -
Joined
-
Last visited
Content Type
Profiles
Forums
Events
Gallery
Everything posted by DocRob
-
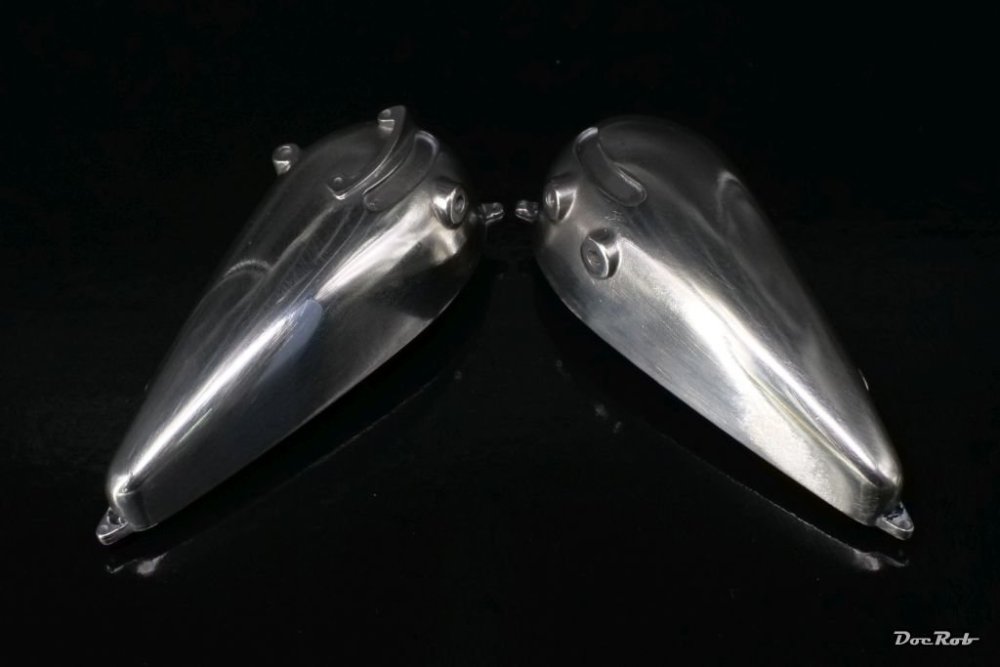
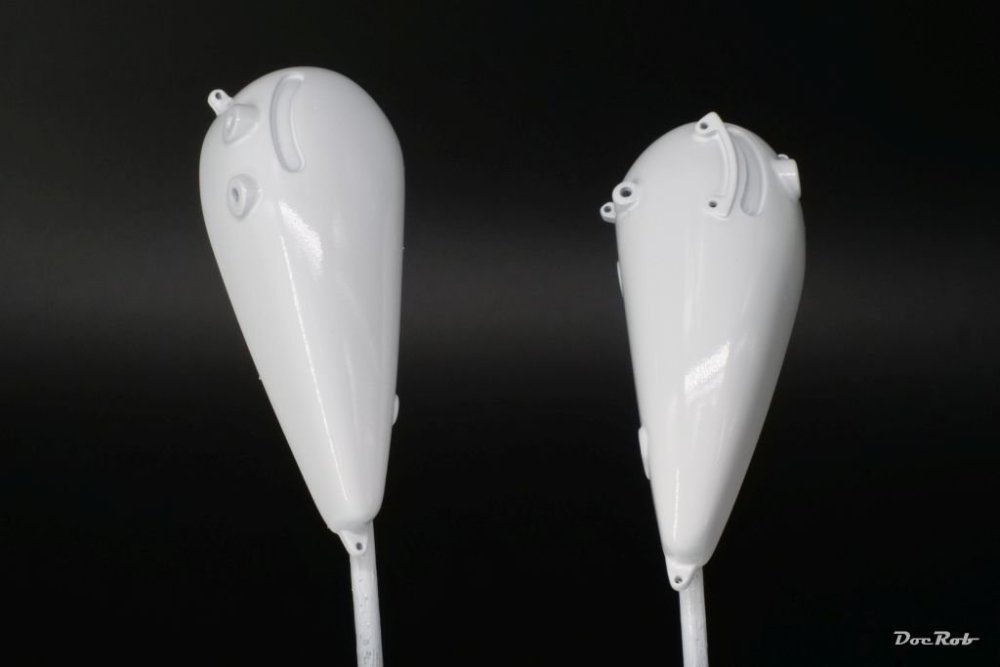
 I gave the fuel tank another try and oversprayed the white, after sanding away the visible seam, using a different white color. The result was better but not good enough, so I stripped the tank, something I never did before. I always try to have the perfect plan, the appropriate tools, but this time, no luck. There are several decals for the fuel tank included in the kit, so my next try will be a polished finish with next to apply pinstripes in flame shape, similar to the black and white design. I filed and steel wooled the surface, before I polished with Autosol and my Proxxon cotton bit and finally by hand with cotton cloth and again Autosol. Somehow the sheen is hard to capture, it looks near mirror like in reality and the grey ´smear´ on the lower pic is some kind of reflex , no bad spot. Cheers Rob
- 157 replies
-
- 12
-

-
Open a MFH box and feel it oozing quality, Peter, a special moment. The price tag is high, but the kits are in a league of it´s own. Availability is always an issue, as the kits sell fast and are out of stock forever or at least for a long time. There is no need for aftermarket with the Crocker, the only item used, was some millimeters of wine cap foil. I was heavily inspired not only by real cars, when I designed some, but also by Comic books, like Michel Vaillant and even more the fantastic designs by Franquin and other authors, who draw Spirou et Fantasio stories. They had such futuristic designs and I tried to follow their paths. The Ferrari comes close with it´s design. My favorite car is and will ever be the Citroen DS, the goddess, but I never owned one. I would have bought one back in Berlin, but on my island, it´s hard to maintain and the terrain is not perfect for a classic car, so I stay with my Jeep, an also classic design. About the Cobra Coupe, I don´t know. There are so many kits to build and my projects tend to be lengthy, so we´ll see. Cheers Rob
-
Like Carl said, Paul. I bought mine directly from MFH, they respond and ship ultra fast, even faster than Companies from the Spanish mainland, which is the closest to me. Six days is normal for MFH, record like. The items arrive very well packed, in my case delivered by FedEx, who somehow manage to get the package around the customs. Prices, at least for me are best direct from MFH by far. If you want an item, you use the web page to buy and will receive an offer soon afterwards. Cheers Rob
-
I can resist, Hubert, as I said, I like the regular (what a word, considering the epic design) SL 300 better. The air scoop on the hood and the over prominent exhaust spoils it for me with the Uhlenhaut. The GTO, well that´s one to consider, the Miura, I have in Hasegawa plastic. You´re right about absolute classics, but I´m more biased toward my personal design epitomes. Cheers Rob
-
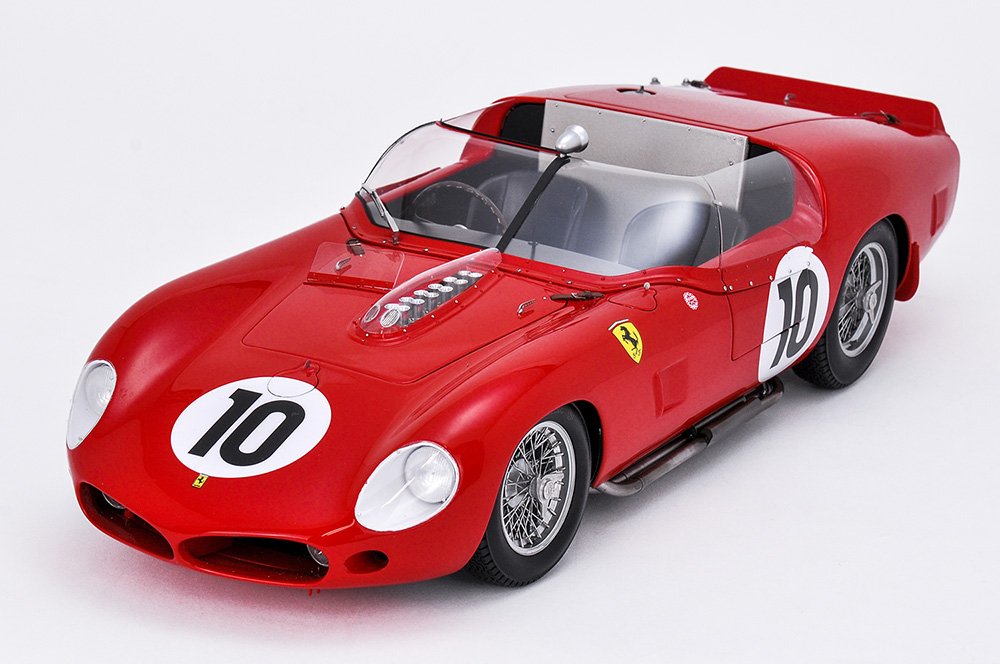
Today my fifth MFH kit arrived and I think, it will be the last for a while, to mend my suffering wallet a bit . I considered the Mercedes SL 300 Uhlenhaut as well, but I would have preferred the regular SL 300 without the strange looking intake on the bonnet and the Ferrari 250 TRI rang my bell just a bit more with it´s sexy displayed engine. This from the MFH homepage borrowed picture shows how the beast hopefully looks, when finished. I´m not that much of a Ferrari fan, but some of their designs are absolutely addictive to me. Spoked wheels, shark nose, Spyder design, and last but not least, the plexi glass cover on the hood, to display the cylinders, just wow. When I was 15, I started to ´develop´ a lot of designs for lots of different objects, from coffee cups to cars and wanted to be an industrial designer later, after finishing my engineer apprenticeship. I learned design painting with acrylics, inks and copic markers, as well as airbrushing. Over some years, I designed dozens of sports car, only for fun. Most of them were red, had classic forms and many showed parts of the engines. It was the pre internet time and I had only a few books about the real cars, but tried to create some real classics. The Ferrari could have come close, as well as the Alfa Tipo 33 Stradale. Long story, short ending, they never accepted me at the Berlin art university for design and I studied engineering and I have to say, I´m happy the way it turned out. I couldn´t have stand it to design cars in the 90´s and 2000´s, which look like a piece of soap and are only to be distinguished by the logo up front. Yeah, the 250 TRI is a reminiscence to these happy days for me. Cheers Rob

-
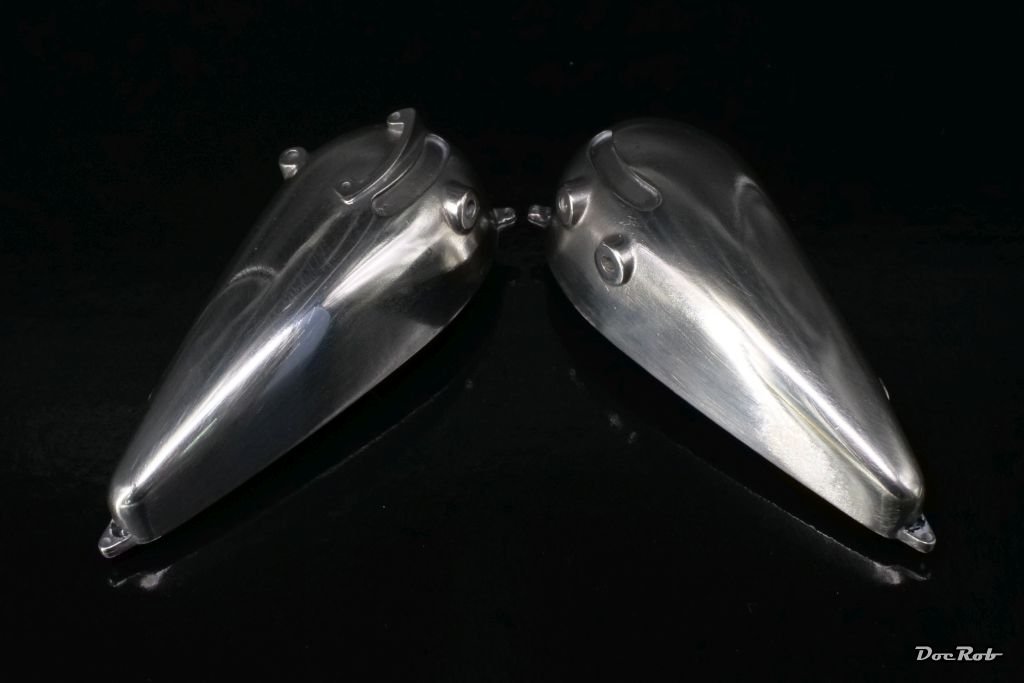
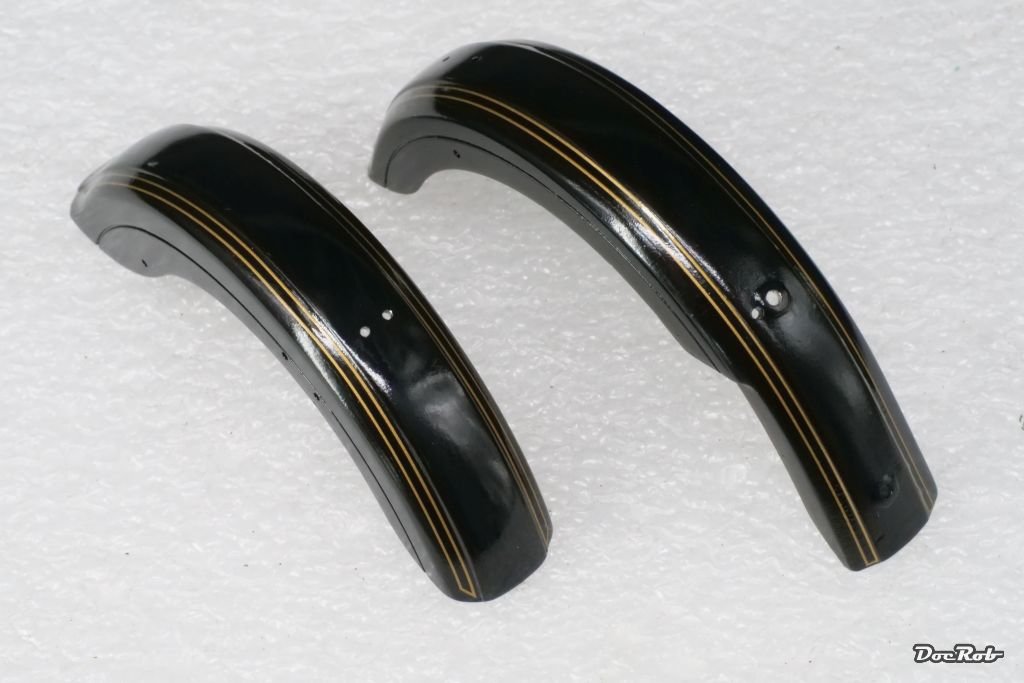
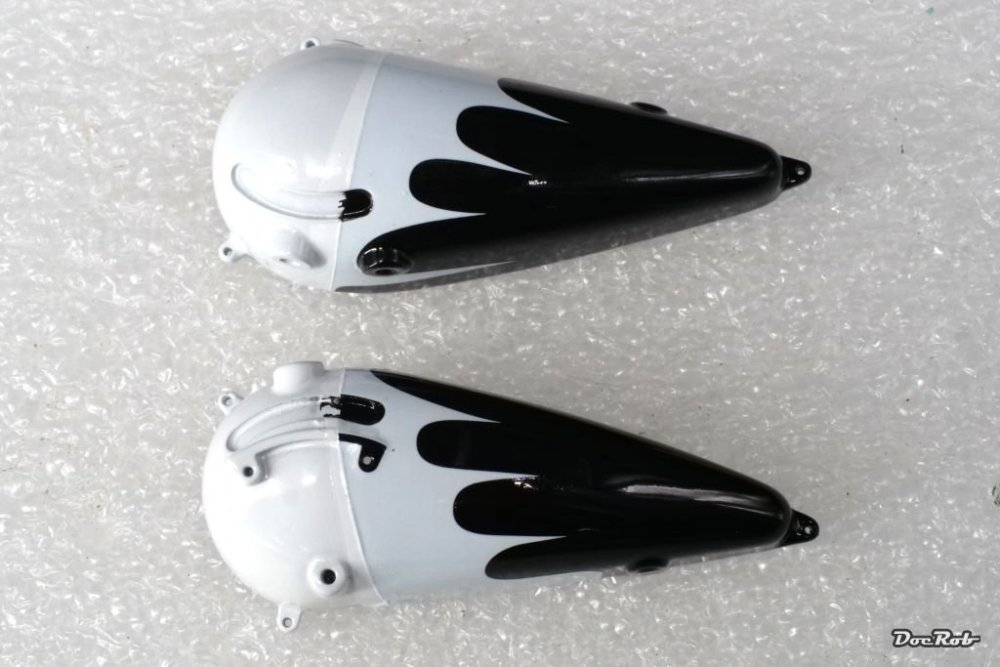
Hmmh, well, mixed success for today. The decals for this MFH kit are extremely well made. They fit perfectly, are robust and have a good color density. I dreaded the golden pinstripes on the mudguards a bit, but they came out great, applied only with water and a drop of detergent, no decal solutions needed. The parts are still not gloss coated. I´m not happy with the fuel tank. As per manual, I airbrushed it gloss white, masked off the front part, and sprayed the rest gloss black. The finish was almost perfect, but there was a tiny parting line between the colors. After applying the decals, the parting line showed even more, but there is also a different hue to the white sprayed part of the tank. I may strip the tank and use other decals as decor. The flame decals generally lay down beautifully and all the wrinkles on the curved contour could be pushed out while curing, but the result is not satisfactory. I watched the MFH promotion pictures of the kit, and the parting line is visible as well, bummer. Cheers Rob

-
The Yard Office: Update: 6/17/24: Major Progress
DocRob replied to Peterpools's topic in Non LSM 'WIP
I always felt, that military modelers are best suited to weather trains and buildings on railroad dios, Peter. Many of the model railroads look factory fresh and lack reality to my eye. Your work with the shack looks very lived in and will be a great add on to a railroad dio. Nice to see something different here. Cheers Rob -
Thank you Peter, today, I sprayed gloss black onto the rims, mudguards and various other parts. At first glance, it came out super glossy, but let´s wait, until it has fully cured. The fuel tank was not so easy, as the rear part needs to be sprayed black and masking the white at the appropriate area proved difficult. There are overlapping decals, later to be applied, but determining the exact position was tedious. I hope it came out well. Cheers Rob
-
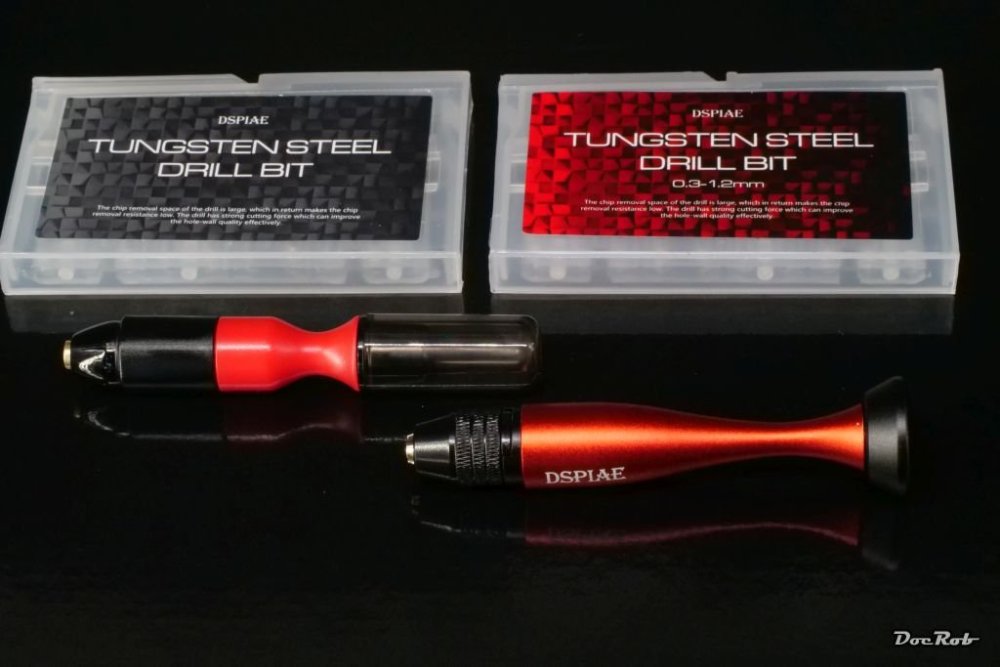
Well that´s better than to have them loose on the workbench, like right now, Phil . The drill bits came in sturdy boxes, no need for extra storage parts, but thanks for recommending. Cheers Rob
-
Tamiya 1/350 USS FLETCHER: Update - 6-11-24: On Hold
DocRob replied to Peterpools's topic in Non LSM 'WIP
Sorry to hear about your issues with the ship kit. 1/350 details are very small and the scale is not the best to start with ships. There is a learning curve with al that scraping, sanding cutting and replacing with PE, but I´m sure with a bit of training, your results will improve. I used quite a lot of tools for my ship build and chisels with 2mm or 3mm blade were extremely helpful, specially for removing plastic from flat surfaces, like mentioned molded anchor chains. Working with these at the right angle leaves a near perfect flat surface. PE folding tweezers were more helpful than the larger folding tools. I have two Tamiya tweezers, a long one and a short, pointed one. Folding up box like structures is easy with these, much less time consuming than with a large folding tool, which has other qualities. When it comes to rounded contours with PE, it helps to anneal the brass with a lighter flame. Heat up the metal until it turns bluish, no more. Glad you seem to stay with the USS Fletcher, Peter, albeit with lesser detail. I used a lot of PE with my USS Arizona, but far from all and my plastic was worse than yours. Give yourself some time and patience, it´s a new genre, which calls for a different mindset and new skills, but it´s worth exploring. Take the Fletcher as a learning mule and maybe you are surprised with the outcome in the end. There are many sea faring options in larger scales, from 1/200 up to 1/35 and there is also WOOD modeling . Cheers Rob -
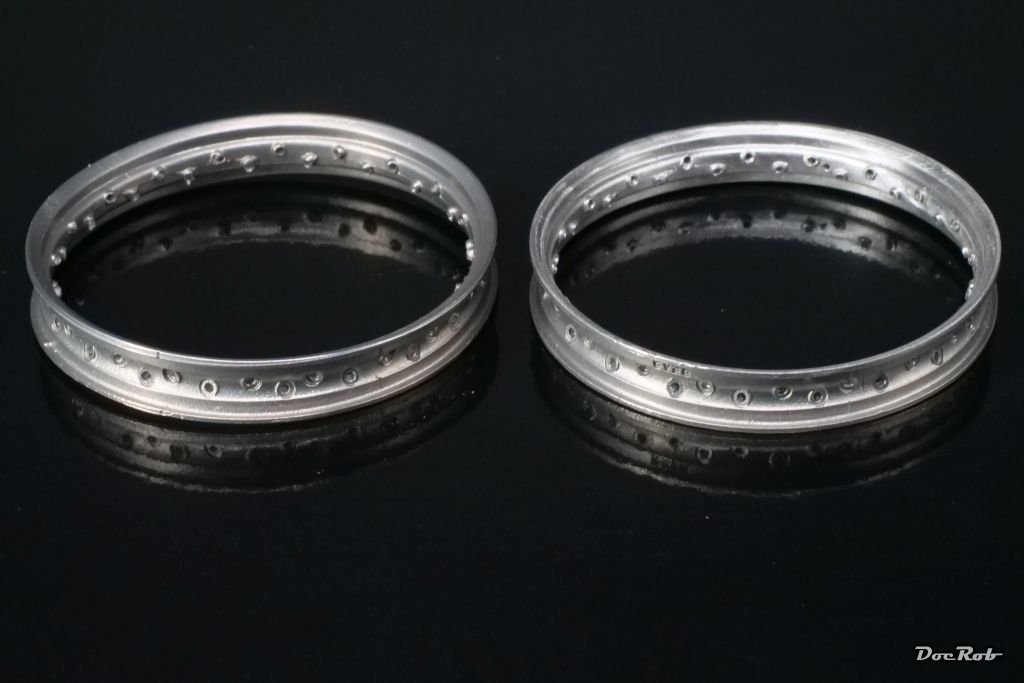
Lots of prep work done lately. I filed, sanded and near polished fuel tank and mudguards, primed them with Mr. Color grey primer 1200 and sprayed the tank with Tamiya LP-2 gloss white, which came out nice and shiny. Of course, I drilled all the necessary holes beforehand. The rims needed also a lot of preparation. As you can see on the pic, there are prominent cast seams between the spokes, which I cleaned with a sharp blade and then used a rotating tool to refine the surfaces. I decided against polishing and also primed the rims, after I drilled the holes for the spokes. Body color will be black now, where initially thought about dark blue, but I don´t like the look of blue rims. All other parts, which will be painted black, were drilled, prepared and primed. Luckily some help arrived today, more drill bits and two DSPIAE hand drills, the left one with a collet, the right one with a chuck. You can´t have enough of these, as you permanent need to drill holes in different diameters. Cheers Rob

- 157 replies
-
- 10
-
-
Absolutely Carl, I rarely have jumped so often from step to step in the manual like with the Crocker. Additionally you always have to identify, where which fitting belongs with the parts list and drill the accepting hole, after measuring the appropriate diameter. Until now, the most important tool was the Proxxon mini drill with a stand and even more important the foot pedal for the hundreds of holes to drill. Cheers Rob
-
Indeed Peter, but they are human after all. Since yesterday, I prepare the mudguards and fuel tank for painting and this includes a lot of prep work. There are blemishes in the cast, which has to be filed and sanded away, then a bit of polishing. These parts are primed now and the tank got a gloss white coat and needs to fully dry now. I also drilled the rims, to accept the spokes and cleaned them a bit. There is a small but very visible cast seam from spoke to spoke, which I removed with a sharp blade and smoothed everything with a brass brush on a rotating tool. Initially, I thought about polishing the rims, but that would be very difficult and I will paint them, as were a lot on the original bikes. Cheers Rob
-
F-15DJ Kai or Eagle Plus- Finished!
DocRob replied to BlrwestSiR's topic in The Great Twins Broup Bluild
Looking good Carl, this will be a one off Eagle and a beautiful one. With these large kits, gravity takes it´s toll sometimes. Better now, than after painting. Cheers Rob -
I purchased five or six times there over the last year. No problems at all. The shipping took some time, but that was ok for me, as I chose the cheapest shipping method. Cheers Rob
-
LSM Modelling News 2023 merged Fran and Artful69’s threads
DocRob replied to Fran's topic in Modelling Discussion
Indeed interesting and an ideal example for 1/16. I have the 1/35 Riich kit in my stash and will pass, but I guess the Riich kit is challenging with lots of tiny details and zillions of parts. Cheers Rob -
Thank you Peter, these MFH kits are something special. The detailing is extremely good and I often ask myself, how they achieve the amount of detail with their white metal casting. Now with the engine almost done, I´m half through the manual, but there are still a lot of challenges to master. There is the spoking of the wheels, the PE chain to build and to airbrush a decent finish onto the tank and mudguards. I´m really interested, if the motorcycle kits are easier or more difficult to build, than the MFH car kits, but I will find out soon. Cheers Rob
-
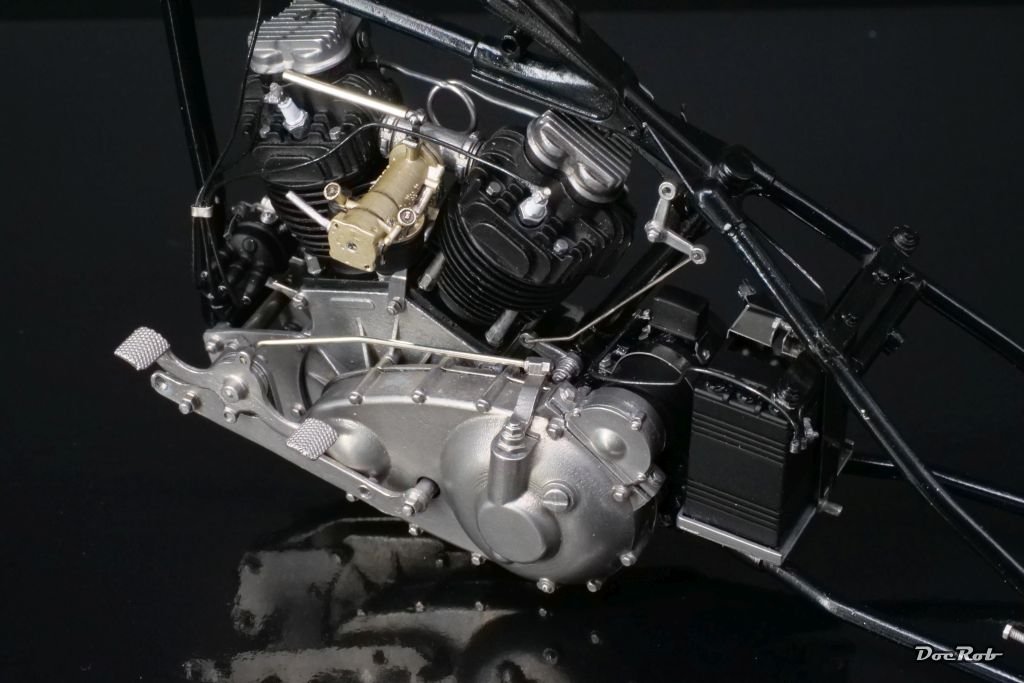
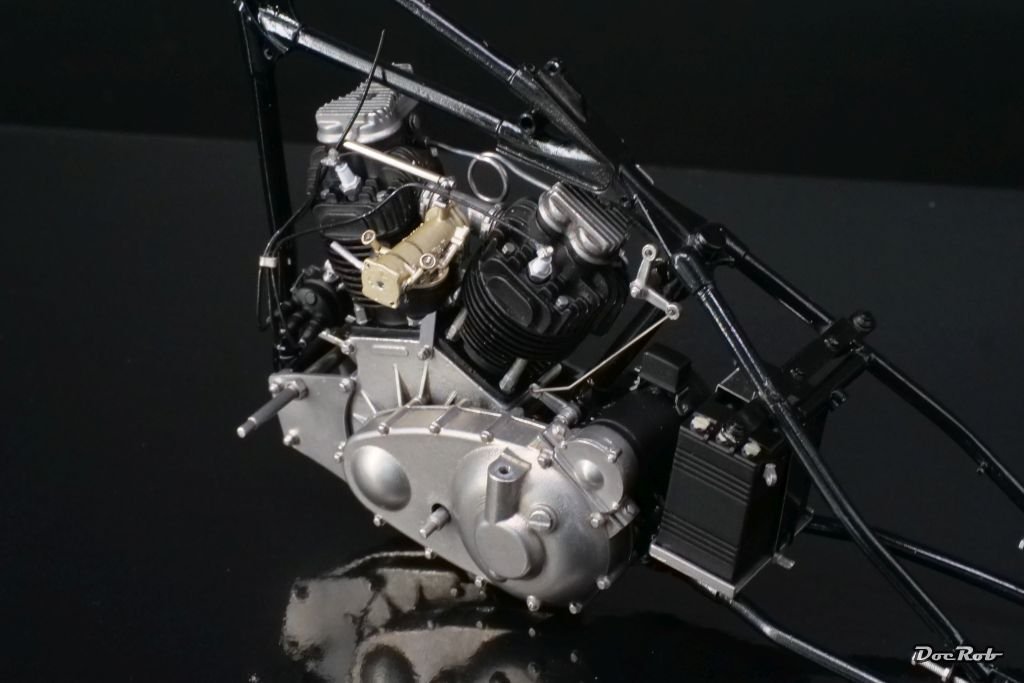
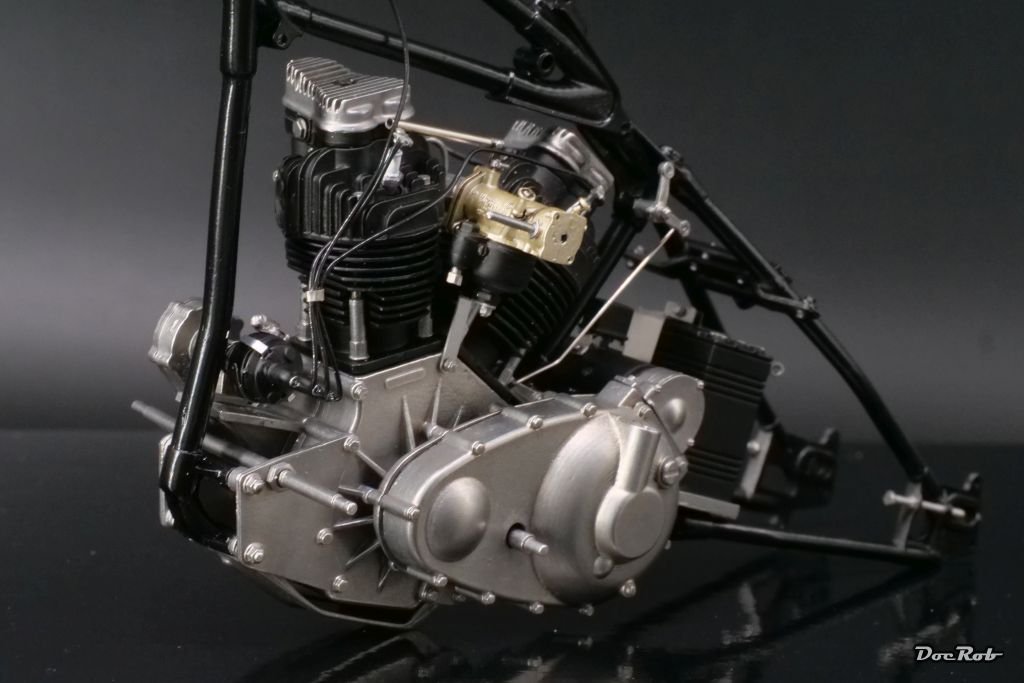
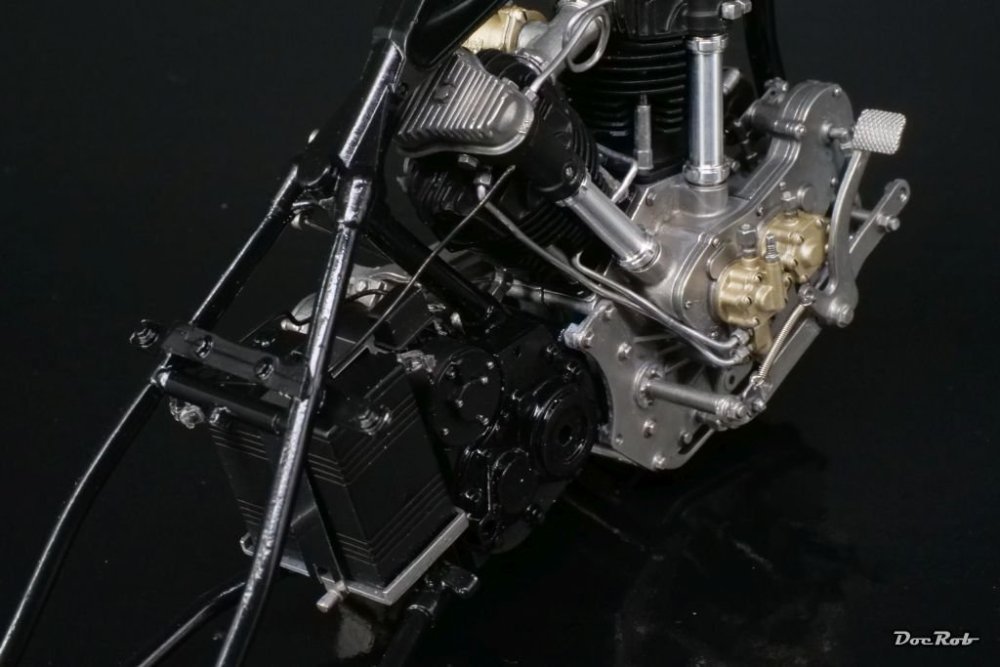
The battery/alternator area was a little bit nightmarish to assemble, with lots of connecting parts, PE brackets and the wiring, which needed to be pre fabricated, because of the tiny PE connection fittings. Somehow, I got it done with a bit of wiggling. Adding the pedals on both sides was much simpler affair, luckily and they are now awaiting the footrests. Until now, there is one thing to remember with that kind of build. Study the manual, examine, where all the parts connect and how, measure the connecting diameters and drill out the corresponding holes and try not to forget any, as they may be impossible too reach later. Sure, test fitting is mandatory as well. Cheers Rob

-
Thank you all, the battery / alternator area proved to be very difficult to finish, so far the hardest part of the build. The space is crammed and the alternator needed some wiring and the battery of course too. The wiring consists from normal electric wire and needs very tiny bended PE fittings at the ends, which have to be mounted with equally tiny rivets . It´s also hard to determine the length of the wires, which needed to be pre fabricated. After a lot of cursing and test fitting, I finally made it. Pictures will follow. Cheers Rob
-
I added the ignition wiring, spark plugs and the mysterious third wire, which leads to the hidden condenser coil, the shift rods and gearbox. The alternator and battery are finished, but only mounted temporary, to determine the length of the wiring. The only "AM" used is the tiny bracket, which holds together the ignition wiring. I fabricated it from tin of a wine bottle cap. So far no real worries except a wrong aligned part (my fault), which needed to be pried loose. Luckily I was test fitting the following assemblies and noticed it. Electrical wiring is a bit tedious, as there are tiny PE parts to bend, to accept the un-isolated wire, which easily slips out before gluing. You learn to like Tamiya manuals, where they show you the length of the wires, but apart from that, the MFH manual is pretty clear and easy to understand. Cheers Rob

- 157 replies
-
- 11
-
-
Tamiya 1/350 USS FLETCHER: Update - 6-11-24: On Hold
DocRob replied to Peterpools's topic in Non LSM 'WIP
We´ve all been at this point Peter, no mojo left for finishing the actual project and no desire to start the next in the row. It even happens to me with nothing like a fixed path of subjects, only building aircraft. I need permanent change to keep me interested and I hate redundance. You spoke about your situation and I like your approach to start a new adventure, no matter what is the outcome. To me modeling has become a very important hobby, not only for the results and the time spent, but also as a tranquilizing factor in times, when other things in live were not in sync and helped me through difficult phases in the past. Sometimes, when I´m in a modeling slump, it feels, like I owe something to the hobby and it will keep me sane with future problematic phases. It helps to fuel the spirit and start over again, even better, like you did with an empty desk - do something new approach. I have only the experience of my 1/350 USS Arizona build under my build, considering plastic ship modelling and this was a challenging project due to the poor plastic quality, but it was a lot of fun also and I learned a lot of new skills and techniques. I have only two more 1/350 kits in my stash, but some vessels in larger scale, like the Revell 1/144 Flower Class Corvette along a nice Pontos set and I look forward to build this one. I also have my eye on the 1/200 IJN Mikasa, as I like the older shaped ships a lot and the early livery of Mikasa is quite colorful. I wish you tons of fun with the destroyer and all that brass and maybe there is a sea base in the looming, a thing I never tried. Cheers Rob -
Muchas gracias amigos, good plastic motorcycle kits do look great, but what separates the metal kits is the weight of the material, which adds another dimension. Besides, it´s fun to leave the aluminum parts unpainted, the white metal looks the part. Cheers Rob
-
Nice progress with the started painting phase, Chris. I hear you on faded or not. A bit of fading should enhance the look of the finished model, I think. Cheers Rob
-
HobbyBoss T-34/85 | No. 82602 | 1:16
DocRob replied to FullArmor's topic in LSM Armour Finished Work
Fantastic result FA, the Russian heavy metal came out great. I like the wear and weathering a lot as well as all the tiny details, which pop the eye. Cheers Rob -
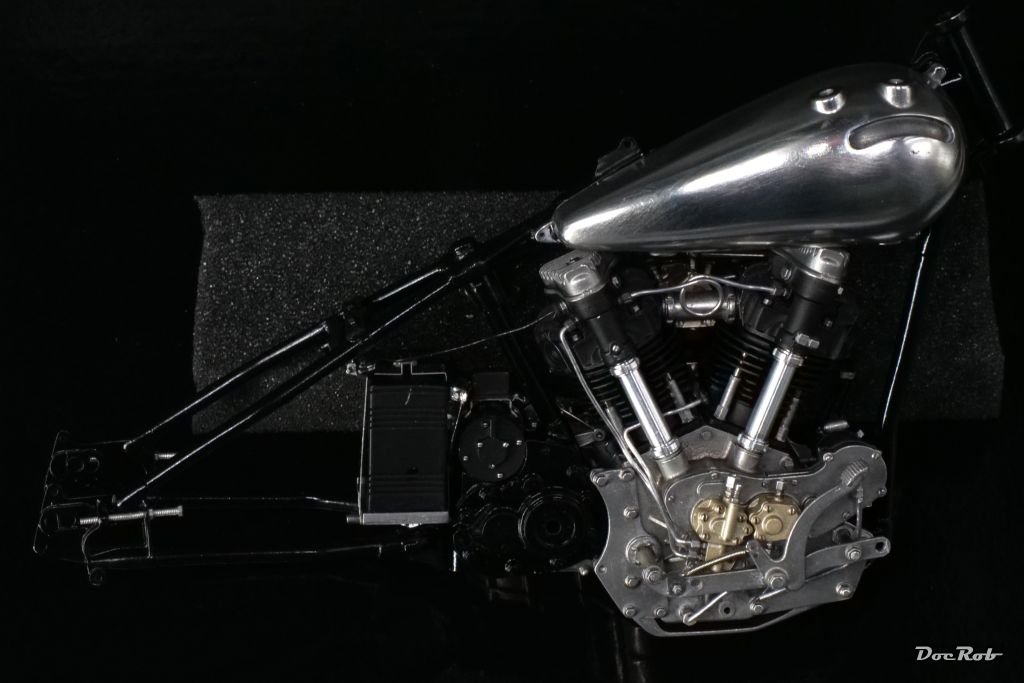
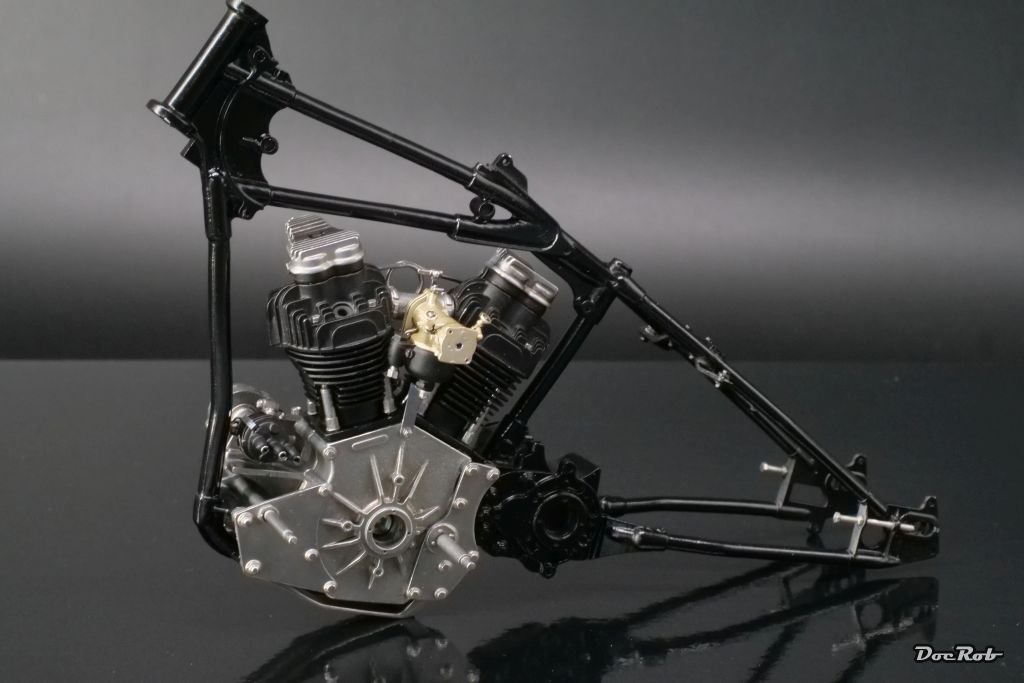
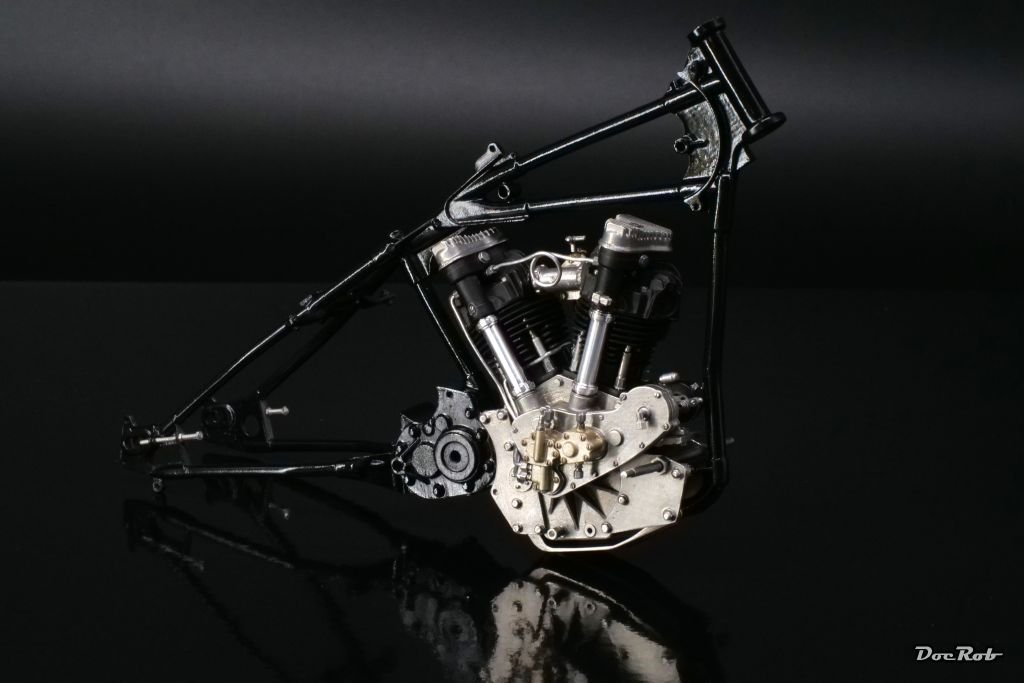
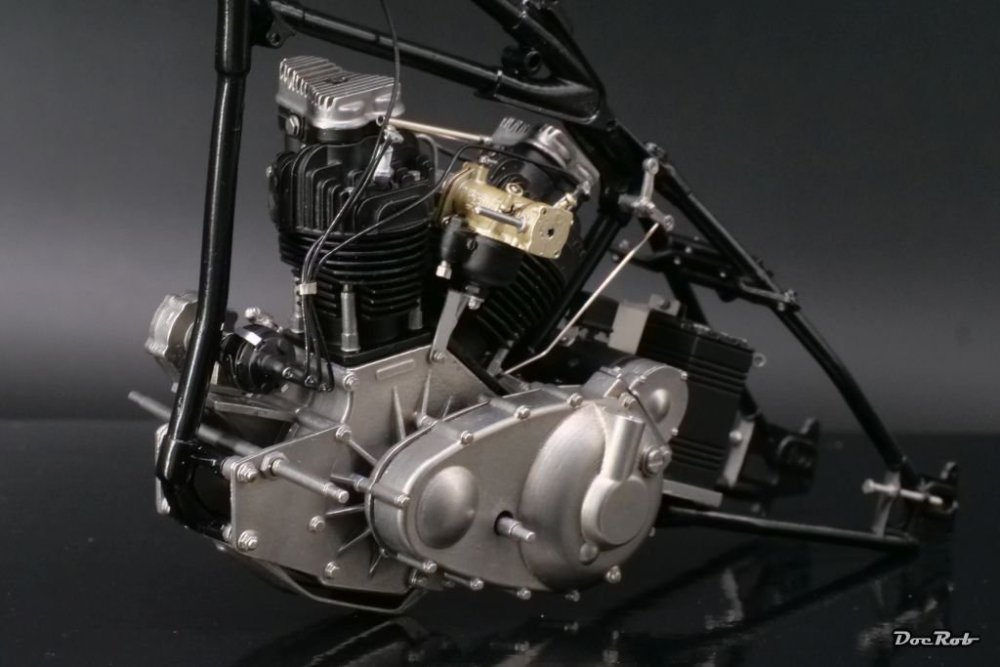
I achieved some important progress today, marrying the engine and the frame. Luckily casting precision and design is very good and I had only a little wiggling to do, while join the numerous connection points of the engine bearing plates to the engine. The frame itself needed some bending, to accept the engine, which I did before painting. The cast material is durable but easy to bend an very good to work with, luckily. Cheers Rob