NigelR32
-
Posts
407 -
Joined
-
Last visited
Content Type
Profiles
Forums
Events
Gallery
Everything posted by NigelR32
-
Hi everyone, Peter at Airscale kindly sent me a sample of his brand new Cockpit upgrade set for the forthcoming Airfix 1/24 Hellcat kit. It's a real beauty of a set!! I've put together a video review on my channel, go take a look... Enjoy!!
-
I feel for you Jeff.. I was at this stage with my Nan many years ago. She would whisper in my ear "That bloody Nigel has been round here and stolen all my tools from the shed and borrowed £500 which I'll never get back". Yeah, I'm Nige!! As you say, the brain plays some funny tricks, but I'm sure, deep down inside your Mom is very happy to see you and appreciates your company.
-
Hi all, For those that havent seen this over on LSP, I thought I'd put this up here. Alistair of Aerocraft has sent me this message last night, just to make everyone aware of who is doing the work on the Turrets and why it's taking a while. I am 100% confident that these Turrets will come to fruition as I have seen the initial mouldings and, shall we say, the less successful mouldings and rest assured, Alistair is committed to getting these parts out there for you to add to your model. Note that this update will not only cure the seam removal, but it will also correct the shape, the framing of all three turrets and positiion the guns correctly. As soon as there is more information available it will be posted here.. as this is no longer a secret. Hi Guys I have and I am still working on some replacement turrets for the Hobby Boss B-24 Liberator. These are proving to be a lot more difficult than would first appear, and I have already done and discarded a few basic masters already. It is not only just how to make the master but then and or also how to cast it. I need to get the master good, and figure the assembly of it all to enable the clear domes to be cast and then how to integrate the, gun slots and the 'bulged' metal sections as separate parts. Before anybody asks yes I do have the Hasegawa / Eduard 1/72 scale kits and am trying to use those as a basic design pattern, BUT it is a lot more tricky when upscaling it all and designing it all to work with silicone moulds and resin. Over the past few months I have spent quite a lot on reference materials including kits and books, casting materials, and have just sent sketches to be drawn in 3d for some parts that I will get printed, some are only sections to help me do casting. As with all of this there is a lot of trial and error, and once I have the basic 'shells' correct I will have to look and see what will need revising for the interior parts to work. There is a strong possibility that the interior parts will need changing. So far with my investigation the front turret requires the most changes the top and the rear less so but changes are needed. As many of you know there are variations on the turrets but first of all I will be working to represent the Emerson nose turret, the Consair rear turret and the Martin top turret. At this stage I cannot and will not be able to provide a time scale and or price, but the sooner the better for me, but I am only human and I need to complete the two projects mentioned below and the turrets are going to take some time to get them correct. Although I will try my best there could be hurdles along the way, and I am not easily beaten BUT, it needs to work for me and work for the customers. Non LSP information, but just to keep those interested in the loop 1/48 Hunter T.7 masters are progressing well, decals are currently being drawn for the first two box options, there will be a few releases of this set in a few different guises. I hope to have some pictures and more information up in the next two weeks. I need to get back to the high altitude 1/72 Wellington, but I can say that I and Franta of DK Decals have been working together on the project and I can tell you that he has already drawn three schemes all quite different, that will be placed on a various decal sheet in the near future. The other tricky part is the clear resin, to keep that part short and simple I have been testing and working with some new clear, and it is yielding varied results but I am getting better with it and I really need a break through with it as ALL of the above projects require it to work. Also once clear works well I can hopefully get the P-51 canopies out, well I am re-working the masters for those as well... they may come out sooner than the B-24 stuff...... So please be patient but for now you know what I am working on, however I hasten to add this is all in my 'spare' time after the day job............ cheers Ali
-
So sorry to hear Jeff.. I feel for you and his family. I recently lost my neighbour Marc. Never drank, never smoked, looked like a body builder and was a really nice genuine bloke. The big C got him at only 45. Take it staedy Jeff and keep on trucking Doug..
-

Me 163B 'Komet', 'White 13' (re-titled!)
NigelR32 replied to JayDee's topic in LSM 1/35 and Larger Work In Progress
Nice!! I keep getting asked to build this on my channel. I wasn't aware the kit had issues. What's wrong with it James? -
HK Models 1/32 Lancaster Hints, Tweaks and Tips,
NigelR32 replied to NigelR32's topic in Modelling Discussion
In a word, No. I have one book, mentioned before and Google. -
HK Models 1/32 Lancaster Hints, Tweaks and Tips,
NigelR32 replied to NigelR32's topic in Modelling Discussion
That's one for you to judge Ron. Mine are too long as they are not fully trimmed down. Look at some pics and cut them so they "look right" to your eye. I would also add, I used .15 and .33 because it's what I had, these sizes arent set in stone. -
I think we are talking weeks rather than months..
-
Ron, I will not comment on the Ebay turrets but I will say there are resin replacements on the way. I've been approached by someone out there who is currently working on corrected and seamless clear resin parts to replace the kit parts. As we all know, the guns are too close together and the cheeks are all wrong on the nose turret, the framing on the top turret is incorrect and there are issues with the rear turret shape too I believe? This will all be corrected as far as I know? Watch this space, my YT channel and keep your ear to the ground.....
-
HK Models 1/32 Lancaster Hints, Tweaks and Tips,
NigelR32 replied to NigelR32's topic in Modelling Discussion
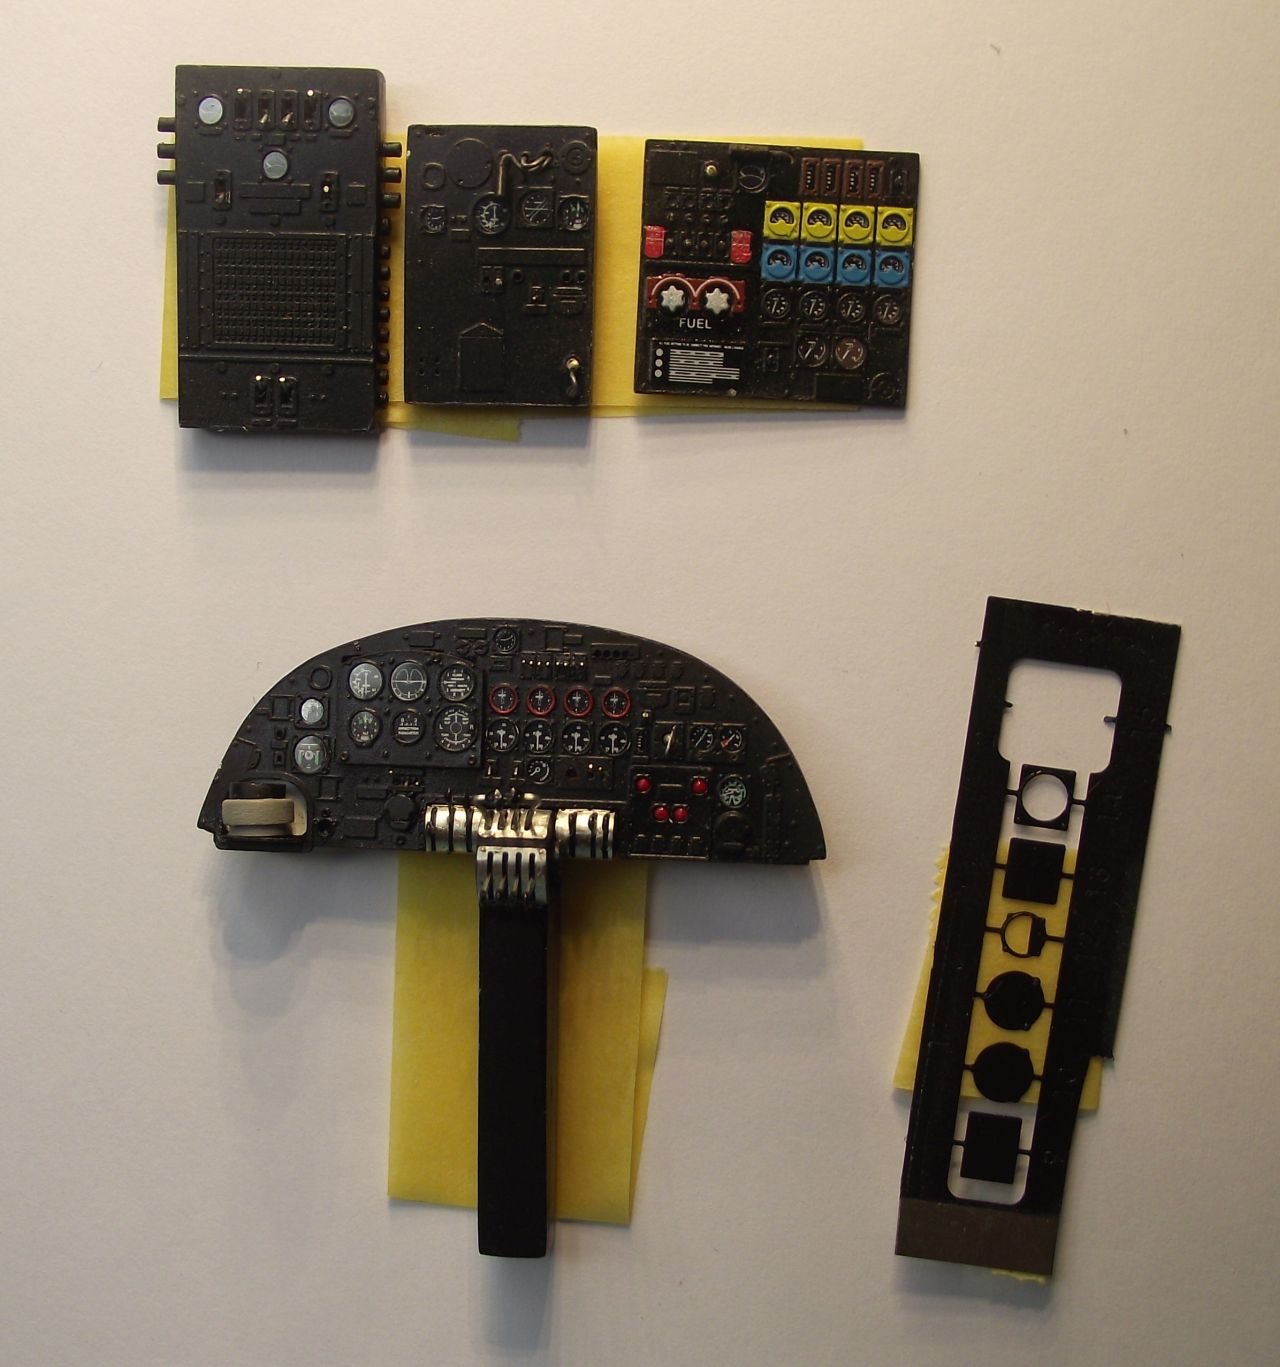
As this is a tweaks thread, I thought I'd post this little picture here... It is the Airscale IP upgrade set.. More detail over on my build thread.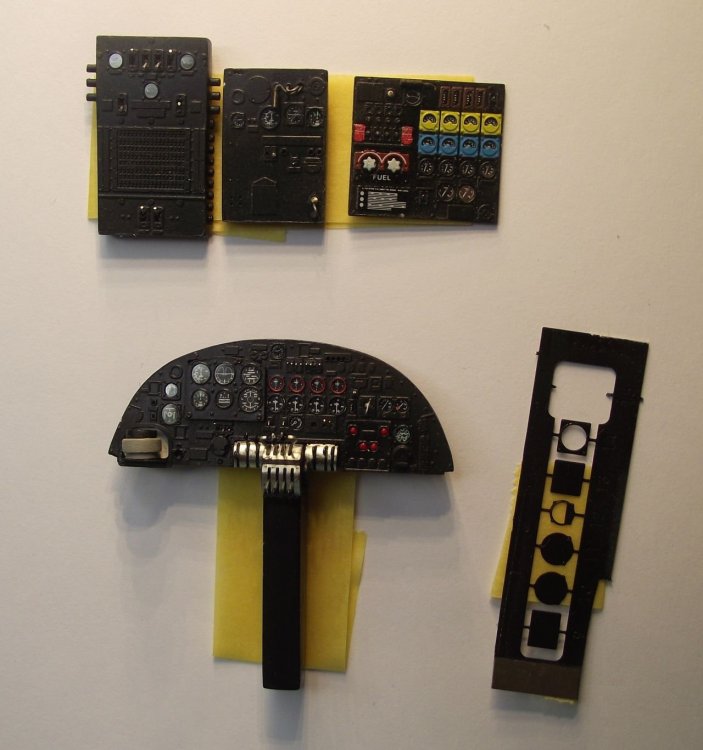
-
1/32 Lancaster build and improvements
NigelR32 replied to NigelR32's topic in LSM 1/35 and Larger Work In Progress
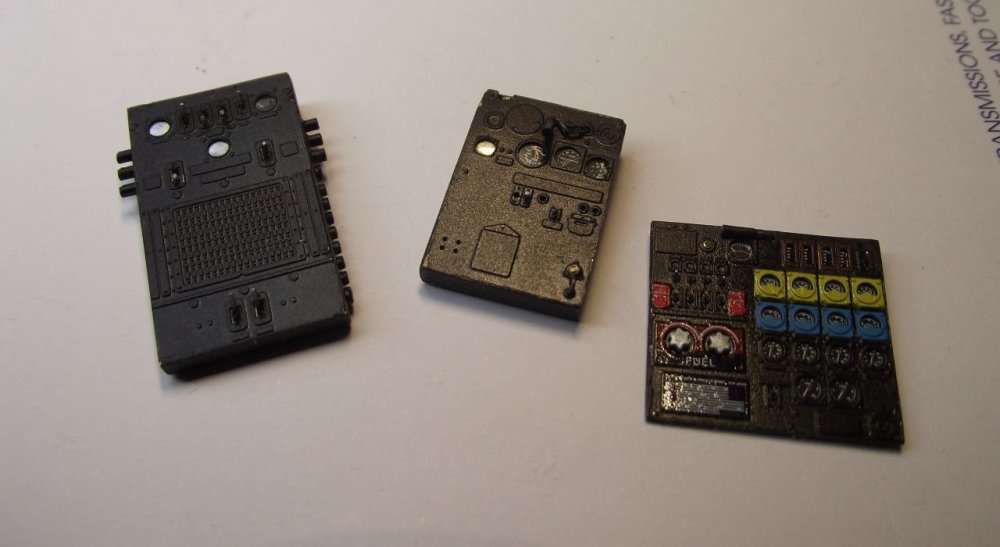
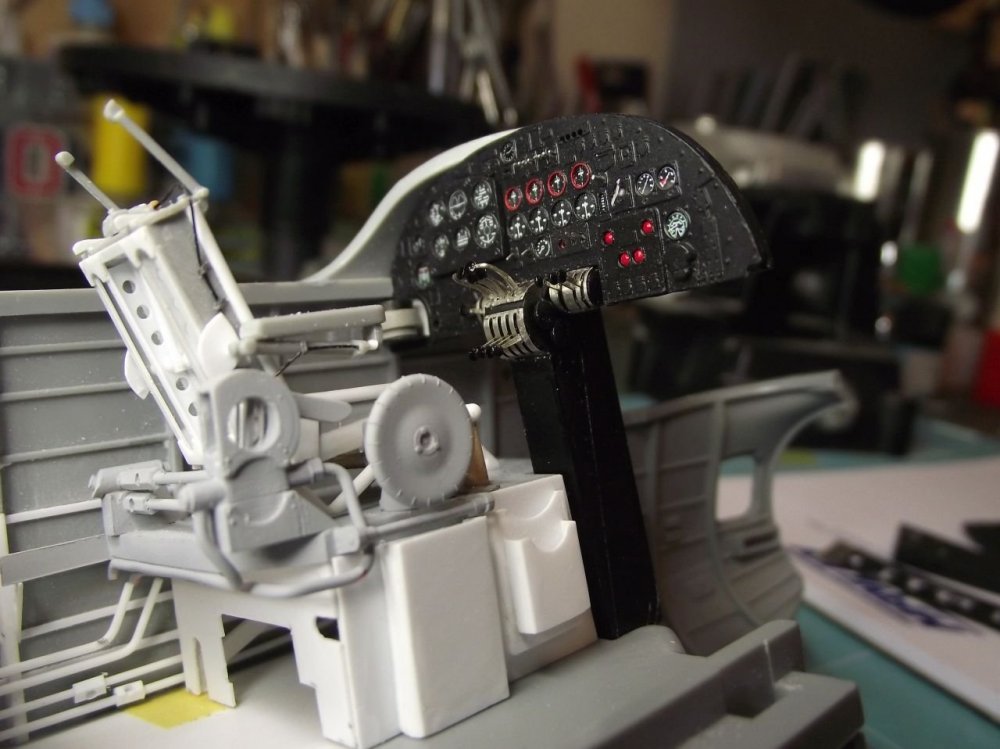
Hey guys, me again... I just finished assembling the Airscale IP upgrade set, and what a beautiful set it is... Here are the three panels you get in the set, as well as the IP. Note the added toggle switches and fuel taps. The engineers panel looks lovely in my opinion.. The IP is a thing of beauty.. I put together a couple of videos about how I got on with the set.. Go get a beer and enjoy.. Here's part 1 Here's Part 2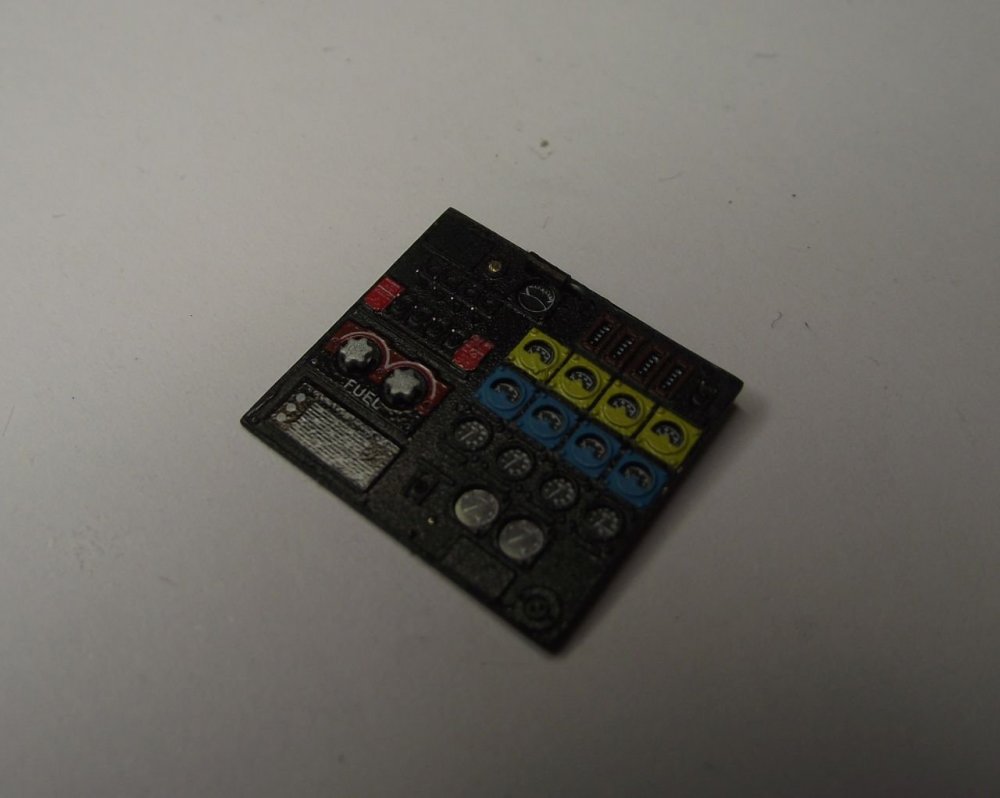

-
That forum has been toxic for a looong time. Much friendlier over here. Just my 2p...
-
HK Models 1/32 Lancaster Hints, Tweaks and Tips,
NigelR32 replied to NigelR32's topic in Modelling Discussion
I think we are back to MkX city yes Ernie... -
HK Models 1/32 Lancaster Hints, Tweaks and Tips,
NigelR32 replied to NigelR32's topic in Modelling Discussion
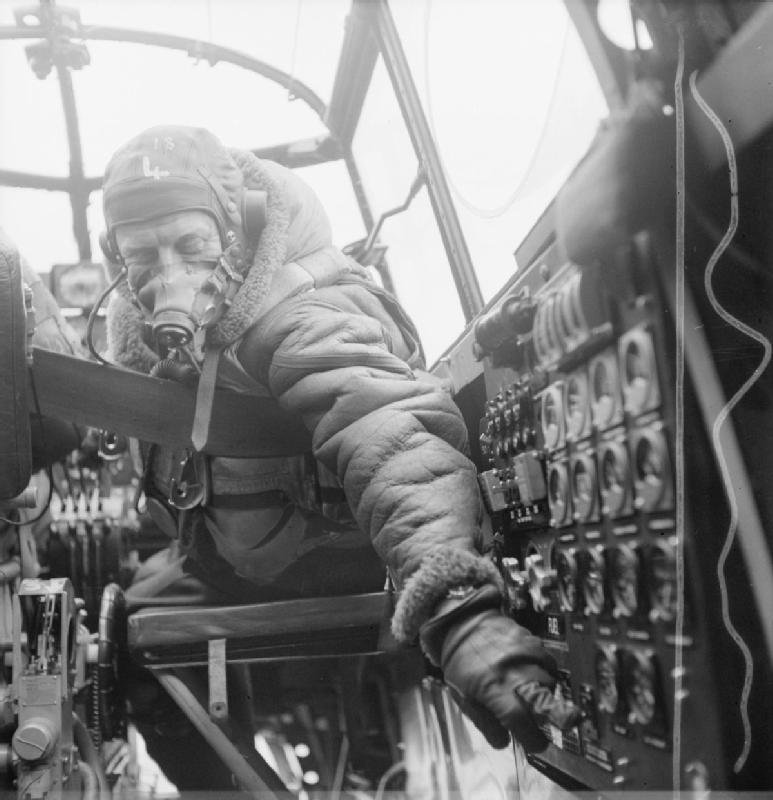
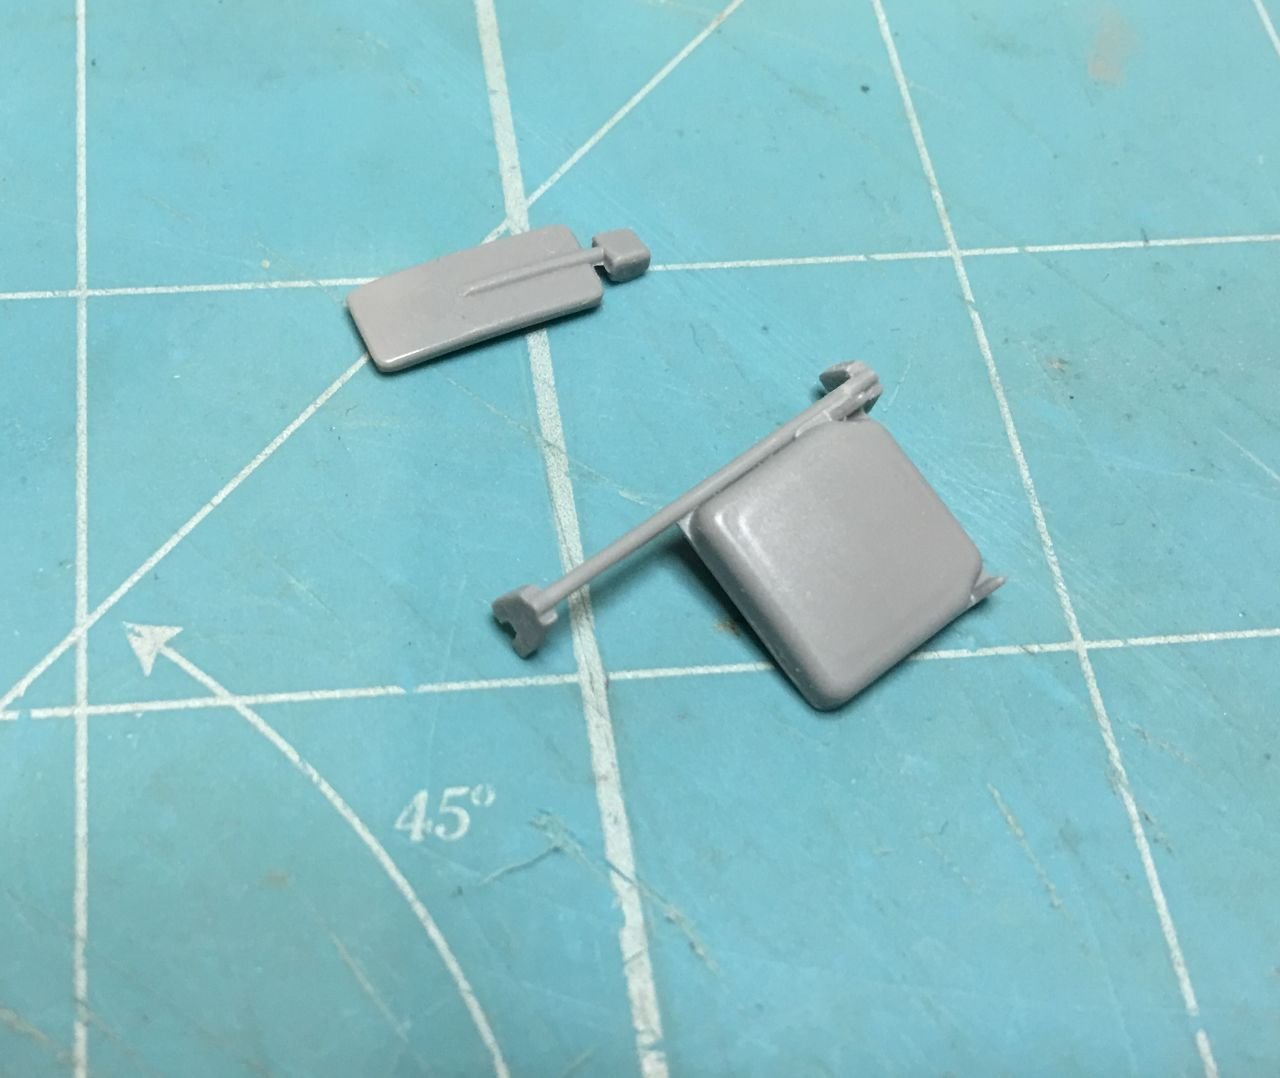
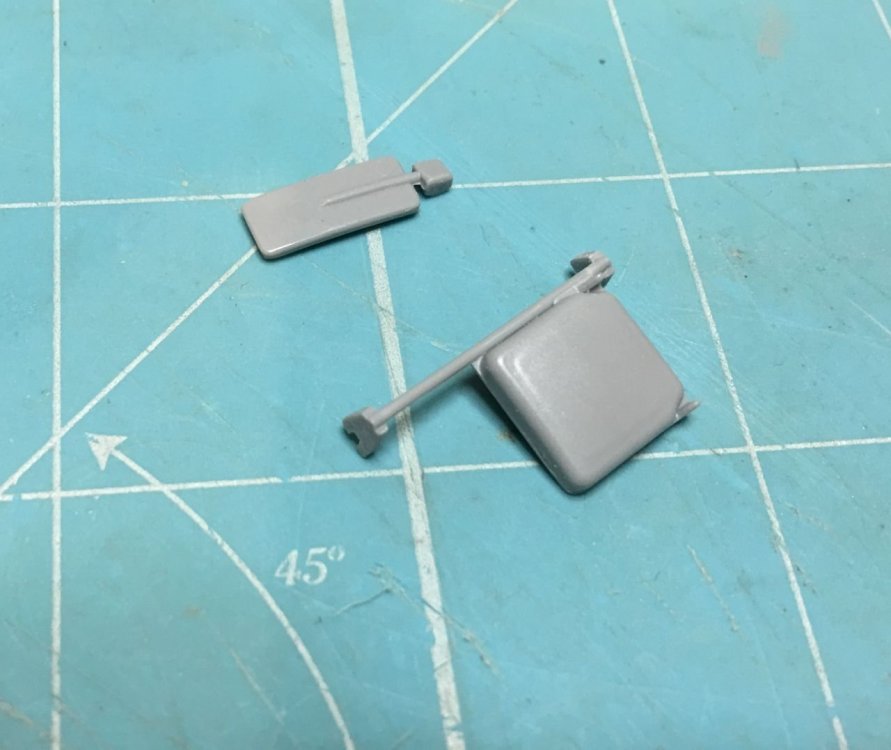
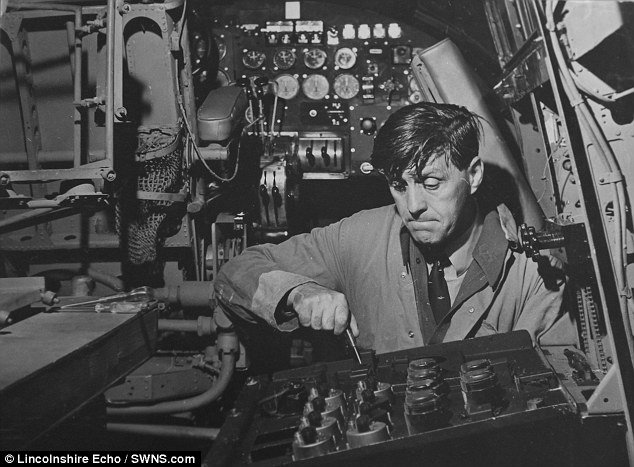
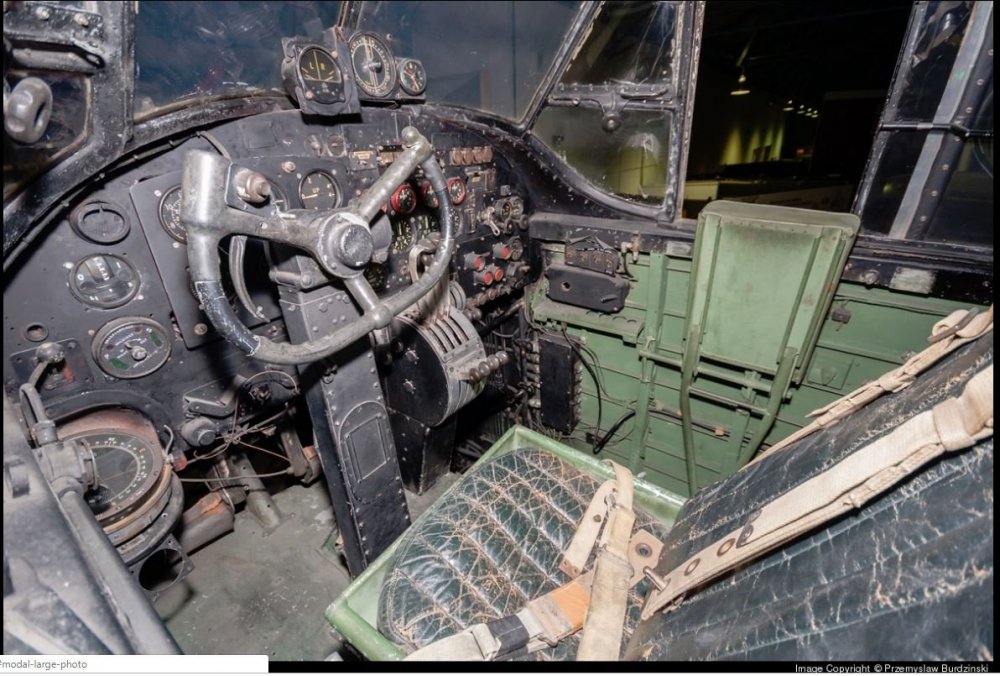
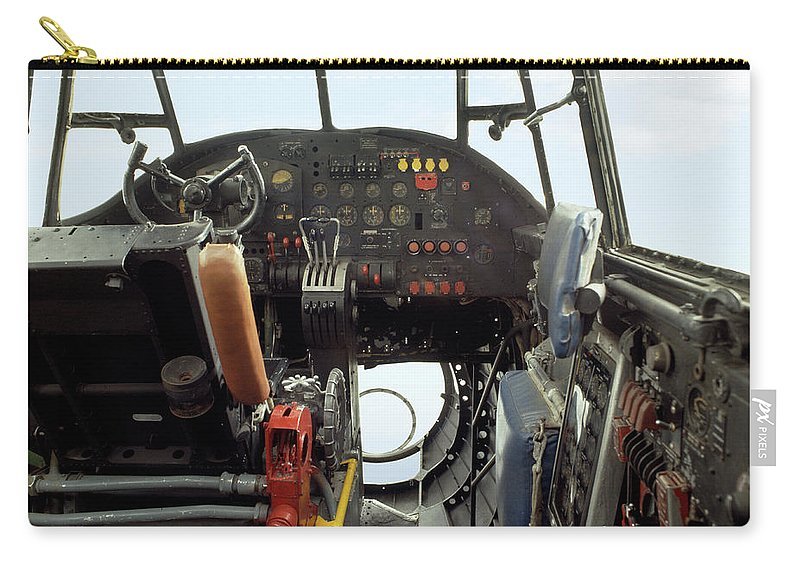
Sorry mate.. there I go again, assuming everyone would know what I'm talking about... (All pics used are for reference only. No copyright infringement intended) I'll start by showing you the kit parts, which appear to depict this.. Note ejector pin marks on face of backrest!! Now, a BI/III would have had a seat like this.. surely? The backrest was simply a strap which was attached between the pilots seat and starboard inner fuselage wall... And would look like this when stowed So guys, it looks like we need to do even MORE scratchbuilding...


-
HK Models 1/32 Lancaster Hints, Tweaks and Tips,
NigelR32 replied to NigelR32's topic in Modelling Discussion
Has anyone noticed the engineers seat in the kit? It looks nothing like the original B,1 seat but does pretty much look like the seat in Just Jane? Does anyone know whats going on here.. is the seat right or wrong in the kit?? -
Thats a definite addition to my WNW collection. I wont order direct though because the good old UK customs slaughters us every time. I have the GIV but cant even face opening the bags let alone start it. I also have the Felixstowe.. I would love to see a Muromets in 1/32 scale. I asked Richard how likely it is that they would do it... he replied, "About as likely as model kit company announcing two 1/32 Lancasters at the same time"... Oooh..
-
HK Models 1/32 Lancaster Hints, Tweaks and Tips,
NigelR32 replied to NigelR32's topic in Modelling Discussion
I'm afraid not Ron. There are so many people out there who will say I'm wrong, theyll mess their kit up and say I caused them to make the error and blame me for trashing their model. I spend hours and hours looking at pictures and look for, OK, "that" panel meets the fuselage at "that" rib, then "that" rib is 4th back from the edge of the IP so therefore it's out by "this" much. I dont have drawings, just Google. My dimensions could well be wrong, but I think they're a lot closer than stock. If you go back to the start of my build log I tell you how much it's all out for the seat. -
HK Models 1/32 Lancaster Hints, Tweaks and Tips,
NigelR32 replied to NigelR32's topic in Modelling Discussion
Thanks Jeff. As much as I moan and whinge about the kit, I really do enjoy making all these changes and upgrades. For sure, the WNW kit will be more accurate according to the cad images they have released. I will be getting one as soon as I possibly can and will do an online review of it. I think the biggest difference between the two kits is this.... Some say of this kit, "It's a great canvas to add aftermarket to", some reviewers say of WNW kits, "The beauty of theses kits is that it's all in the box, you dont need to add anything". You pays yer money, you takes yer choice. -
HK Models 1/32 Lancaster Hints, Tweaks and Tips,
NigelR32 replied to NigelR32's topic in Modelling Discussion
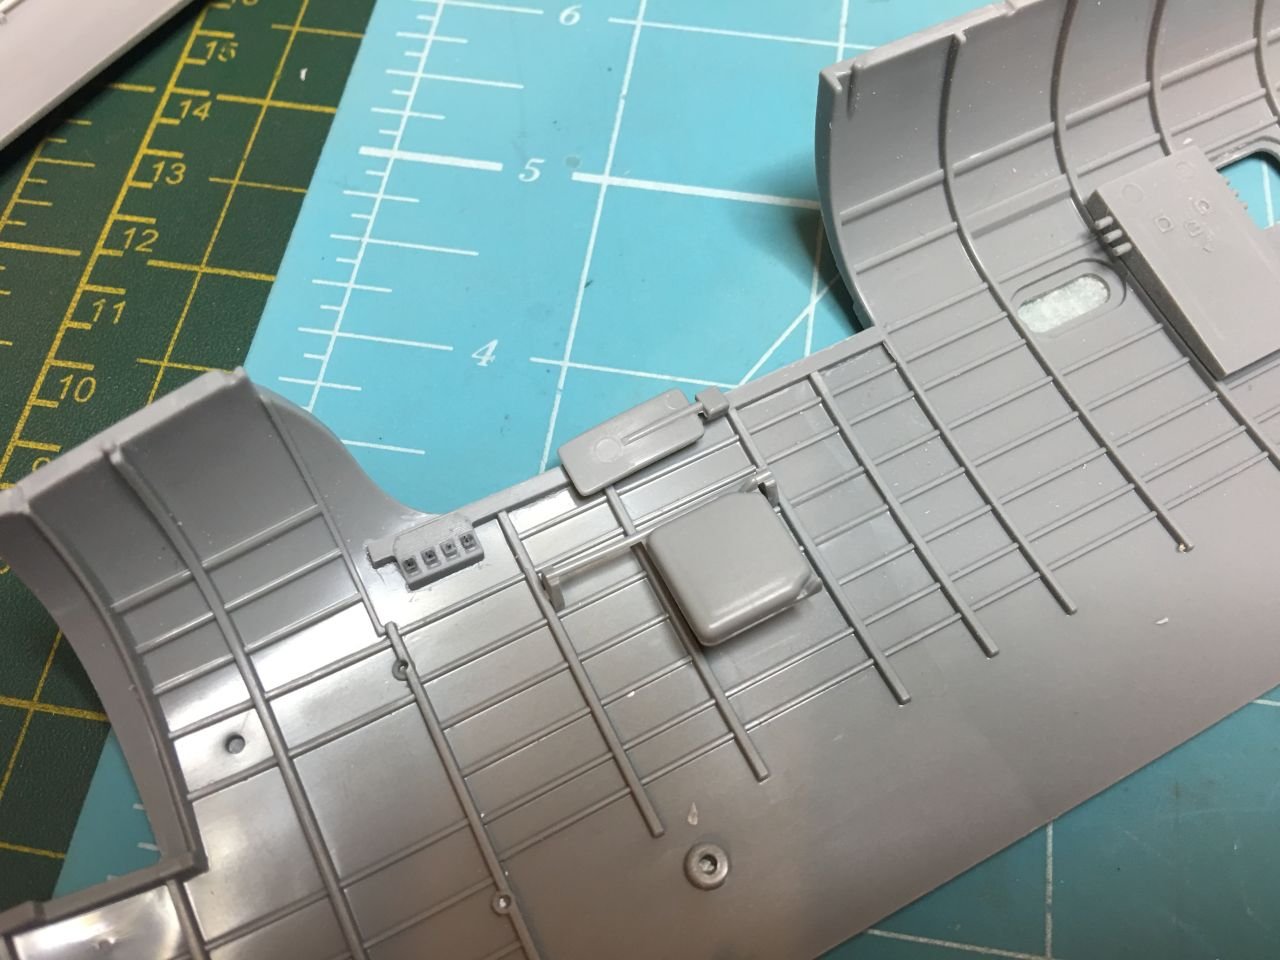
Just to add a note here.. I have removed the ramp on the table. It is for the the "Fishpond" system, which is part of the H2S radar. Obviously, it has a coat of Mr Surfacer which has yet to be rubbed down.
-
HK Models 1/32 Lancaster Hints, Tweaks and Tips,
NigelR32 replied to NigelR32's topic in Modelling Discussion
The WNW kit will have everything Yrjo. It will not have detail you cant see, such as the rear fuselage, but from the cad images available it looks like it could be the finest model aircraft kit ever? -
1/32 Lancaster build and improvements
NigelR32 replied to NigelR32's topic in LSM 1/35 and Larger Work In Progress
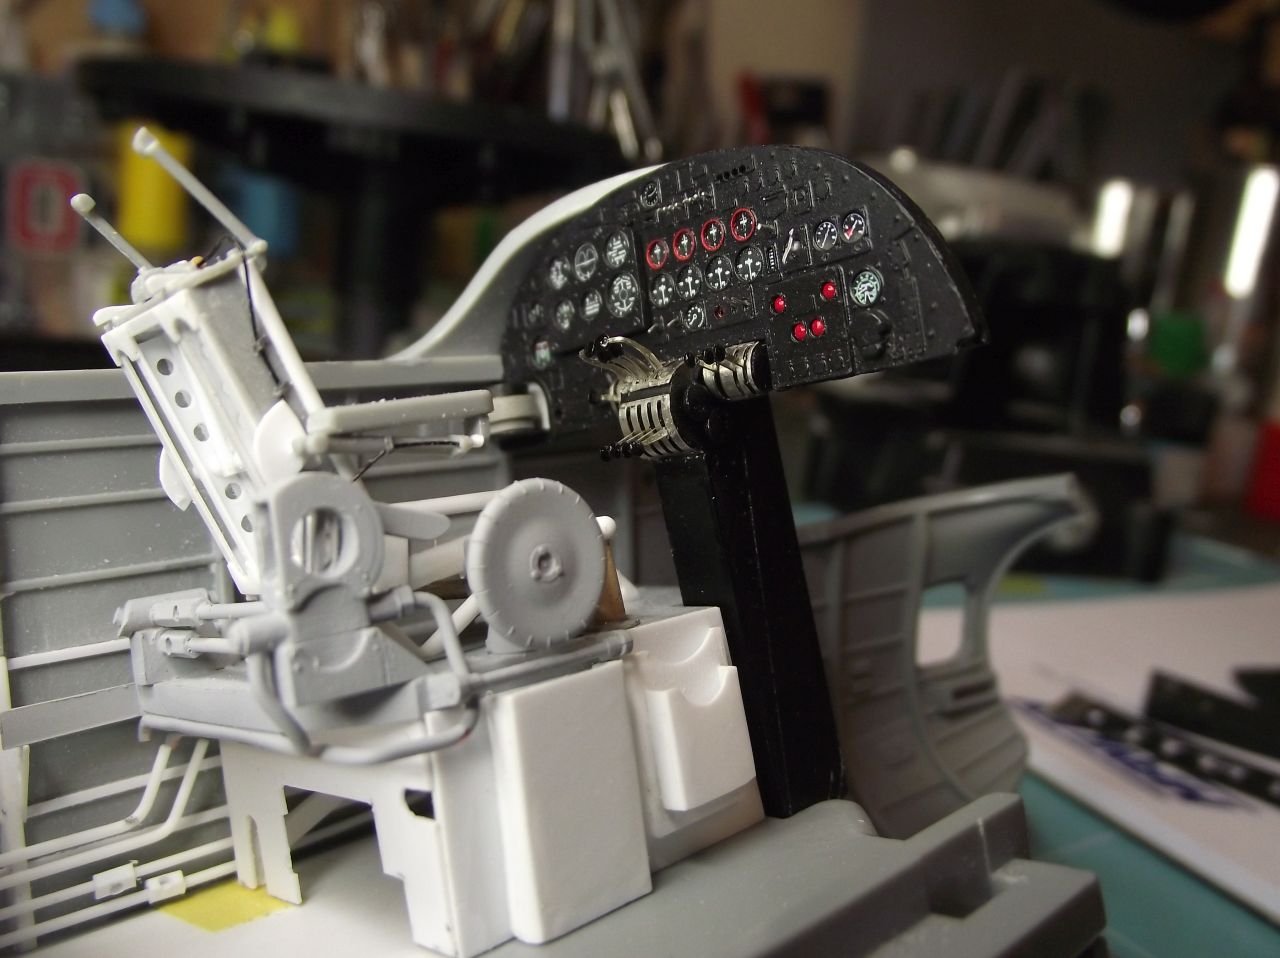
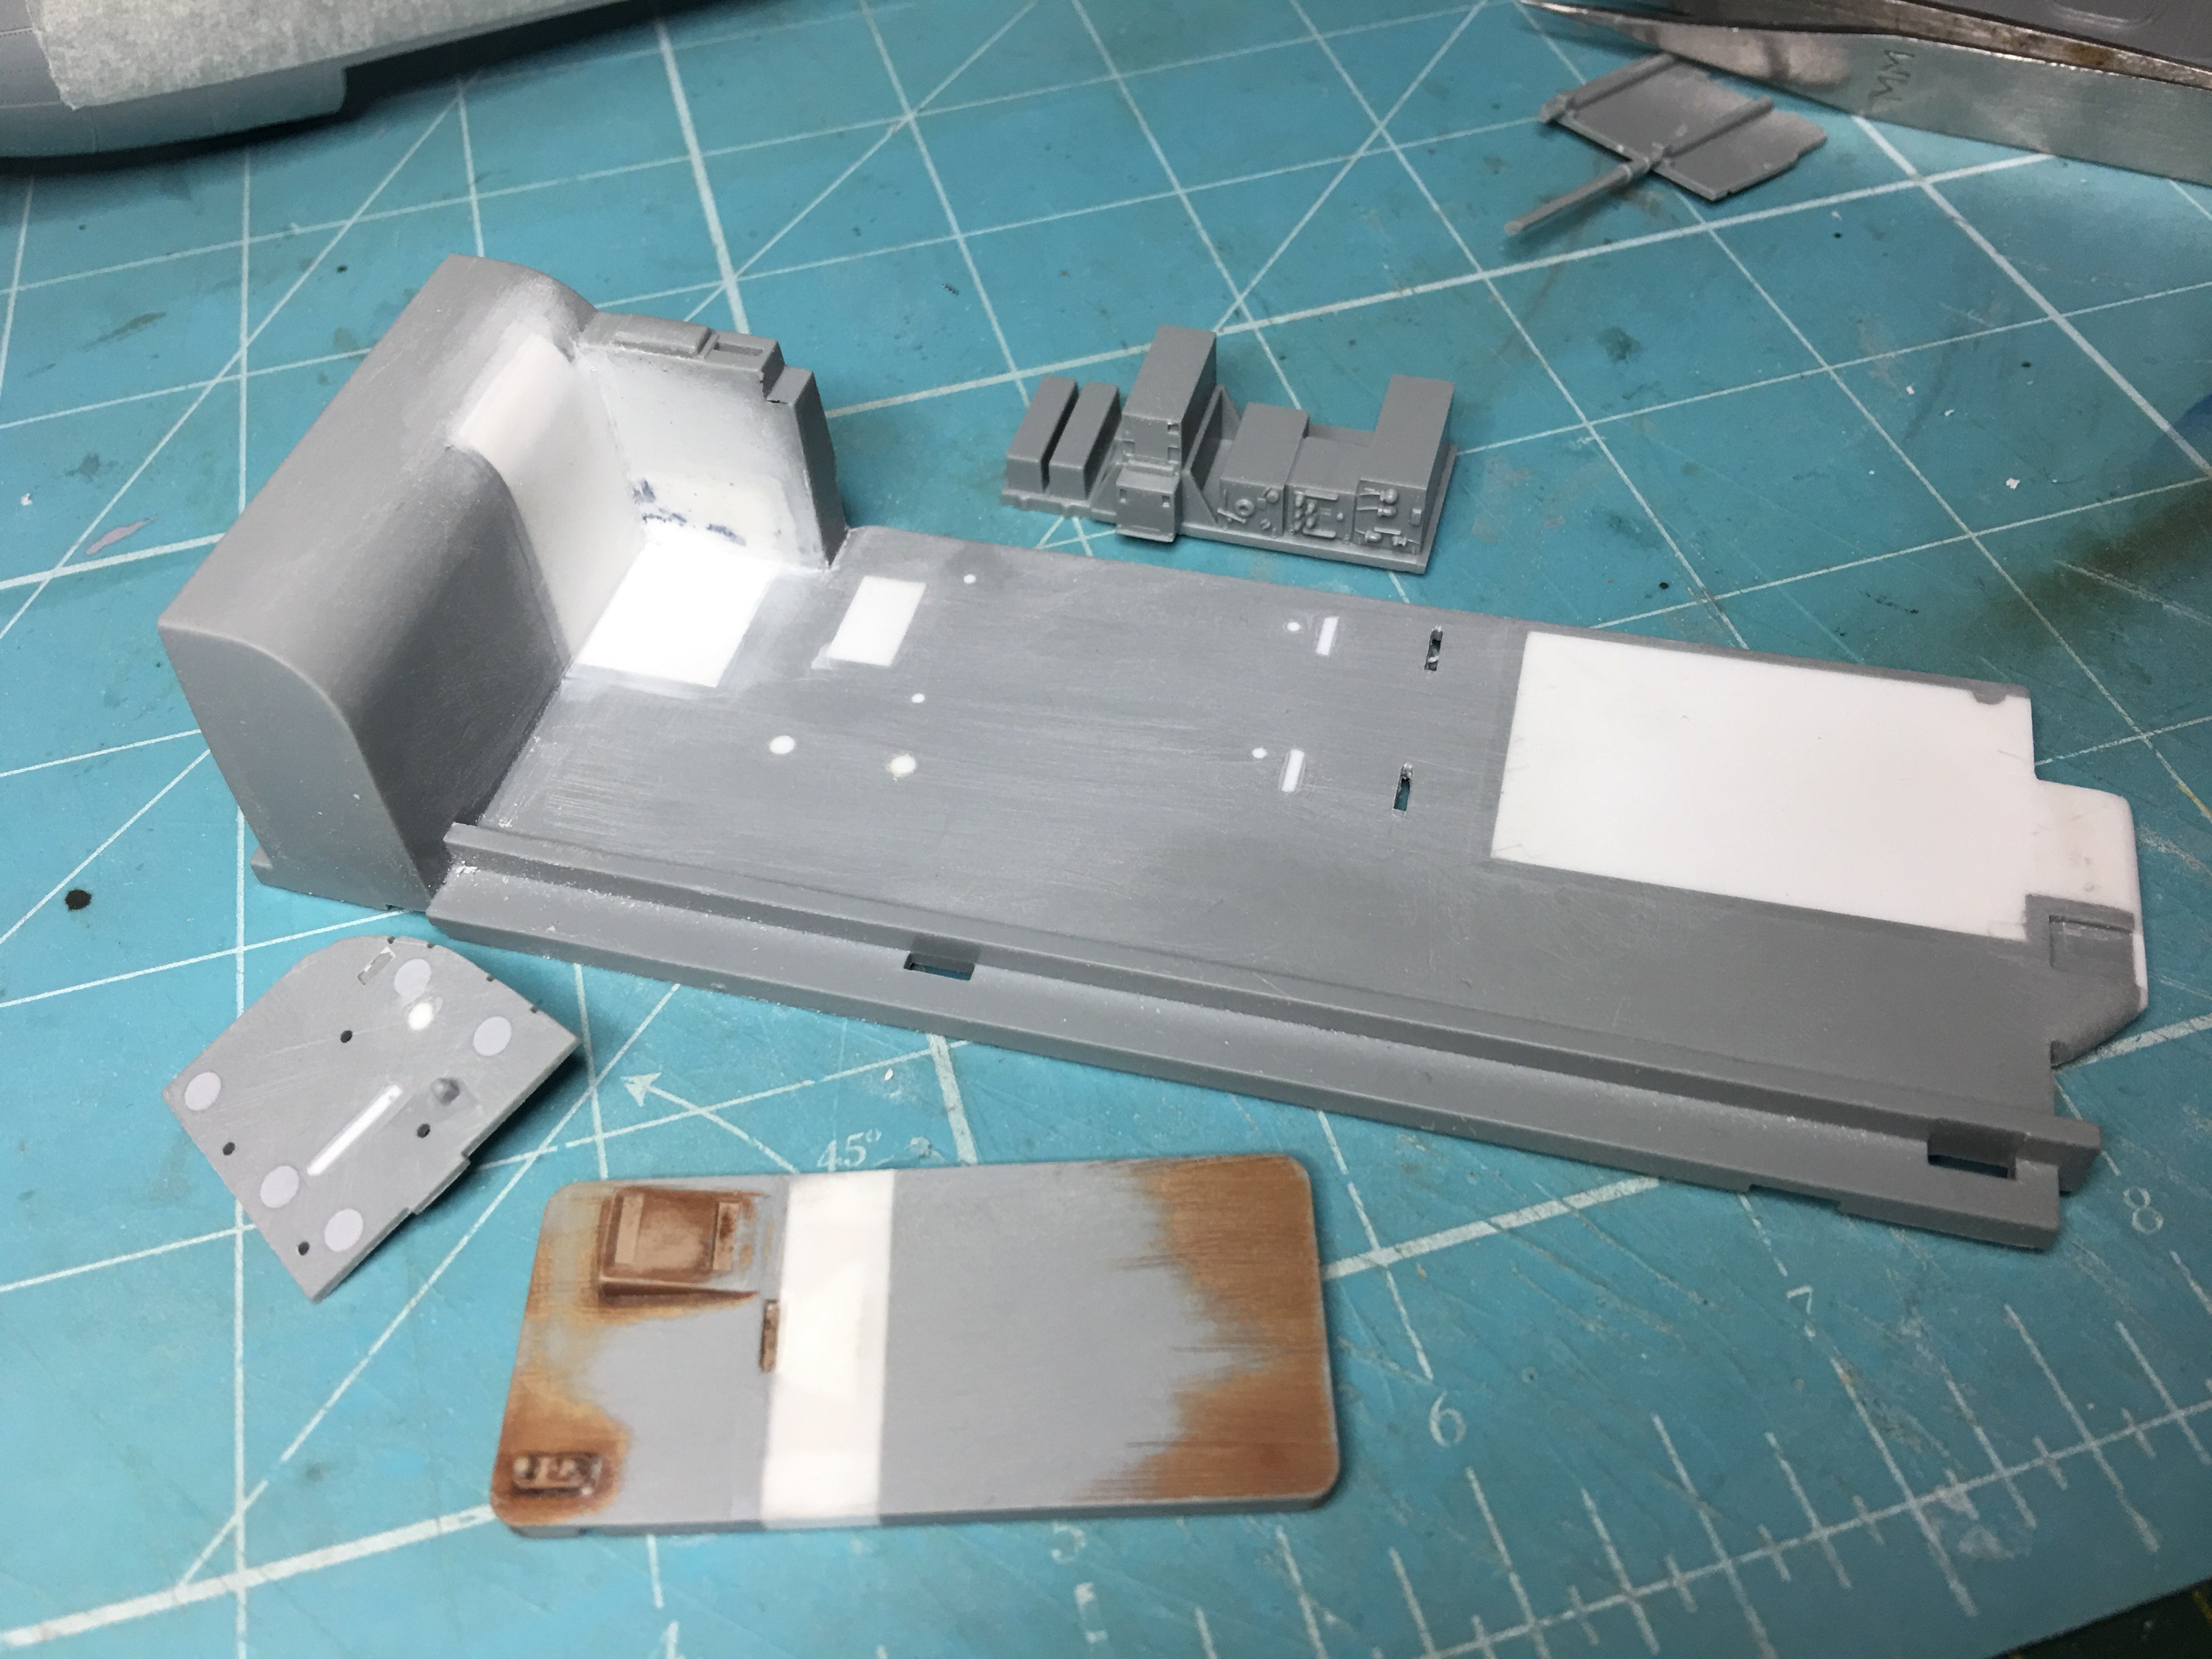
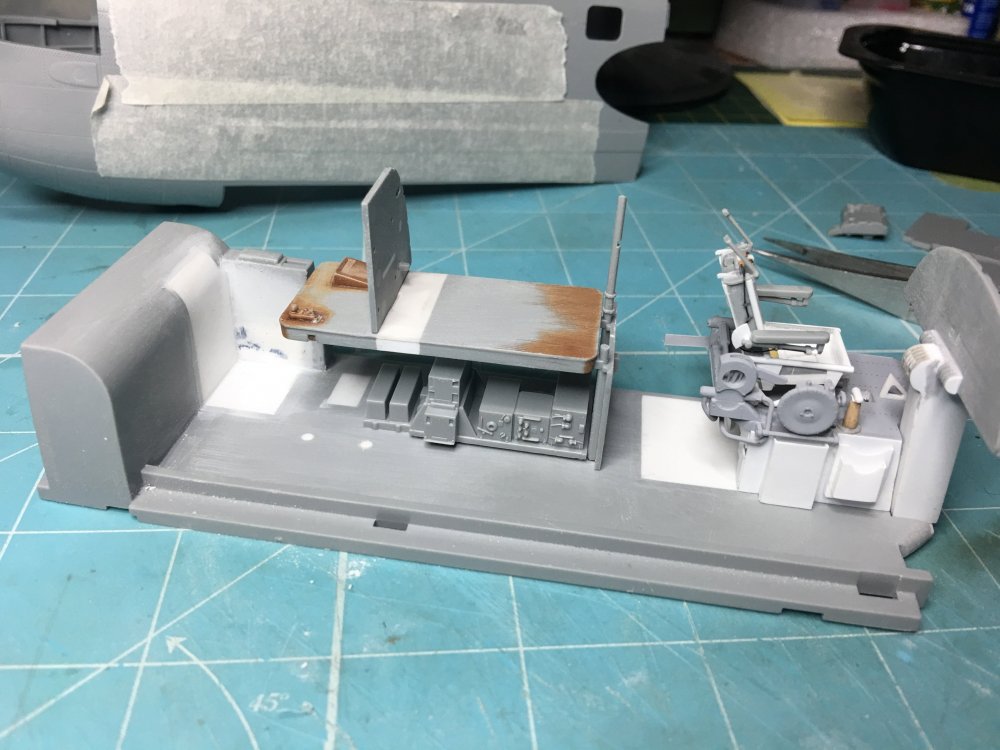
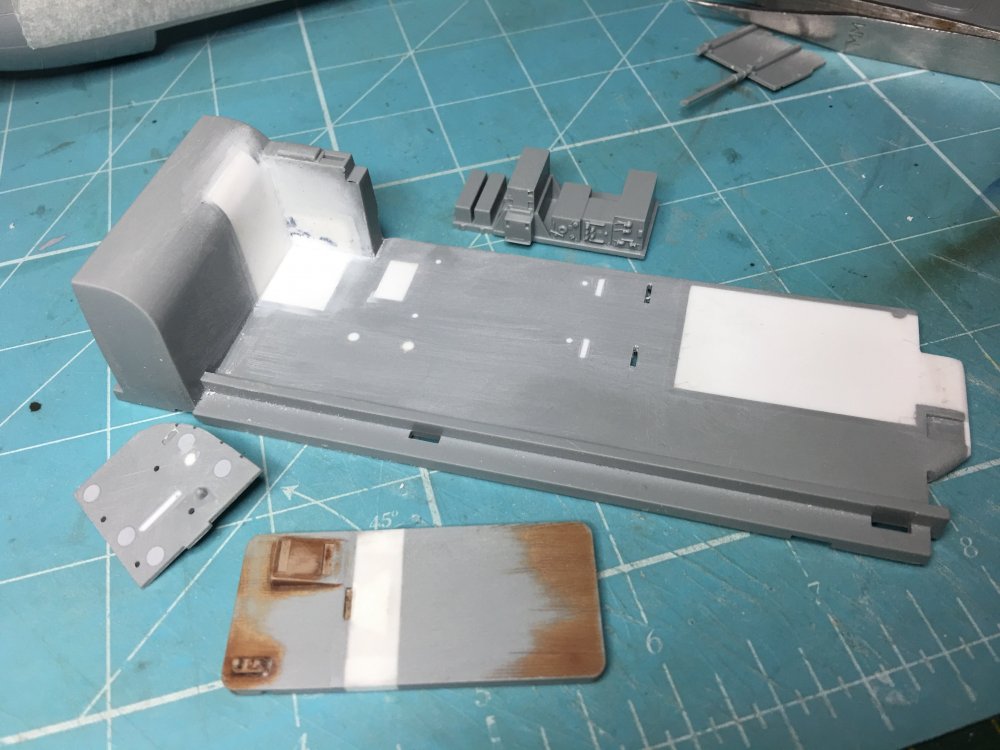
OK, here goes.. this is gonna be a long one.. If you look at pics of early Lancs from inside the cockpit you'll see that the bulkhead behind the pilots seat is forward of the upper fusleage opening. The HK kit has this bulkhead flush with the rear edge of the opening. I can see how this error has been made.. the pilots raised floor area is too long in the kit, so the bulkhead is proprtionally correct in relation to the back of the raised floor.. but... as you travel rearwards the position of the W/O in relation to the main spar is fixed.. as a result the overall length of the table has suffered and the Navigator has taken the hit. I think this also explains why the two boxes, which I think are depicting batteries, in front of the W/O seat are under his feet and not forward under the table? We must also consider the radio gear in the kit and their locations. The ARI 5033 radio, part X25 is called out to go on a shelf fitted to the bulkhead part X4. This is incorrect for an early Lanc so the slot for the shelf, part X5 should be filled and the shelf sent off to the spares bin. The two boxes and bracket sat on the pedestal behind the pilots seat, parts X20-X22 and EP9-10 are actually equipment for the H2S Radar, so should go in the spares bin if the H2S is not used. The ARI 5033 Indicator should be put in this place on a pedestal. So, in the first pic we can see the holes filled in the floor, yes, all of em in reality, and the new holes I've made for the front bulkhead. (The bulkhead needs to be thinned down to represent the sheet metal it's made from. In the foreground we can see the table extension and the slot filled in the radio bulkhead part X4. I am checking to see if the angled platform on the table needs to be removed as it carries an electrnic display called "Fishpond" which I believe was part of the H2S radar so shouldn't be there on my model? As previously mentioned, note the woodgrain on the table.. now destroyed. Note also the ejector pin marks on the bulkheads.. these need to be filled. Behind the floor we can see the floor mounted boxes, part X23 with the two boxes cut out in front of the W/O seat. I haven't fully researched what this array should look like yet but it would appear that this is also incorrect for a B.I/III without H2S? The two most forward boxes should be mounted on a frame, with the larger one, the control panel on top. Both these boxes support the Indicator now fitted on the pedestal above them...... Have I lost you yet? In this next picture we can see the whole lot placed into position. Note the proximity of the forward bulkhead in relation to the pilots seat, the room around the W/O feet and the correctly proprtioned table. Also note the vertical supports need to be relocated forward to stay in proprtion with the table and radio bulkhead. Here we can see the whole lot placed inside the front fuselage section. I feel this has been worth doing, especially on my model as I have corrected the pilots floor and closed up the huge gap behind it. It would appear the vertical pillar on the fron bulkhead is ficticious so needs to be removed. I will also need to make the pedestal for the Indicator to sit on. Thanks for stopping by...
-
HK Models 1/32 Lancaster Hints, Tweaks and Tips,
NigelR32 replied to NigelR32's topic in Modelling Discussion
OK, here you go guys.. this shall now be known as the Bummer, Bugger Bigger mod.. If you look at pics of early Lancs from inside the cockpit you'll see that the bulkhead behind the pilots seat is forward of the upper fusleage opening. The HK kit has this bulkhead flush with the rear edge of the opening. I can see how this error has been made.. the pilots raised floor area is too long in the kit, so the bulkhead is proprtionally correct in relation to the back of the raised floor.. but... as you travel rearwards the position of the W/O in relation to the main spar is fixed.. as a result the overall length of the table has suffered and the Navigator has taken the hit. I think this also explains why the two boxes in front of the W/O seat are under his feet and not forward under the table? So, in the first pic we can see the holes filled in the floor, yes, all of em in reality, and the new holes I've made for the front bulkhead. (The bulkhead needs to be thinned down to represent the sheet metal it's made from. In the foreground we can see the table extension and the slot filled in the radio bulkhead part X4. As previously mentioned, note the woodgrain on the table.. now destroyed. Note also the ejector pin marks on the bulkheads.. these need to be filled. Behind the floor we can see the floor mounted boxes, part X23 with the two boxes cut out in front of the W/O seat. In this next picture we can see the whole lot placed into position. Note the proximity of the forward bulkhead in relation to the pilots seat, the room around the W/O feet and the correctly proprtioned table. Also note the vertical supports need to be relocated forward to stay in proprtion with the table and radio bulkhead. Here we can see the whole lot placed inside the front fuselage section. I feel this has been worth doing, especially on my model as I have corrected the pilots floor and closed up the huge gap behind it. It would appear the vertical pillar on the fron bulkhead is ficticious so needs to be removed. I will also need to make the pedestal for the Indicator to sit on. I have written a more in depth article on my build thread which looks very similar to this one... I hope to get my video out today on building the Airscale IP set, that should be an interesting watch? Thanks for stopping by...
-
The Force is strong with this one...
NigelR32 replied to Bill_S's topic in LSM 1/35 and Larger Work In Progress
Why have I only just seen this?? So, you put pressure on me without even telling me?? You diwty Wats.. there I was running blind not realising anyone was following along? Very soon I'll be doing a video on putting together the IP set from Airscale. I've found another issue tonight.. the table is too short so the bulkhead behind the pilots seat is too far back. BTW.. the upper turret blanking plate is in the kit box. -
Pulled up my chair, got some vbeer and popcorn.. My choice would be seventh from the top, looks like a proper aggressor to me..
-
HK Models 1/32 Lancaster Hints, Tweaks and Tips,
NigelR32 replied to NigelR32's topic in Modelling Discussion
I noticed another little issue with the cockpit tonight.. the navigators table is too short and the first "bulkhead" at the front of said table is too far back. I'm just working on the correction now, will post pics tomorrow. Biggest bummer of all is the fact that i already woodgrained my table ready for a coat of interior green then scrub away to show some wear Anyway, its lengthened now so I will need to do it all again!!