NigelR32
-
Posts
407 -
Joined
-
Last visited
Content Type
Profiles
Forums
Events
Gallery
Everything posted by NigelR32
-

HK Models 1/32 Lancaster Hints, Tweaks and Tips,
NigelR32 replied to NigelR32's topic in Modelling Discussion
Nice job Yrjo.. that is a good way to fill those holes. I remember trying to do this using mr Surfacer and I was forever chasing it due to shrinkage. Which landing lights are wrong mate?? If I may suggest, perhaps in future you could consider masking the area around the focused repair as this will avoid a lot of rework after you're done? -
HK Models 1/32 Lancaster Hints, Tweaks and Tips,
NigelR32 replied to NigelR32's topic in Modelling Discussion
As soon as that Tractor is available, I'll have it for review and I'll do a YouTube review on my channel. I may also do a video build of it?? -
Thank you.. I look forward to it.
-
HK Models 1/32 Lancaster Hints, Tweaks and Tips,
NigelR32 replied to NigelR32's topic in Modelling Discussion
Hey Andrew.. I may have experience under my belt, but there is no such thing as a stupid question.. I wasn't aware that they were different lengths top and bottom, but i was aware there are dedicated port / starboard tips. I was only suggesting that in my opinion the biggest issue with the fit is not wing section, as you've sorted with your fillet, but the step that you get at the joint. If you look back at my pics you'll see I added two layers of tape to space the tip "up" and bring it level with the wings surface. If you look closely at your attached pic you'll see that on the upper surface the tip looks lower than the wing surface and the bottom is off too. Getting a perfect join here is gonna take a lot of work!! -
1/18 P51C Mustang "Lopes Hope 3rd"
NigelR32 replied to airscale's topic in LSM 1/35 and Larger Work In Progress
Guys, don't be fooled.. i know exactly what Peter is doing here.. he has dismantled a real P-51 and is posting pictures of its component parts. There's no way that anyone could make a model this realistic and we shouldn't be taken in by it. -
Takom 1/35 V2 Rocket
NigelR32 replied to JeroenPeters's topic in LSM 1/35 and Larger Work In Progress
I said i was gonna love this.. I wasn't wrong. This is simply stunning!! Thanks for sharing. -
I'm not sure if it's "hotter" to be exact.. but I was having an issue with some Vallejo Metal Colour that wouldnt dry, so i soaked the parts in the AK thinner for a few minutes as it dissolved the paint. The parts literally crumbled.. like sugar cubes.. It was really strange, the surface was unaffected but the composition of the plastic was destroyed??
-
She looks great!! I have a couple of these, I'm one of the guys who cut the engines up to correct the wing/engine interface, then wondered why I bothered.. hence why I have two.... Could you please post a "how to" on achieving that great camo scheme. It looks so.. well...right!!
-
RR Spey powered RAF Phantom conversion
NigelR32 replied to Wingco57's topic in LSM 1/35 and Larger Work In Progress
Nice work Cees. If you need to do any finer cutting work, may i suggest the JLC saw from modelling tools.co.uk One things for sure, as soon as tyou finish this a kit will be released. i seem to remember many moons ago Trumpeter were going to release a range of RAF F-4's? If you need any little bits and bobs for your build let me know, I think I have a load of odd Decals and PE bits left from my mega build of Easy Rockin Mama?- 414 replies
-
- 4
-

-
- conversion
- phantom
- (and 1 more)
-
Tamiya 1/32 A6M2b to a A6M3 model 22
NigelR32 replied to CrankyCrafstman's topic in LSM 1/35 and Larger Work In Progress
Nice work Ron, looks like you nailed that cockpit green colour. I would like to ask a question regarding the Vallejo metal colour. How do you find it dries? I have some Aluminium that stays slightly tacky whenever I use it, whether over primer or straight on plastic? Do you find it goes off just fine, or does it stay slightly tacky? I even tried matt coating it and the matt coat wouldn't dry either?? -
HK Models 1/32 Lancaster Hints, Tweaks and Tips,
NigelR32 replied to NigelR32's topic in Modelling Discussion
I agree this is a great way of getting the end of the wing to the same shape as the tip, but I feel the issue is also to do with the step between the wing and the tip? On my starboard wing the tip is proud on one side and stepped back on the other. -
Totally agree with the comments here.. it really boosts your mojo to get into an armour kit and just build it. However.. there is a caveat to this.. anything with an interior.. that'll burn your mojo for sure!!
-
HK Models 1/32 Lancaster Hints, Tweaks and Tips,
NigelR32 replied to NigelR32's topic in Modelling Discussion
Thank you Yka.. It's nice to have a name to identify people with for me, especially as we communicate very much. -
HK Models 1/32 Lancaster Hints, Tweaks and Tips,
NigelR32 replied to NigelR32's topic in Modelling Discussion
What is your christian name? -
HK Models 1/32 Lancaster Hints, Tweaks and Tips,
NigelR32 replied to NigelR32's topic in Modelling Discussion
OK.. here i have used "Quote" as I am answering a question you have asked, or am referring to a point you have raised. So, for example.. If you asked.. "What colour are the tyres", I would press "quote" when I answered you. But.. If no one asked the question and I discovered the tyres were blue, I would write a fresh post, with no "quote" to tell everyone "Hey guys, the tyres are bue". Then, you might reply, and press "quote" and just write "Really, I thought they were Green"??? -
HK Models 1/32 Lancaster Hints, Tweaks and Tips,
NigelR32 replied to NigelR32's topic in Modelling Discussion
Good to hear. May I ask, why have you randomly posted pics of the bomb aimers blister and the bomb bay? -
HK Models 1/32 Lancaster Hints, Tweaks and Tips,
NigelR32 replied to NigelR32's topic in Modelling Discussion
A little tip guys if you are using the Airscale IP upgrade.. Remove 0.5-0.7mm from the front ends of parts P50 and P46. These are the cockpit sills and if left stock will prevent the IP from fitting between the fuselage halves. -
HK Models 1/32 Lancaster Hints, Tweaks and Tips,
NigelR32 replied to NigelR32's topic in Modelling Discussion
Hi, It is impossible to give measurements due to the shape. I have worked from pictures, so I could be wrong, but I can tell you that I have reduced the floor height to 14.5mm high and it is 25mm wide. Obviously, I accept no responsibility if I am wrong. -
Oh yeah, oh yeah.. looking VERY cool!! I tried the Real Color when it first came out on Armour. I am hooked!! Did you use the AK thinner or MCLT? The AK thinner is really nice, but it does attack the plastic if soaked. Ask me how I know!!
-
hk models Lancaster B Mk.I, R5868, PO-S (S-Sugar)
NigelR32 replied to JayDee's topic in LSM 1/35 and Larger Work In Progress
Looking good James. I assume the fit is that good you can get away with painting in sub assy's then clipping it all together? -
HK Models 1/32 Lancaster Hints, Tweaks and Tips,
NigelR32 replied to NigelR32's topic in Modelling Discussion
Not sure what you mean there David? I dont think it's a fault, I think it was designed that way. I'm sure it's correct for a late version with a massive intake or something but I cant find a pic right now. If you look at the Revell 1/72 in this area you'll see what I mean, only the Revell is much worse., I'm bulding one right now. So, once it's together the top of the intake will blend into this bump, so both will need to be faired in and reshaped if accuracy is your main goal.. oh and you're mental like me!! Basically, HK have fitted an extra large radiator but luckily the outer shape of the intaks cowling isn't too far off. -
HK Models 1/32 Lancaster Hints, Tweaks and Tips,
NigelR32 replied to NigelR32's topic in Modelling Discussion
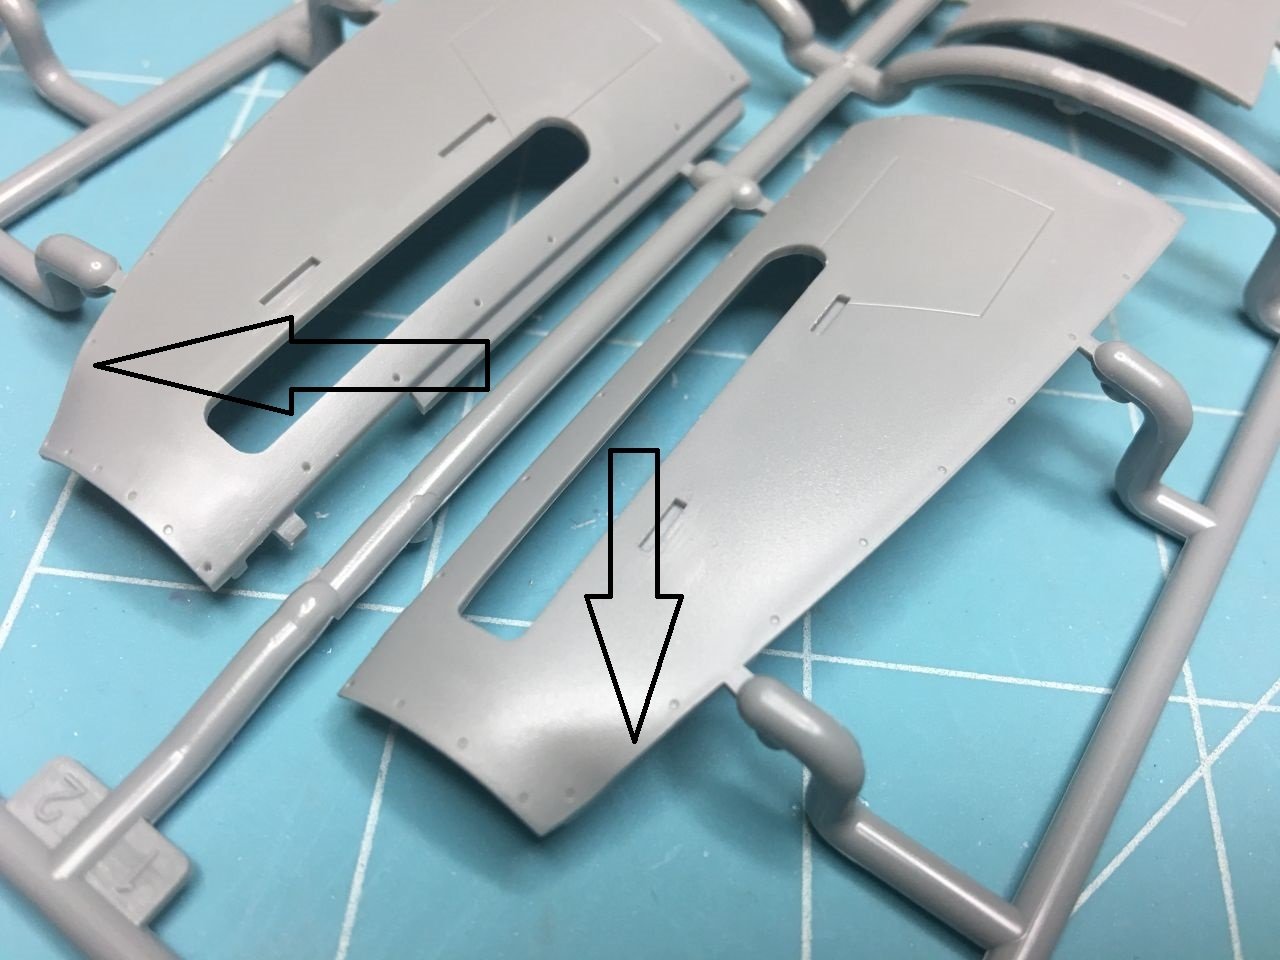
I have added an arrow to the "bulge" I speak of. AFAIK and looking at the pics above, in all cases, this edge of the side cover should be straight?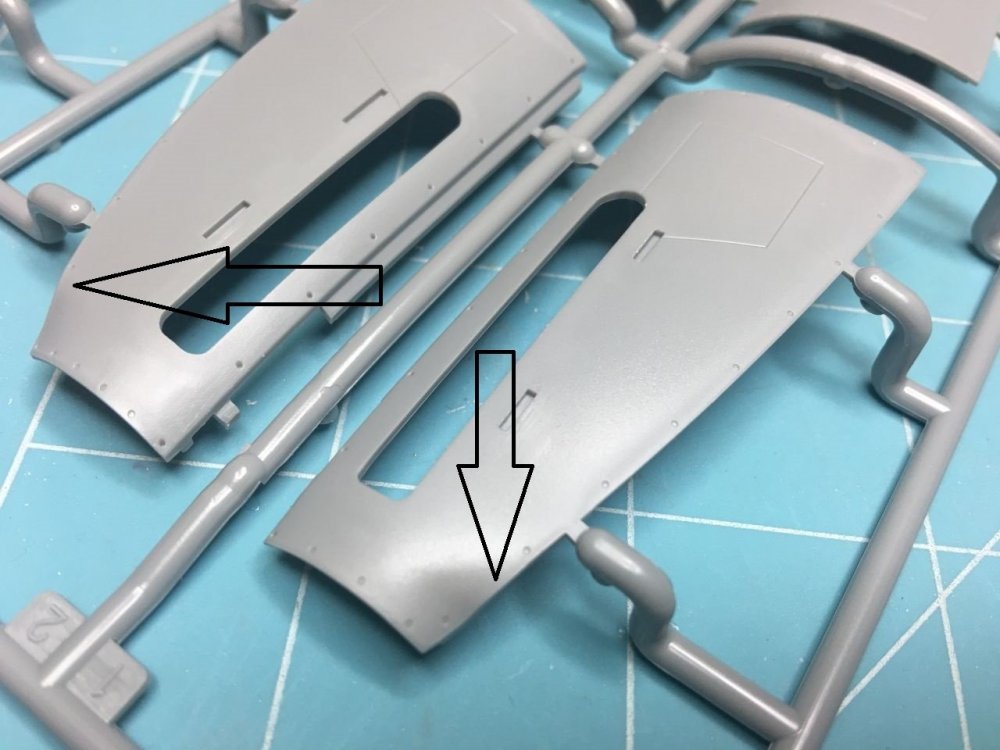
-
HK Models 1/32 Lancaster Hints, Tweaks and Tips,
NigelR32 replied to NigelR32's topic in Modelling Discussion
You've done well there!! What a nightmare though trying to clean up with all that rivetting in the way? If Yan says to fit L47 first, why do the instructions tell you to put the tip on before fitting that part? Surely it would be much easier to fit that part L47 before ANYTHING else?? Thank you for the tip, this is indeed a valuable tip!! Why the stretched sprue?? -
HK Models 1/32 Lancaster Hints, Tweaks and Tips,
NigelR32 replied to NigelR32's topic in Modelling Discussion
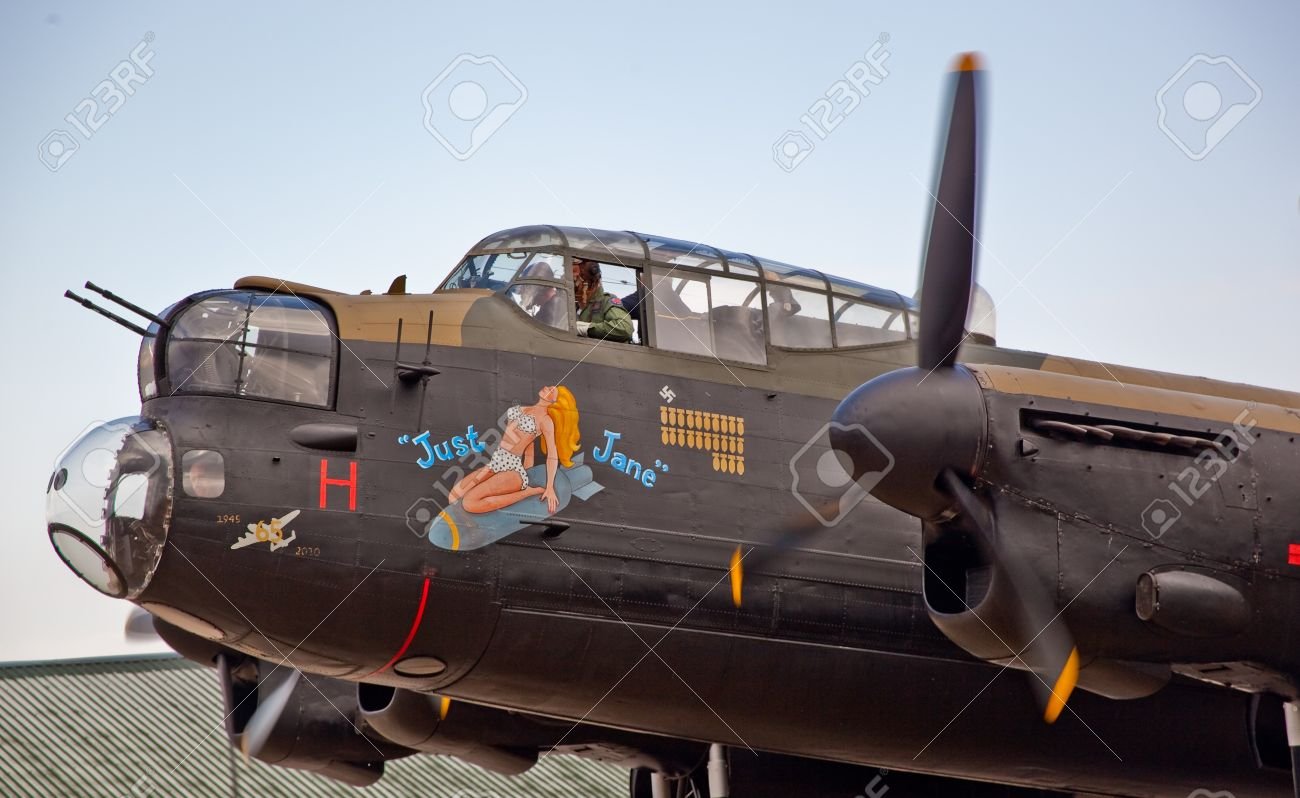
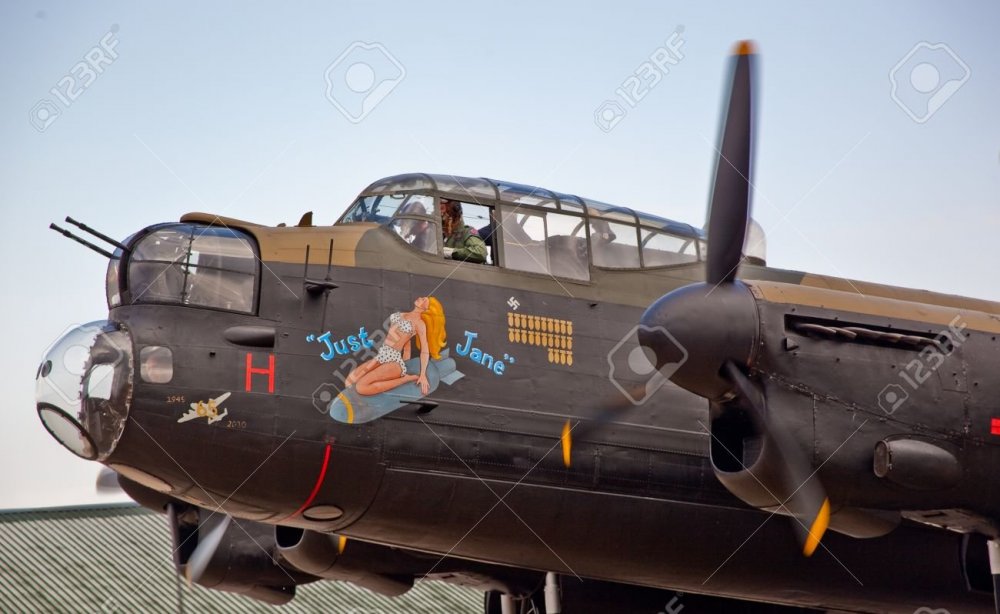
OK guys.. I've been looking into this issue with the intakes. HELP!! I'm looking for opinions here.. the first pic is a period picture of a MkX, KB903.. for reference only. Next picture is modern, Just Jane NX611 Picture for reference only. This is a MkVII delivered to Far East spec, so is this why it has deeper radiators? Just Jane has Radiators as depicted in the kit, but doesnt have the "kink" in the engine side cover?? Next pic is S for Sugar, when she was a gate guard. She was a B.MkI Picture for refence only So, it would appear that I was wrong to assume the Mk X vs Mk I/II differences? It would appear the F.E. Aircraft had deeper intakes with a larger radiator? So, If I reshape my intakes to the shape of pics 1 and pic 3 I should be OK for a Dambuster?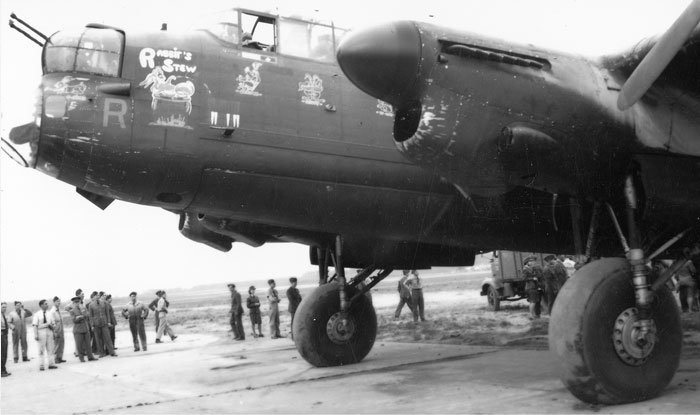

-
HK Models 1/32 Lancaster Hints, Tweaks and Tips,
NigelR32 replied to NigelR32's topic in Modelling Discussion
Thanks David. I need to fill those in on my kit as the Dambuster (464 Provisioning) didnt have the holes. Wish me luck!!