Umlaufmotor Posted November 4, 2013 Posted November 4, 2013 In work since ........................ ?Completion ........................? 8
Administrators JeroenPeters Posted November 4, 2013 Administrators Posted November 4, 2013 Insane!!! Ouch! You just crossed the line from amazing to 'out of this world'.... A whole new level... Respect. 1
One-Oh-Four Posted November 5, 2013 Posted November 5, 2013 There's only one emoticon possible for this: It isn't called "kwijl" (drool) for nothing.... Yumm!
One-Oh-Four Posted November 5, 2013 Posted November 5, 2013 And now for a serious reply: I like these photos very much because they can serve as examples for detailing parts. I really want to try the pencil-method for the prop, for instance!
Jamme Posted November 5, 2013 Posted November 5, 2013 Incredible job, should you not say it's a 1/32 scale model, I believe nobody would tell..... congrats, Jamme
Umlaufmotor Posted November 16, 2013 Author Posted November 16, 2013 Thank you all very very much for your kind comments.I am very happy that you like this work. The following pictures show the detail work on the observer MG.This work is a mix of the beautiful parts of the kit, the master model company and a little scratch work.The scope consists of the kit parts, brass tube and plastic waste.I used a simple piece of a clear plastic rod and a drop of Tamiya "clear yellow" to represent the eyepiece. Servus Bertl 3
Umlaufmotor Posted November 16, 2013 Author Posted November 16, 2013 Of course, both front MG's were also detailed.Kitpart's, brass tubes, a little scratch-work .........- ready. The most interesting challenge: The weapons numbers. Written with a thin pencil.................................................... ..................................Yeah, I know - that's pretty stupid. Servus Bertl 4
Administrators JeroenPeters Posted November 16, 2013 Administrators Posted November 16, 2013 Oh my god!! This is amazing! I love the wooden stock on the guns. This is just too good... Can't wait fro more... 1
Administrators JayDee Posted November 16, 2013 Administrators Posted November 16, 2013 Jeez, this is inspirational. SO many techniques. This is one of my favourite builds at the moment. 2
Administrators Fran Posted November 16, 2013 Administrators Posted November 16, 2013 Love your techiques!!!!! Bertl what's the tolo in the second pic???
Wingco57 Posted November 17, 2013 Posted November 17, 2013 Your attention to detail is breathtaking. On the other hand you make it look So simple. Thanks for teaching us. Cees 1
Grant Posted November 18, 2013 Posted November 18, 2013 Wow, it's fair to say that this is absolutely ..... S T U N N I N G !!! 1
rkranias Posted November 18, 2013 Posted November 18, 2013 are you frackin' kidding me? my eyes hurt, this is epic stuff! 2
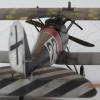
Umlaufmotor Posted November 20, 2013 Author Posted November 20, 2013 Many many thanks to all of you for the applause. Here are some pictures of my attempt to represent the aluminum skin.I use always Mr. Metal Color (polish color) for that.First, a thin layer Mr. Metal Primer is applied as a primer.Thereafter, the aluminum shade is painted. Allow to dry this color. NOT polish.Now applied irregular spots Mr. Metal Color "Iron" with an old short-haired brush .To vary the effect, you can be painted smaller spots with "stainless".Leave to dry the paint. After being polished with the short-haired brush. The brush is moved in rotation. Please do not press to hard with the brush, otherwise too much paint is polished away. The different effect in different lighting conditions is not to be overlooked. Attention, Important! After polishing must be sealed with high-gloss clear coat, NEVER with matt varnish. Servus Bertl 2
Administrators JeroenPeters Posted November 20, 2013 Administrators Posted November 20, 2013 That's a great technique! I have the same paints so I'm sure I should be able to do this 1
Administrators Fran Posted November 20, 2013 Administrators Posted November 20, 2013 Bertl you should write a book with all the techniques.... Just Awesome... If you do, I will be the first in line to buy it! Cheers, Francisco 1
Umlaufmotor Posted November 22, 2013 Author Posted November 22, 2013 Thank you, Francesco - but with only one selling book, I can not eat my fill. Thank you, Martin. I always use usually a mixture of about 50% Mr. Metal primer and 50% Mr Color Thinner. Several thin layers of paint after another. Tamiya clear works also good, but the primer can be paint thinner.Thank you, Jeroen. Please try it, it's a very easy and simple method. Servus Bertl
Grant Posted November 23, 2013 Posted November 23, 2013 Where can we buy your techniques book Bertl ? :)A great tutorial and one for the "hints & tips" bank! I love the effect you've managed, thank you for sharing. 2
Verbeek Posted February 17, 2015 Posted February 17, 2015 It looks amazing, great work. But, no more?
Beychevelle Posted February 18, 2015 Posted February 18, 2015 You have a license for those machine guns?
Verbeek Posted February 18, 2015 Posted February 18, 2015 Like I say before, no more update about this built? Last update was 22 November 2013.

Recommended Posts
Create an account or sign in to comment
You need to be a member in order to leave a comment
Create an account
Sign up for a new account in our community. It's easy!
Register a new accountSign in
Already have an account? Sign in here.
Sign In Now