Trigger Posted August 3, 2014 Posted August 3, 2014 Hello Everyone, Well as promised, i have now started the build of my 1/24 scale Typhoon`. I will be building the "Pulverizer IV" version, just because this Tiffie was once stationed in the Netherlands. I saw that Erik wil be building the 'Pulverizer II" , so both our aircraft wil be "Bombphoons". The first thing i did when the kit arrived was to inspect the canopy, and yes mine had a crack and a distortion in the back of the canopy. Yesterday the replacement part arrived from Airfix, and this one has no crack, but still has the distortion . i think i'll just leave it as it is right now, and perhaps in the near future this will be sorted out as well. i also ordered the aftermarket radiator grille set from Radu Brinzan, and the cockpit decal set from air scale. Both will be a fine improvement on the kit parts from what i have seen so far. So after having studied the building manual, you must immediately make the choice of what type of aircraft you are going to build and if it will be an "in flight" model or a " wheels down" version. I will be building a "wheels down " version with the engine and the gun bays exposed. so here are the first pictures of my attempt to build this monster. I first put primer on the frame and then i sprayed the frame in flat aluminum tamiya xf 16. I also sprayed some loose parts of the cockpit such as the floorboards and side panels in aluminum and then in a coat of flat black. (so i can chip some paint here and there and then the aluminum will appear underneath) i have weathered the frame using oil paints in different colors that i mixed. The firewall and the tubing underneath the engine mostly black creating the look of an engine with some oil loss. The oil tank is now dry fitted against the firewall and was weathered with raw umber, burnt sienna and coal black. The floor boards were also sprayed in aluminum first with a coat of black on top, and then i used a brush with a tiny bit of thinner to remove the black in some places to create a bit of a worn look. Well that's is it for today, I hope i will be able to keep up the build so i can send you guys a regular update. Greetings, Frank 1
Paulster Posted August 3, 2014 Posted August 3, 2014 I wish they would hurry and sell out of these kits so there are none left for me.
Administrators JayDee Posted August 3, 2014 Administrators Posted August 3, 2014 Thanks for sharing this. I'll follow your lead here. Mine will be here in 2 days.
Wingco57 Posted August 4, 2014 Posted August 4, 2014 Ahh mooi en welkom. Good start on your LSM career. Cees
alpinestar Posted August 4, 2014 Posted August 4, 2014 Nice start mate. I'm planning on starting mine maybe next week so i'm watching with interest Chris.
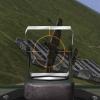
Trigger Posted August 4, 2014 Author Posted August 4, 2014 Here's another small update on my Typhoon project, Having seen the Hispano gun barrels of the kit where you have to drill a a 0.9 mm hole at the business end of the gun, i decided to use a set of air master gun barrels originally ment for the 1/24 mosquito. i still had these in my stash, and i thought they might come to good use on this kit. The length of the barrel is exactly the same for both mosquito and Typhoon, the only difference is the recoil spring that is placed 7mm further backwards. This is is of no consequence for the build, the only problem is the the gun fairing witch is a bit to small to fit the gun barrel. i had to file the inside of the fairing to make the space needed to fit the barrel. The gun fairings wil become a bit thin, but i think it is well worth the effort, because those guns look so much better with the brass ones in place. Here are some pictures of the modification. And also thanks to you all for the responses on this build, That is it for today, Greetings, Frank 1
nmayhew Posted August 5, 2014 Posted August 5, 2014 beautiful stuff Frank! am i right in thinking some Typhoons had unshrouded cannons - or am i thinking of a different aircraft altogether? if so, i hope Master do some more appropriate barrels but your use of them is excellent - good call
Administrators JayDee Posted August 5, 2014 Administrators Posted August 5, 2014 am i right in thinking some Typhoons had unshrouded cannons - or am i thinking of a different aircraft altogether? Desert Hurricanes?
Trigger Posted August 5, 2014 Author Posted August 5, 2014 beautiful stuff Frank! am i right in thinking some Typhoons had unshrouded cannons - or am i thinking of a different aircraft altogether? if so, i hope Master do some more appropriate barrels but your use of them is excellent - good call I don't know, all i know is that there were 2 types of hispano guns in use, the mk II and the mk V , The mk V had a shorter barrel length. The early " car door Typhoons" had no barrel fairings, while later bubble top versions all had barrel fairings as seen on this kit. They were all ( as far as i can research ) mk II hispano's.
Wingco57 Posted August 5, 2014 Posted August 5, 2014 The Mk V's were used in the Tempest, not in Tiffies as far as I know. Cheers Cees
rkranias Posted August 7, 2014 Posted August 7, 2014 First production batch Typhoon 1b, think car door, had the uncovered cannon. The second production batch Typhoon 1b, think car door, had cannon covered. BTW really nice work to date.
Trigger Posted August 7, 2014 Author Posted August 7, 2014 First production batch Typhoon 1b, think car door, had the uncovered cannon. The second production batch Typhoon 1b, think car door, had cannon covered. BTW really nice work to date. Hello Rick, Thanks for the comment, but what you are doing on your build with "slick Chick" is also very impressive!, i wil build my Typhoon in the variant with a bomb under each wing, and i am very much impressed with the build of your bombs for your P47D, How did you get your bombs with a sort of "orange peel" surface, i absolutely love that finish, and it really looks like the real deal. Hoping to hear from you, Frank.
rkranias Posted August 7, 2014 Posted August 7, 2014 Hello Rick, Thanks for the comment, but what you are doing on your build with "slick Chick" is also very impressive!, i wil build my Typhoon in the variant with a bomb under each wing, and i am very much impressed with the build of your bombs for your P47D, How did you get your bombs with a sort of "orange peel" surface, i absolutely love that finish, and it really looks like the real deal. Hoping to hear from you, Frank. Thanks for the nice compliments Frank. The texture finish on the bombs is quite simple. Mr. Surfacer 500 applied in a "stippled" fashion. 500lb GP bomb. Right - out of box kit bomb. Left - PE (brass) fins and front/rear fuse added, also painted with Mr Surfacer 500 then stippled with short brush for texture. Paint is done, now to decide of weather, chipping, etc. Hope this is helpful. Feel free to contact me with any questions.
JohnB Posted August 7, 2014 Posted August 7, 2014 That's going to be a beauty Frank. I just received mine today and am very favorably impressed. I plan to hold off on building it for a while and see what the after-market guys come up with. I look forward to following your build.
Trigger Posted August 8, 2014 Author Posted August 8, 2014 That's going to be a beauty Frank. I just received mine today and am very favorably impressed. I plan to hold off on building it for a while and see what the after-market guys come up with. I look forward to following your build. Thanks for the comment John, Your builds look pretty good to, i see that you are a real P51 fan. And you are absolutely right, the P51 was, and is still an amazing aircraft. Maybe you are right not to start the build of your typhoon straight away. I am sure that the aftermarket guys will step in and make some nice photo etch additions. the radiator grilles from RB productions for instance are a nice example. I am now making some sub assemblies for my Typhoon, and i am waiting for my cockpit decal set from Aeroscale so i can move on with the cockpit area. i'll try to keep up with the build, so i can post an update regularly, Greetings, Frank 1
JohnB Posted August 8, 2014 Posted August 8, 2014 Thanks Frank. I too am waiting for the Airscale instruments which look to be really nice.
Trigger Posted August 17, 2014 Author Posted August 17, 2014 Hello folks, A little update on my typhoon build, haven't had much time for the build, but i have done some sub assemblies en i have progressed with the pilot's seat and the engine, here are some pics i have used the rb productions seat belts for the pilot's seat, and i am in the process of painting all the bits and pieces of the engine, and believe me, there are plenty i'am also weathering the engine a bit before all those bits and pieces are mounted and i will weather them as i go along. i have also used the rb radiator grilles as you can see on the following pictures. I have used a mix of oil paints to weather the radiator a bit, but the rb set is a real improvement on the radiator set of the kit. also started on painting the exhaust stacks, i first sprayed them with flat black, and then started with a mix of paints to give them a "burnt" look, still working on that to get it right though, they will need another few layers to get them right. that's it for today, more to follow
Wingco57 Posted August 17, 2014 Posted August 17, 2014 Looking great, especially the radiator. I was looking at this kit at the aviation megastore yesterday and was almost tempted to buy it, almost. Cheers Cees
Trigger Posted August 24, 2014 Author Posted August 24, 2014 i am almost done with the engine, it only needs some detailing and weathering. it wasn't easy to get al the hoses and pipes in to place, and for anyone who want's to build this one, i really suggest to read the manual a couple of times, and follow the instructions about positioning the various parts to the letter. If for instance you want to place the radiator under the engine, beware to he right angle of 90 degrees, or else you will have an issue with the the radiator cowling. The fit of the parts is so accurate that there is no room for error, if you don't do it precisely as written it wil come back to haunt you further in the build. here are some pictures of the engine and radiator in place. As i will be building the pulverizer IV, i have started on the bombs as well, they only need a few stripes, and i have given them the same treatment as rick has done on his bombs for his p47 , to give them a bit of an "orange peel" look. that's it for now, more to come greetz, Frank 1
Trigger Posted August 25, 2014 Author Posted August 25, 2014 She's coming along great! Will be nice to go to school on when I get my Tiffie off the ground. Good to know about the Master 20mms. Personally I'm hoping they put out some turned brass fairings. I'll be all over those. Hello Doogs, Thanks for the comment, about the 20 mm canons, there is one snatch when you use those, not only you have to widen the fairings, but i have learned from another forum (Oops, what other forum?) from a guy who already placed the master canons, that you have a building issue when you try to put those guns in to the wing. The outer guns won't fit! This is because the plastic ones can bend a little so you can feed them through the frames, and the master canons are to rigid to do that. You can solve that by changing the mounting order as described in the manual, instead of placing the frames first, you now have to put the the guns in first, and then place the frames, so be warned! Greetz, Frank ( ps, i wil be building another Typhoon, but this time with rockets, and i don't now if i wil be using the master barrels again, perhaps like you i will wait until the aftermarket boys have come with a nice set of fairings ) No problem so far, canon fits like a glove, but then you have to put in another frame, and #%&@&, it doesn't fit!!, the canon is to rigid, so it can't just "flip" over the rear frame. I wil just have to work around that and change the moment in which the canon has to be place in conjunction with the second frame. It will take some tweaking her and there i'am sure. I will let you know when i am actually going to place the guns, to be continued< Frank

Recommended Posts
Create an account or sign in to comment
You need to be a member in order to leave a comment
Create an account
Sign up for a new account in our community. It's easy!
Register a new accountSign in
Already have an account? Sign in here.
Sign In Now