JayDee
-
Posts
3,265 -
Joined
-
Last visited
Content Type
Profiles
Forums
Events
Gallery
Everything posted by JayDee
-

HK Models 1:32 Mosquito bomber coming soon!
JayDee replied to JayDee's topic in Modelling Discussion
I also believe the two-seat Do 335 will come after the Mosquito, but that's for another day and another topic. -
HK Models 1:32 Mosquito bomber coming soon!
JayDee replied to JayDee's topic in Modelling Discussion
Ok, I believe that HK will supply parts for ALL these versions in the same box. That isn't guaranteed yet. It depends on logistics, but I chatted with Neil tonight, and this is the current intention. YES....First half of January. Things are subject to change, but for the moment, there is no reason to think it might be later, all going to plan. Tooling is pretty much done, pending small revisions which can take only a few days from CAD to tool. I envisage us having some sprues before the end of the year... -
Tally Ho! Despite the 1:32 Do 335B-2 being released soon, and the Do 335A-0 following in the not too distant future (already here with us at LSM!), HK Models has now painted in its plans for the release of the Mosquito (bomber version). There will actually be a few versions of this, and I can't confirm if several versions will be in the same box, but we thought you might like to see some renders of this great looking machine. For all you impatient types, pre-orders will be taken for this at Telford in November, and release looks to be happening in the first half of January 2015! I bet that took you by surprise! Any questions, ask away and I'll get you some answers. Enjoy!
-
Looking good Graham. Will the Spiteful be at Telford again?
-
1:32 F4U-1 cockpit Eduard 'Brassin' Catalogue # 632039 Available from Eduard for €41,25 Bunny Fighter Club price: €35,06 I'm actually quite surprised that it's taken Eduard so long to release a complete cockpit upgrade for the recent(ish) 1:32 Tamiys F4U-1 Corsair, especially with the bubble-canopy F4U-1A just around the corner. Still, it's probably true to say that the F4U-1 'Birdcage' will stay popular for a long time. Having seen the kit itself, and knowing the level of detail within the cockpit, it may seem surprising that a whole resin replacement is now available, but just wait until you see this! You really won't want to build that kit without first seeing the detail that this upgrade offers. Eduard have used their satin black cardboard package for this release, and before you open it, you can feel that it's quite weighty. When opened, you'll see that part of that weight are the four, double sided and folded instruction sheets required for this project, followed by SIX bags of resin which is cast in a combination of light grey, mid grey and clear, plus a small wallet with two PE frets and an instrument panel decal. Two casting blocks are packaged within the main box, un-bagged due to their delicate nature. The resin parts are protected within the box by pieces of soft grey foam, and the instructions are wrapped around these for extra security. This is going to be no quick project, and the FOURTY-NINE pieces of resin and around SIXTY photo-etch parts, are testimony to that. Strangely enough, I'm attracted to the bag with the two largest parts first, plus those loose parts: Eduard appear to use the darker resin for the thinner components, and here, these are the deeply curved floor and the upper side walls which are attached at a late stage in construction. Light grey resin is used for the forward and rear bulkheads. The detail within these key areas is stunning, with plenty of subtle detail hiding around the key structures and avionics/pipework/cabling. I have to say that some carefully applied washes and dry brushing will bring levels of detail out that would normally be overshadowed by the larger cockpit components. Holding the various parts together, you can see that a lot of effort has been made in ensuring that detail areas, such as constructional elements, line up perfectly, as was seen in the 1:48 Spitfire Mk.IX cockpit replacement set. There are a number of minor webs on the cockpit floor, underneath cabling and pipes, and this will need careful trimming away. This goes for the main, central web in the floor too. These thinner, fragile parts are connected to their casting blocks via thin resin walls which look easy to remove and clean up. You will fine smoothly recessed areas on the sidewalls into which the side consoles will neatly fit, so there will be no guesswork here. A number of avionics boxes and cabling are included too. The main, light grey components for the bulkheads are a detail painters dream; especially the forward bulkhead with its mass of pipes, wiring, junction boxes etc. My only real criticism of these parts are the quite thick casting blocks which will need some elbow-grease to remove and clean up. This is a very complex set and one which will bore the pants off you if I describe every single piece (many of which I couldn't' even put a name to), so from here, let's take a look at this bag by bag, with photos, using captions where appropriate. I will also highlight anything which I think you should be aware of. Wallet 2 Wallet 3 Wallet 4 Here we can see that Eduard have given the choice of two different instrument panels. A full resin part is supplied, including cast instrument detail. Those instruments also have dial detail, so unless you're into dry brushing and micro-detail painting, you might prefer the other option. That second option is a resin panel with only a minor amount of cast detail. A first layer of PE is then applied, and then the instrument decal. Finally, a PE fascia is overlaid to complete the panel. This will be painted, and onto this you will lay the instrument decal before then applying the fascia. In an unusual move, this fascia panel is supplied as base brass, and is not colour-printed. Wallet 5 Wallet 6 All resin parts have been thoughtfully connected to their casting blocks in the least obtrusive manner possible. Many connecting areas fall along assembly joints, or will be hidden from view, despite them not really being a problem anyway. Eduard has mastered the easy to remove system for casting blocks, with only those two bulkhead parts having blocks which will require some substantial effort to remove. Many parts are also quit e fragile-looking, such as various pipes etc, and again we see these parts cast in the darker grey resin, which perhaps is a little different and more resilient to being handled. No flaw can be found anywhere, such as breakages, bubbles or short cast. This is as good as it can possibly get. Photo Etch There are two PE frets in this set, with one being colour-printed, and the other in bare brass. The colour fret contains the seatbelt set which is composed of belts and separate buckles. I think I prefer the textile belts to these though, for a more realistic effect and weathering possibilities. The second fret holds the various instrument panel layers, with neatly etched bezels. A series of levers are included too, as well as pedal adjustment ratchets and various brackets. Etch quality is excellent, and small connecting points mean parts will be easy to remove from the fret. Instructions There is a LOT of work involved in assembling this, and an even bigger job in painting it, but that is fun, right? There's no doubt that Eduard have done an admirable job in presenting the various constructional sequences with relative clarity. Newly attached parts are shown in blue ink, whilst any surgery required to the host kit, is inked in red. There is indeed some surgery to perform, but this seems to be limited to the removal of the moulded structures (frames) within the cockpit, and no actual wall thinning is required. This should be a relatively easy project to install within the plastic. Colour reference codes are supplied for Mr Hobby paints, throughout construction. A useful parts map, with part numbers, is supplied on the rear page of the manual. To complete the cockpit assembly, you will need a little lead, tin or copper wire for various tasks. Conclusion In the UK, you can buy this set for £30 to £35, and whilst the Tamiya kit itself can be bought for around £90 to £95 (cheaper from Lucky Model etc), it seems like quite a high proportion of cost to spend on just the cockpit. Having said that, the sheer number of parts in this set, and how thorough it is, for me, is a perfect reason to do so. It seems incredulous that you could improve the Tamiya kit parts to such an extent that you'd scrap them completely, but this is exactly what this set provides, at the same time, offering a mammoth leap in detail over the original. For me, this set is a MUST! Very highly recommended My sincere thanks to Eduard for the review sample seen here. To purchase directly, click THIS link. James H
-
1:24 Grumman F7F Tigercat N7654C
JayDee replied to airscale's topic in LSM 1/35 and Larger Work In Progress
Christ! You bringing this to Telford? -
New F4U-1a EagleCals just in time for the Tamiya 1/32nd kit!!!
JayDee replied to judyc's topic in Modelling Discussion
YES!!!!!! Thanks Judy!- 7 replies
-
- 1
-

-
- corsair
- 1/32 tamiya Corsair
- (and 2 more)
-
Special Hobby 1/32 Hawker Tempest Mk.V (SH32049)
JayDee replied to petr@specialhobby's topic in Special Hobby
Maybe look at the Airfix part will help? This was no doubt worked from Arthur Bentley's drawing. I have a spare filter if you want me to send it? -
eduard 1/32 Meteor F.4 wheels for HK Kit
JayDee replied to benjaminsummerfield's topic in Aircraft Reviews
Nice review Ben, cheers. I have a set here, and know how good these are. -
1:24 Grumman F7F Tigercat N7654C
JayDee replied to airscale's topic in LSM 1/35 and Larger Work In Progress
You have my attention Peter! Ambitious and BIG! Thanks for showing all these individual steps. It's an education. -
Taming the Owl! Revell's He-219
JayDee replied to JeroenPeters's topic in LSM 1/35 and Larger Work In Progress
Looks so good. How many open tank areas along the spine? You made a big improvement on that gun pod area -
Just had a parcel from MPM. These included: 1:32 Special Hobby Bristol M.1C 'Wartime' 1:32 Special Hobby Bristol M.1C 'Chequers and Stripes' 1:48 Special Hobby Supermarine Walrus 1:48 Special Hobby Fairey Firefly 1:48 CMK He 177 Wheel bay set 1:48 CMK He 177 engine set Reviews soon!
-
Gaspatch Models 1:32 Spandau, Lewis , Vickers machine guns
JayDee posted a topic in Aircraft Reviews
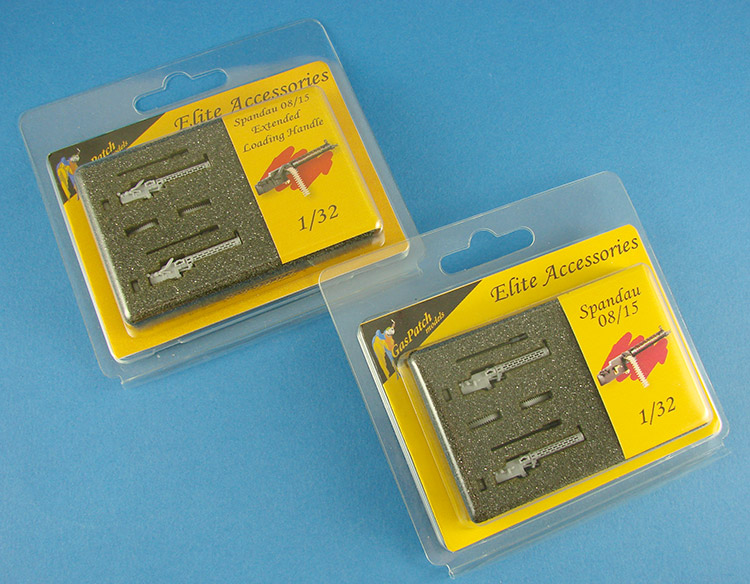
1:32 Spandau, Lewis , Vickers machine guns Gaspatch Models Catalogue # see article for code and price Available from Gaspatch Models After some simply astounding releases in both kit form and in aftermarket, Gaspatch Models had been relatively quiet for a period of time. Apart from the turnbuckle releases which this company is famed for, over the last year, we've reviewed their 1:48 Salmson kit, and also a suite of their 3D printed Lewis guns. It was this latter product which signalled the start of a new product range for Gaspatch, and the one we were certainly keen to follow up. Today, I'm pleased to be able to bring to you the very latest machine gun releases from this exacting company. The items we've received are: 13-32043, Vickers Colt-Built, €12,50 13-32046, Vickers British Hyland Type B Loading Handle, €12,50 13-32047, Vickers British Hyland Type E Loading Handle, €12,50 13-32056, Lewis Mk.II, €12,50 14-32060, Spandau 08/15 Extended Loading Handle, €12,50 14-32061, Spandau 08/15, €12,50 All gun sets are comprised of TWO machine guns to enable a complete port/starboard installation, and they are packed into attractive blister packs which contain a rendered image of the gun on the back. The delicate parts within are recessed into pieces of soft grey foam which has had the part shapes cut from the foam with heat, ensuring a snug fit and minimum risk of any breakage. To help further, whenever Gaspatch have sent me these sets, they also come packed into a sturdy cardboard box. Buy with confidence. Vickers Guns This machine gun has perhaps one of the longest service records of any machine gun ever invented, being used for almost 60yrs in various countries around the world. Conflicts that it served in range from the Great War through to the Korean War etc. The gun itself was a water-cooled, .303 calibre, medium machine gun which first entered service in 1912. Produced by Vickers, the ground-based version of this required 3 men to operate it in combat, whilst deployed to a team of six to help transport it around the battlefield, and then deploy it. The Vickers also had a good reputation for reliability, and was well liked by those who had to use it. The easy synchronising ability of the gun made it the standard gun to be fitted to both British and French aircraft during WW1, and the resultant airflow over the jacket, rendered the weighty water cooling system redundant. This of course greatly lessened the weight of the weapon too, again making it idea for air combat. Several slots were machined into the external jacket, increasing the effectiveness of air cooling. I have by no means requested every Vickers gun from the new range. There are actually NINE guns in this range, but felt that the ones that we've been sent are going to be very representative of this particular range of weapons. These particular sets are packaged into the smaller blister packs due to the smaller number of component parts per gun; and as stated there are two machine funs per packet. Each of these sets contains FOUR parts each. The Vickers gun itself is a single piece item, and there are of course ammunition feeds for both guns. Differences between the guns are quite subtle in most respects, but still identifiable. The Hyland Type E version has its loading handle pointing slightly downwards, towards the pilot's abdomen, ensuring that cocking the lever looks a little more natural, despite probably needing a little more moment force than the others. Each of the other types has their loading handle pointing slightly skyward, and each type has a different handle grip. It is also noted that the muzzles across these guns are slightly different too, depending on their manufacturer. Gun detail is simply jaw-dropping. Those ex-water cooled jackets have their air-cooled slots beautifully represented, and the loading handles actually look operable. What's more, the jackets on these are hollow, and there is actually the entire barrel length within them. That is just INCREDIBLE! Only 3D printing in ultra-high resolution would allow such a feat of production. The ammunition feed to the breech is also hollow, all the way through. Also visible are the mounting lugs with open bolt holes, and constructional riveting. Gorgeous, is the only word I can use to begin to describe these guns. Production is in light grey plastic. Lewis Gun The Lewis Gun was a light machine gun which entered service at the start of WW1, and continued in operational use until the early 1950s. It was also known as the Lewis Automatic Rifle. A wide cooling tube was usually fitted around the barrel when used on the ground, but this was omitted on aircraft due to natural airflow air-cooling. This gun, American in origin, was also of .303 calibre, and ammunition was fed into the chamber from a cylindrical drum which could be removed and quickly reloaded. Continual operation of the gun relied on the expanding propellant gas from the barrel, driving a piston which drove a cam track to the firing bolt, allowing for continual fire. The Lewis was also the first fixed machine gun to be fired from an aircraft, and was extensively used throughout the Great War, both on forward firing mounts and via cupola-ring mounts for observer/gunners. This release occupies on of the larger blister packs, containing EIGHT parts. These are two guns, two spent cartridge bags and four ammunition drums. The Lewis could take two drums of different capacities, but all four of these look identical. I don't know if the drums themselves looked different externally, but Gaspatch have indeed supplied those extras. Each drum, highly detailed, also has a superb leather strap handle! The guns are again exquisite. They contain what can only be described as filigree detail, including the sighting mechanism, wooden grip, hollow muzzle and textured wooden pistol grip. A mounting pip sits on top, onto which you fit the ammunition drums. A canvas spent shell bag with metal chute, is included as a separate part which just needs affixing to the side of the gun. Spandau 08/15 Without a doubt, THE name in German aircraft-borne weapons, along with Parabellum. The Spandau was probably the most numerous air combat weapon employed by the Germans in the Great War. Known as the MG08 (Maschinengewehr), the type was actually the standard German machine gun in WW1, and a lighter and slightly more compact version, the MG08/15 was deployed in large numbers. This gun had a calibre of 7.92mm, and the aircraft-specific version had a cooling jacket with a large number of slotted perforations, creating an extremely cool-firing weapon, Aircraft versions of both the MG, known as IMG08 and LMG08/15 were also now the standard weapon for German aircraft, as well as infantry, and were usually deployed in pairs, except for some Eindecker machines which carried just one or even three weapons (latter being prototypical). Both Spandau sets are of the 08/15 format, and both occupy the larger blister packs. Each set also comprises EIGHT parts. These are two guns, two barrels, two padded cushions, and two ammunition feeds. The guns themselves are essentially the same except for one type which has an extended loading type handle which was seen on some installations. It's hard to talk about the gun itself, without using many superlatives. Please remember the open, slotted nature of the Spandau cooling, and to see this replicated in the most amazingly fine detail is something I'm still getting used to. The gun jacket incorporates the forward stiffening plate and cross-reticule gun-sight. A hole exists here for you to slot the barrel through, with integral open ended muzzle. Loading handle mechanism again looks as though it would operate, and if this was regular plastic, this would need many separate parts to create the same effect that these guns have. A mounting bracket is also included as part of the gun, and detail, overall, is probably the highest of seen of any contemporary item. All parts across all sets are produced in the same colour plastic, except for the barrel/muzzle assembly in the Spandau sets. These are produced in dark grey plastic, with open, flared muzzle. Threading these into the barrels is very easy too, with just a little fiddling to make it locate into the hole within the rear of the gun. The remaining parts are for the cushioned pads at the rear of the gun, protecting the pilot's head from striking the metal chassis, and also the very detailed ammunition feed belts. Instructions All sets have a simple set of rendered illustrations within, showing assembly and general painting for the guns. Whilst there isn't too much variety in terms of colours to use, always check any online references for minute detail which you can apply with your paints. Conclusion Each time I see Gaspatch's latest releases, I'm bowled over by the finesse and attention to detail that they seem to cram into such small parts. Production of these sets is second to none, and they are probably amongst my favourite aftermarket sets for WW1 aircraft. Just absolutely astounding, in every aspect. These sets cost €12,50 each, so they aren't cheap, relatively, but what they add to a model, with the absolute minimum of fuss, has surely got to be worth a few of your hard-earned coin. Very highly recommended My sincere thanks to Gaspatch Models for these review samples. To purchase directly, click the links in the article. James H
-
Rotachute Mk.I: Raoul Hafner's aircraft Fly Model Catalogue # 32004 Available from Hannants for £19.30 Raoul Hafner was an Austrian engineer who left his home country in 1933, and continued his developmental works on rotary winged aircraft in Britain. Raoul's work included a system to deliver a combat-ready soldier, accurately to the battlefield. This became known as the Rotachute, and at a time when parachute silk was in short supply, the British establishment took the Rotachute project seriously, and ordered trials of this rather unique rotary kite. Hafner, despite being Austrian and an ex-internee, was allowed to continue this work during wartime, with trials of the Rotachute being undertaken at RAF Ringway (now Manchester International Airport). The Rotorchute Mk.I comprised a tubular steel framework, control frame, skid undercarriage, self-inflating rear fairing, and a mount for a machine gun. Unfortunately, the type never saw any service, and never left the trial stages. Whilst the type was never deployed, this seemingly insignificant aircraft did help to further our knowledge of rotor-driven aircraft, and Raoul Hafner's contribution to this area of aviation research, should never be understated. The most obvious thing I see with this kit is that the box is seriously too big for this diminutive model. A nicely illustrated box artwork depicts the Rotachute flying alongside a Miles Magister aircraft, having been presumably towed by it. This side-opening box has further images of Fly releases on its side (including 2 further Rotachute kits), and the rear of the box serves as your painting guide. Here you can see that the Mk.I P1, and Mk.I P2 can be chosen from for your finish. Inside the box, a single tan/fawn coloured sprue contains THIRTEEN parts, and also a small fret of photo etch, with a further SEVEN parts. Yes, that is it. No decals, but of course, you also get the simple instructions sheet. This is probably the simplest 1:32 kit I've ever had the privilege to see. PLASTIC It really is important with this model , that you begin your paint job almost as soon as you start to build. The nature of the plastic shell fuselage really does dictate this. Externally, the fabric covered framework looks very authentic, and will look excellent with some modulation painting. Internally, there is no detail, but you may wish to add a little of your own, as I'm pretty sure you can peek inside there. A couple of ejector pin marks will need to be removed first. Moulded separately are the stabilising fins, but a delicate engraving on the exterior shows where these must fit. Being a short run kit, it's common to find no locating pins, and that is the case here. All other parts on the sprue are also very nicely moulded, including the forward pilot framework, seat cushion, paddle rotor, skid and supports. In fact, that is it! Flash is very minimal and ejector pin marks don't trouble any of the parts. With the frames, you will need to thin these a little and make them a little less clunky, but that is it. PHOTO ETCH To stop the pilot falling backwards into the shell, he has a fabric strap backrest. You will find that here, on this fret, along with a set of shoulder and lap belts. Detail on these is perfectly adequate for what they represent. Two parts on here are not to be used, and are not shown in the instructions. Looking at the images of the two versions on the rear of the box, there appears to be a part protruding from the upper forward frame, and both machines definitely will use another unidentified part which I think may be something to do with the mount of the machine gun (Barrel?). Etch quality is very good, with small connecting gates that will make it easy to remove the parts. RESIN Only one part is supplied here, and this is the machine gun. Cast in yellow resin, detail is sharp throughout, and contains an amazingly tiny trigger and an open muzzle end. The part is connected to its block via a thin, perforated resin wall, and you'll have no difficulty in removing this. Use of the gun is also optional. INSTRUCTIONS Generally, these are easy to follow, and colours are referenced, although not actual codes. Diagrams are in line drawing format. It's a little disappointing that the location for the last two PE parts is not mentioned, nor is the MG installation image very adequate, but I imagine that a quick trawl of Google will yield the images you need. Conclusion A very simple, neat and attractive kit which could well be one of those 'mojo restoring' projects that we all sometimes yearn for. Construction is simple, and this version doesn't even contain decals, unlike the other releases which we hope to review here in the next month or two. The only tidying up you'll need to do is on the frameworks, and I also suggest you look at the angle of the rotors when stationary. They may actually droop a little, so you would need to factor this into your build. Highly recommended My sincere thanks to Fly Model for this review sample. To purchase directly, click THIS link. James H
-
Revell Junkers Ju 88D-1 in US markings.
JayDee replied to JayDee's topic in LSM 1/35 and Larger Work In Progress
This will be firmly wheels down How would you see those wheel bays in flight? -
Revell Junkers Ju 88D-1 in US markings.
JayDee posted a topic in LSM 1/35 and Larger Work In Progress
Hi all, Recent months on LSM haven't been too kind to me with maintaining build logs and having to postpone and in lots of cases, cancel entire projects. If you expected to see that Fokker D.VII, it won't happen yet. If you were waiting for the Me 410, it won't happen yet. If you were waiting for the 1:48 He 219, it won't happen yet. I think you get the idea. My time isn't running in a linear manner, and commitments have often seen things constantly shift. In an attempt to break deadlock, I'm rolling a project I've had in the sidelines for a long time; a Junkers Ju 88D-1. This is essentially an 88A-4, but with a few very minor external changes. The machine's main differences are in areas we simply won't see. Where the real change here is that this machine will carry AMERICAN markings, and odd ones too. Camouflage is actually of the RAF desert type, with an azure blue underside. Check out that US flag too! I'll use the Revell Ju 88A-4 kit, along with Eduard's BIGED set and Brassin resin wheels. Profimodeller will supply the tail wheel and main gear wells. Exposed fuel tank will be from CMK. I'll ask Mal to make masks for this, as 1:32 decals don't exist. I hope you like it. -
Model Expo 1/16 Sopwith Camel
JayDee replied to crazypoet's topic in LSM 1/35 and Larger Work In Progress
Now THIS is interesting. I have the 1:16 Albatros, from the same company, in my stash. I watch with interest. -
Very cool little kit Petr!
-
Stuka B2 (1/24) Winter Camouflage
JayDee replied to Layton's topic in LSM 1/32 and Larger Aircraft Ready for Inspection
How did you do the white distemper finish? -
Very atmospheric. I absolutely love it. Always wanted to do something like this but have no idea where to start. I hope you can educate me a little.
-
I might be able to help with some images of a Bf 109E I built a long time ago. Perhaps these are the ones? STAGE 1: Paint the interior using the regular base coat colour. In this care, RLM02 STAGE 2: Mix a little black into the base colour and airbrush around the corners and edges of the various parts. Next, add a little white to some new base colour, and airbrush the centres of the open areas. Thin your paints a little more than you would with your first base colour. STAGE 3: Using a more heavily diluted base coat, mist over the parts and subtly blend them together. STAGE 4: Paint and wash your cockpit as normal Does this help?
-
Taming the Owl! Revell's He-219
JayDee replied to JeroenPeters's topic in LSM 1/35 and Larger Work In Progress
These belts just look so good. You can scrunch them a little too and open them out again. They look more natural then. -
1:35 Rheinmetall-Borsig Flugabwehrrakete Rheintöchter R-III CustomScale Catalogue # 35019 Available from CustomScale for €89.00 Germany produced some of the weirdest and not-so-wonderful weapons of the war, and most certainly some of the most frightening, in terms of possibility. There's truth in the fact that adversity influences innovation, and whilst some nations still operated biplanes in 1939, it's a chapter which ended with jet and rocket flight, and ultimately with the atomic bomb. On the positive side, many of those innovations, borne out of desperation, are still with us today in some form. Technologies which Germany played with in terms of aircraft design can be seen in modern military aircraft, and even in commercial airliners. Looking purely at the military side of things, the surface to air missiles which are a common weapon in today's military arsenals can be traced directly back to their origins in Germany's experimental weapons trials which were conducted throughout the war. Enter the Rheintöchter. Whilst the name 'Rhine Maiden' might have sounded quaint (derived from the Wagner opera), its use was to be far more sinister. Whilst not actually used in anger, the very premise of the weapon would have shaken Allied bomber crews to their core, had they been deployed. The Rheintöchter was a multi-stage, solid fuel rocket which was designed to launch from ramps and gun platforms, and even possibly from a launch plane. Whilst the rocket had many test firings, it was thankfully never used in anger, although its concept heralded in a whole new deadly era in weapons technology. The fact that CustomScale have now released the Rheintöchter as a resin kit goes to prove there's very little that escapes the keen eye of the resin manufacturers in our hobby. I must admit that when I was looking at the German experimental rockets at RAF Cosford, it never dawned on me just how cool these would be if produced in kit form, but now I am about to find out. CustomScale's Rheintöchter R-III kit comes in a sturdy, top-opening corrugated card box, with an attractive colour label on the lid, depicting the finished model. Very attractive it looks too. Inside the box, four zip-lock wallets contain all of the smaller resin parts, whilst there are five larger components, individually protected by a bubble-wrap sleeve. Don't let the relative simplicity of the finished model deceive you. There is a reasonable amount of construction to negotiate here. The first thing I looked at was the set of instructions, which we'll come to later. I found these a little lacking, to be honest, and I do think you need to consult the box imagery in order to clarify proceedings. The first bag I come to contains the Rheintöchter's solid rocket boosters which are attached to the sides of the main rocket body. These are individually cast, with sharp, circumferential rib detail. Several casting blocks contain the booster's rocket nozzles, which are neatly cast with nice thin walls. There are four main fins for the Rheintöchter, and two of these appear to have a streamlining fairing on their tips. I might be wrong about the function of these. Detail, where applicable (fins were wooden on the actual rocket) is good, but my sample suffers from a deep scratch on one fin, and that of course will need to be filled and sanded back. Other parts included in this packet are for the forward stabilising fins, rocket launch arm parts, a couple of unidentified blocks which look like casting blocks without parts, and a number of other small parts; also unidentified. I will need to contact CustomScale to clarify what these are. The remaining packets contain an absolute mass of resin parts which construct the aiming and targeting equipment, as well as the elevating ratchet and hinged brackets which allow the platform stabilising arms to be deployed or folded away. Indeed, you can see. A number of parts on my sample seem to have remnants of rubber mould on them, BUT it also appears that I have been given what appear to be a second set of duplicate parts, and these are debris-free. I can't see any other reason for multiples, and it certainly seems that way, with additional parts being included where I know only a single element will be used. Whether this set is directly from the shelf, or put aside for review, it's good to know that CustomScale accept that some parts might not have been to standard, so included extras in there for you to work with. No such extra parts are given with the larger, bubble-wrapped components, but having said that, there is no casting debris to be been here. You will, however, need a large piece of abrasive paper. The base of the unit, into which the two folding stabiliser arms fit, has a full span casting block on the underside of the part, and this isn't even. With some care, this can be neatly ground back to the nicely defined lower edge ridge. There are a few minor bubbles to fill on this 'trailer' format part, and you'll need to touch them up a little with some filler. The rocket launching arm/ramp is really very good, with domed rivets on the exterior and structural elements within, even though you won't easily see this when built. There is a little damage to one of my parts, with a small section of resin missing, but I can replace this very easily. Both side faces of this arm are held apart by a top cap strip. Casting of these parts is nice and thin, and detail is really very good. Quality of the rotating base which supports the firing ramp, is a little hit and miss. Detail across both parts is very good, with some flash to remove here and there. One external face of one part does have some crazing in it, and it's perhaps a little more than micro-filler/primer would cope with. What makes this a little more difficult is the detail in and around this area. I've mentioned this to CustomScale and they will send a replacement with my next review samples package. No qualms, and very happy to sort it out for me. Onto the last two pieces. One of these forms the pivot base which separates the two arms holding the firing ramp. Detail here is minimal by design, and one of the locking clasps has broken away. The detail there is very fine, so I'm not too surprised. As pivot detail is present on both upper and lower sides, the casting block is connected to the edge of the part via a resin wall which needs cutting away. Finally, we have the main event; the body of the Rheintöchter rocket itself. This is cast as a single part, from the warhead down to the exhaust. The latter is cast hollow, and to a reasonable depth too, and detail over the whole part is very good, with the various hardware attachment parts, lugs and stage section panel lines being very neat. A very reasonable job has also been made of the seams too, with only a small length of the rear seam needing more work that the rest. I have previously said this, but the instructions are the real weak link here. Several sheets of A4 paper are included which contain rough, hand-drawn sketches of part assembly, and don't really seem to take into account the whole parts count. There is also no text notation on them, and the drawings aren't very clear when it comes for accounting for all the resin you get. I would check the box image against any reference photos you may be able to find online. Conclusion Whilst some of my text seems to bemoan the lack of real instruction and some damage to parts, in the whole, this is a very nice kit of a very unusual subject. That in itself makes this one of those models which you simply have to build at some point. CustomScale have been very helpful when it came to the defects I found here, and I imagine they will be equally as helpful with regard to further constructional information. Resin casting quality is above average, and is indicative of smaller resin manufacturers. It's by no means perfect, but if you are tackling something like this, I will assume that your skill level will allow you to overcome any hurdles with relative ease. Recommended My sincere thanks to CustomScale for the review sample. To purchase directly, click THIS link. ***Keep an eye out on the CustomScale site, as their e-shop will be online soon. Email them for details about purchase*** James H
-
Taming the Owl! Revell's He-219
JayDee replied to JeroenPeters's topic in LSM 1/35 and Larger Work In Progress
Looks like the etch parts are some of the better items in that set. Looking sharp so far -
Looking sweet Mal. How long before you nail the mask sets? I think I am possibly two weeks from paint on mine. I'll be doing the shark-mouth machine, and it'll be sitting on the Airfix stall at Telford, so it'd be good to have used your set for that build.