

Trigger
-
Posts
211 -
Joined
-
Last visited
Content Type
Profiles
Forums
Events
Gallery
Everything posted by Trigger
-
i agree with all of the above, BUT, i am a real 1/24 scale fan, and over the years i have seen a slow but constant growing of choice in 1/24 scale models, Airfix certainly were the market leader in such models, but trumpeter has a nice scale of 1/24 scale models also, and is still improving. The only downside is the price of those models, i can get almost 2 1/32 scale models for the price of one 1/24 scale model. But that is not going to discourage me in buying them. Airfix has now certainly set the standard with their new release of the typhoon, And i can't wait to see the birth of more 1/24 scale in the future. The aftermarket guys for instance have done a great job on the Airfix Mosquito, look at the alley cat conversion sets available for the Mosquito, Montex masks, master gun barrels and machine-guns, you name it and it's al there. The possibility's for improving your model are numerous. Indeed the next five years will be very exciting, and i can't wait to be a part of that, Let's start building!
-
Hawker Typhoon 1/24 "Pulverizer IV"
Trigger replied to Trigger's topic in LSM 1/35 and Larger Work In Progress
Thanks Jeroen, I'll be watching your build on the he219 too, love those german aircrafts, i was working on a me109 g10, but then the typhoon came along, so i put that on ice for a while, Frank -
Hawker Typhoon 1/24 "Pulverizer IV"
Trigger replied to Trigger's topic in LSM 1/35 and Larger Work In Progress
Hello George, I have decided earlier in the build to use the master turned brass barrels to replace the plastic ones in the kit. So far no problem, but when you try to push the master barrels through the holes in the frames they get stuck between two frames because they are too rigid, and the plastic ones can bend just enough to fit through the holes. I have dry fitted the barrels now and i have found a way to place them, but that means i must dry fit the entire gun bay in to place and glue them into place afterwards. meanwhile i am now working on the all the loose parts of the wing and the undercarriage, pictures soon to follow, greetings , Frank -
Great review James, And beautiful and very sharp pictures too, they really do this kit justice. From experience i must say that you are right what the manual is concerned, you really have to study it and look twice before you start assembling. You also have a point with the leading edge lights, none of the aircraft versions seem to have them? i only know that when the Typhoons were being equipped with rockets, they removed the leading edge ligths because they were afraid that they could catch fire from the exhaust flames of the rockets. So i guess that Airfix thought that they should give you two options, with or without leading edge lights. very impressive review, Greetings, Frank
-
Hawker Typhoon 1/24 "Pulverizer IV"
Trigger replied to Trigger's topic in LSM 1/35 and Larger Work In Progress
Thanks Cees, Your build with the spitfire is also coming along nicely, (one can never have enough Spitfires), i've got some in my stash as well, for future builds, greetings, Frank -
Hawker Typhoon 1/24 "Pulverizer IV"
Trigger replied to Trigger's topic in LSM 1/35 and Larger Work In Progress
Thanks for the comment Guy, greetz, Frank -
Hawker Typhoon 1/24 "Pulverizer IV"
Trigger replied to Trigger's topic in LSM 1/35 and Larger Work In Progress
Hello Doogs, Thanks for the comment, about the 20 mm canons, there is one snatch when you use those, not only you have to widen the fairings, but i have learned from another forum (Oops, what other forum?) from a guy who already placed the master canons, that you have a building issue when you try to put those guns in to the wing. The outer guns won't fit! This is because the plastic ones can bend a little so you can feed them through the frames, and the master canons are to rigid to do that. You can solve that by changing the mounting order as described in the manual, instead of placing the frames first, you now have to put the the guns in first, and then place the frames, so be warned! Greetz, Frank ( ps, i wil be building another Typhoon, but this time with rockets, and i don't now if i wil be using the master barrels again, perhaps like you i will wait until the aftermarket boys have come with a nice set of fairings ) No problem so far, canon fits like a glove, but then you have to put in another frame, and #%&@&, it doesn't fit!!, the canon is to rigid, so it can't just "flip" over the rear frame. I wil just have to work around that and change the moment in which the canon has to be place in conjunction with the second frame. It will take some tweaking her and there i'am sure. I will let you know when i am actually going to place the guns, to be continued< Frank -
Hawker Typhoon 1/24 "Pulverizer IV"
Trigger replied to Trigger's topic in LSM 1/35 and Larger Work In Progress
i am almost done with the engine, it only needs some detailing and weathering. it wasn't easy to get al the hoses and pipes in to place, and for anyone who want's to build this one, i really suggest to read the manual a couple of times, and follow the instructions about positioning the various parts to the letter. If for instance you want to place the radiator under the engine, beware to he right angle of 90 degrees, or else you will have an issue with the the radiator cowling. The fit of the parts is so accurate that there is no room for error, if you don't do it precisely as written it wil come back to haunt you further in the build. here are some pictures of the engine and radiator in place. As i will be building the pulverizer IV, i have started on the bombs as well, they only need a few stripes, and i have given them the same treatment as rick has done on his bombs for his p47 , to give them a bit of an "orange peel" look. that's it for now, more to come greetz, Frank -
IAF F-16 "Barak" Block 40
Trigger replied to Funkyzeit's topic in LSM 1/32 and Larger Aircraft Ready for Inspection
Great build, Rookie uh?, hmm, yeah right! Looks great, love the weathering and the cockpit, nice detail, Looking forward to seeing more of your work, Greetz, Frank -
Hawker Typhoon 1/24 "Pulverizer IV"
Trigger replied to Trigger's topic in LSM 1/35 and Larger Work In Progress
Hello folks, A little update on my typhoon build, haven't had much time for the build, but i have done some sub assemblies en i have progressed with the pilot's seat and the engine, here are some pics i have used the rb productions seat belts for the pilot's seat, and i am in the process of painting all the bits and pieces of the engine, and believe me, there are plenty i'am also weathering the engine a bit before all those bits and pieces are mounted and i will weather them as i go along. i have also used the rb radiator grilles as you can see on the following pictures. I have used a mix of oil paints to weather the radiator a bit, but the rb set is a real improvement on the radiator set of the kit. also started on painting the exhaust stacks, i first sprayed them with flat black, and then started with a mix of paints to give them a "burnt" look, still working on that to get it right though, they will need another few layers to get them right. that's it for today, more to follow -
Airfix 1/24 Typhoon - airscale Instrument Panel
Trigger replied to airscale's topic in Modelling Discussion
wow, thats looking good Peter, And it is also a good tutorial for the ones that are going to build the Typhoon. I am building one right now and can't wait to use your set on my build. i'll be following this build, Thanks for sharing, Frank -
just got an e-mail from profimodeller, they will produce 8 replacement rocket bodies for the set that i have bought, so with these my rockets should have the same length as the ones in the kit. we will wait and see, anyway they responded to my mail within a day, and if they do what they promised, than everything should be okay again. to be continued,
-
forgot the photo,
-
Hello Nick, I have read the article in Wikepedia, and indeed it says that the length of the thing would be 140 cm. But when you look at the picture and you see those men screwing on the rp head, then either we had a ground crew that aren't any taller than 130 cm or wikipedia has got it wrong? The length of the rocket exceeds the length of the people working with them. I don't believe those guys were that small. i have looked at all the reference info i could find, lot's of pictures but no actual measurements, so i guess you are right that unless someone takes a tape measure and goes to a museum or so, we will never know the actual length of the thing. Anyway, i won't be using the profimoddeller's rockets, looking at all the pictures i've got than they are definitely to short. perhaps in the near future someone will know the answer. Greetings, Frank
-
No i have not, i have been taking a goof look at the rockets, and it is just a matter of changing the length of the tube from the explosive warhead to the fin of the rocket. the Airfix Rockets are 77mm in length, and the profimodeller's are 65 mm in length. The fin of the Profimodeller's rocket is also a tiny bit smaller. They do look better than the plastic ones in the kit an (if the length is adapted) could be a welcome aftermarket item. Wil be dropping them a line and, and i'll wait for their reply, Frank
-
Looking great!, Just got your e-mail that they were send to me, am looking forward to using them in my Typhoon build. Right in time because i started with the cockpit area. This set is a real good upgrade compared to the kit decals, and i'm looking forward to using them. Thanks for the good news, Frank
-
1:32 Hasegawa P-40 E "Dottie II"
Trigger replied to rieser's topic in LSM 1/32 and Larger Aircraft Ready for Inspection
WOW! I am afraid i've got to put in a lot of hours on my airbrush before i will even come close to this. The weathering looks great. This is exactly what is so great about this forum, that is that we all learn from each other, il be putting some of your techniques in to practice on my own builds, and hopefully, someday in the near, (or not so near) future i will be able to stand in the shadow of this build. great result! Frank -
Hawker Typhoon 1/24 "Pulverizer IV"
Trigger replied to Trigger's topic in LSM 1/35 and Larger Work In Progress
Thanks for the comment John, Your builds look pretty good to, i see that you are a real P51 fan. And you are absolutely right, the P51 was, and is still an amazing aircraft. Maybe you are right not to start the build of your typhoon straight away. I am sure that the aftermarket guys will step in and make some nice photo etch additions. the radiator grilles from RB productions for instance are a nice example. I am now making some sub assemblies for my Typhoon, and i am waiting for my cockpit decal set from Aeroscale so i can move on with the cockpit area. i'll try to keep up with the build, so i can post an update regularly, Greetings, Frank -
Well Nick, I have received my shipment of rockets in 1/24 scale from profi modeller, and i must say they look pretty good, look for yourself. Nice manual with clear instructions, so i assembled one of those rockets, looks rather good. so i took a rocket from the kit and glued that together so i could compare the two.................................................. HELP!!!!!!!!! MY ROCKETS HAVE SHRUNK!!!!! Am i wrong or does the package say that these are in a 1/24 scale?.... I am afraid you are right about your scepticism , so i would advise you not to buy these, they might do for a 1/32 scale perhaps ? greetings, Frank
-
1:32 Hasegawa P47D "Slick Chick"
Trigger replied to rkranias's topic in LSM 1/35 and Larger Work In Progress
oops! pushed the reply button to soon. As i was saying, your build looks fantastic, and i wil certainly buy my self a couple of those punch and die sets from RP toolz! It is just by that sort of detail that makes a model to stand out. Will be following this build with interest ! Frank- 118 replies
-
- 1
-

-
- Panzer Busters
- 368FG/395FS
- (and 3 more)
-
1:32 Hasegawa P47D "Slick Chick"
Trigger replied to rkranias's topic in LSM 1/35 and Larger Work In Progress
Hello Rick, I am very much impressed with the detail of your scratch building, I- 118 replies
-
- 1
-
-
- Panzer Busters
- 368FG/395FS
- (and 3 more)
-
Hawker Typhoon 1/24 "Pulverizer IV"
Trigger replied to Trigger's topic in LSM 1/35 and Larger Work In Progress
Hello Rick, Thanks for the comment, but what you are doing on your build with "slick Chick" is also very impressive!, i wil build my Typhoon in the variant with a bomb under each wing, and i am very much impressed with the build of your bombs for your P47D, How did you get your bombs with a sort of "orange peel" surface, i absolutely love that finish, and it really looks like the real deal. Hoping to hear from you, Frank. -
Hawker Typhoon 1/24 "Pulverizer IV"
Trigger replied to Trigger's topic in LSM 1/35 and Larger Work In Progress
I don't know, all i know is that there were 2 types of hispano guns in use, the mk II and the mk V , The mk V had a shorter barrel length. The early " car door Typhoons" had no barrel fairings, while later bubble top versions all had barrel fairings as seen on this kit. They were all ( as far as i can research ) mk II hispano's. -
well, i will bite the bullet in this, i have just ordered a set, and the shipping costs are 2,58 euro's. I will just have to wait and see if i'll get any additional charges for the import. so i will "do the honours" and will let you know if the set is worth the purchase. probably for this amount they won't charge me extra i guess. (Just received a set of Radu Brinzan's radiator sets's, and they look stunning!) If you want to improve your typhoon, than i would buy them immediately. Frank
-
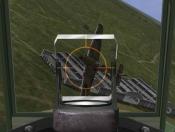
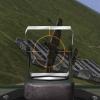
Hawker Typhoon 1/24 "Pulverizer IV"
Trigger replied to Trigger's topic in LSM 1/35 and Larger Work In Progress
Here's another small update on my Typhoon project, Having seen the Hispano gun barrels of the kit where you have to drill a a 0.9 mm hole at the business end of the gun, i decided to use a set of air master gun barrels originally ment for the 1/24 mosquito. i still had these in my stash, and i thought they might come to good use on this kit. The length of the barrel is exactly the same for both mosquito and Typhoon, the only difference is the recoil spring that is placed 7mm further backwards. This is is of no consequence for the build, the only problem is the the gun fairing witch is a bit to small to fit the gun barrel. i had to file the inside of the fairing to make the space needed to fit the barrel. The gun fairings wil become a bit thin, but i think it is well worth the effort, because those guns look so much better with the brass ones in place. Here are some pictures of the modification. And also thanks to you all for the responses on this build, That is it for today, Greetings, Frank