

Trigger
-
Posts
211 -
Joined
-
Last visited
Content Type
Profiles
Forums
Events
Gallery
Everything posted by Trigger
-
1/32 Tamiya Spitfire MkIXc WD-W EN354
Trigger replied to Mauricio_1971's topic in LSM 1/35 and Larger Work In Progress
Great looking Merlin, definitely has the the look you are aiming for, looking forward to your progress on this build, Greetz, Frank -
and it does, great, now Photobucket can ......................... (i dare not say). greetz, Frank
-
Just testing if this works.....

-
Revell bf 109 g6 Erich hartmann
Trigger replied to coolboxx's topic in LSM 1/35 and Larger Work In Progress
Wow, great looking G6, love the airbrush work! -
Ta-152H-0 awaiting restoration at the NASM
Trigger replied to JeroenPeters's topic in LSM 1/35 and Larger Work In Progress
Wow, love this build, and those detail pictures from the real thing are fantastic ! It wil be quite a challenge to give the fuselage and engine the right look. Really looking forward to that, Frank -
Hawker Typhoon Cardoor 1/24 Airfix
Trigger replied to Trigger's topic in LSM 1/35 and Larger Work In Progress
Hello, Thanks everyone for the comments, i haven't done a lot i must admit, managed to get the engine in and i am detailing it a bit further, I will leave the portside uncovered and the starboard side covered. Also i will show one gun bay opened and will detail that further, (bought the excellent eduard hispano canon set to do this, the detail is stunning) also i am in the process of making my own spark plug leads, so i can show this on the port side as if the spark plugs are being replaced. (they really didn't have al long service life, i believe they had to be replaced after every thirty hours of flight), imagine replacing 48 spark plugs regularly, those ground crews really had a hell of a job keeping those aircraft in the air. Making spark plug leads is pretty labour intensive, first i punched out 48 hexagonal nuts, because the leads end up in a sort of jacket with a nut on top and that is being plugged on to the spark plug. I managed to buy spark plugs from rb motion and i have placed them in to the sabre engine. Also i have further detailed the cockpit withe the side control panels using the eduard pe set.Normally i wouldn't do this, but with the car door version much more of the cockpit is visible with the door opened, it would be a shame if this would go to waste. I have alos opted for some white metal landing gear oleos, as the ones in the kit are not strong enough for my taste and can snap of easily. enough said, here are some pictures, Also working on the electrical wiring using braided hoses with lead strips to clamp them in to place, still a work in progress. When you compare the eduard parts versus the kit parts, than you can see the difference Well that's it for now, hope you like it, Frank -
Hawker Typhoon Cardoor 1/24 Airfix
Trigger replied to Trigger's topic in LSM 1/35 and Larger Work In Progress
Hello, Some progress made on the Typhoon, basically everything is the same as the bubble top version, except for the pilot seat, I have closed up the hole that keeps the oil tank in place in the firewall, now the fire wall is nice and smooth looking, also closed the cross hole to align the engine against the firewall, now i have a little bit of clearance to play with when mounting the chin radiator. Also placed a few parts on the firewall sooner than the manual says. Normally you should place those parts with the engine in place, but by then it is very hard to place them. Also i gave the firewall a wash with some oils Weathered the pilot's seat, For this build i used the Yahu instrument panel, looks very good in my opinion, i just made the cables at the back of the panel with some lead wire, and beefed the panel up with some black plasticard, otherwise it would loo a little thin. I also bought an interior upgrade set from Eduard especially for the car door version, The set includes the window regulator handle that is not provided for in the kit and some door frames in photo etch, I am going to build the version with the white nose, but because this is an early version of the Typhoon, it didn't have the fishplates on the tail section for reinforcement, so i have to remove them from the frame, Fish plates on Fish plates removed Described an riveted, not entirely satisfied with the result, so i wil go over that again, and after a bit of primer and sanding it will look allright (although sanding in that area is a real challenge with all that detail and panel lines) I am now working on the rest of the cockpit, the throttle box, steering column etc. I have also bought the upgrade set from Eduard for the landing flaps, since i am going to build it with the wheels and flaps down. Well that's it for now, Let me know what you guys think, every comment is welcome and appreciated, Cheers, Frank -
Look what landed at my doorstep! The long awaited Cardoor version of the Typhoon. This one will be my new work in progress for the coming months. Couldn't resist to place its bubble top brother in front of the box. Lets see what is different in the box....... No more distortions in the clear parts or cracks, looks very good. The car doors are also on the clear parts sprue The extra Z sprue containing all the parts that are different from the bubble top version The hispano guns can be mounted either with or without the protective shrouds. The cockpit is on the inside a little different, and more is visible now, so that is certainly an improvement if you want to show parts of the cockpit. There are various versions of the canopy possible, i still have to decide what version. So it is time to commence with this build and add a Typhoon to my "squadron". iI will try to do regular updates on this build, lots of the construction is very much the same. I have ordered some aftermarket stuff from Eduard for the interior, because now more will be visible through the car door, and also the Master Hispano's, will look great without the protective shrouds. Well, i will get some styrene on the table now and start the build! That's it for now, Cheers, Frank
-
Thanx for the reply Jeroen, how is the Heinkel coming along? Also thanx to you Mikester! Thanx for the comment Arnold, with every new model i try to improve on my skills, sometimes it works and sometimes a model is moved to "the shelf of doom" until i get my motivation back to continue, Greetz, Frank
-
Hasegawa 1/32 P-47 Thunderbolt II SEAC
Trigger replied to ArnieC's topic in LSM 1/32 and Larger Aircraft Ready for Inspection
Nice build, They also make the P47 in 1/24 scale, but when i see the beast in 1/32 scale it is still a huge aircraft, i like the appearance of the p47, it's like a "tank" in the skies with massive fire power, i am definitely tempted to buy one. Like the colourscheme, you don't see them in these colours very often, Greetz, Frank- 8 replies
-
- 1
-

-
- SEAC
- Thunderbolt II
- (and 2 more)
-
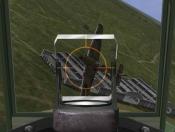
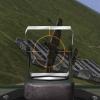
Hello Everybody, Here is my finished build of my (second) hawker typhoon, It is build with the wheels up. I don't have a work on progress of this one, but i will include some pictures in detail . Next on the list is , yes again a Typhoon but this time the cardoor version, just received an email from airfix saying that they are about to send the kit!, so stay tuned, from this build i will do a work in progress, So on with the pictures, Cockpit detail before closing up Gun sight in detail Rockets in detail (master), withe scorch marks from firing on the rails and withe weathering of the rockets weathering of the wing roots and exhaust stains Exhaust stains and chipping of cockpit and engine covers Wing roots weathered, tried to restrain myself not to over do withe the weathering, it's always hard to stop at the right point dirty undersides and weathered rockets Chipping of the propellor, hmmm, i see the port engine cover is moving a bit outwards, need to fix that. So that's it, now it's waiting for the cardoor version, (i almost got myself a squadron!), Cheers, Frank
-
Revell 1/32 He-162 "Salamander"
Trigger replied to efrick's topic in LSM 1/32 and Larger Aircraft Ready for Inspection
Indeed a very nice build, it's unbelievable that the germans were able to produce such aircraft at the end of the war with the minimal resources they had. I wouldn't give up on the vallejo air range if i were you, just ad a few drops of vallejo flow improver in your airbrush cup, this makes all the difference while spraying, after i started using that stuff i have much less tip drying on my needle, and i can keep spraying longer without clogging my airbrush. The finish with vallejo air is really good in my opinion. Anyway, great build, Frank -
Yet another Tamiya Corsair Birdcage 1/32
Trigger replied to spliffsecond's topic in LSM 1/35 and Larger Work In Progress
Great work, "not up to forum standards?" are you nuts, this is looking great, super detail on that engine, carry on! Greetz, Frank -
Are you a LSM member? Then show us your work!
Trigger replied to JeroenPeters's topic in General Discussion
I agree with Jeroen I have been lurking a lot, so also guilty as charged. But the problem with me is that i start all sorts of projects, get bored ore lose interest, en then get started on the next project without showing my work to you guys. Here are some examples of what i have been working on but not yet have published. Me 109 G6 Still not finished yet, i will promise to post a work in progress on this one, Also working on another Typhoon, but trying to super detail this one, waiting for the cardoor version to arrive..... Wiring harness replaced by braided hose and made fasteners from lead strip Ordered spark plugs and ignition leads and am busy trying to fit them on the Napier Sabre engine Also have a Hurricane mkIIC as a work in progress, but haven't worked on that one for a while So there is a lot going on and i promise to put them al in the work in progress tab. Greet, Frank -
a D out of a G.... HK's B-17 conversion
Trigger replied to brahman104's topic in LSM 1/35 and Larger Work In Progress
wow, amazing work! And you can forget your first note about " i am not the worlds greatest modeler " , this is certainly outstanding work, I wil be following this one for sure, Greetings, Frank -
Trumpeter Hawker Hurricane 1/24 mk IIC
Trigger replied to Trigger's topic in LSM 1/35 and Larger Work In Progress
Small update on the Hurricane, Mostly been working on all sub assembly's, here are some pics, Wheel bay with some scratch build piping for the landing gear oleos All sorts of parts ready for primer The wheel covers with a scratch build brake line added with brake hose, That's it for now, not much progress, had very little time last month, until the next update, Cheers, Frank -
Trumpeter Hawker Hurricane 1/24 mk IIC
Trigger replied to Trigger's topic in LSM 1/35 and Larger Work In Progress
Thanks, will try to give regular updates, Frank Thank you, the Hurricane is an old time favorite for me Hello Cees, Yes i wil be detailing the gunbays to, so stay tuned, Greetz, Frank -
Thanks for the tip Jamme, i think we gave Hobby Zone a real boost in their sales, Cheers, Frank
-
I had this one in my stash for some time now, and this will be my coming build, with some aftermarket stuf from trumpeter and master. started the build by adding the pe parts to the different parts of the aircraft Floor boards and flaps, first sanded down and sink holes removed rudder cable hole as it was and with the pe replacement part the instrument panel with the instrument decal underneath, not placed yet, the pe parts are just loose in place to get the general idea who it will look the hispano canons after treatment with blackening agent from master Looking so much better than the plastic counter part The radiator and oil cooler Different parts ready for primer Landing gear bay fire wall with the original plastic framing sanded down cockpit sidewalls That's it for now, i am trying to prepare as much of the pe parts as i can prior to the build. I wil try to post regular updates, Cheers, Frank
-
Revell Beaufighter X
Trigger replied to Wingco57's topic in LSM 1/32 and Larger Aircraft Ready for Inspection
Great build, and lot's of scratch building as well, i have always loved the beau fighter, after the mosquito this is my next favourite aircraft, Greetz, Frank -
Wow, i would love to see that catalina being build! ( would love to get one, but soooo expensive, but who knows perhaps somewhere in the future , Sigh......)
-
The minute i saw this, i knew i had to have it, placed an order, and the shipment was delivered within 3 days. My workbench has never looked so organized. I will most certainly order more of these
-
wow! Really incredible story, what a collection! I think it's a good thing that all those planes go up for sale now. If they would stay where they are they would probably be beyond restoration at some point. It would be a good thing to see those aircraft back in the air again.
-
I use tickopur r33, is a universal cleaner for ultrasonic cleaners. Works fantastic, you only need a mixture of 5% cleaner and 95% water. Works fantastic after each painting session i put my Harder & Steenbeck evolution nozzle and body in my ultrasonic cleaner, and like efric said, you won't believe the stuff that still comes out of your airbrush even after you THINK you have cleaned it. after that a quick rinse with water and a bit of lube on the needle, and your airbrush is as good as new. The cleaner that i use is a concentrated mixture so you only need a little each time and a 1 liter bottle will last for ages.
-
I have already built the 1/24 airfix Mosquito, but i DEFINITELY want this one, ( a lot easier to display also), will be following this closely, as soon as it's out i'll be all over this kit.