

Trigger
-
Posts
211 -
Joined
-
Last visited
Content Type
Profiles
Forums
Events
Gallery
Everything posted by Trigger
-
Airfix 1:24 Hawker Typhoon Mk.1b
Trigger replied to JayDee's topic in LSM 1/32 and Larger Aircraft Ready for Inspection
ahhhh, You kept that one really under the hat, but i love it, especially the cut out side panel, it sure does this kit justice for the fine detailing in the cockpit area. Bravo, James, Frank -
Hawker Typhoon 1/24 "Pulverizer IV"
Trigger replied to Trigger's topic in LSM 1/35 and Larger Work In Progress
Hello guys, Here's an update on the Tiffie, been busy getting the roundels sprayed on, tedious job and a lot of masking, specially because all the roundels have four colours. Here are some pictures, Now i have to do some weathering on those roundels and insignia, now they look to "fresh" . Next step is to put a coat of clear on the aircraft to get a good underground for the other little decals that can not be sprayed on, but that's all for the next time, Frank -
Hawker Typhoon 1/24 "Pulverizer IV"
Trigger replied to Trigger's topic in LSM 1/35 and Larger Work In Progress
Hello Cees, Thanks for the comment, The chincowl in my case is a poor fit, but this is because i wanted to build the Tiffie with al cowlings of, and decided further in the build to place the chin radiator because it looks awesome, and really gives this aircraft an "aggressive " look. that's when the problem occurred, you really have to decide in advance what version you are going to build and then stick to it. i now have a "gap" from approximately 1 mm where the under cowling meets the underside of the wing, clearly visible on my last photo's. i also fell in to the trap that George has encountered when fitting the engine. I also had to remove a piece of the rear part of the engine to make it fit to it's support's and to make it fit to the firewall. i have not removed enough, resulting in that 1 mm gap. so beware when you fit the engine, i believe it's better to remove the entire support that should fit in the firewall before fitting the engine, then the engine simply falls in to place on it's supports, and you should have no issues when placing the radiator. The key word is dry fit, dry fit and again dry fit. In my case i will keep the chin cowling as a loose part, as i intend to make a diorama around this one with complete re-armament crew. Looking forward to your progress photo's by the way, greetings, Frank (p.s received my masks today from maketar, they make the masks with the right insignia for the Pulverizer IV, complete with canopy masks, wheel masks etc., so i can get busy with that, looking forward to that job) -
Hawker Typhoon 1/24 "Pulverizer IV"
Trigger replied to Trigger's topic in LSM 1/35 and Larger Work In Progress
Waiting for paint masks now, meanwhile busy with some weathering on the leading edges and putting on the yellow line on the outer leading edges. painted the canopy and a lot of loose parts. Before i put on the camo colours i first sprayed the leading edges in flat aluminum withe the idea when the camo was put over it i could then give a slight rub to get the aluminum to shine through the camo colours. Some pictures here to see what i mean, Also placed the chin radiator, sprayed that one to dark, must change that to match the rest of the aircraft Dry fitted the bombs under the wings, looks awesome, i can imagine that those germans must have been pretty scared when an aircraft with such a load came down on them Just a small update, as soon as i got my paint masks i can get going on the roundels and the insignia, so till next time, Frank -
How are the 1/24 Airfix replacement Typhoon canopies?
Trigger replied to One-Oh-Four's topic in Modelling Discussion
Hi Erik, I have bought two Typhoons, and both had the crack and the "droop" in the canopy, got two replacements from Airfix, no crack anymore but the "droop" and also the distortion in the windscreen remain. I don't think that they will get this sorted with Airfix, and i will be using the replacement part, I can live with the "droop" and the distortion. (of course this shouldn't have happened with a kit in this price range, but i don't want to keep nagging about it). I am now so far in the build that the rest of the detailing of the kit takes most of the attention, and not so much the canopy, but as with everything, you know it's there, so you immediately start looking for it, anyway, it won't ruin the pleasure i have from building this kit. I guess it's up to builder to decide, and it's for your pleasure, so you decide how important it is for you greetings, Frank -
Hawker Typhoon 1/24 "Pulverizer IV"
Trigger replied to Trigger's topic in LSM 1/35 and Larger Work In Progress
Another update on the Tiffie, Put on the second layer of the camouflage color, used blue tack to lay out the pattern and then taped the whole thing. See for yourself And after putting on the color, removed the tape an done some post shading on the green and grey camo That's it for now, got a lot of weathering and post shading to do to make it look right, but i am not to unhappy with the result so far, Until next time, Frank -
Hawker Typhoon 1/24 "Pulverizer IV"
Trigger replied to Trigger's topic in LSM 1/35 and Larger Work In Progress
Picture time again, couldn't resist to put another coat of paint on. First pre shaded the entire airplane, this time using black because the colours matt dark green and mat ocean grey that will be used for the top side of the airplane won't allow anything else to shine through. I used for the mat ocean grey the tamiya equivalent xf82. I put a couple of thin layers on because i don't want to ruin the pre shading that i've done. It's always difficult when to stop. I chose to do so pretty quick, because when the second colour will be applied, matt dark green, the pre shading will be hardly visible otherwise. (Less is more in this case i think) see for yourself, well, that's it for now. I really want to wait for Mal to finish his masks for my project, so i can get the camo pattern right. meanwhile i will concentrate on the wheels and other small stuff. Till next time Frank -
Hawker Typhoon 1/24 "Pulverizer IV"
Trigger replied to Trigger's topic in LSM 1/35 and Larger Work In Progress
Another update on the Tiffy, Been concentrating on the underside of the fuselage, put some primer on and started pre shading the wings with dark sea grey, the coat on top of that will be the proper color, medium sea grey. The darker color is just strong enough to shine through the medium sea grey. The rest of the weathering will be done with powders and oil paint washes. Here are some pictures from the underbody. (Can hardly get the thing in the paint booth, it's one huge beast, took some careful handling not to damage anything) Fortunately i had stocked up on a lot of medium sea grey and the other colours that i'am going to need, because she sure needs LOT'S of paint Need to fill the seem where the tailwheel section connects to the underside of the fuselage, must have missed that one. i'll let everything dry now so when the paint is hardened i can adjust some things. The seem on the starboard wing extension is also to big for my taste, will work on that one too. Anyway, i have got some paint on, and will be moving on to the topside next time. -
Fw-190D9 Hasegawa 1/32
Trigger replied to artro219's topic in LSM 1/32 and Larger Aircraft Ready for Inspection
Wow, Great build, love the paint job, The photography is outstanding! ( Great choice too, love the Focke Wulf 190) -
Hmm, Than i'd rather go for a Whirlwind too, would look smashing in 1/24 scale. A most underestimated aircraft of the second world war. Can hardly wait, who can i bribe to tell me what it is going to be? Good going Airfix!
-
Hawker Typhoon 1/24 "Pulverizer IV"
Trigger replied to Trigger's topic in LSM 1/35 and Larger Work In Progress
Cees, does that mean you have inside information? you've got a spy at airfix HQ? You can tell me, i won't talk to anybody about it.......... Frank -
I hope it was just a slip of the pen with the release year, I don't believe it will be the car door Tiffie, not just after launching the Bubble top version, but a re release of the mosquito would be a possibility. I have done the mosquito, and i must say also a great kit, so a bomber version would be a nice addition, and feasible with little modifications to the production. Will be watching this with interest,
-
Hawker Typhoon 1/24 "Pulverizer IV"
Trigger replied to Trigger's topic in LSM 1/35 and Larger Work In Progress
Ha, ha, well i could say those blobs are actually plastic explosives, but they aren't. Just my way to be able to remove the landing gear doors in a simple way, and those toothpick's come in very handy when airbrushing all detail parts , or else i would be camouflaging my hand every time. I also use "satė stokjes" to hold up the small parts for painting. Airfix indeed have made a quantum leap in constructing their kits. If they would do a re -release of the "big five," the hurricane, spitfire, me 109 , fw190 and the mustang, then i would certainly buy them. Frank. -
Hawker Typhoon 1/24 "Pulverizer IV"
Trigger replied to Trigger's topic in LSM 1/35 and Larger Work In Progress
Started on the flaps today and gave them a bit of weathering, they will be in the down position when i put the plane on display. The weathering might be a bit heavy, but these planes were used under the most awful conditions on improvised landing strips, so i guess they must have taken guide a beating with minimal maintenance . some pics with a dry fit of the the flaps. the paint underneath is medium sea grey as advised in the manual. Trying to get all those little bits together so i can get to the painting stage, shouldn't take me more than a few weeks now. i just hope that Mal will have those masks ready in time. Frank -
HPH Reichenberg Re 4a 'Piloted V-1'
Trigger replied to JeroenPeters's topic in LSM 1/35 and Larger Work In Progress
Hello Jeroen, Love the subject, you never see one of these build, love the chipping effect as well, must try that one day, but i'am a bit scared that it might just ruin my build when done wrong. ( i guess i must try to do it, because that is what this forum is all about, to learn from one another) love the GI Joe to, looks very good with this display, Frank -
1:32 Hasegawa P47D "Slick Chick"
Trigger replied to rkranias's topic in LSM 1/35 and Larger Work In Progress
looking great Rick, or should i say " it looks slick, Rick" I am almost tempted to buy me a p47, i have always admired the sheer strength that this plane displays. Looking forward to the further paint job on this one, Greetings , Frank- 118 replies
-
- 1
-

-
- Panzer Busters
- 368FG/395FS
- (and 3 more)
-
Hello Mal, your Tiffie will look just fine in a steep dive and a turning propeller, as i have said before, you can write me down for two sets. My current build of the Tiffie is now nearly ready to get some paint, so drop me a line once you've got them ready please greetings, Frank
-
Hawker Typhoon 1/24 "Pulverizer IV"
Trigger replied to Trigger's topic in LSM 1/35 and Larger Work In Progress
Here's another update on the Tiffie, Have been busy to fit the fuselage on to the wing roots. Fit is fine, there's only a little seem visible, so i taped both sides of the seem and filled it with Tamiiya surface primer. The result is a very small pencil like seem that will blend in once the primer is applied on the aircraft. I was planning to do a build with everything visible, also the radiator, but i decided to place the chin radiator cowlings, because they look great, and they are a real characteristic piece of the Typhoon. I have test fitted the cowlings, and with some fiddling i got them in to place. I have also given the underside of the wings where the flaps are attached a coat of medium sea grey. the manual says that this should be the proper color, though i have seen on other builds, aluminum coloured and cockpit green coloured flaps. so i don't know whats right, so i think i will stick to the color mentioned in the manual. ( or someone must be able to tell me what the right color is?). anyway, here are some pictures withe the preparation of the aircraft, the moment of putting paint on is getting closer, can hardly wait. So next time i hope to show some pictures with a primed Tiffie, ready for the paint job. -
Hawker Typhoon 1/24 "Pulverizer IV"
Trigger replied to Trigger's topic in LSM 1/35 and Larger Work In Progress
Thanks for the tip George, I must say that i took the rusty burnt kind of look from the first model on display that i saw, it was build by Chris Wauchop i believe, he got one of the pre product models from Airfix, so i didn't look any further, and thought that this is what it should look like. There are of course only limited colour pictures from this period, so reference material is difficult to get. Enjoy the weather by the way, i completely understand you, (got a sailing boat myself, other hobby), so i understand what you mean, (nice weather, nice company, a cold beer or wine, sunset.........................) Greetz, Frank -
Hawker Typhoon 1/24 "Pulverizer IV"
Trigger replied to Trigger's topic in LSM 1/35 and Larger Work In Progress
i am waiting for it George, bring it on, Greetz, Frank -
Hawker Typhoon 1/24 "Pulverizer IV"
Trigger replied to Trigger's topic in LSM 1/35 and Larger Work In Progress
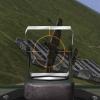
Hello Cees, The only problem i had with fitting the canon barrels is that they are too rigid, and they must be flipped over the rear crossmember in the fuselage as i have showed in my earlier pictures. I only had to widen the hole in the gun bays so i got enough room to stick them through. not the most elegant solution, but those holes are barely noticeable once the guns are in place, so i can live with that. The holes still are within the diameter of the crossmember opening by the way. The fairings fit properly once you have widened them, this is because of the recoil spring that sits a bit further to the back in comparison with the plastic ones. I used a dremel to widen them up to a point that i didn't dare to go any further. They are pretty thin now, but they accommodate the guns very well. Judge for yourself, as i have some pictures with one fairing in to place. I also dry fitted the fuselage to the wings, once again a near perfect fit. I am very much impressed by the accuracy of the parts, they all line up perfectly, but be warned, RTFM as i may say so. here are some pictures so you can see for yourself, Hope you like it, but Cees, when can we expect your build of this magnificent kit? you must be craving for it by now? Greetz, Frank -
Hawker Typhoon 1/24 "Pulverizer IV"
Trigger replied to Trigger's topic in LSM 1/35 and Larger Work In Progress
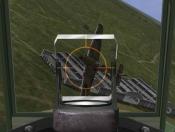
Another update on the tiffie, Last week i have been busy to get the gun bays and the wings ready. Everything went as it should, but what an incredibly tight fit of the wings. This kit is certainly measured out by the millimeter. After numerous dry fitting i finally went for it and glued the wings together. Fits like a glove. There's just a little seam on the leading edge, but that will only take some minor sanding, i don't want to ruin the fine detailing on the wings by to much sanding. The master barrels are also in place after some "persuasion" . ammo boxes in place and done some weathering of the gun bays. Also widened the fairings so they will all fit over the guns. Next move will be the fuselage. Also dry fitted it on to the wings, and fits like it should, but that's for the next time, here are the pictures. That's it for now, Next week the fuselage.. -
Matchbox 1/32 Westland Lysander Mk-1
Trigger replied to RalphSarc's topic in LSM 1/35 and Larger Work In Progress
A real iconic aircraft, You don't see these kind of builds very often. The lysander certainly deserves a better place in history, how many pilots haven't been saved from occupied europe with the lysander, and how many droppings haven't been made with this aircraft?. Looking forward to see this build in progress, Frank -
Hello Nick, Of course you're right, but i believe that if a firm corrects their mistake, they definitely deserve a chance, that's why i put it out here on the forum. In the e-mail they sent me they said that they have changed the rockets to the right scale, so anyone who orders them now should get the right ones. ( It wouldn't hurt though when people do order them to ask for it specifically to avoid any misunderstanding)
-
Here's an update on the profimodellers rockets, just received an envelope with extensions to fit on the body of the rockets so they will have the same length as the ones in the kit. see for yourself, i think as they are now they can be used on the Typhoon and will look smart. Although it doesn't show to well on the pictures, the body of the rockets now have the exact same length as the plastic ones. I must say that profimodeller really solved my problem, (without charge by the way,) greetings, Frank