DocRob
-
Posts
7,015 -
Joined
-
Last visited
Content Type
Profiles
Forums
Events
Gallery
Everything posted by DocRob
-
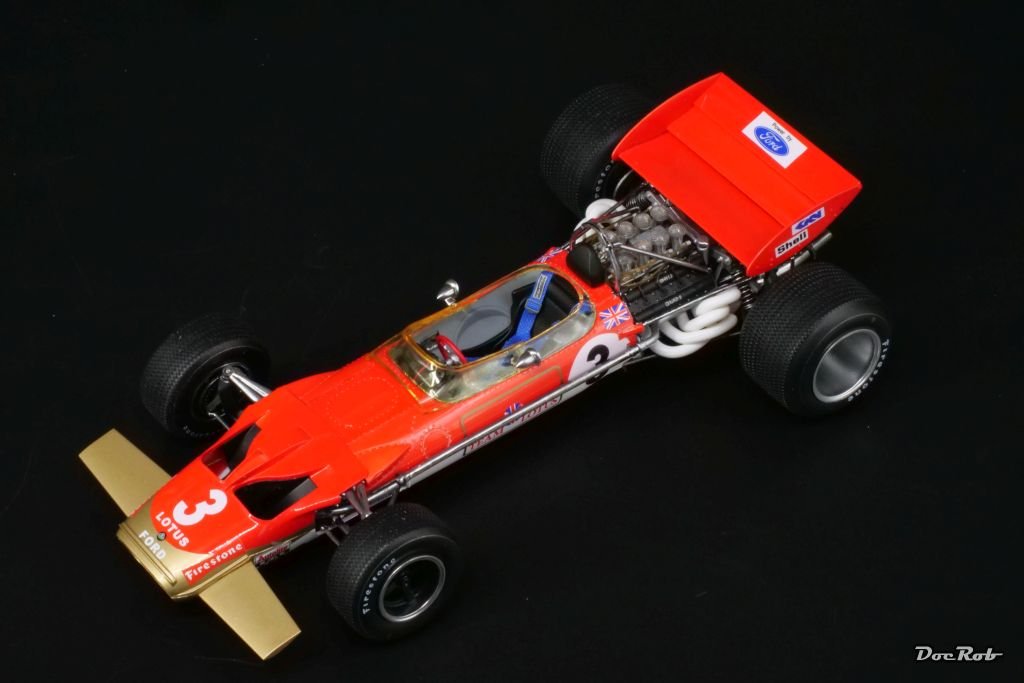
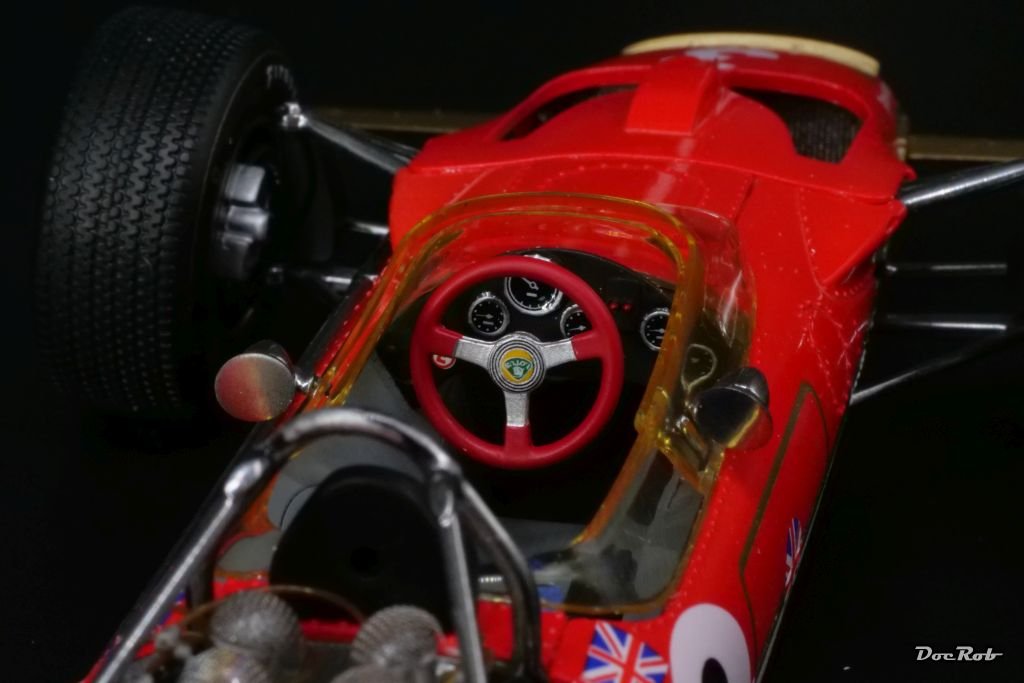
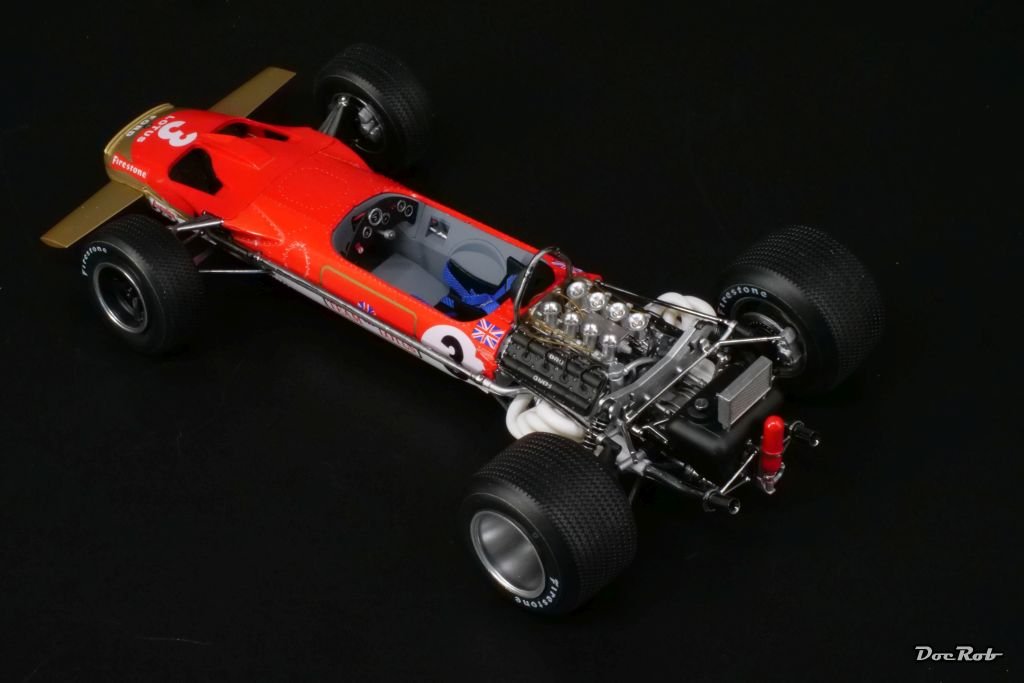
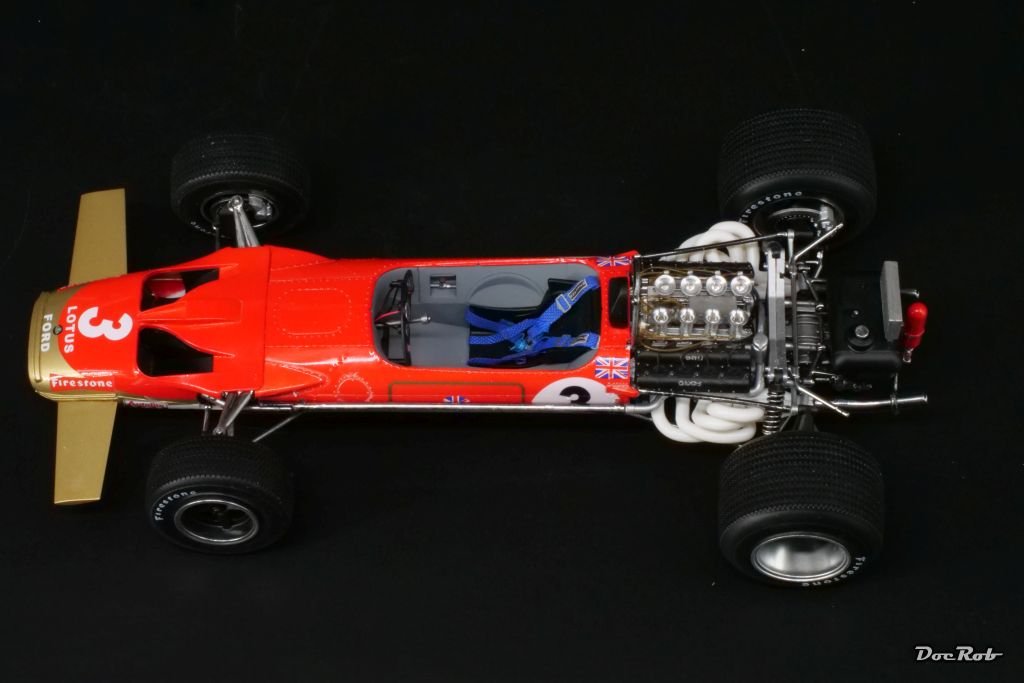
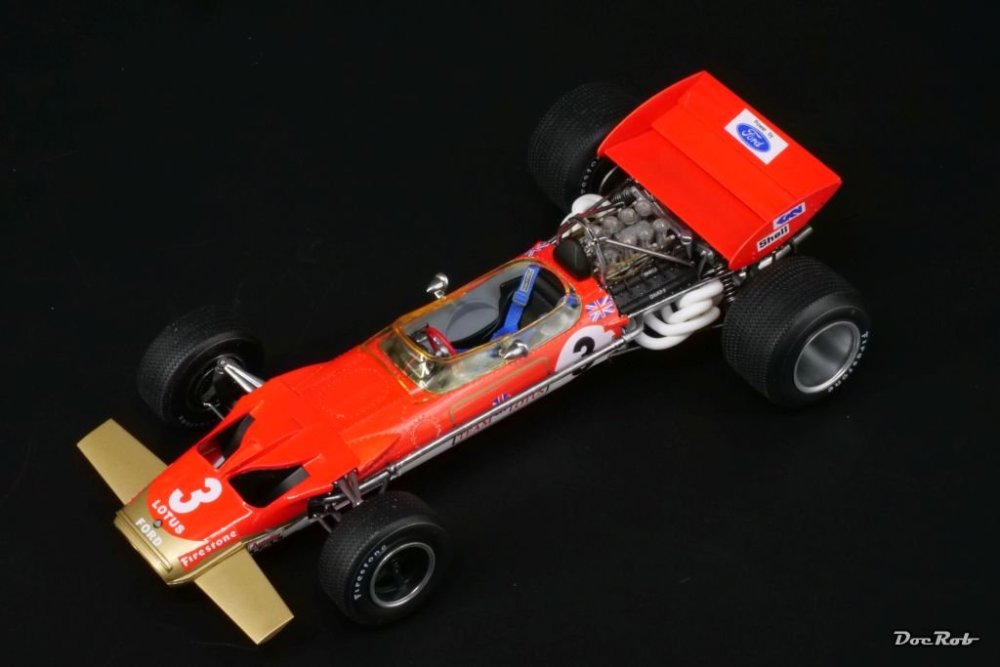
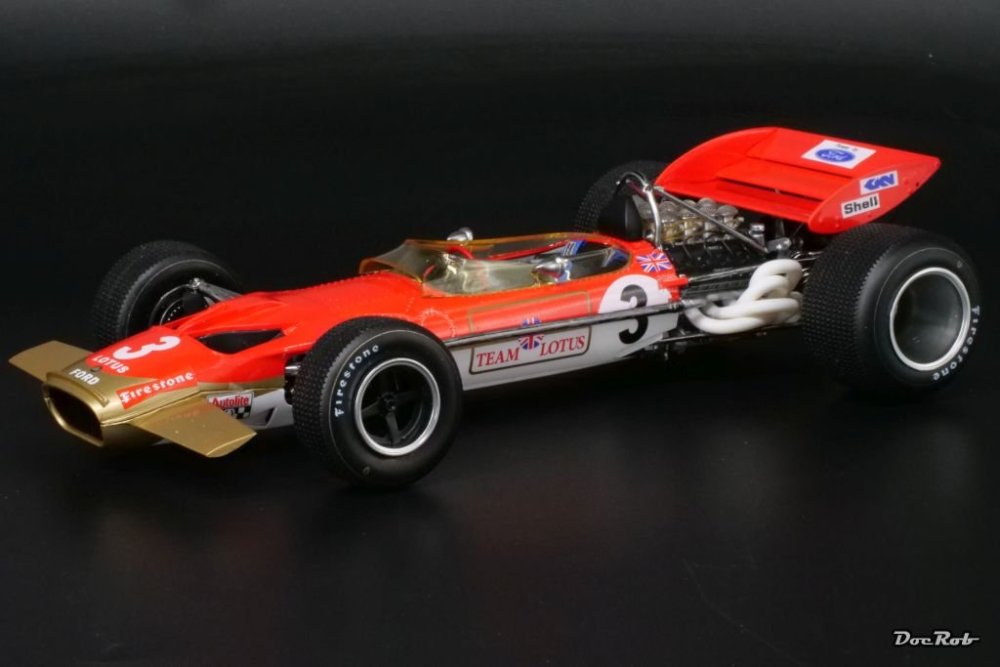
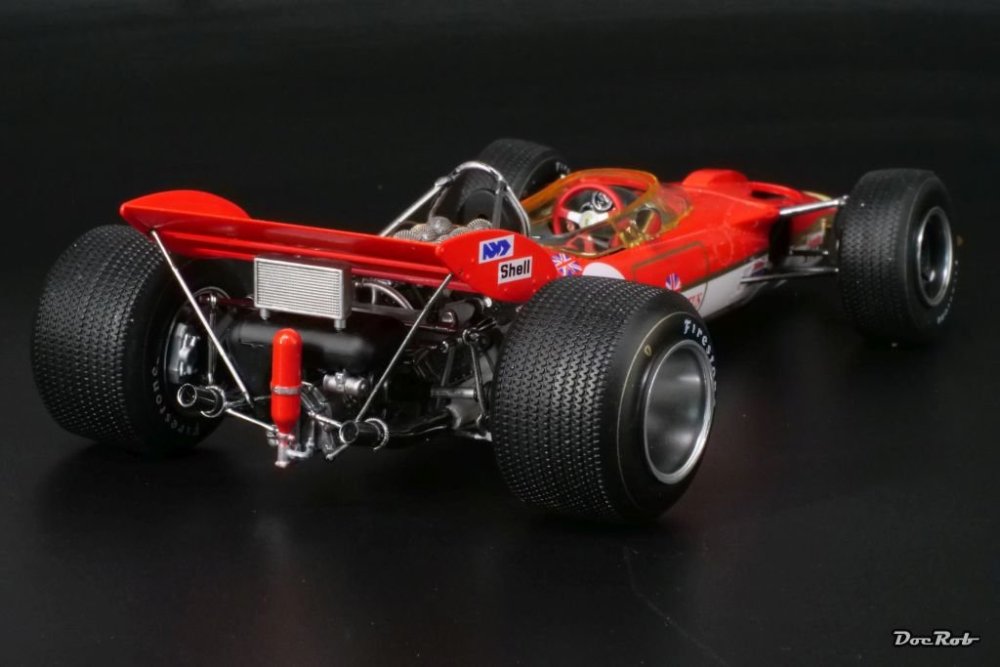
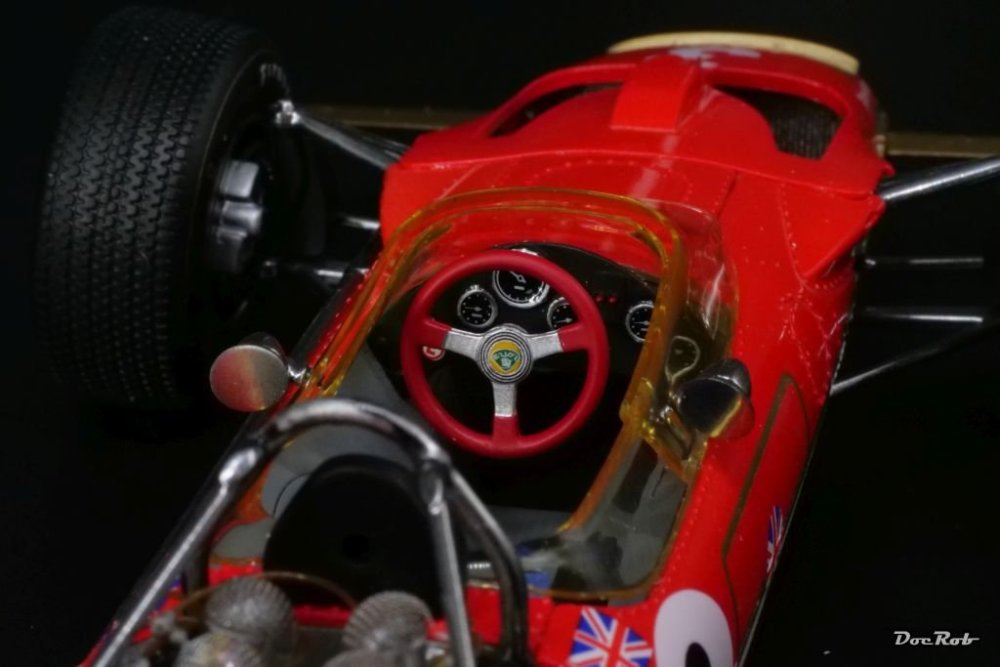
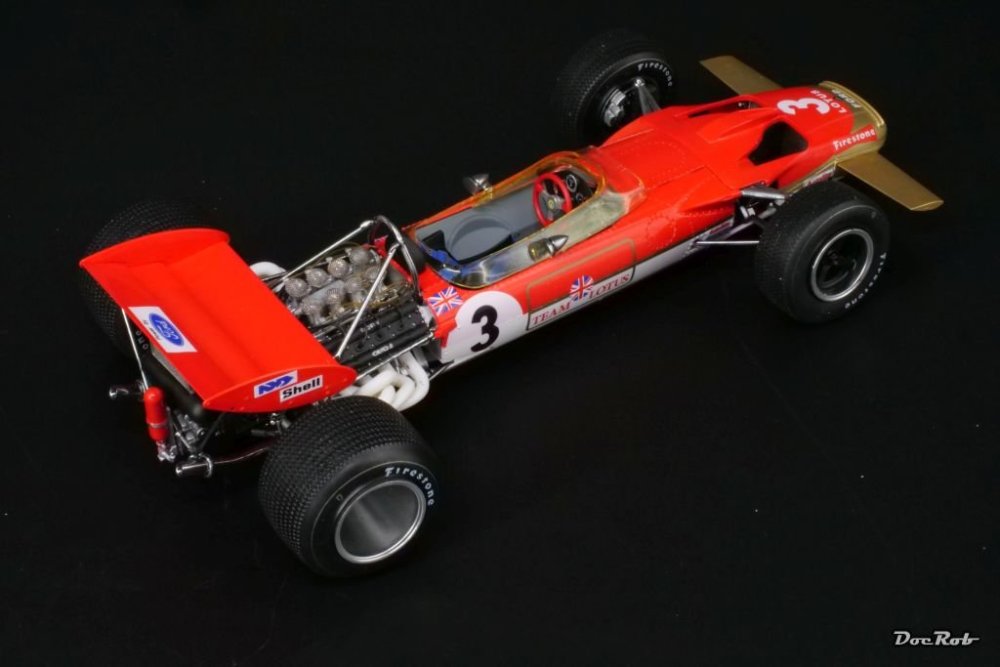
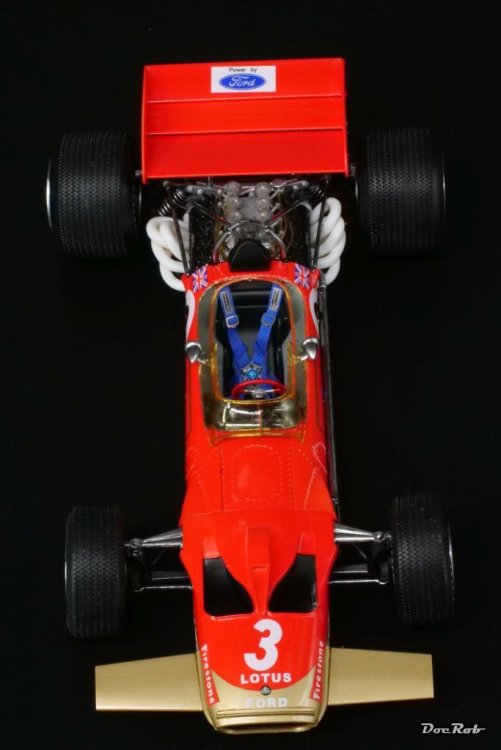
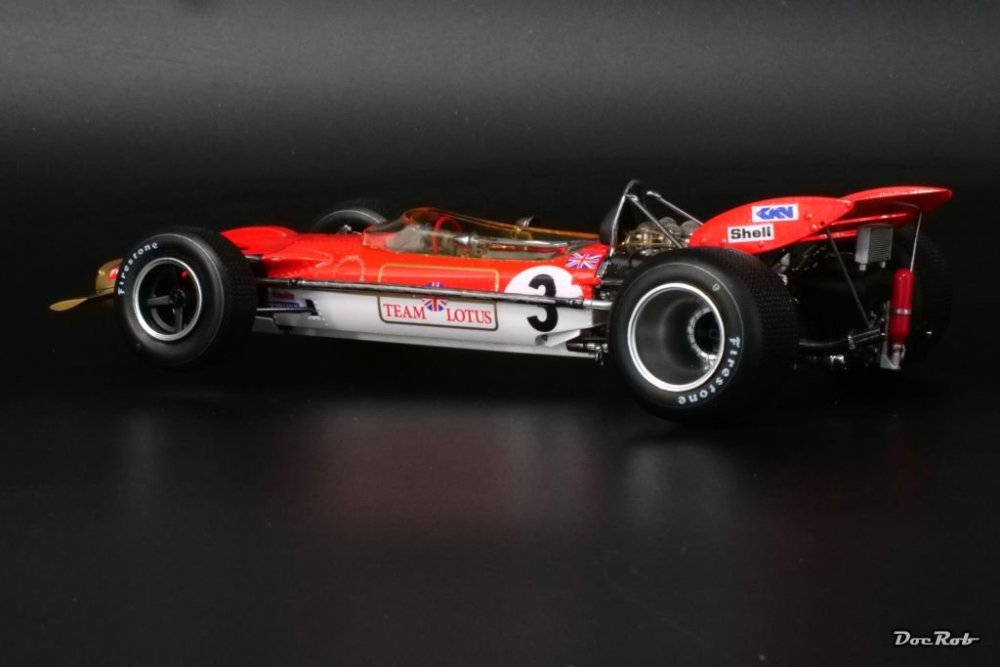
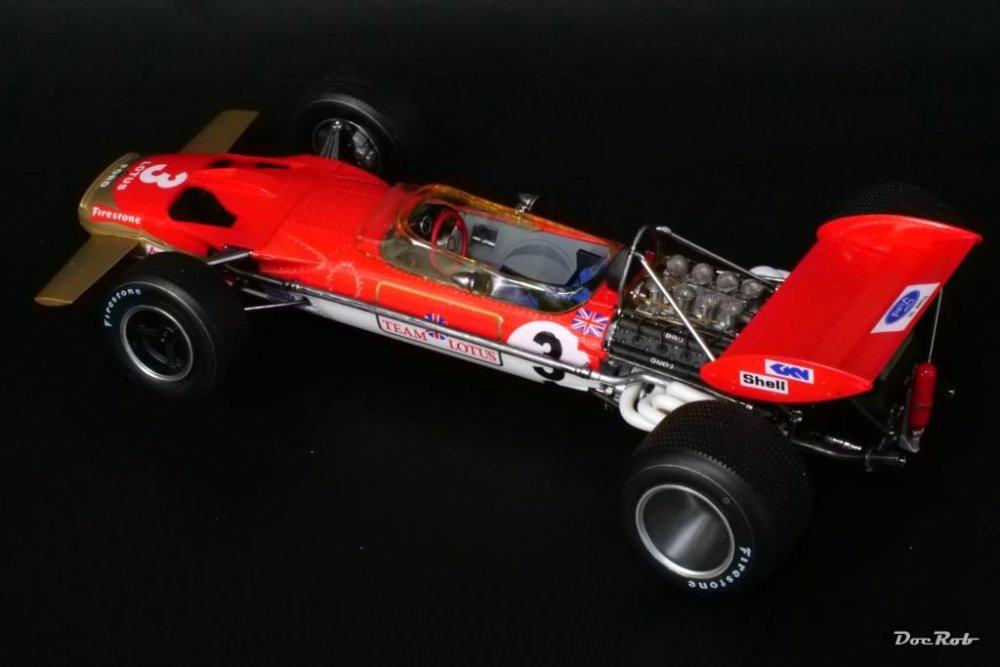
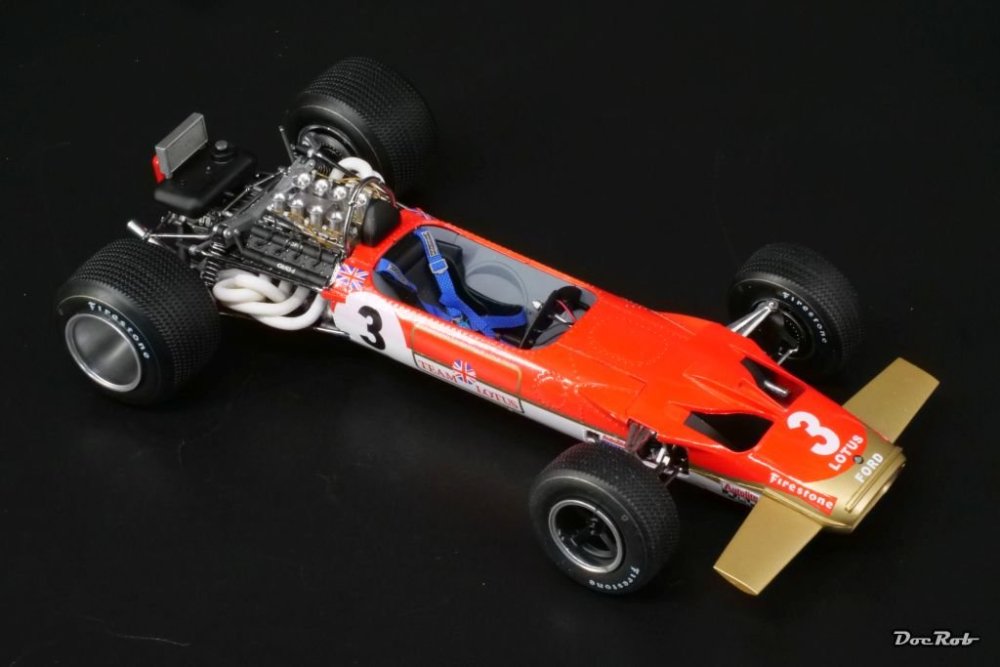
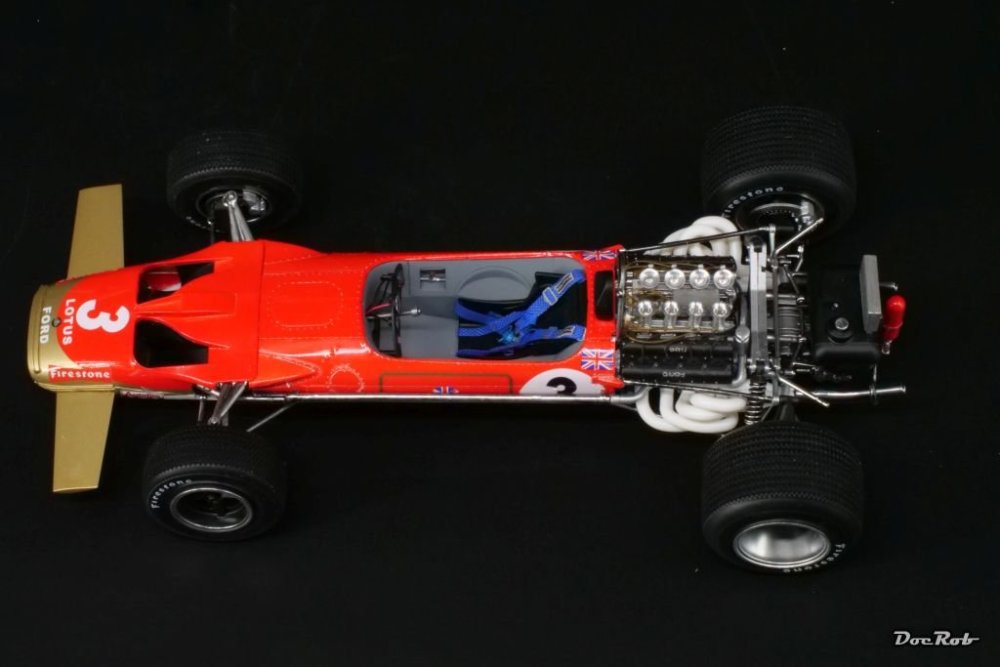
I got the Lotus 49c over the finish line. Final assemblies were the rear wing, the tiny metal nets over the air intakes, the steering wheel and clear parts around the cockpit and many small parts. The wing was easier mounted then thought, luckily. The rods were fragile and I can understand, why wings were banned sometimes in F1 due to the risk of flying around and hurting somebody. I hope, I did Jochen Rindt´s 1970 Monaco winner some justice. The build was not always pleasant, but I like the result despite some shortcomings. Cheers Rob


-
Thank you, there will be a lot of touch up work, before I finish this one. The chrome is especially prone to wear from handling. The fit issues, well, I even had to drill out the front suspensions for accepting the axles. The exhausts were another matter, which took hours to get right. I never faced a kit like this which is very good or very poor nothing in between. Cheers Rob
-
I loved the start in your familiar terrain, FA, the truck will be an ugly beauty, I´m sure. Cheers Rob
-
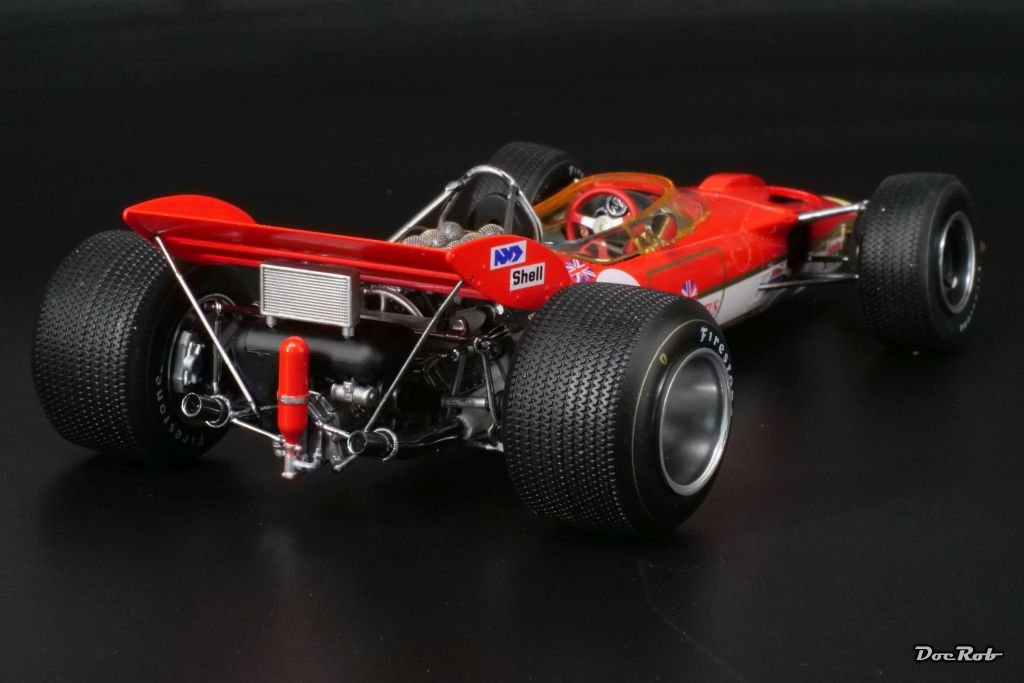
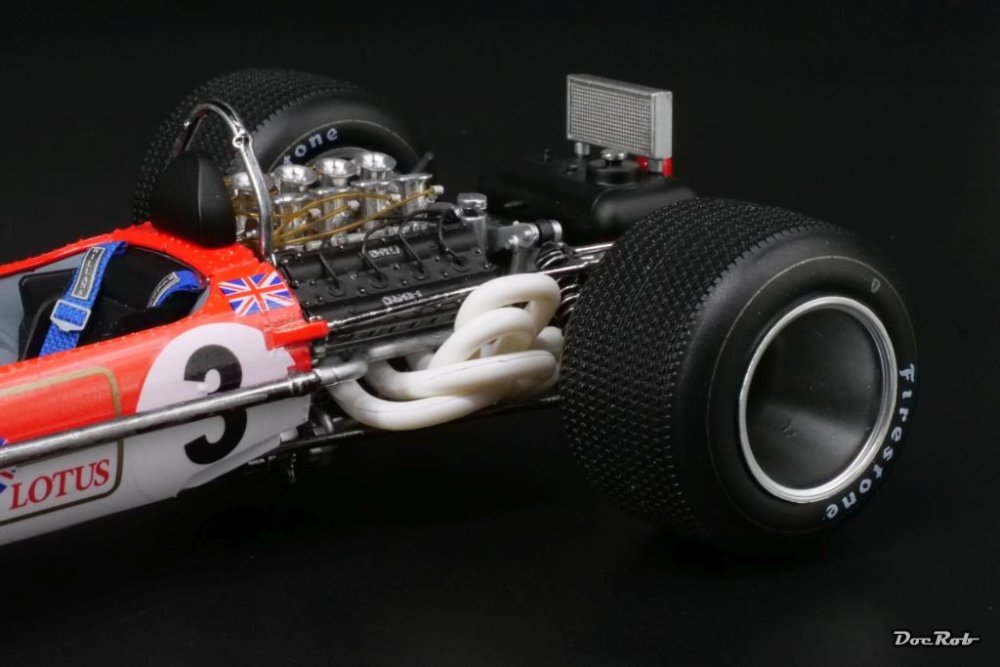
Almost done, the Lotus and my nerves. Assembly is very difficult due to fit issues and the complexity of the car itself. There were the exhausts with a special PITA award mentioning. I had to break them from the engine, because it would have been impossible to install the four chromed rods, connecting the body with the rear suspension. I had to shave off a lot of the exhausts undersides to fiddle them in and glue them in place. Cheers Rob

-
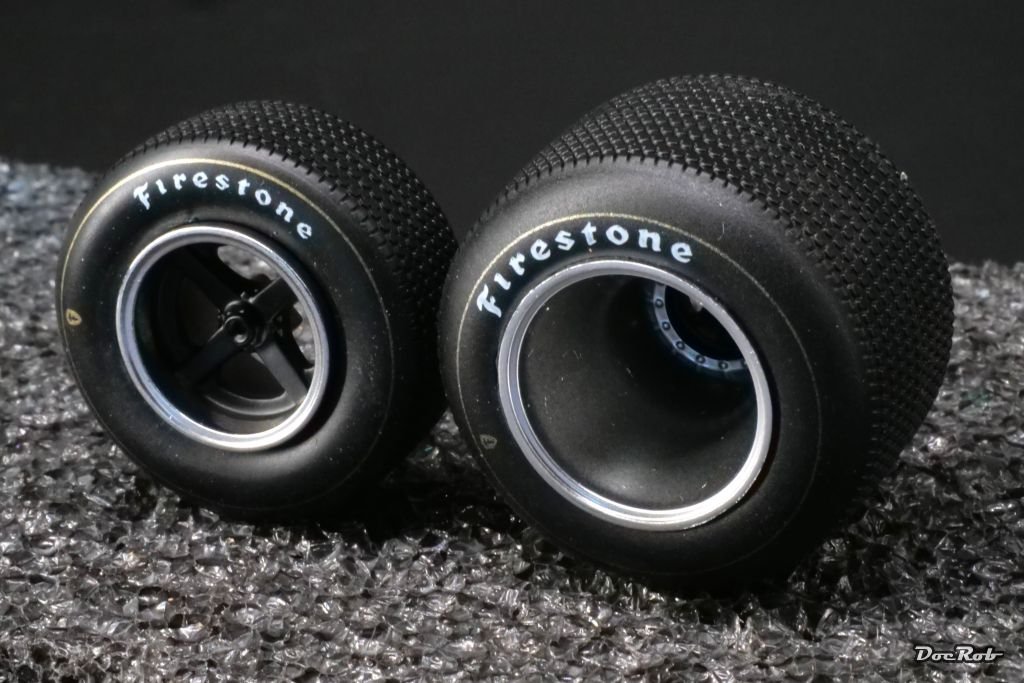
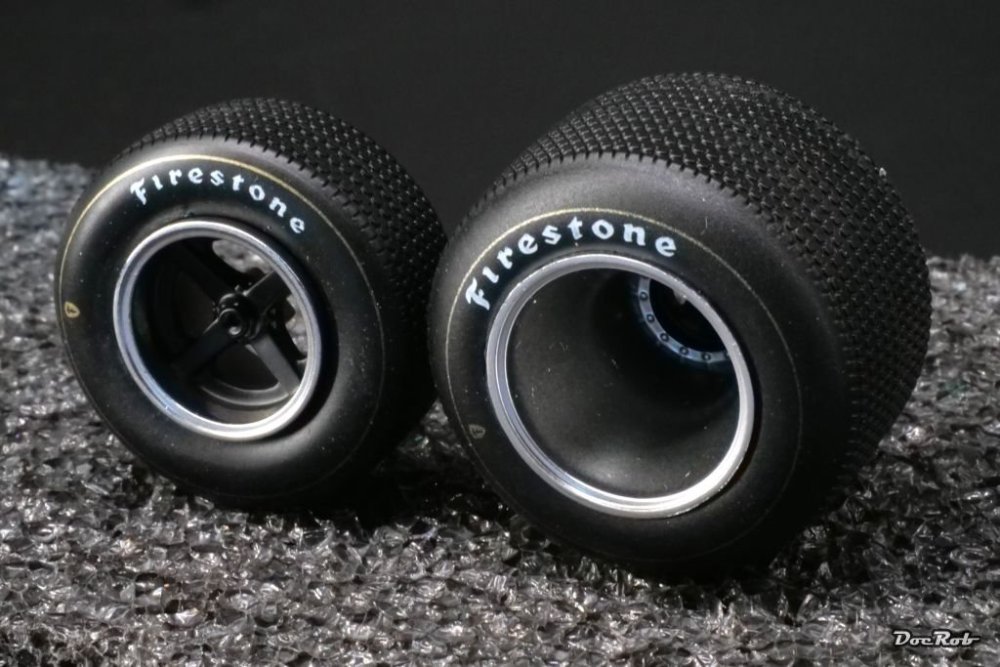
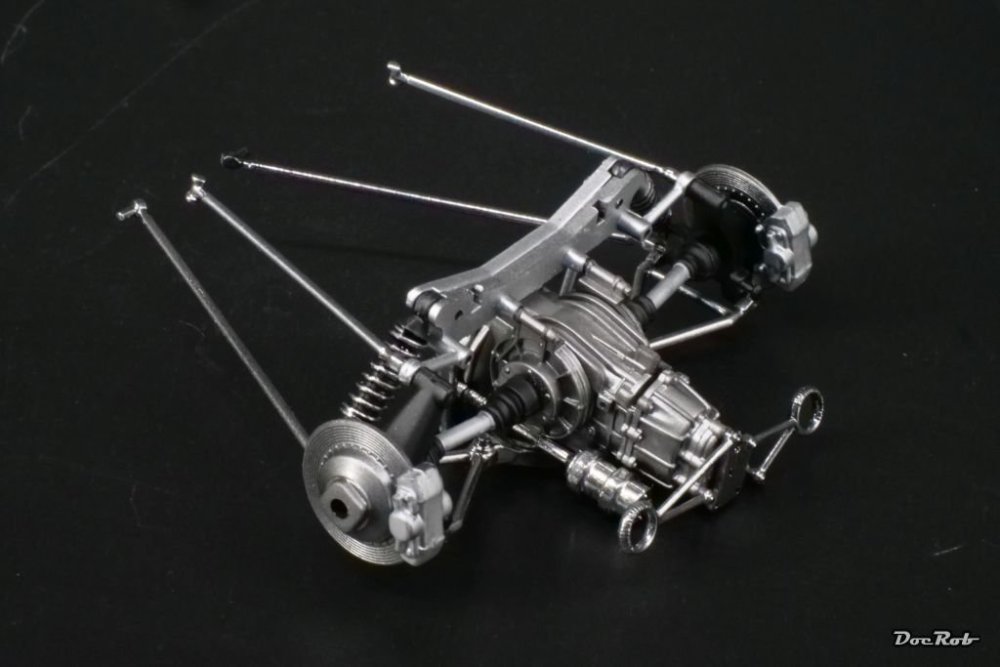
A lot is going on lately, not modeling wise, unfortunately, but I´m still onto the Lotus 49. Everything is prepared and painted and waiting to be assembled. The kit is a VERY mixed bag, quality wise. Some engineering is fantastic and you need no glue to assemble, others areas are downright terrible, specially where the pre chromed parts come into play. I de-chromed the sprues with oven cleaner, because the detail looked soft. Unfortunately it wasn´t the chrome, the plastic got covered in a layer which looks like clear resin as a base for the chrome and this is not removable. It´s also impossible to glue the de-chromed parts with plastic glue, they call for CA. I had to drill most of the holes on the back end out, they were simply to narrow. One of the best aspects of the kit are the pre-printed tires, an approach, I wish other companies would copy. The rims were sprayed polished aluminum and semi gloss black, as the chrome looked wrong. I assembled the gearbox with the rear suspension, an area, where there is great engineering, intersecting the parts with almost no need for glue. One of the worst area of the kit were the exhausts, which were chromed, albeit they need to be painted black or white, depending the car you show. The de-chromed plastic doesn´t take paint well and need CA to glue, not easy, when you assemble the four parts per side with only seconds to fit them to the engine case, moving and wiggling the fragile parts. Cheers Rob

-

What is on your bench right now ? Share a picture :)
DocRob replied to Martinnfb's topic in Modelling Discussion
Great looking pit, Gus. I had no problems closing the fuselage with my ZM Kai-Phantom or other fit probs with my kit. For the cockpit, i used only the supplied decals, as there were no AM sets available for the Japanese bird. For the detailing the seats, I used a set by Kits-World which was terrible. I guess, Quinta is of better quality. Cheers Rob -
I guess, it´s news for ´26, but a very much welcomed one. Lukgraph of Poland is releasing a Grumman Goose G-21 civilian in 1/32 scale. TMN: Kit countdown... Clayton's top ten upcoming releases of the month... There is something else for our Canadian birds with wings aficionados under the same link above. A Canadian CT-114 Tutor Snowbirds in 1/32 as a 3D-printed kit by Joycraft. Cheers Rob
-
I´ll try FA. I take you were after a pristine look of the Honda. Some of the different metallic surfaces doesn´t fit then for this goal. The frame is one example, I guess you used metallic wax, right? Aluminum usually looks pretty uniformly, when not weathered or other ways harmed. I would recommend spraying with Alclads, AK Extreme Metal or some of the Tamiya LP colors. The disc breaks look too dark and uneven for my liking, same goes for the brass/titanium? colored mounts of the disc brakes. The third area, I had already written about, the exhaust heat staining. It´s best done with an airbrush and transparent colors. I know, it´s a very different approach to get all the metals and materials look right. It helps to study pictures of the real thing. The scale is also quite different from the usual 1/32 or 1/35 stuff, where you need different procedures to make it look right. I know, that may sounds devastating but in fact isn´t meant to be, I´m talking about details. Your NSR is a beauty and I only want to tell you my personal view on some of the problematic areas. I only felt, the material replication is not up to your painting and weathering skills you show with armor kits, which I secretly envy. To me replicating materials is my main driving force in modeling and I´m a bit nuts about it. I love WWI planes with cloth and wood to imitate and more or less modern cars and bikes with all the different materials and surface finishes. In a former life, I was an engineer and know a lot about metals. I also sampled thousands of surface pictures from different pristine or weathered or corroded materials in former times for believable 3D renderings. Cheers Rob
-
It got you addicted FA, you should change your forum name . No more heavy weathered, grimy tanks, but highly polished bikes and cars. Believe me, I know the feeling . The Honda came out nice and you can´t go wrong with Tamiya´s bikes. There is always room to improve, I think, your metallic works finishes could be better. In some areas, the metal looks metal, in others not so much. It´s fun to replicate all the different "modern" metals on bike kits, but it needs a bit of training and a close look at the real ones. That´s not at all meant to be offending, your Honda looks fine overall, but there are areas which could be refined a little. Cheers Rob
-
Trumpeter P-47D Razorback
DocRob replied to crazypoet's topic in LSM 1/35 and Larger Work In Progress
You may consider very thin strips of silver or blackened silver painted Kabuki tape. It may not be correct, but given the scale... Cheers Rob -
What is on your bench right now ? Share a picture :)
DocRob replied to Martinnfb's topic in Modelling Discussion
Down to the bone . I love absurd dios, but have no idea how to pair your FW 190´s with that bony predator, Carl. Cheers Rob -
Trumpeter P-47D Razorback
DocRob replied to crazypoet's topic in LSM 1/35 and Larger Work In Progress
I know, how you feel, I life under similar circumstances since years. No thinner, rattle can or paint jar exceeding 30ml got shipped to my place if any. It´s complicated and the customs situation makes it even worse. Best case is two weeks of waiting, worst case, you pay everything, fill in the forms for customs and pay them later on, only to hear that your parcel got returned after a month of delivery time, pure horror. Luckily, there are some vendors on the Spanish mainland, who don´t care and just send the stuff. Love their smuggeling service . We don´t even have your kind of president Cheers Rob -
Indeed, very nice, the idea with the masking tape with diluted PVA is registered, thanks for that. Cheers Rob
-
1:32nd scale Fokker D.VII (OAW)
DocRob replied to sandbagger's topic in WNW and WW1 Ready for Inspection'
Thanks for the kind offer, Mike. I think, I have an appropriate Mercedes engine in my stash, good idea with the Aviattic panels though, I have to check them. Cheers Rob -
1:32nd scale Fokker D.VII (OAW)
DocRob replied to sandbagger's topic in WNW and WW1 Ready for Inspection'
I always wanted to build this one, but have only two BMW powered D.VII. Maybe I will bite at Ghotaforce or live it through your build. Cheers Rob -
Dedicated 1/72 catagory? Maybe, maybe not.......
DocRob replied to JohnB's topic in Problems? Suggestions? Tell us!
There´s a spelling error, PW, It should be called: RÄDER MÜSSEN.... not RÜDER MÜSSEN... RÄDER is German for wheels. Cheers Rob -
Nice work Carl and good to see, that ZM got the fit of the numerous fuselage panels right. That was not always the case with their TA-152, I built many moons ago. The internal detail maybe is a bit over the top, but at least, it doesn´t look toyish anymore, like with the TA-152. Cheers Rob
-
I have worked with 1manarmy masks mentioned by Paul on two builds, They are fantastic to work with, very precise cut and have a well researched placing guide. Even the tiniest lettered stencils are perfectly readable. Cheers Rob
-
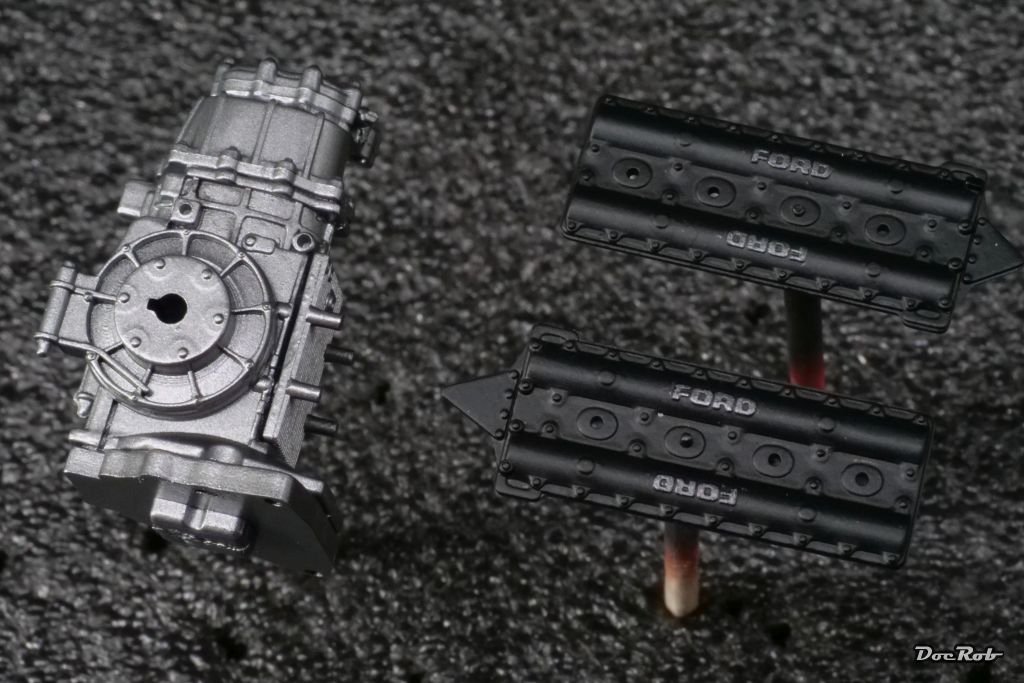
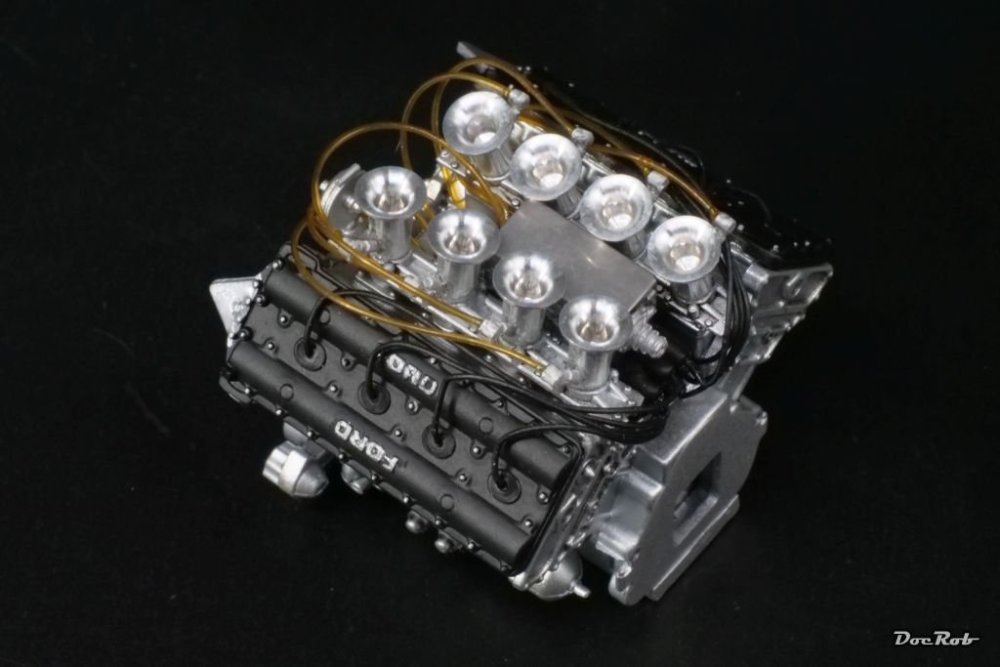
At least, you identified it as a Ford branding, so there is hope for my meagre painting skills with that logo . Cheers Rob
-
The best decal solution to my eye is a hairdryer. Even the most rigid carbon fiber decals settled around the wildest contours using one with the addition of decal softeners. Cheers Rob
-
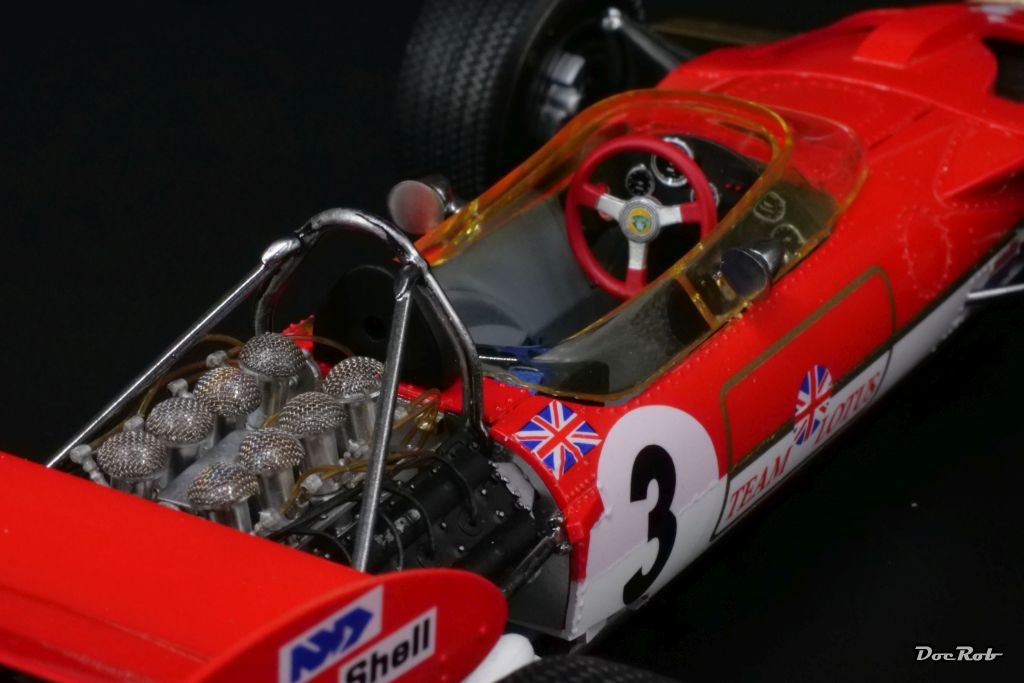
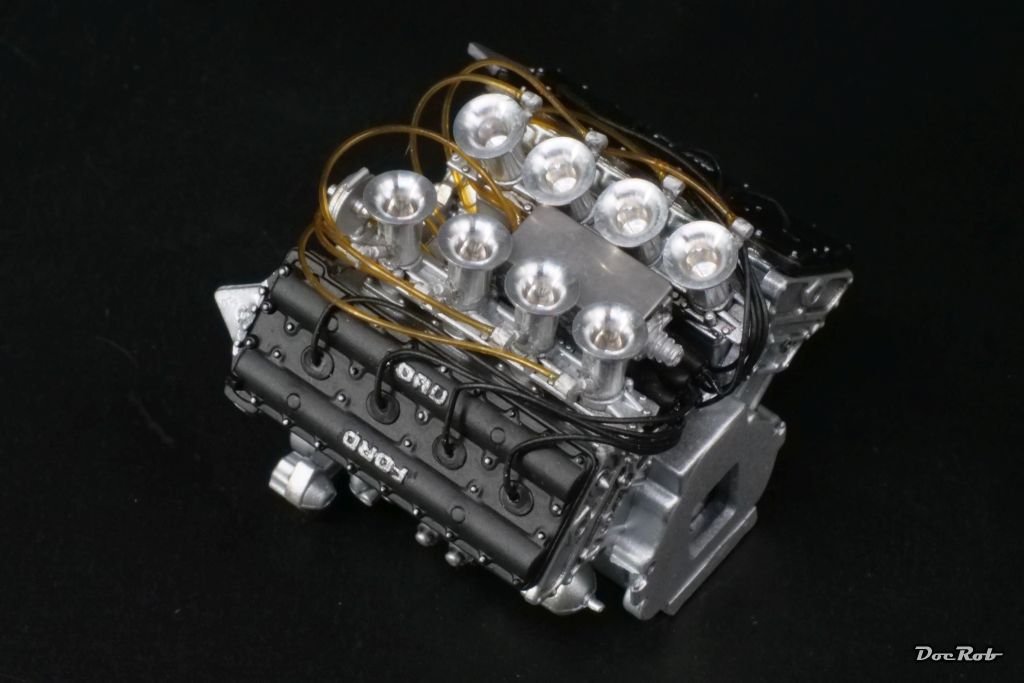
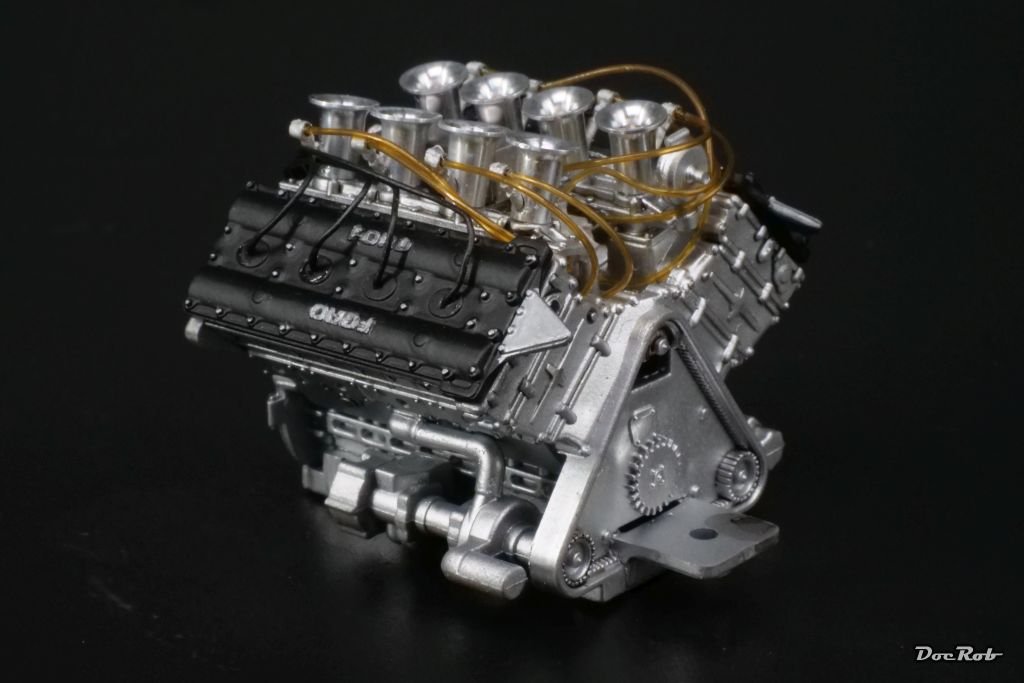
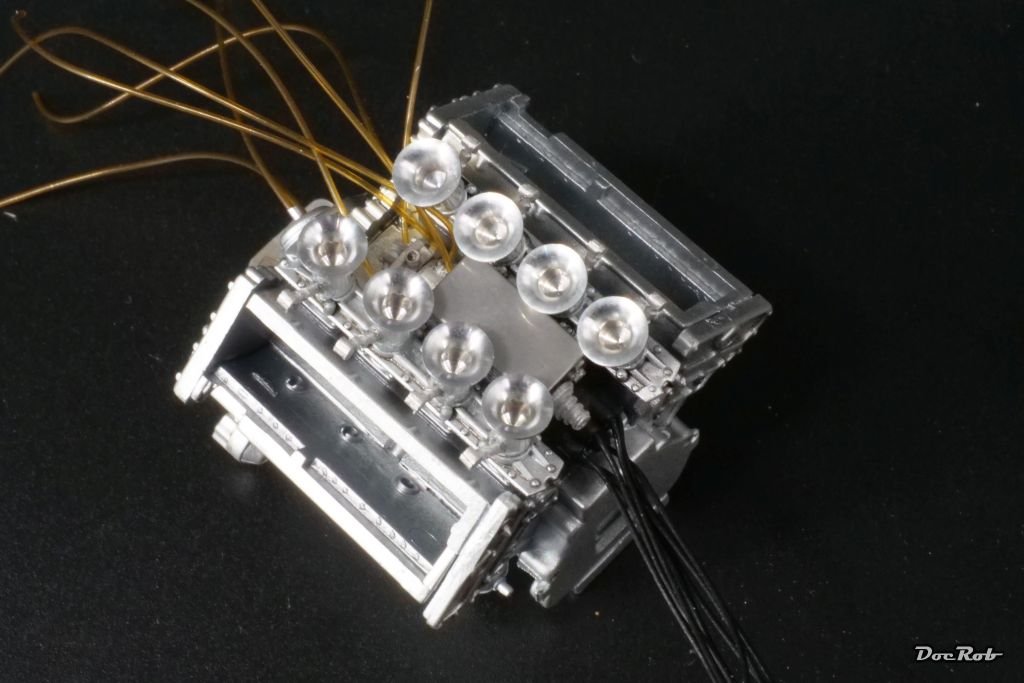
Finally, I got the wild hairdo of the engine straightened out. I combed and parted the fuel lines and ignition wires and glued them into place with CA. It wasn´t that terrible a task than thought, but needed a steady hand. My hand was less steady, when I tried to refine the Ford brandings with a brush and paint. I will rework it, when I have a completely unmoving hand, but today, I exhausted myself with swimming and running, not the best combo for painting these only slightly protruding buggers. The worst about macro photos, you can´t hide anything, the engine is tiny and looks better to the real eye. Cheers Rob
-
Trumpeter P-47D Razorback
DocRob replied to crazypoet's topic in LSM 1/35 and Larger Work In Progress
Well, there is always the question of sanity due to rum consumption or close the panels over the gun bays and stay sober . You obviously chose the first option, maybe because of the self promised rum intoxication . I like the work you have done and am astonished, how difficult it seems to be to find decent pics of these gun bays. Maybe that´s why the AM producers got it all wrong. I only built one Jug a long time ago, but that was a buttoned up Eduard boxing of the Hasegawa kit, so no inspiration to get from me. Cheers Rob -
You are right, it´s a demanding task, but very rewarding as well. Sometimes, it is a bit like meditation, until a drill bit breaks and sticks into the white metal part . I guess, you know both kinds of feelings with your fine plumbing on the P47´s landing gear. Cheers Rob
-
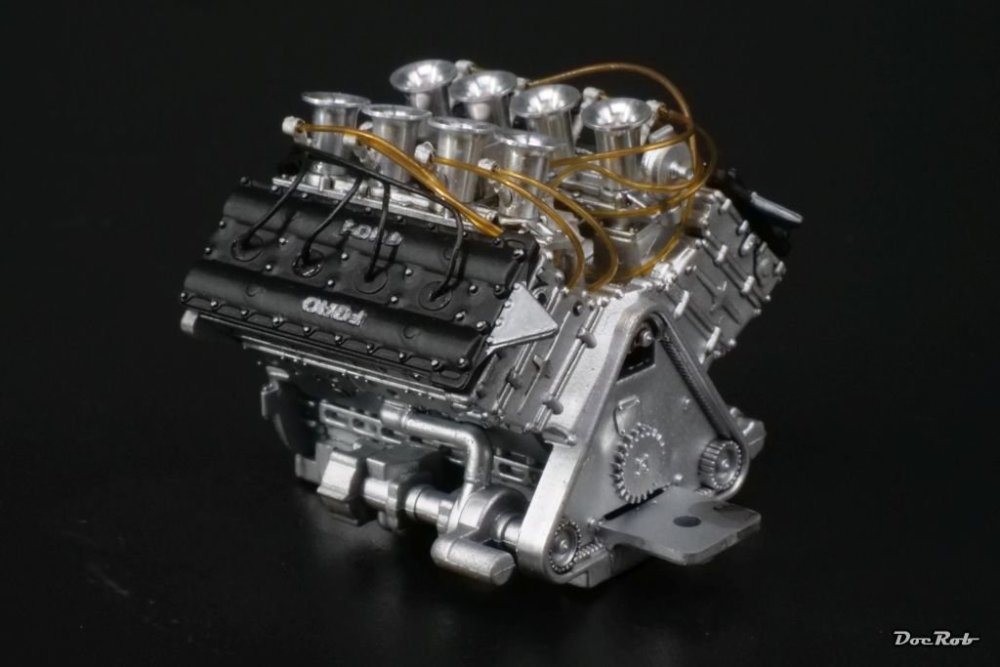
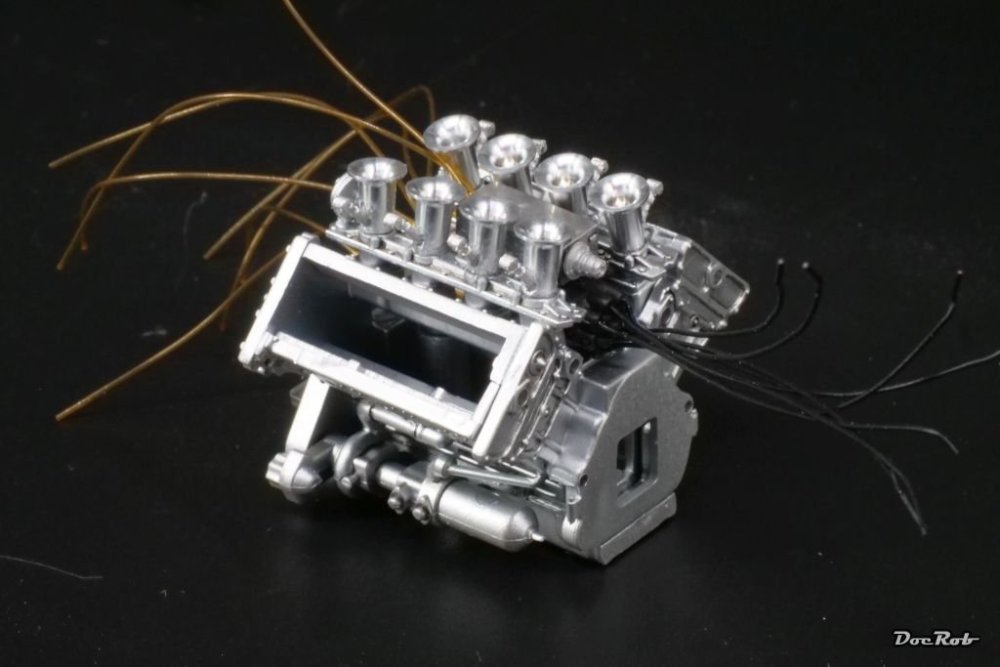
I have seven or eight kits with the legendary Ford / Cosworth DFV engine implemented and this is the firs time I build one. Actually the Lotus 49 was the first car in a long row using this engine, which proved to be the most victorious F1 engine of all time and for years set a kind of standard in F1 racing until it got finally replaced in 1983. I decided to give the kit engine some extra love and added a MFH set with turned funnels and fuel and ignition distributors. The engine will be very visible, so a bit extra detailing will improve the looks. I glued the yellow transparent fuel lines to the distributor with CA and then did the same with the ignition wiring, made from black 0,4 mm cable. Drilling the numerous 0,4 mm holes was delicate and gluing everything in place after shortening the tubes and wires will be equally difficult. I also assembled the gear box and sprayed it gun metal. I decided against the texturized color from Zero paints for that task, because I think in 1/20 scale the texture might be a tad too much. The valve covers were sprayed firs aluminum, followed by semi mate black, which I planned to carefully erase with a toothpick on the Ford logos. It didn´t work that way, so out with the AK Aluminum pencil, which also wasn´t successful due to the grainy application. It had to be the good old soft pencil, not perfect, but good enough for me. Cheers Rob


-
It depends, Mike. For lets say engine parts, I use only one coat, sometimes even without primer. I mostly paint these with Tamiya LP colors, sometimes with X or XF. With car bodies, I prefer multiple layers, with only one layer, it´s easier to sand/polish through, but I tend to spray only two layers with less hot colors, one for the color coverage and one for the surface finish, obviously heavier thinned. It´s always about how can I achieve the desired finish with as less coats as possible. I don´t want to loose detail with amounting layers, but the coatings have to be robust. Cheers Rob