DocRob
-
Posts
7,082 -
Joined
-
Last visited
Content Type
Profiles
Forums
Events
Gallery
Everything posted by DocRob
-

What is on your bench right now ? Share a picture :)
DocRob replied to Martinnfb's topic in Modelling Discussion
It just happens sometimes, Hubert. I had the Super Chrome in my shopping basket for a while anyway, but it was not available at the time you mentioned it. I have to check, if I have some Aqua Gloss and will try it, as the Super Chrome looks too good. Cheers Rob -
What is on your bench right now ? Share a picture :)
DocRob replied to Martinnfb's topic in Modelling Discussion
While removing the decals and polishing afterwards, I touched the chromed body often, without leaving any prints. This seems to be the only thing the Super Chrome is resistant to. Cheers Rob -
What is on your bench right now ? Share a picture :)
DocRob replied to Martinnfb's topic in Modelling Discussion
I considered Alclad or Extreme Metals from AK, where I have used chrome and polished aluminum from both. Usually, Extreme Metallics are a bit more durable than Alclad, but the Super Chrome is ultra fragile. I wanted all out chrome but had to pay the price. Your Hustler is looking sharp with the metal finish. Cheers Rob -
What is on your bench right now ? Share a picture :)
DocRob replied to Martinnfb's topic in Modelling Discussion
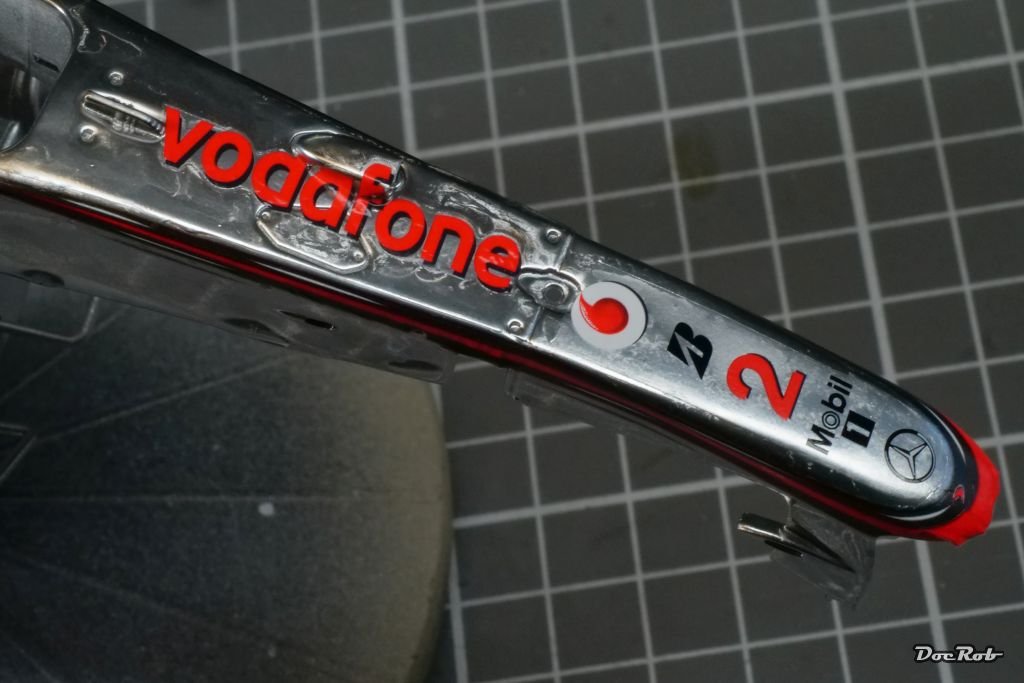
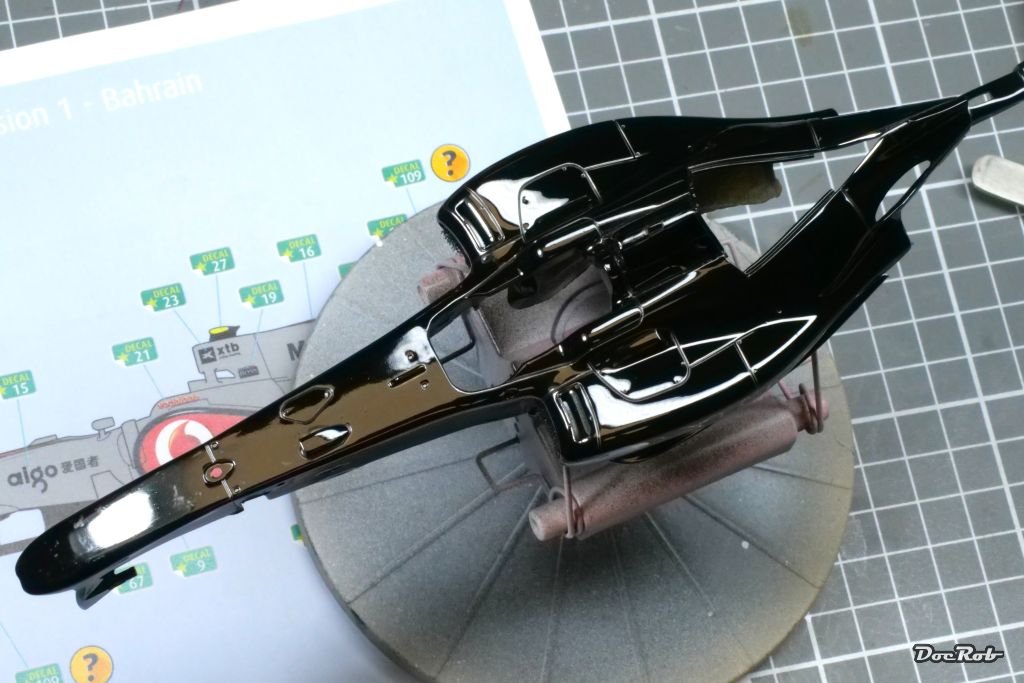
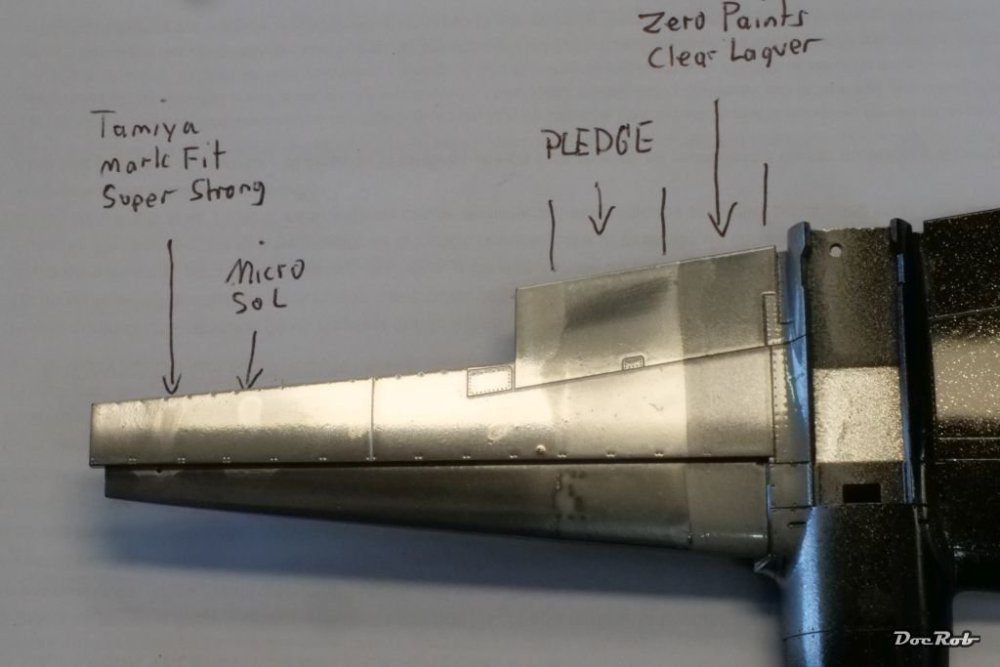
Yesterday, I was absolutely excited about AK´s Super Chrome and other than in some reviews, mine didn´t dull while drying. I decided to do some testing, before I got serious with decaling the McLaren. In short, what is possible with AK´s Super Chrome - ABSOLUTELY NOTHING. I tried decal solutions on the left side and both harmed the surface. Same with the clear coating, which I considered before decaling, again no way. If you tack on kabuki tape, you lift off a lot of paint, no masking allowed. But it got worse, after all that testing, I was certain, that only lukewarm water with a drop of detergent would be the way, but even that harmed the surface. The MP4/25 project is officially a fail now and the verdict on AK´s Super Chrome is: It´s the chromiest chrome around, but only usable for a Silver Surfer figure. Cheers Rob
-
What is on your bench right now ? Share a picture :)
DocRob replied to Martinnfb's topic in Modelling Discussion
Hombres, I´m not often overexcited with modeling products, least not when they claim to be "Super". AK´s Super Chrome earned the super, along mega, hyper and simply fantastic. I sprayed it on top of my glossy black primed McLaren body and it is absolutely chrome. First, I tested it on a dummy and I was disappointed. My usual chrome spraying approach of misting super fine layers of chrome onto each other didn´t work here. The shine comes with a heavy, wet coat, pretty unusual for chrome paint. Now, I have to wait, until it dried completely and then I test durability, masking and decaling including decal fluids on top, fingers crossed. Thanks to @HubertB for pointing it out. Cheers Rob

-
Trumpeter P-47D Razorback
DocRob replied to crazypoet's topic in LSM 1/35 and Larger Work In Progress
I like the looks of the gunports and ammo belts. Sometime it helps to lean back and envision the model as it looks when ready and my guess is, it will be a beauty and the ammo belts will fit in perfectly. Cheers Rob -
What is on your bench right now ? Share a picture :)
DocRob replied to Martinnfb's topic in Modelling Discussion
Well, beauty lays in the eye of the beholder, I like the chrome body, but else,.... The decals are fantastic, I nearly finished the CF-decals today and started assembling the rear section. I also "primed" all body parts for the chrome finish. I again used Tamiya LP-1 gloss black, which can be sprayed to a perfect glossy finish, when thinned properly. Did I mention, it´s a TOP OPENING box from Revell, there is a revolution going on . cheers Rob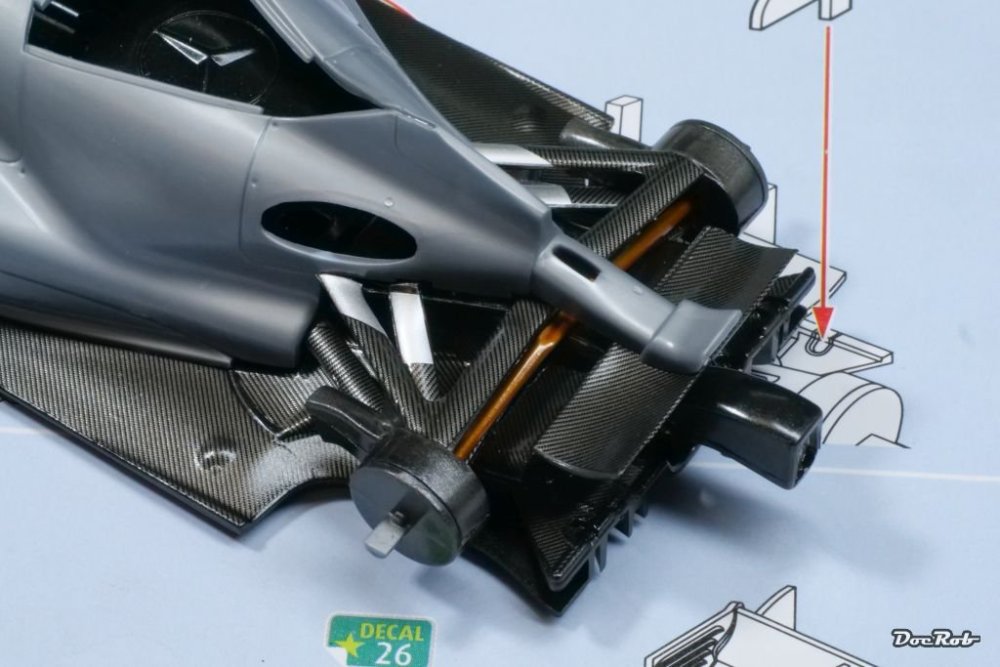

-
Sad to hear it, Chris, but sometimes it´s better to quit, than to burden yourself with a very unpleasant build experience as a mojo killer. I always hesitate twice, before buying an Italeri kit, there are so many bad ones and that from a major company. I wish you luck with the new kit in town. Cheers Rob
-
Muchas gracias amigo, always nice to hear when my work is an inspiration for others, that´s a two way process to me and what forums like LSM are made for. I profited so often from the input of fellows here as well. One thing that always drives me, besides realistic material reproduction is that I hate to quit. It happened, but not very often, luckily. Cheers Rob
-
What is on your bench right now ? Share a picture :)
DocRob replied to Martinnfb's topic in Modelling Discussion
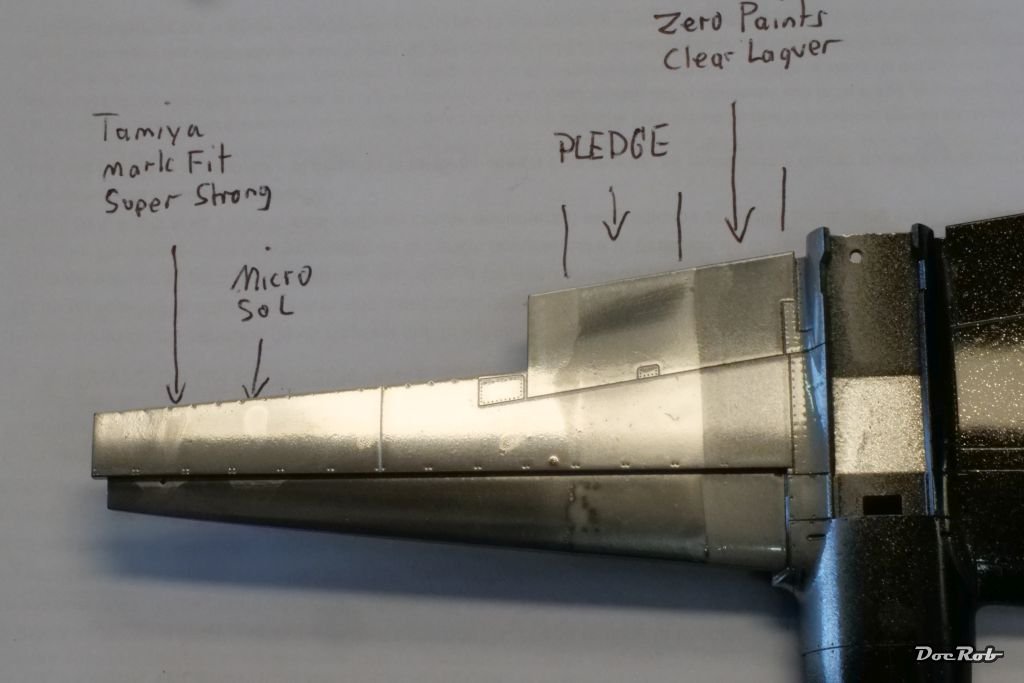
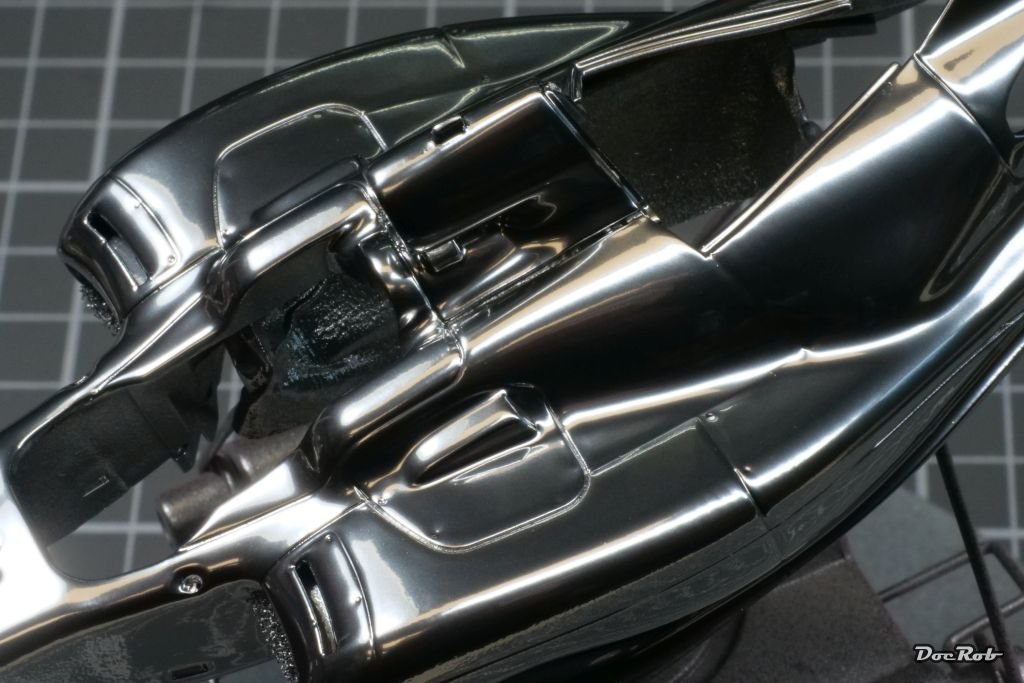
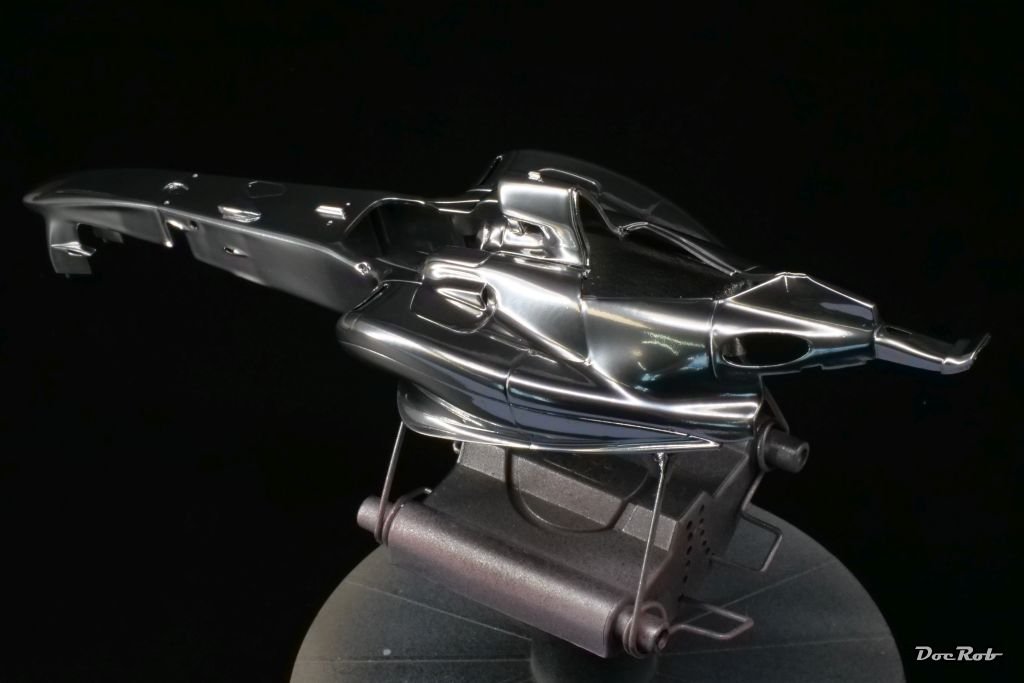
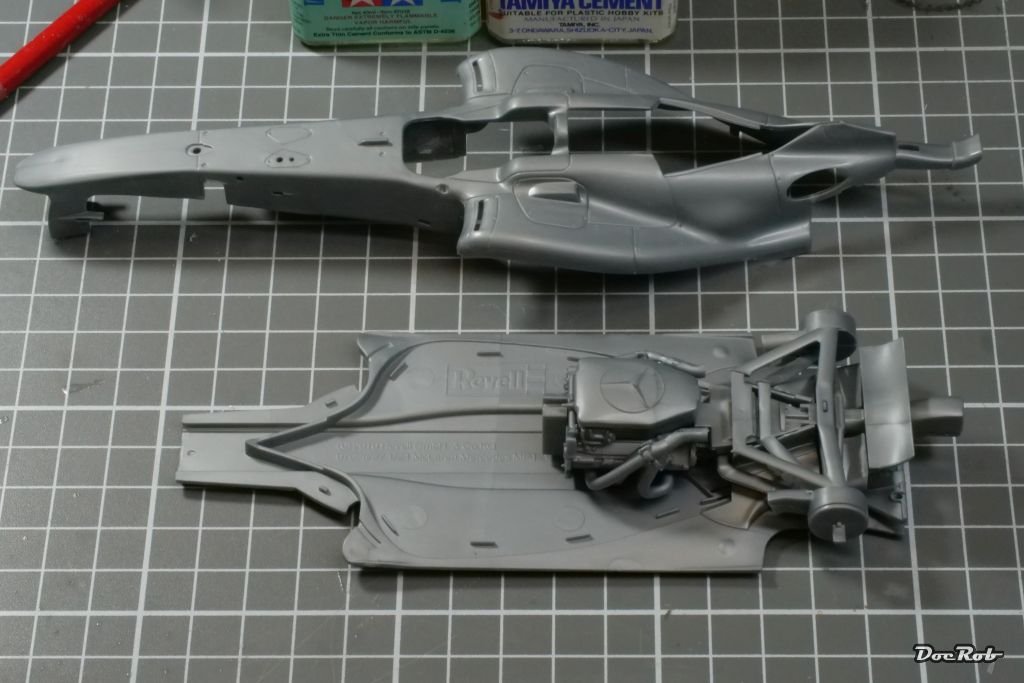
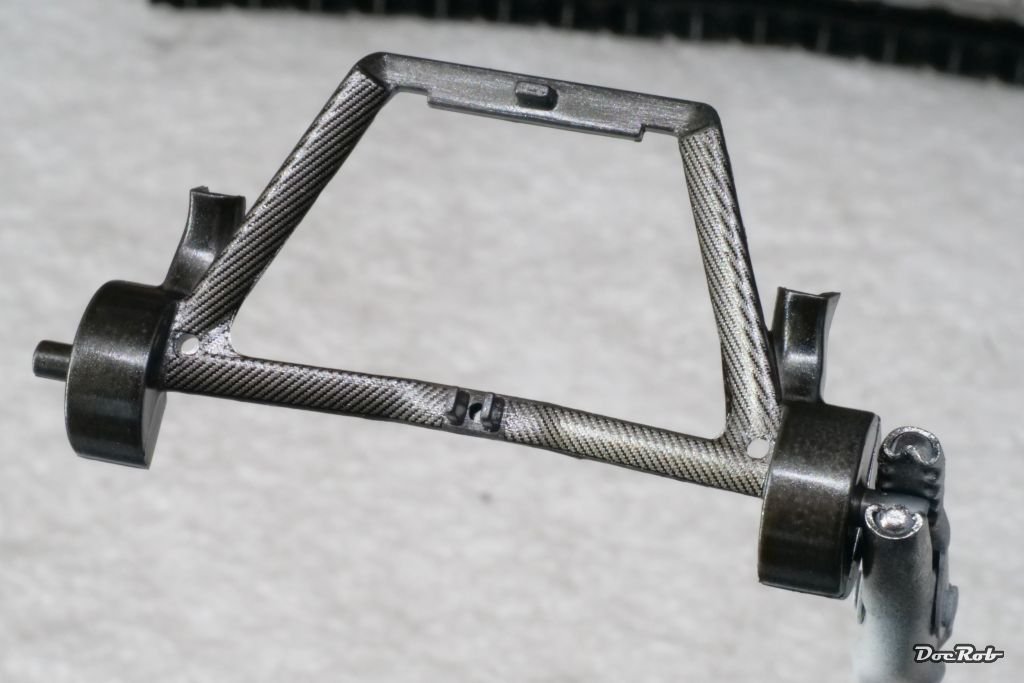
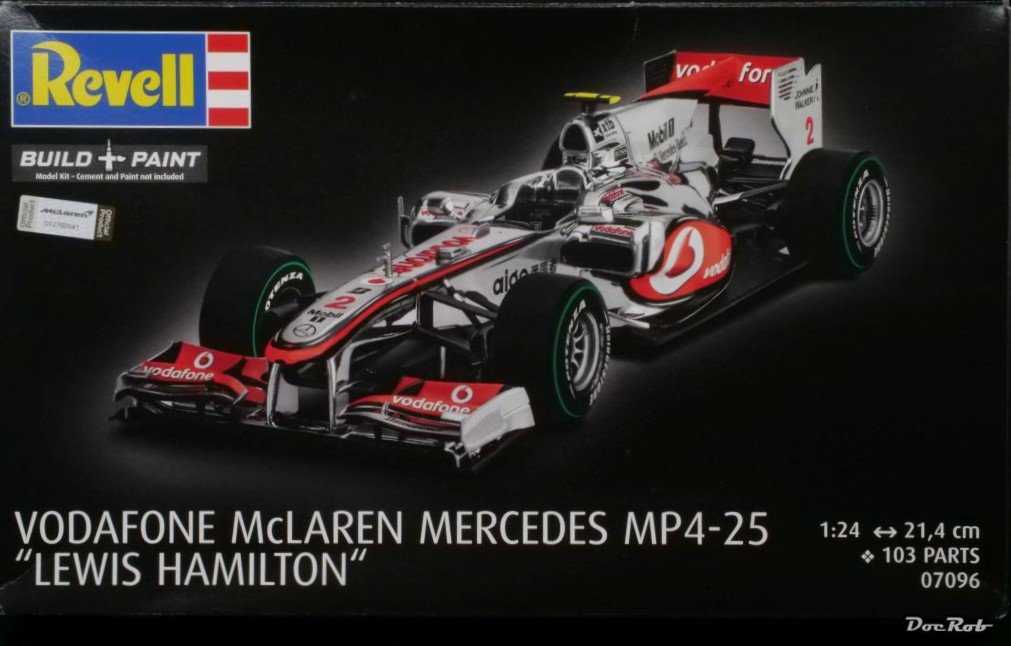
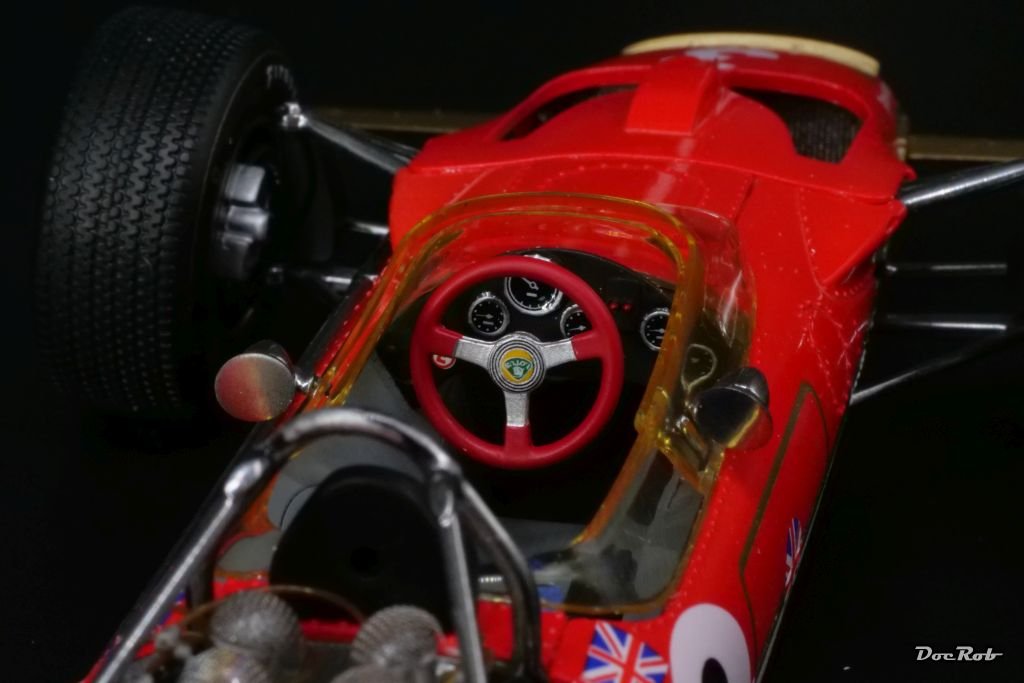
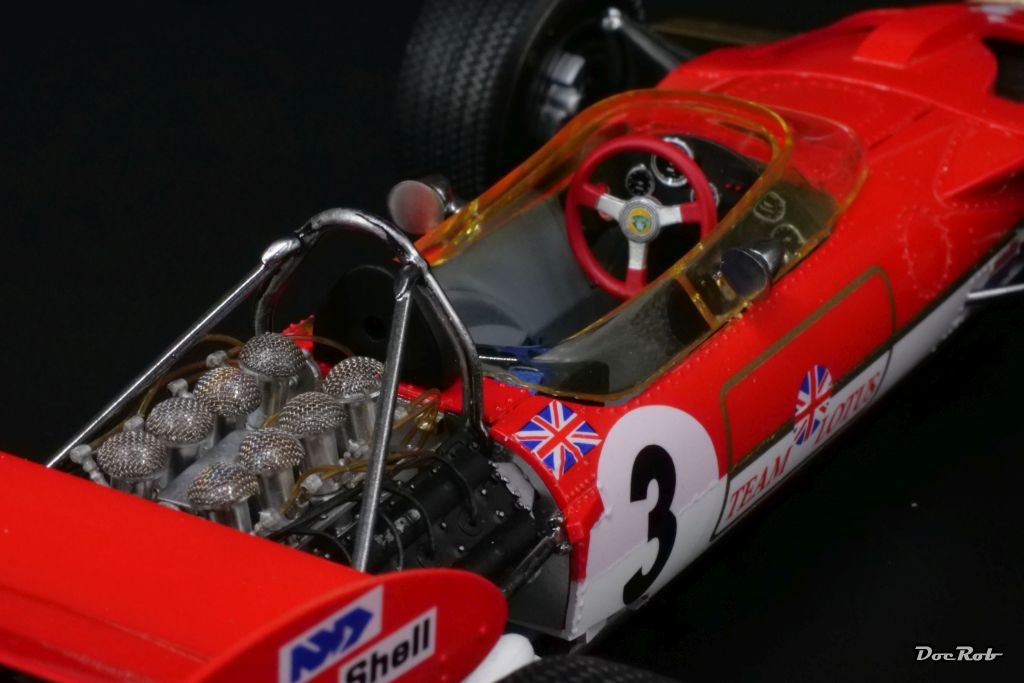
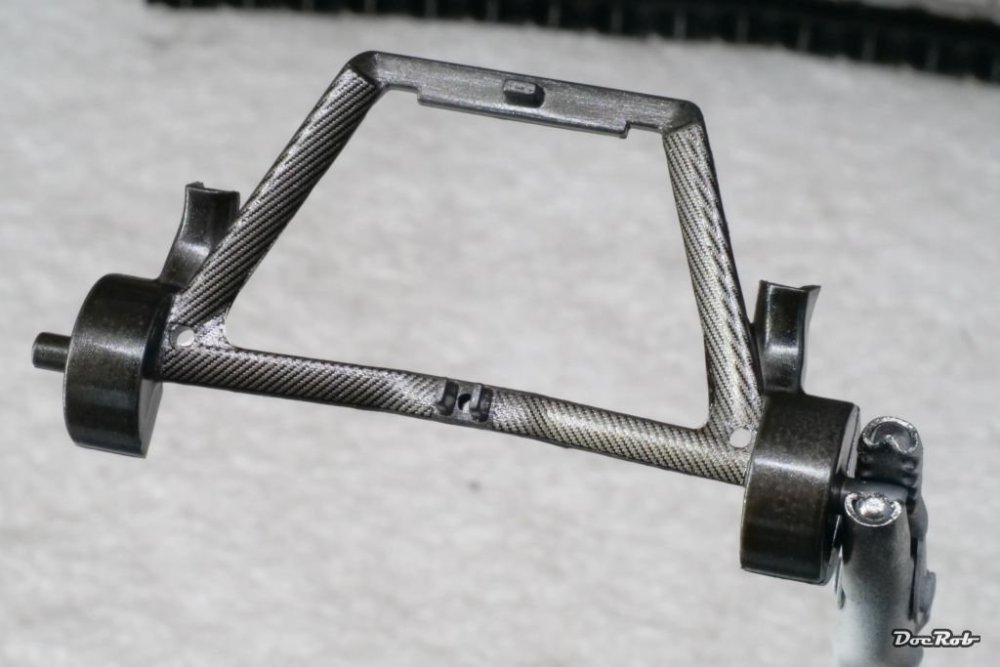
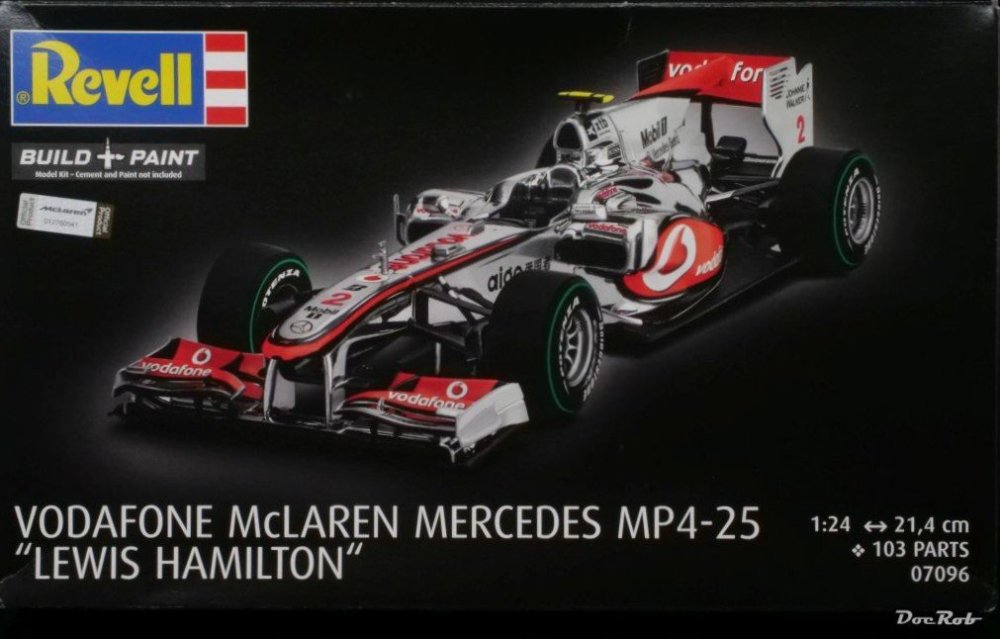
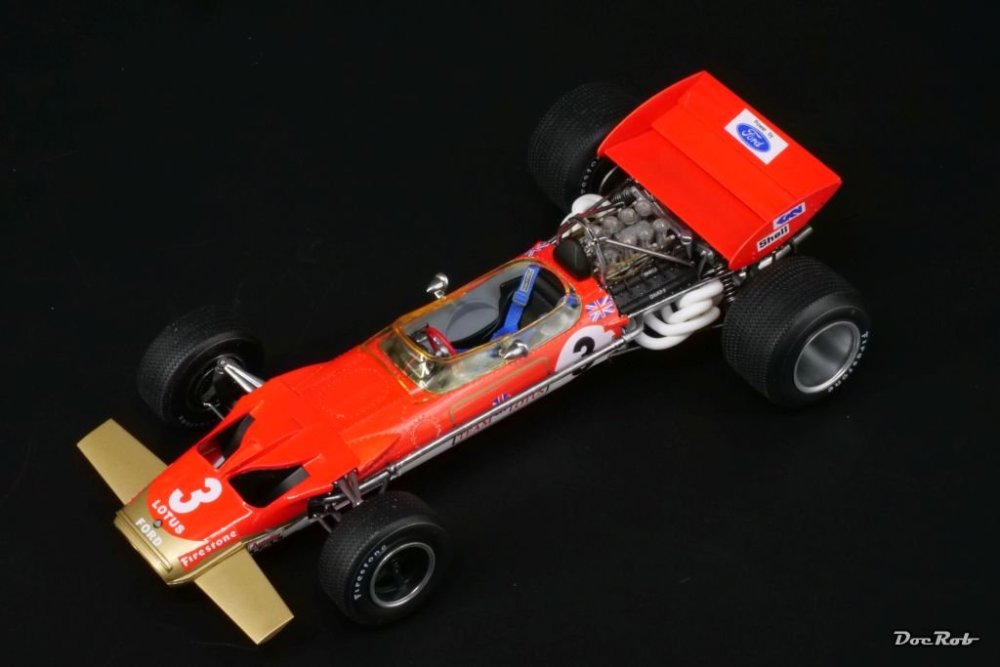
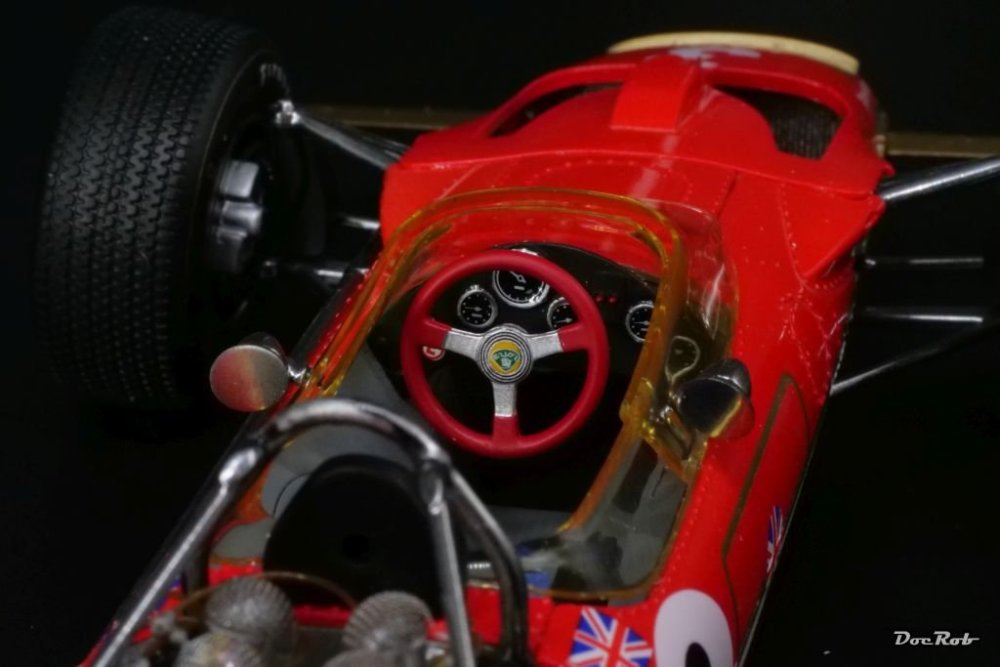
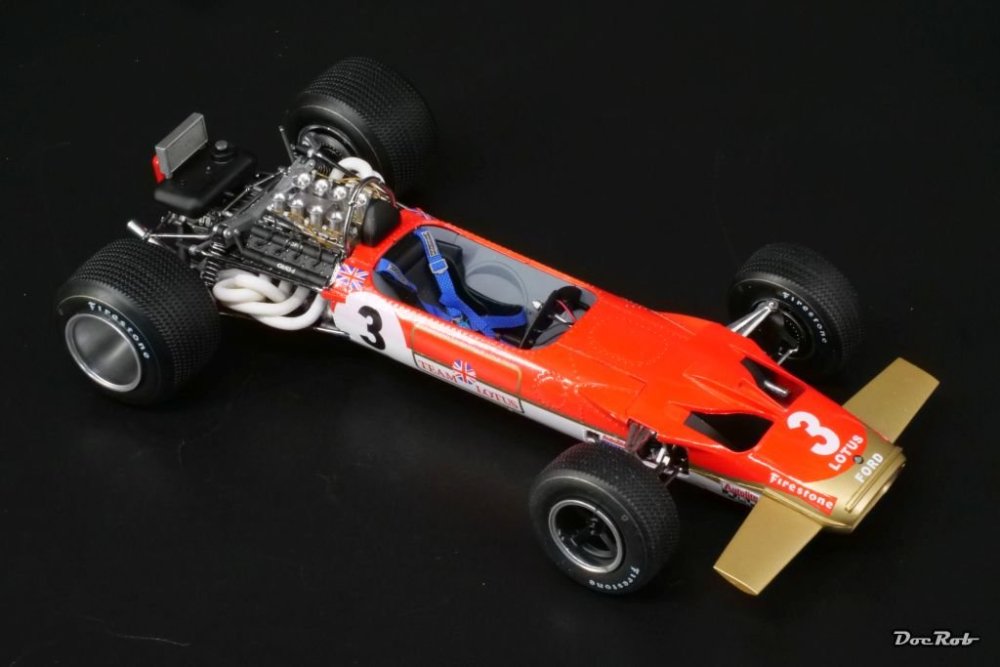
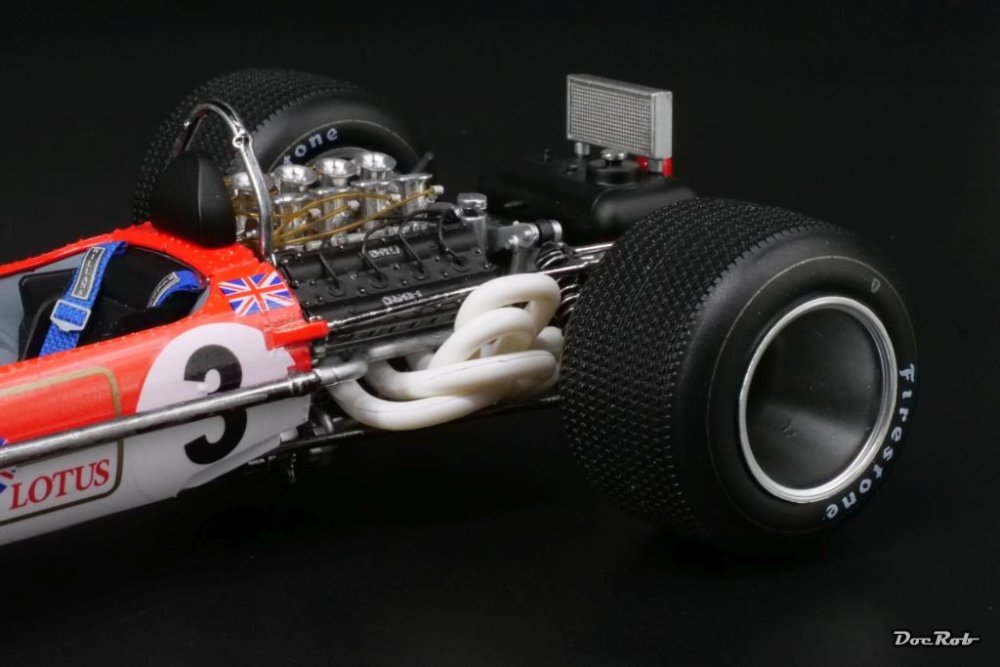
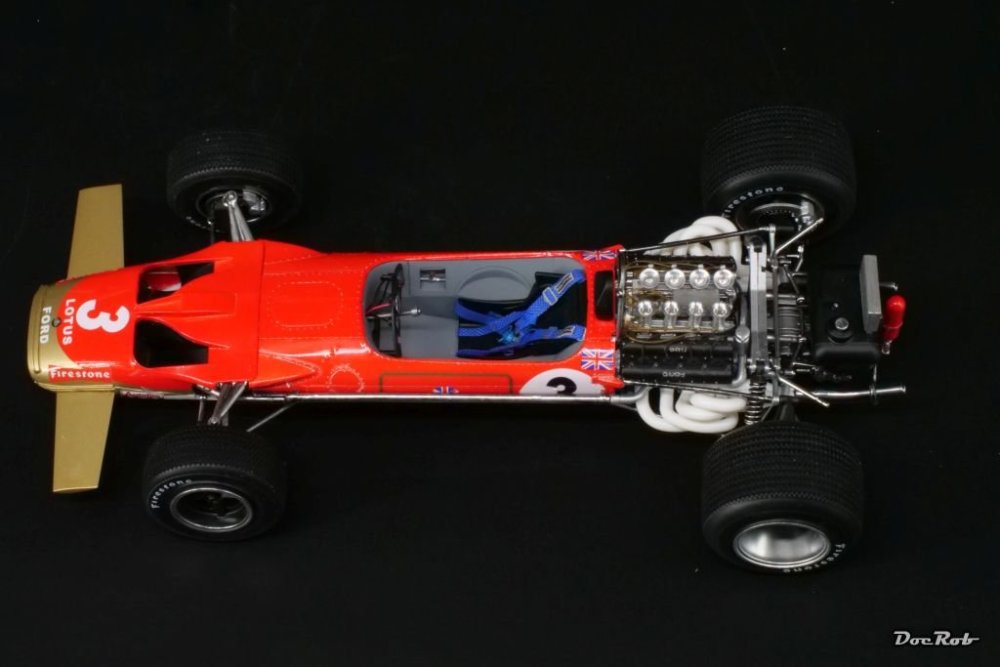
I got this little kit for a few Euros and thought, it could serve as a quick, relaxing build. I´m not that interested in modern F1 cars, but the box said "build and paint". My main goal is going oob for a high shine chrome finish with carbon fiber decals applied. There is not enough interesting stuff going on for a WIP. The kit parts fit well and until now, the build is easy. I prepared nearly all the parts and here you see the engine on the floor pan. There is no way to show the engine, which is a bit weird. I only painted it black and hide it inside the body. There are a few mold lines to address on the body, but nothing really bad. For now, the absolute highlight of the kit is the extensive decal sheet, including a lot of carbon fiber decals. I primed the CF-covered parts with Tamiya LP Metallic Black, which sprayed to a high shine finish, thinned with leveling thinner and an absolute recommendation under CF-decals. The decals fit like a glove, are not brittle and respond well to hairdryer and Tamiya Mr. Mark Strong, even on delicate shapes. Cheers Rob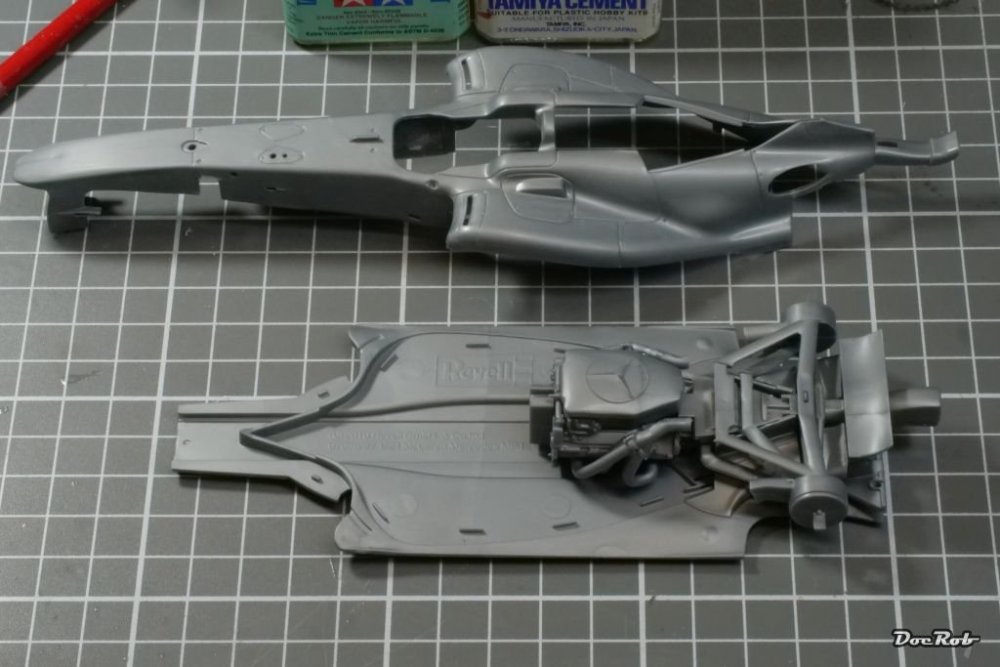

-
About 500 times have guessed myself if I want one, maybe I should buy it. An iconic movie with iconic ca.... - er ... gliders, ...er..., spinners. I wouldn´t mind a WIP, Carl. Cheers Rob
-
Thank you Count, you are certainly right about the seat belt material. It looks far better then a decal and I had no blue Christmas ribbon left. Cheers Rob
-
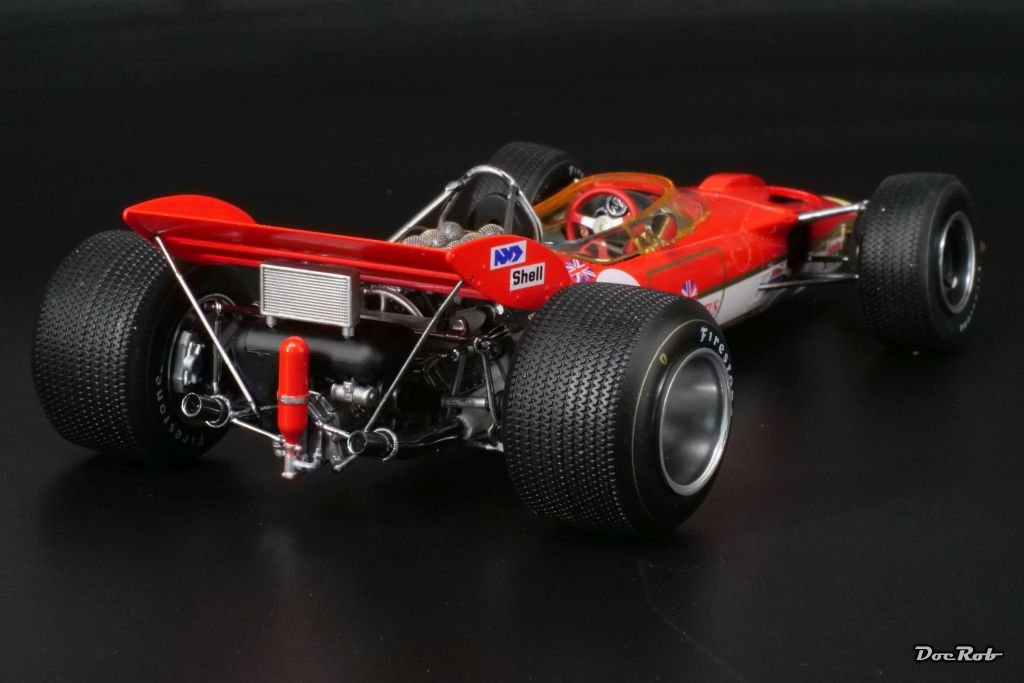
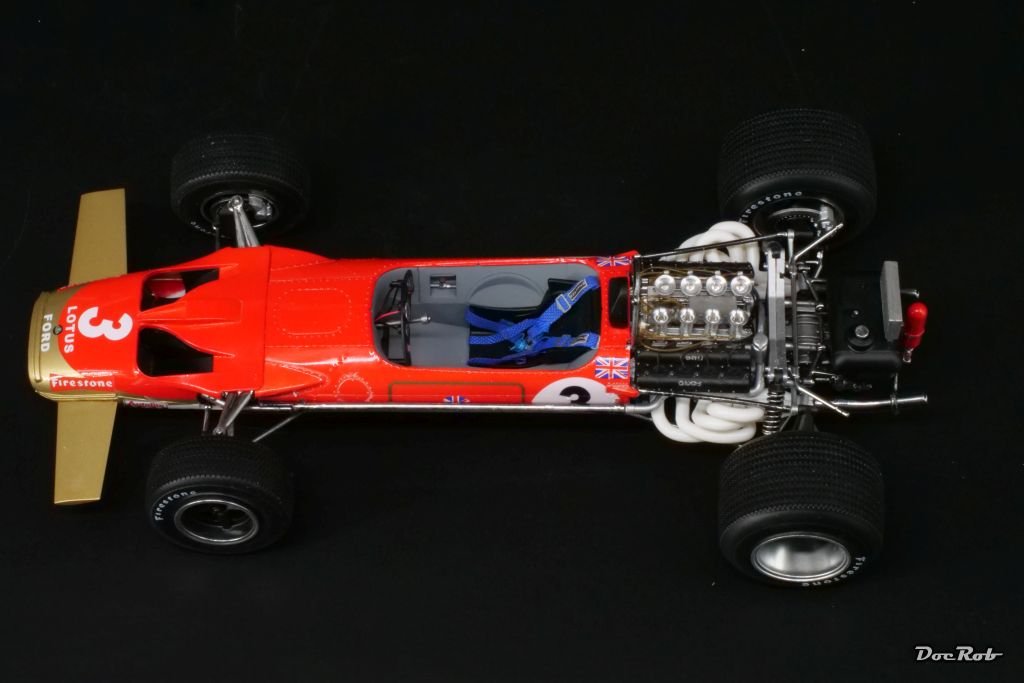
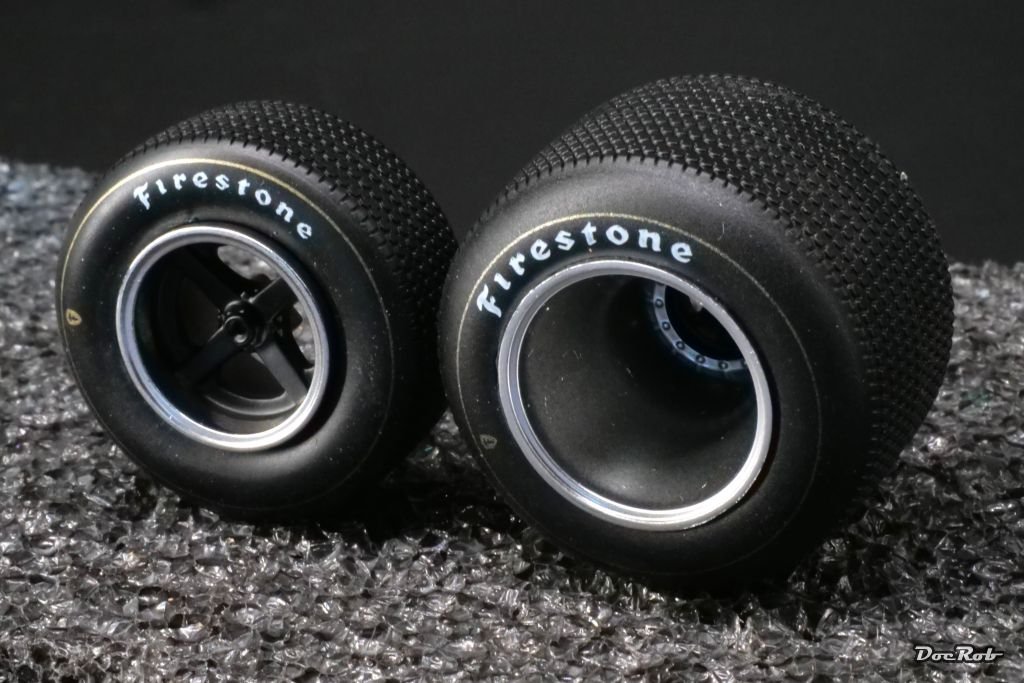
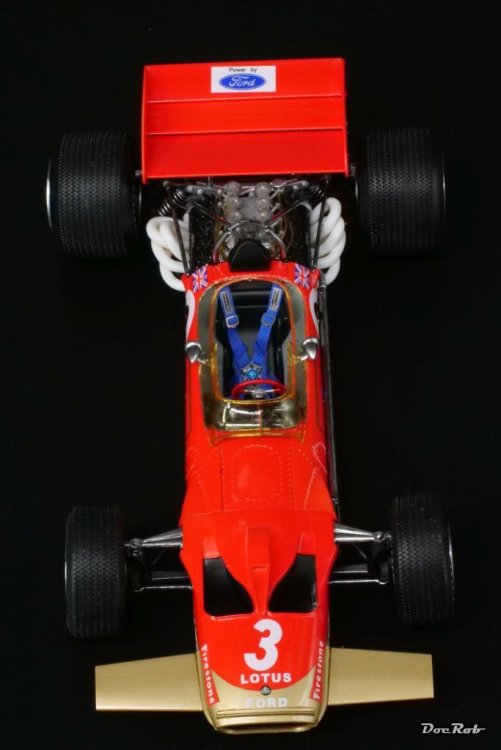
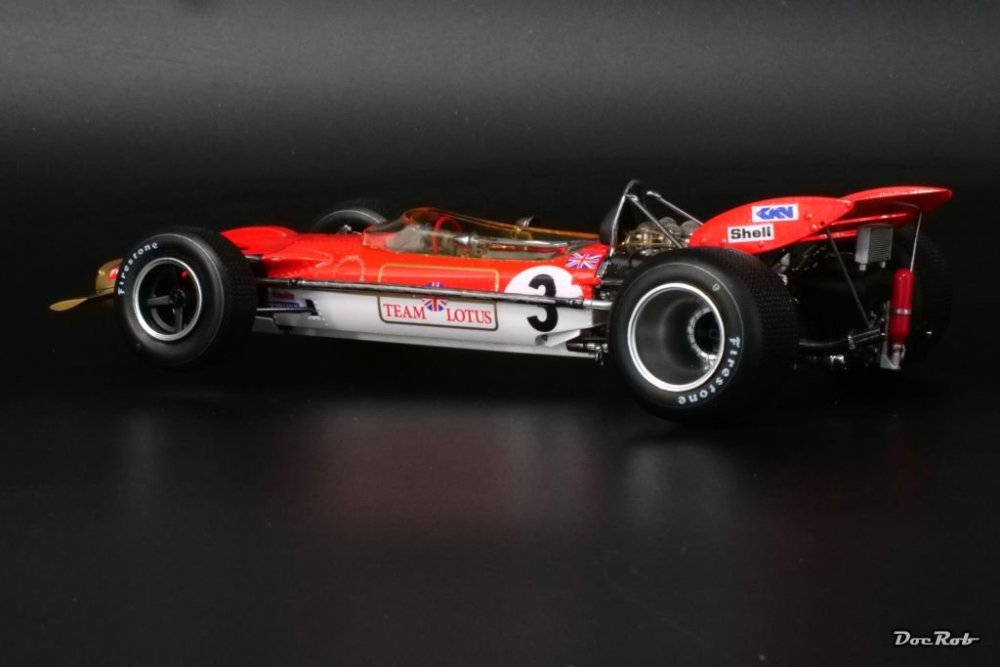
I don´t attend shows, so those requirements don´t apply to me, but what´s important with my car and bike builds is believable material reproduction and correct shininess of materials scale wise. For example, the rear rims of the Lotus 49 weren´t high polished aluminum, instead very slightly dull, but with a fine processed surface, given what photos of the real car show. Chrome wouldn´t do here and look wrong. Cheers Rob
-
Thank you PW, indeed a 60´s design, which raced in 1970 for the last time, giving way to the famous type 72. Cars and bikes need a completely different approach while building and painting. Nice when a well designed kit helps and doesn´t pour sugar in the tank. Cheers Rob
-
Lots of fine detail. I´m sure, you´ll weather the hell out of it. Cheers Rob
-
Henschel Hs-123 A-1 ICM 1/32
DocRob replied to Marek Models's topic in LSM 1/35 and Larger Work In Progress
Welcome to LSM. Cockpit and engine of your Henschel look fantastic. Can´t wait to see the fabric on the wings finished. Cheers Rob -
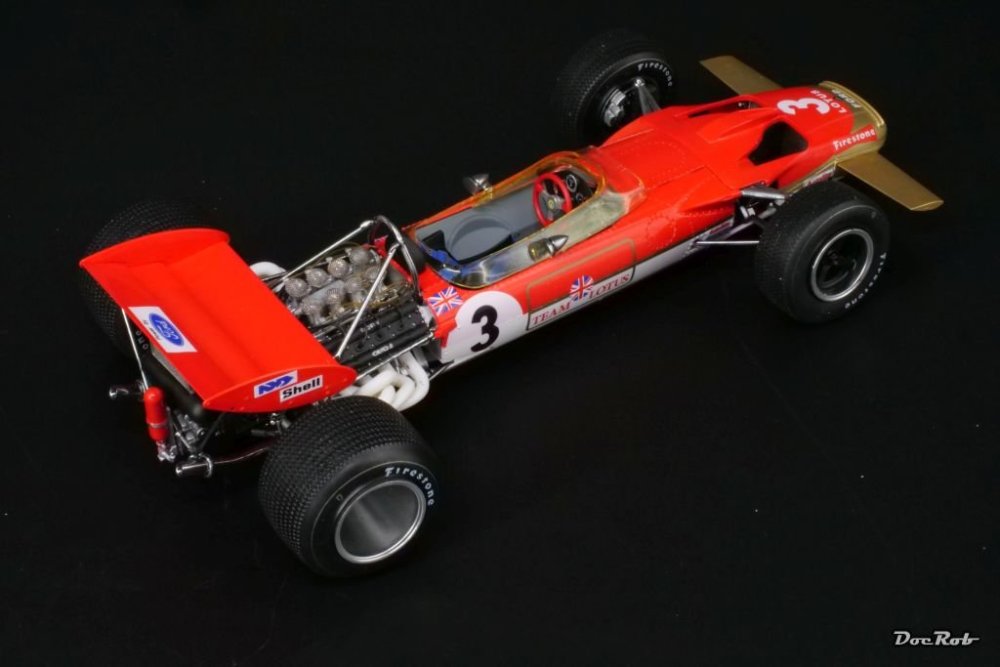
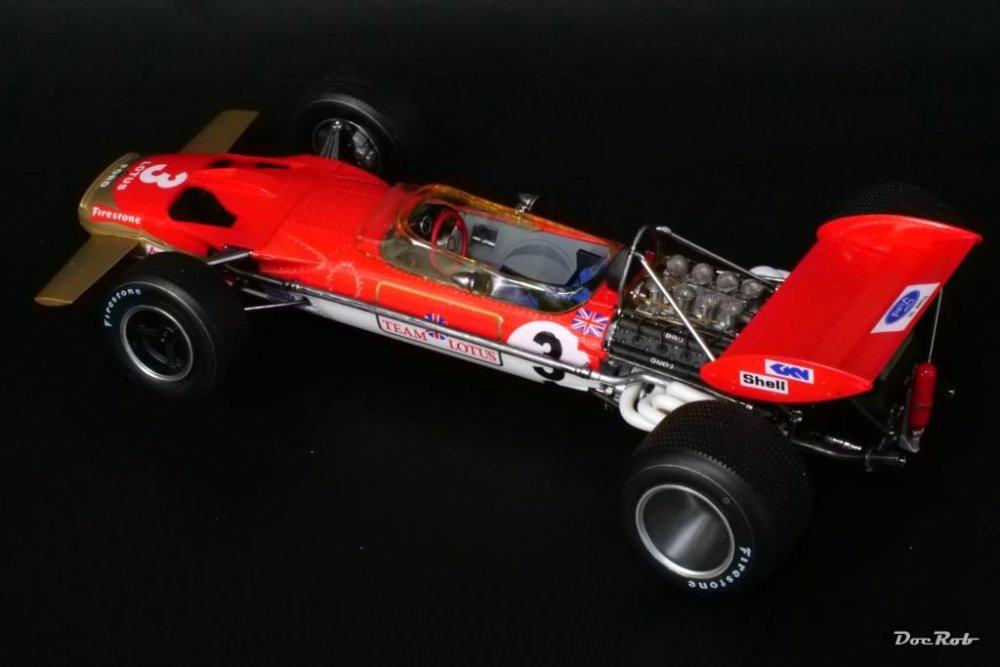
Thank you gents, there are builds, where you wish they would never end and some you´re happy to have them finished. This is one of the latter, but it looks like a Lotus 49 in the end and has a vivid appearance in the display shelf. I have some more Ebbro kits and even with the experience of this build, I´m looking forward to build them. There is a lot to like about the kits, like the pre printed tires, lots of detail and the choice of subjects. Cheers Rob
-
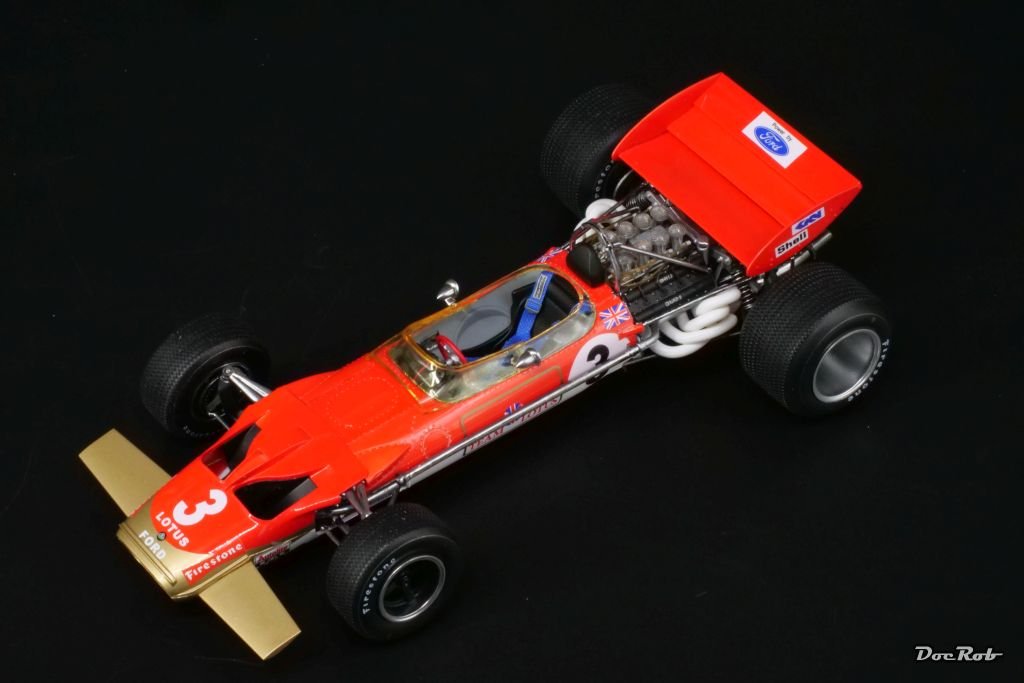
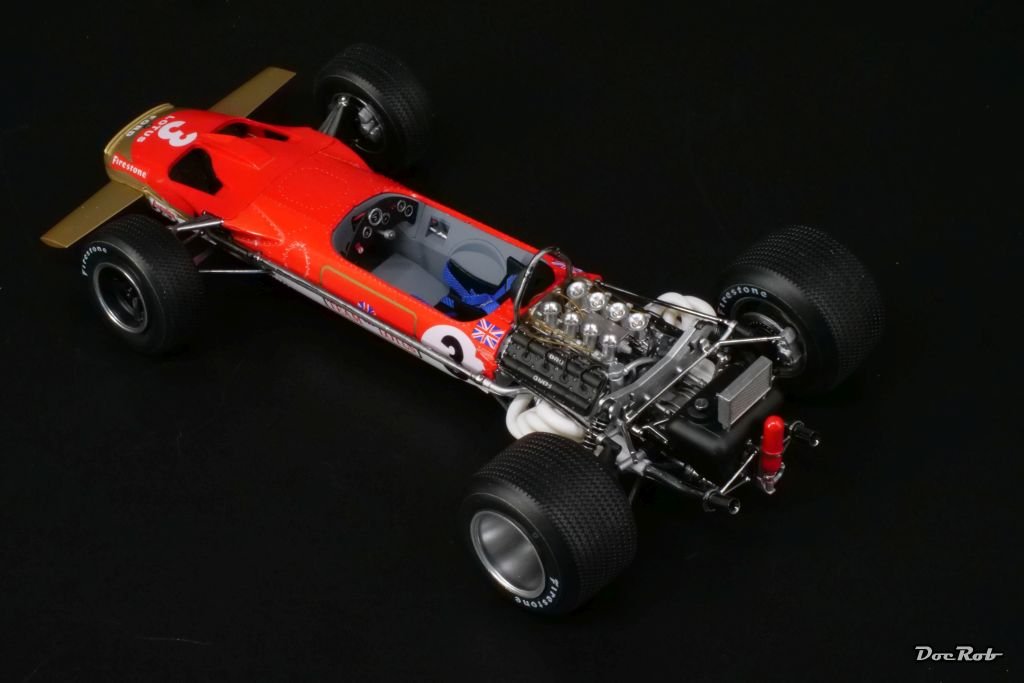
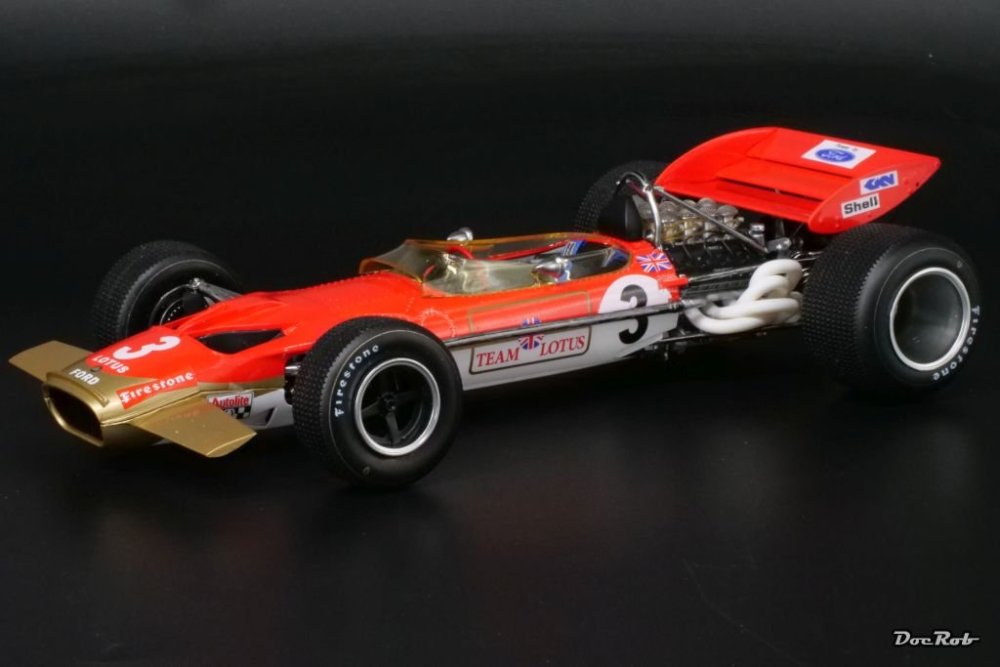
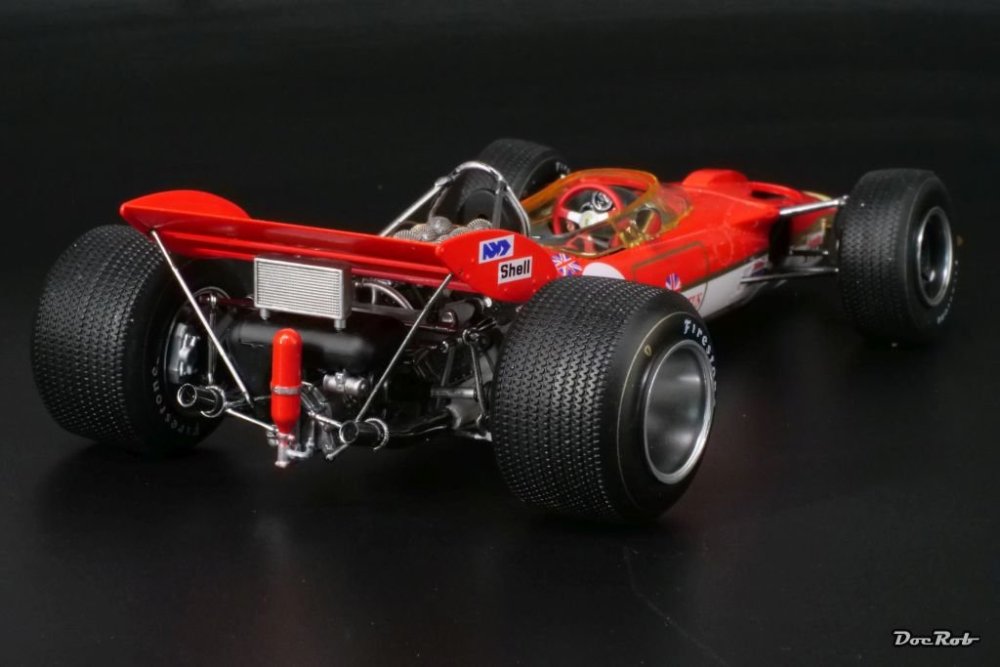
I got the Lotus 49c over the finish line. Final assemblies were the rear wing, the tiny metal nets over the air intakes, the steering wheel and clear parts around the cockpit and many small parts. The wing was easier mounted then thought, luckily. The rods were fragile and I can understand, why wings were banned sometimes in F1 due to the risk of flying around and hurting somebody. I hope, I did Jochen Rindt´s 1970 Monaco winner some justice. The build was not always pleasant, but I like the result despite some shortcomings. Cheers Rob


-
Thank you, there will be a lot of touch up work, before I finish this one. The chrome is especially prone to wear from handling. The fit issues, well, I even had to drill out the front suspensions for accepting the axles. The exhausts were another matter, which took hours to get right. I never faced a kit like this which is very good or very poor nothing in between. Cheers Rob
-
I loved the start in your familiar terrain, FA, the truck will be an ugly beauty, I´m sure. Cheers Rob
-
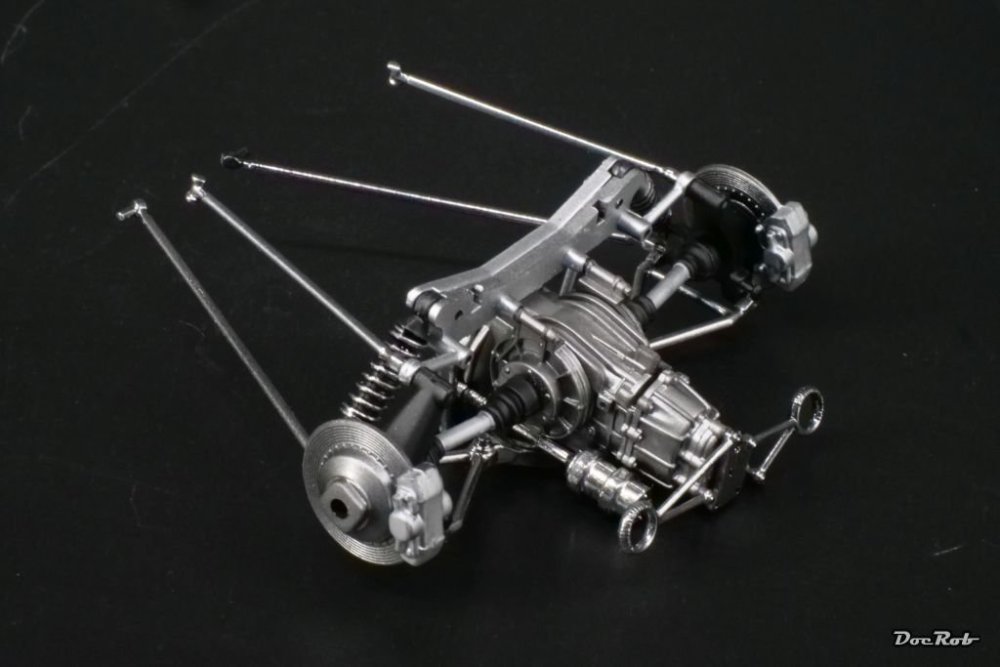
Almost done, the Lotus and my nerves. Assembly is very difficult due to fit issues and the complexity of the car itself. There were the exhausts with a special PITA award mentioning. I had to break them from the engine, because it would have been impossible to install the four chromed rods, connecting the body with the rear suspension. I had to shave off a lot of the exhausts undersides to fiddle them in and glue them in place. Cheers Rob

-
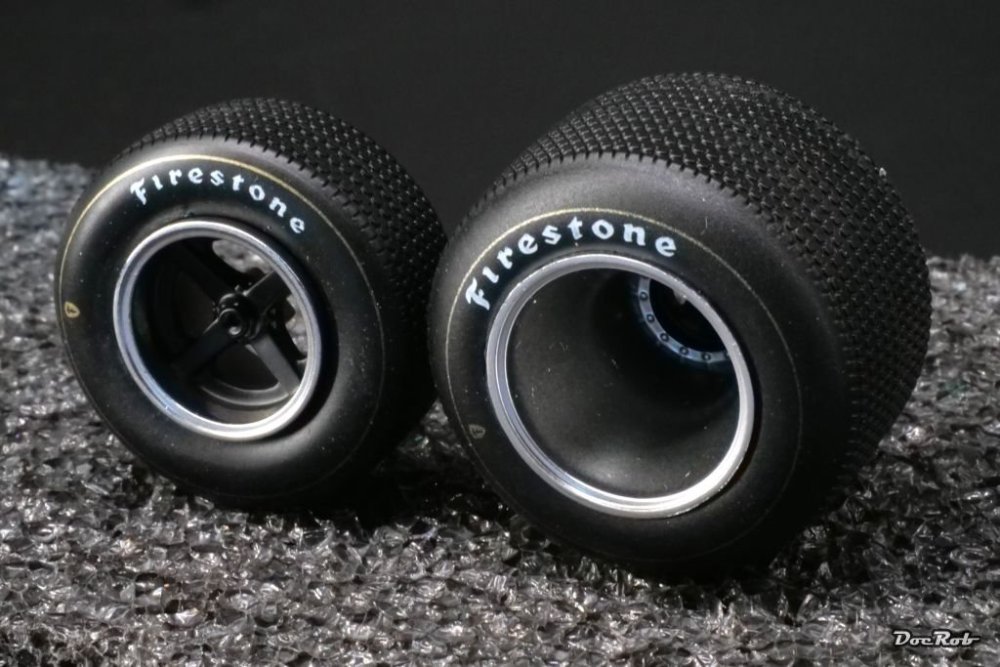
A lot is going on lately, not modeling wise, unfortunately, but I´m still onto the Lotus 49. Everything is prepared and painted and waiting to be assembled. The kit is a VERY mixed bag, quality wise. Some engineering is fantastic and you need no glue to assemble, others areas are downright terrible, specially where the pre chromed parts come into play. I de-chromed the sprues with oven cleaner, because the detail looked soft. Unfortunately it wasn´t the chrome, the plastic got covered in a layer which looks like clear resin as a base for the chrome and this is not removable. It´s also impossible to glue the de-chromed parts with plastic glue, they call for CA. I had to drill most of the holes on the back end out, they were simply to narrow. One of the best aspects of the kit are the pre-printed tires, an approach, I wish other companies would copy. The rims were sprayed polished aluminum and semi gloss black, as the chrome looked wrong. I assembled the gearbox with the rear suspension, an area, where there is great engineering, intersecting the parts with almost no need for glue. One of the worst area of the kit were the exhausts, which were chromed, albeit they need to be painted black or white, depending the car you show. The de-chromed plastic doesn´t take paint well and need CA to glue, not easy, when you assemble the four parts per side with only seconds to fit them to the engine case, moving and wiggling the fragile parts. Cheers Rob

-
What is on your bench right now ? Share a picture :)
DocRob replied to Martinnfb's topic in Modelling Discussion
Great looking pit, Gus. I had no problems closing the fuselage with my ZM Kai-Phantom or other fit probs with my kit. For the cockpit, i used only the supplied decals, as there were no AM sets available for the Japanese bird. For the detailing the seats, I used a set by Kits-World which was terrible. I guess, Quinta is of better quality. Cheers Rob -
I guess, it´s news for ´26, but a very much welcomed one. Lukgraph of Poland is releasing a Grumman Goose G-21 civilian in 1/32 scale. TMN: Kit countdown... Clayton's top ten upcoming releases of the month... There is something else for our Canadian birds with wings aficionados under the same link above. A Canadian CT-114 Tutor Snowbirds in 1/32 as a 3D-printed kit by Joycraft. Cheers Rob
-
I´ll try FA. I take you were after a pristine look of the Honda. Some of the different metallic surfaces doesn´t fit then for this goal. The frame is one example, I guess you used metallic wax, right? Aluminum usually looks pretty uniformly, when not weathered or other ways harmed. I would recommend spraying with Alclads, AK Extreme Metal or some of the Tamiya LP colors. The disc breaks look too dark and uneven for my liking, same goes for the brass/titanium? colored mounts of the disc brakes. The third area, I had already written about, the exhaust heat staining. It´s best done with an airbrush and transparent colors. I know, it´s a very different approach to get all the metals and materials look right. It helps to study pictures of the real thing. The scale is also quite different from the usual 1/32 or 1/35 stuff, where you need different procedures to make it look right. I know, that may sounds devastating but in fact isn´t meant to be, I´m talking about details. Your NSR is a beauty and I only want to tell you my personal view on some of the problematic areas. I only felt, the material replication is not up to your painting and weathering skills you show with armor kits, which I secretly envy. To me replicating materials is my main driving force in modeling and I´m a bit nuts about it. I love WWI planes with cloth and wood to imitate and more or less modern cars and bikes with all the different materials and surface finishes. In a former life, I was an engineer and know a lot about metals. I also sampled thousands of surface pictures from different pristine or weathered or corroded materials in former times for believable 3D renderings. Cheers Rob