DocRob
-
Posts
7,043 -
Joined
-
Last visited
Content Type
Profiles
Forums
Events
Gallery
Everything posted by DocRob
-
Good that you have one, Martin . Cheers Rob
- 2,035 replies
-
- 2
-

-
- car related stuff
- anything about cars
- (and 6 more)
-
Thank you Gary, not like your foiling, but damn close for an airbrushed finish . Cheers Rob
-

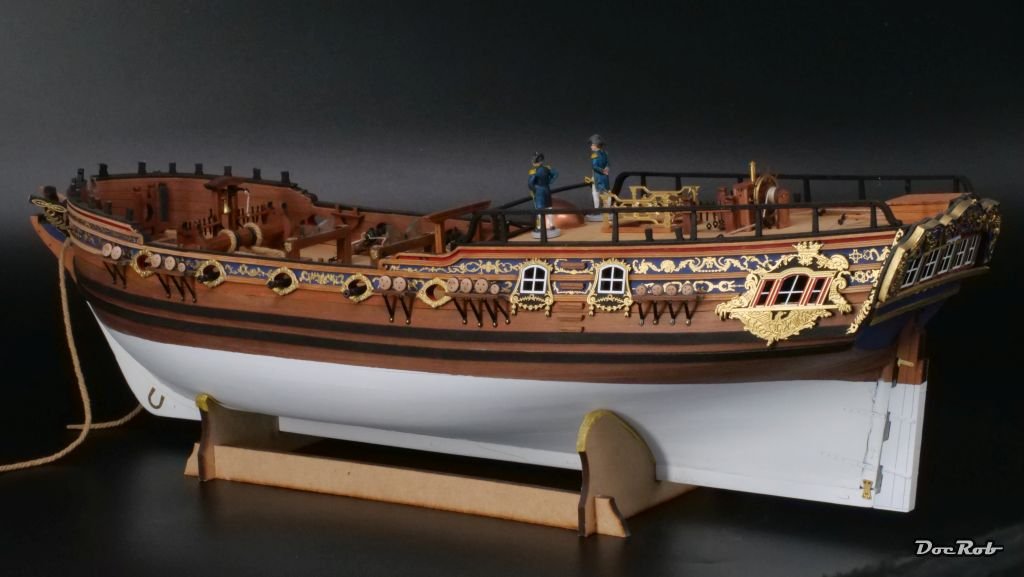
Duchess of Kingston - Beauty of the Seas - Wooden Sailing Ship 1/64
DocRob replied to DocRob's topic in Non LSM 'WIP
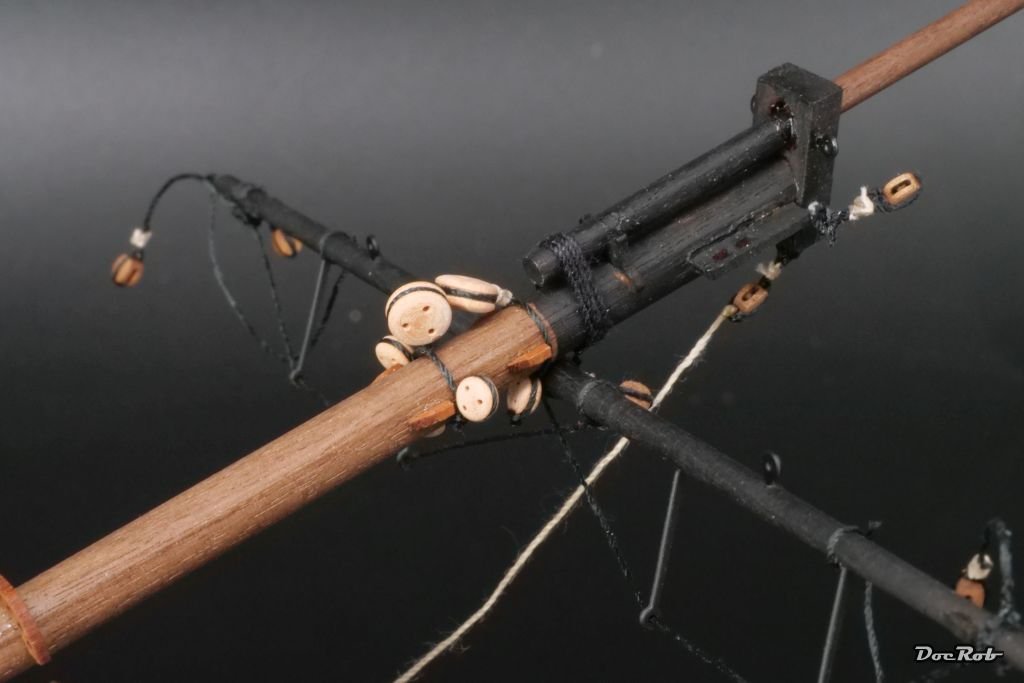
Long time no see and there is a reason for it, RIGGING. I built some WNW biplanes over the years and found the rigging difficult but manageable, but this is something completely different, this is frightening and I don't know, how the talented builders over on MSW manage to rig their ships to perfection. BUT, I will not give up, I will try to finish the Duchess of Kingston as good as I can, but I can tell you, never in my modeling career I felt so lost. Luckily there are many good build threads on MSW, which helped me during the earlier stages of the build and will help with the rigging too. This is where I restarted, Hull and decorations are complete, all masts and yards are prepared: Then I started rigging, adding several blocks and deadeyes to the bowsprit and yard. The process is complicated and my seizing looks terrible in places. CA glue for securing my simple knots is the savior. The bowsprit and yard are not permanently attached to the hull, as I want the maximum possible freedom of movement as long as possible. I will continue to pre-rig all the masts, before adding them to the hull. Cheers Rob


-
That's the case here too, but the main problem seems to be the distribution chain for spare parts. The big players are only allowed to use their designated suppliers and if these don't have the parts needed, it's waiting time. My friend has a small workshop and I hope, he can solve the problems with the united force of mechanics on our island, with the large company failing, I completely lost my confidence in them. Cheers Rob
- 2,035 replies
-
- 2
-

-
-
- car related stuff
- anything about cars
- (and 6 more)
-
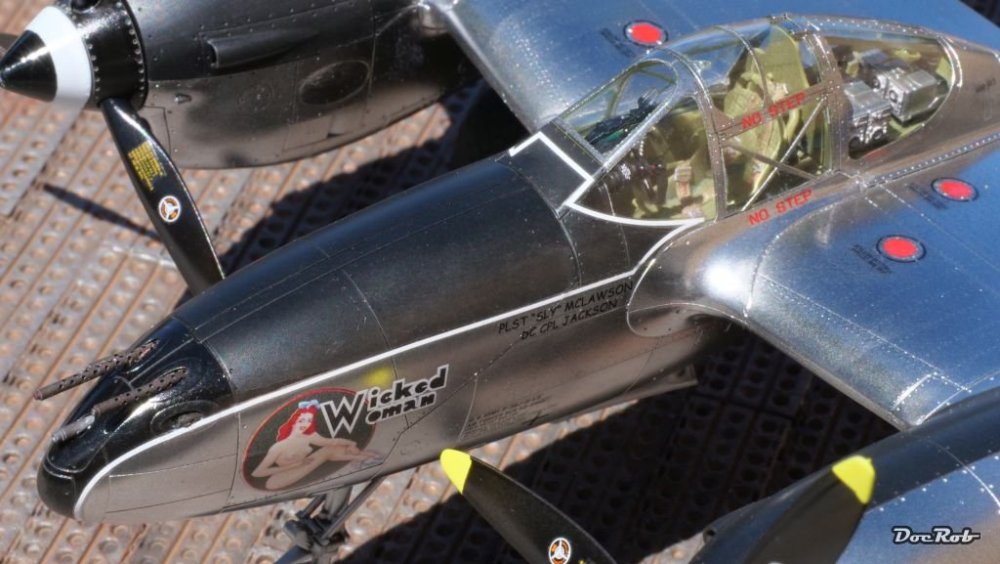
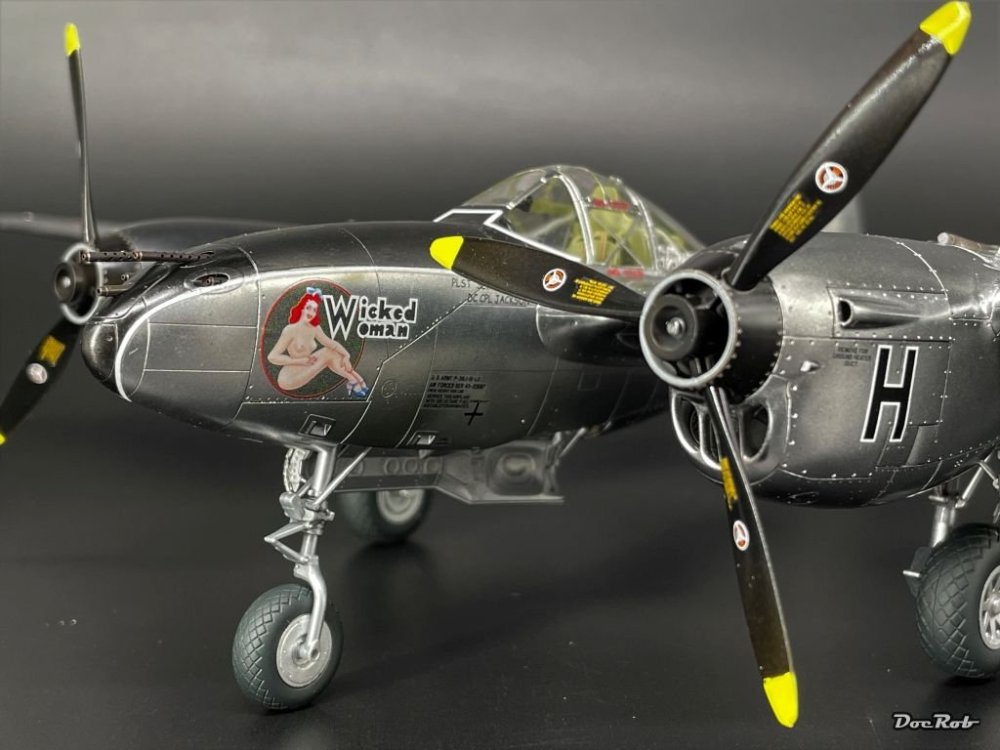
Thank you Hubert and Phil, after some experiments, I 'd say, Tamiya LP-1 gloss black and Alclad chrome or polished aluminum are a dream team. @Bomber_County Before you consider respraying your P-51, be aware, that no masking should be done onto the polished aluminum and be careful with hot decal solutions. Cheers Rob
-
Dentists wet dream Cheers Rob
-
I do, but heavy hearted, my Jeep is in a workshop since FOUR month. There is a problem with the automatic gear. Nothing serious it seems, but the mechanics can't get the missing parts. Next week a friend who is a mechanic will 'rescue' the Jeep from this terrible workshop (the biggest on the islands) and try to fix it. The dog is well though, but misses the more spacious Jeep as well. Cheers Rob
- 2,035 replies
-
- 4
-
-
- car related stuff
- anything about cars
- (and 6 more)
-
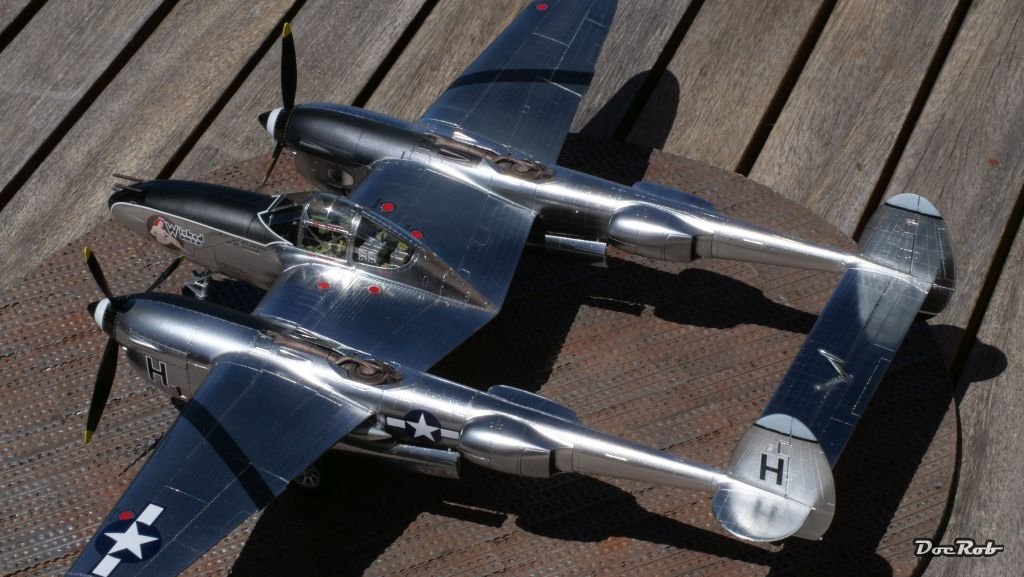
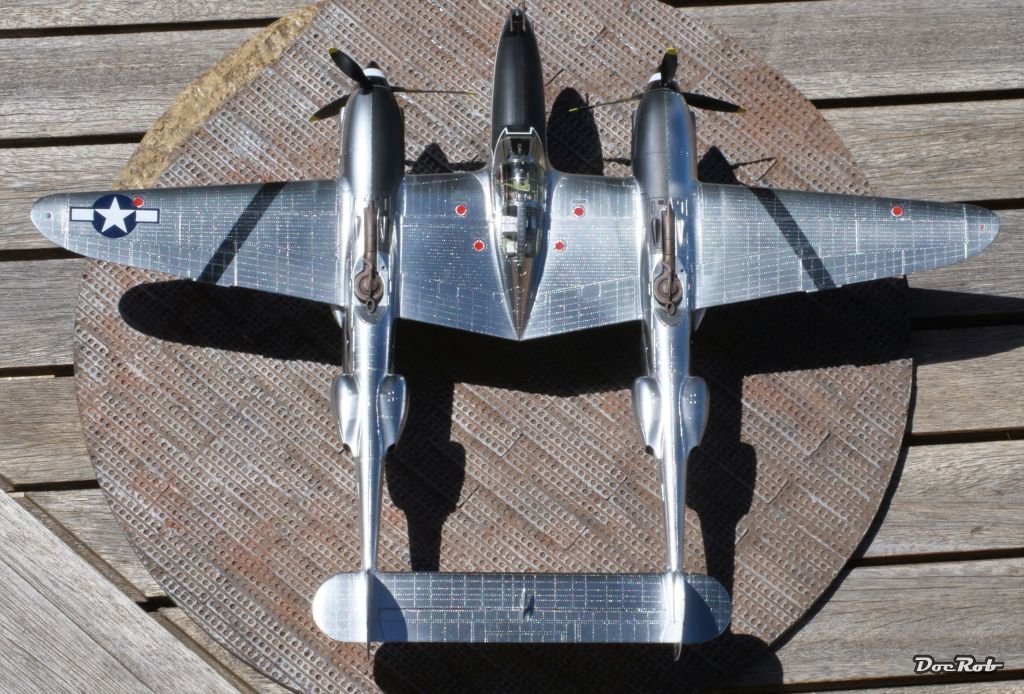
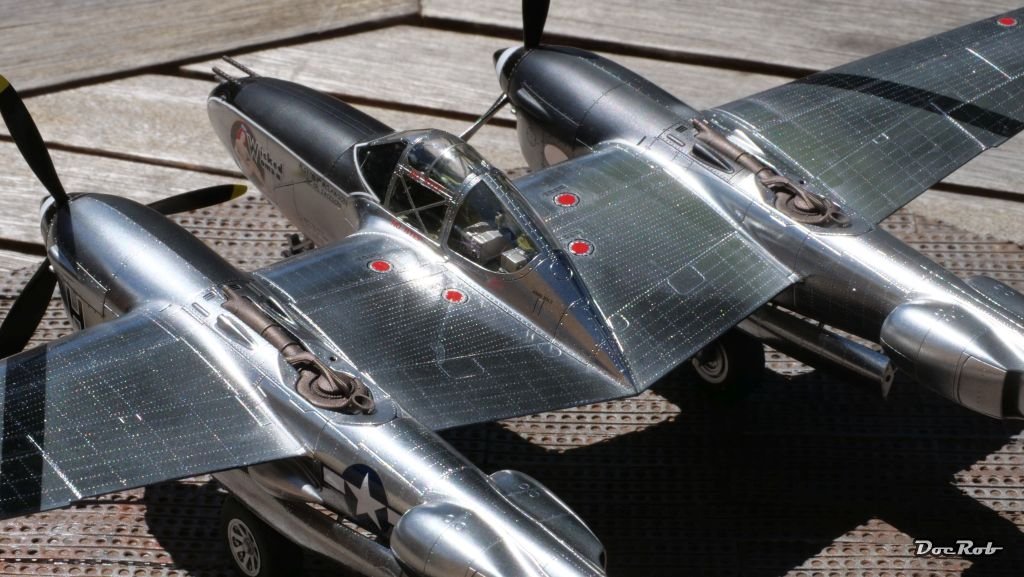
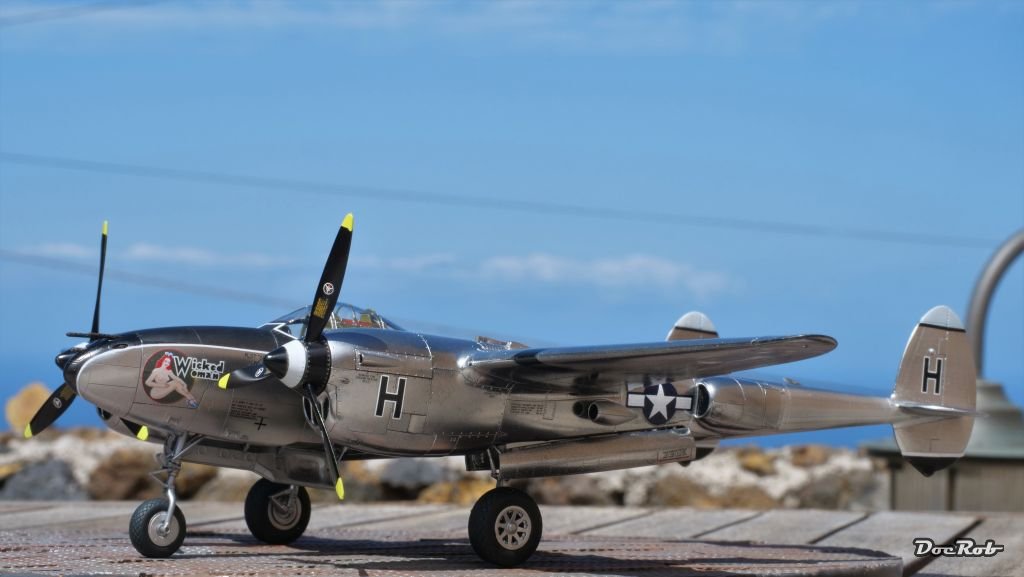
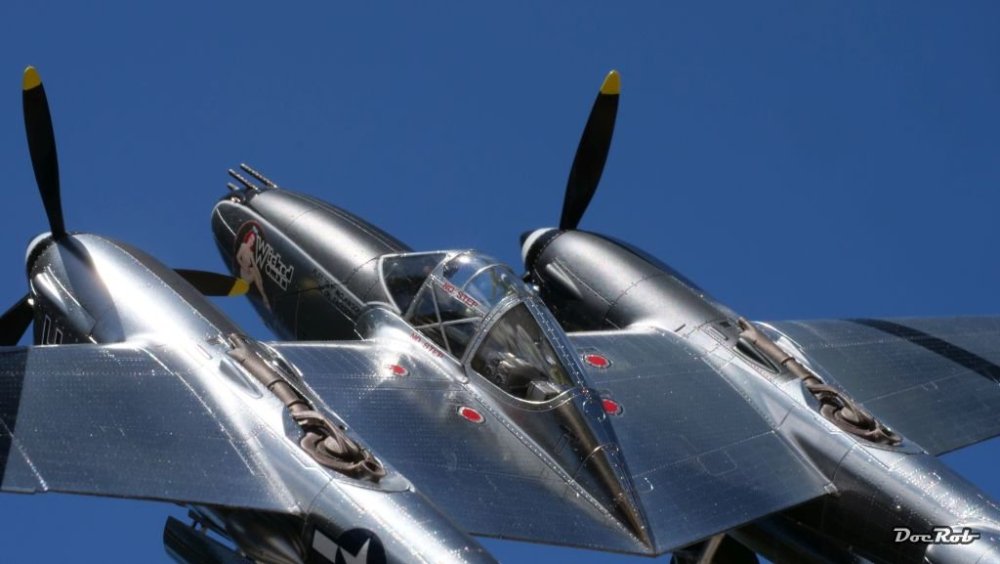
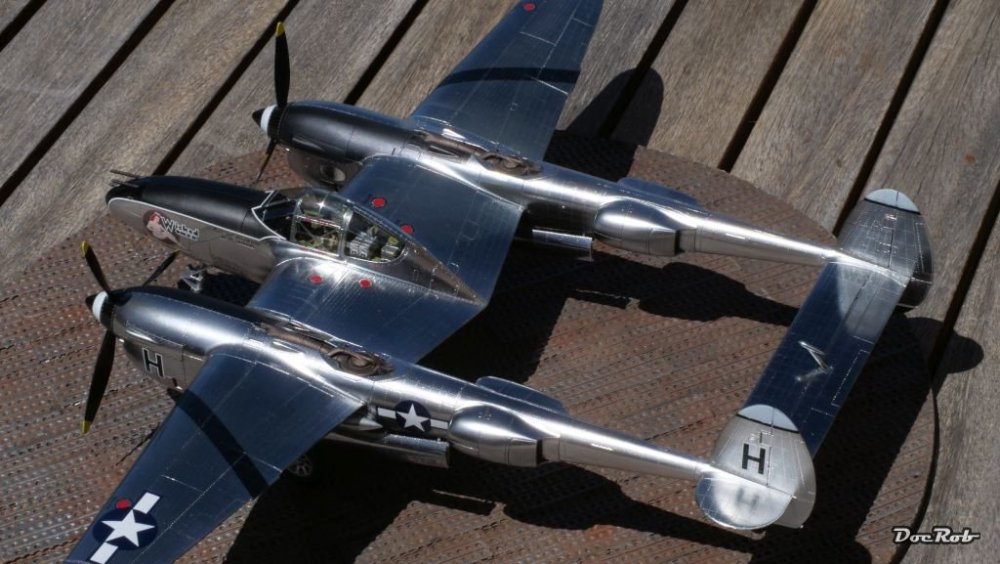
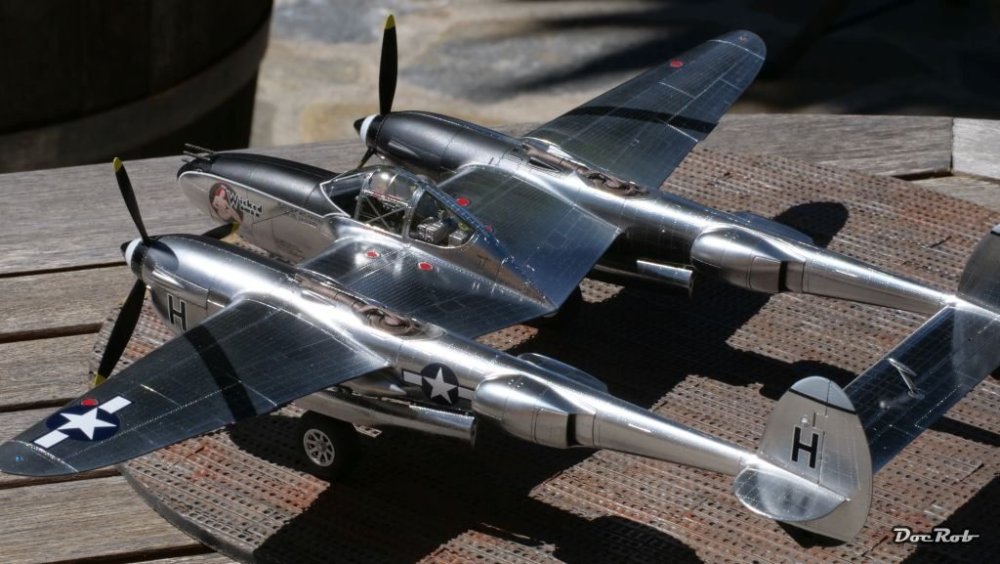
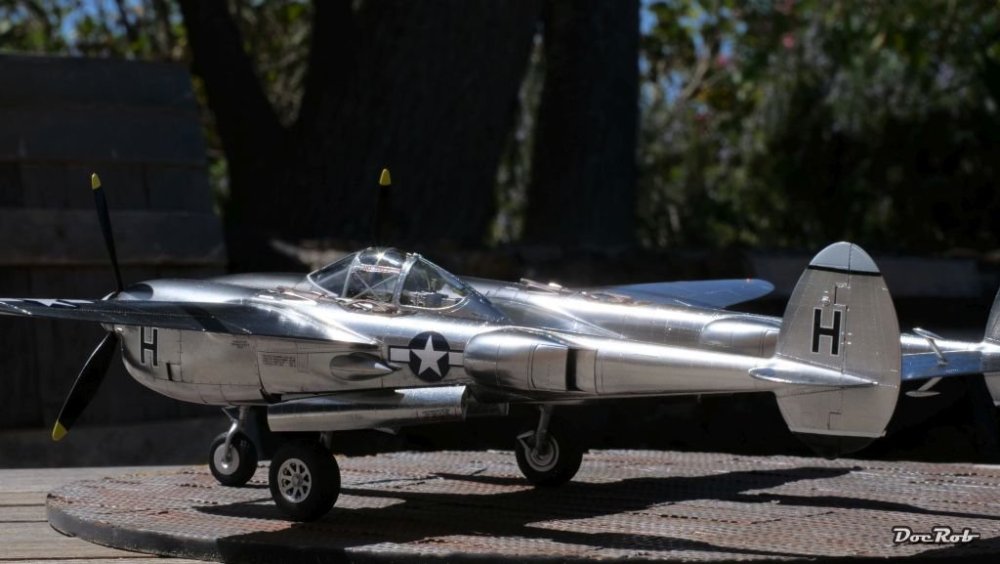
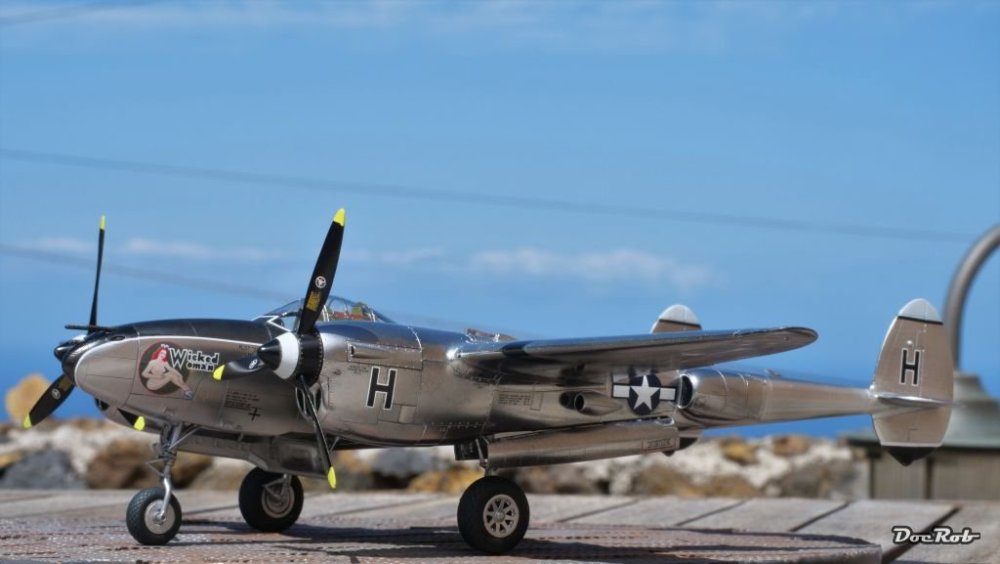
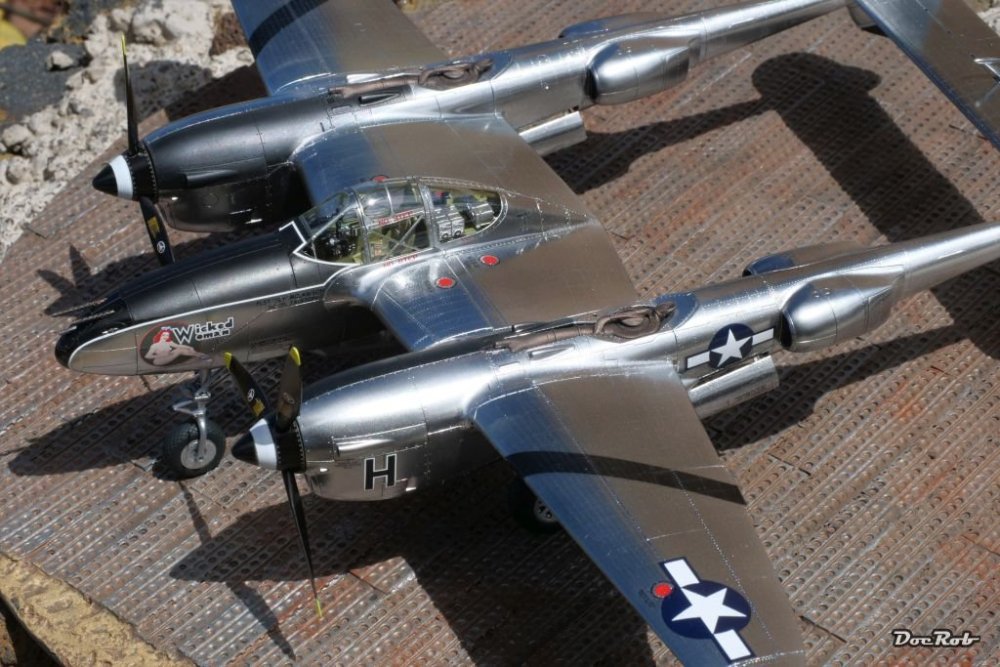
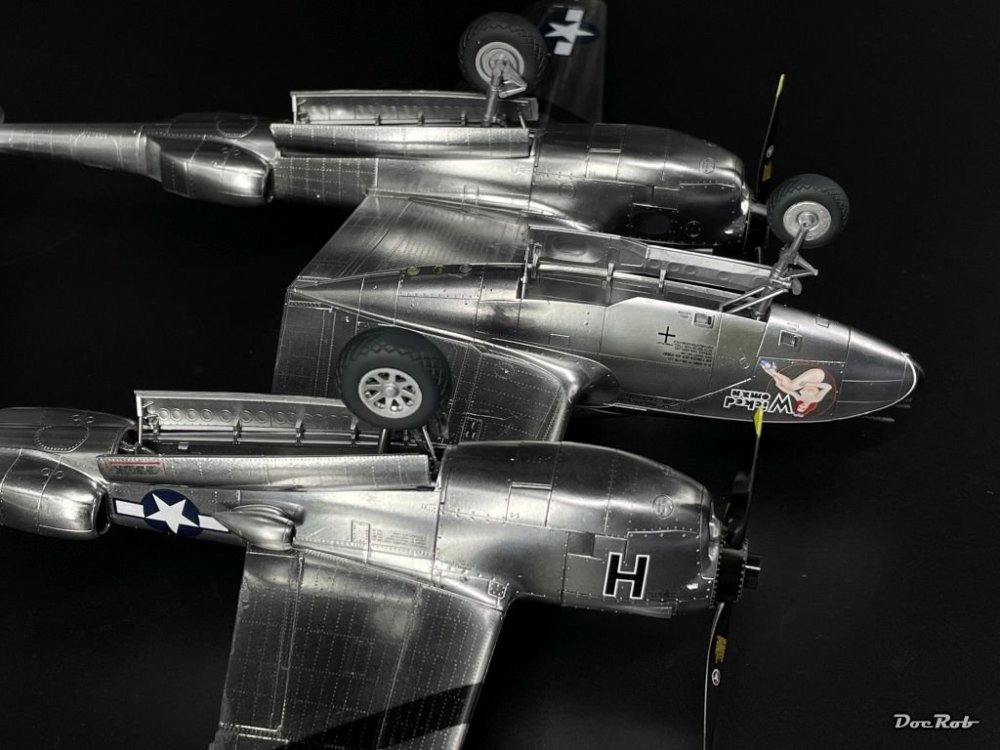
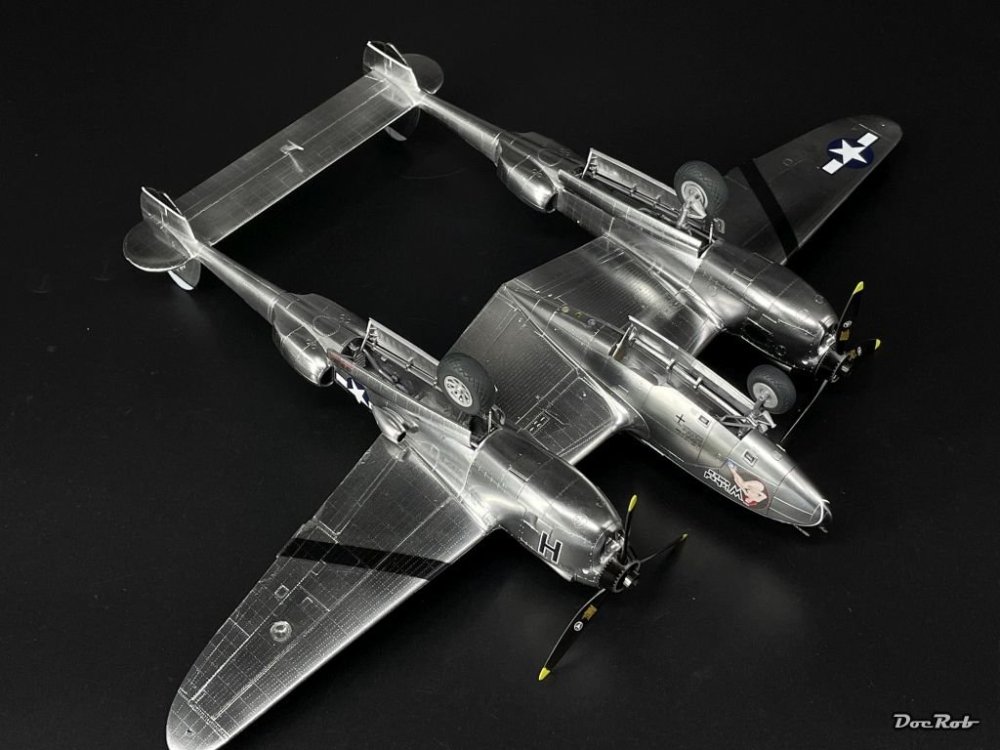
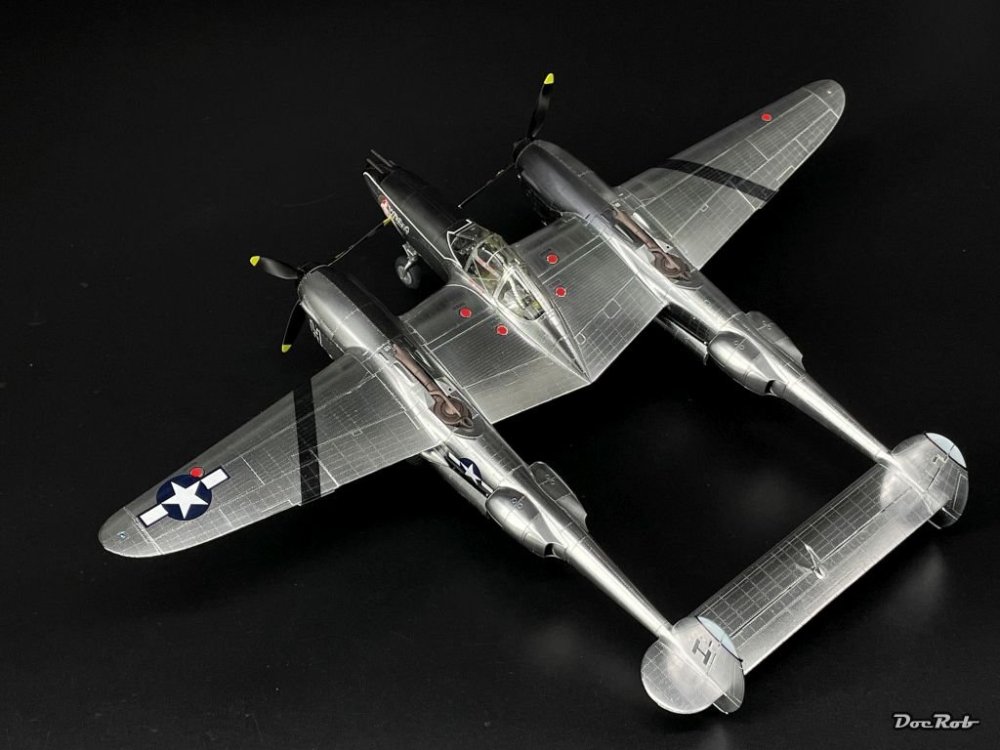
Thank you Martin and PW, a bare metal P-38J is the best looking version of this bird imho. Nonetheless, I will build an OD -H soon again riveted. Cheers Rob
-
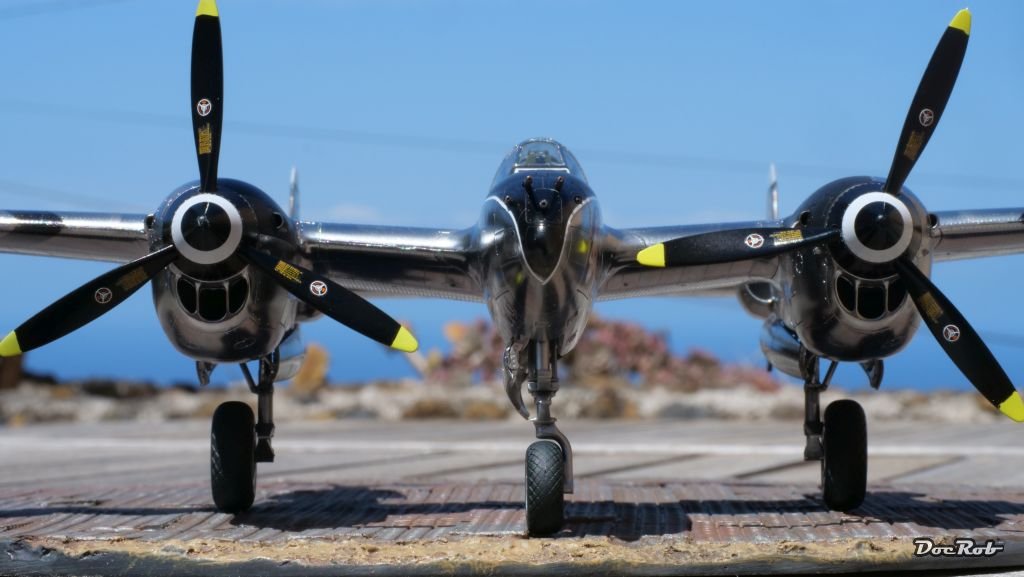
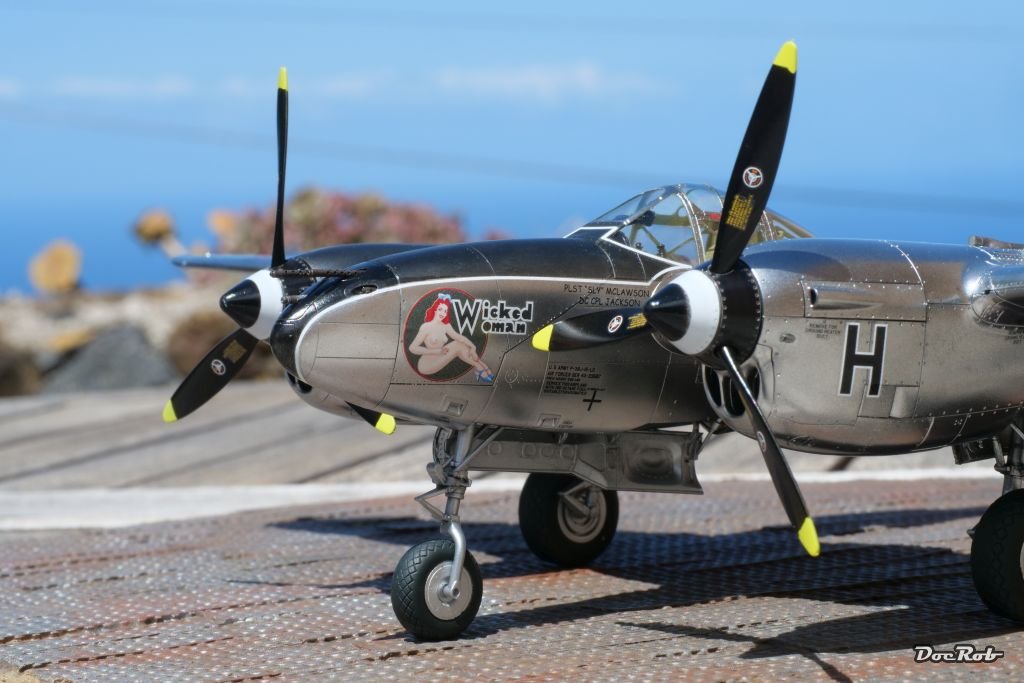
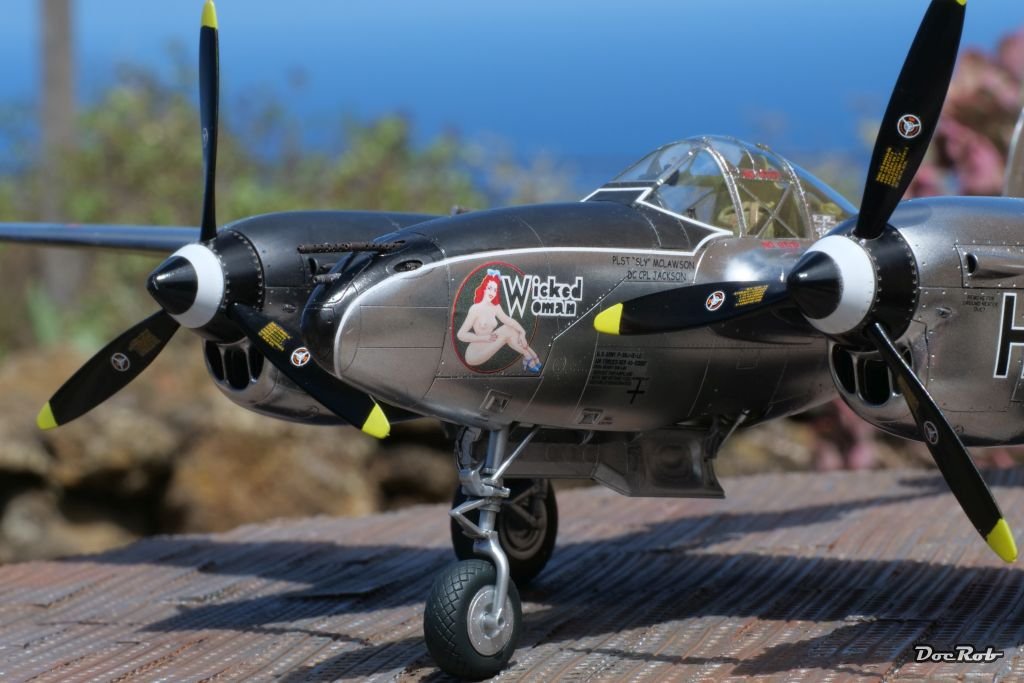
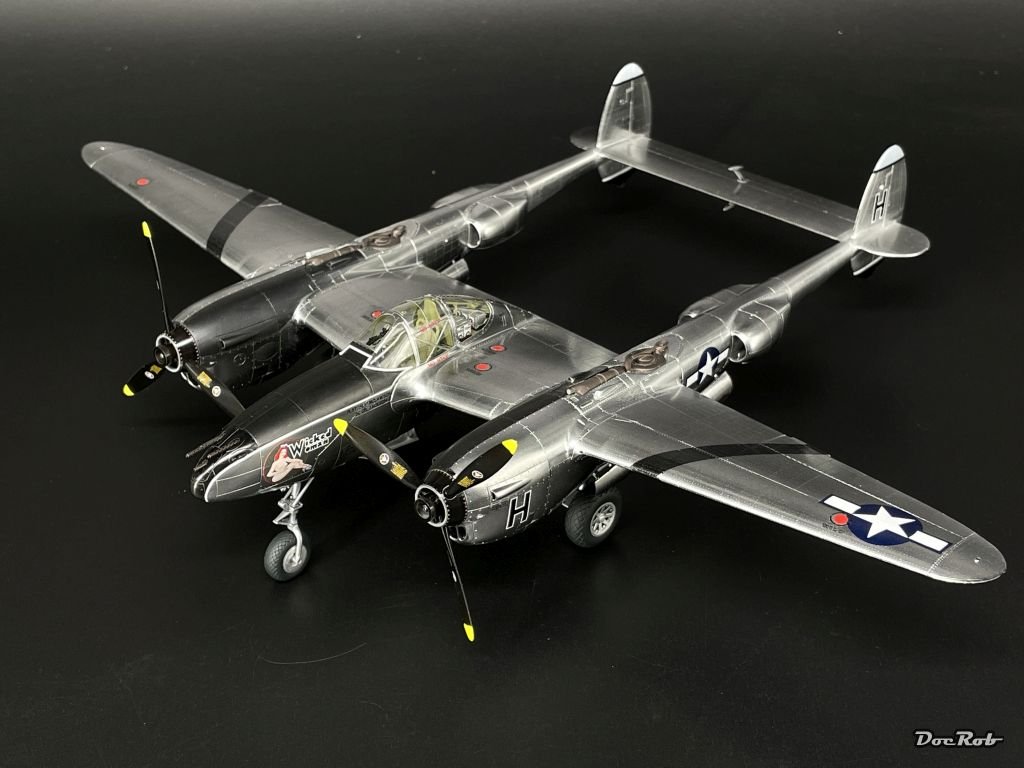
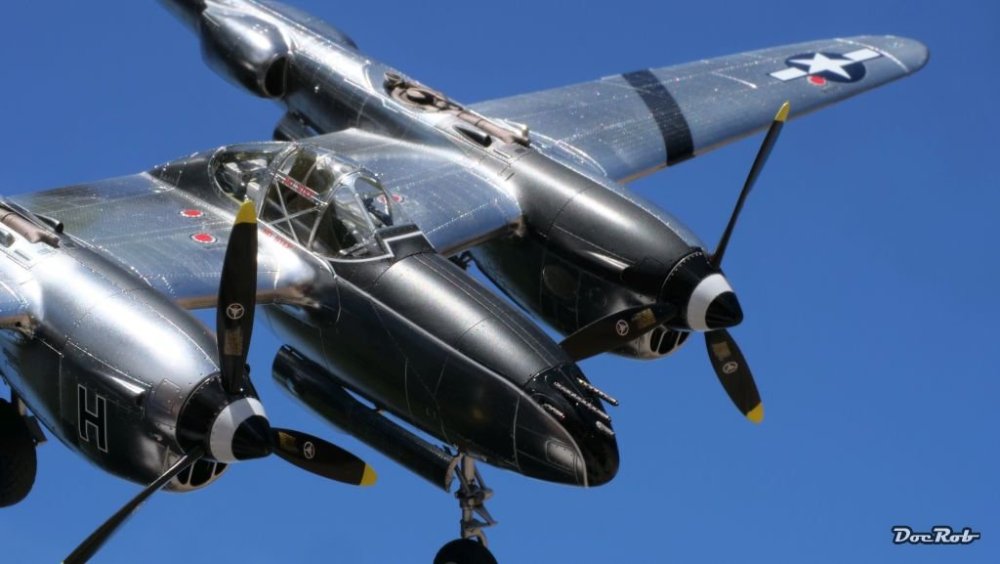
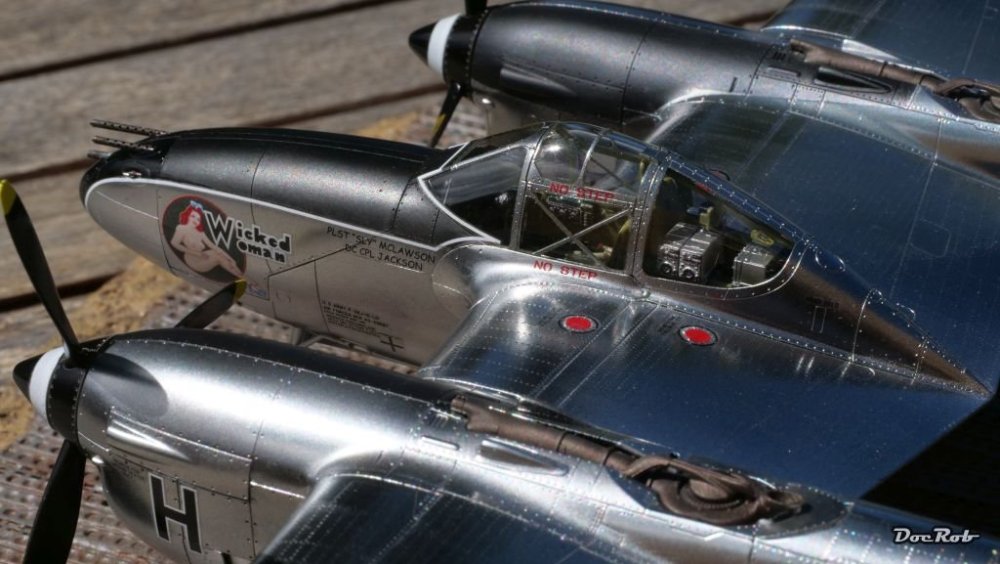
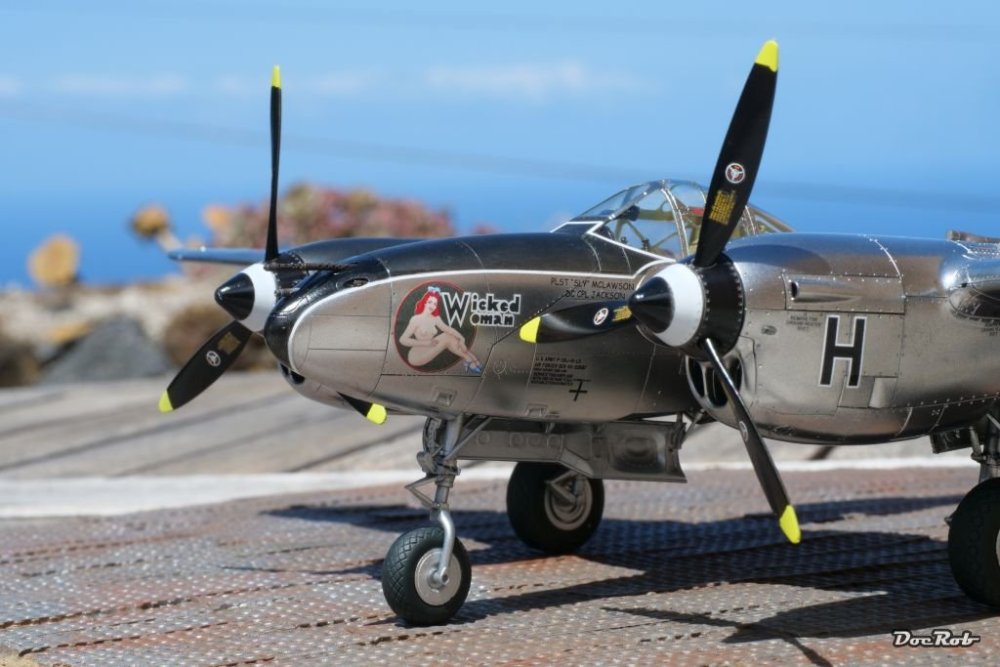
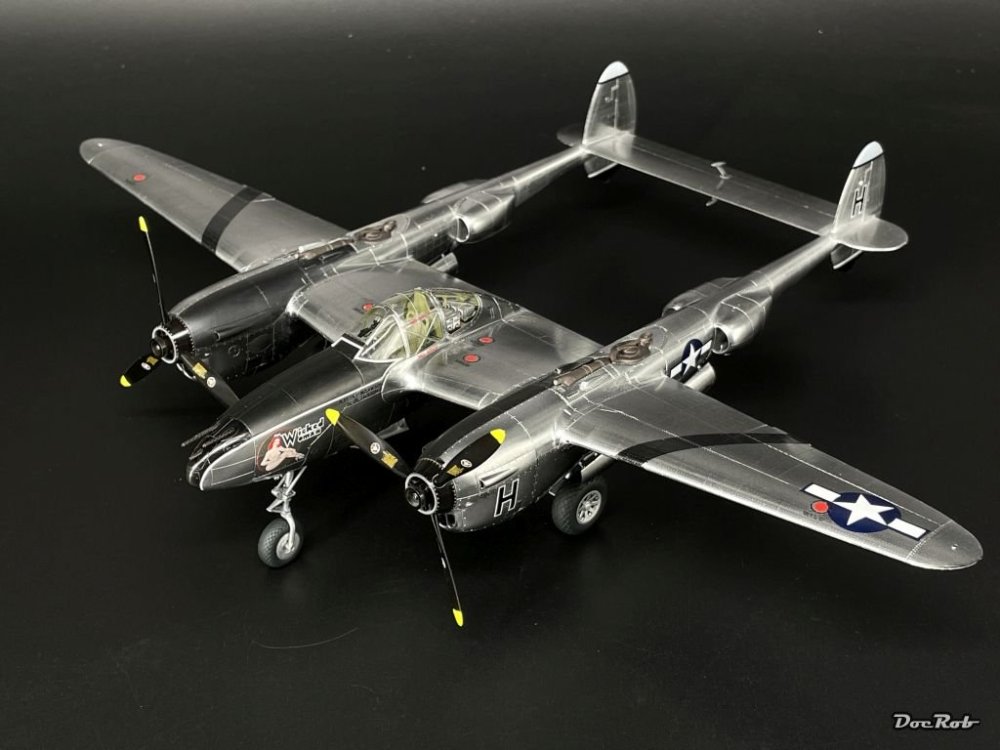
Thank you Kevin, Peter and Chris, I still think, I have to take some better outdoor pictures, but with the wind yesterday, it was impossible. The spinner masking with the circular template only worked, because these Quick Wheel masks have a thin flexible layer, which seals the circle completely. With metal or plastic mask, I think some paint would have seeped in. Maybe it's possible to use a very thin metal mask with liquid mask from behind. Cheers Rob
-
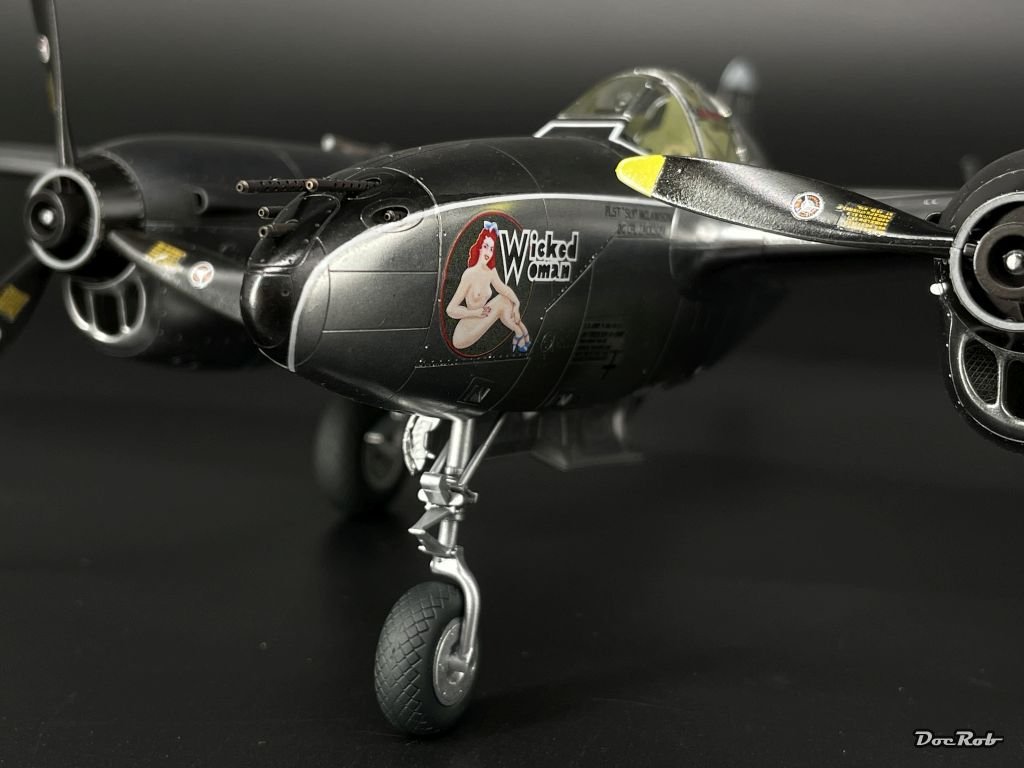
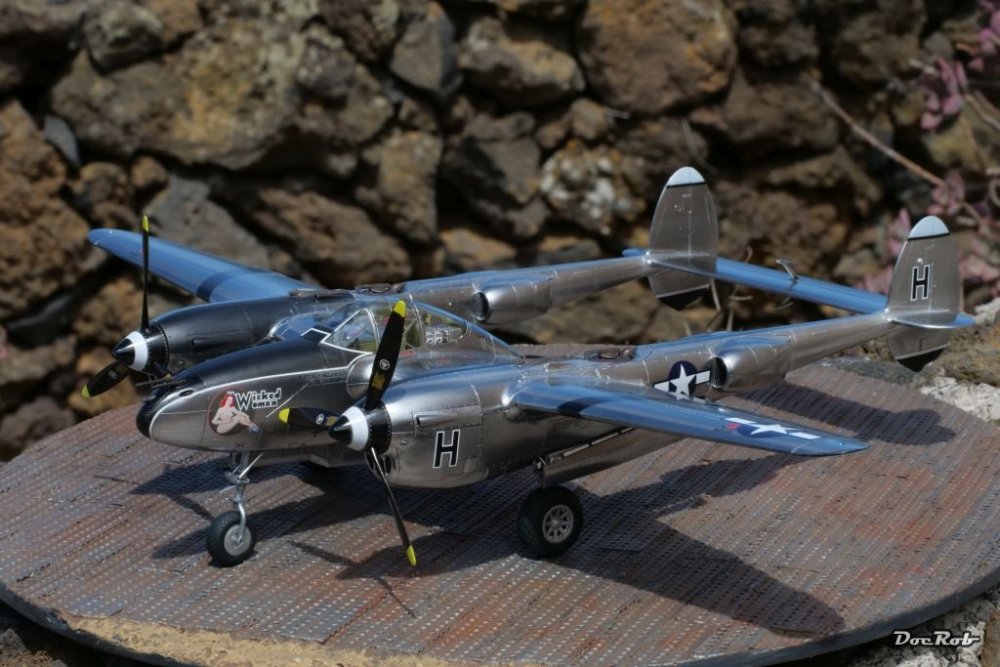
Some pics under bright sunlight. Unfortunately it is very windy, so no risky angles, the wicked woman would have gone airborne . Cheers Rob


- 72 replies
-
- 17
-
-

-
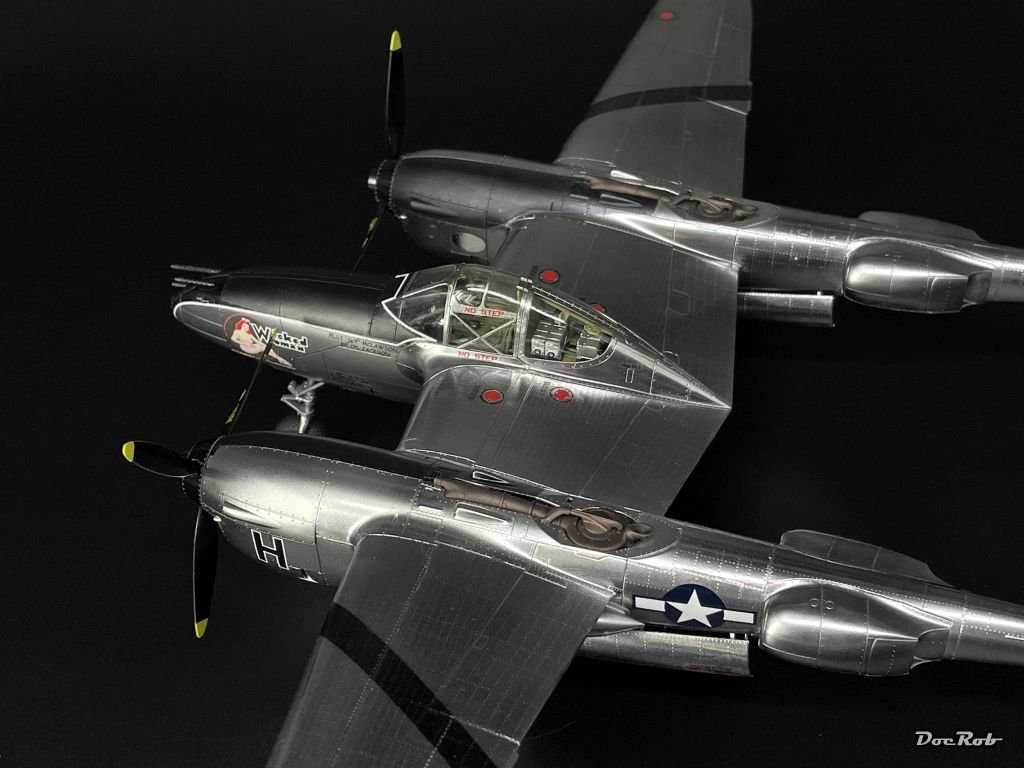
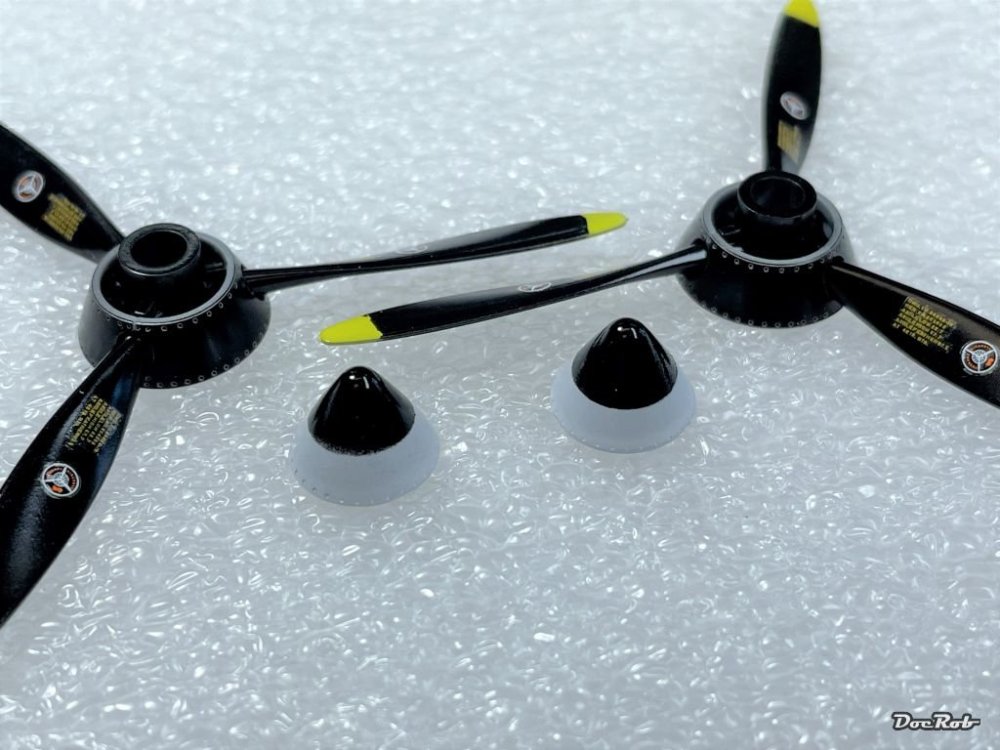
Thanks again Peter, finally I got the spinners done. I used a mask for the return wheels of a STUG IV, made from soft plastic. Fixed from behind with a bit of force and adhesive tape: and then sprayed black and hooray, it worked: Cheers Rob

-
Thank you Chris, it was good to train the high shine finishes with my recent F1 Renault build as preparations. I feel much more confident now with NMF. Brass barrels are mostly a good addition, specially when patinaed, which gives the perfect look and you don't have color obscuring detail from the filigran barrels. Cheers Rob
-
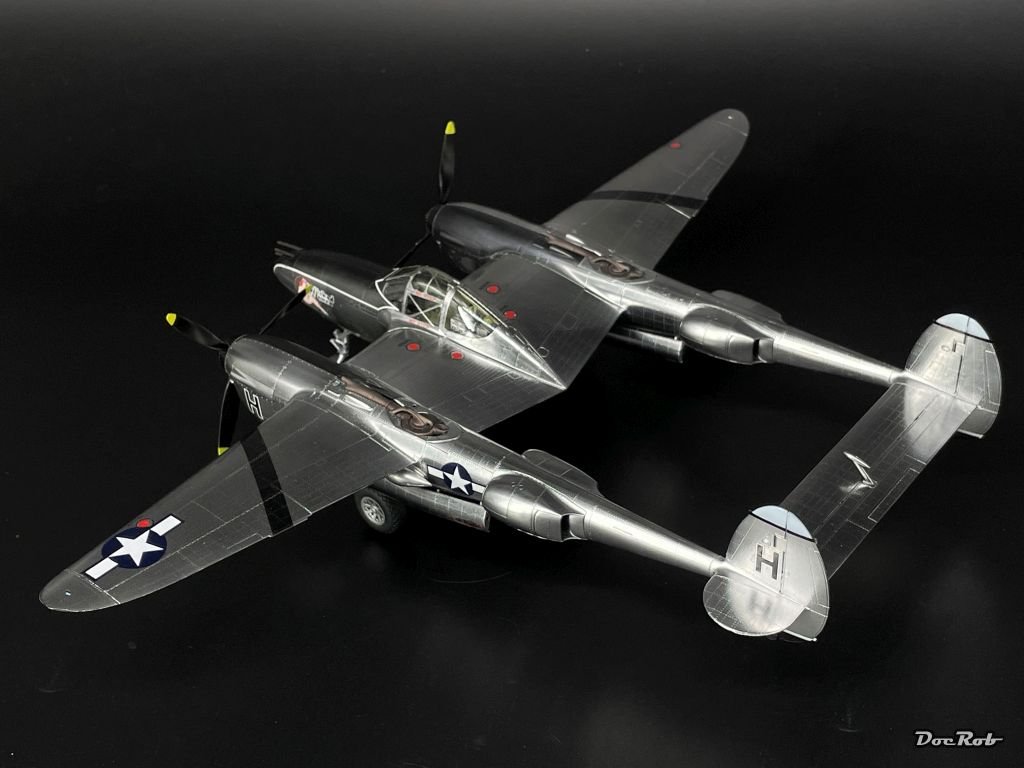
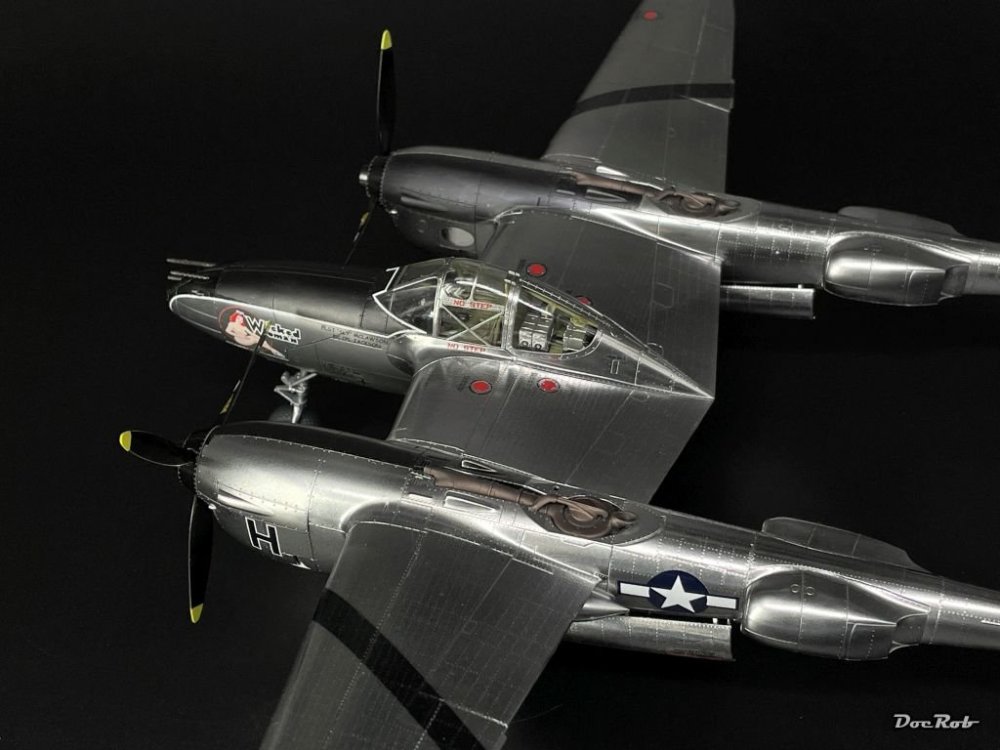
Thank you Peter, in my eyes, the P-38 has the perfect shape for a polished aluminum surface, but I will do my earlier one in OD, but I think, I will rivet the -H as well. The decals made by Cartograph for Bombshell worked very well and luckily didn't need any strong solvents to lay down. The spinners are totally my fault. The parting lines would not be a real problem, but I have to paint the spinner front cone white (easy) and then paint the tip black (not so easy). I tried masking with flexible tape and masking fluid and failed, I tried to dip the peak into black color and failed again. I still have no solution to the problem, maybe I try a circular mask next. Cheers Rob
-
You put yourself into some situation with this build Peter. Who would have thought, a relatively recent release could be so bad in so many aspects. Looking at the last pictures, I think you mastered the worst and that should give you reason for satisfaction. The cockpit looks super bueno and I really like the old school effort, like Kevin mentioned. You can be proud about your achievements. Cheers Rob
-
Love it Carl, you should make a restauration project and start? smoking . Cheers Rob
-
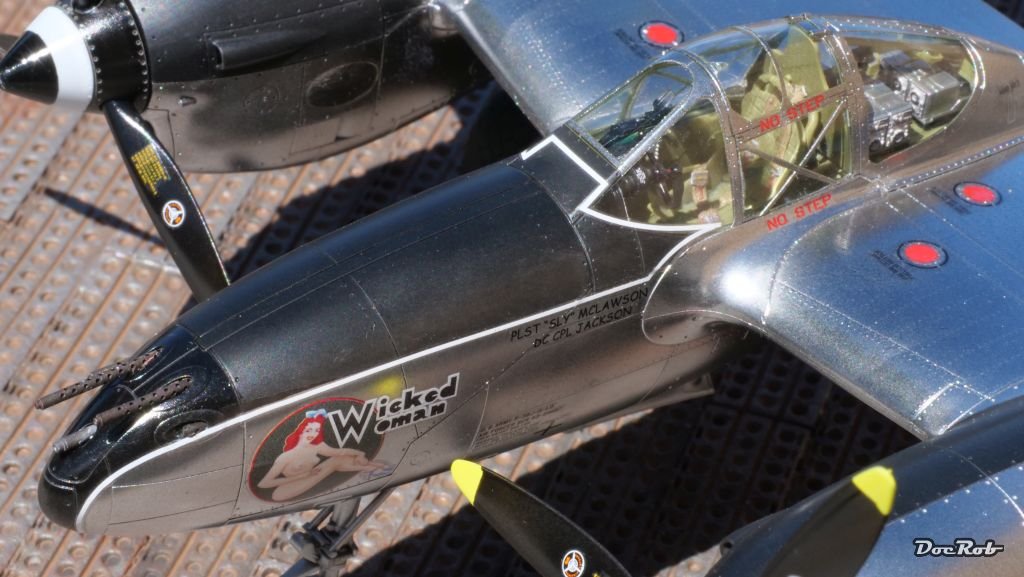
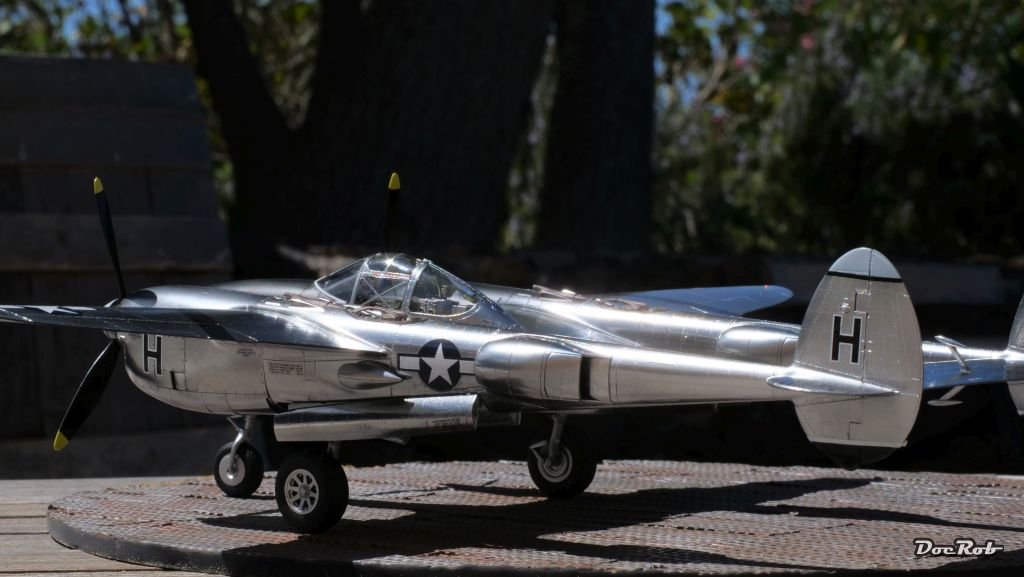
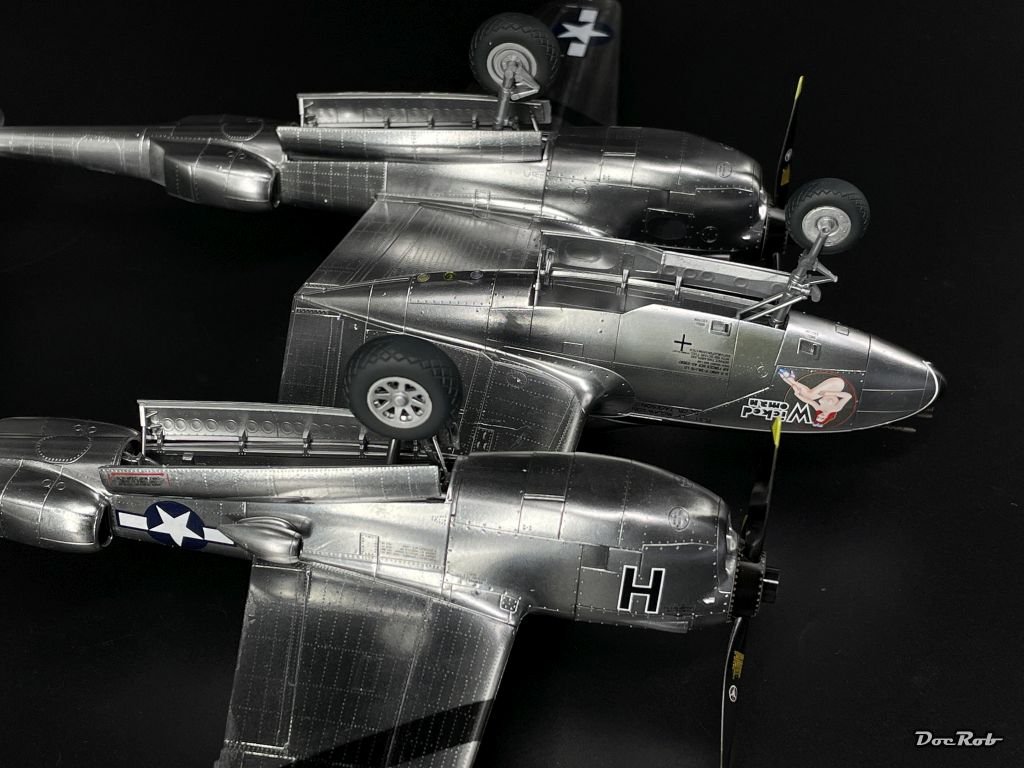
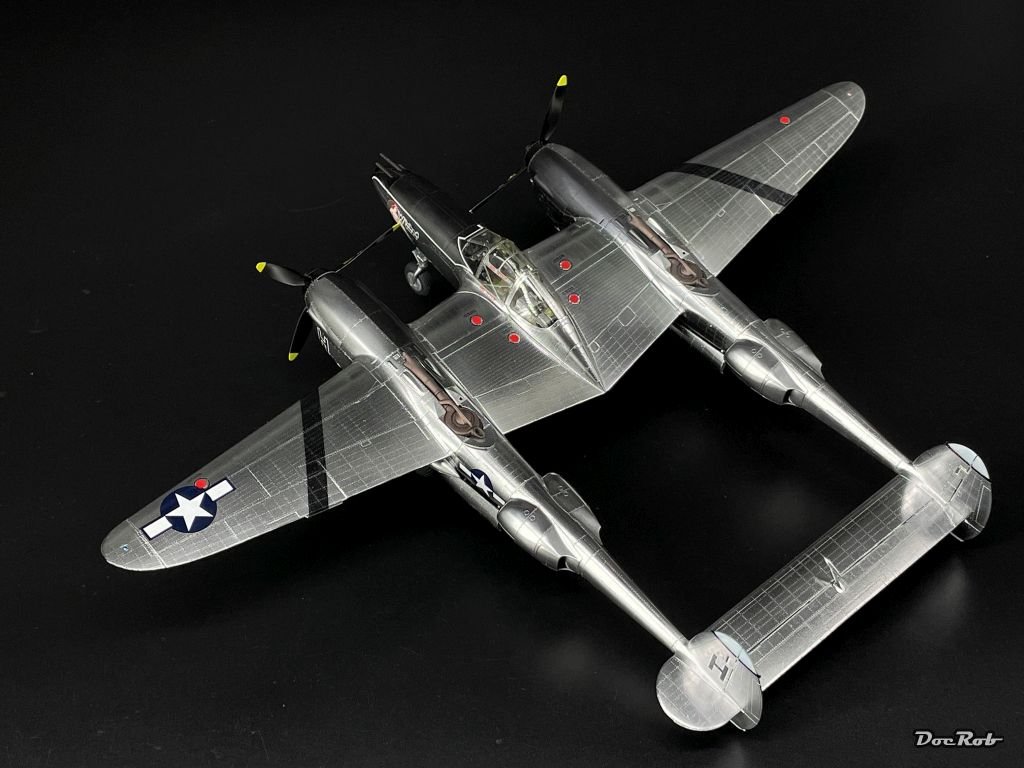
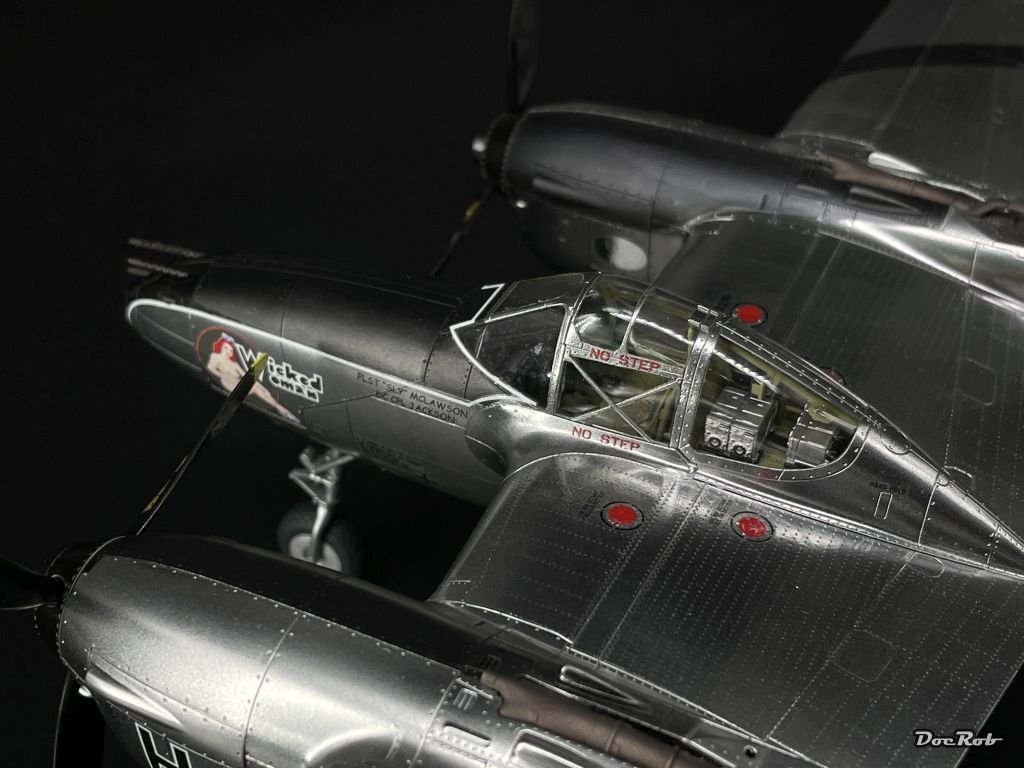
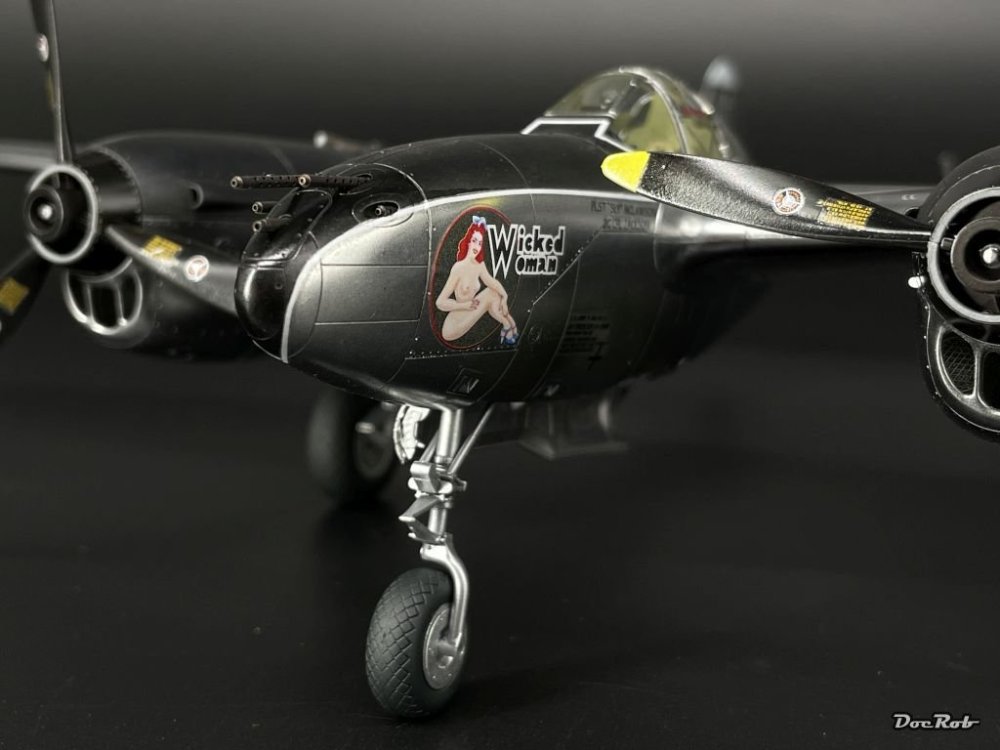
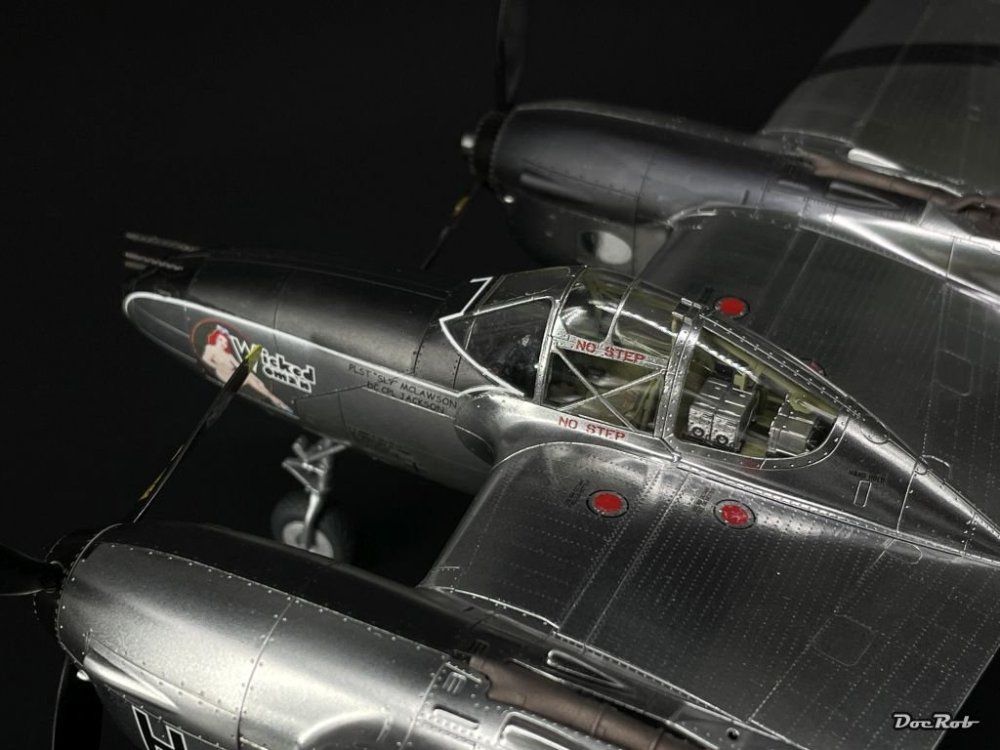
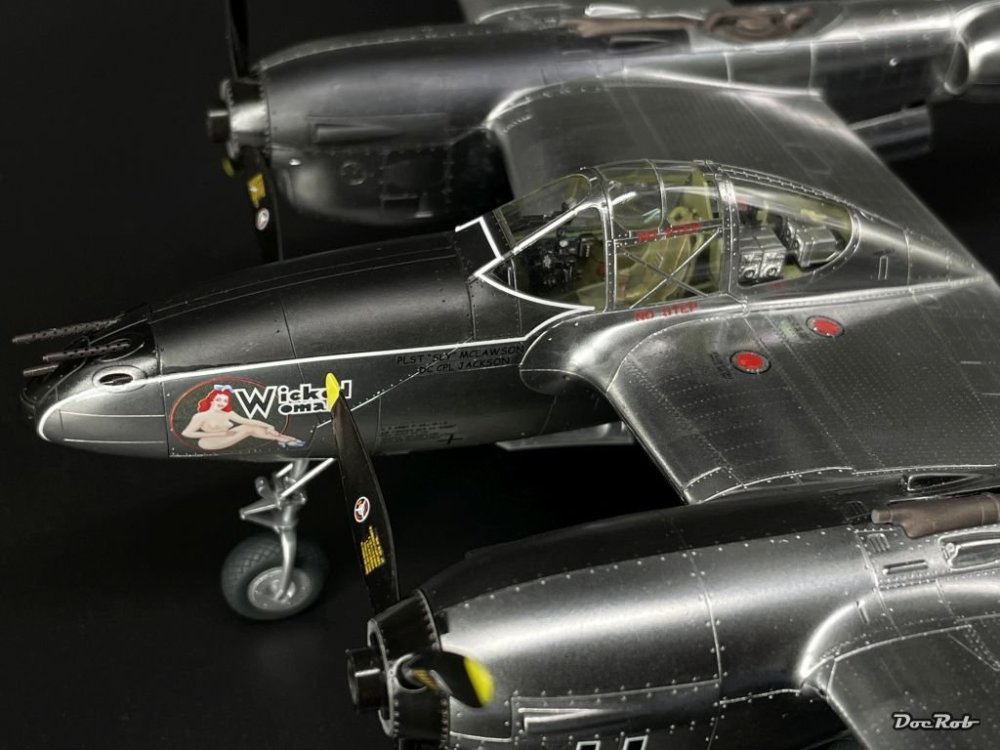
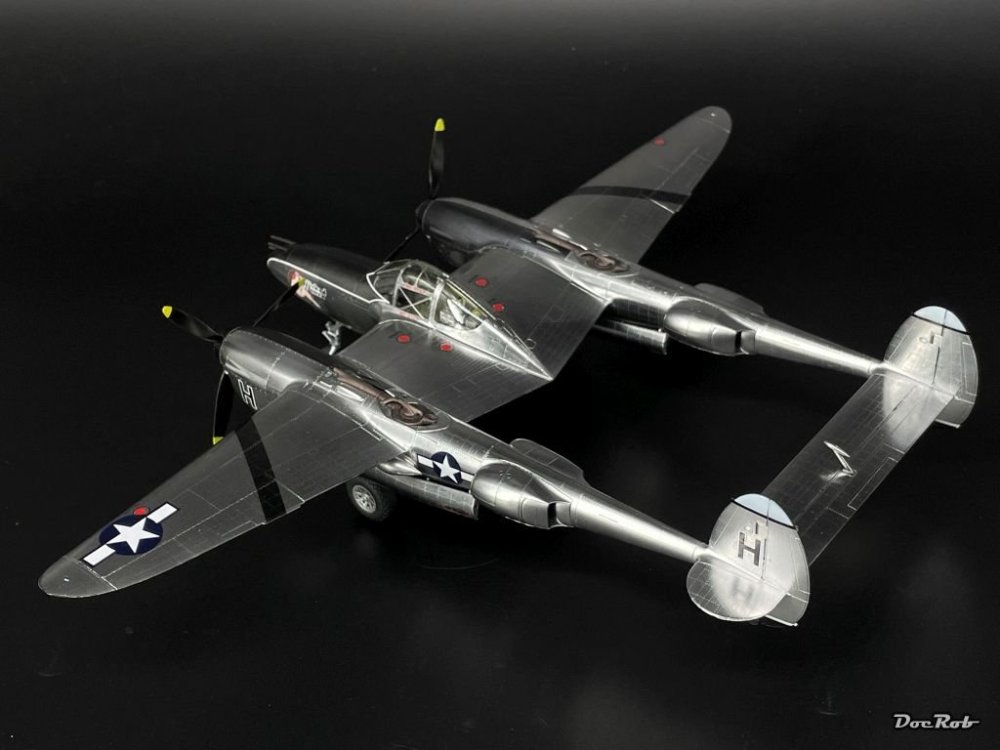
After my vacations, finally an update. I tried to finish the P-38 and mainly did over the last days. The prop hubs with black and white parts gave me grieve and now I airbrushed them for the third time, very annoying. That's why they are not on the pics. I carefully applied the decals, which behaved very well and on the aluminum, you can barely see carrier film. The white pinstripes around the black nose panels, where a bit difficult to master, but thankfully the thin strips were robust enough not to tear. The stencils are not complete, but I don't know, if I apply the rest. There were quite a lot of differences, between the Tamiya decal plan for the stencils and the ones I used from Bombshell. I used only warm water with some drops of detergent, because I didn't want to spoil my surfaces with aggressive solvents. I painted the navigation and formation lights with clear colors, picked up some other details and then added the non weathered wheels only sprayed in one black shade, untypical for me. I used the kit wheels, flattened with a sanding stick, because my Ultracast wheels didn't look too good and the Eduard masks wouldn't have fitted. The barrels are made of brass by Master and got a treatment with a patinating liquid, which give a matte brown black look, which I find very convincing. Cheers Rob
-
Wow Martin, how terrible, we had something like that on my neighbor island for about a month. The fire destroyed 7% of the total area, luckily no houses or lives got wasted. Cheers Rob
-
Don't limit yourself Paul. It's not that hard and with some test mules and proper preparation, everything is possible. Cheers Rob
-
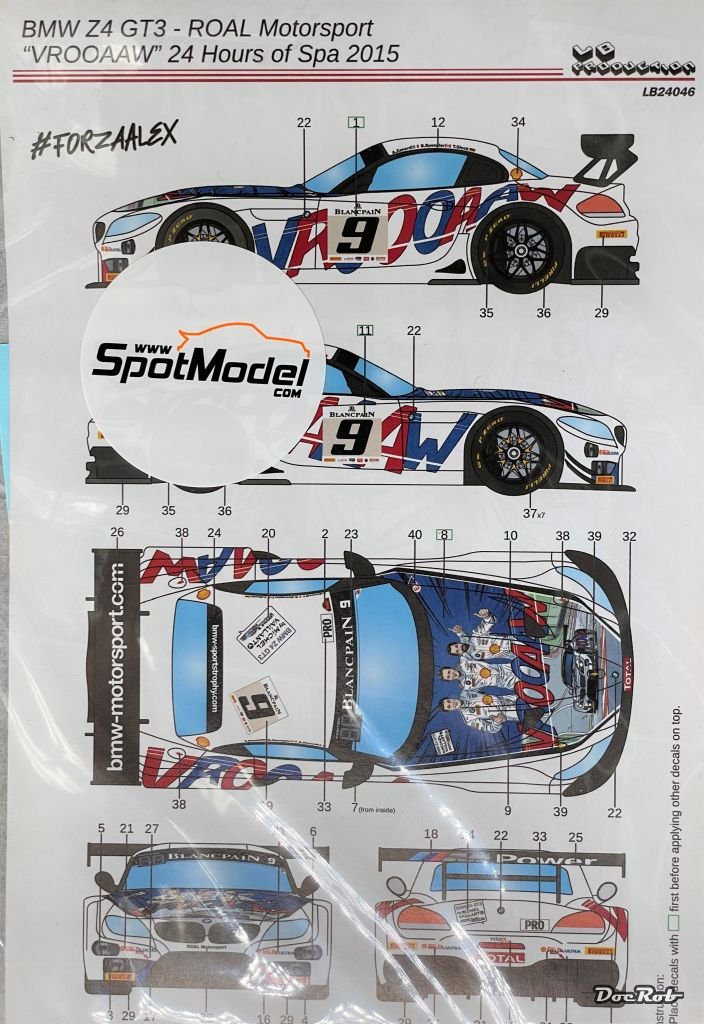
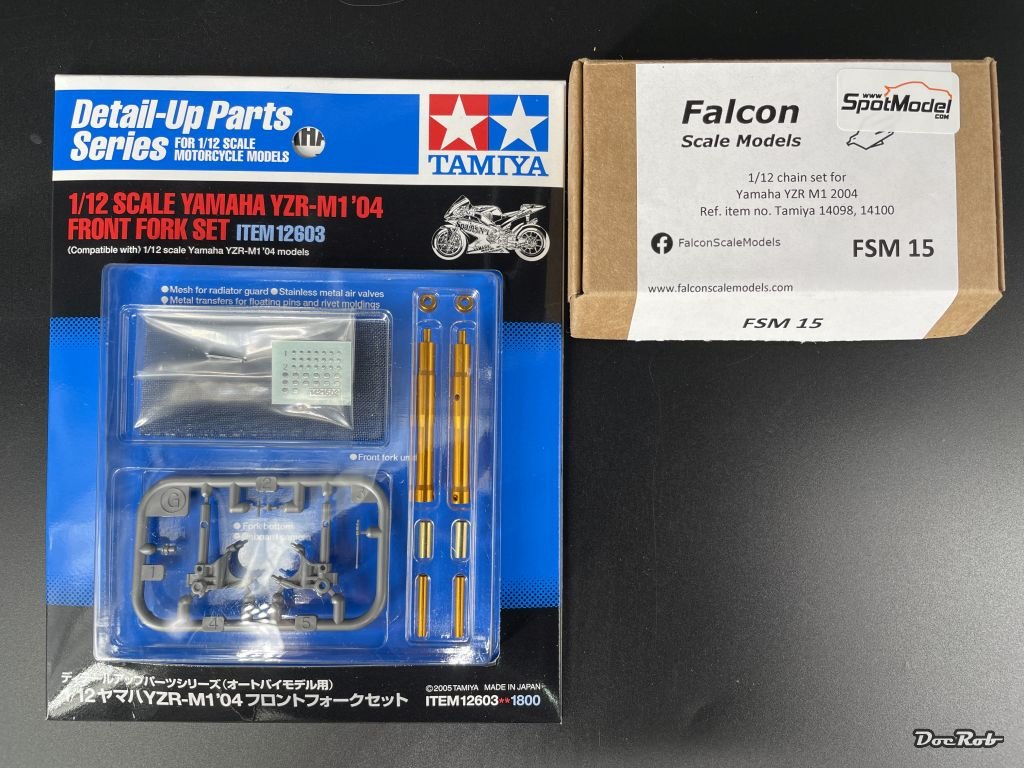
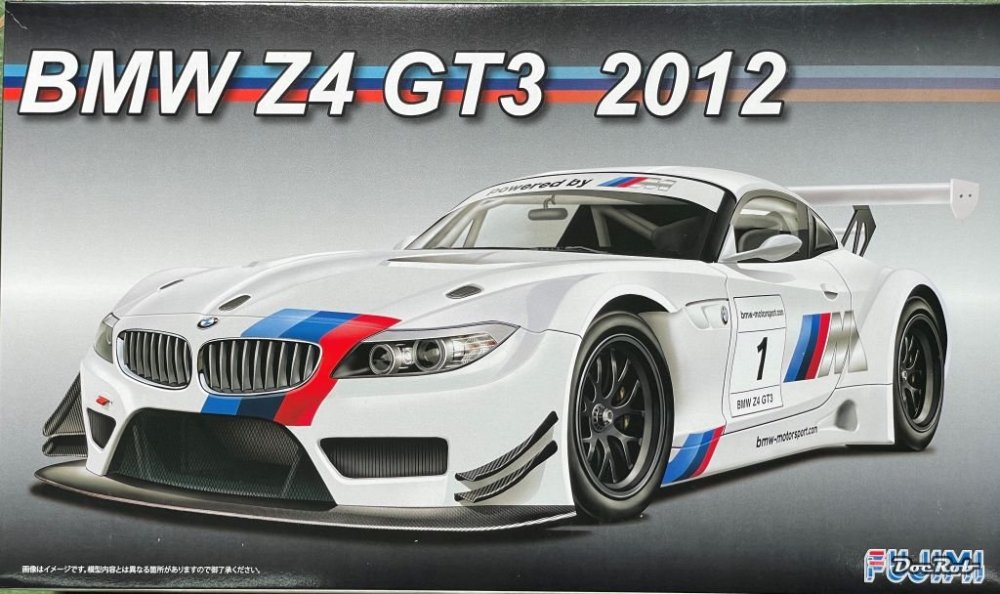
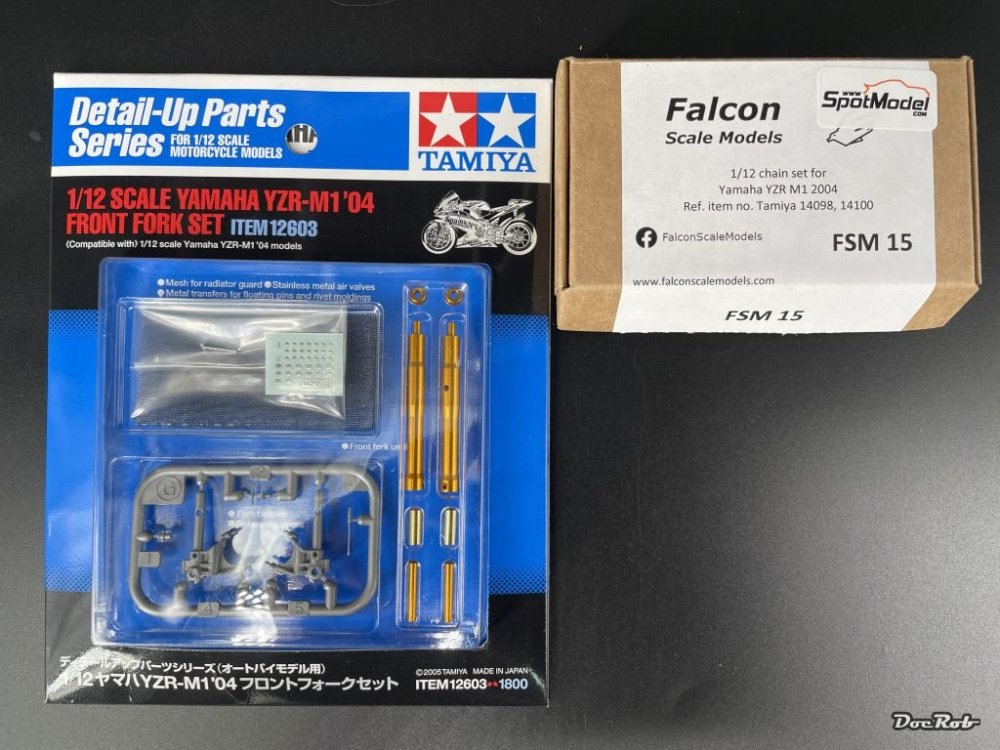
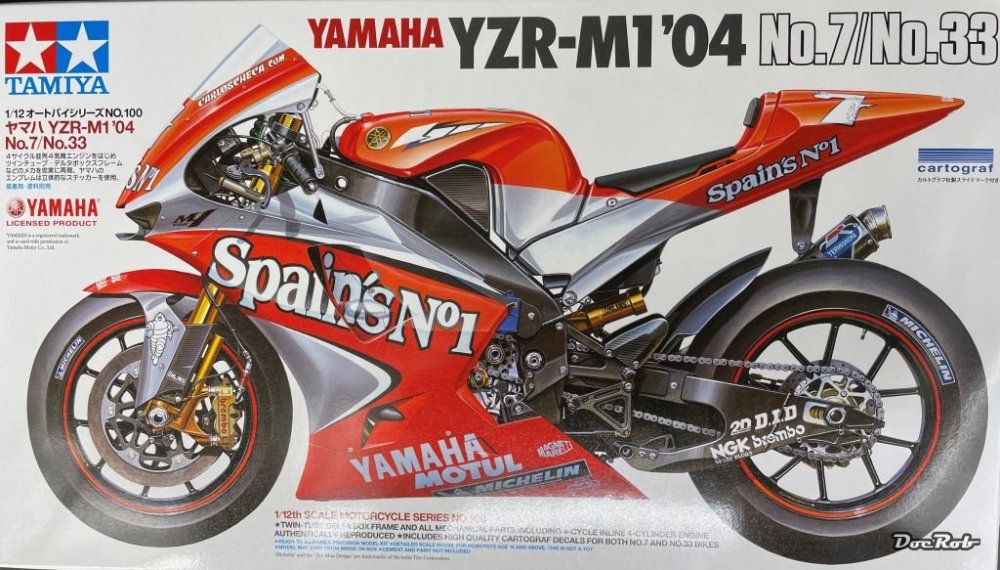
Some more speedy additions to m stash, direct from Japan and some decals from a Spanish vendor. First, a car, I don't like too much, a Fujimi BMW Z4 GT3 from Fujimi: ...but, when I saw these Michel Vailant reminescence decals from LB Productions, the deal was done. VROOAAW Again not my favorite motorcycle, but the extra decal sheet determined my choice: Some extras, Tamiya front fork set and Falcon Scale Models 3D-printed chain set. Spider man is coming, the famous Yamaha in Spidey livery driven by Marco Melandri. The decals are made by Renaissance Model and are printed in a glossy aluminum finish. Cheers Rob


-
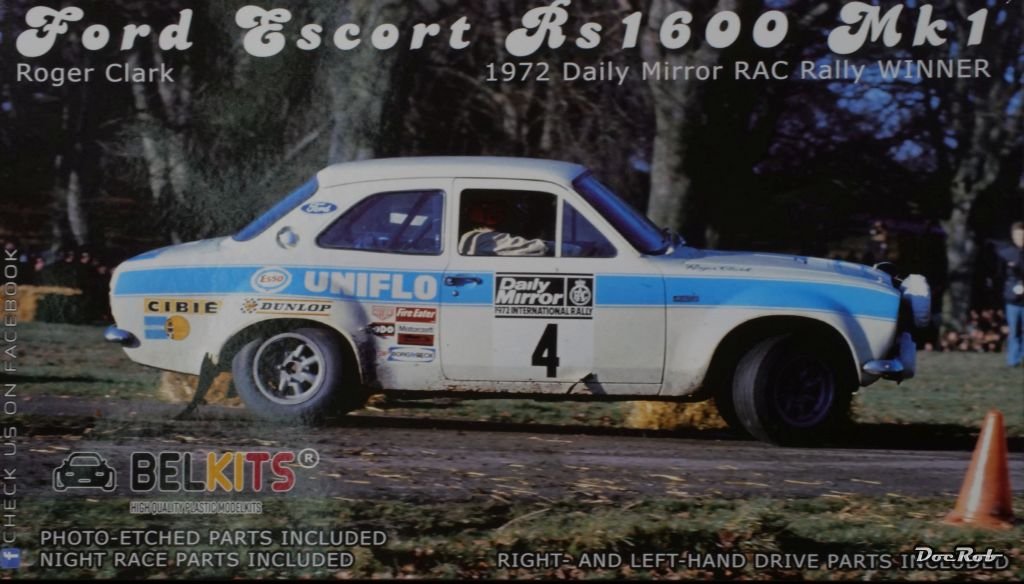
I have another one in stash Carl, a 2017 Ford Fiesta WRC, but haven't built any of the Belkits. The plastic seems to be of good quality, as are the decals. The kits are very complete with PE and extra night light sets, but I don't like the look of the manuals too much. Time will tell, how they build up. The Ford Escort became rare over the years and right now, Belkits choose to do a re-pop. Cheers Rob
-
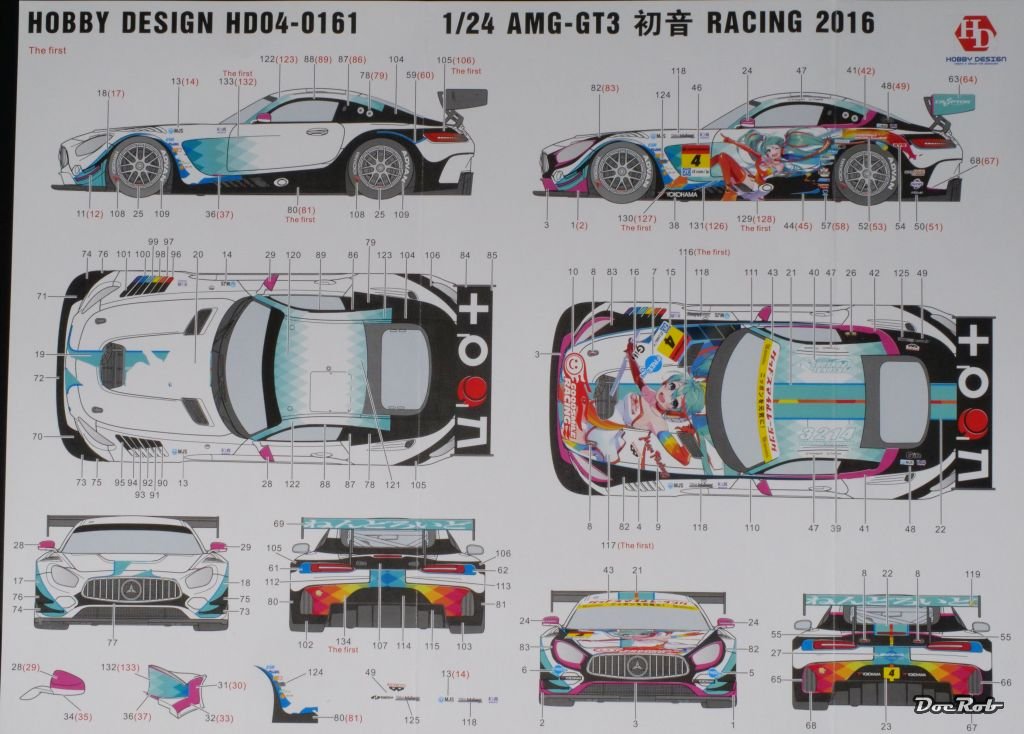
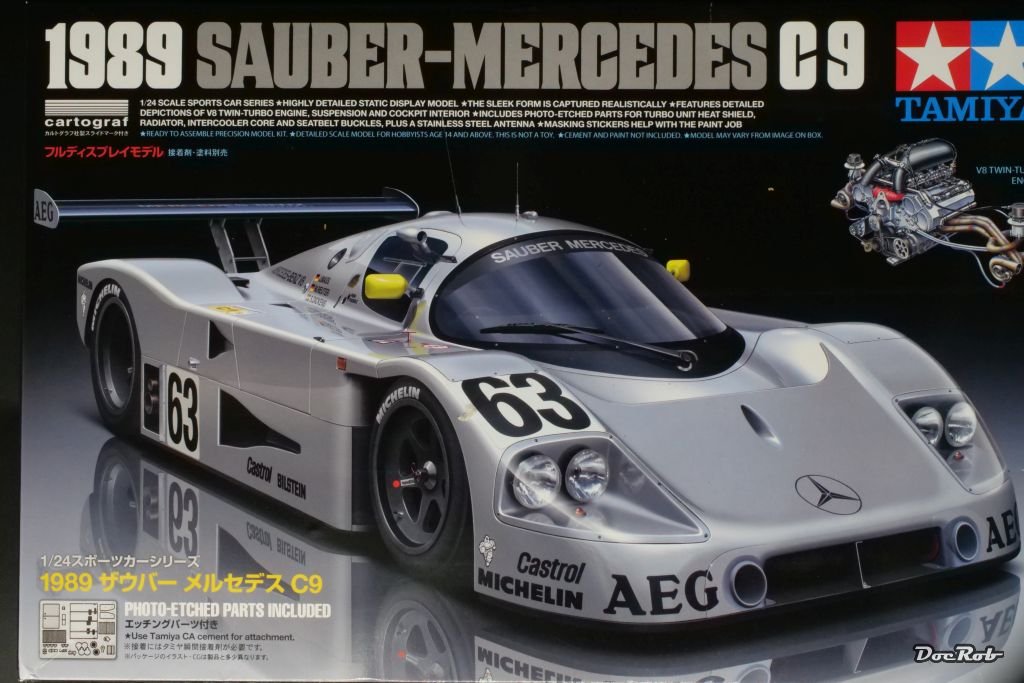
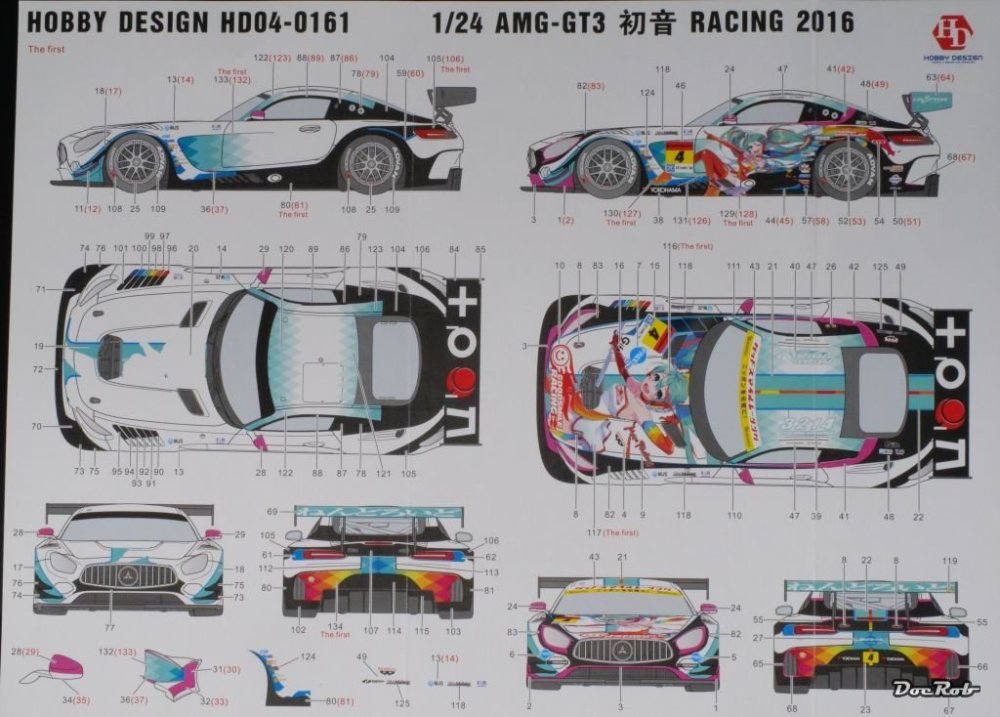
Some car related stuff arrived during my vacation. Belkit's Ford Escort, which fortunately got re-released. I love the bulky body of this small car and the kit is very complete, with RH or LH option, fabric seat belts, PE and Cartograph decals. There is no need for a lot of AM, except when you wish to have an engine. The Sauber Mercedes C9 is beginning to get a bit hard to find, at least with my possibilities. I found it in Japan and will add some details, when time comes. Last, a weird decal set for Tamiya's GT3 AMG Mercedes from Hobby Design. FOUR sheets of nicely printed decals, some in several layers. I have another crazy decal set for the same car, so maybe I make a duo build. I opted for the 2016 livery, because the more recent ones need a body transformation kit as well. Cheers Rob


-
Not only, PW. I was born and risen in West Berlin, so the typical cover art appealed to me. Can't remember the Ferret though, maybe because I lived in the American sector. Cheers Rob
-
Unlike Hubert, I like the powerful looking -J better, than the early models, with one exception Peter and this is yours. Again you build and painted a perfectly finished model which is pure eye candy. The decals are blended in completely and you have the right touch for a very convincing finish, scale wise. Sometimes, it feels so good to have such a Über-kit, where you can fully concentrate on the appearance. Perfect for me, as building is the most boring part through a project. Cheers Rob
-
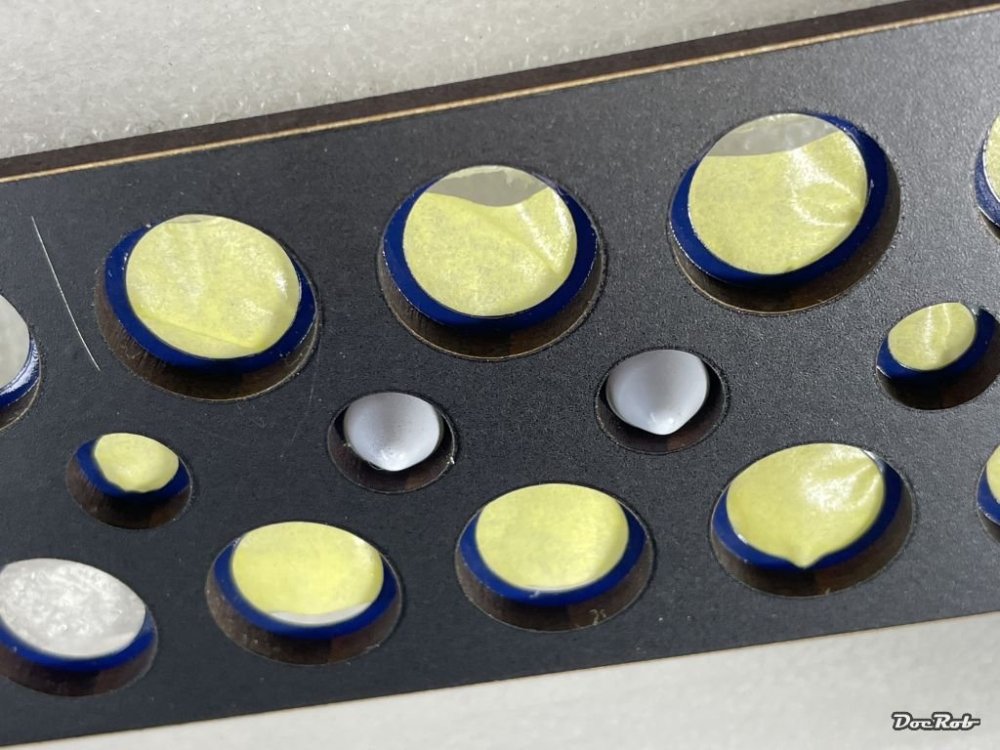
Muchas gracias señhores, I used the experiences gained with my recently finished 1/12 Renault RE20 for the polished aluminum. The main goal was no more masking after the aluminum application. Therefore, anti glare panels nose area and wing and tail strips were airbrushed on before using aluminum. Masking was a bit more work, specially around the curved nose area. I chose a scheme without invasion stripes and selected the hopefully best quality decals from Bombshell, printed by Cartograph, because I want to work with lukewarm soap water only. The purpose of the build was to get the maximum possible shiny NMF as a challenge and secondly adding the rivets, of course Which went better than expected. The idea of having complete area covering decals instead of single rivets, which you have in the end with HGW's products for example, seems to work out, being less delicate to handle. @CANicoll I would do the riveting again, without doubt, Chris. The process is time consuming, but with good surface preparation, there are less difficulties than thought. I think my -G/H model of the P-38 will be without riveting, as I'm not sure, how they look under a dull OD coat, but maybe... Most of the clear parts were not polished and I used no Future bath this time, as clarity was very good. The aft clear canopy had a scratch , hey it's Tamiya, but it was there and it disturbed me. I used the Tamiya polish system with it's three different grains to get rid of that. Cheers Rob
-
The OneManArmy masks are fantastic products. well cut and super sharp. I used them on two builds now, a Tamiya Corsair and a Fly Arado 234. The Corsair was easier, because the stencils have only one color. With the Arado, it was laborous, because some stencils are multi colored and you have to cut the extensive walkways to size I really like, that national markings are included, as well as individual markings for some planes. The manual is well made and shows placing and orientation, as well as colors. There are worthy tips mentioned, like using transparent adhesive film as an adjusting aid, specially recommended on curved surfaces. The only negative aspect, beside the enormous masking effort needed (I‘m an overdpray coward) is, that the OMA webpage doesn‘t give you informations about what‘s included on the sheets. Cheers Rob